

Page 1
1400/1650
USER’S GUIDE
USER’S GUIDE
MODE D´EMPLOI
MODE D´EMPLOI
• Read this User’s Guide before you start using your P-touch.
• Keep this User’s Guide in a handy place for future reference.
• Lisez attentivement ce guide avant d’utiliser le P-touch pour la première fois.
• Conservez ce guide dans un lieu sûr en vue de référence ultérieure.
Page 2

USER’S GUIDE
Page 3
Introduction
Thank you for purchasing this P-touch!
With your new P-touch, select from a variety of character styles, sizes and frames to
design practical custom labels for any need. In addition, the selection of pre-formatted
label types allows you to quickly and easily label patch panels, cables, connectors and
other components.
With this P-touch, you can print legible, long-lasting labels in no time. The quality and
performance of this P-touch make it an extremely practical machine in the plant or in the
field.
Although this P-touch is easy to use, we suggest that you read this User’s Guide
carefully before starting, and then keep this manual nearby for future reference.
Canadian Department of Communications Compliance Statement
This digital apparatus does not exceed the Class B limits for radio noise emissions
from digital apparatus as set out in the interference-causing equipment standard
entitled “Digital Apparatus”, ICES-003 of the Department of Communications.
Switching the language of the messages between English and French
1 Erase all of the text in the display either with b, or by pressing g, then
b.
2 Press g, then Z.
3 Press l or r until LANGUAGE is displayed.
4 Press u or d until the desired language setting is displayed, and then
press n.
☞ The default setting is ENGLISH.
☞ Turning off the machine does not change the language setting.
☞ The language cannot be changed if some text remains in the display. Be sure to
erase all of the text before changing the language of the messages.
Page 4

CONTENTS
1. Getting Started ..............................................................1
General Description ...................................................................... 1
Top view & bottom view ...............................................................................1
Keyboard & LCD display .............................................................................2
General Precautions ...................................................................... 4
Batteries & Tape Cassettes ............................................................. 5
Installing batteries and a tape cassette .........................................................5
Cleaning ........................................................................................ 8
Cleaning the print head, rollers and tape cutter ..........................................8
Optional AC Adapter ..................................................................... 9
Connecting the AC adapter ...........................................................................9
Turning the P-touch On/Off .......................................................... 9
2. Label Type Modes ........................................................10
Selecting a Label Type Mode ....................................................... 10
Normal and Vertical Modes .........................................................10
Rotate Mode and Rotate & Repeat Mode ..................................... 11
Flag Mode .................................................................................... 12
Port & Panel Modes .....................................................................13
3. Basic Functions ............................................................15
Performing Basic Operations .......................................................15
Choosing functions, parameters, settings and groups ................................15
Choosing the default setting .......................................................................15
Confirming a choice ....................................................................................15
Cancelling a choice ....................................................................................15
Inputting Label Data .................................................................... 16
Entering and editing text .............................................................................16
Entering an accented character ..................................................................18
Entering a bar code ....................................................................................19
Entering a symbol .......................................................................................21
Formatting the Label ....................................................................24
Specifying a label length .............................................................................24
Specifying a margin size .............................................................................24
Framing the text ..........................................................................................25
i
Page 5

Specifying the character size ......................................................................26
Specifying the character width ...................................................................27
Specifying the character style .....................................................................28
Using the pre-formatted Auto Format templates ........................................30
Printing Labels ............................................................................. 31
Previewing the label layout ........................................................................31
Feeding tape ...............................................................................................31
Printing a label ...........................................................................................31
Using special printing functions .................................................................32
Storing and Recalling Files ........................................................... 36
Storing label text .........................................................................................36
Recalling text that has been stored .............................................................37
Deleting text that has been stored ...............................................................37
4. Machine Adjustments ..................................................38
Selecting how tape is fed and cut ................................................................38
Adjusting the display contrast .....................................................................38
Setting the Auto Reduction function ............................................................39
Calibrating the label length ........................................................................39
Specifying if the PERSONAL symbol category is continually updated ...... 40
Changing the units of measure ...................................................................40
Changing the language ...............................................................................40
Displaying version information ..................................................................40
5. Using P-touch With a Computer (for PT-1650 only) ...41
Installing the Software & Printer Driver ...................................... 42
Before installation .......................................................................................42
Installing the P-touch Editor 3.2 software ..................................................43
Installing the USB printer driver ................................................................44
Reading the User’s Guide ............................................................ 46
Using P-touch Editor 3.2 ..............................................................47
Starting up P-touch Editor 3.2 ....................................................................48
Displaying the Properties ...........................................................................48
Entering text ................................................................................................49
Notes on usage ............................................................................................49
Transferring Data To/From a Computer ......................................50
Entering Transfer mode ..............................................................................50
Downloading data to the P-touch ...............................................................51
Adding a user-defined character image to the text .....................................52
Using template data ....................................................................................52
ii
Page 6

Using downloaded database data ...............................................................54
Backing up/restoring P-touch data .............................................................57
6. Appendix .....................................................................58
Troubleshooting ........................................................................... 58
Error Message List ........................................................................ 59
Machine Specifications ................................................................ 63
Hardware ....................................................................................................63
Software ......................................................................................................63
Accessories (For Canada Only) .................................................... 64
Index ........................................................................................... 68
Contact Information (For Canada Only) ......................................72
iii
Page 7

iv
Page 8
Getting Started
1
1
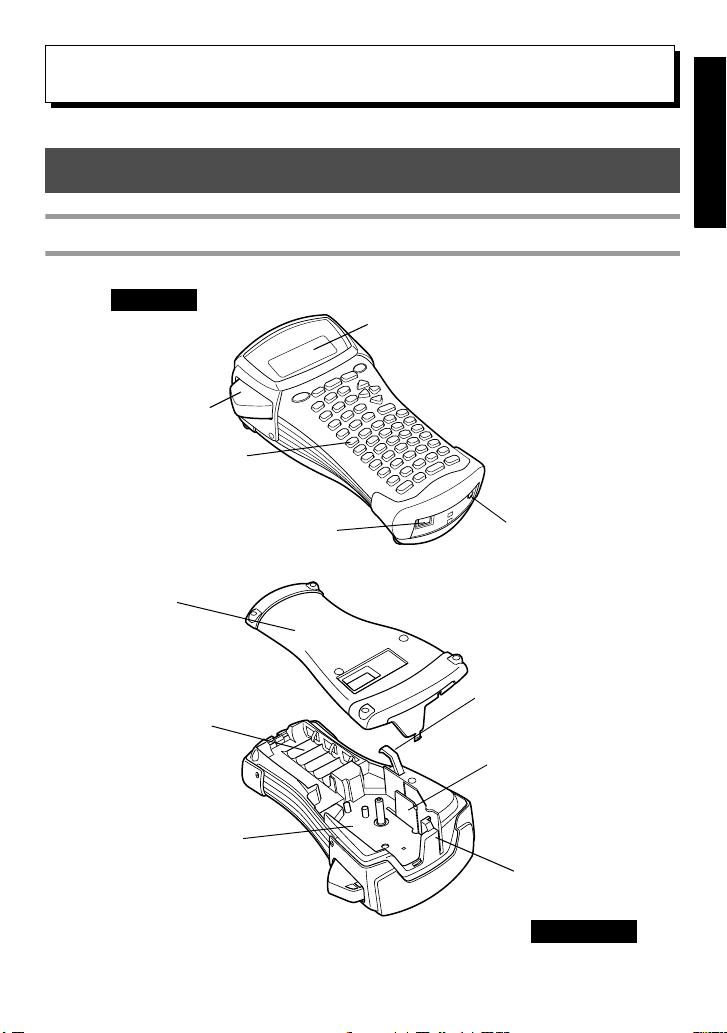
General Description
Top view & bottom view
Top view
Tape cutter button
Keyboard
Getting Started
Display
Back cover
Battery compartment
Tape cassette compartment
USB port
(for PT-1650 only)
AC adapter connector
Cassette release lever
Print head
Tape exit slot
Bottom view
1
Page 9
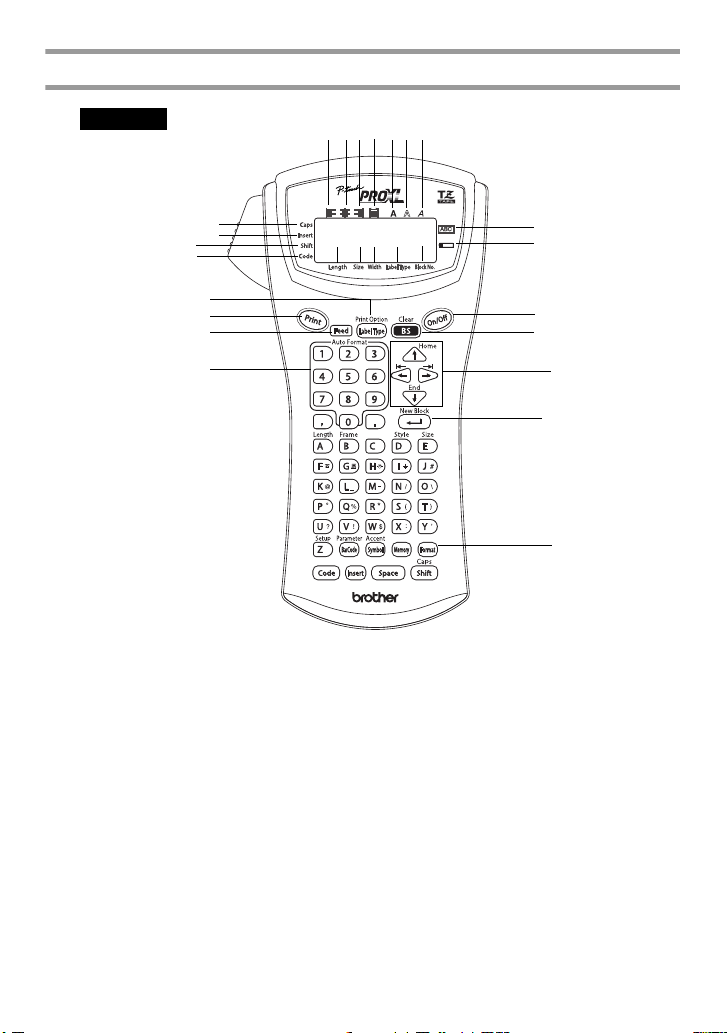
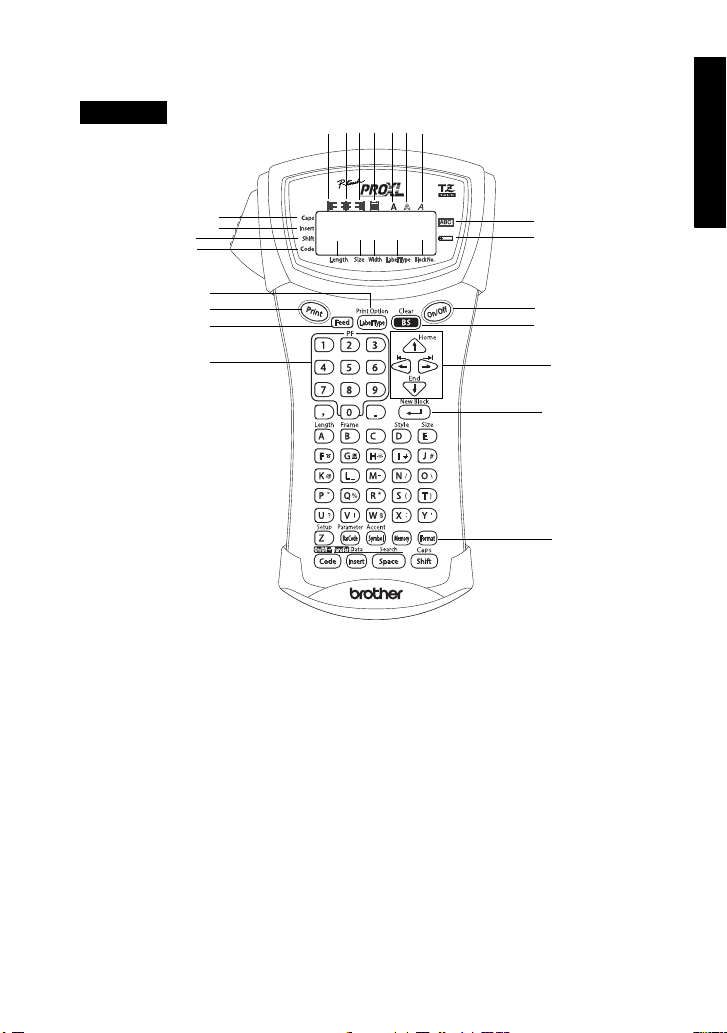
Keyboard & LCD display
PT-1400
E
F
G
H
Q
P
O
N
162
1 Left text alignment (page 29)
2 Center text alignment (page 29)
3 Right text alignment (page 29)
4 Justified text alignment
(page 29)
5 Bold text style (page 28)
6 Outline text style (page 28)
7 Italic text style (page 28)
8 Frame (page 25)
9 Low battery (page 6)
0 Block number (page 17)
A Label Type setting (page 10)
B Width setting (page 27)
C Size setting (pages 26 & 27)
D Length setting (page 24)
345
D
7
0
A
BC
E Caps mode (page 16)
F Insert mode (page 17)
G Shift mode (page 16)
H Code mode (page 16)
I Power key (page 9)
J Backspace key
(pages 15 & 18)
K Arrow keys (page 15)
L Return key (pages 15 & 17)
M Global format key (pages 26)
N Auto Format keys (page 30)
O Feed key (page 31)
P Print key (page 31)
Q Label Type (page 10)
8
9
I
J
K
L
M
2
Page 10
PT-1650
1
345
7
62
E
F
G
H
Q
P
O
N
1 Left text alignment (page 29)
2 Center text alignment (page 29)
3 Right text alignment (page 29)
4 Justified text alignment
(page 29)
5 Bold text style (page 28)
6 Outline text style (page 28)
7 Italic text style (page 28)
8 Frame (page 25)
9 Low battery (page 6)
0 Block number (page 17)
A Label Type setting (page 10)
B Width setting (page 27)
C Size setting (pages 26 & 27)
D Length setting (page 24)
0
A
BC
D
E Caps mode (page 16)
F Insert mode (page 17)
G Shift mode (page 16)
H Code mode (page 16)
I Power key (page 9)
J Backspace key
(pages 15 & 18)
K Arrow keys (page 15)
L Return key (pages 15 & 17)
M Global format key (pages 26)
N PF keys (page 30)
O Feed key (page 31)
P Print key (page 31)
Q Label Type (page 10)
Getting Started
8
9
I
J
K
L
M
3
Page 11

General Precautions
● Use only Brother TZ tapes with this machine. Do not use tapes that do not
have the mark.
● Do not pull on the tape being fed from the P-touch, otherwise the tape cassette may
be damaged.
● Avoid using the machine in extremely dusty places. Keep it out of both direct
sunlight and rain.
● Do not expose the machine to extremely high temperatures or high humidity.
Never leave it on the dashboard or in the back of your car.
● Do not store tape cassettes where they would be exposed to direct sunlight, high
humidity or dust.
● Do not leave any rubber or vinyl on the machine for an extended period of time,
otherwise the machine may be stained.
●
Do not clean the machine with alcohol or other organic solvents. Only use a soft, dry cloth.
● Do not put any foreign objects into or heavy objects on the machine.
● To avoid injuries, do not touch the cutter’s edge.
● Use only the AC adapter designed exclusively for this machine. Use of any other
adapter will void the warranty.
● Do not try to disassemble the AC adapter.
●
When the machine is not to be used for a long period of time, disconnect the AC adapter,
and remove the batteries to prevent them from leaking and damaging the machine.
● Use six AA alkaline or rechargeable (Ni-Cd or Ni-MH) batteries.
● Never try to disassemble the P-touch.
●
It is recommended that you use the USB cable supplied with the P-touch. Should another
USB cable need to be used, ensure it is of high quality construction (for PT-1650 only).
®
● IBM
● Microsoft
● All other software and product names mentioned are trademarks of registered
● Portions of the graphics filter software are based in part on the work of the
4
and PC-DOS® are trademarks of International Business Machines, Inc (for
PT-1650 only).
®
and Windows® are registered trademarks of Microsoft Corp. in the US
and other countries (for PT-1650 only).
trademarks of their respective companies (for PT-1650 only).
Independent JPEG group (for PT-1650 only).
Page 12
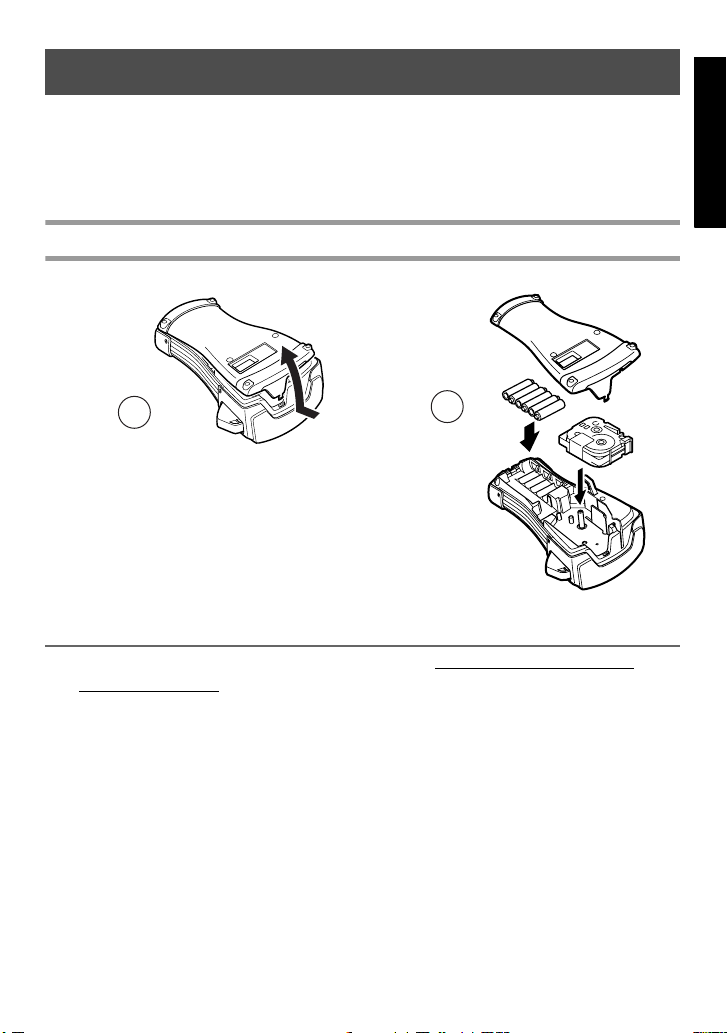
Batteries & Tape Cassettes
This machine has been designed to allow you to change the batteries and tape cassettes
quickly and easily. With batteries installed, this compact and portable machine can be
used anywhere. TZ tape cassettes are available for this machine in a wide variety of
types, colors and sizes, enabling you to make distinctive color-coded and stylized labels.
Installing batteries and a tape cassette
Getting Started
1
2
Notes on batteries
☞ This P-touch requires six AA-size batteries. Rechargeable (Ni-Cd or
Ni-MH) batteries can be used instead of six alkaline batteries.
☞ The rechargeable batteries cannot be recharged by leaving them in the P-touch with the
AC adapter connected. Instead, recharge the batteries by using a battery charger
designed specifically for the type of batteries used. For more details on the rechargeable
batteries, refer to the instructions provided with them.
☞ Do not use any of the following, otherwise battery leakage or damage may occur.
• Manganese batteries
• A combination of new and used batteries
• A combination of batteries of different types (alkaline, Ni-Cd and Ni-MH),
different manufacturers or different models
• A combination of recharged and uncharged batteries
5
Page 13
☞ Make sure that the batteries are inserted so that their poles point in the correct direction.
With batteries installed, the P-touch determines the remaining battery charge during
printing and feeding. If a low battery charge is detected, the low battery indicator ())
comes on. When this occurs, be sure to replace the batteries. The low battery indicator
may not come on in some operating conditions.
☞ Before replacing the batteries, make sure that the P-touch is turned off. In addition, when
replacing the batteries, insert the new ones within five minutes of removing the old ones,
otherwise the text shown in the display and any text stored in the memory will be lost.
☞ If you do not intend to use this P-touch for an extended period of time, remove the
batteries. When the power is disconnected, all text shown in the display and stored in the
memory will be lost.
☞ Since the enclosed batteries begin discharging from the time that the unit is shipped from
the factory, their life span may not meet specifications, depending on when the unit is
put into use.
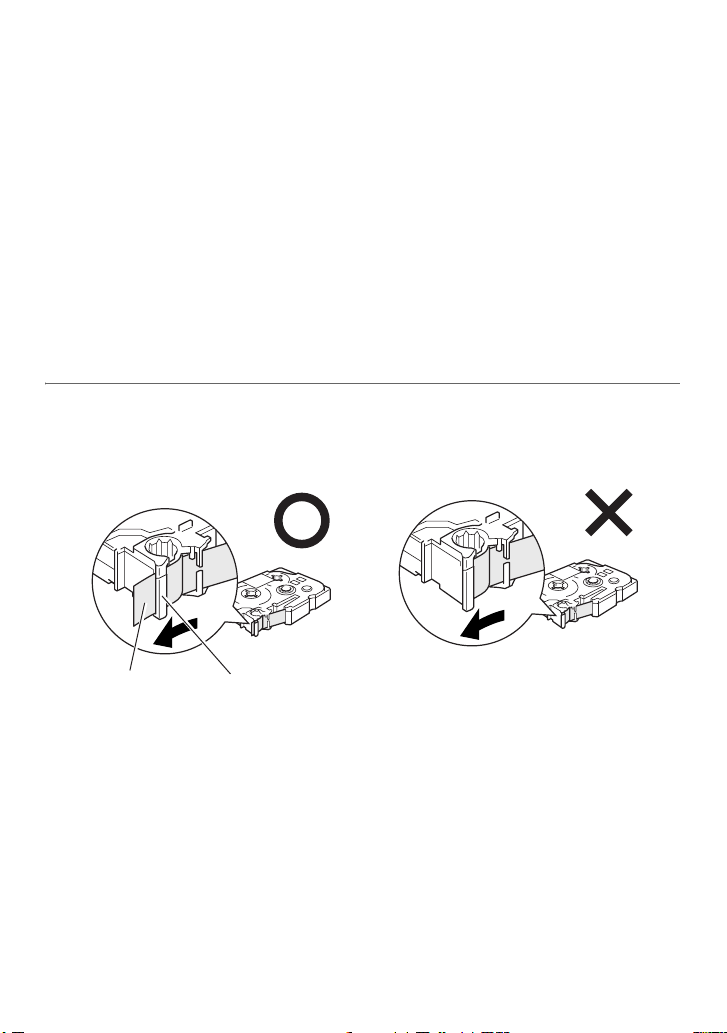
Notes on tape cassettes
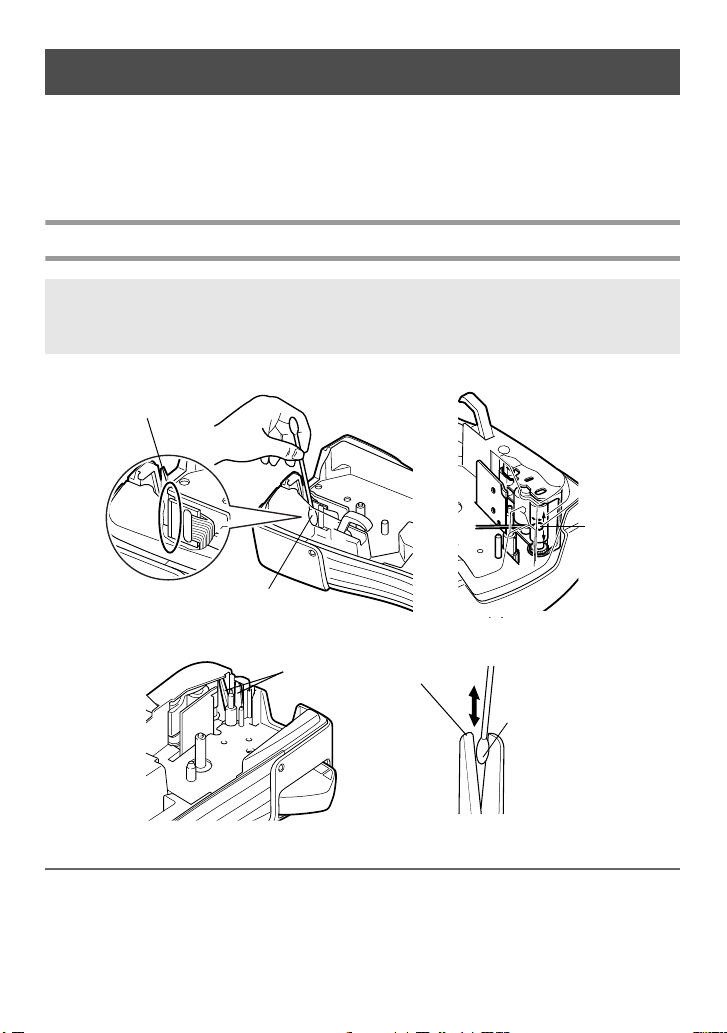
☞ Before installing the tape cassette, make sure that the end of the tape feeds under the tape
guides. If the tape cassette to be installed has an ink ribbon and the ink ribbon is loose,
use your finger to wind the toothed wheel in the direction of the arrow on the cassette
until there is no slack in the ribbon.
End of the tape Tape guides
☞ When inserting the tape cassette, make sure that the inner ribbon does not catch on the
corner of the metal guide.
☞ After installing a tape cassette, press f once to remove any slack in the tape, and then
press the tape cutter button to cut off the excess tape.
☞ Always cut off the tape before removing it from the machine. If the tape is pulled on
before being cut off, the tape cassette may be damaged.
6
Page 14
Strong Adhesive Tape
☞ For textured, rough, or slippery surface, we recommend using Strong Adhesive Tape.
☞ Although the instruction sheet included with the Strong Adhesive Tape
cassette recommends cutting the tape with scissors, the tape cutter that
this P-touch is equipped with is able to cut Strong Adhesive Tape.
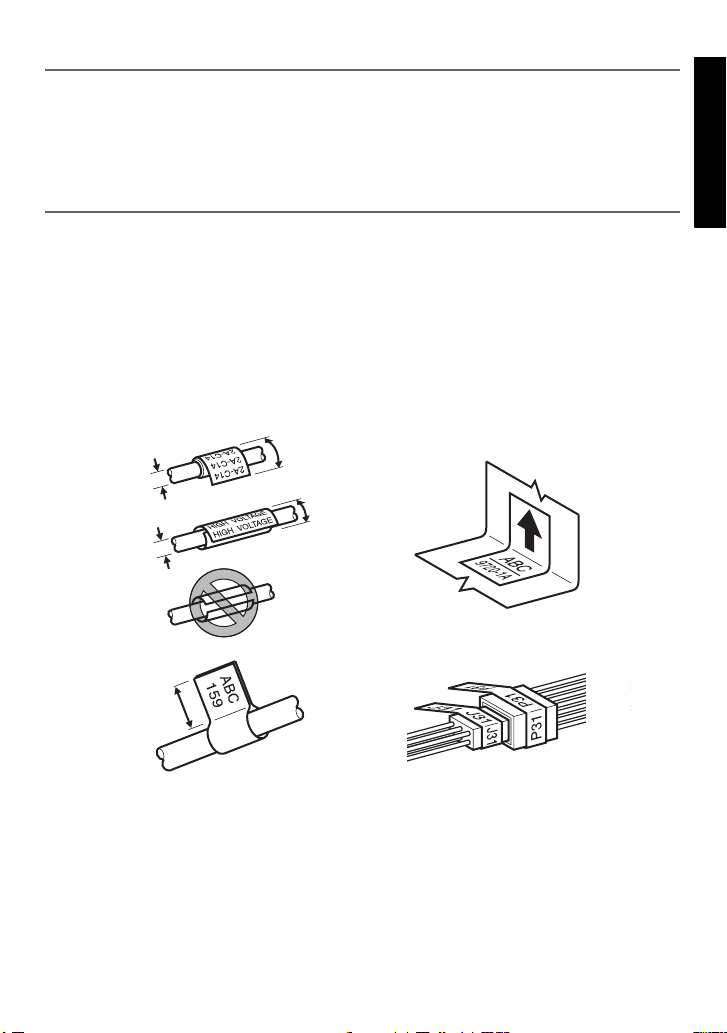
Flexible ID Tape
☞ For applications that require more flexible labels, such as around sharp bends and
cylindrical objects, we recommend using Flexible ID Tape.
☞ Labels made with Flexible ID Tape are not designed for use as electrical insulation.
☞ When wrapping labels around cylindrical objects, the diameter of the object should be at
least 1/8" (3 mm), otherwise the label should be wrapped as a flag and the FLAG Label
Type mode should be used. In addition, the overlapping ends of the label or the label flag
should be at least 3/16" (5 mm).
☞ The label may peel off cylindrical objects if the object is bent after the label is affixed.
Overlap > 5 mm
Diameter > 3 mm
Overlap > 5 mm
Diameter > 3 mm
Flag > 5 mm
Getting Started
7
Page 15
Cleaning
Occasionally, certain parts of the P-touch may need to be cleaned. Dust or dirt may
become attached to the P-touch’s print head and rollers, particularly when the unit is
used outdoors or in a very dusty environment. With use, the tape cutter may become
covered with adhesive, making it difficult to cut the tape.
Cleaning the print head, rollers and tape cutter
☞ Before cleaning the print head and rollers, press o to turn off the P-touch, and then
remove the batteries and disconnect the optional AC adapter.
☞ Be extremely careful not to touch the cutter blades with your fingers.
Print head
Dry Cotton swab
Dry Cotton swab
Tape cutter blades
Tape cutter blades
Dry cotton swab
Notes on cleaning the print head & rollers
☞ If a blank horizontal streak appears through the label text, clean the machine’s print
head.
☞ The print head can be cleaned more easily if the optional print head cleaning cassette
(TZ-CL4) is used.
8
Page 16
Notes on cleaning the tape cutter
☞ If the tape cannot be cut correctly, clean the tape cutter blades.
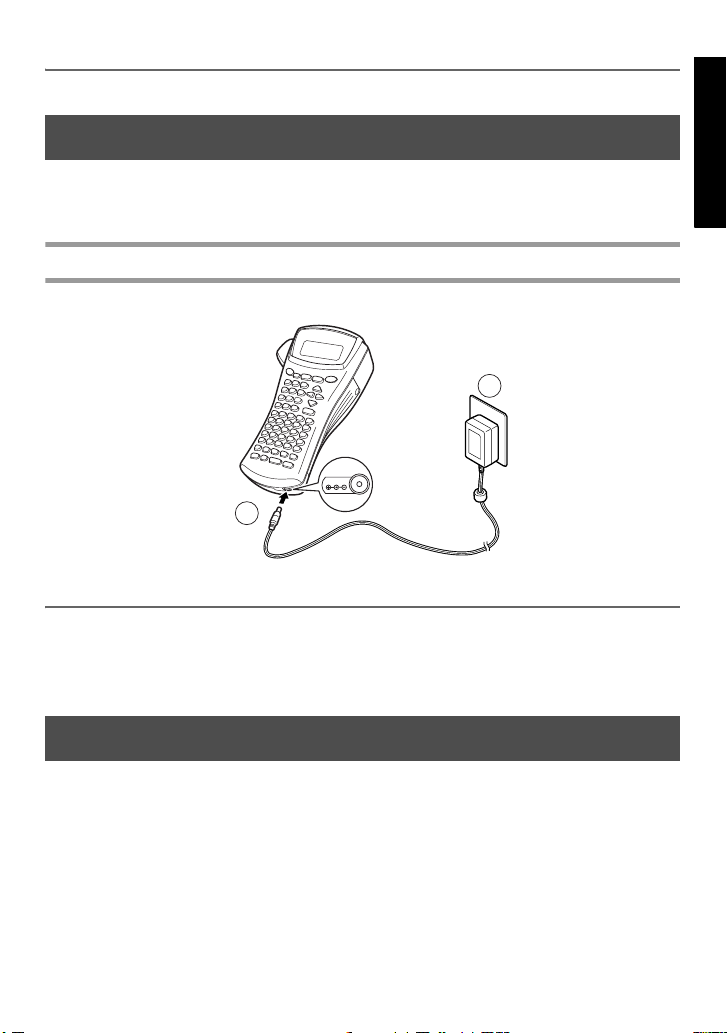
Optional AC Adapter
When printing a large number of labels or labels that contain a large amount of text, it may be
useful to connect the P-touch to a standard electrical outlet using the optional AC adapter.
Connecting the AC adapter
2
DC IN 9-9.5V
1
Notes on the AC adapter
☞ Only use the AC adapter designed exclusively for this machine.
☞ Disconnect the AC adapter if you do not intend to use this P-touch for an extended
period of time. When the power is disconnected, all text shown in the display and stored
in the memory will be lost.
Turning the P-touch On/Off
Getting Started
Press o to turn on or turn off the P-touch.
If batteries are installed or the P-touch has remained plugged in using the AC adapter,
the previous session’s text is displayed when the P-touch is turned on again. This feature
allows you to stop work on a label, turn off the machine, and return to it later without
having to re-enter the text.
Regardless of whether the P-touch is being operated from batteries or the AC adapter,
the machine will automatically turn off if no key is pressed or no operation is performed
for 5 minutes.
9
Page 17

Label Type Modes
2
2
Selecting a Label Type Mode
Pressing a allows you to select one of the two regular modes for designing and printing
your own custom labels, or any of the five special modes available for printing labels preformatted for identifying patch panels, cables, connectors and other components.
1 Press a.
2 Press u or d (or continue pressing a) until the desired mode is
displayed. (For details on each Label Type mode, refer to the sections below.)
3 Press n to apply the selected Label Type mode.
• If NORMAL or VERTICAL was selected, continue entering the label text as
described in chapter 3, Basic Functions.
• If ROTATE, ROT-REP, PORT, PANEL, or FLAG was selected, continue
with the following steps.
4 Press l or r until the desired parameter is displayed.
5 Press u or d until the desired setting is displayed (or use the number keys
to type in the desired setting).
6 Press n to apply the selected settings.
7 Type the text for each label in a separate text block.
8 Print the labels.
• To print a single copy of each label, press p.
• To print multiple copies or several copies while increasing certain characters, or to
g
print using any other special printing function, press
your options. (For details, refer to
Using special printing functions
, then a and choose
on page 32.)
Normal and Vertical Modes
Labels printed using the Normal and Vertical Label Type
modes can be formatted and printed to fit any need.
10
NORMAL
ABCDE
VERTICAL
A
B
C
E
D
Page 18
After selecting the Label Type mode NORMAL or VERTICAL, the label text can be
entered, formatted, printed and cut as usual. With the Normal Label Type mode, the
entered text is printed horizontally along the label. With the Vertical Label Type mode,
the entered text is printed vertically along the label.
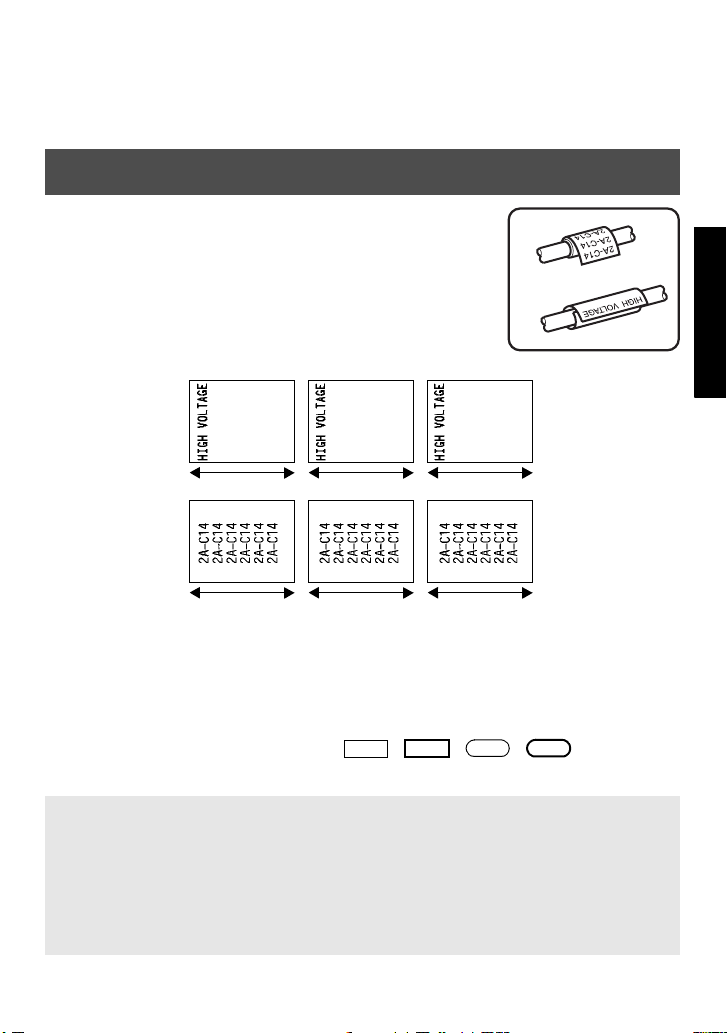
Rotate Mode and Rotate & Repeat Mode
Labels printed using these Label Type modes can be wrapped
around cables and wires to mark them. With both of these
modes, the text is rotated 90° counterclockwise and each text
block printed on a separate label as shown below. With the
Rotate & Repeat mode, the text is printed repeatedly along
the length of the label so that it can easily be read from any
angle.
Rotate
Label Type Modes
Rotate
&
Repeat
Block length
Block length
Block lengthBlock length
Block lengthBlock length
After selecting the ROTATE or ROT-REP Label Type mode, specify the length of
each label and a frame style if desired.
● BLK LEN. (block length): 0.80" to 8.00" (20 to 200 mm)
Default: 1.20" (30 mm)
● FRAME: OFF, , , ,
1 2
3 4
Default: OFF
☞ A single block of text can contain a maximum of 7 text lines, and with the ROT-REP
Label Type mode, only the text lines that fit within the label are printed.
☞ For labels to be attached to cables and wires, we recommend using Flexible ID Tape.
When wrapping Flexible ID Tape around cylindrical objects, the diameter of the
object should be at least 1/8" (3 mm), otherwise the FLAG Label Type mode should
be used. In addition, the overlapping ends of the label or the flag length should be at
least 3/16" (5 mm).
11
Page 19
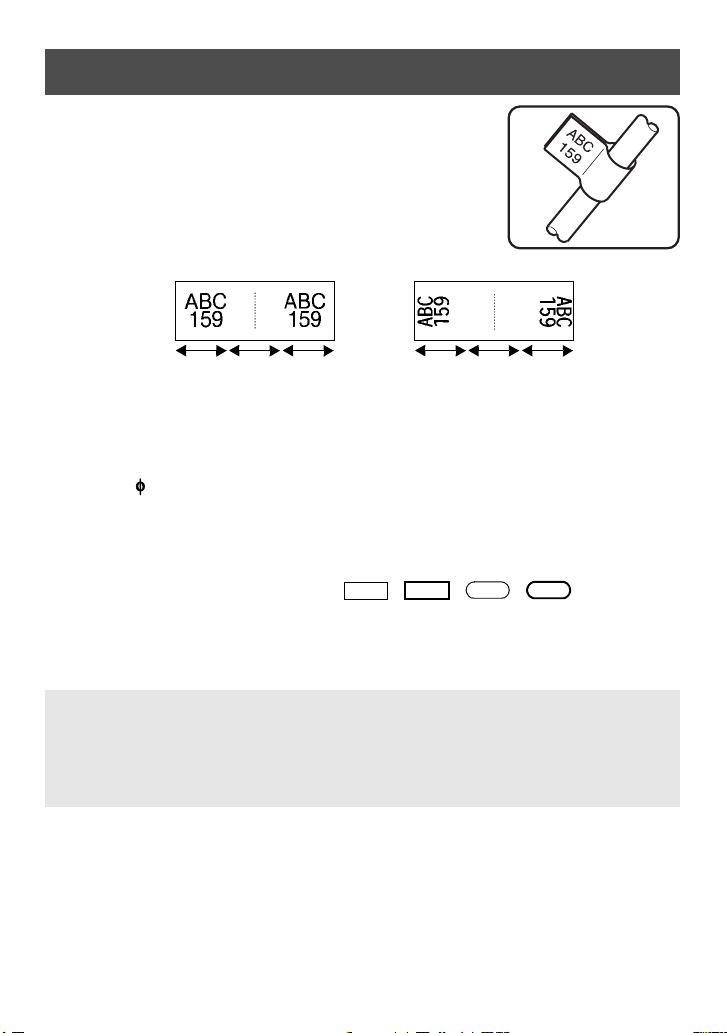
Flag Mode
Labels printed using this Label Type mode can be wrapped
around cable or wire with the ends stuck together to form a
flag. With the FLAG Label Type mode, each block of text is
printed at both ends of separate labels. The length of the
unprinted part of this label is equal to the circumference of
the cable or wire. In addition, the text can be printed
horizontally or rotated 90°.
ROTATE
set to
OFF
Flag
length
Flag
diameter
Flag
length
ROTATE
set to
ON
Flag
length
Flag
diameter
Flag
length
After selecting the FLAG Label Type mode, specify the length and diameter of the flag,
a frame style if desired, and whether or not to rotate the text.
● FLAG (flag diameter): 0.00" to 4.00" (0 to 100 mm)
Default: 0.25" (7 mm)
● FLAG LEN (flag length): 0.40" to 8.00" (10 to 200 mm)
Default: 1.20" (30 mm)
● FRAME: OFF, , , ,
1 2
3 4
Default: OFF
● ROTATE: OFF, ON
Default: OFF
☞ A single block of text can contain a maximum of 7 text lines.
☞ For labels to be attached to cables and wires, we recommend using Flexible ID Tape.
To wrap Flexible ID Tape around cylindrical objects, use the FLAG Label Type
mode when the diameter of the object is less than 1/8" (3 mm). In addition, the flag
length should be at least 3/16" (5 mm).
12
Page 20

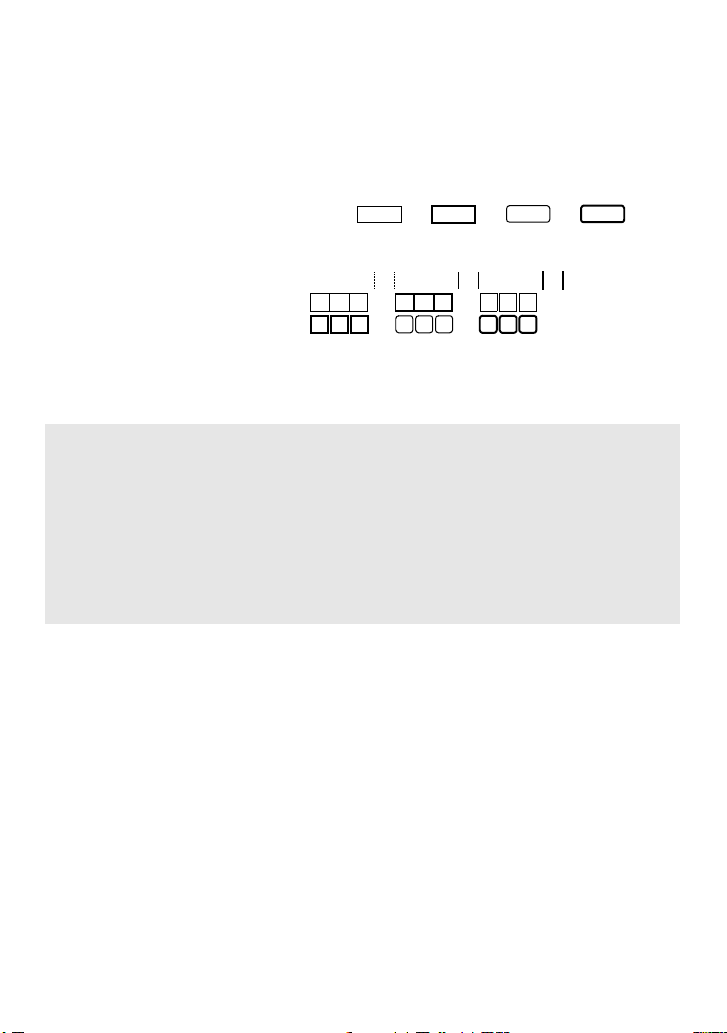
Port & Panel Modes
Labels printed using these Label Type modes can be used to identify various
components or panels.
With the Port Label Type mode, each block of
the text is printed on a separate label, making
these labels useful for identifying different
components or ports that are not equally spaced.
With the
Panel
Label Type mode, all blocks of
the text are evenly spaced on a single label,
making this label useful for a row of equally
spaced switches, fuses or connectors on a patch
panel. In addition, the text blocks can be printed
in the order that they were typed in or in the
FRONT REVERSE
opposite order.
Port
Block length
Block length
Panel
(PRINT set
to FRONT)
Panel
(PRINT set
to REVERSE)
Block length Block length
Block length Block lengthBlock length
After selecting the PORT or PANEL Label Type mode, specify the length of each text
block or label, and select a frame style if desired. For the PANEL Label Type mode,
select whether the text blocks are printed in the order that they were typed in or in the
reverse order.
Label Type Modes
13
Page 21
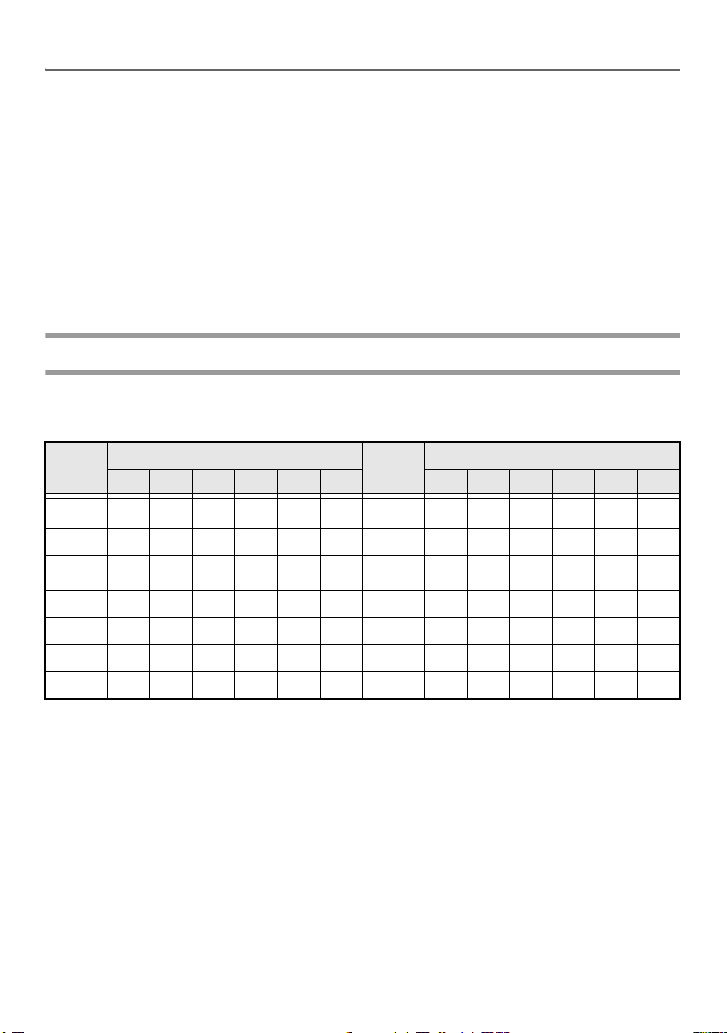
● BLK LEN. (block length): * For the PORT Label Type mode:
0.80" to 8.00" (20 to 200 mm)
Default: 1.20" (30 mm)
* For the PANEL Label Type mode:
0.25" to 8.00" (6 to 200 mm)
Default: 1.20" (30 mm)
● FRAME: * For the PORT Label Type mode:
OFF, 1 , 2 , 3 , 4
Default: OFF
* For the PANEL Label Type mode:
OFF, 1 , 2 , 3 ,
4 , 5 , 6 ,
7 , 8 , 9
Default: OFF
● PRINT (print order): FRONT, REVERSE
Default: FRONT
☞ For these types of labels, we recommend using Strong Adhesive Tape.
☞ The PRINT parameter is only available with the PANEL Label Type mode.
☞ Using the Numbering function with the PANEL Label Type mode makes it easy
to create a single label of multiple blocks containing ascending characters, which
can be used, for example, to label patch panels as shown above. Simply type in
one block of text, and then use the Numbering function to print several copies of
the text block on a single label while automatically increasing certain characters
in each block. (For details on the Numbering function, refer to
copies with incremental characters
on page 32.)
Printing multiple
14
Page 22

Basic Functions
3
3
Performing Basic Operations
Choosing functions, parameters, settings and groups
● If “WX” appears, press l to select the previous item or r to select the next
item.
S
● If “
Choosing the default setting
● To select the default setting of a function or parameter, press e.
” appears, press u to select the previous item or d to select the next
T
item.
Confirming a choice
● To select an item from a list, to apply a selected setting, or to answer “yes”, press
n.
Cancelling a choice
● To quit a function and return to the previous display without changing the text, or
to answer “no”, press b.
Basic Functions
15
Page 23

Inputting Label Data
Entering and editing text
Entering characters
● To type a lowercase letter, a number, a comma or a period, simply press the key for
that character.
● To type an uppercase letter, press h to enter Shift mode, and then press the
applicable letter.
● To type uppercase letters continuously, press g, then h to enter Caps mode,
and then type.
☞ To exit Shift mode without typing a letter, press h.
☞ To exit Caps mode, press
☞ To type a lowercase letter in Caps mode, press
Entering spaces
● To add a blank space to the text, press e.
Moving the cursor
Move the cursor in order to review and edit the text, or you can select the various
functions and settings.
● To move the cursor left, right, up or down, press l, r, u or d.
● To move the cursor to the beginning of the current line of text, press g, then
l.
g, then h.
h, then the applicable letter.
● To move the cursor to the end of the current line of text, press g, then r.
● To move the cursor to the beginning of the entered text, press g, then u.
● To move the cursor to the end of the entered text, press g, then d.
☞ To move the cursor several characters or lines at once, hold down l, r, u or
d.
16
Page 24
Adding a new line of text
● To end the current line of text and start a new one, press n. “ ” appears at the
end of the line.
☞ The number of text lines that can be printed depends on the width of the tape.
Tape Width
1/4" (6 mm) 2
3/8" (9 mm) 2
1/2" (12 mm) 3
3/4" (18 mm) 5
1" (24 mm) 7
Maximum Number of
Lines That Can Be Printed
☞ The line number on the display indicates the line number of the text block.
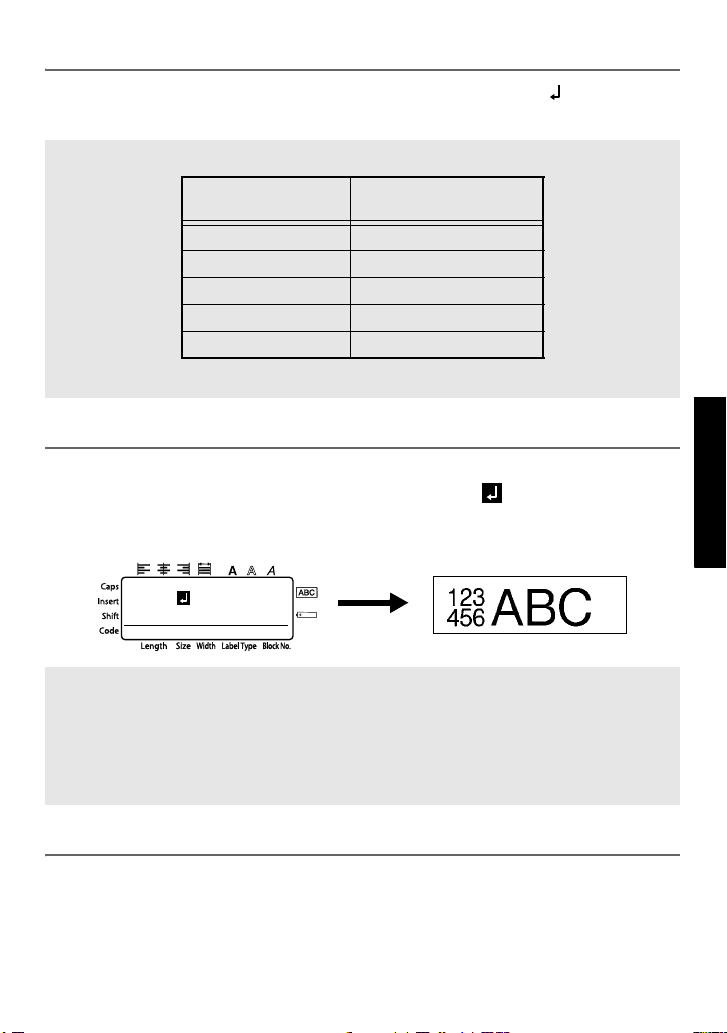
Adding a new text block
● To create a new text block so that one section of the text can have a different
number of lines than another, press g, then n. “ ” appears at the end of
the block.
For example, text entered as shown below, will be printed as follows.
R
R
2:456
R
1:ABC_
---- -- 1 NORMAL 2
☞ A single label can only contain a maximum of fifty text blocks.
☞ The number of the block that the cursor is in is indicated at the bottom of the display.
☞ All texts blocks have the same formatting features.
☞ While trying to print a large amount of data at one time, some outputted labels may be
blank. For example, when printing 50 records, the maximum number of characters
that can be printed at one time is limited to approximately 200.
Basic Functions
Inserting text
● To insert the text that you type at the cursor’s current position, make sure that the
Insert indicator is displayed. Otherwise, press i to enter Insert mode.
● To replace the text at the cursor’s current position instead of inserting it, press i
to exit Insert mode.
17
Page 25
Deleting text
● To remove characters to the left of the cursor’s current position, press b until
all of the characters that you wish to delete are removed.
● To delete all of the text:
1 Press g, then b.
2 Press u or d to select either TEXT ONLY (to erase just the text) or
TEXT&FORMAT (to erase all of the text and return all formatting functions
to their default settings).
3 Press n.
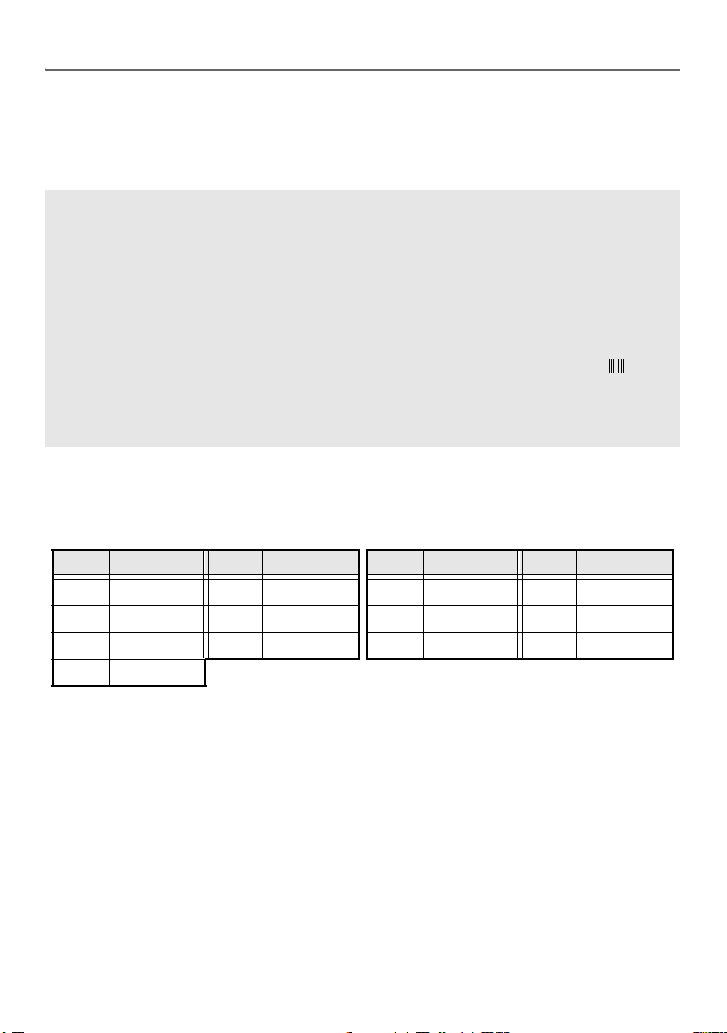
Entering an accented character
There are various accented characters available with the Accent function.
The following accented characters are available.
Letter
Accented Characters
0 1 2 3 4 5 0 1 2 3 4 5
Letter
A АБДВГЖ a абдвгж
CÇ c ç
E ÈÉËÊ e èéëê
~
E
I ÍÏÎ i íï î
NÑ n ñ
O ÓÖÔÕ o óöôõ
U ÙÚÜÛ u ùúüû
Accented Characters
~
e
1 Press g, then s. The message “ACCENT a-u/A-U?” appears.
2 Press the key of the letter in the desired accented character until the desired
character is selected.
3 Add the accented character(s) to the text.
• To add a single accented character or the last one in a series, skip to step
• To add a series of accented characters to the text, press g, then n.
4 For each additional accented character, repeat steps 2 and 3.
5 Press n.
18
5.
Page 26
☞ To type in an uppercase accented character, press h (or press g, then h to
enter Caps mode) before pressing the letter key.
☞ An accented character can also be selected by typing in the corresponding code from
the table above. For example, typing “A2”, then pressing
n adds “Ä” to the text.
Entering a bar code
The Bar Code function allows bar codes to be printed as part of labels.
☞ Since this machine is not specifically designed for special bar code label-making,
some bar code readers may not be able to read the labels.
☞ Bar code readers may not be able to read bar codes printed with certain ink colors on
certain label tape colors. For best results, print barcode labels in black on white tape.
In addition, the various bar code parameters enable you to create more customized bar
codes.
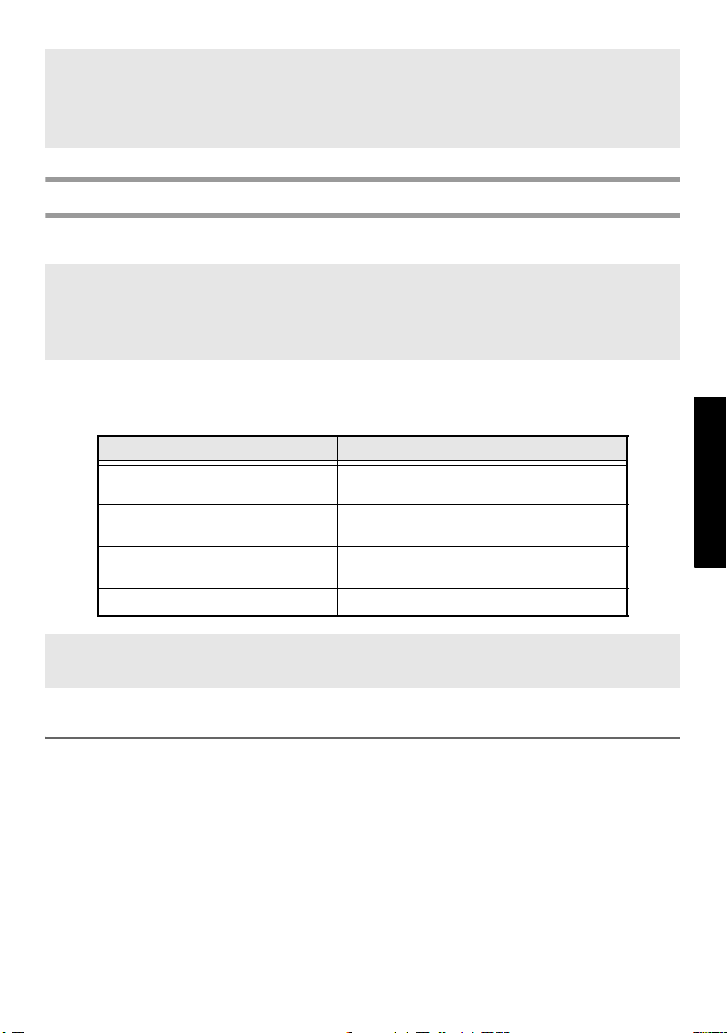
Parameter Settings
PROTOCOL
WIDTH
(bar width)
(numbers printed below bar code)
UNDER#
CHECK DIGIT OFF, ON
CODE 39, I-2/5, EAN13, EAN8, UPC-A,
UPC-E, CODABAR, EAN128, CODE128
MEDIUM, SMALL, LARGE
ON, OFF
Basic Functions
☞ The CHECK DIGIT parameter is only available with the CODE 39, I-2/5 and
CODABAR protocols.
Setting bar code parameters
1 Press g, then c.
2 Press l or r until the parameter that you wish to change is displayed.
3 Press u or d until the desired setting is displayed.
4 Repeat steps 2 and 3 until all parameters are set as you wish.
5 Press n.
19
Page 27
Entering bar code data
1 Press c.
2 Type in the new bar code data or edit the old data.
3 Press n to add the bar code to the text.
☞ To add special characters to the bar code data (only with protocols CODE39,
CODABAR, EAN128 or CODE128), position the cursor below the character
immediately to the right of where you wish to add the special character, and then
press
s. Press u or d until the desired special character is displayed, and
then press
of the special characters that are available.)
☞ To change the data or WIDTH or UNDER# parameter settings of a bar code that has
already been added to the text, position the cursor below the bar code mark ( ), and
then press
☞ If the tape is to small the P-touch will automatically adjust the bar codes to prevent
the misreading or unreading by bar code reader.
The following special characters can only be added to bar codes created using protocol
CODE39 or CODABAR.
Symbol
0
1. 5+ 1$4.
2 (SPACE) 6 % 2 : 5 +
3$
n to add the character to the data. (Refer to the tables below for a list
g, then c.
CODE39 CODABAR
Character
Symbol
Character
Symbol
Character
Symbol
Character
– 4/ 0– 3/
20
Page 28
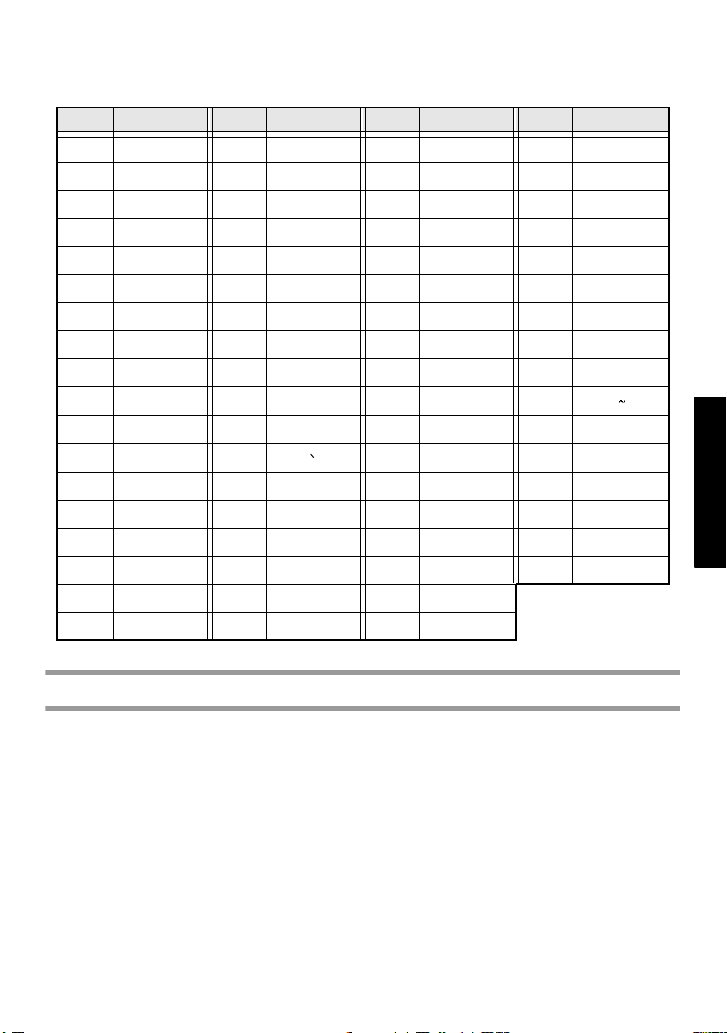
The following special characters can only be added to bar codes created using protocols
EAN128 and CODE128.
Symbol
Character
Symbol
Character
Symbol
Character
Symbol
Character
0 (SPACE) 18 < 36 BEL 54 EM
1!19=37BS55SUB
2”20>38HT56ESC
3#21?39LF57{
4 $ 22 @ 40 VT 58 FS
5%23[41FF59|
6 & 24 \ 42 CR 60 GS
7’25]43SO61}
8 ( 26 ^ 44 SI 62 RS
9)27_45DLE63
10 * 28 NUL 46 DC1 64 US
11 + 29 47 DC2 65 DEL
12 , 30 SOH 48 DC3 66 FNC3
13 – 31 STX 49 DC4 67 FNC2
14 . 32 ETX 50 NAK 68 FNC4
15 / 33 EOT 51 SYN 69 FNC1
16 : 34 ENQ 52 ETB
17 ; 35 ACK 53 CAN
Entering a symbol
Basic Functions
There are 147 symbols and pictures available with the Symbol function.
1 Press s. The last category used is displayed.
2 Press u or d to select the desired category.
3 Press l or r until the desired symbol is selected.
4 Add the symbol(s) to the text.
• To add a single symbol or the last one in a series, skip to step
• To add a series of symbols to the text, press g, then n.
5 For each additional symbol, repeat steps 2 through 4.
6.
21
Page 29
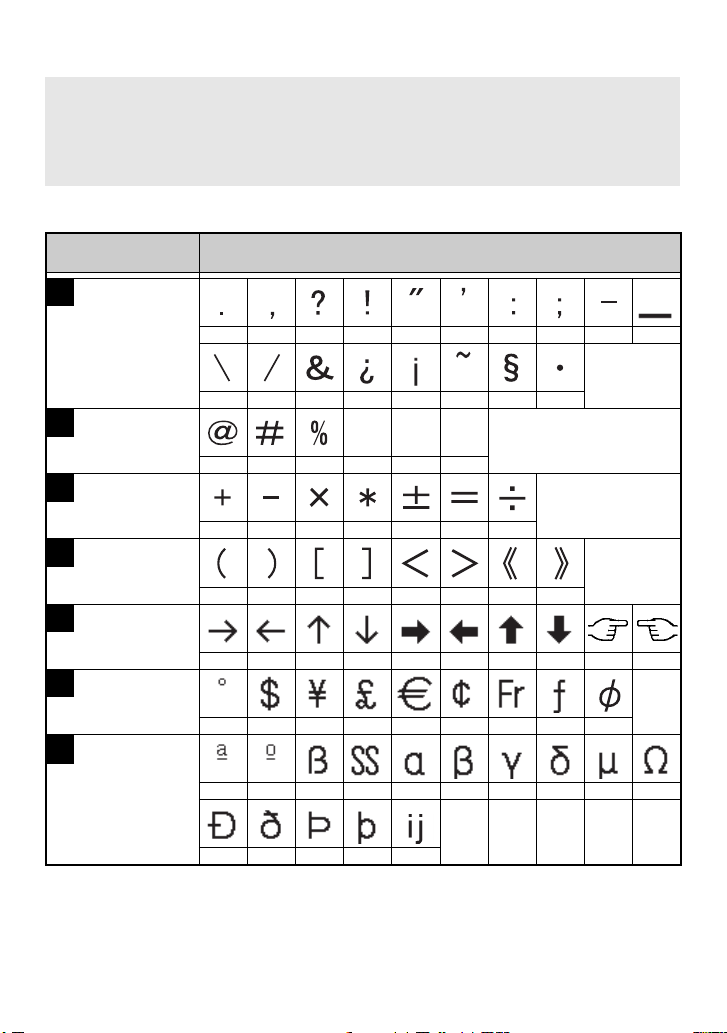
6 Press n.
☞ A symbol can also be selected by typing in the corresponding code from the table
below. For example, typing “A02”, then pressing
☞ Some symbols are printed in color on the keypad. To use a symbol on a key, press
n adds “?” to the text.
g to enter Code mode, and then press the key for the symbol.
The following symbols are available.
Category
Symbols
A
PUNCTUATION
B
BUSINESS
C
MATHEMATICS
D
BRACKET
E
ARROW
F
UNIT
G
INTERNATIONAL
CHARACTERS
00 01 02 03 04 05 06 07 08 09
10 11 12 13 14 15 16 17
®©
00 01 02 03 04 05
00 01 02 03 04 05 06
00 01 02 03 04 05 06 07
00 01 02 03 04 05 06 07 08 09
00 01 02 03 04 05 06 07 08
00 01 02 03 04 05 06 07 08 09
10 11 12 13 14
™
22
Page 30
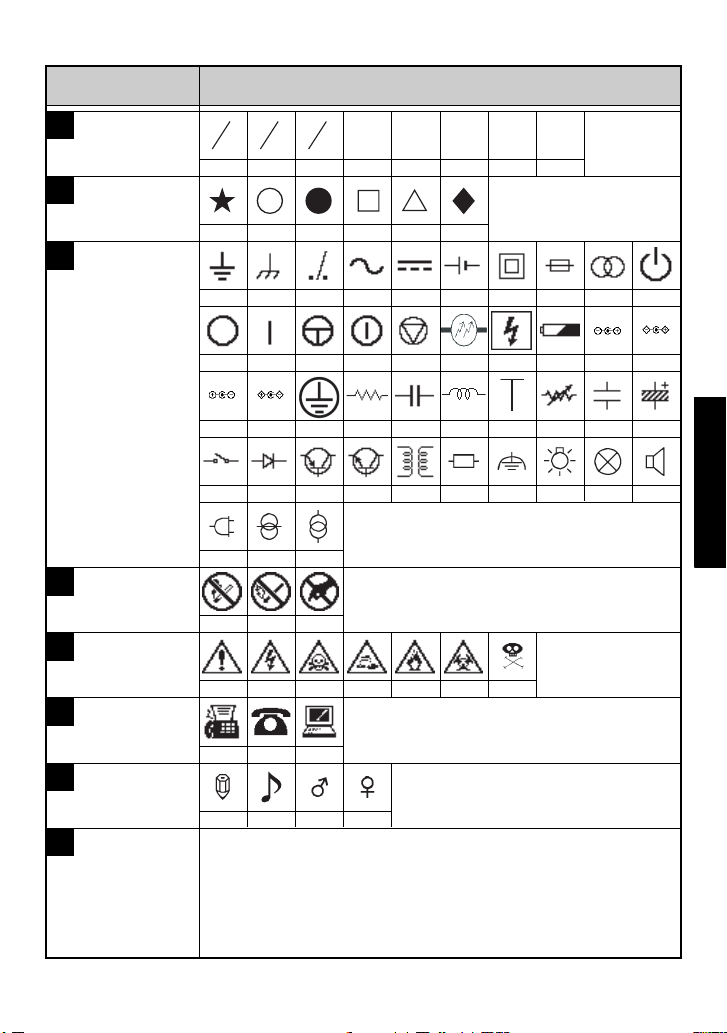
Category
Symbols
H
NUMBER
I
PICTOGRAPH
J
ELECTRICAL /
ELECTRONIC
K
PROHIBITION
L
WARNING
M
COMMUNICATIONS
N
OTHERS
Z
PERSONAL
CATEGORY
12131
00 01 02 03 04 05 06 07
00 01 02 03 04 05
00 01 02 03 04 05 06 07 08 09
10 11 12 13 14 15 16 17 18 19
20 21 22 23 24 25 26 27 28 29
30 31 32 33
40 41 42
00 01 02
00 01 02 03 04 05 06
00 01 02
00 01 02 03
01
4
2
34 35 36 37 38 39
2
1
*A maximum of 16 most recently selected symbols are
automatically saved in the PERSONAL symbol category.
Basic Functions
23
Page 31

☞ Once the PERSONAL symbol category becomes full, newly selected symbols will
overwrite older ones unless the Symbol Save function is set to OFF
. (Refer to
Specifying if the PERSONAL symbol category is continually updated on page 40.)
Formatting the Label
Specifying a label length
The length of the label can be specified as follows.
1 Press g, then A.
2 Press l or r until LENGTH is displayed.
3 Press u or d until the desired label length is
0.30" to 39.00" (6 to 999 mm)
displayed (or use the number keys to type in the
desired setting).
4 Press n.
Specifying a margin size
The size of the margins for the left and right sides of the text can be specified.
1 Press g, then A.
2 Press l or r until MARGIN is displayed.
3 Press u or d until the desired margin
setting is displayed (or use the number keys to
margine type in the desired setting).
4 Press n.
0.10" to 4.00" (2 to 99 mm)
24
Page 32

Framing the text
1 Press g, then B.
2 Press u or d until the desired frame setting is displayed.
3 Press n. The selected setting is applied to the entire text.
The following frame styles are available.
Frame
Setting
18
29
310
411
512
613
714
Sample
Frame
Setting
Sample
Basic Functions
25
Page 33

Specifying the character size
The character size can be specified for all text in the label or only for the text in the line
that the cursor is in.
☞ With the default character size setting AUTO, the largest possible text size is
automatically selected depending on the width of the installed tape and the number of
lines in the text.
Formatting the character size of all text
1 Press t.
2 Press l or r until GLB SIZE is displayed.
3 Press u or d until the desired character size setting is displayed.
4 Press n. The selected setting is applied to the entire text.
Formatting the character size of a line
1 Move the cursor to the line of text whose size you wish to change.
2 Press g, then E.
3 Press u or d until the desired character size setting is displayed.
4 Press n. The selected setting is only applied to the text line that the cursor is
positioned in.
☞ Since the text sizes that can be printed depends on the width of the tape, the following
table shows the maximum text size that can be used with each tape width.
Tape Width Maximum Text Size
1/4" (6 mm) 12 points (3 mm)
3/8" (9 mm) 18 points (4 mm)
1/2" (12 mm) 24 points (6 mm)
3/4" (18 mm) 36 points (9 mm)
1" (24 mm) 48 points (12 mm)
☞ With the AUTO setting selected and the text in a block consisting of just one line of
only uppercase letters (and no accented letters), the text is printed slightly larger than
the maximum possible for the tape width.
26
Page 34

Specifying the character width
Formatting the width of all text
1 Press t.
2 Press l or r until GLB WIDE is displayed.
3 Press u or d until the desired character width setting is displayed.
4 Press n. The selected setting is applied to the entire text.
Formatting the width of a line
1 Move the cursor to the line of text whose character width you wish to change.
2 Press g, then E.
3 Press l or r until WIDTH is displayed.
4 Press u or d until the desired character width setting is displayed.
5 Press n. The selected setting is only applied to the text line that the cursor is
positioned in.
The following width sizes are available for each text size as shown.
Basic Functions
Width
Size
12 mm
(48 points)
9 mm
(36 points)
6 mm
(24 points)
4 mm
(18 points)
3 mm
(12 points)
2 mm
(9 points)
1 mm
(6 points)
NORMAL NARROW MINIMUM WIDE
27
Page 35

Specifying the character style
Formatting the character style of all text
1 Press t.
2 Press l or r until GLB STYL is displayed.
3 Press u or d until the desired character style setting is displayed.
4 Press n. The selected setting is applied to the entire text.
Formatting the character style of a line
1 Move the cursor to the line of text whose character style you wish to change.
2 Press g, then D.
3 Press u or d until the desired character style setting is displayed.
4 Press n. The selected setting is only applied to the text line that the cursor is
positioned in.
The following text styles are available.
Style
Setting
Sample
NORMAL ITALIC
Style
Setting
Sample
28
BOLD
OUTLINE
I+BOLD
(italic &
bold)
I+OUTL
(italic &
outline)
Page 36

Specifying the alignment for all lines in the text
1 Press t.
2 Press l or r until ALIGN is displayed.
3 Press u or d until the desired setting is displayed.
4 Press n. The selected setting is applied to the entire text.
The following alignment settings are available.
LEFT CENTER RIGHT JUSTIFY
Basic Functions
29
Page 37

Using the pre-formatted Auto Format templates
Various pre-formatted label templates are available, enabling you to quickly and easily
create labels for a variety of applications—from identifying the contents of boxes and
file folders to labelling equipment and making name badges and ID tags. After simply
selecting one of the ten label templates, type text into each of its fields, and then the label
is ready to be printed.
The following label templates are available.
Key
1
2
3
4
5
6
7
8
9
0
Template
Name
BIN BOX
ASSET1
ASSET2
ASSET3
ASSET4
ID LABEL
SIGN
BADGE
FILING
IC CHIP
Tape Width
Label Length
3/4" × 2.80"
(18 mm × 70 mm)
1" × 3.30"
(24 mm × 84 mm)
1" × 3.15"
(24 mm × 80 mm)
1" × 1.65"
(24 mm × 41 mm)
1" × 2.25"
(24 mm × 56 mm)
1" × 2.80"
(24 mm × 70 mm)
1" × 4.05"
(24 mm × 102 mm)
3/4" × 4.05"
(18 mm × 102 mm)
1/2" × 3.55"
(12 mm × 89 mm)
3/8" × 1.05"
(9 mm × 26 mm)
Template Fields Sample
1 SYMBOL? 2 TEXT1?
3 TEXT2?
4 BAR CODE?
1 TEXT1? 2 TEXT2?
3 BAR CODE?
1 TEXT?
2 BAR CODE?
1 TEXT?
2 BAR CODE?
1 TEXT1? 2 TEXT2?
3 TEXT3? 4 TEXT4?
5 TEXT5?
1 TEXT1? 2 TEXT2?
3 TEXT3?
1 SYMBOL? 2 TEXT1?
3 TEXT2?
1 NAME?
2 COMPANY?
1 TITLE?
2 SUBTITLE?
1 TEXT1? 2 TEXT2?
1 Press g, then the number key where the template that you wish to use is
assigned.
2 Press n. The first field for the selected template is displayed.
30
Page 38

3 Press u or d to display each field, and then type in the text.
4 • To print a single copy, press p.
• To print multiple copies, several copies while increasing certain characters, or
a mirror image of the text, press g, then a. (For details, refer to Using
special printing functions on page 32.)
☞ Accented characters (page 18), symbols (page 21) and bar codes (page 19) can be
entered in the template fields.
☞ To quit using the template, display the last field, and then press n . The Auto
Format menu appears. Press u or d until EXIT appears, and then press n .
Printing Labels
Previewing the label layout
The Preview function allows you to see a sample of the layout of the text.
● To use the print preview, press g, then p. The length of the current label is
indicated in the lower-left corner of the display.
☞ To scroll the print preview left or right, press l or r.
☞ To return to the text, press
n or b.
Feeding tape
● To feed out 1" (23 mm) of tape, press f. The message “FEED” is displayed.
☞ Press f to feed out any leftover printed tape after pressing o to quit printing.
Printing a label
● To print out a label, press p. The message “WORKING”, then “COPIES”
followed by the number of the label being printed is displayed.
☞ To quit printing, press o to turn off the P-touch.
Basic Functions
31
Page 39

Using special printing functions
Various special printing functions are available that enable you to print multiple copies
of labels, print several copies while incrementing the values of certain characters, print
specific sections of label text, or print label text as a mirror image.
Printing multiple copies of a label
The Repeat Printing function allows you to print up to 99
copies of the same text.
ABC
1 Press g, then a.
ABC
2 Press l or r until COPIES is displayed.
3 Press u or d until the desired number of copies
is displayed (or use the number keys to type in the
desired setting).
4 Press n (or p). START appears in the Print Option menu.
5 Press n (or p) to begin printing the specified number of copies. The
number of each copy is displayed while it is being printed.
☞ If the Cut function is set to 1 or 3, the message “CUT TAPE TO CONTINUE”
appears after each label is printed. Press the tape cutter button to cut off the label and
continue printing.
☞ Be sure to cut the tape within 5 minutes from the time that the message appears.
☞ For the different options available for cutting the tape, refer to
fed and cut on page 38.
☞ To specify settings for additional Print Option functions, instead of continuing with
step
5, press u or d until CONTINUE is displayed in the Print Option
menu, and then press n.
☞ If you have data in memory, choose TEXT or DATA PRINT.
ABC
Selecting how tape is
Printing multiple copies with incremental characters
The Numbering function can be used to print several copies of
the same text while incrementing the values of certain
characters (letters, numbers or bar code data) after each label is
printed. This type of automatic incrementation is very useful
when printing serial number labels, production control labels
or other labels requiring ascending codes.
1 Press g, then a.
32
2A-C16
ABC
2A-C15
2A-C14
Page 40

2 Press l or r until NUMBER is displayed.
3 Press u or d until the desired number of copies is displayed (or use the
number keys to type in the desired setting).
4 Press n. The message “START?” appears. (To specify only the character at
the cursor’s current position as the numbering field, press p, and then skip to
step 9.)
5 Press u, d, l or r until the first character that you wish to include in
the numbering field is flashing.
6 Press n. The message “END?” appears.
7 Press u, d, l or r until the last character that you wish to include in
the numbering field is flashing.
8 Press n. START appears in the Print Option menu.
9 Press n (or p) to begin printing the specified number of labels. The
number of each copy is displayed while it is being printed.
☞ If the Cut function is set to 1 or 3, the message “CUT TAPE TO CONTINUE”
appears after each label is printed. Press the tape cutter button to cut off the label and
continue printing.
☞ Be sure to cut the tape within 5 minutes from the time that the message appears.
☞ For the different options available for cutting the tape, refer to
Selecting how tape is
fed and cut on page 38.
☞ Letters and numbers increase as shown below.
0 Î 1 Î ...9 Î 0 Î ...
A Î B Î ...Z Î A Î ...
a Î b Î ...z Î a Î ...
A0Î A1 Î ...A9Î B0 Î ...
Spaces (shown as underlines “_” in the examples below) can be used to adjust the
space between characters or to control the number of digits that are printed.
_Z Î AA Î ...ZZÎ AA Î ...
_9 Î 10 Î ...99Î 00 Î ...
1_9Î 2_0 Î ...9_9Î0_0 Î ...
☞ Only one numbering field can be selected from any text.
☞ A numbering field must be located entirely within one line of text of a single block.
☞ A maximum of five characters can be selected for the numbering field.
☞ If you include a non-alphanumeric character such as a symbol in the numbering field,
only the letters and numbers in the numbering field will be increased when the labels
are printed, or just one label will be printed if the field only contains a nonalphanumeric character.
Basic Functions
33
Page 41

☞ To specify settings for additional Print Option functions, instead of continuing with
9, press u or d until CONTINUE is displayed in the Print Option
step
menu, and then press
☞ If a bar code is selected as the numbering field in step
and continue with step
n.
5, skip steps 6 and 7,
8.
Printing a range of text blocks
The Block Printing function enables you to select the range of
text blocks to print.
1 Press g, then a.
LM
NOP
QR
ST
UVWX
2 Press l or r until the first number in the range
displayed below BLOCK NO. is flashing.
3 Press u or d until the desired block number is
NOP
QR
displayed (or use the number keys to type in the desired setting).
4 Press r so that the second number in the range displayed below BLOCK NO.
is flashing.
5 Press u or d until the desired block number is displayed (or use the
number keys to type in the desired setting).
6 Press n (or p). START appears in the Print Option menu.
7 Press n (or p) to begin printing the specified number of labels. The
number of each copy is displayed while it is being printed.
☞ To specify settings for additional Print Option functions, instead of continuing with
step
7, press u or d until CONTINUE is displayed in the Print Option
menu, and then press n.
Printing mirrored labels
This function prints your label so that the text can be read
from the adhesive side of the tape. If mirror-printed labels are
attached to glass or some other transparent material, they can
be read correctly from the opposite side.
1 Press g, then a.
2 Press l or r until MIRROR is displayed.
ABC
ABC
OFF
ON
34
Page 42

3 Press u or d until ON is displayed.
4 Press n (or p). START appears in the Print Option menu.
5 Press n (or p) to begin printing the specified number of labels. The
number of each copy is displayed while it is being printed.
☞ When using the Mirror Printing function, the text should be printed on clear tape.
☞ To specify settings for additional Print Option functions, instead of continuing with
step
5, press u or d until CONTINUE is displayed in the Print Option
menu, and then press n.
Combining special printing functions
Many of the special printing functions can be combined,
depending on various conditions, such as which Label Type
mode is selected or whether a template is being used. For
example, by combining the operations for the Repeat Printing
function and the Numbering function to print two copies of a
label with “1” selected as the numbering field and three
increments, the labels shown above will be printed.
☞ For details on the various special printing functions, refer to the corresponding
section above.
A-1
A-1
A-2
A-2
A-3
A-3
Basic Functions
35
Page 43

Storing and Recalling Files
Frequently used label text along with its formatting can be stored in the memory and
easily recalled so that it can be edited and quickly printed. When each text file is stored,
it is given a number to make recalling it easier. Up to 10 text files or approximately
2,000 characters can be stored in the memory.
Since a copy of the stored text file is recalled when the Recall function is used, the text
can be edited or printed without changing the originally stored file. When a file is no
longer needed or more space is necessary, the Clear function can be used to delete text
files.
Storing label text
1 Press m.
2 Press u or d until STORE is displayed.
3 Press n.
4 Press u or d until the file number where you wish to store the text is
displayed.
5 Press n.
☞ If the maximum number of characters has already been stored, the error message
“MEMORY FULL!” appears in the display. If this occurs, an existing text file must
be deleted before the new one can be stored.
☞ If a file is already stored under the selected file number, the message
“OVERWRITE?” appears in the display. To overwrite the stored file with the new
one, press
text file, press
n. To go back and choose another file number without overwriting the
b, and then select a different file number.
36
Page 44

Recalling text that has been stored
1 Press m.
2 Press u or d until RECALL is displayed.
3 Press n.
4 Press u or d until the file number containing the text that you wish to
recall is displayed.
5 Press n. Any text previously entered in the display is erased and the text
stored under the selected file number is recalled into the display.
☞ To view other parts of the selected text file, press l or r.
Deleting text that has been stored
1 Press m.
2 Press u or d until CLEAR is displayed.
3 Press n.
4 Press u or d until the file number containing the text that you wish to
delete is displayed.
5 Select the file(s) to be deleted.
• To delete a single file, skip to step
• To select multiple files, press e. The current file number is highlighted.
Continue selecting text files by repeating step 4, then pressing e until all
files that you wish to delete are selected.
• To delete all files, press g, then e.
6 Press n. The message “OK TO CLEAR?” (or “CLEAR ALL?” if all files
were selected) appears.
6.
Basic Functions
7 Press n. The text stored in the selected files is deleted.
☞ If you do not wish to delete the selected text file(s), press b instead of n in
7.
step
☞ To view other parts of the selected text file, press
l or r.
☞ To remove a text file from those that are to be deleted, display the text file, and then
press e so that the file number is no longer highlighted.
37
Page 45

Machine Adjustments
4
4
Various functions are available for changing and adjusting the operation of the P-touch.
Selecting how tape is fed and cut
The Cut function enables you to specify how the tape is fed out after it is printed. The
settings of the Cut function consist of combinations of two different cut methods:
cut-pause (where the machine stops printing so the label can be cut) and chain printing
(where the last copy is not fed out to be cut, reducing the amount of tape that is wasted).
Chain printing is an economical function designed to help eliminate “wasted tape”
at the beginning of labels. Without chain printing, the excess from the previous printing
session is cut before the first label in the current session is printed. However, if a setting
using chain printing is selected, the last label in the previous session remains in the
machine (is not fed out), so that the next label can be printed without wasting tape. When
the last label is printed, press f to feed the chain of labels, and then press the tape
cutter button to cut it.
The following settings are available: (The default setting is 1.)
1
(cut-pause: no chain printing)
2
(no cut-pause; no chain
printing)
1 Press g, then Z.
2 Press l or r until CUT is displayed.
3 Press u or d until the desired setting is displayed, and then press n.
☞ After printing with the Cut function set to 3 or 4, press f to feed the tape, and then
press the tape cutter button to cut it.
3
(cut-pause; chain printing)
4
(no cut-pause; chain printing)
Adjusting the display contrast
The display can be made lighter or darker by selecting a setting between -2 and +2. (The
default setting is 0.)
Select a lower value to decrease the contrast (make the display lighter).
38
Select a higher value to increase the contrast (make the display darker).
Page 46

1 Press g, then Z.
2 Press l or r until CONTRAST is displayed.
3 Press u or d until the desired setting is displayed, and then press n.
Setting the Auto Reduction function
With the Auto Reduction function, you can select whether the text width (TEXT
WIDTH) or the text size (TEXT SIZE) will be reduced if text that is set to the AUTO
Size setting is too large for the specified label length. (The default setting is TEXT
SIZE.)
1 Press g, then Z.
2 Press l or r until AUTO REDUCTION is displayed.
3 Press u or d until the desired setting is displayed, and then press n.
If TEXT SIZE is selected and more text is added, the character size is
reduced so the text fits within the specified label length.
If TEXT WIDTH is selected and more text is added, the character width is
reduced so the text fits within the specified label length.
However, after the character width is reduced to MINIMUM, the character
size will be reduced so the text fits within the specified label length.
Calibrating the label length
If the length of the printed label does not correspond to the length specified with the
Length function, the printed label length can be recalibrated with the Length Adjust
function by selecting a setting between -1 and +3. (The default setting is 0.)
1 Press g, then Z.
2 Press l or r until LENGTH ADJUST is displayed.
3 Press u or d until the desired setting is displayed, and then press n.
Machine Adjustments
39
Page 47

Specifying if the PERSONAL symbol category is
continually updated
You can specify whether symbols continue to be added to the
(with the older symbols deleted) when the category becomes full (
added after the
1 Press g, then Z.
2 Press l or r until SYMBOL SAVE is displayed.
3 Press u or d until the desired setting is displayed, and then press n.
PERSONAL
symbol category becomes full (
PERSONAL
ON
OFF
). (The default setting is ON.)
symbol category
) or symbols are no longer
Changing the units of measure
The units used for displaying measurements can be set to millimeters (mm) or inches
(inch). (The default setting is inch.)
1 Press g, then Z.
2 Press l or r until UNITS is displayed.
3 Press u or d until the desired setting is displayed, and then press n.
Changing the language
The language of the menus, settings and messages can be changed by selecting
ENGLISH or FRANÇAIS. (The default setting is ENGLISH.)
1 Press g, then Z.
2 Press l or r until LANGUAGE is displayed.
3 Press u or d until the desired setting is displayed, and then press n.
Displaying version information
This function can be used to display the version information for the P-touch software
and built-in symbol set.
1 Press g, then Z.
2 Press l or r until VERSION INFO is displayed.
3 Press u or d until the desired version information is displayed.
4 Press n to exit Setup mode.
40
Page 48

Using P-touch With a Computer
5
5
(for PT-1650 only)
This P-touch is equipped with a USB port, allowing you to connect it to a computer
running Microsoft
which is installed together with the printer driver, Transfer Manager and Backup
Manager.
● P-touch Editor 3.2 is a label-designing software that provides additional
illustration and layout features enabling you to design more elaborate label
templates and create databases. Once these label templates and databases have
been created, they can be downloaded to the P-touch, where they can be used to
print labels.
● Transfer Manager is used to download data created on the computer to this
portable P-touch, so that it can be used anywhere you go to create labels. The
following types of data can be downloaded to the P-touch.
• Label templates created with P-touch Editor allow you to expand the P-touch’s
capabilities to create customized labels.
• Databases created with P-touch Editor or in the *.csv format provide you with
convenient access to large amounts of data (for example, customer lists and
inventory), which can be used to print labels.
• User-defined character images in the *.bmp format can be used to enhance
labels with characters that are not available on the P-touch.
● Backup Manager allows you to back up the following types of data from the
P-touch onto the computer, and restore this data to the P-touch in case the P-touch
data is lost.
• Label templates
• Database
• User-defined character images
• Label files stored in the P-touch memory
®
Windows®. The enclosed CD-ROM contains P-touch Editor 3.2,
☞ The P-touch Editor software and the printer driver must be installed before the
P-touch is connected to the computer or turned on.
☞ Only use the enclosed USB interface cable to connect the P-touch to the computer.
A single computer cannot be connected to multiple P-touch machines at the same time.
☞
☞ Although the P-touch can be connected to the computer through a USB
connection, label layouts created in P-touch Editor cannot be printed directly
from the application.
41
Using P-touch With a
Computer (for PT-1650 only)
Page 49

Installing the Software & Printer Driver
The P-touch Editor 3.2 software, provided on the enclosed CD-ROM, includes a variety
of more complex functions for printing bar codes and images, enabling you to design
just about any label that you can imagine. With this application, the printer driver must
also be installed in order for the application to communicate with the P-touch.
☞ Although the P-touch can be connected to the computer through a USB
connection, label layouts created in P-touch Editor cannot be printed directly
from the application.
Before installation
Check that your system configuration meets the following requirements.
Computer
Operating system
Processor
Memory
Hard disk free space At least 20 MB (100 MB for a full installation)
Monitor 800 x 600 dpi (SVGA)/High Color or higher
USB port Available
CD-ROM drive Available
®
IBM
PC/AT or compatible
®
Microsoft
Professional or XP Home Edition
Pentium 166 MHz or higher (XP Professional and XP Home Edition:
Pentium 300 MHz or higher)
At least 64 MB (XP Professional and XP Home Edition: 128 MB or
higher)
Windows® 98, 98 SE, Me, 2000 Professional, XP
☞ For installation on Windows® 2000, administrator privileges are required. In
addition, transferring data requires power user or administrator privileges. This
software cannot be operated in Users groups. In addition, this software is not
compatible with the Windows
☞ With Windows
®
XP, transferring data and installation is only possible from an
®
2000 Server operating system.
account with administrator privileges.
42
Page 50

Installing the P-touch Editor 3.2 software
☞ Do not connect the P-touch to the computer until you are instructed to.
☞
We strongly recommend closing all Windows applications before installing this software.
1 Insert the enclosed CD-ROM into the computer’s CD-ROM drive. A dialog box
automatically appears, allowing you to select the language of the installer.
☞
If the InstallShield® Wizard does not automatically start up:
First, double-click “My Computer” on the desktop, and then double-click the CD-ROM
drive containing the CD-ROM. (For Windows® XP, click “My Computer” in the Start
menu, and then double-click the CD-ROM drive containing the CD-ROM.)
Then, double-click “Setup.exe” to display the dialog box.
2 Select the desired language, and then click “OK”. The InstallShield
®
Wizard for
installing the P-touch Editor software starts up, and then the “Welcome” dialog
box appears.
3 Carefully read the contents of the “Welcome” dialog box, and then click “Next ”
to continue. The “User Information” dialog box appears.
4 Type the necessary information into the appropriate boxes, and then click “Next”.
A dialog box appears, asking for confirmation of the entered information.
5
Click “Yes” to register the entered information. The “Setup Type” dialog box appears.
6 Select the installation method, and then click “Next”.
If “Custom” is selected, clicking “Next” will display a dialog box that allows you
to select which options to install.
After P-touch Editor is installed, a dialog box appears, allowing you to select
whether or not to install the printer driver.
7 Click “Yes”. The first Driver Setup dialog box appears, informing you that the
P-touch printer driver will be installed.
8 Continue with the procedure in Installing the USB printer driver on page 44.
9 When installation of P-touch Editor is finished, a dialog box appears, allowing
you to upgrade P-touch Editor 3.2 so that it will be compatible with Access 2000.
To upgrade P-touch Editor 3.2 for Access 2000, click “Yes”, and then follow the
instructions that appear.
Using P-touch With a
Computer (for PT-1650 only)
43
Page 51

☞ If a dialog box appears, indicating that the installation is finished and suggesting that
the computer be restarted, select the option for restarting the computer, click “Finish”
to restart the computer, and then remove the CD-ROM from the CD-ROM drive.
☞ To uninstall the P-touch Editor 3.2 software, double-click “Add/Remove Programs”
(“Add or Remove Programs” in Windows® XP) in the Control Panel window, and
then follow the instructions that appear.
Installing the USB printer driver
☞ Do not connect the P-touch to the computer until you are instructed to do so,
otherwise the printer driver may not be installed correctly.
With Windows® 98, 98 SE, Me or 2000:
1 When the dialog box appears, informing you that the P-touch printer driver will
be installed, click “Next”. A dialog box appears, instructing you to connect the
P-touch to the computer.
2 Connect the P-touch to the computer
USB interface cable
using the enclosed USB interface cable,
and then hold down g and press
o to turn on the P-touch in
Transfer mode. A dialog box appears,
indicating that the printer driver has
been installed.
3 Click “Finish”.
☞ If a dialog box appears, indicating that the installation is finished and suggesting that
the computer be restarted, select the option for restarting the computer, click “Finish”
to restart the computer, and then remove the CD-ROM from the CD-ROM drive.
®
With Windows
XP:
☞ A message appears, informing you that the printer driver has passed Brother’s own
compatibility tests and that “Continue Anyway” should be pressed if a warning
message appears. Click “OK”
1 When the dialog box appears, informing you that the P-touch printer driver will
be installed, click “Next”. A dialog box appears, instructing you to connect the
P-touch to the computer.
44
Page 52

2 Connect the P-touch to the computer
USB interface cable
using the enclosed USB interface cable,
and then hold down g and press
o to turn on the P-touch in
Transfer mode. The first “Found New
Hardware Wizard” dialog box appears.
3 Select “Install the software
automatically (Recommended)”, and
then click “Next”. A dialog box
appears, warning that the software has
not passed Windows® Logo testing.
4 Click “Continue Anyway” to continue
with the installation. A “Found New
Hardware Wizard” dialog box appears,
indicating that the Found New
Hardware Wizard has finished installing the printer driver for the P-touch.
☞ If a “Driver Setup” dialog box appears,
indicating that the printer driver has been
installed, click “Finish”.
5 Click “Finish”. A dialog box appears, indicating that the installation is finished.
6 Select “Yes, I want to restart my computer now.” (or “Yes, restart immediately”
if the printer driver was installed separately), click “Finish” to restart the
computer, and then remove the CD-ROM from the computer.
☞ To uninstall the printer driver, start up the installer on the CD-ROM, click the Driver
button in the dialog box that appeared, and then select the desired option and follow
the instructions that appear.
45
Using P-touch With a
Computer (for PT-1650 only)
Page 53

Reading the User’s Guide
The P-touch Editor User’s Guide can be viewed either by inserting the CD-ROM into
the drive each time you wish to refer to it or by installing it onto your computer so that it
is quickly available at any time. Since the User’s Guide is an HTML document, a
browser is needed to read it.
To view the User’s Guide from the CD-ROM:
1 Start up Windows
2 Select the CD-ROM drive.
3 Double-click the Ptouch folder
4 Double-click the Manual folder
5 Double-click “Main.htm”.
To view the User’s Guide installed on the hard disk:
1 Click “Start” in the taskbar to display the Start menu.
2 Point to “Programs”.
3 Point to “P-touch Editor 3.2”.
4 Click “The User’s Guide P-touch Editor 3.2”.
®
Explorer.
46
Page 54

Using P-touch Editor 3.2
P-touch Editor 3.2 makes it easy for anyone to design and print more complex labels for
almost any need imaginable.
Notes on creating templates
Since some P-touch Editor 3.2 functions are not available with the P-touch machine,
keep the following points in mind when using P-touch Editor 3.2 to create templates.
☞ Since only the Helsinki font is available on the P-touch machine, the font used to print
the text may be different from the font selected for the template in P-touch Editor. In
addition, since the size of all text on the P-touch machine is set to AUTO, the text size
may automatically be reduced.
☞ Although character styles can be applied to individual characters with P-touch Editor,
styles can only be applied to a line of text with the P-touch machine. In addition, some
character styles are not available on the P-touch machine.
☞
Differently from P-touch Editor, the P-touch machine cannot print underline or strikeout.
☞ Only the first 999 lines of a database linked to a template is read by the P-touch machine.
☞ Only the first line of text typed into a database field is read by the P-touch machine.
Therefore, if you wish to print from a database with more than one line of text, create the
template and database with separate fields for each line of text.
☞
Some characters available with P-touch Editor are not available with the P-touch machine.
☞ Bar codes specified with settings not compatible with the P-touch bar codes settings will
not print correctly.
☞
A template created with P-touch Editor should have a fixed length with a maximum of 39" (1 m).
☞ The template and database should be created so that no more than approximately 500
characters per label will be printed.
☞ Fields that extend out of the print area may not print completely.
☞ A numbering field specified with P-touch Editor will not transfer and is not compatible
with the Numbering function on the P-touch machine.
Backgrounds specified with P-touch Editor are not compatible with the P-touch machine.
☞
☞
Time and date objects using the “At Printing” setting on P-touch Editor will not be printed.
☞ The printed label may differ from the image that appears in the Preview area of Transfer
Manager.
☞ If the number or order of fields in a database are changed and only the database (*.csv
file) is transferred to update it, the database may not link correctly with the template. In
addition, the first line of data in the transferred file must be recognized by the P-touch
machine as “field names”, otherwise the database cannot be used to print.
☞ A P-touch Editor layout that uses the split printing function (enlarging the label and
printing it on 2 or more labels) cannot be transferred.
☞ The length of the label set with P-touch Editor and the label length setting on the P-touch
may be slightly different as a result of the P-touch’s computational margin of error.
Using P-touch With a
Computer (for PT-1650 only)
47
Page 55

Starting up P-touch Editor 3.2
1 Click “Start” in the taskbar to display the Start menu.
2 Point to “Programs”.
3 Point to “P-touch Editor 3.2”.
4 Click “P-touch Editor 3.2”.
When P-touch Editor is started, the following window is displayed.
Menu bar
Standard toolbar
Property dock
Layout area
Print area
Draw toolbar
Object dock
Status bar
Displaying the Properties
Title bar
Rulers
Cursor
☞ Although the screens shown in the following explanations are for Windows
SE and Me, the operations for Windows
®
2000 and XP are the same unless
®
98, 98
specifically mentioned.
The desired Properties can be displayed by clicking the icon in the property dock.
Page Properties icon
Font Properties icon
Layout Properties icon
Text Properties icon
Database Properties
icon
Page Properties ( )
When the P-touch is selected as the printer:
Click this button to
hide the Properties.
48
Page 56

Entering text
☞ Although the screens shown in the following explanations are for Windows
SE and Me, the operations for Windows
®
2000 and XP are the same unless
®
98, 98
specifically mentioned.
1 Click (Text button) on the draw toolbar.
Text can be typed in, and the pointer changes from (selection pointer) to
(I-beam pointer).
2 Move the I-beam pointer to the position in the layout area where you wish to type
in text, and then click the left mouse button. The cursor flashes in the layout area
to indicate that you can now type in text.
3 Use the computer keyboard to type in the text.
4 To create a new line of text, press the keyboard’s Enter key.
☞ With P-touch Editor 3.2, text is always typed in using the insert mode. The overwrite
mode cannot be used to type in text.
☞ To change the font and text size, click the appropriate icon in the property dock, and
then select the desired settings from the Properties that appear.
☞ For details, refer to Reading the User’s Guide on page 46.
Notes on usage
Bar codes
Keep the following points in mind when using P-touch Editor 3.2 to print bar codes.
Bar code readers may not be able to read bar codes printed with certain ink colors
•
on certain label tape colors.
• Be sure to test the bar code reader to make sure that it can read printed bar
codes in the environment where you plan to use them.
• The bar codes protocols that can be used are limited to those available with the
P-touch. Refer to page 19 for a list of the available bar code protocols.
49
Using P-touch With a
Computer (for PT-1650 only)
Page 57

Databases
Keep the following points in mind when using the database functions of P-touch
Editor 3.2.
☞ For general details, refer to the User’s Guide supplied on the P-touch Editor 3.2
CD-ROM.
• The database function of P-touch Editor 3.2 uses database files that are
compatible with Microsoft Access 97. By upgrading P-touch Editor 3.2 using a
program available on the CD-ROM, P-touch Editor will become compatible
with Access 2000. If P-touch Editor 3.2 has not been updated to Access 2000
during installation, refer to the Readme file located at Ptouch\Editor\Ac2k on
the CD-ROM, and start up the program.
• P-touch Editor 3.2 can import files other than .mdb files, such as .csv files.
Files saved as .csv files with an application such as Microsoft Excel can be
used with P-touch Editor. Refer to the User’s Guide supplied on the P-touch
Editor 3.2 CD-ROM for more details.
• Using a function available with Microsoft Access 97, Excel files can be linked
to .mdb files. With this function, data changed in Excel is automatically
updated with P-touch Editor.
Transferring Data To/From a Computer
A template, database or a user-defined character image (character not available on the
P-touch) can be transferred from the computer and assigned to a PF key on the P-touch.
Entering Transfer mode
● Hold down g and press o to turn on
the P-touch in Transfer mode.
☞ To exit Transfer mode, press o to turn off the P-touch.
☞ Be sure not to turn off the P-touch while data is being set to it, otherwise the data
will be lost.
☞ Regardless of whether the P-touch is being operated from batteries or the AC
adapter, the machine will automatically turn off if no key is pressed or no
operation is performed for 5 minutes.
50
Page 58

Downloading data to the P-touch
☞ Although the P-touch can be connected to the computer through a USB
connection, label layouts created in P-touch Editor cannot be printed directly
from the application.
1 Make sure that the P-touch is in Transfer mode. (For more details, refer to
Entering Transfer mode on page 50.)
2 • For downloading a template or database to the P-touch, start P-touch Editor
3.2. and open the template (and database) file.
• Click [Transfer Template] command on the [File] menu to convert the layout
file to a P-touch template format and start up Transfer Manager.
3 For a user-defined character image,
point to “Programs” on the Start menu,
point to “P-touch Editor 3.2”, and then
click “Transfer Manager”.
4 From the File List, select the data that
you wish to transfer.
☞ If the desired data is not listed in the File List, click “Modify Folder”. In the “Browse
For Folder” dialog box that appears, select the folder containing the desired data, and
then click “OK”.
5 For each template or a user-defined character image that you want transferred,
click “Change PF Key Mapping”, and then select the PF key where you wish to
assign the data.
6 Click “Start” to begin transferring the data. A dialog box appears, indicating that
the data is being transferred.
7 When the message “The transfer was completed successfully.” appears, click
“OK”.
8 On the P-touch, press o to exit Transfer mode and turn off the P-touch.
51
Using P-touch With a
Computer (for PT-1650 only)
Page 59

☞ The P-touch can only contain one database at a time. However, the database can be
replaced or updated.
☞ When data is downloaded to a PF key, it replaces the preset template initially
available on the P-touch. To restore the initial templates, use Transfer Manager to
download the *. pd3. files from the folder located at \etc\Transfer in the P-touch
Editor folder.
☞ Only one character image or template can be assigned to a PF key. If a character
image or template is already assigned to a PF key, the previous data is erased when a
different character image or template is transferred.
☞ Only the files that are selected will be transferred. To transfer more than one file at
the same time, hold down the keyboard’s Ctrl key, and then click the name of each
file that you wish to transfer.
☞ To stop transferring the data, click “Cancel” in the dialog box that appears during
transfer.
Adding a user-defined character image to the text
If a user-defined character image (a bitmap character not usually available on the
P-touch) is assigned to a PF key, that character can be added to any label that you create
on the P-touch.
● Press g, then the applicable PF key.
The character is added to the text at the
cursor’s position.
☞ Only a monochrome bitmap (*.bmp) file can be transferred to the P-touch.
☞ A high-resolution file can be cut from a file with the specifications described above.
☞ The downloaded image is automatically resized to the width of the tape being used.
R
R
1: ABC IMPORT/EX
---- -- 1 NORMAL 1
Using template data
A label layout created with P-touch Editor (*.lbl file) can be downloaded to the P-touch,
where it can be used as a template for printing labels. The templates can be printed using
text either from a database or text directly typed in.
When a database (*.mdb file created with P-touch Editor 3.2 or *.csv file) is downloaded
to the P-touch, data from selected records can be added to labels either using a template
linked to the database or using a new template. In addition, the database data can be
searched to find specific records.
52
Page 60

☞ The P-touch can only contain one database at a time. However, the database can be
replaced or updated.
Using a template not linked to a database
Using a template not linked to a database is the same as using any of the preset Auto
Format templates. For details on using Auto Format templates, refer to Using the pre-
formatted Auto Format templates on page 30.
Using a template linked to a database
A single record or a range of records in the database linked to the template can be printed.
1 Press g, then the PF key where the template that you wish to use is assigned.
2 Press n. The database data is displayed.
To select a single database record to be printed in the template:
3 Press u or d to highlight the
desired record, and then press n.
4 To edit any text in the record, press
u or d to display the text, and
then type in the new text.
5 Press p.
To select a range of database records to be printed in the template:
3 Press u or d to highlight a record, and then press n.
M
R
NO.:[Part Nam]
NO
1:
AC adapter
4 Press g, then a. The message “CLEAR TEXT & PRINT DATABASE?”
appears.
5 Press n.
6 Press l or r until RECORD NO. is displayed, and then specify the desired
range of records.
7 Press n (or p). START appears in the Print Option menu.
8 Press n (or p) to begin printing the labels using the specified range of
records.
53
Using P-touch With a
Computer (for PT-1650 only)
Page 61

☞ If the Cut function is set to 1 or 3, the message “CUT TAPE TO CONTINUE”
appears after each label is printed. Press the tape cutter button to cut off the label and
continue printing.
☞ Be sure to cut the tape within 5 minutes from the time that the message appears.
☞ For the different options available for cutting the tape, refer to
Selecting how tape is
fed and cut on page 38.
☞ To search for a specific record while the database data is displayed (in step
above), refer to
☞ To view other fields in the record selected in step
☞ When editing data as described in step
Searching the database on page 56.
3, press l or r.
4 of the procedure for printing a single
2
database record, the database remains unchanged. When printing a range of database
records, the text cannot be edited.
☞ To specify settings for additional Print Option functions, instead of continuing with
step
8, press u or d until CONTINUE is displayed in the Print Option
menu, and then press
page 32 and
Printing mirrored labels on page 34.)
☞ To quit using the template, display the last field, and then press n . The
n. (Refer to Printing multiple copies of a label on
template
menu appears. Press u or d until EXIT appears, and then press n .
☞ While trying to print a large amount of data at one time, some outputted labels may be
blank. For example, when printing 50 records, the maximum number of characters
that can be printed at one time is limited to approximately 200.
Using downloaded database data
Either an *.mdb database, created with P-touch Editor 3.2, or a database converted to a
*.csv file can be transferred to the P-touch. The database data can be used either with a
template or added to a label created on the P-touch without using a template.
Adding database data to a label
1 Move the cursor to place in the text where you wish to add the database data.
2 Press g , then i.
3 Press u or d until the record containing the desired data is flashing.
4 Press l or r until the desired data is flashing.
5 Press n. The selected data is added to the label text.
☞ To search for a specific record, refer to Searching the database on page 56.
54
Page 62

Using database data in a Label Type mode
This function enables you to select the range of database fields to print.
1 Press a, and then select the Label Type mode as described in chapter 2.
2 Press g, then a. The message “CLEAR TEXT & PRINT DATABASE?”
appears.
3 Press n.
4 Press l or r until RECORD NO. is displayed, and then specify the desired
range of records.
5 Press l or r until FIELD NO. is displayed, and then specify the desired
range of record fields.
6 Press n (or p). START appears in the Print Option menu.
7 Press n (or p) to begin printing the labels using the specified range of
records.
☞ If label text has been typed in, you will be asked to choose either TEXT PRINT or
DATA PRINT when
PRINT. If TEXT PRINT is selected, the special printing functions for printing
multiple copies of labels (refer to page 32), printing multiple copies with incremental
characters (refer to page 32), printing a range of text blocks (refer to page 34), or
printing the label text as a mirror image (refer to page 34) are available.
☞ To specify settings for additional Print Option functions, instead of continuing with
7, press u or d until CONTINUE is displayed in the Print Option
step
menu, and then press
page 32 and
Printing mirrored labels on page 34.)
☞ While trying to print a large amount of data at one time, some outputted labels may be
blank. For example, when printing 50 records, the maximum number of characters
that can be printed at one time is limited to approximately 200.
g, then a is pressed. At this time, select DATA
n. (Refer to Printing multiple copies of a label on
55
Using P-touch With a
Computer (for PT-1650 only)
Page 63

Searching the database
While selecting a database record to be used in a template or while selecting a database
record whose data is to be added to a label, the database can be searched for records
containing specific characters or records with a specific number.
To search the database for a record containing specific characters:
1 Press g and e until the search
screen is displayed.
2 Type in the characters that you wish to
search for.
3 Press n. The first record after the currently selected one that contains the
entered characters appears.
To display a record with a specific number:
1 Press g and e until the jump
screen is displayed.
2 Press u or d until the desired
record number is displayed, or use the
number keys to type in the desired
number.
3 Press n. The record with the specified record number appears.
R
SEARCH CHARA.
[
R
JUMP RECORD NO.
L
M
]
1
56
Page 64

Backing up/restoring P-touch data
Backup Manager, which was installed with P-touch Editor 3.2, enables you to save the
following types of data from the P-touch onto the computer as a backup in case the
P-touch data is lost. In addition, the data backed up onto the computer can be restored
onto the P-touch
• Label templates
• Database
• User-defined character images
• Label files stored in the P-touch memory
1 Make sure that the P-touch is in Transfer mode. (For more details, refer to
Entering Transfer mode on page 50.)
2 On the Start menu, point to “Programs”,
point to “P-touch Editor 3.2”, and then
click “Backup Manager”.
3 To back up P-touch data onto the
computer, click the Printer → PC tab,
and then click “Update List”.
To restore P-touch data backed up on
the computer, click the PC → Printer
tab.
4 From the File List, select the data that you wish to back up or restore.
5 Click “Start”. A dialog box appears, indicating that the data is being transferred.
6 When the message “The transfer was completed successfully.” appears, click
“OK”.
.
☞ Only the selected data will be backed up or restored. To select more than one file,
hold down the keyboard’s Ctrl key, and then click the names of the desired files.
☞ To select all data, click “Select All”.
☞ To stop transferring the data, click “Cancel” in the dialog box that appears during
transfer.
☞ To restore data to a different PF key, click “Change PF Key Mapping” on the PC →
Printer tab, and then select the PF key where you wish to assign the data.
☞ Only one character image or template can be restored to a PF key. If a character
image or template is already assigned to a PF key, the previous data is erased when a
different character image or template is transferred.
Using P-touch With a
Computer (for PT-1650 only)
57
Page 65

Appendix
6
6
Troubleshooting
Problem Solution
1 The display stays blank after you
have turned on the machine.
2 The machine does not print or the
printed characters are blurred.
3 The text files that you stored in
the memory are no longer there.
4 The printed characters are not
formed properly.
5 A blank horizontal line appears
through the printed label.
6 Striped tape appears.
7 The P-touch has “locked up” (i.e.,
nothing happens when a key is
pressed).
58
• Check that the AC adapter
(model AD-60/AD-24) is
connected correctly.
• If you are using batteries, check
that they are correctly inserted.
• If the batteries are low, replace
them with new ones.
• Check that the back cover has
been properly attached.
• If the tape cassette is empty,
replace it with a new one.
• If the batteries are low, replace
them with new ones.
• If you are using batteries, they
may have a low charge. Try using
the AC adapter or replace the
batteries with new ones.
• Clean the print head as explained
on Cleaning the print head,
rollers and tape cutter on page 8.
• You have reached the end of the
tape. Replace the tape cassette
with a new one.
• Turn off the P-touch, and then
while holding down g and
R, turn the machine back on.
The machine will be reset. Please
note all the LCD text, formats
and files in memory are erased.
Excluding PF (templates or
images) and database. Use
P-touch Editor Backup Manager.
Page 66

Error Message List
Error Message Cause Solution
1 BLOCK LIMIT!
7 LINE LIMIT!
50 LINE LIMIT
REACHED!
BUFFER EMPTY!
BUFFER FULL!
CASSETTE
CHANGED!
CHECK
BATTERIES!
• This message appears if you
try to use the Numbering
function when multiple
blocks of text have been
entered with the PANEL
Label Type mode selected.
• This message appears if 7
lines have already been
entered in a text block when
you press
• This message appears if you
delete , causing the
number of lines in a block to
exceed the 7-line limit.
• This message appears if 50
text blocks have already
been entered when you press
n.
g, then n.
• This message appears if no
text has been typed in when
you try to print or Preview
function.
• This message appears if you try
to add a character, a space, a
new line, a new block, a
symbol, an accented character
or a bar code after the
maximum number of characters
has already been entered.
• This message appears if the
tape cassette was changed
while the P-touch paused for
the tape to be cut.
• This message appears if a
combination of new and
used batteries, a combination
of batteries of different types
(alkaline, Ni-Cd and NiMH), manufacturers or
models, or a combination of
recharged and uncharged
batteries have been installed.
• Cancel the Numbering
• Limit the number of text
• Limit the number of lines in
• Adjust the number of lines
• Limit the number of text
• Type in some text before
• Delete some existing text
• Change the tape cassette
• Replace the batteries with
• If rechargeable batteries are
function.
blocks to 1.
a text block to 7.
so that the block will not
have more than 7 lines.
blocks to 50.
trying to perform any of
these operations.
before trying to add any
more.
back again.
six new AA batteries of the
same type.
installed, recharge all
batteries.
Appendix
59
Page 67

Error Message Cause Solution
CHECK SETTING IN
LABEL TYPE MODE!
On 3/4" (18 mm) tape:
CHECK THE NUMBER
OF LINES! 5 MAX
On 1/2" (12 mm) tape:
CHECK THE NUMBER
OF LINES! 3 MAX
On 3/3" (9 mm) and 1/4" (6
mm) tape:
• This message appears if you
try to change the settings for
the Length function or
Frame function after a Label
Type mode with a preset
label length or frame has
already been selected.
• This message appears if you
try to print or use the
Preview function when the
number of lines in the text is
greater than the maximum
possible for the installed
tape.
• Select a different Label
Type mode.
• Reduce the number of lines
or install a wider tape.
CHECK THE NUMBER
OF LINES! 2 MAX
CHOOSE COPIES
LESS THAN 1000!
CUTTER ERROR!
IMAGE CHARACTER
SIZE ERROR!
(for PT-1650 only)
INPUT WHOLE
CODE!
• This message appears if
more than 1000 copies were
selected with the Print
Option functions.
• Note the number of copies
plus the number of
sequential labels cannot
exceed 1000.
• This message appears if the
tape cutter button was
pressed in when
pressed or the tape was
being fed.
• This message appears if a
wide user-defined character
image is entered when the
Vertical Label Type mode
is selected.
• This message appears if the
required number of digits is not
entered in the bar code data.
p was
• Select less than 1000 copies.
• Release the tape cutter
button. If
press
printed tape.
• If the problem cannot be
corrected, contact your
service representative.
• Change the Label Type
mode or use a tall userdefined character image.
• Input the correct number of
digits or change the bar code
protocol.
p was pressed,
f to feed out any
60
Page 68

Error Message Cause Solution
INPUT ABCD AT
BEGIN & END!
INSERT 1" TAPE
INSERT 24mm TAPE
INSERT 3/4" TAPE
INSERT 18mm TAPE
INSERT 1/2" TAPE
INSERT 12mm TAPE
INSERT 3/8" TAPE
INSERT 9mm TAPE
INSERT 1/4" TAPE
INSERT 6mm TAPE
LENGTH LIMIT!
MEMORY FULL!
• This message appears if a
letter between A and D has not
been entered at the beginning
and end of the bar code data
CODABAR
when the
protocol is selected.
• This message appears if a 1"
(24-mm)-wide tape cassette
is not installed when
printing an Auto Format
template created for 1"
(24-mm)-wide tape.
• This message appears if a
3/4" (18-mm)-wide tape
cassette is not installed when
printing an Auto Format
template created for 3/4"
(18-mm)-wide tape.
• This message appears if a
1/2" (12-mm)-wide tape
cassette is not installed when
printing an Auto Format
template created for 1/2"
(12-mm)-wide tape.
• This message appears if a
3/8" (9-mm)-wide tape
cassette is not installed when
printing an Auto Format
template created for 3/8"
(9-mm)-wide tape.
• This message appears if a
1/4" (6-mm)-wide tape
cassette is not installed when
printing an Auto Format
template created for 1/4"
(6-mm)-wide tape.
• This message appears if you
try to print or use the
Preview function when the
length of the text is greater
than the 3' 1/3" (1 m) limit.
• This message appears if you
try to store a text file after
approximately 2000
characters have already been
stored in the memory.
• Enter a letter between A and
D at the beginning and end
of the bar code data.
• Install a 1" (24-mm)-wide
tape cassette.
• Install a 3/4" (18-mm)-wide
tape cassette.
• Install a 1/2" (12-mm)-wide
tape cassette.
• Install a 3/8" (9-mm)-wide
tape cassette.
• Install a 1/4" (6-mm)-wide
tape cassette.
• Delete some of the text.
• Delete an unwanted file to
make space for the new one.
Appendix
61
Page 69

Error Message Cause Solution
MIN 4 DIGITS!
NO FILES!
NO DATABASE OR
INCORRECT FORMAT
(for PT-1650 only)
NO TAPE!
RECORD NOT
FOUND!
(for PT-1650 only)
TEXT TOO HIGH!
XX BLOCK
TEXT TOO LONG!
TEXT TOO LONG!
XX BLOCK
VALUE OUT OF
RANGE!
• This message appears if less
than the minimum four
digits are entered as the bar
code data.
• This message appears if no
files are stored in the
memory when you try to
recall or delete one.
• This message appears if no
database has been
downloaded to the P-touch
when you press
g, then
i.
• This message appears if no
tape cassette is installed
when you try to feed the
tape, print or use the
Preview function.
• This message appears when
the specified text or record
number cannot be found in
the database.
• This message appears if the
size of the text is larger than
the width of the installed
tape.
• This message appears if the
length of the text is longer
than the label length that has
been set with the Length
function.
• This message appears if you
try to print a label that is
longer than the specified
block length.
• This message appears if the
value entered while setting
Margin, Length
the
Block Length
within the allowable range.
• This message appears if the
specified characters cannot
be found in the database.
• This message appears if the
values for the blocks, records
or fields to be printed is not
within the allowable range.
, and
function is not
• Enter a minimum of four
digits before pressing
n.
• Store a text file before trying
to recall or delete one.
• Download a database.
• Install a tape cassette and try
again.
• Try searching for different
text or a different record
number.
• Reduce the size of the
characters, install a tape with
a greater width, or select the
AUTO
• Press
longer label length.
• Reduce the size or width of
the characters, or select the
AUTO text size setting.
• Select a longer block length.
• Type in a value that is within
the allowable range.
text size setting.
A, and then select a
62
Page 70

Machine Specifications
Hardware
Power supply: Six AA alkaline batteries or
Input device: Keyboard (56 keys)
LCD: 48 × 132 dots
Print tape: TZ tape is available in the following five widths:
Print head: 18.1 mm (height)/180 dpi (resolution)
Tape cutter: Manual cutter
Dimensions:
(PT-1400)
Weight:
(PT-1400)
Dimensions:
(PT-1650)
Weight:
(PT-1650)
Six AA rechargeable batteries or
AC adapter (model AD-60/AD-24)
+ Caps and other indicators
1/4" (6 mm)
3/8" (9 mm)
1/2" (12 mm)
3/4" (18 mm)
1" (24 mm)
With tape cutter button: 5 3/16" (W) × 9 1/4" (D) × 3 3/8" (H)
(131 mm (W) × 235 mm (D) × 86 mm (H))
Without tape cutter button: 4 1/2" (W) × 9 1/4" (D) × 3 3/8" (H)
(114 mm (W) × 235 mm (D) × 86 mm (H))
1.23 lb. (560 g)
With tape cutter button: 5 1/4" (W) × 9 7/16" (D) × 3 7/16" (H)
(133 mm (W) × 239 mm (D) × 87 mm (H))
Without tape cutter button: 4 1/2" (W) × 9 7/16" (D) × 3 7/16" (H)
(116 mm (W) × 239 mm (D) × 87 mm (H))
1.36 lb. (615 g)
Software
Appendix
Character
fonts:
Character
sizes:
Character
styles:
Buffer size: Maximum 512 characters
Memory size: Approximately 2000 characters
1 built-in font (Helsinki)
AUTO plus 7 point sizes (1, 2, 3, 4, 6, 9 and 12 mm (6, 9, 12,
18, 24, 36 and 48 points))
Normal, Bold, Outline, Italic, Italic + Bold, and Italic +
Outline
Maximum 7 lines
Maximum 50 blocks
63
Page 71

Accessories (For Canada Only)
● Supplies
The following supplies and accessories are available for your P-touch and can be
purchased from an authorized Brother dealer or directly from Brother should your
dealer not stock them.
Use only Brother TZ tapes with this machine. Brother cannot be held
responsible for trouble caused by the use of unauthorized supplies. Do not use
tapes that do not have the mark.
TZ Laminated Tape Cassettes (26.2 feet long, unless otherwise noted)
Stock No. Description
1” (24 mm)
TZ-151 Black characters on clear adhesive 1 $25.99
TZ-251 Black characters on white adhesive 1 $28.99
TZ-451 Black characters on red adhesive 1 $28.99
TZ-651 Black characters on yellow adhesive 1 $28.99
TZ-252 Red characters on white adhesive 1 $28.99
TZ-253 Blue characters on white adhesive 1 $28.99
TZ-354 Gold characters on black adhesive 1 $31.99
TZ-155 White characters on clear adhesive 1 $32.95
TZ-355 White characters on black adhesive 1 $31.99
*TZ-B51 Black characters on fluorescent orange adhesive 1 $35.99
3/4” (18 mm)
TZ-141 Black characters on clear adhesive 1 $22.99
TZ-M41 Black characters on clear (mat) adhesive 1 $24.99
TZ-241 Black characters on white adhesive 1 $24.99
TZ-242 Red characters on white adhesive 1 $24.99
TZ-243 Blue characters on white adhesive 1 $24.99
TZ-344 Gold characters on black adhesive 1 $28.99
TZ-345 White characters on black adhesive 1 $28.99
TZ-545 White characters on blue adhesive 1 $28.99
TZ-641 Black characters on yellow adhesive 1 $24.99
*TZ-B41 Black characters on fluorescent orange adhesive 1 $29.99
*16.4 ft. long
Qty/
Package
Price**
64
Page 72

Stock No. Description
1/2” (12 mm)
TZ-131 Black characters on clear adhesive 1 $19.99
TZ-132 Red characters on clear adhesive 1 $19.99
TZ-133 Blue characters on clear adhesive 1 $19.99
TZ-135 White characters on clear adhesive 1 $23.95
TZ-231 Black characters on white adhesive 1 $20.99
TZ-232 Red characters on white adhesive 1 $20.99
TZ-233 Blue characters on white adhesive 1 $20.99
TZ-334 Gold characters on black adhesive 1 $24.99
TZ-335 White characters on black adhesive 1 $24.99
TZ-431 Black characters on red adhesive 1 $20.99
TZ-435 White characters on red adhesive 1 $24.99
TZ-531 Black characters on blue adhesive 1 $20.99
TZ-631 Black characters on yellow adhesive 1 $20.99
TZ-731 Black characters on green adhesive 1 $20.99
TZ-M31 Black characters on matte clear adhesive 1 $20.99
3/8” (9 mm)
TZ-121 Black characters on clear adhesive 1 $16.99
TZ-221 Black characters on white adhesive 1 $19.99
TZ-222 Red characters on white adhesive 1 $19.99
TZ-223 Blue characters on white adhesive 1 $19.99
TZ-325 White characters on black adhesive 1 $22.99
1/4” (6 mm)
TZ-111 Black characters on clear adhesive 1 $14.99
TZ-211 Black characters on white adhesive 1 $16.99
TZ-315 White characters on black adhesive 1 $20.99
Qty/
Package
Price**
Appendix
65
Page 73

Strong Adhesive Tapes
Stock No. Description
1" (24 mm)
TZ-S151 Black characters on clear strong adhesive tape 1 $31.99
TZ-S251 Black characters on white strong adhesive tape 1 $31.99
TZ-S651 Black characters on yellow strong adhesive tape 1 $31.99
TZ-SM951 Black characters on matte silver strong adhesive tape 1 $34.99
3/4" (18 mm)
TZ-S141 Black characters on clear strong adhesive tape 1 $27.99
TZ-S241 Black characters on white strong adhesive tape 1 $27.99
TZ-S641 Black characters on yellow strong adhesive tape 1 $27.99
TZ-SM941 Black characters on matte silver strong adhesive tape 1 $31.99
1/2" (12 mm)
TZ-S131 Black characters on clear strong adhesive tape 1 $23.99
TZ-S231 Black characters on white strong adhesive tape 1 $23.99
TZ-S631 Black characters on yellow strong adhesive tape 1 $23.99
3/8" (9 mm)
TZ-S221 Black characters on white strong adhesive tape 1 $21.99
1/4" (6 mm)
TZ-S211 Black characters on white strong adhesive tape 1 $19.99
Qty/
Package
Flexible ID Tapes
Stock No. Description
1" (24 mm)
TZ-FX251 Black characters on white flexible ID tape 1 $31.99
3/4" (18 mm)
TZ-FX241 Black characters on white flexible ID tape 1 $27.99
1/2" (12 mm)
TZ-FX231 Black characters on white flexible ID tape 1 $23.99
Qty/
Package
Non-Laminated Tapes
Stock No. Description
3/4” (18 mm)
TZ-N641 Black characters on yellow adhesive 1 $21.99
TZ-N541 Black aharacters on blue adhesive 1 $21.99
TZ-NF41 Black characters on purple adhesive 1 $21.99
1/2” (12 mm)
TZ-N631 Black characters on yellow adhesive 1 $17.99
TZ-N531 Black characters on blue adhesive 1 $17.99
TZ-NF31 Black characters on purple adhesive 1 $17.99
Qty/
Package
Price**
Price**
Price**
66
Page 74

Security Tape
Stock No. Description
3/4” (18 mm)
TZ-SE4 Black characters on white adhesive 1 $49.95
Qty/
Package
Fabric Tape
Stock No. Description
1/2” (12 mm)
TZ-FA3 Blue characters on white adhesive 1 $34.95
Qty/
Package
Stamp Lit/Holder
Stock No. Description
3/4” (18 mm) Stamp Area 9 × 55 mm
SK-MB Additional stamper for Large stamp with black ink 1 $49.95
Qty/
Package
Options
Stock No. Description
TZ-CL4 Cleaning Tape 1 $24.99
UNO737022 Lettering Stick 1 $1.21
AD-60 AC adapter 1 $34.95
AD-24 AC adapter 1 $29.99
**Prices and availability of accessories subject to change without notice.
Qty/
Package
Price**
Appendix
Price**
Price**
Price**
67
Page 75

Index
A
AC adapter ...................................... 9
Accent function............................. 18
alignment...................................... 29
arrow keys....................... 2, 3, 15, 16
Auto Format function .................... 30
Auto Format keys ............................ 2
Auto Reduction function ............... 39
B
backspace key................. 2, 3, 15, 18
Backup Manager ........................... 57
bar code
special characters...................... 20
Bar Code function ......................... 19
batteries .......................................... 5
block number.............................. 2, 3
block range ................................... 34
bold text style................................ 28
indicator.................................. 2, 3
C
cancelling ..................................... 15
Caps indicator............................. 2, 3
Caps mode.................................... 16
center text alignment..................... 29
indicator.................................. 2, 3
chain printing................................ 38
character
size............................................ 26
style........................................... 28
width......................................... 27
choosing ....................................... 15
default setting............................ 15
cleaning
print head.................................... 8
rollers .......................................... 8
tape cutter ................................... 8
68
Clear function ............................... 18
Code indicator ............................ 2, 3
confirming..................................... 15
Contrast function........................... 38
copies ........................................... 32
cursor............................................ 16
Cut function .................................. 38
cut-pause ...................................... 38
D
database record range................... 53
databases ................................ 53, 54
Label Type mode....................... 55
searching................................... 56
default setting................................ 15
deleting
memory files.............................. 37
text............................................ 18
display ............................................ 2
contrast ..................................... 38
E
error messages............................... 59
F
Feed key................................ 2, 3, 31
Flag mode ..................................... 12
Flexible ID Tape.............................. 7
Format key ........................ 26, 27, 28
formatting.......................... 26, 27, 28
Frame function.............................. 25
frame indicator............................ 2, 3
G
global format key ........................ 2, 3
global formatting
character size ............................ 26
character style ........................... 28
Page 76

character width ......................... 27
I
indicators ........................................ 2
block number.......................... 2, 3
bold text style.......................... 2, 3
Caps ........................................ 2, 3
center text alignment ............... 2, 3
Code ....................................... 2, 3
frame....................................... 2, 3
Insert ....................................... 2, 3
italic text style ......................... 2, 3
justified text alignment ............ 2, 3
Label Type setting.................... 2, 3
left text alignment.................... 2, 3
length ...................................... 2, 3
low battery .............................. 2, 3
outline text style ...................... 2, 3
right text alignment.................. 2, 3
Shift......................................... 2, 3
size.......................................... 2, 3
width....................................... 2, 3
Insert indicator ............................ 2, 3
Insert key....................................... 17
installing
printer driver ............................. 44
P-touch Editor............................ 42
italic text style ............................... 28
indicator.................................. 2, 3
J
justified text alignment .................. 29
indicator.................................. 2, 3
K
keyboard ......................................... 2
L
label margins................................. 24
Label Type key............................ 2, 3
Label Type mode........................... 10
databases................................... 55
Label Type setting indicator......... 2, 3
language ....................................... 40
LCD display .................................... 2
left text alignment.......................... 29
indicator.................................. 2, 3
length adjustment.......................... 39
Length function ............................. 24
length indicator........................... 2, 3
local formatting
character size ............................ 26
character style ........................... 28
character width ......................... 27
locked up...................................... 58
low battery indicator ................... 2, 3
lowercase letters............................ 16
M
Margin function............................. 24
measurements ............................... 40
Memory key.................................. 36
mirror printing............................... 34
N
New Block function ...................... 17
Normal mode................................ 10
Numbering function...................... 32
numbers........................................ 16
O
outline text style............................ 28
indicator.................................. 2, 3
P
Panel mode................................... 13
PERSONAL symbol category ......... 23
setup ......................................... 40
PF keys............................................ 3
Port Block mode............................ 13
Port mode ..................................... 13
power key ............................... 2, 3, 9
preview......................................... 31
print head........................................ 8
69
Page 77

Print key................................ 2, 3, 31
printer driver
installing.................................... 44
printing
database record range ............... 53
text block range......................... 34
problems....................................... 58
P-touch Editor
installing.................................... 42
starting ...................................... 47
template .................................... 52
User’s Guide ............................. 46
R
recalling........................................ 37
Repeat Printing function................ 32
Reset ............................................. 58
restoring ........................................ 57
return key........................ 2, 3, 15, 17
right text alignment ....................... 29
indicator.................................. 2, 3
rollers.............................................. 8
Rotate & Repeat mode................... 11
Rotate mode.................................. 11
S
searching....................................... 56
selecting.................................. 15, 16
default setting............................ 15
Setup key ...................................... 38
Shift indicator.............................. 2, 3
Shift mode..................................... 16
size ............................................... 26
indicator.................................. 2, 3
Space key................................ 15, 16
storing ........................................... 36
Strong Adhesive Tape...................... 7
style .............................................. 28
Symbol key ................................... 21
T
tape
cassettes ...................................... 5
cutter........................................... 8
templates
Auto Format .............................. 30
P-touch Editor............................ 52
text
alignment .................................. 29
size............................................ 26
size adjustment.......................... 39
style........................................... 28
width......................................... 27
width adjustment....................... 39
Transfer Manager .......................... 51
Transfer mode ............................... 50
troubleshooting ............................. 58
U
units.............................................. 40
uppercase letters ........................... 16
USB connection ...................... 44, 45
user-defined character image ........ 52
V
version .......................................... 40
Vertical mode................................ 10
W
width............................................. 27
indicator.................................. 2, 3
70
Page 78

71
Page 79

Contact Information (For Canada Only)
Service Center List / Liste des centres de service
If you need a local service center, please call 1-877-BROTHER (1-877-276-8437)
Si vous devez rejoindre un centre de service local, veuillez téléphoner au 1-877-BROTHER
(1-877-276-8437) pour vous informer sur le centre de service autorisé le plus proche de vous.
to locate the authorized service center closest to you.
Operational Assistance / Pour de l’assistance sur le fonctionnement
For technical and operational assistance you may call 1-877-BROTHER (1-877-276-8437)
Pour de l’assistance technique et sur le fonctionnement vous pouvez
téléphoner au 1-877-BROTHER (1-877-276-8437)
Assistance on the Internet / Assistance sur l’internet
For Product information and downloading the latest drivers:
Pour de l’information sur les produits et pour télécharger les dernier pilotes:
http://www.brother.ca or http://www.brother.com
http://www.brother.ca ou http://www.brother.com
Accessories & Supplies / Accessoires et fournitures
To order Brother Accessories or supplies by Visa or MasterCard, you may call toll free
1-877-BROTHER (1-877-276-8437), or to order by mail, complete the accessories
order form in your user’s guide and mail it along with your payment to:
Pour commander les accessories et les fournitures Brother en utilisant votre carte Visa
ou MasterCard, vous pouvez téléphoner sans frais au 1-877-BROTHER (1-877-276-8437),
ou pour commander par la poste, veuillez remplir le bon de commande des accessoires
que vous trouverez dans votre guide de l’utilisateur et postez-le accompagné de votre paiement à :
72
La corporation internationale Brother (Canada) Ltée
Brother International Corp. (Canada) Ltd.
1, rue Hotel de Ville,
Dollard des Ormeaux, QC
Canada H9B 3H6
Page 80

ACCESSORY ORDER FORM
This order form is provided for your convenience should your retailer not stock the item(s)
needed or if you prefer to order by telephone. To order by phone, please call Brother International at 1-877- BROTHER (1-877-276-8437) and have your Visa or MasterCard available.
Stock No. Description Price Quantity Total
TOTAL
Prices subject to change without notice.
Before calling:
1. Review the reverse side of this form and select the desired items.
2. Complete the order form, indicating the quantity of each item (for your records).
3. Enter the total on the “Supply/Accessory Total” line below (for your records).
4. Add appropriate sales tax and shipping/handling costs (for your records).
5. Have your Visa or MasterCard number and expiration date available.
Supply/Accessory Total $
All Residents of Canada: Please add
applicable sales taxes (G.S.T. & P.S.T.).
Shipping/Handling $5.00
TOTAL DUE $
G.S.T. # R100663764
P.S.T. # 100100117TQ0001
* Prices subject to change without notice.
G.S.T $
P.S.T. $
Page 81

Contact Information (For Canada Only)
Service Center List / Liste des centres de service
If you need a local service center, please call 1-877-BROTHER (1-877-276-8437)
Si vous devez rejoindre un centre de service local, veuillez téléphoner au 1-877-BROTHER
(1-877-276-8437) pour vous informer sur le centre de service autorisé le plus proche de vous.
to locate the authorized service center closest to you.
Operational Assistance / Pour de l’assistance sur le fonctionnement
For technical and operational assistance you may call 1-877-BROTHER (1-877-276-8437)
Pour de l’assistance technique et sur le fonctionnement vous pouvez
téléphoner au 1-877-BROTHER (1-877-276-8437)
Assistance on the Internet / Assistance sur l’internet
For Product information and downloading the latest drivers:
Pour de l’information sur les produits et pour télécharger les dernier pilotes:
http://www.brother.ca or http://www.brother.com
http://www.brother.ca ou http://www.brother.com
Accessories & Supplies / Accessoires et fournitures
To order Brother Accessories or supplies by Visa or MasterCard, you may call toll free
1-877-BROTHER (1-877-276-8437), or to order by mail, complete the accessories
order form in your user’s guide and mail it along with your payment to:
Pour commander les accessories et les fournitures Brother en utilisant votre carte Visa
ou MasterCard, vous pouvez téléphoner sans frais au 1-877-BROTHER (1-877-276-8437),
ou pour commander par la poste, veuillez remplir le bon de commande des accessoires
que vous trouverez dans votre guide de l’utilisateur et postez-le accompagné de votre paiement à :
La corporation internationale Brother (Canada) Ltée
Brother International Corp. (Canada) Ltd.
1, rue Hotel de Ville,
Dollard des Ormeaux, QC
Canada H9B 3H6
Page 82

ACCESSORY ORDER FORM
This order form is provided for your convenience should your retailer not stock the item(s)
needed or if you prefer to order by telephone. To order by phone, please call Brother International at 1-877- BROTHER (1-877-276-8437) and have your Visa or MasterCard available.
Stock No. Description Price Quantity Total
TOTAL
Prices subject to change without notice.
Before calling:
1. Review the reverse side of this form and select the desired items.
2. Complete the order form, indicating the quantity of each item (for your records).
3. Enter the total on the “Supply/Accessory Total” line below (for your records).
4. Add appropriate sales tax and shipping/handling costs (for your records).
5. Have your Visa or MasterCard number and expiration date available.
Supply/Accessory Total $
All Residents of Canada: Please add
applicable sales taxes (G.S.T. & P.S.T.).
Shipping/Handling $5.00
TOTAL DUE $
G.S.T. # R100663764
P.S.T. # 100100117TQ0001
* Prices subject to change without notice.
G.S.T $
P.S.T. $
Page 83

MODE D’EMPLOI
Page 84

Introduction
Merci d’avoir choisi cette P-touch!
Grâce à votre nouvelle P-touch, vous disposez d’un vaste choix de caractères, de tailles
et d’encadrements, qui vous permettront de créer des étiquettes adaptées à tous vos
besoins. De plus, les différents types d’étiquettes pré-formatées mises à votre disposition
vous permettrons d’étiqueter rapidement et facilement des panneaux de répartition, des
câbles, des connecteurs, ainsi qu’une multitude d’autres éléments.
Le logiciel du CD-ROM livré avec l’appareil vous offre des fonctionnalités
complémentaires,
pour concevoir vos étiquettes. Grâce à ce logiciel, vous pourrez également importer des
gabarits d’étiquette et des caractères spéciaux dans votre P-touch et sauvegarder sur
votre ordinateur des données contenues dans l’appareil.
Avec votre P-touch, vous pourrez imprimer des étiquettes lisibles et durables en un tour
de main. La qualité et les performances de cette P-touch ne cesseront de vous étonner,
que ce soit à l’usine ou sur le terrain.
La P-touch est très facile à utiliser. Cependant, nous vous conseillons de lire ce manuel
avant la première utilisation et de le garder à porter de main si vous souhaitez le consulter
ultérieurement.
Avis de conformité aux normes du ministères des communications du Canada
Cet appareil numérique respecte les limites d’émission de parasites radioélectriques
applicables aux appareils numériques de classe B prescrites dans la norme sur le
matériel brouilleur intitulée “Appareils Numériques”, NMB-003 édictée par le
Ministère des Communications.
Changement de la langue des messages entre l’anglais et le français
d’illustration et de présentation, ainsi que des modèles de présentation
1 Effacez tout le texte de l’affichage soit avec b, soit en appuyant sur g,
puis sur b.
2 Appuyez sur g, puis sur Z.
3 Appuyez sur l ou sur r jusqu’à ce que LANGUE s’affiche.
4 Appuyez sur u ou sur d jusqu’à ce que la langue souhaitée s’affiche,
puis appuyez sur n.
☞ La configuration par défaut est ENGLISH.
☞ Le fait d’éteindre la machine ne change pas la langue.
☞ Vous ne pouvez pas changer la langue s’il reste du texte sur l’écran. Effacez bien
tout le texte avant de changer la langue des messages.
Page 85

SOMMAIRE
1. Préliminaires .................................................................1
Présentation de l’appareil .............................................................. 1
Face avant et face arrière .............................................................................1
Clavier et écran à cristaux liquides ..............................................................2
Précautions importantes ................................................................ 4
Piles et cassettes de ruban .............................................................5
Installation des piles et d’une cassette de ruban ..........................................5
Nettoyage ...................................................................................... 8
Nettoyage de la tête d’impression, des rouleaux et du coupe-ruban ............8
Adaptateur secteur ........................................................................ 9
Branchement de l’adaptateur secteur ...........................................................9
Mise en marche/Arrêt de la P-touch .............................................. 9
2. Modes de Format d’étiquette .......................................10
Choix d’un mode de Format d’étiquette ...................................... 10
Modes Normal et Vertical ...........................................................10
Mode Rotation et mode Rotation et répétition ............................11
Mode Drapeau ............................................................................. 12
Modes Port & Panel (panneau) ....................................................13
3. Fonctions de base ........................................................15
Opérations élémentaires ..............................................................15
Choix de fonctions, de paramètres, de configurations et de groupes .........15
Choix de la configuration par défaut ..........................................................15
Confirmation d’un choix .............................................................................15
Annulation d’un choix .................................................................................15
Saisie de données ......................................................................... 16
Saisie et modification de texte ....................................................................16
Saisie d’un caractère accentué ...................................................................18
Saisie d’un code barres ...............................................................................19
Saisie d’un symbole ....................................................................................21
Mise en forme de l’étiquette ........................................................24
Configuration de la longueur d’une étiquette .............................................24
Configuration de la taille d’une marge ......................................................24
Encadrement de texte ..................................................................................25
i
Page 86

Configuration de la taille des caractères ...................................................26
Configuration de la largeur des caractères ................................................27
Configuration du style des caractères ........................................................28
Utilisation de gabarits pré-définis de mise en forme automatique .............30
Impression d’étiquettes ................................................................31
Aperçu de la composition de l’étiquette .....................................................31
Avance du ruban .........................................................................................31
Impression d’une étiquette ..........................................................................32
Utilisation des fonctions spéciales d’impression ........................................32
Stockage et rappel de fichiers ......................................................36
Stockage de texte d’étiquette .......................................................................36
Rappel d’un texte stocké .............................................................................37
Suppression d’un texte stocké .....................................................................37
4. Réglages de l’appareil ..................................................38
Sélection des paramètres d’avance et de coupure du ruban ......................38
Réglage du contraste de l’écran .................................................................39
Réglage de la fonction Réduction automatique ..........................................39
Calibrage de la longueur de l’étiquette ......................................................40
Mise à jour régulière de la catégorie personnelle de symboles .................40
Changement des unités de mesure ..............................................................40
Changement de la langue ...........................................................................41
Affichages des informations relatives aux versions ....................................41
5.
Utilisation de la P-touch avec un ordinateur (pour PT-1650 seulement)
...42
Installation du logiciel et du pilote d’imprimante ........................43
Avant l’installation .....................................................................................43
Installation du logiciel P-touch Editor 3.2 .................................................44
Installation du pilote d’imprimante USB ....................................................45
Mode d’emploi ............................................................................47
Utilisation du logiciel P-touch Editor 3.2 ..................................... 48
Démarrage du logiciel P-touch Editor 3.2 .................................................49
Affichage des propriétés .............................................................................49
Saisie de texte ..............................................................................................50
Remarques d’utilisation ..............................................................................50
Transfert des données vers/depuis un ordinateur ........................51
Passage en mode Transfert .........................................................................51
Téléchargement des données vers la P-touch .............................................52
Ajout d’une image de caractère programmable au texte ...........................53
Utilisation des données de gabarit .............................................................53
ii
Page 87

Utilisation de données d’une base de données téléchargée .......................55
Sauvegarde/Restauration des données de la P-touch .................................58
6. Annexes .......................................................................59
Détection de pannes ....................................................................59
Liste des messages d’erreur ..........................................................60
Spécifications de l’appareil ..........................................................65
Matériel .......................................................................................................65
Logiciel .......................................................................................................65
Accessoires (Canada seulement)...................................................66
Index ........................................................................................... 70
Information sur les contacts (Canada seulement) ........................ 74
iii
Page 88

iv
Page 89

Préliminaires
1
1
Présentation de l’appareil
Face avant et face arrière
Face avant
Levier du coupe-ruban
Clavier
Port USB
Couvercle arrière
Compartiment des piles
Ecran
Prise pour l’adaptateur secteur
Levier de dégagement de la
cassette
Préliminaires
Compartiment de la cassette de ruban
Tête d’impression
Fente de sortie du ruban
Face arrière
1
Page 90

Clavier et écran à cristaux liquides
PT-1400
E
F
G
H
Q
P
O
N
1 Alignement horizontal à gauche
(page 29)
2 Alignement horizontal centré
(page 29)
3 Alignement horizontal à droite
(page 29)
4 Alignement horizontal justifié
(page 29)
5 Style typographique gras (bold)
(page 28)
6 Style typographique contour
(page 28)
7 Style typographique italique
(page 28)
8 Encadrement (page 25)
9 Piles faibles (page 6)
0 Nombre de blocs (page 17)
A Paramètre Format d’étiquette
(page 10)
B Paramètre Largeur (page 27)
2
162
D
345
7
0
A
BC
C
Paramètre Taille (
8
9
I
J
K
L
M
page 26 &27
D Paramètre Longueur (page 24)
E
Mode Maj (majuscules) (
F Mode Insertion (page 17)
G Mode Shift (majuscule)
(page 16)
H Mode Code (page 16)
I Touche d’Alimentation (page 9)
J Touche de Correction
(page 15 & 18)
K Touches de Déplacement du
curseur (page 15)
L Touche de Retour à la ligne
(page 15 & 17)
M Mis
e en page générale (
N Touches PF (page 30)
O Touche d’Avance du ruban
(page 31)
P Touche Impression (page 32)
Q Format d’étiquette (page 10)
page 16
page 26)
)
)
Page 91

PT-1650
1
345
7
62
E
F
G
H
Q
P
O
N
D
1 Alignement horizontal à gauche
(page 29)
2 Alignement horizontal centré
(page 29)
3 Alignement horizontal à droite
(page 29)
4 Alignement horizontal justifié
(page 29)
5 Style typographique gras (bold)
(page 28)
6 Style typographique contour
(page 28)
7 Style typographique italique
(page 28)
8 Encadrement (page 25)
9 Piles faibles (page 6)
0 Nombre de blocs (page 17)
A Paramètre Format d’étiquette
(page 10)
B Paramètre Largeur (page 27)
0
A
BC
C
Paramètre Taille (
8
9
I
J
K
L
M
page 26 &27
D Paramètre Longueur (page 24)
Mode Maj (majuscules) (
E
page 16
F Mode Insertion (page 17)
G Mode Shift (majuscule)
(page 16)
H Mode Code (page 16)
I Touche d’Alimentation (page 9)
J Touche de Correction
(page 15 & 18)
K Touches de Déplacement du
curseur (page 15)
L Touche de Retour à la ligne
(page 15 & 17)
M Mis
e en page générale (
page 26)
N Touches PF (page 30)
O Touche d’Avance du ruban
(page 31)
P Touche Impression (page 32)
Q Format d’étiquette (page 10)
Préliminaires
)
)
3
Page 92

Précautions importantes
● N’utilisez que des rubans Brother TZ dans cet appareil. N’utilisez jamais de
rubans ne portant pas la marque .
● Ne tirez pas sur le ruban, vous risqueriez de l’endommager.
● N’utilisez pas votre appareil dans un endroit très poussiéreux. Protégez-le de la
lumière directe du soleil et de la pluie.
● N’installez pas votre appareil dans un endroit surchauffé ou humide. Veillez à ne
jamais le laisser sur le tableau de bord ou sur la plage arrière de votre véhicule.
● Conservez vos cassettes de ruban à l’abri de la lumière directe du soleil, de
l’humidité et de la poussière.
● Ne laissez pas de caoutchouc ou de vinyle sur l’appareil trop longtemps. Ces
matières pourraient laisser une trace.
●
N’utilisez ni alcool, ni solvant organique pour nettoyer l’appareil. Utilisez uniquement un
chiffon doux et sec.
● Ne déposez aucun objet étranger ou lourd sur l’appareil.
● Pour éviter de vous blesser, ne touchez pas la lame du coupe-ruban.
● Utilisez uniquement l’adaptateur secteur spécialement conçu pour cet appareil.
L’utilisation de tout autre adaptateur annulera la garantie.
● Ne démontez jamais l’adaptateur secteur.
●
Si vous n’utilisez pas l’appareil pendant une longue période, débranchez l’adaptateur
secteur et/ou retirez les piles pour éviter qu
● Utilisez six piles AA alcalines ou rechargeables (Ni-Cd ou Ni-MH).
● Ne démontez jamais la P-touch.
● Utilisez de préférence le câble USB fourni avec l’appareil. Si vous devez utiliser
un autre câble USB, assurez-vous de sa qualité de fabrication optimale
(pour PT-1650 seulement).
®
● IBM
et PC-DOS® sont des marques commerciales de International Business
Machines, Inc (pour PT-1650 seulement).
● Microsoft
®
et Windows® sont des marques déposées de Microsoft Corporation
aux, Etats-Unis et dans d’autres pays (pour PT-1650 seulement).
● Tous les autres noms de logiciels et de produits cités sont des marques déposées
par leurs sociétés respectives (pour PT-1650 seulement).
● Certaines parties du logiciel de filtre graphique se basent partiellement sur les
travaux de l’Independent JPEG Group (pour PT-1650 seulement).
’
elles ne fuient et n’endommagent l’appareil.
4
Page 93

Piles et cassettes de ruban
Cet appareil a été spécialement conçu pour faciliter et accélérer le changement des piles
et des cassettes. Une fois les piles insérées, vous pouvez utiliser cet appareil portatif et
peu encombrant n’importe où. Il existe un vaste choix de types, de couleurs et de tailles
de cassettes de ruban TZ compatibles avec votre appareil. Mettez cette diversité au profit
de votre créativité en produisant des étiquettes de couleurs et de styles adaptés à vos
besoins.
Installation des piles et d’une cassette de ruban
Préliminaires
1
2
Remarques concernant les piles
☞ La P-touch fonctionne avec six piles AA. Vous pouvez utiliser des piles
rechargeables (Ni-Cd ou Ni-MH) à la place des 6 piles alcalines.
☞ Ne rechargez jamais les piles lorsqu’elles se trouvent dans l’appareil, relié au secteur par
l’adaptateur. Utilisez, à la place, un chargeur de piles spécialement conçu pour le type de
piles utilisé. Pour de plus amples informations sur les piles rechargeables, reportez-vous
aux instructions fournies avec celles-ci.
☞
Afin d’éviter que les piles ne fuient et que l’appareil ne soit endommagé, vous ne devez pas:
• Utiliser des piles au manganèse
• Associer des piles usagées et des piles neuves
• Associer des piles de types (alcaline, Ni-Cd et Ni-MH), de fabricants ou de
modèles différents
• Associer des piles rechargées et déchargées
5
Page 94

☞ Insérez les piles en veillant à orienter les polarités correctement. Une fois les piles
insérées, la P-touch indique le niveau de charge des piles lors de l’impression et de
l’avance du ruban. Si l’appareil détecte un niveau de charge faible, l’indicateur Piles
faibles ()) s’affiche. Dans ce cas, vous devez changer les piles. Il est possible que
l’indicateur Piles faibles ne s’affiche pas dans certaines conditions d’utilisation.
☞ Avant de changer les piles, assurez-vous que la P-touch est hors tension. En outre,
lorsque vous installez des piles neuves, veillez à le faire dans les cinq minutes qui
suivent le retrait des piles usées, sinon le texte affiché et tous les fichiers texte
mémorisés seront perdus.
☞ Retirez les piles si vous savez que vous n’utiliserez pas votre appareil pendant une
longue période. Veuillez noter que tous vos messages, y compris ceux mémorisés, seront
perdus.
☞ Le déchargement des piles fournies commençant dès leur départ de l’usine, leur durée
peut ne pas correspondre aux spécifications, en fonction du moment de la première
utilisation de l’appareil.
Remarques sur les cassettes de ruban
☞ Avant d’introduire la cassette, veillez à faire passer l’extrémité du ruban sous les guides.
Si le ruban de la nouvelle cassette est détendu, tournez la roue dentée dans le sens de la
flèche indiquée sur la cassette, à l’aide du doigt, jusqu’à ce que le ruban soit bien tendu.
Extrémité du ruban Ruban sous les guides
☞ Lorsque vous introduisez la cassette, veillez à ce que le ruban ne se coince pas sur le
bord du support métallique de sécurité.
☞ Après avoir introduit la cassette, appuyez sur
appuyez sur le levier du coupe-ruban pour couper le ruban excédentaire.
☞ Coupez toujours le ruban avant de l’enlever de la machine. Si vous tirez sur le ruban sans
l’avoir coupé, vous risquez d’endommager la cassette de ruban.
f pour faire avancer le ruban, et
6
Page 95

Ruban à forte adhérence
☞ Nous recommandons d’utiliser du ruban à forte adhérence sur les surfaces irrégulières,
rugueuses ou glissantes.
☞ Bien que les manuels d’utilisation fournis avec les cassettes de ruban à
forte adhérence recommandent de couper le ruban avec une paire de
ciseaux, le coupe-ruban dont la P-touch est équipée peut couper du ruban
à forte adhérence.
Ruban ID Flexible
☞ Si vous avez besoin d’étiquettes plus flexibles, à utiliser par exemple sur des surfaces
anguleuses ou rondes, nous vous recommandons d’utiliser un ruban ID Flexible.
☞ Les étiquettes de rubans ID Flexibles ne sont pas isolantes.
☞ Le diamètre de l’objet sur lequel vous souhaitez apposer une étiquette doit être au moins
égal à 1/8 po (3 mm). S’il est inférieur, apposez l’étiquette comme un drapeau et utilisez
le mode de type d’étiquette DRAPEAU. En outre, les rebords de l’étiquette ou du
drapeau doivent mesurer au moins 3/16 po (5 mm).
☞ L’étiquette peut se détacher de certains objets cylindriques si ces objets subissent une
torsion après la pose de l’étiquette.
Rebord > 5 mm
Diamètre > 3 mm
Rebord > 5 mm
Diamètre > 3 mm
Préliminaires
Drapeau > 5 mm
7
Page 96

Nettoyage
De temps à autres, certaines parties de l’appareil doivent être nettoyées. Poussière et
autres impuretés risquent d’encrasser la tête d’impression et les rouleaux, surtout si
l’appareil est utilisé à l’extérieur ou dans des endroits très poussiéreux. Suite à des
utilisations répétées, de l’adhésif peut s’accumuler sur le coupe-ruban, rendant la coupe
difficile.
Nettoyage de la tête d’impression, des rouleaux et du coupe-ruban
☞ Avant de nettoyer la tête d’impression et les rouleaux, appuyez sur o pour éteindre
la P-touch, puis retirez les piles et l’adaptateur secteur en option.
☞ Prenez garde à ne pas toucher les lames avec les doigts.
Tête d’impression
Coton-tige sec
Coton-tige sec
Lames du
coupe-ruban
Lames du
coupe-ruban
Coton-tige sec
Remarques sur le nettoyage de la tête d’impression et des rouleaux
☞ Si des lignes blanches apparaissent au milieu des caractères imprimés, nettoyez la tête
d’impression de l’appareil.
☞ La tête d’impression se nettoiera plus facilement si vous utilisez une cassette de
nettoyage pour tête d’impression, en option (TZ-CL4).
8
Page 97

Remarques sur le nettoyage du coupe-ruban
☞ Si le ruban ne se coupe pas correctement, nettoyez les lames du coupe-ruban.
Adaptateur secteur
Lorsque vous imprimez un grand nombre d’étiquettes ou des étiquettes contenant une grande
quantité de texte, nous vous recommandons de connecter la P-touch au secteur en utilisant un
adaptateur secteur.
Branchement de l’adaptateur secteur
2
DC IN 9-9.5V
1
Remarques sur l’adaptateur secteur
☞ Utilisez uniquement un adaptateur secteur compatible avec cet appareil.
☞ Débranchez l’adaptateur secteur si vous savez que vous n’utiliserez pas l’appareil
pendant une période prolongée. Lorsque vous débranchez l’appareil, tous vos messages,
y compris ceux mémorisés, seront perdus.
Préliminaires
Mise en marche/Arrêt de la P-touch
Appuyez sur o pour allumer ou éteindre la P-touch.
Lorsque vous mettez l’appareil sous tension, qu’il fonctionne sur piles ou sur secteur, il
affiche le texte de la dernière utilisation. Cette fonction de sauvegarde automatique vous
permet d’interrompre à tout moment une séance de travail, d’éteindre l’appareil et de
reprendre le travail ultérieurement, sans devoir ressaisir le texte.
Que l’appareil fonctionne sur piles ou sur secteur, il s’éteint automatiquement après cinq
minutes d’inactivité.
9
Page 98

Modes de Format d’étiquette
2
2
Choix d’un mode de Format d’étiquette
En appuyant sur a vous pouvez sélectionner l’un des deux modes normaux de
conception et d’impression d’étiquettes personnalisées ou l’un des cinq modes spéciaux
permettant d’imprimer des étiquettes préalablement mises en page, pour l’identification
de panneaux de répartition, de câbles, de connecteurs et d’autres composants.
1 Appuyez sur a.
2 Appuyez sur u ou d (ou appuyez de nouveau sur a) jusqu’à ce que le
mode souhaité s’affiche. (Pour plus de détails sur les modes de Format
d’étiquette, reportez-vous aux sections ci-dessous.)
3 Appuyez sur n pour appliquer le mode Format d’étiquette sélectionné.
• Si vous avez sélectionné NORMAL ou VERT, poursuivez la saisie du texte
de l’étiquette comme indiqué dans le chapitre 3, Fonctions de base.
• Si vous avez sélectionné ROTATATION, ROT&REP, PORT, PANNEAU
ou DRAPEAU, observez les étapes suivantes.
4 Appuyez sur l ou r jusqu’à ce que le paramètre souhaité s’affiche.
5 Appuyez sur u ou d jusqu’à ce que le paramètre souhaité s’affiche (ou
utilisez les touches numériques pour saisir le paramètre souhaité).
6 Appuyez sur n pour appliquer les paramètres sélectionnés.
7 Saisissez le texte de chaque étiquette dans un bloc de texte séparé.
8 Imprimez les étiquettes.
• Pour n’imprimer qu’une seule copie de chaque étiquette, appuyez sur p.
• Pour imprimer plusieurs copies, pour incrémenter certains caractères ou pour
utiliser toute autre fonction spéciale d’impression, appuyez sur
a
et choisissez vos options. (Pour plus de détails, reportez-vous à la section
Utilisation des fonctions spéciales d’impression
à la page 32.)
g
, puis sur
Modes Normal et Vertical
Les étiquettes imprimées en mode Normal et Vertical
peuvent s’adapter à tous vos besoins en termes de mise en
page et d’impression.
10
NORMAL
ABCDE
VERT
A
B
C
E
D
Page 99

Après avoir sélectionné le mode du Format d’étiquette NORMAL ou VERT, le texte de
l’étiquette peut être saisi, mis en page, imprimé et coupé normalement. Si le mode
sélectionné est Normal, le texte saisi s’imprime horizontalement sur l’étiquette. Si le
mode sélectionné est Vertical, le texte saisi s’imprime verticalement sur l’étiquette.
Mode Rotation et mode Rotation et répétition
Les étiquettes imprimées en utilisant ces deux modes peuvent
être enroulées autour de câbles, afin de les marquer. Avec chacun
de ces modes, le texte subit une rotation de 90° dans le sens anti-
’
horaire et chaque bloc de texte s
différente, comme présenté ci-dessous. Avec le mode
et répétition
afin qu
, le texte est imprimé plusieurs fois sur l’étiquette,
’
il puisse être lu facilement depuis n’importe quel point.
Rotation
imprime sur une étiquette
Rotation
d’étiquette
Modes de Format
Rotation
et
répétition
Longueur du bloc
Longueur du bloc
Longueur du blocLongueur du bloc
Longueur du blocLongueur du bloc
Après avoir sélectionné le mode de Format d’étiquette ROTATATION ou ROT&
REP, précisez la longueur de chaque étiquette et un style d’encadrement, le cas échéant.
● B.LONG. (longueur du bloc): 0,80 à 8,00 po (20 à 200mm)
Par défaut: 1,20 po (30 mm)
● CADRE: NON, , , ,
1 2
3 4
Par défaut: NON
☞ Un seul bloc de texte peut contenir au maximum 7 lignes et, avec le mode de format
d’étiquette ROT&REP, seules les lignes de texte comprises dans l’étiquette sont
imprimées.
☞
Pour les étiquettes qui seront enroulées autour de câbles et de fils, nous recommandons
d
’
utiliser du ruban ID Flexible. Lorsque vous enroulez un ruban ID Flexible autour
d
’
objets cylindriques, le diamètre de ces objets doit être au moins égal à 1/8 po (3 mm).
Sinon, utilisez le mode de Format d’étiquette
l
’
étiquette ou la longueur du drapeau doivent être de 3/16 po (5 mm) minimum.
DRAPEAU
. En outre, les rebords de
11
Page 100

Mode Drapeau
Les étiquettes imprimées avec ce mode peuvent être enroulées
’
autour d
drapeau. Avec le mode
s
non imprimée de l
câble. En outre, le texte peut être imprimé horizontalement ou
avec une rotation de 90°.
un câble; leurs extrémités se colleront pour former un
DRAPEAU
’
imprime aux extrémités de l’étiquette. La longueur de la partie
’
étiquette correspond à la circonférence du
, chaque bloc de texte
ROTATATION
défini sur
NON
Longueur
du
drapeau
Diamètre
du
drapeau
Longueur
du
drapeau
ROTATATION
défini
sur OUI
Longueu
r du
drapeau
Diamètre
du
drapeau
Longueur
du
drapeau
Après avoir sélectionné le mode DRAPEAU, précisez la longueur et le diamètre du
drapeau, ainsi que le style d’encadrement et la rotation du texte, le cas échéant.
● DRAP. φ (diamètre du drapeau): 0,00 à 4,00 po (0 à 100 mm)
Par défaut: 0,25 po (7 mm)
● DRAP. L. (longueur du drapeau): 0,40 à 8,00 po (10 à 200 mm)
Par défaut: 1,20 po (30 mm)
● CADRE: NON, , , ,
1 2
3 4
Par défaut: NON
● ROTATATION: NON, OUI
Par défaut: NON
☞ Un bloc de texte peut contenir au maximum 7 lignes.
☞
Pour les étiquettes qui seront enroulées autour de câbles et de fils, nous recommandons
’
utiliser du ruban ID Flexible. Lorsque vous enroulez un ruban ID Flexible
d
d
’
objets cylindriques, utilisez le mode
DRAPEAU
lorsque le diamètre
autour
de ces objets est
inférieur à 1/8 po (3 mm). En outre, la longueur du drapeau doit être de 3/16 po (5 mm)
minimum.
12
 Loading...