

Page 1
1500PC
Model : PT-1500PC
Quick Reference
Guide de référence rapide
Page 2

Page 3
Quick Reference
Quick Reference
ENGLISH
Page 4

Thank you for purchasing the P-touch 1500PC!
With your new Brother label printer, you can print personalized labels for any purpose. Simply insert a
label cassette into the PT-1500PC, design your label with the enclosed P-touch label-designing software,
and then print it out. Your customized label prints out in seconds. Label tape cassettes are available in
various sizes and colors—ideal for color-coded labeling or any other special labeling needs.
Tw o label-designing applications are available on the enclosed CD-ROM. The easy-to-use P-touch Quick
Editor software allows text to be entered and formatted quickly so that simple labels can be printed
instantly. The more advanced P-touch Editor Ver. 3.1 application not only automates complex layout
functions, but it also includes a variety of pre-formatted templates for immediate use.
Canadian Department of Communications Compliance Statement
This digital apparatus does not exceed the Class B limits for radio noise emissions from digital
apparatus as set out in the interference-causing equipment standard entitled “Digital Apparatus”,
ICES-003 of the Department of Communications.
Page 5

Table of contents
Unpacking ............................................................................................................................. 2
General description ............................................................................................................... 2
General precautions .............................................................................................................. 2
Inserting a photo into the photo frame .................................................................................. 3
Tape cassettes ........................................................................................................................ 3
Changing the tape caessette .................................................................................................. 4
Connecting the AC adapter ................................................................................................... 4
Power/Feed key ..................................................................................................................... 5
Connecting the USB interface cable ...................................................................................... 5
Software and printer driver ................................................................................................... 5
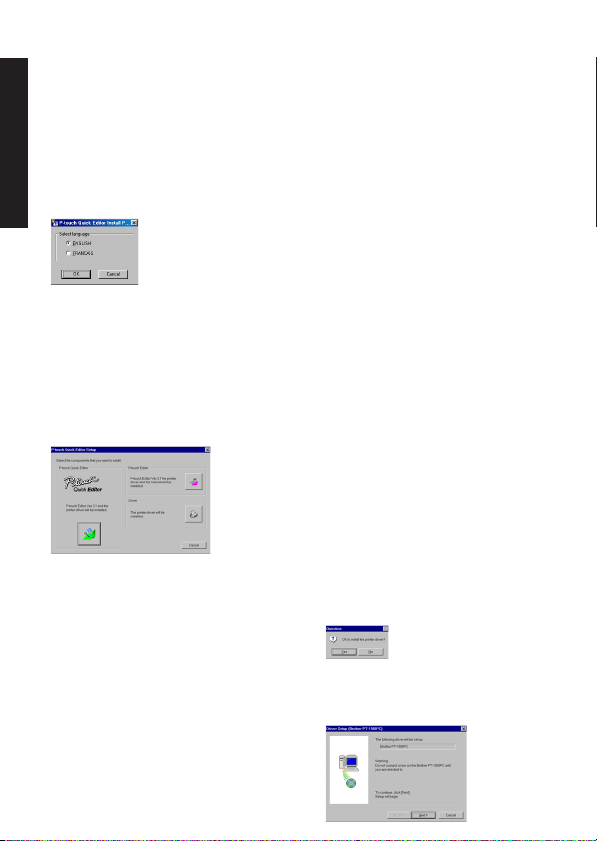
For PC-compatible users (Windows
Before installation .......................................................................................................... 6
Installing P-touch Quick Editor ....................................................................................... 6
Installing P-touch Editor Ver. 3.1 .................................................................................... 8
Installing the printer driver ............................................................................................. 9
Reading the User’s Guide ............................................................................................... 9
Uninstalling the software and printer driver .................................................................. 10
Replacing, deleting or adding another printer driver ..................................................... 10
For Macintosh users .............................................................................................................12
Before installation ........................................................................................................ 12
Installing P-touch Quick Editor ..................................................................................... 12
Installing P-touch Editor Ver. 3.1 .................................................................................. 13
Selecting the driver ...................................................................................................... 14
Reading the User’s Guide ............................................................................................. 14
Uninstalling the software and printer driver .................................................................. 14
Starting up the P-touch Editor Ver 3.1 software .................................................................. 15
Starting up P-touch Editor Ver. 3.1 ................................................................................ 15
Starting up the P-touch Quick Editor software .......................................................... 16
Starting up P-touch Quick Editor .................................................................................. 16
Using P-touch Quick Editor ................................................................................................. 16
Specifying a label size .................................................................................................. 16
Entering text ................................................................................................................. 17
Importing text ............................................................................................................... 17
Using the Text History list ............................................................................................. 17
Adding a symbol .......................................................................................................... 17
Changing the background color ................................................................................... 18
Viewing the text ........................................................................................................... 18
Printing ........................................................................................................................18
Hiding/displaying P-touch Quick Editor (Windows only) .............................................. 18
Quitting P-touch Quick Editor ...................................................................................... 18
Printing a label .................................................................................................................... 19
Removing the label backing ................................................................................................. 19
Quitting P-touch Quick Editor ............................................................................................. 20
Maintenance ........................................................................................................................ 20
Cleaning the print head and roller ................................................................................ 20
Cleaning the tape cutter ............................................................................................... 21
Troubleshooting ................................................................................................................... 21
Monitoring the P-touch status ....................................................................................... 21
Problem-solving ........................................................................................................... 22
Machine specifications ........................................................................................................ 22
Accessories .......................................................................................................................... 23
®
98/98SE/Me/2000) ........................................................ 6
1
Page 6
Unpacking
• PT-1500PC (with photo frame attached)
• 1/2” (12 mm) wide TZ tape cassette (black characters on white tape; 26’ 1/4” (8 meters))
• AC adapter (model AD-60; for plugging the PT-1500PC into the AC outlet)
•
USB Interface cable (for connecting the PT-1500PC to either an IBM PC-compatible or Macintosh computer)
• Quick Reference
• CD-ROM containing the PC and Mac software and their manuals
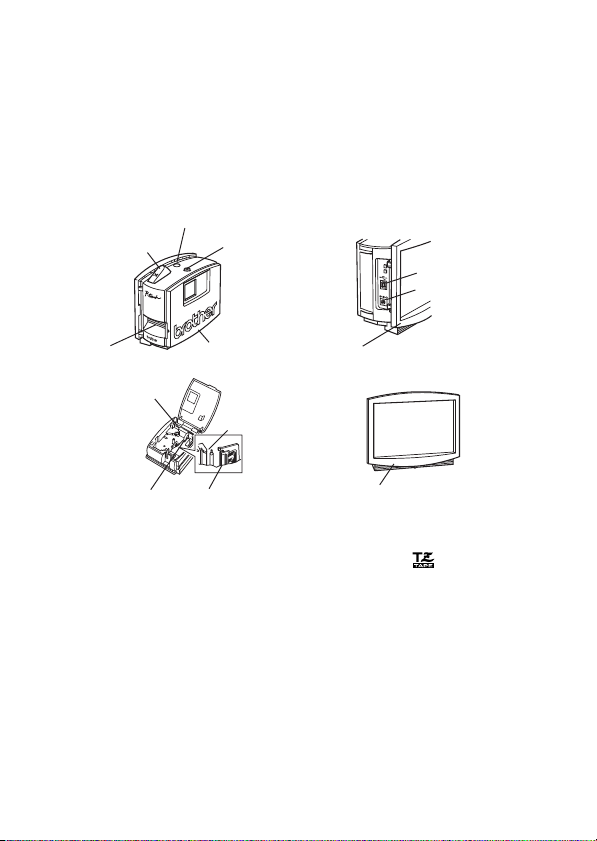
General description
Status indicator
Tape cutter button
Power/Feed key
DC IN 9.5V
USB port
AC adapter connector
Tape exit slot
Tape
separator
Release lever
Tape compartment cover
Cutter
Print head
Photo frame
Photo frame (uninstalled)
General precautions
• Use only Brother TZ tapes with this machine. Do not use tapes that do not have the mark.
• Do not pull on the tape being fed from the P-touch. Otherwise, the tape cassette may be damaged.
•Avoid using the machine in extremely dusty places, and keep it out of both direct sunlight and rain.
• Do not expose the machine to high temperatures or high humidity.
•
Do not leave any rubber or vinyl objects on the machine for an extended period of time. Doing so may cause staining.
• Do not clean the machine with alcohol or other organic solvents. Use a soft, dry cloth only.
• Do not put any foreign objects into or anything on the machine.
•To avoid injures, do not touch the cutter’s edge.
• Do not touch the print head, which becomes very hot when the P-touch is used. Even after the machine is turned off, the
print head remains hot for some time.
• Use only the enclosed AC adapter (model AD-60) designed exclusively for this machine. Use of any other adapter will
void the warranty.
• Use only the enclosed USB interface cable. Use of any other cable will void the warranty.
•When the machine is not being used for a long period of time, disconnect the AC adapter.
• Do not try to disassemble the P-touch.
• IBM® is a trademark of International Business Machines, Inc.
•
Microsoft® and Microsoft Windows® are registered trademarks of Microsoft Corp. in the US and other countries.
•Macintosh and Power Macintosh are registered trademarks of Apple Computer, Inc.
•
All other software and product names mentioned are trademarks or registered trademarks of their respective companies.
2
Page 7
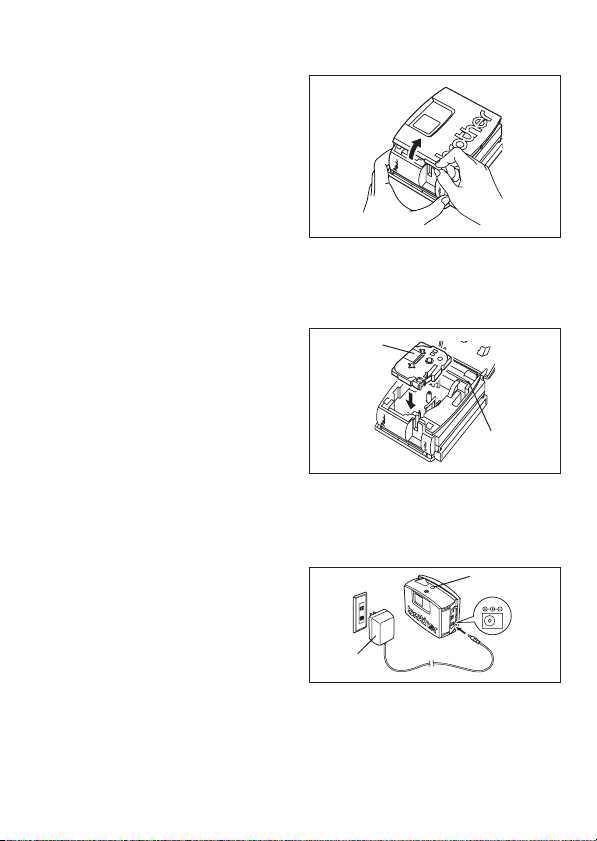
Inserting a photo into the photo frame
A photo can be inserted into the photo frame attached to the PT-1500PC, turning it into a decorative
addition to your workspace.
Insert a photo into the photo frame in either of the following two ways:
• By removing the photo frame from the PT-1500PC
1 Remove the photo frame from the
PT-1500PC by carefully pulling off the
frame, grabbing it from the back of the
PT-1500PC as shown.
Be careful that the tape compartment
cover is not opened when removing
the photo frame.
2 Remove the cardboard backing and the
clear protective sheet from the photo
frame.
3 Stack the clear protective sheet, the
photo, and the cardboard backing in that
order, facing down.
4 Insert one end of the stack under the two
tabs on one side of the frame, and then
insert the stack under the two tabs on the
other side of the frame.
5 Attach the photo frame to the side of the
PT-1500PC opposite to the tape
compartment cover.
•Without removing the cardbord backing and
the clear protective sheet from the photo frame
Slide the photo between the cardbord
backing and the clear protective sheet.
D
C
I
N
9
.
5
V
Tape cassettes
• Do not pull on the tape being fed from the machine, otherwise the tape cassette may be damaged.
• If the label is attached to a wet or dirty surface, it may easily peel off. Before affixing the label, clean
the surface where it will be attached.
• Depending on the environmental conditions and the material, condition, roughness, and shape of
the affixing surface, the label may move out of place or peel off. In order to test the label’s adhesive
strength or before using this label where safety is a particular concern, test the label by affixing a
small piece of it to a hidden area of the intended surface.
• Sunlight, wind and rain may cause the color of the label to fade or the label to peel off.
•Markings made with oil-based or water-based ink may be visible through a label affixed over them.
To hide the markings, use two labels layered on top of each other, or use tape with a dark background.
• This tape may not be adequate in cases where liabilities may result due to damage or injuries.
3
Page 8
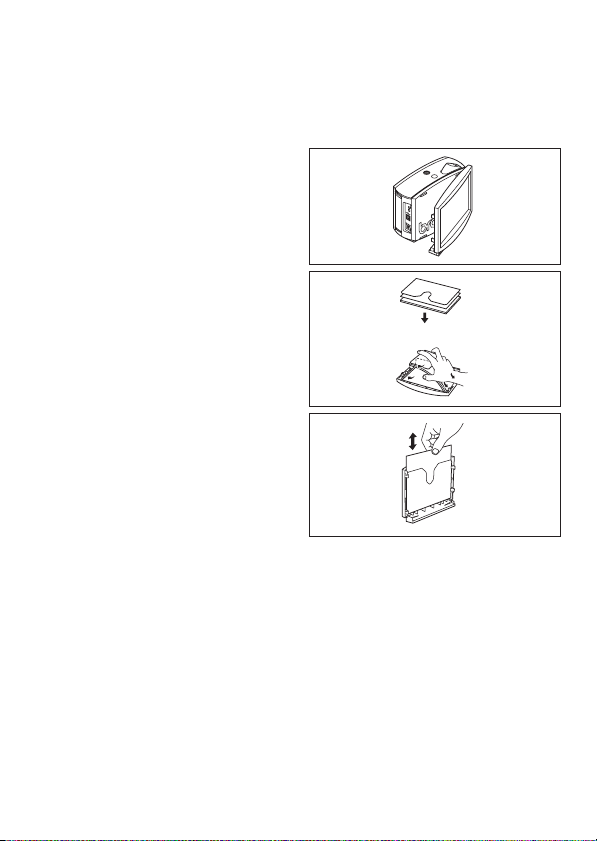
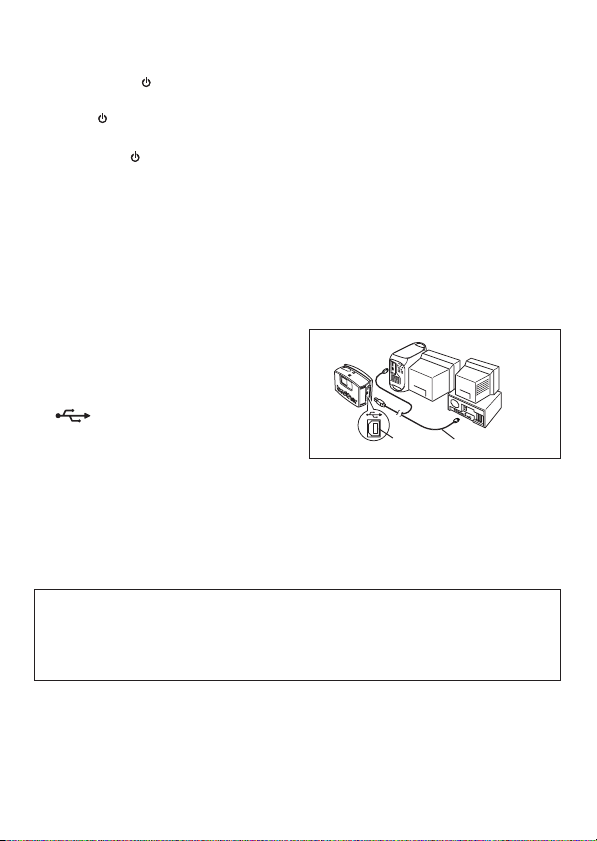
Changing the tape cassette
1 Lift open the tape compartment cover. The
installed cassette is also released.
Be careful that the photo frame does not
fall off when the tape compartment cover
is opened.
2 If a tape cassette is already installed, remove
it by pulling it straight up.
3 If the ink ribbon in the tape cassette to be
installed is loose, use your finger to wind the
toothed wheel in the direction of the arrow
on the cassette until there is no slack in the
ribbon. Also, make sure that the end of the
tape feeds under the tape guide.
If you are inserting a new tape cassette
provided with a stopper, be sure to
remove the stopper.
4 Insert the tape cassette firmly into the tape
compartment, making sure that the entire
back of the cassette touches the bottom of
the compartment.
When inserting the tape cassette, make
sure that the ink ribbon does not catch on
the corner of the metal guide.
5 Securely close the tape compartment cover
by pressing down on the textured area of the
cover near the tape exit slot.
Tape cassette
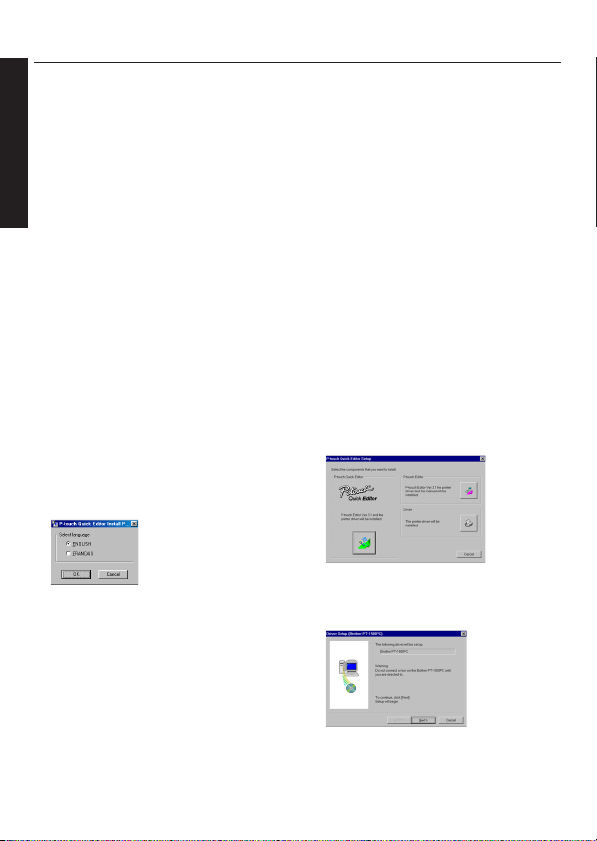
Connecting the AC adapter
Connect the AC adapter to the PT-1500PC as described below.
1 Insert the plug on the adapter cord into the
connector marked DC IN 9.5V on the PT1500PC.
2 Insert the plug on the adapter into the nearest
standard electrical outlet. The status indicator
lights up in green to indicate that the
machine is on.
To turn off the PT-1500PC, press the
Power/Feed key so that the status
indicator goes off.
AC adapter
Tape
separator
Status indicator
DC IN 9.5V
4
Page 9
Power/Feed key
The power/feed key ( ) can be used both for turning on and off the PT-1500PC and for feeding out tape.
•To turn the PT-1500PC on or off:
Press once.
•To feed out some tape:
Hold down for at least two seconds.
Connecting the USB interface cable
Connect the PT-1500PC to the computer as described below.
When connecting the PT-1500PC to an IBM PC-compatible computer, label-designing software
and the printer driver must be installed before the PT-1500PC is connected to the computer and
plugged in using the AC adapter. Follow the installation procedures on pages 6 through 10 to
install the software and the printer driver, and then connect the PT-1500PC to the computer when
you are instructed to do so.
1 Insert the flat connector on the enclosed USB
interface cable into the USB port on the
computer.
2 Insert the square connector on the enclosed
USB interface cable into the USB port
( ) on the PT-1500PC.
When making a USB connection through
a hub, a proper connection may not be
possible due to the type of hub used. If
printing is not possible with a hub
connection, try connecting the PT1500PC directly to the computer using
the USB interface cable.
USB port
USB interface cable
Software and printer driver
Brother Co., Ltd. and its suppliers possess all rights and copyrights to this software (including, but
not limited to, the programming, images, clip art, templates, and text incorporated into the software), the text in the enclosed manuals, and duplicates of the software. This software, either in
part or in whole, may not be duplicated, modified, reverse-engineered, disassembled or decompiled
without permission.
With the enclosed CD-ROM, the following can be installed:
• P-touch Quick Editor
• P-touch Editor Ver. 3.1
• PT-1500PC printer driver
5
Page 10
For PC-compatible users (Windows® 98/98SE/Me/2000)
Before labels can be printed on the PT-1500PC, label-designing software and the PT-1500PC printer
driver must be installed. In order to design labels that can be printed on the PT-1500PC, two applications
are available on the enclosed CD-ROM: P-touch Quick Editor and P-touch Editor Ver. 3.1
Before installation
Check that your system configuration meets the following requirements.
Computer: IBM PC or compatible
For Windows®
Operating system:
Hard disk free space: At least 20 MB
Available memory: Minimum 32 MB
Monitor: VGA or higher graphics card
USB port
CD-ROM drive
Do not connect the PT-1500PC to the computer before installing the label-designing software,
otherwise it may not be installed correctly. Be sure not to connect the PT-1500PC until you
are instructed to do so.
For installation on Windows® 2000, administrator privileges are required.
In addition, printing requires power user or administrator privileges.
This software cannot be operated in Users groups.
Installing P-touch Quick Editor
The P-touch Quick Editor software provides quick access to the more simple label-designing features for easy
text input and instant printing of labels. Install the P-touch Quick Editor software on a PC as described below.
1
Insert the enclosed CD-ROM into the
computer’s CD-ROM drive. A dialog box
automatically appears, allowing you to select
the language.
If the dialog box does not automatically
appear, double-click “My Computer” on the
desktop, double-click the icon for the CDROM drive containing the CD-ROM, and then
double-click “Setup.exe” to display the dialog
box.
2 Select the language for the Windows
operating system that you are using, and then
click the OK button. A dialog box appears,
allowing you to select what to install.
Microsoft® Windows® 2000 or pre-installed with Microsoft® Windows® 98/98SE/Me
T
o install just the printer driver, click the bottom
button (Driver) on the right side. The first Driver
Setup dialog box appears, informing you that the
PT-1500PC printer driver will be installed.
Continue with the procedure in
the printer driver
on page 9.
Installing
6
Page 11
To install the P-touch Editor Ver. 3.1 software,
click the top button (P-touch Editor) on the
right side. Then, continue with the procedure
in
Installing P-touch Editor Ver. 3.1
3
Click the left button (P-touch Quick Editor). The
InstallShield® Wizard for installing the P-touch
Quick Editor software starts up, and then the
Welcome dialog box appears.
4 Carefully read the contents of the dialog box,
and then click the Next button to continue.
The User Information dialog box appears.
5 Type the necessary information into the
appropriate boxes (If the information has
already been registered in Windows®, it will
automatically appear.), and then click the
Next button. A dialog box appears, asking for
confirmation of the entered information.
6 Click the Yes button to register the entered
information.
To change the information, click the No
button, and then return to step 4.
The Choose Destination Location dialog box
appears.
on page 8.
7 Click the Next button to begin installation.
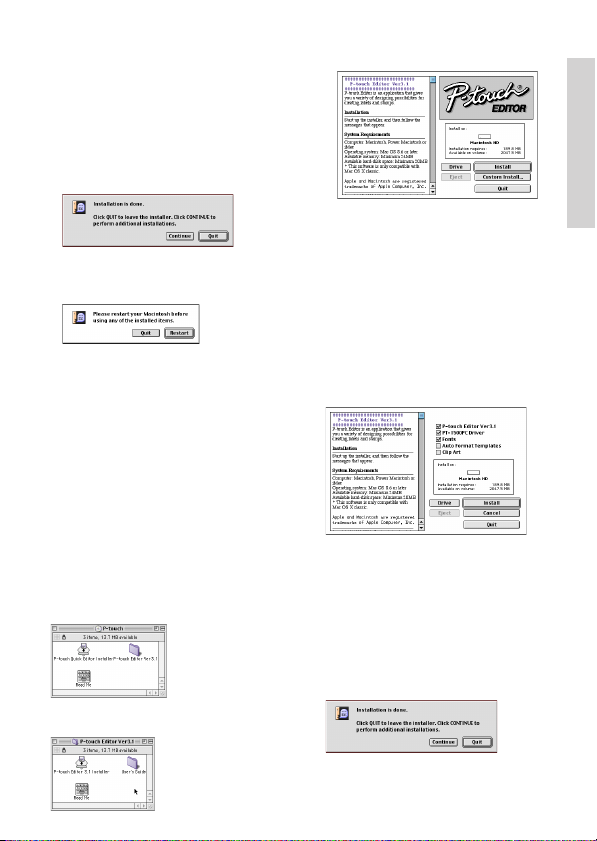
8 After P-touch Quick Editor is installed, a
dialog box appears, allowing you to select
where the shortcut to P-touch Quick Editor
will be added (page 16).
9 Select the desired location for the shortcut,
and then click the Next button. A dialog box
appears, allowing you to select whether or
not to install the printer driver.
To install the printer driver, click the Yes
button. The first Driver Setup dialog box
appears, informing you that the PT-1500PC
printer driver will be installed.
Continue with the procedure in
printer driver
If the printer driver is already installed, click
the No button. A dialog box appears,
showing that installation is finished.
Select “Yes, I want to restart may computer
now.”, click the Finish button to restart the
computer, and then remove the CD-ROM
from the CD-ROM drive.
on page 9.
Installing the
For Windows®
7
Page 12
Installing P-touch Editor Ver. 3.1
The P-touch Editor Ver. 3.1 software includes a
variety of more complex functions for printing
barcodes and images, enabling you to design just
about any label that you can imagine. Install the
P-touch Editor Ver. 3.1 software on a PC as described below.
1
Insert the enclosed CD-ROM into the
computer’s CD-ROM drive. A dialog box
For Windows®
automatically appears, allowing you to select
the language.
If the dialog box does not automatically
appear, double-click “My Computer” on the
desktop, double-click the icon for the CDROM drive containing the CD-ROM, and then
double-click “Setup.exe” to display the dialog
box.
2 Select the language for the Windows
operating system that you are using, and then
click the OK button. A dialog box appears,
allowing you to select what to install.
To install just the printer driver, click the
bottom button (Driver) on the right side.
The first Driver Setup dialog box appears,
informing you that the PT-1500PC printer
driver will be installed.
Continue with the procedure in
the printer driver
To install the P-touch Quick Editor
software, click the left button (P-touch
Quick Editor). Then, continue with the
procedure in
Editor
3 Click the top button (P-touch Editor) on the
right side. The InstallShield® Wizard for
installing the P-touch Editor Ver. 3.1 software
starts up, and then the Welcome dialog box
appears.
8
on page 9.
Installing P-touch Quick
on page 6.
Installing
4 Follow the instructions that appear and
continue with the installation. During
installation, the following installation
methods will be available.
Typical
All of the basic options (P-touch Editor Ver.
3.1, clip art, Auto Format templates, Help,
and 13 fonts) are installed.
Compact
Only P-touch Editor Ver. 3.1 is installed.
Custom
Editor: P-touch Editor Ver. 3.1
Clip Art: Illustrations for the P-touch
Editor Ver. 3.1 Clip Art function
Fonts: 13 fonts
Auto Format Templates: Templates for
the Auto Format function
User’s Guide: User’s Guide (HTML) for
the P-touch Editor Ver. 3.1
The User’s Guide can also be viewed
from the CD-ROM without installing it
onto the computer.
Help: Help files for P-touch Editor Ver. 3.1
If the Change button can be clicked while
an option is selected, sub-components
can be selected. Click the Change button
to display the Select Sub-components
dialog box, and then select the subcomponents that you wish to install by
putting a check mark beside them. If
certain options or sub-components are
not installed, some P-touch Editor Ver. 3.1
functions may not be available. After
selecting the desired sub-components,
click the Continue button.
5 After P-touch Editor Ver. 3.1 is installed, a
dialog box appears, allowing you to select
whether or not to install the printer driver.
To install the printer driver, click the Yes
button. The first Driver Setup dialog box
appears, informing you that the PT-1500PC
printer driver will be installed.
Page 13

Continue with the procedure in
printer driver
If the printer driver is already installed, click
the No button. A dialog box appears,
showing that installation is finished.
Select “Yes, I want to restart may computer
now.”, click the Finish button to restart the
computer, and then remove the CD-ROM
from the CD-ROM drive.
below.
Installing the
Installing the printer driver
With Plug-and-Play, new devices connected to the
system are detected, and their drivers are automatically installed. Since the PT-1500PC will be
connected through the USB port, its driver will be
installed with Plug-and-Play. Be sure to read the
installation instructions described below before
installing the printer driver supplied on the CDROM.
Be sure not to connect the PT-1500PC until you
are instructed to do so.
1 Click the Next button. A dialog box appears,
instructing you to connect the PT-1500PC to
the computer.
2 Connect the PT-1500PC to the computer
using the enclosed USB interface cable as
described on page 5, and then turn on the
PT-1500PC. A dialog box appears, showing
that the printer driver has been installed.
3 Click the Finish button. A dialog box
appears, showing that installation is finished.
4 Select “Yes, I want to restart my computer
now.”, click the Finish button to restart the
computer, and then remove the CD-ROM
from the computer.
Reading the User’s Guide
The P-touch Editor User’s Guide can be viewed
either by inserting the CD -ROM into the drive
each time you wish to refer to it or by installing it
onto your hard disk so that it is quickly available
at any time. Since the User’s Guide is an HTML
document, a browser is needed to read it.
• From the CD-ROM:
1 Start up Windows Explorer.
2 Select the CD-ROM drive.
3 Double-click “Main.htm” in the Manual
folder within the Ptouch folder on the
CD-ROM.
• From the P-touch Editor 3.1 group window:
Double-click The User’s Guide P-touch
Editor Ver3.1 icon.
• With the Start button:
1 Click the Start button in the taskbar to
display the Start menu.
2 Select “Programs”.
3 Select “P-touch Editor 3.1”.
4 Click “The User’s Guide P-touch Editor
Ver3.1”.
For Windows®
9
Page 14
Uninstalling the software and printer driver
Uninstall the P-touch Editor Ver. 3.1/P-touch Quick
Editor software from a PC as described below.
1 Start up Windows® 98/98SE/Me/2000.
2 Click the Start button in the taskbar, select
“Settings”, and then click “Control Panel”.
3 In the Control Panel window, double-click
For Windows®
“Add/Remove Programs”.
4 In the Add/Remove Programs Properties
dialog box, select "P-touch Quick Editor" (to
delete the P-touch Quick Editor software) or
“P-touch Editor 3.1” (to delete the P-touch
Editor Ver. 3.1 software), and then click the
Add/Remove button.
5 A message appears, asking if you wish to
delete the selected application. Click the Yes
button to delete the application.
If you do not wish to delete the
application, click the No button.
6 In the dialog box that appears, indicating that
the application is deleted, click the OK
button.
Replacing, deleting or adding another printer driver
1 Turn off the PT-1500PC, and then disconnect
it from the computer.
2
Insert the enclosed CD-ROM into the
computer’s CD-ROM drive. A dialog box
automatically appears, allowing you to select
the language.
If the dialog box does not automatically
appear, double-click “My Computer” on the
desktop, double-click the icon for the CDROM drive containing the CD-ROM, and then
double-click “Setup.exe” to display the dialog
box.
3 Select the language for the Windows
operating system that you are using, and then
click the OK button. A dialog box appears,
allowing you to select what to install.
4 Click the bottom button (Driver) on the right
side. The first Driver Setup dialog box
appears, allowing you to select whether to
replace, delete or add another PT-1500PC
printer driver.
10
Page 15
5 Select the desired operation, and then click
the Next button.
If “Replace with new Brother PT-1500PC”
is selected, the previously installed printer
driver is deleted, and replaced with a new
one. Select this option when upgrading
the printer driver, or when running
Windows® 2000 and changing to a
PT-1500PC with a different serial number.
If “Add Brother PT-1500PC” is selected, a
new printer driver is added. With USB on
Windows® 98/Me, only a port is added
without adding the PT-1500PC as a new
printer. Select this option when connecting
and using multiple PT-1500PCs with the
same computer.
6 If “Replace with new Brother PT-1500PC” or
“Add Brother PT-1500PC” was selected: A
dialog box appears, instructing you to
connect the PT-1500PC to the computer.
Connect the PT-1500PC to the computer
using the enclosed USB interface cable as
described on page 5, and then turn on the
PT-1500PC. A dialog box appears, showing
that the printer driver has been installed.
If “Delete Brother PT-1500PC” was selected:
A dialog box appears, asking for confirmation
to delete all PT-1500 printer drivers.
Click the Yes button. A dialog box appears,
showing that the printer drivers have been
deleted.
Click the Finish button. If a dialog box
appears, explaining that the computer should
be restarted, select the option for restarting
the computer, and then click the Finish
button.
For Windows®
Select “Yes, restart immediately.”, and then
click the Finish button to restart the
computer.
11
Page 16
For Macintosh users
Before labels can be printed on the PT-1500PC, label-designing software and the PT-1500PC printer
driver must be installed. In order to design labels that can be printed on the PT-1500PC, two applications
are available on the enclosed CD-ROM: P-touch Quick Editor and P-touch Editor Ver. 3.1
Before installation
Check that your system configuration meets the following requirements.
Computer: Macintosh
For Macintosh
Operating system: Mac OS 8.6 or later
* This software is only compatible with Mac OS X classic.
The Mac version of the software is for a Mac with an English operating system. If the software is installed
on a Mac with an operating system in a different language, the software may not run properly.
Hard disk free space: At least 30 MB
A few hundred megabytes of additional free space may be needed when printing long labels or
large amounts of data.
Available memory free space: Minimum 24 MB
USB port
CD-ROM drive
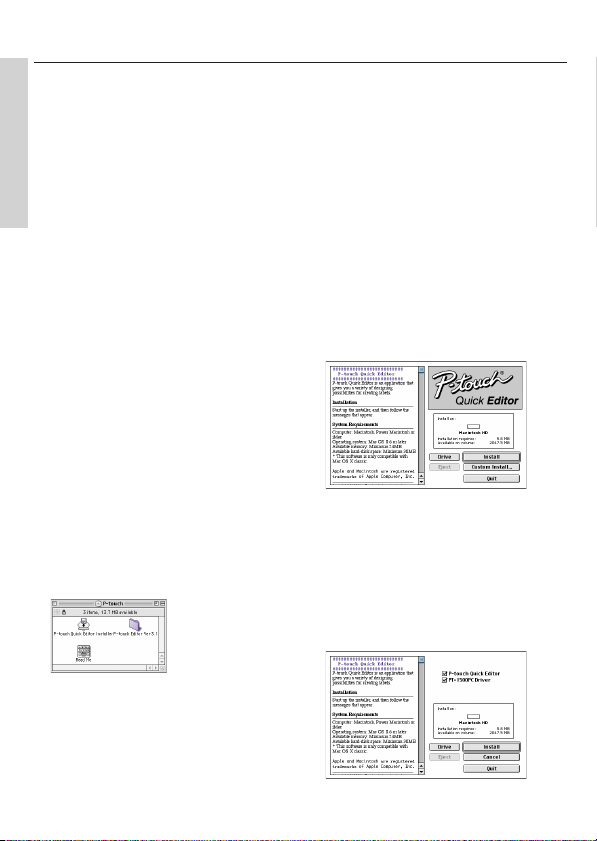
Installing P-touch Quick Editor
The P-touch Quick Editor software provides quick
access to the more simple label-designing features
for easy text input and instant printing of labels.
Install the P-touch Quick Editor software on a Mac
as described below.
1 With the PT-1500PC and computer turned
off, connect the PT-1500PC to the Macintosh
using the enclosed USB interface cable. Be
sure to leave the PT-1500PC off.
2 Turn on the Macintosh.
3
Insert the enclosed CD-ROM into the computer’s
CD-ROM drive. A folder opens, allowing you to
view the contents of the CD-ROM.
5 Select the installation method.
Clicking the Install button immediately starts
installing the most basic options.
About 30 MB of available hard-disk space is
needed to begin installation. In order to install
all options, about 30 MB of available harddisk space is needed. If enough hard-disk
space is available, click the Install button.
Clicking the Custom Install button displays a dialog
box that allows you to select which options to install.
4 Double-click the P-touch Quick Editor
Installer icon in the folder that appears. The
installer starts up.
12
Page 17
Only the options with a check mark beside
them are installed. Select the options that
you wish to install, and then click the Install
button to begin installation.
In order to print from the PT-1500PC,
“PT-1500PC Driver” must be selected for
installation.
6 When the installation is finished and the
following dialog box appears, click the Quit
button.
7 When the dialog box appears asking if you
wish to restart the computer, click the Restart
button to restart the computer.
Installing P-touch Editor Ver. 3.1
The P-touch Editor Ver. 3.1 software includes a
variety of more complex functions for printing
barcodes and images, enabling you to design just
about any label that you can imagine. Install the
P-touch Editor Ver. 3.1 software on a PC as described below.
1 With the PT-1500PC and computer turned
off, connect the PT-1500PC to the Macintosh
using the enclosed USB interface cable. Be
sure to leave the PT-1500PC off.
2 Turn on the Macintosh.
3 Insert the enclosed CD-ROM into the
computer’s CD-ROM drive. A folder opens,
allowing you to view the contents of the CDROM.
4 Double-click the P-touch Editor Ver3.1 folder
to open it.
5 Double-click the P-touch Editor 3.1 Installer
icon in the folder. The installer starts up.
6 Select the installation method.
Clicking the Install button immediately starts
installing the most basic options. (Some clip
art illustrations are not installed.)
About 30 MB of available hard-disk space is
needed to begin installation.
In order to install all options, about
120 MB of available hard-disk space is
needed. If enough hard-disk space is
available, click the Install button.
Clicking the Custom Install button displays a
dialog box that allows you to select which
options to install.
Only the options with a check mark beside
them are installed. Select the options that
you wish to install, and then click the Install
button to begin installation.
In order to print from the PT-1500PC,
“PT-1500PC Driver” must be selected for
installation.
7 When the installation is finished and the
following dialog box appears, click the Quit
button.
For Macintosh
13
Page 18
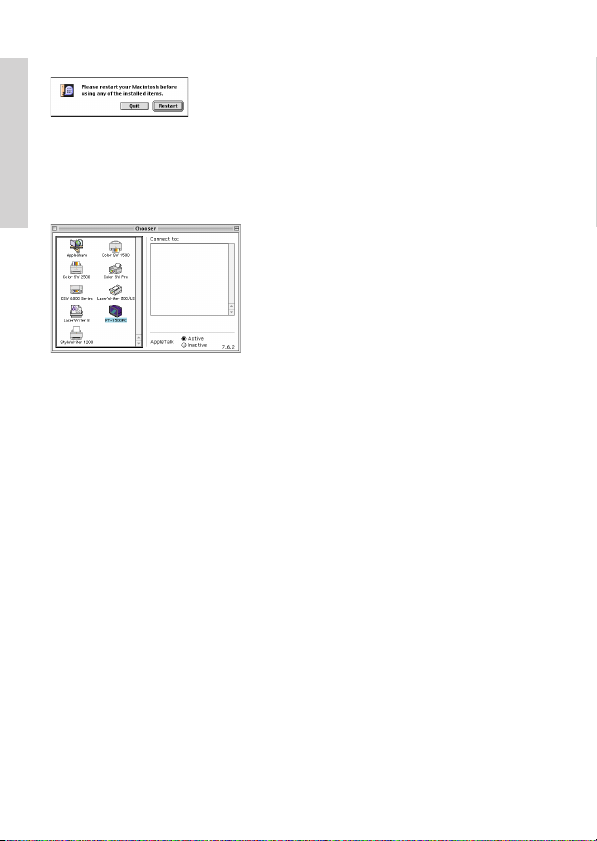
8 When the dialog box appears asking if you
wish to restart the computer, click the Restart
button to restart the computer.
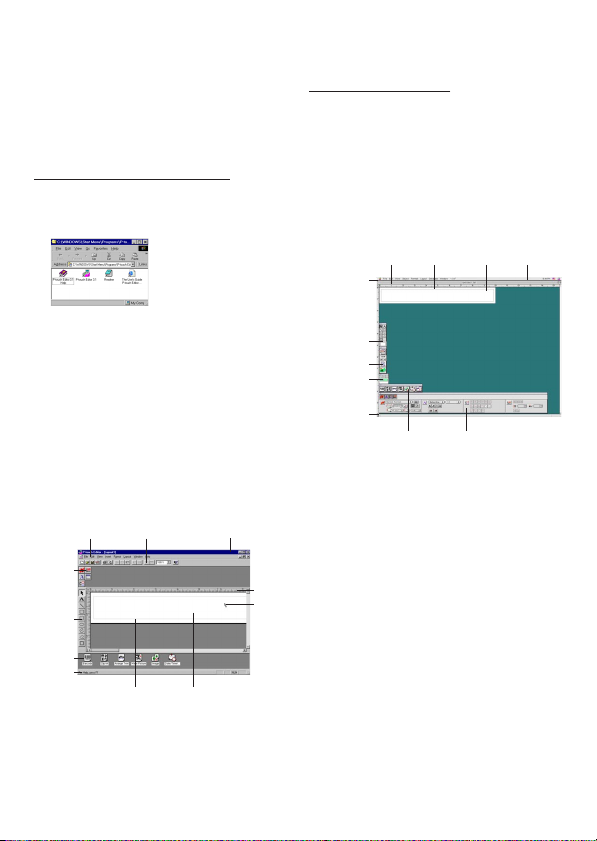
Selecting the printer
1 Pull down the Apple menu and select
“Chooser” to display the Chooser window.
For Macintosh
2 In the list on the left, click the PT-1500PC
icon.
3 Close the Chooser window to confirm your
settings.
Reading the User’s Guide
The P-touch Editor User’s Guide can be viewed
either by inserting the CD -ROM into the drive
each time you wish to refer to it or by installing it
onto your hard disk so that it is quickly available
at any time. Since the User’s Guide is an HTML
document, a browser is needed to read it.
• From the CD-ROM:
Double-click “Main.htm” in the User’s
Guide folder within the P-touch Editor
Ver3.1 folder on the CD-ROM.
•With the Start button:
Double-click “Main.htm” in the User’s
Guide folder within the P-touch Editor
Ver3.1 folder installed on the hard disk.
Uninstalling the software and printer driver
Uninstall P-touch Quick Editor, P-touch Editor
Ver3.1 and the printer driver as described below.
When deleting the printer driver, be sure that
the P-touch is turned off and unplugged.
1 Drag the following folder to the Trash icon:
• P-touch Quick Editor folder (for the P-
touch Quick Editor software)
• P-touch Editor Ver3.1 folder (for the P-
touch Editor Ver. 3.1 software)
2 In the System Folder, open the Extensions
folder.
3 Drag the following icons to the Trash icon:
•PT-1500PC and USB PT-1500PC
Extension
4 In the System Folder, open the Preferences
folder.
5 Drag the following icons to the Trash icon:
• P-touch Quick Editor Prefs, P-touch Editor
3.1 Prefs, and PT-1500PC Prefs
The software and the printer driver are now
deleted.
14
Page 19
Starting up the P-touch Editor Ver. 3.1 software
Starting up P-touch Editor Ver. 3.1
The P-touch Editor Ver. 3.1 application makes it
easy for anyone to design more complex labels
and print them for almost any need imaginable.
On an IBM PC-compatible computer:
• By clicking the P-touch Editor icon:
Double-click the P-touch Editor 3.1 icon
in the P-touch Editor 3.1 group window.
•With the Start button:
1 Click the Start button in the taskbar to
display the Start menu.
2 Select “Programs”.
3 Select “P-touch Editor 3.1”.
4 Click “P-touch Editor 3.1”.
After P-touch Editor Ver. 3.1 is started, the following window is displayed.
For more details on the functions of P-touch
Editor Ver. 3.1, refer to its User ’s Guide,
which can either be installed on the
computer or viewed from the CD-ROM .
Menu bar Standard toolbar
Property
dock
Draw
toolbar
Object
dock
Status
bar
Layout area
Title bar
Print area
On a Macintosh computer:
• Double-click the P-touch Editor Ver3.1.6
icon in the P-touch Editor Ver3.1 folder
installed on the computer.
After P-touch Editor Ver. 3.1 is started, the following window is displayed.
For more details on the functions of P-touch
Editor Ver. 3.1, refer to its User ’s Guide,
which can either be installed on the
computer or viewed from the CD-ROM .
Rulers Layout area Print area Title bar
Menu bar
Draw toolbar
Print toolbar
Database
toolbar
Status bar
Object dock Property dock
Rulers
Cursor
15
Page 20
Starting up the P-touch Quick Editor software
Starting up P-touch Quick Editor
When P-touch Quick Editor is installed on a
PC, you can choose to add shortcuts to the
desktop, the StartUp menu, and to the Quick
Launch toolbar.
On an IBM PC-compatible computer:
•
If a shortcut was added to the StartUp menu:
P-touch Quick Editor automatically starts up
when the computer is started up.
• If a shortcut was added to the desktop:
Double-click the P-touch Quick Editor
icon on the desktop.
•
If a shortcut was added to the Quick Launch toolbar:
Double-click the P-touch Quick Editor
icon in the Quick Launch toolbar.
• If no shortcuts were added:
1 Click the Start button in the taskbar to
display the Start menu.
2 Select “Programs”.
3 Click “P-touch Quick Editor”.
After P-touch Quick Editor is started, the
following window is displayed.
P-touch Quick Editor can be hidden or
displayed by clicking its icon in the system
tray, at the right of the taskbar.
On a Macintosh computer:
•
Double-click the P-touch Quick Editor icon in the Ptouch Quick Editor folder installed on the computer.
After P-touch Quick Editor is started, the following window is displayed.
Toolbar
Label view
Toolbar
Label view
Using P-touch Quick Editor
The P-touch Quick Editor enables you to design a simple label layout quickly and easily. In addition to the
various functions available through the buttons in the toolbar, right-clicking (Windows) or holding down the
Control key and clicking (Macintosh) in the label view displays a pop-up menu containing more commands.
Specifying a label size
Before entering text, the label size must be set. A
selection of preset layout sizes is available for a
variety of needs.
1 Click the arrow beside the Properties button
( ) to display a drop-down menu.
2 Click [Tape Settings] to display various label
format settings.
The Tape Settings can also be displayed by
selecting [View Properties], then clicking
[Tape Settings] in the pop-up menu,
displayed by right-clicking (Windows) or
holding down the Control key and
clicking (Macintosh) in the label view.
3 In the Format list, click the desired label
format.
The size of the label layout can also be set
by specifying the Length and Width settings
or by dragging the edges of the label view
until the layout is the desired size.
16
Page 21

Entering text
The entire text can quickly be formatted by specifying the font, size, style and alignment. In addition, a frame can be drawn around the text.
1 Click the arrow beside the Properties button
( ) to display a drop-down menu.
2 Click [Text Settings] to display various text
format settings.
The Text Settings can also be displayed by
selecting [View Properties], then clicking
[Text Settings] in the pop-up menu,
displayed by right-clicking (Windows) or
holding down the Control key and
clicking (Macintosh) in the label view.
3 In the Text Settings, select the desired text
formats.
4 Click in the label view, and then type or
import the text.
Typing in the label view shows the text as
it will appear when it is printed. However,
by clicking the Change View button
( ), the text is displayed in the text
box, giving you a clearer view of the
entered text.
Importing text
Text that has already been typed in another application can easily be imported into the label.
1 Select the desired text in the other
application.
2 Import the text into the label layout either by
pressing the designated shortcut keys
(Windows only) or by dragging it from the
other application.
(Windows only) To specify the shortcut
keys used to import text, right-click in the
label view (or text box), and then click
[Options] in the menu that appears. In the
Options dialog box that appears, select the
desired shortcut keys for importing text.
Using the Text History list
The 10 most recently printed texts are automatically stored for future use.
1 Click the Text History button ( ) to
display the Text History list.
2 Click the desired text.
Text selected from the Text History list
replaces all text already entered in the
layout.
Adding a symbol
A symbol from the various installed symbol fonts
can be added at the left side of the label text.
1 (Windows) Right-click in the label view (or text
box), select [Symbols] in the menu that appears,
and then click [Insert/Change]. The Input Symbol dialog box appears.
(Macintosh) Hold down the Control key and
click in the label view (or text box), select
[Symbol font] in the menu that appears, and
then click [Import/Change]. A dialog box
displaying symbols appears.
2 In the Symbol Font list, select the desired
symbol font.
3
In the Symbol List view, select the desired symbol.
4 Click the OK button. The selected symbol is
added at the left of the text.
If a symbol has already been added to the
text, it will be replaced by the newly
selected symbol.
17
Page 22

Changing the background color
The background color of the layout can be
changed to suit your preference.
•(Windows) Right-click in the label view (or text
box), select [Background Color] in the menu
that appears, and then click the desired color
from the list.
(Macintosh) Hold down the Control key and
click in the label view (or text box), select
[Background Color] in the menu that appears,
and then click the desired color from the list.
To select a color other than those listed,
select [User Settings] (Windows) or [User
Setting] (Macintosh) from the Background
Color submenu, create the desired color
in the dialog box that appears, and then
click the OK button.
Viewing the text
Layouts that are too long to fit in the screen can be
scrolled by clicking the Arrange button ( ) to
view the left, the center, then the right side of the
layout with each click of the button.
If the label view (or text box) has been
moved away from the tool bar, it will be
docked before scrolling.
Printing
Before printing labels, certain print options can
be selected.
1 Click the arrow beside the Print button
( ) to display a drop-down menu.
2 (Windows) Click [Print Options]. The Print
dialog box appears.
(Macintosh) Click [Print]. A dialog box
containing the print options appears.
On the Macintosh, this dialog box can
also be displayed by just clicking the Print
button.
3 Select the desired print settings.
Cut Marks: This option allows you to select
whether or not to print cut marks (:), which
indicate where to cut the label so that the left
and right margins are equal.
Mirror Printing: This option allows you to
print the text in reverse so it can be attached
to a window.
Copies: This option allows enter the number
of copies to be printed.
4 (Windows) Click the OK button.
(Macintosh) Click [Print]. The layout is
printed.
(Windows) To begin printing:
1 Either click the Print button ( ), or click
the arrow beside the Print button, and click
[Print] in the drop-down menu.
2 Select the desired print settings.
3 Click the OK button.
Hiding/displaying P-touch Quick Editor (Windows only)
P-touch Quick Editor can be hidden by clicking
the Hide button ( ). Re-display P-touch Quick
Editor by clicking its icon in the system tray, at the
right of the taskbar.
Quitting P-touch Quick Editor
•(Windows) Do either of the following:
Right-click the P-touch Quick Editor icon
in the system tray, and then click [Exit] in
the menu that appears.
Right-click in the label view (or text box),
and then click [Exit] in the menu that
appears.
(Macintosh) Do either of the following:
Click [Quit] in the [File] menu
Hold down the Control key and click in
the label view (or text box), and then click
[Quit] in the menu that appears.
18
Page 23

Printing a label
GH
ABCDEF
1 Turn on the PT-1500PC and start up the computer.
2 Start up either P-touch Quick Editor or P-touch Editor Ver. 3.1, and make sure that the PT-1500PC
is selected as the printer.
3 Design your label.
4 Click the [Print] command in the application,
select the desired print settings, and then
click the Print button. The status indicator of
the PT-1500PC flashes while it is receiving
the data. After the label is printed, press in on
the tape cutter button to cut off the label.
While printing multiple copies, the PT1500PC may stop printing for a short
while in order for the print head to cool
down. Printing will continue once the
print head has sufficiently cooled down.
To feed out extra tape, hold down the
Power/Feed key for a few seconds.
Feed
Removing the label backing
The enclosed tape separator enables you to easily remove the backing from labels printed on laminated tape.
1
Hold the tape in your left hand, with the
printed surface facing up, and hold the stick
in your right hand.
2
Pass the tape halfway through the long
narrow hole in the stick.
3
Turn the stick three-quarters of a turn
towards you, and then pull the stick away
from you as shown in the illustration.
4
Peel off the label backing.
EF
D
ABC
19
Page 24

Quitting P-touch Quick Editor
On an IBM PC-compatible computer:
• From the application:
Right-click in the label view (or text box), and then click [Exit] in the menu that appears.
• From the taskbar:
Right-click on the P-touch Quick Editor icon in the system tray, at the right of the taskbar, and
then click [Exit] in the menu that appears.
On a Macintosh computer:
• From the pop-up menu:
While holding down the Control key, click in the label view (or text box), and then click [Quit]
in the menu that appears.
• From the application menu:
Click the [File] menu, and then click the [Quit] command.
Maintenance
Cleaning the print head and roller
A blank horizontal line appearing through the printed label indicates that the print head and roller are
dirty. Clean the print head and roller according to the following procedure.
1 Turn off the PT-1500PC.
2 Open the tape compartment cover.
3 Remove the tape cassette if one is installed.
Print head
4 Use a dry cotton swab to gently wipe up and
down along the print head and roller.
Caution:
Be careful not to touch the cutter near the
print head and roller while cleaning them.
In addition, do not try to clean the
print head immediately after printing,
otherwise you may be burned.
5 Insert the tape cassette, and then close the
tape compartment cover.
* Cleaning can easily be done using the
optional print head cleaning cassette
(TZ-CL4).
20
Roller
(area to be cleaned)
Print head
(area to be cleaned)
Cotton swab
Cotton swab
Page 25

Cleaning the tape cutter
After a while, adhesive may accumulate on the
cutter, preventing it from cutting or resulting in the
tape being jammed. Once a year, use a cotton swab
dipped in isopropyl (rubbing) alcohol to clean off
the cutter.
Do not touch the cutter’s edge, otherwise
you may be injured.
Troubleshooting
Monitoring the P-touch Status
You can determine the status of the PT-1500PC from the status indicator.
Status Indicator
Lights up
Flashes a few times
• The P-touch is operating normally and is in stand-by.
• The P-touch is receiving data from the computer correctly.
Cause→Remedy
Cotton swab
Tape cutter
Flashes quickly
Flashes, staying off
longer that it is on
Flashes slowly
• The cassette is not installed. → Install a cassette.
•A transmission error occurred. → Press the power/feed key to turn
the PT-1500PC off, then on again.
•
The tape cutter button was pressed while printing
• An EEPROM error occurred. → Contact your service representative.
• The print head is cooling down. → Wait until printing continues.
→
Try printing again.
21
Page 26
Problem-solving
If you think the P-touch is not printing correctly, but you cannot determine the problem with the status
indicator, refer to the following list of possible problems, and then perform the necessary operations.
Problem
The P-touch does
not print. A
printing error is
indicated.
While printing,
striped tape appears.
The status indicator does not light
up or flash.
A blank horizontal
line appears through
the printed label.
A data transmission error appears
on the computer.
* If two or more of the same P-touch models are connected through their USB ports, select “PTUSB
(PT-1500PC-XXXXXXXXX):” (where XXXXXXXXX is the serial number) instead of “PTUSB:”. The serial number is written above the barcode on the silver label attached to the bottom of the P-touch.
Cause
• The interface cable is not
correctly connected.
• The tape cassette is not inserted correctly.
• The tape compartment
cover is open.
There is no more tape in the
tape cassette.
The AC adapter in not correctly connected.
The print head and roller are
dirty.
The wrong port is selected.
Check that the interface cable is correctly
connected, the tape cassette is correctly installed, and that the tape compartment cover
is closed.
Insert a new tape cassette, and then either
press the Power/Feed key or turn the P-touch
off, then on again.
Check that the AC adapter is correctly connected. If
the power button still does not light up or flash, contact your service representative.
Clean the print head and roller according to
the procedure in
roller
on page 20.
Windows
Under “Print to the following port” in the
printer Properties dialog box, select
“PTUSB:” for the USB connection.*
Mac
Select in the Chooser the PT-1500PC where the
P-touch is connected.
Solution
Cleaning the print head and
Machine specifications
Power supply: AC 120 V, 60 Hz (AC adapter model AD-60)
Label tape: 5 widths available:
Print head: 112 dots
Port: USB
Dimensions: 6 1/2” × 2 2/3” × 5 3/8” (166 × 66.5 × 137.4 mm)
Weight: 18 ozs (540 g)
22
1/4” (6 mm)
3/8” (9 mm)
1/2” (12 mm)
3/4” (18 mm)
1” (24 mm)
180 dpi
Page 27

Accessories
• Supplies
Obtain tape cassettes from your nearest authorized dealer. Brother cannot be held responsible for
trouble caused by the use of unauthorized supplies.
Use only Brother TZ tapes with this machine. Do not use tapes that do not have the mark.
Stock No. Description QTY/PACKAGE PRICE
1” (24 mm)
TZ151 Black Characters on Clear Adhesive 1 $25.99
TZ251 Black Characters on White Adhesive 1 $28.99
TZ451 Black Characters on Red Adhesive 1 $28.99
TZ651 Black Characters on Yellow Adhesive 1 $28.99
TZB51 Black Characters on Flu. Orange Adhesive 1 $35.99
TZ252 Red Characters on White Adhesive 1 $28.99
TZ253 Blue Characters on White Adhesive 1 $28.99
TZ354 Gold Characters on Black Adhesive 1 $31.99
TZ155 White Characters on Clear Adhesive 1 $32.95
TZ355 White Characters on Black Adhesive 1 $31.99
TZS251 Industrial (Strong Adhesive) Black Characters on White Adhesive 1 $31.99
3/4” (18 mm)
TZ141 Black Characters on Clear Adhesive 1 $22.99
TZM41 Black Characters on Clear (Mat) Adhesive 1 $24.99
TZ241 Black Characters on White Adhesive 1 $24.99
TZ641 Black Characters on Yellow Adhesive 1 $24.99
TZB41 Black Characters on Flu. Orange Adhesive 1 $29.99
TZ242 Red Characters on White Adhesive 1 $24.99
TZ243 Blue Characters on White Adhesive 1 $24.99
TZ344 Gold Characters on Black Adhesive 1 $28.99
TZ345 White Characters on Black Adhesive 1 $28.99
TZ545 White Characters on Blue Adhesive 1 $28.99
TZS241 Industrial (Strong Adhesive) Black Characters on White Adhesive 1 $27.99
1/2” (12 mm)
TZ131 Black Characters on Clear Adhesive 1 $19.99
TZ231 Black Characters on White Adhesive 1 $20.99
TZM31 Black Characters on Clear (Mat) Adhesive 1 $20.99
TZ431 Black Characters on Red Adhesive 1 $20.99
TZ531 Black Characters on Blue Adhesive 1 $20.99
TZ631 Black Characters on Yellow Adhesive 1 $20.99
TZ731 Black Characters on Green Adhesive 1 $20.99
TZ132 Red Characters on Clear Adhesive 1 $19.99
TZ135 White Characters on Clear Adhesive 1 $23.95
TZ232 Red Characters on White Adhesive 1 $20.99
TZ133 Blue Characters on Clear Adhesive 1 $19.99
TZ233 Blue Characters on White Adhesive 1 $20.99
TZ334 Gold Characters on Black Adhesive 1 $24.99
TZ335 White Characters on Black Adhesive 1 $24.99
TZ435 White Characters on Red Adhesive 1 $24.99
TZS231 Industrial (Strong Adhesive) Black Characters on White Adhesive 1 $23.99
3/8” (9 mm)
TZ121 Black Characters on Clear Adhesive 1 $16.99
TZ221 Black Characters on White Adhesive 1 $19.99
TZ222 Red Characters on White Adhesive 1 $19.99
TZ223 Blue Characters on White Adhesive 1 $19.99
TZ325 White Characters on Black Adhesive 1 $22.99
TZS221 Industrial (Strong Adhesive) Black Characters on White Adhesive 1 $21.99
23
Page 28

Stock No. Description QTY/PACKAGE PRICE
1/4” (6 mm)
TZ111 Black Characters on Clear Adhesive 1 $14.99
TZ211 Black Characters on White Adhesive 1 $16.99
TZ315 White Characters on Black Adhesive 1 $20.99
TZS211 Industrial (Strong Adhesive) Black Characters on White Adhesive 1 $19.99
Non-laminated tapes
Stock No. Description QTY/PACKAGE PRICE
3/4” (18 mm)
TZN641 Black Characters on Yellow Adhesive 1 $21.99
TZN541 Black Characters on Blue Adhesive 1 $21.99
TZNF41 Black Characters on Purple Adhesive 1 $21.99
1/2” (12 mm)
TZN631 Black Characters on Yellow Adhesive 1 $17.99
TZN531 Black Characters on Blue Adhesive 1 $17.99
TZNF31 Black Characters on Purple Adhesive 1 $17.99
Iron on transfer tape
Stock No. Description QTY/PACKAGE PRICE
3/4” (18 mm)
TZIY41 Black Characters 1 $29.95
Security tape
Stock No. Description QTY/PACKAGE PRICE
3/4” (18 mm)
TZSE4 Black Characters on White Adhesive 1 $49.95
Fabric tape
Stock No. Description QTY/PACKAGE PRICE
1/2” (12 mm)
TZFA3 Black Characters on White Adhesive 1 $34.95
Stamp kit/holder
Stock No. Description QTY/PACKAGE PRICE
1” (24 mm) Stamp Area 13.5 × 65 mm
SKLB LARGE Stamp Kit (Stamp holder + Tape cassette) 1 $54.95
SHLB LARGE Stamp Holder 1 $27.45
3/4” (18 mm) Stamp Area 9 × 55 mm
SKMB MEDIUM Stamp Kit (Stamp holder + Tape cassette) 1 $49.95
SHMB MEDIUM Stamp Holder 1 $24.95
Options
Stock No. Description QTY/PACKAGE PRICE
TZCL4 Print head cleaning cassette 1 $24.95
24
Page 29

ACCESSORY ORDER FORM
This order form is provided for your convenience should your retailer not stock the item(s) needed or
if you prefer to order by telephone. To order by phone, please call Brother International at 1-800-6682768 and have your Visa or MasterCard available.
Stock No. Description Price Quantity Total
TOTAL
Prices subject to change without notice.
Before calling:
1. Review the reverse side of this form and select the desired items.
2. Complete the order form, indicating the quantity of each item (for your records).
3. Enter the total on the “Supply/Accessory Total” line below (for your records).
4. Add appropriate sales tax and shipping/handling costs (for your records).
5. Have your Visa or MasterCard number and expiration date available.
Supply/Accessory Total $
All Residents of Canada: Please add G.S.T $
applicable sales taxes (G.S.T. & P.S.T.). P.S.T. $
Shipping/Handling $5.00
TOTAL DUE $
G.S.T. # R100663764
P.S.T. # 100100117TQ0001
* Prices subject to change without notice.
✂
Page 30

Page 31
ACCESSORY ORDER FORM
This order form is provided for your convenience should your retailer not stock the item(s) needed or
if you prefer to order by telephone. To order by phone, please call Brother International at 1-800-6682768 and have your Visa or MasterCard available.
Stock No. Description Price Quantity Total
TOTAL
Prices subject to change without notice.
Before calling:
1. Review the reverse side of this form and select the desired items.
2. Complete the order form, indicating the quantity of each item (for your records).
3. Enter the total on the “Supply/Accessory Total” line below (for your records).
4. Add appropriate sales tax and shipping/handling costs (for your records).
5. Have your Visa or MasterCard number and expiration date available.
Supply/Accessory Total $
All Residents of Canada: Please add G.S.T $
applicable sales taxes (G.S.T. & P.S.T.). P.S.T. $
Shipping/Handling $5.00
TOTAL DUE $
G.S.T. # R100663764
P.S.T. # 100100117TQ0001
* Prices subject to change without notice.
✂
Page 32

Page 33

Guide de référence rapide
Guide de référence rapide
FRANÇAIS
Page 34

Merci d’avoir acheté la P-touch 1500PC !
Avec votre nouvelle imprimante d’étiquette Brother, vous pourrez imprimer des étiquettes personnali-
sées pour n’importe quel usage. Il suffit d’insérer une cassette d’étiquettes dans la PT-1500PC, de concevoir votre étiquette avec le logiciel de conception d’étiquette P-touch fourni, et de l’imprimer. Votre
étiquette personnalisée s’imprime en quelques secondes. Les cassettes de ruban d’étiquettes existent en
différentes tailles et en différentes couleurs - ce qui est idéal pour faire un codage par couleur d’étiquette
ou pour tous vos autres besoins d’étiquetage spéciaux.
Les deux applications de conception d’étiquettes sont enregistrées sur le CD-ROM. Le logiciel P-touch
Quick Editor facile à utiliser vous permet d’écrire un texte et d’effectuer un formatage rapide de façon à
imprimer instantanément des étiquettes simples. L’application P-touch Editor Ver.3.1 plus perfectionnée
permet non seulement d’automatiser les fonctions de page complexes, mais également d’utiliser tout un
choix de modèles préformatés à utiliser immédiatement.
Avis de conformité aux normes du ministères des communications du Canada
Cet appareil numérique respecte les limites de bruits radioélectriques applicables aux appareils
numériques de classe B prescrites dans la norme sur le matériel brouilleur: “Appareils Numériques”, NMB-003 édictée par le Ministère des Communications.
Page 35

Table des matières
Déballage .......................................................................................................................................... 2
Description générale ......................................................................................................................... 2
Précautions générales ........................................................................................................................ 2
Insertion d’une photo dans le cadre à photo .....................................................................................3
Les cassettes de ruban ....................................................................................................................... 3
Remplacement de la cassette de ruban .............................................................................................. 4
Raccordement de l’adaptateur secteur .............................................................................................. 4
Touche d’alimentation/avance .......................................................................................................... 5
Raccordement du câble d’interface USB ...........................................................................................5
Logiciel et pilote d’imprimante .......................................................................................................... 5
Pour les utilisateurs d’un ordinateur compatible PC (Windows® 98/98SE/Me/2000) ........................... 6
Avant l’installation ..................................................................................................................... 6
Installation de P-touch Quick Editor .......................................................................................... 6
Installation de P-touch Editor Ver.3.1 ......................................................................................... 8
Installation du pilote d’imprimante ............................................................................................ 9
Consultation du mode d’emploi ................................................................................................ 9
Désinstallation du logiciel et du pilote d’imprimante ............................................................... 10
Remplacement, suppression ou ajout d’un autre pilote d’imprimante ...................................... 10
Pour les utilisateurs d’un Macintosh ................................................................................................. 12
Avant l’installation ................................................................................................................... 12
Installation de P-touch Quick Editor ........................................................................................ 12
Installation de P-touch Editor Ver.3.1 ....................................................................................... 13
Sélection de l’imprimante ........................................................................................................ 14
Consultation du mode d’emploi .............................................................................................. 14
Désinstallation du logiciel et du pilote d’imprimante ............................................................... 14
Lancement du logiciel P-touch Editor Ver.3.1 .................................................................................. 15
Lancement de P-touch Editor Ver.3.1 ....................................................................................... 15
Lancement du logiciel P-touch Quick Editor ................................................................................... 16
Lancement de P-touch Quick Editor ........................................................................................ 16
Utilisation de P-touch Quick Editor ................................................................................................. 16
Réglage de la taille de l’étiquette .............................................................................................16
Entrée de texte ......................................................................................................................... 17
Importation de texte ................................................................................................................ 17
Utilisation de la liste d’historique du texte ............................................................................... 17
Ajout d’un symbole ................................................................................................................. 17
Changement de la couleur du fond ......................................................................................... 18
Affichage du texte ................................................................................................................... 18
Impression ............................................................................................................................... 18
Masquage/affichage de P-touch Quick Editor (Windows seulement) ........................................ 18
Pour quitter P-touch Quick Editor ............................................................................................ 18
Impression d’une étiquette .............................................................................................................. 19
Retrait du dos de l’étiquette ............................................................................................................ 19
Pour quitter P-touch Quick Editor ................................................................................................... 20
Entretien .......................................................................................................................................... 20
Nettoyage de la tête d’impression et du rouleau ...................................................................... 20
Nettoyage du couteau du ruban .............................................................................................. 21
Dépannage ...................................................................................................................................... 21
Contrôle de l’état de P-touch ...................................................................................................21
Solution des problèmes ........................................................................................................... 22
Spécifications du matériel ............................................................................................................... 22
Accessoires ...................................................................................................................................... 23
1
Page 36

Déballage
• PT-1500PC (avec cadre à photo monté)
• Cassette de ruban TZ de 12 mm (1/2 po) de large (caractères noirs sur fond blanc ; 26 1/4 pi (8 mètres))
• Adaptateur secteur (modèle AD-60 ; pour le branchement de la PT-1500PC dans la prise secteur)
•
Câble d’interface USB (pour le raccordement de la PT-1500PC à un ordinateur compatible PC ou un Macintosh)
• Référence rapide
• CD-ROM contenant le logiciel PC et Mac et leurs manuels
Description générale
Indicateur d’état
Touche de couteau
du ruban
Touche
d’alimentation/
avance
Port USB
Connecteur d’adaptateur
DC IN 9.5V
secteur
Fente de sortie
de ruban
Séparateur
de ruban
Levier de
dégagement
Couvercle du logement
de ruban
Couteau
Tête
d’impression
Cadre à
photo
Cadre à photo (démonté)
Précautions générales
• Utilisez exclusivement des rubans Brother TZ avec cet appareil. N’utilisez pas de rubans ne portant pas le logo .
• Ne tirez pas sur le ruban qui sort de la P-touch. Vous risqueriez d’endommager le ruban.
• Evitez d’utiliser l’appareil dans des endroits très poussiéreux, et mettez-le à l’abri des rayons du soleil et de la pluie.
• N’exposez pas l’appareil à des températures ou une humidité élevées.
•
Ne laissez pas d’objets en vinyle ou en caoutchouc en contact avec l’appareil pendant longtemps. Cela pourrait laisser des taches.
• Ne nettoyez pas l’appareil avec de l’alcool ou d’autres solvants organiques. Utilisez uniquement un linge doux et sec.
• Ne posez de corps étrangers ni rien d’autre sur l’appareil.
• Pour ne pas vous blesser, ne touchez pas le tranchant du couteau.
• Ne touchez pas la tête d’impression, qui devient très chaude pendant l’utilisation de la P-touch. La tête d’impression
reste encore chaude quelque temps après la mise hors tension.
• Utilisez uniquement l’adaptateur secteur fourni (modèle AD-60), qui a été conçu exclusivement pour l’appareil. L’utilisation d’un autre adaptateur secteur annulerait la garantie.
• Utilisez uniquement le câble d’interface USB fourni. L’utilisation d’un autre câble annulerait la garantie.
• Si vous ne prévoyez pas d’utiliser l’appareil pendant un certain temps, débranchez l’adaptateur secteur.
• N’essayez pas de démonter la P-touch.
• IBM® est une marque de International Business Machines, Inc.
•
Microsoft® et Microsoft Windows® sont des marques déposées de Microsoft Corp. aux Etats-Unis et dans d’autres pays.
•Macintosh et Power Macintosh sont des marques déposées de Apple Computer, Inc.
•
Tous les autres noms de logiciels et de produits sont des marques ou des marques déposées des sociétés respectives.
2
Page 37

Insertion d’une photo dans le cadre à photo
Vous pouvez insérer une photo dans le cadre à photo fixé à la PT-1500PC, ce qui en fait un élément
décoratif sur votre lieu de travail.
Pour insérer la photo dans le cadre à photo, vous avez deux méthodes au choix :
• En retirant le cadre à photo de la PT-1500PC
1 Retirez le cadre à photo de la PT-1500PC
en tirant délicatement sur le cadre, et en
le saisissant par l’arrière de la PT-1500PC
comme indiqué.
Faites attention à ce que le couvercle
du logement du ruban ne s’ouvre pas
quand vous retirez le cadre à photo.
2 Retirez le dos en carton et la feuille de
protection transparente du cadre à photo.
3 Empilez la feuille de protection
transparente, la photo et le dos en carton
l’un sur l’autre, dans cet ordre, face vers
le bas.
4 Insérez une extrémité de la pile sous les
deux languettes sur un côté du cadre, puis
insérez la pile sous les deux languettes de
l’autre côté du cadre.
5 Fixez le cadre à photo sur le côté de la
PT-1500PC opposé au couvercle du
logement du ruban.
• Sans retirer le dos en carton ni la feuille de
protection transparente du cadre à photo
Glissez la photo entre le dos en carton et
la feuille de protection transparente.
D
C
I
N
9
.
5
V
Les cassettes de ruban
• Ne tirez pas sur le ruban qui sort de la P-touch. Vous risqueriez d’endommager le ruban.
• Si vous fixez l’étiquette sur une surface humide ou sale, elle risque de se décoller facilement. Avant
de fixer l’étiquette, nettoyez la surface où vous allez la coller.
• Selon les conditions de l’environnement et le matériau, l’état, la rugosité et la forme de la surface de
fixation, il est possible que l’étiquette se déplace ou se décolle. Pour vérifier la force d’adhérence de
l’étiquette ou avant d’utiliser l’étiquette sur un endroit particulièrement sensible, faites un essai en
collant un petit morceau d’étiquette sur une section dissimulée de la surface de collage prévue.
• Le soleil, le vent et la pluie risquent de provoquer une perte de couleur de l’étiquette ou de la
décoller.
• Les inscriptions effectuées avec une encre à base d’huile ou à base d’eau risquent d’être visibles
même si l’étiquette est collée dessus. Pour les dissimuler, collez deux étiquettes l’une sur l’autre, ou
utilisez un autocollant à base sombre.
• Ce ruban peut ne pas convenir dans les cas où des dommages ou des blessures risquent d’entraîner
des obligations contractuelles.
3
Page 38

Remplacement de la cassette de ruban
1 Soulevez le couvercle du logement du ruban
pour l’ouvrir. La cassette se dégage
également.
Faites attention à ce que le cadre à photo
ne tombe pas lorsque le couvercle du
logement du ruban est ouvert.
2 S’il y a déjà une cassette de ruban dans
l’appareil, sortez-la en tirant droit dessus.
3
Si le ruban encreur de la cassette de ruban à
installer est distendu, tournez la roue dentée
avec le doigt dans le sens de la flèche sur la
cassette jusqu’à ce que le ruban soit bien
tendu. Par ailleurs, vérifiez que l’extrémité du
ruban avance bien sous le guide de ruban.
Si vous insérez une cassette de ruban
neuve dotée d’une butée, n’oubliez pas
de retirer la butée.
4 Insérez la cassette de ruban à fond dans le
logement de ruban en veillant à ce que tout
le dos de la cassette touche bien le fond du
logement.
Lorsque vous insérez la cassette de ruban,
veillez à ce que le ruban ne soit pas pris
sur le coin du guide métallique.
5
Refermez le couvercle du logement de ruban
à fond en appuyant sur la section hachurée du
couvercle près de la fente de sortie du ruban.
Cassette de
ruban
Raccordement de l’adaptateur secteur
Raccordez l’adaptateur secteur à la PT-1500PC comme indiqué ci-dessous.
1 Insérez la fiche du cordon de l’adaptateur
dans le connecteur marqué DC IN 9.5V sur
la PT-1500PC.
2 Insérez la fiche de l’adaptateur dans la prise
secteur la plus proche. L’indicateur d’état
s’allume en vert pour indiquer que l’appareil
est sous tension.
Pour mettre la PT-1500PC hors tension,
appuyez sur la touche d’alimentation/
avance de façon que l’indicateur d’état
s’éteigne.
Adaptateur
secteur
Séparateur de
cassette
Indicateur d’état
DC IN 9.5V
4
Page 39

Touche d’alimentation/avance
La touche d’alimentation/avance ( ) sert à mettre la PT-1500PC sous et hors tension et à avancer le ruban.
• Pour mettre la PT-1500PC sous et hors tension :
Appuyez une fois sur .
• Pour avancer le ruban :
Maintenez enfoncée pendant au moins deux secondes.
Raccordement du câble d’interface USB
Raccordez la PT-1500PC à l’ordinateur comme indiqué ci-dessous.
Lorsque vous raccordez la PT-1500PC à un ordinateur compatible IBM PC, il faut que le logiciel
de conception d’étiquettes et le pilote d’imprimante soient installés avant de raccorder la PT1500PC à l’ordinateur et de la brancher sur l’adaptateur secteur. Effectuez la procédure
d’installation des pages 6 à 10 pour installer le logiciel et le pilote d’imprimante, puis raccordez la
PT-1500PC à l’ordinateur lorsque vous y êtes invité.
1 Insérez le connecteur plat du câble
d’interface USB fourni dans le port USB de
l’ordinateur.
2 Insérez le connecteur carré du câble
d’interface USB fourni dans le port USB
( ) de la PT-1500PC.
Si vous faites le raccordement USB via un
concentrateur, le raccordement peut ne
pas être correct en fonction du type de
concentrateur. Si l’impression n’est pas
possible avec un raccordement par
concentrateur, essayez de raccorder la PT1500PC directement à l’ordinateur avec
le câble d’interface USB.
Port USB
Câble d’interface USB
Logiciel et pilote d’imprimante
Brother Co., Ltd. et ses fournisseurs détiennent tous les droits et les droits d’auteur de ce logiciel
(y compris, mais sans s’y limiter, les programmes, images, clip art, modèles, et textes incorporés
dans le logiciel), le texte des manuels fournis et les copies du logiciel. Ce logiciel, en partie ou en
totalité, ne peut être ni copié, ni modifié, ni désossé, ni démonté ni décompilé sans permission.
Le CD-ROM fourni permet d’installer les programmes suivants :
• P-touch Quick Editor
• P-touch Editor Ver.3.1
• Pilote d’imprimante PT-1500PC
5
Page 40

Pour les utilisateurs d’un ordinateur compatible PC (Windows® 98/98SE/Me/2000)
Pour pouvoir imprimer des étiquettes sur la PT-1500PC, il faut que le logiciel de conception d’étiquettes et le
pilote d’imprimante de la PT-1500PC soient installés. Pour concevoir les étiquettes à imprimer sur la PT-1500PC,
vous avez deux applications au choix sur le CD-ROM : P-touch Quick Editor, et P-touch Editor Ver.3.1.
Avant l’installation
Pour Windows®
Vérifiez que la configuration de votre système remplit les conditions suivantes.
Ordinateur : IBM PC ou compatible
Système d’exploitation :
Espace libre sur le disque dur : Au moins 20 Mo
Mémoire disponible : Au moins 32 Mo
Moniteur : Carte graphique VGA ou plus puissante
Port USB
Lecteur de CD-ROM
Ne raccordez pas la PT-1500PC à l’ordinateur avant d’avoir installé le logiciel de conception
d’étiquettes, sinon il risque de ne pas être installé correctement. Ne raccordez pas la PT1500PC avant d’y avoir été invité.
L’installation de Windows® 2000 exige des privilèges d’administrateur.
De plus, l’impression exige des privilèges d’administrateur ou d’utilisateur de puissance.
Ce logiciel ne peut pas fonctionner dans des groupes d’utilisateurs.
Installation de P-touch Quick Editor
Le logiciel P-touch Quick Editor assure un accès rapide aux fonctions de conception d’étiquette les plus
simples permettant une entrée de texte et une impression instantanée des étiquettes. Installez le logiciel Ptouch Quick Editor sur le PC en procédant de la manière suivante.
1
Insérez le CD-ROM fourni dans le lecteur de
CD-ROM de l’ordinateur. Une boîte de
dialogue s’affiche automatiquement pour vous
permettre de sélectionner la langue.
Si la boîte de dialogue ne s’affiche pas
automatiquement, double-cliquez sur “Poste
de travail” dans le bureau, double-cliquez sur
l’icône du lecteur de CD-ROM qui renferme
le CD-ROM, puis double-cliquez sur
“Setup.exe” pour afficher la boîte de dialogue.
2 Sélectionnez la langue de votre système
d’exploitation Windows, puis cliquez sur le
bouton OK. Une boîte de dialogue s’affiche
pour vous permettre de sélectionner quoi
installer.
6
Microsoft® Windows® 2000 ou préinstallé avec Windows® 98/98SE/Me
Si vous ne souhaitez installer que le pilote
d’imprimante, cliquez sur le bouton du bas
(Driver) sur le côté droit. La première boîte de
dialogue Configuration du pilote s’affiche pour
vous informer que le pilote d’imprimante de la
PT-1500PC va être installé.
Continuez avec la procédure de
du pilote d’imprimante”
, à la page 9.
“Installation
Page 41

Pour installer le logiciel P-touch Editor Ver.3.1,
cliquez sur le bouton du haut (P-touch Editor) sur le
côté droit. Ensuite, effectuez la procédure de
“Installation de P-touch Editor Ver.3.1”
3
Cliquez sur le bouton gauche (P-touch Quick
Editor). L’assistant InstallShield® pour l’installation
du logiciel P-touch Quick Editor est lancé, puis la
boîte de dialogue Bienvenue s’affiche.
, à la page 8.
7 Cliquez sur le bouton Suivant pour
commencer l’installation.
8 Lorsque P-touch Quick Editor est installé,
une boîte de dialogue s’affiche pour vous
permettre de sélectionner où ajouter le
raccourci d’accès à P-touch Quick Editor
(page 16).
Pour Windows®
4 Lisez attentivement le contenu de la boîte de
dialogue, puis cliquez sur le bouton Suivant
pour continuer. La boîte de dialogue
Informations utilisateur s’affiche.
5
Entrez les informations nécessaires dans les cases
appropriées (si les informations ont déjà été
enregistrées dans Windows®, elles s’affichent
automatiquement), puis cliquez sur le bouton
Suivant. Une boîte de dialogue s’affiche vous
demandant de confirmer les informations entrées.
6 Cliquez sur le bouton Oui pour enregistrer
les informations entrées.
Pour modifier les informations, cliquez sur
le bouton Non, puis revenez à l’étape 4.
La boîte de dialogue Sélection du dossier
d’installation s’affiche.
9 Sélectionnez l’emplacement du raccourci et
cliquez sur le bouton Suivant. Une boîte de
dialogue s’affiche pour vous permettre de
sélectionner si vous souhaitez installer le
pilote d’imprimante ou non.
Pour installer le pilote d’imprimante, cliquez
sur le bouton Oui. La première boîte de
dialogue Configuration du pilote s’affiche
pour vous informer que le pilote d’imprimante
de la PT-1500PC va être installé.
Continuez avec la procédure de
du pilote d’imprimante”, à la page 9.
Si le pilote d’imprimante est déjà installé,
cliquez sur le bouton Non. Une boîte de
dialogue s’affiche pour vous indiquer que
l’installation est terminée.
Sélectionnez “Oui, je veux redémarrer mon
ordinateur maintenant”, cliquez sur le bouton
Terminer pour redémarrer l’ordinateur, et
enlevez le CD-ROM de l’ordinateur.
“Installation
7
Page 42

Installation de P-touch Editor Ver.3.1
Le logiciel P-touch Editor Ver.3.1 comprend diverses fonctions plus complexes pour impression de
code à barres et d’images, ce qui vous permet de
dessiner pratiquement n’importe quel type d’étiquette imaginable. Installez le logiciel P-touch Editor
Ver.3.1 sur le PC en procédant de la façon suivante.
1
Insérez le CD-ROM fourni dans le lecteur de
CD-ROM de l’ordinateur. Une boîte de
Pour Windows®
dialogue s’affiche automatiquement pour vous
permettre de sélectionner la langue.
Si la boîte de dialogue ne s’affiche pas
automatiquement, double-cliquez sur “Poste
de travail” dans le bureau, double-cliquez sur
l’icône du lecteur de CD-ROM qui renferme
le CD-ROM, puis double-cliquez sur
“Setup.exe” pour afficher la boîte de dialogue.
2
Sélectionnez la langue de votre système
d’exploitation Windows, puis cliquez sur le
bouton OK. Une boîte de dialogue s’affiche pour
vous permettre de sélectionner quoi installer.
Si vous ne souhaitez installer que le pilote
d’imprimante, cliquez sur le bouton du bas
(Driver) sur le côté droit. La première boîte de
dialogue Configuration du pilote s’affiche
pour vous informer que le pilote d’imprimante
de la PT-1500PC va être installé.
Continuez avec la procédure de
du pilote d’imprimante”
Pour installer le logiciel P-touch Quick
Editor, cliquez sur le bouton gauche (Ptouch Quick Editor). Ensuite, effectuez la
procédure de
Quick Editor”
3 Cliquez sur le bouton du haut (P-touch
Editor). L’assistant InstallShield® pour
l’installation du logiciel P-touch Editor
Ver.3.1 est lancé, puis la boîte de dialogue
Bienvenue s’affiche.
8
“Installation de P-touch
de la page 6.
“Installation
, à la page 9.
4 Suivez les instructions qui s’affichent et
continuez l’installation. Pour l’installation,
vous avez plusieurs méthodes au choix.
Typique
Toutes les options de base (P-touch Editor
Ver.3.1, Clip Art, Modèles auto formatés, Aide
et 13 polices de caractères) sont installées.
Compacte
Seul P-touch Editor Ver.3.1 est installé.
Personnalisée
Editeur : P-touch Editor Ver.3.1
Clip Art : Illustrations pour la fonction
Clip Art de P-touch Editor Ver.3.1
Polices : 13 polices de caractères
Modèles auto formatés : Modèles pour la
fonction de formatage automatique
Mode d’emploi : Mode d’emploi (HTML)
de P-touch Editor Ver.3.1
Vous pouvez également consulter le
mode d’emploi sur le CD-ROM sans
l’installer dans l’ordinateur.
Aide :
Fichiers d’aide de P-touch Editor
Ver .3.1
Si vous pouvez cliquer sur le bouton
Changer pendant qu’une option est
sélectionnée, vous pourrez sélectionner
des sous-composants. Cliquez sur le
bouton Changer pour afficher la boîte de
dialogue Sélectionner les sous-composants,
et sélectionnez les sous-composants que
vous souhaitez installer en cochant leur
case. Si vous n’avez pas installé toutes les
options ni tous les sous-composants,
certaines fonctions de P-touch Editor
Ver.3.1 ne seront pas disponibles. Quand
vous avez sélectionné les sous-composants
souhaités, cliquez sur le bouton Continuer.
5
Lorsque l’installation de P-touch Editor Ver.3.1
est terminée, une boîte de dialogue s’affiche pour
vous permettre de sélectionner si vous souhaitez
installer le pilote d’imprimante ou non.
Pour installer le pilote d’imprimante, cliquez
sur le bouton Oui. La première boîte de
dialogue Configuration du pilote s’affiche
pour vous informer que le pilote d’imprimante
de la PT-1500PC va être installé.
Page 43

Continuez avec la procédure de
du pilote d’imprimante” ci-dessous.
Si le pilote d’imprimante est déjà installé, cliquez
sur le bouton Non. Une boîte de dialogue s’affiche
pour vous indiquer que l’installation est terminée.
Sélectionnez “Oui, je veux redémarrer mon
ordinateur maintenant”, cliquez sur le bouton
Terminer pour redémarrer l’ordinateur, et
enlevez le CD-ROM de l’ordinateur.
“Installation
Installation du pilote d’imprimante
Avec la fonction Plug-and-Play, les nouveaux périphériques raccordés au système sont détectés,
et leur pilote est automatiquement installé. Si vous
souhaitez raccorder la PT-1500PC via le port USB,
son pilote sera installé avec la fonction Plug-andPlay. Lisez attentivement les instructions d’installation décrites ci-dessous avant d’installer le pilote d’imprimante fourni sur le CD-ROM.
Ne raccordez pas la PT-1500PC avant d’y avoir
été invité.
1 Cliquez sur le bouton Suivant. Une boîte de
dialogue s’affiche pour vous inviter à
raccorder la PT-1500PC à l’ordinateur.
2 Raccordez la PT-1500PC à l’ordinateur à
l’aide du câble d’interface USB fourni
comme expliqué à la page 5, puis mettez la
PT-1500PC sous tension. Une boîte de
dialogue s’affiche pour vous informer que le
pilote d’imprimante est installé.
3 Cliquez sur le bouton Terminer. Une boîte de
dialogue s’affiche pour vous indiquer que
l’installation est terminée.
4
Sélectionnez “Oui, je veux redémarrer mon
ordinateur maintenant”, cliquez sur le bouton
Terminer pour redémarrer l’ordinateur, et
enlevez le CD-ROM de l’ordinateur.
Consultation du mode d’emploi
Vous pouvez consulter le mode d’emploi de P-touch
Editor soit en insérant le CD-ROM dans le lecteur
chaque fois que vous souhaitez vous y reporter, soit
en l’installant sur le disque dur de façon à pouvoir
le consulter à tout moment. Le mode d’emploi étant
un document au format HTML, vous aurez besoin
d’un moteur de recherche pour le lire.
• Sur le CD-ROM :
1 Démarrez Windows Explorer.
2 Sélectionnez le lecteur de CD-ROM.
3 Double-cliquez sur “Main.htm” dans le
dossier Mode d’emploi à l’intérieur du
dossier Ptouch sur le CD-ROM.
• Dans la fenêtre du groupe P-touch Editor 3.1 :
Double-cliquez sur l’icône “Le manuel
d’utilisation P-touch Editor Ver.3.1”.
• Avec le bouton Démarrer :
1 Cliquez sur le bouton Démarrer dans la
barre de tâches pour afficher le menu
Démarrer.
2 Sélectionnez “Programmes”.
3 Sélectionnez “P-touch Editor 3.1”.
4 Cliquez sur “Le manuel d’utilisation P-
touch Editor Ver.3.1”.
Pour Windows®
9
Page 44
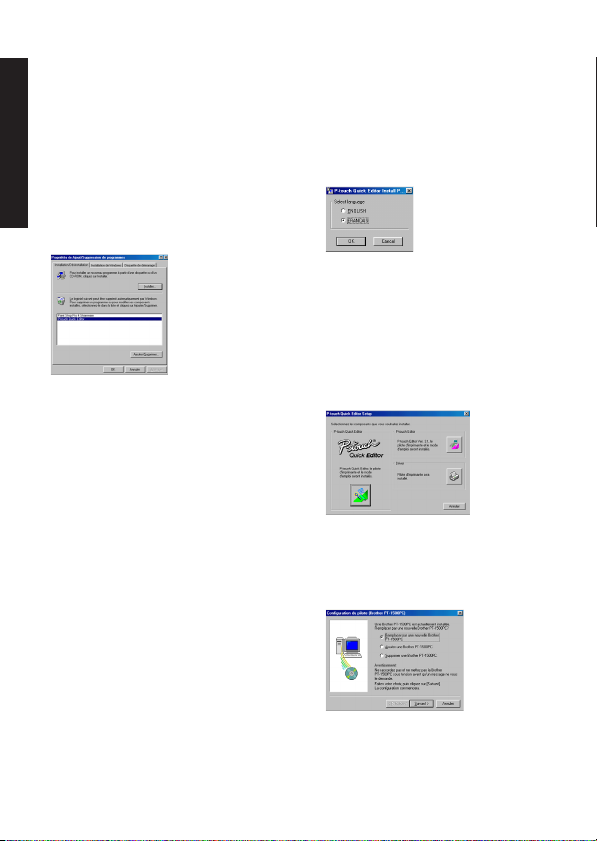
Désinstallation du logiciel et du pilote d’imprimante
Pour désinstaller le logiciel P-touch Editor Ver.3.1/
P-touch Quick Editor du PC,procédez de la façon
suivante.
1 Démarrez Windows® 98/98SE/Me/2000.
2 Cliquez sur le bouton Démarrer dans la barre
de tâches, sélectionnez “Paramètres”, puis
sélectionnez “Panneau de configuration”.
Pour Windows®
3 Dans la fenêtre Panneau de configuration,
double-cliquez sur “Ajout/Suppression de
programmes”.
4 Dans la boîte de dialogue Propriétés de
Ajout/Suppression de programmes,
sélectionnez “P-touch Quick Editor” (pour
supprimer le logiciel P-touch Quick Editor)
ou “P-touch Editor 3.1” (pour supprimer le
logiciel P-touch Editor Ver.3.1), puis cliquez
sur le bouton Ajouter/Supprimer.
5 Un message apparaît pour vous demander si
vous voulez supprimer l’application
sélectionnée. Cliquez sur le bouton Oui pour
supprimer l’application.
Si vous ne voulez pas supprimer
l’application, cliquez sur le bouton Non.
6 Dans la boîte de dialogue qui apparaît pour
vous indiquer que l’application est
supprimée, cliquez sur le bouton OK.
Remplacement, suppression ou ajout d’un autre pilote d’imprimante
1 Mettez la PT-1500PC hors tension, puis
débranchez-la de l’ordinateur.
2
Insérez le CD-ROM fourni dans le lecteur de
CD-ROM de l’ordinateur. Une boîte de
dialogue s’affiche automatiquement pour vous
permettre de sélectionner la langue.
Si la boîte de dialogue ne s’affiche pas
automatiquement, double-cliquez sur “Poste
de travail” dans le bureau, double-cliquez sur
l’icône du lecteur de CD-ROM qui renferme
le CD-ROM, puis double-cliquez sur
“Setup.exe” pour afficher la boîte de dialogue.
3
Sélectionnez la langue de votre système
d’exploitation Windows, puis cliquez sur le
bouton OK. Une boîte de dialogue s’affiche pour
vous permettre de sélectionner quoi installer.
4 Cliquez sur le bouton du bas (Driver) sur le
côté droit. La première boîte de dialogue
Configuration du pilote s’affiche pour vous
permettre de sélectionner si vous voulez
remplacer, supprimer ou ajouter un autre
pilote d’imprimante pour la PT-1500PC.
10
Page 45

5 Sélectionnez l’opération souhaitée, puis
cliquez sur le bouton Suivant.
S
i vous sélectionnez “Remplacer par une
nouvelle Brother PT-1500PC”, le pilote
d’imprimante préalablement installé est
supprimé et remplacé par un nouveau.
Sélectionnez cette option pour effectuer une
mise à niveau du pilote d’imprimante, ou si vous
fonctionnez sous Windows® 2000, pour passer à
une PT-1500PC ayant un autre numéro de série.
Si vous sélectionnez “Ajouter une Brother PT1500PC”, un nouveau pilote d’imprimante
est ajouté. Avec USB sous Windows® 98/Me,
seul un port est ajouté, sans ajouter la PT1500PC comme nouvelle imprimante.
Sélectionnez cette option si vous raccordez
plusieurs PT-1500PC au même ordinateur.
6 Si vous avez sélectionné “Remplacer par une
nouvelle Brother PT-1500PC” ou “Ajouter
une Brother PT-1500PC” : Une boîte de
dialogue s’affiche pour vous inviter à
raccorder la PT-1500PC à l’ordinateur.
Raccordez la PT-1500PC à l’ordinateur à l’aide du
câble d’interface USB fourni comme expliqué à la
page 5, puis mettez la PT-1500PC sous tension.
Une boîte de dialogue s’affiche pour vous
informer que le pilote d’imprimante est installé.
Si vous avez sélectionné “Supprimer une
Brother PT-1500PC” : Une boîte de dialogue
s’affiche pour vous demander de confirmer la
suppression de tous les pilotes d’imprimante
de la PT-1500PC.
Cliquez sur le bouton Oui. Une boîte de
dialogue s’affiche pour vous indiquer que les
pilotes d’imprimante sont supprimés.
Cliquez sur le bouton Terminer. Si une boîte
de dialogue s’affiche pour vous expliquer
que vous devez redémarrer l’ordinateur,
sélectionnez l’option de redémarrage de
l’ordinateur, puis cliquez sur le bouton
Terminer.
Pour Windows®
Sélectionnez “Oui, redémarrer immédiatement”, et cliquez sur le bouton Terminer
pour redémarrer l’ordinateur.
11
Page 46

Pour les utilisateurs d’un Macintosh
Pour pouvoir imprimer des étiquettes sur la PT-1500PC, il faut que le logiciel de conception d’étiquettes
et le pilote d’imprimante soient installés. Pour concevoir les étiquettes à imprimer sur la PT-1500PC,
vous avez deux applications au choix sur le CD-ROM : P-touch Quick Editor, et P-touch Editor Ver.3.1.
Avant l’installation
Vérifiez que la configuration de votre système remplit les conditions suivantes.
Ordinateur : Macintosh
Pour Macintosh
Système d’exploitation : Mac OS 8.6 ou ultérieur
* Ce logiciel n’est compatible qu’avec le système Mac OS X Classique.
La version Mac du logiciel est conçue pour un Macintosh avec système d’exploitation anglais. Si vous
installez le logiciel sur un Macintosh avec système d’exploitation dans une autre langue, le logiciel
risque de ne pas fonctionner correctement.
Espace libre sur le disque dur : Au moins 30 Mo
Il faudra au moins quelques centaines de mégaoctets supplémentaires d’espace libre sur le
disque dur pour pouvoir imprimer de longues étiquettes ou une grande quantité de données.
Espace libre de mémoire disponible : Au moins 24 Mo
Port USB
Lecteur de CD-ROM
Installation de P-touch Quick Editor
Le logiciel P-touch Quick Editor assure un accès
rapide aux fonctions de conception d’étiquette les
plus simples permettant une entrée de texte et une
impression instantanée des étiquettes. Installez le
logiciel P-touch Quick Editor sur le Mac en procédant de la manière suivante.
1
La PT-1500PC et l’ordinateur étant hors
tension, raccordez la PT-1500PC au Macintosh
à l’aide du câble d’interface USB fourni.
Laissez bien la PT-1500PC hors tension.
2 Mettez le Macintosh sous tension.
3
Insérez le CD-ROM fourni dans le lecteur de CDROM de l’ordinateur. Un dossier s’ouvre pour
vous permettre de voir le contenu du CD-ROM.
4 Double-cliquez sur l’icône “P-touch Quick
Editor Installer” dans le dossier qui s’affiche.
L’installateur démarre.
5 Sélectionnez la méthode d’installation.
Cliquez sur le bouton “Install” pour démarrer
immédiatement l’installation des options les
plus élémentaires.
Il faut environ 30 Mo d’espace libre sur le
disque dur pour commencer l’installation.
Pour pouvoir installer toutes les options, il
faudra environ 30 Mo d’espace libre sur le
disque dur. Si vous avez suffisamment
d’espace sur le disque dur, cliquez sur le
bouton “Install”.
Si vous cliquez sur le bouton “Custom Install”
une boîte de dialogue s’affiche pour vous
permettre de sélectionner quelles options
installer.
12
Page 47

3 Insérez le CD-ROM fourni dans le lecteur de
CD-ROM de l’ordinateur. Un dossier s’ouvre
pour vous permettre de voir le contenu du
CD-ROM.
Seules les options dont la case est cochée sont
installées. Sélectionnez les options que vous
souhaitez installer, et cliquez sur le bouton
“Install” pour commencer l’installation.
Pour pouvoir imprimer sur la PT-1500PC,
sélectionnez “PT-1500PC Driver” pour
l’installation.
6 Lorsque l’installation est terminée et que la
boîte de dialogue suivante apparaît, cliquez
sur le bouton “Quit”.
7 Lorsque la boîte de dialogue s’affiche pour
vous demander si vous voulez redémarrer
l’ordinateur, cliquez sur le bouton “Restart”
pour redémarrer l’ordinateur.
Installation de P-touch Editor Ver.3.1
Le logiciel P-touch Editor Ver.3.1 comprend diverses fonctions plus complexes pour impression
de code à barres et d’images, ce qui vous permet
de dessiner pratiquement n’importe quel type d’étiquette imaginable. Installez le logiciel P-touch
Editor Ver.3.1 sur l’ordinateur en procédant de la
façon suivante.
1
La PT-1500PC et l’ordinateur étant hors
tension, raccordez la PT-1500PC au Macintosh
à l’aide du câble d’interface USB fourni.
Laissez bien la PT-1500PC hors tension.
2 Mettez le Macintosh sous tension.
4 Double-cliquez sur le dossier “P-touch Editor
Ver3.1” pour l’ouvrir.
5 Double-cliquez sur l’icône “P-touch Editor
3.1 Installer” dans le dossier. L’installateur
démarre.
6 Sélectionnez la méthode d’installation.
Cliquez sur le bouton “Install” pour démarrer
immédiatement l’installation des options les
plus élémentaires. (Certaines illustrations
Clip Art ne seront pas installées.)
Il faut environ 30 Mo d’espace libre sur le
disque dur pour commencer l’installation.
Pour pouvoir installer toutes les options, il
faudra environ 120 Mo d’espace libre sur le
disque dur. Si vous avez suffisamment
d’espace sur le disque dur, cliquez sur le
bouton “Install”.
Si vous cliquez sur le bouton “Custom
Install”, une boîte de dialogue s’affiche pour
vous permettre de sélectionner quelles
options installer.
Pour Macintosh
13
Page 48

Seules les options dont la case est cochée sont
installées. Sélectionnez les options que vous
Pour Macintosh
souhaitez installer, et cliquez sur le bouton
“Install” pour commencer l’installation.
Pour pouvoir imprimer sur la PT-1500PC,
sélectionnez “PT-1500PC Driver” pour
l’installation.
7 Lorsque l’installation est terminée et que la
boîte de dialogue suivante apparaît, cliquez
sur le bouton “Quit”.
8 Lorsque la boîte de dialogue s’affiche pour
vous demander si vous voulez redémarrer
l’ordinateur, cliquez sur le bouton “Restart”
pour redémarrer l’ordinateur.
Sélection de l’imprimante
1
Déroulez le menu Apple et sélectionnez
“Sélecteur” pour afficher la fenêtre “Sélecteur”.
2 Dans la liste de gauche, cliquez sur l’icône
PT-1500PC.
3 Refermez la fenêtre “Sélecteur” pour
confirmer les réglages.
14
Consultation du mode d’emploi
Vous pouvez consulter le mode d’emploi de P-touch
Editor soit en insérant le CD-ROM dans le lecteur
chaque fois que vous souhaitez vous y reporter, soit
en l’installant sur le disque dur de façon à pouvoir
le consulter à tout moment. Le mode d’emploi étant
un document au format HTML, vous aurez besoin
d’un moteur de recherche pour le lire.
• Sur le CD-ROM :
Double-cliquez sur “Main.htm” dans le
dossier Mode d’emploi à l’intérieur du
dossier P-touch Editor Ver.3.1 sur le CDROM.
•Avec le bouton Démarrer :
Double-cliquez sur “Main.htm” dans le
dossier Mode d’emploi à l’intérieur du
dossier P-touch Editor Ver.3.1 sur le
disque dur.
Désinstallation du logiciel et du pilote d’imprimante
Pour désinstaller P-touch Quick Editor, P-touch
Editor Ver.3.1 et le pilote d’imprimante, procédez
de la façon suivante.
Lorsque vous supprimez le pilote
d’imprimante, assurez-vous que la P-touch
est hors tension et débranchée.
1 Glissez-déplacez le dossier suivant sur
l’icône de la poubelle :
• Dossier P-touch Quick Editor (pour le
logiciel P-touch Quick Editor)
• Dossier P-touch Editor Ver3.1 (pour le
logiciel P-touch Editor Ver.3.1)
2 Dans le dossier Système, ouvrez le dossier
Extensions.
3 Glissez-déplacez les icônes suivantes sur
l’icône de la poubelle :
•PT-1500PC et USB PT-1500PC Extension
4 Dans le dossier Système, ouvrez le dossier
Préférences.
5 Glissez-déplacez les icônes suivantes sur
l’icône de la poubelle :
• P-touch Quick Editor Prefs, P-touch Editor
3.1 Prefs, et PT-1500PC Prefs
Le logiciel et le pilote d’imprimante sont
maintenant supprimés.
Page 49

Lancement du logiciel P-touch Editor Ver.3.1
Lancement de P-touch Editor Ver.3.1
Avec l’application P-touch Editor Ver.3.1, n’importe qui pourra créer et imprimer des étiquettes
plus complexes adaptées à pratiquement tous les
besoins imaginables.
Sur un ordinateur compatible IBM PC :
• En cliquant sur l’icône P-touch Editor :
Double-cliquez sur l’icône P-touch Editor 3.1
dans la fenêtre du groupe P-touch Editor 3.1.
•Avec le bouton Démarrer :
1
Cliquez sur le bouton Démarrer dans la barre
de tâches pour afficher le menu Démarrer.
2 Sélectionnez “Programmes”.
3 Sélectionnez “P-touch Editor 3.1”.
4 Cliquez sur “P-touch Editor 3.1”.
Quand P-touch Editor Ver.3.1 a démarré, la fenêtre suivante s’affiche.
Pour les détails sur les fonctions de P-touch
Editor Ver.3.1, voyez le mode d’emploi, que
vous pouvez soit installer dans l’ordinateur
soit consulter sur le CD-ROM.
Barre de tâches
standard
Zone de page
Barre de titres
Zone d’impression
Ancrage de
propriété
Barre de
tâches de
dessin
Ancrage
d’objets
Barre
d’état
Barre de menus
Sur un ordinateur Macintosh :
• Double-cliquez sur l’icône P-touch Editor
Ver.3.1.6 dans le dossier P-touch Editor
Ver3.1 installé dans l’ordinateur.
Quand P-touch Editor Ver.3.1 a démarré, la fenêtre suivante s’affiche.
Pour les détails sur les fonctions de P-touch
Editor Ver.3.1, voyez le “User’s Guide”, que
vous pouvez soit installer dans l’ordinateur
soit consulter sur le CD-ROM.
Zone de page
Zone
d’impression
Règles
Curseur
Règles
Barre de
menus
Barre d’outils
de dessin
Barre d’outils
d’impression
Barre d’outils
de base de
données
Barre d’état
Ancrage d’objets Ancrage de propriété
Barre
de titres
15
Page 50

Lancement du logiciel P-touch Quick Editor
1
Lancement de P-touch Quick Editor
Si vous avez installé P-touch Quick Editor sur
votre ordinateur, vous pouvez ajouter des
raccourcis vers le poste de travail, le menu
Démarrer et la barre d’outils Quick Launch.
Sur un ordinateur compatible IBM PC :
• Si vous avez ajouté un raccourci vers le
menu Démarrer :
P-touch Quick Editor démarre automatiquement
lorsque vous démarrez votre ordinateur.
• Si vous avez ajouté un raccourci vers le poste
de travail :
Double-cliquez sur l’icône P-touch Quick
Editor dans le poste de travail.
•
Si vous avez ajouté un raccourci vers la barre d’outils
Quick Launch :
Double-cliquez sur l’icône P-touch Quick
Editor dans la barre d’outils Quick Launch.
• Si vous n’avez pas ajouté de raccourci :
Cliquez sur le bouton Démarrer dans la barre
de tâches pour afficher le menu Démarrer.
2 Sélectionnez “Programmes”.
3 Cliquez sur “P-touch Quick Editor”.
Quand P-touch Quick Editor a démarré, la
fenêtre suivante s’affiche.
Barre d’outils
Zone d’ffichage
Vous pouvez masquer ou afficher P-touch
Quick Editor en cliquant sur son icône dans le
tiroir système, à droite de la barre de tâches.
Sur un ordinateur Macintosh :
•
Double-cliquez sur l’icône P-touch Quick Editor
dans le dossier P-touch Quick Editor installé dans
l’ordinateur.
Quand P-touch Quick Editor a démarré, la fenêtre
suivante s’affiche.
d’étiquette
Barre d’outils
Zone d’affichage
d’étiquette
Utilisation de P-touch Quick Editor
Le P-touch Quick Editor vous permet de créer des étiquettes simples rapidement et en toute facilité. Outre
diverses fonctions qui sont accessibles via les boutons de la barre d’outils, un clic droit de la souris (Windows)
ou une pression maintenue sur la touche Control et un clic (Macintosh) dans la zone d’affichage de l’étiquette
fait apparaître un menu déroulant qui renferme d’autres commandes.
Réglage de la taille de l’étiquette
Avant d’entrer le texte, vous devez régler la taille
de l’étiquette. Vous disposez d’un choix de tailles
de page préréglées adaptées à différents besoins.
1 Cliquez sur la flèche à côté du bouton
Propriétés ( ) pour afficher un menu
déroulant.
2 Cliquez sur [Réglages du ruban] pour afficher
différents réglages de format d’étiquettes.
16
Vous pouvez également afficher les
Réglages du ruban en sélectionnant
[Afficher propriétés], puis en cliquant sur
[Réglages du ruban] dans le menu
déroulant, qui s’affiche avec un clic droit
(Windows) ou en maintenant la touche
Control enfoncée et en cliquant (Macintosh)
dans la zone d’affichage de l’étiquette.
3 Dans la liste Format, cliquez sur le format
d’étiquette souhaité.
Vous pouvez également régler la taille de
page de l’étiquette en spécifiant les
paramètres Longueur et Largeur ou en
glissant-déplaçant les bords de l’étiquette
dans la zone d’affichage jusqu’à ce que
vous obteniez la taille de page voulue.
Page 51

Entrée de texte
Le texte entier se formate rapidement en spécifiant
la police, la taille, le style et l’alignement. De plus
vous pouvez tracer un cadre tout autour du texte.
1
Cliquez sur la flèche à côté du bouton Propriétés
( ) pour afficher un menu déroulant.
2 Cliquez sur [Réglages du texte] pour afficher
différents paramètres de formatage du texte.
Vous pouvez également afficher les Réglages
du texte en sélectionnant [Afficher propriétés],
puis en cliquant sur [Réglages du texte] dans
le menu déroulant, qui s’affiche avec un clic
droit (Windows) ou en maintenant la touche
Control enfoncée et en cliquant (Macintosh)
dans la zone d’affichage de l’étiquette.
3 Dans Réglages du texte, cliquez sur les
formats de texte souhaités.
4 Cliquez sur la zone d’affichage de l’étiquette,
puis tapez ou importez le texte.
Quand vous tapez le texte dans la zone
d’affichage de l’étiquette, le texte s’affiche
tel qu’il apparaîtra quand il sera imprimé.
Mais si vous cliquez sur le bouton
Changer vue ( ), le texte s’affiche
dans la boîte de texte, ce qui vous permet
de mieux voir le texte entré.
Importation de texte
Vous pouvez importer en toute facilité dans l’étiquette
un texte qui a déjà été entré dans une autre application.
1 Sélectionnez le texte dans l’autre application.
2 Importez le texte dans la page de l’étiquette
soit en appuyant sur les touches de raccourci
spécifiées (Windows seulement), soit en le
glissant-déplaçant depuis l’autre application.
(Windows seulement) Pour spécifier les
touches de raccourci à utiliser pour
importer le texte, effectuez un clic droit
dans la zone d’affichage de l’étiquette (ou
dans la boîte de texte), puis cliquez sur
[Options] dans le menu qui apparaît. Dans
la boîte de dialogue Options qui s’affiche,
sélectionnez les touches de raccourci
souhaitées pour importer le texte.
Utilisation de la liste d’historique du texte
Les 10 textes imprimés les plus récemment sont
automatiquement enregistrés à des fins d’utilisation ultérieure.
1
Cliquez sur le bouton Historique du texte ( )
pour afficher la liste Historique du texte.
2 Cliquez sur le texte souhaité.
Le texte sélectionné dans la liste
Historique du texte remplace tous les
textes déjà entrés dans la page.
Ajout d’un symbole
Vous pouvez ajouter un symbole, choisi dans les
différentes polices de symboles installées, sur la
gauche du texte de l’étiquette.
1
(Windows) Effectuez un clic droit dans la zone
d’affichage de l’étiquette (ou la boîte de texte),
sélectionnez [Symboles] dans le menu qui apparaît, puis cliquez sur [Insérer/Changer]. La
boîte de dialogue d’entrée de symbole s’affiche.
(Macintosh) Maintenez la touche Control
enfoncée et cliquez dans la zone d’affichage de
l’étiquette (ou la boîte de texte), sélectionnez
[Symbol font] dans le menu qui apparaît, puis
cliquez sur [Import/Change]. Une boîte de
dialogue affichant les symboles apparaît.
2 Dans la liste Police du Symbole, sélectionnez
la police de symboles.
3
Dans l’affichage Liste des Symboles, sélectionnez
le symbole.
4 Cliquez sur le bouton OK. Le symbole
sélectionné est ajouté à la gauche du texte.
Si un symbole a déjà été ajouté au texte, il sera
remplacé par le nouveau symbole sélectionné.
17
Page 52

Changement de la couleur du fond
Vous pouvez changer la couleur du fond de la page
en fonction de vos préférences.
•(Windows) Effectuez un clic droit dans la zone
d’affichage de l’étiquette (ou la boîte de texte),
sélectionnez [Couleur arrière-plan] dans le
menu qui apparaît, puis cliquez sur la couleur
souhaitée dans la liste.
(Macintosh) Maintenez la touche Control enfoncée et cliquez dans la zone d’affichage de l’étiquette (ou la boîte de texte), sélectionnez [Background Color] dans le menu qui apparaît, puis
cliquez sur la couleur souhaitée dans la liste.
Pour sélectionner une autre couleur que
celles de la liste, sélectionnez [Réglages
personnalisés] (Windows) ou [User
Setting] (Macintosh) dans le sous-menu
“Background Color”, créez la couleur de
votre choix dans la boîte de dialogue qui
apparaît, et cliquez sur le bouton OK.
Affichage du texte
Vous pouvez faire défiler les pages qui sont trop
longues pour tenir sur l’écran en cliquant sur le
bouton Arranger ( ) pour afficher le côté gauche, le centre puis le côté droit de la page à chaque clic sur le bouton.
Si vous avez éloigné la zone d’affichage de
l’étiquette (ou la boîte de texte) de la barre
d’outils, elle sera ancrée avant de défiler.
Impression
Avant d’imprimer une étiquette, vous pouvez sélectionner certaines options d’impression.
1
Cliquez sur la flèche à côté du bouton Imprimer
( ) pour afficher un menu déroulant.
2
(Windows) Cliquez sur [Options d’impression].
La boîte de dialogue Imprimer apparaît.
(Macintosh) Cliquez sur [Print]. Une boîte de
dialogue contenant les options d’impression apparaît.
Sur le Macintosh, vous pouvez également
afficher cette boîte de dialogue en
cliquant sur le bouton “Print”.
3 Sélectionnez les paramètres d’impression.
Repères de découpage : Cette option vous
permet de sélectionner si vous voulez
imprimer ou non des repères de découpage
(:), qui indiquent l’endroit où couper
l’étiquette pour que les marges gauche et
droite soient égales.
Impression miroir : Cette option vous permet
d’imprimer le texte à l’envers pour pouvoir le
coller sur une fenêtre.
Copies : Cette option vous permet de régler
le nombre d’exemplaires à imprimer.
4 (Windows) Cliquez sur le bouton OK.
(Macintosh) Cliquez sur le bouton “Print”. La
page s’imprime.
(Windows) Pour commencer l’impression :
1
Cliquez sur le bouton Imprimer ( ), ou
cliquez sur la flèche à côté du bouton Imprimer,
et cliquez sur [Imprimer] dans le menu déroulant.
2 Sélectionnez les paramètres d’impression.
3 Cliquez sur le bouton OK.
Masquage/affichage de P-touch Quick Editor (Windows seulement)
Vous pouvez masquer P-touch Quick Editor en cliquant sur le bouton Dissimuler ( ). Pour réafficher
P-touch Quick Editor, cliquez sur son icône dans le
tiroir système, à droite de la barre de tâches.
Pour quitter P-touch Quick Editor
•
(Windows) Effectuez l’une des deux opérations suivantes :
Effectuez un clic droit sur l’icône P-touch
Quick Editor dans le tiroir système, puis cliquez
sur [Quitter] dans le menu qui apparaît.
Effectuez un clic droit dans la zone d’affichage
de l’étiquette (ou la boîte de texte), puis cliquez
sur [Quitter] dans le menu qui apparaît.
(Macintosh) Effectuez l’une des deux opérations suivantes :
Cliquez sur [Quit] dans le menu [File].
Maintenez la touche Control enfoncée et
cliquez dans la zone d’affichage de
l’étiquette (ou la boîte de texte), puis cliquez
sur [Quit] dans le menu qui apparaît.
18
Page 53

GH
ABCDEF
Impression d’une étiquette
1 Mettez la PT-1500PC sous tension et démarrez l’ordinateur.
2 Démarrez P-touch Quick Editor ou P-touch Editor Ver.3.1, et vérifiez que la PT-1500PC est bien
sélectionnée comme imprimante.
3 Concevez l’étiquette.
4 Cliquez sur la commande [Imprimer] dans
l’application, sélectionnez les paramètres
d’impression, puis cliquez sur le bouton
Imprimer. L’indicateur d’état de la PT1500PC clignote pendant la réception des
données. Lorsque l’impression de l’étiquette
est terminée, appuyez sur la touche de
couteau du ruban pour couper l’étiquette.
Si vous imprimez plusieurs exemplaires de
l’étiquette, la PT-1500PC cesse d’imprimer
pendant quelques instants de façon à laisser la
tête d’impression refroidir. Puis l’impression
reprend quand la tête a suffisamment refroidi.
Pour faire avancer le ruban, maintenez la
touche alimentation/avance enfoncée
pendant quelques secondes.
Feed
Retrait du dos de l’étiquette
Le séparateur de ruban fourni vous permet de décoller en toute facilité le dos des étiquettes imprimées sur un
ruban plastifié.
1
Tenez le ruban de la main gauche avec la
surface imprimée dirigée vers le haut, et
tenez le bâtonnet de la main droite.
2
Faites passer le ruban à mi-chemin dans le
long orifice étroit du bâtonnet.
3
Tournez le bâtonnet de trois-quarts de tour
vers vous, puis éloignez le bâtonnet de vous
comme indiqué sur le schéma.
4
Décollez le dos de l’étiquette.
EF
D
C
AB
19
Page 54

Pour quitter P-touch Quick Editor
Sur un ordinateur compatible IBM PC :
• Depuis l’application :
Effectuez un clic droit sur la zone d’affichage de l’étiquette (ou la boîte de texte), puis cliquez
sur [Quitter] dans le menu qui apparaît.
• Depuis la barre de tâches :
Effectuez un clic droit sur l’icône P-touch Quick Editor dans le tiroir système, à droite de la
barre de tâches, puis cliquez sur [Quitter] dans le menu qui apparaît.
Sur un ordinateur Macintosh :
• Depuis le menu déroulant :
Maintenez la touche Control enfoncée, et cliquez sur la zone d’affichage de l’étiquette (ou la
boîte de texte), puis cliquez sur [Quit] dans le menu qui apparaît.
• Depuis le menu de l ‘application :
Cliquez sur le menu [File], puis cliquez sur la commande [Quit].
Entretien
Nettoyage de la tête d’impression et du rouleau
Une ligne horizontale blanche qui apparaît sur l’étiquette imprimée signifie que la tête d’impression et
le rouleau sont sales. Nettoyez la tête d’impression et le rouleau en procédant de la façon suivante.
1 Mettez la PT-1500PC hors tension.
2 Ouvrez le couvercle du logement du ruban.
3 Retirez la cassette de ruban s’il y en a une.
Tête
d’impression
4 Utilisez un coton-tige sec pour essuyer
délicatement et de haut en bas la tête
d’impression et le rouleau.
Attention:
Faites attention à ne pas toucher le
couteau près de la tête d’impression et
du rouleau lorsque vous les nettoyez.
Par ailleurs, n’essayez pas de
nettoyer la tête d’impression tout de
suite après l’impression, car vous
risqueriez de vous brûler.
5 Insérez la cassette de ruban, puis refermez le
couvercle du logement du ruban.
* Le nettoyage s’effectuera en toute facilité
avec la cassette de nettoyage pour tête
d’impression en option (TZ-CL4).
20
Rouleau
(section à nettoyer)
Tête d’impression
(section à nettoyer)
Coton-tige
Coton-tige
Page 55

Nettoyage du couteau du ruban
Au bout d’un certain temps, des matières adhésives risquent de s’accumuler sur le couteau,
l’empêchant de couper et provoquant des bourrages du ruban. Une fois par an, nettoyez le couteau avec un coton-tige trempé dans de l’alcool
isopropyle (alcool à brûler).
Ne touchez pas le tranchant du couteau,
car vous pourriez vous blesser.
Dépannage
Contrôle de l’état de P-touch
Vous pouvez déterminer l’état de la PT-1500PC avec l’indicateur d’état.
Indicateur d’état
Allumé
Clignote un petit nombre
de fois
Clignote rapidement
Clignote, l’intervalle éteint étant
plus long que l’intervalle allumé
Clignote lentement
• La P-touch fonctionne normalement et elle est en état de veille.
• La P-touch est train de recevoir les données de l’ordinateur, et la
• Il n’y a pas de cassette. → Insérez une cassette.
• Il s’est produit une erreur de transmission. → Cliquez sur la touche
•
•
• La tête d’impression est en train de refroidir. → Attendez que
réception s’effectue correctement.
d’alimentation/avance pour mettre la PT-1500PC hors tension, puis
à nouveau sous tension.
Vous avez appuyé sur la touche de couteau du ruban pendant
l’impression.
Il s’est produit une erreur EEPROM. → Contactez votre service après-vente.
l’impression reprenne.
Cause possible → Correction
→
Recommencez l’impression.
Coton-tige
Couteau du ruban
21
Page 56

Solution des problèmes
Si vous pensez que la P-touch ne fonctionne pas correctement mais que vous n’arrivez pas à déterminer
la cause du problème avec l’indicateur d’état, consultez la liste des problèmes possibles ci-dessous, puis
effectuez les corrections nécessaires.
Problème
La P-touch
n’imprime pas.
Une erreur
d’impression est
indiquée.
Pendant l’impression,
des bandes apparaissent
sur le ruban.
L’indicateur d’état
ne s’allume pas ou
ne clignote pas.
Une ligne horizontale
blanche apparaît sur
l’étiquette imprimée.
Une erreur de
transmission des
données s’affiche
sur l’ordinateur.
* Si vous raccordez plusieurs modèles de P-touch similaires via leur port USB, sélectionnez “PTUSB
(PT-1500PC-XXXXXXXXX):”, (où XXXXXXXXX est le numéro de série) à la place de “PTUSB:”. Le
numéro de série se trouve au-dessus du code barres, sur le fond de la P-touch.
Cause possible
•
Le câble d’interface n’est
pas raccordé correctement.
• La cassette de ruban n’est
pas insérée correctement.
• Le couvercle du logement
de ruban est ouvert.
Il n’y a pas de ruban dans la
cassette.
L’adaptateur secteur n’est
pas raccordé correctement.
La tête d’impression et le
rouleau sont sales.
Vous avez sélectionné le
mauvais port.
Vérifiez que le câble d’interface est raccordé
correctement, que la cassette de ruban est
insérée correctement, et que le couvercle du
logement de ruban est fermé.
Insérez une cassette neuve, et cliquez sur la touche d’alimentation/avance ou mettez la P-touch
hors tension puis à nouveau sous tension.
Vérifiez si l’adaptateur secteur est raccordé
correctement. Si la touche d’alimentation ne s’allume
toujours pas, contactez votre service après-vente.
Nettoyez la tête d’impression et le rouleau en
procédant comme indiqué dans
la tête d’impression et du rouleau”
Windows
Sous “Imprimer par le port suivant” de la boîte de
dialogue Propriétés de l’imprimante, sélectionnez
“PTUSB:” pour le raccordement USB.
Mac
Sélectionnez dans le “Sélecteur” la PT-1500PC
à laquelle la P-touch est raccordée.
Correction
“Nettoyage de
, à la page 20.
Spécifications du matériel
Alimentation : CA 120 V, 60 Hz (adaptateur secteur modèle AD-60)
Ruban d’étiquette : 5 largeurs au choix:
Tête d’impression : 112 points
Port : USB
Dimensions : 166 × 66,5 × 137,4 mm (6 1/2 po × 2 2/3 po × 5 3/8 po)
Poids : 540 g (18 on)
22
6 mm (1/4 po)
9 mm (3/8 po)
12 mm (1/2 po)
18 mm (3/4 po)
24 mm (1 po)
180 dpi
Page 57

Accessoires
• Fournitures
Vous pouvez vous procurer des cassettes de ruban auprès de votre revendeur. Brother ne saurait être
responsable des anomalies provoquées par l’utilisation de fournitures non agréées.
Avec cet appareil, utilisez exclusivement des rubans TZ. N’utilisez pas de rubans ne portant pas le logo .
N° de stock
24 mm (1 po)
TZ151 Caractères noirs sur ruban clair 1 25,99$
TZ251 Caractères noirs sur ruban blanc 1 28,99$
TZ451 Caractères noirs sur ruban rouge 1 28,99$
TZ651 Caractères noirs sur ruban jaune 1 28,99$
TZB51 Caractères noirs sur ruban orange fluorescent 1 35,99$
TZ252 Caractères rouges sur ruban blanc 1 28,99$
TZ253 Caractères bleus sur ruban blanc 1 28,99$
TZ354 Caractères dorés sur ruban noir 1 31,99$
TZ155 Caractères blancs sur ruban clair 1 32,95$
TZ355 Caractères blancs sur ruban noir 1 31,99$
TZS251 Industriel (à adhérence spéciale) caractères noirs sur ruban blanc 1 31,99$
18 mm (3/4 po)
TZ141 Caractères noirs sur ruban clair 1 22,99$
TZM41 Caractères noirs sur ruban clair (mat) 1 24,99$
TZ241 Caractères noirs sur ruban blanc 1 24,99$
TZ641 Caractères noirs sur ruban jaune 1 24,99$
TZB41 Caractères noirs sur ruban orange fluorescent 1 29,99$
TZ242 Caractères rouges sur ruban blanc 1 24,99$
TZ243 Caractères bleus sur ruban blanc 1 24,99$
TZ344 Caractères dorés sur ruban noir 1 28,99$
TZ345 Caractères blancs sur ruban noir 1 28,99$
TZ545 Caractères blancs sur ruban bleu 1 28,99$
TZS241 Industriel (à adhérence spéciale) caractères noirs sur ruban blanc 1 27,99$
12 mm (1/2 po)
TZ131 Caractères noirs sur ruban clair 1 19,99$
TZ231 Caractères noirs sur ruban blanc 1 20,99$
TZM31 Caractères noirs sur ruban clair (mat) 1 20,99$
TZ431 Caractères noirs sur ruban rouge 1 20,99$
TZ531 Caractères noirs sur ruban bleu 1 20,99$
TZ631 Caractères noirs sur ruban jaune 1 20,99$
TZ731 Caractères noirs sur ruban vert 1 20,99$
TZ132 Caractères rouges sur ruban clair 1 19,99$
TZ135 Caractères blancs sur ruban clair 1 23,95$
TZ232 Caractères rouges sur ruban blanc 1 20,99$
TZ133 Caractères bleus sur ruban clair 1 19,99$
TZ233 Caractères bleus sur ruban blanc 1 20,99$
TZ334 Caractères dorés sur ruban noir 1 24,99$
TZ335 Caractères blancs sur ruban noir 1 24,99$
TZ435 Caractères blancs sur ruban rouge 1 24,99$
TZS231 Industriel (à adhérence spéciale) caractères noirs sur ruban blanc 1 23,99$
9 mm (3/8 po )
TZ121 Caractères noirs sur ruban clair 1 16,99$
TZ221 Caractères noirs sur ruban blanc 1 19,99$
TZ222 Caractères rouges sur ruban blanc 1 19,99$
TZ223 Caractères bleus sur ruban blanc 1 19,99$
TZ325 Caractères blancs sur ruban noir 1 22,99$
TZS221 Industriel (à adhérence spéciale) caractères noirs sur ruban blanc 1 21,99$
Description Qté/Paquet Prix
23
Page 58

N° de stock
6 mm (1/4 po)
TZ111 Caractères noirs sur ruban clair 1 14,99$
TZ211 Caractères noirs sur ruban blanc 1 16,99$
TZ315 Caractères blancs sur ruban noir 1 20,99$
TZS211 Industriel (à adhérence spéciale) caractères noirs sur ruban blanc 1 19,99$
Description Qté/Paquet Prix
Ruban non laminé
N° de stock
18 mm (3/4 po)
TZN641 Caractères noirs sur ruban jaune 1 21,99$
TZN541 Caractères noirs sur ruban bleu 1 21,99$
TZNF41 Caractères noirs sur ruban violet 1 21,99$
12 mm (1/2 po)
TZN631 Caractères noirs sur ruban jaune 1 17,99$
TZN531 Caractères noirs sur ruban bleu 1 17,99$
TZNF31 Caractères noirs sur ruban violet 1 17,99$
Description Qté/Paquet Prix
Ruban transfert avec reqassage
N° de stock
18 mm (3/4 po)
TZIY41 Caractères noirs 1 29,95$
Description Qté/Paquet Prix
Ruban de sécurité
N° de stock
18 mm (3/4 po)
TZSE4 Caractères noirs sur ruban blanc 1 49,95$
Description Qté/Paquet Prix
Ruban en tissu
N° de stock
12 mm (1/2 po)
TZFA3 Caractères bleus sur ruban blanc 1 34,95$
Description Qté/Paquet Prix
Ensemble de tampon
N° de stock
24 mm (1 po) Espace Utilisable – 13,5 × 65 mm
SKLB
Ensemble de tampons GRAND FORMAT (Le porte-tampon + cassette de ruban)
SHLB Le porte-tampon GRAND FORMAT 1 27,45$
18 mm (3/4 po) Espace Utilisable - 9 × 55 mm
SKMB
Ensemble de tampons FORMAT MOYEN (Le porte-tampon + cassette de ruban)
SHMB Le porte-tampon FORMAT MOYEN 1 24,95$
Description Qté/Paquet Prix
1 54,95$
1 49,95$
Options
N° de stock
TZCL4 Cassette de nettoyage de tête d’impression 1 24,95$
Description Qté/Paquet Prix
24
Page 59

BON DE COMMANDE POUR LES ACCESSOIRES
Veuillez faire parvenir ce bon de commande à vos clients/concessionnaires dans le cas ou il n’ont pas
d’inventaires ou s’ils préfèrent commander par le téléphone. Pour commander par téléphone, appelez
Brother International au 1-800-668-2768, et donnez vorte numéro de carte Visa ou MasterCard.
Référence Description Prix Quantité Total
TOTAL
Les prix sont sujets à changements sans préavis.
Pour remplir le bon de commande :
1.Consultez les renseignements au verso de ce bon et sélectionnez les items requis.
2.Complétez le bon de commande au-dessus et indiquez la quantité requise pour chaque item (pour
vos dossiers).
3.Entrez le total sous “Total fournitures/accessoires” ci-dessous (pour vos dossiers).
4.Ajoutez la taxe de vente et les frais d’expédition/manutention appropriés (pour vos dossiers).
5.Donnez votre numéro de carte Visa ou MaterCard, de même la date d’éxpiration.
Total Fournitures/Accessoires , $
Tous les résidents du Canada doivent TPS , $
ajouter les taxes de ventes applicables. (TPS et TVP) TVP , $
Expédition/Manutention , 5$
MONTANT DÛ , $
TPS No. R100663764
TVP No. 100100117TQ0001
* Les prix sont sujets à changements sans préavis.
✂
Page 60

Page 61
BON DE COMMANDE POUR LES ACCESSOIRES
Veuillez faire parvenir ce bon de commande à vos clients/concessionnaires dans le cas ou il n’ont pas
d’inventaires ou s’ils préfèrent commander par le téléphone. Pour commander par téléphone, appelez
Brother International au 1-800-668-2768, et donnez vorte numéro de carte Visa ou MasterCard.
Référence Description Prix Quantité Total
TOTAL
Les prix sont sujets à changements sans préavis.
Pour remplir le bon de commande :
1.Consultez les renseignements au verso de ce bon et sélectionnez les items requis.
2.Complétez le bon de commande au-dessus et indiquez la quantité requise pour chaque item (pour
vos dossiers).
3.Entrez le total sous “Total fournitures/accessoires” ci-dessous (pour vos dossiers).
4.Ajoutez la taxe de vente et les frais d’expédition/manutention appropriés (pour vos dossiers).
5.Donnez votre numéro de carte Visa ou MaterCard, de même la date d’éxpiration.
Total Fournitures/Accessoires , $
Tous les résidents du Canada doivent TPS , $
ajouter les taxes de ventes applicables. (TPS et TVP) TVP , $
Expédition/Manutention , 5$
MONTANT DÛ , $
TPS No. R100663764
TVP No. 100100117TQ0001
* Les prix sont sujets à changements sans préavis.
✂
Page 62

Page 63

Page 64

Printed in China
Imprimé en Chine
LA6475001
 Loading...