

Page 1
3
MFC‑L8610CDW / MFC‑L8895CDW / MFC‑L8900CDW /
MFC‑L8905CDW
Quick Setup Guide
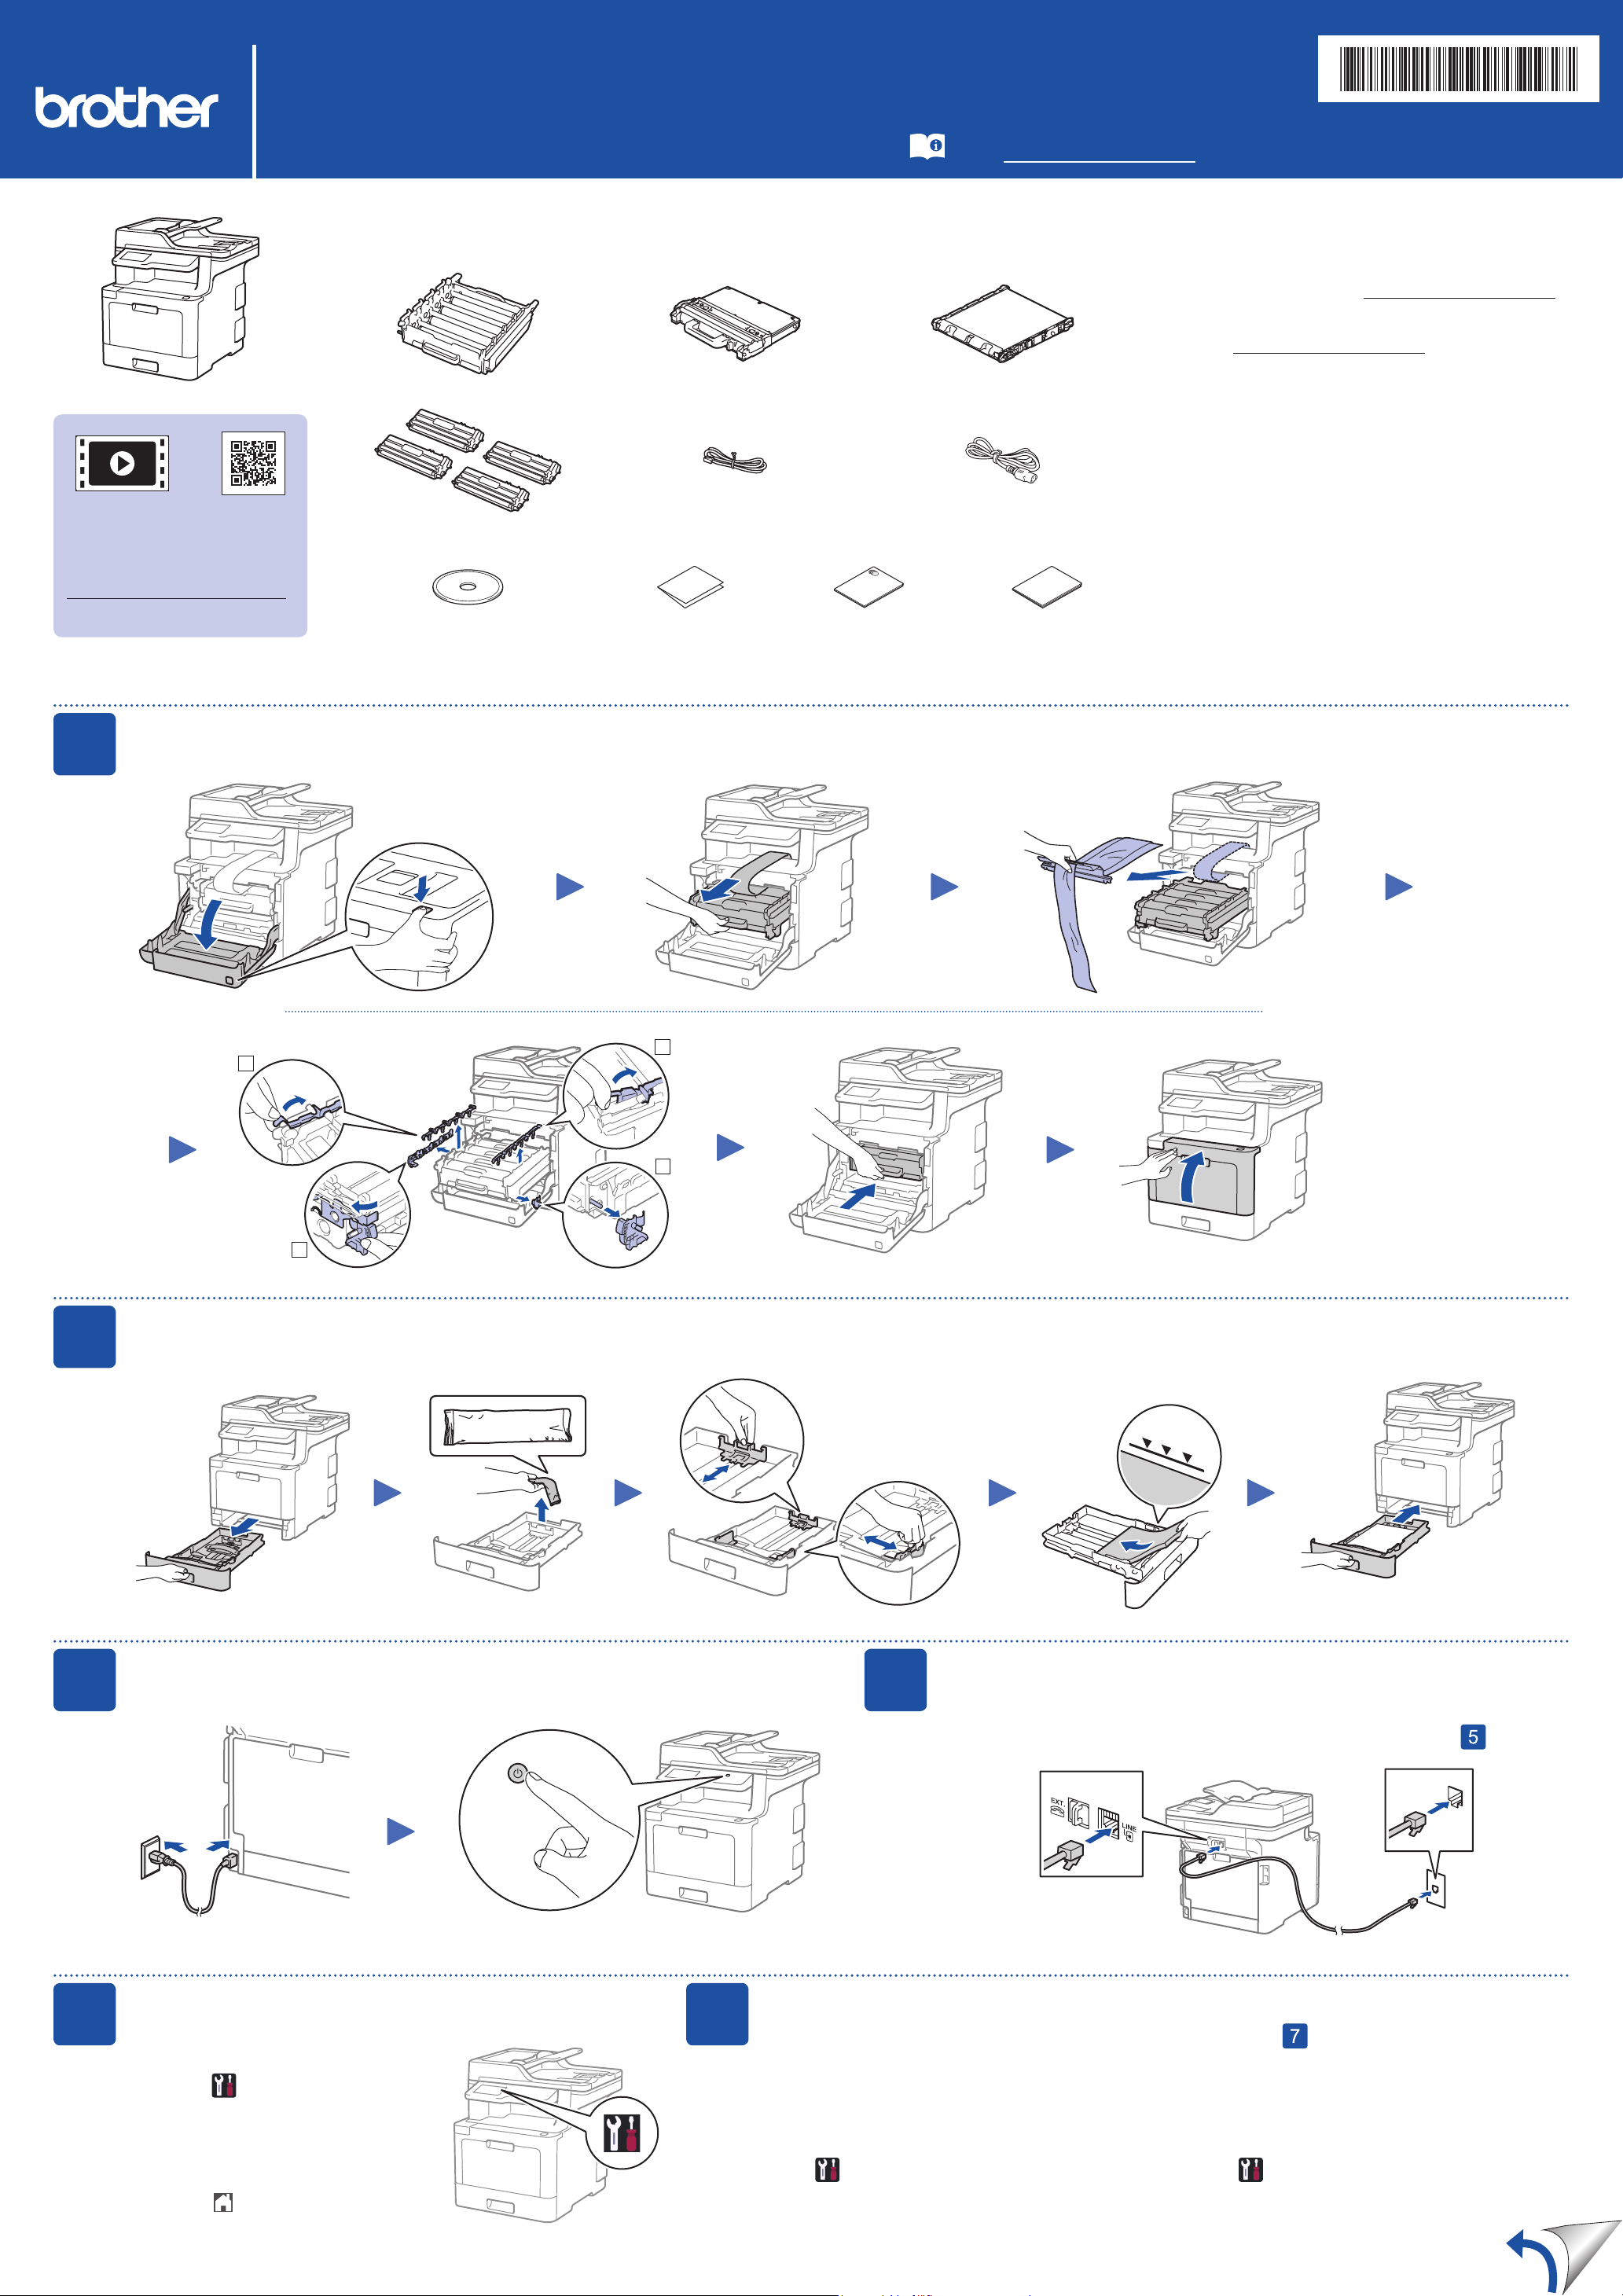
Unpack the machine and check the components
Read the Product Safety Guide first, then read this Quick
Setup Guide for the correct installation procedure.
Not all models are available in all countries.
The latest manuals are available at the Brother Solutions
Center: solutions.brother.com/manuals.
D01V10001-00
USA/CAN
Version C
Watch our Video FAQs for
help with setting up your
Brother machine:
solutions.brother.com/videos.
* Already installed in the machine
Drum Unit* Waste Toner Box* Belt Unit*
Toner Cartridges*
(Black, Cyan, Magenta and Yellow)
Brother Installation Disc Quick Setup Guide Product Safety Guide Reference Guide
Telephone Line Cord AC Power Cord
(only for certain models)
NOTE:
•Manuals in Spanish for this model are available on the Brother
Solutions Center. (USA only): solutions.brother.com/manuals
Los manuales en español de este modelo están disponibles
en el Brother Solutions Center. (Solamente en los Estados
Unidos): solutions.brother.com/manuals
•The components included in the box may differ depending on
your country.
•The available connection interfaces vary depending on the
model.
•Interface cables are not included. You must purchase the
correct interface cable if you require one.
USB cable
We recommend using a USB 2.0 cable (Type A/B) that is
no more than 6 feet (2 meters) long.
Network cable
Use a straight-through Category 5e (or greater) twistedpair cable.
•The illustrations in this Quick Setup Guide show the
MFC-L8900CDW.
1
Remove the packing materials and install the drum unit and toner cartridge assembly
Remove the packing tape.
1
4
2
3
2
Load paper in the paper tray
Connect the power cord and turn on the machine
Adjust the paper
guides.
4
Do not exceed this mark.
Connect the telephone line cord
5
Back Front
Select your language (if needed)
1. On the machine’s Touchscreen,
press
[All Settings] >
[Initial Setup] >
[Local Language].
[Settings]* >
2. Press your language.
3. Press .
* [Settings] menu is MFC-L8610CDW only.
6
If you do not plan to use the fax feature on this machine, go to step .
Configure the machine for faxing
If you do not plan to use the fax feature on this machine, go to step .
NOTE:
•For more information on using the fax feature, see the Online User’s Guide.
•Your machine is programmed to automatically receive faxes. To change this default mode, see the Online User’s Guide.
A. Set the date and time
Press [Settings]* > [All Settings] >
[Initial Setup] > [Date & Time], and
then set the date and time you want.
B. Set the Station ID
Press [Settings]* > [All Settings] >
[Initial Setup] > [Station ID], and then
set your fax or telephone number and your name.
Page 2
7
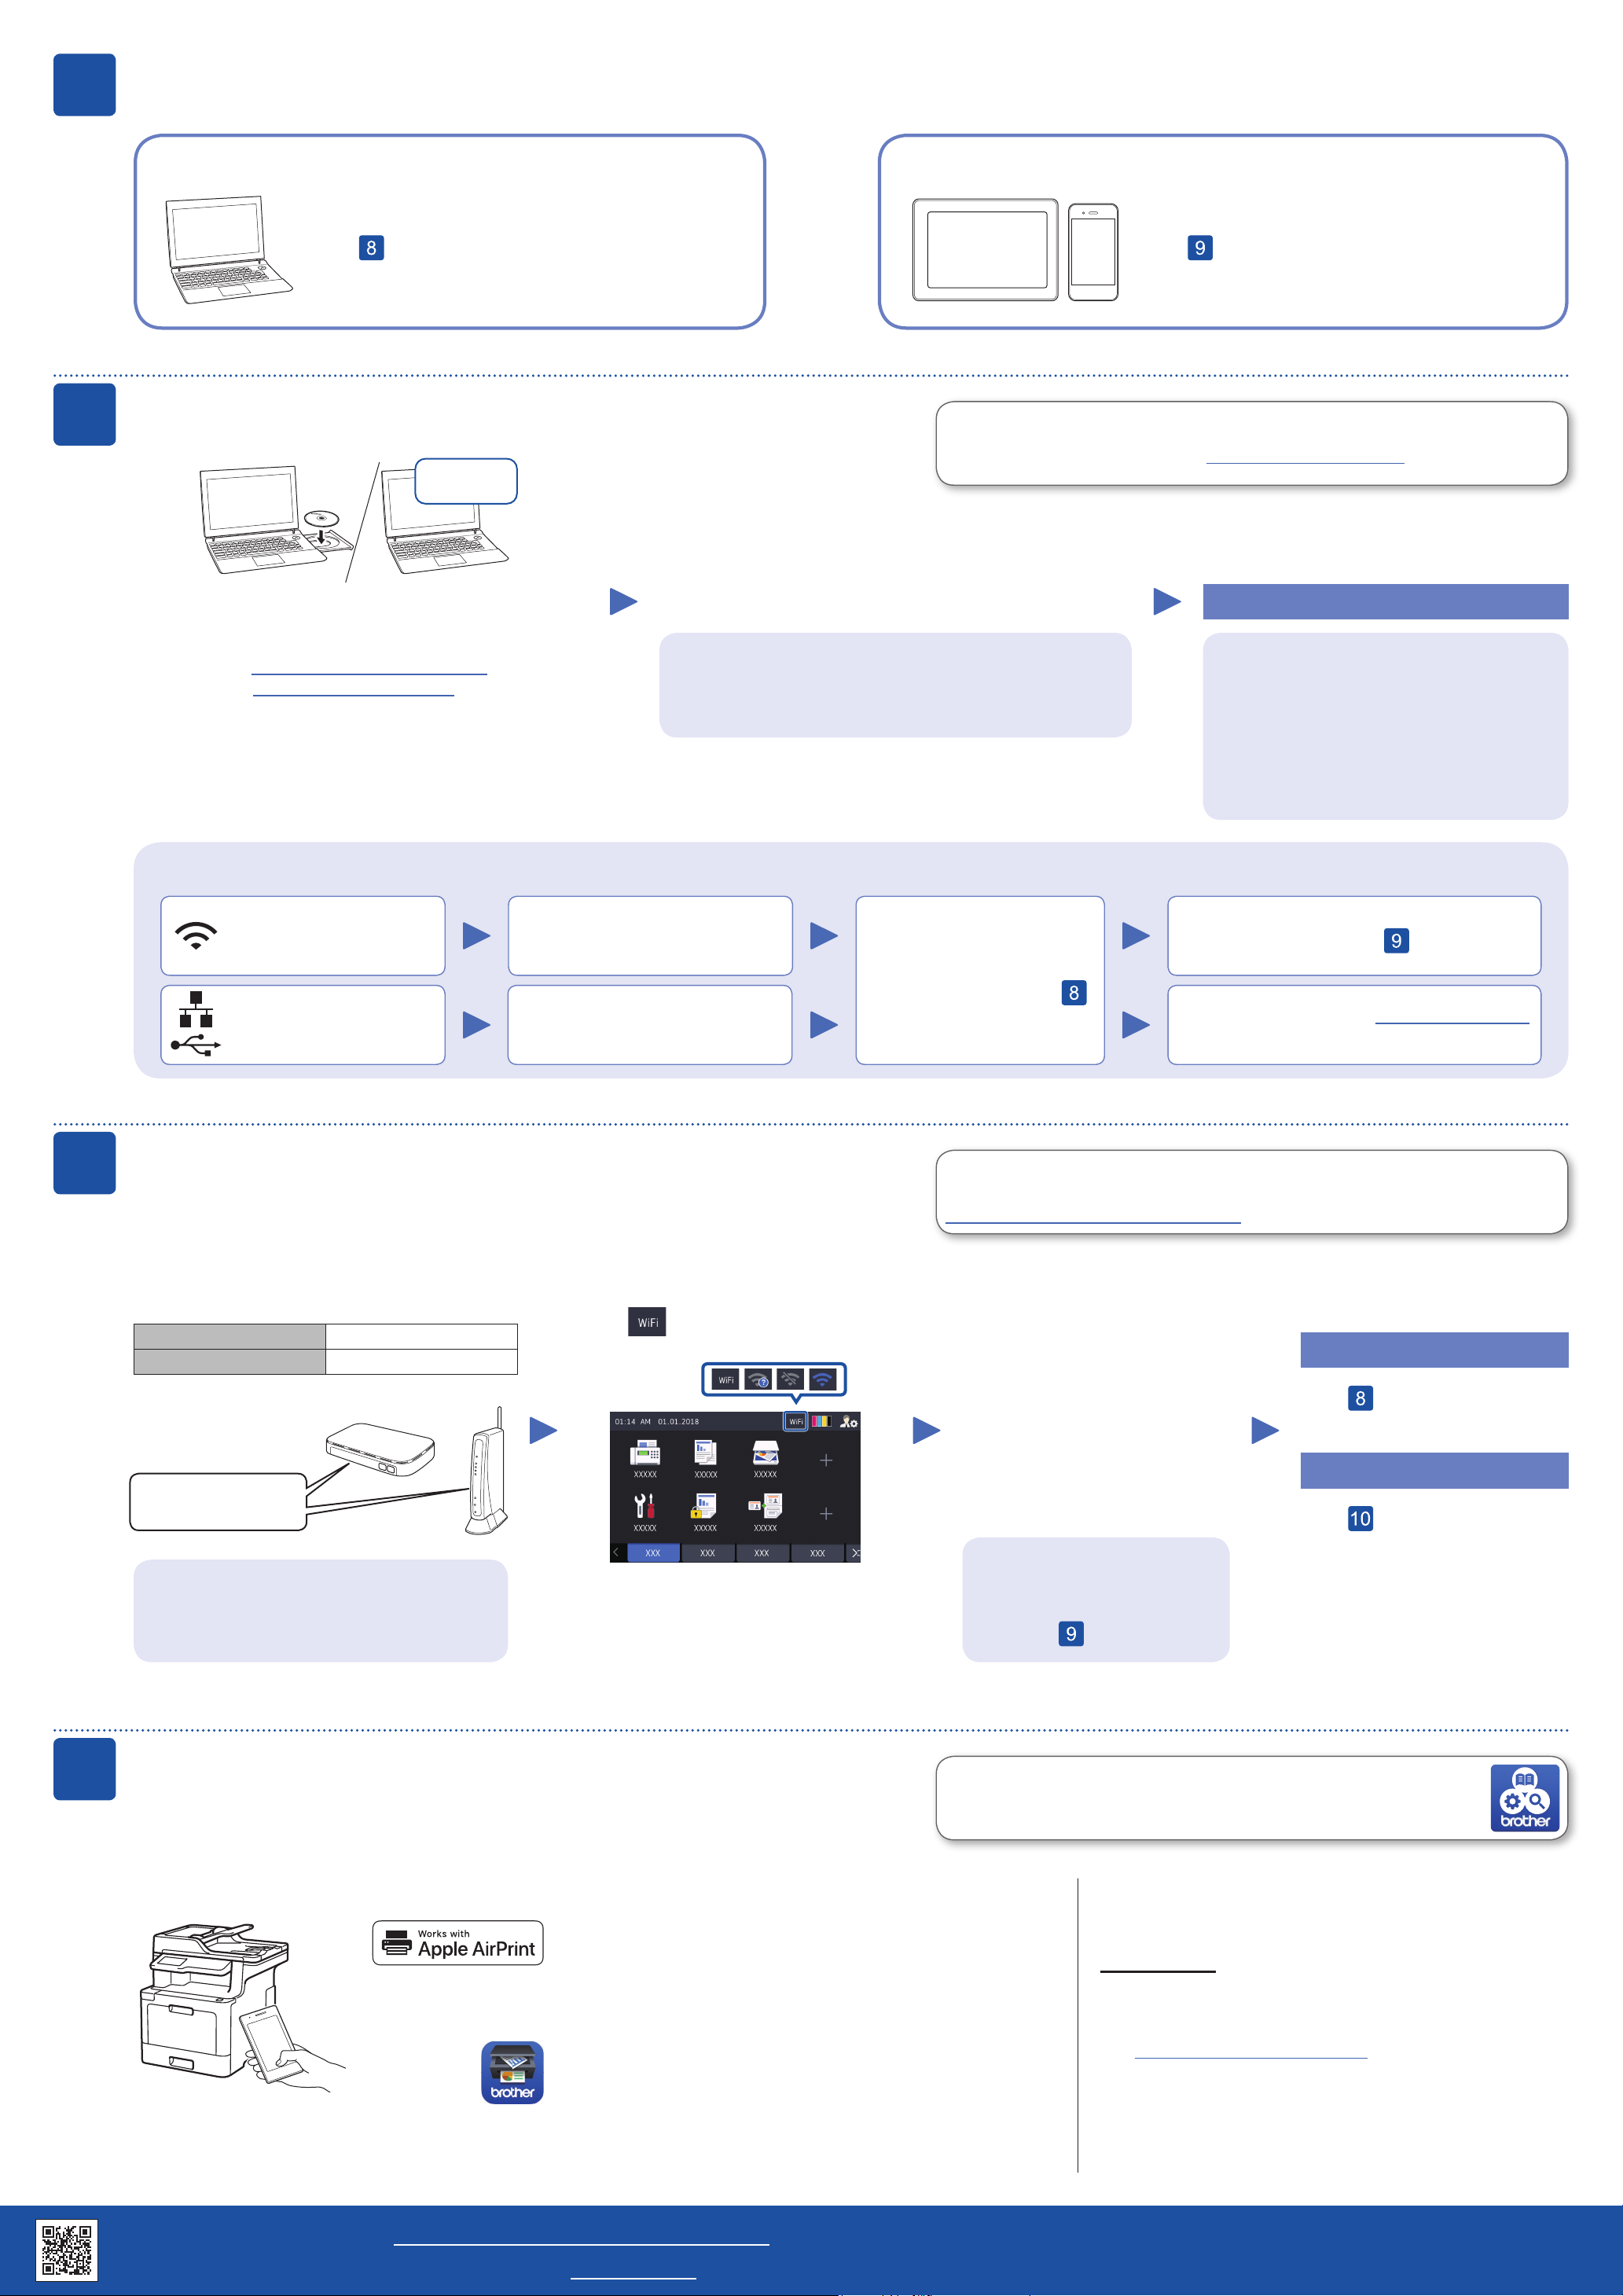
Select a device to connect to your machine
8
Computer
Go to and follow the instructions.
Connect your computer
Download
Put the installation disc into your CD/DVD drive, or
download the Full Driver & Software Package at:
Mobile Device
Brother regularly updates firmware to add features and apply bug fixes. To
check for the latest firmware, visit solutions.brother.com/up3.
Follow the on‑screen instructions and prompts.
Go to and follow the instructions.
Finished
For Windows®: solutions.brother.com/windows
For Macintosh: solutions.brother.com/mac
If you are using a recently released operating system on
your computer, visit the above websites for updated driver
and software information.
Can’t Connect? Check the following:
Wireless network
Wired network
USB connection
Restart your wireless access
point/router (if possible).
Disconnect the cable.
For Windows®:
If the Brother screen does not appear automatically, go to
Computer (This PC). Double-click the CD/DVD-ROM icon,
and then double-click start.exe.
Restart your machine and
computer, and then go to
.
For Network Users: Important Notice for
Network Security
The default Web Based Management
password is located on the back of the
machine and marked “Pwd”.
We recommend immediately changing the
default password to use network tools/utilities
securely and to protect your machine from
unauthorized access.
If still not successful, go to .
If still not successful, visit support.brother.com
for FAQs & Troubleshooting.
9
Alternative wireless setup
Find your SSID (Network Name) and Network
Key (Password) on your wireless access point/
router and write them in the table provided below.
SSID (Network Name)
Network Key (Password)
SSID: XXXXXXX
Network key: XXXX
If you cannot find this information, ask your
network administrator or wireless access
point/router manufacturer.
Press
[Yes].
> [Setup Wizard] >
Even if you do not have a wireless access point/router, you can connect your
device and your machine directly. For additional wireless network support, go to
solutions.brother.com/wireless-support.
Select the SSID (Network Name)
for your access point/router and
enter the Network Key (Password).
When the wireless setup is
successful, the Touchscreen
displays [Connected].
If setup is not successful, restart
your Brother machine and your
wireless access point/router,
and repeat
.
Go to to install software.
Go to to install apps.
For Computer
For Mobile Device
10
Print or scan using your mobile device
Your mobile device must be connected to the same wireless network as your Brother machine.
AirPrint is available for Apple device users. You do not need to
download any software to use AirPrint. For more information,
see the Online User’s Guide.
Download and install our free application Brother iPrint&Scan
from a mobile application store, such as the App Store, Google
Play™ or Microsoft® Store using your mobile device.
Brother SupportCenter is a mobile app that provides the latest support
information for your Brother product.
Visit the App Store or Google Play™ to download.
Optional apps
You can print from and scan to your mobile device using
various apps.
(USA only) For more information on apps,
visit www.brother-usa.com/connect.
For instructions, see the Online User’s Guide.
Additional Wireless Support: solutions.brother.com/wireless-support
For FAQs, Troubleshooting, and to download software and manuals, visit support.brother.com. © 2017 Brother Industries, Ltd. All rights reserved.
 Loading...