

Page 1
Quick Setup Guide
WARNING
Note
1
MFC-J220
Start Here
Before you can use the machine, please read this Quick Setup Guide for the correct setup and installation.
WARNING
CAUTION
WARNING indicates a potentially hazardous situation which, if not avoided, could result in death
or serious injuries.
CAUTION indicates a potentially hazardous situation which, if not avoided, may result in minor
or moderate injuries.
MFC-J410
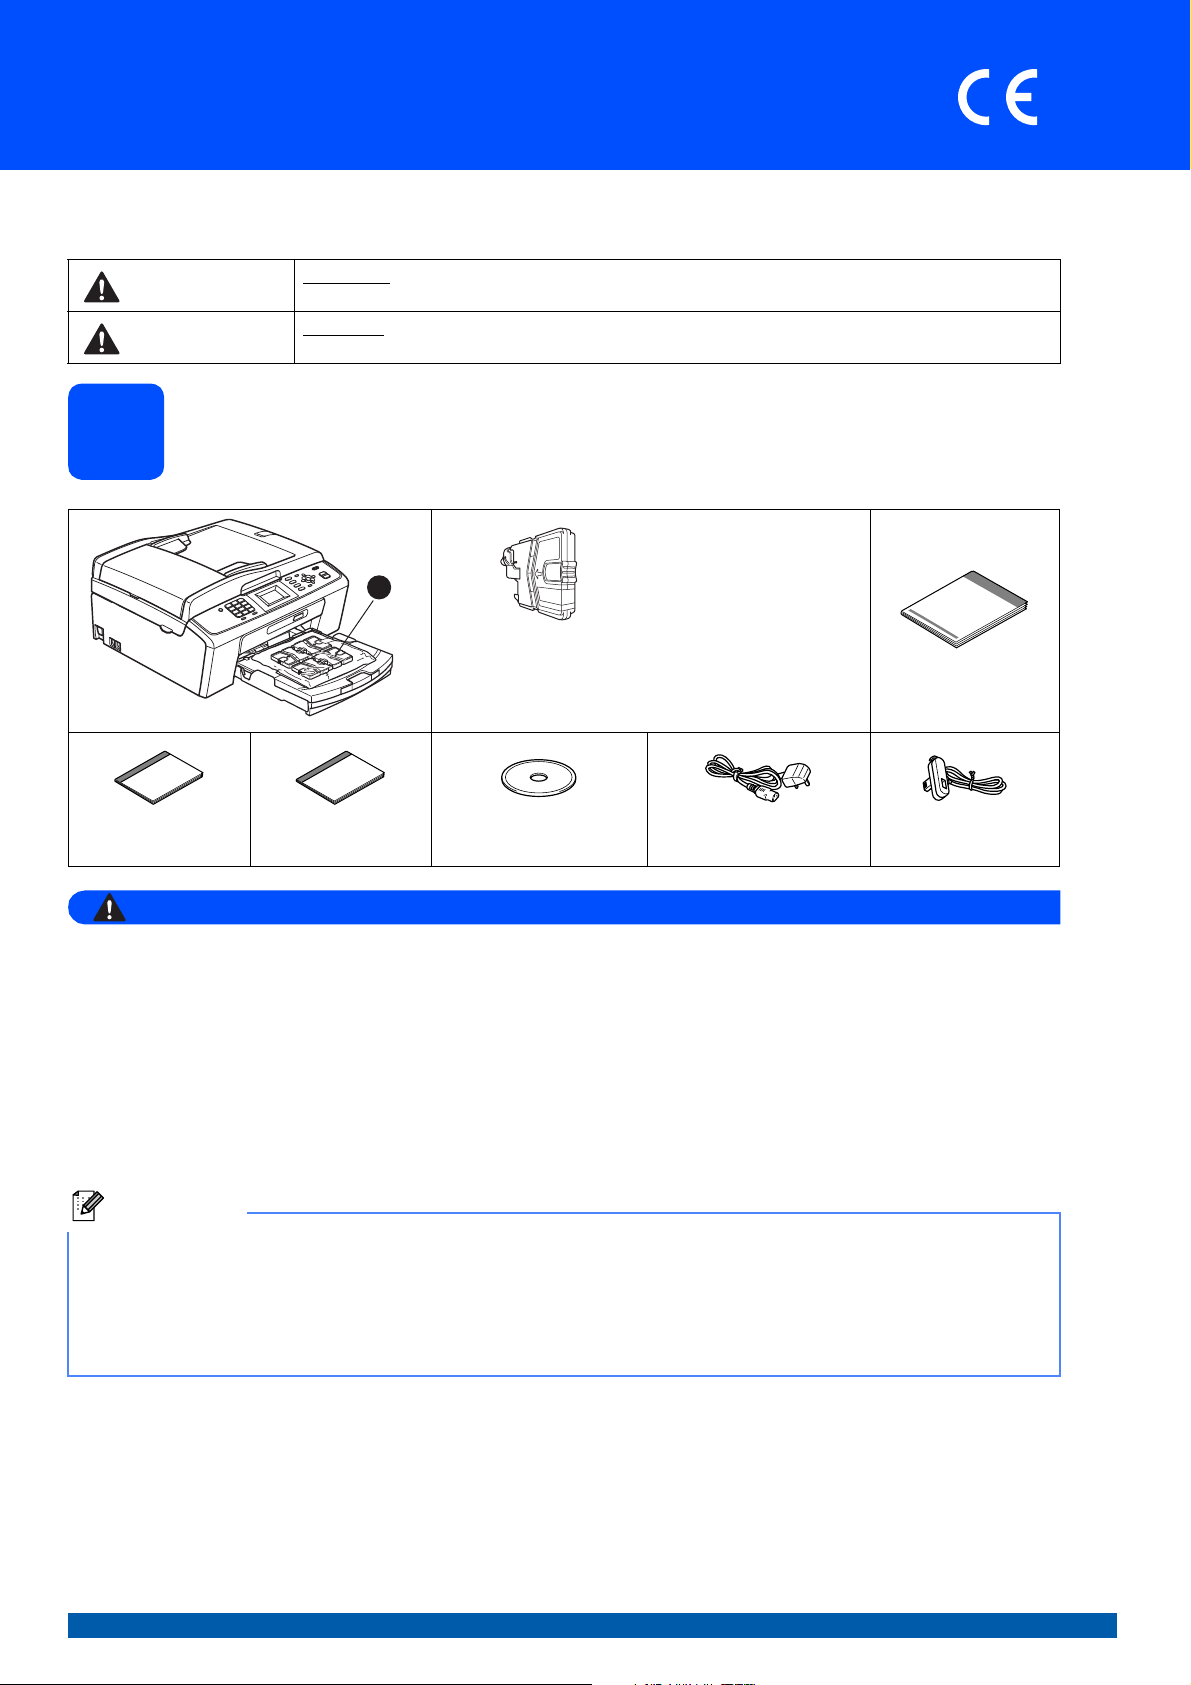
Unpack the machine and check the components
1
Black
Yellow
Cyan
Magenta
Inbox Ink Cartridges
[x4]
(Approx. 65% yield of the
replacement cartridge)
For details, see
Consumable items in the
Basic User’s Guide.
Quick Setup Guide
Basic User’s Guide Safety and Legal
booklet
Plastic bags are used in the packaging of your machine. To avoid danger of suffocation, please keep
these bags away from babies and children.
Most of the illustrations in this Quick Setup Guide show the MFC-J410.
Installation CD-ROM
Documentation CD-ROM
Power Cord Telephone Line Cord
a Remove the protective tape and film covering the machine, and also from the LCD.
b Remove the plastic bag a containing the ink cartridges from on top of the paper tray.
c Make sure you have all components.
• The components included in the box may differ depending on your country.
• Save all packing materials and the box in case for any reason you must ship your machine.
• You need to purchase the correct USB cable.
USB cable
Please make sure you use a USB 2.0 cable (Type A/B) that is no more than 2 metres long (cable not included).
UK/IRE/GEN Version 0
1
Page 2

Load plain A4 paper
1
IMPORTANT
1
2
d Fan the stack of paper well to avoid paper jams
and misfeeds.
2
a Pull the paper tray a completely out of the
machine.
1
b Lift the output paper tray cover a.
e Gently put the paper into the paper tray print
side down and top edge first. Check that the
paper is flat in the tray.
DO NOT push the paper in too far.
f Gently adjust the paper side guides to the
paper with both hands. Make sure that the
paper side guides touch the edges of the
paper.
g Close the output paper tray cover.
h Slowly push the paper tray completely into the
c With both hands, gently press and slide the
machine.
paper side guides a and then the paper length
guide b to fit the paper size.
Make sure that the triangular marks c on the
paper side guides a and paper length guide b
line up with the mark for the paper size you are
using.
1
i While holding the paper tray in place, pull out
the paper support a until it clicks, and then
unfold the paper support flap b.
3
2
2
3
Page 3
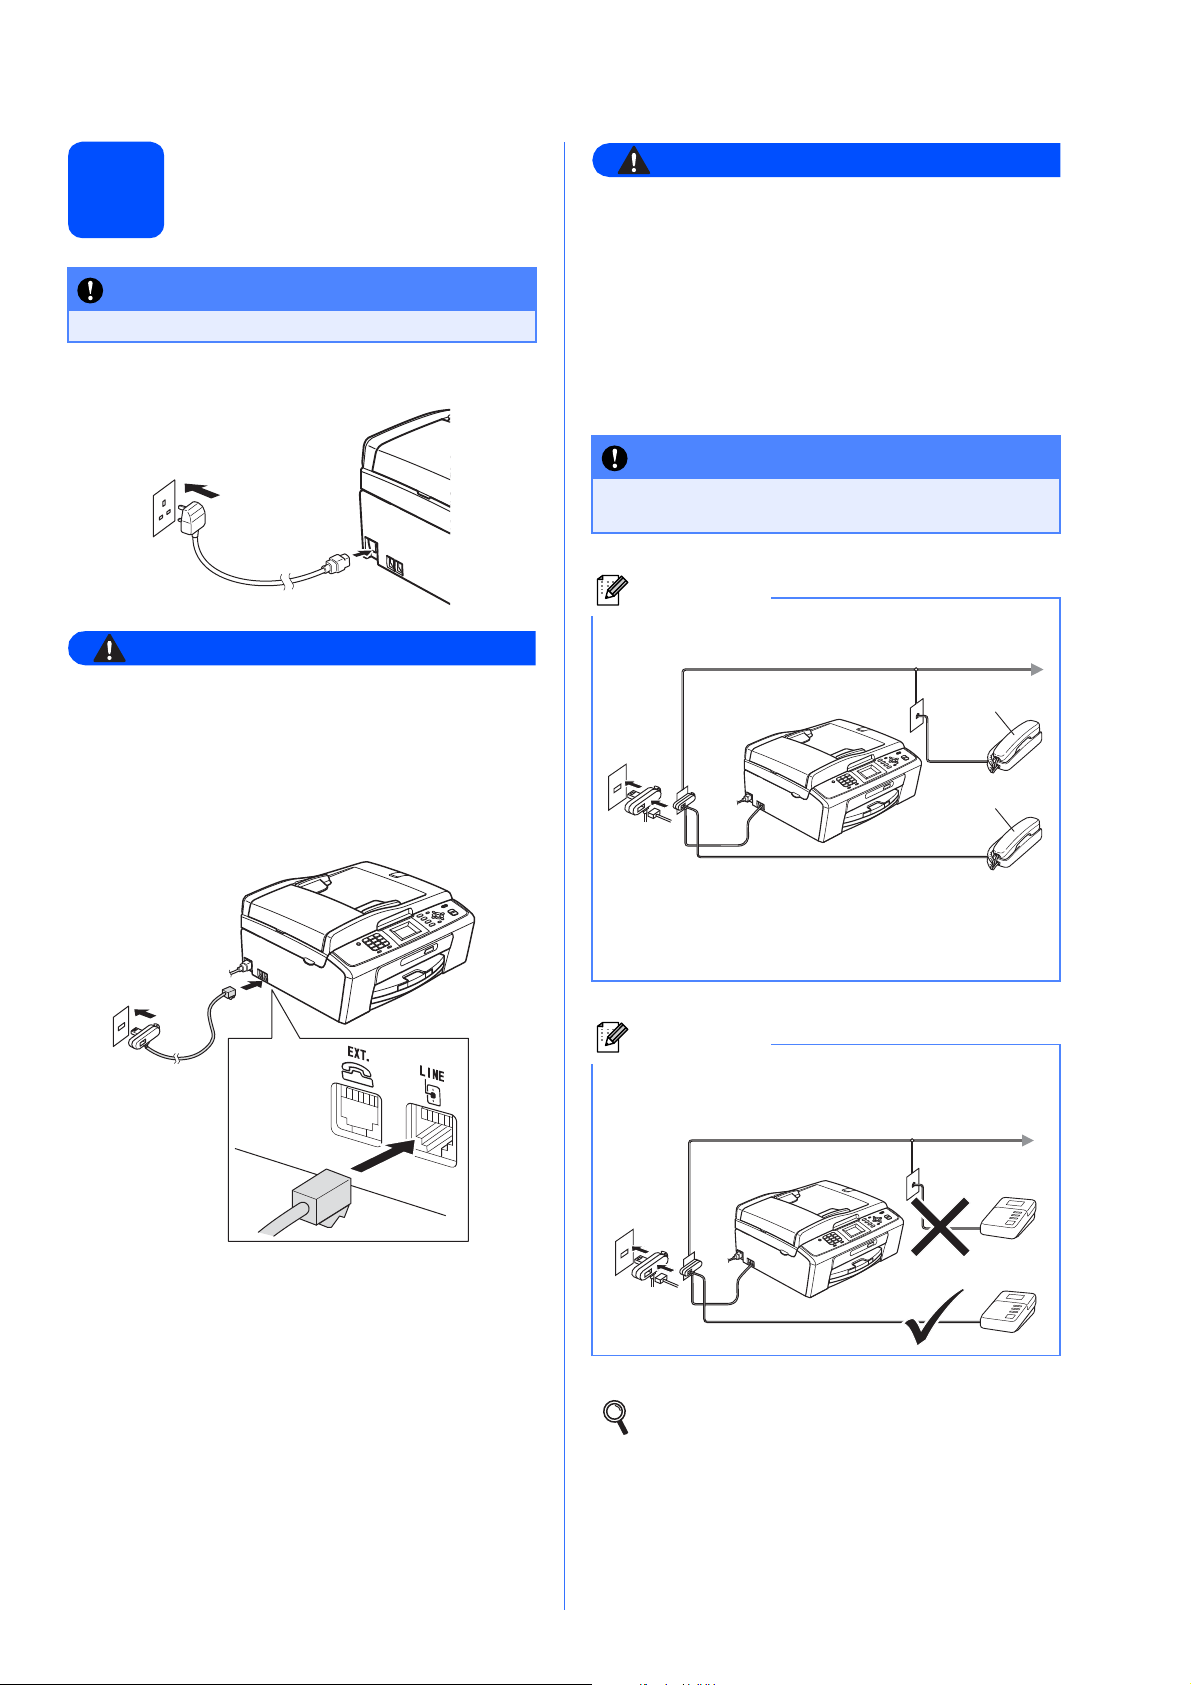
Connect the power cord
WARNING
WARNING
IMPORTANT
IMPORTANT
Note
Note
3
DO NOT connect the USB cable yet.
and telephone line
a Connect the power cord.
Since the machine is grounded through the
power outlet, you can protect yourself from
potentially hazardous electrical conditions on
the telephone network by keeping the power
cord connected to your machine when you
connect it to a telephone line. Similarly, you
can protect yourself when you want to move
your machine by disconnecting the telephone
line first and then the power cord.
The telephone line cord MUST be connected
to the socket on the machine marked LINE.
If you are sharing one telephone line with an
external telephone, connect it as shown below.
The machine must be fitted with an earthed
plug.
b Connect the telephone line cord. Connect one
end of the telephone line cord to the socket on
the machine marked LINE and the other end to
a telephone wall socket.
11
22
1 Extension telephone
2 External telephone
Please make sure you use an external telephone
with a cable no more than 3 metres long.
If you are sharing one telephone line with an
external telephone answering machine, connect it
as shown below.
Set the receive mode to External TAD if
you have an external answering machine.
See Choose a Receive Mode on page 6.
For additional details, see Connecting an
external TAD (telephone answering device)
in chapter 6 in the Basic User’s Guide.
3
Page 4
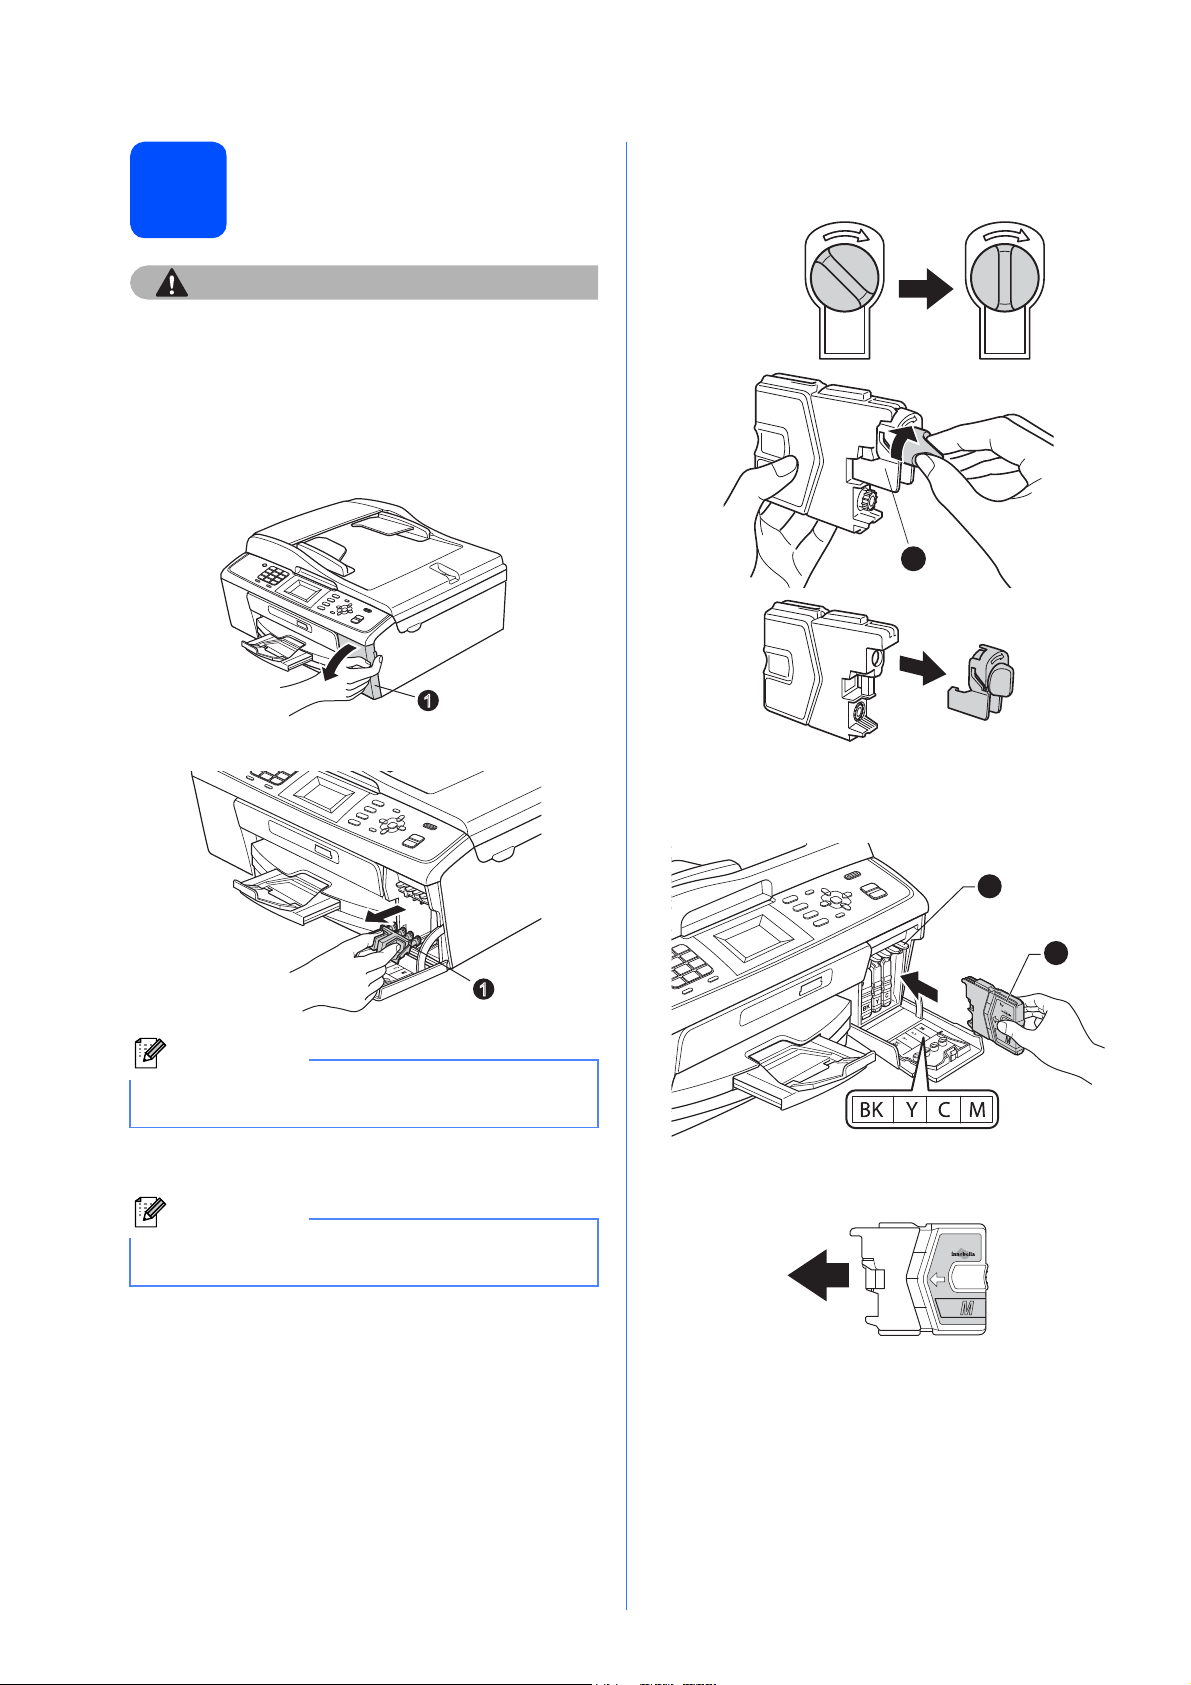
Install the ink cartridges
CAUTION
Note
Note
1
1
1
1
2
4
If ink gets in your eyes, wash them out with water
at once, and if irritation occurs consult a doctor.
a Make sure that the power is turned on.
The LCD shows No Ink Cartridge.
b Open the ink cartridge cover a.
e Turn the green knob on the protective yellow
cap clockwise until it clicks to release the
vacuum seal, then remove the cap a.
c Remove the green protective part a.
Do not throw away the green protective part. You
will need it if you transport the machine.
d Unpack the ink cartridge.
Make sure you install the Inbox Ink Cartridges
included with your machine first.
f Take care to match the colour of the lever a
with the cartridge colour b, as shown in the
diagram below.
g Install each ink cartridge in the direction of the
arrow on the label.
4
Page 5

h
Note
Gently push the ink cartridge until it clicks. After
all the ink cartridges are installed close the ink
cartridge cover.
The machine will prepare the ink tube system for
printing. This process will take approximately four
minutes. Do not turn off the machine.
Check the print quality
5
a When the preparation process has finished, the
LCD shows Set Paper and Press Start.
Press Colour Start.
b Check the quality of the four colour blocks a
on the sheet. (black/yellow/cyan/magenta)
1
c If all lines are clear and visible, press 1 (Yes)
on the dial pad to finish the quality check and
go to step 6.
OK
If you can see missing short lines, press 2 (No)
on the dial pad and follow the steps on the
LCD.
Poor
5
Page 6

6
Do you want to use the telephone features of your
machine (if available) or an external telephone or
external telephone answering device connected on the
same line as the machine?
Your machine
automatically answers
every call as a fax.
Your machine controls
the line and
automatically answers
every call. If the call is
not a fax, the telephone
will ring for you to pick
up the call.
Your external telephone
answering device (TAD)
automatically answers
every call. Voice
messages are stored
on the external TAD.
Fax messages are
printed.
You control the
telephone line and must
answer every call
yourself.
Do you want the machine to
answer fax and telephone calls
automatically?
Manual
Fax Only
Fax/Tel
External TAD
No
Yes
Yes
No
No
Yes
Are you using the voice message
function of an external telephone
answering device?
Choose a Receive Mode
7
Set the LCD contrast (if needed)
There are four possible receive modes: Fax Only,
Fax/Tel, Manual and External TAD.
a Press Menu.
b Press a or b to choose Initial Setup.
Press OK.
c Press a or b to choose Receive Mode.
Press OK.
d Press a or b to choose the receive mode.
Press OK.
e Press Stop/Exit.
6
For details, see Using receive modes in
chapter 5 in the Basic User’s Guide.
If you are having difficulty reading the LCD, try
changing the contrast setting.
a Press Menu.
b Press a or b to choose General Setup.
Press OK.
c Press a or b to choose LCD Settings.
Press OK.
d Press a or b to choose LCD Contrast.
Press OK.
e Press d or c to choose the contrast level.
Press OK.
f Press Stop/Exit.
Set the date and time
8
The machine displays the date and time, and if you
set up the station ID, it will add it to each fax you send.
a Press Menu.
b Press a or b to choose Initial Setup.
Press OK.
c Press a or b to choose Date&Time.
Press OK.
d Enter the last two digits of the year on the dial
pad, and then press OK.
Year:2010
(e.g. Enter 1 0 for 2010.)
e Repeat for month/day/time in 24-hour format.
f Press Stop/Exit.
Page 7

9
Note
Note
Enter personal information (Station ID)
Fax Transmission Report
10
You should store your name and fax number to be
printed on all fax pages that you send.
a Press Menu.
b Press a or b to choose Initial Setup.
Press OK.
c Press a or b to choose Station ID.
Press OK.
d Enter your fax number (up to 20 digits) on the
dial pad, and then press OK. To enter a “+” for
international codes, press l.
e Enter your name (up to 20 characters) using
the dial pad, and then press OK.
• See the following chart for entering your name.
• If you need to enter a character that is on the
same key as the last character, press c to
move the cursor to the right.
• If you entered a letter incorrectly and want to
change it, press d or c to move the cursor to the
incorrect character, press Clear.
Your Brother machine is equipped with a
Transmission Verification Report that can be used as
confirmation that you sent a fax. This report lists the
name or fax number of the receiving party, the date,
time, and duration of the transmission, the number of
pages transmitted, and whether or not the
transmission was successful. If you want to use the
Fax Transmission Report feature, see Transmission
Verification Report in chapter 4 in the Basic User’s
Guide.
Set Tone or Pulse dialling
11
Your machine comes set for Tone dialling service. If
you have Pulse dialling service (rotary), you need to
change the dialling mode.
mode
a Press Menu.
b Press a or b to choose Initial Setup.
Press OK.
c Press a or b to choose Tone/Pulse.
Press OK.
Press
key
2 ABC2
3 DEF 3
4 GH I 4
5 JKL5
6 MNO6
7 PQRS
8 TUV8
9 WXY Z
One
time
Two
times
Three
times
Four
times
f Press Stop/Exit.
If you make a mistake and want to start again,
press Stop/Exit and go back to a.
For details, see Entering Text in Appendix C
in the Basic User’s Guide.
d Press a or b to choose Pulse (or Tone).
Press OK.
e Press Stop/Exit.
7
Page 8

12
Now go to
Now go to
Note
Set the telephone line type
13
Set the phone line compatibility
If you are connecting the machine to a line that
features PBX or ISDN to send and receive faxes, it is
necessary to change the telephone line type
accordingly by completing the following steps.
a Press Menu.
b Press a or b to choose Initial Setup.
Press OK.
c Press a or b to choose Phone Line Set.
Press OK.
d Press a or b to choose Normal, PBX or ISDN.
Press OK.
e Press Stop/Exit.
PBX and TRANSFER
The machine is initially set to Normal, which lets the
machine connect to a standard PSTN (Public
Switched Telephone Network) line. However, many
offices use a central telephone system or Private
Branch Exchange (PBX). Your machine can be
connected to most types of PBX. The machine’s
recall feature supports timed break recall only (TBR).
TBR will work with most PBX systems allowing you to
gain access to an outside line, or transfer calls to
another extension. The feature works when the Tel/R
key is pressed.
If you are connecting the machine to a VoIP service
(over the Internet) you need to change the
compatibility setting.
If you are using an analogue telephone line you
can skip this step.
a Press Menu.
b Press a or b to choose Initial Setup.
Press OK.
c Press a or b to choose Compatibility.
Press OK.
d Press a or b key to choose
Basic(for VoIP).
Press OK.
e Press Stop/Exit.
For Windows® Users:
Page 9
For Macintosh Users:
Page 12
8
Page 9
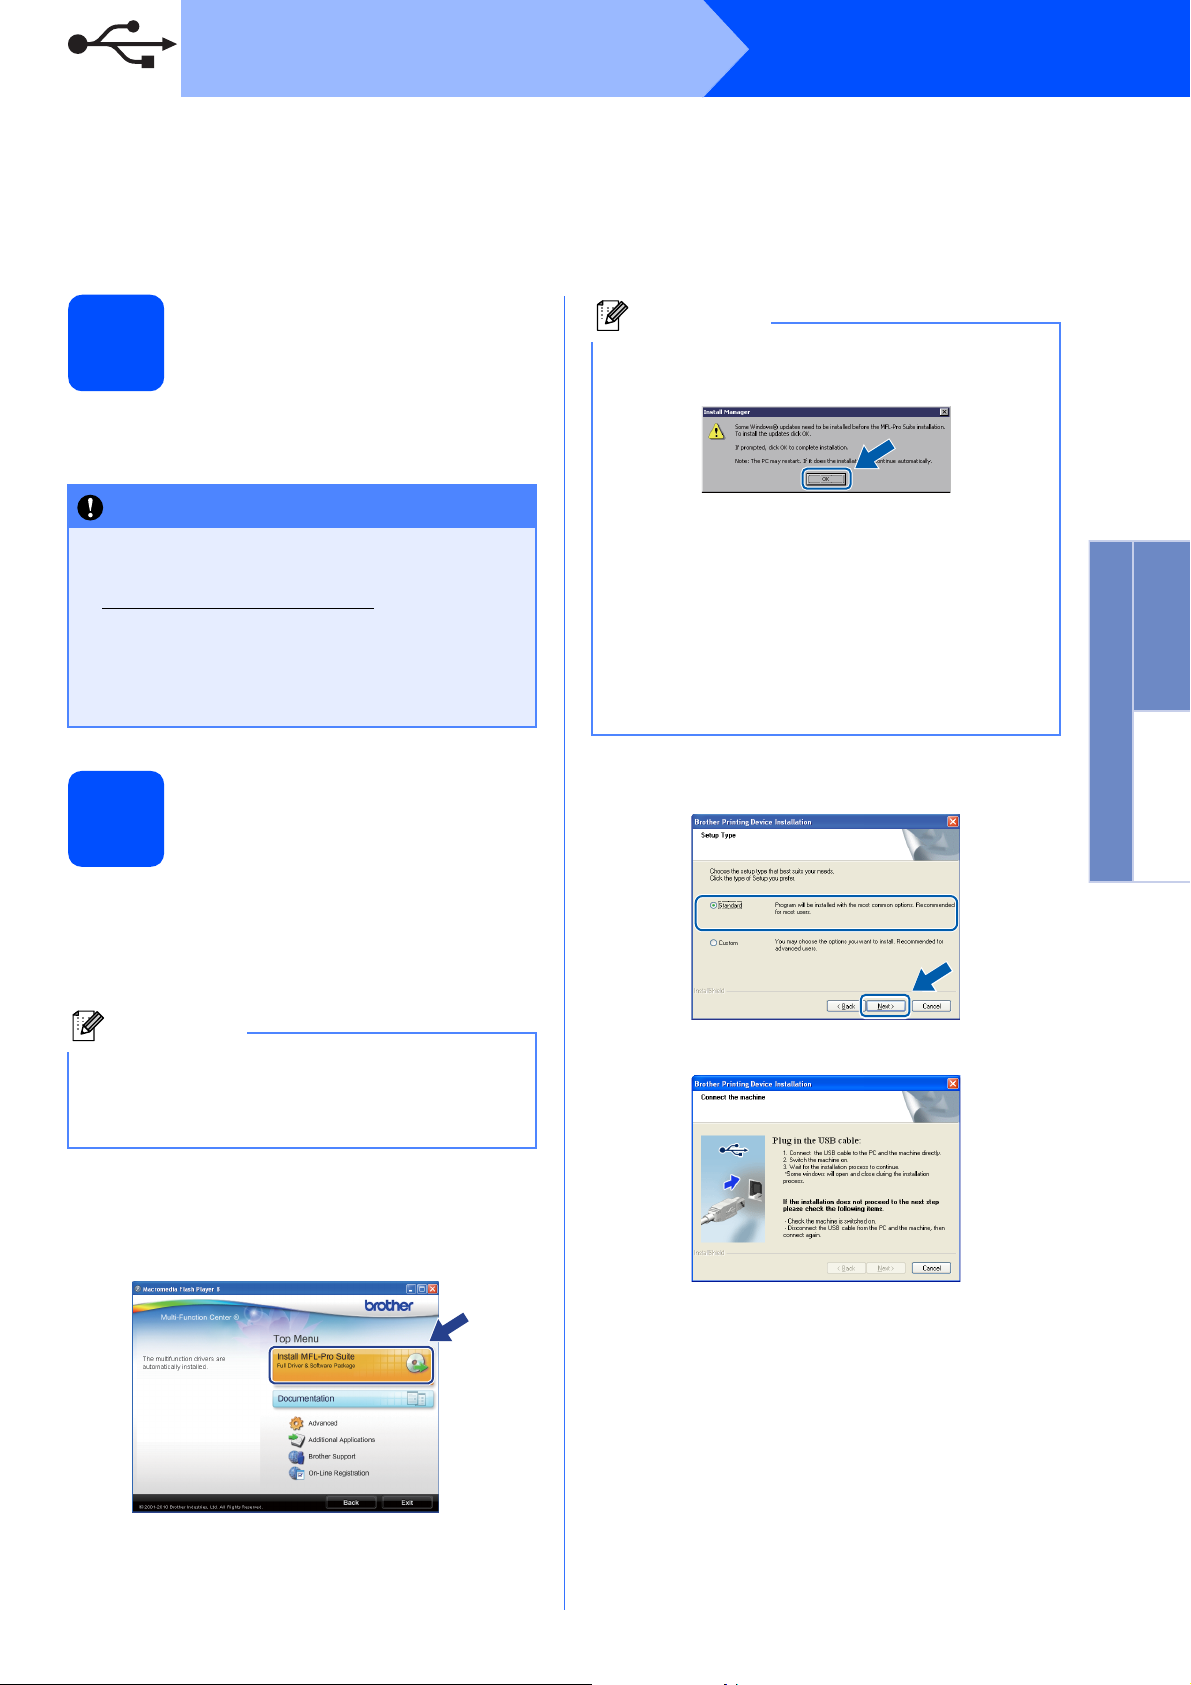
USB
IMPORTANT
Note
Note
For USB interface users
(Windows
Windows Vista
®
2000 Professional/XP/XP Professional x64 Edition/
®
/Windows® 7)
Windows
®
Before you install
14
a Make sure that your computer is ON and you
are logged on with Administrator rights.
• DO NOT connect the USB cable yet.
• For the latest drivers and information, visit
http://solutions.brother.com/
• If there are any programs running, close
them.
• The screens may differ depending on your
operating system.
Install MFL-Pro Suite
15
a Put the supplied installation CD-ROM into your
CD-ROM drive. If the model name screen
appears, choose your machine. If the language
screen appears, choose your language.
• If this screen appears, click OK and restart
your computer.
• If the installation does not continue
automatically, open the top menu again by
ejecting and then reinserting the CD-ROM or
double-click the start.exe program from the
root folder, and continue from b to install
MFL-Pro Suite.
• For Windows Vista
the User Account Control screen appears,
click Allow or Yes.
®
and Windows® 7, when
c Choose Standard, and then click Next. The
installation continues.
Windows
®
USB
Macintosh
If the Brother screen does not appear
automatically, go to My Computer (Computer),
double-click the CD-ROM icon, and then
double-click start.exe.
b The CD-ROM Top Menu will appear. Click
Install MFL-Pro Suite and click Yes if you
accept the license agreements. Follow the
on-screen instructions.
d When this screen appears, go to the next step.
9
Page 10

USB
IMPORTANT
1
3
2
Connect the USB cable
16
a Using both hands, use the plastic tabs on both
sides of the machine to lift the scanner cover
until it locks securely into the open position.
b Connect the USB cable to the USB socket
marked with a symbol. You will find the
USB socket inside the machine as shown
below.
Windows
®
c Carefully guide the USB cable through the
trench as shown below, following the trench
around and toward the back of the machine.
Then connect the cable to your computer.
Make sure that the cable does not restrict the
cover from closing, or an error may occur.
d Lift the scanner cover to release the lock a.
Gently push the scanner cover support
down b and close the scanner cover c.
USB
2
10
Page 11

USB
Now go to
IMPORTANT
Note
Note
Note
Finish
Note
e The installation will continue automatically.
The installation screens appear one after
another.
Windows
®
Finish and restart
17
DO NOT cancel any of the screens during the
installation. It may take a few seconds for all
screens to appear.
For Windows Vista® and Windows® 7, when the
Windows Security screen appears, click the
check box and click Install to complete the
installation correctly.
f When the User’s Guides screen is displayed,
click View Manuals on the Web if you want to
download the manuals and follow the
on-screen instructions. You can also view the
manuals on the documentation CD-ROM.
g When the On-Line Registration screen is
displayed, make your selection and follow the
on-screen instructions.
h If you do not want to set your machine as the
Default printer, uncheck Set as Default
Printer.
a Click Finish to restart your computer.
After restarting the computer, you must be
logged on with Administrator rights.
• If an error message appears during the
software installation, run the Installation
Diagnostics located in start/All Programs/
Brother/MFC-JXXX (where MFC-JXXX is your
model name).
• Depending on your security settings, a
Windows Security or antivirus software window
may appear when using the machine or its
software. Please allow or permit the window to
continue.
Windows
®
USB
Macintosh
b In the Check for Firmware Updates screen,
choose the firmware update setting you want
and click OK.
Internet access is required for the firmware
update.
The installation is now
complete.
Proceed to Install Optional Applications on
page 14.
XML Paper Specification Printer Driver
The XML Paper Specification Printer Driver is the
most suitable driver when printing from
applications that use the XML Paper Specification
documents. Please download the latest driver by
accessing the Brother Solutions Center at
http://solutions.brother.com/
11
Page 12

USB
IMPORTANT
IMPORTANT
IMPORTANT
Macintosh
For USB interface users (Mac OS X 10.4.11, 10.5.x, 10.6.x)
b Connect the USB cable to the USB socket
Before you install
14
marked with a symbol. You will find the
USB socket inside the machine as shown
below.
a Make sure your machine is connected to the
power and your Macintosh is ON. You must be
logged on with Administrator rights.
• For the latest drivers and information on the
Mac OS X you are using, visit
http://solutions.brother.com/
• For Mac OS X 10.4.0 to 10.4.10 users,
upgrade to Mac OS X 10.4.11 - 10.6.x.
USB
Connect the USB cable
15
• DO NOT connect the machine to a USB port
on a keyboard or a non-powered USB hub.
• Connect the machine directly to your
Macintosh.
a Using both hands, use the plastic tabs on both
sides of the machine to lift the scanner cover
until it locks securely into the open position.
c Carefully guide the USB cable through the
trench as shown below, following the trench
around and toward the back of the machine.
Then connect the cable to your Macintosh.
Make sure that the cable does not restrict the
cover from closing, or an error may occur.
12
Page 13

USB
1
3
2
Finish
Note
Macintosh
d Lift the scanner cover to release the lock a.
Gently push the scanner cover support
down b and close the scanner cover c.
2
Install MFL-Pro Suite
16
a Put the supplied installation CD-ROM into your
CD-ROM drive.
b Double-click the Start Here OSX icon to install.
e When this screen appears, click Next.
f When the Brother Support screen appears,
click Close to finish the installation or go to
step 17.
Download and install
Presto! PageManager
17
When Presto! PageManager is installed OCR
capability is added to Brother ControlCenter2. You
can easily scan, share and organize photos and
documents using Presto! PageManager.
(MFC-J410 only)
a Click the Presto! PageManager icon to go to
the Presto! PageManager download site, and
follow the on-screen instructions.
Windows
®
USB
Macintosh
c Please wait, it will take a few seconds for the
software to install. After the installation, the
Brother software will search for the Brother
device.
d Choose the machine from the list, and then
click OK.
The installation is now
complete.
To use Image Capture on Mac OS X 10.6.x,
please install the CUPS Printer Driver, which can
be downloaded from the Brother Solutions Center
(http://solutions.brother.com/
).
13
Page 14

Install Optional Applications
IMPORTANT
Note
Install FaceFilter
Studio/BookScan &
1
Whiteboard Suite
supported by Reallusion,
Inc
FaceFilter Studio is an easy-to-use borderless photo
printing application. FaceFilter Studio also lets you
edit your photo data and add photo effects such as
red eye reduction or skin tone enhancement.
The BookScan Enhancer software can correct your
scanned book images automatically.
The Whiteboard Enhancer software cleans up and
enhances text and images from photos taken of your
whiteboard.
• The machine must be ON and connected to
the computer.
• The computer must be connected to the
Internet.
• Make sure you are logged on with
Administrator rights.
• This application is not available for
Windows Server
®
2003/2008 series.
2
To get instructions on how to use FaceFilter Studio,
download and install FaceFilter Studio Help.
a To run FaceFilter Studio, go to
start/All Programs/Reallusion/
FaceFilter Studio on your computer.
b Click the button on the upper right corner
of the screen.
c Click Check for updates to go to the
Reallusion update web page.
Windows
®
Install FaceFilter Studio Help
a Open the top menu again by ejecting and then
reinserting the installation CD-ROM or by
double-clicking the start.exe program from the
root folder.
b The CD-ROM Top Menu will appear. Choose
your language and then click Additional
Applications.
c Click the button for the application you want to
install.
d Click the Download button and choose a folder
to save the file in.
e Close FaceFilter Studio before you start the
installer for FaceFilter Studio Help.
Double-click the downloaded file from the
folder you specified and follow the on-screen
instructions for installation.
To view the complete FaceFilter Studio Help,
choose start/All Programs/Reallusion/
FaceFilter Studio/FaceFilter Studio Help on
your computer.
d Go back to the Additional Applications screen
14
to install more applications.
Page 15

Consumables
Replacement consumables
When the time comes to replace ink cartridges, an error message will be indicated on the LCD. For more
information about the ink cartridges for your machine, visit http://www.brother.com/original/
Brother re-seller.
Ink cartridge
Black Yellow Cyan Magenta
LC985BK LC985Y LC985C LC985M
What is Innobella™?
Innobella™ is a range of genuine consumables offered by Brother.
The name “Innobella™” derives from the words “Innovation” and “Bella”
(meaning “Beautiful” in Italian) and is a representation of the “innovative”
technology providing you with “beautiful” and “long lasting” print results.
or contact your local
Trademarks
The Brother logo is a registered trademark of Brother Industries, Ltd.
Brother is a registered trademark of Brother Industries, Ltd.
Multi-Function Link is a registered trademark of Brother International Corporation.
Windows Vista is either a registered trademark or a trademark of Microsoft Corporation in the United States and other countries.
Microsoft, Windows, Windows Server and Internet Explorer are registered trademarks of Microsoft Corporation in the United States and/or
other countries.
Apple, Macintosh and Safari are trademarks of Apple Inc., registered in the United States and other countries.
FaceFilter Studio is a trademark of Reallusion, Inc.
Each company whose software title is mentioned in this manual has a Software License A greement specific to it s proprietary programs.
Any trade names and product names of companies appearing on Brother products, related documents and any other
materials are all trademarks or registered trademarks of those respective companies.
Compilation and Publication
Under the supervision of Brother Industries, Ltd., this manual has been compiled and published, covering the latest product descriptions and
specifications.
The contents of this manual and the specifications of this product are subject to change without notice.
Brother reserves the right to make changes without notice in the specifications and materials contained herein and shall not be responsible for
any damages (including consequential) caused by reliance on the materials presented, including but not limited to typographical and other
errors relating to the publication.
Copyright and License
©2010 Brother Industries, Ltd. All rights reserved.
Get inspired. Double-click the Brother CreativeCenter icon on your desktop to access a FREE web site with many
ideas and resources for personal and professional use.
http://www.brother.com/creativecenter/
 Loading...