Quick Setup Guide
MFC-230C
Before you can use the machine, you must set up the hardware and install the software. Please read this Quick Setup Guide for the correct setup procedure and installation instructions.
STEP 1
Setting Up the Machine
STEP 2
Installing the Driver & Software
Setup is Complete!
Keep this Quick Setup Guide, the User’s Guide and the supplied CD-ROM in a convenient place for quick and easy reference at all times.

1 Symbols used in this guide
Warning |
Caution |
Improper Setup |
|
|
|
Warnings tell you what to do to prevent |
Cautions specify procedures you must |
Improper Setup icons alert you to |
possible personal injury. |
follow or avoid to prevent possible |
devices and operations that are not |
|
damage to the machine or other objects. |
compatible with the machine. |
|
|
|
Note |
User’s Guide or Software User’s Guide |
|
|
|
|
|
|
|
Notes tell you how you should respond |
Indicates reference to the User’s Guide |
|
to a situation that may arise or give tips |
or Software User’s Guide which is on |
|
about how the current operation works |
the CD-ROM we have supplied. |
|
with other features. |
|
|
|
|
|

Table of Contents |
|
Getting Started |
|
Carton components...................................................................................................................................... |
2 |
Control panel................................................................................................................................................ |
3 |
STEP 1 – Setting Up the Machine |
|
Removing the protective parts ..................................................................................................................... |
4 |
Loading paper .............................................................................................................................................. |
4 |
Connecting the power cord and telephone line............................................................................................ |
6 |
Installing the ink cartridges........................................................................................................................... |
7 |
Print quality check ........................................................................................................................................ |
9 |
Choosing your language (Canada only)..................................................................................................... |
10 |
Setting the LCD contrast ............................................................................................................................ |
10 |
Setting the date and time ........................................................................................................................... |
11 |
Setting your station ID................................................................................................................................ |
11 |
Setting tone or pulse dialing mode............................................................................................................. |
12 |
Choosing a Receive Mode ......................................................................................................................... |
12 |
Sending in the Product Registration and Test Sheet (USA only).............................................................. |
13 |
STEP 2 – Installing the Driver & Software |
|
Windows® |
|
For USB Interface Users |
|
(For Windows® 2000 Professional/XP/XP Professional x64 Edition/Windows Vista™) ........................... |
16 |
Installing FaceFilter Studio.................................................................................................................... |
19 |
Macintosh® |
|
For USB Interface Users |
|
(For Mac OS® X 10.2.4 or greater) ........................................................................................................... |
20 |
Installing FaceFilter Studio Help |
|
Instructions on how to install FaceFilter Studio Help (For Windows® users) ............................................. |
23 |
Installing FaceFilter Studio Help ........................................................................................................... |
23 |
Consumables |
|
Replacement consumables........................................................................................................................ |
24 |
Ink cartridge .......................................................................................................................................... |
24 |
1
Getting Started
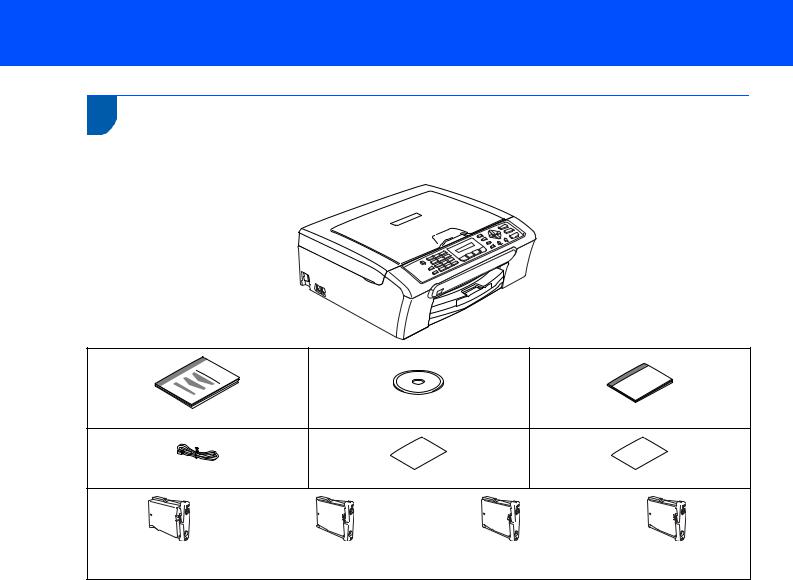
1
1 Carton components
Carton components may vary from one country to another.
Save all packing materials and the carton in case for any reason you must ship your machine.
Quick Setup Guide |
CD-ROM |
|
User’s Guide |
Telephone Line Cord |
Test Sheet (USA only) |
Accessory Order Form |
|
Black (LC51BK) |
Yellow (LC51Y) |
Cyan (LC51C) |
Magenta (LC51M) |
|
Ink Cartridges |
|
|
A USB interface cable is not a standard accessory.
Please make sure you use a USB 2.0 cable that is no longer than 6 feet (2 meters) long.
Your machine has a USB interface that is compatible with the USB 2.0 specification. This interface is also compatible with Full-Speed USB 2.0; however, the maximum data transfer rate will be 12 Mbits/s. The machine can also be connected to a computer that has a USB 1.1 interface.
DO NOT connect the interface cable at this time.
Connecting the interface cable is done during the software installation process.
When you use a USB cable, make sure you connect it to the USB port of your computer and not to a USB port on a keyboard or a non-powered USB hub.
2
Getting Started
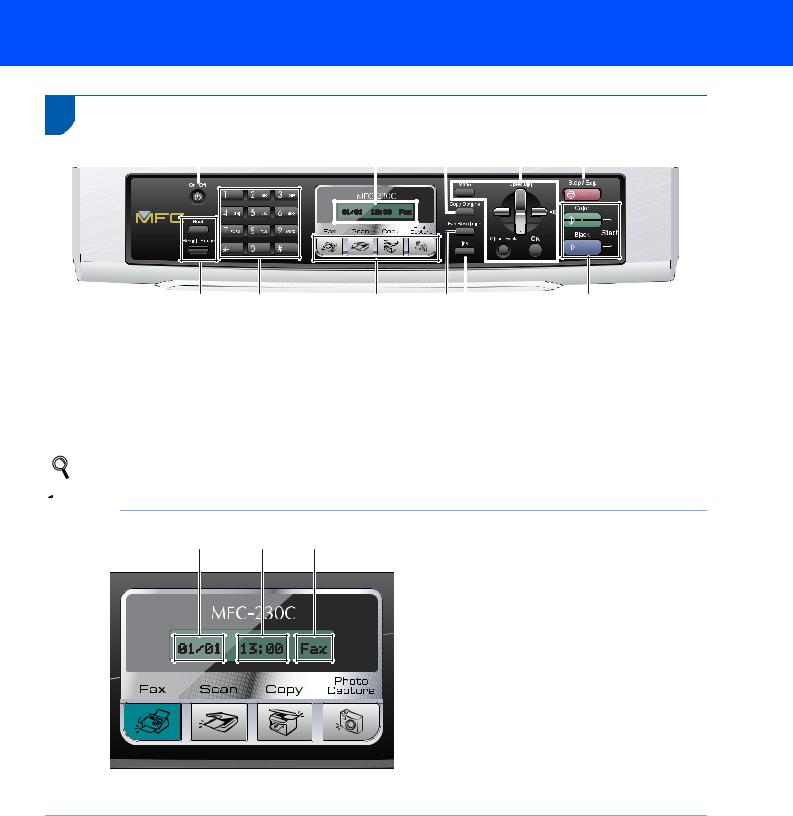
2 Control panel
11 |
|
|
|
|
|
10 |
9 |
|
8 |
|
|
|
|
|
|
7 |
|
|||||||||||||||||
|
|
|
|
|
|
|
|
|
|
|
|
|
|
|
|
|
|
|
|
|
|
|
|
|
|
|
|
|
|
|
|
|
|
|
|
|
|
|
|
|
|
|
|
|
|
|
|
|
|
|
|
|
|
|
|
|
|
|
|
|
|
|
|
|
|
|
|
|
|
|
|
|
|
|
|
|
|
|
|
|
|
|
|
|
|
|
|
|
|
|
|
|
|
|
|
|
|
|
|
|
|
|
|
|
|
|
|
|
|
|
|
|
|
|
|
|
|
|
|
|
|
|
|
|
|
|
|
|
|
|
|
|
|
|
|
|
|
|
|
|
|
|
|
|
|
|
|
|
|
|
|
|
|
|
|
|
|
|
|
|
|
|
|
|
|
|
|
|
|
|
|
|
|
|
|
|
|
|
|
|
|
|
|
|
|
|
|
|
|
|
|
|
|
|
|
|
|
|
|
|
|
|
|
|
|
|
|
|
|
|
|
|
|
|
|
|
|
|
|
|
|
|
|
|
|
|
|
|
|
|
|
|
|
|
|
|
|
|
|
|
|
|
|
|
|
|
|
|
|
|
|
|
|
|
|
|
|
|
|
|
|
|
|
|
|
|
|
|
|
|
|
|
|
|
|
|
|
|
|
|
|
|
|
|
|
|
|
|
|
|
|
|
|
|
|
|
|
|
|
|
|
|
|
|
|
|
|
|
|
|
|
|
|
|
|
|
|
|
|
|
|
|
|
|
|
|
|
|
|
|
|
|
|
|
|
|
|
|
|
|
|
|
|
|
|
|
|
|
|
|
|
|
|
|
|
|
|
|
|
|
|
|
|
|
|
|
|
|
|
|
|
|
|
|
|
|
|
|
|
|
|
|
|
|
|
|
|
|
|
|
|
|
|
|
|
|
|
|
|
|
|
|
|
|
|
|
|
|
|
|
|
|
|
|
|
|
|
|
|
|
|
|
|
|
|
|
|
|
|
|
|
|
|
|
|
|
|
|
|
|
|
|
|
|
|
|
|
|
|
|
|
|
|
|
|
|
|
|
|
|
|
|
|
|
|
|
|
|
|
|
|
|
|
|
|
|
|
|
|
|
|
|
|
|
|
|
|
|
|
|
|
|
|
|
|
|
|
|
|
|
|
|
|
|
|
|
|
|
|
|
|
|
|
|
|
|
|
|
|
|
|
|
|
|
|
1 |
2 |
3 |
4 |
5 |
6 |
1 |
Fax and telephone keys |
|
7 |
Stop/Exit key |
|
|
2 |
Dial Pad |
|
8 |
Menu keys |
|
|
3 |
Mode keys |
|
9 |
Copy Options key |
|
|
4 |
Fax Resolution key |
|
10 |
LCD (Liquid Crystal Display) |
|
|
5 |
Ink key |
|
11 |
On/Off key |
|
|
6 |
Start keys |
|
|
|
|
|
For the details of the control panel, see Control panel overview in Chapter 1 of the User’s Guide.
 Note
Note
1 |
2 |
3 |
1 |
Date |
2 |
Time |
3 |
Receive mode |
When the machine is idle (not being used) it will return to the default display shown above. The default display shows the date, time, and the current receive mode.
3
STEP 1 Setting Up the Machine
1
1Removing the protective parts
1Remove the protective tape and film covering the scanner glass.
2Remove the foam bag containing the ink cartridges from on top of the paper tray.
 Improper Setup
DO NOT connect the USB cable. Connecting the USB cable is done during the software installation process.
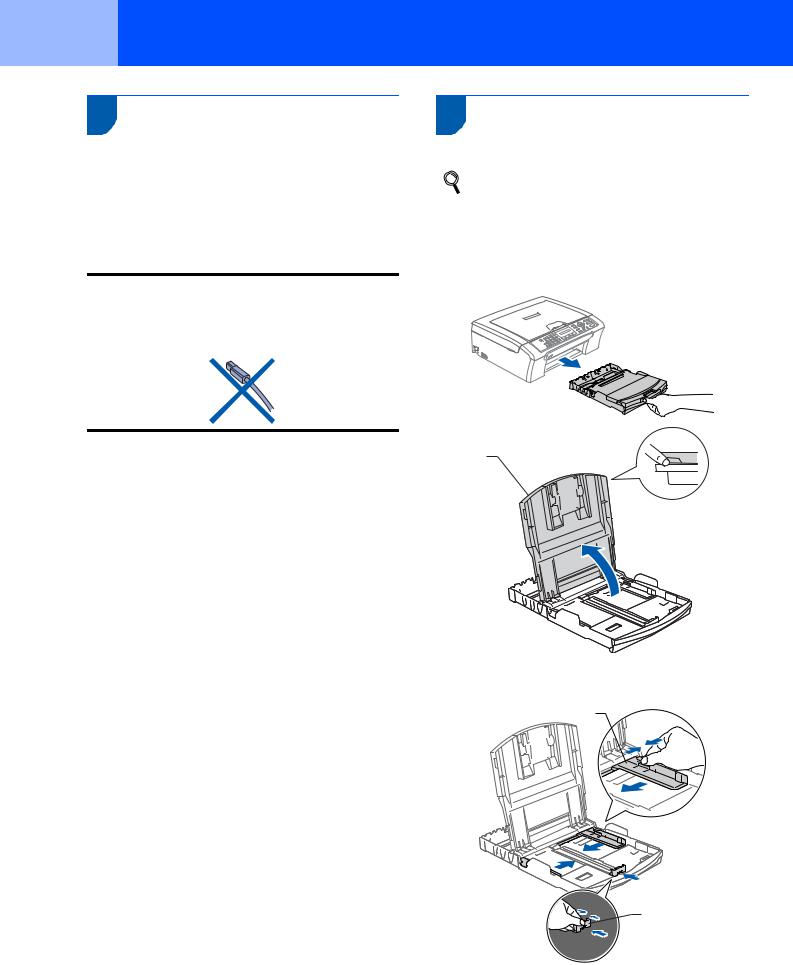
2 Loading paper
You can load up to 100 sheets of 20 lb (80
g/m2) paper.
For details, see Acceptable paper and other media in Chapter 2 of the User’s Guide.
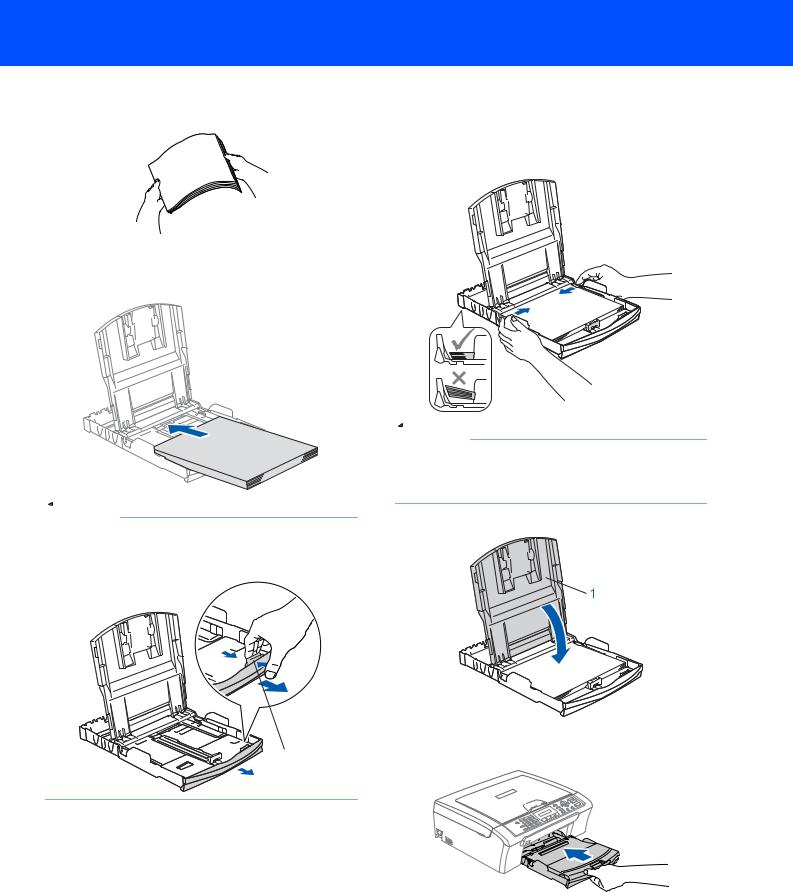
1 Pull the paper tray completely out of the machine and lift the output paper tray cover (1).
1
2 Press and slide the paper side guides (1) and paper length guide (2) to fit the paper size.
1
2
4
Setting Up the Machine
3
4
Fan the stack of paper well to avoid paper jams |
5 Gently adjust the paper side guides with both |
and misfeeds. |
hands to fit the paper. |
|
Make sure that the paper side guides and |
|
paper length guide touch the edges of the |
|
paper. |
Gently put the paper into the paper tray print side down and top edge first.
Check that the paper is flat in the tray.
 Note
Note
When you use Legal size paper, press and hold the universal guide release button (1) as you slide out the front of the paper tray.
 Note
Note
Be careful that you do not push the paper in too far; it may lift at the back of the tray and cause paper feed problems.
6 Close the output paper tray cover (1).
|
7 Slowly push the paper tray completely into the |
1 |
machine. |
5
STEP 1 Setting Up the Machine
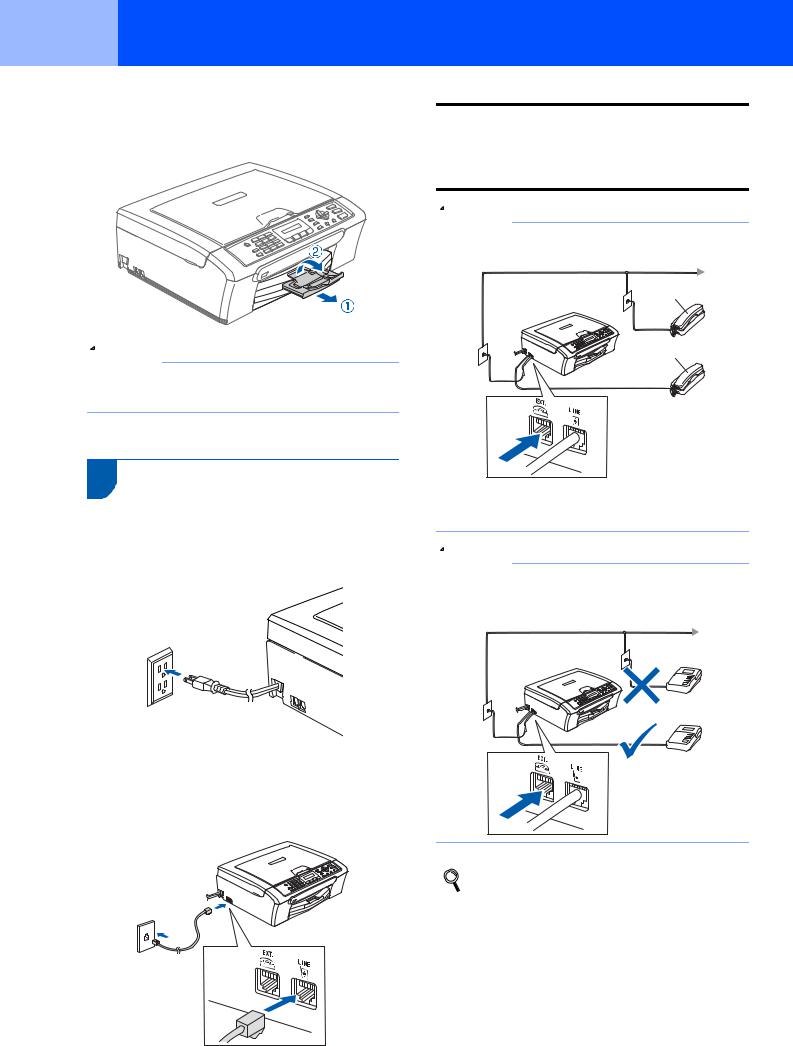
8 While holding the paper tray in place, pull out
the paper support ( ) until it clicks, and then unfold the paper support flap (
 ).
).
 Note
Note
Do not use the paper support flap ( ) for Legal size paper.
3Connecting the power cord and telephone line
1 Connect the power cord.
2 Connect the telephone line cord. Connect one end of the telephone line cord to the jack on the machine marked LINE and the other end to a modular wall jack.
 Improper Setup
DO NOT connect the USB cable. Connecting the USB cable is done during the software installation process.
 Note
Note
If you are sharing one telephone line with an external telephone, connect it as shown below.
1
2
1Extension telephone
2External telephone
 Note
Note
If you are sharing one telephone line with an external telephone answering machine, connect it as shown below.
Set the receive mode to ‘External TAD’ if you have an external answering machine. For details, see Connecting an external TAD (telephone answering device) in Chapter 7 of the User’s Guide.
6
Setting Up the Machine
4 Installing the ink cartridges
 Warning
If ink gets in your eyes, wash them out with water at once, and if irritation occurs consult a doctor.
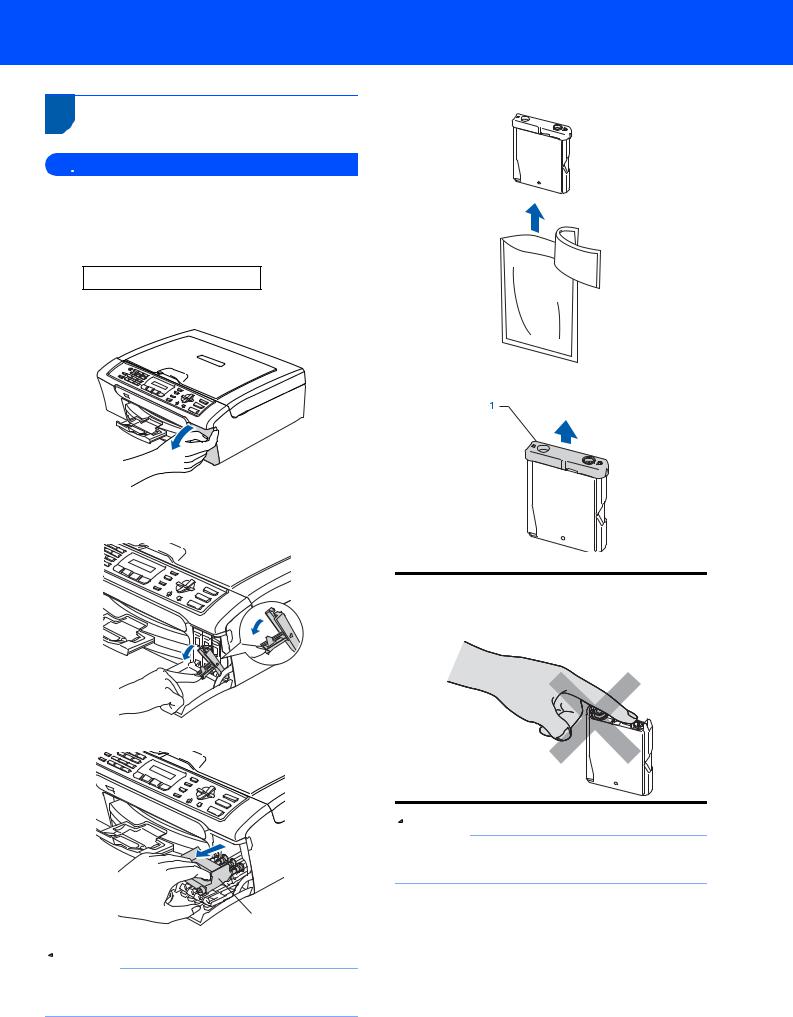
1 Make sure that the power is turned on. The LCD shows:
No Cartridge
2 Open the ink cartridge cover (1).
 1
1
3 Pull all the lock release levers down and remove the yellow protective part (1).
1
 Note
Note
Do not throw away the yellow protective part. You will need it if you transport the machine.
4 Take out the ink cartridge.
5 Carefully remove the protective yellow cap (1).
 Improper Setup
DO NOT touch the area shown in the illustration below.
 Note
Note
If the protective yellow cap comes off when you open the bag, the cartridge will not be damaged.
7

STEP 1 Setting Up the Machine
6
7
Install each ink cartridge in the direction of the arrow on the label.
Take care to match the color of the lock release lever (1) with the cartridge color (2), as shown in the diagram below.
2
1
M brother
Lift each lock release lever and gently push it until it clicks, and then close the ink cartridge cover.
The first time the ink cartridges are installed the machine prepares and cleans the ink tube system. This initial process will take more time than a normal cleaning cycle but will happen only once.
The LCD shows:
Preparing System
q
Approx 4 Minutes
Cleaning
q
Please Wait
 Note
Note
If the LCD shows Install Black,
Install Yellow, Install Cyan or
Install Magenta after you install the ink cartridges, check that the ink cartridges are installed properly.
8

Setting Up the Machine
 Caution
•DO NOT take out ink cartridges if you do not need to replace them. If you do so, it may reduce the ink quantity and the machine will not know the quantity of ink left in the cartridge.
•DO NOT shake the ink cartridges. If ink stains your skin or clothing, wash with soap or detergent at once.
•DO NOT repeatedly insert and remove the cartridges. If you do so, ink may seep out of the cartridge.
•If you mix the colors by installing an ink cartridge in the wrong position, clean the print head several times after correcting the cartridge installation.
(See Cleaning the print head in Appendixes B of the User’s Guide.)
•Once you open an ink cartridge, install it in the machine and use it up within six months of installation. Use unopened ink cartridges by the expiration date written on the cartridge package.
•DO NOT dismantle or tamper with the ink cartridge, this can cause the ink to leak out of the cartridge.
•Brother strongly recommends that you do not refill the ink cartridges provided with your machine. We also strongly recommend that you continue to use only Genuine Brother Brand replacement ink cartridges. Using or attempting to use potentially incompatible inks and/or cartridges in your machine may cause damage to the machine itself and/or it may result in unsatisfactory print quality. Our warranty coverage does not apply to any problem that was caused by the use of unauthorized third party ink and/or cartridges. To protect your investment and guarantee your print quality please continue to replace consumed ink cartridges with only Genuine Brother Branded Supplies.
5Print quality check
1After the cleaning cycle is finished, the LCD shows:
Set Paper and
q
Press Start
2 Make sure A4, Letter or Legal size paper is loaded in the paper tray.
Press Color Start.
The machine starts printing the Print Quality Check Sheet (only during initial ink cartridge installation).
3 Check the quality of the four color blocks on the sheet.
(black/ yellow/ cyan/ magenta)
 Improper Setup
Avoid touching the printed surface of the paper immediately after printing, the surface may not be completely dry and may stain your fingers.
9

STEP 1 Setting Up the Machine
4 The LCD shows:
Is Quality OK?
q
1.Yes 2.No
If all lines are clear and visible, press 1 (Yes) on the dial pad to finish the quality check.
If you can see missing short lines, press 2 (No) on the dial pad and go to step 5.
OK |
Poor |
5 The LCD asks you if the print quality is OK for black and color. Press 1 (Yes) or 2 (No) on the dial pad.
Black OK?
q
1.Yes 2.No
Color OK?
q
1.Yes 2.No
After pressing 1 (Yes) or 2 (No) for both black and color, the LCD shows:
Start Cleaning?
q
1.Yes 2.No
6 Press 1 (Yes), the machine will then start cleaning the colors.
7 After cleaning is finished, press Color Start. The machine starts printing the Print Quality Check Sheet again and goes back to step 3.
6Choosing your language (Canada only)
1 Press Menu.
2 Press 0.
3 Press 0.
4 Press a or b to choose your language (English or French), and then press OK.
Language:English
5 Press Stop/Exit.
7 Setting the LCD contrast
You can adjust the LCD contrast for a sharper and more vivid display. If you are having difficulty seeing the LCD from your position, we recommend the following contrast setting for improved viewing.
1 Press Menu.
2 Press 1.
3 Press 7.
4 Press a or b to choose Dark or Light.
5 Press OK.
6 Press Stop/Exit.
Contrast:Dark
Contrast:Light
10

Setting Up the Machine
8 Setting the date and time
The machine displays the date and time, and if you set up the station ID it will add it to each fax you send.
1 Press Menu.
2 Press 0.
3 Press 2.
4 Enter the last two digits of the year on the dial pad, and then press OK.
Year:2007
(e.g. Enter 0 7 for 2007.)
5 Enter the two digits for the month on the dial pad, and then press OK.
Month:03
(e.g. Enter 0 3 for March.)
6 Enter the two digits for the day on the dial pad, and then press OK.
Day:01
(e.g. Enter 0 1 for the first day of the month.)
7 Enter the time in 24-hour format on the dial pad, and then press OK.
Time:15:25
(e.g. Enter 1 5, 2 5 for 3:25 P.M.)
8 Press Stop/Exit.
To confirm the current date and time, print out the User Settings report. (See Printing Reports in Chapter 9 of the User’s Guide.)
9 Setting your station ID
You should store your name and fax number to be printed on all fax pages that you send.
1 Press Menu.
2 Press 0.
3 Press 3.
4 Enter your fax number (up to 20 digits) on the dial pad, and then press OK.
Fax:_
5 Enter your name (up to 20 characters) using the dial pad, and then press OK.
Name:_
 Note
Note
•See the following chart for entering your name.
•If you need to enter a character that is on the same
key as the last character, press  to move the cursor to the right.
•If you entered a letter incorrectly and want to
change it, press  or
or  to move the cursor to the incorrect character, press Clear/Back.
Press |
One |
|
Two |
Three |
Four |
|
|
key |
time |
|
times |
times |
times |
|
|
|
|
|
|
|
|
2 |
A |
|
B |
C |
2 |
|
|
|
|
|
|
|
|
3 |
D |
|
E |
F |
3 |
|
|
|
|
|
|
|
|
4 |
G |
|
H |
I |
4 |
|
|
|
|
|
|
|
|
5 |
J |
|
K |
L |
5 |
|
|
|
|
|
|
|
|
6 |
M |
|
N |
O |
6 |
|
|
|
|
|
|
|
|
7 |
P |
|
Q |
R |
S |
|
|
|
|
|
|
|
|
8 |
T |
|
U |
V |
8 |
|
|
|
|
|
|
|
|
9 |
W |
|
X |
Y |
Z |
|
|
|
|
|
|
|
6 |
Press Stop/Exit. |
|
|
|
||
 Note
Note
If you make a mistake and want to start again, press Stop/Exit and go to back to step 1.
For details, see Entering Text in Appendix C of the User's Guide.
11

STEP 1 Setting Up the Machine
 Note
Note
(USA only)
The Telephone Consumer Protection Act of 1991 makes it unlawful for any person to use a computer or electronic device to send any message via a telephone fax machine unless such messages clearly contain, in a margin at the top or bottom of each transmitted page, or on the first page of the transmission, the date and time it is sent and an identification of the business or other entity or other individual sending the message and the telephone number of the sending machines or such business, other entity or individual.
10Setting tone or pulse dialing mode
Your machine comes set for a Tone dialing service. If you have a Pulse dialing service (rotary), you need to change the dialing mode.
1 Press Menu.
2 Press 0.
3 Press 4.
4 Press a or b to choose Pulse (or Tone). Press OK.
5 Press Stop/Exit.
11 Choosing a Receive Mode
There are four possible receive modes: Fax Only,
Fax/Tel, Manual and External TAD.
Do you use a Distinctive |
|
See Distinctive Ring |
|
Ring subscriber service? |
Yes |
||
in Chapter 7 of the |
|||
|
|||
No |
|
User's Guide. |
Are you connecting an external telephone or external TAD (telephone answering device) to the machine?
Yes |
No |
Are you using the voice message function of your external TAD (telephone answering device)?
 No
No
Do you want the machine to answer fax and telephone calls automatically?
 Yes
Yes
Do you want to use the machine for fax only?

 Fax Only
Yes Your machine automatically answers every call as a fax.
No
Fax/Tel
Your machine controls the line and automatically answers every call. If the call is not a fax, the telephone will ring for you to pick up the call.
No
Manual
You control the telephone line and must answer every call yourself.
Yes
External TAD
Your external telephone answering device (TAD) automatically answers every call. Voice messages are stored on the external TAD. Fax messages are automatically printed.
1 Press Menu.
2 Press 0.
3 Press 1.
4 Press a or b to choose the mode. Press OK.
5 Press Stop/Exit.
For details, see Using receive modes in Chapter 6 of the User's Guide.
12

Setting Up the Machine
12Sending in the Product Registration and Test Sheet (USA only)
1 Fill out the Product Registration and Test Sheet.
2
3
4
5
Put the sheet face down on the scanner glass.
Make sure  (Fax) is illuminated in Green.
Enter the toll-free fax number: 1-877-268-9575.
Press Black Start.
 Note
Note
You will receive a confirmation fax of your Product Registration.
You can also register your product online using the On-Line Registration link from the installation CDROM or visit http://www.brother.com/registration.
Now go to
Supplied CD-ROM ‘MFL-Pro Suite’ on the next page to install the drivers.
13

Supplied CD-ROM ‘MFL-Pro Suite’
1
1 Supplied CD-ROM ‘MFL-Pro Suite’
Windows® |
Macintosh® |
 Install MFL-Pro Suite
You can install the MFL-Pro Suite software and multifunction drivers.
 Install Other Drivers or Utilities
You can install additional MFL-Pro Suite software utilities, install without ScanSoft™ PaperPort™ 11SE with OCR by NUANCE™,or install FaceFilter Studio.
 Documentation
View the Software User’s Guide in HTML format. You can also view the manuals in PDF format by accessing the Brother Solutions Center. The Software User’s Guide includes instructions for features available when connected to a computer. (eg. Printing and scanning details)
 On-Line Registration
Register your machine from the Brother Product Registration Page.
 Brother Support
View contact information for Brother Customer Service and how to find a Brother Authorized Service Center. View our web site for original/genuine Brother supplies at http://www.brother.com/original/ for Supplies Information.
 Repair MFL-Pro Suite
If an error occurred during the installation of the MFLPro Suite, use this selection to automatically repair and re-install the MFL-Pro Suite.
 Note
Note
MFL-Pro Suite includes the Printer Driver, Scanner Driver, Brother ControlCenter3, ScanSoft™ PaperPort™ 11SE.
ScanSoft™ PaperPort™ 11SE is a document management application for scanning and viewing documents.
 Start Here OSX
You can install the MFL-Pro Suite that includes the printer driver, scanner driver and Brother
ControlCenter2 for Mac OS® X 10.2.4 or greater.
 Presto! PageManager
You can also install Presto!® PageManager® to add OCR capability to Brother ControlCenter2 and easily scan, share and organize photos and documents.
For Mac OS® X 10.3.9 or greater users, you can directly install the software from the included CD-ROM, follow the steps in Installing the Drivers & Software.
For Mac OS® X 10.2.4 to 10.3.8 users, you need to download the software from the Brother Solutions Center web site. To download, follow the steps in Installing the Drivers & Software.
 Documentation
View the Software User’s Guide in HTML format. You can also view the manuals in PDF format by accessing the Brother Solutions Center.The Software User’s Guide includes instructions for features available when connected to a computer. (eg. Printing and scanning details)
 Brother Solutions Center
Access the Brother Solutions Center for FAQs, User’s Guides, driver updates and tips for using your machine. (Internet access required)
 On-Line Registration
Register your machine from the Brother Product Registration Page.
 Utilities
You can find the following additional Utilities from this folder.
Presto!® PageManager® Uninstaller
14

STEP 2 |
Installing the Driver & Software |
|
Follow the instructions on this page for your operating system and interface. |
|
|
For the latest drivers, documentation, and to find the best solution for your problem, access the Brother Solution Center |
|
|
directly from the CD-ROM / Driver or visit http://solutions.brother.com. |
|
|
Windows® |
|
|
For USB Interface Users |
|
|
(For Windows® 2000 Professional/XP/ |
|
|
XP Professional x64 Edition/Windows Vista™) ........................................................... |
16 |
|
Macintosh® |
|
|
For USB Interface Users |
|
|
(For Mac OS® X 10.2.4 or greater) ................................................................................. |
20 |
|
The screens for Windows® in this Quick Setup Guide are based on Windows® XP. The screens for Mac OS® X in this Quick Setup Guide are based on Mac OS® X 10.4.
Screens on your computer may vary depending on your operating system.
15

STEP 2 Installing the Driver & Software
Windows®
1
USB
Windows®
1For USB Interface Users
(For Windows® 2000 Professional/XP/
XP Professional x64 Edition/Windows Vista™)
Important |
4 The CD-ROM main menu will appear. Click |
|
Install MFL-Pro Suite. |
||
|
Make sure that you have finished the instructions from STEP 1 Setting Up the Machine on pages 4 through 13.
 Note
Note
•The supplied CD-ROM includes the ScanSoft™ PaperPort™ 11SE. This software supports Windows® 2000 (SP4 or greater), XP (SP2 or greater), XP Professional x64 Edition and Windows Vista™ only. Please update to the latest Windows® Service Pack before installing MFL-Pro Suite.
•Please close any applications running before installing MFL-Pro Suite.
1 Unplug the machine from the AC outlet and from your computer, if you already connected an interface cable.
2 Turn on your computer.
You must be logged on with Administrator rights.
3 Put the supplied CD-ROM into your CD-ROM drive. If the model name screen appears, choose your machine. If the language screen appears, choose your language.
If this window does not appear, use Windows® Explorer to run the start.exe program from the root folder of the Brother CD-ROM.
 Note
Note
•If this screen appears, click OK and restart your computer.
•If the installation does not continue automatically, open the main menu again by ejecting and then reinserting the CD-ROM disc or double-click the
start.exe program from the root folder, and continue from Step 4 to install the MFL-Pro Suite.
•For Windows Vista™, when the User Account Control screen appears, click Allow.
16

Installing the Driver & Software
Windows®
5
6
7
8
After reading and accepting the ScanSoft™ PaperPort™ 11SE License Agreement, click
Yes.
The installation of the ScanSoft™ PaperPort™ 11SE will automatically start and is followed by the installation of MFL-Pro Suite.
When the Brother MFL-Pro Suite Software License Agreement window appears, click Yes if you agree to the Software License Agreement.
Choose Standard, and then click Next. The installation continues.
9 When this screen appears, go to the next step.
USB
Windows®
10 Using both hands, use the plastic tabs on both sides of the machine to lift the scanner cover until it locks securely into the open position.
11 Insert the USB cable into the USB socket marked with a symbol. You will find the USB socket inside the machine as shown below.
 Note
Note
For Windows Vista™, when this screen appears, click the check box and click Install to complete the installation properly.
12 Carefully route the USB cable through the trench and out the back of the machine as shown below and connect the cable to your computer.
17

STEP 2 Installing the Driver & Software
Windows®
USB
Windows®
 Improper Setup
•DO NOT connect the machine to a USB port on a keyboard or a non-powered USB hub. Brother recommends that you connect the machine directly to your computer.
•Make sure that the cable does not restrict the cover from closing, or an error may occur.
•Make sure you use a USB 2.0 cable that is no longer than 6 feet (2 meters) long.
13 Lift the scanner cover to release the lock ( ). Gently push the scanner cover support down (
 ) and close the scanner cover (
 ).
).
14 Turn on the machine by connecting the power cord.
The installation of the Brother drivers will automatically start. The installation screens appear one after another. Please wait, it will take a few seconds for all the screens to appear.
 Improper Setup
DO NOT try to cancel any of the screens during this installation.
15 When the On-Line Registration screen is displayed, make your selection and follow the on-screen instructions.
16 Click Finish to restart your computer. After restarting the computer, you must be logged on with Administrator rights.
 Note
Note
After restarting the computer, the Installation Diagnostics will run automatically. If the installation is unsuccessful, the installation results window will be shown. If the Diagnostics shows a failure, please follow the on-screen instructions or read the on-line help and FAQ’s in
Start/All Programs/Brother/MFC-XXXX.
The MFL-Pro Suite has been installed completely. Proceed to Installing FaceFilter Studio on page 19 to install the FaceFilter Studio application.
 Note
Note
MFL-Pro Suite includes the Printer Driver, Scanner Driver, Brother ControlCenter3, ScanSoft™ PaperPort™ 11SE.
ScanSoft™ PaperPort™ 11SE is a document management application for scanning and viewing documents.
18

Installing the Driver & Software
Installing FaceFilter Studio
FaceFilter Studio is an easy-to-use borderless photo printing application. FaceFilter Studio also lets you edit your photo data and add photo effects such as red eye reduction or skin tone enhancement.
Important
Before you launch FaceFilter Studio for the first time, you must confirm MFL-Pro Suite is installed, your Brother machine is turned ON and connected to our computer.
17 Open the main menu again by ejecting and then reinserting the CD-ROM disc or by double-clicking the start.exe program from the root folder.
18 The CD-ROM main menu will appear. Click
Install Other Drivers or Utilities.
19 Click the FaceFilter Studio button to install.
20 For information on basic FaceFilter Studio functions, see Using FaceFilter Studio for photo printing by REALLUSION in the Software User’s Guide on the CD-ROM.
For more detailed information, install FaceFilter Studio Help. See Instructions on how to install FaceFilter Studio Help (For
Windows® users) on page 23.
Windows®
USB
Windows®
19

STEP 2 Installing the Driver & Software
Macintosh®
2For USB Interface Users
(For Mac OS® X 10.2.4 or greater)
USB
Macintosh®
Important
Make sure that you have finished the instructions from STEP 1 Setting Up the Machine on pages 4 through 13.
 Note
Note
For Mac OS® X 10.2.0 to 10.2.3 users, upgrade to Mac OS® X 10.2.4 or greater. (For the latest
information for Mac OS® X, visit http://solutions.brother.com)
1 Using both hands, use the plastic tabs on both sides of the machine to lift the scanner cover until it locks securely into the open position.
2 Insert the USB cable into the USB socket marked with a symbol. You will find the USB socket inside the machine as shown below.
3 Carefully route the USB cable through the trench and out the back of the machine as shown below and connect the cable to your Macintosh®.
 Improper Setup
•DO NOT connect the machine to a USB port on a keyboard or a non-powered USB hub. Brother recommends that you connect the machine directly to your Macintosh®.
•Make sure that the cable does not restrict the cover from closing, or an error may occur.
•Make sure you use a USB 2.0 cable that is no longer than 6 feet (2 meters) long.
4 Lift the scanner cover to release the lock ( ). Gently push the scanner cover support down (
 ) and close the scanner cover (
 ).
).
20

Installing the Driver & Software
Macintosh®
5
6
7
8
Turn on the machine by connecting the power cord.
Turn on your Macintosh®.
Put the supplied CD-ROM into your CD-ROM drive.
Double-click the Start Here OSX icon to install. Follow the on-screen instructions.
For Mac OS® X 10.3.x or greater users: The MFL-Pro Suite, Brother printer driver, scanner driver and Brother ControlCenter2 have been installed and the installation is now complete.
Go to step 15.
11 For Mac OS® X 10.2.4 to 10.2.8 users: Click Add.
USB
Macintosh®
12 Choose USB.
13 Choose MFC-XXXX (where XXXX is your model name), and then click Add.
 Note
Note
Please wait, it will take a few seconds for the software to install. After the installation, click Restart to finish installing the software.
9 The Brother software will search for the Brother device. During this time the following screen will appear.
10 When this screen appears, click OK.
14 Click Print Center, then Quit Print Center.
The MFL-Pro Suite, Brother printer driver, scanner driver and Brother ControlCenter2 have been installed and the installation is now complete.
21

STEP 2 Installing the Driver & Software
Macintosh®
15 To install Presto!® PageManager®, doubleclick the Presto! PageManager icon and follow the on-screen instructions.
USB
Macintosh®
For Mac OS® X 10.2.4 to 10.3.8 users: When this screen appears, click Go to download the software from the Brother Solutions Center web site.
 Note
Note
When Presto!® PageManager® is installed OCR capability is added to Brother ControlCenter2. You can easily scan, share and organize photos and
documents using Presto!® PageManager®.
Presto!® PageManager® has been installed and the installation is now complete.
22

Installing FaceFilter Studio Help
Instructions on how to install FaceFilter Studio Help (For Windows® users)
To get instructions on how to use FaceFilter Studio, download and install FaceFilter Studio Help. Your computer must be connected to the internet.
Installing FaceFilter Studio Help
1
2
3
4
5
To run FaceFilter Studio, go to
Start/All Programs/FaceFilter Studio in the Start menu.
Click the |
button on the upper right corner |
of the screen. |
|
Click Check for updates to go to the Reallusion update web page.
Click the Download button and choose a folder to save the file in.
Close FaceFilter Studio before you start the installer for FaceFilter Studio Help. Double-click the downloaded file from the folder you specified and follow the on-screen instructions for installation.
 Note
Note
To view the complete FaceFilter Studio Help, choose Start/All Programs/FaceFilter Studio/ FaceFilter Studio Help on your computer.
23

Consumables
1
1 Replacement consumables
When the time comes to replace ink cartridges, an error message will be indicated on the LCD. For more information about the ink cartridges for your machine, visit http://solutions.brother.com or contact your local Brother re-seller.
Ink cartridge
Black |
Yellow |
Cyan |
Magenta |
|
|
|
|
LC51BK |
LC51Y |
LC51C |
LC51M |
|
|
|
|
|
|
|
|
What is Innobella™?
Innobella™ is a range of genuine consumables offered by Brother.
The name "Innobella™" derives from the words "Innovation" and "Bella" (meaning "Beautiful" in Italian) and is a representation of the "innovative" technology providing you with beautiful and long lasting print results.
24

Trademarks
The Brother logo is a registered trademark of Brother Industries, Ltd. Brother is a registered trademark of Brother Industries, Ltd.
Multi-Function Link is a registered trademark of Brother International Corporation.
Windows and Microsoft are registered trademarks of Microsoft Corporation in the United States and /or other countries. Windows Vista is either a registered trademark or trademark of Microsoft Corporation in the United States and /or other countries.
Macintosh and True Type are registered trademarks of Apple Computer, Inc.
Nuance, the Nuance logo, PaperPort and ScanSoft are trademarks or registered trademarks of Nuance Communications, Inc. or its affiliates in the United States and/or other countries.
Presto! PageManager is a registered trademark of NewSoft Technology Corporation. PictBridge is a trademark.
FaceFilter Studio is a trademark of Reallusion, Inc.
Each company whose software title is mentioned in this manual has a Software License Agreement specific to its proprietary programs.
All other brand and product names mentioned in this manual are trademarks or registered trademarks of their respective companies.
Compilation and Publication
Under the supervision of Brother Industries Ltd., this manual has been compiled and published, covering the latest product descriptions and specifications.
The contents of this manual and the specifications of this product are subject to change without notice.
Brother reserves the right to make changes without notice in the specifications and materials contained herein and shall not be responsible for any damages (including consequential) caused by reliance on the materials presented, including but not limited to typographical and other errors relating to the publication.
Copyright and License
©2007 Brother Industries, Ltd.

USA/CAN
 Loading...