

Page 1
Twin
Needle, Lockstitch
Machine
Doppelnadei-Verriegelungsstichmaschine
Machine
Maquina
L T2-B841
a Double
de
Doble Pespunte con Dos Agujas
Aiguille
· L T2-B842 · L T2-B845
L T2-B847 · L T2-B848
L T2-B872
INSTRUCTION
BED
MANUEL
MANUAL
I EN U
· L T2-B875
MANUAL
NGSAN
D'INSTRUCTIONS
DE
LEITU
INSTRUCCIONES
NG
pour
Point
Noue
Page 2
CONTENTS
~
NAMES
~
INSTALLATION
ITJ
PowerTable
[2]
To Attach
~
To
[1]
Installing
Compl
[5]
To
[QJ
To Attach
ITl
To
[BJ
Precau
the Belt Cover ................................................. 10
~
LUBRICATION
ITJ
Lubrication ......................................................
[2]
Oiling
~
CORRECT
ITJ
To Attach
[2]
To Remove the Bobbin ...................................
~
To
[11
To Attach
[5]
[Q]
[1]
Adjustment
[BJ
Adjustment
[9]
Thread Tension .............................................. 19
[Q]
To
~
STANDARD
ITJ
[2]
~
[11
[5]
~
TROUBLESHOOTING GUID
OF
MAIN
PARTS
~
...... ................ .
~
..................
the
Oil Pan and Knee Lifter ............ 6
Attach the Rubber Bases and Cushions
the
Skirt, Knee Lifter
ying
Bar...
Install
the Mac
the
Bobbin
Attach
the
Thr
tions
Before Installing
~
...............................................................
OPERATION
the
Needles ....................................
Wind
the
Lower
the
Bobbin ...................................... 15
L
ower
Threading
UpperThreading
of
the
of
the
Stop
the
Needle Bars ................................ 23
ADJUSTMENTS
Adjustment
Fe
ed-
Timing
Adjustment
Rotary-Hook
Adjustment
Adjustment
How
to
of
the Needles and
................................................... 25
of
the
Timing
of
the Presser Foot He
of
th e Feed Dog
Change Gauges ................................. 33
............................ ...... 5
.......................................
hine Head·
Winder......................... 9
ead
Unwind
... ........ ............................
Thread ............................ 14
............................................ 16
............................................
Presser Foot Pressure ...... 18
Stitch Length .................... 18
Needles and
....................................... 26
Belt
Tension.
er .................... 9
~
..... ................
~
.................
igh
Height
E
~
t .........
.............. 32
......... ...... 37
...
...... 7
...
11
11
12
...
13
13
13
17
25
31
5
7
8
IN
HAL
TSVERZEICHNIS
~
TEILEBEZEICHNUNG
~
AUFSTELLUNG
ITJ
Nahtisch .......................................................... 5
[2]
Montage
Kniehebers ......................
~
Montage der
Dampfer
@
Montage der Tulle und der
Knieheberstange ...................
[5]
Aufstellung
Riemenspannung ........................................... 8
[Q]
Montage
[1]
Montage
[BJ
Vorkehrungen
rles Riemen schutzes .......................................
~
SCHMIERUNG
[I]
Schmierung ....................................................
[2]
Vor
DER
MASCHINENBETRIEB
[I]
Nadelbefestigung ........................................... 13
[2]
Entnehmen
~
Aufw
@ Einsetzen
[5]
Einf
[QJ
Einf
[1]
Einstellung des Stoffdruckerfuf?.drucks ......... 18
[BJ
Einstellung
[9]
Fadenspann ung .............................................
[Q]
Abschal
~
STANDARDEINSTELLUNGEN
[I]
Einstellung des Nadel- und
Tr
ansporteurgleichlaufs ................................ 25
[2]
Einstellung
synchronis
~
Einstellung der Stoffdruckerfuf?.hohe ..........
[1]
Einstellung der
[5]
Austa uschen verschiedener Teile ................. 33
der
Olwanne
Gummiauflagen
.......................................................... 7
des Maschinenoberteils
des Spulers ..................................... 9
des Spulentragers .......................... 9
vor
~
der
lnb
etriebnahme .................................
RICHTIGE
der
Spulen .................................. 13
ickeln des Unter
der
Spulen ...................................... 15
adeln des Unterfadens ............................ 16
adeln des Oberfadens ..............................
der
Stitch lange ............................
ten
einer
der
ierung ........................................... 26
Transporteurhohe
~
........ ................ .. .
~
...................................... 5
und
des
...
............................. 6
und
der
..
.....................
und
dem
Anbringen
.......................................
.... ...................... 13
fadens .......................... 14
Nadelstange ....................... 23
~
.............. 25
Nadei-Greifer-
................ 32
..
7
10
11
11
12
17
18
19
..
31
~
FEHLERSUCHE
~
..................................... 38
Page 3

TABLE
DES MATIERES
INDICE
DEL
CONTENIDO
~
NOMS
~
MISE
[iJ Table ...........
[ZJ
~
@
[Q]
~
ITl
1BJ
~
LUBRIFICATION
[1]
[ZJ
~
FONCTIONNEMENT
[1]
[2]
~
@ Installation
[5)
~
ITl
!Bl
~
!!]!
~
REGLAGES
[iJ Sync
[ZJ
~
111
[5)
~
RECHERCHES
DES
PIECES
EN
PLACE
In
stallation du reservo
relevage au genou .......................................... 6
In
stallation des supports
et des amortisseurs ........................................ 7
Montage
de
genoui
In
stallation de Ia tete de Ia machine.
Tension de
Installation de l'enrouleur
Installation
Precautions a prendre
le couvercle de
Lubrification ...................................................
Graissage ........................................................ 12
Installation des a
Depose de Ia cannette .................................... 13
Bobinage du fil inferie
Enfilage du fil inferie
Enfilage du fil su
Reglage du
Reglage de Ia
Tension de fil ..................................................
Arret des barres a a
(droite et gauche) ...........................................
l'entraine
Synchronisation
du crochet
Reglage de
Reglage de
Comment
de Ia jupe, de
llere ................................................. 7
courroie
du
de
pied
STANDARD
hr
onisation des aiguilles et de
ment
rot
Ia hauteur
Ia
changer les jauges ........................ 33
PRINCIPALES
~
...........
... ...
.................................................... 5
ir
d'huile et
de
Ia
barre de liaison
correcte ......................... 8
de cannette .......... 9
porte-bobines ......................... 9
avant
courroie
~
iguill
Ia cannette .............................. 15
perieur
de biche ............................... 18
longueur
.................................
..
.. ..
..
.... ....
CORRECT
es ................................ 13
ur
................................ 14
ur
................................... 16
................................. 17
de
point
iguill
e
»
................................................
des a
iguille
atif
............................................ 26
du pied de biche ........ 31
haute
ur
des griffes ....
DE
PANNES
~
~
.. ......
... ...
du
caoutchouc
de
monter
.. ..
..
..
.... .... ...
»
..
....................
....
.. .. ......
..
s et
............
................... 39
..
........ 5
10
11
11
......
..
. 13
18
19
23
....
..
..
25
25
..
32
NOMBRE
PRINCIPAL
~
INST ALA
[1]
Mesa de Ia
[ZJ
Para colocar el deposito de aceite y
ellevantado r de rodi lla .................................. 6
~
Para colocar almohadi llas y bases de
cauc
@ lnstalaci
mi
sion de
[Q]
Para instalar Ia cabeza de Ia maquina ·
Tension de Ia correa ....................................... 8
~
Para colocar
[Z]
Para colocar
!Bl
Precauciones a
Ia
cubierta de
~
LUBRICACION
[1]
Sistema de lubricacion ...................................
[ZJ
Aceitado ....
P
ARA
C
OR RECTO
[iJ Para colocar l
[ZJ
Para sacar Ia
~
Para devanar el
@ Para colocar Ia bobina .................................... 15
[Q]
Para enhebrar el
~
Enhebrado de los hilos super
[Z]
Ajuste de Ia presion del pie del
pren
!Bl
Ajuste
[91
Tension del hilo ..............................................
!!]!
Para
de
Ia aguja
~
AJUSTES
[iJ Ajuste
Ia
alimentacion ...............................................
[ZJ
Ajuste de
ca
y
[3]
Aju
ste de Ia altura del pin del prensatelas ..... 31
@ Ajuste de Ia a
[5)
Como cambiar
DE
LAS
PIEZAS
ES
CION
ho
............................................................. 7
on
UN
sa
tel
de
que
de
ngrejo
~
....
..
..
..
.... ....
..
.... ...... ....
maquina
de Ia falda, barra de trans-
lle
vantador
el
el
Ia
................ ........................ .............. 12
FUNCIONAMIENTO
as agujas ..........
bobin
as
..................................................... 18
Ia
longitud
dejen de funcio
._
......................................................
~
. . . ..
Ia
sincronizacion de las agujas y
Ia
sincronizacion de l
s .....................................................
lt
....................................... 5
de rod ilia .................... 7
devanador de Ia bobina ........ 9
port
a-conos ........................... 9
tom
ar antes de in stalar
correa ...................................
»
.. .. ..
..
..
.... .... .. ..
a .......................................
hilo inferior
hilo
inferior
de Ia puntada
.. ..
. . .. .
..
. . . .
ura del
alimentador
los calibradores .....................
.. .. .... ..
....
....
.....................
........................... 14
......................... 16
ior
es ................
........
nar
las barras
.. ..
.. .. .
..
.. .. . .. .. .
as aguja
................
.. ... 5
.. ..
...
....
....
.......
s
10
11
11
13
13
13
17
18
19
23
25
25
26
32
33
GUIA
DE
PARA
FALLAS
LA
LOCALIZACION
........
40
Page 4
NAMES OF MAIN PARTS
TEILEBEZEICHNUNG
NOMS DES PIECES PRINCIPALES
NOMBRE DE LAS PIEZAS PRINCIPALES
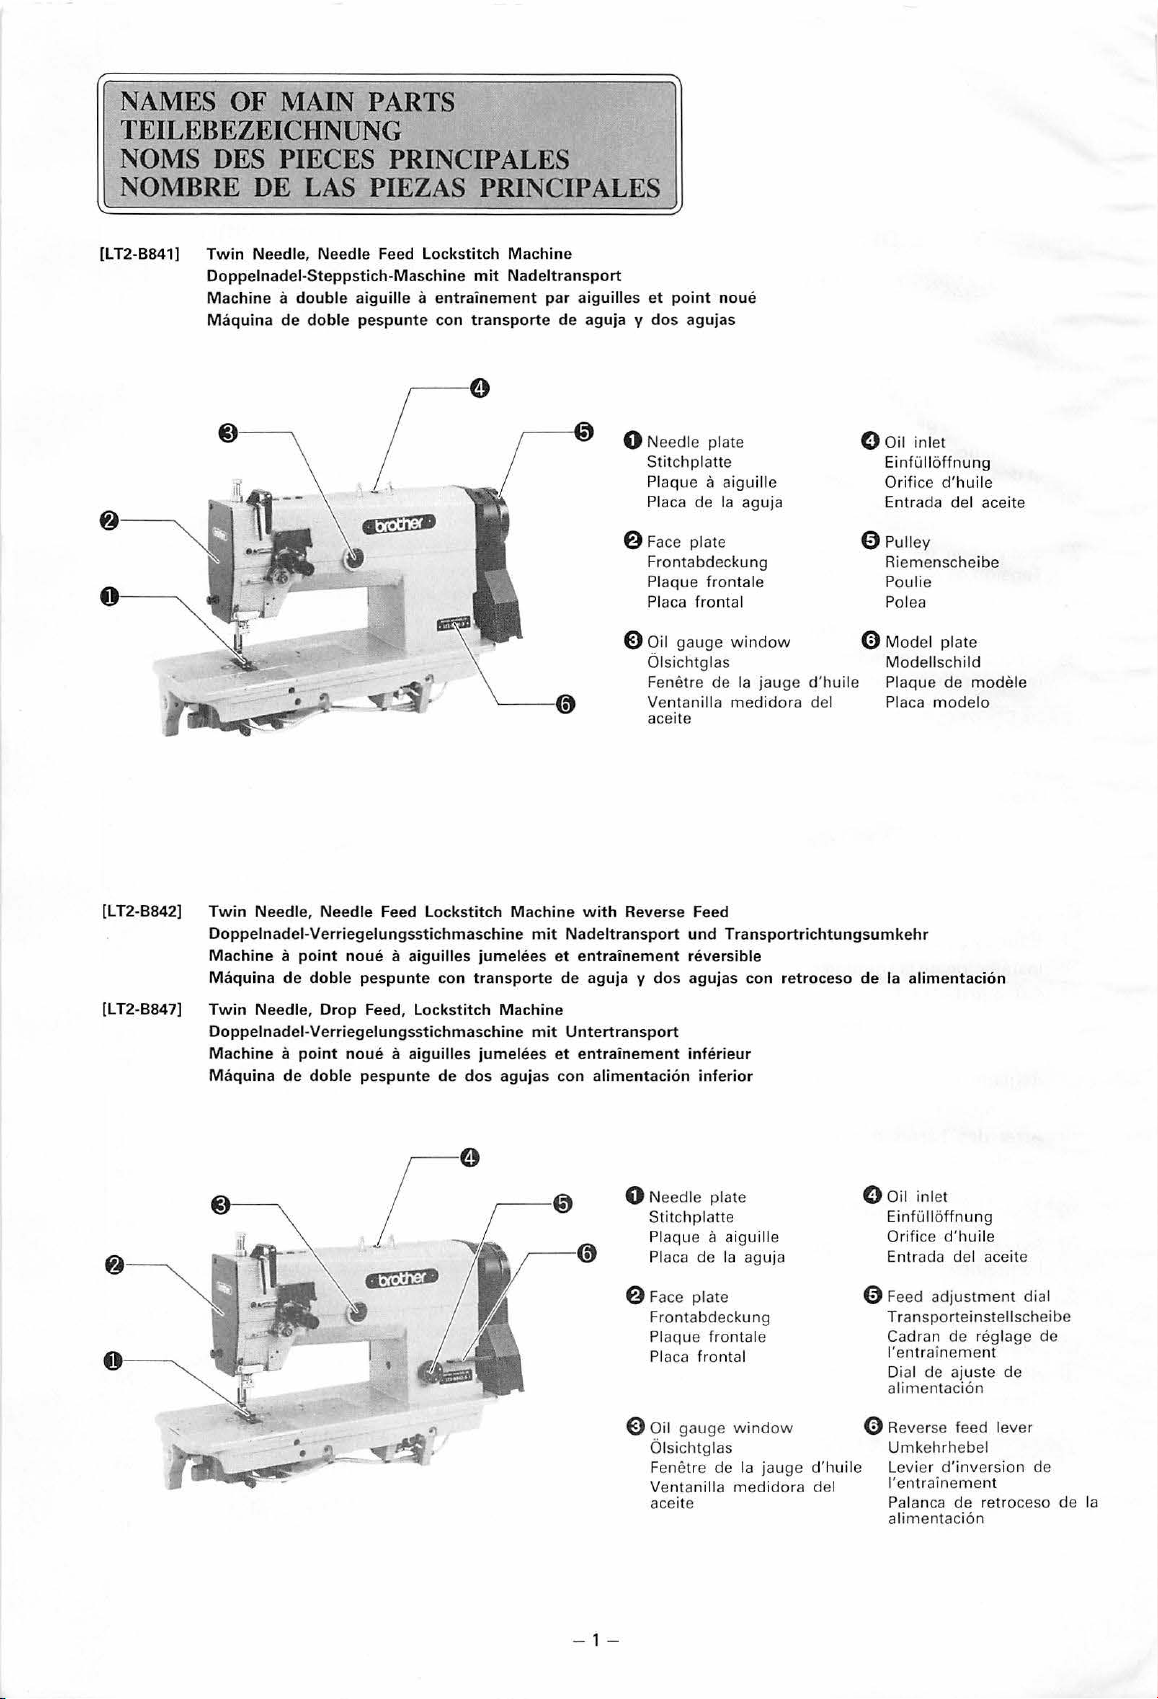
[L
T2-B841]
Twin
Needle, Needle Feed
Doppelnadei-Steppstich-Ma
Machine a double
Ma
quina
de
aiguille a entrainement
doble
pespunte
Lockstitch
schine
mit
con
transporte
Machin
e
Nadeltr
ans
port
par aiguilles
de aguja y dos agujas
et point
noue
[L T2-B842) Tw
Doppelnadei-Verriegelungsstichmaschine
Machine a point
Maquina
[L T2-B847)
Twin
Doppelnadei-Verriegelungsstichmaschine mit
Machine a point
Maquina
in
Needle, Need le Feed
noue a aiguilles
de
doble
pespunte
Needle,
de
Drop
doble
noue
pespunte
Feed,
a aiguilles
Lockstitch
jumele
con
transporte de
Lockstitch
jumele
de dos agujas
Machine
mit
es
Machine
es
0 Needle
Stitchplatt
Plaque a aiguille
Pl
aca
de Ia aguja
plat
6 Face pla te
Fro
ntabd
Plaq ue frontale
Placa frontal
0 Oil ga
with
Reverse Feed
Nadeltransport
et
entrainement
aguja y dos agujas con re
Untertransport
et
entrainement
con
alimentac
uge window
Ols
ichtg
Fenetre de Ia jauge d'h
Ventanilla medidora del
aceite
las
und
reversible
inferieur
i6n
inferior
e
e
O o il inlet
Einfi.ill6ffnu
O
Entrada
0 P
eckung
Ri
Poulie
Po lea
0 Model
Modellschild
Plaque
uile
Placa
Transportrichtungsumkehr
troceso
de
Ia
ice d'hu
del aceite
plat
de
mod
ng
il e
e
mod
elo
rif
ulley
emenschei be
alimentaci6n
ele
0 Needle plate
Stitchplatte
P
la
que a aiguil le
Placa
de Ia aguja
6 Face plate
Fr
ontab
deckung
Plaque frontale
Pla
ca
frontal
0 Oil ga uge
Olsichtglas
Fenetre de Ia jauge d'hu
Ventan
ill
aceite
-
1-
a medi dora del
windo
()
Oil inlet
fi.ill6ffnun
Ein
Or
if
ice d'huile
Entrada
0 Feed adj
Transporte
Cadran
l'e ntrainement
Dial de ajuste de
imentaci6n
al
w
0 Reverse feed lever
Umkehrhebel
Levier
ile
l'entrainem
Palanca de retroceso de
ali
mentaci6
g
del aceite
ustment
instellscheibe
de
reglage
d'invers
ent
n
ion de
dial
de
Ia
Page 5
[L T2-B845]
[L
T2-B848]
Twin
Needle, Needle Feed, Lo
Dop
pelnadei-Ecken/Ve
Machine a
Maquina
Twin
Doppelnadei
Machine a
Maquina
point
de
doble pespunte con
Needle, Drop Feed, Angular S
-E
cke
point
de
coser puntadas angulares de dos agujas con a
rri
noue a aigui
nniihm
oblique
ckstitch
egel
ung
ll
es jumelees
aschine m
Machine
sstichmaschine
transporte
titching Machine
it
Untertransport
a aiguilles jumelees
with
mit
Nadeltransport
et
entrainement
de
aguja y
et entr
Angular
par
dos
ainement
limentaci
Stitching
aiguille avec
agujas con
inferieur
6n
point
puntada
inferior
oblique
angul
ar
0 Needle plate
Stitchplatte
Plaque a aiguille
Placa
de
Ia
aguja
8
Face
plate
Frontabdeckung
Plaque
front
ale
Placa frontal
0
Oi
l gauge w
Olsichtglas
Fenetre
Ventani lla medidora del
aceite
de
indo
Ia
jauge d'huile
0 Oil inl
et
Eintulloffnung
Orifi
ce d'huile
Entrada del aceite
0 Feed adju stment dial
Transporteinstellscheibe
Cadran de
l'entrainement
Dial
alimentaci6n
w
0 Reverse feed lever
Umkehrhebel
Levier d'inversion
l'entraineme
Pal
anca de retroceso de
a
lim
de
ajuste
entaci6n
reglage
de
nt
de
de
Ia
For
Use
Sew
ing speed (spm
S
tit
ch l
eng
th
Presse r Presser
foot
heig
ht
Feed dog h
Nee
dle
s
dl
e feed mechanism
Nee
Single needle st
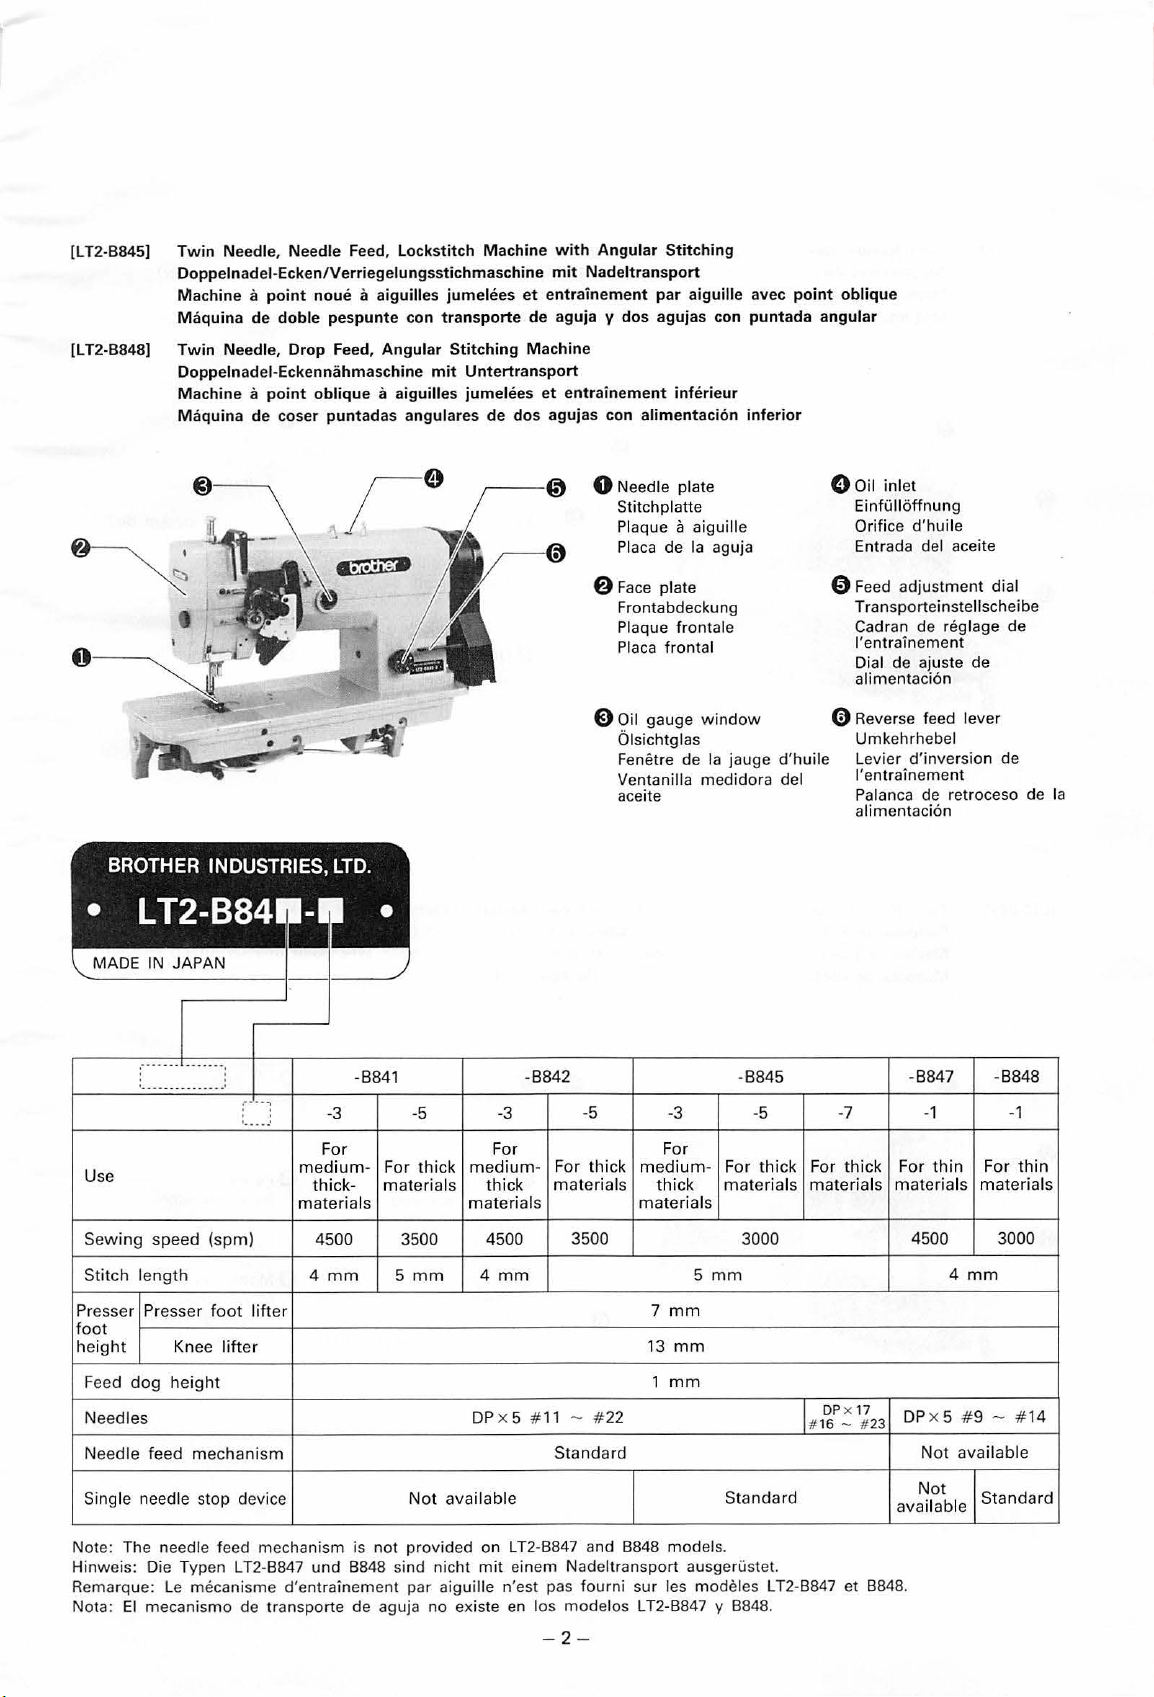
Note: The needle feed mechanism is n
Hinweis: Die Typen L TZ-8847
Remarque: Le mecanisme d'e
Nota: El mecanisme de
Knee
eight
foot
lift
op
devi
medium
materia
) 4500 3500 4500 3500 3000
lift
er
er
ce
tr
ansporte de aguja no existe
- For
thick
ls
4
mm
und
8848 si nd nic
ntr
ainement par ai
-5 -3
thick
mat
erials
5
mm
N
ot
ot
provided on L T2-B8
For
medium
thick
materia
4
DP
available
ht
mit einem Nadeltran sport ausgerustet.
guille n'est pas fourni s
-
8842
-5
For
thick
mat
erials
ls
mm
x5 #11 -#2
S
tandard
47 and 8848
en
los modelos L TZ-8847 y 8848.
-3
For
medium
thi
ck
materia
7
mm
13
mm
1
mm
2
mod
ur
les modeles L T2-8847 et 8848.
- 2 -
5
-
ls
mm
els.
-
For
mat
St
8845
-5
thick
erials
andar
For
materials
DP
#
16
d
-8847 -
-7 -1
thick
For
materia
4500
x 17
- #23
DP
Not
Not
available
thin
For
ls
materi
3000
mm
4
x5#9-#1
avai lable
Sta
8848
-1
thin
als
4
ndard
Page 6
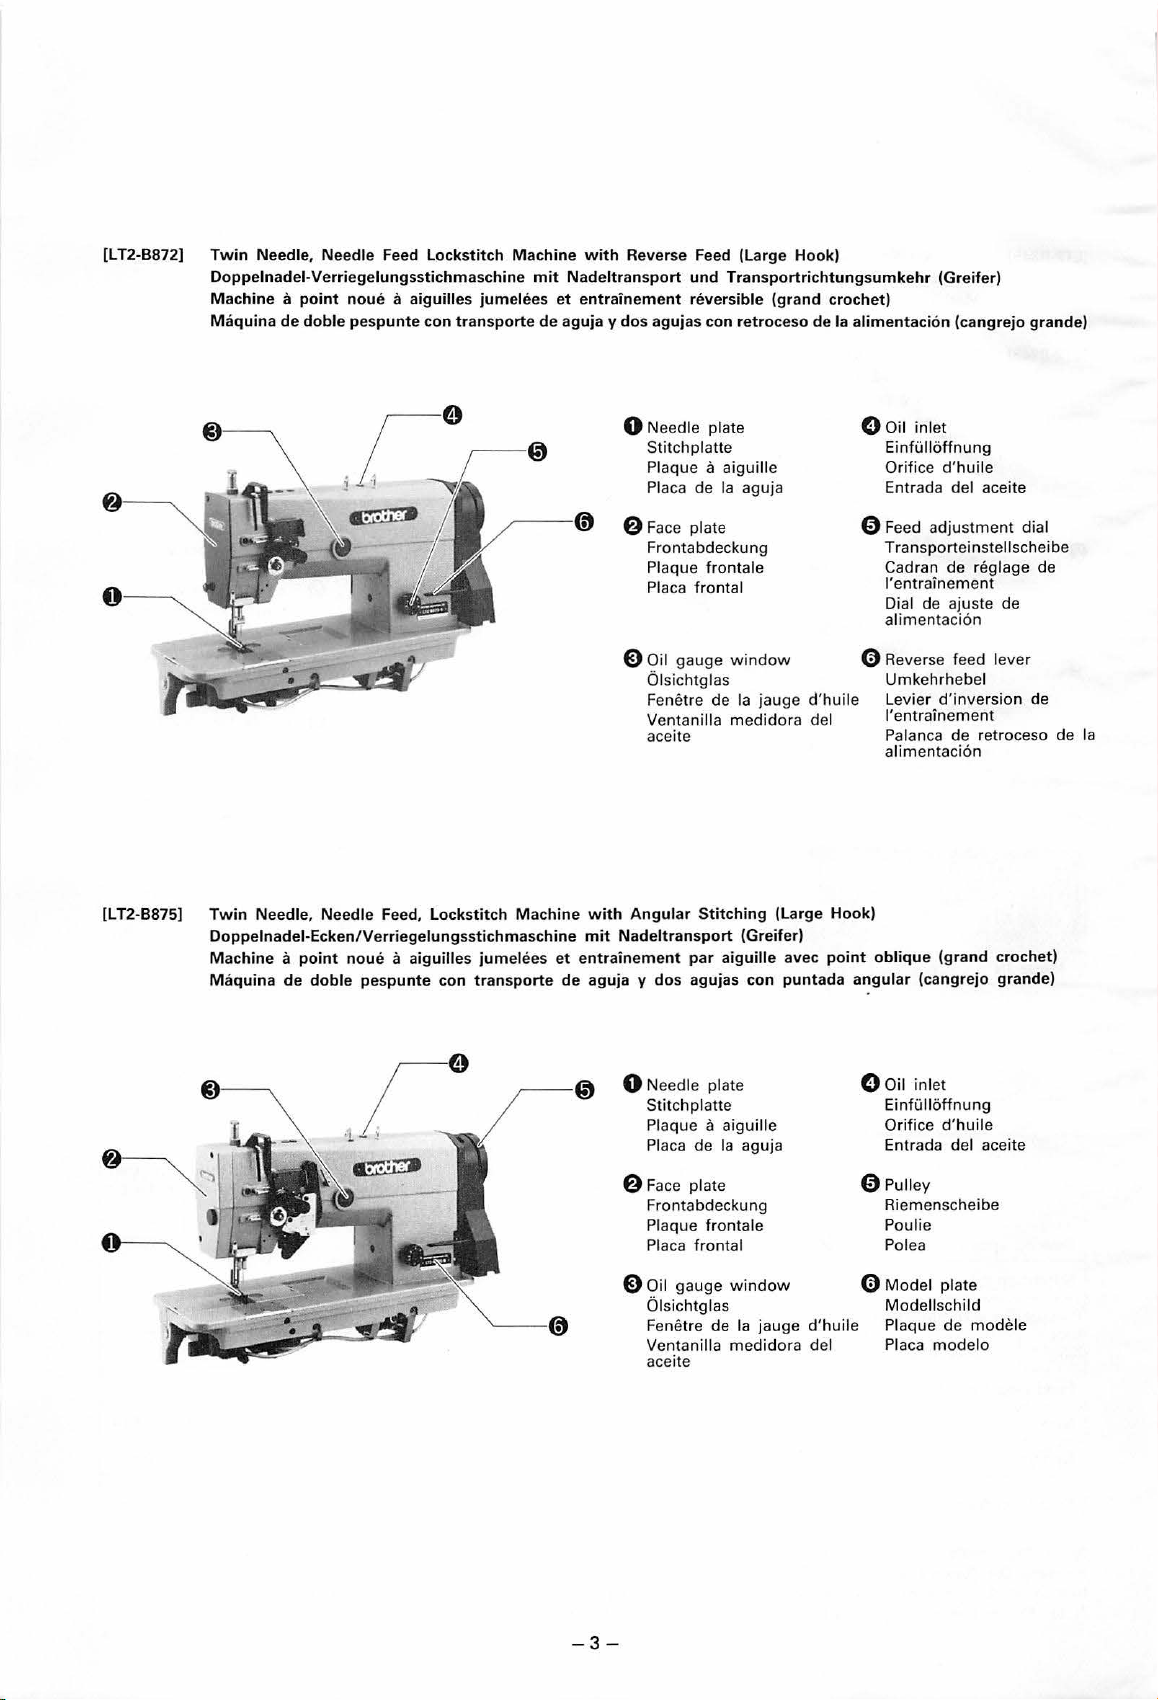
[LT2-B872]
Twin
Needle, Needle Feed
Doppelnadei-Verriegelungsstichmaschine
Machine a point
Maquina
de
doble
nou
pespunte
Lockstitch
e a aiguilles jumelees
con
Machine
transporte
with
mit
Nadeltransport
et
entrainement
de
aguja y
Reverse Feed (Large Hook)
und
Transportrichtungsumkehr
reversible (grand crochet)
dos
agujas con retroceso de
0 Needle plat e
platt
Stitc h
Pl
aque a aiguille
Pl
aca de
e
Ia
aguja
Ia
alimentaci6n
Ooil
Einf
Orifi
Entrada
(Greifer)
(cangrejo grande)
inlet
ullo
ffnu
ng
ce
d'h
uile
del aceite
[L
T2-B875]
Twin
Needle, Needle Feed,
Doppelnadei-Ecken/
Machine a point
Maquina
de
doble
Lockstitch
Verriegelungsstichma
noue
a aiguilles jumelees
pespunte
con
transporte
Machine
schine
et
de
6 Face plate
Fro
Pl
aque frontal e
Pl
aca frontal
E)
Oil gau
Olsic
Fenetre de Ia
Ve
nta
aceite
with
Angular
mit
Nadeltransport
entrainement
aguja y
dos
0 Needl e pla
S
tit
Pl
aq ue a
Pl
aca de Ia aguja
ntab
deckun g
ge
win
htgl
as
nill
a medidora del
Stitching
par
aiguille
agujas
te
ch platte
aiguille
dow
jauge d'huile
(Large Hook)
(Greifer)
avec
con
puntada
0 Feed adjus t
Tr
ansporteinstellscheibe
Cadran de
'entrain
l
Dial de ajuste de
ime
ntaci6n
al
0 Reverse feed lev
Umke
Levier
l'entrainem ent
Palan
ca
alimentaci6n
point
oblique
angular
(cangrejo grande)
nl
O o il i
EinfUIIo
Orifice d'h
En
trada del aceite
men
regl age de
ement
hrhebel
d'i
nversi
de retr
(grand
et
ff
nung
uil
t dial
er
on
de
oceso de Ia
crochet)
e
6 Face pla
Frontabdeckung
Pl
Pl
E)
Oil gauge
Ol
Fenetre
Venta
ace
te
aque
fron
aca
fron
sichtglas
de
nilla
it
e
tal
-3-
tale
win
dow
Ia jauge
medidora
d'h
del
uile
0P
ull
ey
Riemenscheibe
Poulie
Po lea
0 Model pl
Mode
Plaque de modele
Placa
at
llschild
mo
delo
e
Page 7
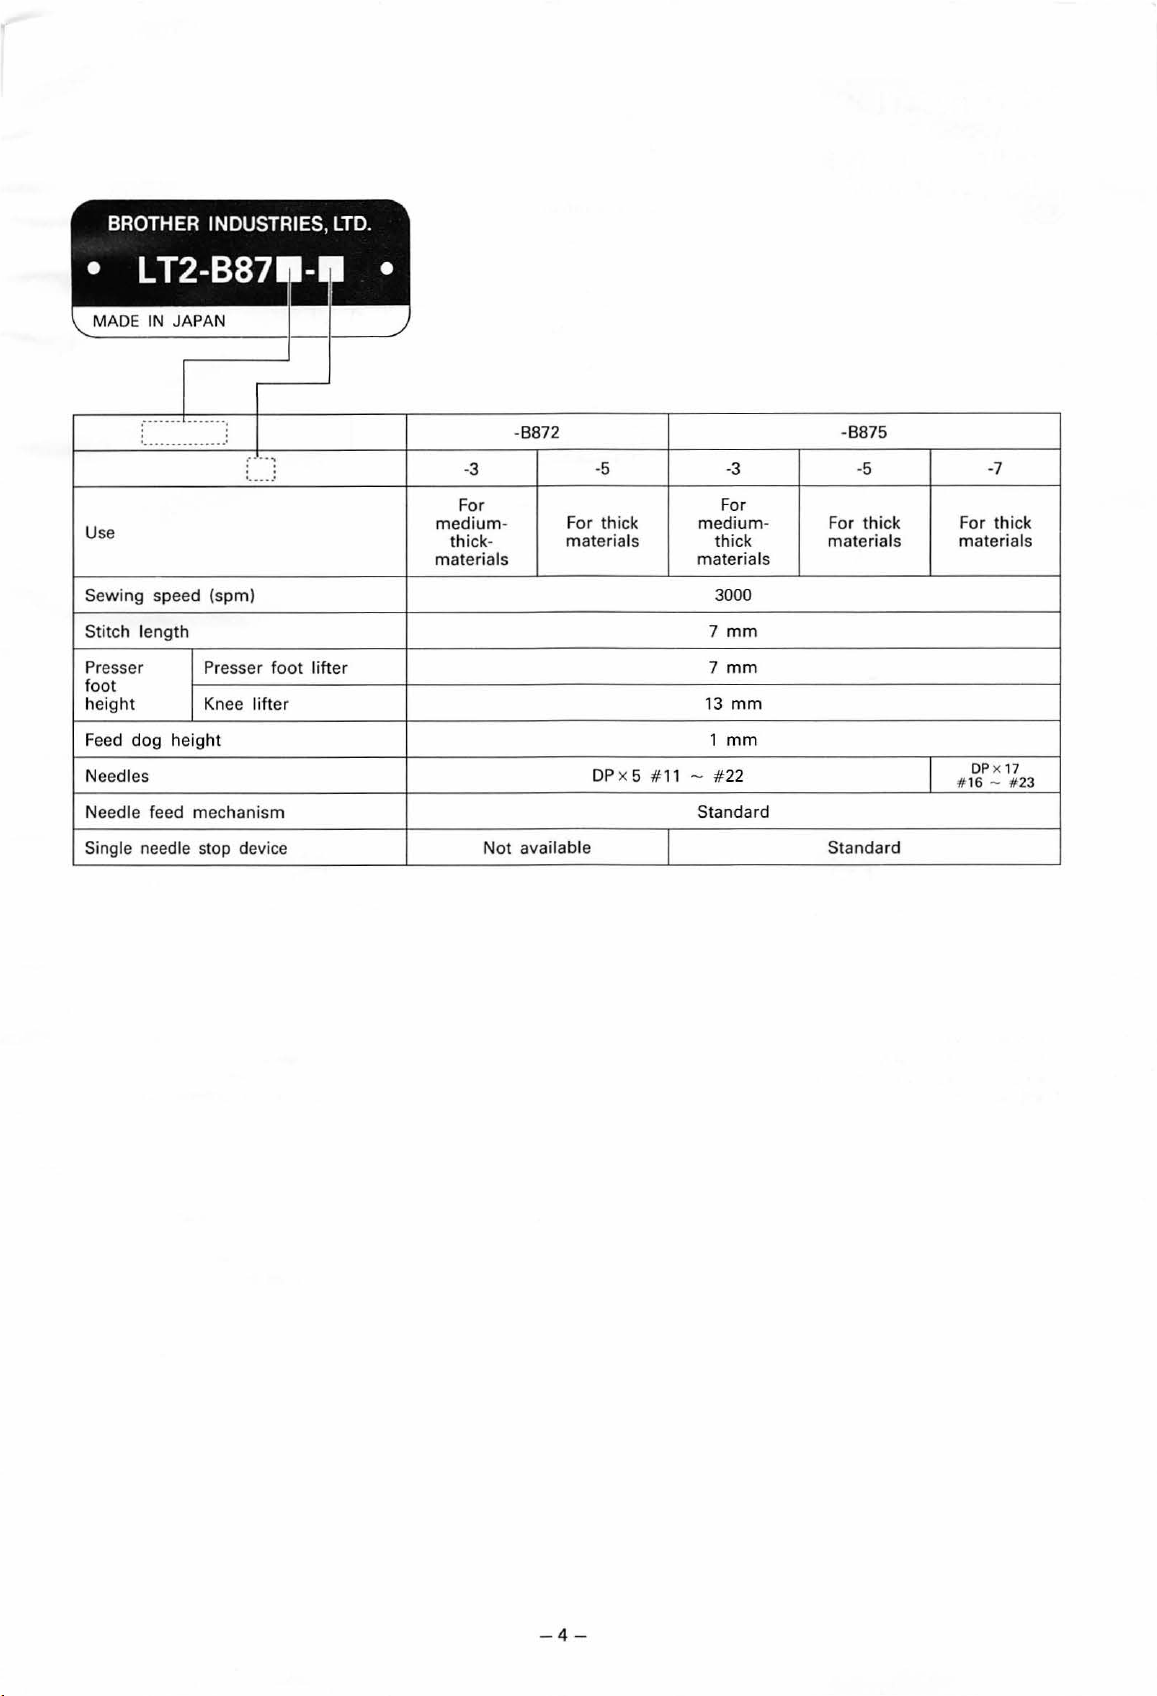
-8872
.,
.. •
U
se
-3
For F
medium-
thick-
materials
-5
For thick med
materials
materials
-3
or
ium
- For thick For thick
thick
-8875
-5
materials materials
-7
Sewing speed
Stitch length
Presser
fo
ot
height Knee l
F
eed
dog
Needles
Needle feed mechanism Standard
Single needle stop device
(spm)
Presser
height
f
oot
lifter
ift
er
DP
x 5 # 11
Not
available Standard
-
3000
7
7
13
1
#22
mm
mm
mm
mm
DP
x 17
# 16 - # 23
- 4 -
Page 8
INSTALLATION
AUFSTELLUNG
MISE
INST
EN
ALA
PLACE
CION
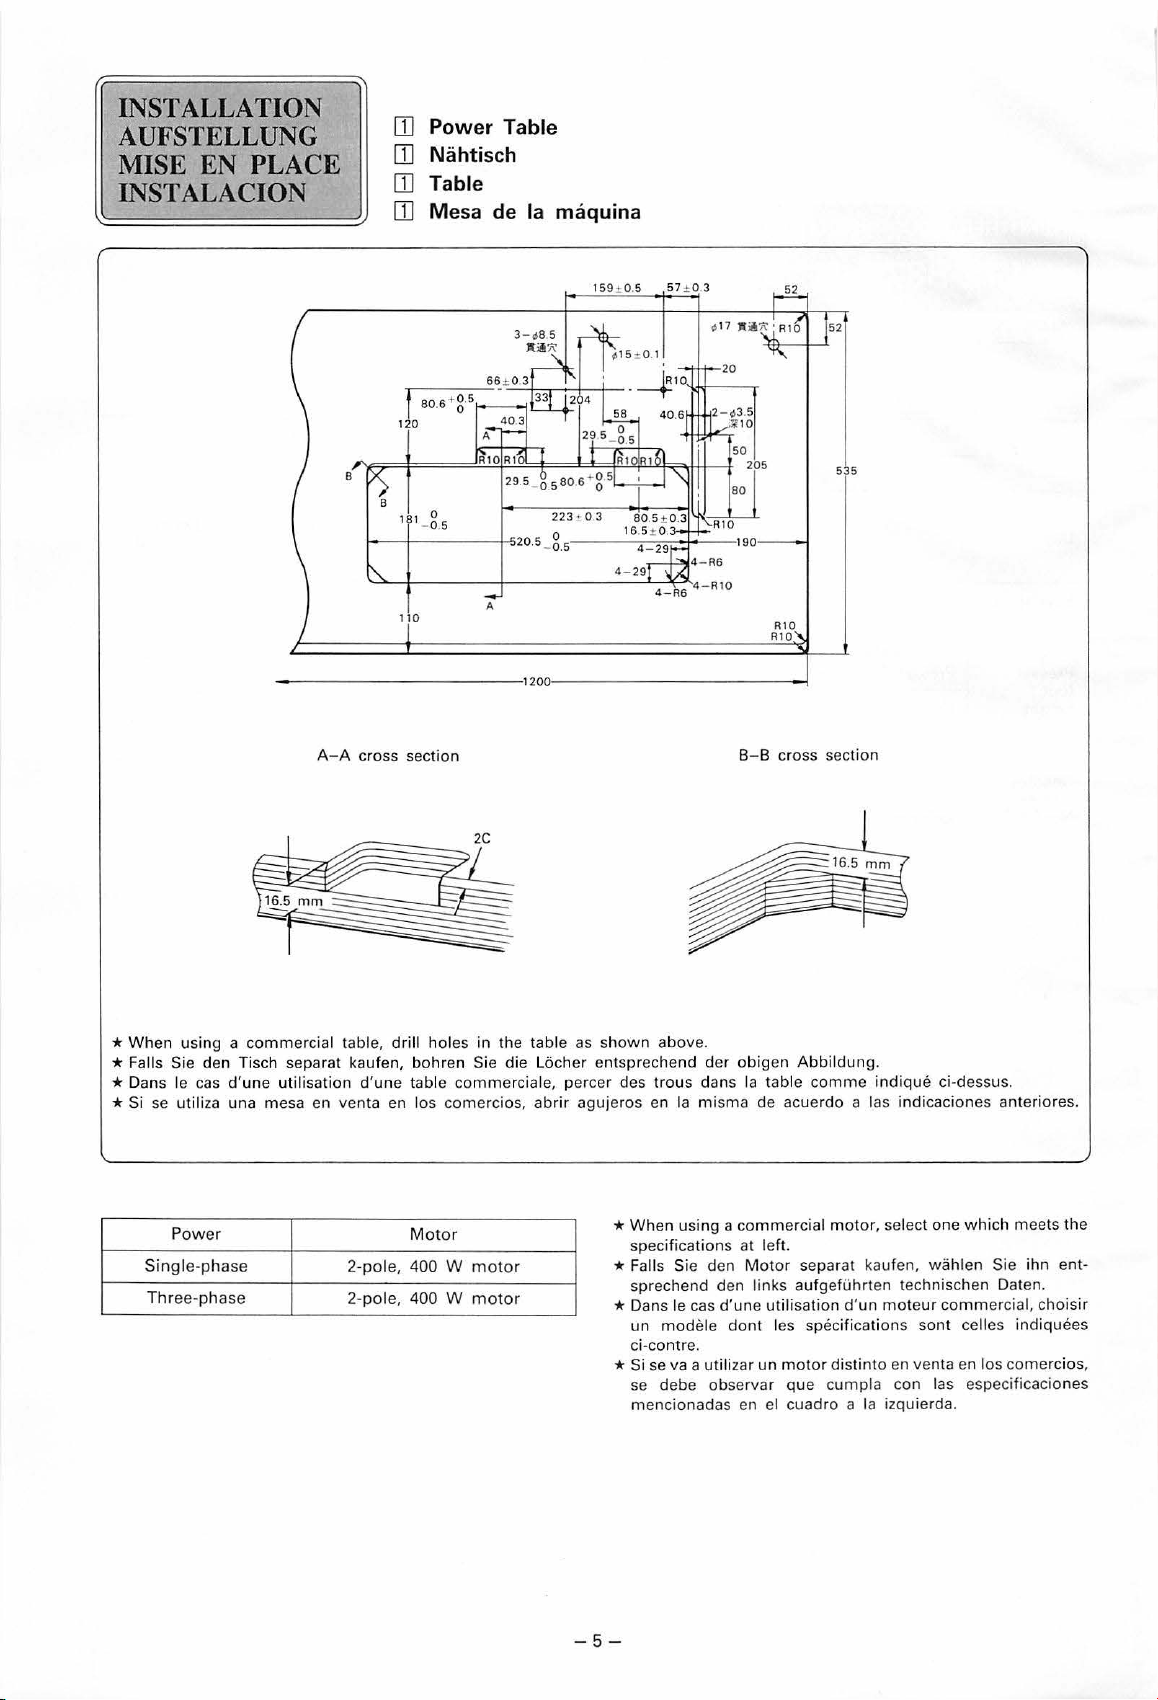
[I]
Power Table
[I]
Nahtisch
[I]
Table
[I]
Mesa de
Ia
maquina
159~0.5
A
--
-----------
A-A
cross section
1200
1---------------l
57
±0.3
5 5
B-B
cross section
*
When
using a commercial table,
drill
holes in the table as
shown
above.
* Falls Sie den Tisch separat kaufen, bohren Sie die Locher entsprechend
* Dans le cas
* Si se
Single
Three
d'une
util
isation
utiliza
una mesa en venta en los comercios,
P
ower
-phase
-phase
d'une
2-pole,
2-pole,
table
Motor
400
400
comme
W
motor
W
motor
rciale, percer des
abrir
agujeros en
* When us
specifications at
* Falls Sie den
sprechend den
* Dans le cas
un
ci-
* Si
se debe observar
mencionadas en el cuadro a Ia izquierda.
trous
Ia misma de acuerdo a las indicaciones anteriores.
modele
cont
re.
se
va a ut
der
obigen
Abbildung.
dans Ia table
ing a comme
Motor
d'une
dont les
ilizar un m
comme
rcial motor, select one
left.
separat kaufen,
links aufgefUhrten technischen Daten.
utilisation
specifications sont celles indiquees
otor
que
d'un
distinto
cumpla
indique
mote
en venta en los comercios,
con las especificacion
ci-dessus.
whic
h meets the
wahlen
ur
Sie ihn
commercial, chois
ent
-
ir
es
-5-
Page 9
*Select
* Wahlen Sie die Motorriemenscheibe und
* Choisir
*
the correct motor pulley and V-belt by referring to the table below to suit the power frequency
Ia
lieu d'utilisation de
Seleccionar
especificaciones
bonne poulie de moteur ainsi qu'une courroie trapezoidale appropriee qui conviennent a
Ia
Ia
machine.
polea del motor y correa trapezoidal correctas de. acuerdo a
de
Ia
corriente de
Se
referer
su
of
your area.
den
Keilriemen entsprechend der ortlichen Stromfrequenz (siehe nachstehende Tabelle).
Ia
au
localidad.
tableau ci-dessous pour leur selection.
Ia
tabla a continuaci6n, para que
frequence de puissance du
se
adecue a las
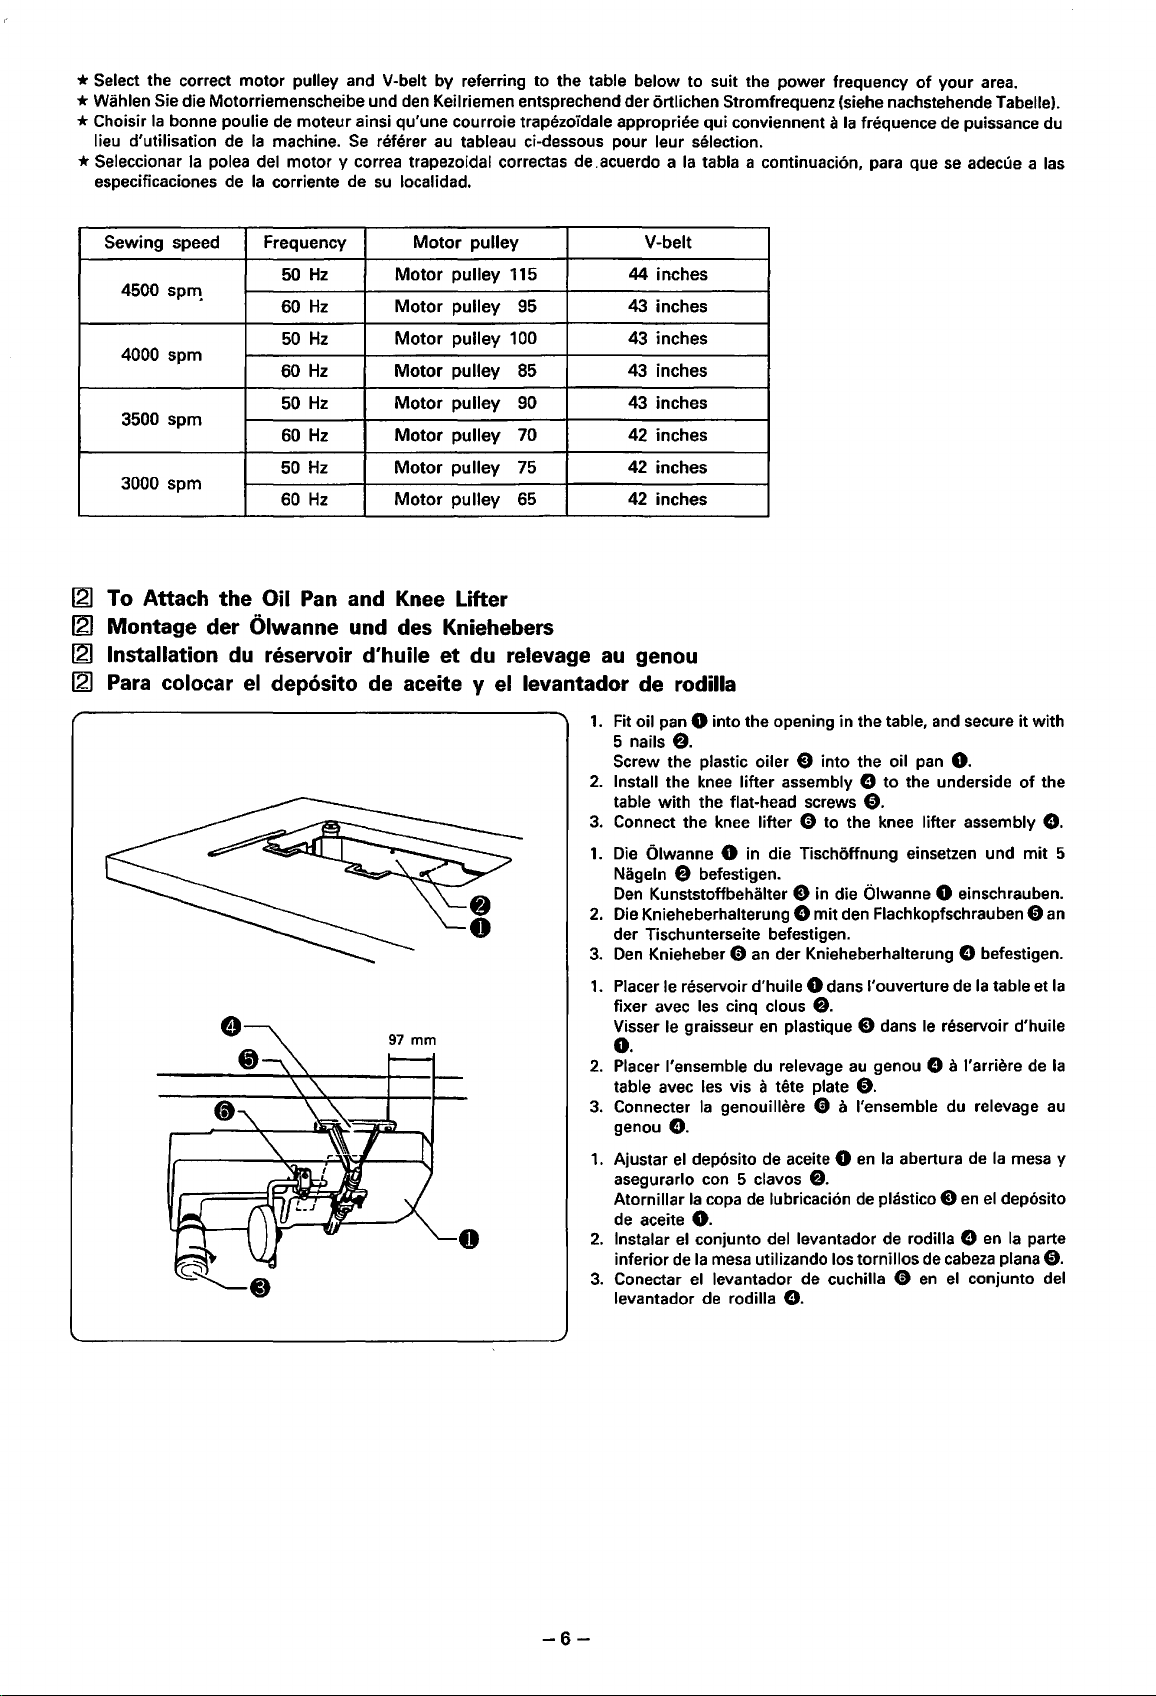
Sewing speed Frequency
spr11
4500
4000
spm
3500
spm
3000
spm
[21
To Attach the Oil
[21
Montage der Olwanne
[21
Installation
~
Para
colocar
du
reservoir d'huile et
el
Motor
pulley
Motor
50
60
50
60
50
60
50
60
Hz
Hz
Hz
Hz
Hz
Hz
Hz
Hz
Pan
and
und
pulley 115 44 inches
Motor
pulley
Motor
pulley 100 43 inches
Motor
pulley
Motor
pulley
Motor
pulley
Motor
pulley
Motor
pulley
Knee
Lifter
des
Kniehebers
du
deposito de aceite y
0
V-belt
95
85
90
70 42 inches
75
65
relevage
el
levantador de rodilla
43 inches
43 inches
43 inches
42 inches
42
inches
au
genou
1.
Fit oil
pan
5 nails
Screw the plastic oiler 8 into the oil
2.
Install the
table with the flat-head screws
3.
Connect the
1.
Die
Qlwanne 0 in die Tischoffnung einsetzen und mit 5
Nageln 8 befestigen.
Den
Kunststoffbehalter 8 in die Qlwanne 0 einschrauben.
2.
Die
Knieheberhalterung
der Tischunterseite befestigen.
3.
Den
Knieheber 0
1.
Placer le reservoir d'huile 0 dans l'ouverture de
fixer avec les cinq clous
Visser le graisseur
0.
2.
Placer !'ensemble du relevage
table avec les vis a tete plate
3. Connecter
genou
Ajustar
1.
asegurarlo con 5 clavos
Atornillar
de
aceite
lnstalar
2.
inferior
3. Conectar
levantador
0 into the opening in the table,
e.
pan
knee
lifter assembly 8
to
the underside
e.
knee
lifter 0 to the
emit
an
der Knieheberhalterung e befestigen.
knee
lifter assembly
den Flachkopfschrauben e
e.
en
plastique 8 dans
au
le
genou 8 a l'arriere
e.
Ia
genouillere 0 a !'ensemble du relevage
e.
el
deposito de aceite 0
en
Ia
abertura de
e.
Ia
copa
de
lubricacion
0.
el
conjunto del levantador de rodilla e
de
Ia
mesa
el
utilizando los tornillos
levantador de cuchilla 0
de
rodilla
e.
de
plastico 8
de
en
and
secure
it
with
0.
of
Ia
table et
reservoir d'huile
de
Ia
mesa y
en
el
deposito
en
Ia
parte
cabeza
plana
el
conjunto del
the
e.
an
Ia
Ia
au
e.
-6-
Page 10
~
To Attach
~
Montage der Gummiauflagen und der Dampfer
~
Installation des supports de caoutchouc
~
Para colocar almohadillas y bases de caucho
~
Installing
~
Montage der Tulle und der Knieheberstange
~
Montage de Ia jupe, de
~
lnstalacion de Ia falda, barra de transmision del levantador de rodilla
the
Rubber Bases and Cushions
the
Skirt, Knee Lifter Complying Bar
Ia
barre de liaison de genouillere
et
des amortisseurs
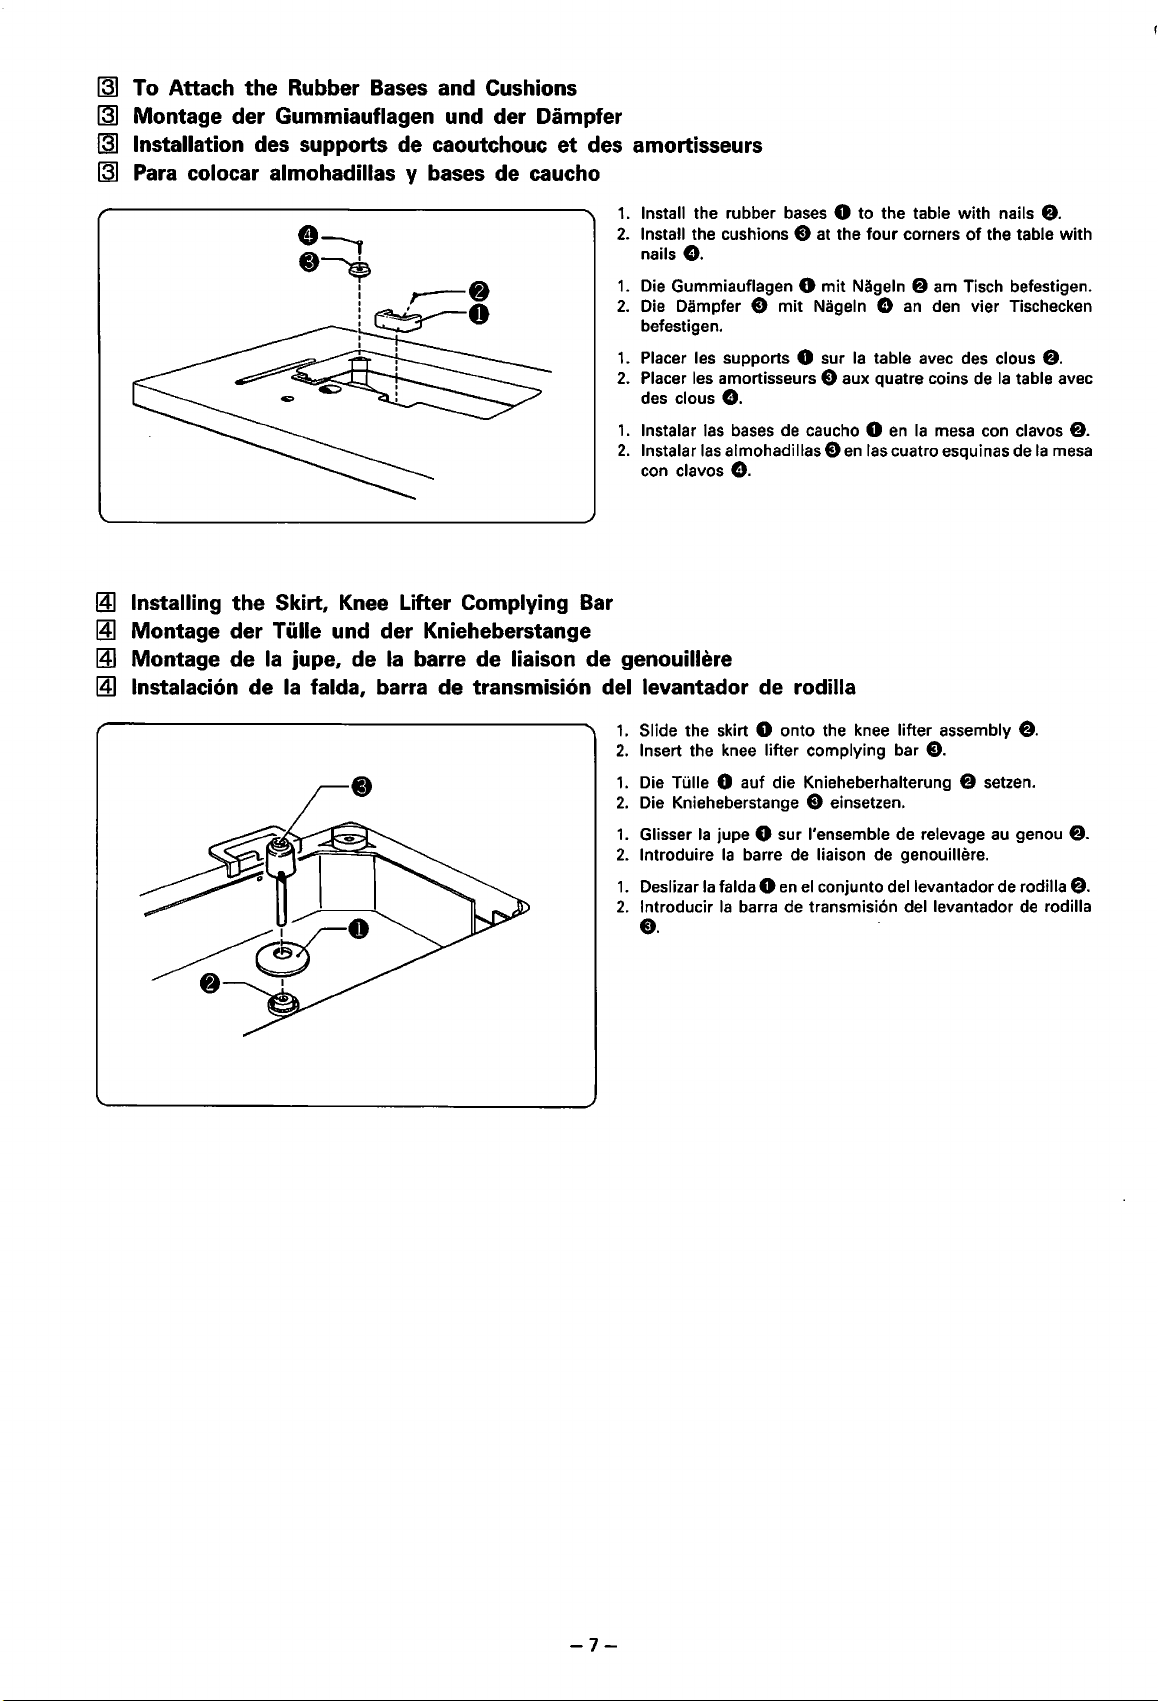
1.
Install the rubber bases 0 to the table with nails
2.
Install the cushions E) at the four corners
nails
0.
1.
Die Gummiauflagen 0
2.
Die
Dampfer E)
befestigen.
1.
Placer les supports 0 sur
2.
Placer les amortisseurs 8 aux quatre coins de
des
clous
1.
lnstalar las
2.
lnstalar las almohadillas 8
con
clavos
0.
bases
0.
mit
de
caucho 0
of
the table with
mit
Nageln e am Tisch befestigen.
Nageln 0
an
den vier Tischecken
Ia
table avec des clous
en
Ia
mesa con clavos
en
las cuatro esquinas de
Ia
e.
e.
table avec
e.
Ia
mesa
1.
Slide the skirt 0 onto the
2.
Insert the
1.
Die Tulle 0 auf die Knieheberhalterung e setzen.
2.
Die Knieheberstange 8 einsetzen.
1.
Glisser
2.
lntroduire
1.
Deslizar
2.
lntroducir
knee
lifter complying bar
Ia
jupe 0 sur !'ensemble de relevage
Ia
barre de liaison de genouillere.
Ia
falda 0
en
Ia
barra de transmisi6n del levantador
knee
lifter assembly
8.
el
conjunto dellevantador de rodilla
e.
au
e.
genou
de
rodilla
e.
e.
-7-
Page 11
[5]
To Install
(Q)
Aufstellung des Maschinenoberteils und Riemenspannung
[QI
Installation de
(Q)
Para instalar
the
Machine Head· Belt Tension
Ia
tete
de
Ia
machine· Tension de courroie correcte
Ia
cabeza de
Ia
maquina ·Tension de
Ia
correa
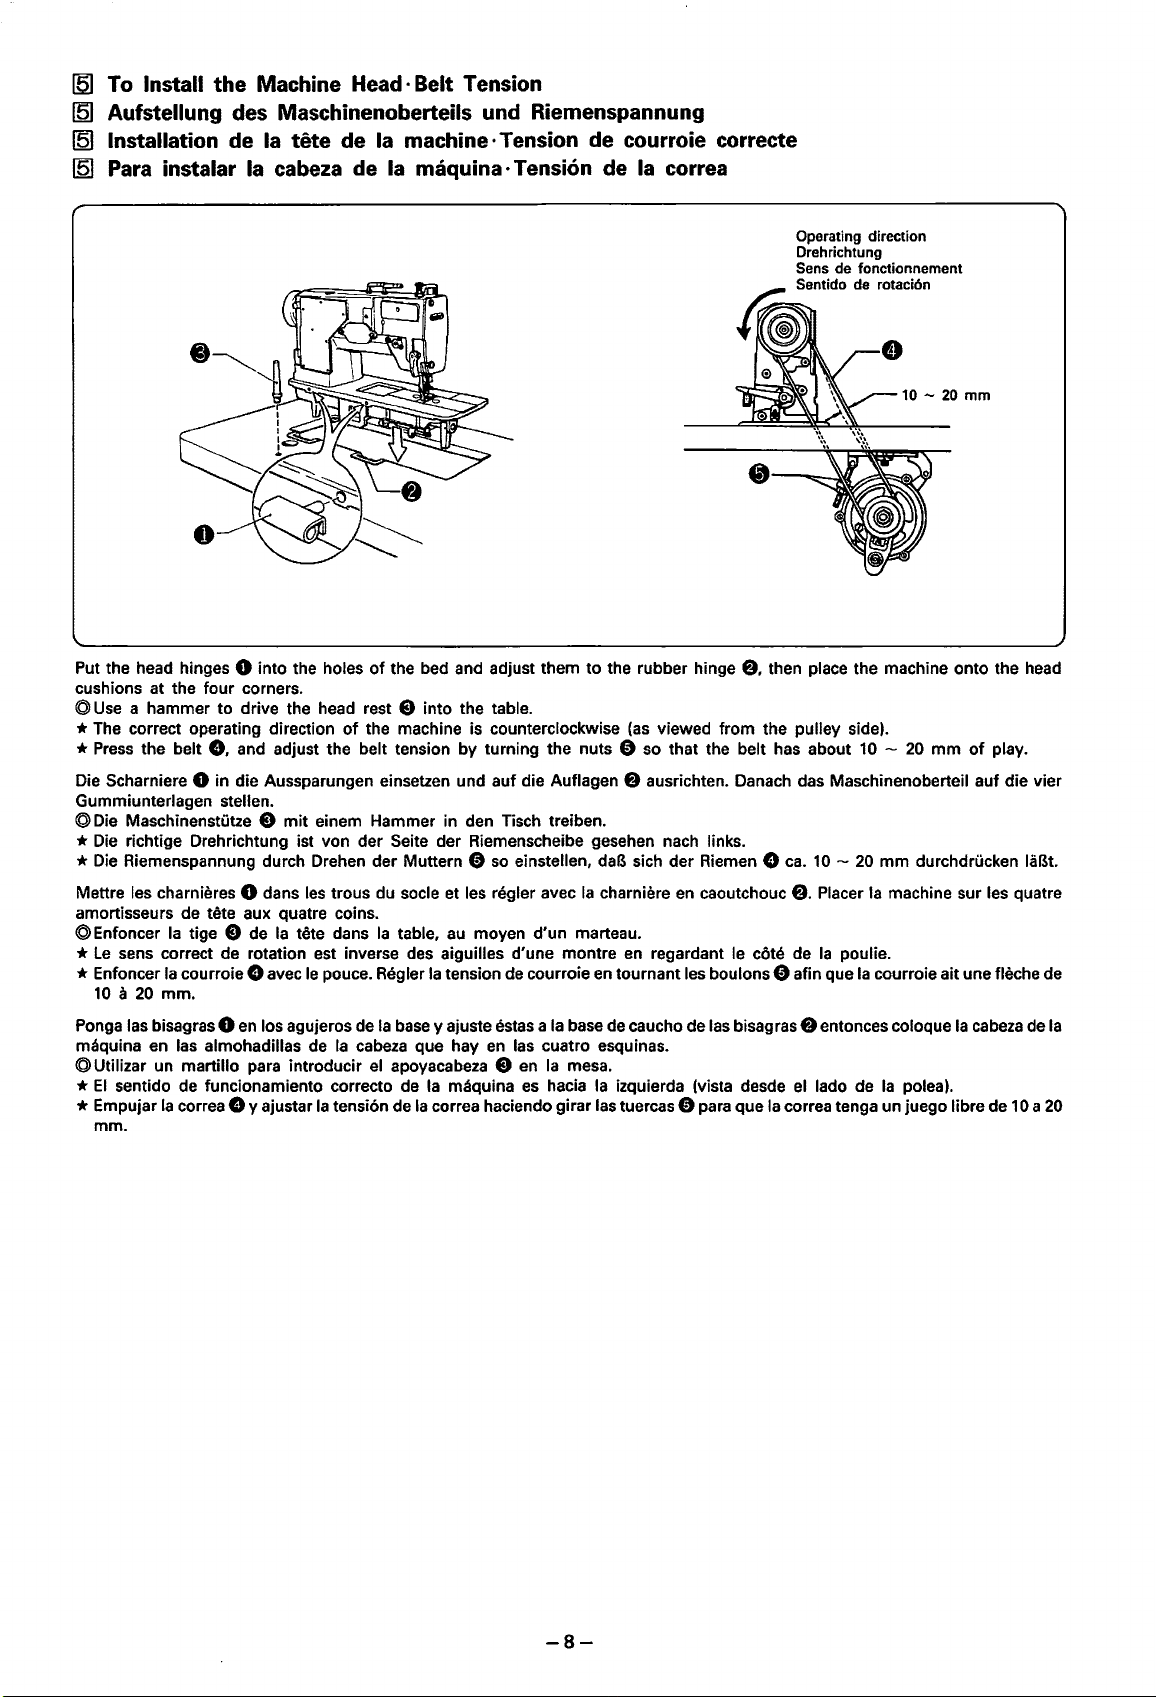
10-
20
mm
Put the head hinges 0 into the holes
cushions at the four corners.
©Use
a hammer to drive the head rest E) into the table.
* The correct operating direction
*Press
Die Scharniere
Gummiunterlagen stellen.
©Die
*Die
*Die
Mettre les charnieres 0 dans
amortisseurs de
@ Enfoncer
*
* Enfoncer
Ponga las bisagras
maquina en las almohadillas de
@ Utilizar un martillo para introducir
*
* Empujar
the belt
8,
and adjust the belt tension by turning the nuts 0 so that the belt has about
0 in die Aussparungen einsetzen und auf die Auflagen e ausrichten. Danach das Maschinenoberteil auf die vier
Maschinenstutze E)
richtige Drehrichtung ist von der Seite der Riemenscheibe gesehen nach links.
Riemenspannung durch Drehen der Muttern 0
tete aux quatre coins.
Ia
tige E) de
Le
sens correct de rotation est inverse des aiguilles d'une montre
Ia
courroie 8 avec
10 a 20
mm.
0
El
sentido de funcionamiento correcto de
Ia
mm.
correa 8 y ajustar
mit
les
Ia
tete dans
le
en
los agujeros de
of
the bed and adjust them to the rubber hinge
of
the machine is counterclockwise
einem Hammer in den Tisch treiben.
so
einstellen,
trous du socle et les regler avec
Ia
table,
au
moyen d'un marteau.
pouce. Regier
Ia
cabeza que hay
Ia
tension de
Ia
tension de courroie
Ia
base y ajuste estas a
el
apoyacabeza E)
Ia
maquina
Ia
correa hacienda girar las tuercas 0 para que
en
las cuatro esquinas.
en
es
Ia
base
Ia
mesa.
hacia
Ia
en
Ia
(as
daB
charniere
en
tournant les boulons 0 afin que
de
caucho de las bisagras e entonces coloque
izquierda (vista desde
e.
then place the machine onto the head
viewed from the pulley side).
sich der Riemen 8
en
caoutchouc
regardant le cote de
ca.
10-
e.
Placer
Ia
el
lado de
Ia
correa tenga un juego libre de
10 -20
20
Ia
poulie.
Ia
mm
mm durchdrucken laBt.
machine sur les quatre
courroie a
Ia
polea).
it
une fleche de
Ia
of
play.
cabeza
de
Ia
10 a 20
-8-
Page 12
121
To
Attach the
121
Montage
IB1
Installation de l'enrouleur de cannette
[§]
Para
colocar
des
Bobbin
Winder
Spulers
el
devanador de
Ia
bobina
111
To
111
Montage
111
Installation
111
Para
Attach the Thread Unwinder
des
Spulentragers
du
porte-bobines
colocar
el
porta-conos
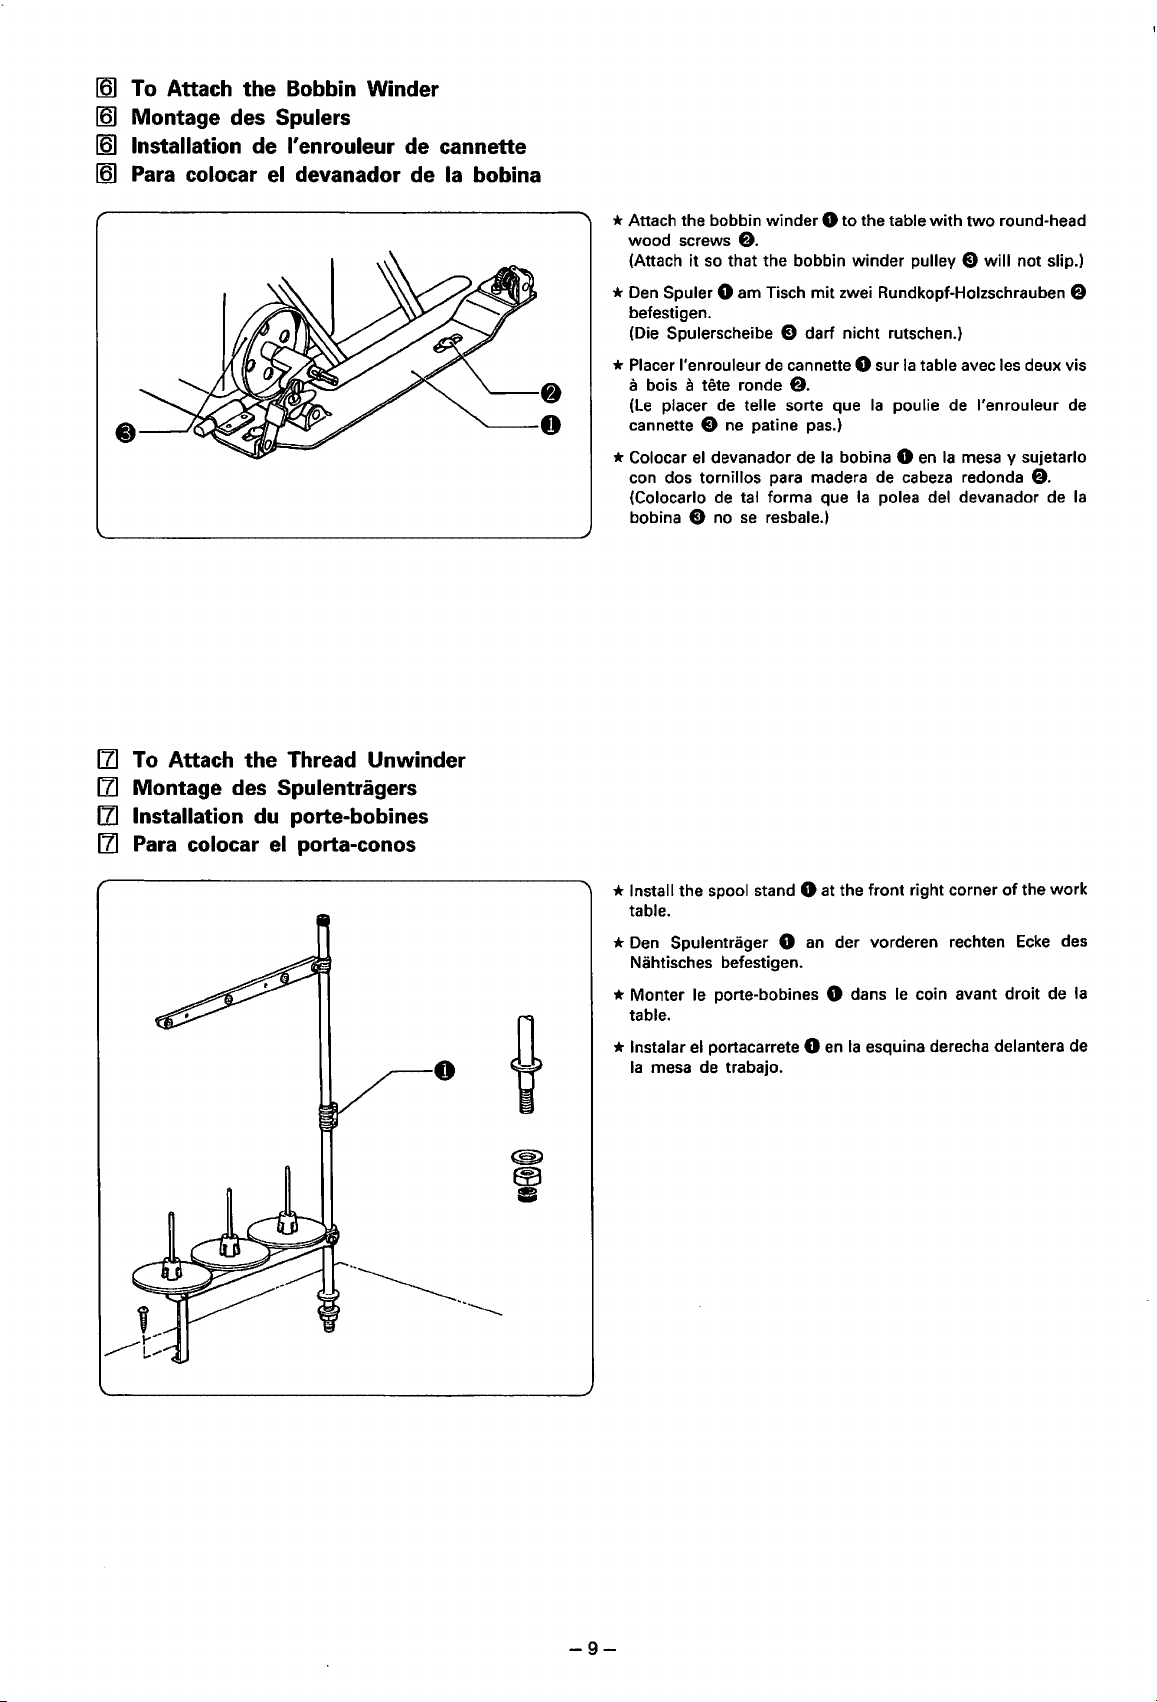
* Attach the bobbin winder 0
wood screws
(Attach it
*
Den
Spuler 0 am Tisch mit zwei Rundkopf-Holzschrauben 8
befestigen.
(Die Spulerscheibe
* Placer l'enrouleur
a bois a tete ronde
(Le
placer de telle sorte que
0 cannette e ne patine pas.)
* Colocar
con dos tornillos para madera
(Colocarlo
bobina e no
8.
so
that the bobbin winder pulley 8 will not slip.)
8 darf nicht rutschen.)
de
cannette 0 sur
8.
el
devanador de
de
tal forma que
se
Ia
resbale.)
to
the table
bobina 0
Ia
with
two
Ia
table avec les deux vis
Ia
poulie de l'enrouleur de
en
Ia
cabeza
mesa y sujetarlo
redonda
de
polea del devanador
round-head
8.
de
Ia
* Install the spool stand 0 at the front right corner
table.
*
Den
Spulentrager 0
Nahtisches befestigen.
an
der vorderen rechten
of
the work
Ecke
* Monter le porte-bobines 0 dans le coin avant droit de
table.
* lnstalar
Ia
el
portacarrete 0
mesa de trabajo.
en
Ia
esquina derecha delantera de
des
Ia
-9-
Page 13
(HI
Precautions Before Installing
!B)
Vorkehrungen
!B)
Precautions a prendre avant de
(HI
Precauciones a
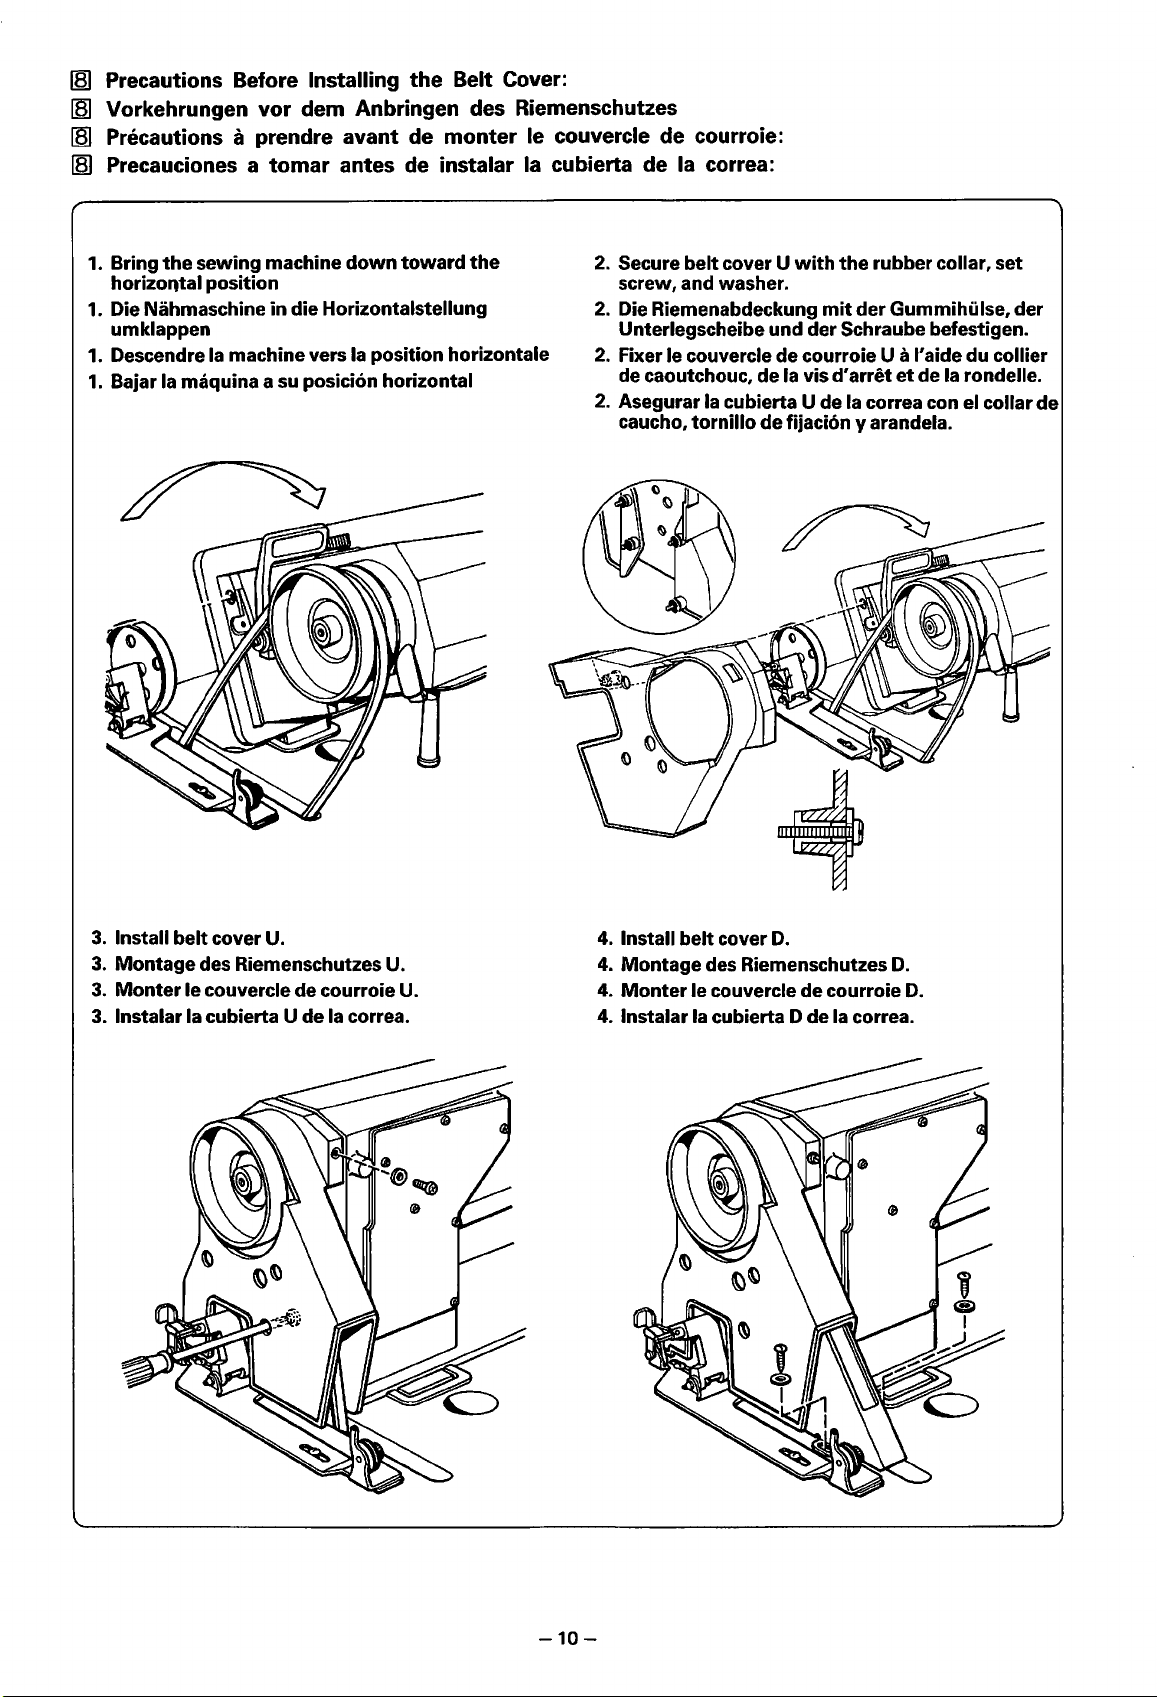
1.
Bring
the
sewing machine
horizo11tal position
1.
Die Nahmaschine
umklappen
1.
Descendre
1.
Bajar
Ia
maquina a su posicion horizontal
vor
tomar
in
die Horizontalstellung
Ia
machine vers
dem Anbringen des Riemenschutzes
antes de instalar Ia cubierta de
down
the
Belt Cover:
monter
toward
Ia
position horizontale
the
le couvercle de courroie:
Ia
correa:
2.
Secure
screw, and washer.
2.
Die Riemenabdeckung
Unterlegscheibe und der Schraube befestigen.
2.
Fixer le couvercle de courroie U a
de caoutchouc, de
2.
Asegurar
caucho,
belt
cover U
Ia
cubierta U de
tornillo
de fijacion y arandela.
with
Ia
the
rubber collar, set
mit
der Gummihlilse, der
I'
aide
vis
d'arret
et
de
Ia
correa con el collar de
du
Ia
rondelle.
collier
3.
Install
3.
Montage
3.
Monter
3.
lnstalar
belt
cover U.
des Riemenschutzes U.
le couvercle de courroie U.
Ia
cubierta U de
Ia
correa.
4.
Install
belt
cover
D.
4.
Montage des Riemenschutzes
4.
Monter
4. lnstalar
le couvercle de courroie
Ia
cubierta D de
Ia
correa.
D.
D.
-10-
Page 14
LUBRICATION
SCHMIERUNG
* Use BROTH
* Empfohlense Schmierol: BROTHER-Nahmaschinenol
*
Ut
iliser l'huile BROTHER (huile machine)
* Utilizar aceite
ER
oil
(white spindle
BRO
THER (aceite blanco para husos)
oil)
LUBRIFICATION
LUBRICACION
IIl Lubrication I Schmierung I Lubrification I Sistema de lubricaci6n
Test sheet
blatt
Test
Papier d'essai
de
prueba
Hoja
_\
..
\_
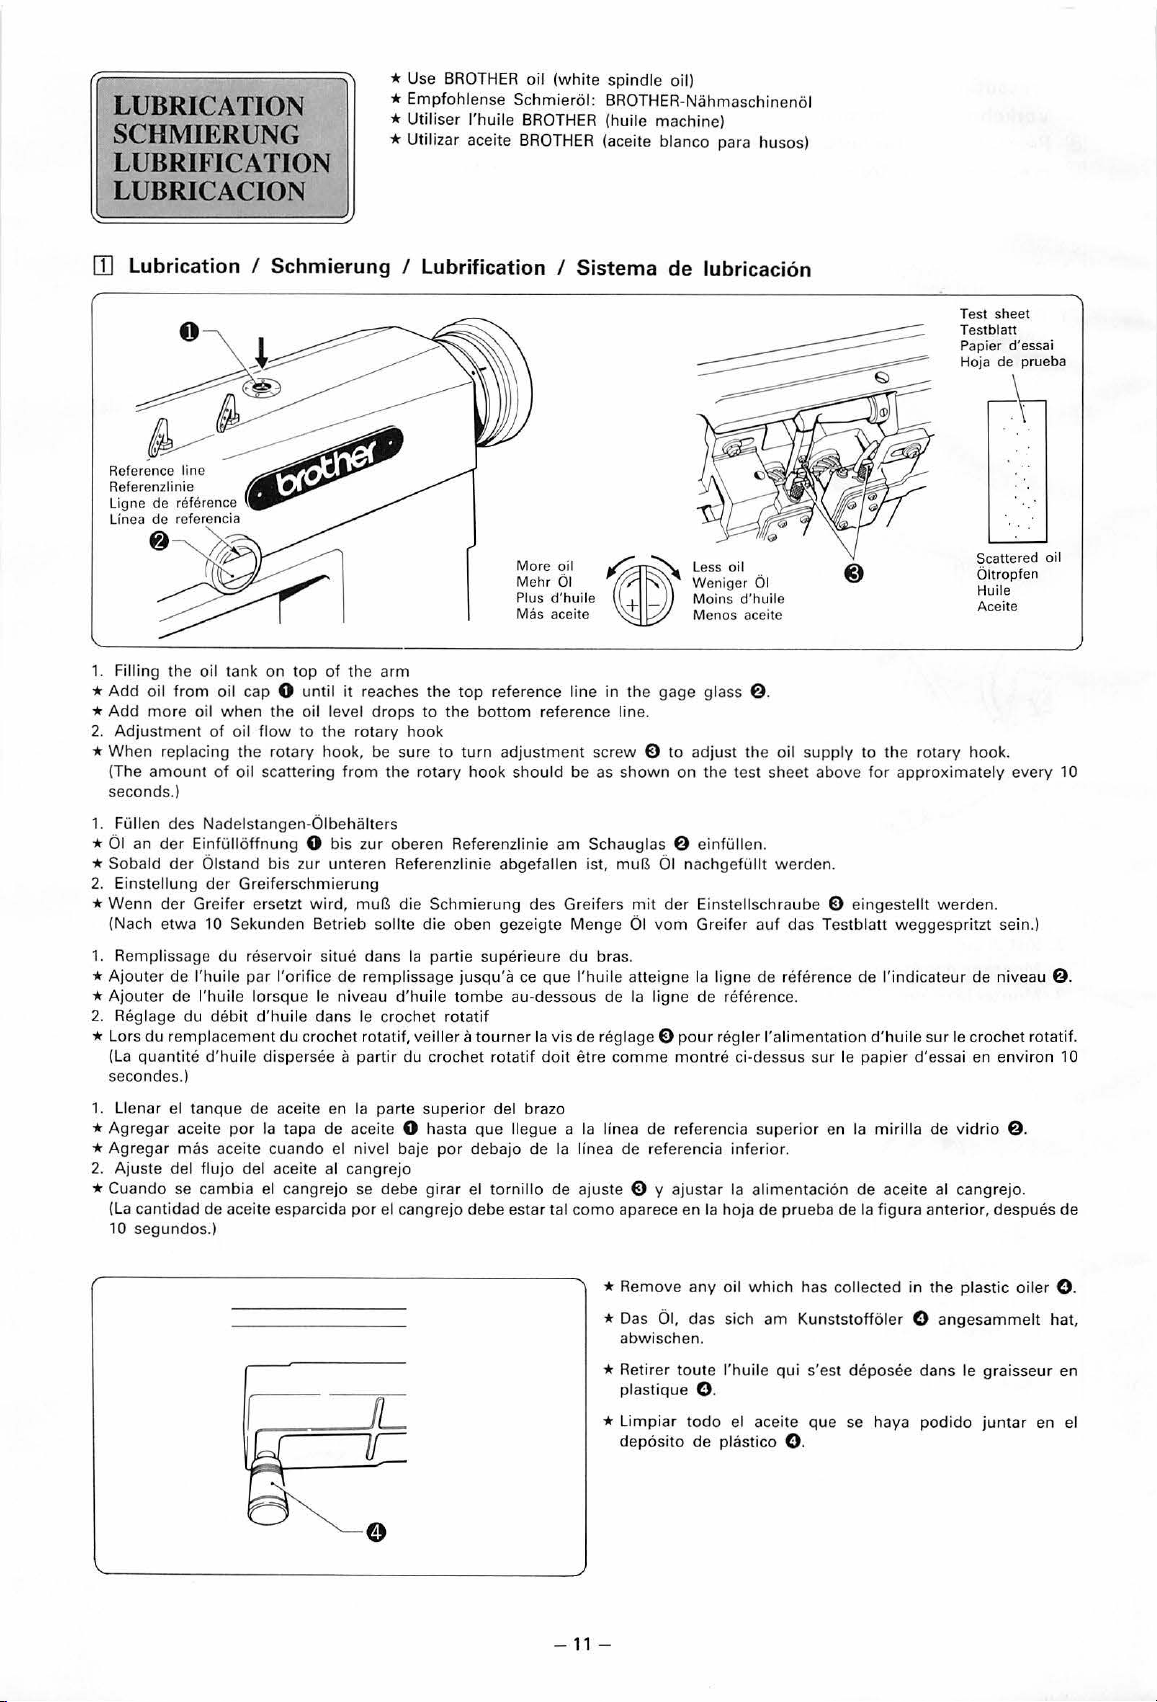
1.
Filling the oil tank
*
Add
oil
*Add
2.
Adjustment
*
When
(The
seconds.)
1.
Fullen des Nadelstangen-Oibehalters
01
*
* Sebald
2.
Einstellung
Wenn
*
(Nach etwa
1. Remplissage
*
Ajouter de
*
Ajouter
2.
Reg
* Lors
(La
secondes.)
1. Llenar el tanque
* Agrega r aceite
*
Agregar
2.
Ajus
* Cuando se cambia el cang rejo se debe
(La
10 segundos.)
from oil cap 0 until it reaches the
more
oil
replacing the rotary hook, be sure
amount
an
der
EinfUIIoffnung 0 bis zur oberen Referenzlinie
der
Olstand bis zur
der
Greifer ersetzt
l'huile
de l'huile lorsque le niveau
lage
du
du
remplacement du crochet rotatif, veill
quantile
mas aceite cua
te del f
can
tid
ad de aceite esparcida
on
top
of
the
arm
when
of
der
10 Sekunden Betrieb sollte die oben gezeigte Menge 01
debit
d'huile dispersee a
luj
the oil level
oil
flow
to the rotary hook
of
oil scattering fr
Greifersc
du
reservoir situe dans Ia partie superieure du bras.
par
por
o del aceite al cangrejo
hmi
wird,
!'orifice
d'huile dans le crochet
de
aceite en
Ia
tapa de aceite 0 hasta que llegue a
ndo
drops
om
the rotary hook should be as
unter
en Referenzlinie abgefallen ist.
erung
mu~
die
de
remplissage jusqu'a ce que
d'h
partir
du cr
Ia
parte super
el nivel baje por debajo
por
el cangrejo debe estar tal
top
to
the
bottom
to
turn
Schmierung
uile tombe
rotatif
er a tourn
ochet
ior
girar
el
tornillo
More
oil
Mehr
01
Plus
d'huile
Mas
aceite
reference line
reference line.
adj
ustment
des Greifers
au-dessous de Ia ligne de reference.
er Ia vis de reglage
rot
atif
doit etre
del brazo
de
in
the gage glass 6 .
screw E)
shown
am
Schaugla s 6 einfUIIen.
mu~
01 nachgefUI
mit
der
vom
l'huile
atteigne
E)
comme
Ia
linea de referenda
Ia
lin
ea
de
refe rencia inferio
de ajuste
E)
y ajustar
como
aparece en Ia hoja de prueba de
oil
Less
Weniger
Mains d'huil
Menos
aceite
to
adjust the o
on
the test sheet above for
Einstellschraube
Greifer auf das Testblatt
Ia
ligne de reference de l'indicat
pour
regl
er
montre
ci-dessus
Ia
Scattered oi I
01
e
il
supply
to
the rot
approximate
It werden.
E)
eingestel
weggespr
!'alimentati
superior
r.
alimentaci6n de aceite al cangrejo .
sur
on
d'huile
le papi
er
d'essai en
en Ia
mirilla
Ia
figura anterior, despues de
Oltropfen
Huile
Aceite
ary
hook.
ly every 10
lt
werden.
itzt sein
eur
de niveau
sur
le crochet rotatif.
environ
de v
idr
io
6 .
.)
6.
10
any
* Remove
*
Das
01.
abw
ischen.
* Retirer
plas
tiqu
*
Limpiar
deposito
oil
das sich
toute l'huile
e 0 .
todo el aceite que
de plast
-11-
which
has collected in the plastic
am
Kunststoffoler 0
qui s'est deposee dans le graisse
se
ico
0 .
haya
angesamme
podido junta
oiler
lt hat.
ur
r en el
0 .
en
Page 15

[21
Oiling
[2]
Vor der lnbetriebnahme
[2]
Graissage
[2]
Aceitado
Before using the machine,
Vor Arbeitsbeginn ein bis zwei Tropfen
Avant
d'utiliserAntes de utilizar
flecha.
Ia
machine, mettre une goutte ou deux d'huile dans les points indiques par une
Ia
maquina, asegurarse de haber puesto una o dos gotas de aceite en cada uno
be
sure
to
supply a drop
Nahmaschinenol auf die
or
two
of
oil at each
mit
of
Pfeilen bezeichneten Stellen auftragen.
the poins indicated by
de
los puntos que
an
arrow.
fiE~che.
se
indican con una
-12-
Page 16

CORRECT OPERATION
DER RICHTIGE MASCHINENBETRIEB
FONCTIONNEMENT CORRECT
PARA UN FUNCIONAMIENTO CORRECTO
ITJ
To Attach
ITJ
Nadelbefestigung
ITJ
Installation des aiguilles
ITJ
Para colocar las agujas
the
Needles
Long
groove
Lange
Nut
Longue
gorge
Ranura larga
Long
groove
La
nge
Nut
Longue
gorge
Ranura larga
0
* Loosen the screws 0 , hold the needles a with their
re-tight
en the screws
* Die Sc
* Desserrer les
*
12]
[2]
[2]
[2]
hraub
en 0 losen. Die bei
Schrauben 0 befestigen.
vis
serrer les vis
Aflojar
uj
a, y vo
ag
0.
los
tornillos
lver a apreta rlas con l
To Remove
Entnehmen der Spulen
Depose de Ia cannette
Para sacar Ia bobina
0.
de
0 , i
nt
rodu
ir
e les aiguilles a
n Nadeln a
mit
completement
0 , mantener las agujas a con su ranura la
os
the
tornillos
Bobbin
0.
* Be sure to turn the
*
Zum
ausgeschaltet werden.
* Veiller a
boitier
* Desconec
long
groove
facing
nach innen gerichtet
en s'assurant
rg
a h
aCia
Ersetzen d
couper
er
Spule oder der Spulenkapsel muB die Nahmaschine
I' a
limentation
a cannette.
tar
Ia
corriente para
1. Raise the
slide plates a by
2.
Pull the rotary
bobbin
1. Die Nadeln 0
rechts und
2. Die
1. Relever les aig
Ouvrir
droite
2.
Relev
cannette 0 .
1.
Levantar las agujas 0 a l
placas
izquierd
2.
Tir
bobin
inward,
power
insert t
hem all
the
way into the needle bars, an d
er
Nut
ganz in die Nadelstangen schieben und mit
que
Ia longue
adentro, insertarlas completamen
off when replaci ng the
needles 0 to the
gorge
des aiguilles soit vers l'interieur
bobbin
lors du remplacement de
cambiar
hook
Ia
bobina
mo
ving them
latches 8
y Ia caja de Ia
high
est positions, and open the
to the
upward,
te
en l
as
and b
Ia
cannette et du
right
and left.
and then remove the
0 .
gan
z nach oben stellen
links auseina
Spul
en 0 an
uill
les plaques de glissement a en les gl issant vers Ia
ou vers Ia gauche.
er
les cliquets du crochet rotati f E)
corredizas a
a.
ar
hacia arriba las perill
a 0 .
deR
Laschen
es 0 a
moviendo
nder
leur
as
posiciones mas altas y
as de los cangrejos
ziehen.
E)
position
las a
und
die Deckel a nach
herausziehen.
Ia plus haute.
et
Ia
derecha y a
bar
ras de Ia
obb
in case.
bob
ina.
enlever Ia
abrir
E)
y sacar Ia
den
et
las
Ia
- 13 -
Page 17

To Remove the Bobbin
Cases
Entnehmen der Spulenkapseln
Depose des boites a cannette
Para
sacar las cajas de
~
To
Wind
~
Aufwickeln des Unterfadens
~
Bobinage
~
Para devanar el hilo inferior
the
du
Ia
bobina
Lower Thread
fil
inferieur
1.
Raise
the needles 0 to the highest positions, and open the
slide plates e by moving them to the right and left.
2.
Remove the bobbin
1.
Die
Nadeln 0 ganz nach oben stellen und die Deckel 8 nach
rechts und
2.
Die Spulenkapseln e
1.
Relever les aiguilles 0 a leur position
Ouvrir les plaques 8
gauche.
2.
Rei
ever les cliquet des crochets rotatifs et
cannette
1.
Levantar
placas
izquierda.
2.
Quitar las cajas de
1.
Push
2.
Push
3.
Wind the thread around the bobbin 0 a few times (in the
direction
4.
If the thread cannot
guide screw
left
*To
wind more thread onto the bobbin
tightening the screw
links auseinanderziehen.
e.
Ia
agujas 0 a las posiciones mas altas y abrir las
corredizas 8 moviendolas a
the bobbin 0 onto the bobbin winder shaft
the bobbin winder stop latch e all the way downward.
of
the arrow), and then operate the machine.
0,
as
necessary.
cases
E) by grasping the latches.
an
den Laschen herausziehen.
Ia
en
les glissant vers
Ia
bobina e sujetandolas por las aldabas.
be
and move the thread guide 0 to the right
wound evenly, loosen the thread
plus haute.
Ia
droite ou vers
en
lever les boites a
Ia
derecha y a
0,
make adjustment by
e.
Ia
Ia
f).
or
1.
Die
Spule 0 auf die Spulerspindel
2.
Den
3.
4.
2.
3.
4.
Spulerhebel e ganz nach unten drucken.
Den
Faden
Falls der
verschieben.
*Urn
mehr
1.
Pousser
2.
Pousser a fond
3.
Tourner le fil autour
4.
Si
le fil n'est
comme necessaire.
* Lorsqu'on veut mettre davantage
1.
Empujar
Empujar completamente hacia abajo
Enrollar
Si
no fuera posible enrollar
izquierda segun
*Para
in pfeilrichtung einige Male urn die Spule 0 wickeln und die Maschine betatigen.
Faden
nicht
gleichma~ig
Faden
auf die Spule 0 wickeln
Ia
cannette 0 sur
le
cliquet Q d'am!lt
pas
enroule regulierement, desserrer
Ia
bobina 0 sobre
el
hilo alrededor de
enrollar mas hilo
sea
Ia
de
Ia
cannette 0 plusieurs fois dans le sens de
el
Ia
bobina 0 varias veces
el
hilo
necesario.
en
Ia
bobina
f)
stecken.
aufgewickelt wird, die Fadenfuhrungsschraube 0 losen und die Fadentuhrung 0 seitlich
zu
konnen,
tige 8 de l'enrouleur
de
l'enrouleur
de
fil sur
Ia
cannette, resserrer
carretel
8.
Ia
aldaba de traba del devanador
en
forma uniforme, aflojar
0,
ajustar apretando
mu~
die Schraube e angezogen werden.
de
cannette.
de
cannette.
Ia
fh!!che.
Ia
vis 0 du guide-til et deplacer le guide-fil 0 vers
Ia
vis
e.
(en
el
sentido indicado por
el
tornillo del guiahilos 0 y mover
el
tornillo
de
0.
Faire tourner
Ia
bobina
e.
Ia
flecha) y luego, hacer funcionar
el
Ia
machine.
Ia
droite ou
guiahilos 0 a
Ia
Ia
Ia
derecha o a
-14-
gauche,
maquina.
Ia
Page 18

~
To Attach the
~
Einsetzen der Spulen
~
Installation de
~
Para
colocar
1.
Raise
the needles 0 to the highest positions.
Place
2.
3.
4.
1.
2.
3. Die Lasche E) des Greifers umklappen.
4.
1.
2.
3. Pousser le cliquet E) du crochet rotatif.
4. Fermer les plaques coulissantes.
1.
2.
3. Empujar
4. Cerrar
bobbin
Push
latch E)
Close the
Die Nadeln 0 ganz nach oben stellen.
Die Spule 8 in den Greifer einsetzen (siehe Abbildung).
Den
Relever les aiguilles 0
Placer
ci-dessus.
Levantar las agujas 0 a las posiciones mas altas.
lnsertar
bed
Deckel
zuschieben.
Ia
cannette 8 dans
Ia
bobina
Ia
perilla del cangrejo
Ia
mesa deslizante.
Bobbin
Ia
cannette
Ia
bobina
f)
into the rotary hook
of
the rotary hook flat.
slide.
au
maximum.
le
crochet rotatif comme montre
f)
dentro del cangrejo como
E)
as
shown above.
para que quede horizontal.
se
ve arriba.
1.
Raise
the needles 0
Place
bobbin
2.
3.
Push
Close the bed slide.
4.
1.
Die Nadeln
2.
Die Spulenkapsel
bildung).
Die Lasche
3.
Den
4.
1.
2.
3.
4.
1.
2.
3.
4.
Deckel
Relever les aiguilles
Placer
ci-dessus.
Pousser le cliquet
Fermer les plaques coulissantes.
Levantar las agujas
lnsertar
Empujar
Cerrar
case
latch E)
0 ganz nach oben stellen.
E) des Greifers umklappen.
zuschieben.
Ia
cannette 8 dans le crochet rotatif comme montre
Ia
bobina 8 dentro del cangrejo como
Ia
perilla del cangrejo E) para que quede horizontal.
Ia
mesa deslizante.
to
the highest positions.
8 into the rotary hook
of
the rotary hook flat.
8 in den Greifer einsetzen
0
au
E) du crochet rotatif.
0 a las posiciones mas altas.
maximum.
as
shown above.
(siehe Ab-
se
ve arriba.
-15-
Page 19

[QJ
Lower Threading
[QJ
Einfadeln des Unterfadens
[QJ
[QJ
Enfilage
Para
du
fil inferieur
enhebrar
el
hilo inferior
1.
Insert the bobbin e into the rotary hook
2.
Pass
the thread through
slot®
and under the tension spring
e.
Pass
3.
1.
2.
3.
1.
2.
3.
1.
2.
3.
the thread through the needle plate and pull out about
50
mm.
Die Spule e in den Greifer 0 einsetzen.
Den
Faden durch den Schlitz @ unter die Span.nfeder e
einziehen.
Den
Faden
durch die Stichplatte fUhren und
herausziehen.
Placer
Ia
cannette e dans le crochet rotatif
Placer
le
fil dans
Ia
Passer le fil dans
lnsertar
Pasar
de tension
Pasar
mm.
Ia
bobina e dentro del cangrejo
el
hilo a traves de
el
hilo a traves del placa de
fente @ et sous le ressort
Ia
plaque a aiguille et tirer environ
Ia
ranura ® y por debajo del muelle
e.
0.
ca.
0.
de
tension
0.
Ia
aguja y sacar unos
50
50
mm
e.
mm.
50
1.
Insert the bobbin 0 into the bobbin
2.
Pass
the thread through
slot®
and under the tension spring
e.
3.
Pass
the thread through slots@
thread-loosening-prevention spring
4.
Pass
the thread through the thread hole 0 and pull out about
50
mm.
Die
1.
Spule 0 in die Spulenkapsel e einsetzen.
Den
2.
3.
4.
1.
2.
3.
4.
1.
2.
3.
4.
Faden durch den Schlitz @ unter die Spannfeder e
einziehen.
Den
Faden
durch die Schlitze @ und © und durch die
Unterfaden-Spannfeder
Den
Faden
durch das
herausziehen.
Placer
Ia
Placer
Passer le fil dans les fentes@ et
empeche celui-ci de
Passer le fil dans le trou
lnsertar
Pasar
de
Pasar
del muelle de prevenci6n
Pasar
50
cannette 0 dans les boites a cannette
le
fil dans
Ia
bobina 0 dentro de
el
hilo a traves
tension
mm.
e.
el
hilo a traves de las ranuras@ y © y luego a traves
el
hilo a traves del agujero del hilo 0 y sacar unos
0 fUhren.
Loch
0 fUhren und
Ia
fente @ et sous le ressort de tension
se
relacher.
0 et tirer environ
de
Ia
ranura ® y por debajo del muelle
de
flojedades
case
and©,
and then through the
0.
©puis
dans le ressort 0 qui
Ia
caja de
en
e.
Ia
el
ca.
e.
50
mm.
bobina
hilo
50
mm
e.
e.
0.
-16-
Page 20

~
Upper Threading
~
Einfadeln des Oberfadens
[QJ
Enfilage
1§1
Enhebrado de los hilos superiores
du
fil superieur
[LT2-B841)
[LT2-B842)
[LT2-8847)
[LT2-B872)
Raise the thread take-up
Den
Fadenabnahmehebel ganz nach oben stellen. outside.
Relever le passe-til
levantar
el
tirahilo a su posici6n mas alta.
to
the highest position.
a
sa
position
Ia
Tirer environ
par le chas de l'aiguille.
Sacar unos
traves del ojo de
hilo a
cada aguja.
plus haute. Die Faden von der Nadelinnenseite her durchziehen.
50
mm
de
50
mm
de
Pass
the threads through the needle eyes from inside
Passer
le til
au
l'exterieur.
Pasar los hi los a
interior hacia
til
travers du chas de l'aiguille de l'interieurvers
traves de los ojos de las agujas desde
ellado
de afuera.
Cotton thread/Baumwollfaden/
Fil
coton/Hilo de algod6n
to
ellado
[LT2-B845]
[LT2-B848]
[LT2-B875]
Raise the thread take-up
Den
Fadenabnahmehebel ganz nach oben stellen.
Relever le passe-til
levantar
Pass
outside.
Faden von der Nadelinnenseite her durchziehen.
Die
Passer le til au travers du chas
l'exterieur.
Pasar los hi los a traves de los ojos de las agujas desde
interior hacia
el
tirahilo a
the threads through the needle eyes
ellado
de afuera.
to
the highest position.
a
sa
position
su
posici6n mas alta.
de
Ia
from
l'aiguille de l'interieur vers
plus haute.
inside to
ell
Pull
out
thread through each
the needle eyes.
Faden etwa
Die
weit
durch die Nadelohre
ziehen.
Tirer environ
par le chas de l'aiguille.
ado
about
50
mm
of
of
50
mm
50
mm
de fil
If
the arm thread guide.
Bei Verwendung von Synthetik-Faden den
mitgelieferten Filz in die
Placer le feutre dans le guide-til du bras
synthetique.
Si
(incluido)
~
'\..__
Synthetic thread/Synthetikfaden/
Fil
synthetique/Hilo sintetico
synthetic thread is used, use the felt (included) in
Fadentuhrung einsetzen.
se
utiliza hilo sintetico, utilizar el fieltro
en
el guiahilo del brazo.
Arm
thread guide
FadenfUhrung
Guide-til du bras
Guiahilo del brazo
Arm
thread guide
Fadenfuhrung
Guide-til du bras
Guiahilo del brazo
en
cas de til
-17-
Page 21

III Adjustment of the Presser Foot Pressure
III Einstellung des StoffdruckerfuBdrucks
III Reglage
III Ajuste de
du
pied
de
biche
Ia
presion del pie del prensatelas
Use
Verwendung
Utilisation
Uso
For thin materials
Fur dunne Stoffe
Pour des materiaux fins
Para
tejidos finos
For
medium thick
materials
Fur
mitteldicke Stoffe
Pour
des
d'epaisseur moyenne
Para
medio
For
Fur
Pour des materiaux epais
Para
materiaux
tejidos
de
grosor
thick materials
dicke Stoffe
tejidos gruesos
Presser foot pressure
StoffdruckerfuBdruck
Pression du pied de
biche
Presion del pie del
prensatelas Altura del tornillo de
3
kg
4
kg
5
kg
Adjustment screw
height
Ei
nstellsch
ra u be
Ia
31
28
26
vis
mm
mm
mm
Hauteur de
reglage
ajuste
de
*Adjust
* Der StoffdruckerfuBdruck kann
*
* Ajustar
[B)
1B1
1B1
!B)
* Parar
*No
Regier
the presser
Ia
pression du pied de biche
Ia
presion del pie del prensatelas hacienda girar
foot
pressure by turning the presser foot adjustment screw
mit
Adjustment of the Stitch Length
Einstellung der StichUinge
Reglage de
Ajuste
Ia
maquina de coser. Mantener presionado el regulador de
que
el
baton del regulador
indice rojo con
Soltar
el
baton del regulador de
oprimir
Ia
longueur de point
de
Ia
longitud de
de
Ia
Ia
posicion deseada
el baton del regulador de
alimentacion 0 entre
Ia
der Einstellschraube 0 eingestellt werden.
en
tournant
Ia
vis de reglage du pied de biche
el
tornillo de ajuste del pie del prensatelas
[L
T2-B841 1
[LT2-B8411
[L
T2-B841 1
Ia
puntada
[LT2-B8411
*Stop
the sewing machine. Hold the feed regulator button 0
depressed and turn the pulley
regulator button
e.
Continue turning the pulley and align the red index with
the desired setting on the scale.
Release the feed regulator button
*Do
not press the feed regulator button 0 during sewing
machine operation. Also, make sure the button is
starting the sewing machine.
* Die Nahmaschine stoppen. Den Transporteinstellknopf
gedruckt halten und die Riemenscheibe Iangsam vorwarts
drehen, bis der Transporteinstellknopf
Exzenterrads
weiterdrehen, um die rote Markierung auf die gewunschte
Skalenposition auszurichten und den Zufuhrungsreguliertaste
0 loslassen.
Danach die Zufl.ihrungsreguliertaste 0 loslassen.
* Wahrend des Nahens darf der Transporteinstellknopf 0 nicht
gedruckt werden. Vor dem Nahbeginn prufen, ob er in der
oberen nicht gedruckten
* Arreter
l'entrainement
Ia
regulateur de l'entrainement
roue excentrique
l'index rouge sur
*
Ia
poulie vers l'avant de
Relacher le bouton du regulateur de l'entrainement
Ne
pas appuyer sur
0 pendant le fonctionnement de
en
Ia
escala.
alimentacion
Ia
alimentacion 0 mientras
en
0.
Ia
ranura
demarrer
relevee.
Ia
alimentacion 0 y girar
de
Ia
Ia
rueda excentrica
se
esta usando
0.
0.
0.
slowly
forward so that the feed
0 enters the groove in the eccentric wheel
0.
up
before
0
0 auf die Nut des
e ausgerichtet ist. Danach die Riemenscheibe
Stellung steht.
machine. Maintenir le bouton du regulateur de
0
en
position enfoncee et tourner lentement
facton a ce
0 penetre dans
e.
Continuer a tourner
le
reglage desire.
le
bouton du regulateur de l'entrainement
machine, verifier que le bouton est
Ia
polea lentamente hacia adelante para
e.
Seguir girando
Ia
maquina de coser.
que le bouton du
Ia
rainure
Ia
poulie, et amener
Ia
machine. Avant de
Ia
en
position
polea y alinear
de
0.
Ia
el
-18-
Page 22

Adjustme
Ein
stellung der Stichlange [LT2-
nt
of the Stitch Length [LT2-8842, 8845, 8847, 8848, 8872, 8875]
884
2, 8845, 8847, 8848, 8872, 8875]
Reglage de Ia longueur de point [L T2- 8842 , 8845, 8847, 8848, 8872, 8875]
Ajuste de
Ia longitud de Ia puntada
[LT2-8842, 8845, 8847, 8848, 8872, 8875]
* Sto p
the machine
desired st it ch length. The large r
stitch .
* The material
pr
essed
down
lever
will
released.
*
Be
scheib
automat
i s
till
stehender Maschine kann
e 0 die
and turn the feed
will
be fed backward
, and
forw
ically return
gewunschte
* Durch Drucken des
um
geke
hrter
Richtung
automatisch in die Ausgangsste
wird
wieder vo
rwarts transportiert.
adju
stm e.nt dial 0 to the
the numb
er, the lo
when the reverse lever 6 is
ard again
to
when
its
mit
orig
it
inal
der Trans
Stichlange eingestellt werden.
Umk
ehrhebels 6
transportiert
llun
. Be
im
g zuruc
wird
Loslassen kehrt
k,
nger
the
is released. The
position
por
der
when
teinstell -
Stoff
in
er
und
der
Stoff
* Arre ter
* Le
Ia
machine
tr
ava il sera entraine vers
Le le
vier
reviendra
et
tourner
automatiquement
* Parar Ia maqui na y hacer
grande sera
*
El
tejido se al
mi
sma. La palan
~
Thread Tension
~
Fadenspannung
~
Tension
~
Tension del hi
1. Thread Te nsion
Fa
denspannung
1.
1. Tension de
1. Tension del hilo
Ia
puntada.
imentar
ca volvera a
de fil
fil
a hacia atras al
lo
le
bouto
n de reglage 0
l'arrier
e lorsque le levier d'invers
a sa posi
girar
el dial de ajuste de Ia alime
empujar
utom
aticamente a su posicion original al soltar
Good even stitches
Schone gleichmiiBige Stiche
Po
int
s corrects
Puntadas parejas
Upp
er
thr
lo
wer thread tension t
Zu hohe Oberfadenspannung
zu schw
ache
La
ten
sion
important
est trop Ia
La tension
grande o Ia del
Upp
er
thr
lower thr
ead tensi
Zu schwache
bzw. zu h
La tension
celle
Iaibie ou
rop
imp
orta
t
La
ten
sion del
Ia del hila infer
poca o
emasidado
d
Ia
ead tension t
Unt
erfadenspannung
du Iii superie
e ou celle
ibi
e
del hilo super
hila infe
ead tens
ion too
on too stro
Ober
Unterfadens
du
Iii
superie
du
Iii
nte
hil
a super
grande.
fadenspannung
ohe
du
superie
tion d'o
palan
oo str
oo
weak
ur
Iii
inh
ior
rior
weak
pannung
ur
est
ior
ior
es
de
rig ine
ca
de
retroceso de Ia
ong
or
bzw
.
est
trop
irie
ur
es
muy
es poca.
or
ng
tro
p
ur
est
es muy
l'entrainemen
ion
lor
squ'
ntaci6n
6 est
il
est relache.
0 a
Ia
t selon Ia
e
nfonc
longitud
alime
ntaci6n 6 y, de nuevo, hacia adelante al soltar Ia
Ia misma.
Tension of
Unt
erladenspannung
Tension
Tension de
low
du
fil inferieur
hilo inferior
~
Co
tton
Baumwo
Coton
Al9od6n
Dacron
Synthetics
Da
cron
Pol
ies
ter
Dacron
Tension
ll
e
Co
n•
Tension
Cou
longueur
~.
et vers l'avant lorsqu
de
point
de puntada deseada. A ma
er thread
For medium-thick
unt
n•
nt
Mitteldicke
Po
Para
medic
Steffe
ur
tissus moyens
tejidos de 9rosor
50 -70
9
5o
a 70
9
#5
0
- 45 g
35
35
a 45
9
#
50
desiree.
'il
est relach
yor
F
or
thick
Di
cke
our
P
P
ara
e.
numero
Steffe
tissus epais
tejidos gruesos
60 - 80 g
60 a
80
9
#50
60 -
70
g
60
ll
70 g
#3
0
mas
- 1
9-
Page 23

Less
tension
Geringere Spannung
Mains de tension
Menos tension
Less
tension
Gerlngere Spannung
Mains de tension
Menos tension
*The
tension
adjustment screw
*Adjust
*After
to obtain a good even stitch.
Die
Unterfadenspannung kann durch Drehen der Schraube 0
*
*
Die
Oberfadenspannung kann durch Drehen der Spannungsrandelmutter e eingestellt werden.
* Nachdem die Unterfadenspannung einmal eingestellt ist, kann die GleichmaBigkeit der Stiche
eingestellt werden.
*
La
tension du til interieur depend de
du
fil inferieur.
*
Regier
* Apres que
d'obtenir de bons points bien
*
La
tension del hilo inferior varia con
tension
* Ajustar
*
Una
uniformes y
of
the lower thread varies with the kind
0.
the tension
the tension
Ia
tension du fil superieur
Ia
del hilo inferior
Ia
tension del hilo superior haciendo girar
vez
ajustada
of
the upper thread by turning the thread tension nut
of
the lower thread
tension du fil inferieur a ete ajustee une fois, il suffit ensuite d'ajuster seulement
0.
Ia
tension del hilo inferior, sera necesario ajustar solamente
de
calidad.
More tension
Hohere Spannung
Plus
de
tension
Mas tension
of
cloth and thread, and
has
once been adjusted,
Ia
qualite du travail et du fil. Elle peut etre reg
en
tournant
equilibres.
el
tipo de tejido y con
le
boulon e
it
is hereafter necessary to adjust only the tension of the upper thread
fur
de
reglage
el
hilo utilizado, y puede ser ajustada girando
Ia
tuerca de tension del hilo
can
be
adjusted by turning the lower thread tension
e.
die verschiedenen Stoff- und Fadenarten eingestellt werden.
lee
en
rournant
de
Ia
tension.
e.
Ia
tension del hilo superior para obtener puntadas
II
mit
der Oberfadenspannung
Ia
vis de reglage 0
Ia
tension du fil superieur afin
el
de
Ia
tornillo de ajuste de
tension
-20-
Page 24

2. Thread take-up spring
Operating range of thread take-up spring
*The
standard operating range
The operating range
Tension of the thread take-up spring
*The
standard tension
Adjust the tension
Thread take-up spring timing
* The take-up spring guide 0 should
the thread take-up spring
of
the thread take-up spring
of
of
the thread take-up spring e by loosening the screw 0 and turning the thread tension stud
of
the thread take-up spring is 5 -
the thread take-up spring is
be
at the center for standard thread take-up spring
e.
loosen set screw 0 and turn the take-up spring guide
less
Geringere Spannung
less
tension
Geringere Spannung
More
Hohere Spannung
•
•
10
grams.
mm.
E)
timing adjustment. To adjust the timing
e.
E)
can
be adjusted by the thread take-up stopper 0 after loosening the screw
30 -70
8.
G.
of
2.
Fadenabnahmefeder
Bewegungsbereich der Fadenabnahmefeder
* Der normale Bewegungsbereich der Fadenabnahmefeder betragt 5 -
Durch
losen
eingestellt werden.
Spannung der Fadenabnahmefeder
* Die normale Spannung der Fadenabnahmefeder betragt
Durch
Synchronisation der Fadenabnahmefeder
* Fur die Normaleinstellung der Fadenabnahmefeder
Fadenabnahmefeder
der Schraube 8 und Verschieben des Anschlags 0 kann der Bewegungsbereich der Fadenabnahmefeder
losen
der Schraube 0 und Drehen der Randel mutter 0 kann die Spannung der Fadenabnahmefeder
E)
die Schraube 0 losen und die Fuhrung 0 drehen.
30 -70
E)
muB sich die Fuhrung 0 in der Mitte befinden. Zum Einstellen der
g.
10
mm.
-21-
E)
eingestellt werden.
E)
Page 25

5 - 10
mm
Moins
Menos
c.
de
tensi
tension
@)
Plus
de
Mas tension
on
tension
Pl
us de tensi
M
as
tension
on
2. Ressort du passe-til
Gamme
*La
Le ressort 9
de tonctionnement
gamme
de
fonctionnement
peut
etre regie
du
ressort de passe-fil
standard du ressort de passe-til est
par
Ia
but
ee
0 du passe-fil apres
Tension du ressort de passe-til
*
La
tension standard
Elle pe
ut
etre reg lee en desserrant
Synchronisation du ressort
* Le reglage
centre.
de
Si un reglage s'avere necessai r
du
ressort de passe-fil est de 30 a 70 g.
synchronisation
Ia
vis 0 et en
du
releveur de til
du
ressort 9
e,
tournant
du
releveur de f
desserrer Ia vis de fixation 0
2. Resorte del tirahilos
Gama de tuncionamiento del resorte del tirahilos
* La
gama
de
La
gama
tornillo
de
0.
funcionami
funciona
ent o normal del resorte del tirahilos esta entre 5 y 10
miento
del resorte del tirahilos 9
se
Tension del resorte del tirahilos
* La tension
Ajustar
Si
ncronizaci6n del resorte del tirahilos
* La
guia
Para ajustar
normal
Ia
tension del reso rte d
del resorte del tirahilos 0
del reso rte del tirahil
Ia
sincronizacion del resorte del tirahilos 9 ,
el
tirahilos 9 afl
deb
e est
os
se encuentra entre 30 y 70 gramos.
ojando
ar
en el centro para hacer
aflojar
!.~!=====~
de
avoir
desserre Ia v
Ia goup
ill
e 0
il
est correct lorsque le
puede ajust
el
tornil
ar
por
lo 0 y hacienda girar el pasador de tensi
el
ajuste de sincronizacion del reso rte de l tirahilos 9
el torn i
llo
Menos tension
fl
(3
5 a 10
mm.
de
tension
guide 0 du
et
tou rner le
mm.
med
ia del
de fijacion 0 y
de tension
@
is
0 .
de
fil.
ressort du releveur se
guid
e 0
du
ressort du releveur de fi
tope
del tirahilos 0 , de spues de
girar
Ia guia del resorte del tirahilos
on del
tro
uve au
aflo
hilo
normal.
l.
jar el
0 .
0.
- 22 -
Page 26

11m
To
Stop
the
Needle Bars
lim
Abschalten einer Nadelstange [L T2-B845, 8848, 8875]
[OJ
Arret
HDl
Para que dejen
des barres a aiguille (droite
de
funcionar las barras
(right
and left) [LT2-8845, 8848, 8875]
et
gauche) [L T2-B845, 8848, 8875]
de
Ia aguja (de
[L T2-8845, 8848, 8875]
1.
To
stop
operation
1.
Operation d'arret des barres a
of
the
needle
Needle stop
Nadelstopp
Arret de l'aiguille
Parada de aguja
bar/1.
aiguille/1.
--
Abschalten der Nadelstangen/
Para
que dejen de funcionar las barras de aguja
Ia
derecha y
(1)
To stop operation
Move the stop
(1)
Abschalten der lin
Den Abschalthebel 0 auf
(1)
Operation d'arret de
Placer le levier 0 d'arret sur
(1)
Para
que deje de funcionar
izquierda:
Ia
Mover
lever 0
ken
palanca de detencion 0 hacia
de
Ia izquierda)
of
the left needle bar:
to
the
"L"
position.
Nadelstange:
"L"
stellen.
Ia
barre a aiguille gauche:
Ia
position
Ia
barra de aguja de
L.
Ia
posicion
Ia
"L".
0
Push
Drucken
Pousser
Oprimir
Needle stop
Nadelstopp
Arret
de
Parada de aguja
0
•
l'aiguille
(2)
To stop operation
Move the stop
(2)
Abschalten der rechten Nadelstange:
Den Abschalthebel 0 auf
(2)
Operation d'arret de
Placer le levier 0 d'arret sur
(2)
Para
que deje de funcionar
Mover
Ia
palanca de detencion 0 hacia
(3)
To resume twin-needle sewing:
Pnss
the push lever
its original position automatically.
*The
stop lever
but
it
is better
temporarily with the thread take-up lever at its highest
position.
(3)
Nahen
mit
Den Hebel e drucken. Der Abschalthebel 0 springt
automatisch in die
* Der Abschalthebel kann wahrend des Betriebs betatigt wer-
den.
Es
wird
jedoch empfohlen, zuerst die Maschine anzuhal-
ten und den Fadenabnahmehebel ganz nach oben
(3)
Enfin faire
Appuyer sur le bouton poussoir
0 revient a
*La
manipulation du levier d'arret peut etre effectuee pendant
que
Ia
machine fonctionne, mais il est preferable de
apres avoir arrete
ressort de passe-til sur
(3)
Para
volver a coser con las des agujas:
Ia
Empujar
0 volvera
*La
palanca de detencion puede moverse incluso con
maquina
una vez que
palanca del tirahilos en
palanca de empuje
su
en
funcionamiento, perc
Ia
of
the right needle bar:
lever 0
can
be
to
beiden Nadeln:
Ia
couture avec les aiguilles jumelees.
sa
position initiale automatiquement.
Ia
posicion original de forma automatics.
maquina
to
the
"R"
position.
"R"
stellen.
Ia
barre a aiguille droite:
Ia
position
Ia
barra de aguja de
e.
The stop lever 0
moved while the machine is operating,
do
so
by
first stopping the machine
Ausgangsstellung zuruck.
e,
machine temporairement an
sa
position
se
haya parade temporal mente con
su
posicion mas alta.
e.
Ia
La
es
R.
Ia
Ia
posicion
will
then return
ensuite
le
levier d'arret
plus haute.
palanca de detencion
mejor realizar el ajuste
derecha:
"R".
zu
stellen.
le
faire
pla~ant
to
le
Ia
Ia
-23-
Page 27

2.
Number
2.
Bestimmung der Stichzahl
2.
Tableau fixant le nombre de points
2.
Numero de puntadas: para una rapida referencia
of
stitches: quick-reference guide
No.
of
Stichzahl
Nombre
Numero
Sewing angle
Niihwinkel
Angle
Angulo
Sewing angle
Nahwinkel
Angle
de
couture
Angulo
de
costura
Stitches
de
points
de
puntadas
2
3
4
5 4.8 3.5
6
7 3.7 2.5
8
40°
40°
de
couture 40°
de
costura
400
30°
/
/
/ /
4.4
/
4.0 2.9 2.3
3.0
2.2
de
4QO
No. of stitches 6
Stichzahl 6
Nombre
Numero
50°
60°
/
/
3.5
4.6
2.8
3.4
2.2
2.7
1.9
1.6
2.0
1.7
/
de
points: 6
de
puntadas: 6
70°
80°
4.6
3.8 3.2
3.0 2.5
2.3 1.9 1.6
1.8 1.5 1.3
1.5
1.3
v v
lL'
/ / /
/
goo
2.1
110°
100°
2.7
2.2 1.8
1.8
1.5
1.3
/ / / /
/
/ / / /
/
/
/
/
/
/ / / /
1200
/
/
1.2
130°
1.5
/ /
/ /
v
/
1400
1.1
~
For 1/4" needle
©Determine
The number
[Example]
For a sewing
~
Nadelabstand: 1/4":
©Fur
ein schones Aussehen beim Ecknahen kann die Stich lange aus der untenstehenden Tabelle bestimmt werden.
Die unterschiedliche
[Beispiel]
Bei einem Nahwinkel von
~
Avec un ecartement entre aiguiles de 1/4"
©Determiner
Le
nombre de points de l'aiguille exterieure varie en fonction de l'angle a coudre et de l'ecartement des points.
[Exemple]
Avec une couture
~
Para
© Determinar
[Ejemplo]
Para
un ancho de aguja de 1/4 de pulgada:
El
numero de puntadas de
un angulo de costura de 40° y largo de puntada de 2,9
width:
the sewing pitch from the chart below
of
stitches
angle
Ia
longueur des points selon le tableau ci-dessous afin d'obtenir de beaux points d'angle.
a
Ia
distancia entre puntadas con el cuadro anterior para realizar costuras perfectas en las esquinas.
of
the outer needle varies according
of
40°
and a sewing pitch
Stichzahl zwischen der auBern und inneren Nadel hangt vom Nahwinkel und der Stichlange ab.
40°
und einer Stichlange von 2,9
40°
et un ecartement entre points de 2,9 mm, le nombre de points devient
Ia
aguja exterior cambia segun
to
make beautiful corner stitching.
of
2.9 mm, the number
mm
Ia
combinaci6n del angulo de costura y de
mm,
to
the combination
of
stitches becomes
betragt der Sitchzahlunterschied
el numero de puntadas sera
of
sewing angle and sewing pitch.
6.
6.
6.
Ia
distancia entre puntadas.
6.
-24-
Page 28

STANDARD ADJUSTMENTS
STANDARDEINSTELLUNGE
REGLAGES
AJUST
III
Adjustment of
III
Einstellung des Nadel- und Transporteurgleichlaufs
III
Synchronisation des aiguilles
III
Ajuste de
ES
STANDARD
the
Needles and Feed-Timing
Ia
sincronizaci6n de las agujas y
N
et
de l'entrainement
Ia
alimentaci6n
Reference line
Referenzlinie
Ligne de reference
Linea de referencia
1. Remove
2.
Tilt
3.
Turn
4.
While
bed,
5.
Return the machine head
1. Die
2. Das Maschinenoberteil
3.
Die Riem enscheibe drehen, b
4.
Die obere Riemenwelle festhalten
Wellenlage rgehause ausrichten
5. Das Maschine
1.
Enlever les a
2. Basculer
3.
Tourner Ia
4.
Le
Inst
5.
Remettre Ia tete de
1.
Guitar
2.
lnclinar
3.
Hacer
4.
Mientras
referencia en
5.
Colocar
the needles.
the machine head back and remove the
the machine
holding
and
attach the
Nad
eln entfernen.
Ia
bras superieur
aller
Ia
las agujas.
Ia
cabeza de
girar
se sostiene el arbol s
Ia
cabeza de
pulley
the
upper
nob
erteil
iguill
es.
tete de
poulie de
etant
courroie
Ia
polea de
Ia
plancha de
until
shaft so
timing
belt 0 .
to
umkippen
wieder
Ia
machine vers
Ia machine a fin
immobile, aligner
de
synch r
Ia
machine en place et install er les aiguill
Ia
maquina
Ia
maquina
Ia
maquina
(LT2-8841]
timing
the
"A"
mark is aligned
that
it
won't
move,
its origina l posi tion, and install the needles.
und
den Gleichlaufriemen 0 en tfernen.
is
die Markierung
und
den Pfeil
und
den Gleichlaufriemen 0 anbringen.
zuruckstellen
onisation
hacia atras y
uperior
montaje
de nuevo en su posicion
und
l'ar
rie
re
que
le rep ere
Ia flech e s
0 .
hasta
que
para
que
del brazo, y colocar
belt 0 .
with
align the
"A"
auf
die Nadeln einsetzen.
et enlever
quitar
Ia marca
no
se
arrow
mit
dem
der
unt
eren Riemenscheibe 6
Ia courroi
"A"
so it aligne
ur
Ia poulie inferieure de
Ia corr
ea
"A"
mueva, a
linear
Ia
correa sincronizadora 0 .
orig
the red
se
dot.
on
the
rot en Punk! ausgerichtet ist.
e de sync
evec
es.
sincronizadora 0 .
encuentre alineada
Ia
flecha en
inal e instalar las agujas.
lowe
r belt pulley 6
hronis
le trait rouge.
courroie
Ia
polea de Ia correa
(LT2-8842 , 8845,
(L
T2-8872, 8875] Red dot
with
the reference line
mit
der entsprechenden Linie
ation 0 .
6 avec le repere
con
el
punto
rojo.
inferior
8847
, 8848]
on
the arm
auf
su
r le socle du bras.
6 con
Ia
linea de
dem
-2
5 -
Page 29

[2)
Adjustment
121
Einstellung der Nadei-Greifersynchronisierung
[2)
Synchronisation des aiguilles
[21
Ajuste de
1.
Needle
1.
Abstand zwischen den Nadeln und den Greiferspitzen
1.
Distance entre l'aiguille
1.
Separacion entre
to
of
the
Needles and Rotary Hook Timing
et
du crochet
Ia
sincronizacion de las agujas y cangrejos
rotary hook
Ia
aguja y
point
et
Ia
gap
pointe du crochet
Ia
punta del cangrejo
rotatif
rotatif
Rotary hook point
Greiferspitze
Pointe du crochet rotatif
Punta del cangrejo i
(1)
Loosen
screws®,@,©,@,
points is
(2)
Tighten screw
(3) Firmly tighten screws
Note
*Tighten
Also, be sure not
(1) Die Schrauben
Greiferplatte
(2) Die Schraube@ festziehen und
einstellen.
(3) Nach abgeschlossener Einstellung die Schrauben
Hinweis
*Die
Schraube © festziehen,
Am
(1) Desserrer les
les aiguilles et les pointes du crochet rotatif soit de
(2) Resserrer
0,05 mm.
(3)
Serrer fermement les vis
Remarque
* Serrer
Veiller aussi a ne pas modifier
(1)
Aflojar los tornillos
agujas y las puntas del cangrejo
(2)
Apretar
(3)
Apretar firmemente los tornillos
Nota
1 - 3 mm.
@,
and then turn adjustment screw 8 until the needle
®,
screw © so that the rotating hook shaft gear e lightly touches plate
to
change the position
®,
@, © und@
0 auf 1 - 3
Greiferrad e darf die Position der Schraube © nicht verandert warden.
vis®,@,©,@,
Ia
vis@,
puis tourner
Ia
vis © de
el
fa~on
tornillo@
®,
@,
y girar
a
* Apretar el tornillo © para que
Se
debe tener cuidado de no cambiar
Needle
Nadel
Aiguille
Aguja
and shift the rotary hook base 0 right or left until the clearance between the needles and rotary hook
@,
and © when the adjustment is completed.
of
the screw stop
losen, um den Abstand zwischen den Nadeln und den Greiferspitzen durch Verschieben der
mm
einzustellen.
mit
der Einstellschraube 8 den Abstand zwischen der Nadel und der Greiferspitze auf 0,05
®,
so
daB das Greiferrad e die Platte e Ieicht beruhrt.
et deplacer
Ia
®,
@ et © lorsque le reglage est termine.
ce
que l'engrenage de l'arbre du crochet rotatif e effleure
Ia
©,@
y mover
el
tornillo de ajuste 8 hasta que
el
Ia
base du crochet rotatif 0 vers
vis de reglage 8 jusqu'a
position de
sea
®,
@ y © cuando
engranaje de eje de cangrejo e toque ligeramente
Ia
butee de
Ia
base del cangrejo 0 a
de 1 - 3 mm.
Ia
posicion de
for
@ and © wieder richtig festziehen.
1 a 3
ce
que
Ia
Ia
separaci6n entre
se
haya completado
Ia
parada de tornillo del
®
0
to
rotary hook point gap is 0.05 mm.
e.
set screw ©
mm.
Ia
distance entre l'aiguille et
vis d'arret © de l'engrenage
Ia
derecha y a
Ia
droite ou
el
of
gear
e.
Ia
gauche jusqu'a
Ia
Ia
izquierda hasta que
Ia
aguja y
tornillo
Ia
Ia
de fijaci6n © del engranaje
ajuste.
ce
que
Ia
distance entre
Ia
pointe du crochet rotatif soit de
plaque
e.
e.
Ia
separaci6n entre las
punta del cangrejo
placa
e.
sea
de 0,05 mm.
mm
e.
-26-
Page 30

2.
Clearances between rotary hooks and needle plate
2.
Abstande zwischen Greifer und Stichplatte
2.
Distance entre crochets rotatifs
2.
Separacion entre los cangrejos y Ia placa de Ia aguja
et
plaque a aiguille
0
0
* Loosen the screws
0 are 0.6
-0.9
8,
mm.
and raise
or
lower the rotary hooks 0 until the clearances between the rotary hooks 0 and the needle plate
* Die Schrauben 8 losen und die Hohe der Greifer 0 so einstellen, daB die Abstande zwischen den Greifern 0 und der Stich platte
0,6 - 0,9
* Desserrer les vis 8 et relever ou abaisser les crochets rotatifs 0 jusqu'a
Ia
plaque a aiguille
* Aflojar los tornillos 8 y levantar o bajar los cangrejos 0 hasta que
entre 0,6 y 0,9
3.
Needle Bar Lift Stroke and Height
3.
Einstellung des Nadelstangenhubs und der Nadelstangenhohe
mm
betragen.
G)
mm.
®
de 0,6 a 0,9 mm.
®
ce
que I' on ait une distance entre les crochets rotatifs 0 et
Ia
separaci6n entre los cangrejos 0 y
Ia
placa de
I I
l I
,,
Needle height
Nadelhohe
Ia
aguja
(H)
G)
este
G)
Needle clampNadelhalter
* Insert the needle clamp all the way into the needle bar.
*
Den
Nadelhalter ganz in die Nadelstange hineinschieben.
-27-
0
0
Page 31

Stitch length
Stich lange
Needle height
Nadelhohe
(H)
(H)
2
-3
mm
LT2-B841
3
-5
mm
LT2-B842
-3
2 mm
-5
2.4 mm
-3
LT2-B845
I
3 mm
-5
I
-7
LT2-B847
-1
2
2.0
LT2-B848
-1
mm
mm
Stitch length
Stich lange
Needle height
Nadelhohe
(H)
(H)
-3
LT2-B872
I
-5
3
2.4
-3
mm
mm
I
LT2-B875
-5
I
-7
Needle bar height (LT2-8841, 8842, 8847, 8872)
(1)
Set the feed adjustment dial
(2)
When the needle bar 0 is in its lowest position, the needle position reference
of
bottom edge
bar with the bottom edge
the needle bar support
to
the
"0"
position.
0.
Loosen the set
of
the needle bar support
screw~.
and align the needle position reference
0.
line®
of
the needle bar must
be
aligned
line®
with
of
the needle
Needle bar lift stroke
(1)
Turn the feed-adjustment dial to 2
(2)
When the needle bar 0 is H mm
aligned with the bottom edge
bar is
Loosen the three set screws
(3)
When the rotary hook point is aligned
1.5
hook point is 1 -
mm.
or
3.
(2.4
mm
or
2.0
of
the needle bar.
8,
and align the rotary hook point with the needle center.
with
mm) above its lowest position, needle position reference line
At
this time, the rotary hook point must
the needle center, confirm that the space between the top
"b"
of
be
aligned with the needle center.
of
the needle eye and rotary
the needle
(Model LT2-8845, 8848, 8875)
Remove the set screw
needle eye is 1 - 1.5 mm.
CD
turn the needle clamp screw
CD,
and adjust so that the space between the rotary hook point and the top
Nadelhohe (LT2-8841, 8842, 8847, 8872)
(1)
Die
(2)
Einstellung
(1)
(2)
(3)
Transporteinstellscheibe auf
Wenn die Nadelstange 0 in der untersten Position steht,
ausgerichtet sein. Losen
buchse
0 auszurichten.
des
Nadelstangenhubs
Die
Transporteinstellscheibe auf
Wenn die Nadelstange 0 H mm
Unterkante der Nadelstangebuchse ausgerichtet sein.
Der
Greifer kann auf die Nadelmitte eingstellt werden, wenn die drei Schrauben 8 gelost werden.
Wenn der Greifer auf die Nadelmitte ausgerichtet ist, kontrollieren, ob der Abstand zwischen der oberen Seite des Nadelohrs und
dem Greifer 1 - 1,5
mm
Sie
betragt.
"0"
stellen.
die Schraube
"2
oder 3" stellen.
(2,4
mm oder
mull
GD,
urn die Bezugslinie ® der Nadelstange
2,0
mm)
die Bezugslinie
Ciber
der untersten Position steht, muB die Bezugslinie
Der
Greifer
mull
®mit
auf die Nadelmitte ausgerichtet sein.
der Unterkante der Nadelstangenbuchse 0
mit
der Unterkante der Nadelstangen-
"b"
(Modell L T2-8845, 8848, 8875)
Oer
Abstand zwischen der oberen Seite des Nadelohrs und dem Greifer kann eingestellt werden, wenn die Schraube
die Einstellschraube
CD
am Nadelhalter gedreht wird.
CD
entfernt und
mit
of
the
the
der
-28-
Page 32

3.
Course
3.
Altura y recorrido
et
hauteur
®
de
releve-barre d'aiguille
de
elevaci6n de
®
Pince-aiguille
Mensula
de
aguja
Ia
barra
de
agujas
~
Plus haut
Superior
,
..
I I
~I
Hauteur de l'aiguille
Altura
de
Ia
aguja
0
[H)
0
* lntroduire
* lntroducir
Longueur du
Longitud de
Hauteur de
Altura de
Longueur du
Longitud de
Hauteur de
Altura de
Hauteur
(1) Tourner le bouton de reglage de l'entrainement en position
(2)
Lorsque
alignee
position de l'aiguille @ de
Course
(1) Tourner le bouton de reglage de l'entrainement sur
(2)
Lorsque
d'aiguille
du crochet
Desserrer les trois vis G et aligner
(3) Lorsque
l'aiguille et
point
Ia
puntada
l'aiguille
Ia
aguja
point
Ia
puntada
l'aiguille
Ia
aguja
de
l'aiguille (LT2-8841, 8842, 8847, 8872)
Ia
barre a aiguille 0 est a
avec le bord inferieur du logement 0 de
(H)
(H)
(H)
(H)
Ia
et hauteur
Ia
barre a aiguille 0 est H
"b"
de
Ia
barre a aiguille est alignee avec le bord inferieur du logement de
rotatif
doit
etre alignee avec le milieu de l'aiguille.
Ia
pointe du crochet rotatif est alignee avec le milieu de l'aiguille, verifier que l'espace entre le
Ia
pointe du crochet rotatif est de 1 a 1,5
le
pince-aiguille a fond dans
Ia
mensula de aguja hasta
LT2-B841
-3
2
mm
sa
barre a aiguille avec le bord inferieur du logement 0 de
-5 -3
3
mm
LT2-B872
-3
position
mm
Ia
I
Ia
(2,4
mm
pointe du crochet rotatif avec le milieu de l'aiguille.
LT2-B842 LT2-B845 L T2-B847 L T2-B848
2
mm
-5
plus basse,
Ia
ou 2,0
Ia
barre a aiguille. Desserrer
Ia
position
mm)
au-dessus de
mm.
(Modele L T2-8845, 8848, 8875)
Retirer
Ia
vis
CD,
du chas de l'aiguille
tourner
Ia
vis
CD
soit
du pince-aiguilles et regler de telle
compris entre 1 et 1,5 mm.
Ia
barre a aiguille. .
el
fondo de
-5
2,4
mm
"0".
ligne-repere de position
facton
Ia
barra de agu)as.
-3
3
mm
-3
3
mm
2,4
mm
Ia
vis de reglage
"2"
ou
"3".
sa
position
Ia
que l'espace entre
-7
LT2-B875
1
d'aiguille@
Ia
barre a aiguille.
Ia
-5
Gi>,
Ia
barre a aiguille.
plus basse,
pointe du crochet rotatif et le
I
de
Ia
barre a aiguille
et aligner
Ia
ligne-repere de position
Ace
moment-la,
sommet
2
mm
mm
-7
doit
Ia
du chas de
sommet
-1
-1
2,0
Ia
ligne-repere de
etre
pointe
-29-
Page 33

Altura de
(1)
Colocar
(2)
Cuando
debe
de
Recorrido de elevacion de
(1)
(2)
(3)
Ia
aguja (LT2-8841, 8842, 8847, 8872)
el
dial
de
ajuste
de
Ia
Ia
barra de agujas 0 esta
de
estar alineada con
referencia de posicion
el
borde inferior del soporte de
de
Ia
Ia
Hacer girar
Cuando
posicion de
cangrejo debe de estar alineada con
con
Cuando
de aguja y
el
dial de ajuste de
Ia
barra de agujas 0 estil H mm
Ia
aguja
"b"
de
Ia
barra de agujas esta alineada con
el
centro
de
Ia
Ia
punta del cangrejo este alineada con
Ia
aguja.
punta del cangrejo
(Modelo L T2-8845, 8848, 8875)
Sacar
el
tornillo de fijacion
del cangrejo y
Ia
CJ),
girar
el
parte superior del ojo de
alimentacion
en
su
aguja ® de
en
posicion mas baja,
Ia
barra de agujas con
barra de agujas
Ia
alimentacion a
(2,4
mm o 2,0
el
es
tornillo
centro de
1 -
de
el
1,5
fijacion de
Ia
aguja
Ia
centro de
mm.
Ia
posicion
Ia
aguja. Aflojar los tres tornillos de fijacion
Ia
sea
"0".
Ia
linea
de
Ia
barra
posicion
mm)
Ia
abrazadera de aguja
1 - 1,5 mm.
referencia
de
agujas
el
"2" o "3".
per
encima de
el
borde inferior de
aguja, confirmar que
4.
Clearances between rotary hooks and bobbin
de
posicion de
0.
Aflojar
el
tornillo
borde inferior del soporte de
su
posicion mils baja,
Ia
barra de agujas.
el
espacio entre
CD,
yajustar
de
openers
*Adjust
4.
* Durch Losen der Schraube
the clearances between the rotary hooks 8 and the
bobbin
case
openers
case
openers
arrow) by loosening screw
opener
G)
to the right
G)
G)
have fully retracted in the direction
Abstand zwischen Greifer und Spulenkapselhebel
Spulenkapselhebels
und den Spulenkapselhebeln 8 auf ungefahr
len (bei ganz in
selhebel
G)).
G)
den Abstand zwischen den Greifern 8
Pfeilrichtung zuruckgestelltem Spulenkap-
Ia
aguja
®de
de
fijacion
En
8,
y alinear
Ia
parte superior del agujero
modo que
to about
or
0.2
CD
and moving the bobbin
left.
CD
und durch Verschieben des
Ia
0,
Ia
barra de agujas
Ia
linea de referencia de
este estado,
Ia
punta del cangrejo
el
espacio entre
mm
(when the bobbin
barra de agujas
y alinear
Ia
Ia
punta de
Ia
linea
punta
case
of
case
0,2
mm
einstel-
0.
the
4.
Distance entre les crochets rotatifs
*Regier
4.
* Ajustar las separaciones entre los cangrejos 8 y los abridores de las cajas de
les distances entre les crochets rotatifs 8 et les ouvertures des boites a cannette
le logement de
de
Ia
boite a cannette
Ia
boite a cannette est rentre entierement dans le sens de
G)
vers
Ia
droite ou
Separacion entre los cangrejos y los abridores de las cajas de
abridores
abridor de
de
las cajas de
Ia
caja
de
Ia
Ia
bobina
bobina
G)
G)
hacia
et
les ouvertures des boites a cannette
Ia
gauche.
esten total mente plegados
Ia
derecha o hacia
en
el
Ia
izquierda.
Ia
sentido
fleche
Ia
G)
en
desserrant
Ia
bobina
bobina
G)
de
Ia
flecha) aflojando
pour qu'elles scient de
Ia
vis
CD
et
en
deplacer le logement
a aproximadamente
el
tornillo
0,2
0,2
mm
CD
y moviendo
mm
lorsque
(cuando los
el
-30-
Page 34

~
Adjustment of the
~
Einstellung der StoffdruckerfuBhohe
~
Reglage de
131
Ajuste de
Ia
Ia
altura del pie del prensatelas
Presser
Foot Height
hauteur du pied de biche
1.
Loosen the screw
2.
Remove the face plate.
3.
Raise
the presser foot E) by using the presser foot lifter
4.
Loosen screw 8 and raise
the presser
plate.
*
Be
careful not to turn the presser bar
1.
Die Schrauben 0 losen.
2.
Die Frontabedeckung entfernen.
3.
Den
StoffdruckerfuB E)
4.
Die Schraube 8 losen und die Stoffdruckerfuhrung
einstellen, daB dar Abstand zwischen dam StoffdruckerfuB
und dar Stichplatte ungefahr 7 mm betragt.
E)
0.
or
lower the presser guide
foote
will rise to about 7 mm above the needle
0.
mit
dem Hebel e anheben.
so
e.
that
so
* Die Stoffdruckerstange 0 nicht drehen.
7
mm
1.
Desserrer les vis
2.
Enlever
3.
Relever le pied de biche E) par le relevage manuel
4.
Desserrer
de
Ia
Ia
plaque a aiguille.
* Bien faire attention a
1.
Aflojar et tornillo
2.
Ouitar
Ia
placa delantera.
3.
Levantar
4.
Aflojar
de
el
el
tornillo 8 y levantar o bajar
Ia
placa de agujas.
* Poner cuidado para no hacer girar
0.
plaque avant.
Ia
vis 8 et relever ou abaisser le guide du pied de biche afin que le pied de biche E)
ne
pas tourner
Ia
barre du pied de biche
0.
pie del prensatelas E) utilizando
Ia
guia del prensatelas para que
Ia
barra del prensatelas
e.
0.
el
levantador del pie del prensatelas
el
pie del prensatelas 8
0.
e.
se
releve d'environ 7
se
levante unos 7
mm
mm
por encima
au-dessus
-31-
Page 35

~
Adjustment of the
~
Einstellung der Transporteurhohe
~
Reglage de
~
Ajuste de
1.
Turn the pulley until the feed dog 0 rises to the highest position.
2.
Loosen screw
1.
Durch Drehen der Riemenscheibe den Transporteur 0 ganz nach oben stellen.
2.
Die
Schraube
steht.
1.
Tourner
2.
Desserrer
au-dessus de
1.
Girar
2.
Aflojar
mm por encima de
Ia
Ia
polea hasta que
el
tornillo
Ia
Ia
altura
f)
and raise
f)
losen und den Transporteurhalter
poulie de
Ia
vis
f)
relever
Ia
plaque a aiguille.
f)
y levantar o bajar
Feed
Dog
hauteur
Ia
Ia
placa de
des
del
alimentador
or
lower the feed dog holder
machine jusqu'a
ou
abaisser le support
el
alimentador 0 quede levantado a
Ia
agujas.
Height
griffes
f)
so
f)
so einstellen,
ce
que les griffes 0 soient a leur position
f)
des griffes de telle sorte que les griffes 0
el
sujetador del alimentador
that the feed dog 0 wi
daB
der Transporteur 0 ungefahr 1,0 mm uber der Stichplatte
Ia
posicion mas alta.
f)
para que
II
rise to about
el
alimentador 0
Ia
plus haute.
se
1.0
m m above the needle plate.
se
relevant d'environ 1,0 mm
levante aproximadamente
1,0
-32-
Page 36

IQI
How
to Change Gauges
IQI
Austauschen verschiedener Teile
IQ)
Comment changer les jauges
IQI
Como cambiar
Turn the power switch off.
Die Stromzufuhr ausschalten.
Couper l'alimentation electrique a
Desconectar
Remove the slide plate.
Den
Deckel
Ouvrir les plaques coulissantes.
Abrir las placas corredizas.
Remove the needle.
Die
Nadeln herausziehen.
Enlever
Ouitar
Remove the needle clamp.
Die
Nadelklemme abnehmen.
Retirer le pince-aiguille.
Desmontar
los
Ia
corriente.
abnehmen.
les
aiguilles.
las
agujas.
Ia
mensula de aguja.
calibradores
3
Ia
machine.
Raise
the presser foot by using the
presser foot lifter.
Den
StoffdruckerfuB mit dem Hebel
anheben.
Relever le pied de biche par le
relevage manuel.
Levantar
utilizando
del prensatelas.
Remove the presser foot.
Den
Enlever le pied de biche.
Ouitar
el
pie del prensatelas
el
levantador del pie
StoffdruckerfuB abnehmen.
el
pie del prensatelas.
5
Remove the needle plate.
Die
Stichplatte entfernen.
Retirer
Ia
Ouitar
6
Remove the
Den
Enlever
Ouitar
7
plaque a aiguille.
Ia
placa de agujas.
feed
Transporteur entfernen.
les
griffes
el
alimentador
dog.
-33-
Page 37

®
@
Adjusting the rotary hook
base
* Make the following adjustment when replacing the current
gauge with one wider. The feed dog cannot
adjustment is not made. Loosen screws
and shift the rotary hook base right
or
®,
left.
installed
@,
©,
if
this
and @,
be
Einstellung der Greiferplatten
* Wenn die Lehre gegen eine breitere ausgetauscht wird, muB
die folgende Einstellung gemacht werden, weil sonst der
Transporteur nicht angebracht werden kann. Die Schrauben
®,
@,
© und @ losen und die Greiferplatten seitlich
verschieben.
Reglage
des
bases
du
crochet rotatif
* Proceder aux reglages suivants tors du remplacement
posees si
vers
Ajuste de
* Realizar
hace
ce
reglage n'est
Ia
gauche.
Ia
base
el
siguiente ajuste cuando
este ajuste. Aflojar los tornillos
pas
effectue. Desserrer les
del cangrejo
se
cambia
®,
vis®,@,©
el
calibrador actual por uno mas amplio.
®,
© y @ y mover
de
Ia
jauge d'origine par une plus large.
et @. et deplacer
Ia
base
del cangrejo hacia
Les
les
bases du rochet rotatif vers
El
alimentador no
griffes
Ia
se
derecha o hacia
puede instalar si no
ne
peuvent pas etre
Ia
droite
Ia
izquierda.
ou
se
-34-
Page 38

Order
Reihenfolge
Ordre
Orden
What to do
Einstellungen
Marche a suivre
Metodo
Attach the needle clamp.
Die Nadelhalter anbringen.
Fixer le
pince-aiguille.
el
Colocar
1
Attach the needle.
Die Nadeln einsetzen.
Fixer les aiguilles.
Colocar las aguias.
2
Attach the feed dog.
Den
Transporteur anbringen.
Fixer les griffes.
3
Colocar
el
sujetador de aguja.
alimentador.
* Loosen screw 0 and align the needles so that the needles
holes in the feed dog.
* Die Schraube 0 losen und die Nadeln ausrichten, so daB sie in der Mitte der Nadellocherdes
Transporteurs stehen.
* Desserrer
d'aiguilles dans les griffes.
* Aflojar
agujas
Feed
Transporteur
Griffes
Alimentador
Ia
vis 0 et aligner les aiguilles de sorte qu'elles tombent
el
tornillo 0 y alinear las agujas para que bajen
en
el
alimentador.
Long groove
Longe Nut
Longue gorge
Ranura larga
dog
will
fall in the centers
en
los centres de los orificios de
of
the needle
au
centre des trous
Adjustment
Einstellung des Nadelstangenhubs.
Reglage
reh!ve-barre a aiguille.
Ajustar
barra de agujas.
4
Return the machine head
al
position.
Das
8asculer
Volker
5
of
needle bar
Ia
hauteur et
el
recorrido de elevacion
Machinenoberteil aufklappen.
Ia
t~te
Ia
vers l'arriere.
cabeza
a su posicion original.
lift
Ia
course du
to
its origin-
stroke.
de
Needle bar down position
Tiefe Nadelstangenstellung
Position basse de
barre a aiguille
Posicion baja de
barra de agujas
Ia
Ia
@
884138842
8872
8847-2.0
2.4
mm
mm
8845}8875
8848-2.0
2.4
t
When the needle bar is in its lowest position, the needle position reference
bar is aligned with the bottom edge
When the needle bar is 2
of
the needle bar is aligned with the bottom edge
rotary hook point must be aligned with the needle center.
Wenn die Nadelstange in der untersten Position steht, muB die 8ezugslinie
Unterkante der Nadelstangenbuchse ausgerichtet sein.
Wenn die Nadelstange 2 oder
mit
der Unterkante der Nadelstangenbuchse ausgerichtet sein. Der Greifer muB auf die
Nadelmitte ausgerichtet sein.
Ia
Lorsque
de
Lorsque
de position
Ia
l'aiguille.
Cuando
aguja®
Cuando
referencia de posicion de
buje de
centro
barre a aiguille est a
Ia
barre a aiguille doit etre alignee avec le bord inferieur du logement de
Ia
barre-aiguille est 2 ou 2,4 mm au-dessus de
barre a aiguille.
d'aiguille@
Ia
barra de agujas esta
de
Ia
barra de agujas esta alineada con
Ia
barra de agujas esta 2 mm o
Ia
barra de agujas.
de
Ia
aguja.
Ace
or
2.4
2,4
de
Ia
barre a aiguille est alignee avec le bord inferieur du logement de
moment,
Ia
aguja@ de
En
of
mm
sa
en
este estado,
the needle bar bushing.
above its lowest position, needle position reference
mm uber der untersten Position steht, muB die Bezugslinie@
position
Ia
pointe du crochet rotatif doit etre alignee avec le milieu de
su posicion mas baja,
2,4
Ia
barra de agujas esta alineada con
of
the needle bar bushing.
Ia
plus basse,
mm
Ia
punta de cangrejo debe
Ia
ligne-repere de position d'aiguille@
sa
position
Ia
el
por encima de
linea de referencia de posicion de
borde inferior del buje de
su
posicion mas baja,
line®
Ia
plus basse,
el
de
estar alineada con
of
At
this time, the
Ia
barre-aiguille.
Ia
Ia
barra de agujas.
borde inferior del
mm
mm
the needle
line@
®
mit
der
ligne-repere
Ia
linea de
Ia
el
-35-
Page 39

Move the rotary hook base.
Die Greiferplatten verschieben.
Deplacer les bases du crochet rotatif.
Ia
Mover
base del cangrejo.
6
Clearance between rotary hooks and
needle.
Abstand zwischen den Greifern und
der
Stichplatte.
Distance entre les crochets rotatifs et
7
Ia
plaque a aiguille.
Separacion entre los cangrejos y
aguja.
Rotary hook timing and needle height.
Greifereinstellung und Nadelhohe.
Synchronisation des crochets rotatifs
et
de
Ia
Sincronizacion del cangrejo y de
altura de
8
hauteur d'aiguille.
Ia
aguja.
Shift the rotary hook base to the approximate position (within 1 - 3 mm).
* The rotary hook base will
Tighten screw@, and turn the adjustment screw until the needle to rotary hook gap is 0.05
mm. After adjustment,
Die Greiferplatte in die ungefahre Position (innerhalb 1 - 3 mm) schieben.
* Die Greiferplatte laBt sich nur verschieben, wenn die Schrauben
werden.
Die Schraube
der Einstellschraube auf 0,05
Schrauben
Amener
*
La
base du crochet rotatif
Serrer
crochet rotatif
® et
Mover
Ia
*
La
base del
Ia
Apretar el tornillo @ y girar el tornillo de ajuste hasta que
punta del cangrejo
@y©.
@ festziehen und den Abstand zwischen der Nadel und der Greiferspitze
®,
® und © wieder richtig festziehen.
Ia
base du crochet rotatif sur
Ia
vis@
et tourner
so
it
de 0,05 mm. Lorsque le reglage est termine, serrer fermement les vis
©.
base del cangrejo a una posicion cercana (de aproximadamente 1 - 3 mm).
cangr~o
not
move unless screws
firmly
tighten screws
mm
einstellen. Nach abgeschlossener Einstellung die
Ia
ne
bougera pas
Ia
vis de reglage jusqu'a
no
se
movera a menos que
sea
de 0,05 mm. Despues del ajuste, apretar firmemente los tornillos
position approximative
si
les vis
®,
®,
® and
®,
®,
ce
que
se
aflojen los tornillos
®,
©.
© et @ ne sont pas desserrees.
Ia
®
Rotary hook point
G reiferspitze
Pointe du crochet rotatif
Punta del cangrejo
Ia
© and @ are loosened.
®, ®,
© und @ gelost
(1
- 3
mm
de tolerance).
Ia
distance entre l'aiguille et
®,
separacion entre
®,
Ia
aguja y
© y
mit
le
®,
@.
Ia
®,
Return the head to its original position.
Das
Maschinenoberteil wieder zuruckstellen.
Remettre
Volver
a colocar
posicion original.
9
Attach the needle plate.
Die Stichplatte anbringen.
Fixer
Ia
1 0
11
Colocar
Attach the presser foot.
Den StoffdruckerfuB anbringen.
le pied de biche.
Fixer
Colocar
Ia
tete en place.
Ia
cabeza
plaque a aiguille.
Ia
placa de agujas.
el
prensatelas.
en
Adjustment screws
@
Einstellschraube
Vis de reglage
Tornillos de ajuste
su
Loosen the three set screws
Der Greifer kann auf die Nadelmitte eingestellt werden, wenn die Schrauben 8 gelost werden.
Desserrer
l'aiguille.
Aflojar los tres tornillos 8 de fijacion, y ali near
---z=======5""--
--------------::----
--------------
les trois vis 8 de reglage et aligner
8,
and align the rotary hook point
Ia
pointe du crochet rotatif avec le milieu de
Ia
punta de cangrejo con
Rotary hook point
0 Pointe du crochet rotatif
Greiferspitze
Punta del cangrejo
with
the
el
centro de
Needle center
Nadelmitte
Centre
Centro
0
\ • Down position
\If.,---•
,_
__
....,...
LT2-B841t
LT2-B842
L T2-B845 2.4
LT2-B872
LT2-B875
LT2-B847)L T2-B848 2.0
0.05
mm
nee~le
center.
Ia
aguja.
de l'aiguille
de las agujas
Tiefstellung
Position basse
Posicion inferior
mm
mm
End
Ende
Fin
Final
-36-
Page 40

[
TROUBLESHOOTING
Be
sure
to check
the
following
before
GUIDE
calling
an
]
authorized
service
station.
Problem
1.
Sewing machine pulley does
2.
Needle thread
3.
Seams d
on'
t match.
and
bobbin thread break.
n't
turn
Where
to
check
(page)
•
Is
.
a breaker or fuse blown?
• Is
the
power
cord disconnected?
• Is the needle
•
Is
the needle tip blunt?
•I
s the needle properly installed? (p.13)
•
Is
the machine proper
•
Is
the rotary hook prop erly lubricated? (p.1 1)
• Is dust
•I
s the presser
• Is the feed dog
• Is the
•
Is
the V-belt tension
tip
bent?
or
thread in the rotary
foot pressur
bobb
too
in scratched?
ly
threaded? (p.16 and 1
hoo
e too weak? (p.18)
low? (p.32)
too
low?
(p.B)
7)
k?
4.
Skipped stitches
5. Poor
thread
6. Broken
needles
tight
ening
• Is the needle t
• Is the needle properly installed?
• Is the presser foot pressure
• Is the machine properly threaded? (p.16 and 17)
• Is the needle tip blunt?
• Is
the sewing speed
• Is the thread take-
•I
s the needl
• Is the
• Is the machine properly threaded? (p.16
• Is the needle tip bent?
• Is the needle tip blunt?
Does the needle pass t
•
e thread tensi
bobbin
ip
bent?
too
weak? (p.18)
too fast?
up
spring operating range too small? (p.21)
on
scratched?
and/or bobbin thread tension too
and
he
center
of
the needle hole in the feed dog?
17)
low
? (p.19)
Caution
If problems 2 to 6 above
If the pr
oblem per
sists,
are
turn
not
due
the
to the
power
cause
off and
on
consult
the
right, check
your
the need
dealer
le
and
.
feed
-37-
timing,
or the
needle
and
rot
ary
hook tim
ing
.
Page 41

~
FEHLERSUCHE
]
PrOfen Sie bei einer
1. Die Riemenscheibe
2.
Der
Ober-oder
3.
Die Nahte sind nich aufeinander ausgerichtet.
Storung
Unterfaden bricht. • Verbogene Nadelspitz
bitte
Storung
dreht
sich nicht. • Durchg ebrannter
die
folgende
n Punkte bevor Sie einen Reparaturdienst
PrOfung
• Nicht angeschlossenes Netzkabel?
• Stumpfe
• Falsche Nadelmontage (Seite
• Falsch eingefadelte Maschine (Seite 16
• Falsch geschmierte r Greifer (Seite
• Greifer verstaubt oder anhaftende Fadenreste?
• Zu schwacher StoffdruckerfuBdruck (Seite
• Zu
tiel
• Zerkratzte Spul
• Zu gering Keilriemenspannung (Seite 8)?
eingestellter Transporteur (Seite 32)?
Unterbrecher bzw. Sicherung?
e?
Nadelspitze?
e?
13)?
ruf
11
en.
)?
und
17)?
18)?
4.
Obersprungene Stich
-
~
5.
Schlechte Fadenspannung
... _
~
6. Nadelbruch
J
.,_
•
Verbogene Nadelspitze?
• Falsche Nad
• Zu geringer StoffdruckerfuBdruck (Seite
• Falsch eingefadel
•
Stump
• Zu hohe Nahgeschwindigkeit?
•
Zu
geringer Bewegungsbereich der Fadenabnahmefeder (Seite
• Zu
geringe
• Zerkratzte Spu le?
• Falsch eingefadelte Maschine (Seite 16 und 17)?
• Verbogene Nadelspitz
•
Stumpfe
• Nadel richtig auf di e Lochmitte des Transporteurs ausgerichtet?
elmontage?
te
fe Nadelspitze
Nadelspitze?
Maschine (Seite 16 und 17)?
Ober- bzw. Unterfadenspannung (Seite 19)?
e?
18)?
21
)?
Hinweis
Falls sich
zwischen Nadel
konnen,
die
obenstehenden
und
die
Maschine ausschalten
Transport
Storungen
eur, bzw. Nadel
2 bis 6
und
den Reparaturdien st benachrichtigen.
nicht
und
mit
den rechts aufgefOhrten PrOfungen beheben lassen,
Greifer
kontrollieren.
Falls
die
Storung
-38-
en a
uch
danach n
die
Synchronisation
icht
behoben
werden
Page 42

[ RECHERCHES DE
PANNES]
Verifier
1. La poulie
2.
3.
les
points
de
Le til de
Le coutures
l'aiguille
suivants
avant
Probl
Ia machine a co
et le til
ne corr
espondent pas.
de faire appel a
eme
udre ne
de
Ia
cannette cassent.
tourne
pas.
un
centre
de
reparation agree.
Points a
• Y a-t-il
• Le cordon d'alimentation est-it debranche?
•
•
• L'aigui
• L'enfilage de
• Le crochet
• Y a-t-il
•
• La griffe
•
•
un
coupe-circuit
La
pointe
La
La
La cannette es
La
de
pointe
de
lle es
rotatif
de
Ia
pressi
on
d'entrainement est-elle placee tr
tension
de
ou
un fusible
l'a
iguille
l'aigui
t-elle correctement montee? (page 13)
Ia
poussilire
du
est-elle
lle est-elle emoussce?
machine est-it correct? (page 16 et
est-it correctemen t lubrifie? (page
ou
du
presseur est-elle
t-elle rayee?
Ia courroie trapezoidale est-elle
verifier
(page)
grille?
tor
due?
ti l dans le crochet ro
trop Iaib
ie? (page 18)
op
bas? (page 32)
trop Iaibi
17)
11
tatif
)
?
e?
(page
B)
4.
La machine saute des points.
5.
Mauvai
se
tension
de
6.
Aiguilles cassees
til.
• La pointe de
• L'a
iguille est-e
•
La press
• L'enfilage de Ia machine est-it correct? (page 16 et 17)
•
La
pointe
La
vit
•
•
La
plage
(page 22)
•
La
tension
(page 19)
• La cannette est-elle raye
• L'enfil
• La pointe
• La pointe
• L'aiguille depasse-t-elle le ce
ment?
l'aiguille
ion
du
de
l'ai
esse de couture est-elle trop
de
fonctionn
de
til
age
de
Ia machine est-il correc
de
l'aiguille est-elle tordu
de
l'aiguille est-elle
est-elle tordue?
lle correctement montee?
presseur est-elle tr
guill
e est-elle emoussee?
eme
nt
du
ressort
d'aiguille
ou
Ia tension de fit de cannette est-elle
e?
emoussee?
ntre du
op
Iaibie? (page 18)
rapide?
de
passe-fit est-elle
t?
(page 16 et 17)
e?
trou d'ai
guille
de
tro
p cou rte?
trop
Ia
griffe d'entraine-
Iaibie?
Attention
Si l
es
prob
l'e
ntrainemen
contacter
lemes 2 a 6 ci-dess us
t ou
un
Ia synchr
concessionnaire.
ne
sont pas
onisation de l' aig
uill
du
e et du
s a Ia cause
croc
het
ind
iquee a droite,
rota
tif
. Si le
probleme
-39-
verifier
n'es
Ia
synchron
isation de l
t pas resolu, coupe r !
'aiguil
le et de
'alimentation
et
Page 43

[
GUIA
Se
recomienda verificar los siguientes
PARA
LA
LOCALIZACION
punt
os antes de acudir
DE
a un ce
FALLAS
ntr
o de servicio autorizado.
]
1.
La
polea de Ia maquina de coser
2. El
hilo
de
Ia aguja y el
3.
Las costuras no encajan.
Problema
hilo
del
bobinador
no gir
a.
estan rotos.
Verificar
•
tEl ruptor
•
tEl
• t
La
• t
La
• t La aguja
• ( La
•(EI c
•
tHay polvo o
• t La
•tEl alimentador
• t La
• ( La tension de Ia correa trapezoidal estl
o el fusib le estan
enchufe esta desconectado?
punta de Ia aguja est a doblada?
pun
ta de Ia aguja est a mellada?
es
t a
co
r recta
maquina
angrejo esta corr
pr
bob
esta correctamente enhebrad
hilo
esion
del prensatelas es demasiado debil? (pagina 18)
ina est a ray ad
men
ectamente lu bricado? (pagina 1
en el cangrejo?
est<i
demasiado baj
a?
(paginal
quemado
te instal ada? (pagina 13)
o?
s?
a?
(pagi n
as
16 y 17)
1)
(pagina 32)
i demasiado debil? (pagina 8)
4.
Se
saltean puntadas.
5.
El
hilo no esta bien apretado.
6.
Agujas rotas
J
.,_
• t La
punt
• t La aguja esui bien instalada?
•
tLa
•
tLa
• t La punta de Ia aguja
• t La ve locidad
•tEl resorte del
• t La tensi
debiles? (pagina 19)
• t
• (La maquina esta correctamente enh ebrad
• t La punta de
• i La punta de
• (
a de Ia aguja est a doblada?
presion del prensatelas
maquina esta correctamente enhebrad
de
Ia costura
tirahilo
on
del hilo
La
bobina
est a rayada?
Ia agu
a p
Ia aguja
asa
por
La aguj
es
dem
es
t a mellada?
es
demasia
s tiene una
en
Ia aguja y Ia tension del hila
ja
es
t a
do
blada?
es
t a mellada?
el centro del
asiado debil? (pagina 18)
do
gama mu
orificio
a?
(pagi nas 16 y 1
rapida?
y pequena? (pagina
en
Ia
a?
(paginas 16 y 17)
de
Ia aguj
a en el a
71
bob
ina son muy
limentador?
221
Precauci6n
Si los pr
al
su dis
oblemas
imentador
tribuidor.
, o
Ia
2 a 6 ant
sincronizac
erio
i6n
res
no
se deben a Ia cau
entre
Ia aguj
a y el cangrejo
sa
des
crit
a a
Ia
. Si todavia existe
derecha, veri ficar Ia sincroniza ci
un
problema
-40-
, desconect
6n ent
ar
Ia corri ente y cons
re Ia aguja y el
ul
tar con
Page 44

BROTHER
INDUSTRIES, L TO.
NAGOYA,
JAPAN
Printed in Japan/Gedruckt in
Japan/lmprime
au
Japon/lmpreso
1.18·841' 842, 845
847,848 .
192842-002
8708®
en Jap6n
 Loading...