

Page 1

hitelliF/iX(MUmi M
OWNER'S MANUAL
biXDthec
Page 2

Page 3

IMPORTANT NOTICE
INCLUDES
A Starter Roll
OFOUR NEW
Thekma/^
PLUSPAKH
IT ficis UHE PLAIN PAPER
ALSO USES STANDARD
FAX PAPER
This is to remind you that your
new Fax unit Includes a starter roll
of our new Therma PLUS Fax paper.
* feels like plain paper
* reduces print fading
(under normal filing conditions)
* easy to write on
* you can even use a highlighter
Remember, it is your choice to either use
Therma PLUS paper (Brother reorder #6890) or
to use standard Fax paper (Brother reorder #6825).
Page 4

IMPORTANT USER INFORMATION
The following operational information should be included in our Owner’s Manual.
— PLEASE READ BEFORE CONTINUING —
1) USING THE TAD INTERFACE FOR TELEPHONE ANSWERING MACHINE
HOOK-UP (ADDENDUM TO PAGE 9-5 FOR MODEL INTELLIFAX 600/
650M OWNER'S MANUAL).
In some cases, your fax may not be able to detect a phone call from a fax call until after your answering
machine has completely played the outgoing message. This is a standard telecommunication protocol and
not a product problem.
Therefore, the following procedure must be followed when you connect your fax with a telephone
answering device (TAD)....
STEP 1) The number of rings on your telephone answering device, if adjustable, should be set to its
lowest value (less than 4 rings).
STEP 2) The outgoing message on your telephone answering device, should be recorded at less than
20 seconds in length.
For best operation, we recommend a five second blank area in the beginning of the outgoing
message.
A calling fax unit will send a calling tone for only 35 seconds after it dials your telephone/fax number.
Therefore, in order for your telephone answering device to pick-up, the length of your outgoing message
plus the number of rings of your answering device should not exceed 35 seconds.
2) RADIO STATION INTERFERENCE (ADDENDUM TO PAGE 10-1 FOR
MODEL INTELLIFAX 600/650M OWNER'S MANUAL).
With the number of cellular phones and microwave towers, it is possible that you may experience radio
station noise while using your fax handset as a telephone (depending on your geographic location in
relation to these towers).
If you experience this handset noise, simply us the following information to FAX # (908) 469-4547.
* Your Name
* Address
* Phone Number
* Fax Number
* Explanation of the frequency problem
We will then immediately contact you with an easy, no cost solution for your location.
Page 5

YOUR BROTHER FAX REFERENCE SECTION
■ lntelMFAX600/650M FUNCTION SELECTION CHART
1. Press FUNCTION key, select function (1 -6).
2. Press SET.
3. Select sub-function (1-9).
4. Follow prompt message, if displayed.
Main Function
Selections
Funct.
NO.
Item
Description
Temp. Settings
1
2
Cancel Job
Print Reports
3
4 Set Auto Dial
Sub Function
Selections
Funct.
NO.
Item
Description
1
Contrast
Resolution
2
Overseas Mode
3
Not available
Act. Report
1
2 All Dial
Coverpage
3
Call Back Msg
4
User Options
5
Xmit Report
6
One-Touch Dial
1
Speed-Dial
2
Funct.
NO.
5
6
Main Function
Selections
User Options
Setup System
Funct.
NO.
1
2
3
4
5
6
7
8
9
1
2
3
4
5
6
Sub Function
Selections
Tone/Pulse
Ring Delay
Auto Redial
Speaker Volume
F/T Ring Time
Smoothing
Beeper
Coverpage
Ring Volume
Date/Time
Daily Timer
Interval
Station ID
Remote Code
SeLpbvcipagc
(only for
Intellifax650M)
Page 6
YOUR BROTHER FAX REFERENCE SECTION
The control pane] keys
A description of the control panel is shown on page 3-1.
Loading paper
Paper loading is described on page 2-2.
Connecting your fax to the telephone line.
The method for connecting the machine to a telephone line is described on page 2-5.
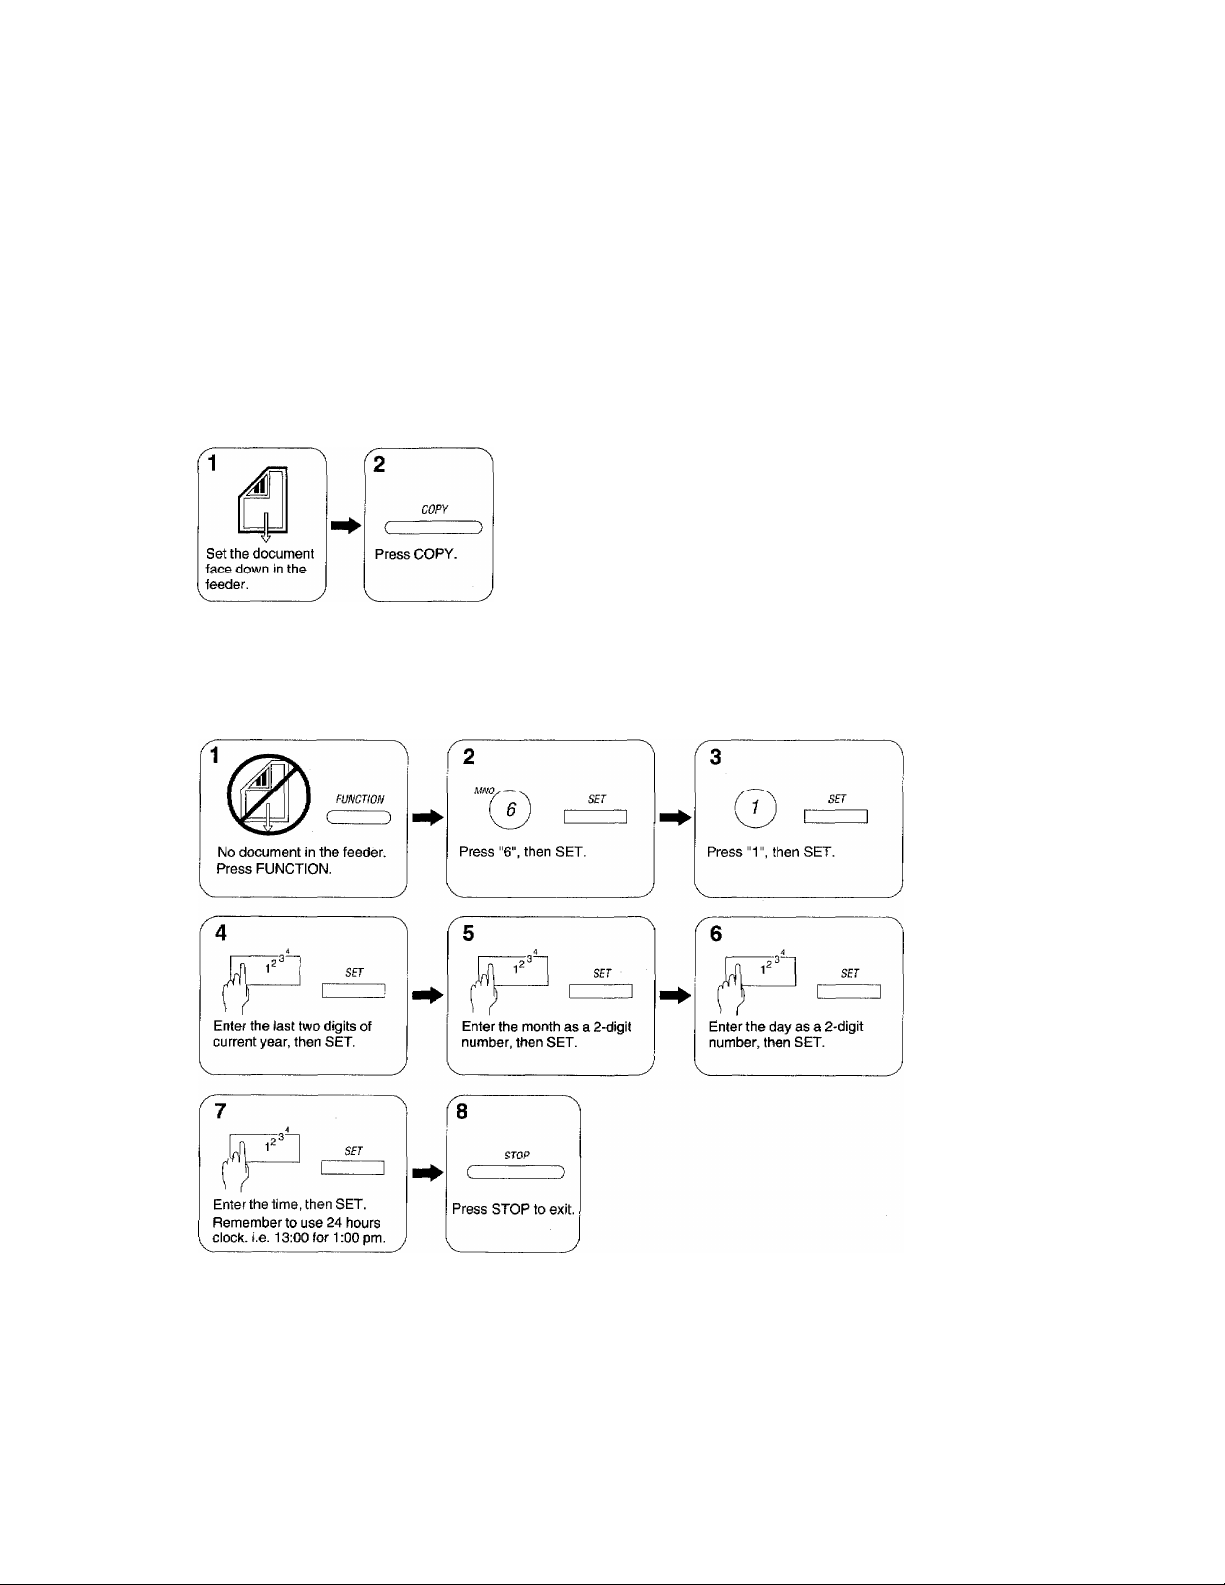
Making a copy
Setting the date and time
Page 7
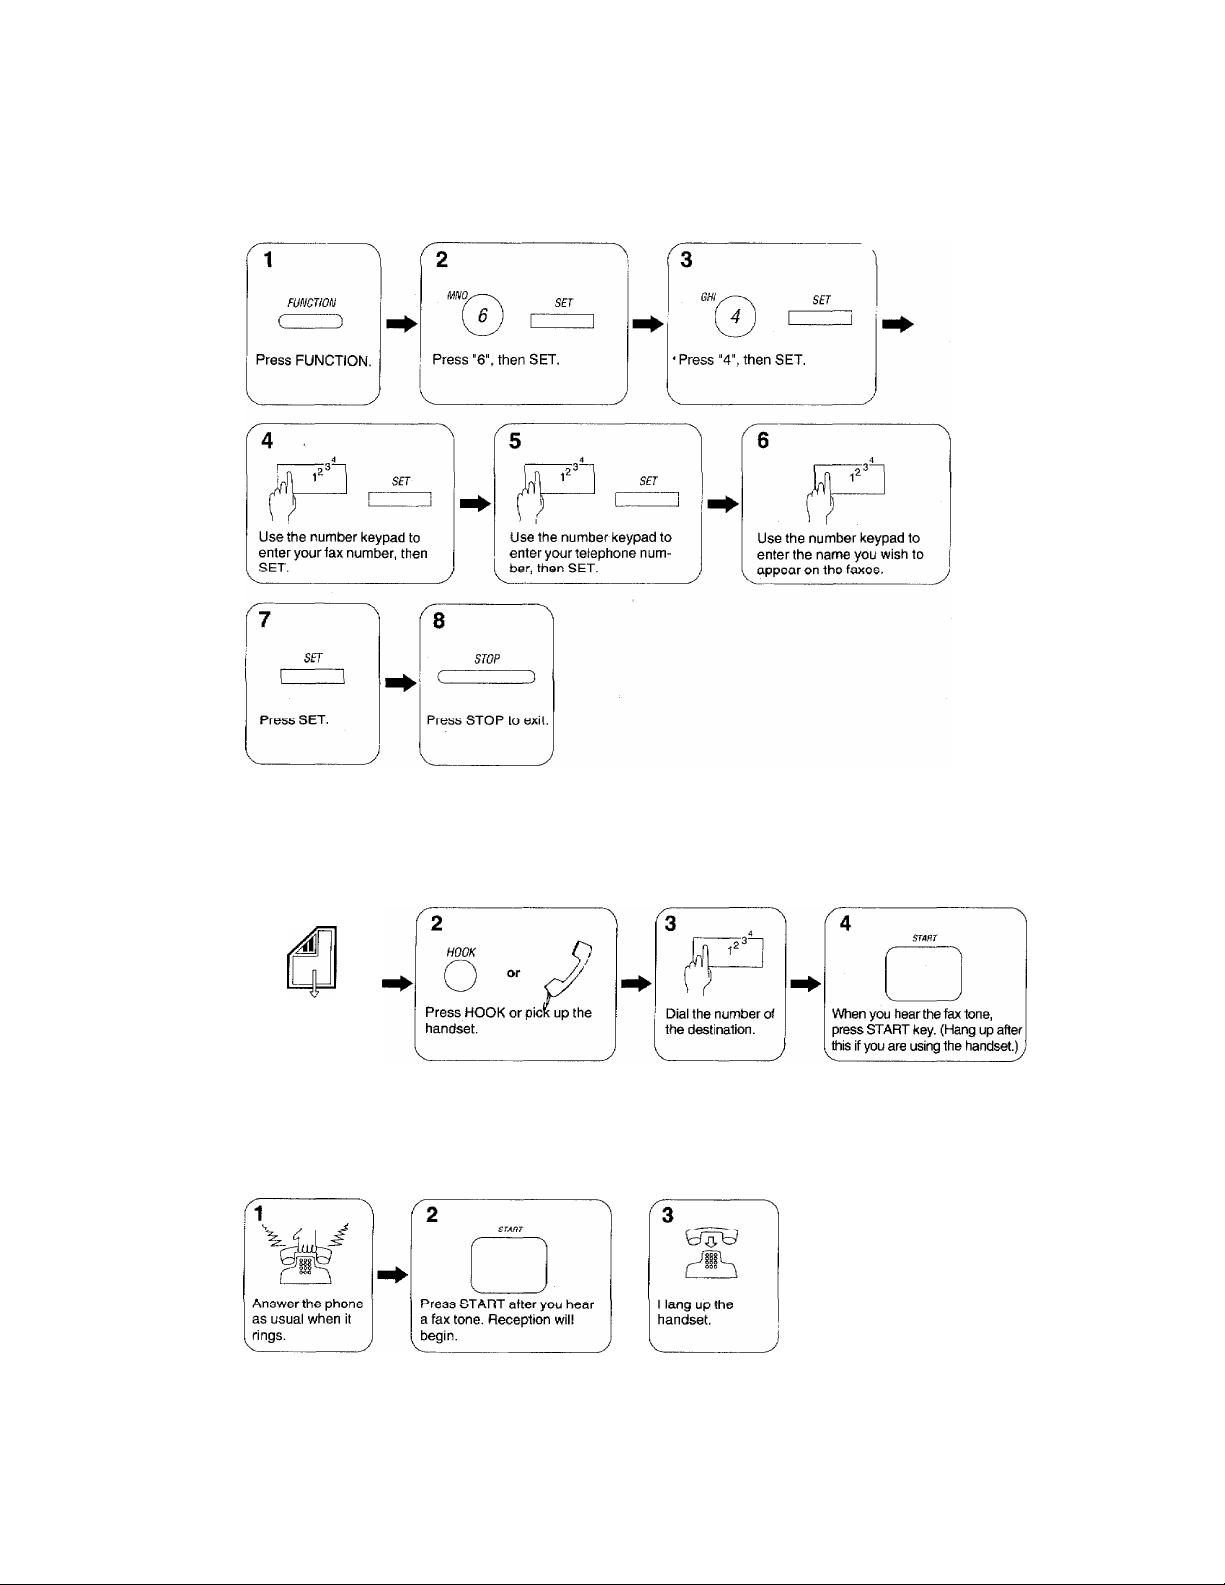
Registering the station ID
YOUR BROTHER FAX REFERENCE SECTION
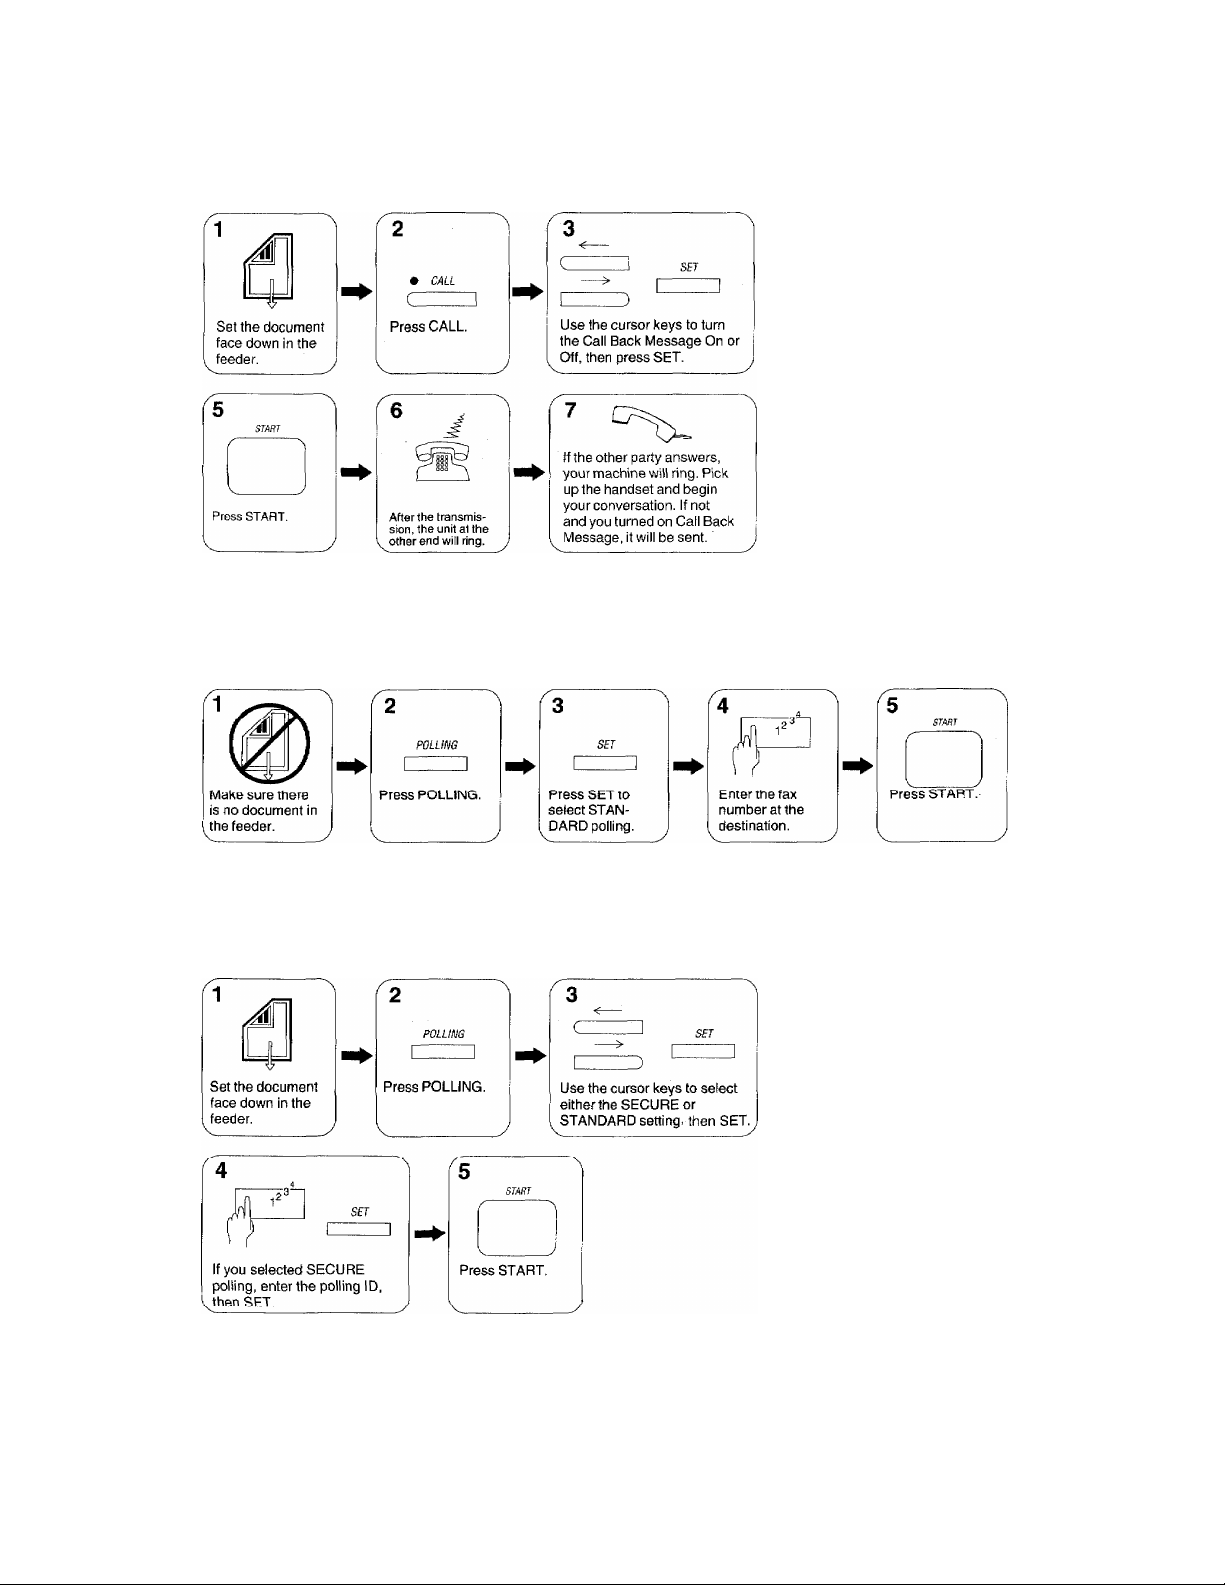
Sending a fax (Manual Transmission, No CNG tone will be sent.)
/^7
Set the document
face down in the
^eder.
Manual reception of faxes
Ml
Page 8
YOUR BROTHER FAX REFERENCE SECTION
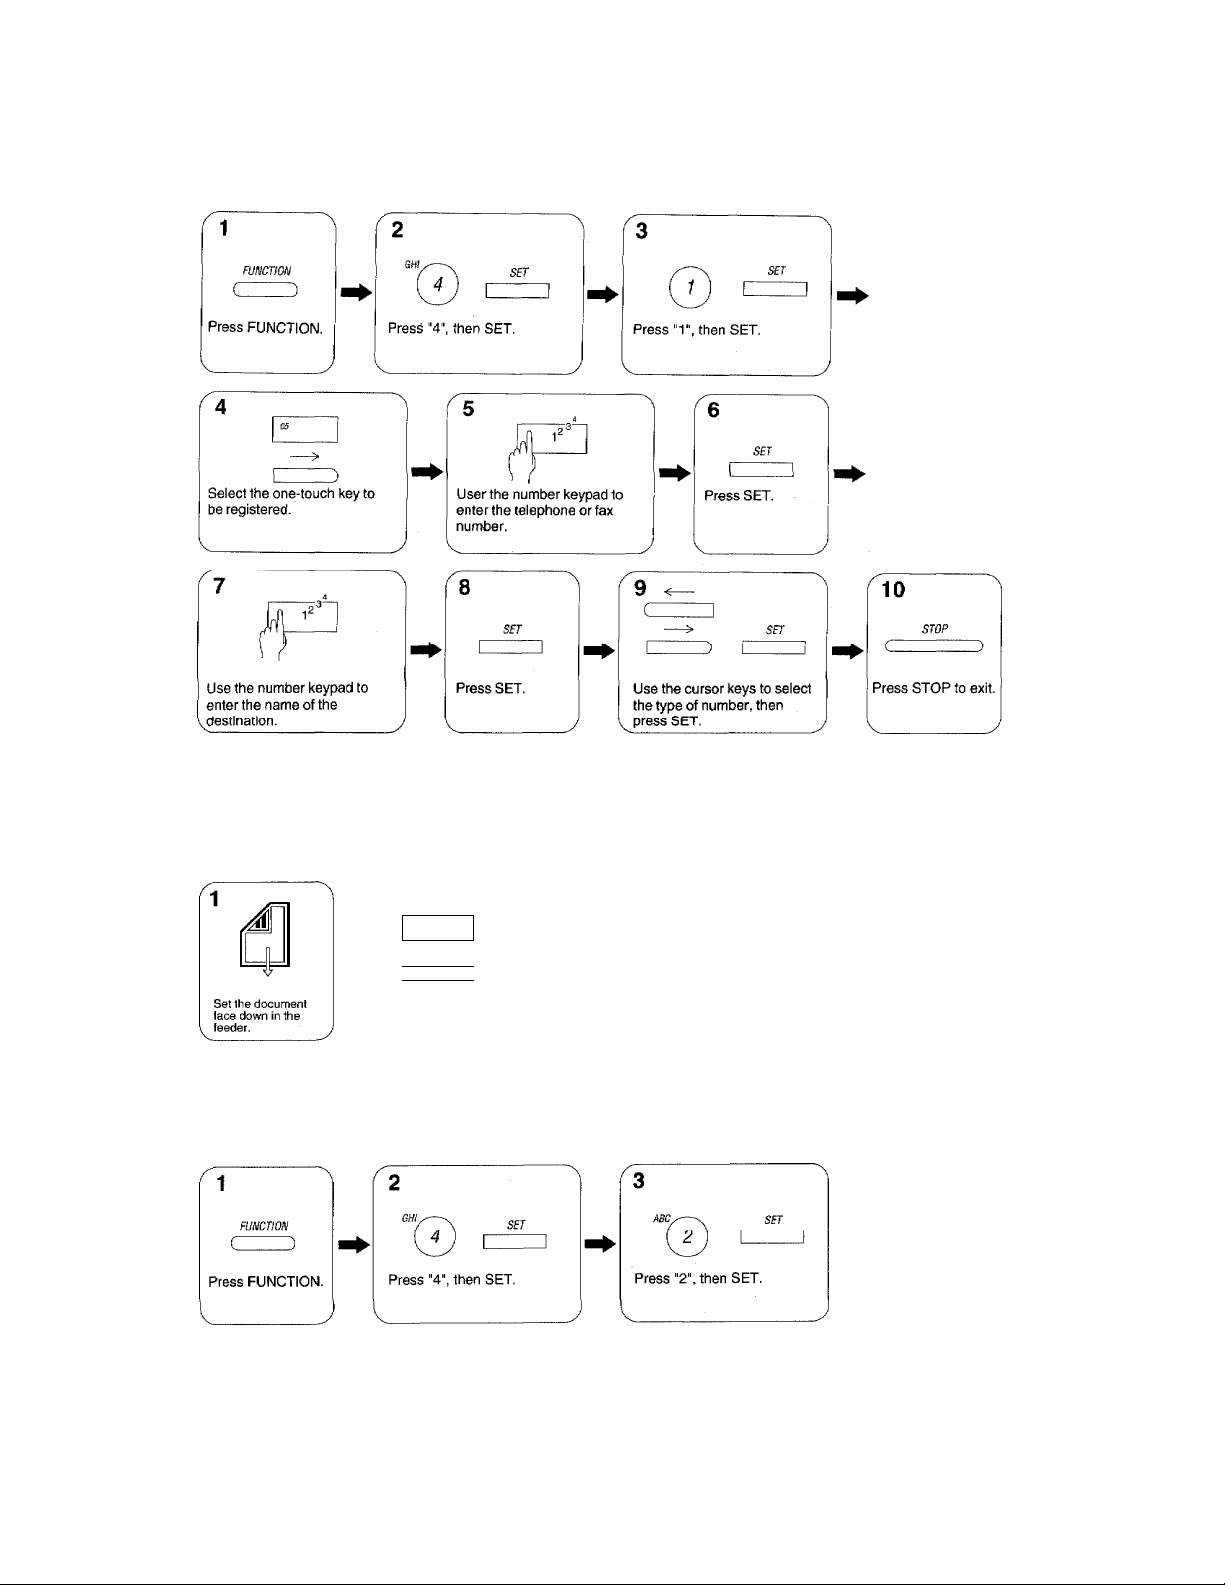
Registering one-touch numbers
Sending a one-touch fax
05
___
)
1
Press the onetouch number
1 keypad.
Registering speed-dial numbers
Press START.
IV
Page 9
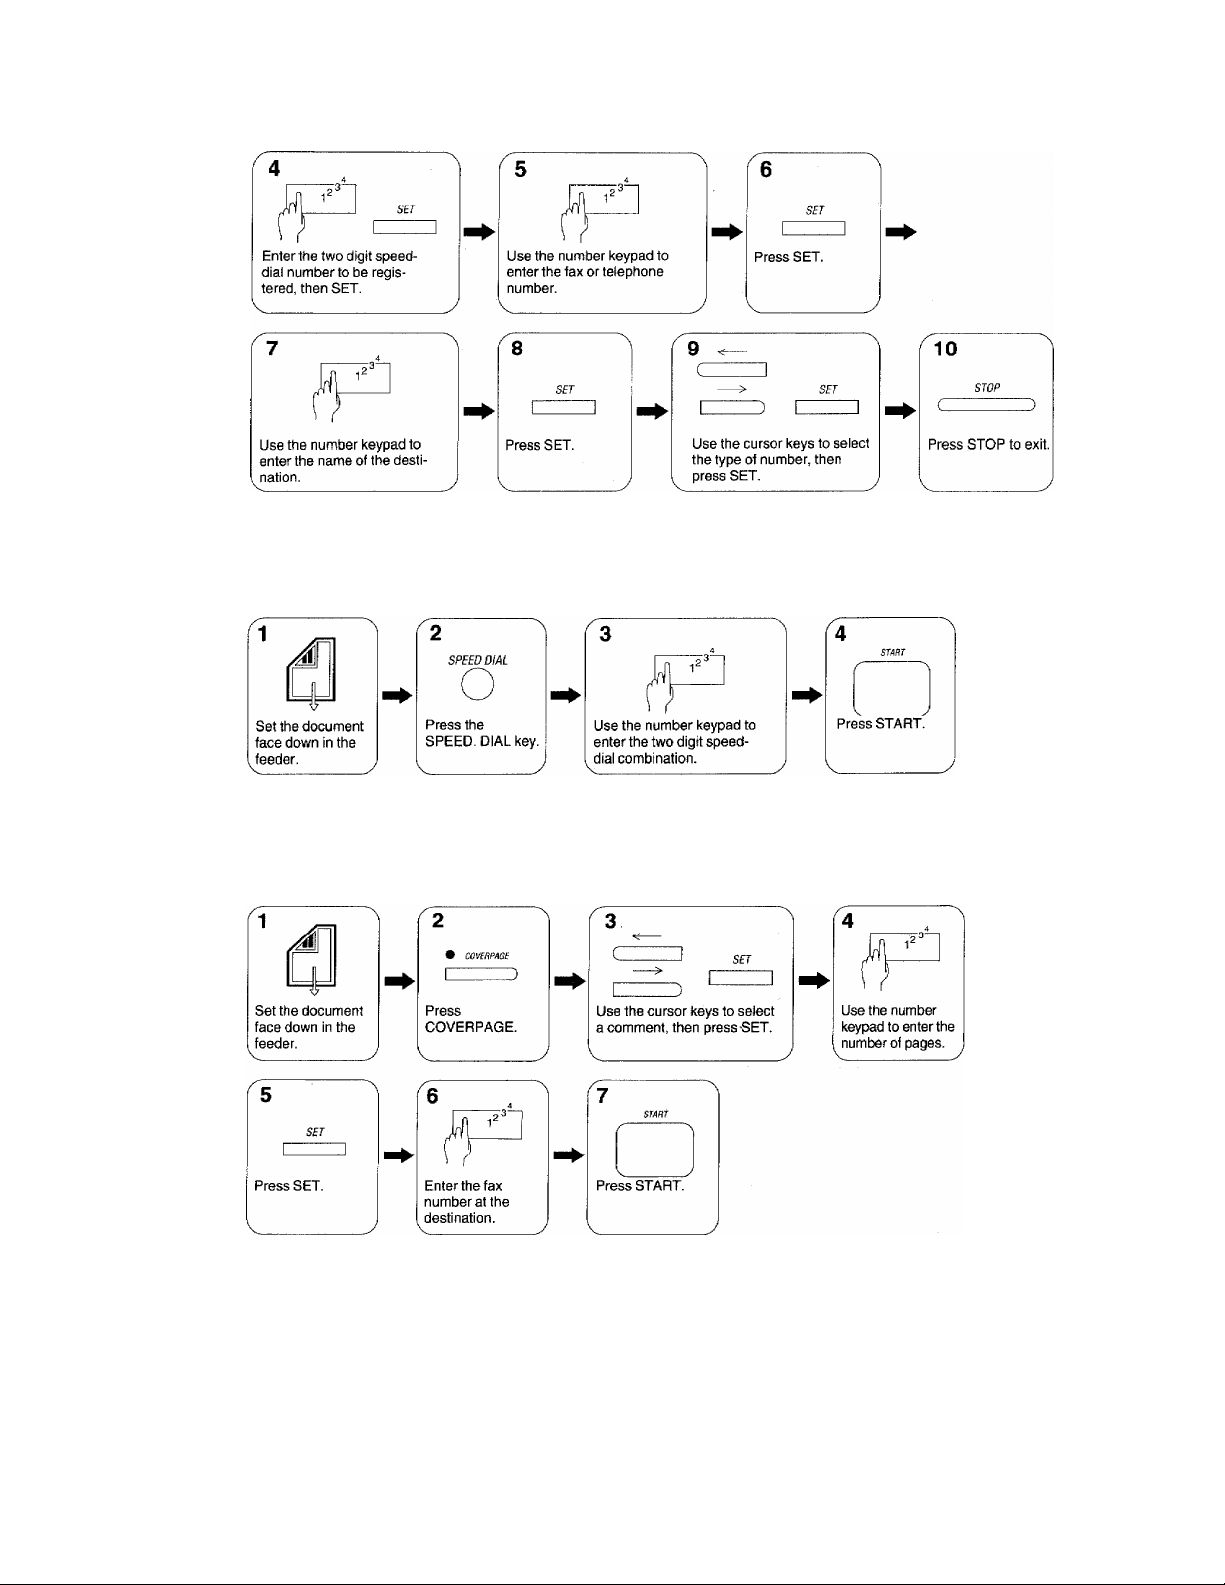
• Sending speed-dial faxes
YOUR BROTHER FAX REFERENCE SECTION
Sending a fax with a super COVERPAGE
Page 10
YOUR BROTHER FAX REFERENCE SECTION
Sending a fax with Call Reservation
Standard Polling
4
Enter the fax
number at the
destination.
• Setting a document to be polled
VI
Page 11
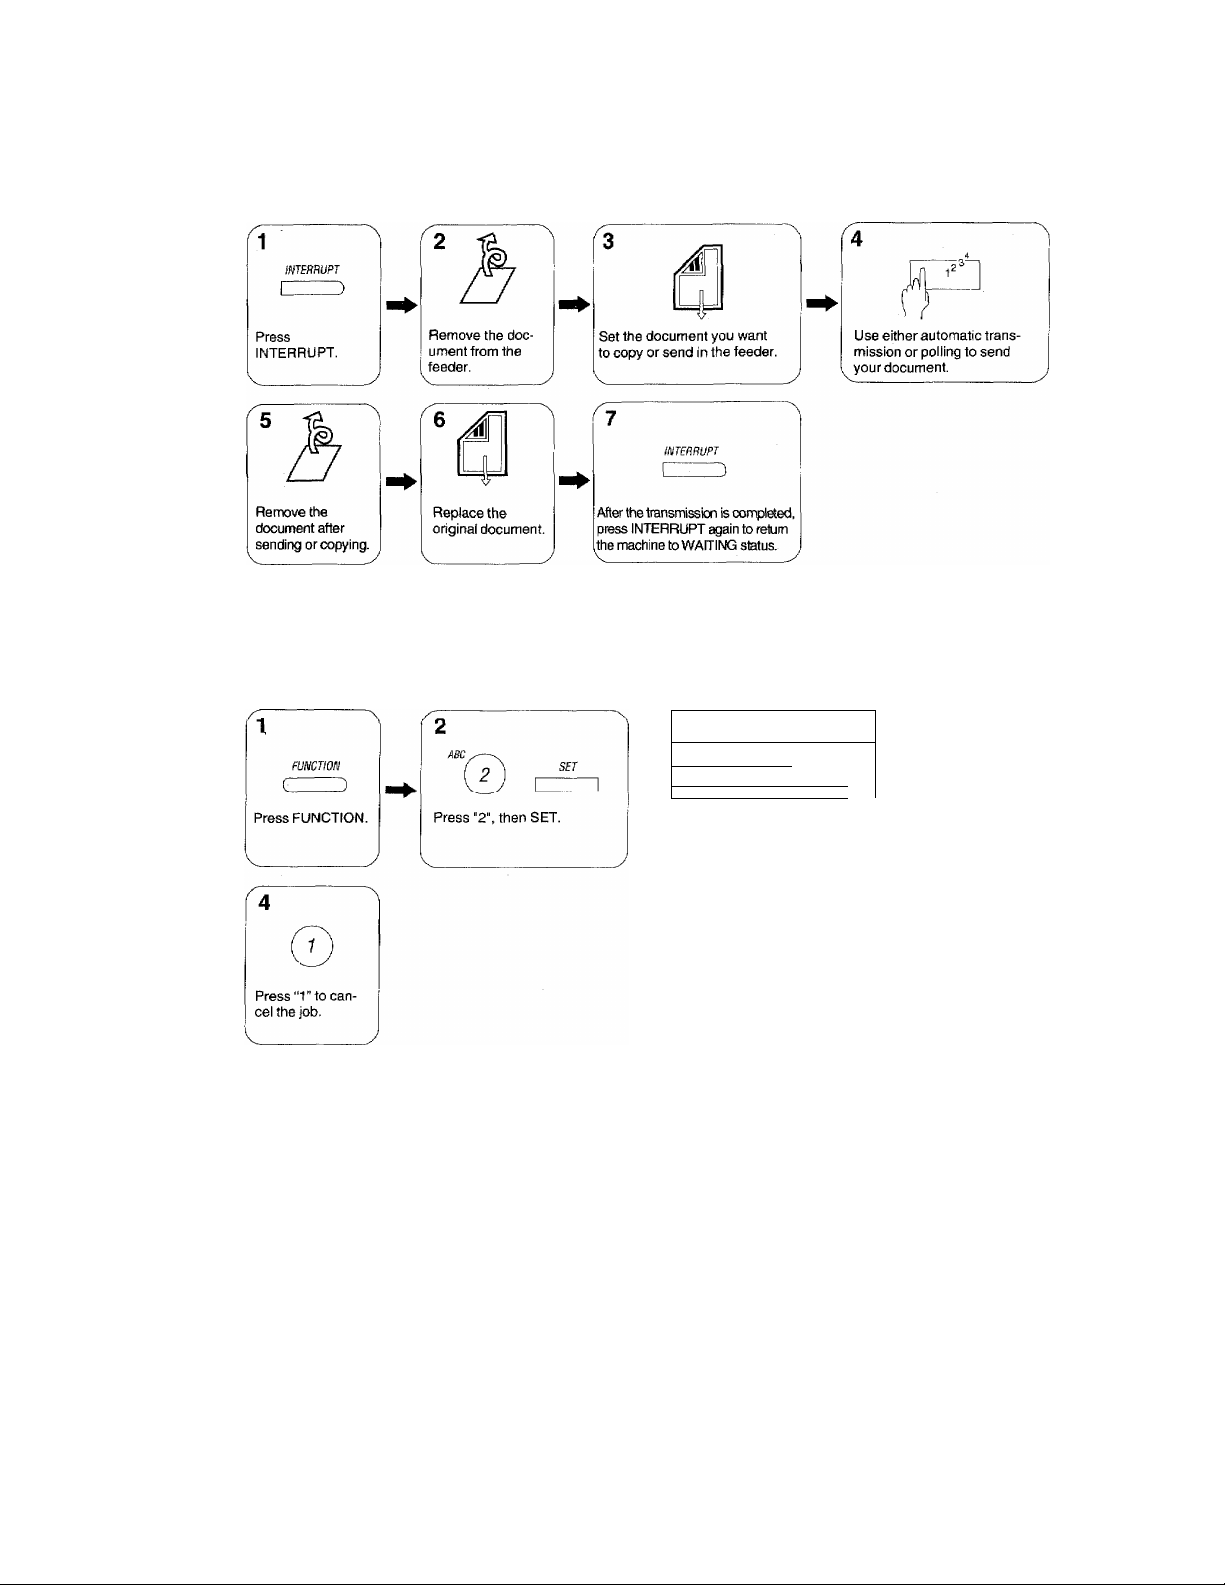
Interrupting a transmission
• Cancelling a job
YOUR BROTHER FAX REFERENCE SECTION
3 ^
—>
:
______
Use the cursor keys
to select the job you
want to cancel, then
press SET.
Auto Redial can be cancelled by simply pressing the STOP key.
___
1
) 1
5fr
VII
Page 12

CONTENTS
1. GENERAL INFORMATION 1 -1
Introduction..................................................................................................................1-1
StandardTelephone And FCC Notices ...............................................
Important Safety Instructions.................................................................................
2. INSTALLATION 2-1
Unpacking The Machine..............................................................................................2-1
Loading Paper .............................................................................................................2-2
Selecting A Location....................................................................................................2-3
Connecting The Handset.............................................................................................2-3
Installing The Wire Extensions....................................................................................2-4
Connecting The Unit To A Power Outlet
Connecting The Unit To A Telephone Line
Jacks............................................................................................................................2-6
Multi line Connections (PBXs).....................................................................................2-6
Connecting To a Private Branch Exchange
Connecting The Unit To An External Telephone.........................................................2-7
Installing The One-Touch Dial LAbel...........................................................................2-8
.....................................................................
...................................
...............................................................
3. BASIC OPERATION 3-1
The Control Panel Keys ..............................................................................................3-1
The Control Panel
Making A Copy.............................................................................................................3-6
Suitable Types Of Document.......................................................................................3-7
..................
....................................................................................3-2
4. USING THE FUNCTIONS 4-1
Viewing And Choosing Function Options
Using The Stop Key ....................................................................................................4-3
Entering Data And Changing Settings
Choice Of Options
Entering Fixed Length Numbers
Entering Variable Length Numbers
Using The Numeric Keypad To Enter Text..................................................................4-5
Entering Repeated Characters....................................................................................4-6
Special Characters, Symbols And Punctuation Marks
Correcting Mistakes ..................................
...........................
................................................................................4-4
...................................................................
...............
...
........................................................................4-3
.............................................................................
.........................................................4-3
................................................
...
...............................................................4-7
5. SETTING THE USER OPTIONS 5-1
Tone/pulse......................................................................................................... 5-2
Ring Delay .................................................................................................................. 5-3
Auto Redial...................................................................................................................5-4
Speaker Volume ......................................................................................................... 5-5
F/T Ring Time .............................................................................................................5-6
Smoothing
Beeper .............................................
Coverpage On/Off .......................................................................................................5-9
Ring Volume ..................................................................................................................5-10
..............................
....................................................................................5-7
...
........................................................................5-8
6. SYSTEM SETUP 6-1
Date/Time ...................................................................................................................6-2
Daily Timer...................................................................................................................6-4
Activity Report Interval.................................................................................................6-5
Station ID.....................................................................................................................6-6
Remote ID
Coverpage Comment................................................................................................... 6-10
........................................................................... .......................................
........................
...
...
...........................2-5
1-2
. 1-4
2-4
2-6
4-1
4-4
4-7
6-7
Vili
Page 13

CONTENTS
7. AUTO DIALING 7-1
Chain Dialing............................................................................................................... 7-1
Storing Auto Dial Numbers............................................................................................7-2
Using The Redial/Pause Key........................................................................................ 7-2
Storing One-Touch Dial Numbers ........................................................................... . 7-2
Storing A Speed-Dial Number ......................................................................................7-5
8. SENDING FAXES 8-1
Sending A Fax Automatically........................................................................................8-1
Sending A Fax Manually ...........................................'
Sending A Fax Using Chain Dialing.............................................................................. 8-4
Automatic And Manual Redialing................................................................................. 8-5
Resolution..................................................................................................................... 8-5
Contrast....................................................................................................................... 8-7
Overseas Mode........................................................................................................... 8-7
Temporary Settings....................................................................................................... 8-7
Temporary Setting Of Contrast .................................................................................. 8-8
Multiple Resolution Transmission................................................................................. 8-9
Temporary Setting Of Overseas Mode
TheCoverpage ............................................................................................................. 8-12
Sending A Fax With A Coverpage ............................................................................ 8-13
Call Reservation And The Call Back Message
Sending A Fax With Call Reservation............................................................................ 8-15
........................................................................
...............................................
.........................................................
8-3
8-11
8-15
9. RECEIVING FAXES AND OTHER CALLS 9-1
Manual Reception................................................................................................
Automatic Fax Reception ............................................................................................. 9-2
The F/T Switch ............................................................................................................. 9-3
Answering A Telephone Call In F/T Mode .................................................................. 9-4
Remote Activation ..................................................................................................... 9-4
The TAD Mode ............................................................................................................. 9-5
Smoothing................................................................................................................... 9-7
Reception Into Memory (Only for lntelliFAX650M) ...................................................... 9-7
...
. 9-1
10. USING THE UNIT AS A TELEPHONE 10-1
Manual Dialing ............................................................................................................19-1
One-touch Dialing ..................................................................................................... 10-1
Speed Dialing.......................................................................................................... 19-1
Using Keys With The Telephone
..............................................................................
19-1
11. POLLING 11-1
What Is Polling?.......................................................................................................... 11-1
Why Is Polling Used?................................................................................................. 11-1
Secure Polling........................................................................................................... 11-1
Setting Up The lntelliFAX600/650M To Be Polled .................................................... 11-2
Polling Another Fax Machine With The lntelliFAX600/650M
.....................................
11-4
12. USING THE TIMER 12-1
Delayed Sending .......................................................................................................12-1
I nterrupting A Timer Or Polled Job
Cancelling A Timer Or Polled Job..............................................................................12-4
..........................................................................
12-2
13. PRINTING LISTS AND REPORTS 13-1
Activity Report............................................................................................................. 13-1
All Dial List .................................................................................................................. 13-2
Coverpage ................................................................................................................. 13-3
Call Back Message .....................................................................................................13-4
User Options .................................................-...........................................................13-5
Transmission Verification (Xmit) Report......................................................................13-6
IX
Page 14

CONTENTS
14. TROUBLESHOOTING 14-1
image Quality.............................................................................................................. 14-1
General Machine Errors And Paper Jams ......................................................................................14-1
Problems When Copying ........................................................................................... 14-3
Problems When Dialing...............................................................................................14-3
Problems When Sending A Fax
Problems When Receiving A Fax................................................................................14-5
Problems When Polling...............................................................................................14-6
..................................................................................
14-4
15. CLEANING 15-1
Cleaning The Printer And Scanner .............................................................................15-1
16. SPECIFICATIONS 16-1
17. INDEX 17-1
Page 15

1. GENERAL INFORMATION
Introduction
Thank you for purchasing this Brother IntelliFAX600/650M.
This modem, desktop facsimile machine can be used for sending and receiving faxes,
nationally and internationally, via the public telephone network. It has a wide range of
functions that facilitate fax transmission and reception.
The IntelliFAX600/650M has been designed to be simple to use, but please take a little time
to read this owner’s manual, to ensure that your IntelliFAX600/650M gives the best
performance, and years of trouble-free service.
GENERAL INFORMATION
1-1
Page 16

GENERAL INFORMATION
Standard Telephone And FCC Notices
(Only applies to 120 V model)
These notices are in effect on models sold and used in U.S.A.
This equipment is hearing-aid compatible.
When programming emergency numbers and/or making test calls to
emergency numbers:
• Remain on the line and briefly explain to the dispatcher the reason for the call
before hanging up.
• Perform such activities in the off-peak hours, such as early morning or late
evening.
This equipment complies with Part 68 of the FCC Rules. On the rear panel of this equipment
is a label that contains, among otiicr information, the FCC Registration Number and Ringer
Equivalence Number (REN) for this equipment. You must, upon request, provide this
information to your telephone company.
You may safely connect this equipment to the telephone network by means of the standard
modular jack, USOC RJllC.
The REN is useful to determine the quantity of devices you may connect to your telephone
line and still have those devices ring when your telephone number is called. In most, but
not ail areas, the sum of the RENs of all devices connected to one line should not exceed
five (5). To be certain of the number of devices yon may connect to your line, as determined
by the REN, you should contact your local telephone company to determine the maximum
REN for your calling area.
If your IntelliFAX600/650M causes harm to the telephone network, the telephone company
may discontinue your service temporarily. If possible, they will notify you in advance. But
if advanced notice is not practical, you will be notified as soon as possible. You will be
informed of your right to file a complaint with the FCC.
Your telephone company may make changes in its facilities, equipment, operations or
procedures that could affect the proper functioning of your equipment. If they do, you will
be notified in advance to give you an opportunity to maintain uninterrupted telephone
service.
If you experience trouble with this IntelliFAX600/650M, please contact the manufacturer’s
authorized service agency for information on obtaining service or repair. The telephone
company may ask that you disconnect this equipment from the network until the problem
has been corrected or until you arc sure that the equipment is not malfunctioning.
If you are not able to solve a problem with your fax machine, contact Brother service
personnel at 1-800-284-4 FAX (U.S.A. Only).
_______________________
1-2
Warning
For protection against the risk of electrical shock, always disconnect all cables from the
wall outlet before servicing, modifying or installing the equipment.
This equipment may not be used on coin service provided by the telephone company nor
connected to party lines.
Page 17

GENERAL INFORMATION
This equipment has been tested and found to comply with the limits for a Class B digital
device, pursuant to Part 15 of the FCC Rules. These limits are designed to provide
reasonable protection against harmful interference in a residential installation. This
equipment generates, uses, and can radiate radio frequency energy and, if not installed
and used in accordance with the instructions, may cause harmful interference to radio
communications. However, there is no guarantee that interference will not occur in a
particular installation. If this equipment does cause harmful interference to radio or
television reception, which can be determined by turning the equipment off and on, the
user is encouraged to try to correct the interference by one or more of the following
measures;
• Re-orient or relocate the receiving antenna.
• Increase the separation between the equipment and receiver.
• Connect the equipment into an outlet on a circuit different
from that to which the receiver is connected.
• Consult the dealer or an experienced radio/TV technician
foi help.
Brother cannot accept any financial or other responsibilities that may be the result of
your use of this information, including direct, indirect, special or consequential
damages. There are no warranties extended or granted by this document.
The serial number may be found on the label affixed to the back of the unit. For your
convenience, note the number below and retain this owner’s manual to serve as a permanent
record of your purchase, in the event of a theft or fire, or for future reference.
MODEL NO. IntelliFAX600/650M SERIAL NO.
NAME OF DEALER_________________________
DATE OF PURCHASE
______________________
1-3
Page 18

GENERAL INFORMATION
Important Safety Instructions
1. Read all of these instructions.
2. Save them for later reference.
3. Follow all warnings and instructions marked on the product.
4. Unplug this product from the wall outlet before cleaning. Do not use liquid or aerosol
cleaners. Use a damp cloth for cleaning.
5. Do not use this product near water.
6. Do not place this product on an unstable cart, stand, or table. The product may fall,
causing serious damage to the product.
7. Slots and openings in the cabinet and the back or bottom are provided for ventilation;
to ensure reliable operation of the product and to protect it from overheating, these
openings must not be blocked or covered. The openings should never be blocked by
placing the product on a bed, sofa, rug, or other similar surface. I’his product should
never be placed near or over a radiator or heat register. This product should not be placed
in a built-in installation unless proper ventilation is provided.
8. This products should be operated from the type of power source indicated on the
marking label. If you are not sure of the type of power available, consult your dealer or
local power company.
9. This product is equipped with a 3-wire grounding type plug, a plug having a third
(grounding) pin. This plug will only fit into a grounding-type power outlet. This is a
safety feature. If you are unable to insert the plug into the outlet, contact your electrician
to replace your obsolete outlet. Do not defeat the purpose of the grounding-type plug.
10. Do not allow anything to rest on the power cord. Do not locate this product where
persons will walk on the cord.
11. If an extension cord is use with this product, make sure that the total of the ampere
ratings on the products plugged into the extension cord do not exceed the extension cord
ampere rating. Also, make sure that the total of all products plugged into the wall outlet
does not exceed 15 amperes (U.S.A. only).
12. Never push objects of any kind into this product through cabinet slots as they may touch
dangerous-voltage points or short out parts that could result in a risk of fire or electric
shock. Never spill liquid of any kind on the product.
13. Do not attempt to service this product yourself, as opening or removing covers may
expose you to dangerous voltage points or other risks. Refers all servicing to service
personnel at 1-800-284-4 FAX.
14. Unplug this product from the wall outlet and refer servicing to qualified service
personnel under the following conditions:
1-4
Page 19

GENERAL INFORMATION
A. When the power cord or plug is damaged or frayed.
B. If liquid has been spilled into the product.
C. If the product has been exposed to rain or water.
D. If the product does not operate normally when the operating instructions are
followed. Adjust only those controls that are covered by the operating instructions
since improper adjustment of other controls may result in damage and will often
require extensive work by a qualified technician to restore the product to normal
operation.
E. If the product has been dropped or the cabinet has been damaged.
F. If the product exhibits a distinct change in performance, indicating a need for
service.
1-5
Page 20
INSTALLATION
2. INSTALLATION
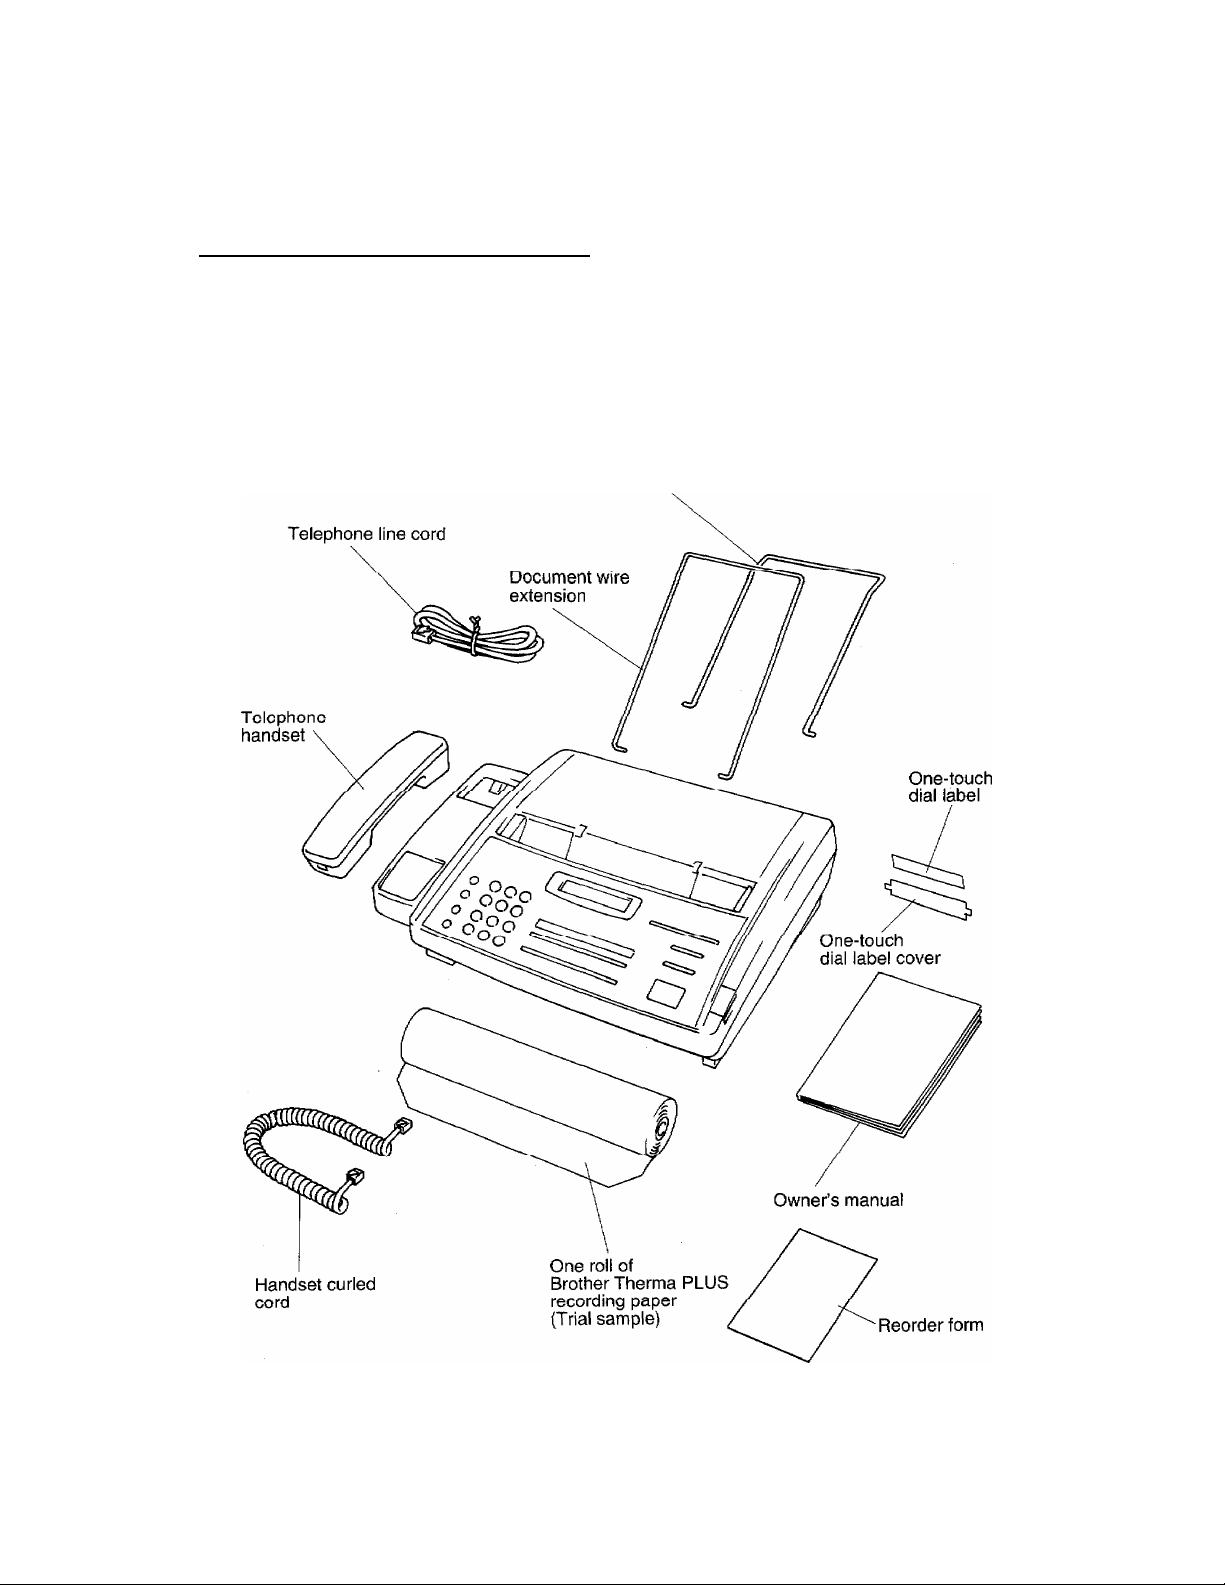
Unpacking The Machine
Unpack the unit and accessories from the box. Check that you have all the
items shown below.
Receive wire extension
2-1
Page 21
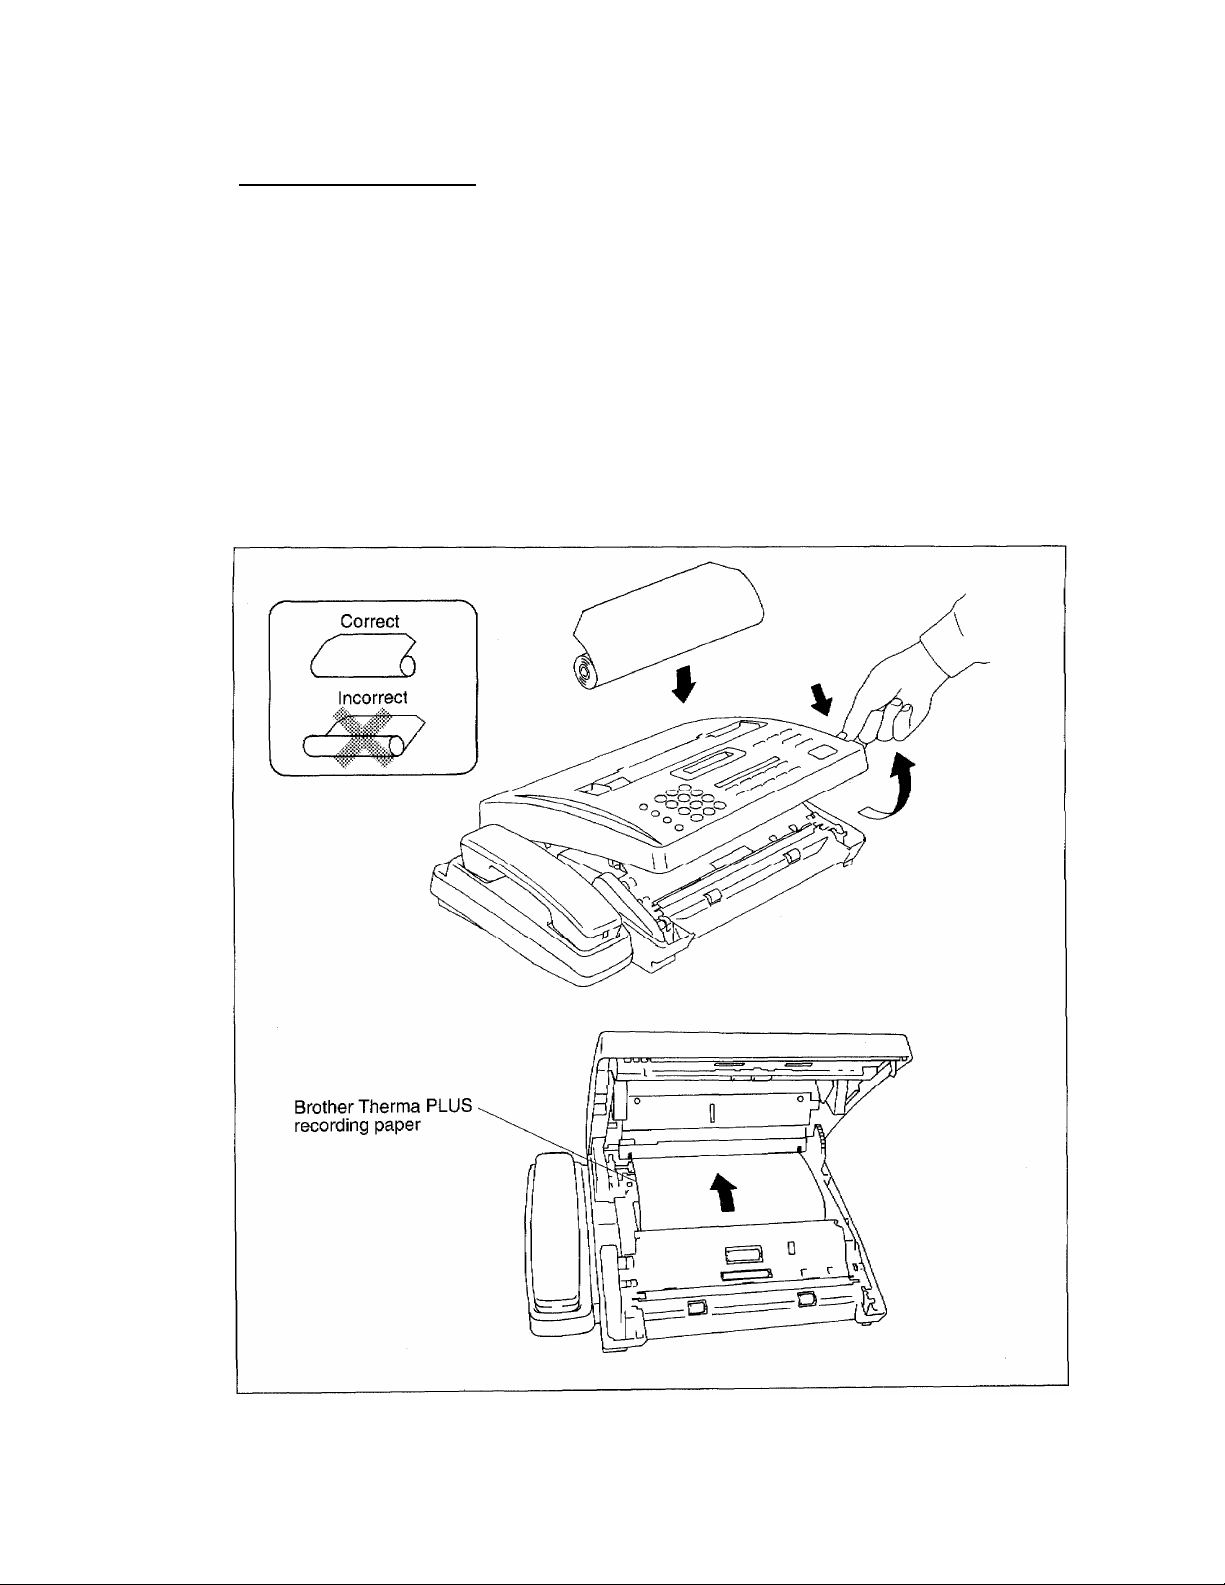
Loading Paper
INSTALLATION
1) Open the top cover of the machine by pressing the release button.
2) Remove the protective wrapping from the roll of recording paper, and
unroll about 4 inches of paper from the roll.
3) Insert paper roll into paper bin, with paper coming off the top of the roll.
(Otherwise fax messages will not print on the thermal coated side of the
paper).
4) Insert the roll of recording paper placing paper between guide lines.
Leave about 4 inches protruding from the back of the machine. Take
slack out of paper by pulling the paper tight.
5) Close the top cover of the machine, pressing down gently but firmly until
the latches click.
2-2
Page 22
INSTALLATION
Selecting A Location
The following points should be kept in mind when selecting a place to set up your fax
machine.
• Place the fax machine on aflat, stable surface such as a desk or stand.
• Select a place where the machine will not be subjected to bumping or excessive
vibration.
• Do not set it up in a high-traffic area.
• Locate the unit near a telephone wall jack and a standard, grounded power outlet.
• Avoid setting up the machine near heaters, air conditioners, water, chemicals or
refrigerators.
• Avoid direct sunlight, excessive heat, moisture, or dust.
• Do not connect the unit to electrical outlets controlled by wall switches or automatic
timers. Disruption of power can wipe out information in the unit’s page memory.
• Do not connect the unit to electrical outlets on the same circuit as large appliances
and other equipment that might disturb the power supply.
• A void interference sources, such as speakers or the base units of cordless telephones.
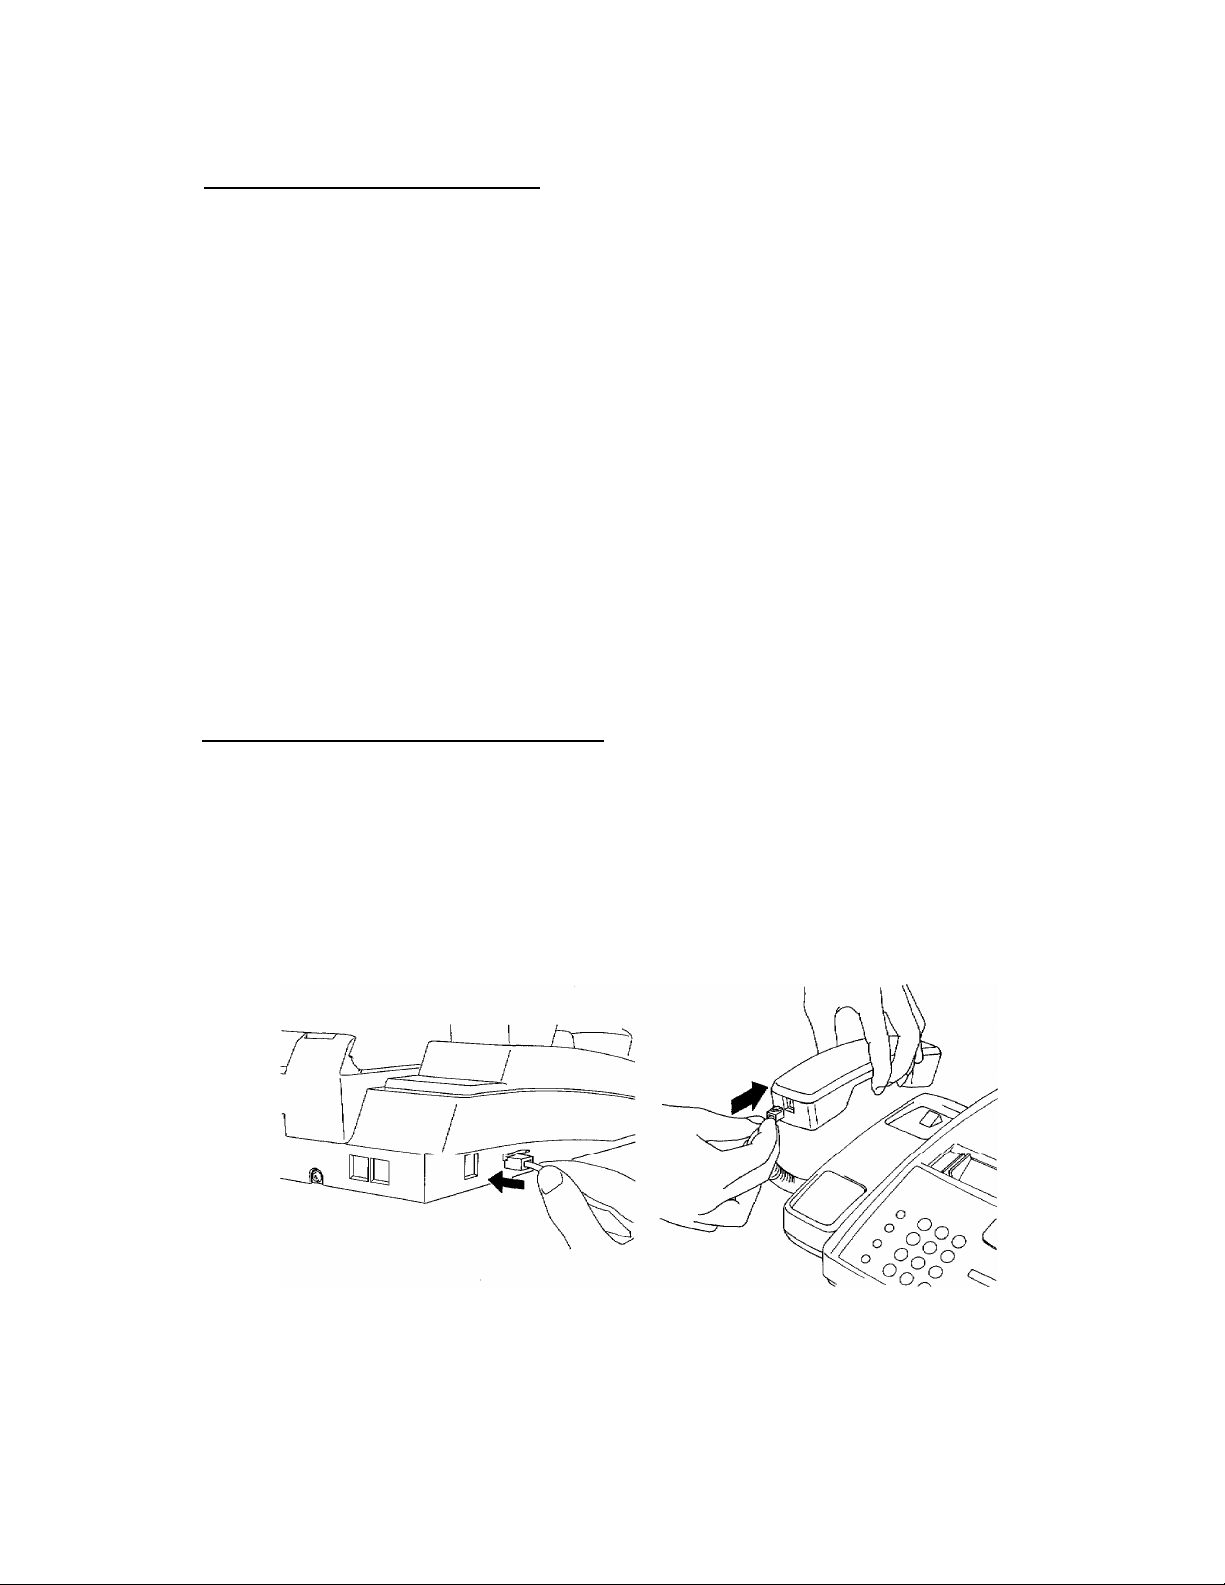
Connecting The Handset
1) Connect the handset by locating the insert opening on the left side of the telephone cradle
and plugging in the curled handset cord.
Push firmly and listen for the click as it locks in place.
2) Insert the other end of the handset cord in the opening at the mouthpiece end of the
handset. This should click into place as well.
2-3
Page 23
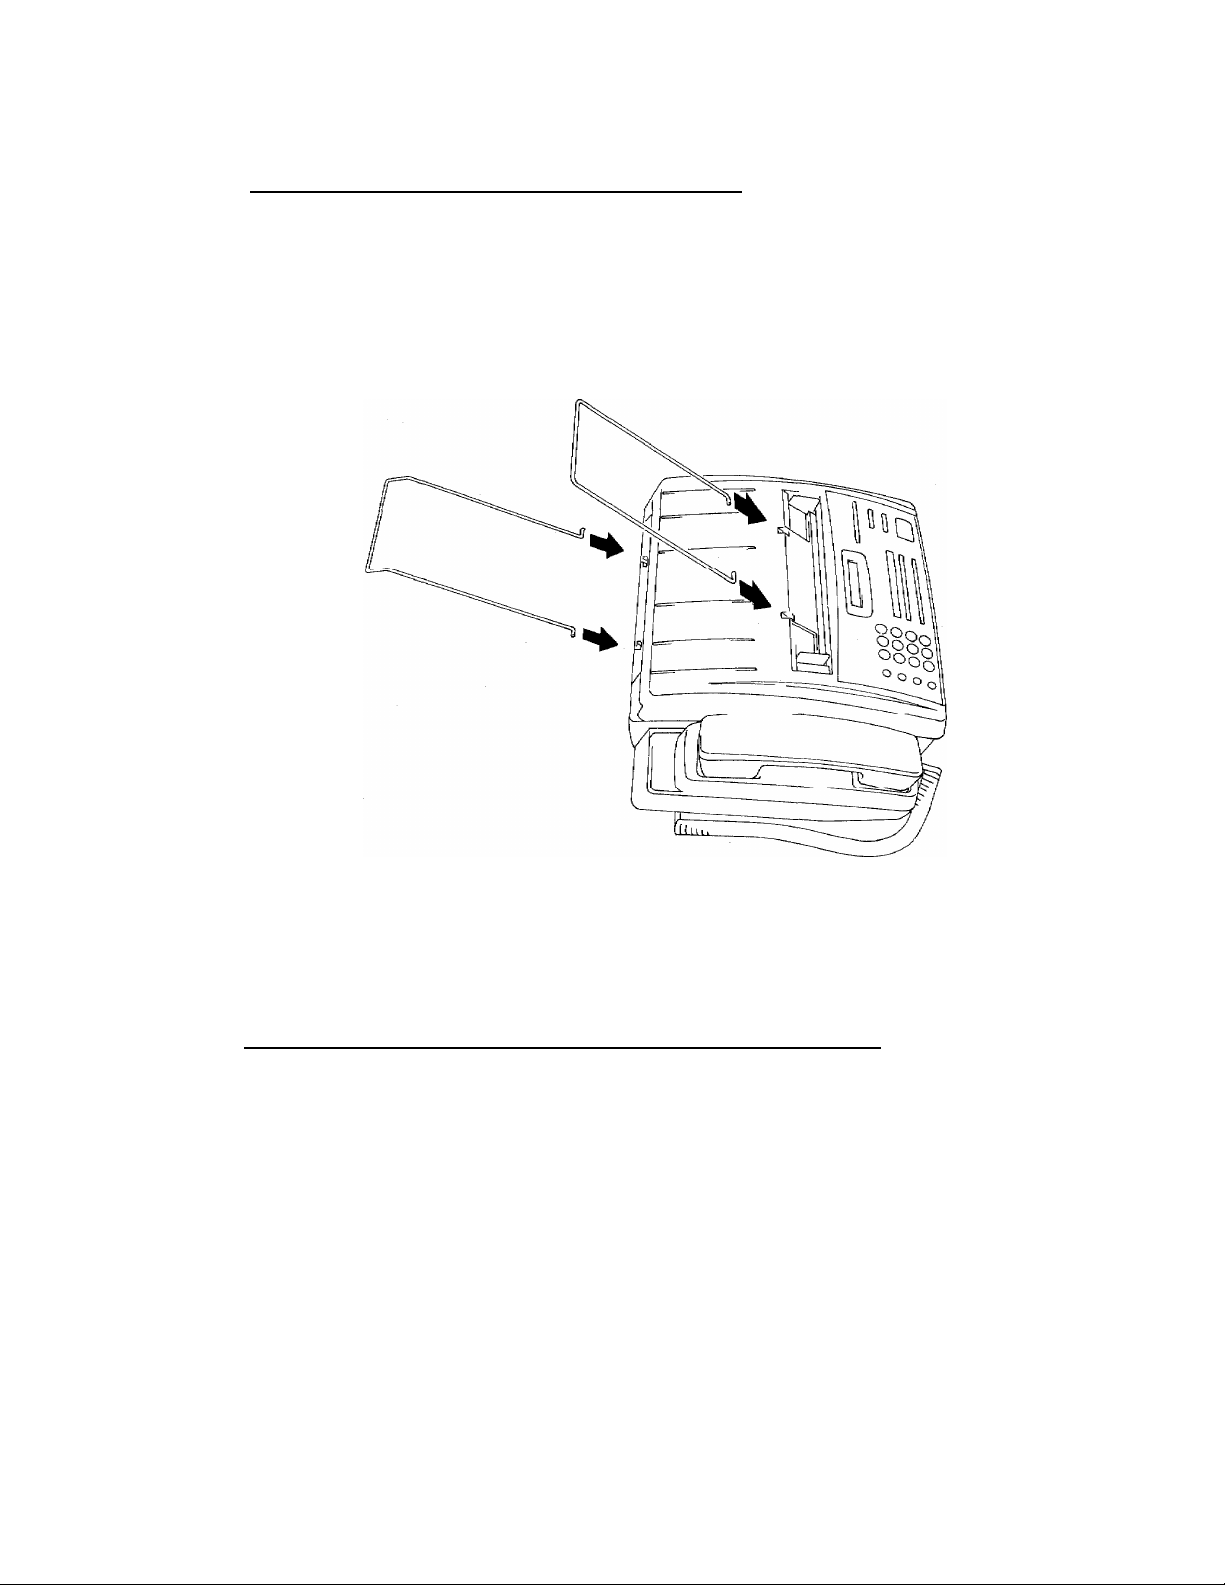
Installing The Wire Extensions
1) Pinch the ends of the receive wire extension together slightly and insert
the prongs into the holes provided at the rear of the machine as shown in
the illustration.
2) Pull the ends of the document wire extension apart slightly and insert them
into the holes provided on the machine as shown in the illustration.
INSTALLATION
• ImtaU^mreextemionswdhtheaffvedparisofthewireextension
poin^ibwnmird.
Connecting The Unit To A Power Outlet
Important
The machine must always be connected to the power outlet
before you connect it to a telephone line.
Similarly, when moving the unit, the telephone line
connection should be removed before unplugging the
power cord. This is because the machine relies on the
ground from the plug to protect you from any hazardous
electrical conditions occuring on the telephone network.
The IntelliFAX600/650M can be plugged into any standard, grounded,
power outlet.
2-4
Page 24
INSTALLATION
Make sure that the socket is grounded and is not on the same circuit as
any large appliances or office machines such as refrigerators or
photocopiers, since these can generate interference that may affect the
operation of the IntelUFAX600I650M, The power requirements for the
IntelUFAX600l650M can be found in the SPECIFICATIONS section,
(page 16-1).
There is no ONIOFF switch. As soon as the machine is plugged to a live
power outlet it is ON and the datellime display will appear on the LCD
screen.
When the machine is plugged in, the recording paper will be fed through
automatically.
WARNING: This apparatus must be grounded using
3 prong piug.
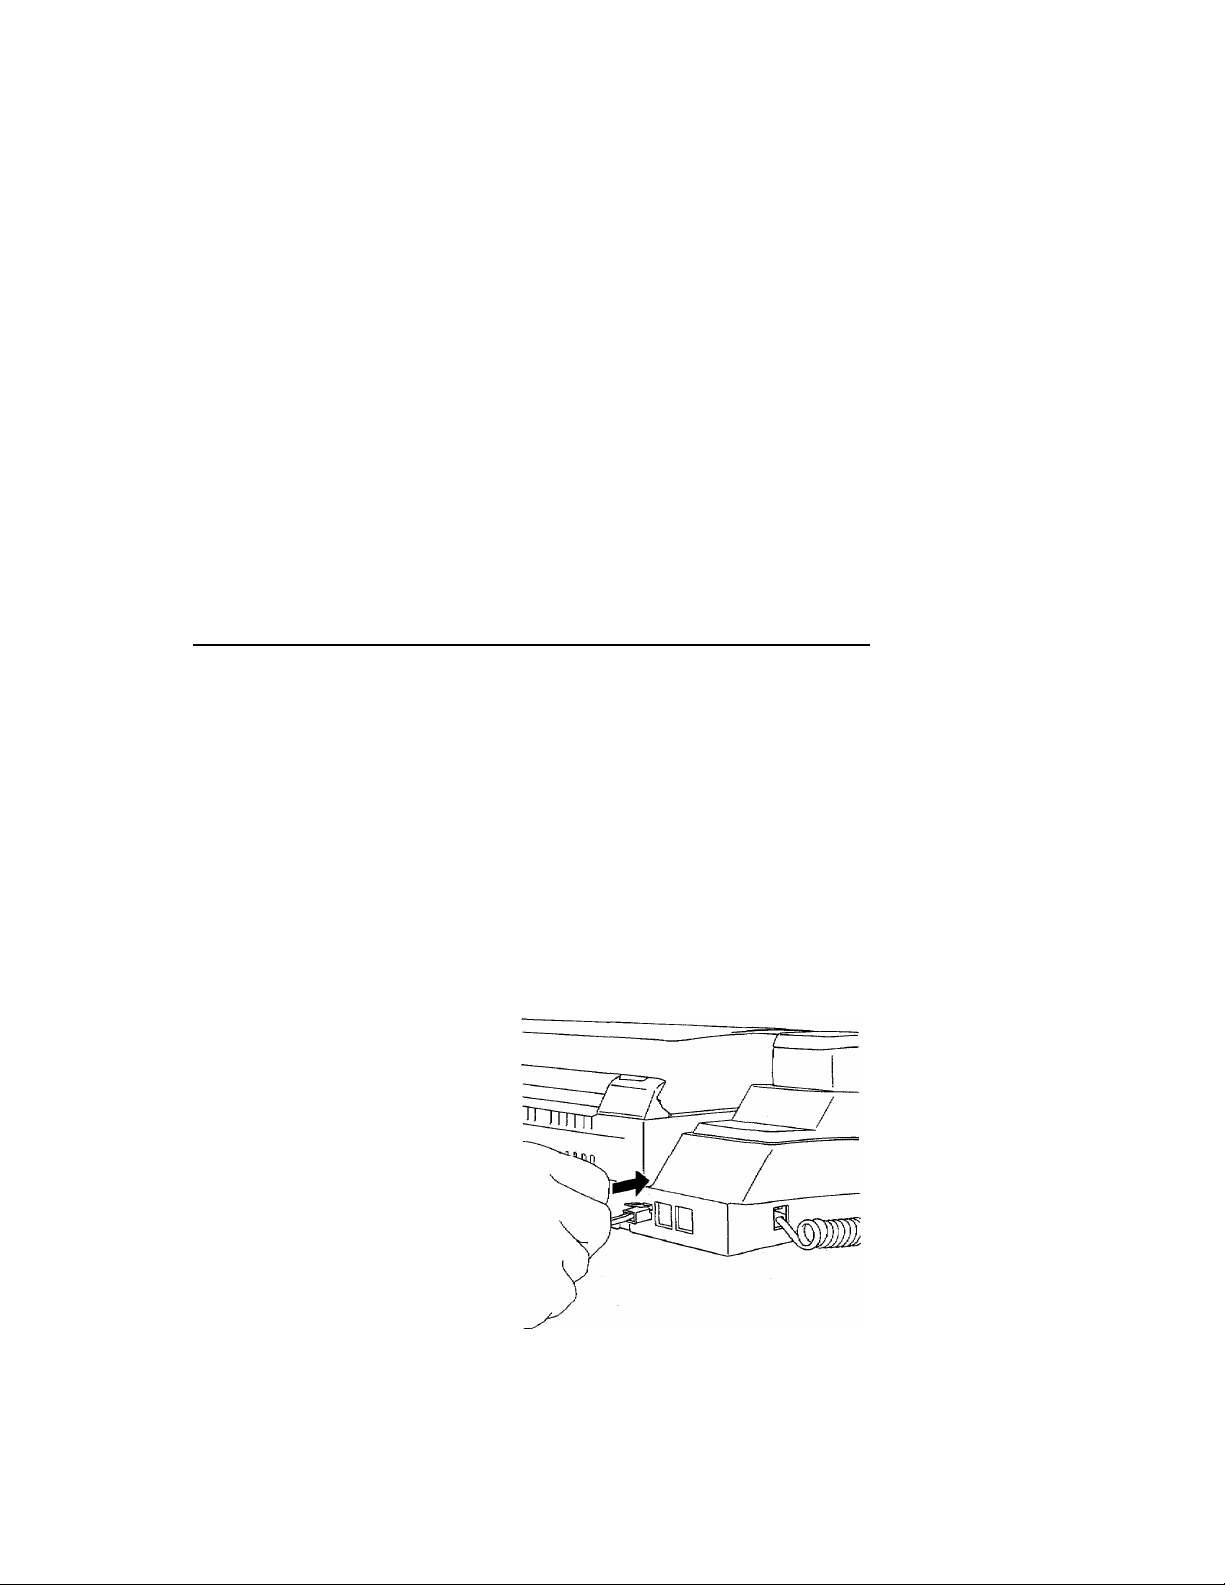
Connecting The Unit To A Telephone Line
If you plan to use a single telephone line connection follow the instractions
below. This is straightforward if your telephone receiver is connected using
modular telephone jacks.
1) Plug one end of the telephone line cord into the back of the fax machine.
Use the LINE soekcl located faidiest to the left. Make sure it clicks into
place.
2) Plug the other end of the cord into the telephone wall jack socket. Make
sure this end clicks into place.
If you have call waiting, ring master, or any other custom calling
feature on your telephone line it may create a problem in the
operation of your fax unit.
2-5
Page 25
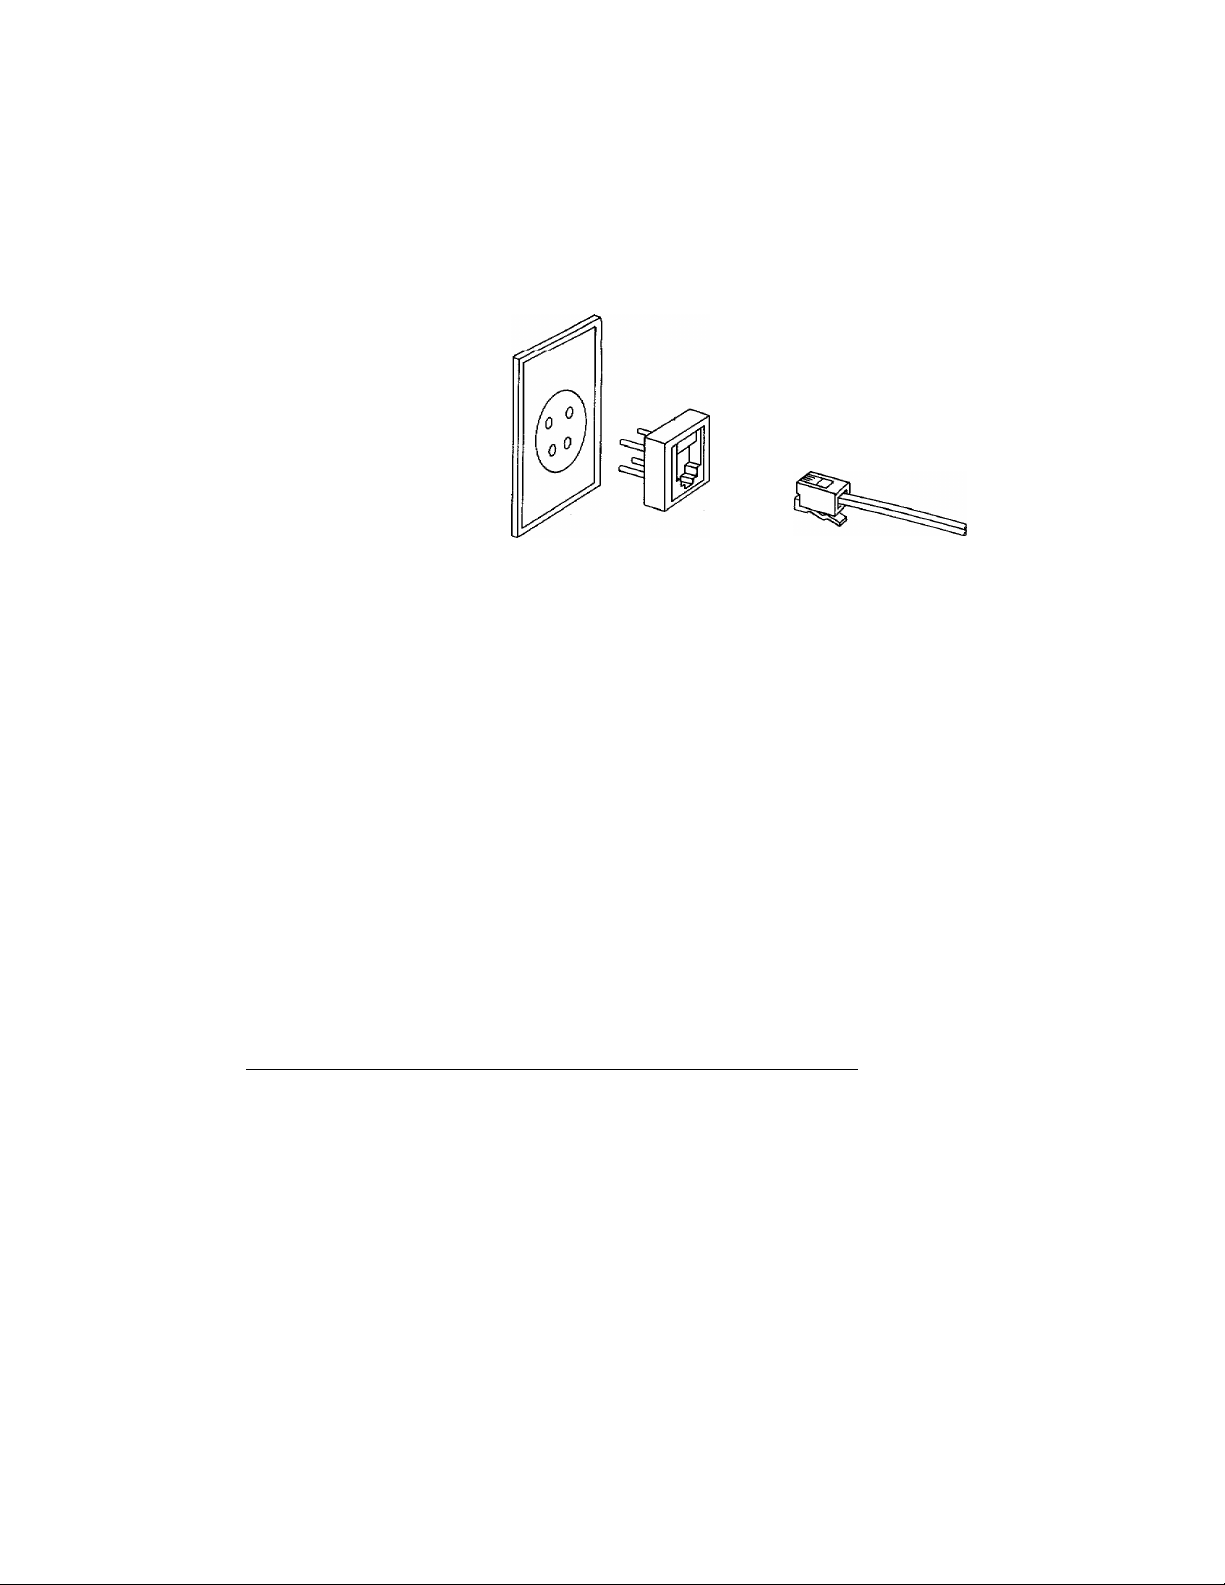
Jacks
If you have the older 4-prong telephone wall jack, you must use a modular
4-prong adapter (USOC RJAIX). Plug the adapter into the wall jack and then
plug the telephone cord into the adapter, as shown in the illustration below.
Multi Line Connections (PBXs)
Most offices use a central telephone system. While it is often relatively simple
to connect the machine to a key system or a PB X (private branch exchange),
wc suggest that you contact the company which iiisLalled your téléphoné
system and ask them to connect the fax machine for you.
INSTALLATION
It is advisable to have a separate line for the fax machine. You can then leave
the machine in AUTO ANSWER mode to receive faxes at any time of the
day or night.
If the fax machine is to be connected to a multi-line system, ask your installer
to connect the unit to the last line on the system. This will prevent the unit
from being activated each time a telephone call is received.
• As with all fax units this machine must be connected to a two wire
system. If your line has more than two wires proper connection of the
fax machine can not be made.
Connecting To A Private Branch Exchange
The following points should be kept in mind if you are installing the machine
to work with a private branch exchange (PBX).
1) It is not guaranteed that the unit will operate correctly under all
circumstances with PBXs. Any cases of difficulty should be reported first
to the company that handles your PBX.
2) If all incoming calls will be answered by a switchboard operator, it is
recommended that the AUTO ANSWER function be set to be manual.
(see page 9—1) All incoming calls should initially be regarded as
telephone calls.
____________
3) The unit may be used with either the pulse or tone dialing telephone types.
2-6
Page 26
INSTALLATION
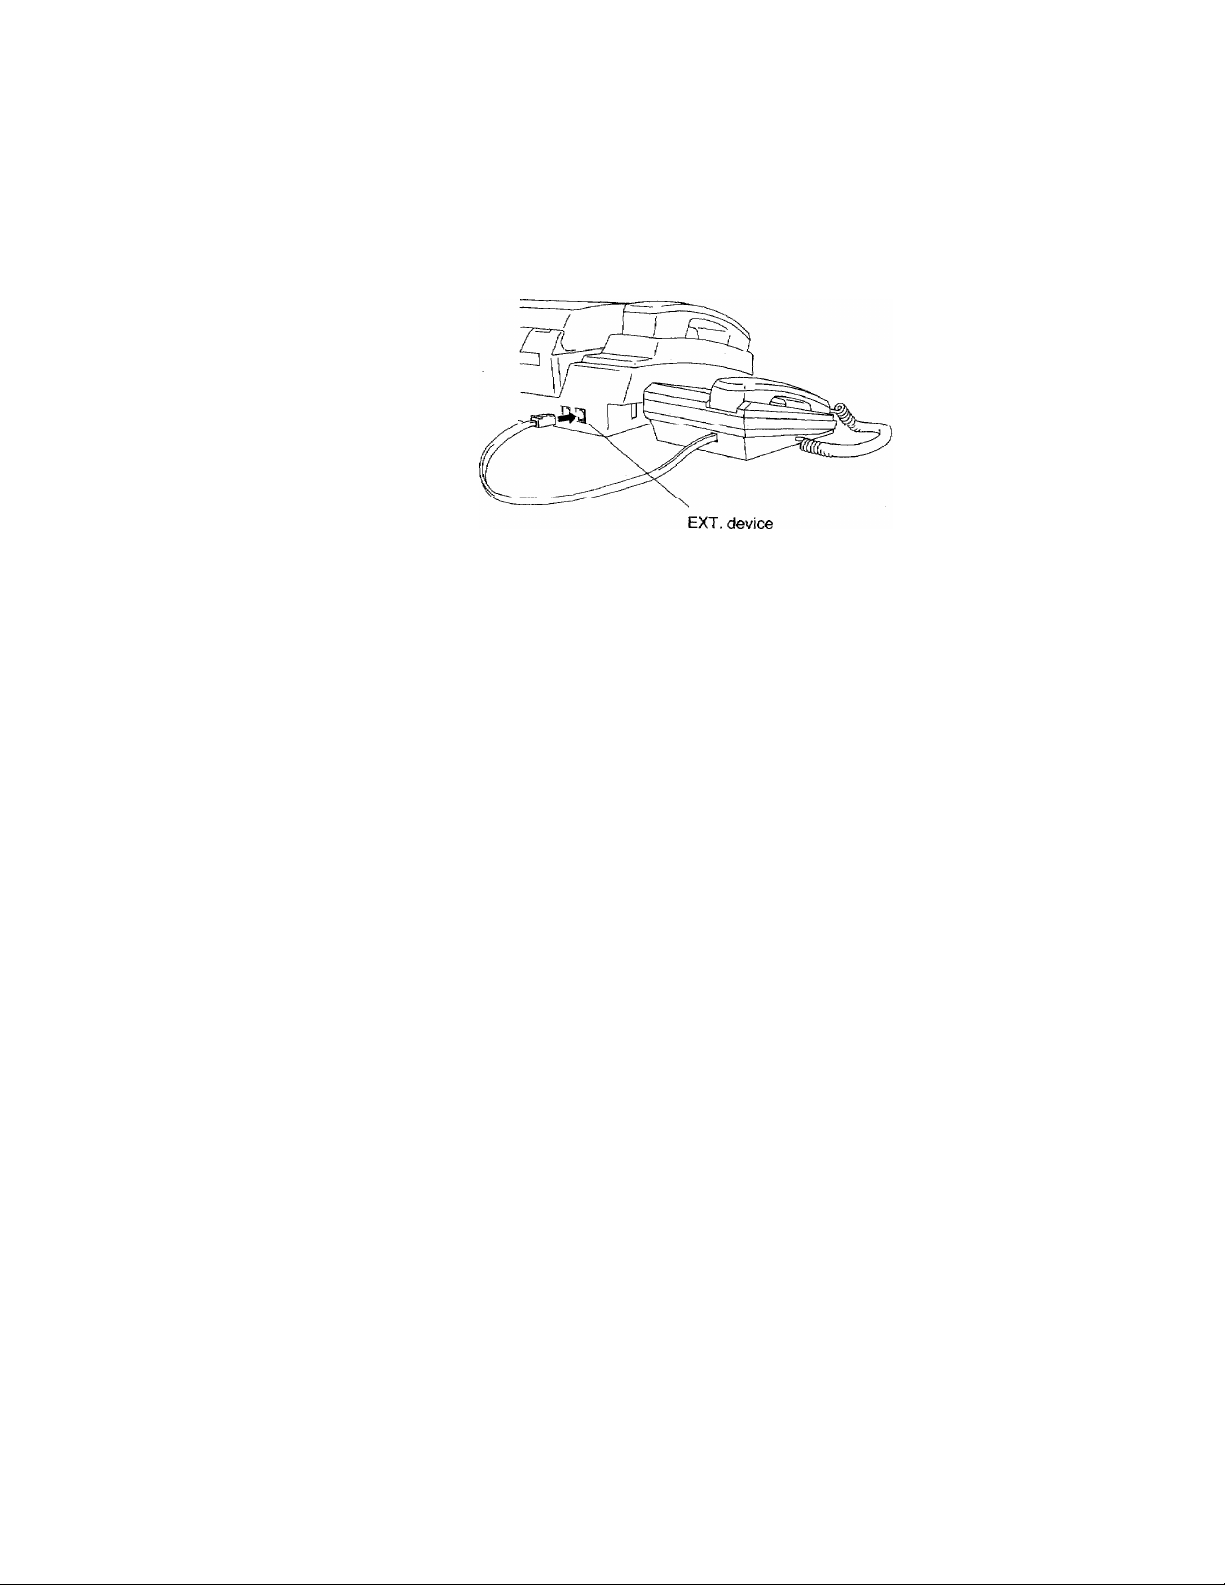
Connecting The Unrt To An External Telephone
Connect an external telephone to the Ext. Device Jack as shown.
You can remotely activate the machine using your external telephone.
This is described in the section "Remote Activation" (See 9^).
You can also attach a Telephone Answering Machine to the Ext. device
jack instead of a telephone.
2-7
Page 27
INSTALLATION
Installing The One-Touch Dial Label
Luuiite tlie oiie-Louch dial label as shown in the diagram below and cover it
with the plastic sheet.
01 02 03 04 05
_________________
2-8
Page 28

CO
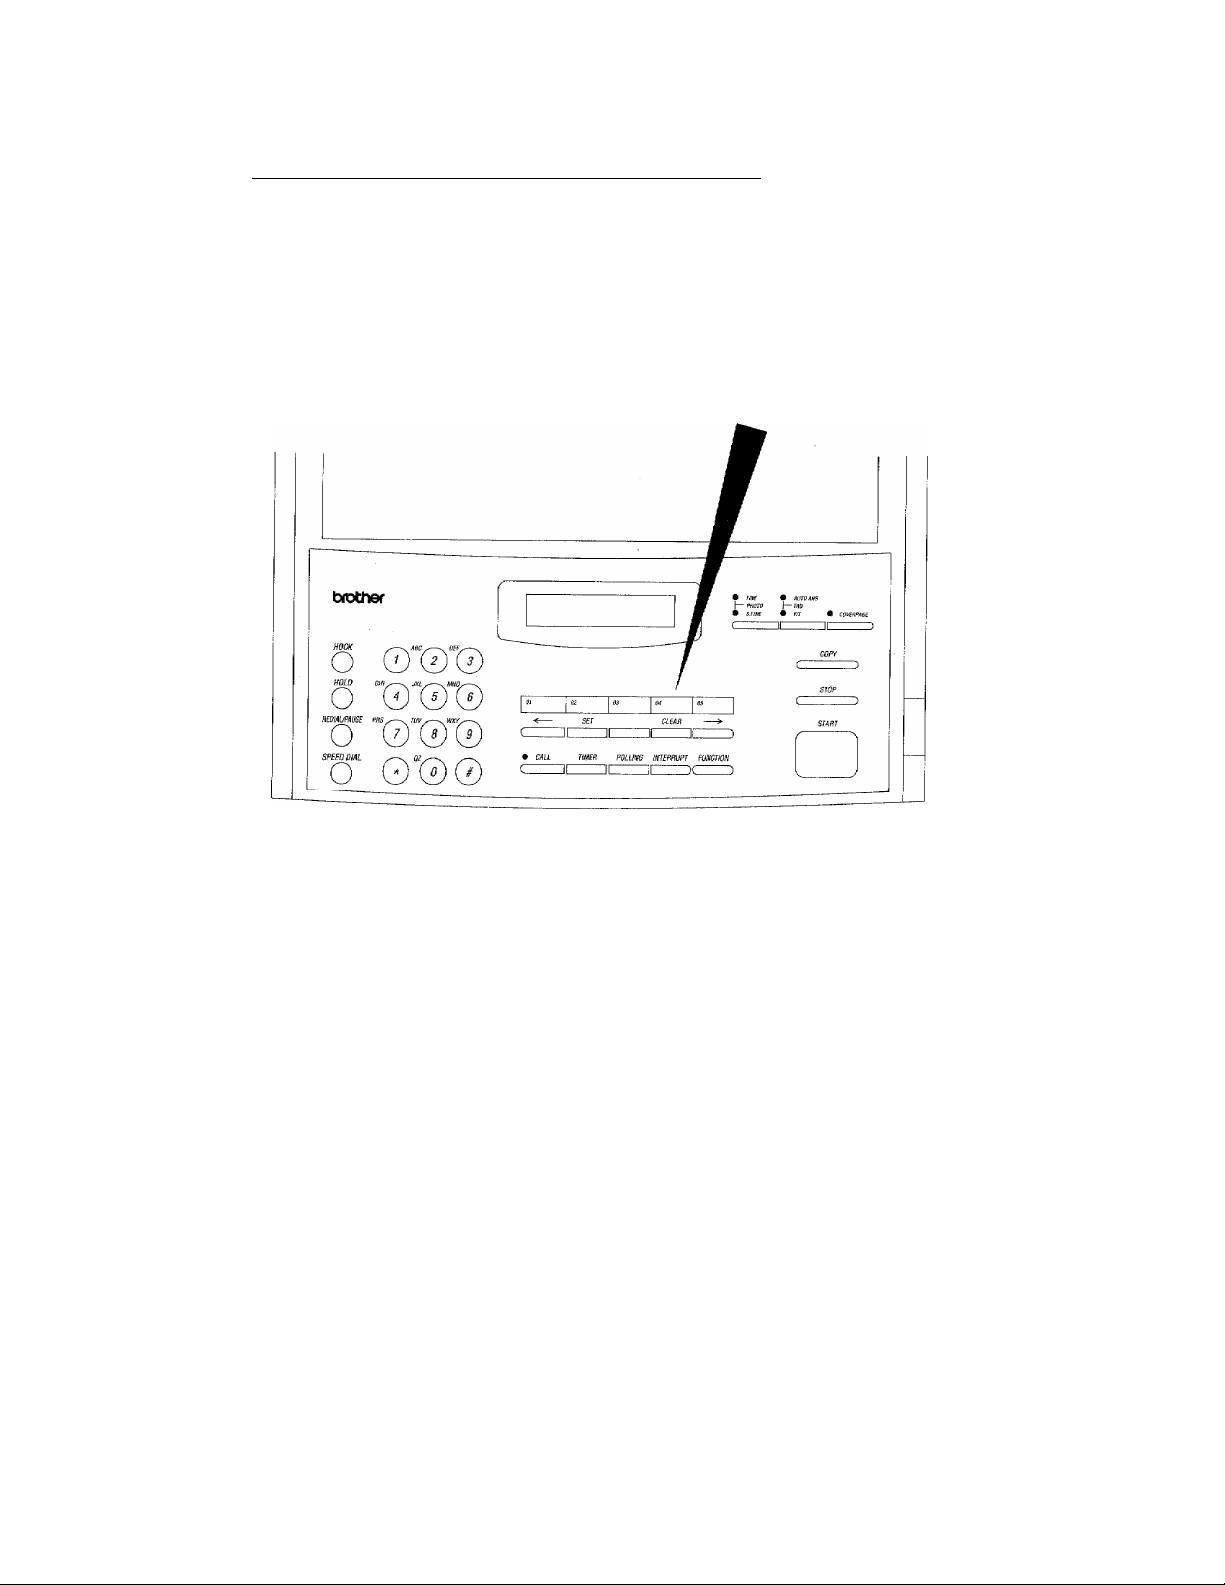
The Control Panel Keys
brother
• FINE • AUTO ANS
I— PHOTO I— TAD
• S.FINE m FfT • COVERPAGE
( ._■■ iizz.(ijY ,.-.i ^
01
>
0)
Ô
o
■D
m
33
>
5
HOOK I ( c 1 X
®Q '^(T) (7) ( 3
HOLD
® 0(e)
REDIAUPAUSE
®
SPEED DIAL
®
PRS TUV . WXY^—
(?) G^Cq
o * °
QZ
COPY
STOP
02
1^ a2o®8ï
/
03 04
SET
• cm. riMCfi Kune imnnupT mcrm
CLEAR
iXIpaion
05
[®3pa@DC@D
C
START
@
Page 29

3. BASIC OPERATION
The Control Panel
1. Hook
BASIC OPERATION
A summary and brief description of the controls and indicators
on the IntelHFAX600/650M control panel is given below. This
should be used with reference to the accompanying, numbered
diagram of the control panel. More detailed descriptions of the
function of each control will be found in the relevant section
of this manual.
HOOK
o
2. Hold
HOLD
o
3. Redial/Pause
REDIAmUSE
O
4. Speed-Dial Key
SPEED DfAL
o
This key is used to dial telephone or fax numbers without
lifting the handset.
For automatic transmission, neither the HOOK button nor the
handset are necessary for transmission.
This key is used to put an incoming call on hold.
(Pressing this key a second time will cancel the hold status.)
This key has two functions. When numbers are being stored in
the auto dialing memories, PAUSE inserts a short delay into
the number at the point where the PAUSE key is pressed. For
more information on PAUSE see page 7-2.
If an outgoing call fails to be connected for any reason,
pressing REDIAL allows the number to be re-dialed.
Automatic re-dialing is also available on the IntelliFAXbOO/
650M. See pages 5-4 for more information.
The SPEED-DIAL key is pressed before entering a two-digit
speed-dial (abbreviated code) number for dialing. Pressing this
key tells the IntelHFAXfinn/fi50M to expect an abbreviated
code instead of a full-length, manually-dialed number. For
more information on storing and using speed-dial numbers, see
page 7—5 and 8—1.
3-2
Page 30
BASIC OPERATION
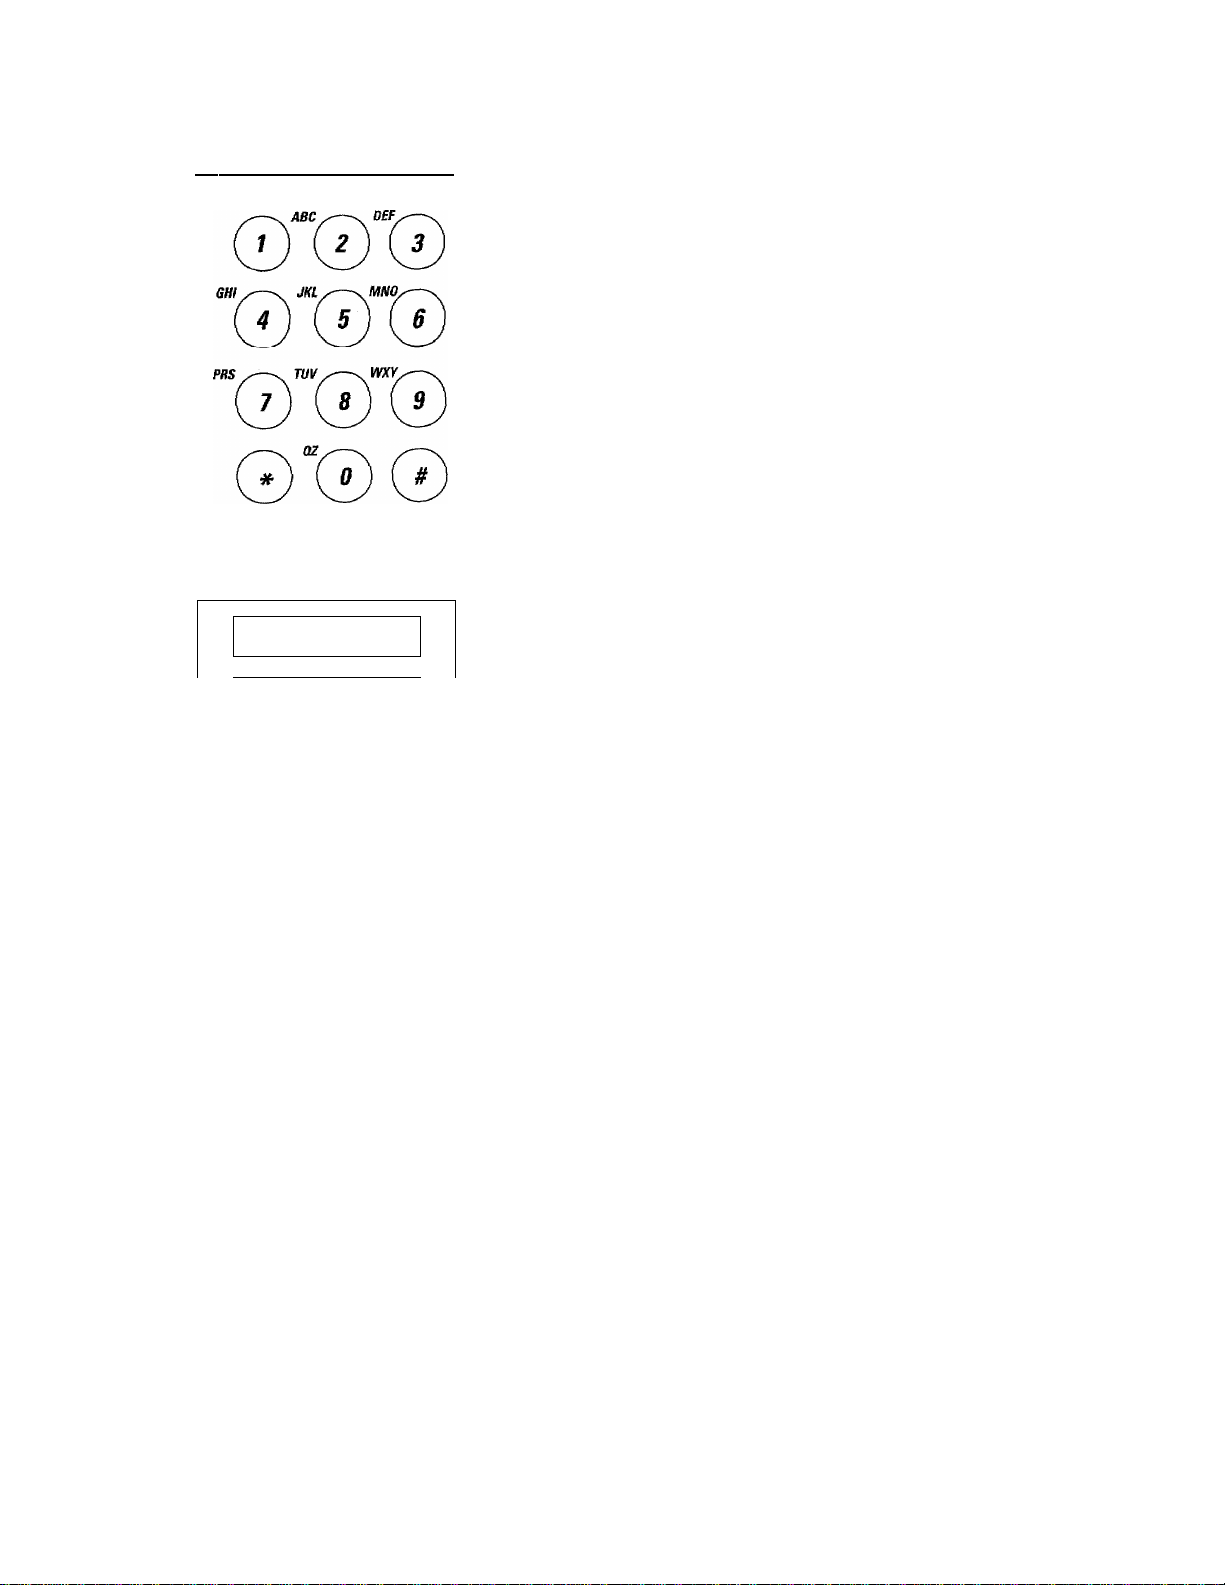
5. Numeric Keypad
The 12 key numeric keypad on the left of the control panel is
used for manual dialing and speed-dialing. It is also used for
entering numbers and text when setting up the IntelliFAXbOO/
650M. For more information on using the numeric keypad see
pages 4—5.
6, Liquid Crystal Display Screen
f A
BROTH E R
7-10 One-Touch Dial Keys
7. Left Cursor
8. Set
SET
The 16-character, alphanumeric liquid crystal display (LCD)
is used to display helpful messages to facilitate operation of
the IntelliFAX600/650M.
Also, displays Date and Time in idle mode.
Each of the five, labelled one-touch dial keys can have a
frequently used fax or telephone number assigned to it. These
numbers can then be dialed simply by pressing the correct
one-touch key. For more information on storing and using
one-touch numbers, see page 7-2 and 8-1.
Four of the five one-touch dial keys also have a secondary
function. See following.
Pressing the left cursor key scrolls the function back to the
previous item, or moves the cursor one place to the left on the
display when data is being entered.
This key is used to confirm selection of an option in the
function, or to confirm that data entry is complete.
9. Clear
CLEAR
3-3
This key is used to go back one step in a function procedure,
or to clear data from the display. The character above the
cursor and everything to the right of the cursor will be cleared.
Page 31

10, Right Cursor
11. Call Reservation
BASIC OPERATION
pressing the right cursor key scrolls the function down to the
next item, or moves the cursor one place to the right on the
display when data is being entered.
CALL
C I
12, Timer
TIMER
13. Polling
POLUNG
14. Interrupt
INTERRUPT
15. Function
This key is used to enable the call reservation feature.
The TIMER function is used when you wish to perform delay
sending of a fax, or polling, until a later time. For more
information on timer operation see page 12-1.
Polling allows you to call up another fax machine and have it
send you a fax that has been left in its document feeder, or
allows you to leave a document in your IntelliFAX600/650M
for another machine to poll. For more information on polling see
page 11-1.
If you wish to send an urgent fax after the timer has been set,
pressing the INTERRUPT key will temporarily interrupt the
timed job.
FUNCTION
C
......
)
16. Resolution
• FINE
I— PHOTO
• S.FLNE
c
Pressing the FUNCTION key puts the IntelliFAX600/650M
into "function mode", which is used for less frequently used
operations such as configuring the machine and storing dial
numbers. For more information on using the functions see page
4-1.
This key sets the resolution at which a fax is transmitted. For
more information see page 8-5.
When both lights are lit, then unit is in photo mode. When no
lights are lit, then unit is in standard mode.
3-4
Page 32

BASIC OPERATION
17. Answer Mode
• AUTO ANS
I—TAO
• F/r
18. Coverpage
COVEFPAGE
19, Copy
COPY
C
_________
)
20. Stop
STOP
21. Start
START
This key is used to set manual, automatic, fax/telephone, or
answering machine (TAD) mode. When both lights are lit, then
unit is in TAD mode. When no lights are lit, then unit is in
manual reception mode. For more information see page 9-1.
When this key is pressed before dialing or selecting coverpage
"on" (see page 5.SETTING THE USER OPTIONS) the
IntelliFAX600/650M will automatically generate a coverpage
which will be sent as the first page of the fax.
This key is pressed when you wish to make a copy of the
document in the document feeder, rather than sending it as a
fax.
This key can be used to terminate or cancel most operations of
the IntelliFAX600/650M.
This key initiates dialing and transmission of a fax, and is also
used for some other operations such as printing reports.
3-5
Page 33

Making A Copy
BASIC OPERATION
The IntelliFAX600/650M can be used as a convenience
copier. Once you have unpacked and set up the machine, it’s
a good idea to make a trial copy to check that the machine is
working, before attempting to send and receive faxes.
After the IntelliFAX600/650M has been connected to the
power outlet and has warmed up, the date/time display will
appear when there is no document in the feeder.
To make a copy, place the document you wish to copy,
face-down, in the document feeder, and feed it in gently until
you feel some resistance. You can copy any document up to
8.5 inches/216 mm wide (A4 size).
COPY:
FAX ;
PRESS COPY
ALTERNATE |
1
NO. & START
- b - FINE
^ I-7 PHOTO
-O- S.FINE
C
COPYING
COPY
□ c
When the IntelliFAX600/650M detects the document, the
display will change from the date and time.
To prevent the document from skewing as it is fed, adjust the
paper guides to fit the width of the document.
The default setting for making copies is SUPER FINE.
If you are copying a photograph, press the RESOLUTION key
until both lamps are lit. If you are making several copies, some
with photographs, set the resolution page by page in I.TEMP.
SETTINGS, (see page 8-9.)
Press the COPY key.
The display will indicate that the machine is copying, and the
document will be fed through the machine.
Note:
- When the copy has been printed, the automatic paper cutter
will cut the page from the paper roll,
- The machine cannot read text or images closer than 1/8" from
any edge of the document.
- Do not pull on the paper while copying is in progress. This
may ruin the copied image.
3-6
Page 34

BASIC OPERATION
Suitable Types of Document
The automatic document feeder (ADF) of the
IntelIiFAX600/650M will handle a wide variety of paper size
and thickness for copying and fax transmission, but to avoid
document jams and possible damage to the machine, the
following points should be noted.
• The range of optimum thicknesses for sheets used in the
ADF is 2.8 X 10~^-3.9 x 10~^ inches (0.07 - 0.10 mm) and
the range for weight is 0.07 x 10~^-0.114 x 10~^ Ibs/inch^
(52-SOgfm ). If you are using only one sheet of paper, the
thickness of the paper should be between 3.9 x 10 -4.7 x
—3
10 inches (0.07 - 0.12 mm) and the weight, between 0.114
X 10~^-0.121 X10^ Ibsfinch^ (80 - 85g!n?).
• Feed documents of more than 10 pages manually, one sheet
at a time.
• Before inserting the document into the ADF, make sure the
pages are not stuck together, to avoid double feeding.
If the document you are about to transmit or copy is more
than one page, fan the sheets of paper and insert them face
down, so that the first page is at the bottom and will be fed
first.
3~7
• The document should not be narrower than the smallest
setting of the paper guides, nor wider than the widest setting
(5.8 inches to 8.5 inches).
• The document should be between 3.9 inches to 35.4 inches.
• The paper should be between 0.002 inches and0.003 inches
thick.
• The paper should not be curled, wrinkled or creased.
• The paper should not be damp.
• The paper should not have any protrusions such as paper
clips, staples, or pasted-on additions. These may damage
the scanner or ADF mechanism.
• If the document is unsuitable forfeeding through the ADF,
make a photocopy and use that.
Page 35

lntelliFAX600/650M
USING THE FUNCTIONS
MAIN FUNCTION ITEM
1.TEMP. SETTINGS
2.CANCEL JOB
3.PRINT REPORTS
4.SET AUTO DIAL
5.USER OPTIONS
SUB-FUNCTION ITEM
1.CONTRAST
2.RESOLUTION
3.0VERSEAS MODE
N/A
1.ACT. REPORT
2.ALL DIAL
3.COVERPAGE
4.CALL BACK MSG
5.USER OPTIONS
6.XMIT REPORT
1.ONE-TOUCH DIAL
2.SPEED-DIAL N/A
1.TONE/PULSE
2.RING DELAY
DEFAULT SETTING
AUTO
STANDARD
OFF
N/A
N/A
N/A
N/A
N/A
N/A
OFF
N/A
TONE
4 RINGS
6.SETUP SYSTEM
Notes
N/A = Not applicable
3.AUTO REDIAL
4.SPEAKER VOLUME
5.F/T RING TIME
6.SMOOTHING
7.BEEPER
8.COVERPAGE OFF
9.RING VOLUME
1.DATE/TIME
2.DAILY TIMER
3.INTERVAL
4.STATIONID
5.REMOTE CODE OFF
6.SET COVER PAGE
(Only forlntelllFAXeSOM)
ON
LOW
30 SECONDS
ON
ON
HIGH
N/A
00:00
OFF
N/A
N/A
3-8
Page 36

USING THE FUNCTIONS
4. USING THE FUNCTIONS
The IntelliFAX600/650M has a number of user-configurable
settings, which you may change in order to obtain the best
performance from the machine.
Some of these options have been set at the factory, and you
may not need to change them. Where an option has been set at
the factory, the setting is given in the table opposite. Other
items such as the date, time and station identification of your
IntelliFAX600/650M, will need to be changed when you first
set up the machine.
Before you can configure the machine, you will first need to
understand the functions, and how to use them.
The most frequently used functions on the IntelliFAX600/650M
have special keys assigned to diem, such as the START, STOP and
COPY keys. Other ftmctions, including storing one-touch dial and
speed-dial numbers and configuring the IntelliFAX600/650M to
suit your requirements, are used less frequently, fri fact many of
these items will only need to be changed when the machine is first
set up. These functions are accessed by pressing the FUNCTION
key, after which a sequence of helpful prompt messages on the
display wül guide you through the available options.
Viewing And Choosing Function Options
FUNCTION
C )
1
ENTER NO. & SET
Automatically
3
3.PRINT REPORTS
4.SET AUTO DIAL
3
5.USER OPTIONS
3
6.SETUP SYSTEM
The functions on the IntelliFAX600/650M are accessed by
pressing the FUNCTION key. There are 6 main function items,
each of which has several sub-function items associated with
it. The main function and associated sub-function items are
shown in the table opposite.
When the FUNCTION key is pressed, A message will appear
briefly on the display instructing you on the use of the cursor
keys. The display will then automatically scroll through the
selections available in the primary function item one at a time.
You can also use the cursor keys (< >) to scroll through the
function selections.
Pressing right cursor repeatedly will quickly scroll forward
through the main function items in the order 2,3,4,5,6,1...
4-1
Page 37

FUlilCTtON
USING THE FUNCTIONS
3
ENTER NO. & SET
, Automatically
1.TEMP, SETT I N G S
6.SETU P SYSTEM
5.USER OPTIONS
4.SET AUTO DIAL
3. PRi NT REPORTS
2 .CAN C EL JOB
JKL
5.USER OPTIONS
SET
Pressing left cursor repeatedly will quickly scroll through the
main function items in a reverse direction 6,5,4,3,2,1 ...
A function item can be selected in one of two ways.
a) Press the key on the numeric dial-pad whose number
corresponds to the number of the function item, even if the
item is not currently displayed, then press the SET key.
For example, to select USER OPTIONS from the function,
press the 5 key on the dial pad and the SET key.
Automatically
1 .TON E/PU LSE
3
2.RING DELAY
3
3.AUTO REDIAL
3
4.SPEAKER VOLUME
3
5 . F/T RING TIME
3
6.S MOOTHING
3
7 . B E E P E R
__
=3 1
8. COVER PAGE
1
9. RING VOLUME
3
The display will begin to scroll through the sub-functions that
are available for USER OPTIONS.
4-2
Page 38

USING THE FUNCTIONS
■0
b) Press the key on the numeric dial-pad whose number
corresponds to the number of the function item, even if the
Item IS not currently displayed, and wait for two seconds.
For example, to select function item 5. USER OPTIONS, press
the 5 key on the dial pad.
5. USER OPTIONS
2 SECOND DELAY
Once a function item has been selected, it will appear in the
display for two seconds, then the display will begin to scroll
through the sub-functions that are available for that function.
You can use the dial pad and the SET key to view and select
sub-function items in the same way as selecting main function
items.
Using The Stop Key
If at any time you get hopelessly lost in the functions, you can
escape by pressing the STOP key, which will return you to the
date/time display. If you make a wrong choice and simply want
to back up to the previous step, you can press the CLEAR key.
Entering Data And Changing Settings___________
Function items have different options associated with them. In
some cases you may have to make a choice from a number of
preset options. In other cases you may have to enter data such
as names and fax or telephone numbers.
Choice Of Options
4-3
_______________________________
Some settings can be selected from a fixed number of options.
For example, the speaker volume can be set to LOW or HIGH.
When presented with this type of choice, the display will
alternate between the item to be selected and a help message
prompting you to make a selection using the left and right
cursor keys and the SET key.
Page 39

USING THE FUNCTIONS
] OR
SPEAKER:LOW
SET
I I
Use the left and right cursor keys to view and change the
available options.
As soon as you press one of the cursor keys, the display will
stop alternating, so that the prompt message is no longer
displayed.
When theTequired choice is in the display, press the SET key
to confirm your choice.
Entering Fixed Length Numbers
ENTER MONTHiXX
Some function items require you to enter numbers using the
'©
ENTER MOMTH;OX
■0
ENTER MONTH:03
numeric keypad. Some of these numbers may be of fixed
length, such as the date and time for the clock.
The IntelliFAX600/650M knows that the month data is always
two digits. After you enter the second digit of the month, press
the SET key. However, if the data in the display is correct and
you do not wish to change it, you can skip to the next step by
only pressing the SET key.
sfr
ENTER DAY:XX
Entering Variable Length Numbers
Some function items, such as storing one-touch dial numbers,
require you to enter numbers whose length is not fixed, such
as fax and telephone numbers.
In such cases you will be prompted with an alternating display
message to enter the number then press SET. Pressing SET
tells the IntelliFAX600/650M that you have finished.
4-4
Page 40

USING THE FUNCTIONS
0 0
©
0 0©
0 0©
0 0©
5:0613306531
SET When you have entered the number and checked that it is
I correct, press the SET key to confirm the entry.
As soon as you press the first digit of the number, the display
will stop alternating and only the number entry line will be
displayed, with the digit that you have just entered.
Use the numeric keypad to enter the rest of the number.
Using The Numeric Keypad To Enter Text
The 12-key dial pad is used for dialing faA and telephone
numbers. It is also used to enter numbers, symbols, text and
punctuation marks when in the function mode.
Each key on the dial pad has a number printed on it. When the
IntelliFAX600/650M is expecting a numeric input (for
example a fax number) only numbers can be input using the
dial pad.
Each dial key also has two or three letters printed by the side
of it, apart from the 1 key and the * and # keys, which are used
for special characters.
The characters assigned to each key are as follows:-
"1" key
"2" key
"3" key .... .DEF3
"4 " key ...............GHI4
*’5” key
"6" key . . . . .MN06
"7" key
’8" key
"9" key
"O 'key .... .QZO
"*■' key
"#" key
...............
..................
...............
...............
................
................
................
................
AEOU/E0AN1
ABC2
JKL5
PRS7
TUV8
WXY9
(SPACE)!"#$%&’()*+,-,/
:;<=>?©[ ]A_
_____ _ _
4-5
Page 41

USING THE FUNCTIONS
NAME : B
“©
NAME : BJ
'©
NAME;BK
©
NAME ; BL
©
NAME : B5
When the IntelliFAX600/650M is expecting text input (for
example a name), the first thing that appears in the display when
you press one of the number keys is the relevant number. Press
the key again, and the first letter associated with that key appears.
Thus, if you press the 5 key repeatedly, the character currently
above the display cursor will change, as shown opposite;-
J-K-L-5-J-.
Remember, this only applies when the IntelliFAX600/650M
is expecting a text input, such as a name. When it is expecting
a numeric input, such as a telephone number, pressing the
number key repeatedly will simply produce the same number
repeated on the display.
By pressing the appropriate number key the correct number of
times, you can get the character you wish to enter to appear
above the cursor. You can then press another number key to
move onto the next character.
Entering Repeated Characters
NAME
■©
NAME • LA
NAME : LA
©
NAME : L A A
©
NAME : LAB
The IntelliFAX600/650M does not know that you wish to go
onto the next character until you press a different number key.
Should you wish tn enter the same character twice in
succession, or another character on the same number key, you
must move the cursor one place to the right by pressing the
right cursor key. The example opposite shows how to enter the
letter A followed by the letter B.
The initial condition of each character, before a number key is
pressed, is a blank, so if you wish to enter a space for a
particular character, press the right cursor key twice.
4-6
Page 42

USING THE FUNCTIONS
Special Characters, Symbols And Punctuation Marks
All commonly used accented characters are assigned to the 1
key. Symbols and punctuation marks are assigned to the * and
# keys.
NAME : DENT
A total of 36 characters is available on these keys. To make it
o
M A R K -_!"#$%&'()* +
easier, when you press the 1, * or #, the display will change to
show a list of the characters available on that key.
The cursor appears below the currently selected character.
O
M A R K -_!"#$%&'()* +
NAM E ; D E NT &
SIX TIMES
Correcting Mistakes
NAME:DENT & SON
] c
NAME : DENT & SON
CLEAR
NAME : DENT &
Press the * key repeatedly, until the cursor is below the
required character, then press the right cursor key.
The example opposite shows how to use the * key to enter the
ampersand (&) symbol.
If you enter an incorrect character, you can use the left cursor
key to move the cursor back to the incorrect character, then
enter anew character using the correct number key. If you want
to replace a character with a space, press the key once.
Note that you cannot insert additional characters into existing
text or numbers, you can only overwrite them with new
characters, so if you leave out a character you must move the
cursor back to the character after the last correct character and
press the CLEAR key. This will erase the chaiacter above the
cursor and everything to the right of the cursor. You may then
re-enter the text.
4-7
Page 43

SETTING THE USER OPTIONS
5. SETTING THE USER OPTIONS
After reading the previous section on using the
IntelliFAX600/650M functions, you are now ready to proceed
with configuring the machine. As mentioned in the previous
section, the configuration is carried out under two function
items, USER OPTIONS and SETUP SYSTEM.
To access the USER OPTIONS function
FUNCTION
cr )
©
5. USER OPTIONS
SET
...
3^1
1. TONE/PULSE
I i
1
0
SET
Press the FUNCTION key.
Press die 5 key.
The USER OPTIONS function will appear in the display.
Press the SET key. The display will begin to scroll through the
sub-function items that are available for USER OPTIONS.
At this point you can select the TONE/PULSE option by
pressing the 1 key and the SET key, or pressing the 1 key and
waiting two seconds. In the following sections, for simplicity,
only the number key plus SET key method of selecting a
function item is used, but don’t forget that you can use both
methods.
OR
2 SECOND DELAY
If you wish to change more than one user option, you can do
this without exiting from the user options function. When you
have finished setting one option, just select the next option
using number key. When you have finished setting all the
options you wish to change, press the STOP key.
5-1
Page 44

SETTING THE USER OPTIONS
I.Tone/Pulse
The IntelliFAXd00/650M supports pulse (ROTARY) and tone
(MULTI-FREQUENCY) dialing, and you must select the type
of dialing suitable for your telephone line.
5. USER OPTIONS
©
1. TONE/PULSE
SET
DIAL!NG:TONE
\ ALTERNATE |
SELECT < > & SET
] OR [
SET
I I
To set tone or pulse dialing;
After selecting the USER OPTIONS, press the 1 key.
I.TONE/PULSE will appear in the display, then press the SET
key.
An alternating display will prompt you to select TONE or
PULSE using the cursor keys, then press the SET key.
3 If you wish to change the currently displayed setting, press one
of the cursor keys, otherwise press the SET key to exit.
Press the SET key.
1. TONE/PULSE
O 0©
O 0©
0 0©
O ©O
5-2
OR C
The display will revert to I.TONE/PULSE.
If you want to set another user option, press a number key,
otherwise press the STOP key to exit.
Page 45

2.Ring Delay
SETTING THE USER OPTIONS
This option sets the number of rings before the
IntelliFAX600/650M will answer an incoming call when set
to AUTO ANS or F/T mode.
If you do not wish to be disturbed by incoming fax calls, it is a
good idea to set this to "0" (zero) so that no Ring Tones will
be heard.
5. USER OPTIONS
"0
2 . R 1
RING
SELECT <> & SET
N Q DELAY
SET
i
_________
i
D E L A Y : 0 4
1 ALTERNATE |
OR
RING DELAY:02
To set the ring delay;
After selecting the USER OPTIONS, press the 2 key.
2.RING DEUAY will appear in the display, then press the SET
key.
An alternating display will prompt you to select the ring delay
using the cursor keys, then press the SET key.
If you wish to change the current setting, press one of the cursor
keys, otherwise press the SET key to exit.
As soon as you press a cursor key, the display will stop
alternating and only the selection line will be displayed.
OR r ) Use the cursor keys to select 0, 1,2, 3 or 4 rings.
SET
L I
2. RING DELAY
O 0©
O 0©
©00
OR c
O ©0
Press the SET key.
The display will revert to the 2.RING DELAY display.
If you want to set another user option, press a number key,
otherwise press the STOP key to exit.
5-3
Page 46

SETTING THE USER OPTIONS
S.Auto Redial
In the event of an outgoing call failing to make connection due
to the called number being engaged or for some other reason,
selecting auto redial ON allows the IntelliFAX600/650M to
redial the last used number up to 3 times at 5-minute intervals.
5. USER OPTIONS
■©
3.AUTO REDIAL
5tr
] OR [
SET
r
....
I
To set auto redial:
After selecting the USER OPTIONS, press the 3 key.
3. AUTO REDIAL will appear in the display, then press the
SET key.
An alternating display will prompt you to change the auto
redial setting between OFF and ON using the cursor keys, then
press the SET key.
If you wish to change the current setting, press one of the cursor
keys, otherwise press the SET key to exit.
Press the SET key.
3.AUTO REDIAL
O 0 ©
©00
O 0 ©
O0O
OR f
.............
5-4
STOP
The display will revert to 3,AUTO REDIAL
If you want to go on to set another user option, press a number
•>
key, otherwise press the STOP key to exit.
Page 47

4.Speaker Volume
5. USER OPTIONS
■©
SETTING THE USER OPTIONS
The monitor speaker allows the progress of incoming and
outgoing calls to be monitored. Two selections are available,
low and high.
To set the speaker volume;
After selecting the USER OPTIONS, press the 4 key.
4. SPEAKER VOLUME
SET
/'TZs— <— —> If you wish to change the current setting, press one of the cursor
^ ^ I OR I ) keys, otherwise press the SET key to exit.
Sfr
4.SPEAKER VOLUME
O 0©
O 0©
O 00
©0©
OR C
4. SPEAKER VOLUME will appear in the display, then press
the SET key.
An alternating display will prompt you to change the speaker
volume setting between HIGH and LOW using the cursor keys,
then press the SET key.
Press the SET key.
The display will revert to 4.SPEAKER VOLUME.
If you want to set another user option, press a number key,
otherwise press the STOP key to exit.
5-5
Page 48

SETTING THE USER OPTIONS
5.F/T Ring Time
In F/T answer mode, when the IntelliFAXhUU/bSUM answers
an incoming call and detects that it is not a fax being sent, it
will output a simulated ringing tone from the speaker to alert
the user that there is an incoming telephone call or manually
transmitted fax. The F/T RING TIME option sets the time for
which this ringing occurs, before the IntelliFAX600/650M
reverts to fax receiving mode. The F/T switch monitors for fax
tone (CNG) during F/T ring time. All automatic transmissions
must generate CNG tone to meet CCITT specifications. More
detailed information about the F/T switch and reception of
faxes is given on page 9-1.
5. USER OPTl
---
\ JKL .-—V
0 N S
3“ ©
5 . F / T RING
sfr
RING TIME:30 SEC|
\ ALTERNATE
SELECT ^ ^
RING TIME:10 SEC
TIME
t
& SET
OR
To set the F/T ring time:
After selecting the USER OPTIONS, press the 5 key.
5. F/T RING TIME will appear in the display, then press the
SET key.
1
An alternating display will prompt you to change the F/T ring
time setting using the cursor keys, then press the SET key.
If you wish to change the current setting, press one of the cursor
keys, otherwise press the SET key to exit.
As soon as you press a cursor key, the display will stop
alternating and only the selection line will be displayed.
OR
SET
5. F/T RING TIME
O ©O
0 00
0 ©0
O ©0
OR C
5-6
Use the cursor keys to select 10, 20, 30 or 60 seconds.
Press the SET key.
The display will revert to 5.F/T RING TIME.
If you want to set another user option, press a number key,
otherwise press the STOP key to exit.
Page 49

S.Smoothing
SETTING THE USER OPTIONS
This is a unique Brother feature that enhances the appearance
of any received fax by smoothing out "jagged edges" on lines
and text. More detailed information about smoothing is given
on page 9-7.
5. USER OPTIONS
r\
6. SMOOTHING
SET
SMOOTHING:ON
\ ALTERNATE \
SELECT & SET
<— —» If you wish to change the current setting, press one of the cursor
CZZZZZ] OR I ) keys, otherwise press the SET key to exit.
SET
!
~1
To switch smoothing on or off;
After selecting the USER OPTIONS, press the 6 key.
6.SMOOTHING will appear in the display, then press the SET
key.
An alternating display will prompt you to change the
smoothing setting between OFF and ON using the cursor keys,
then press the SET key.
Press the SET key.
6, SMOOTHING
O00
000
O 00
OR C
G00
The display will revert to 6.SMOOTHING.
If you want to set another user option, press a number key,
otherwise press the STOP key to exit.
Note:
- Smoothing is done by the receiver and adds no additional
communications time. It is usually set to "on".
5-7
Page 50

SETTING THE USER OPTIONS
T.Beeper
When the beeper is switched on it will sound each time a key
is pressed. The beeper also sounds when an error occurs or you
receive a message.
5 .USER OPTIONS
■ 0
7 .BEEPER
SET
r. ~i
BEEPER:ON
ALTERNATE
SELECT < > & SET
] OR [
SET
To switch the beeper on or off:
After selecting the USER OPTIONS, press the 7 key.
7.BEEPER will appear in the display, then press the SET key.
An alternating display will prompt you to change the beeper
setting between OFE and ON using the cursor keys, then press
the SET key.
If you wish to change the current setting, press one of the cursor
keys, otherwise press the SET key to exit.
Press the SET key.
1 .BEEPER'
O 0©
0 0
O 0©
©00
5—8
©
OR c
The display will revert to 7.BEEPER.
If you wish to set another user option, press a number key,
otherwise, press the STOP key to exit.
Page 51

S.Coverpage On/Off
SETTING THE USER OPTIONS
If you frequently send a fax with a coverpage, it is convenient
to set coverpage to ON to avoid having to set the coverpage
each time.
5. USER OPTIONS
©
8. COVERPAGE
SET
] OR
SET
I
....
:
1 . COMMENT
1 ALTERNATE
SELECT < >
OFF
t
& SET
To switch the coverpage on or off:
After selecting the USER OPTIONS, press the 8 key,
S.COVERPAGE will appear in the display, then press the SET
key.
An alternating display will prompt you to change the
coverpage setting between OFF and ON using the cursor keys,
then press the SET key.
If you wish to change the current setting, press one of the cursor
keys, otherwise press the SET key.
If you set to ON, you will be prompted to select comment by
using the cursor keys.
] OR
SET
I
-- -
1
- O - COVERPAG£
D
8, COVERPAGE
Select a comment you wish to send, then press the SET key.
The COVERPAGE lamp will be lit, and the display will revert
to S.COVERPAGE.
If you wish to set another user option, press a number key,
otherwise, press the STOP key to exit.
5~9
Page 52

SETTING THE USER OPTIONS
9.Ring Volume
Note:
- If you set the coverpage to on, total number of pages will not
be printed on the coverpage.
Also please note that the comment that you select will be sent
on all coverpage transmissions.
- If you wish to not send a coverpage for a specific
transmission, then just press the COVERPAGE button.
You can control ring volume high or low.
5. USER OPTIONS
9. RING VOLUME
SET
. y [
RING
---------
1
1
V 0 L U M E : H 1 G H
ALTERNATE |
SELECT < > & SET
] OR [
SET
i I
To set the ring volume;
After selecting the USER OPTIONS, press the 9 key.
9.RING VOLUME will appear in the display, then press the
SET key.
An alternating display will prompt you to change the ring
volume setting between HIGH and LOW using the cursor
keys, then press the SET key.
If you wish to change the current setting, press one of the cursor
keys, otherwise just press the SET key to exit.
Press the SET key.
9. RING VOLUME
O 0O
O 0©
0 0
O00
5-10
©
OR c
The display will revert to 9.R1NG VOLUME.
If you want to set another user option, press a number key,
otherwise press the STOP key to exit.
Page 53

6. SYSTEM SETUP
To access the SETUP SYSTEM function;
■ O FUKCTION
CZ
----
)
\ mo ^—V.
□= ©
6. SET UP SYSTEM
SET
I
........"1
©
1 . D A T E / T I M E
Press the FUNCTION key.
Press the 6 key.
The SETUP SYSTEM function will appear in the display.
Press the SET key.
The display will begin to scroll through the siih-funetion items
that are available for SETUP SYSTEM.
You can select DATE/TIME by pressing the 1 key plus the
SET key, or you can select a different function item by pressing
another number on the keypad plus the SET key.
SET
I
If you wish to change more than one SETUP SYSTEM
function item, you can do this without exiting from the
function. When you have finished setting one item, just select
the next function item using number key or cursor keys.
When you have finished setting all the items you wish to
change, press the STOP key.
6-1
Page 54

SYSTEM SETUP
1.Date/Time
6.SETUP SYSTEM
0
1 . D A T E / T I M E
SET
E N.T E RY E A R : X X
ENTER Y E A R ; 9 X
ENTER
\
_____
i
ENTER
ENTER
Y E A R : 9 2
1 _l
M 0 N T H : X X
M O N T H : 0 X
The IntelliFAX600/650M has a built-in clock, which displays
the date and time. This clock is used to place date and time on
incoming and outgoing faxes.
To set the date and time:
After selecting the SETUP SYSTEM, press the 1 key and the
SET key.
Use the numeric keypad to enter the last two digits of the year.
Press the SET key.
Enter two digits for the month.
ENTER
M 0 N T H : 0 3
SET
1
ENTER
ENTER
ENTER
^ [■> sfr
. i 1 :i
D A Y : X X
D A Y : 1 X
D A Y : 1 4
ENTER T I M E ; X X ; X X
ENTER T I M E : 1 X : X X
ENTER
ENTER
T I M E ; 1 2 ; X X
T I M E : 1 2 : 4 X
ENTER T 1 M E ; 1 2 ; 4 3
Press the SET key.
Enter two digits for the day of the month.
Press the SET key.
Enter the time in 24 hour format.
6-2
Page 55

SYSTEM SETUP
SET
1 . D A T E / T I M E
After entering the fourth digit of the time, press the SET key.
The display will revert to l.DATE/TIME.
If you want to change another system setting, press a number
key, otherwise press the STOP key to exit.
Note;
- In the event of power failure, the clock will continue to
operate from a re-chargeable internal battery for about 1
hour. After this the date and time will be lost and must be
re-entered.
- All other settings in the USER OPTIONS and SETUP
SYSTEM functions are stored in non-volatile memory, and
will be retained indefinitely in the event of power failure.
6-3
Page 56

SYSTEM SETUP
2.Daily Timer
The DAILY TIMER is the time which is displayed whenever
you select the timer function for a delayed job. If you
frequently do delayed jobs at the same time, it is convenient
to set the daily timer to that time to avoid having to set the
timer manually each time you do a delayed sending or polling
job.
6. SETUP SYSTEM
■©
2. DAILY TIMER
SET
\::: i
ENTER TIME:00:00
ENTER TIME:10:00
ENTER TIME;19:00
ENTER TIME:19:40
ENTER TIME:19:45
S£T
To set the daily timer:
After selecting the SETUP SYSTEM, press the 2 key.
2.DAELY TIMER will appear in the display, then press the
SET key.
You will be prompted to enter the time. Use the numeric
keypad to enter the time in 24 hour format.
Press the SET key.
2. DAILY TIMER
6-4
After entering the fourth digit, press the SET key. The display
will revert to 2.DAILY TIMER.
If you want to change another system sotting, press a number
key, otherwise press the STOP key to exit.
Page 57

S.Activity Report Interval
The activity report is a list of all incoming and outgoing faxes
that have been sent or received over a certain interval. You can
set the interval at which the activity report is printed to OFF
(activity report not printed), 6,12, 24 hours, 2 days, 4 days or
7 days and the start time at which the activity report is first
printed. For example, to print the activity report once a day at
15:00, you would set the activity report interval to 24 hours
and the start time to 15:00. The activity report lists the last 30
most recent activities, that is, transmissions that the machine
has sent or received.
SYSTEM SETUP
6.SETUP SYSTEM
3. INTERVAL
SET
I......
I
OR [
EVERY 12 HOURS
To set the activity report interval and start time:-
After selecting the SETUP SYSTEM, press the 3 key.
3.INTERVAL will be displayed, then press the SET key.
An alternating display will prompt you to select the interval at
which the activity report is to be printed using cursor keys, then
press the SET key.
If you wish to change the activity report interval, press a cursor
key, otherwise press the SET key to continue.
As soon as you press a cursor key, the display will stop
alternating, and only the selection line will be displayed.
SET
OR i )
Use the cursor keys to select OFF, or to select the interval at
which the activity report is to be printed. If you select 7 days,
you will be asked on which day of the week the activity report
is to be printed. Use the cursor keys to select.
Press the SET key.
6-5
Page 58

SYSTEM SETUP
START
START A T
START
START A T
START
A T
A T
A T
SET
Q 00 0
1 0
1 9
1 9
1 94 5
3. INTERVAL
Enter the start time for the activity report print in 24 hour
format.
0 0
0 0
4 0
After entering the fourth digit, press the SET key. The display
will revert to the 3.INTERVAL display.
If you want to change another system setting, press a number
key, otherwise press the STOP key to exit.
Note;
- You can also print the activity report on demand. See page
13-1.
- The default setting for interval is "OFF".
4.Station ID
6. SETUP SYSTEM
■©
4, STATION ID
SET
The STATION ID is printed on the coverpage, and at the top
of each page of every fax you send. It also identifies your fax
machine to other callers who wish to send faxes to you. Station
ID is an important feature, since it verifies that each page of a
fax has come from your fax machine, and lets callers know that
they are sending to the correct destination.
You can enter your name or company name, fax number and
telephone number in the station ID.
To set the station ID on your IntelliFAX600/650M;
After selecting the SETUP SYSTEM function option, press
the 4 key.
4.STATION ID will appear in the display, then press the SET
key.
You will be prompted to enter your fax number and press the
SET key.
6-6
Page 59

SYSTEM SETUP
FAX:061 3305520
SET
CZZZZ]
SET
Using the numeric keypad, enter your fax number (which can
have up to 20 digits).
Press the SET key to confirm the entry.
You will now be prompted to enter your telephone number.
If you have a telephone on a different line, enter your telephone
number. If your IntelliFAX600/650M and telephone share the
same line, enter the same number again up to 20 digits.
Press the SET key to confirm the entry.
You will be prompted to enter your name.
Enter your name or the name of your company (up to 20
characters) in the way described in the section of Using The
Numeric Keypad To Enter Text (page 4-5).
SET
4. STATION ID
Press the SET key to confirm the entry.
The display will revert to 4.STATION ID. If you want to
change another system setting press a number key, otherwise
press the STOP key to exit.
Note;
-The telephone number is only used for the Call Back
Messages and super COVERPAGE features.
- If you do not enter a fax number, no other information can
be entered.
'You cannot enter a using the PAUSE key when
registering your fax and telephone number. Use the (<— / —>)
cursor keys instead to enter a space. It will be printed as “ ”,
but will not be displayed.
6-7
Page 60

SYSTEM SETUP
5. Remote Code
Faxes can be received through the use of an external telephone
or an extension telephone.
You can activate the fax machine from a remote telephone.
This is useful if you are using the machine on an extension of
a key telephone system.
Remote activation allows you to receive a call on a telephone
which is either connected from the fax unit, or is parallel
connected to your line (extension telephone), but is not located
near the fax unit. If an in-coming call is a fax transmission,
simply enter the remote code on the external/ extension
telephone (tone-type) to enable reception of the fax.
Note:
- If you accidentally pick up your extension or external
telephone by mistake when you are transmitting at receiving
a fax, there might be some slight distortion on the document.
Registering Remote Code
6. SETUP SYSTEM
■©
5. REMOTE CODE
SET
] OR [
- If you wish to pick up a telephone call remotely from an
extension telephone during F/T ringing, you can use the
remote deactivation code.
Use the following procedure to register a remote code.
After selecting the SETUP SYSTEM function, press the 5 key.
5.REMOTE CODE will appear in the display, then press the
SET key.
An alternating display will prompt you to select remote
activation ON or OFF using the cursor keys, then press the SET
key.
If you wish to change the current setting, press one of the cursor
keys, otherwise press the SET key to exit.
6-8
Page 61

SYSTEM SETUP
SET
ACT.
ACT.
C 0 D E : I 5 1
C 0 D E ; * 3 6
SET
r T' ~l
DEACT. CODE:#51
DEACT. CODE:#31
SET
c
Press the SET key.
If you set to ON, you will be prompted to enter a new remote
code.
The default setting is *51. If you do not wish to change the
default setting, press the SET key.
Using numeric keypad, enter a three-digit code, then press the
SET key.
You will be prompted to enter a new deactivation code, which
deactivates the fax unit and allows you to answer a call on a
telephone which is parallel connected.
The default setting is #51. If you do not wish to change the
defaut setting, press the SET key.
Using numeric keypad, enter a three-digit code, then press the
SET key.
5.REMOTE CODE
The screen will revert to 5. REMOTE CODE
Note:
- Due to limitations of telephone systems and telephone sets,
remote deactivation can not be guranteed to work under all
circumstances.
6~9
Page 62

SYSTEM SETUP
S.Coverpage Comment (Only for lntelliFAX650M)
The IntelliFAX650M can send an electronically generated
coverpage with any fax that is transmitted. Any one of three
preset and two user-definable comments can be added to this
coverpage.
The coverpage comments are identified by numbers, as
follows:
1. (COMMENT OFF)
2. PLEASE CALL
3. URGENT
4. CONFIDENTIAL
5. (USER DEFINED)
6. (USER DEFINED)
6.SETUP SYSTEM
mo.
6.SET COVERPAGE
SET
] OR [
5 . T
5.TOP SECRET
lo store your own coverpage comments in the Intelli-
FAX650M:-
After selecting the SETUP SYSTEM, press the 6 key.
6.SET COVERPAGE will appear in the display, then press the
SET key.
You will be prompted to select the number of the coverpage
comment you wish to store.
Press the cursor key to select the number of the coverpage
comment that you wish to store, then press the SET key.
Use the numeric keypad to enter the text of the coverpage
comment (which can be up to 27 characters) in the way
described in the section of Using The Numeric Keypad To
Enter Text (page 4-5).
SET
6.SET COVERPAGE
6-10
Press the SET key to confirm the entry.
The display will revert to 6. SET COVERPAGE. If you wish
to change another system setting, press a number key,
otherwise press STOP to exit.
Page 63

7. AUTO DIALING
AUTO DIALING
The IntelliFAX600/650M allows you to store frequently used
fax and telephone numbers in the machine’s memory, and to
recall and dial them using codes. This useful feature saves you
having to dial the full number on the numeric keypad. There
are five labelled one-touch dial buttons for your most
frequently used numbers, and you can store a further 10
speed-dial numbers on the IntelliFAXbOO and 40 speed-dial
numbers on the IntelliFAX650M that can be called up by
dialing a two-digit code on the numeric key pad.
Note:
- When storing auto dial numbers, it is vital that you take every
precaution during entry of numbers into the auto dial
memories, to ensure that the numbers are correct. Always
double-check international dialing prefixes. It is a good idea
to print out the all dial list whenever you have stored or
amended a one-touch or speed-dial number. See page 13-2
"Printing the all dial list".
Chain Dialing
- Incorrect numbers can cause great expense to you,
unnecessary congestion of the telephone network, and
inconvenience to others.
- In the event of interruption in electric power, all the stored
fax and telephone numbers are retained in memory.
In addition to the one-touch dialing and speed dialing functions
available on the unit, a further convenient option called "chain
dialing" can be used with either of the auto dialing functions.
When you send an automatic-transmission, the machine
allows you to use a single one-touch dial or speed dial number.
However, if you register a one-touch or speed-dial as a "chain
dialing" number, the machine allows you to use up to five chain
numbers and on6 one-touch or speed-dial number.
When dialing overseas fax or telephone numbers, there may
be situations in which a company can offer you better rates
than the telephone company you normally use. Chain dialing
lets you choose the telephone company, whose line charge is
lower if you register the access code to a second telephone
company as a chain dial number. This is also important when
using a telephone credit card.
7-1
Page 64

AUTO DIALING
You can register numbers with up to 20 digits.
Chain dialing are registered the same as any other number except
that you register the type as a chain. See page 7-4 and 7-6.
Storing Auto Dial Numbers
Auto dial numbers can be stored by selecting function item 4
- SET AUTO DIAL, then choosing either ONE-TOUCH
DIAL or SPEED-DIAL from the options presented.
As well as the fax or telephone number, you can also store the
name of the destination, which will be displayed as a check
when you dial the number using one-touch or speed-dialing.
Using The Redial/Pause Key
When storing anto dial numbers, yon will n.se the numeric keypad
to enter numbers and text as described earlier.
If your IntelliFAX600/650M is connected to a PBX, you may
need to insert a code for outside line access before each fax or
telephone number that you store in the memory. For example,
if your code for outside line access is "9", you will need to store
"9" as the first digit of every fax or telephone number in the
auto dialing memories.
If yonr PRX returns secondary proceed indication (in other
words, if you have to wait for "outside dial tone" before
dialing, after accessing an outside line) the PAUSE button
should be used.
During storage of auto dial numbers, pressing the PAUSE
button between the outside line access code and the rest of the
number displays a dash on the LCD, for example
9-0613306531.
When dialing using the auto dial number, this builds in 3.5 second
delay, needed to allow time for the outside telephone exchange to
prepare for dialing after the access code has been dialed.
Only one pause can be inserted into a number, so if you need more
than a 3.5 second delay, please contact your Brother service who
can adjusts the pause period.
Storing One-touch Dial Numbers
FUNCmiV
■0
7-2
Press the FUNCTION key.
Press the 4 key to access the SET AUTO DIAL function.
Page 65

AUTO DIALING
4. SET AUTO DIAL
©
1.ONE-TOUCH DIAL
SET
[Z
......
I
SELECT ONE-TOUCH
5: BROTHER
ALTERNATE
1. CHANGE 2. EXIT
0
4.SET AUTO DIAL will be displayed, then press the SET key.
The display will begin to scroll through the sub-function items
that are available for 4.SET AUTO DIAL.
Press the 1 key to access the ONE-TOUCH DIAL function,
then press the SET key.
You will be prompted to select a one-touch key.
Press the one-touch key to which you wish to assign a number.
If the one-touch key is already in use, you will be asked if you
wish to change it or exit and select a different one-touch
number. This display does not appear if the one-touch key you
chose is not assigned.
Press 1 to assign a new number to the one-touch key, or press
2 to choose a different one-touch key.
5 :
ALTERNATE
ENTER & SET
5:0613306531
SET
NAME ;
ALTERNATE
i
ENTER & SET
You will be prompted to enter the fax or telephone number of
the destination. If you are replacing an existing number with
a new one, the old number will appear in the display. Press the
CLEAR key to erase the old number.
Enter the number, using the numeric keypad (with can have up
to 20 digits).
Press the SET key.
You will be prompted to enter the name of the destination.
If you are replacing an existing name with a new one, the old
1
name will appear in the display. Press the CLEAR key to erase
the old name.
For information on using the numeric key pad to enter text,
please read the section on Using The Numeric Keypad To
Enter Text.
7-3
Page 66

AUTO DIALING
NAME:BROTHER
S£T
Use the numeric keypad to enter the name (up to 17
characters).
Press the SET key.
You will now be prompted to use the cursor keys to select the
type of number. There are four options.
FAX - Choose this option if the destination number is a fax
machine.
TEL - Choose this option if the destination number is a
telephone.
F/T - Choose this option if the destination number has both a
fax and a telephone on one line.
CHAIN - Choose this option if you ore registering a number
for chain dialing.
This information will be printed on the list of auto dial
numbers, so that you know which of your auto dial destinations
are fax, telephone, both or chain.
^ C=ID OR
T Y P E : T E L
^ I Qp I
SET
............
I :□
SELECT ONE-TOUCH
ORC
The default setting is FAX. If you wish to change this, press a
cursor key, otherwise press the SET key to continue.
As soon as you press a cursor key, the display will stop
alternating, and only the selction line will be displayed.
Make your selection with the cursor keys.
Press the SET key.
The display will change to SELECT ONE-TOUCH.
If you wish to assign another one-touch key, press the
one-touch key. Otherwise press the STOP key to exit.
7-4
Page 67

Storing A Speed-dial Number
4. SET AUTO DIAL
After selecting the SET AUTO DIAL, press the 2 key to access
'©
the speed-dial function.
AUTO DIALING
2. SPEED-DIAL
SET
I I
SPEED-DIAL? #
SPEED-DIAL? #0
SPEED-DIAL? #05
# 05:BROTHER
ALTERNATE
1. CHANGE 2. EXIT
©
2.SPEED-DIAL will appear in the display, then press the SET
key.
You will be prompted to enter a two-digit speed-dial number.
Using the numeric keypad, enter the two-digit speed-dial
number (from 01 to 10 on the IntelliFAXhOO, from 01 to 40
on the IntelliFAX650M) to which you wish to assign a number.
A speed-dial number is always a two-digit code, even if the
first digitiszero. You cannotjustenter 5 for speed-dial number
0^, for example, you must enter 05
If the speed-dial number is already in use, you will be asked if
you wish to change it, or exit and select a different speed-dial
number. This display will not appear if the speed-dial number
you choose is not assigned.
Press 1 to assign a new number to the speed-dial number, or
press 2 to choose a different speed-dial number.
# 05 :
ALTERNATE
ENTER & SET
#05:061 3306531
SET
You will be prompted to enter the fax or telephone number of
the destination. If you are replacing an existing number with
a new one, the old number will appear in the display. Press the
CLEAR key to erase the old number.
Use the numeric keypad to enter the number (which can have
up to 20 digits).
Press the SET key.
7-5
Page 68

AUTO DIALING
NAME;
ALTERNATE |
1
ENTER
NAME: BROTHER
& SET
SET
You will now be prompted to enter the name of the destination.'
If you are replacing an existing name with a new one, the old
name will appem in the display. Press the CLEAR key to erase
the old name.
Use the numeric keypad to enter the name (up to 15
characters).
Press the SET key.
You will now be prompted to use the cursor keys to select the
type of number. There are four options.
FAX - Choose this option if the destination number is a fax
machine.
TEL - Choose this option if the destination number is a
telephone.
F/T - Choose this option if the destination number has both a
fax and a telephone on one line.
CHAIN - Choose this option if you arc registering a number
for chain dialing.
OR [
T Y P E : T E L
OR
SET
SPEED-DIAL? #_
The default setting is FAX. If you wish to change this, press a
cursor key, otherwise press the SET key to continue.
As soon as you press a cursor key, the display will stop
alternating, and only the sclction line will be displayed.
Make your selection with the cursor keys.
Press the SET key.
The display will change to SPEED-DIAL? #_.
If you wish to assign another speed-dial number, enter the
two-digit short code. Otherwise press the STOP key to exit.
7-6
Page 69

8. SENDING FAXES
In a previous section you learned how to use the Intelli-
FAX600/650M as a copier. This section tells you how to send
faxes. It’s important to remember that the same rules about
what documents are suitable for copying also apply to
documents for transmission, so if you skipped that section it’s
a good idea to read it now.
The IntelliFAX600/650M has many features for ease of use
and to enhance the quality of transmitted faxes. After looking
at the basics of sending a fax, we will go on to discuss some
of these more advanced features.
Sending A Fax Automatically
03/14/1992 12;43
To send a fax, first insert the document you wish to send, face
down, in the document feeder, just as when making a copy.
SENDING FAXES
^ I
dOi
COPY
FAX:
0613306531
BROTHER FRANCE
PRESS COPY
ALTERNATE \
I
NO. & START
O 0©
© ©0
©0©
O © 0
The top edge of the document should face into the feeder,
otherwise your fax will be received upside-down.
After you insert the document, the display will change,
prompting you to press the COPY key, or dial a fax number
and press the START key.
Dial the number of the destination, using one of the following
methods.
1, Manual Dialing
Dial each digit of the destination fax number on the numeric
keypad.
The number will appear in the display as you dial, so that you
can check if it is correct.
2. One-Touch Dialing
Up to five fax numbers can be stored, and recalled using one
of the five one-touch buttons located immediately below the
display. To dial one of these stored numbers, simply press the
appropriate button.
When you press a one-touch button, the name of the
destination will appear in the display.
8-1
Page 70

SENDING FAXES
3. Speed'Dialing
Up to 10 speed-dial numbers on the IntelliFAXbOO and up to
40 speed-dial numbers on the IntelliFAX650M can be stored,
and recalled by dialing a two-digit speed dial code on the
keypad.
SPEED DIAL
o
SPEED-DIAL? #
3”©'©
SPEED-DIAL? #0
SPEED-DIAL? #05
SET
BROTHER BELGIUM
To speed-dial, first press the speed-dial key. This tells the
IntelliFAX600/650M to expect a speed dial code instead of a
full-length, manually-dialed number.
You will be prompted to enter a speed-dial number.
Enter the two digit speed dial code.
Press the SET key.
After entering the code, the name of the destination will appear
on the display.
Information on storing one-touch and speed-dial numbers is
given in the section on AUTO DIALING, page 7-1.
SENDING
8-2
After the number to be dialed has been entered by one of these
three methods, press the START key.
The IntelliFAX600/650M will dial the number and send the
fax.
Note:
- When sending automatically, a "CNG" tone is sent by your
unit. This is an important signal if the other end is using a F/T
switch or TAD interface.
Page 71

Sending A Fax Manually
If you want to send a fax manually, first place the document
in the feeder.
^ i
dOl
You will be prompted to press the COPY key, or enter a fax
number and press START. As you wish to send the fax
manually, ignore this message.
Lift the telephone receiver or press the HOOK key, and listen
for dial tone.
You will be prompted to enter the fax number.
SENDING FAXES
©00
/ O©0
O 0©
SENDING
You can use manual, one-touch or speed-dialing on the
IntelliFAX600/650M.
If the called side is a fax machine set to auto answer, you will
hear fax tones when the machine answers the call.
Press the START key to send your fax.
The IntelliFAX600/650M will begin to send the fax.
You may now replace the telephone receiver.
8-3
Page 72

SENDING FAXES
If the called party answers the call manually, you can have a
conversation.
If you want to send a fax after speaking to the called party,
press the START key after the called party has pressed theirs
and is putting fax tones onto the line.
SENDING
The IntelliFAX600/650M will begin to send the fax.
You may now replace the telephone receiver.
Sending A Fax Using Chain Dialing
Place the document in the feeder.
O 0©
00©
OR
OR
0 00
O 0©
0 0
©
O ©0
©00
O ©0
Press the chain dial number first (you can do up to 5 chains per
dialing sequence).
Press other registered telephone numbers.
c
8-4
Press the START key.
Note:
- You can place a pause either at the end of a chain number or
the begining of the next chain number to allow time for
delayed dial tones.
- Depending on the type of telephone credit card you are using
it maybe necessary to register the telephone numbers as chain
dial numbers and the access code as a regular number,
- If you are doing manual dialing any pause keys must be
placed into the registered chain dial number.
Page 73

Automatic And Manual Redialing
SENDING FAXES
HEDIAUPAUSE
o
AWAITING REDIAL
Resolution
If your call fails to be connected for any reason, you can redial
the number by pressing the REDIAL/PAUSE key.
If you don’t want to waste time re-trying a busy number, the
IntelliFAX600/650M can also redial the number automatically
if auto redial has been switched on when configuring the system
(see page 5^). The IntelliFAX600/650M will re-dial the
number three times at five-minute intervals before giving up.
In the interval between re-tries, AWAITING REDIAL is
displayed.
If you wish to stop auto redial, just press the STOP key.
In order to transmit a document over the telephone network,
the IntelliFAX600/650M scans the document, line-by-line,
from top to bottom, in the same way as a television picture.
The scanned image is then sent to another fax machine as an
electrical signal, where it is printed out line by line to
reproduce a copy of the original document.
The smaller the distance between the scan lines, the better the
reproduction of the document. This is known as the
RESOLUTION of the fax machine.
The IntelliFAX600/650M has three resolution settings.
STANDARD is a resolution of 98 x 203 lines per inch.
FINE is a resolution of 196 x 203 lines per inch.
SUPERFINE is a resolution of 392 x 203 lines per inch.
There is also a special mode for photographs, which will be
described later.
When sending a fax or making a copy, the resolution can be
changed at any time before you press the START key or COPY
key.
It is set by pressing the RESOLUTION key (labelled
FINE-S.FINE-PHOTO) on the right of the control panel.
Standerd resolution is selected when both lamps are off. One of
the other resolution setting is selected when the appropriate lamp
is lit. Afer sending the fax, the resolution will revert to
STANDERD.
8-5
Page 74

SENDING FAXES
•
flNE
I—
PHOTO
•
S.F}\B
c
H~
PHOTO
• SRftff
•
FINE
^
1—
PHOTO
XX S.FINE
STANDARD resolution can be used for most typewritten text.
FINE resolution should be used for small text such as printed
text.
SUPERFINE resolution should be used for very small text and
artwork.
Note that SUPERFINE resolution is a proprietary mode that
can only be used between Brother fax machines. If you try to
send a fax in SUPERFINE resolution to a non-Brother fax
machine, it will be sent in FINE resolution.
Why bother with different resolution modes, at all? Why not
simply send all faxes in superfine mode? The answer is that it
takes roughly twice as long to send a fax in fine mode as in
normal mode, and four times as long in superfine mode.
Photo Mode
ORIGINAL FAX
BLACK
50% GRAY
WHITE
When the IntelliFAX600/650M scans a document, it breaks
each line down into a large number of dots called pixels,
(pixels stands for picture elements). The printer in the
receiving fax can only print each pixel as black or white, it
cannot pnnt shades of gray.
This can be a problem when transmitting pictures with shades
of gray such as photographs, since all areas of the picture
darker than a certain shade will come out black, and all lighter
areas will come out white.
To get around this problem the lntelliFAX600/650M uses a
technique similar to that used to print photographs in
newspapers, simulating shades of gray with combinations of
dots. Blocks of 16 pixels are used. Some of these will be black
and some white, depending on the shade of gray being
simulated.
Note that photo mode should only be used for those documents
that require it, because:-
- A fax sent in photo mode takes as long as one sent in superfine
mode.
- The scanning method used for photo mode tends to make the
edges of text look ragged.
8-6
Page 75

Contrast
Overseas Mode
SENDING FAXES
Contrast is the difference in lightness between the black and
white parts of a document. This can vary depending on the
color of the paper and the quality of text. A document typed
with a new nylon ribbon on white paper will have higher
contrast than one typed with an old ribbon on colored paper.
The IntelliFAX600/650M has automatic contrast control that
allows it to decide which areas of the document are white and
which are black.
Occasionally you may have a very light or a very dark
document that does not give good results when faxed. In this
case you can ovemde the automatic control, and set the
contrast to SUPER LIGHT to send a very light document or
SUPER DARK to send a very dark document.
Overseas mode provides an efficient method for sending your
fax overseas.
Temporary Settings
If you have a document that is very light, you can set the
contrast manually using the TEMP. SETTINGS function. You
can also use the TEMP. SETTINGS to change the resolution
page by page, or to send your fax overseas.
One important use for Temporary Settings is for Multiple
Resolution transmission. This allows you to pre select the
resolution for each document being sent.
When you set the resolution using the RESOLUTION key, this
sets the resolution for the whole document. However, some
documents may need different resolution settings for different
pages. For example, if you had a document with a lot of text
pages and a few photographs, you would want to send the text
pages in standard mode for minimum transmission time, and
the photographs in photo mode.
The IntelliFAX600/650M allows you to set the resolution for
each page of a document, using the RESOLUTION option of
the TEMP. SETTINGS function.
After the fax has been sent, contrast will revert to AUTO,
resolution will revert to STANDARD and overseas mode will
revert to OFF.
8-7
Page 76

SENDING FAXES
1.Temporary Setting Of Contrast
To change the contrast setting:
Place the document in the feeder.
FUNCTION
( J
©
1. TEMP.SETTINGS
sfr
©
1. CONTRAST
SET
] OR I )
CONTRAST:S. LIGHT
Press the FUNCTION key.
Press the 1 key and the SET key to select the TEMP.
SETTINGS function.
The display will begin to scroll through the sub-function items
that are available for l.TEMP. SETTINGS.
Press the 1 key to access the CONTRAST function, then press
the SET key.
You will be prompted to change the contrast using the cursor
keys.
Use the cursor keys to select AUTO, S.LIGHT or S. DARK.
If you decide not to change the contrast, press the SET key to
exit.
SET
1. CONTRAST
O ©0
© 0©
© 0©
© 00
8-8
OR ( ...:zz)
STOP
Press the SET key.
The display will revert to l.CONTRAST.
If you wish to go on to set another temporary setting, press a
number key, otherwise press the STOP key to exit.
You can now send your fax in usual way.
Page 77

2.Multiple Resolution Transmission
To set the resolution page by page:
SENDING FAXES
i
dOl
1. TEMP. SETTINGS
■©
2. RESOLUTION
SET
C I OR
Place the document in the feeder.
After selecting the TEMP. SETTINGS, press the 2 key.
2.RESOLUTION will appear in the display, then press the
SET key.
You will be prompted to select the resolution for page 1.
If you wish to change the resolution for page 1, press a cursor
key, otherwise press the SET key to continue.
PAGE 01 : FINE
] OR [
SET
As soon as you press a cursor key the display will stop
alternating, and only the selection line will be displayed.
Use the cursor keys to select the resolution for page 1.
Press the SET key.
8-9
Page 78

SENDING FAXES
PAGE02:STANDARD
o © ©
© ©©
© ©©
©0©
OR C
Repeat for the remaining pages of the document.
Press the STOP key when you have finished.
You can now send your fax in the usual way.
You may have noticed that when you set the resolution for a
particular page, that resolution came up as the suggested
setting for the next page. If you wanted the next page to have
the same resolution, you just pressed the SET key. If you can
group all the pages with the same resolution together, just press
the RESOLUTION key to save a lot of finger work on the
cursor keys.
Note:
- Resolution is controlled by the transmitting fax machine.
- When transmitting colored documents such as color
photographs, remember that the IntelliFAX600/65OM can
only "see" in black-and-white, even in photo mode, which
means that different colors may be seen, and transmitted, as
the same shade of gray. If in doubt, make a trial copy before
sending the colored document.
8-10
Page 79

3.Temporary Setting Of Overseas Mode
When you are having trouble sending overseas, you may wish
I
ij] dOl
1. TEMP.SETTINGS
’©
to turn ON the overseas mode.
To change the overseas inode setting:-
Place the document in the feeder.
After selecting the TEMP. SETTINGS, press the 3 key.
SENDING FAXES
3. OVERSEAS MODE
S£T
L .. I
OR I )
OVERSEAS;ON
SET
I ' "I
3. OVERSEAS MODE
©or“©
3.0 VERSE AS MODE will appear in the display, then press
the SET key.
An alternating display will prompt you to change the overseas
mode setting using the cursor keys, then press the SET key.
Use the cursor keys to select ON or OFF. If you decide not to
change the setting, just press the SET key to exit.
Press the SET key.
The display will revert to 3. OVERSEAS MODE.
O 0©
O 0©
0 00
©00
OR c
If you wish to set another TEMP. SETTINGS, press a number
key, otherwise press the STOP key.
You can now send your fax in usual way. After transmission,
overseas mode will revert to OFF.
8-11
Page 80

SENDING FAXES
The Coverpage
It’s good idea to send a coverpage as the first page of a fax,
giving details of who the fax is being sent to, who it’s from,
and so on. The IntelliFAX600/650M can generate a coverpage
electronically, without you having to prepare one and feed it
through the document feeder. This saves paper and ensures that
all your faxes have a standard coverpage format.
To see what a coverpage looks like, you can print out a sample
by selecting function item 3.PRINT REPORTS, and choosing
option 3.COVERPAGE (see page 13-3).
A coverpage contains;-
- The destination name and fax number taken from the
one-touch or speed-dial memory. If you dialed manually, the
name will be left blank.
- Your name, fax, and telephone number, taken from the
Station ID.
- The number of pages to be transmitted.
- There are three fixed coverpage comments to choose from.
On the IntelliFAX650M, you can customise the other two
yourself. They are:-
1. COMMENT OFF (no coverpage note)
2. PLEASE CALL
3. URGENT
4. CONFIDENTIAL
5. (User selectable)
only for Intel IIP AX650M
6. (User selectable)
Information on storing your own coverpage notes is given on
page 6-10.
Yuu can send the coverpage with every transmission if you set
the COVERPAGE to "ON". (See page 5-9)
8-12
Page 81

Sending A Fax with A Coverpage
SENDING FAXES
03/14/1992 12:43
COPY
FAX:
1 .COMMENT OFF
S E L EC T < >
PRESS COPY
ALTERNATE |
I
NO. & START
ALTERNATE |
1
& SET
To send a fax with a coverpage:
Insert the document face down in the feeder.
You will be prompted to press the COPY key, or enter a fax
number and press the START key. As you wish to use the
coverpage, ignore this message.
Press the COVERPAGE key.
You will be prompted to select the comment (if any) that you
wish to appear on the coverpage.
Select the coverpage comment by pressing a cursor key.
Note:
- If you make a mistake you can try again by pressing the STOP
key.
2. PLEASE CALL
S£T
I
---
I
TOTAL PAGES? :00
O-'® "0
TOTAL PAGES? :04
SET
I I
Your chosen coverpage comment will remain in the display
then press the SET key.
You will be prompted to enter the total number of pages to be
transmitted.
If you wish the total number of pages transmitted to appear on
the coverpage, enter the number of pages. Otherwise press
SET.
Press the SET key. The COVERPAGE lamp will now light.
8-13
Page 82

SENDING FAXES
ENTER
PRESS START KEY
FAX NO.
1 ALTERNATE |
O 0O
0 00
0 0©
0 0©
START
SENDING
You will be prompted to enter the fax number of the destination
and press the START key.
Dial the fax number using manual, one-touch,or
speed-dialing.
Press the START key.
Note:
- If you enter "00" for the number of pages, the total number
of pages area will be left brank.
- If you have turned coverpage "on" (see page 5-9), then when
you press COVERPAGE button, it will turn it off for this
transmission.
8-14
Page 83

SENDING FAXES
Call Reservation And The Call Back Message
The purpose of this feature is to alert the party receiving your
fax transmission that you want to speak to them on completion
of the transmission. When your document has been printed at
the receiving station, the receiving fax machine will ring as if
it were receiving a telephone call. If the receiving party is
present and picks up the handset, your fax machine will also
ring. Then you can pick up the handset and talk with the person
to whom you have just sent a fax.
Sending A Fax With Call Reservation
The steps for sending a fax transmission with call reservation
are as follows.
Set the document face down in the feeder, then press the CALL
key.
CALL
The display will prompt you to change the setting of call back
message between OFF and ON using the cursor keys, then
press the SET key.
If you wish to change the current setting, press one of the cursor
keys, otherwise press the SET key to exit.
OR
ser
Press the SET key.
____ ___ ___ _
The CALL lamp will light, when ON is set.
The call back message is a text message that will be printed at
the receiving station if the receiving party does not answer.
The message requests the receiver to call you.
8-15
Page 84

SENDING FAXES
I ENTER
PRESS
F A X N 0 . I
ALTERNATE |
I
START KEY
O 0 ©
0 0©
0 0©
0 ©o
CALLING
CALL PICKUP
You will now be prompted to enter fax number. Select the
destination fax number, by entering it manually, or using
one-touch or speed-dial, then press START.
When the document has been transmitted, the unit at the
receiving station rings.
If the receiving party answers, your unit will also ring.
You can now pick up the handset and talk. If the receiving
party does not answer and you have previously selected CALL
BACK MESSAGE "ON", a call back message will be printed
at the receiving station instead.
Note:
- If you have not registered your telephone number at station
ID (see page 6-6), you cannot send a call back message.
- If an errors occurs during the transmission of the fax itself
the CALL RESERVATION function will not operate.
8-16
- There are certain types of fax machine which will not respond
to the CALL RESERVATION function.
- When auto redialing, CALL RESERVATION will be
canceled. But, if you select CALL BACK MESSAGE "ON",
the unit will send a call back message after sending the
document.
- You can not use CALL RESERVATION with either the
timer or polling function.
- If you set the CALL RESERVATION then set up a timer
(delayed) transmission, the CALL RESERVATION and
CALL BACK MESSAGE will be canceled.
- An example of the call back message is shown on page 13-8.
Page 85

RECEIVING FAX AND OTHER CALLS
9. RECEIVING FAXES AND OTHER CALLS
# AUTOANS
i—TAD
• F/T
Manual Reception
• AUTOAIIIS
)—TAD
•
f/T
How the IntelliFAX600/650M handles incoming calls
depends on the setting of the ANSWER MODE. This is
controlled by the key at the top right of the control panel with
two lamps labelled AUTO ANS, F/T and TAD.
The IntelliFAX600/650M may be connected to a telephone
line on its own, or together with a telephone instrument so that
you can make and receive telephone calls, as well as receive
faxes.
If you wish to answer all incoming calls manually, press the
ANSWER MODE key until both lamps are off.
When an incoming call rings the telephone on the fax, answer
the call by picking up the telephone.
If you hear the voice of a human caller, you can have a
telephone conversation in the normal manner.
RECEIVING
Your IntelliFAX600/650M will begin to receive the incoming
fax message.
You may then replace the telephone receiver.
9-1
Page 86

RECEIVING FAX AND OTHER CALLS
If you hear the calling tone of another fax machine when you
lift the receiver, press the START key on your IntelliFAX600/
650M immediately.
RECEIVING
Your IntelliFAX600/650M will begin to receive the incoming
fax message.
You may then replace the telephone receiver.
Automatic Fax Reception
If you have a telephone line dedicated to fax use, and you
require automatic reception of all calls, you should use the fax
auto-answer mode.
* AUTOANS
f—MD
•
f/T
I
............
Press the ANSWER MODE key until the "AUTO ANS" lamp
is lit.
All incoming faxes will then be received automatically,
without any manual intervention.
RECEIVING
9-2
When a fax is being received, the display will show the
message RECEIVING.
You should also set the RING DELAY to "0" (zero), so that
the IntelliFAX600/650M will answer incoming calls with no
ring delay. See page 5-3 for information on how to do this.
You may also connect a telephone to this line, but you will
only be able to make outgoing calls, as the IntelliFAXbOO/
650M will answer all incoming calls automatically.
Page 87

The F/T Switch
RECEIVING FAX AND OTHER CALLS
Connecting a fax and a telephone to a single line may cause
problems. If the fax is set to AUTO ANS mode and you do not
answer the call before the fax machine does, incoming
telephone callers will hear fax tones and may think they have
mis-dialed. On the other hand, if you have the fax machine set
to manual answer, you have to answer every incoming call
manually, and some of these calls may be faxes.
Fortunately, the lnteIliFAX600/650M is fitted with a call type
discriminator, often called a fax/telephone switch or F/T
switch. The F/T switch can distinguish between incoming fax
calls and incoming telephone calls, by listening for the calling
tone (CNG tone) sent by the transmitting fax machine. If an
incoming call is a fax, the IntelliFAX600/650M will receive it
automatically in most cases. If the call is a lelephuiie call, the
IntelliFAX600/650M will output a simulated ringing tone
from its speaker to alert you to pick up the telephone receiver.
Note that some fax messages that are transmitted manually
may not be received automatically, because some fax
machines do not send calling tone in manual mode.
• AUTÙAHS
I—TAO
f/r
I
RECEPTION IN F/T MODE
The F/T switch is activated by pressing the ANSWER MODE
key until the F/T lamps is lit.
In F/T answer mode, the IntelliFAX600/650M will answer
incoming calls automatically.
It will then listen for fax calling tone (CNG tone) for 4 seconds.
CNG is generated by most Group 3 fax machines in Automatic
transmission mode. If this is detected, it will receive the fax
message automatically.
If CNG tone is not detected, the IntelliFAX600/650M decides
that the incoming call is a telephone call, and will output a
simulated ringing signal from the loudspeaker, to alert you to
answer the call. You can set the time for which this ringing
signal is output under function item 5..5 - USER OPTIONS FfT RING TIME.
If you do not answer the call within the F/T ring time, the
IntelliFAX600/650M will revert to fax receiving mode. This
allows a manually transmitted fax to be received even if calling
tone has not been detected.
9-3
Page 88

RECEIVING FAX AND OTHER CALLS
Answering A Telephone Call In F/T Mode
To answer a call, pick up the telephone receiver when you hear
the simulated ring tone.
You may now speak to the calling party.
STAHT
r
------------
^
If, after speaking to you, the calling party wishes to send a fax,
you can receive it by pressing the START key when the calling
party is ready to send.
RECEIVING
Remote Activation
Your IntelliFAX600/650M will begin to receive the incoming
fax.
You can then replace the telephone receiver.
If you have an extension telephone connected in parallel to the
fax unit, you can activate or deactivate the fax unit remotely.
If you pick up the extension telephone and discover that a fax
is being sent, you can turn on the fax unit remotely by pressing
Remote Activation code on your touch tone telephone. The fax
unit will turn on and receive fax message. Also, if you wish to
receive a document after talking to distant end, this can be done
by using the code.
If you are not near your unit when F/T ringing occurs, you can
deactivate the fax unit remotely by inserting the Remote
Deactivation code which will shut off the fax machine and let
you talk on the line.
9-4
Page 89

The TAD Mode
Using An External TAD
RECEIVING FAX AND OTHER CALLS
The TAD mode is intended to be used when you use the fax
machine with TAD (Telephone Answering Device) attached
to the Ext. Device jack in back of the unit.
TAD mode differs from F/T mode in that pseudo-ring tone is
not output during the outgoing message, and the T AD outgoing
message does not invite the user to wait for someone to answer
the call, but only to record a voice message.
TAD mode is activated by pressing the ANSWER MODE key
until both lamps are lit.
Connect your external TAD to the Ext. Device Jack as shown
in the illustration below.
Set the ANSWER MODE key to "TAD" (so that the both
lamps are lit.)
The external TAD is now ready for use.
The unit will enter the document reception mode automatically
when another party tries to send a fax transmission with a CNG
tone to your machine. CNG tone is generated by most G3 fax
machines in automatic transmission mode.
If the sending party (using a tone type unit) presses your
Remote Code, fax reception is switched to the main unit.
If the ICM (Incoming Message) section of your external TAD
is full, the TAD will not answer the telephone. As a result, the
unit cannot receive the transmission.
9-5
Page 90

RECEIVING FAX AND OTHER CALLS
If your external TAD has a paging function, the unit may
prevent the paging function from working.
Some fax machines may not be able to signal your fax machine
to switch on automatically during a transmitting. To cover this
possibility we recommend that you record a message on your
TAD requesting the sending party to enter the Remote Code
on his unit before transmission.
A sample message; "Our answering machine is connected to
a fax unit at present, so if you would like to send a fax, please
press the xxx (your Remote Code) by tone signal and send your
fax after you hear the FAX tone. If you would like to leave a
message, please do so after this message. Thank you."
Note;
- When you pick up the handset of the fax while conversation
on an external telephone, you will hear an alarm and the
display will prompt "EXT. TEL IN USE".
When you want to use the fax unit handset, first press HOOK
key, which will disconnect the external telephone and enable
the use of the fax unit handset
9-6
Page 91

Smoothing
SMOOTHING OFF
SMOOTHING ON
RECEIVING FAX AND OTHER CALLS
In the section on sending faxes, we saw how changing the
resolution altered the quality of a transmitted fax. Changing
the resolution setting on the IntelliFAX600/650M will not
affect the resolution of an incoming fax. However, the
IntelliFAX600/650M has a proprietary technique that will
enhance the appearance of any incoming fax. This is called
SMOOTHING.
When an incoming fax is being transmitted in standard or fine
mode, the íntelliFAX600/650M can look at the incoming data
and interpolate extra lines between those being sent by the
transmitting fax. This smooths the outlines of text and prevents
lines in artworks from having a jagged appearance.
Note:
- Smoothing enhances incoming faxes from any fax machine,
not just Brother machines. It has no effect on the resolution
of outgoing faxes.
- Smoothing has no effect if a fax is being sent to you in
superfine resolution, since the printer in the
IntelliFAX600/650M is already working at its maximum
resolution.
- Smoothing has no effect when printing list and reports.
For information on how to turn smoothing on or off, turn to
page 5-7.
Reception Into Memory (Only For lntelliFAX650M)
If the IntelUFAX650M has run out of paper it will
automatically store any fax transmissions it receives in its
memory. Also, if it runs out of paper midway through receiving
a transmission, it will store the part of the document that it is
unable to print. The following message appears on the LCD
display:
PAPER ROLL EMPTY
Load the machine with paper and the unit will print any stored
documents or parts of documents automatically.
No data is lost provided you do not turn off the machine prior
to printing out the stored documents or if you lose power.
9-7
Page 92

USING THE UNIT AS A TELEPHONE
10.USING THE UNIT AS A TELEPHONE
As well as sending fax transmissions, this fax machine can also
be used to make telephone calls. You can rather dial numbers
manually or use one-touch dialing or speed dialing.
Manual Dialing
HOOK
^7 'I OR O
One-Touch Dialing
HOOK
OR O
Speed Diaiing
HOOK
^7 OR O
Pick up the handset and dial the telephone number normally
using the number keys.
Alternatively, press the HOOK key to enable dialing and then
dial the telephone number using the number keys. When the
receiving party answers, pick up the handset and proceed with
your call.
You can use any of the one-touch telephone numbers that you
have registered. Simply pick up the handset (or press the
HOOK key), and press the appropriate one-touch key.
If you use the HOOK key, pick up the handset when your call
is answered.
You can also make use of the speed dial feature. Simply pick
up the handset (or press the HOOK key), press the
SPEED-DIAL key and press the appropriate 2 digits
speed-dial number.
SPEED DIAL
If you used the HOOK key, pick up the handset when your call
is answered.
o
Using Keys With The Telephone
RCÙfAÌ^AUSE
Use this key to put a pause between numbers. (You can not use
the PAUSE key continuously.)
o
HOLD
Use this key to put a telephone call on hold.
o
Use this key to switch the dialing type to "tone" from "pulse".
10-1
Page 93

11. POLLING
What Is Polling?
Why Is Polling Used?
POLLING
During normal fax transmission, you call up another fax
machine and send a fax. In this case you pay for the cost of the
call, just as when you make a normal voice telephone call.
Conversely, when someone calls up your fax machine and
sends you a fax, they pay for the cost of the call.
Polling reverses this procedure. To poll another fax machine,
you call it up, and request it to send you a fax which has been
left in the document feeder. You pay for the cost of the call
and receive a document. Conversely, you may leave a
document in your fax machine and allow another fax machine
to call up and poll for it. This is being polled.
You may want someone to send you a long document, but they
may not wish to pay for the cost of the call. This problem may
be solved if they agree to leave the document in their fax
machine so that you can call them up and poll for it.
Secure Polling
Polling may be used by a head office to gather in information
such as orders and sales statistics from home-based sales
people. They may have difficulty sending in a fax if the head
office fax machine is busy, but head office can probably call
up their home number with less difficulty. It may also be
preferable for head office to bear the cost of the call.
Polling can also be used to take advantage of differences in
call charges depending on the place from which the call is
initiated.
Once you leave a document in your fax machine to be polled,
anyone can call up and poll for that document. To prevent this,
you can use secure polling. This simply means that you agree,
in advance, a four digit password with the caller who is going
to poll for your document. When they call, they must key in
the password before they can poll for the document.
Please note the called side’s machine should be a Brother
machine.
11-1
Page 94

POLLING
Setting Up The lntelliFAX600/650M To Be Polled
Setting up the IntelliFAX600/650M to be polled is very easy,
but don’t forget, if you wish the polling to be secure, the other
party’s machine should be a Brother machine, and also you
must first agree on a four digit ID with the other party.
Place the document to be polled face-down in the document
feeder.
COPY PRESS COPY
ALTERNATE |
1
FAX:
NO. & START
POLLm
OR
SET
X X X X
POLLIN G
1 D
You will be prompted to press the COPY key, or enter a fax
number and press the START key. As you are setting up the
machine to be polled, ignore this message.
Press the POLLING key.
You will be prompted to select STANDARD or SECURE
polling. The default is STANDARD.
If you wish to select SECURE polling, press a cursor key and
the SET key, otherwise just press the SET key to continue.
POLLI
POLLIN G
POLLI
POLLIN G
N G
N G
11-2
1 X X X
1 D
1 2 X X
1 D
1 2 3 X
1 D
12 3 4
1 D
If you selected SECURE polling, enter the four digit ID that
you have previously agreed with the other party.
Page 95

POLLING
SET
r ~ I
PRESS START KEY
START
POLLED WAITING
SENDING
Press the SET key.
Press the START key.
The IntelliFAX600/650M will go into a waiting state.
When the calling party polls your machine, the SENDING
display will appear, indicating that your IntelliFAX600/650M
is sending the fax back to the polling fax machine.
After a document has been polled, "Polled Report" will be
printed out automatically.
Note:
- If you wish to cancel a polled job, you must enter to function
item 2. CANCEL JOB (see page 12-4).
11-3
Page 96

POLLING
Polling Another Fax Machine With The lntelliFAX600/650M
_________________________
Setting up the IntelliFAX600/650M to poll another fax
machine is almost as easy as setting it up to be polled, but don’t
forget, you cannot poll another fax machine unless the other
party has set up their machine to be polled, and has given you
the ID in the case of secure polling. Also, the other party’s
machine should be a Brother machine in the case of secure
polling.
Make sure that there is no document in the feeder.
Press the POLLING key.
You will be prompted to select STANDARD or SECURE
polling.
] OR C
S£T
POLLING ID:XXXX
POLLING ID:1XXX
POLLING ID:12XX
POLLING ID:123X
POLLING ID:1234
SET
If you wish to select SECURE polling, press a cursor key and
the SET key, otherwise just press the SET key to continue.
If you selected SECURE polling, enter the four digit ID that
you have previously agreed with the other party.
Press the SET key.
At this point you will be prompted to enter a fax number.
11-4
Page 97

O 00
© 0©
O ©0
O ©0
START
f.
V
RECEIVING
POLLING
Enter the fax number of the fax machine to be polled, using
manual, one-touch, or speed-dialing.
Press the START key.
Your machine will now call up the other fax machine and poll
for the document.
11-5
Page 98

USING THE TIMER
12. USING THE TIMER
job to be carried out immediately, except that you must also
START key, the job will not be carried out immediately, but
at the time you have set on the timer.
Delayed Sending
To set up the IntelliFAX600/650M for delayed sending:-
The InteIliFAX600/650M has a built-in timer linked to the
clock. This allows you to leave a document in the
IntelliFAX600/650M for later transmission, for example, in
the evening, when telephone lines are less busy and call
charges are lower. This is known as delayed transmission.
Setting up a transmission on the timer is just like setting up a
set the timer. Then, when you have set up the job and press the
i
dOi
COPY
t
1
PRESS
ALTERNATE
TIMER
COPY:
FAX: NO. & START
SET TIME = 00:00
O O0
0 0©
0 0©
O © 0
SET TIME=21:35
Place the document to be sent in the document feeder.
You will be prompted to press the COPY key, or to enter a fax
number and press START. As you wish to set the timer, ignore
this message.
Press the TIMER key.
If you set the daily timer when you configured the machine,
this time will be shown in the display. If you wish to use the
time that is already set on the daily timer, simply press the SET
key.
Otherwise, enter the time at which you wish the document to
be sent.
12-1
\ 1
SET
Press the SET key.
Page 99

ENTER FAX NO
ALTERNATE
I
PRESS
START KEY
O ©0
O 0©
0 0©
O ©©
0613306531
START
USING THE TIMER
I
You wili be prompted to enter the fax number of the
destination.
Enter the fax number of the destination, using manual,
one-touch, or speed-dialing.
Press the START key.
TIMER WAITING
The IntelliFAX600/650M will go into a waiting state.
After transmission has successfully been completed, a
"Delayed Sending Report" will be printed out automatically.
Note:
- Once the timer has been set for a delayed transmission, you
cannot send another fax unless you interrupt or cancel the
timer job, which is explained on page 12-4. Your
IntelliFAX600/650M can, of course, continue to receive
incoming faxes.
Interrupting A Timer Or Polled Job
After the timer has been set, you may wish to send an urgent
fax, poll another station, or make a copy. You can do this
TIMER WAITING
OR
POLLED WAITING
without losing the delayed sending or polled job.
Id interrupt a delayed sending or polled job:-
_____________
INTiRRUPT
REMOVE DOCUMENT
Press the INTERRUPT key.
You will be prompted to remove the document.
Remove the document from the feeder.
12-2
Page 100

USrNG THE TIMER
INSERT DOCUMENT
INSERT DOCUMENT
1
INTERRUPT
rr.-j
TIMER WAITING
Ynii win be prompted to insert a new document.
If you wish to make a copy or send a priority fax, insert the
document.
Send your fax or make a copy in the normal way.
After the transmission or making a copy, you will be prompted
to replace the original document.
Replace the original document itj the feeder.
Press the INTERRUPT key.
OR
POLLED WAITING
The display will return to TIMER WAITING or POLLED
WAITING, depending on what job was originally set up.
12-3
 Loading...