

Page 1

Printer Manual
FAX-4100
®
Page 2

Table of Contents
1
Printer Driver Settings (For Windows
®
Only) ............................. 1-1
Using the Brother FAX-4100 Printer Driver............................. 1-1
Features in the Printer Driver .............................................. 1-1
Basic Tab.................................................................................... 1-2
Paper Size ............................................................................ 1-3
Multiple Page....................................................................... 1-3
Border Line.......................................................................... 1-3
Orientation........................................................................... 1-3
Copies .................................................................................. 1-3
Collate.................................................................................. 1-4
Media Type.......................................................................... 1-4
Advanced Tab ............................................................................ 1-5
Print Quality ........................................................................ 1-5
Resolution ....................................................................... 1-5
Toner Save ...................................................................... 1-5
Print Setting (For Windows
®
95/98/98SE/Me Only)...... 1-6
Duplex Printing ................................................................... 1-6
Manual Duplex................................................................ 1-6
Binding Offset................................................................. 1-6
Watermark ........................................................................... 1-7
Print Watermark.............................................................. 1-7
In Background................................................................. 1-7
Watermark Text .............................................................. 1-8
Watermark Bitmap.......................................................... 1-8
Position ........................................................................... 1-8
Page Setting ......................................................................... 1-9
Device Options .................................................................. 1-10
Quick Print Setup .............................................................. 1-11
Administrator (For Windows
®
95/98/98SE/Me Only)...... 1-11
Print Date & Time ............................................................. 1-12
Accessories Tab........................................................................ 1-13
Paper Source Setting.......................................................... 1-13
Default Source ................................................................... 1-13
Available Options.............................................................. 1-13
Support ..................................................................................... 1-14
Brother Solutions Center ................................................... 1-14
Check Setting..................................................................... 1-14
i
Page 3

2
Features in the Printer Driver (For Windows
®
2000)............... 1-15
General Tab ....................................................................... 1-15
Printing Preferences ...................................................... 1-15
Layout Tab......................................................................... 1-16
*1 Orientation ............................................................... 1-16
*2 Pages Per Sheet ........................................................ 1-17
Paper/Quality Tab.............................................................. 1-17
*1 Paper Source ............................................................ 1-17
*2 Media ....................................................................... 1-18
Advanced Options......................................................... 1-18
*1 Paper /Output ........................................................... 1-18
*2 Graphic..................................................................... 1-19
*3 Document Options ................................................... 1-19
Device Settings Tab........................................................... 1-20
Installable Options ........................................................ 1-20
How to Print, Fax and Scan Using Apple
®
Macintosh
For FAX-4100: Set up Your USB Equipped Apple
®
............... 2-1
®
Macintosh
with Mac OS 8.5-9.2............................................................... 2-1
How to Print Using Brother Printer Driver ................................ 2-1
®
ii
Page 4

Printer Driver Settings
1
1
(For Windows
®
Only)
Using the Brother FAX-4100 Printer Driver
A Printer Driver is software that translates data from the format used by a
computer into the format required by a particular printer. A driver uses a printer
command language or page description language.
The latest printer driver can also be downloaded from the Brother Solutions
Center at http://solutions.brother.com.
Features in the Printer Driver
The screens shown in this section are from FAX-4750e Windows
Note
screens on your PC may vary depending on your Windows
For more detailed information, please see the on-line Help in the printer driver.
You can also change settings by clicking the illustration on the left side of the
tab screen.
®
®
98. The
Operating System.
PRINTER DRIVER SETTINGS (FOR WINDOWS
®
ONLY)
1 - 1
Page 5
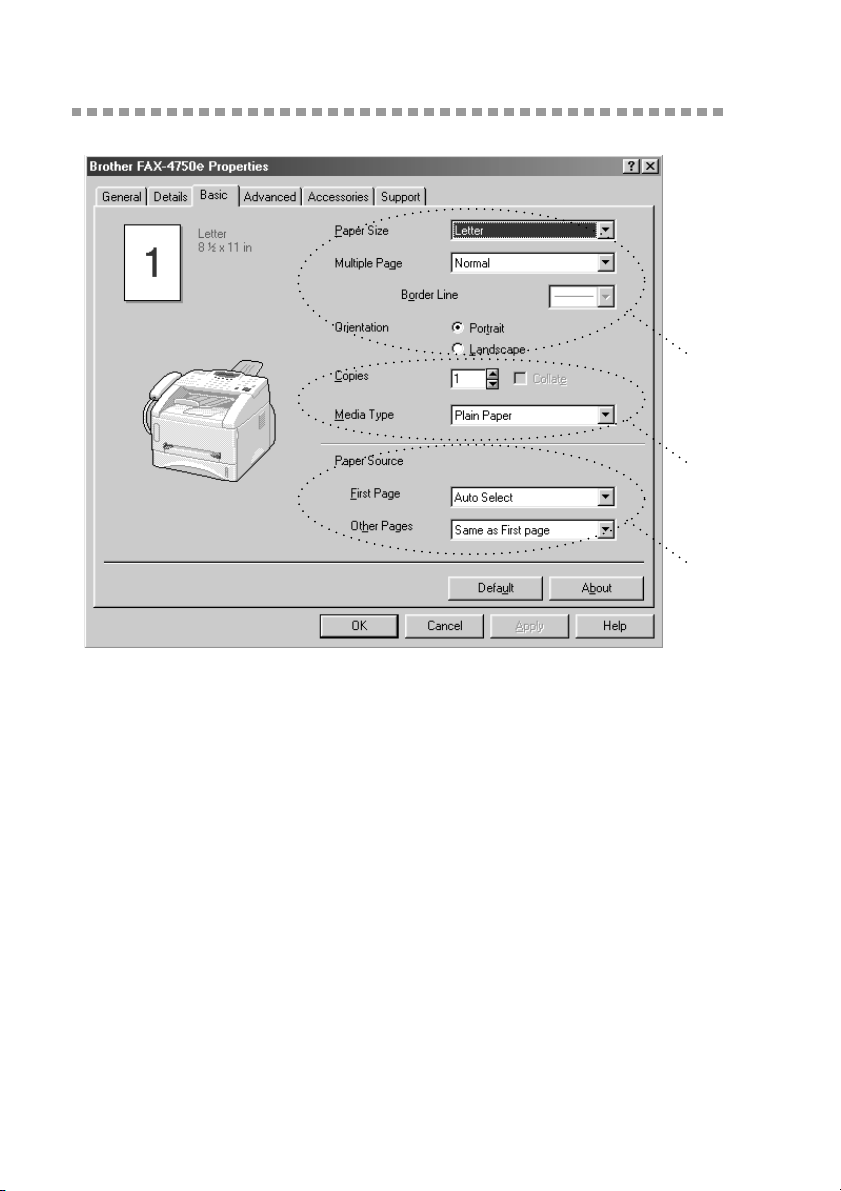
Basic Tab
*1
*2
*3
*1 Select the Paper size, Multiple Page and Orientation.
*2 Select number of Copies and Media Type.
*3 Select Paper Source, First Page and Other Pages.
1 - 2
PRINTER DRIVER SETTINGS (FOR WINDOWS
®
ONLY)
Page 6

Paper Size
From the drop-down box select the Paper Size you are using.
Multiple Page
The Multiple Page selection can reduce the image size of a page allowing
multiple pages to be printed on one sheet of paper or enlarging the image size
for printing on page on multiple sheets of paper.
Ex. 4 in 1
Ex. 1 in 2 × 2 pages
Border Line
When printing multiple pages on one sheet with the Multiple Page feature you
can select to have a solid border, dash border or no border around each page on
the sheet.
Orientation
Orientation selects the position of how your document will be printed (Portrait
or Landscape).
portrait
Landscape
Copies
The copies selection sets the number of copies that will be printed.
PRINTER DRIVER SETTINGS (FOR WINDOWS
®
ONLY)
1 - 3
Page 7
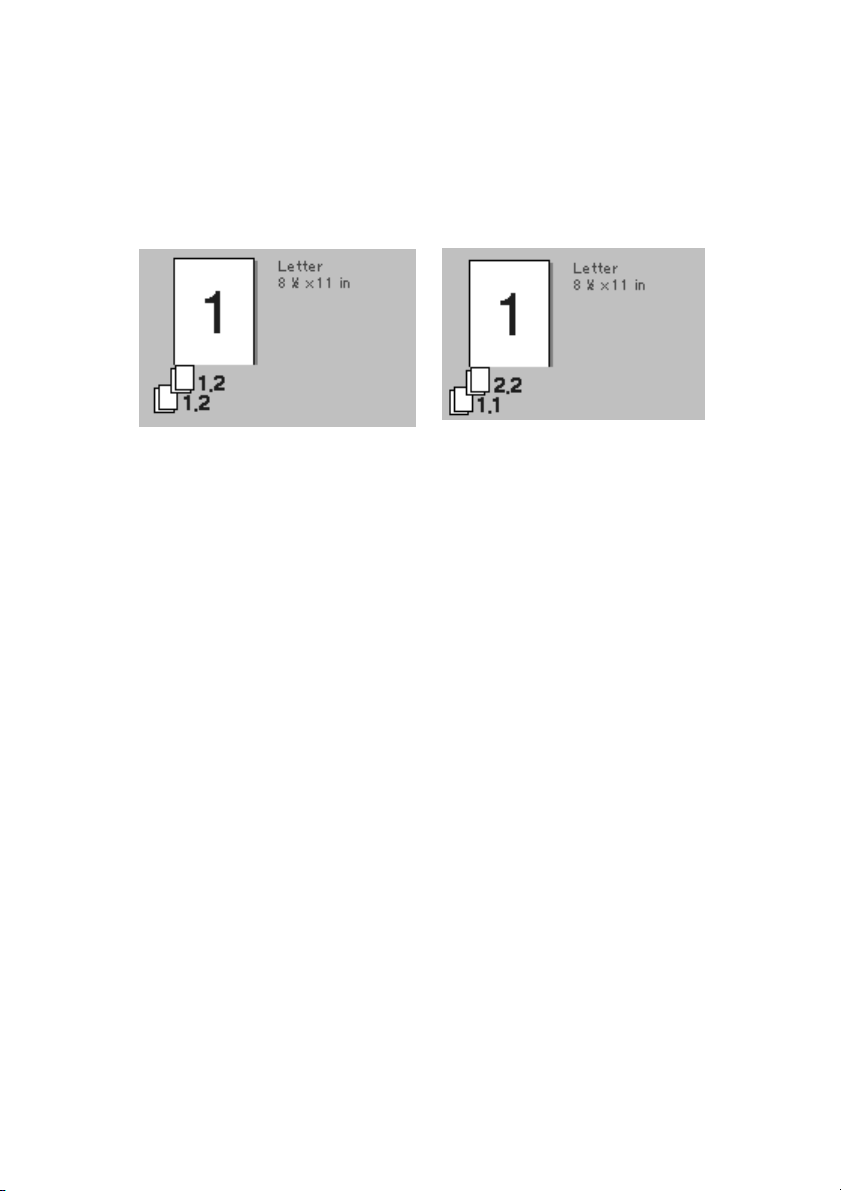
Collate
The collate selection is active if more than one copy is selected. With the collate
check box selected, one complete copy of your document will be printed and
then repeated for the number of copies you selected. If the collate check box is
not selected then each page will be printed for all the copies selected before the
next page in the document is printed.
Collate box checked
Collate box not checked
Media Type
You can use the following types of media in your printer. For the best print
quality, select the type of media that you wish to use.
Plain Paper
Thin Paper
Thick Paper
Thicker Paper
Bond Paper
Transparencies
When using ordinary plain paper, select Plain Paper . When using heavier
weight paper, envelopes or rough paper select
For bond paper, select
Bond Paper and for OHP transparencies, select
Transparencies .
Thick Paper or Thicker Paper .
1 - 4
PRINTER DRIVER SETTINGS (FOR WINDOWS
®
ONLY)
Page 8
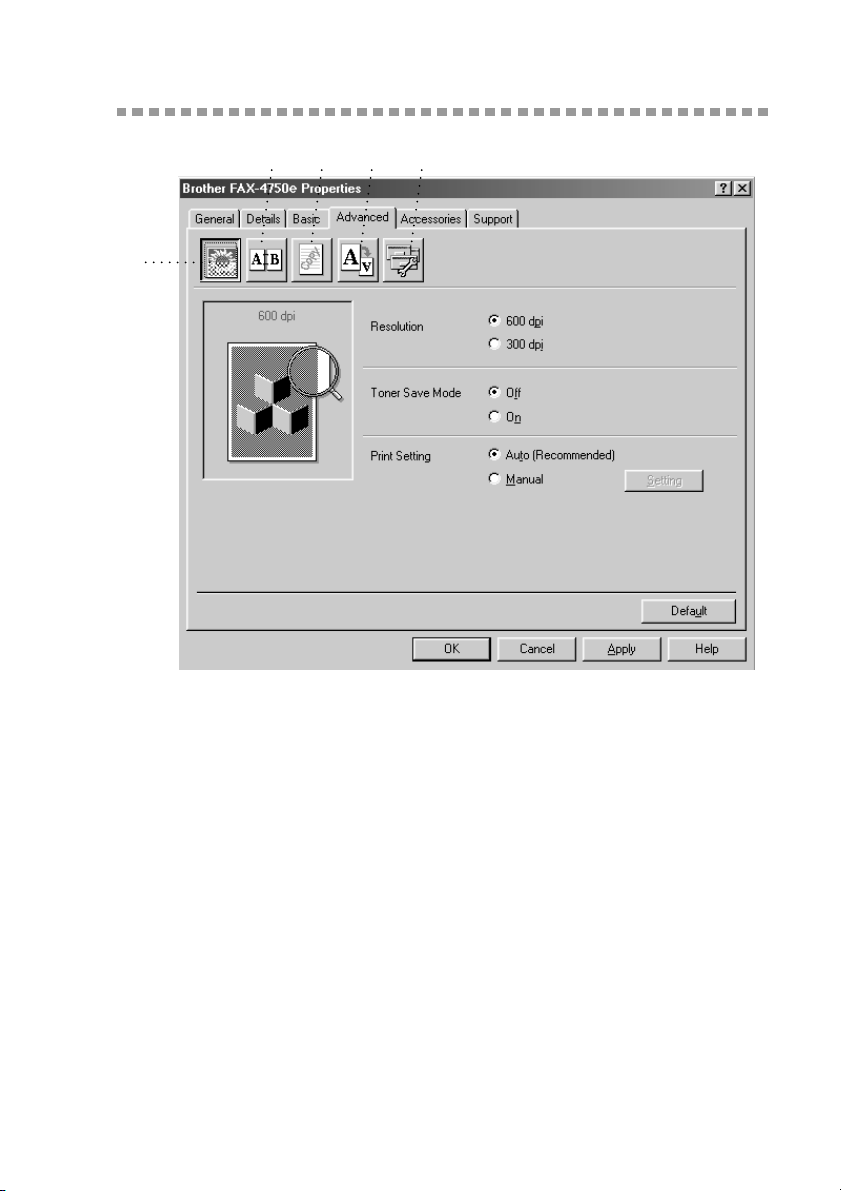
Advanced Tab
*2 *3 *4 *5
*1
Change the tab settings by selecting one of the following icons:
*1 Print Quality
*2 Duplex Printing
*3 Watermark
*4 Page Setting
*5 Device Option
Print Quality
Resolution
You can change the resolution as follows:
• 300 dpi
• 600 dpi
Toner Save
You can save running costs by turning on the Toner Save Mode, which reduces
the print density.
PRINTER DRIVER SETTINGS (FOR WINDOWS
®
ONLY)
1 - 5
Page 9

Print Setting (For Windows
®
95/98/98SE/Me Only)
Print Setting is used for optimizing your print quality for the type of document
being printed (Photos, Graphics or Scanned Images). When you choose
(Recommended)
, the printer automatically prints with the most suitable print
Auto
settings.
With the Print Setting set to Manual, you can change the Brightness, Contrast
and Graphics Quality options manually.
Duplex Printing
Choosing the Duplex Printing icon displays the Manual Duplex features
available.
Manual Duplex
Check the Manual Duplex box and there are six types of duplex directions
available for each orientation. In this mode, the MFC prints all the even numbered
pages first. Then the printer driver stops and shows the instructions required to reinstall the paper. When you click OK the odd numbered pages are printed.
Binding Offset
Check the Binding Offset option, you can specify the offset value of the binding
side in inches or millimeters (0 - 8 inches) [0 - 203.2 mm].
1 - 6
PRINTER DRIVER SETTINGS (FOR WINDOWS
®
ONLY)
Page 10

Watermark
You can place a logo or text into your document as a Watermark by using a
bitmap file as your source file or select one of the preset Watermarks.
Print Watermark
The Print Watermark feature offers printing choices of:
On all pages
On first page only
From second page
Custom
In Background
With the In Background feature checked the Watermark will print behind your
document on the page. If this feature is not checked then the Watermark will
print on top of your document.
PRINTER DRIVER SETTINGS (FOR WINDOWS
®
ONLY)
1 - 7
Page 11

You can change the size and the position of the Watermark on the page by
selecting the Watermark and clicking the Edit button. If you want to add a new
Watermark, click the New button and select Text or Bitmap from the Watermark
Style.
Watermark Text
Enter your Watermark text into the Text Box and select the Font, Size, Darkness
and Style.
Watermark Bitmap
Enter the file name and location of your bitmap image in the File box or Browse
for the file location. You can also set the scaling size of the image.
Position
The position settings offer controls on where the Watermark can be positioned
on the page.
1 - 8
PRINTER DRIVER SETTINGS (FOR WINDOWS
®
ONLY)
Page 12

Page Setting
You can change the print size of your document with the Scaling feature.
1
Check Off if you want to print the document as it appears on your screen.
2
Check Fit to Paper Size, if your document has an unusual size, or if you have
only the standard size paper.
3
Check the Free box if you want to reduce or enlarge the output.
You can also use the Mirror or Reverse Print feature for your page setting.
PRINTER DRIVER SETTINGS (FOR WINDOWS
®
ONLY)
1 - 9
Page 13

Device Options
Set one of the following Printer Functions:
Quick Print Setup
Administrator (For Windows
Print Date & Time
1 - 10
PRINTER DRIVER SETTINGS (FOR WINDOWS
®
95/98/98SE/Me Only)
®
ONLY)
Page 14

Quick Print Setup
The Quick Print Setup feature allows you to quickly select driver settings. To
view settings, simply click your mouse button on the task tray icon. This feature
can be set to ON or OFF from the Device Options section.
Administrator (For Windows® 95/98/98SE/Me Only)
The administrator selection permits the Copy, Scaling and Watermark features
to be locked and password protected.
Record your password and keep it in a safe place for future reference. If you
Note
forget your password these settings can not be accessed.
PRINTER DRIVER SETTINGS (FOR WINDOWS
®
ONLY)
1 - 11
Page 15

Print Date & Time
When enabled the Print Date and Time feature will automatically print the date
and time from your computers system clock on your document.
Click the Setting button to change the Date and Time Format, Position and Font.
To include a background with the Date and Time select Opaque. When Opaque
is selected you can set the Darkness of the Date and Time background by
changing the percentage.
The Date and Time indicated in the selection box represents the format the will
Note
be printed. The actual Date and Time printed on your document is
automatically retrieved from the settings of your computer.
1 - 12
PRINTER DRIVER SETTINGS (FOR WINDOWS
®
ONLY)
Page 16

Accessories Tab
The Accessories Tab includes the settings for configuring the printer driver for
what size paper is being used for each paper source. This tab also installs any
additional options into the driver settings.
Paper Source Setting
To configure the paper size for each paper source, highlight the source from the
Paper Source Setting list. Select the Paper Size from the pull-down box and
click Update. (The Paper Source Setting is used when selecting Auto Select in
the Basic Tab.)
Default Source
The Default Source allows you to choose which paper source will be used when
the paper size of the document being sent does not match the Paper Source
Settings.
Available Options
In order to access the optional 2nd paper
tray the option must be installed in the
driver. Highlight the model number from
the Available Options list and click
Add. The optional tray will then be listed
in the Installed box, Paper Source Setting
list and the screen illustration will display
the 2nd tray.
PRINTER DRIVER SETTINGS (FOR WINDOWS
®
ONLY)
1 - 13
Page 17

Support
The Support Tab provides driver version information and setting information.
In addition there are links to the Brother Solution Center and Driver Update
Web sites.
Brother Solutions Center
The Brother Solutions Center is a Web site offering information about your
Brother product including FAQ’s , User Guides, Driver updates and Tips for
using your machine.
Check Setting
The Check Setting selection displays a list of your current drivers settings.
1 - 14
PRINTER DRIVER SETTINGS (FOR WINDOWS
®
ONLY)
Page 18

Features in the Printer Driver (For Windows® 2000)
The Windows® 2000 printer driver utilizes Microsoft’s uni-driver architecture.
The following section describes the driver features and selections available for
Windows
General Tab
®
2000.
Printing Preferences
In the General tab, click the Printing Preferences... button to access the Layout
tab.
PRINTER DRIVER SETTINGS (FOR WINDOWS
®
ONLY)
1 - 15
Page 19

Layout Tab
*1 *2
*1 Orientation
Select the Orientation, which is how your document will be positioned on the
paper (Portrait or Landscape).
Portrait Landscape
1 - 16
PRINTER DRIVER SETTINGS (FOR WINDOWS
®
ONLY)
Page 20

*2 Pages Per Sheet
You can select 1, 2, 4, 6, 9 or 16 pages to be printed on one sheet of paper. The
image of each page will be reduced as needed to fit on the paper.
2 in 1 4 in 1
Paper/Quality Tab
*1
*2
*1 Paper Source
Possible paper sources are: Automatically Select, Auto, Upper Paper Tray,
Lower Paper Tray (optional cassette #2) and Manual Feed Slot.
When “Automatically Select” is chosen the machine automatically will choose
the cassette with the appropriate size of paper.
The paper size for each paper source must be set in the Device Settings tab for
Note
the Automatically Select feature to work properly.
The “Auto” option is for machines that can automatically detect the size of paper
that is loaded in the paper source; Auto is not active for your
PRINTER DRIVER SETTINGS (FOR WINDOWS
machine
.
®
ONLY)
1 - 17
Page 21

*2 Media
For the best print quality, select the type of media you are using:
Regular
Thick Paper
Thicker Paper
Transparency
When using ordinary plain paper, select Regular. When using heavier weight
paper, envelopes, or rough paper, select Thick Paper or Thicker Paper. For OHP
transparencies, select Transparency.
Advanced Options
Click the Advanced... button in the Paper/Quality tab to access the screen
below:
*1
*2
*3
*1 Paper /Output
Paper Size – Select the paper size of the document you are printing. This size
should be the same as the paper size that is set in your application software.
Copy Count – Type the number of copies you want.
1 - 18
PRINTER DRIVER SETTINGS (FOR WINDOWS
®
ONLY)
Page 22

*2 Graphic
Print Quality – You can change the resolution as follows:
600 × 600 dots per inch
300 × 300 dots per inch
*3 Document Options
Advanced Printing Features – You can Enable or Disable Advanced Printing
Features from this selection. If you disable it, Page Order, Pages Per Sheet,
Copy and Collate will be disabled.
Halftoning – This selection is for changing the dither pattern to achieve the best
print results when printing graphics. The choices are as follows:
Auto Select
Super Cell
Dither 6 × 6
Dither 8 × 8
PRINTER DRIVER SETTINGS (FOR WINDOWS
®
ONLY)
1 - 19
Page 23

Device Settings Tab
Form To Tray Assignment – This selection assigns the paper size to each paper
source. For auto paper selection (Automatically Select) to work properly, the
paper size set for each source must match the actual size of paper loaded.
The available options are:
A4
A5
B5 (JIS)
Executive
Legal
Letter
Installable Options
Printer Memory – If you installed optional memory in your machine, you must
select the correct size of total memory in the machine for the driver to access the
additional memory.
Lower Tray – If an optional lower tray is installed, this selection must be set to
ON to enable access to the lower tray.
1 - 20
PRINTER DRIVER SETTINGS (FOR WINDOWS
®
ONLY)
Page 24

2
How to Print, Fax and Scan
2
Using Apple
®
Macintosh
®
For FAX-4100: Set up Your USB Equipped Apple® Macintosh® with Mac OS 8.5-9.2
Before you can connect the Brother machine to your Machintosh®, you must
Note
purchase a USB cable that is no longer than 6 feet (1.8 meters).
To work with your Brother machine your USB Equipped Apple® Macintosh®
must be set up with Mac OS 8.5-9.2
How to Print Using Brother Printer Driver
To select the Printer:
1
From the Apple menu, open the Chooser.
2
Click HL-1200/MFL Pro icon. On the right side of the Chooser, click the printer
to which you want to print. Close the Chooser.
HOW TO PRINT, FAX AND SCAN USING APPLE
®
MACINTOSH
®
2 - 1
Page 25

To print the document:
3
From application software such as PaperPort®, click File menu and select Page
Setup. You can change the settings for Paper Size, Orientation and Scaling,
and then click OK.
4
From application software such as PaperPort, click File menu and select Print.
Click Print to start printing.
If you want to change Copies, Pages, Resolution, Paper Source and Media
Note
Type, select your settings before clicking Print.
Option Setup allows you to select Duplex.
2 - 2
HOW TO PRINT, FAX AND SCAN USING APPLE
®
MACINTOSH
®
 Loading...