

Page 1

FAX-717
FAX-727
FAX-737MC
®
USER’S GUIDE
Page 2

Available Models for Each country
Australia, New Zealand FAX -727 , FAX-737MC
Others FAX -717 , FAX-727, FAX -737MC
THIS EQUIPMENT IS DESIGNED TO WO RK W ITH A TW O WIR E ANAL OGUE PSTN LINE
FITTED WITH THE A PPROP RIATE CON NE CTO R.
APPROVAL INFORMATION
Brother advises th at this pr oduct may not function correctly in a country othe r tha n w hich it was
originally purchased, and does no t offer any warranty in the event that this product is used on public
telecomm u n ication lines in a n other co untry.
Page 3
Using This Manual
Thank you f or pu rchasing a Brother fax machine (FAX).
This machine has been designed to be simple to use, with LC D screen prompt s to guide you through
functions. Howev er, you can use yo ur mach ine to its fullest potential by taking a few minutes to read
this man ual.
Additionally, your machine can print a Help List. Make sure that there is no
document in the Automatic Docum ent Feeder, and pres s
to print a list of basic operational steps and functions.
press
1
Copy/Reports
Finding Information
All cha pter hea dings a n d subh e adings a re listed in the T ab le of C o ntents. You will be able to fin d
information abou t a s pecific feature by checking the Index at th e back of this manual. Also,
throughout this manual, you will s ee special s ymbo ls alerting y ou to important information ,
cross-references, and w a rnin gs. Illustrations o f some screen display s also help you choo se th e
correct key-presses.
Symbols Used In This Manual
Note or add itional information.
The machine would be damaged or would not work correctly if this is not
observed.
and
Warning s detail prec au tions you must take to avoid possib le perso na l
injury.
i
Page 4
User-Friendly Programming
We h ave desi gned your fax ma chine with on-screen pro gramming using navigation keys.
User-friendly prog ramming helps y ou t ake full advantage of all the f unct ions your machine ha s to
offer. (S ee Using This Manual, pa ge i.)
Because y ou do all your program ming on the LCD, we c reat ed s tep- by-s tep o n-sc reen prompts to
help you program you r machine. All you need to do is follow the prom pts as they guide you through
the fu n c tion m e nu selec tions an d progra mming option s and se ttings.
A complete list of th e functio n selec tions, op tions, an d settings that are a vailable is provi ded in th e
appendix of th is manual. (See Men u Mode & Menu Selection Table, page 100.)
Function Mode
You can a ccess the Function Mode by pressing Menu/Set.
When you enter the Fu nction M ode , your mac hine displays a list of main m enu options f rom which
you can ch oose. These op tions appear one af ter the other on the display. Se lect an option by pressin g
Menu/Set when the option appears on the LCD .
You can “ scro ll” more quickly through opti ons by pressing . When the scre en displays your
selection, press Menu/Set. (Use to scroll backwa rd if you passed your choice or to save ke y
strokes. Both arrow keys show all options, in the opposite order.)
When you finish a function , the screen displays AC CEPTED .
If you want to exit the Function M ode, press
Stop/Exit
.
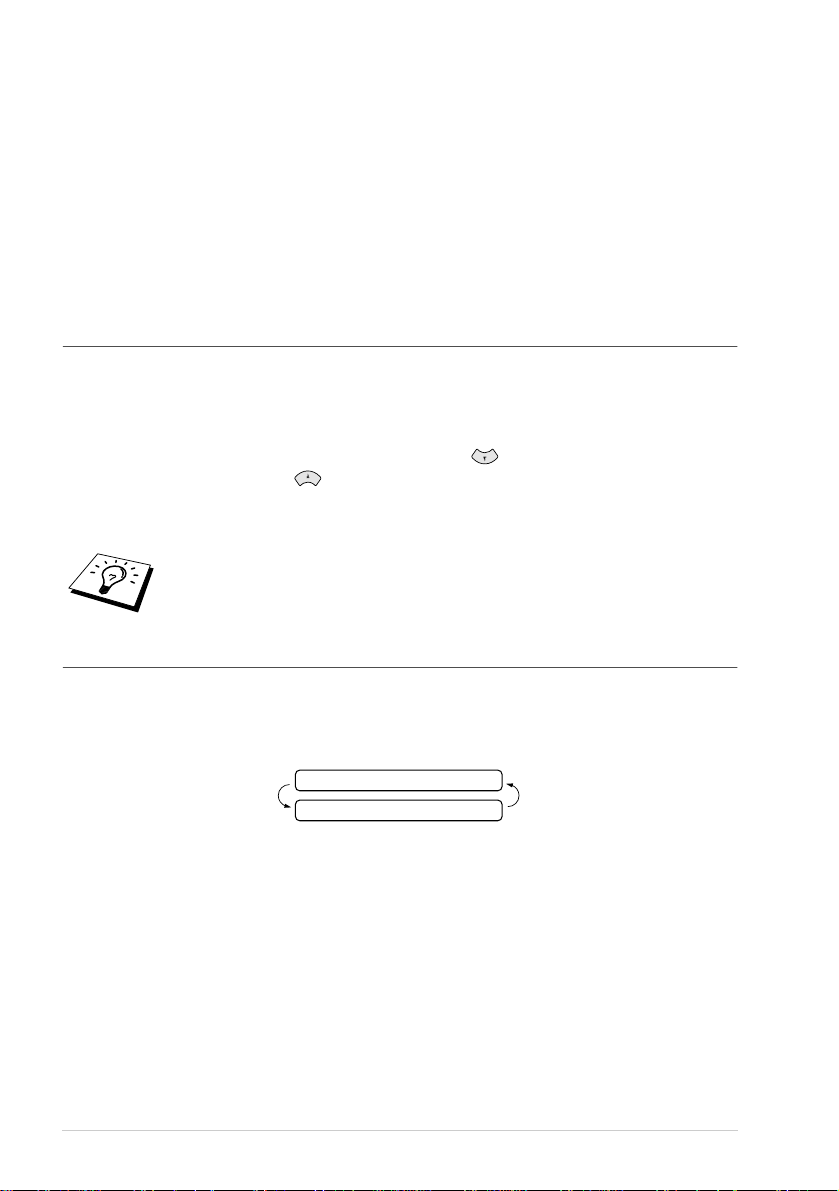
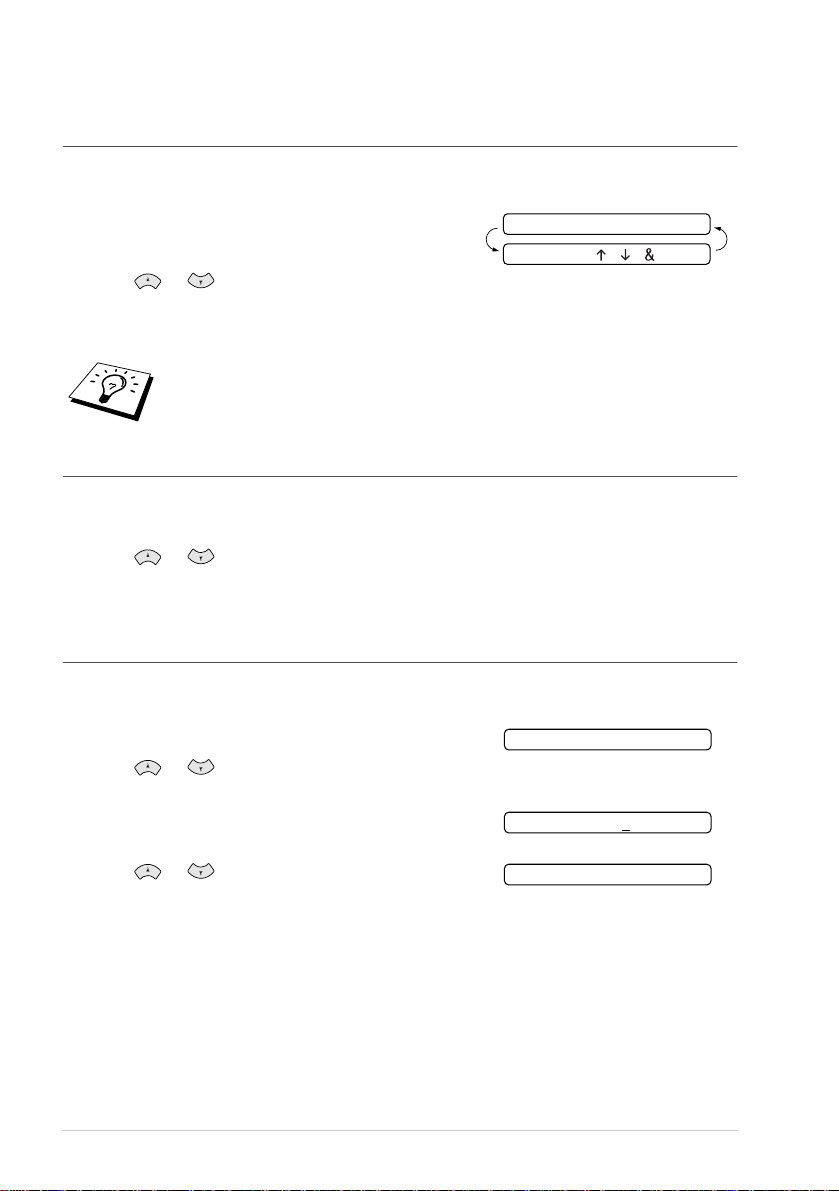
Alternating Displays
The LC D sometimes alternates between the currently selecte d option, and a help m essage giving
brief instructions abou t ho w to proc eed. The display you will probably see m ost often is shown
below, sh ow in g you that when you place a document in the f eeder, you can either dia l a number to
send it as a fax or pres s the copy key to make a copy of the d ocument.
FAX: NO. & START
COPY: PRESS COPY
ii
Page 5

Quick Reference Guide
Sending Faxes
Automatic Tran smission
1 Inser t the document face
down in the Automatic
Document Feeder.
2 Enter the fax number you
want to call.
3 Press Fax Start.
Receiving Faxes
Select Receive Mode
Press Rece iv e Mode to select
FAX ONLY, FAX/TEL,
TAD:ANSWER MACH.
717/727) or
(FAX-737MC) or MANUAL.
If you select FAX/TEL, make
sure you set Ring Delay and F/T
Ring Time.
MC:MSG CTR
(FAX-
Storing Numbers
Storing One Touch Dial
Numbers
1 Press Menu/Set, 6, 1.
2 Press One Touch key
where you want to store a
number.
3 Enter a number (up to 20
digi ts), and then press
Menu/Set.
4 Enter a name (or leave it
blank), and then press
Menu/Set.
5 Press or to select
the type of nu mb e r and
press Menu/Set.
6 Press or to select if
you set ANTI JUNK to ON
(or OFF) and press
Menu/Set. (Not available in
Austral ia and New
Zealand)
7 Press Stop/Exit.
Storing Speed Dial Numbers
1 Press Menu/Set, 6, 2.
2 Ente r a two-digi t Speed Dial
number and then press
Menu/Set.
3 Enter a num ber (up t o 20
digits), and then pre ss
Menu/Set.
4 Enter a name (or leave it
blank), and then press
Menu/Set.
5 Press or to select
the type of nu mb e r and
press Menu/Set.
6 Press or to select if
you set
(or
Menu/Set. (Not available in
Austral ia and New
Zealand)
7 Press Stop/Exit.
ANTI JUNK
OFF
) and press
to ON
iii
Page 6

Dialling Operations
Making Copies
One Touch Dialling
1 Inser t the document face
down in the Automatic
Document Feeder.
2 Press One Touch key
where you want to call.
3 Press Fax St art.
Speed Dialling
1 Inser t the document face
down in the Automatic
Document Feeder.
2 Press Search/Mute, then
press # and the two-digit
Speed Dial number.
3 Press Fax St art.
Search
1 Inser t the document face
down in the Automatic
Document Feeder.
2 Press Search/Mute, and
then enter the first letter of
the name you are looking
for.
3 Press or to search
the memory.
4 Press Fax St art, when the
LCD show s the nam e you
want to call.
Making a Single Copy
1 Inser t the document face
down in the Automatic
Document Feeder.
2 Press Copy/Reports twice.
Sorting Multiple Copies
1 Inser t the document face
down in the Automatic
Document Feeder.
2 Press Copy/Reports.
3 Enter the nu mbe r of co pie s
you want (up to 99).
4 Press Menu/Set.
5 Press or to select
SORT
, and then press
Copy/Reports.
iv
Page 7

Table of Contents
PREPARATION AND SIMPLE USE GUIDE
Preparation and Simple Use Guide
Advi ce for Pr eparation and Sim ple Use Guid e...................................4
FAX-71 7/727 Control Panel Overview...............................................8
FAX-737 MC C o n tr o l Pane l O verview..... ................................... ......10
BASIC USE
Chapter 1 Setup
Initial S ettings......................... ................................... ........................12
Cus to m Settin g s...................... ...........................................................14
Melody Se ttings (O nly for FAX-737MC)................................... ......16
Storing Nu mbers fo r Easy Dialling.................................... ...............17
Chapter 2 Sending a Fax
Scanning Adjustment.............. ................................... ........................20
Send in g Op er atio n............................................ .................................20
Dialling a Nu mber............................................ .................................21
Chapter 3 Receiving a Fax
Ans wer Mode Settings ............................. ................................... ......23
Rec eiving a Fax........................................ ................................... ......26
Chapter 4 Making Copies
Copy Functions....................... ...........................................................28
Chapter 5 Telephone
Ma k in g a Call..................................................................... ...............30
Ans wering a Call...................................... .........................................32
Chapter 6 Printing Reports
Tran smission Report an d Journ al Setting........................... ...............33
Usin g th e Repo r ts Key...................................... .................................34
v
Page 8

ADVANCED USE
Chapter 7 Advanced Sending
Adv anced O p erations................................................ .........................35
Chapter 8 Advanced Receiving
Operation from an E x ternal or E x tension Telephone........................44
Chapter 9 Telephone Service
Telephone Service for Aus tralia (Telstra® Duet)..............................47
Telephone Service for Ne w Z ea lan d........................................... .......50
Telephone Service for Some Countries.............................................54
Chapter 10 Polling
Pollin g R eceive...................... ................................... .........................56
Polled Transm it...................... ................................... .........................58
Secur e Po lling................................................... ........ .................. .......59
Chapter 11 Remote Fax Options (Only for FAX-717/727)
Fax Forwa r d in g...................... ............................................................60
Rem ote Retrieval ............................ ................................... ................61
Chapter 12 Message Centre (Only for FAX-737MC)
Mes s a g e Centr e Mode .................... ................................... ................65
Fax Forwa r d in g / P aging.......... ............................................................70
Rem ote Retrieval ............................ ................................... ................72
MAINTENANCE
Chapter 13 Troubleshooting and Maintenance
Error Messages ..................................................................................77
Docu ment Jams and Pape r J ams....................... .................................79
Diffic u lty with Operation.......................................... .........................81
Regular Main tenance...................... ................................... ................83
Packin g and Shippin g th e Machine ............................................ .......90
IMPORTANT INFORMATION
Chapter 14 Important Safety Information
Important Inf o r mation fo r Australia ..................................................91
Important Inf o r mation f or New Zealand ............................ ................92
Important Inf or mation f o r Some Countries.......................................95
vi
Page 9

APPENDIX
Chapter 15 Specifications
Specifi cations................................................... .................................98
Me n u Mod e & Menu Se lection Table................................ .............100
Ente r in g Text................................... ................................................106
About Fax Machines......................................... ...............................107
Glossary........................................... ................................................10 8
Index....................................... .........................................................111
Acc e s sory L ist................................. ................................... .............114
vii
Page 10

Preparation and Simp le Use Guide
Simple steps to prepare and use the machine.
Follow these simple steps below to prepare an d use the machine.
Howeve r, b efor e you perform th ese step s, r efer to t he Important In formation (page 91), and
Advice for Prepara tion and Simple U se Guid e (page 4).
If you need further information, refer to BASIC US E or ADVANCED US E.
1 Make sure you have the items shown below
Check that you have the following ite m s:
Paper
Adapter
(Only for Australia)
Wire Extension
AND SIMPLE USE
PREPARATION
Telephone
Line Cord
Telephone
Handset
Handset
Curled Cord
Paper T ray
One Touch
Name Label
User’s Guide
Quick Setup Guide
* The printing cartridg e is already insta lled in the mach in e.
Keep the packing materials for possible future transport. Failure to pack
the machin e prope rly may damage the mach ine an d such damages will no t
be cover ed un de r warr a n ty.
2 Read the Quick Setup Guide
Follow the in s tructions on the Brother Quick Setup Guide to s et up the mach in e.
3 Setting the Dialling Mode (Tone/Pulse) (Not available in New Zealand)
1
Press Menu/Set, 1, 1. The screen prompt s you to select TONE or PULSE.
2
Use or to select the dialling mode, and pre ss Menu/Set when the scree n di splay s
the dialling mode you want.
3
Press Stop/Exit.
4 Using the telephone
1
Pick up the hands et.
2
When yo u hear a dial tone, dial the nu m ber, using the dial pad.
3
To hang up, replace the handset on its crad le.
Preparatio n an d S im pl e U se Guide
1
Page 11
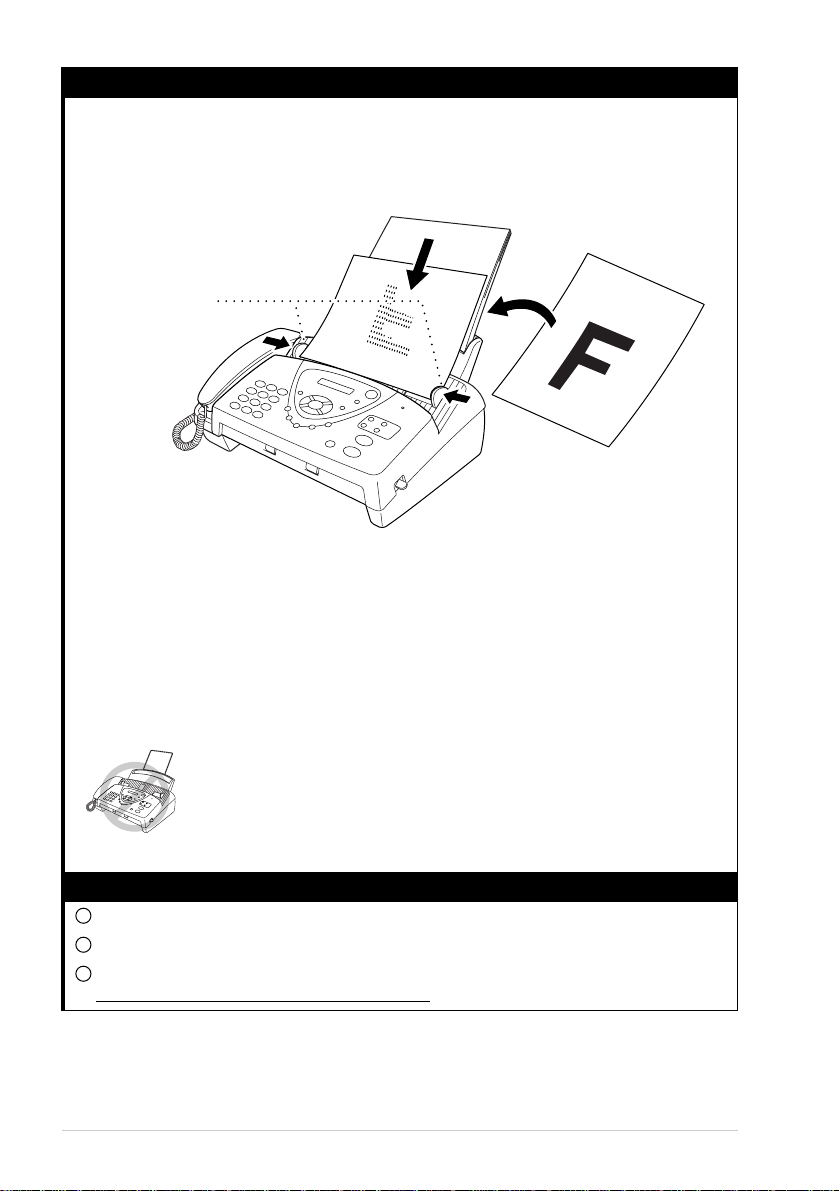
5 Settin g the D ocu ment
■
Docum ents must be b etwe en 14.8 and 21.6 cm w ide , an d 15 and 60 cm long. Your fax
machine can only sca n an image 2 0.8 c m wide, regardle ss of how wide the paper is.
■
Make sure you insert documents face down, top edge first.
■
Adjust the pa per guides to fit the width of y our document.
Paper Guides
■
The Autom at ic Document Feeder can hold up t o 10 pages, feeding e ach one individually
through the fa x machine. Use stan dard (64 gsm~9 0 gsm) paper when using the A ut o m atic
Docum ent Feeder; if you are u sing heavier paper, feed each sheet individually to pre v ent
paper jams.
■
Press Resolution (before you send th e fax) to select the resolution for the doc ument yo u are
sending. If you wish to send in STANDARD re solu tion, i.e. a general fax with no graphics,
then the defa ult is STANDA RD, and the resolu tion button need not be presse d. (S ee
Resolution, p age 20.)
• DO NOT use, curled, wrinkled paper, folded, ripped paper, or paper with
staples, paper clips, paste, or tape attached.
• DO NOT use, cardboard, newspaper or fabric.
• DO NOT use paper on which correction fluid has been used.
• Make sure documents written with ink are completely dry.
6 Sending a fax automatically
1
Insert the docu ment face down in the A utomatic Do cument Feeder.
2
Enter the fax num b e r you want to call.
3
Press Fax Start.
IMPORTANT: D o not pick up the handset.
2
Page 12
7 Making a Single Copy
1
Insert the document face dow n in the Automatic Document Feeder.
2
Press Copy/Rep orts.
3
Press Copy/Rep orts. (See Making C opie s, page 2 8 .)
To cancel, press Stop/Exit.
Your m achi ne cannot scan anyth ing c loser th an 4 mm from the edge of the paper.
Do NOT pull the paper while copying is in progress.
8 Setting up the Answer phone (MC) (Only for FAX-737MC)
1
Press Menu/Set, 8 , 1. The screen pro m pts you to choose a DO C (Docu ment) setting.
2
Press or to select ON (or OFF), and press Me nu/Set.
The screen prompts you to ch oose a VOICE settin g .
3
Press or to selec t y our setting from the list (ON, OFF or EXT), and press
Menu/Set when th e screen display s your s election .
4
Press Stop/Exit.
5
Press Menu/Set, 8, 3. Th e sc reen prompts you to choose an OGM.
6
Press or to reach MSG CTR OGM.
This is the on ly setting y ou can select if y ou wa n t to turn the Message Cen tre on.
7
Press Menu/Set.
8
Press or to select RECO RD MSG and pr ess Menu/Set.
9
Pick up the h ands et to rec o rd a message.
For examp le: H ello. We are unable to take your call at this time. Please leave a m essage after
the tone. If you wish to se nd a fax, please press 5 1 ( 9 1 for New Ze aland), wait for the
fax tones, then press th e st art button on your m ac h ine . (See Reco rd in g the Messa g e Centre’s
Outgoing Me ssag e (MSG CTR OGM ) , page 66.)
10
Replace the handset. The Message Centre play s your OGM.
11
Press Stop/Exit.
12
Activate M e ssage Centre (MC ) Mode by press ing .
AND SIMPLE USE
PREPARATION
Preparatio n an d S im pl e U se Guide
3
Page 13

Advice for Preparation and Simple Use Guide
Packing
When ever you transport the machine, use the packing mater ials that came with yo ur machine and
pack the machine corr ectly.
Choosing a Location
Place your fax m achine o n a flat, stable surface, such a s a desk. Select a place that is free of vibratio n
and shock s. L ocate the machin e near a telephone so cket and a standard, earthed Mains socket.
Avoid pla cing your machine in a busy area. Do not place near heaters, air co nditioner s, water,
chem ica ls o r re frig era to rs. D o no t e xp o se th e ma ch in e to d irec t su nlig ht, exc es siv e h eat , m ois ture o r
dust. Do not c onnect your mac hine to electrical outlets controlled by w al l swi tche s or auto m atic
timers. Disruption of power can wipe out information in the unit’s memo ry. D o not connect your
machine t o electrical outlets on the same circuit as large appliances or other equip ment that m ight
disrupt the pow er supply. Avoid connecting the fax m achine near to interference sources, such as
speakers or th e base units of cordless p hones.
Connecting the Power Cord
• This fax must be earthed using a 3-pin plug.
• Since the machine is earthed through the power outlet, you can protect
yourself from potentially ha zardous electri cal condition s on the teleph one
network by kee pin g th e p o wer to y ou r machin e on wh en yo u co nn ect it to
a telephone line. Similarly, you can protect yourself when you want to
move your machine, by disconnecting the telephone line first, and then
th e power cor d.
• Lightning and power surges can damage this product! We recommend
that you use a quality surge protec tion device on the A C power line as well
as on the telephone line, or unplug the lines during a lightning storm.
Memory Storage
Your mac hine is e quip ped w ith an intern al batte ry w hich w ill kee p the d ate and time in form ation for
up to ab ou t 48 h ou rs afte r po w er h as be en c ut off. Af ter th is tim e, th e d ate an d time w i ll be lost an d
you will hav e to re-enter the inform a tion. In the even t o f a pow er failure, all settings in the me n us
are st o red permanently exce p t for the settings that are valid for the nex t fax on ly (e.g. contrast,
overseas mo de).
The FA X-737M C w ill re tain any d ocuments or voice mes sa ge s stor ed in to the me m ory for u p to 1 5
hours after a power interruption.
The FAX -717/7 27 will not retain any docume nts stored into the mem ory after a power interrup tion.
4
Page 14
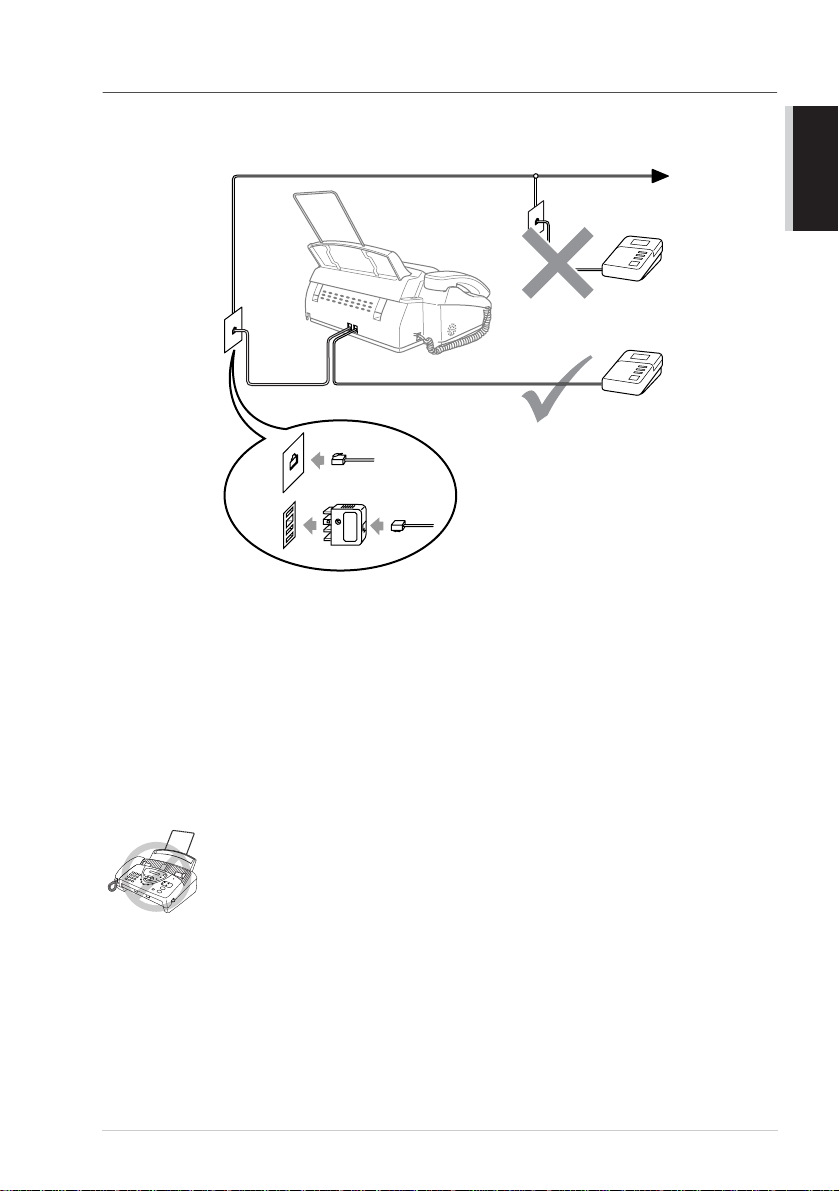
Connecting an External Telephone Answering Device (TAD)
Connections
1
You may connect an external TAD to your machin e, as shown below .
TAD
TAD
(Example for Australia)
2
Set the numb er of rings to one or two on your external T A D. (The fax machine’s Ring Delay
setting does not apply.)
3
Record the o utgo ing message on your external TAD (s ee next page).
4
Set the extern a l TAD to answer calls.
5
Set MESSAGE STORE (Function menu 8 -1) to VOICE:EXT. (Only for FAX-737MC)
6
Set the Answer Mode to TAD:ANSW ER MA CH .. (Only for FAX-717/727)
On FAX-737MC, set the Answer Mode to MC:MSG CTR.
AND SIMPLE USE
PREPARATION
Do not conn ect a TAD elsewh ere on the same phon e line––your mac hine and
TAD will both try to control the line.
Preparatio n an d S im pl e U se Guide
5
Page 15
Outgoing Message (OGM) of External TAD
Timing is importa n t in reco rding this message.
1
Record fo ur s econds of silence at the be gin ning of your mes sage . (Th is a llows your machi ne
time t o listen for the fax C NG tones of a utomati c transm iss ions be fore they stop.)
2
Try to record the s hort est possi ble message on y our telep hone answering device (ideally less
than 20 se conds).
3
End your m es sage by giving your Fax Receive C ode for people sending manual faxes. For
example:
“After the bee p, leave a message or send a fax m anually by pressing 5 1 ( 9 1 for New
Zealand).”
Please no te that some faxes tha t are sent manually c annot be received automatically because some
fax mach ines do not se nd a fax tone in m anual m ode. In these cases you mu st inform ca llers that they
must enter the rem o te Fax Re ceive C o de to send a fax.
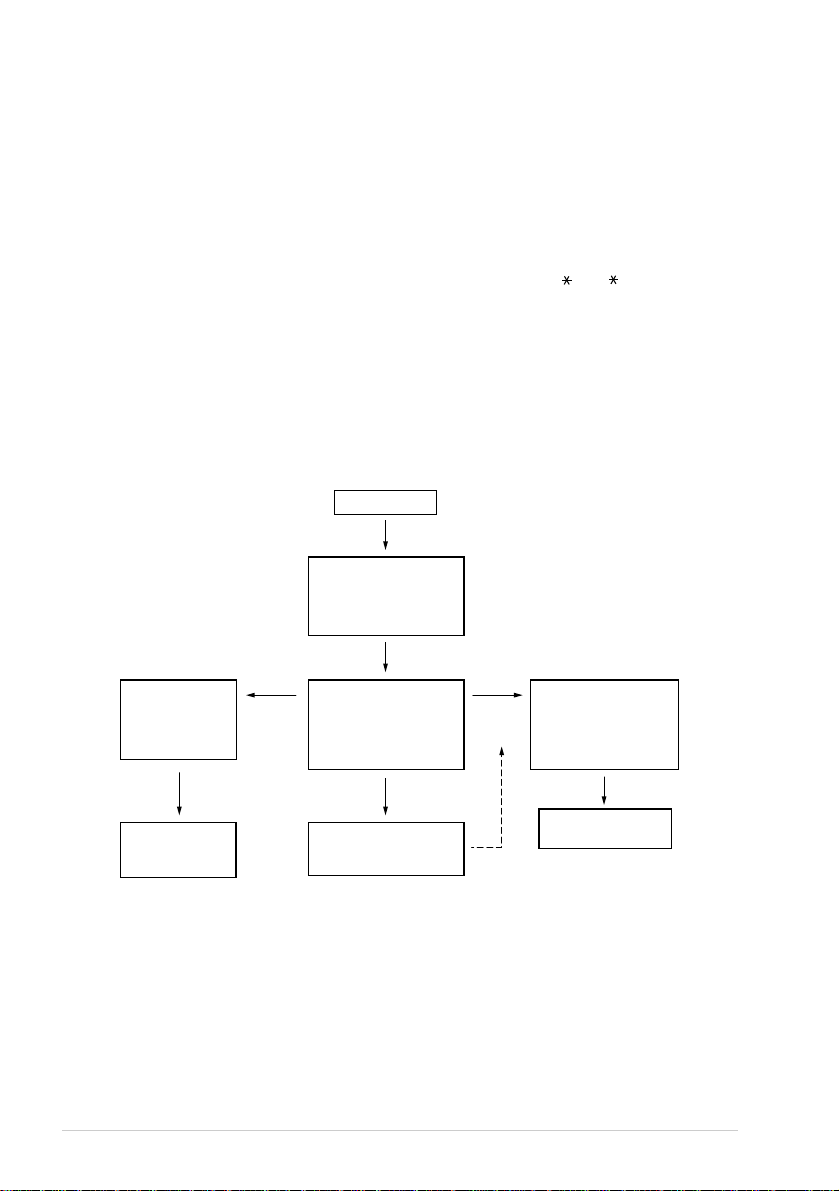
Sequence of External TAD Receptio n
Whe n you le ave yo u r mac h in e set in T AD mode, all calls w ill be an swere d by the e x ternally
connected telephone answerin g device, and fax calls will be received autom atically provided they
come from a mach in e whic h s ends sta ndard Calling to n e (CN G).
Incoming Call
The call is picked up
by the TAD.
(Recommended short
TAD ring delay such
as 1 or 2 rings.)
Fax reception is
automatically
activated by
fax tone.
The fax message
is received on
paper.
6
Auto dial
fax call
The external TAD
outgoing message
begins (recommended
length of 10 seconds
or less).
Voice call
The caller leaves a
voice message on the
external TAD.
Manual
fax call
The caller can also
send a fax message
after the voice message.
The caller must press
Start or enter your
remote activation
code to activate the
machine and press
Start.
The fax message is
received on paper.
Page 16
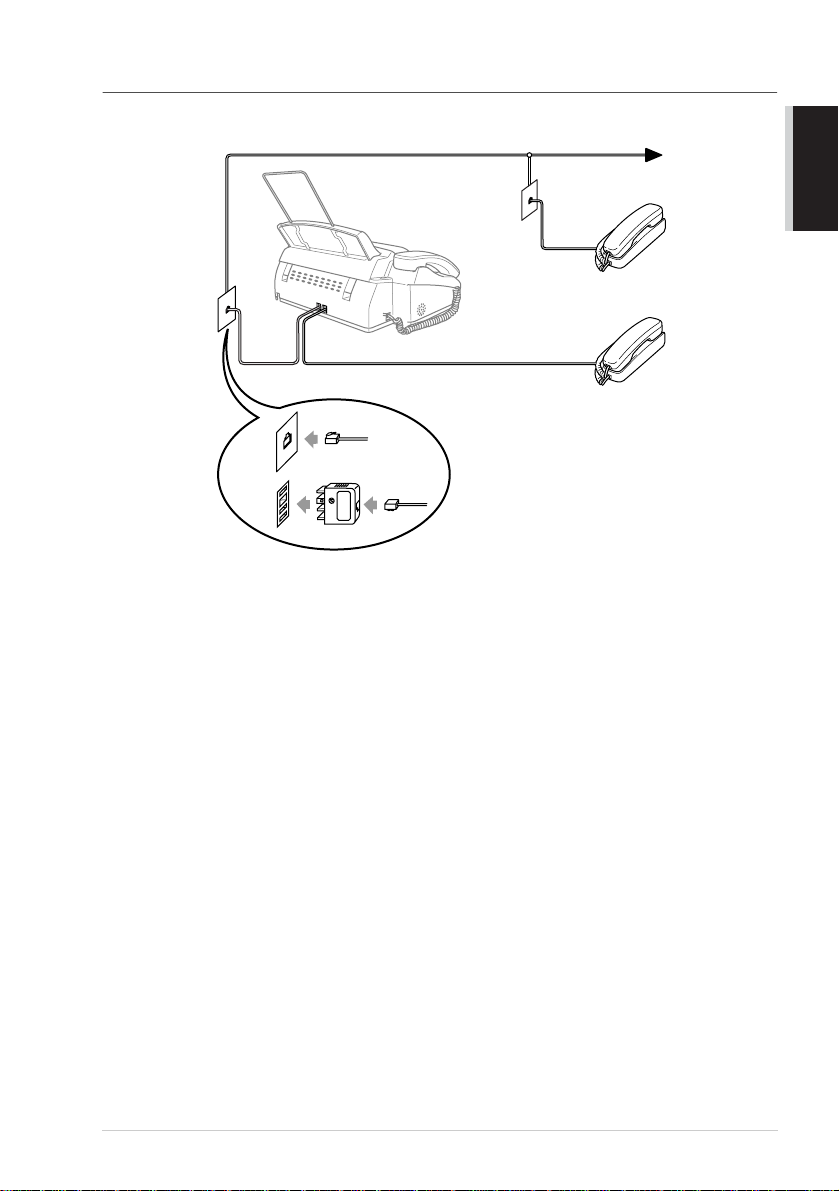
Connecting an External Telephone
Your ma chine is equipped with a hand set that you can u se as a regula r phone. How ever, you ca n also
connect a separa te telephone to your m achine, as shown below.
Extension
Telephone
External
Telephone
(Example for Australia)
Whenev er th is e xtern al p hone (or TAD ) is in use, the screen displa ys EXT. TEL IN USE , a nd, if
the fax handset is lifted, an alarm sounds.
To disconnect th e call on the external ph one and switch to th e fa x, lift the ha ndset and press Hook
(FAX-717/727) or Speak er Phone (F A X-737MC).
AND SIMPLE USE
PREPARATION
Preparatio n an d S im pl e U se Guide
7
Page 17

FAX-717/727 Control Panel Overview
(FAX-727 panel is the same as FAX-717)
1
2
13
12
3
LCD (Liquid Cr ysta l Displa y)
1
Displays m essages to help you set up an d
operate your machine.
Hook
2
Lets you dial tele phone and fax num b e rs
without lifting the ha ndset.
Dial Pad
3
Dials phone and fax numbers and can be
used as a keyboard for en tering
information i nto t he machine.
# key let s you switch the dialling type
during a te le phone c all from "PU L SE" to
"TON E". (Not available in N ew Zealand)
Redial/P a u se
4
Re-dials the last number called. A lso
inserts a pause in autodial numbers.
Search/Mut e
5
Lets you dial stored phone num ber s by
pressing # and a two-d igit number or lets
you look u p num bers stored in the dialling
memory. A lso, lets y ou pu t c alls on h old.
Recall
6
Use this key to gain access to an outside
line and/or to reca ll the operator or
transfer a call to another extensio n when it
is connected to a PABX. ( A ustralia &
New Zealand only)
4 5 6
7
8 9
Receive Mod e
7
Use to se lect ho w th e m ach ine w ill han dle
incoming call s.
Resolution
8
Sets the resolution w hen you s end a fax or
make a copy.
Stop/Exit
9
Stops a fax, cancels an operation or exits
from Menu m ode.
Fax Start
0
Starts an operation, such as sending a fax.
Copy/Repor ts
A
With docu ment in the A utomat ic
Document Feeder : M akes a copy.
Without d oc ument in the Automatic
Document Feeder : Le ts you access the
Reports m enu so yo u can select a report to
print: HE LP L IST, QU ICK-DIAL,
FAX JOURNAL, XMIT VERIFY,
TEL.INDEX, US ER S ETTINGS and
MEMORY STATUS List.
One Touch Dial Keys
B
These fou r keys give yo u instant access to
previously stored phone numbers.
10
11
8
Page 18

Navigation Keys:
C
Menu/Set
Lets you ac cess the menu an d
programmin g mode and stores your
settings in the machine.
or
Press to scro ll fo rw ar d or ba ck war d to se t
a men u selec tio n.
You can als o us e these keys to do an
alphabetical search f o r th e names of
stored numbers.
or
Press to scroll through the menus an d
options.
—OR—
You ca n press these k eys to a d just the
beeper, ring or speaker volume.
AND SIMPLE USE
PREPARATION
Preparatio n an d S im pl e U se Guide
9
Page 19
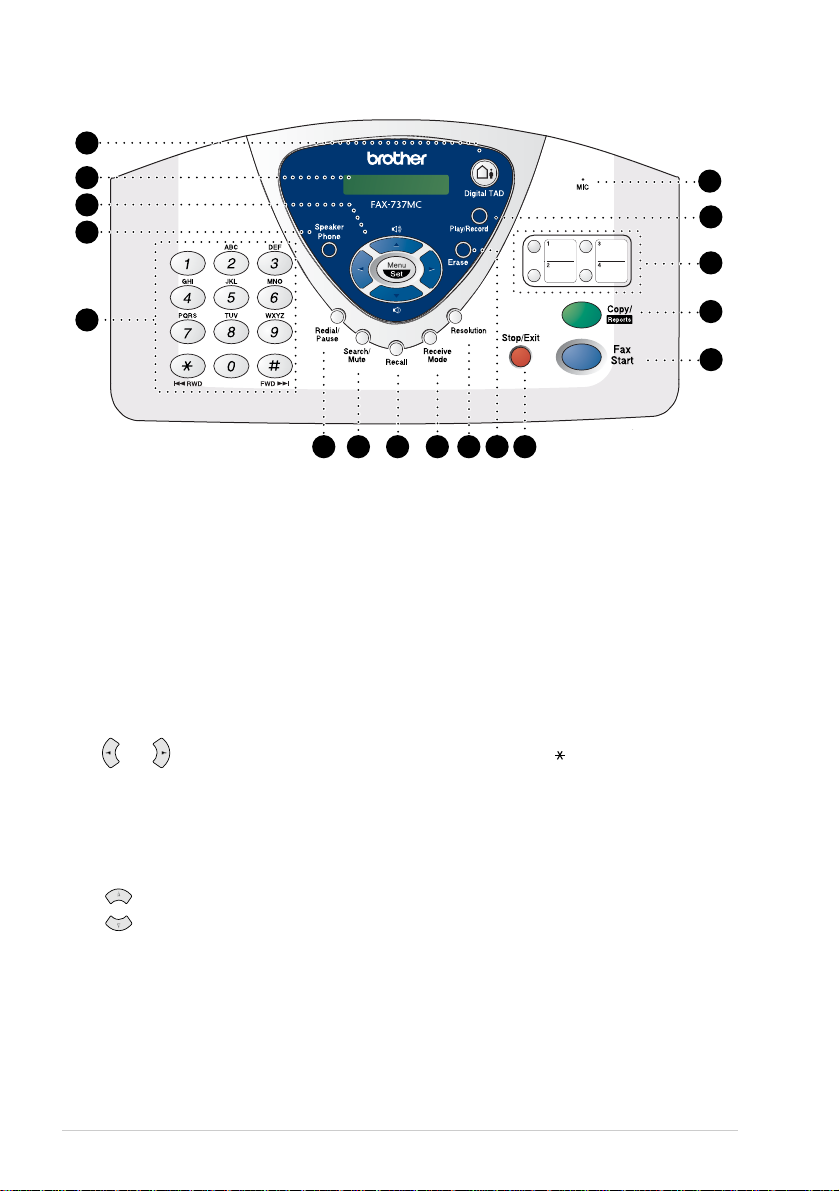
FAX-737MC Contr o l Pan el Ov er vie w
1
2
3
4
5
Digital TAD
1
Lets you activate Message Centre.
Also, notifies you tha t you have voice or
fax mess ages in the mem ory.
LCD (Liquid Cr ysta l Displa y)
2
Displays m essages to help you set up an d
operate your machine.
Navigation Keys:
3
Menu/Set
Lets you acce ss the menu and
programming mode and stores your
settin g s in the machine.
or
Press to s croll forw ard o r ba ckw ard to set
a menu s election.
You can also use these keys to do an
alphabetical searc h for the names of
stored numbers.
or
Press to scroll through the m enus and
optio n s .
—OR—
You can press these keys to adjust the
beeper, ring o r speaker volum e.
17
16
15
14
13
6
7 8
4
5
6
7
8
11 12
9 10
Speaker Phone
Lets you speak to the person at the other
end and d ial telephone and fax numbers
without lifting the ha ndset.
Dial Pad
Dials phone and fax numbers and can be
used as a keyboard for entering
information into the machine.
# key lets you sw i tch t he dialling type
during a telephone call from "PULSE" to
"TONE". (Not available in New Zealand)
# key also lets you s k ip to the next
message when you are playing voice
messages and key lets you repeat the
last message when you are pla ying voic e
messages .
Red ial/Pa u se
Re-dials the last number called. A lso
inserts a pause in autodial numbers.
Search/Mute
Lets you dial stored phone num ber s by
pressing # and a two-di git number or lets
you look up num bers stored in the d ialling
mem ory. Also , lets yo u put calls on hold.
Recall
Use this key to gain a ccess to an outs ide
line a n d /or to recall the o perator o r
transf er a call to an other e xtension when it
is connected t o a PABX . (Australia &
New Zealand only)
10
Page 20

Receive M ode
9
Use to sele ct ho w the ma chin e w ill han dle
incom ing ca lls.
Resolution
0
Sets the resolution when you sen d a fax or
make a copy.
Erase
A
Lets you delete voice m essages, fax
messages or all message s.
Stop/Exit
B
Stops a fax, cancels an opera tion or exits
from Menu mode.
Fax Start
C
Starts an operation, such as sending a fax.
Copy/Reports
D
With document in the Automatic
Document Feeder: M akes a copy.
Witho ut doc u ment in the Au toma tic
Document Feeder: L ets y ou access the
Reports menu so you can select a report to
print: H ELP LIST, QUICK-DIAL,
FAX JOURNAL, XMIT VERIFY,
TEL.INDEX, USER SETTINGS and
MEMORY STATUS List.
One Touch Dial Keys
E
These four keys g ive you instan t access to
previously stored phone numbers.
Play/Record
F
Lets you listen to voice messages and
print fax messages s tored in m emory.
Also, lets you record te lephon e calls.
MIC (Microphone)
G
Picks up your vo ice w hen you speak to
another party using s peakerphone.
AND SIMPLE USE
PREPARATION
Preparation and Si mple Use Guide
11
Page 21
1
Setup
Initial Settings
Setting the Dialling Mode (Tone/Pulse) (Not available in New Zealand)
You r mach in e is initially set to TONE. If you are using a PULSE dia l line, yo u can change the
settin g to PUL SE by following the steps below.
1
Press Menu/Set, 1, 1. The screen prompts you to select TONE or PULSE.
2
Use or to select the dialling mode, and pres s Me nu/Set w h en the s cree n d is play s the
diallin g mode you w a nt.
3
Press Stop/Exit.
Although this equipment can use either Pulse or Tone signalling, only the
performance of the To ne signalling is subject to regulatory requirements for correct
operation. It is therefore strongly recomm ended that the equip m ent is set to use
the Tone signalling for access to public or private emergency services. The Tone
signalling also provides faster call set up.
Setting the Date and Time
The scre en display s the date an d time you set, w henever the ma chine is in s tand-by m ode. It w ill print
the date and time on every fax you send.
In the e ven t o f a p ow e r failu re, th e m ac hi ne m a inta ins d ate a n d tim e in fo rm atio n fo r ab ou t 48 h o urs .
1
Press Menu/Set, 1, 2.
2
Enter the tw o dig its o f th e y e ar, a nd pres s Menu/Set. “04” is registered as 2004 in the mac hine.
3
Enter two digits for the m onth and press Me nu/Set.
4
Enter two dig its for the day an d press Menu/Set.
5
Enter the tim e in 24 h our fo rmat an d p ress Menu/Set.
6
Press Stop/Exit.
Chapter 1
12
Page 22

Setting the Station ID
You can store your name, fax number and telephone numb er in this setting. Th e name and fax
numb er will be p rinted o n the fax co ver page s and all fax pages that you sen d. (The tele phon e numb er
will be printed only on your cov er pages and on the call bac k m essages.) (S ee Electronic C over P age
(Only for FAX -7 27/737MC), page 35 and Call Reserva tion (On ly for FA X -727/7 3 7 MC), page 38.)
It is important that you e nter the fax an d teleph o ne numbers in the inte rnationa lly stand ardised
format, i.e. in accordance with the followi ng strict sequence:
- The “+” (plus ) cha rac ter (by pressing key)
- Your Country C ode
- Your local area c ode minus any leadin g “0”
- A space
- You r n umber on the local ex chan g e, using s p aces to a id reada bility as appro priate.
1
Press Menu/Set, 1, 3.
2
Enter your fax number (up to 20 d igits) an d pr ess Menu/Set.
3
Enter your telephone number (up to 20 dig its) and press Menu/ Set.
4
Enter your nam e (up to 20 ch arac ters) using the dial pad an d the chart. To enter a space press
twice.
5
Press Menu/Set.
6
Press Stop/Exit.
■
When you enter your name , see Entering Text, page 106.
■
The telephone number you enter is used only for the Call B ack Message and
Cover Page fea tures.
■
If you do not enter a fax n um ber, no additional information can be entered.
■
To enter a space, press once between numbers a nd tw ice bet ween
characters.
■
If your Station ID has already b een programme d, the scr een prompts “1” to
make a change, or “2” to exit without changing .
BASIC USE
Setup
13
Page 23
Custom Settings
Volum e Settin gs
Beeper Volume
You ca n set the be eper t o LOW, HIGH or OFF. The machine comes set to LOW. W hen the beeper
is set to LOW or HIGH, the machine beep s every tim e you pres s a ke y or make a n erro r, and at the
end of sendin g or receiving a fax.
1
Press Menu/Set, 1, 4.
2
Press or to select your setting.
3
Whe n the sc reen dis p lays the setting y ou wa n t, press M enu/ Set.
4
Press Stop/Exit.
Speaker Volume
You can ad just the speak er volum e. If you h ave FA X -717/72 7, you mu st lift the handset, then press
Hook before you can adjust the vo lume. If you have FAX-737MC, press Speaker Phone.
Press or to adjust the volume level. The display sho ws th e setting you are choo sing . Each
key press ch anges the volu me to the next s etting. T he new setting will remain u n til you c hange it
again.
■
If you have FAX -737MC, you can a djust the speaker volume while you ar e
listening to your OGM (Outgoing Message ) and IC Ms (incoming messages).
■
If you tu rn Inc o ming Reco rd in g Monitor to
FAX -737MC, the Speak e r for screenin g c a lls will be d is abled and you won’t
hear callers leaving messag es. The volume for other operations can still be
and .
controlled using
OFF (Menu/Set, 8, 5
) on
Ring Volume
You can a djus t the ring volume wh en your fax mach ine is idle. You can select a r ing volu m e level
or press or until the ring is off.
Press or to adjust the volum e level . W ith each key p ress , the fax m ach ine rings so y ou can
hear the current setting and the display show s the setting you are choosin g. Each key press chang es
the volume to the n ex t setting. The n e w settin g will remain u n til you change i t aga in.
Chapter 1
14
Page 24

PABX and TRANSFER (Not available for some countries)
Your machin e is initially set to be connected with PSTN (Public Sw itched Telephone Ne twor k)
lines. Howe ver m any of fices us e a cen tral telep hone sy stem or P rivate A utom atic B ran ch Exch ang e
(PABX) . Your fax can be connecte d to most types of PA BX. You can gai n access to the outside line
from your fax connected to PA B X by just pressing Recall.
You can trans fer a call to ano ther ext ension by pressing
If your machine is connected to a PABX, you may need to insert an additional
number p refix (e.g. “9”) and a “p ause”, not press
telephone num ber, in order to again access to the outside line.
Recall
, before each fax or
Recall
Setting PABX
If your mach ine is connected to a PA BX syste m , s et PB X :ON. If not, set OFF.
1
Press Menu/Set, 1, 5. Th e screen display s
2
Press or to select ON (or OFF).
3
Press Menu/Set when the screen displays your selection.
4
Press Stop/Exit.
You can program an
or Speed D ial location. Wh en program ming th e O ne Tou ch or S pe ed Dial num be r
(Function men u 6- 1 or 6- 2) p ress
the telephone nu m ber. If you do this, you do not need to press
before you dial using a One Touch or Speed Dial location. (See Storing Numb ers
for Eas y D ialling, pa ge 17.) How ever, if PBX is set to OFF, you can’t use the O ne
Touch or Speed Dial number tha t an
keypress as part of a number stored in a One Touch
Recall
Recall
Recall
PBX:OFF
SELECT≈≈≈≈≈≈≈SET
first (the screen displays “!”), then enter
keypress is program med into.
.
Recall
BASIC USE
each time
Setup
15
Page 25
Melody Settings (Only for FAX-737MC)
Setting the Ring Pattern
You can s elec t a ring patte rn from signal (regular ring pattern) or 4 t ypes of melody.
The default setting is SIGNAL.
1
Press Menu/Set, 9, 1.
2
Press or to select SIGNAL, MELO DY 1,
MELODY2, MELODY3 or MELODY4 and press Menu/Set.
3
Press Stop/Exit.
Even if you select a melody for rings, F/T pseudo-ring can not b e changed to the
melody.
Setting the Music on Hold
You can sele ct the music on hold . You ca n also se t the m us ic to OFF.
1
Press Menu/Set, 9, 2.
2
Press or to select MELODY1, MELODY2, MELO DY 3, MELODY4 or OFF and
press Menu/Set when the screen dis p lays yo u r selection.
3
Press Stop/Exit.
Setting the Melody Alarm
You can r ing the melody at the setting time .
Also, you can select the alarm soun d fr om a signal or 4 types of melody.
1
Press Menu/Set, 9, 3.
2
Press or to select ON (or OFF) and press
Menu/Set. If you select OFF, go to Step 5.
3
Enter the tim e in 24-h our format you want to set the
alarm and press Menu/Set.
4
Press or to select SIGNAL, MELO DY 1,
MELODY2, MELODY3 or MELODY4 and press
Menu/Set.
5
Press Stop/Exit.
◆
During the Melody Ala rm waiting, the screen display s ALAR M W A ITIN G .
◆
Once the m elody rings on the time you set, the Melo dy Alarm setting returns to O FF.
◆
If the time you set comes during the a n other op eration, the Melody Alarm rings af te r they
are finished.
SIGNAL
SELECT≈≈≈≈≈≈≈SET
3.MELODY ALARM
SET≈TIME=10:15
MELODY1
Chapter 1
16
Page 26
Storing Numbers for Easy Dialling
You can set up your machine to d o thr ee t ypes of easy dialling:
One Touch, Speed Dial, and G rou ps f or Broadcasting of faxes.
If you use the Ca ller ID subscriber service offered by your local phone company (For Si ngapore,
Hong K ong and Philippine on ly), you can register the n umb er for A nti-Junk Fax/ Call in O ne T ouch
and Speed Dial locations.
If you lose electrical power, auto d ial num ber s in memory w ill not be lost.
Storing
One Touch Dial Numbers/Storing Junk
Fax/Call Numbers
You can store four fax/phone numbers that you can dia l by pressing one key . You can also store
names w ith these numbers. W hen you press a O ne Touch dial k ey, the s cree n di spla ys th e name or
number as th e call is dialled. (See One Touch Dial ling, pag e 21.)
■
One Touch keys are n ot the dial pad keys. They are th e f our keys (numbers 1–
4) located to the right of the navigation ke ys.
■
If you want to store a Junk numb er, you have to set
(Not available in Australia and N ew Zealand)
1
Press Menu/Set, 6, 1.
2
Press the One T ouch key where you want to st ore a number. The screen displays the loca tion
you selected.
3
Enter a numb er ( up to 20 digits) and press Menu/Set.
If you wa nt to ente r a pau se in the di alling seq ue nc e (to w ait fo r an “ou tsid e line ,”
for example), press
Redial/Pause
appears on the scre en.
4
Use the dial pad to enter the na me or c ompany (up to 15
characters) and press Me nu/Set. Yo u can use th e chart
to help you e n ter letters (See Entering Text, pa ge 106.)
—OR—
To store the number without a name, press M enu/S et.
5
Press or to select the type of num ber and press Menu/Set.
Redial/Pause
enters a 3.5-secon d pause w hen the num ber is dialled, an d a da sh
as y o u’re e n te ring d igits. Pr e ssing
ANTI JUNK
NAME:
to ON in Step 6.
BASIC USE
FAX a fax only number
TEL a telephone (voice) number
F/T both a fax and telep hone (voice) num ber
Setup
17
Page 27
6
Press or to select if you s et ANTI JUNK to ON (or OFF) and press
Menu/Set.
(Not available in Australia and N ew Zealand)
If you set
the m ac hine . Th e ma ch ine w ill reje ct r eceiv ing the fax m es sa ge or t elep h one ca ll.
(Not available in Australia and N ew Zealand)
If you don’t use the Caller ID subscriber service offered by your local
telephone company, you cannot use the Anti-Junk function.
(For Singapore, Hong Kong and Philippine)
7
Return to Step 2 to store another One Touch number—OR—Press Stop/Exit to exit.
When you dial a One T ouch Dial num ber, the screen displays the name you h ave stor ed, o r, if
you have not s tored a name, the nu m ber you have stored .
ANTI JUNK
to ON, the number is registered as th e Junk Fax or Call in
Storing Speed Dial Numbers/Storing Junk Fax/Call Numbers
You can s tore Spe ed Dial numbers , when you dial by pressing only four keys . There are 100
(FAX -727 /73 7MC) or 60 (FA X-717) Speed Dial locations.
If you want to store a Junk num ber , yo u have to set
(Not available in Australia and N ew Zealand)
1
Press Menu/Set, 6, 2.
2
Use th e dia l pad to ente r a tw o-d ig it loca tion an d pre ss
Menu/Set. (00-99 for FAX -72 7/73 7MC, 01-60 for
FAX-717)
3
Enter the number (up to 20 dig its) and p ress
Menu/Set.
4
Use the d ial pad to enter the name o r compa ny (up to 1 5
characters) (S ee Entering Text, page 106.) and press Menu/Set—OR—Press Menu/Set to
store th e number with out a na me.
5
Press or to select the type of numb er and press Menu/Set.
ANTI JUNK
SPEED-DIAL? #
#05:
ENTER & SET
NAME:
to ON in Step 6.
FAX a fax only number
TEL a telephone (voice) n um ber
F/T both a fax and telephone (voice) number
6
Press or to select if you set AN TI JUNK to ON (or OFF) and press
Menu/Set.
7
Return to Step 2 to store another Speed D ia l number—OR—Press Stop/Exit to exit.
Chapter 1
18
(Not available in Australia and N ew Zealand)
Page 28

Changing One Touch and Speed Dial Numbers
If you try to store a One Touch o r Speed Dia l number in a location w here a numb er is already stored,
the screen displays the current name store d the re, then prompts you to eithe r
1. CHANGE—OR—2. QUIT.
1
Press 1 to ch ange the number stored, o r pr ess 2 to exit without m aki ng a change.
2
Enter a new number.
◆
If you want to eras e the entire nu mbe r, press Stop/Exit when the cur sor is to th e lef t of th e
digits. The letters above a nd t o the righ t of the cursor are deleted.
◆
If you want to change a digit, use or to position the cursor under the digit you want
to chan ge, the n type o v e r it.
3
Follow the directions from Step 3 in Storing One Touch N umbers or Storing Speed Dial
Numbers.
Setting Up Groups for Broadcasting
Groups allow you to send the same fax messag e to m any fax numbe rs b y pressing only one One
Touch key (B roadcasting). First, you’ll need to store each fax number a s a One T ouch or Sp eed Dial
number. Then, you can com bine them into a Group. Each Gro up uses up a One T ouch key. Finally,
you can hav e up to four small Gro ups, or you can assign up to 103 (FAX-727/737MC) or 63
(FAX-7 17) n u m bers to one large Group. (See Stor ing One Tou ch Dial Num bers/Storing Junk
Fax/Call Numbers, page 17, Storing Speed Dial Nu mbe rs/Storing Jun k Fax/Cal l Num bers, page 18
and Broadca sting , page 2 2 .)
1
Press Menu/Set, 6, 3.
2
Select a One T ouch key wh er e you wish to sto re th e
number. (For exa mple, press One Touch key 2 to store a Group.)
3
Use the dial pad to enter the Group number and pr ess
Menu/Set. (For example, press 1 fo r Grou p 1.)
4
To include One Touch or Sp eed Dial numbers in the
Group , enter them as if y ou w ere d ialling . For e xam ple,
for One Tou ch key 3, press One Touch key 3. For
Speed D ial locati on 09, press Search/Mute , th e n
press 0, 9 on the dial pad. The LCD shows 03, #09.
5
Press Menu/Set to accept the numbers for this gro up.
6
Use the dial pad to enter a name for the group and press
Menu/Set. (For example, NEW CL IENTS) (See
Entering Text, page 106.)
7
Press Stop/Exit.
SELECT ONE-TOUCH
SETUP GROUP:GO
ENTER & SET
G01:≈03≈09_
NAME:
ENTER & SET
BASIC USE
You can p rint a list of all One Touch and Sp eed Dial numbe rs. (See P rinting
Reports, page 33.)
Setup
19
Page 29

2
Sending a Fax
Scanning Adjustment
Contrast
If your document is very light or very d ark, you might want to set the contrast accordingly. Use
LIGHT to send a light d ocum ent. Use DA RK to send a dark docum ent. After sending the documen t
the contrast setting is set to AU TO (suitable for m ost documents) aut om atically.
1
Insert the doc um ent face down in the Automatic Document Feeder.
2
Press Menu/Set, 3, 3.
3
Use or to sele ct AUTO, LIGHT, or DARK.
4
When the scre en displays your selection, press
Menu/Set. The screen dis plays:
5
Press 2 if you have finished choosing settings, an d go to
Step 6—OR––Press 1 if yo u want to select additional
settin g s. The d isp lay returns to SETU P SEN D menu.
6
Enter a fax nu mber and press F ax Start to send a fa x.
Resolution
When you have a document in the feed er, y ou can use the R eso lution key. Press Resolution
contin uou sly u ntil yo u see y our s elec tion o n the s creen .
page,
see M u ltiple Re so lution T r ansm is sion, page 43.
STANDARD: s uitable fo r most typed docum ents.
FINE: good for sm al l print; transmits a little sl o w er than standard resolutio n.
S. FINE: good for sm al l print or artwork; transmits slower tha n fin e re solution .
PHOTO: use when document ha s varying shades of g rey; slow tra nsmission time.
If you want to set a different resolution for each
ACCEPTED
NEXT
1.YES≈2.NO
Sending Operation
Manual Transmission
Manu al trans m iss ion lets you hear the dial tone, ringing and fax receiving tones before sending the
fax.
1
Insert the doc um ent face down in the Automatic Document Feeder.
2
Pick up the h and set and listen for a dial ton e— OR—P re ss S pe aker Ph on e (for FA X-737 M C
only).
3
Enter the fax num b e r you w a n t to call. (S e e Dia llin g a Nu mber, page 21.)
4
When you hear the fax ton e, pr ess Fax Start. If you are using the handse t, hang up.
Chapter 2
20
Page 30

Automatic Tran smission
This is the eas ie st way to send a fax.
IMPO RTANT: Do not p ick up t he handset—OR —P r ess S p e aker P hone (for FAX-737MC
only).
1
Insert the document face dow n in the Automatic Document Feeder.
2
Enter the fax number you wa nt to call.
3
Press Fax Start.
Dialling a Number
One Touch Dialling
1
Insert the document face dow n in the Automatic Document Feeder.
2
Press th e One T ouch k ey of th e locatio n you w a n t to call.
3
Press Fax Start.
If you try to use a One Touch or Speed Dial location with no num ber stored in it,
you hear a w arn ing so und, and screen displays
retur n s to nor mal afte r 2 seconds.
NOT ASSIGNED
Speed Dial lin g
1
Insert the document face dow n in the Automatic Document Feeder.
2
Press Search/Mute, then press # and the two-digit Speed Dial number.
3
Press Fax Start.
. The display
BASIC USE
Search
You can search for name s yo u have stored in On e T ouch and Speed Dial mem ories. (See Storing
One Touch Dial Numbers/Storing Junk Fax/Call Numbers, page 17 and Storing Speed Dial
Number s/Sto ring Junk Fax/Call Numb ers, page 18.) Nam es are displayed alphabetically.
1
Insert the document face dow n in the Automatic Document Feeder.
2
Press Search/Mute.
3
To search for numbers alphabetically by nam e, enter the first letter of the name by using the dial
pad, and then pre ss or .
4
When the screen displays the name you w ant to call, press Fax Start.
Sending a Fax
21
Page 31

Automatic and Manual Fax Redial
Automatic Fax Redial: If you are sending a fax automatically and the line is busy, the machine will
automatically redial up to 3 times at 5 minute intervals.
Manual Fax Redial: Place the document to be re-sent and press Redial/Pause and then Fax Start
to make a second call to the last number dialled.
Broadcasting
Using the numbers you have stored in Groups, One Touch and Speed Dial memory, you can
“Broadcast” faxes automatically to a maximum of 104 (FAX-727/737MC) or 64 (FAX-717)
different locations in a few simple steps.
To Broadcast, you must set Memory TX to either ON or NEXT FAX ONLY.
After the Broadcast is completed, a Broadcast Report will be printed automatically to let you know
the results.
1
Insert the document face down in the Automatic Document Feeder.
2
Press Menu/Set, 3, 9 to select ON or NEXT F AX ONLY .
3
Press Menu/Set.
4
Enter the One Touch and Speed Dial numbers (one after the other), Search numbers or a Group
number you have stored.
5
Press Fax Start. The machine stores the document in memory, and then transmits it to all the
numbers you entered. If the line is busy, your machine will redial.
Stop/Exit
Press
To cancel all locations, press
page 40.)
during transmission to cancel the current fax Broadcast.
Menu/Set, 4
. (See Cancelling a Scheduled Job,
Chapter 2
22
Page 32

3
Receiving a Fax
Answer Mode Settings
Select Answer Mode
MANUAL — Us e this function if you receive m any telephone calls and few fax m essages. Y ou mu st
answ er all calls yourse lf. If you hear fax tones, w ait until the m ac h ine take s over th e call
automatically, then h ang up (see Fax Detect function).
FAX ONLY —Use this function if you want to receive fax messag es only (no telephon e cal ls). The
machine aut oma tically answ ers e very call as a fax call. Y ou c annot re ceive a v oice cal l, but you ca n
dial out and make a voice call.
FAX/TEL— Use this function if you expect to receive m any fax message s and few phon e calls. The
mach ine auto m at icall y an sw e rs ev ery c all. If the ca ll is a fax , it p rin ts th e fa x. If the c all i s not a fa x,
it signals you with an F/T pseudo-ring, different from t h e phone company ringing, to alert you to
pick up the call. If you s elect this setting, you will need to set the Rin g Delay a n d F/T Ring Time
features (on the follow ing pages). (See For F/T (Fax/Tel) Mode Only, page 44.)
TAD:ANSWER MACH. (FAX-717/727 ) —This is the only se ttin g in w h ich you c an use an
external answering m achine. Your teleph one answering de vice answers ev ery call. Once the
external telephone answering device (TAD ) answers, the machine listens fo r fa x tones. If it detects
fax tones, fax messag es a re p rinted.
The T AD setting works on ly with an extern al telepho ne ans wering d e v ice (TA D). Ring Delay and
F/T R in g Time do not wo rk in this se tting.
MC:MSG CTR (FAX -73 7MC )— FA X-7 37M C pr ovide s you wi th a b uilt-in digit al M ess age Cen tre
for fax and voice. When you set the machine to an sw er calls, it will record up to 15 minutes of
messages. Se e Message Centre (Only for F A X-737MC ), page 65 for mo re inform a tion.
BASIC USE
FAX-717/727
FAX-737MC
09/06≈15:25≈≈FAX
Current
Answer Mode
09/06≈15:25≈≈MC
Current
Answer Mode
MAN:MANUAL
FAX:FAX ONLY
F/T:FAX/TEL
TAD:ANSWER MACH.
(Only for FAX-717/727)
MAN:MANUAL
FAX:FAX ONLY
F/T:FAX/TEL
≈MC:MSG CTR
(Only for FAX-737MC)
Receiving a Fax
23
Page 33

To select or change your Answer Mode
1
Press Receive Mode. The screen displays your current selection.
The options on FAX-717/727 are:
FAX≈ONLY
FAX/TEL
TAD:ANSWER≈MACH.
MANUAL
The options on FAX-737MC are:
Or, if TAD Mode is switc hed ON by pressing
(Digital TAD button), it overrides your Answer M ode
Setting, so the displa y show s :
2
Continue to press Recei ve Mode un til your n ew se lection appea rs. Afte r 2 seco nds, the scre en
return s to the da te and time display, along with you r new Answ er Mo d e setting .
If you are changing Ans wer Mode while in another operation, the screen returns to
the current operation display.
FAX≈ONLY
FAX/TEL
MANUAL
MC:MSG≈CTR
Setting the Ring Delay
The Ring Delay setting determ ine s the nu mber of times th e machine ring s be fore it answer s. (See
Operation from an External or Extensio n Te leph one, page 44 and For F/T (Fax/T el) Mode Only,
page 44.)
1
Press Menu/Set, 2, 1. If you h ave a FAX-717/727, go to Ste p 3.
2
Press or to select RING DELAY, and press Menu/Set.
3
Press or to select how many times the l ine rings before the mac hine answer s, and press
Menu/Set when the s cree n dis play s your selection.
4
Press Stop/Exit.
Chapter 3
24
(Only for FAX-737MC)
When Toll Saver is
off for the machine to ope rate using your Ring Delay setting. (See Se ttin g the
Toll Saver, pag e 70.)
, it overrides your Ring Delay setting. Toll Save r must be
ON
Page 34

Setting the F/T Ring Time (Only Applies to F/T Receiving Mode)
You need to determi ne how long the mac hine w ill give its special F/T pseudo- ring whe n you h ave a
voice call. Th is ringing happe n s after the initial ringing from th e p hone c o mpany. Only the fax
machine rings f or 20, 3 0, 40 o r 70 sec onds; n o other phones (extension o r ex ternal) on th e same line
rings during the spec ial F/T pseudo-ring.
1
Press Menu/Set, 2, 2.
2
Press or to selec t h o w long the machin e will ring to alert y ou tha t you h a v e a voic e
call, and press Menu/Set when the screen displays your se lect ion.
3
Press Stop/Exit.
Even if the caller hangs up during the F/T pseudo-ringing, the machine con tinues
the F/T pseudo-ringing for the set time.
Please note th a t some fa xes can n ot be received a utomatically in F/T mode, becau se some fa x
machines do not send the stan dard Group 3 ca llin g tone (“CNG”)
This machine does not generate F/T ringi ng tones to an y extension
telep ho ne s . A ny suc h ext e ns ion te l ephones wi ll on ly ring dur in g th e pe riod
set on ring delay.
, but this is not c ommon.
Recording the Fax/Tel Outgoing Announcement (FAX/TEL OGM) (Only for FAX- 737MC)
This is the annou ncement played by your machine (not an external TAD ) when som eone calls and
your machin e is set to F/T mode. A lth ough callers hear your announcement, the y cannot leave a
message. Se e Erasing the O utgoing Message ( O G M), page 67 for directions to erase the
announcement. The p urp ose of this F/T messa ge is for the c alle rs to bet ter u nder stan d the status of
their call, when your machin e is set in F/T receiving mo de. If you wan t to use Message C entre, you
MUST record the Message Centre OGM.
1
Press Menu/Set, 8, 3. The screen prompts you to choo se FAX/TEL OGM , MSG CTR OGM
or PAGING OG M .
2
Press or to select FAX/TEL OG M , and p ress Menu/Set.
3
Press or to select RECOR D MSG and press Menu/Set, then pick u p the han dse t to
record a mes sage.
4
Replace the handset. Your announ cem ent is played.
5
Press Stop/Exit.
BASIC USE
Receiving a Fax
25
Page 35

It is not necessary to have an outgoing message. The F/T mode will work fine
without one. It is only to help the caller unders tand the status of your machine.
For example, you can leave a mess age that says:
“Hello, plea se wa it, we are trying to c onnec t y ou. If yo u wis h to send a fax, ple a se wa it until yo u
hear a fax ton e and press the Start key, or, p ress 5 1 ( 9 1 for New Zealand) (your three-digit
remote Fa x Receive C ode) and press the Start k ey.”
Fax Det e ct
When you use this feature, you don’t have to press Fax Start when you answer a fax call and hear
callin g b eeps. Ju st hold th e hand s et and wait for se veral sec onds. When you se e RECEIVE on the
fax screen or when yo u hear “chirps” through the handset of an ex tension phone connected to anoth er
wall jack, just replace the handset, and your ma chin e does the rest.
• Selecting ON allows the m achi ne to recei ve fax calls auto mat ically, even if you lift the ha ndset
of an extensio n phone, an external phone, a phone o r TAD conne cted to the machine.
• Selecting SE M I lets the fax machin e receive the call only if you ’ve answer ed it at the machine .
• Selecting OFF m ea ns y o u w ill h av e to ac tivat e the m ac hine y ou rsel f, by pre ss ing Fax Start or
by pressing 5 1 ( 9 1 for N ew Ze aland) if you are n ot at your ma chine. (
an External or Extension Telephone
In case Fax D etect does not wo rk, becau se of a poor p hone line co nnection, just press Fax S tart or
press the Fa x R eceive Co de 5 1 ( 9 1 for New Z ealand). (Y ou h ave to set Re mote C ode to ON
in Menu/ Set, 2, 4 to use 5 1 ( 9 1 for New Zealand).)
1
Press Menu/Set, 2, 3.
2
Use or to sele ct ON, SEMI or OFF, and press Menu/Set when the screen displays
your selection.
3
Press Stop/Exit.
If yo u’v e s et t he featu re to O N, bu t y ou r m a chin e do esn ’t a uto m ati cally co n ne ct a fa x c all whe n y ou
lift an external or extensio n phone handset, press 5 1 ( 9 1 for New Z e aland).
At the mac h ine, lift the hand set and pr ess Fax S tar t.
, page 44
and For F/T (Fax/Tel) Mode Only
See Operation from
, page 44
.)
Receiving a Fax
Printing a Reduced Incoming Document
You can alwa ys reduce the size of an incoming fax to a fixed percentage w ith your mach ine. If you
choose AU TO, the mac hine re duc es an inco ming doc ume nt au toma tically , so tha t it fits o n one pag e
of A4 rec ordi ng paper, regardless of the siz e of the original document.
1
Press Menu/Set, 2, 5. The screen displ ays
Chapter 3
26
5.REDUCTION
Page 36

2
Use or to select the reduction ratio you w ant—AUTO, 100 % , 93%, 87%, or 75%.
Choose 100% if you don’t want a reduction.
3
Press Menu/Set when the screen displays your selection.
4
Press Stop/Exit.
If you receive faxes that are split on two pages, change the reduction to
—OR—Ch oose a lower reduction perce ntage.
■
When you use Auto Reduction to reduce incom ing documen ts to fit on one pag e
of recording paper, you ca n do so only as long as th e or iginal document is not
longer than 35 cm. If the original is longer than 35 cm, the data will not be
reduc e d and will carry o ver to p r in t o n a second p a ge.
■
When you use Auto Reduction and you receive an incoming document that is
sma ller th an you r r eco rdin g pa per, no re duc tio n w ill ta ke plac e, an d yo u will g e t
the same size reco rded as t he original.
AUTO
Reception into Memory
As soon as the pape r cassette b ecom es em pty o r ink ribbon run s out during fax receptio n, the scree n
will display CH ECK PA PER; please put some paper in the pa per t ray.
If the MEMOR Y RE CEPT ION switch is ON at this time…
The cu rren t fax recep tion w ill c on tinue , w ith the rem ain ing pa ge (s) be ing store d i n m emory, subject
to availa ble m em o ry. S ub se que nt in co m ing fa x es will a lso b e sto red i nto memory until t he memo ry
is full, fo llo wing which no furthe r incom ing fax c alls will be auto matically answered; all data w ill
be printed as so on as fre sh pap er is put in the pap er cassette.
If the MEMORY RECEPTION switch is OFF at this time…
The cu rren t fax recep tion w ill c on tinue , w ith the rem ain ing pa ge (s) be ing store d i n m emory, subject
to available memory. Su bsequ en t incoming f a x calls will not be automat ic ally ans w ered u ntil fresh
paper is put in the pa per c asse tte. The last fax received wil l be prin ted a s so on as fresh paper is put
in the cassette.
1
Press Menu/Set, 2, 6. Th e screen display s
2
Use or to se lec t ON or OFF, and press
Menu/Set when th e screen display s your s election .
3
Press Stop/Exit.
6.MEM.RECEIVE
BASIC USE
Printing a Fax from Memory (Only for FAX -717/72 7)
If you have fax storage ON for remote retrieval, you can still print a fax from the machi ne’s mem ory
when you are at your ma chin e. ( See Setting Fa x S torage , p age 60.)
1
Press Menu/Set, 8, 4.
2
Press Fax Start.
3
Press Stop/Exit.
Receiving a Fax
27
Page 37

4
Making Copies
Copy Functions
To m ake a single copy that is no t reduced, enlarged or sorted , yo u only have to press one key.
Reme m ber, your mach ine cannot scan anyt hing closer than 4 mm from th e edge of the paper.
Making a Single Copy
1
Insert the doc um ent face down in the Automatic Document Feeder.
2
Press Copy/Reports twice.
To cancel , pre ss Stop/Exit.
Do N O T pull on the paper w hi le co pying is in progress.
The default resolution for a single copy is
photographs by u s ing the
Resolution
key.
. Set th e re solutio n to
S.FINE
PHOTO
for
Copy Options: Single or Multiple Copies, Sort/Stack, Reduce/Enlarge
You can choose additi onal copy options. Fir st, you can sel ect the number of copies. Next, you can
choose whether multiple copies will be STACKED (all copies of page 1, then all copies of page 2, etc.)
or SORTED (collated). Finally, you can choose an enlargement or reduction ra tio. To auto m atically
AUTO
reduce the copy to the paper size you have set for the paper tray, select
a fixed percentage, choose
120%
. To copy a document at i ts original size, select
1
Insert the doc um ent face down in the Automatic Document Feeder.
2
Press Copy/Reports.
3
Enter the number of copies you want (1-99).
To start copying now, pres s Copy/R ep orts.
If you would like to select additio nal cop y op tions , like SOR T, ELG/R DC (E nlarge or R educe)
press Menu/Set.
4
Press or to select SO RT or ST ACK.
To start cop ying n o w without enlarging o r reduc in g , press Copy /Repor ts.
To reduce or enlarge the image, press Menu/Set.
5
Press or to s elec t an en larg eme nt or r educ tion
ratio.
6
Press Copy/Reports.
93%, 87%, 75%
50%
or
. Or, to enlarge the copy, select
100%
.
NO.OF COPIES:01
THEN COPY OR SET
ELG/RDC:100
SELECT≈≈≈≈≈≈≈SET
. To reduce the copy by
150%, 125%
or
Chapter 4
28
Page 38

If you are making multiple copies and get a
are scanning the first page, press
copy. If you selected SO RT and the
Stop/Exit
OUT OF MEMORY
scanning su bsequent page s, you can press
is in m e mory, or pres s
memo ry, press
Copy/Reports
Stop/Exit
to can cel. To re-sta rt the co py job using less
for stacked copies.
OUT OF MEMORY
message w hile you
to cancel the job. Then make a single
message appears while
Copy/Reports
to copy the portion that
The default resolution for multiple copies or reducing and enlarging copies is
Set the resolution to
by using the
memory than
Resolution
FINE
for small print or artwork and
S.FINE
key.
S.FINE
mode.
and
resolutions use up more
PHOTO
PHOTO
for photographs
FINE
.
BASIC USE
Making Copies
29
Page 39

5
Telephone
Making a Call
You can us e your machine to m a k e voice telepho n e calls, b y diallin g manually o r by usin g On e
Touch or Speed D ial m em ory. Yo u can u se the h and set or if you hav e F AX- 737M C you can use the
Speakerp hone to make and receive calls. For more details, see Dialling a N umber, page 21 .
The “full-duplex” di gital Spea kerphon e allows yo u to opera te the phon e hands fre e, or allows m ore
than one p erso n in the room to participate in a tw o-way phone conversation. When using the
Speakerp hone, mak e sure that you speak clearly. If the other pa rty has difficulty hearing you, mo ve
closer to the m icro phone or use the han d set.
On Hook Dialling
1
Dial the num ber by using the dial pad or Qu ick- D ial keys.
The number you are dialling, or th e nam e you h av e stored for On e Touch or Spe ed Dia l is
displayed on t he LCD.
2
For FAX-7 17/727, press Fax S tart and pick up the h andset when yo u hear the call answ ered on
the moni tor speaker. If you pre ss Hook b efo re lifting the h andset, the call wi ll be discon nec ted.
Replace the handset to finish the call.
For FAX - 737MC, press Fax Start, and when the call is answere d, you can now speak to the
party a t the othe r end w ith out lifting the ha ndset. P ress Spea ker Pho ne w hen you finish the
conversation.
One Touch Dialling
1
Pick up the handset—OR—P re ss S pea ker Phon e (for FA X -73 7M C on ly).
2
Press the One Touch D ial k ey of the location you want to call.
3
To hang u p , replac e th e handset—OR—P ress Speaker Pho ne (for FAX-73 7MC only).
If you try to use a One T ouch or Spee d D ial location with no numbe r stored in it,
you hear a warning sound, and scree n displays
returns to normal after 2 seconds.
NOT ASSIGNED
. The display
Speed Dialling
1
Pick up the handset—OR—P re ss S pea ker Phon e (for FA X -73 7M C on ly).
2
Press Search/Mute, then pr ess # and the two -digit Speed Dial numb er. (See Storing Speed Dial
Numb ers/Stor ing J unk F ax/Call Numbe rs, page 18.)
3
To hang u p , replac e th e handset—OR—P ress Speaker Pho ne (for FAX-73 7MC only).
Chapter 5
30
Page 40

Search
You can search for name s yo u have stored in On e T ouch and Speed Dial mem ories. (See Storing
One Touch Dial Numbers/Storing Junk Fax/Call Numbers, page 17 and Storing Speed Dial
Number s/Sto ring Junk Fax/Call Numb ers, page 18.)
1
Pick up the hand set—OR—Press Speaker Ph one (for FAX-737MC only).
2
Press Search /Mu te, then enter the f irst letter of the name y ou ar e looking for by using t he dial
pad.
3
Press or to search the names that ar e dis play ed alphabetically.
4
When the screen displays the name you w ant to call, press Fax Start to begin di a lling.
5
To hang up, replace t he handset—OR—P ress Spe ake r Ph one (for F AX-7 3 7MC only).
Redial
If you are calling someon e and the l ine is busy, yo u can retry the numbe r by pressing R e d ial/Pa u se.
1
Pick up the hand set—OR—Press Speaker Ph one (for FAX-737MC only).
2
Press Red ial/Pa u s e .
3
To hang up, replace t he handset—OR—P ress Spe ake r Ph one (for F AX-7 3 7MC only).
Pause
Press Red ial/Pa u s e to in sert a pause between digits to be dialled.
If your fax m a chine is c onnec te d to a PABX, you may ne ed to ins ert an ad ditiona l number prefix
(e.g. “9”) and a “pause” before e ach fax or telephone number to gain a cces s to the outside line.
(Australia & N ew Zealand only)
When y ou press Redia l/Pause, a dash “-” will ap pear on the display. By storing a pause , you can
create a delay of 3.5 seconds.
BASIC USE
Tone/Pulse (Not avilable in New Zealand)
If you have pulse dialling service, but need to send tone signals (for telephone bank ing, for example),
follow the directions below. If you have to uch tone service, you do not nee d this feature to send tone
signals.
1
Lift the handset a nd dial the numb er.
2
When you are asked to enter any number, press # on the control pan el of the machin e. Any digits
dialled after this sends tone signals.
3
Whe n y ou ha ng up, the machine retur n s to pulse d ialling service.
Teleph one
31
Page 41

Answering a Call
F/T (FAX/TEL) Mode
When you share o ne line for your te leph one and fax m achine, in the F/T (FAX/TE L) mode, th e f ax
machine can determin e w hether an incom in g call is a fax or a teleph one call. (See Answer Mode
Settin g s, p age 23.)
Answering Calls with the Speakerphone (Only for FAX-737MC)
When the machine rin gs, i nstea d of lifting the handset, p ress Spe ake r Ph one. Speak clearly,
toward th e m i crophone. To end the call, press S pea ker Phone.
If you have a bad telepho ne line connection, the other party might hear your voice echoed during the
call. Hang u p and try the ca ll again—OR—Pic k up th e hand se t.
Mute
1
Press Search/Mute to put a call on hold.
2
You can r epla ce th e handset without disconnecting the call.
3
Pick up the machine’s hand set or press Speaker Ph on e (for FAX-73 7MC only) to release the
call from hold.
If you press Searc h/M ute wit hout lifting the ha nds et or pre ssing Speaker Phon e (for
FAX- 737MC only ), this key works as the S earc h key.
You can select a music type or set to off the music during a call put on hold. (See
Setting the Music on Hold, page 16.)
Hook Key ( On ly for FAX-717/727)
If you pick up the m achine’s handset and press Hook w he n you ar e talking lifting the external
telephone’s handset, now you c an t alk to th e oth er party at the machi ne.
Chapter 5
32
Page 42

6
Printing Reports
Transmission Report and Journ al Set ting
Two reports req uire initial setup in the Menu table: Tr ansm ission V e rification Repor t a n d Journ al
Period. For initial setup:
Press Menu/Set, 7, 1.
—OR—
Press Menu/Set, 7, 2.
Customizing the Transmission Verification Report
You can use the Transmi ssion R eport as proof that you sent a fax. This report lists the na m e or fax
number of the receiving party, the time and date of transmi ssion , an d if the t rans m iss ion w as
successful.
When th e fe atur e is OFF, the rep o rt is printe d automaticall y o nly if the re’s an error during
transmission. If the repor t indicate s ERROR , send the docum ent again. If the report indicates you
should check the reada b ility of certain pages, res end tho se pages .
When th e fe atur e is ON, the repo rt is printed with every fax you send.
1
Press Menu/Set, 7, 1.
2
Press or to select ON or OFF , and press Menu/Set.
3
Press Stop/Exit.
Setting the Journal Period
You can set th e machine to p rint activity reports at specific intervals (e very 30 faxes, 6, 12, 24 hours,
2 or 7 days). If you set the interval to OFF, you ca n print the report man ualy. (See To P rint a Repo rt,
page 34.)
1
Press Menu/Set, 7, 2.
2
Press and key to choose your setting and p ress M e nu/Set.
3
If you choose 7 days, the screen prompts you to choose a day at which to be gin t he 7-day
countdown. P res s or to choose your setting a nd pres s Menu/Set.
4
Enter the time to begin printing, in 24-hour format (for example, enter 19:4 5 for 7:45 PM ), and
press Menu/Set.
5
Press Stop/Exit.
1.XMIT≈REPORT
2.JOURNAL≈PERIOD
BASIC USE
Printing Reports
33
Page 43

Using the Reports Key
You can p rin t the following lists and reports:
1.HELP≈LIST
Lists basic operat iona l steps and functions.
2.QUICK≈DIAL
3.FAX≈JOURNAL
4.XMIT≈VERIFY
5.TEL.INDEX
6.USER≈SETTINGS
7.MEMORY≈STATUS
Lists names and numbers stored in One Touch and Speed
Dial memo ry, in numerical order.
Journal lists information a bout the last 30 i ncoming and
outgoing fax es. TX means Transmit; RX means Re c e ive.
Choose if T ransm is sion V erification Repor t is printed after
all F ax e s sent.
Quick-dial list (abov e), alpha betically .
Lists settings for
SETUP SEND, REPORT SETTING
REMOTE FAX OPT
SETUP MSG CTR
(FAX-737MC) and
Lists summ ary inform ation and am ount of occ upied me mory.
INITIAL SETUP, SETUP RECEIVE
,
(FAX-717/727),
(FAX-737MC),
MISCELLANE OUS
SETUP MELOD Y
.
To Print a Report
1
Mak e sure th at there is no d oc ument in the Automatic Document F eeder.
2
Press Copy/Reports, then enter the number (see list abo ve) of the rep ort you want to print. For
example, press 6 to print the USER SETTINGS.
3
Press Stop/Exit.
,
Chapter 6
34
Page 44

7
Advanced Sending
Advanced Operations
Electronic Cover Page (Only for FAX-727/737MC)
The cover p age i s se nt to the rece ivin g party’s machine. Yo ur c over page includes th e na me stored
in the One Touch or Spee d Dial memory, if you have u sed this feat ure to sta rt the call.
The cover page indicates the fa x is from your Station ID, and the number of pages you are sending.
If you have COVE RPG SET UP se t to ON (see Always Send Cover Page, page 36), the number of
pages on the cover page rema ins blan k.
You can sele ct a com ment to includ e on you r cover page , or
you can sele ct 1.COMMENT OFF if you do not wish to
include a comment.
As w e ll as using one o f the co mmen ts show n on the right,
you can also enter up to two cu stom ized m essag es, each 27
characters long. (See Com posing Your Ow n C omments,
page 37.)
Cover Page for Next Fax Only
Mak e s ure Sta tion ID is set up. (See Setting the Statio n ID, page 13. ) This feature does not work
withou t the Sta tion ID.
You can set the f ax t o sen d a cover page with a particular docu ment. This cover page will include
the number o f pa ges in your document.
1
Insert the document face dow n in the Automatic Document Feeder.
2
Press Menu/Set, 3, 1.
3
Press Menu/Set when the screen disp lays NEXT FAX ONLY.
4
Press or to select ON (or OFF), and press Me nu/Set.
5
Press or to view the comment selections.
6
Press Menu/Set when the screen displays your
selection.
7
Enter two digi ts to indicate the num ber of pages you are
sending. (Enter 00 to leave the num ber of pages blank.)
If you have made a m istake, press to back u p and
re-enter the number of pages.
1.COMMENT OFF
2.PLEASE CALL
3.URGENT
4.CONFIDENTIAL
1.COMMENT OFF
2.PLEASE CALL
3.URGENT
4.CONFIDENTIAL
(user defined)
5.
(user defined)
6.
ADVANCED USE
8
Press Menu/Set. The screen displays:
9
Press 1 if you w a nt to sel ect a dditiona l settings. Th e
display returns to the SE TUP SEN D menu—OR—
Press 2 if you a re finished cho osing settings, and g o to
Step 10.
10
Enter the fax number you are calling a nd then press
Fax Start.
ACCEPTED
NEXT
1.YES≈2.NO
Advanced Sendin g
35
Page 45

Always Send Cover Page
Mak e sure S tation ID is set up . (See S etting the Station ID, page 13.) This fea ture does not work
without the S tation ID.
You can se t the machine t o send a cover p age whe never you send a fax. The num ber of pages in you r
fax is n o t includ ed wh e n you u se this settin g.
1
Press Menu/Set, 3, 1.
2
Press or to select ON (or OFF).
3
Press Menu/Set when the scre en dis plays COVERPAGE:ON. (If you select ON, a coverpa ge
is always sent w he n you send a fax.)
4
If you selected ON , the sc reen displays the cov er page
com m ent o p tion s. Pre s s or to view com m en t
selections.
5
Press Menu/Set when the screen displays y our
selection. T he screen displays:
6
Press 1 if you want to select additional settin gs. T he
displa y returns to the SETU P S END menu—OR—
1.COMMENT OFF
2.PLEASE CALL
3.URGENT
4.CONFIDENTIAL
(user defined)
5.
(user defined)
6.
ACCEPTED
NEXT
1.YES≈2.NO
Press 2 to e x it if you are finish ed cho o sing settings.
Using a Printed Cover Page
If you prefer using a printed cover pag e that you can write on, y ou can print the samp le pa ge and
attach it to your fax.
1
Press Menu/Set, 3, 1.
2
Press or to select PRINT SAMPLE , and press Menu/Set.
Chapter 7
36
=== COVER PAGE ===
TO:
FROM:
FAX:
TEL:
PAGE[S] TO FOLLOW
COMMENT:
Page 46

Composing Your Own Comments
1
Press Menu/Set, 3, 2. Th e screen display s: CO VERPAGE NO TE.
2
Use or to choose po sitio n 5 o r 6 for yo u r cus tomized com m en t, an d p ress Menu/Set.
3
Use the dial pad to enter your customized commen t. (See Entering Text, page 106.)
4
Press Menu/Set. The screen displays:
5
Press 1 if you w a nt to sel ect a dditiona l settings. Th e
display returns to the SE TUP SEN D menu—OR—
Press 2 if you are finished c h oosing s ettings and ex it.
ACCEPTED
NEXT
1.YES≈2.NO
Overseas Mode
Sometimes, w hen sending a fax to overseas numbe rs, p roblems can be e xpe rien ced. T his m ode
makes the machine work better for su ch calls.
After you send a fax usin g th is feature, the feature turns itself o ff.
1
Insert the document face dow n in the Automatic Document Feeder.
2
Press Menu/Set, 3, 5.
3
Press or to select ON (or OFF), and press
Menu/Set when th e screen display s your s election .
The scre en displays
4
Press 1 if you w a nt to sel ect a dditiona l settings. Th e
display returns to the SE TUP SEN D menu—OR—Press 2 if you have finished c hoosing
settings, then g o to Step 5.
5
Enter the fax number you are calling, and press Fax St art.
ACCEPTED
NEXT
1.YES≈2.NO
ADVANCED USE
Memory Transmission
This feature allows your m a chine to scan a fa x into its memory an d send it as soon as the s can is
complete. This w ay, you don’t have to wait for the entire fax to be transm itted b efor e you retrieve
your docume nt.
1
Insert the document face dow n in the Automatic Document Feeder.
2
Press Menu/Set, 3, 9.
3
To change th e default setting, press or to
select ON (or OFF) and press Menu/Set. Go to Step
5—OR— For the next fax transmission onl y, press
or to select NE XT FAX ONLY and press
Menu/Set.
4
For the next fax only , press or to select ON (or OFF) and
press Menu/Set.
5
Press 1 to select ad d itional settings. T he dis play retu rn s to the
SETUP SEN D menu—OR—Press 2 if yo u a re finished ch oo s ing settin gs
and go to Step 6.
6
Enter fax number and press F ax Start.
9.MEMORY TX
MEMORY≈TX:OFF
SELECT≈≈≈≈≈≈≈SET
Advanced Sending
37
Page 47

If you get a
press
scanning in a subsequent page, you’ll h a v e the o p tion to p ress
transmit the pag e s scanned so far, or to press
In this case, send th e fax b y th e Manual Transmission .
OUT OF MEMORY
Stop/Exit
to c ance l the sca n. If y ou g et a
message while scanning the first page of a fax ,
OUT OF MEMORY
Stop/Exit
to cancel the op era tion.
message while
Fax Start
to
Depending on you r typical faxes,
If this happens, change the Memory Transmission setting back to
OUT OF MEMORY
errors can occur frequently.
.
OFF
Call Reservation (Only for FAX-727/737MC)
You can s end a fax and let the othe r pa rty know that you want to speak to him aft er the fa x
transm ission is co mpleted. T h e other fa x machine will ring as if it we re receiving a telephone call;
if the other party picks up the handset, your m achine will ring. Lift the handset to have a
conversation.
If you se t Call Rese rvation and Ca ll Back m essage to ON, your mac hine leave s a messa ge if the oth er
party does no t ans w er .
1
Insert the doc um ent face down in the Automatic Document Feeder.
2
Press Menu/Set, 3, 6. Th e screen displays the current setting for C all Rese rvation.
3
Press or to select ON (or OF F), and press Menu/Set when th e screen displays y our
selection.
4
If you set Call Rese rvation to ON, th e screen d isplays
the curr ent setting for Call Ba ck Mes sage. P ress or
to select ON (or OFF), and press Menu/Set when
the screen dis plays your selection. The screen displays
5
Press 1 if you want to select additional settin gs. T he
displa y returns to the SETU P S END menu—OR—
Press 2 if you are finished choosing settings, and go to
Step 6. The screen prompts you to e nter the fax numb er
you want to ca ll.
6
Enter the fax number, and press Fax Start.
7
If you’ve set Call R es ervation to ON, pick up you r hand se t if the m achine rings.
ACCEPTED
NEXT
1.YES≈2.NO
You cannot use auto redial with Call Reservation. Y ou cannot use Call
Reservation with De layed Tr ansmission or with Polling. You must register your
Station ID to set Call Bac k Mes s a g e to
Print Sample Call Back Message
1
Press Menu/Set, 3, 6.
2
Press or to select PRINT SAMPLE , and press Menu/Set.
Chapter 7
38
ON
.
Page 48

Delayed Transmission (Timer)
You can use this function to send a fa x up to 24 hours later.
1
Insert the document face dow n in the Automatic Document Feeder.
2
Press Menu/Set, 3, 7.
3
Enter the time you want the fax to be sent, in 24-hour format (for example, enter 1945 for 7:45
PM), and p re ss Menu/Set.
4
Press 1 if you w a nt to sel ect a dditiona l settings. Th e
display returns to the SE TUP SEN D menu—OR—
Press 2 if you are finished c h oosing s ettings a nd go to
Step 5. The scr een prom pts you to enter the fax n umber.
5
Enter the fax num ber, and press F ax Start. The
mach in e will w a it until the time y ou ha v e entered to
send the fax.
ACCEPTED
NEXT
1.YES≈2.NO
Next-Fax Rese rvation ( Only for FAX-727/737MC)
Even if your m ach ine is r eceiving ano ther fa x, you c an prep are to send yo ur n ext fax. Th is w ay, you
don’t have to wait for it to finish sending or receiv ing the other fax. You can dial this fax call
man ua lly, or by using Redial o r One Touch dialling. (W h en you u s e One T ouch Dial, only the
memory loca tion ––not the name o f th e pe rson you are calling––is d isplayed.)
1
Insert the document face down in the Auto m at ic Document Feeder. If neces sary, press
Resolution to adjus t resolutio n.
2
Enter the fax num ber, and press F ax Start.
3
Press Menu/Set. The screen displays NEXT- FAX RESERVD.
4
To cancel the reservation, remove the documents and p ress Stop/Exit.
ADVANCED USE
■
If you u s e Nex t-Fax Reserv a tion, th e m achine will se n d a do c u ment without
storing it in memory.
■
You can’t use this feature if there is a document waiting in the feeder (possibly
for Delayed Transm ission or Polling Transmit), or when the timer ha s been
interru p te d.
Advanced Sending
39
Page 49

Cancelling a Scheduled Job
You can c an cel task s you’v e sched u led such a s Tim e r or Pollin g Tra ns mit.
1
Press Menu/Set, 4. Any waiting jobs a p p ear on th e displa y . If no job is wa iting, the s creen
displays NO JOB WAITING.
2
If you have more than two jobs waiting, use or to select th e job yo u want to cance l.
Press Menu/Set when the screen display s your se lection—OR—If you h ave only one job
waiting, go to Step 3 .
3
Press 1 to can cel—OR—Press 2 to quit without can celling.
4
Press Stop/Exit.
Interrupting Timer and Polled Transmit Jobs
You can s end a fax or mak e a copy now , ev en i f yo u have the machi ne set to send a fax later, or if
you have it set to b e po lled . However, you cannot use autom atic redi al or the M enu m ode.
1
Press Menu/Set, 5.
2
Wait 2 seco nds, then r emo ve th e doc ume nts th at are w aiting in the A uto matic Do cum ent F eeder .
3
Insert the document you want to se nd now in the Au tomatic Docume nt Fe eder.
4
Enter the number for the fax yo u want to send now , and press Fax Start.
5
After the tra ns m issio n is finis h ed, re turn the first d o cum e nt to the Autom atic D oc um e nt Fe ed er .
6
Press Menu/Set, 5 to restore the timer.
If you set Timer or Polled Transmit using the memory (that is, if you have already
scann ed the do cum ent in to th e m ach ine’s m em ory and will se nd it fro m there ), you
don’t have to interrupt to send a fax or make a copy.
Memory Security
This feature allows you to prevent unauthorised a ccess to the machi ne. Wh en switc hed ON , Mem ory
Security prohibits most functions. The following functions listed are av ailable w hile Memory
Security is switche d ON.
■
Receiving fax es in to memory [ limited by Mem ory Capacity].
■
Scheduled D elayed Transm ission*
■
Polling*
■
Fax Forwarding*
■
Rem ote Re trieval
* Provided it was set before Memory Sec u rity was switch ed ON.
The s tored d o c uments will be saved for up to 15 h o urs in th e event o f a pow er
failure ( F AX-737MC ). The s tored d o cuments w ill n ot be s a v e d in th e e vent o f a
power failure (FAX-7 17/7 27) .
Chapter 7
40
Page 50

Using Memory Security
You mu st us e a password to switch Memory Security ON and OFF.
Setting Up Memory Security for the First Time
1
Press Menu/Set, 0, 1.
2
Enter a 4-digit num ber as a password.
3
Press Menu/Set.
The screen prompts you to re-enter the pa ssw ord.
4
Re-enter the passw ord and press Menu/Set.
5
Press or to choose SET SECURITY.
6
Press Menu/Set.
The screen prompts you to enter the password.
7
Enter a 4-digit passw ord, follow ed by Menu/Set.
This is the same as the secu rity password of the
machine alre ady stored.
The screen displays A CCE PTED fo r 2 secon ds, fo llow ed by SECU RE M OD E - M em ory Se curity
is now switched O N .
If the password yo u enter at Step 7 is incorrect, the screen would display
WRONG PASSWORD
Miscellaneous M enu. You must then sw itch ON Memor y Security again. (See
Switching Memory Security ON, page 42.)
Changing the Memory Security Password
1
Press Menu/Set, 0, 1.
2
Press or to choose SET PASSWORD.
3
Press Menu/Set.
The screen prompts you to enter the old password.
4
Enter the curren t passw o rd.
5
Press Menu/Set.
6
Enter a 4-digit num ber as a new p assword.
7
Press Menu/Set.
The screen prompts you to re-enter the ne w password.
8
Enter the new password again and press Menu/Set.
9
Press Stop/Exit.
. Afte r 2 seconds the display will th en retu rn to
NEW≈PASSWD:
ENTER≈≈≈SET
VERIFY:
ENTER≈≈≈SETENTER≈≈≈SET
PASSWORD:
ENTER≈≈≈SETENTER≈≈≈SET
OLD≈PASSWD:
ENTER≈≈≈SETENTER≈≈≈SET
NEW≈PASSWD:
ENTER≈≈≈SET
VERIFY:
ENTER≈≈≈SETENTER≈≈≈SET
ADVANCED USE
Advanced Sending
41
Page 51

Switching Memory Security ON
1
Press Menu/Set, 0, 1.
2
Press or to choose SET SECU R ITY.
3
Press Menu/Set.
The screen pr ompts you to enter th e password.
4
Enter a 4-digit passw ord, followed by Menu/Set.
This is the same as the sec u rity pass word of the
machine already stored.
The screen di splays ACCEPTE D for 2 second s, followed by SECUR E MODE - M em o ry Se curi ty
is now sw itched ON.
If the password you ente r a t S tep 4 is incorrect, the screen would display
WRONG PASSWORD
Miscellaneous Menu. Y ou must press
Security.
Switching OFF Memory Security
1
When Memor y S ecurity is switched O N, press
Menu/Set.
2
Enter a 4-digit pas sw ord and press Menu/Set.
The screen displays ACCEPTED, then after 2 seconds the
display reverts to nor mal. Memo ry Secu rity is no w switch e d OFF. Then all the data sav ed in the
memory will be printed o ut.
If the password you ente r a t S tep 2 is incorrect, the screen would display
WRONG PASSWORD
SECURE MODE
. After 2 s econds the display will the n retu rn to
and then start from Step 2 to set Me mo ry
1
. After 2 s econds the display will the n return to d isplaying
. You must then start from Step 1 to switch O FF Mem ory Security.
PASSWORD:
ENTER≈≈≈SETENTER≈≈≈SET
PASSWORD:
ENTER≈≈≈SETENTER≈≈≈SET
If you forget the Memory Security password, please contact your Brother dealer for s ervi ce or the
help number given with the warranty documentation.
Chapter 7
42
Page 52

Multiple Resolution Transmission
Use this feature to select se para te resol ution set tings for each page of the f ax you are send ing. This
could be usefu l if you are sending a fax with photos and letters, or some pages wi th small print and
others with no rmal print. Res o lu tion settings retu rn to STAN DA RD after the fax is sent.
1
Insert the docum ent face do wn in the A utom atic D ocu men t Feeder, th en press Me nu/Set, 3, 4.
2
Use or to select resolution for page 1, and pre ss Menu/Set.
3
Repeat Step 2 for subsequent pages. Press Stop/Exit
when yo u ar e fin ishe d. The screen dis play s:
4
Press 1 if you w a nt to sel ect a dditiona l settings. Th e
display returns to the SE TUP SEN D menu—OR—
Press 2 if you a re finished cho osing settings, and g o to
Step 5. The screen prompts you to enter the fax number you want to cal l.
5
Enter the fax number you are calling, and press Fax St art.
ACCEPTED
NEXT
1.YES≈2.NO
ADVANCED USE
If you want to copy a docum ent u sing multiple resolutions, press
in Step 5.
Copy/Repor ts
Advanced Sending
43
Page 53

8
Advanced Receiving
Operation from an External or Extension Telephone
An extern al p hone is a telephone that is plugged into the machine (either into the machine’s EX T
socket or into the back of the connector tha t plu gs in to th e te leph one wall socket).
An extension ph one is another phon e on the sam e ph one numb er as the m ach ine, but plugge d into a
different telephone wall socket. For example , the machine may be con nected to a phone line in your
study, and you may have an other pho ne on the sam e line (and sa me phone nu mbe r) in you r kitchen.
This feature enables yo u to answer the phon e in the kitchen if it rings while you are ma king a coffee,
knowing that you can transfer the call to the m achine if the incoming call is a fax.
If you answ er a fax c all on an external or ex tension pho ne, you ca n m ake yo ur m ach ine tak e over by
using the Fax Receive Code . When you press the Fax Receiv e Code 5 1 ( 9 1 for New
Zealand), the mac h in e starts to receive a fax.
If the machine ans w ers a voice call and F/T pseudo-rings for you to take over, use the Telephone
Answer Code # 5 1 (# 9 1 for New Zealand) to take the call at an extension phone. The Telepho ne
Answ er Code is use d only in F/T m od e. (You hav e to set Re mot e C ode to ON in Menu/Set, 2, 4 to
use 5 1 or # 5 1 ( 9 1 or # 9 1 for New Zealan d).)
If you answer a call, and no one is on the line, assume you are receiving a fax.
• If you are usin g th e m achine phone , press F ax Start, then hang up.
• If you are usin g an extension phone , press 5 1 ( 9 1 for Ne w Zea land), w a it for fax
receiving tones (chirps), then hang up.
• If you are usin g an external phon e, press 5 1 ( 9 1 for New Z ealand) and w ait for the phone
to be disconnected (the screen displ ays RECEIVE) before yo u ha ng up. (Y o ur ca ller will h av e
to press F ax Start to send th e fax.)
If you accidentally pick up an extension p hone when a fax message is being
received, you may d isrupt the transmission or render some portions unreadable.
Extension telephone s are not permitte d in som e countrie s, in such a case the T eleph one A nswer C ode
will n o t work.
The Remote Code also can be used by your callers. When you are using an e xtern al TAD, your
outgoing m essage (OG M) sho uld end w ith the stateme nt “to send a fa x, press 5 1 ( 9 1 for New
Zealand)”. (S ee Outgoing Mes sage (OGM) of E xternal TAD , page 6.)
For F/T (Fax/Tel) Mode Only
Whe n the machine is in F /T mo d e , it will use the F /T Rin g Time (F /T pseudo-ringing) to alert you
to a voice call .
• If you are at th e machine, you can lift the handset to answ er.
• If yo u a re a t an e xte n sion ph o ne, y ou w ill n eed t o lift the h and set d u ring the F/T R ing T im e an d
press # 5 1 (# 9 1 for New Zealand ) be tween the F/T pseudo-rings.
• If no one is on the line, or if someo ne w ants to send yo u a fax, send the call bac k to the mac hine
by pressing 5 1 ( 9 1 for New Zeala nd).
Chapter 8
44
Page 54

Remote Call Transfer
In order to use the Activation Voice C ode, you should first set REMOTE CODE (Menu/Set, 2, 4)
to ON. (See Changing Remote Codes , page 46.)
This function w orks when you rece iv e the inc omin g Voice call at the remot e c ordless p hone
externally connec ted to the fax m ach ine. ( See Con necting a n Externa l Telephone , page 7.) You c an
transfer v oic e call to the fa x mac h ine. But y o u can n ot tra nsfe r the in com in g vo ice ca ll fro m the fa x
machine to the cordless phone.
To transfer telephone call to the fax machine
Whe n you p ick up the v oice ca ll at remo te cord less pho n e and w o uld like to transfe r it to the fa x
machine,
1
Press Activa tio n Voice Code 8 1 at remote cordless phone.
2
The fax mac hine rings (p seudo-ring same as c urrent F/T ring) a nd the display shows
PICK UP PHONE.
3
Pick up th e handset and press Hook or Speaker Ph one (for FA X-737M C only)—OR—Just
press Spe aker Phone (for FA X-737M C only) at the fax ma chine in order to transfer the voice
call to the fax m achine .
Don’t hang up the call from the cordless phone until the voice call has been
transferred to the fax machin e. You will know when t his is because you will no
longer be able to hear or talk to the caller via the cordless phone. If you do not wait
until this point before hanging up from th e cordless phone, the call will be lost.
If nobody answ ers at the fax m achine, pseu do-ringing stops after 30 seconds. In that case, it may still
be possible to speak with the caller fro m the cordless p hone. Speech bet w een the fax ma chine and
the cordless phone (= intercom) is not possible.
ADVANCED USE
Advanced Receiving
45
Page 55

Changing Remote Codes
Remote Code s m ig ht no t w or k with so m e t ele ph on e s ys tems. The prese t F ax Re ce ive Cod e i s
(
for New Ze ala nd). The prese t Te lepho ne An swer Code is
9 1
preset Activation Voice Code is
If you are always disconnect ed w hen accessing you r extern al TA D r emotely, try
changing the Fax Receive Code from
and the Telephone Answer Co de from
cannot use the same numb er for the Fax Receive Code, the Telephon e A nswer
Code, and the Ac tivation Voice C ode.
To change Remote Codes
1
Press Menu/Set, 2, 4.
2
Press or to select ON (or OFF), and press Menu/Set when the screen d ispla ys th e
settin g y ou wa n t.
3
If you wa nt to, enter a new Fax Rec eive C ode, then press Menu/Set.
4
If you wa nt to, enter a new Telephone Answer C ode, then press Menu/Set.
5
If you wa nt to, ent er a new Activation V oic e C ode, then press Menu/Set.
6
Press Stop/Exit.
8 1
.
# 5 1 (# 9 1
( 9 1 for New Z e aland)
5 1
# 5 1
(# 9 1 for N ew Z eala nd)
for New Zealand). The
to
to
1 1 1
5 1
# # #
. You
Chapter 8
46
Page 56

9
Telephone Service
Telephone Service for Australia (Telstra® Duet)
Distinctive Ringing (Telstra® FaxStream® Duet)
This machin e fea ture lets you use the Distinctive Ringing subscriber service offe red by Telstra’s
FaxStream
Each phone number has its ow n Distinctive Ringing pa ttern, so you know w hich phone numb er is
ringing. This is one w ay you can have a separate phon e number for you r fax machine.
Your fax machine has a D istinctive Ringing function, allow ing you to dedicate one p hone numbe r
just for r ec eiving fa xes.
®
Duet, w hich al lows yo u to have two separate te lephone num bers on the on e phon e line.
You can switc h it off tempor arily, then turn it back o n. W hen you get a ne w fax
num b er, m a k e sure you re s et this functio n .
• In order for Duet to work properly, you must set your receive mode to
Manual and set the Distinctive Ringing to ON.
• To have your external TAD answer only the main number, the machine
must be in Manual Mode.
Flowchart Sequen ce of Incom ing Call
Incoming Call
(either Voice or Fax)
ADVANCED USE
All extension phones ring,
fax machine is silent.
(The answer mode must
Registered
Duet (Fax) Number
Fax machine automatically
receives and prints fax
message without ringing.
be MANUAL.)
Main number (Voice Number)
Fax machine begins
ringing on third ring.
You answer the call
at an external phone
or an extension phone
or at the machine’s
handset.
Telephone Answering
Device (TAD)
answers the call.
Telephone Service
47
Page 57

Set the Distinctive Ringing to ON
1
Disconne ct the fax machine from any TAD or telephone company voice m ail .
2
Press Menu/Set, 0, 3. Th e screen display s the current setting of th is feature .
3
Press or to select ON (or OFF).
4
Press Menu/Set.
5
Press Stop/Exit
.
If you s et the Distinc tive R inging to ON , the rece ive m ode will turn to M anual mode
autom atically.
Only in the MC mode, even if you set the D istinctive R inging to ON , the receive
mod e will not be changed .
Caller ID (Caller IDentification)
Caller ID is a tele phone service that allows the subscriber to see a display of the caller’s phone
number or na me as the telephone rin gs. It is a fast way to screen your calls. You ca n respond quick ly
to calls you missed, because Caller IDs are rece ived and stored in your fax machi ne memory.
To get the Caller ID Ser vice: app ly for the Caller ID service a t yo ur local telepho ne
company, if available.
Advantages of Caller ID
For B u siness
All businesses profit f rom a quicker response to customer calls. Bu sinesses that pr ov ide mail order
services, mem ory-lending services or provide co nfidential inform ation, can protect them selves from
false o rd ers or acceptan c e of false identification.
At Home
Residential cu stomers can protect t hemselves from unwanted ca lls.
How Does the Caller ID Work?
The Caller ID Appears on the Display When Your Telephone Rings
As your telep hone rings, the display shows you the caller’s phon e number or name. Once you pick
up the handset, the caller’s ID disappe ars. You will see up to the first 16 characters of the nu mber on
the di s p lay.
Helpful Hints
■
If # UNAVAILABLE appears on the display, it means that the c all came from ou tsid e your
caller ID service a rea or a public phone . *
■
If # WITHHELD appe ars on th e displa y, it mea n s the caller inten tionally b locke d th e
transmission of his/her ID. *
■
If no c aller ID was tra ns mitted to your fa x mach in e, PICK UP PHO NE will remain on the
display.
* Depend s on network Fun ction.
Chapter 9
48
Page 58

The Caller ID is Stored in Your Machine’s Memory
The FAX can store a maxim um of the la st 30 incom ing caller IDs in the mem ory, along with the time
and date o f r eception, The 31st ca ll will cause the oldest ID to be erased.
The C a ller ID informa tion store d in the memory can b e used for the fo llowin g.
■
Printin g the C a ller ID List.
You c a n review calls yo u receiv ed by ch ecking th e Calle r IDs in memory. This report will list
the Da te, Tim e , Phon e Numb er (Caller ID), a nd type of Call (Comment).
Viewing Caller ID List
Caller ID memory stores informa tio n for up to thirty c alls; when the th irty-first c a ll come s in,
information abou t the first ca ll is erase d. You can scroll through Caller ID inform ati on to review
those calls made to y our FAX.
1
Press Menu/Set, 0, 2.
2
Press or to select DISPLAY ID and p ress M enu/S et.
If the na m e was not received, it will not be displayed.
3
Press or to scroll through the Caller ID memo ry to sele ct the Caller ID you w ant to
view and pre ss Menu/Set.
The next screen shows the ca ller’s telepho ne number and the date and time of the call.
4
Press or to return to the C aller ID listing—OR—Press Stop/Exit to ex it.
Printing Cal ler ID Lis t
1
Press Menu/Set, 0, 2.
2
Press or to select PRINT R EPORT.
3
Press Menu/Set.
ADVANCED USE
Returning a Call from the Log
You c a n scroll throug h the Ca lle r ID Lo g and se lect a call to return automaticall y .
1
Press Menu/Set, 0, 2.
2
Press or to select DISPLAY ID and p ress
Menu/Set.
If the name was no t rec eiv ed, it will n o t be displ aye d .
3
Press or to scroll thr oug h the C aller ID Log
and when you see a call you want to return
immediately, press Menu/Set.
4
To be g in dialling, pres s Fax Star t.
5
Begin speaking when the other party answers.
This feature may not be available in certain area.
DISPLAY≈ID
SELECT≈≈≈≈≈≈≈SET
01≈MARY≈HENDERSON
01≈9082438436
01≈02/01≈12:00
DIAL:PRESS≈START
Telephone Service
49
Page 59

Telephone Service for New Zealand
FaxAbility
FaxAbility is a servic e offered by T ele com th at allow s you to h ave an a ddition al number on o ne
phone line, w ith its own distinctive ring pattern. T his way, wh en you get an in coming call, you c an
identi fy the nu mber being ca lled by its ring.
How Will the Fax Machine Treat All Other Numbers?
FaxAbility mode ensures that the mac h ine will answ e r calls to the Fax Ability (secon d ary) number.
Whe n a call comes in to your m a in number, all th e phon es will ring . You ca n set an e xternal
answering d e vice (TAD) to answer calls on the oth er number(s) . (S ee the c hart in the follow ing
page.)
If you change the answer mode on the fax machine to FAX/TEL (F/T) or FAX ONL Y mode, that
settin g w ill override the FaxAbility setup. In FAX/TEL (F/T) o r FAX ON L Y mode, your fax
machine w ill answer all t h e phone num b ers (inc luding its own r ing pa tte rn).
What is the Advantage of Using the FaxAbility Function?
Using Fax A bility is the m ost eff icien t way to recei ve bo th fax and tele phone call s on the same lin e.
It is much easier for your ca llers wh o dial m an ually. T h e fax m achin e will an swer with receiving
tones so they will no t have to press a n Fax Receive Code. And the peo p le wh o call to talk on yo u r
main number will not ha v e to talk to you r fax m a ch ine. Ba sically, it gives y o u two in depen d ent
numb ers w ithout t he higher cost of a second line.
How Does FaxAbility Work?
Your telephone number wi ll have the standard ring pattern of long, long tone, wh ile the new numb er
will ha ve a rin g pat tern o f long , silence , long , etc. W hen FaxA bility is ON, you will n ot hea r the fir st
ring of all incoming calls on the fax m achine. Ex tension phones w ill ring as usual. If the fax m achine
recognizes the ring pattern, all ring ing w ill stop and the fax machin e will answe r and autom a tic ally
receive the fa x message . Otherwis e, you will hea r the extensio n phones an d the fax mach ine contin ue
to rin g . The fax machine always listen s to the ring pa ttern befo re it answers, s o do not p ic k up th e
phone during th at time. You wi ll quickly learn to recognize the ring pattern for faxes, so you w ill not
be tempted to a nswe r that num ber. Either y ou or a telepho ne a nswe ring dev ice can an swer the main
number(s).
Chapter 9
50
Page 60

Registered
FaxAbility Number
Flowchart Sequen ce of Incom ing Call
Incoming Call
All extension phones ring,
fax machine is silent.
(The answer mode should
be MANUAL.)
Main number
Fax machine automatically
receives and prints fax
message.
You answer the call
at an external phone.
Fax machine begins
ringing on third ring.
Telephone Answering
Device (TAD)
answers the call.
How to Turn FaxAbility OFF or ON
The F axAbi lity functio n is designed to accommod ate the F axAbi lity service provid ed by T e lecom .
To ch ange th e setting, re peat Ste ps 1-3 ; S tep 2 is where you can selec t either ON or OFF.
Call Waiting b e eps cau s ed by in coming calls on you r main number can affect fax transmissions.
If you have FaxAbility Service but do n’t
If you do
have Call Waiting as we ll a s FaxAbility, se t the Ca ll Waiting menu optio n to ON. See
have Call Waiting, you n eed d o nothing a t this stag e.
below . The machin e can su s pend Call Waiting when incom in g faxes a re being sent to you.
1
Set the fax m achine to Manua l M ode.
2
Press Menu/Set, 0, 3.
3
Press or to sele ct ON (or OF F).
4
Press Menu/Set.
Only w hen F AXA BILITY is set ON, Call Wai ting can
be selected ON.
3.FAXABILITY
FAXABILITY:OFF
FAXABILITY:ON
CALL WAITING:OFF
In case of FAXABILITY is set OFF, Call Waiting is
autom a tically OF F w ith out ch o ice.
5
Press Menu/Set.
6
Press Stop/Exit.
CALL WAITING:ON
ADVANCED USE
Telephone Service
51
Page 61

Caller ID (Caller IDentification)
Caller ID is a telephone service that allow s the subscriber to see a di splay of the caller’s phone
num be r as the telep ho n e rin gs. I t is a fast wa y to sc reen yo u r ca lls. Y ou ca n re spo nd q uick ly to c alls
you m isse d, b ecause Caller IDs are received and stored in your machine’s m emory.
To get the Ca ller ID Se rvice : app ly for the Caller ID service at your local
telephone com pany, if available.
Adv anta g e s of Caller ID
For B u siness
All businesses profit f rom a quicker response to customer calls. B usinesses that pr o vide mail o rder
services, mem ory-lending services or provide co nfidential inform ation, can protect them selves from
false o rd ers or acceptan c e of false identification .
At Home
Residential cu stomers can protect t hemselves from unwanted ca lls.
How Does the Caller ID Work?
The Caller ID Appears on the Display Whe n Your Telephone Rings
As your telep hone rings, the display shows you the caller’s phon e number. Once you pick up the
handset, the c aller’s ID dis appears. You w i ll see up to the first 16 ch arac ters of th e number on the
display.
Helpful H in ts
■
If # UNAVAILABLE appears on the display, it mea ns that the call came from outside your
caller ID service area. *
■
If # WITH HELD appe ars on th e display , it mean s the calle r intentionally b locked th e
transmission of his/her ID. *
■
If no ca ller ID w as transmitted to your fax machine, PICK UP PHONE will remain o n the
display.
* Depend s on network Fun ction.
Viewing Caller ID List
Caller ID m emory stores in fo rmation for up to thirty calls; whe n the thirty-first call com es in,
information a bout the first call is erased. You ca n sc roll thro ugh Caller ID information to review
those calls ma de t o your fax machi ne.
1
Press Menu/Set, 0, 2.
2
Press or to select DISPLAY ID and press Menu/Set.
If the name was not received, it will no t be displayed.
3
Press or to scroll through the Ca ller ID memo ry to select the C a ller ID you w a n t to
view and press Menu/Set.
The next scree n shows the caller’s telep hone numbe r and the date and time of the call.
4
Press or to return to the C aller ID listing—OR—Pre ss Stop/Exit.
Chapter 9
52
Page 62

Printin g Caller ID List
1
Press Menu/Set, 0, 2.
2
Press or to select PRINT R EPORT.
3
Press Menu/Set.
If you use the Caller ID for Dial back…
■
Please be sure that you use appropriate dialling procedure s for loca l and
national call.
■
Please be sure that you make sure of the details of the exact number to b e
called b a c k, and the ne ed to in s e rt prefix(es) for manual dialling .
■
Please understand that you mach ine may not display precisely the dig its to be
called .
Returning a Call from the Log
You c a n scroll throug h the Ca lle r ID Lo g and se lect a call to return automaticall y .
1
Press Menu/Set, 0, 2.
2
Press or to select DISPLAY ID and p ress
Menu/Set.
If the name was no t rec eiv ed, it will n o t be displ aye d .
3
Press or to scroll thr oug h the C aller ID Log
and when you see a call you want to return
immediately, press Menu/Set.
4
To be g in dialling, pres s Fax Star t.
5
Begin speaking when the other party answers.
This feature may not be available in certain area.
DISPLAY≈ID
SELECT≈≈≈≈≈≈≈SET
01≈MARY≈HENDERSON
01≈9082438436
01≈02/01≈12:00
DIAL:PRESS≈START
ADVANCED USE
Telephone Service
53
Page 63

Telephone Servic e for Some C ountri es
Distinctive Ringing (For Singapore and Hong Kong)
This fax machine feature l ets y ou use the Distinctiv e R in g ing subscriber service offered by som e
telephone co mpa nies, wh ich allows you to have several telepho ne num bers on one ph one line. Each
phone nu m ber has its own Distinctive Ringing pattern, so you’ll know which phone numbe r is
ringing. This is one w ay you can ha ve a separate phone number for your fax machine.
Your fax m ac h ine has a Distinctive Ringing function, allowing you to dedicate one ph one number
just for receiving faxe s. You’ll need to set Distinctive Ringing to ON.
You can switch it off tem porarily, then turn it back on. When you get a new fax
number, m ake sure you reset this function.
■
The fax m a c hine w ill a nswer only calls to th e Distinc tiv e Ringing number.
■
To have your external TAD answer only the main numb er, the fax machine must
be in Manual Mode.
■
In FAX/ TEL (F /T) or FA X ON LY m ode, th e fax m ac hine will an swer a ll num bers
on the phone line.
If you s et the Distinc tive R inging to ON , the rece ive m ode will turn to M anual mode
autom atically.
Only in the MC mode, even if you set the Dist inctive Ringing to ON , the rece ive
mod e will not be changed .
Setting the Distinctive Ringing
1
Press Menu/Set, 0, 3.
2
Press or to select ON (or OFF).
3
Press Menu/Set.
4
Press Stop/Exit.
Caller ID (For Singapore, Hong Kong and Philippine)
The Ca ller ID feature of this ma chin e lets you use the C aller ID su bscriber servi ce offered b y man y
local phone companies. Th is servic e pr ovides you, by m eans of the screen display , the telephone
numb er (or name) of your caller as the line rings.
After a few ri ngs, the screen displays the teleph one number of your caller (or name, if ava ilab le).
Once you p ick up th e hands et, the C aller ID in forma tio n disap pears fro m the screen, b u t the call
information remains stored in the Caller ID memory.
■
You will se e the first 16 cha racters of the number or nam e .
■
# UNAV AIL ABLE display m eans call originates outsid e your Caller ID service area.
■
# W ITHHELD disp lay m ean s t he ca ller h a s in te ntion ally bl oc ke d t rans m iss ion of info rm a tion .
■
PICK UP PH ONE display rem ains on th e screen when no Caller ID informa tio n was
transmitted.
If both the name and number ar e re ceived , the scre en displays only the name.
You can print a list of Caller ID informa tion receive d by; your machine.
Caller ID service varies with different carriers. Call your local phone company to
determine the kind of s ervice availa ble in you area.
Chapter 9
54
Page 64

Viewing Caller ID List
Caller ID memory stores informa tio n for up to thirty c alls; when the th irty-first c a ll come s in,
information abou t the first ca ll is erase d. You can scroll through Caller ID inform ati on to review
those calls made to y our machine.
1
Press Menu/Set, 0, 2.
2
Press or to select DISPLAY ID and p ress M enu/S et.
If the na m e was not received, it will not be displayed.
3
Press or to scroll through the Caller ID memo ry to sele ct the Caller ID you w ant to
view and pre ss Menu/Set.
The next screen shows the ca ller’s telepho ne number and the date and time of the call.
4
Press or to return to the C aller ID listing—OR—Press Stop/Exit.
Printing Cal ler ID Lis t
1
Press Menu/Set, 0, 2.
2
Press or to select PRINT R EPORT a nd press Menu/Set.
Returning a Call from the Log
You c a n scroll throug h the Ca lle r ID Lo g and se lect a call to return automaticall y .
1
Press Menu/Set, 0, 2.
2
Press or to select DISPLAY ID and p ress
Menu/Set.
If the name was no t rec eiv ed, it will n o t be displ aye d .
3
Press or to scroll thr oug h the C aller ID Log
and when you see a call you want to return
immediately, press Menu/Set.
4
To be g in dialling, pres s Fax Star t.
5
Begin speaking when the other party answers.
DISPLAY≈ID
SELECT≈≈≈≈≈≈≈SET
01≈MARY≈HENDERSON
01≈9082438436
01≈02/01≈12:00
DIAL:PRESS≈START
ADVANCED USE
This feature may not be available in certain area.
Telephone Service
55
Page 65

10
Polling
Polling is the process of retrieving faxes from ano ther ma chine. You ca n use your
machine to “poll” other ma chine s , or you can have someone poll your machine.
All part ies invo lved in po lling nee d to set up th eir mach ines to acc omm odate p olling. W hen so meon e
polls your machine to receive a fax, they pay for the cal l; if you poll someone’s fax machine to
receive a fax, you pay for the call. (See Polled Transmit, page 58.)
Polling Receive
Setup for Polling Receive (Standard)
Pollin g Receive is when you call an other fax machine to receive a fax from it.
1
Press Menu/Set, 2, 7. The screen displ ays
2
Press or to choose ST ANDAR D, and press
Menu/Set.
The screen pr ompts you to enter th e fax number you
want to poll, and then to press Fax Start.
3
Enter the fax num b e r you ar e polling , and pr es s Fax Start.
The screen displays DIALLING.
Setup for Polling Receive with Secure Code
You need to make sur e you are using the sam e ID numb er a s the oth er pa rty.
1
Press Menu/Set, 2, 7.
2
Press or to choose SE CURE, and press
Menu/Set.
3
Enter a four-digit number.
This is the same as the sec u rity code o f the fax machine you are po lling.
4
Press Menu/Set.
The screen pr om pts you to enter the fax number you want to poll, and then to pre ss F ax Start.
5
Enter the fax number, and press Fax Start.
POLLING:STANDARD
SELECT & SET
POLLING:SECURE
Chapter 10
56
Page 66

Setup Delayed Polling Receive
You can set your m achine to begin Po llin g Rec e ive at a later time .
1
Press Menu/Set, 2, 7.
2
Press or to choose TIMER, and press
Menu/Set.
3
The screen prompts you to enter the tim e you want to begin polling.
4
Enter the time (in 24-h o ur form at) you want to begin polling .
For exa mple, en ter 21:45 for 9:4 5 PM .
5
Press Menu/Set.
The sc reen pro mpts you to enter the fa x n umb e r y ou are p olling an d then to press Fax Start.
6
Enter the fax numb er, and p ress Fax Start. The m ac hi ne m a kes the p o llin g ca ll at t he time you
entered.
You can se t up only o ne Delayed Polling.
POLLING:TIMER
Sequential Polling
Your m achi ne can request documents from several fax units in a s ingl e operation. You jus t sp ecif y
several destina tions in S tep 4. Afterward, a Sequen tia l Polling Repo rt will be printed.
1
Press Menu/Set, 2, 7. Th e screen display s
2
Press or to choose STAN DARD, SECURE
or TIMER, and press Menu/Set when the screen
display s the se tting you wan t.
3
If you selec ted STAN DA RD, the screen prom pts you to e nter the fax num ber yo u wa nt to poll,
and then to press Fax Start.
• If you selected SE CURE, enter a four -dig it number and press Menu/Set.
• If you selected TIMER, enter th e time (in 24-h o u r format) you want to begin p olling an d
press Menu/Set.
4
Specify the destination fa x machines, w hic h you wish to poll by using O ne Touch, Speed Dial,
Search or a G roup . Fo r exam ple, for One To uch 3 and Spe ed D ial location 0 9, press On e Touch
Dial key 3, Search/M ute, # and 09. (See D ialling a Number, page 21.)
5
Press Fax Start.
Your machine polls each number or group number in turn for a document.
POLLING:STANDARD
ADVANCED USE
Polling
57
Page 67

Cancelling a Scheduled Job
This function allows you to cancel tasks that you’ve scheduled such as Del ayed Fax, Delayed Polling
Receive or Polling Transmit.
1
Press Menu/Set, 4. Any waiting jobs a p p ear on th e displa y . If nothing is w aiting, the screen
displays NO JOB WAITING.
2
If you have more than two jobs waiting, use or to select the job you want to cancel. Press
Menu/Set
Step 3.
3
Press 1 to can cel—OR—Press 2 to exit without can celling.
4
Press Stop/Exit.
when the screen displays your selection—OR—If you have only one job waiting, go to
Polled Transmit
Polling Tran smit is when y o u set up y o ur fax machi n e to wa it with a d o c umen t s o anoth e r fax
machine ca n retrieve it.
1
Insert th e docu ment to be retrieved in the A u to matic Document Feeder.
2
Press Menu/Set, 3, 8. The screen displ ays
3
Press or to choos e ST ANDAR D, and press
Menu/Set.
4
Press 1 to select DOC if you wa nt yo ur m ac h in e to
scan the print ed do cume n t at th e ti me it is polled
—OR—Press 2 to select MEMORY.
5
Press 1 if you want to select additional settin gs. T he
displa y returns to the SETU P S END menu—OR—
Press 2 if you are finished choosing settings and go to
Step 6.
6
Press Fax Start. The screen displays P O LLED WA ITING.
POLLING:STANDARD
SELECT & SET
1.DOC 2.MEMORY
ACCEPTED
NEXT
1.YES 2.NO
Chapter 10
58
If you do not store the polled document into mem ory in Step 4, the polled document
remains on the A uto m at ic D ocument Feeder until your machine is polled.
However, you can “interrupt” it to send another fax. (See Interrupting Timer and
Polled Transmit Jobs, page 40.)
The docum ent on the A utomatic Docu ment Feed er can only b e polled once unless
they had bee n sto red in memory.
Page 68

Setup for Polling Transmit with Secure Code
When yo u set POLL ING:SECU RE to ON , anyone w ho po lls your ma chine m ust enter the polling
ID number.
1
Insert the document face dow n in the Automatic Document Feeder.
2
Press Menu/Set, 3, 8.
3
Press or to choose SECURE, and press
Menu/Set.
4
Enter a four-digit num ber, and press Menu/Set.
5
Press 1 to select DOC if you want your machine to
scan the printed document at the time it is polled
—OR—Press 2 to select MEMORY.
6
Press 1 if you w a nt to sel ect a dditiona l settings. Th e
display returns to the SE TUP SEN D menu—OR—
Press 2 if you are finished c h oosing s ettings a nd go to
Step 7.
7
Press Fax Start and w ait for the f ax t o be polled.
POLLING:SECURE
1.DOC 2.MEMORY
ACCEPTED
NEXT
1.YES 2.NO
Secure Polling
Secure Polling is a wa y to kee p your d oc uments from “falling into the wron g h ands” while th e fax
machine is set up for poll ing. Y ou can use Secu re Polling o nly with another Brother fax machine.
Your four-digit ID number m ust b e entered on the fax m ac hine that polls for your documents.
ADVANCED USE
Some machines do not respond to the pollin g function.
Polling
59
Page 69

11
Remote Fax Options (Only for FAX-717/727)
This chapter is for Model FAX-717/727. If you have model FAX-737MC your remote fax options
are handled by the Message Centre. (See Message Centre (Only for FA X-737MC ), page 6 5 .)
Setting Fax Storage
If you set Fax Sto rage to ON, you w ill be a ble to r etrie ve f ax messages from an oth e r lo catio n, u sing
Fax F orwa rding o r Rem ote Retrie val fun ctions. T he sc reen w ill indic ate wh en you have a fax stor ed
in memory.
1
Press Menu/Set, 8, 2. The screen prompts you to ch oose fax settings.
2
Press or to select ON (or OF F), and press Menu/Set when th e screen displays y our
selection.
3
Press Stop/Exit.
If there are faxes in memo ry w hen you turn the Fax S torage
prompts you to e rase any f axes in memory. (See P rinting a Fax from Memory
(Only for FAX-717/727), page 27.)
If you press
in me mory has not been p rinted b efore, it will be p rinted first, and then era sed. If
you press
, all fax data is erased and Fax Storage is turned off. If th e fax d a ta
1
, data is not erased, and Fax Storage rem ains on.
2
, the screens
OFF
Fax Forwarding
You cann ot use Fax Fo rwarding or R em ote Re trieval whe n “Fa x Storage ” is set to
.
OFF
Programming a Fax Forwarding Number
When Fax Forw arding is se t to ON, your fax m ach ine stores the receiv ed fax in m em ory, then dia ls
the fax m achi ne phone number you have programmed, and forwards the fax m ess age.
1
Press Menu/Set, 8, 1.
2
Press or to select ON (or OFF), and press Menu/Set.
The screen prom p ts you to enter the num b er of the fax m achine where faxes will be forward e d.
3
Enter the forw ardi ng number (up to 20 digits), and press Me nu/Set.
4
Press Stop/Exit.
Chapter 11
60
Page 70

Remote Retrieval
You can cal l your machine from any touch tone ph one (or remote G roup 3 fax mach ine) and use a
Rem o te Acc es s Code a n d other button p resses in order to check th e receiving statu s , re trieve fax
mess ag es or ch ange se ttings.
To receive faxes or the Me mory Status List at your location , you must call from a fax mac hine using
touch tone. For convenience, you can retrieve faxes a nd the Status List from a touch tone phone by
having them sent to a fax machine.
For example , if your hote l roo m does not have a fa x machine, you c an enter the number of th e fa x
mach in e at the hotel’s F ront D e sk.
Setting the Remote Access Code
Enter your R emote A ccess Code when t he fax m achine pick s up your ca ll, so you can ac cess features
remote ly. The default code is inactiv e code (--- ).
1
Press Menu/Set, 8, 3.
2
Enter a three-digit code using number keys 0-9, and #, and press Me nu/S et.
The cannot be change d. Do not use the same digits that appear in you r Fa x R e ceive Code,
Telephone A n swer Code or Activation Vo ice Code.
3
Press Stop/Exit.
Using Your Remote Access Code
1
Dial your fax machine phone number from a to uch tone phone.
2
When yo ur f ax machine answers and beep s, im mediately enter you r Remote Ac cess C ode
(3 digits followe d by ).
3
The fax machine signals if there are any messages received:
1 long beep—Fax message(s)
No long beep—no messa ges
4
The fax ma chine t hen pro mpts you w ith two sho rt beeps to enter a com ma nd. If you wa it longer
than 30 seconds to enter a com m and, the mach ine hangs up. If you enter an invalid com mand,
the machine beeps three tim es.
5
Press 9 0 to reset the m a chine when you fin ish.
6
Hang up.
ADVANCED USE
If your fax machine is set to M ANUAL mode, you can acc ess your machine
remotely by phoning it and letting it ring for about 100 (50 in Australia) secon ds.
Your fa x machine w ill answ e r th e phone afte r 100 (50 in Australia) seconds of
ringing, and you then have 30 seconds to ente r your Remote Access C ode.
Remote Fa x Options (Only for FAX- 717/727)
61
Page 71

Remote Commands
Follow the command s below to acce ss features rem otely. When you c all the f a x mac h in e and e nter
your Remo te Acces s Code (3 digits follow ed by ), the system will signal you with two short beeps
to ent e r a remo te contro l command.
Remote control commands Detail Operation
95 Change Fax Forwa rdin g
Setting
1 OFF If you hear one lo ng beep, the change is accepted. If you he ar
2 Fax forward in g
4 FAX FWD No.
6 FAX STORAGE ON You can set FAX STORAGE ON or OFF. (Switching Fax
7 FAX STORAGE OFF
96 Retrieve FA X
1 Memo ry Status List You must use a remote fax machin e in order to receive a List
2 Retrieve all FAX
3Erase FAX in the
memory
97 Check the rece iving status You can check whether your fax m achine has received any
1DOC
98 Change Answer M ode If you hea r one long beep, you can change th e answ er m ode.
1TAD
2F/T
3FAX
90 Exit After a long b eep, you can ex it rem ote control.
three short beeps , you cannot change it because the
conditions (ex. registering fax forwa rding) h ave no t be en
completed. Yo u can register your fax forw arding nu mbe r by
using 4.FAX FWD NO. Once you have registered the
number, th e machine will automaticall y tu rn to “F AX
FWD:ON” mode. Then, r ecei ve a Mem ory S ta tus List by
entering 961. Check the List to make sure the Fax
Forwardi ng number you registered is correct. Now the
mach ine w ill star t Fax Forwarding.
Storage O FF is only possible if there are no faxes stored in
the memory, or if all faxes have be en erased using Remote
Control 9 6 3.)
of stored fax message(s).
If you hear on e long beep, y ou can erase fax m essage(s) fro m
the memory.
fax me ssage (s). If yes, you w ill hear one long beep. If no, you
will h ea r three short bee ps.
If you hear three short beeps, you cannot change it.
(Exampl e: There is no TA D M SG whe n you wa nt to change
to TAD mode.)
Chapter 11
62
Page 72

Retrieving the Memory Status List
You can retrieve the M emory Status L ist from a remote fax m achine to see if you have any fax
messages.
1
Dial your fax m achine’s number.
2
When yo u hear the beep, imm ediately ent er your Remo te Access Code (3 digits followed by ).
3
When yo u hear two short bee ps, u se th e di al p ad to press 9 6 1.
4
Using the dial pad, enter the num ber (up to 20 digits) of the remote fax m achine wh ere you want
the Mem ory Status List forwarded , an d the n press # #.
You canno t use and # as dial numb ers. Howeve r, if you want to store a pau se,
.
press
#
5
After you hear y our f ax machine beep, hang up an d w a it.
Your fax machine calls the remote f ax machine and sends the Memory Status List. The remote
fax ma chine p rints the List.
Retrieving Fax Messages
1
Dial your fax m achine’s number.
2
When yo u hear the beep, imm ediately ent er your Remo te Access Code (3 digits followed by ).
3
As soon as y ou hear two short bee ps, u se t he dial pad to press 9 6 2.
4
Using the dial pad, enter the num ber (up to 20 digits) of the remote fax m achine wh ere you want
your fax messages forwarded to, and then press # #.
You canno t use and # as dial numb ers. Howeve r, if you want to store a pau se,
.
press
#
5
After you hear y our f ax machine beep, hang up an d w a it.
Your fax machi ne calls the remote fax m achine and sends the stored docum ents. The re mote fax
machine prints your f ax messages.
ADVANCED USE
Remote Fa x Options (Only for FAX- 717/727)
63
Page 73

Changing the Fax Forwarding Number
You can c hange the default setting of y our fax forwarding n um ber from a rem o te fax m achine.
1
Dial your fax m achine’s numb er.
2
When you hear the b eep, imm ediately enter your Rem ote Acc ess Code (3 dig its followed by ).
3
When you hear two sh ort b eeps, use the dial pad to p ress 9 5 4.
4
Enter the new n umber of the rem ote fax machine where you w ant your fax mess ages forwarde d,
and then press # #.
You cannot use and # as dial numbe rs. However , if you want to store a pause ,
.
press
#
5
To retrieve the M emory Status List, when you hear tw o short beeps, use the d ial p ad t o pre ss
9 6 1.
6
Use the dial pad to enter the num ber of the remo te fax mac hine (up to 2 0 digits), and then press
# #.
7
After you hear your fax machine beep, hang up and wait.
Your fax m ac h ine calls the remote fax mac hine . Your fax machi ne th en sends the Me mory
Status List show in g the new forwarding number to the remote fax ma chin e.
8
Check the for w arding number.
If the forwarding number is in correct, return to Step 1 to reset it.
Chapter 11
64
Page 74

12
Message Centre (Only for FAX-737MC)
Message Centre Mode
Message C entre Mode allows you to s tore incoming fax an d voice messages in a flexible me m ory.
The memory stores 15 minutes of voice messages, or up to 20 pages of fax messages. Th e actual
number of p ages stored in m emo ry varies depen ding on the content and the resolution used. Mem ory
is shared between fax and voi ce messages, which ar e stored on a “first-come, first-served” basis. Any
voice or fax mes sage can be retrieved remotely.
You must record an O utgoing Message in order to use the Message Centre Mode. (See R ecording
the Message C entre’s Outgoing Message (MS G C TR OGM), page 66 .)
Flexible Memory Settings (Message Store)
Message Centre Mod e offers you six flexible memory settings, so that you c an decide which kind s
of messages you want to rece ive.
1. DOC:ON, VOICE:ON Both voice and fax messages are stored . You can use the Fax
Forwarding or P aging fea tures and retrieve voice and fax messa ges
remotely.
2. DOC:ON, VOICE:EXT Y ou need an external answering machine conne cted to t he f ax
machine fo r this setting. Fax messages are stored in the M essage
Centre me mory, but voice m essages are stored in your external
answering machine. Re trieve vo ic e mes sa ges from the e x te rnal
answering m achine. You c annot use the Paging feat ure f or voice
messa g e with this se ttin g.
3. DOC:ON, VOICE:OFF All mem or y is u s ed t o stor e fax m es sag e s— n o vo ice messages will
be stored.
4. DOC:OFF, VOICE:ON All mem or y is u se d t o stor e vo ic e m ess ag es—no fax messa g es will
be st ored . In coming faxes w ill b e p rinte d o n pa per. Yo u ca n u se t he
Paging feature , an d retrieve voice mess ages remotely.
5. DOC:OFF, VOICE:EX T You need an external answering machi ne connected to the f ax
mach in e for this s ettin g. Inco m in g fax es are n ot stor ed in me mo ry,
but will be printed on pape r. Voice messages are s tored in the
external answering ma chin e.
6. DOC:OFF, VOICE:OFF Incomin g faxes a re not stored in memory, but will be p rinted on
paper. Vo ice c alls are not stored in memory.
ADVANCED USE
Setting Up Message Centre
You must set up M e ssage C e ntre in the follo wing o rd er:
1
Set the Message Store.
2
Record the Message Centre’s Outgoin g Message (MSG CTR OGM).
3
Activate M e ssage Centre (MC ) Mode by press ing .
Message Centre (Only for FAX-737MC)
65
Page 75

Setting the Message Store
Select the setting from the desc riptions of “ Flex ible M emory Settings”.
1
Press Menu/Set, 8, 1. The screen prompts you to choos e a DOC (D ocument) setting.
2
Press or to select ON (or OFF), and press Menu/Set.
The screen prompts you to choose a VOICE setting.
3
Press or to select y our s ettin g fr om t he lis t (ON, OFF or EXT), and press Menu/Set
when the sc reen dis p lays yo ur selection.
4
Press Stop/Exit.
Recording the Message Centre’s Outgoing Message (MSG CTR OGM)
Recording the Message Cen tre’s O utgoin g M essage (M SG CT R O G M) is the second step you need
to follow before you c an turn on the M essa ge Ce ntre. Make sure you r OG M (O utgo ing Mess age) is
less than 20 seconds long .
1
Press Menu/Set, 8, 3. The scr een prompts you to choose an OGM.
2
Press or to reach MSG CTR OGM.
This is the only setting you can select if you want to turn the Me ssage Centre on.
3
Press Menu/Set.
4
Press or to select RECORD MSG and press Menu/Set.
5
Pick up the handset to record a message.
For example: Hello. W e are un a b le to take you r call at this time. P lease le ave a message after
the signal. If you w ish to send a fax, please press the start bu tton on your machine .
6
Press Stop/Exit and replace the handse t. T he Message Cent re p lays your O GM.
7
Press Stop/Exit.
Listening the Outgoing Message (OG M)
1
Press Menu/Set, 8, 3.
2
Press or to select MSG CTR OGM (or FA X/TEL OGM or PAGING OGM), and
press Menu/Set when the screen dis p lays yo u r selection.
3
Press or to select PLAY M SG and press Menu/Set. Adjust volume by pressing
or .
4
Press Stop/Exit.
Chapter 12
66
Page 76

Erasing the Outgoing Message (OGM)
1
Press Menu/Set, 8, 3.
2
Press or to select MSG CTR OGM (or FAX/TEL OGM or PAGING OGM), and
press Menu/Set when the screen disp lays your selection.
3
Press or to select ERASE MSG and press M e nu/Set.
4
Press 1 to erase the OGM—OR— P re ss 2 to exit without eras ing.
5
Press Stop/Exit.
Activating Message Centre Mode
Press and ho ld until the bu tto n lights and th e screen d isplays MC:MSG CTR.
Whe n light is out, th e Me ss a ge Ce ntre is off. (S ee Setting Up Message Centre, page 65.)
Message Indicator
The light flashes w h en you h ave ne w mes sa ges and /o r faxes waiting fo r your review .
The L CD screen dis plays th e total nu mber of voice
(including recorded conversations) and/or fax m essages
stored in Message C entre mem o ry.
If you press the flashing to turn off the Message Centre
before getting y our new mes sages, th ey wo n ’t be los t. The
new messages w ill be pla ye d auto maticall y a nd the LCD
will ask you to acknowledge the n ew faxes:
Press 1 to p rin t (and auto m atic ally de lete ) the fax es fro m m e mo ry — OR—P re ss 2 to save the fa xes
in memory until prin ting is conven ie nt.
What Happens When the Memory Is Full...
If the memor y becomes full when you have set yo ur m achine to Message Centre
mode, the m achine will change to F/T mo de automatically. In this mode, the
machine can accept incoming faxes auto m at ically. Then, if your m achine should
run out of pa per, the answ e r mod e will shift a utomatically to ma nual mod e. In
manual mode the call is not answered, so your caller will know to try again later.
Out of Recording Paper and Memory Full
[Answer Mode] Manual Mode
Message Centre Mode F/T Mode
Memory Full
Print the Mem ory Status List and select the item to be cleared. This will clear sp ace for new messa ges
and faxes to be store d in m emory. (Se e P rinting R epor ts, p age 33.)
VOICE:03 DOC:02
PRINT DOC?
1.YES 2.NO
Out of Recording Paper
and Memory Full
ADVANCED USE
Message Centre (Only for FAX-737MC)
67
Page 77

Playing Voice Messages
Follow the steps be lo w to liste n to vo ic e mes sa ges.
1
Press Play/Record. Adjust volum e by pressing or .
All new m essag es a re played in the ord er they w ere recor ded. The display sh ows the num b er of
the current m essage , and the total number of me ssa ges.
If Caller ID in formation was re ceived, the mach ine beeps during the message and displays the
Calle r ID info rmation fo r one sec ond.
During pl ayback, the screen displays the time an d date the messa ge was recorded.
2
Press (RWD) at the en d o f the m essag e to repeat a me ssag e. U se # (FWD) to skip to the n ext
messa ge. You can press and # repeatedly u ntil you reach th e message you want to play.
3
Press Stop/Exit.
Printing a Fax Me ssage
Once you p rint a new fax message stored in me mory, it is erased from the memo ry auto matically.
1
Press Play/Record. Afte r two s ec onds, th e machine be gins to p lay voic e mes s ages.
2
After playing voic e m essages, the display asks if yo u
want to print fax message s that are in the memory.
There is no di splay if there are no faxes .
3
To print the fax messages, press 1—OR—Press 2 to
exit without printing .
PRINT DOC?
1.YES 2.NO
Backup Printing Option
When you choose DO C:ON in the Messag e Centre mode, all incoming f ax messages are stored in
the available memory for r etrieval. T o print a backu p copy a u tomatically, turn th is option on.
1
Press Menu/Set, 8, 2. The scr een prompts you to se lect a se ttin g.
2
Press or to display ON (or OFF), and press Menu/Set when the screen displays your
select e d setting.
3
Press Stop/Exit.
Chapter 12
68
Page 78

Erasing Messa ges
If you ch oose to er ase all fax messag es, the m achine w ill prin t any previ ously unpr inted fax messages
before erasing them from me m ory . Fa x messages cann ot b e era sed individually.
You can era se voice message s ind ivid uall y, or all at once.
To erase voice messages individually
1
Press Play/Record. T he machine bee ps and begins me ssag e pl ayback. Each message is
preceded by one long beep, and fo llow ed by two short beeps.
2
To erase a speci fic m essage, press E rase im m edia tely
after the two s h ort beep s , o r while th e mes s ag e is
playing. The screen p rompts:
3
Press 1 to erase the messa ge—OR—Press 2 to exi t
without erasing.
4
Press Stop/Exit.
To erase messages all at once
1
Press Erase. The screen prompts you to choose what
kind of messages you want to eras e.
2
Press or to selec t e rasing a ll voice messages
(ALL VOICE), all docum e n t messag es (AL L DOC.),
or all messages—both voice and f ax—(ALL MSG), and pr ess Menu/Set.
3
Press 1 to erase—OR—Press 2 to exit without eras ing.
ERASE THIS MSG.?
1.YES 2.NO
ERASE ALL VOICE?
SELECT & SET
Setting the Maximum Time for Incoming Messages
Your ma chine comes set to re ceive voice messages up to 30 seconds lon g . You can chan ge this
setting to any length from 20 seco nds to 60 seconds in 5-second increments.
1
Press Menu/Set, 8, 4. Th e sc reen prompts you to select a m axi mum time.
2
Press or to selec t th e max imum time se tting for in comin g messages, and press
Menu/Set when the screen displays your setting.
3
Press Stop/Exit.
ADVANCED USE
Message Centre (Only for FAX-737MC)
69
Page 79

Setting the Toll Saver
When you set the T oll Saver feature, the m ach ine answe rs after 5 (4 in Australia and Ne w Zea land)
rings if you don’t have m essages , and after 3 (2 in Au stralia and New Zeal and) rings if you do have
messa ges . Thi s way , whe n you call the mac hine , if it ring s 4 (3 in Au stralia and N ew Zeala nd) ti mes ,
you know you have no m essages, and can hang up, avoiding any toll cha rge.
When Toll Saver is ON, it overrides your Ring Delay setting. Toll Save r must be
off for the machine to operate using your Ring Delay setting. (See S etting the Ring
Delay, page 24.)
1
Press Menu/Set, 2, 1.
2
Press or to select TOLL SAVER, and press Menu/Set.
3
Press or to select ON (or OFF), and press Menu/Set.
4
Press Stop/Exit.
ICM R ecord in g Mo nito r
This feature lets you turn OFF (or ON) the spea ker volume for voic e messages. When you turn the
monitor OFF, you will not hear messages as they come in.
1
Press Menu/Set, 8, 5.
2
Press or to select OFF (or ON), and press Menu/Set.
3
Press Stop/Exit.
Recording a Conversation
You can record a telephone conversation by p ress ing Play/Record during the con v er sation. Your
recording can be as long as the Incoming Message M axim um Tim e. The other party will hear a beep
every 15 seconds while recording. You can not record a conversation using the Speakerphone.
Fax Forwarding/Paging
When Paging is set to ON, your machine dials the pager number you have programmed an d, when
connected, plays t he Paging OG M message you have recorded for 60 seconds. Th is a ctivates y our
pager and let you know you have a fax or voice m essage in the M ess age Centre memory.
When Fax Forwarding is set to ON, your machine d ials the fax machine p hone numbe r yo u’ve
programmed, and forwards any faxes you’ve received.
You cannot use Paging and Fax Forwarding at the same time.
Chapter 12
70
Page 80

Programming a Fax Forwarding Number
1
Press Menu/Set, 8, 6.
2
Press or until the s c reen dis plays FA X FORWARD , a nd press Menu/Set.
The sc reen pro mpts y o u to enter the number of the fax machin e where faxes will be f orwarded.
3
Enter the forwarding number (up to 20 dig its), and pres s Menu/Set.
4
Press Stop/Exit.
You can change a Fax Fo rwarding number remotely.
Recording the Paging Outgoing Message (OGM)
Before paging ca n work, you sho uld first reco rd th e Paging OGM.
1
Press Menu/Set, 8, 3. The screen prompt s you to choose an O GM.
2
Press or to reach PAGING OGM , an d pr ess Menu/Set.
3
Press or to select RECO RD MSG , and press Menu/Set.
4
Pick up the h andset to record a m essage.
5
Press Stop/Exit and replace the handset. The Message Centre play s your OGM .
6
Press Stop/Exit.
You can d elete or play the Paging message in the same way as the MS G CTR
OGM. (See Recording the Me ssage Centre’s Outgo ing Message (MS G C TR
OGM), page 66.)
Programming the Paging Number
ADVANCED USE
1
Press Menu/Set, 8, 6.
2
Press or until the s c reen dis plays PA G ING , a nd press Menu/Set.
The screen prompts you to enter your pager numbe r.
3
Enter your paging number up to 2 0 dig its and press Me nu/Set.
This is the telephone number which your mach ine m ust call.
4
Press Stop/Exit.
You canno t cha nge a Paging nu m ber remotely.
Message Centre (Only for FAX-737MC)
71
Page 81

Remote Retrieval
This sec tion is fo r FA X -7 37M C . (If you ha ve FA X -71 7/7 2 7, plea se see c ha pter 10 for yo ur remote
fax options.)
You can call you r m achine from any to uch tone ph one (or rem ote Gro up 3 fax ma chine s et for tone)
and use a Rem ote Access Code and R emote Control Co mmands to retrieve voice (and fax) messages.
You can a lso prog ram and change some settings for you r M essage Centre.
Using the Remote Access Code
1
Dial your m achine phone number from a touch tone phone.
2
When your machine answers and beeps, immediately enter your R emote Acc ess Code.
3
The m achine signals the ki nds of messages received:
1 long beep—Fax me ssage(s)
2 long beeps—Voice message (s)
3 long beeps—Fax and Voice mes sage(s)
No beeps— no messages
4
The m achine then prompts yo u with tw o short beeps t o enter a co mm and. If you w ait longer than
30 second s to ente r a c om mand, the machine hangs up. I f yo u enter an invalid com m and, the
mach ine beeps three tim es.
5
Press 9 0 to reset the m achine when you finish.
6
Hang up.
If your fax machine is set to MANUAL m ode, you can access the Message Cen tre
remotely by phoning yo ur machine and letting it ring for about 100 (50 in Australia)
seconds. Yo ur fax mach ine will an s wer the phone after 100 (50 in Au stralia)
seconds of ringing, and you t hen have 30 seconds to enter your Rem ote Access
Code.
Setting the Remote Access Code
Enter you r Remote Ac cess Code when the machine picks up your call, so you can access features
remotely. Th e defau lt code is inactive code (--- ).
1
Press Menu/Set, 8, 7.
2
Enter a three-digit code using numb er keys 0-9, and #, and press Menu/Set.
The cannot be chan ged. D o not use the same digits that appear in your Fax Receive Code,
Telephon e A nswer Code or Activation Voic e Code.
3
Press Stop/Exit.
When you call your m achine a nd enter the R em ote Acc ess Co de, you m ust pre ss
the fourth digit (3 digit number plus ).
Chapter 12
72
Page 82

Remote Control Commands
Follow the comm ands belo w to acces s features rem otely. When you call the fax machin e and enter
your R emo te A ccess C ode (3 digit s follo wed by ), the sys tem w ill sig nal y ou wi th tw o sho rt beep s
to enter a remo te contro l com m a nd.
Rem ote control com m ands Detail Opera tion
91 Playing voice messages After one long beep, the machin e plays In-Comi ng Me ssage
(ICM ).
1 Skip back Press 1 w hile listen ing to an ICM to pla y it a gain. I f yo u pre ss
1 before a message, you w ill hear the previous me ssage.
2 Skip next Wh ile playing ICM, you can skip to next mes sage .
9 STOP Playing Stop p laying th e ICM.
93 Erase all ICM If you hear one long beep, the er ase i s ac cepted. If you hear
three short beep s, you cannot erase because all voice
messages h ave not been pla yed, or there is no voice m essa ge
to erase.
*This code eras es al l recorded messages, not one at a time.
94 Play and Record OGM in
memory
1 Play 1 MSG CTR OG M The mach ine plays the selected OG M . You can stop playing
2 FAX/TEL OGM
3 PAGING OGM
2 Record 1 MSG CTR OG M After one long beep, you ca n record th e selected O GM . You
2 FAX/TEL OGM
3 PAGING OGM
95 Changing Fax
Forwardi ng/Paging setting
1OFF
2 Fax Forwarding
3Paging
4 FAX FWD NO.
OGMs by pressing 9.
will hear the me ssag e pl ayed once. You can stop recording
the message by pressing 9.
If you hear one long beep , the change is ac cepted. If you hear
three short beeps, yo u cannot change it because the
conditions h av e not b ee n me t (E xample: registering p aging
number).
You can reg ister you r fa x fo rwarding number by using
4.FAX FWD NO. (See Changing the F ax F or w arding
Number, page 76.) Once you have registered the numb er, the
mach ine wi ll automatically turn to “FAX FW D:ON ” mode.
Then retrieve a Memo ry Status List by entering 9 6 1 to ma ke
sure that the Fax Forwar ding number you re gistered is correct
in the List.
ADVANCED USE
Message Centre (Only for FAX-737MC)
73
Page 83

Remote control commands Detail Operation
96 Retrieve Fax Enter the n umb er of a r emo te fax ma chine to receiv e a re port
1 Memory Status List
or stored fax messages. (See Retriev ing the Memo ry Statu s
List, page 75 and Retrieving Fax Messages, p age 75.)
2 Retrieve all FAX
3 Erase FAX in the
memory
If you hear one long beep , you can erase the fax message
from the memory.
97 Check the rece iving status You can check whether your fax m achine has received any
1 Document
2Voice
Docum ent or Vo ice m essages. If yes, you w ill hear one long
beep. If no, you will hear th ree sho rt beeps.
98 Change Answer M ode If you hea r one long beep, you can change th e answ er m ode.
1MC
2F/T
If you hear three short beeps, you cannot change it.
(Exampl e: There is no MC M SG when you wan t to change to
MC mode.)
3FAX
90 Exit After a long b eep, you can ex it rem ote control.
Chapter 12
74
Page 84

Retrieving the Memory Status List
You can retrieve the M emory Status L ist from a remote fax m achine to see if you have any fax
messages.
1
Dial your fax m achine’s number.
2
When yo u hear the beep, imm ediately ent er your Remo te Access Code (3 digits followed by ).
3
When yo u hear two short bee ps, u se th e di al p ad to pre ss 9 6 1.
4
Using the dial pad, enter the num ber (up to 20 digits) of the remote fax m achine wh ere you want
the Mem ory Status List forwarded , an d the n press # #.
You cannot use and # as dial numb ers. Howeve r, if you want to store a pau se,
.
press
#
5
After you hear y our f ax machine beep, hang up an d w a it.
Your fax machine calls the remote f ax machine and sends the Memory Status List. The remote
fax ma chine p rints the List.
Retrieving Fax Messages
1
Dial your fax m achine’s number.
2
When yo u hear the beep, imm ediately ent er your Remo te Access Code (3 digits followed by ).
3
As soon as y ou hear two short bee ps, u se t he dial pad to press 9 6 2.
4
Using the dial pad, enter the num ber (up to 20 digits) of the remote fax m achine wh ere you want
your fax messages forwarded, and the n press # #.
You cannot use and # as dial numb ers. Howeve r, if you want to store a pau se,
.
press
#
5
After you hear y our f ax machine beep, hang up an d w a it.
Your fax machi ne calls the remote fax m achine and sends the stored docum ents. The re mote fax
machine prints your f ax messages.
ADVANCED USE
Message Centre (Only for FAX-737MC)
75
Page 85

Changing the Fax Forwarding Number
You can c hange the default setting of y our fax forwarding n um ber from a rem o te fax m achine.
1
Dial your fax m achine’s numb er.
2
When you hear the b eep, imm ediately enter your Rem ote Acc ess Code (3 dig its followed by ).
3
When you hear two sh ort b eeps, use the dial pad to p ress 9 5 4.
4
Enter the new n umber of the rem ote fax machine where you w ant your fax mess ages forwarde d,
and then press # #.
You cannot use and # as dial numbers. Ho wever, if you w ant to store a p ause,
. Also, if your fax machine is con necte d to a P ABX, you can press # first
press
#
before the fax machine’s number. The
& New Zealand only)
5
To retrieve the M emory Status List, when you hear tw o short beeps, use the d ial p ad t o pre ss
9 6 1.
6
Use the dial pad to enter the num ber of the remo te fax mac hine (up to 2 0 digits), and then press
# #.
7
After you hear your fax machine beep, hang up and wait.
Your fax m ac h ine calls the remote fax mac hine . Your fax machi ne th en sends the Me mory
Status List show in g the new forwarding number to the remote fax ma chin e.
8
Check the for w arding number.
If the forwarding number is in correct, return to Step 1 to reset it.
works as well as
#
Recall
key.
(Australia
Chapter 12
76
Page 86

13
Troubleshoo ting and Maintena nce
Error Messages
You ma y occasionally encou nter a difficu lty with your machine or telep hone line. If this happens,
your machin e often identifies the p roblem and d isplays an er ror message . The list below explains the
most com m on error m ess ages.
ERROR MESSAGE CAUSE/ACTION
CHECK CARTRIDGE
RESET OR REPLACE
CHECK DOCUMENT
REMOVE DOCUMENT
CHECK DOCUMENT
PRESS STOP KEY
CHECK PAPER
RELOAD PAPER
COMM.ERROR
CONNECTION FAIL
COOLING DOWN
WAIT FOR A WHILE
COVER OPEN
PLS CLOSE COVER
DISCONNECTED
MACHINE ERROR XX
CALL YOUR DEALER
NO RESPONSE/BUSY
The m achine is out of ribbon o r the pri nt ca rtridge i s not
properly installed. Install the print cartridge ag ain. (See
Changing the Ribb on, pag e 86.)
The docume nts were not inserted or fed properly, or were
too long. (See Do cument Jam, page 79.)
The fax machine is out of paper or paper is not prop erly
loaded in the paper tray. Refill the paper or remove the
paper and load it aga in. If this e rror appe ars while
receiving a fax, lo ad paper to restart printing. If you w ere
coping or printing rep orts, load paper and try again.
A poor qu ality pho n e line resulted in a communica tions
error. Try the call aga in.
You have requested a polling call from another party, but
the o th er fax mach in e is not in Poll Waiting mode. Verif y
the o th er parties polling s etup.
The print head ha s o v erheated. Wait 30 m inutes fo r it to
cool.
The cover is not completely close d. Clos e the co v er.
The other party has disconnected during a call or fax.
The fax machine has a mechanical pro b lem. Unplug the
machine. T hen contact your Brother dealer for serv ice.
The num ber you called do es not answer or is bu sy. Y ou
may also have reached a n um ber not connected to a fax.
Check the number and cal l aga in.
MAINTENANCE
Troubleshooti ng and Maintenanc e
77
Page 87

ERROR MESSAGE CAUSE/ACTION
OUT OF MEMORY
ERASE MESSAGE
OUT OF MEMORY
PRINT:PRESS COPY
OUT OF MEMORY
QUIT:PRESS STOP
OUT OF MEMORY
SEND:PRESS START
OUT OF MEMORY
QUIT:PRESS STOP
PAPER JAM
PLS OPEN COVER
PAPER JAM
REMOVE PAPER
The m em ory capacity h as been exceede d. Pr int t he fa xes
stored in me mory to delete them . T hen try a gain.
There is not en ough memory available to perform your
copy operation. P ress Stop/Exit. Print t he fa x es s tored in
memory to delete them. Then try again .
—OR —P r ess Stop/Exit to canc el the jo b. Then try again.
(See Ca n celling a Sched u led Jo b , p age 58 .)
There is not en ough memory available to send your fax.
Press Stop/Exit. Print the faxes stored in memory to
delete them . T hen try again .
—OR —P r ess Stop/Exit to canc el the jo b. Then try again.
(See Ca n celling a Sched u led Jo b , p age 58 .)
The p aper is jammed in the mac h in e. (See Paper Jam,
page 79.)
Chapter 13
78
Page 88

Document Jams and Paper Jams
Document Jam
The documents were not inserted or fed properly, or were too long.
1
Rem o v e any p a per that is not jammed from th e Auto matic Document Feeder.
2
Open the top cover by lifting the lever on the right side of t he top cover.
3
Pull the docu ment toward th e front of the m a chine.
4
Close the top cover.
Press the both edges of
the top cover and close
it until it clicks.
Document is jammed
Paper Jam
The rec ording p aper is jammed in the mac h in e.
1
Remove any paper that is not jammed.
Top Cover
MAINTENANCE
Troubleshootin g and Maintenance
79
Page 89

2
Open the t op cover by lifting the lever
on the right side of the top cover.
Top Cover
3
Pull the jammed printout gently from the p aper tray toward the front of the m achine. If the
printout is jammed, then p ull it toward the back of the machi ne.
Printout is jammed
YES!
4
Rem ove th e print ca rtridge an d turn th e spoo l to tighte n the ribbon.
5
Instal l the cartrid ge. (See Changing the Rib bon, page 86.)
6
Close the top c ove r.
Press the both edg es of the to p cove r and clo se it until it c licks.
7
Put the recording pa p er back into the p aper tray.
Chapter 13
80
NO!
Page 90

Difficulty with Operation
If you think the re is a problem with s ending o r printing qua lity of you r fax m a chine, make a copy
first. If the copy quality looks goo d then the problem may not be your fax machine. Check the
difficulties below and follow the suggestions to help resolve your proble m s.
DIFFICULTY SUGGES TIONS
Printing or Receiving F axes
Condense d Pr int and
Horizontal Streak s;
Top and B ottom of Sent ences
Cut Off
Vertical B lack Lines When
Receiving
Phone Line or Connections
Fax M achine Does N ot
Answer When C alled
No D ial T one on the Hand set Press Speaker Phone (for FAX-737MC only)—OR— L ift the
Sending F axe s
Poor Trans mitting Quality Try chan ging your resolution to FINE or S.FINE . (See Resol u tion,
Dialling Does Not Work C heck for a dial tone.
This can be caused by static or interference on t he telephone line.
You can make a copy usin g the C opy function and s ee if the same
problem o ccurs. If the co py is also bad, call your B rother deale r for
service.
The sende r’s scanner may be dirty. Ask the sender t o make a cop y
to see if the pr o b lem is w ith the s ending machine. Try receivin g
from another fax machine. If the problem continues, contact the
Brother deale r fo r service.
Mak e sure th e mac hine is in the co rrec t receiving m o de for you r
setup (either F AX , F/T (FA X/T EL) o r TA D). C hec k fo r dial ton e. If
possible, call your machine to he ar it answer. If th ere is still no
answer, check the telephone line cord connection. Connect a
stand ard te lepho ne ha ndset to the mac hine ’s telep hone jack . If ther e
is no ringing w hen you call your machine, call your Tele phone
Com pany to check th e line.
handset. If you he ar no dial tone, check telephone line cord
connections at the m ach ine and w all jack. Che ck that the ha ndse t is
connected to t he machine’s handset jack. Test the wall jack with
another single line telephone. If no dial tone on the wall outlet, call
your Telephone Co mp any.
page 20.) M ake a copy to v erify the machine’s scanner operation.
Change TONE/PULSE setting. (See S etting the Dia llin g Mo d e
(Tone/Pulse) (Not available in New Zealand), page 12.)
Check all line cord connections.
Check power cord con nection.
Send a manu al fax by pressing Sp eaker Phon e (for F AX -737M C
only)—OR—Lifting the ha n dset, and diallin g th e num b er. W a it to
hear fax recei ving tones before pressin g Fax Start.
MAINTENANCE
Troubleshootin g and Maintenance
81
Page 91

DIFFICULTY SUGGESTIONS
Vertical Black L ine s When
Sending
Use your machine to m ake a copy. If the copy shows the sam e
problem, the scann er area is dirty. Lift the front cover and check the
document path. Clean the sc anner’s white roller and t he glass strip
under the roller u sing isop ropyl alc ohol an d a lint-fre e cloth.
Handling Inco m ing C alls
F/T Pseudo-Ring in F/T
Mode
The m a chin e k n ows th e in coming c all is not a fax so it is sign allin g
you to answer the voice call. Pick up the machine ’s handset or
answer from an extension phone and press your machine’s
Telephone A n swer Code (default setting is # 5 1 (# 9 1 for New
Zealand)).
Transferring a Call to the
Machine
If you have ans w ered at the machine’s handset, press Fax Start,
and hang u p immediately.
If you answered at an extension phone, press your three-d igit Fax
Receive Co d e (the factory setting is 5 1 ( 9 1 for New
Zealand)). W hen your m achine answers , han g up.
Machine goes into rece ive
mod e whe n the c a lle r is n ot a
fax
If the ma chine is set to Fax Detect O N, it is m ore sens itive to sou nds.
The ma chin e may mista kenl y interpret certain voices or music on
the line as a calling fax mach in e and re spond w ith fax receivin g
tones. Deactivate th e fa x by pressing Stop/Exit.
Try avoiding this p rob lem by turning Fax D etect t o OFF. (See Fax
Detect, page 26.)
Transmission Verification
Repo rt Prints
“RESULT:ERR OR ”
There is probab ly te m porary noise or static on the phone line. Try
sending the f ax again. If the problem continues, call the Telephone
Compa ny t o check your pho ne l ine.
Chapter 13
82
Page 92

Regular Maintenance
Cleaning the Scanner
1
Unplug the pow er cord for safety.
2
Open the top cov er by lifting the lever on the r ight side of t he to p cover.
3
Clean the w h i te bar and the glass strip u nder the bar with isopropyl alcohol on a lint-free cloth.
Be care ful not to ben d th e spring plate o r drop a n ything into the machine.
White Bar
Glass Strip
4
Close the top cover.
Press th e both e dges o f the top c o ver and close it until it clicks.
MAINTENANCE
Troubleshootin g and Maintenance
83
Page 93

Cleaning the Print Head
WARNING
After you have just used the machine, som e internal parts of the machine are
extremely HOT! So please be careful.
1
Unplug the p ower c ord for safety.
2
Open the to p cove r b y lifting the lever on the right side of the top cov er.
Be car eful not to cut y o urself on the sha rp edge s of the m etal part shown in the
illustrat ion .
Sharp Edge
Chapter 13
84
Page 94

3
Take o ut the p rinting c artridge.
4
To clea n th e m ac hin e’s pr int h ea d, wipe the prin t he ad w ith a lin t-fre e c lo th th at is d ry o r li ghtly
moistened w ith isopropyl alcohol.
Print Head
MAINTENANCE
5
Wait u n til the alcohol o n the prin t head is totally dried.
6
Install the printing cartridge. (Se e Cha ngin g th e R i bbon, pa ge 86.)
7
Press b oth edg e of the top cov er until it clicks an d close th e top co v er.
Troubleshootin g and Maintenance
85
Page 95

Changing the Ribbon
1
Open th e top co v er by lifting the lever on the right side of the to p cove r.
Sharp Edge
Be car eful not to cut y o urself on the sha rp edge s of the m etal part shown in the
illustrat ion .
2
Remo ve t he print cartridge containing the used ribbon and se t it upsid e—down with the blue
gear i n the upp e r left corner.
Chapter 13
86
Blue Gear
Page 96

3
Take the used rib bon out of the cartridge:
Snap ou t t he upp er w hi te spoo l and slid e the rol l o ff t h e bl ue g e ar. ( Do n ot re mo ve t h e bl ue g ear )
1
2 Lift ou t the low e r roll.
Blue Gear
Used Ribbon
White Gear
Lower White Spool
4
Slide the wh ite elastic off the ne w refill rolls and s et them down with the full roll in the lower
Upper White Spool
Cartridge
position. (The ribbon’s shiny side is facing down.)
Remove the w hite gear and spools f ro m th e e nds of the used card board cores. Then ins er t
5
them in to the sa me position s in the ne w c o res.
White Gear
New Ribbon
White Spool
MAINTENANCE
Troubleshootin g and Maintenance
87
Page 97

6
Install the new rib bon back into the car tridg e:
1 Insert th e l o wer rol l in to the cartridge h olders.
2 Skip the upper left cardboa rd onto the b lue gear of the c artridge and insert the up per roll into
the cartridge holders .
Blue Gear
Shiny side is face down
White Spool
7
Turn the upp er right white sp o ol clockw ise to tighten the ribb on, as shown.
Chapter 13
88
Page 98

8
Turn th e cartr idge ov er an d re -ins tall it into the mac h ine: Ins ert th e re cess ed first and plac e
the cartridge into its fou r holders.
MAINTENANCE
9
Press down o n both sides of the top cover to close it securely.
Troubleshootin g and Maintenance
89
Page 99

Packing and Shipping the Machine
When ever you transport the fax mac hine, use the packing materials that cam e with your fax machin e.
Failure to pack the ma chine properly may da mage the m achine and such damag es will not be covered
under wa rran ty.
1
Unplug th e fa x m achine from the AC power outlet.
Do not unplug the fax machine after a print job until you he ar the final click.
2
Remo ve t he paper wire ex tension, telep hone line cord, print cartridge and handset, and pack
them.
If you are returning the fax m achine to B r othe r as par t of the B rother Exchange
Service, pack only the fax m achine. Keep all separate pa rts to use w ith your
“Exchange” m achine.
3
Wrap the fa x mach in e in the p lastic ba g and place it in the original ca rto n with th e origin al
packing material.
Chapter 13
90
Page 100

14
Important Safety Information
Importa nt Infor m a tion for Au s tr a lia
Important Safety Instructions
1
Read all of these instructions.
2
Save th em for la t e r reference.
3
Follow all wa rn ings and instructions marked on the pr oduct.
4
Unplug this prod uct f rom the telephone an d A C sockets (in this orde r) b efor e cle anin g. Do not
use liquid or aerosol clea ners. Use a damp cloth for cleaning.
5
Do not place this pro duct on an unstable su rface.
6
Do no t use th is produ c t near w a ter.
7
Slots and openings in the case and the back or bott om are provided for ventilation; to ens ure
reliable operation of the product and to protect it from overheating, these open ings must not be
blocked or cov ered. The openings sh ould never be blocked by placing the p roduct on a bed, sofa ,
rug, or other similar soft surface. This product s hould nev er be place d near or over a rad iator or
heater. This product should not be placed in a built-in installation unless proper ventilation is
provided.
8
This product shoul d b e opera ted from the type of pow er so urce indica ted on the lab el. If you are
not sure of the type o f power available, consul t wit h your dealer or local power company.
9
This p roduct is equipp e d with a 3 -wire e a rthed plug. This plug will fit into only an earth ed
socket. This is a safety feature. If you are unable to insert the plug into t he outlet, contact your
electrician to replace you r obsolete socket. Do not defeat the purpose of an earthed plug.
10
Do no t allow a nything to rest on the po wer cord. Do n ot loca te this pro duct w h e re peop le can
walk o n the cord.
11
Do no t place a n ything in front of the m a chine th at will blo ck rece ived fax e s. Do n ot place
anything in the path of received faxes.
12
Do not touch a document during printing.
13
Never push o bjec ts o f any kind into this product throug h cabinet slots, since they may touch
dange rous v oltag e po ints or sh ort o ut p arts resu lting in a risk of fi re or ele ctric s hock . Nev er spi ll
liquid of any kind on the product.
14
Do not at tempt to service this p roduct your self, because opening o r remo ving covers may expose
you to dangerous vol tage poin ts and/or other risks. Refer all servicing to service pers onnel.
15
This product has no mains ON /O FF switch. It is therefore h ighly important that access to the
mains plu g an d the ma in s soc ke t to w hi ch th e plu g is c on ne cted , is n e ver o bstr uc te d, in c ase fo r
some reason the m ains power to the machine m ust be quickly disconnec ted.
INFORMATION
IMPORTANT
Important Safety Information
91
 Loading...