

Page 1
bíother
FAX-50
Owner's Manual
Page 2

Page 3

This unit generates, uses and can radiate radio frequency energy and if not
installed and used in accordance with the Owner's Manual, may cause inter
ference to radio and television reception. It has been tested and found to
comply with the limits for a Class B computing device in accordance with the
specifications of Subpart J of Part 15 of the FCC rules, which are designed to
provide reasonable protection against such interference in a residential
installation. However, there is no guarantee that interference will not occur in a
particular installation. If this unit does cause interference (such as static) to
radio or television reception, which can be determined by turning the unit off
and on, the user is encouraged to try to correct the interference by employing
one or more of the following measures:
- change the location of the receiving antenna (indoor type)
- move the unit away from the radio or TV
- plug the unit into a different outlet so that the unit and the radio or TV are on
different branch circuits.
If necessary, the user should consult the dealer or an experienced radio/TV
technician for additional suggestions. The user may find the following booklet
prepared by the Federal Communications Commission helpful: "How to Identify
and Resolve Radio-TV Interference Problems”. This booklet is available from
the U.S. Government Printing Office, Washington, D.C., 20402, Stock No.
004-000-00345-4.
Brother cannot accept any financial or other responsibilities that may be the result of your use
of this Information, including direct, indirect, special or consequential damages. There are no
warranties extended or granted by this document.
The serial number may be found on the label affixed to the rear of the unit.
For your convenience, note this number below and retain this Owner's Manual
to serve as a permanent record of your purchase, in the event of a theft or fire
or for future reference.
MODEL NO. FAX-50
NAME OF DEALER
DATE OF PURCHASE
SERIAL NO.
Page 4

This equipment œmplies with Part 68 of the FCC Rules. On the rear panel of this equipment is a
label that contains, among other information, the FCC Registration Number and Ringer Equivalence
Number (REN) for this equipment. You must, upon request, provide this information to your
telephone company.
Ask your telephone company or Installer to install the jack suitable for your device if such is not
available.
The REN is useful to determine the quantity of devices you may connect to your telephone line and
still have those devices ring when your telephone number Is called. In most, but all areas, the sum
of the RENs of all devices connected to one line should not exceed five (5.0). To be certain of the
number of devices you may connect to your line, as determined by the REN, you should contact
your local telephone company to determine the maximum REN for your calling area.
If your telephone equipment causes harm to the telephone network, the Telephone Company may
discontinue your service temporarily. If possible, they will notify you in advance. But if advanced
notice isn't practical, you will be notified as soon as possible. You will be Informed of your right to
file a complaint with the FCC.
Your Telephone Company may make changes in its facilities, equipment, operations or procedures
that could affect the proper functioning of your equipment. If they do, you will be notified In
advance to give you an opportunity to maintain uninterrupted telephone service.
If you experience trouble with this telephone equipment, please contact the manufacturer's
authorized service agency for information on obtaining service or repair. The telephone company
may ask that you disconnect this equipment from the network until the problem has been corrected
or until you are sure that the equipment is not malfunctioning.
WARNING:
For protection against the risk of electrical shock, always disconnect all cables from the wall outlet
before servicing, modifying or moving the equipment.
This equipment may not be used on coin service provided by the Telephone Company nor
connected to party lines.
NON-HEARING AID-COMP A TIBILITY
The telephone supplied with this equipment is not hearing aid-compatible.
FCC rules prohibit the use of non-hearing aid-compatible telephones in the following locations or
applications:
1.
All public or semi-public coin-operated or credit card telephones.
2.
Elevators, highways and tunnels (automobile, subway, rairoad or pedestrian) where a person
with impaired hearing might be isolated in an emergency.
3.
Places where telephones are specifically installed to alert emergency authorities such as fire,
police or medical assistance personnel.
4.
Hospital rooms, residential health care facilities, convalescent homes, and prisons.
5.
Workstations for hearing-impaired personnel.
6.
Hotel, motel, apartment lobbies; in stores where telephones are used by patrons to order
merchandise; in public transportation terminals where telephones are used to call taxis, or
to reserve lodging or rental.
7.
Hotel and motel rooms. (At least ten percent of the rooms must contain hearing aid-compatible
telephones; or contain jacks for plug-in hearing aid-compatible telephones which will be provided
to hearing-impaired customers upon request.)
Page 5

TABLE OF CONTENTS
Contents
INTRODUCTION 1
PRE-INSTALLATION INSTRUCTIONS 2
A. Before removing the unit from the packing carton 2
B. Contents of the packing carton 2
C. Procedures for removing the unit from the packing carton 2
INSTALLING THE UNIT 3
A. Telephone connections 3
B. Electrical connection 6
C. Inserting the recording paper roll into the unit 7
GETTING FAMILIAR WITH THE UNIT 11
A. The control panel 11
B. Rear panel switches 12
Page
OPERATING THE UNIT
A.
The copy mode
B. How to transmit documents
How to receive documents
C.
How to use the telephone handset
D.
3 FOR YOUR FAX-50
Cleaning the scanning and printing area
A.
Cleaning the recording paper roller
B.
Cleaning the cabinet
C.
TROUBLESHOOTING
SPECIFICATIONS
14
14
15
17
18
20
20
21
21
22
24
Page 6

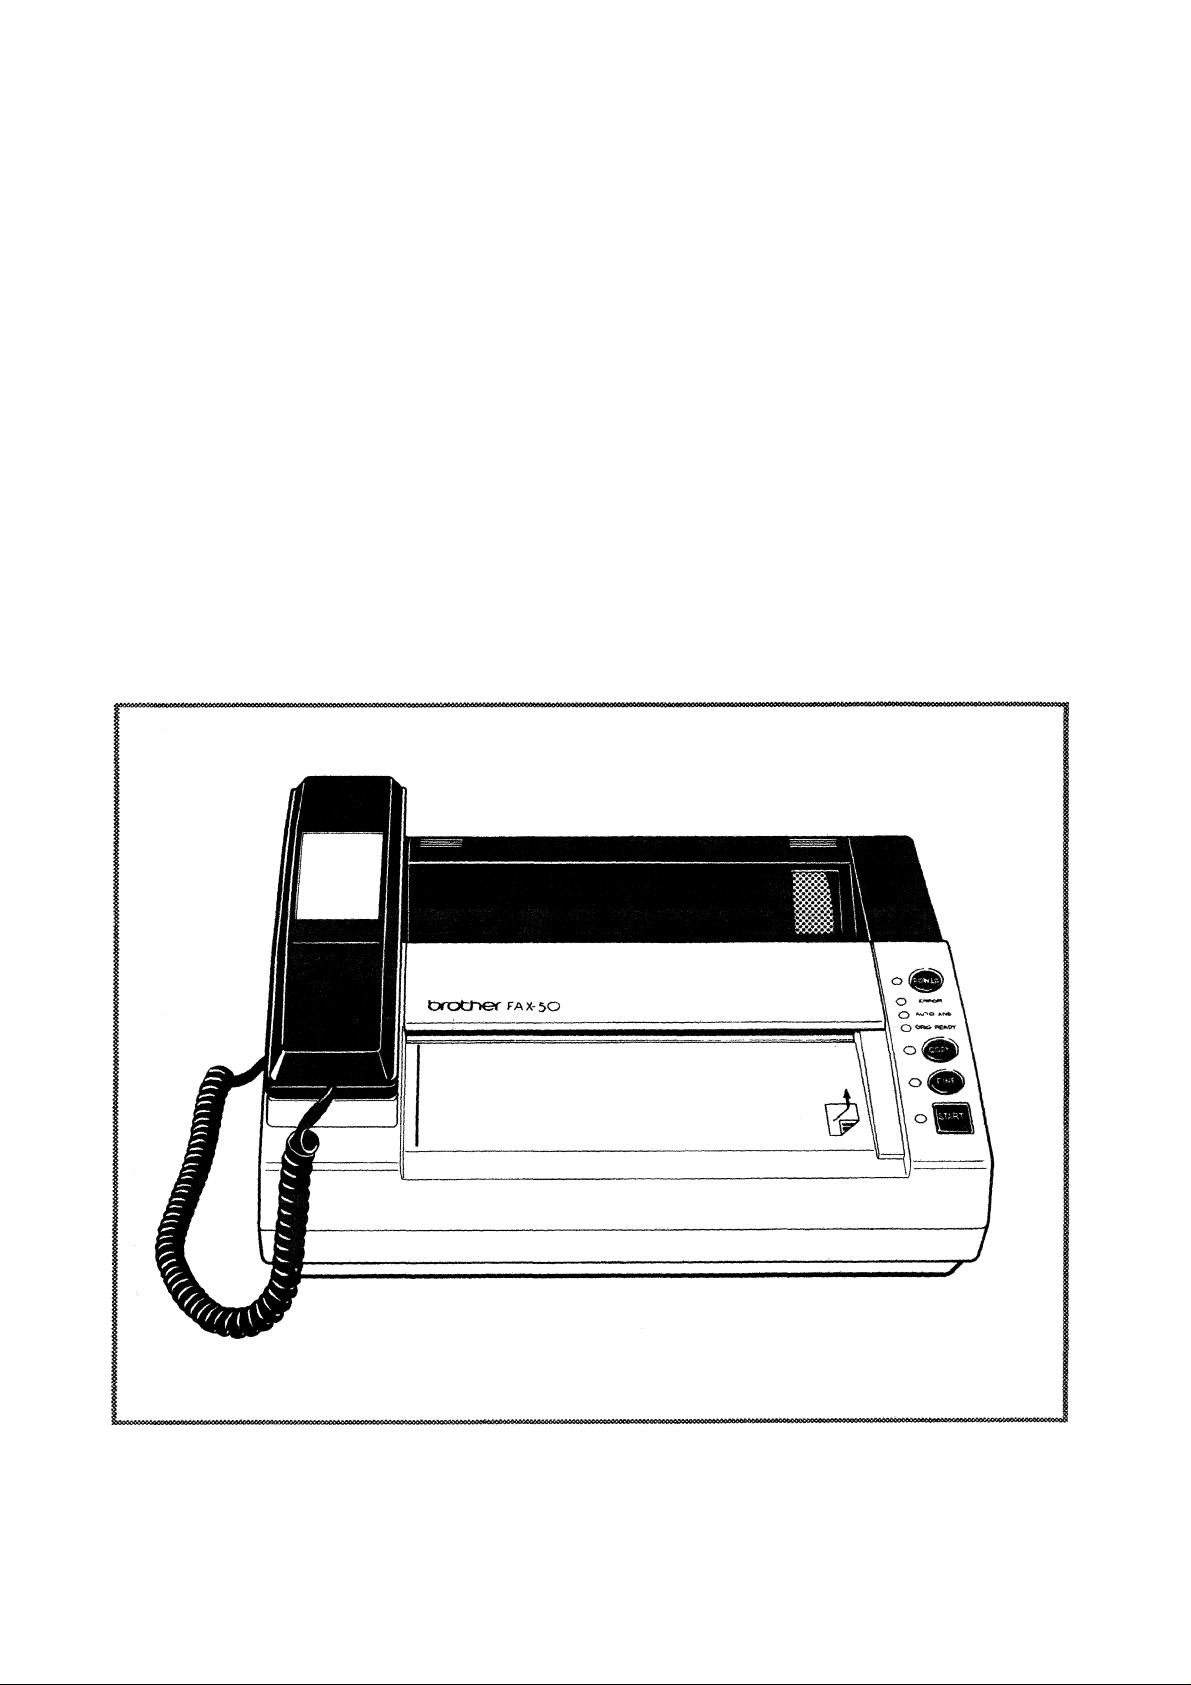
INTRODUCTION
Thank you for purchasing the Brother FAX-50. This Owner’s Manual will help you derive the
fullest benefits from this new, exciting compact facsimile transceiver.
The Brother FAX-50 is a modern, compact desktop digital facsimile unit. Its performance is
compatible with CCITT Group 3. Since Group 3 (G3) units are the most widely used facsimile trans
ceivers, your new FAX-50 is compatible with most modern facsimile units in the world.
All of the Brother FAX-50 features can be easily learned by following step-by-step procedures
listed on the following pages. As you become familiar with the features and operation of the unit,
keep the Owner's Manual handy for quick references and reminders.
The Brother FAX-50 is a modern communications system which combines, in one desktop unit,
three communications devices:
• A rrx)dem telephone with speed-dialing capabilities
• A convenience copier
• A modern digital facsimile transceiver
To fully appreciate this system, think of It as a telephone that can also copy your
documents and send and receive them over regular phone lines!
iq? ^ ^
The Owner's Manual provides a step by step description of the procedures you should employ
in unpacking, installing and learning to operate your Brother FAX-50 facsimile unit. If you follow
these instructions, you will have no problem with either the installation or the operation of the unit.
Modern digital facsimile units are extremely reliable. If you exercise the necessary care, you will
enjoy years of totally trouble-free enjoyment of this unit.
Now, open the Owner's Manual to PRE-INSTALLATION INSTRUCTIONS (page 2) and read
the material carefully.
^ ^ ^ »qy
Page 7

PRE-INSTALLATION INSTRUCTIONS
A. BEFORE REMOVING THE UNIT FROM THE CARTON
The Brother FAX-50 is designed to operate in either office or home environment. It is rugged,
reliable and virtually maintenance-free. However, to ensure years of trouble-free performance,
please observe the following precautions:
• Do not locate the unit near heaters, air conditioners, in direct sunlight or in extremely
dusty environments.
• Install the unit on a flat level surface, such as a desk, a table, a typewriter or computer
stand
• Do not locate the unit where water or chemicals are likely to splash on it
• Select a vibration-free area of your office or home
• Locate the unit within 3 feet from a telephone wall jack
• Locate the unit within 3 feet of a standard, grounded outlet
• Avoid plugging in the unit into an outlet which is on the same line as an air
conditioner, a refrigerator, a copier or an electric typewriter.
B. CONTENTS OF THE PACKING CARTON
The packing carton contains:
1. The Brother FAX-50 unit
2. One roll of thermal recording paper
3. Telephone handset
4. Telephone line cord
5. Owner's Manual
6. Warranty card
7. Test Sheet
PROCEDURES FOR REMOVING THE UNIT FROM THE PACKING CARTON
1. Carefully open the carton (see the appropriate inscription on the carton)
2. Pull out the FAX-50 and the other devices together with the packing trays
3. Remove all packing trays and plastic from the unit
4. Take out the telephone line cord from the plastic packaging
5. Locate and take out the recording paper roll
Page 8

INSTALLING THE UNIT
A. TELEPHONE CONNECTIONS
1, Single-line telephone connection
The simplest way to connect the Brother FAX-50 unit to the public switched telephone network
(phone company lines) is to use a single telephone line. The connection is particularly simple if
you have a modular wall jack. The most common modular jack is referred to as the RJ11C jack. If
you have such a jack, folfow the instructions below. If your wall jack is not modular, it is very easy to
convert the wall plug to a modular form. Conversion is very simple and conversion kits are
available from your local phone company, an electronics / computer store (e.g.. Radio Shack) or
the AT&T phone stores.
To give you a conceptual idea of the connections, here is a simplified diagram;
CONNECTING TO THE PHONE LINE
If you have MODULAR PHONE JACKS (RJ11C), simply plug the phone cord into the wall jack.
If you have the older 4-PRONG JACK, you must use a modular 4-prong adapter USOC (RJA1X).
Plug the adapter into the wall jack and then plug the phone cord into the adapter.
ADAPTOR
PLUG
MODULAR
Page 9
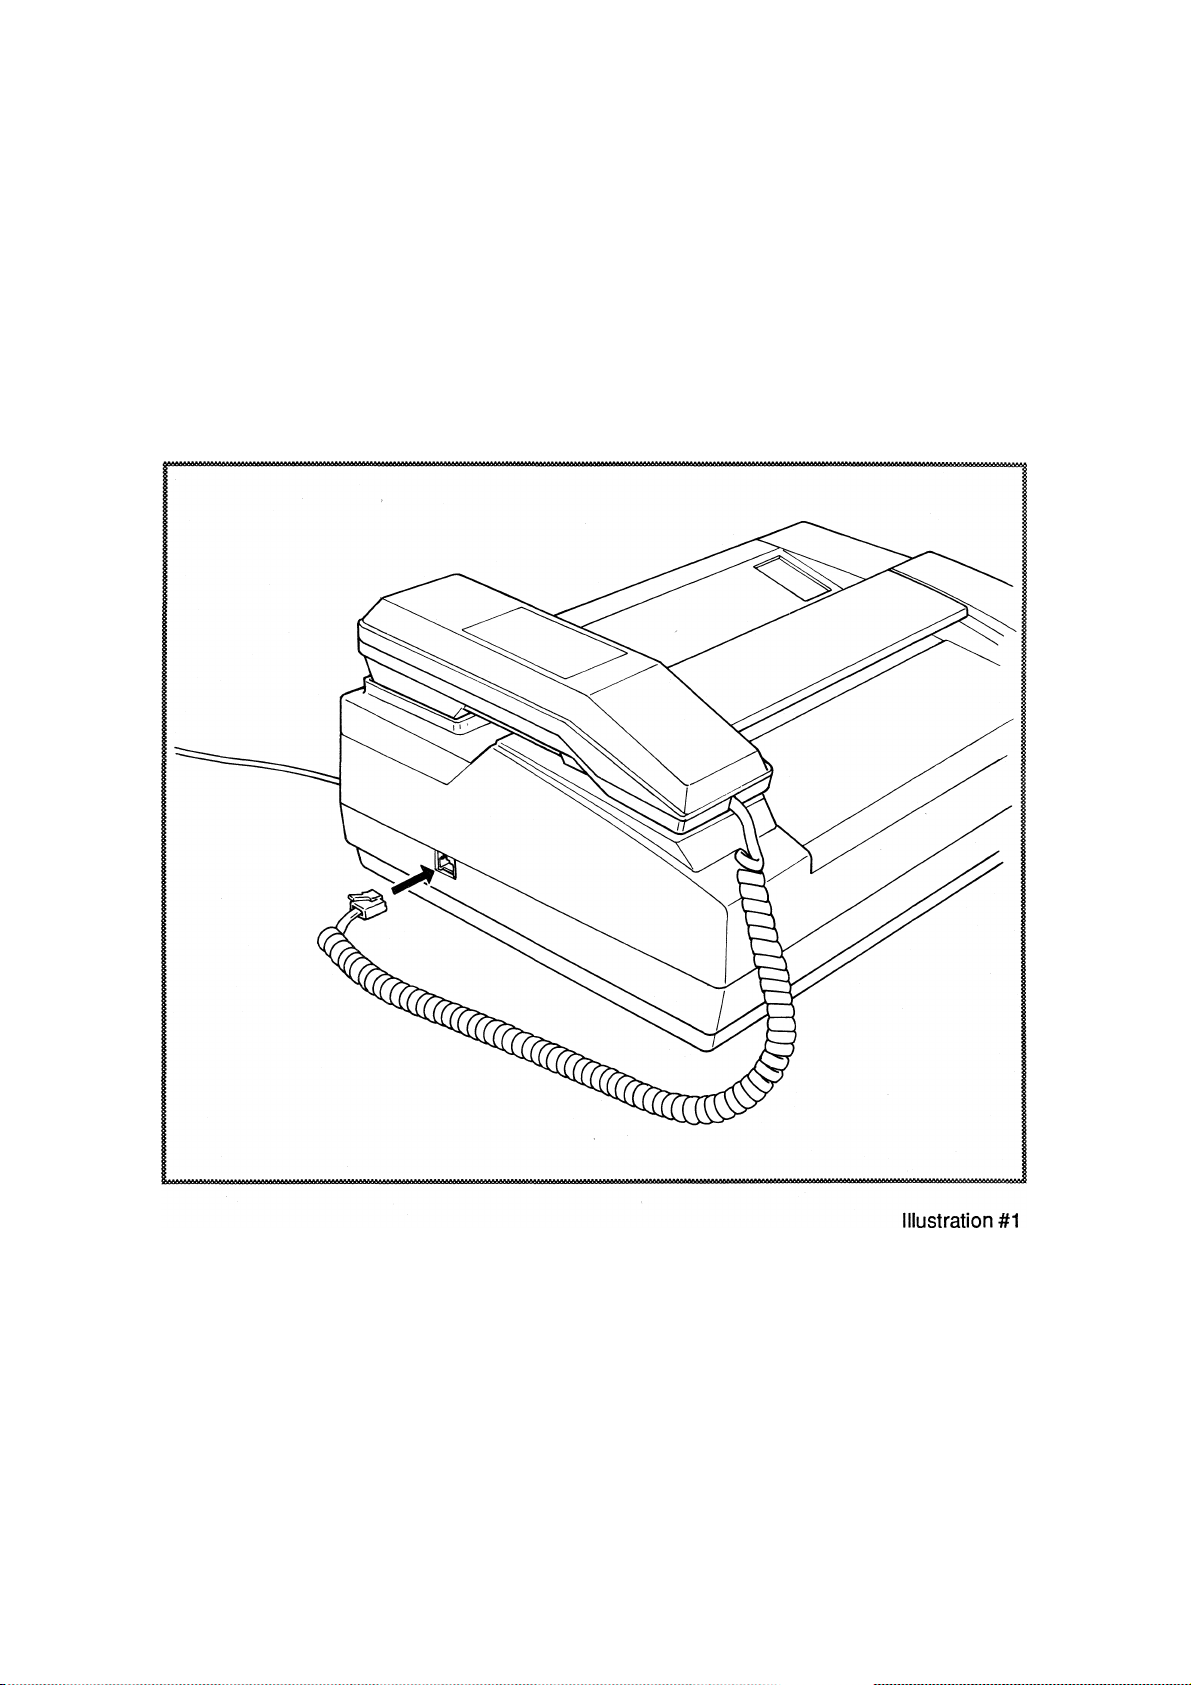
To connect your FAX-50 to the telephone line, follow these steps:
(a) The telephone handset which is included in the carton must be connected to the FAX-
50 by plugging in the handset cord into the jack on the side of the FAX-50 unit. This
is shown in Illustration #1 below.
Page 10
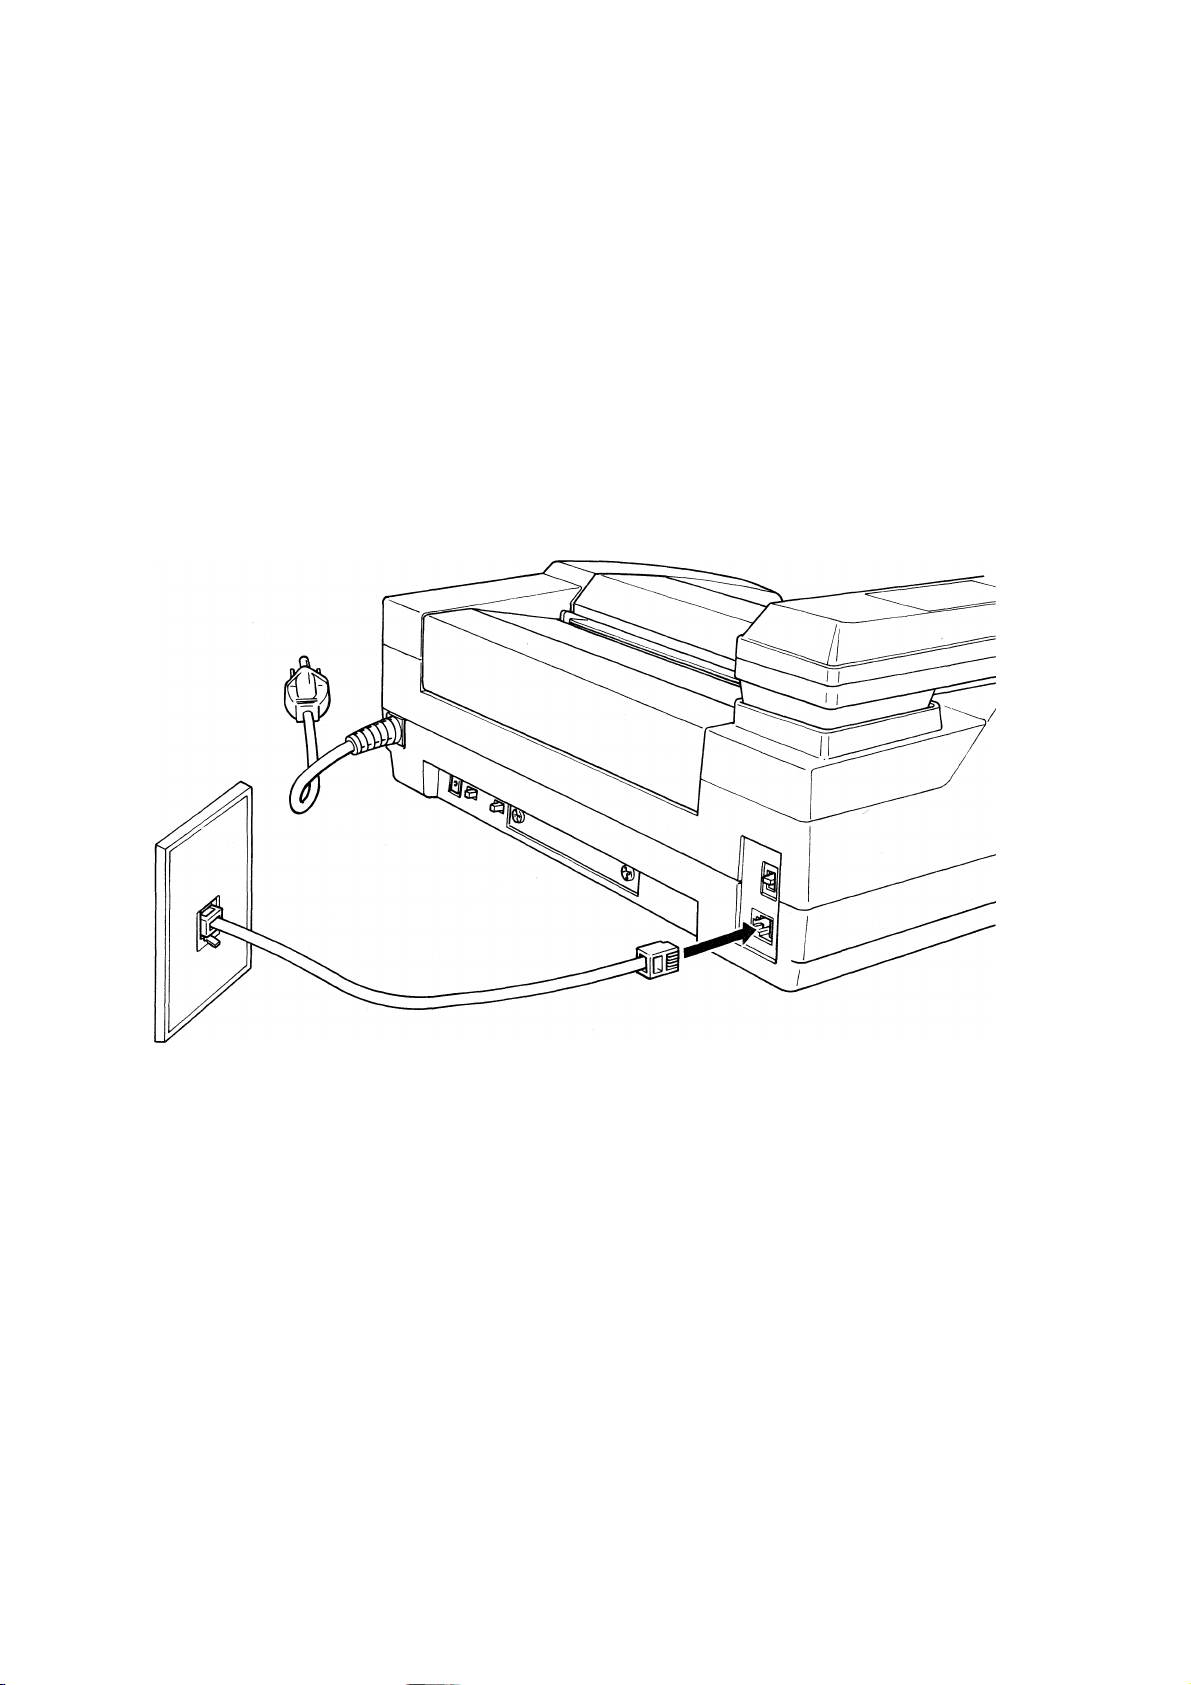
(b) Take the telephone cord which is also included in the carton and connect one of its plugs to
the jack in the back of the FAX-50 unit (this jack is marked 'TELEPHONE CORD" then the
second plug to your modular wall jack (RJ11C). Now, the FAX-50 is connected to the
telephone network. This is shown in iiiustration #2 below.
Illustration #2
Page 11

2. Multi-line telephone connection
Most offices have key systems or PBXs. While in many cases it is relatively easy to connect the
FAX-50 to a key system or a PBX, we suggest that you contact the organization which installed
your company's telephone system and ask them to connect the FAX-50 to the system. If the FAX-
50 is connected to a multi-line system, ask your installer to connect the FAX-50 to the last line on
the system. This way, the FAX-50 will not be activated by every phone call coming into your office.
The preferred solution is to ask the phone company to assign a separate line to the facsimile unit.
In this case, you can leave the unit on 24 hours a day and derive full benefits from its automatic,
unattended receiving capabilities.
Ф
>|;bc sCbc
>1^
B. ELECTRICAL CONNECTION
The FAX-50 can be plugged into any standard power (110 VAC) outlet. Simply make sure that
the outlet is grounded and that it is not on the same line as appliances or office machines which
tend to draw a lot of power in a very short period of time, such as refrigerators, copiers, etc. The
FAX-50 power requirements are listed in the SPECIFICATIONS (see page 22).
^ ^
Page 12

C. INSERTING THE RECORDING PAPER ROLL INTO THE UNIT
To insert the paper roll, follow these directions (the process is illustrated in Illustrations ##3,4,5
and 6 below):
• Place your thumbs over the two spots on the recording paper cover where you see four
horizontal cuts (the left one is next to the handset and the right one is over the cover's
"window." This is shown in lilustration #3 below.
• Push the cover away from the unit.
Page 13

Inside, on the left side, you will see a black release lever. Pull it toward you. This is
shown in iiiustration #4 below.
Page 14

Holding the paper roll so that the paper feeds from the bottom, unroll approximately 10
12 inches and insert the paper end between the rubber roller (platen) and the guide
panel (you will see arrows on the guide panel pointing into the unit.)
Grab the end of the paper as it emerges from the other side of the roller and pull it
toward you. Pull through at least 2 inches of paper. This is shown in iliustration #5
beiow.
Iliustration #5
Make sure the paper is properly aligned in the unit by adjusting it using both hands one hand holds the paper as it comes in under the roller (platen) and the other hand
holds the paper as it comes out on the other side of the roller (platen).
After the paper is aligned, pull the release lever back into the original position (lying
towards the back of the unit.)
Page 15

10
• Take up any paper slack by rolling it back onto the paper roll.
• Close the cover.
• Firmly grab the protruding paper in the front of the machine and using a sideways
motion cut it off against the built-in cutter (much like you cut off aluminum foil in your
kitchen). This is shown in iiiustration #6 beiow.
NOTE: Brother Thermal Recording Paper is recommended for use with this product. The
use of other supplies not specifically sold or approved by Brother may effect the performance
of your unit and may void the Brother Product Warranty.
NOW, YOU ARE READY FOR THE NEXT STEP - LEARNING HOW TO USE THE
FAX-50.
Page 16

11
GETTING FAMILIAR WITH THE UNIT
A. THE CONTROL PANEL
Now that the unit is connected to the telephone network and the power, take a few minutes to
become familiar with the unit. First, let's take a look at the control panel of the Brother FAX-50.
The layout of the control panel and the function of the various buttons are shown in the diagram
below:
LAMPS
POWER
ERROR
AUTO ANSWER AND
RECEPTION
ORIGINAL READY
COPY
CONTROL PANEL
FINE
START
Page 17

12
1. Lamp functions
The following explains the function of each lamp. More information about the lamps and the
various terms used here will be provided below when we discuss the actual operation of the unit.
The POWER Lamp lights up whenever the power is ON.
The ERROR Lamp lights up whenever an error occurs.
The AUTO ANSWER Lamp lights up when the unit is in the "auto receive" mode
The COPY Lamp lights up when you are making a copy
The FINE Lamp lights up when the unit is operating in the "fine" mode
The START Lamp lights up when the unit is preparing to transmit or receive
THE ORIGINAL READY Lamp lights up when the original document is inserted correctly into the
sending section of the unit.
2.
The POWER Button - press to turn the power ON or OFF
The START Button - Press to start transmission or non-automatic reception
The COPY Button - press to copy a document
The FINE Button - press when transmitting a document which contains fine print,
Button functions
photographs or other very detailed images
^
ip* ^ ^
B. REAR PANEL SWITCHES
Looking at the rear panel of the unit, we see a row of switches, as shown in the diagram below.
The following expiains the functions of the controls on the rear panel, starting from the right side.
Page 18

13
The switch on the upper right - NORMAL-TEL ONLY allows you to set this unit to function as a
facsimile machine (NORMAL) or as a simple telephone (TEL ONLY).
Directly below this switch is the modular jack into which you plug in the telephone line cord which
goes into the phone company's RJ11C modular jack on the wall.
The D-N-L CONTRAST switch is used in the transmit or copy mode. Usually, this switch is
set at N - Normal. If the document to be transmitted (or copied) is too light, set the switch to L Light. If the document to be transmitted or copied is too dark, set the switch to D - Dark.
NOTE: The contrast switch affects only the documents which you are sending or copying. It
does not affect documents which you receive from another facsimile unit.
To the left of the D-N-L CONTRAST switch is the OFF-ON AUTO ANS switch. When you set
the switch to ON, the unit will receive transmissions automatically. If the switch is set to OFF, you
will have to answer the phone attached to the facsimile unit and initiate the reception manually by
pressing the START button.
^ ^
Page 19

14
OPERATING THE UNIT
A. THE COPY MODE
The easiest way to start using the unit is to try out the COPY MODE. To make a copy, follow the
simple instructions below;
1.
2.
Make sure the unit is plugged in and that the unit has paper inside of it.
Insert the document you wish to copy into the unit, as shown in Illustration #7.
Make sure that the document is fed face down with the right edge of the paper
flush against the unit's right side paper guide. The text or drawings you are
copying shouid face the machine, not you.
When you insert the paper into the unit, the power will switch on automatically
and the POWER and the ORIGINAL READY Lamps will light.
Page 20

15
3. Press the COPY button on the front panel.
As soon as you press the COPY button, the unit will start pulling the document
through the scanning area and you wiil see it begin to emerge on the other side.
4. When the unit completes copying the document, the original will be completely
free of the unit. The copy may be cut off at the cerrated cutter by holding it at the
upper left corner and pulling it across the cutter towards you (as if you are tearing
off aluminum foil or plastic wrap).
5. Turn the unit OFF by pressing the POWER Button. However, if the POWER
Button is not pressed the unit will turn itself off automatically in five (5)
minutes.
When using the COPY MODE, remember the following:
All copies are always made in the FINE MODE automatically. You don't need to press the FINE
Button.
If you do not insert another document to be copied within six (6) seconds of having made the
preceding copy, the COPY MODE will automatically terminate and the COPY Lamp will go off.
If the phone rings as you are copying a document you can pick up the phone and have a
conversation.
If the other party wishes to transmit (to "fax") a document to you while you are copying, you have
two (2) options:
• Ask the party to wait until you finish copying and then initiate facsimile reception (see
below), or
• Terminate the copying process by pushing the POWER Button twice. The first action
cuts off power and the second one restores it. Then, you can intiate the reception.
^ ^ ^
B.
To transmit a document anywhere in the world, follow the simple instructions below:
HOW TO TRANSMIT DOCUMENTS
1. Insert the document you wish to transmit into the unit, as shown in Illustration #7.
Make sure that the document is fed face down. That is, the text or drawings you
are transmitting are facing the machine, not you. When you insert the paper into
the unit, the POWER will go ON automatically and the POWER Lamp and the
ORIGINAL READY Lamp will light.
2. If your document has a lot of fine print, or if you are transmitting a newspaper
clipping, a photograph, a detailed chart or any other document which has a lot
of detail, press the FINE MODE button. The appropriate lamp will light up. If you
don't need the FINE MODE (which is the case in most transmissions) or if you
have simply forgotten to switch it on, the FAX-50 will transmit the document in
the NORMAL MODE (which, by the way, offers an excellent quality image).
3. Pick up the telephone handset and dial the desired number. Depending on the
type of a facsimile machine you are transmitting to, you should hear one or two
rings followed by a continuous audio tone from the receiving unit.
Page 21

16
4. As soon as you hear the tone, press the START BUTTON. The START lamp
will light up, the two machines will perform what is known as a "handshake" and
the transmission will start.
5. As soon as you have pressed the START BUTTON, you may hang up the phone
handset. While the unit is transmitting, the phone is NOT operational.
6. When the transmission is completed, the original will come out of the unit in
exactly the same manner as the document during the COPY MODE. The FAX50 will sound an audio signal and the power will turn off automatically.
Additional Instructions:
a. If a person, rather than a facsimile machine answers vour transmisison call
If you are calling a facsimile number and instead, someone answers the phone all you have to do
to initiate the transmission is to simply tell the other party to turn on his or her unit, press their
START button and then you will press your START BUTTON. The rest of the transmission
process will be exactly as described in steps 4 - 6 above.
b. If you want to transmit several pages to the same number
If you want to transmit more than one document, simply wait for the audio signal and putting out of
the ORIGINAL READY Lamp which indicates that the first page was transmitted, then place the
second page into the unit immediately. The document will be transmitted to the same telephone
number as the original one. You may continue to send additional documents in the same manner.
IMPORTANT:
Do not transmit or copy very thick pages (over 0.15 mm thick). If you have to transmit such pages,
use a photocopier (not the FAX-50) to make a copy and transmit the copy instead.
Do not transmit or copy wrinkled, wet documents. Make a photocopy and transmit it instead.
Do not transmit or copy documents printed on thick photographic paper, metal or textile. Make a
photocopy and transmit it instead.
Do not transmit or copy documents that are too thin (tissue paper, tracing paper, etc.) Make a
photocopy and transmit it instead.
Remove all staples and paper clips from the documents to be transmitted.
Do not transmit or copy documents held together by scotch tape. Photocopy them and transmit
the photocopy.
PLEASE SEE THE SPECIFICATIONS AT THE END OF THE OWNER’S MANUAL
FOR THE SIZES OF DOCUMENTS THAT CAN BE TRANSMITTED.
Page 22

17
C. HOW TO RECEIVE DOCUMENTS
1. Automatic reception of documents
To receive documents automatically, make sure that the AUTO ANS switch on the back of the
unit is set to ON. The automatic answer lamp will light up whenever this switch is ON.
There is actually nothing you have to do to receive documents in this mode. When someone dials
your number, the FAX-50 will automatically answer the phone and the POWER will automatically
turn ON. The lamp will light to indicate that the power went on. Very shortly, you will hear the unit
working and almost immediately, you will see the document emerging from the unit. Wait until the
transmission is completed, as evidenced by the audio signal going off before cutting off the
paper.
Note that when the unit is receiving automatically, your phone is not functional.
The Brother FAX-50 is capable of unattended reception. That is, you can receive
documents even when you are not there. All you have to do is to leave the unit set to AUTO
ANS ON. When you come back, you will see the received documents. This feature allows your
associates to transmit their documents to you when the phone rates are lowest, in the evening,
on weekends or at night.
2. Manual reception of documents
If the unit is not set for automatic reception, you can receive documents if you follow these simple
instructions:
a. Pick up the phone when you hear a ring. If you hear an audio tone instead of a
voice, you know that someone is trying to transmit to you.
b. Press the POWER Button. The Power Lamp will light up.
c. Press the START Button. The Lamp will light up and stay on steadily as the
reception begins.
d. Replace the handset. You can't use it anyway while the unit is receiving.
e. An audio sound will notify you that the reception is completed. The power will
automatically shut off and the POWER Lamp will turn off.
f. Cut off the paper as you did in the automatic reception and copying modes.
NOTE: WHEN A RED MARK APPEARS ON BOTH SIDES OF THE RECORDING PAPER, IT IS
TIME TO REPLACE IT WITH A NEW ROLL (SEE INSTALLING THE UNIT, Section C)
Page 23

18
D. HOW TO USE THE TELEPHONE HANDSET
Use this handset like you would any other telephone. In addition to normal telephone functions,
you can speed-dial nine (9) different telephone numbers and re-dial the last number called.
When you initially set up your machine, make sure you move the tone-pulse (TP) select switch to
proper setting. The "T" setting is for Touch-Tone service. The "P” setting is for rotary service.
The second switch on the handset is for Ringer Volume.
For Manual Dialing:
1. Pick up the handset.
2. Wait for dial tone.
3. Dial the desired telephone number.
NOTE: To dial a or "#" in Touch-Tone mode, these two keys have to be pressed twice.
Last Number aediaii
1. Pick up the handset.
2. Wait for dial tone.
3. Dial "# 0" and the last number dialed will be redialed.
NOTE: A single input prior to going on hook or prior to coming off hook will erase the last
number dialed.
MemQcy„Diaijnfl;
1. Pick up the handset.
2. Wait for the dial tone.
3. Dial " *N" where N is a number from 1 to 9. This number designates the location of the
stored number you wish to dial.
Memory Programming:
1. Pick up the handset.
2. Press down the hook switch.
3. Push numbers you want to store.
4. Push "* N” where "N" is the number (1 to 9) which is the location where you want to
store the telephone number.
5. Put down the handset.
NOTE: You can also program a telephone prédit card number into a location using the above
method.
PBX Pause
A short pause may be stored in a number sequence by entering " * #".
CHAIN DIALING (used in conjunction with telephone credit card number!
1. Program credit card number into a location by using memory programming.
2. Make sure that programmed numbers have a "0" in front of them so that a telephone
company-automatic operator will come on.
Page 24

19
3. To use chain dialing:
- Pick up the handset.
- Wait for dial tone.
- Press ”* N" where ”N" is a number (1 - 9) of the location of the telephone
number; the telephone number must have a "0" in front of the programmed
number.
- Wait for the automatic telephone operator to come on.
- When operator stops speaking press "* N" where "N" is now the location of the
credit card number.
Example of putting in a telephone number into memory.
Let us say we want to put the telephone number (516) 555-1212 into memory position 2:
1. Pick up the handset.
2. Press down the hook switch.
3. Dial (516) 555-1212.
4. Press"*2".
5. Put down the handset.
To perform memory dialing on above number:
1. Pick up the handset.
2. Wait for dial tone.
3. Dial"*2".
GHI
1 )
2 )
ABC
5)
JKL
3)
DEF
6)
MNO
9|
o|
WXY
«I
LO I
PRS
STORE
TUV
OPER
KEY LAYOUT AND LETTERS ON KEY PAD
ADDRESS
NUMBER
NAME
*1
*2
*3
*4
•K- 5
*6
*7
*8
*9
*0
REDIAL
LAYOUT OF MINI-DIRECTORY
9l±lc
Ф
^ ^
Page 25

20
CARING FOR YOUR FAX-50
A.
Optimum print quality can be maintained if the scanning and printing area are cleaned after using 3
or 4 rolls of recording paper. See instructions below:
Wipe away soil with an applicator or soft cloth.
CLEANING THE SCANNING AND PRINTING AREA
RELEASE LEVER
SCANNING SENSOR
Page 26

21
B. CLEANING THE RECORDING PAPER ROLLER
Wipe away soil with a dry cloth.
C. CLEANING THE CABINET
Wipe soil away with a dry cloth or the like for cleaning the cover.
NOTE: Do not use water, alcohol, thinner or any other organic solvent. Just sweep away visible
dirt and dust. No other cleaning is required.
Page 27

22
TROUBLESHOOTING
If you are having trouble with the image quality in TRANSMIT or RECEIVE modes, try the unit in
the COPY mode. If this test gives you a good reproduction, the problem is not with your unit but
with the other unit or the telephone lines.
If this GUIDE does not help you in solving a problem with your unit, please call our service at:
800-284-4FAX.
TRANSMITTING
SYMPTOM
No lamp indications on
cover.
Power switch is pressed,
but power iamp does not
iight.
Faint drawings or characters
are not reproduced when
sending or copying
Document jam
Error indicator is lit
POSSIBLE CAUSE ACTION
Is power cord plugged in?
Contrast switch set improperly.
Document jammed in transmitting
section.
Communications error has occured this is usualy caused by a bad
phone ine.
Plug in power cord.
Change (D-N-L) switch on
the back of the unit to "L"
(Light setting).
1. Turn off the unit by pressing
the power button.
2. Pull up on document cover to
open it up.
3. Remove the jammed
document.
4. Close cover making sure that
you hear it dick into place.
5. Do not retransmit this docume nt
but make a copy of it first.
1. Redial and try transmission
again.
2. If you get an error, can the
distant location and verify if
ther uni is functioning and
that it is a Group 3 fax
terminal. If it is not working,
have them call for service, if
their fax unit is not Group 3
compatible, then you cannot
transmit to them at all.
Page 28

23
RECEPTION
SYMPTOM POSSIBLE CAUSE ACTION
Received copies are blank
The telephone rings
contiiuously when FAX
unit is called
Recording paper is jammed Paper is jammed in receiving section.
Error indicator is lit
1. The paper is in backwards.
2. Wrong type of paper being used
1. Auto answer switch is turned off.
2. No power.
Communications error has occured this is usuaiy caused by a bad
phone ¡ne.
2. Push back on cover to remove.
3. Pull the black lever.
4. Remove paper roll and tear off
6. Put down the black lever.
8. Remove excess paper.
2. Make sure the other unit is a
3. Make sure your unit is properly
4. Make sure the other unit is
1. Reload the paper correctly.
2. Replace with proper thermal
recording paper.
1. Turn auto answer switch ON.
It is located on the rear of the
unit
2. Check outlet voltage.
1. Turn off the unit by pressing
the power button.
jarmied paper.
5. Reload paper.
7. Close cover making sure that
you hear it click into place.
1. Ask the transmitting unit to
re-send the document.
Group 3 compatible machine.
connected to the phone line.
working properly.
>cbc ^
^
^ ^ ^
Page 29

24
SPECIFICATIONS
Document size Maximum: 8.5"(width) x 23.6"(length)
Minimum: 5.8"(width) x 3.9" (length)
Recording paper size
Effective scanning width
Effective recording width
Recording method
Applicable lines
Power supply
Power consumption Stand-by -10W or less
Dimensions
Weight Approximately 14.8 lb
Environment
Compatibility
Telephone Handset Dialing: Tone/Pulse (DTMF/lOpps)
Connection requirement
8.5"(width) X 100' (length of the roll)
8.2"
8.2"
Thermal
Via Public switched network (phone lines)
110-120 Vac. 60 Hz
Peak -130W or less
13.8" (width) X 9.8" (depth) x 6.1" (height)
Normal household or office temperature and humidity. Note,
excessive temperatures (both low and high) and excessive
humidity may affect the operation of the unit.
CCITT Group 3 meeting T.30 specifications
Station memories: 9 (16 digits each)
Last number redial.
USOC RJ11C Modular Jack or equivalent.
Specifications are subject to change without notice
Page 30

Page 31

Page 32

(FAX-50) 5x1-102
U82589001
8706®
Printed in Japan
 Loading...