

Page 1
Page 2

Page 3

Your Brother Fax Reference Section
SECTION II
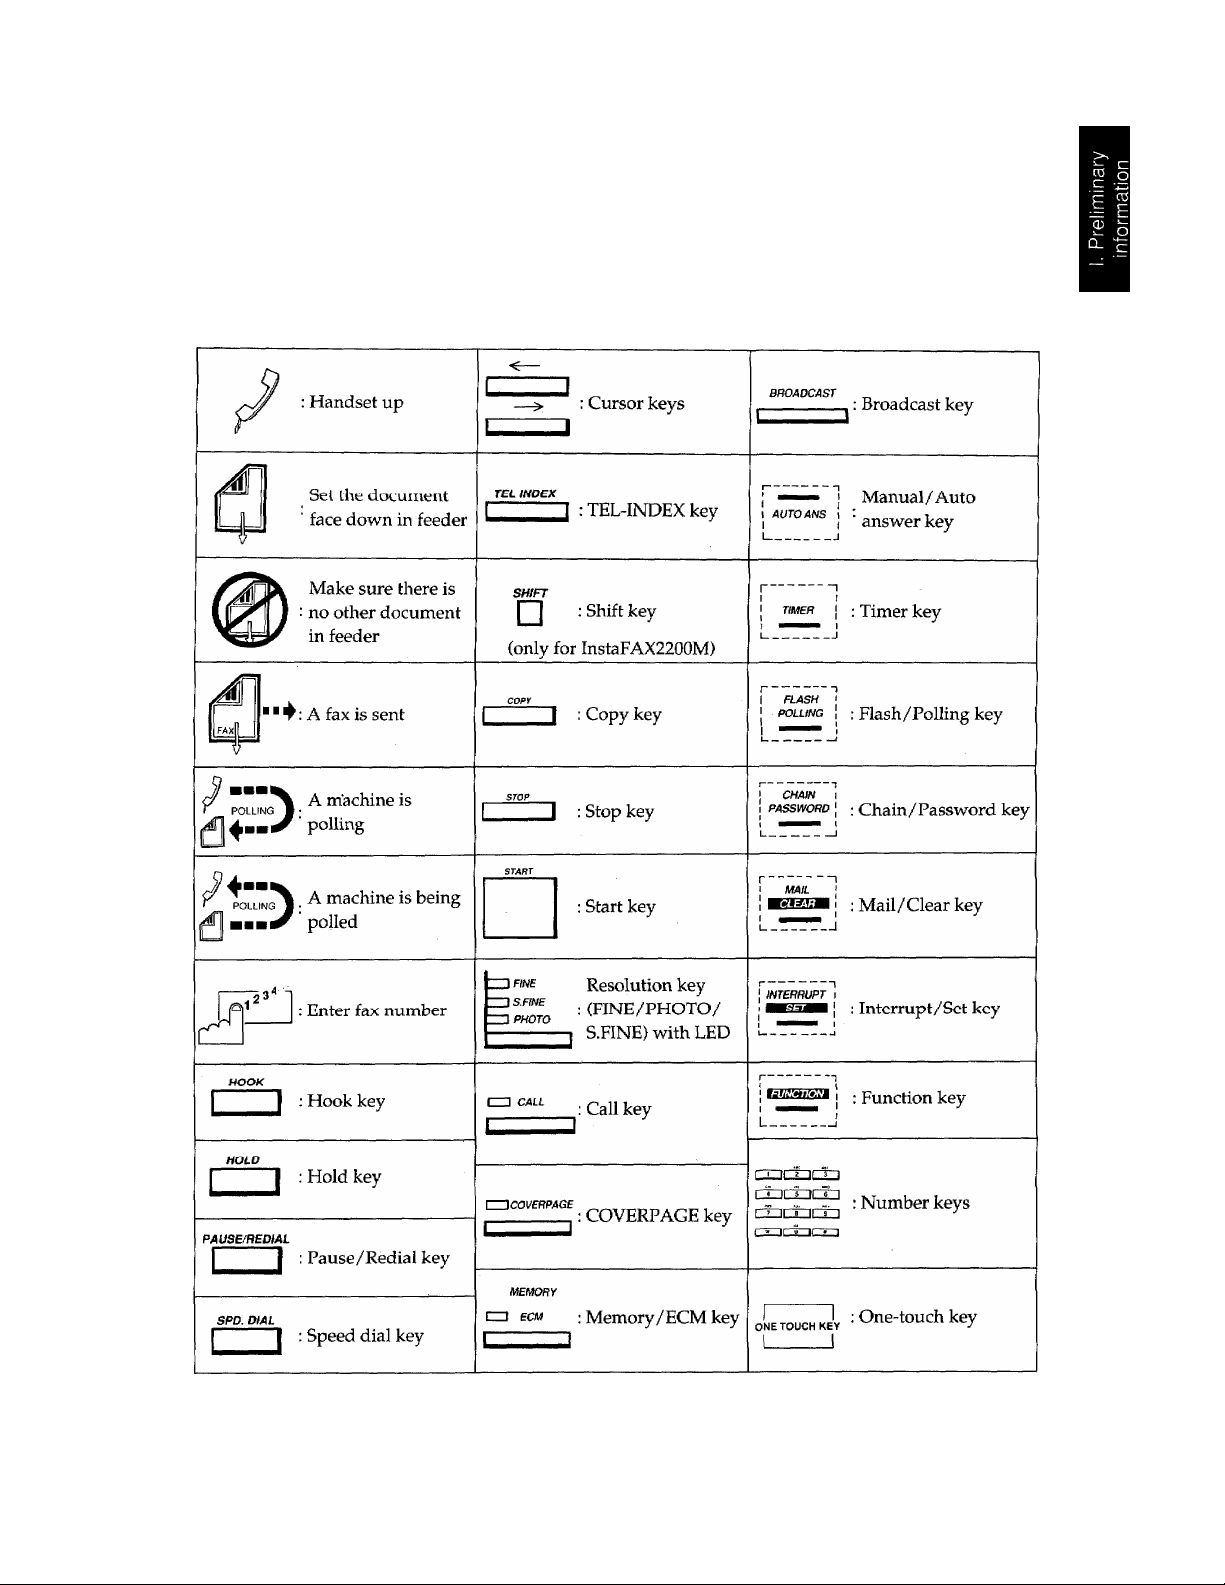
The control panel keys
A description of the control panel is shown on page II-3-1.
SECTION
Loading paper
Paper loading is described on page III-5-1.
Connecting your fax to the telephone line.
The method for connecting the machine to a telephone line is described on page I1I-7-1.
Making a copy
Step
1
2
Symbol Operation
c.
COPY
SECTION IV
• Setting the date and time
Step
Symbol
OZl
Set the document face down
in the feeder.
Press COPY.
Operation
Make sure there is no docu
ment in the feeder.
Press FUNCTION, then
"2".
Display
FAX : ENTER FAX NO.
COPY : PRESS COPY KEY
COPYING
P.Ol
Display
05/01/1992 00:00
FAX/COPY : SET DOC.
2.REGISTRATION
PRESS SET KEY
Page 4

Your Brother Fax Reference Section
Step
Operation
Press SET, then "0"
followed by "2".
Press SET.
Enter the last two digits of
current year, then SET.
Enter the current month as
a 2-digit number, then
SET.
Enter the day as a 2-digit
number, then SET.
Display-
02.DATE-TIME
PRESS SET KEY
YEAR ; XX
INPUT / PRESS SET TO END
MONTH : XX
INPUT / PRESS SET TO END
DAY : XX
INPUT / PRESS SET TO END
TIME : XX:XX
INPUT / PRESS SET TO END
Enter the time, then SET
using 24 Hour System.
Page 5
Registering your name and number
Your Brother Fax Reference Section
Step
__
u
___________
J
1 INTERRUPT I
az
j INTERmPT
I
a* JW
1 'I JL5 JL 6 1
L_z_
1»
t INTERRUPT
i
L-__ -T-,
Symbol
J
------------
—1
! 1
u_ _
0 1
_______
m M wtr
II B
fli
II 0
J
9 1
* 1
2 1
JKL
5 1
Operation
Press FUNCTION, then
"2".
Press SET, then "O'
followed by "5".
Press SET.
Use the number keys to
enter your fax number.
Press SET.
Display
2.REGISTRATION
PRESS SET KEY
05.STATION ID
PRESS SET KEY
FAX:
INPUT / PRESS SET TO END
FAX: 0528115981_
INPUT / PRESS SET TO END
TEL:
INPUT / PRESS SET TO END
rT~ir~T-ir~rn
r-i-|r-o-|r-?
INTERRUPT
r n
I tNTERFiUPT 1
1 1
J
S70P
Use the number keys to
enter your telephone
number.
Press SET.
Use the number keys to en
ter the name you wish to
appear on the faxes.
Press SET. Then press ST OP
key.
TEL: 0528242554_
INPUT / PRESS SET TO END
NAME:
INPUT / PRESS SET TO END
NAME: BR0THER_
INPUT / PRESS SET TO END
06/01/1992 12:00
FAX/COPY : SET DOC.
Ul
Page 6

Your Brother Fax Reference Section
Registering one-touch numbers
Step
Symbol
\ESMHsa
ONE TOUCH KEY
izr3r~^r^~l
rrnrtnrfh
IZI
Operation
Press FUNCTION, then 1.
Press SET, then 1,
Press SET.
Select the one-touch
number to be registered,
(e.g. press 5.)
Use the number keys to
enter the telephone or fax
number.
Press SET.
Display
1 ONE-TOUCH / SPEED DIAL
PRESS SET KEY
1.ONE-TOUCH DIAL
PRESS SET KEY
ONE-TOUCH DIAL
SELECT ONE-TOUCH KEY
^05:__
INPUT / PRESS SET TO END
^05:3087831735
INPUT / PRESS SET TO END
NAME:_
INPUT / PRESS SET TO END
-¡nnnr-T~1
____
______
I
ABC DEF
-fnorrirn
I /NTERfri/Pr
Use the number keys to
enter the name of the
destination.
Press SET, then "1", "2'‘
or "3".
Press SET.
*05:BR0THER MIZUH0_
INPUT / PRESS SET TO END
CURRENT : EAX
l.FAX 2.TEL 3.0FF
ONE-TOUCH DIAL
SELECT ONE-TOUCH KEY
srop
10
w
Press STOP to end
registration.
06/01/1992 12:00
FAX/COPY : SET DOC.
Page 7
Your Brother Fax Reference Section
Sending a one-touch fax (Automatic Transmission - CNG Tone Sent)
Step
Symbol
ONE TOUCH KEY
Operation
Set the document face down
in the feeder.
Press the one-louch
number key (e.g. 5).
Display
FAX
COPY
ENTER
PRESS COPY KEY
BROTHER MIZUHO
PRESS START KEY
Press START.
BROTHER MIZUHO
SENDING
Registering speed diai numbers
Step Symbol Operation Display
I INTERRUPT I
I I
1
_____________
Press FUNCTION, then "1".
iZI
Press SET, then "2".
I
I
1.ONE-TOUCH / SPEED DIAL
PRESS SET KEY
2.SPEED DIAL
PRESS SET KEY
FAX N0.
(
-----------
I iNTcnm/PT
r~imr~rnr~i~i
j INTERRUPT I
I
I
1__J
Press SET.
Enter the two digit speed
dial number to be regis
tered (e.g. 10).
Use the number keys to
enter the telephone or fax
number.
Press SET.
SPEED DIAL
SELECT NO. #_
SPEED DIAL
SELECT NO. #10
#10:3087831735_
INPUT / PRESS SET TO END
NAME;_
INPUT / PRESS SET TO END
Page 8

Your Brother Fax Reference Section
Step
10
1 4 5
1 V
UL
ABC
2
I
I INTERRUPT I
Symbol
Ml ma
IIBnr s 1
fU
D
□L.
or| 3
-----------
STOP
■ 1 6 I
0£F
1
Operation
Use the number keys to
enter the name of the
destination.
Press SET, then "1", "2"
or "3".
Press SET.
Press STOP to end
registration.
Display
NAME:U.K. 0FFICE_
INPUT / PRESS SET TO END
CURRENT
l.FAX 2
FAX
TEL 3.0FF
SPEED DIAL
SELECT NO. #
06/01/1992 12:00
FAX/COPY : SET DOC,
VI
Page 9

Your Brother Fax Reference Section
Sending speed dial faxes (Automatic Transmission - CNG Tone Sent)
Step
Symbol
SPO. OtAL
Operation
Set the document face down
in the feeder.
Press the SPD.DIAL key.
FAX
COPY
Display
ENTER
PRESS
ENTER SPEED NO.
г 4 H 5~1l 6 I
I » H o~ll * I
Use the number keys to
enter the two digit speed
dial combination {e.g. 10).
Press START.
U.K. OFFICE
PRESS START KEY
U.K. OFFICE
SENDING
Sending telephone index faxes (Automatic Transmission - CNG Tone Sent)
Step
Symbol
Operation
Display
FAX N0.
COPY KEY
TEL índex
Set the document face down
in the feeder.
Press the TEL.INDEX key.
Press the appropriate letter
key and (<—/^) cursor
keys to call up the name
you want.
Press START.
FAX : ENTER FAX N0.
COPY ! PRESS COPY KFY
TEL.INDEX
ENTER CHARACTER
NINJ OFFICE
PRESS ^^OR START KEY
NJ OFFICE
SFNniNG
vn
Page 10
Your Brother Fax Reference Section
Sending a fax with a super COVER PAGE
Step
dJCOVERPAGE
CT~IL-i (l_o
I 1 |or| 2
Symbol
I
Operation
Set the document face down
in the feeder.
Press COVERPAGE.
Press a number key (1-6) to
select a comment (e.g. 2),
Select "1" to show the
total number of pages, or
"2" to off.
Use the number keys to
enter the total number of
pages to be sent.
Display
FAX
COPY
ENTER
FAX N0.
PRESS COPY KEY
SELECT COMMENT (1-6)
2.PLEASE CALL
COVERPAGE
2.PLEASE CALL
TOTAL N0 . OF PAGES
l.ON
2.OFF
TOTAL PAGES : 12
ENTER TOTAi N0. OF PAGES
Enter the fax number.
Press START.
Sending a fax with caii reservation
Step
vm
Symbol
\
-----
1 CALL
T—lorf^—I
Set the document facedown
in the feeder.
Press CALL.
Press "1" or "2"
Operation
308 783 1735
SENDING COVERPAGE
Display
FAX
COPY
ENTERFAX N0.
PRESS COPY KEY
CALL BACK MSG
l.ON 2.OFF
ENTER FAX NO
Page 11
Your Brother Fax Reference Section
IX
Page 12

Your Brother Fax Reference Section
• Setting a document to be polled
Step
Symbol
( FLASH I
' POLUNG !
i |or| 2 I
Operation
Set the document face down
in the feeder.
Press POLLING.
Press "1" or "2'
Press START.
Display
FAX ENTER
COPY
PRESS
FAX NO.
COPY KEY
SELECT NO.
¡.STANDARD 2.SECURE
POLL
PRESS START KEY
-OR-
POLL
ENTER FAX NO
nfi/01/1992 13:00
WAITING
-OR-
POLL
WAITING
Sending a fax from memory
Step
Symbol
MEMORV
CT] ECM
1
Operation
Set thedocument face down
in the feeder.
Press MEMORY/ECM.
Enter the destination fax
numberthen press
START.
Display
FAX
COPY
ENTERFAX
PRESS COPY
ENTER FAX NO. 100%
MEMORY
N0.
KEY
98%
Page 13

• Sending a broadcast fax
Your Brother Fax Reference Section
Step
ONE TOUCH KEY
I
______
Symbol
BROADCAST
SPD. DIAL
I
Set the document face down
in Lhe feeder.
Press BROADCAST.
Use a one-touch, speed, or
group key to enter the
number of the destination
machines.
Press START.
Printing out confidential information
Step
Symbol
Operation
Operation
Display
FAX
COPY
ENTER
PRESS COPY KEY
BROADCAST
ENTER FAX NO. 100%
Tt01#10G03
DUTCH OFFICES
NJ OFFICE
SENDING
Display
FAX NO.
MAIL
Make sure there is no docu
ment in the feeder.
Press MAIL.
Press START.
06/01/1992 12:35
FAX/COPY ; SET DOC.
CONE. MESSAGE INFO
PRESS START KEY
CONE. MESSAGE INFO
PRINTING
XI
Page 14
Your Brother Fax Reference Section
Printing out confidential message
Step
1
2
r -1
1 iNTERRUPT \
! ■■'T« 1
r~ “1
1 fUSSiSSM 1
1
1 1
L _j
Symbol
PflS
7 1
ABC
2 1
L _ J
INTERRUPT >
INTERRUPT
Interrupting a transmission
Operation
Press FUNCTION, then
"7".
Press SET, then "2"
Press SET.
Enter the retrieval ID code.
Press SET.
Display
7.CONFIDENTIAL 'MAIL BOX
PRESS SET KEY
2.C0NF. PRINT OUT
PRESS SET KEY
RETRIEVAL ID : XXXX
ENTER CODE NO.
RETRIEVAL ID : 6349
PRESS SET KEY
CONF. MESSAGE
PRINTING
XU
Page 15
Your Brother Fax Reference Section
Canceling a transmission
Step
Symbol
i I Q I
T-~ir~a~~ir3Zi
-^rf-irfu
[ * '|[ 0 II * I
rnrn°^r~2—I
Operation
Press FUNCTION, then
"9".
Press SET.
Select the number of any
operation, you wish to
cancel.
Enter "1" or "2''
Display
9.CANCEL TRANSMISSION
PRESS SET KEY
SELECT NO.
l.HEAD OFFICE 21:00
-OR-
SELECT NO.
2.341 1411 REDIAL
HEAD OFFICE
21:00
CANCEL ? l.YES 2.NO
Xlll
Page 16
Your Brother Fax Reference Section
Sending a fax (manual transmission)
Step
Symbol
HOOK
1=1
or
Manual reception of faxes
Operation
Set the document face down
in the feeder.
Press HOOK or pick up the
handset.
Dial the number of the
destination.
When you hear the fax
tone, press the ST ART
key. (Hang up after this if
you are using the hand
set.)
FAX
COPY
ENTER FAX NO.
03875497
ENTER FAX NO
03875497
SENDING
Display
ENTER
FAX N0.
PRESS COPY KEY
FAX
xtv
Page 17

Contents
I. Preliminary information
GLOSSARY.............................................................................................................................................'l_l
SYMBOLS USED IN THIS MANUAL.............................................................................................. 1-3
IMPORTANT SAFETY INSTRUCTIONS..........................................................................................1-4
STANDARD TELEPHONE AND FCC NOTICES..............................................................................1-6
II. Introduction
1. INTRODUCTION........................................................................................................................ H-M
2. FEATURES...................................................................................................................................... IM-l
3. THE CONTROL PANEL KEYS.................................................................................................. II-3-1
4. FUNCTIONS............................................................................................................................. II-4-1
III. Setting up
1. SELECTING A LOCATION FOR YOUR FAX MACHINE
2. UNPACKING THE MACHINE
3. ASSEMBLING THE HANDSET.............................................................................................. III-3-1
4. INSTALLING THE WIRE EXTENSIONS
5. LOADING PAPER................................................................................................................... III-5-1
6. CONNECTING YOUR FAX TO THE POWER OUTLET......................................................III-6-1
7. CONNECTING TO A TELEPHONE LINE.............................................................................III-7-1
Jacks.......................................................................................................................................... III-7-1
Multi Line Connections (PBXs)............................................................................................ III-7-1
Connecting to a private branch exchange.............................................................................
8. MAKING A TRIAL COPY....................................................................................................... III-8-1
9. ADDITIONAL SET-UP OPTIONS........................................................................................... IH-9-1
Connecting to an external telephone.....................................................................................IIT9-1
....
........................................................................................................................... n_i_i
....................................................
..................................................................................................................
..............................................................................
....................................................
..............................................................................................
.........
..............................................................
........
iii-i-i
III-M
III-2-1
Ill 4 1
IIT7-2
i_i
IV. Basic use................................................................................................................................
1. CONFIGURING THE MACHINE............................................................................................IV-1-1
Setting the date and time...................................................................................................... IV-1-1
Registering your name and number......................................................................................IV-1-2
Entering information using the keys.....................................................................................IV-1-4
Selecting tone or pulse dialing...............................................................................................IV-1-6
Setting the auto answer switch.............................................................................................. IV-1-7
FAX/TEL switch........................................................................................................................IV-1-7
Setting F/T ringing period.......................................................................................................IV-1-9
Setting the ring delay............................................................................................................FV-1-10
Turning auto redial on and off.............................................................................................IV-1-10
Turning the beeper on and off........................................................................................... IV-1-11
Turning the transmission verification report on and off..................................................IV-1-12
Activity report........................................................................................................................IV-1-13
2. SENDING A FAX...................................................................................................................... rV-2-1
Automatic transmission..........................................................................................................IV-2-1
Manual transmission...............................................................................................................IV-2-2
Points to Remember When Sending a Fax
.......................................................................
...IV-1-1
IV-2-2
XV
Page 18

Contents
Loading multiple pages for transmitting or copying.........................................................IV-2-3
Current Setting for sending a fax........................................................................................ IV-2-3
Redialing................................................................................................................................. IV-2-5
3. RECEIVING A FAX....................................................................................................................IV-3-1
Automatic reception............................................................................................................. IV-3-1
Manual reception.....................................................................................................................IV-3-1
Reception with FAX/TEL switching.....................................................................................IV-3-1
Reception by Enhanced Remote Activation........................................................................IV-3-2
Remote activation................................................................................................................ IV-3-2
Reception into memory...........................................................................................................IV-3-2
Registering F/T & Remote ID.................................................................................................IV-3-3
4. USING ONE-TOUCH NUMBERS........................................................................................... IV-4-1
Registering one-touch numbers............................................................................................IV-4-1
Registering one-touch numbers as a group key..................................................................IV-4-3
Sending one-touch faxes.........................................................................................................IV-4-4
Printing a list of one-touch numbers
Changing or Erasing one-touch names and numbers.........................................................IV-4-6
5. USING SPEED DIAL NUMBERS.............................................................................................IV-5-1
Registering speed dial numbers.......................................................................................... IV-5-1
Sending speed dial faxes.........................................................................................................IV-5-2
Printing a list of speed dial numbers.................................................................................. IV-5-2
Changing or Erasing speed dial names and numbers
6. CHAIN DIALING.......................................................................................................................IV-6-1
Setting chain dialing............................................................................................................... IV-6-1
7. USING THE TELEPHONE INDEX..........................................................................................IV-7-1
Looking up a number........................................................................................................... IV-7-1
Sending a fax............................................................................................................................IV-7-1
Printing out the telephone index...........................................................................................IV-7-2
8. USING THE UNIT AS A TELEPHONE.................................................................................IV-8-1
Manual dialing.........................................................................................................................IV-8-1
One-touch dialing................................................................................................................... IV-8-1
Speed dialing........................................................................................................................... IV-8-1
Using the telephone index..................................................................................................... IV-8-1
Using keys with the telephone............................................................................................ IV-8-2
Using an external telephone.................................................................................................. IV-8-2
Using an external telephone answering device
....................................................................................
........................................................
..................................................................
IV-4-4
IV-5-3
IV-8-2
V. Advanced use
1. RESOLUTION............................................................................................................................V-1-1
Single resolution transmission................................................................................................V-1-1
Multiple resolution transmission
The resolution of in-coming documents................................................................................V-1-3
Copier resolution...................................................................................................................... V-1-3
XVI
.................................................................................................................. .....V-1-1
...........................................................................................
V-1-2
Page 19

Contents
Z SETTING THE CONTRAST
3. SMOOTHING (ENHANCED IMAGE RESOLUTION)
4. USING THE SURER COVERPAGE FACILITY
Sending a fax with a super COVERPAGE
Printing out a super COVERPAGE........................................................................................ V-4-2
Entering a comment................................................................................................................ V-4-3
5. CALL RESERVATION AND THE CALL BACK MESSAGE.................................................V-5-1
Sending a fax with Call Reservation....................................................................................... V-5-1
Printing out a Call Back Message............................................................................................V-5-2
6. TIMER TRANSMISSION (DELAYED TRANSMISSION).......................................................V-6-1
Sending a fax with Timer
Initial timer.................................................................................................................................V-6-3
7. THE PASSWORD.........................................................................................................................V-7-1
Sending a FAX with password............................................................................................. V-7-1
Setting the fax receiving password.........................................................................................V-7-2
Turning password protection on and off...............................................................................V-7-3
8. POLLING.......................................................................................................................................V-8-1
What is polling?........................................................................................................................ V-8-1
Standard polling....................................................................................................................... V-8-2
Secure polling............................................................................................................................ V-8-2
Timer (Delayed) polling...........................................................................................................V-8-3
Turn-around polling................................................................................................................. V-8-5
Sequential polling......................................................................................................................V-8-6
Setting a document to be polled
9. SENDING FAXES FROM MEMORY
Sending a fax from memory.................................................................................................. V-9-1
Printing out a "Memory used list"
10. SENDING FAXES WITH THE ECM FEATURE................................................................ V-10-1
11. BROADCASTING
Sending a broadcast fax..........................................................................................................
12. RELAY BROADCASTING......................................................................................................V-12-1
Sending a relay broadcast request........................................................................................V-12-1
Using your machine as the relay unit
Registration of relay ID.......................................................................................................... V-12-2
13. CONFIDENTIAL MAILBOXES.............................................................................................V-13-1
Registering a confidential mailbox.......................................................................................V-13-1
Changing the mail box ID......................................................................................................V-13-3
Printing out confidential information..................................................................................V-13-4
Printing out a confidential message........................................................................
Transmitting to a mail box.....................................................................................................V-13-6
Retrieving confidential messages
14. LOGOREGISTRAHON......................................................................................................... V-14-1
15. VARIOUS TYPES OF TRANSMISSIONS............................................................................V-15-1
.....
.........................................................................................................V-2-1
..........................................................
........................................................................
.............................................................................
.........................................................................................................V-6-1
.............................................................................................V-8-7
........................................................................................
........................................................................................
................................................................................................................
..................................................................................V-12-2
.............
...................................................................................
V-13-7
V-3-1
V-4-1
V-4-1
V-9-1
V-9-2
V 11 1
V-11 -1
V-13-5
xvn
Page 20

Contents
16. INTERRUPTING A TRANSMISSION
17. CANCELLING A TRANSMISSION......................................................................................V-17-1
18. OPTIONAL KITS......................................................................................................................V-18-1
19. PRINTING OUT REPORTS AND LISTS...............................................................................V-19-1
All-dial list............................................................................................................................. V-19-1
Configuration list.....................................................................................................................V-19-2
Power failure report................................................................................................................V-19-4
VI. Troubleshooting............................................................................................................................
Receiving..................................................................................................................................... VI-l
Sending......................................................................................................................................... VI-2
Telephone.....................................................................................................................................VI-3
Copying.........................................................................................................................................VI-3
Others.............................................................................................................................................VI-4
Error messages.............................................................................................................................VI-5
VII. Cleaning................................................................................................................................. ...VII-1
Cleaning the printing area........................................................................................................VII-2
Cleaning the scanner................................................................................................................. VII-3
VIII. Specifications........................................................................................................................... Vlll-l
..................................................................................
V-16-1
VI-1
xvni.
Page 21

I. Preliminary information
GLOSSARY
This glossary is a reference to help you understand terms used in this manual which may be
unfamiliar.
ADF
Broadcasting
Chain dialing
Automatic Document Feeder - this allows the insertion of up
to 30 originals for transmission or copying.
This function permits the transmission of a fax to several
different stations in a single operation.
An option which allows you to use two one-touch or speed
dial numbers for an automatic transmission, (for example,
when you are using telephone credit card.)
Confidential mailbox This feature is used for sending and receiving documents
that should be seen only by those who know the retrieval ID
number. The InstaFAX2100M/2200M has three different
mailboxes.
Convenience copier
ECM
F/T ringing time
Fax password
A copier used to make occasional, temporary reproductions
of documents.
The Error Correction Mode, which is a means of checking the
integrity of a fax transmission.
This is the lime (10,20, or 30 seconds) set for extra ringing of
the fax machine's telephone when receiving manual
transmissions and/or telephone calls for the purpose of
conversations.
A security code that permits transmission to the fax units
using the same code.
Fax receiving password
Fine resolution
Gray scale
One-touch dialing
PBX
This password is used to prevent the reception of unwanted
fax transmissions.
Fax transmission mode used for detailed images. (203 x 196
lines/inch)
Shades of gray (16 levels for InstaFAX2100M, 32/16 levels
for InstaFAX2200M) used to provide faithful reproduction
of photographic images.
A feature which lets you dial a number by pressing just one
key.
Private Branch Exchange, a computerized telephone
switching system (usually found in large organizations)
which accepts calls from the outside and transfers them to
various extensions inside the organization. It is also used to
route calls from the inside to destinations outside the
organization.
T-1
Page 22

GLOSSARY
Photo resolution
Polling
Timer transmission
(Delayed transmission)
A mode used by the fax machine to transmit highly detailed
camera images. (203 x 196 lines/inch).
A feature used by fax machines to request documents from
other fax machines. The unit has the capacity to poll (send
requests for document transmission) and to be polled by
(receive requests for document transmission) other machines.
A feature which permits a document to be sent automatically
to its destination at a time when the sender is not in the office
and/or wants to take advantage of less expensice telephone
rates. InstaFAX2100M/2200M has 3-timer transmissions.
J-2
Page 23
SYMBOLS USED IN THIS MANUAL
SYMBOLS USED IN THIS MANUAL
The symbols used in this manual are intended to make it easier for you to see the steps involved
in a particular unit operation.
1-3
Page 24

IMPORTANT SAFETY INSTRUCTIONS
IMPORTANT SAFETY INSTRUCTIONS
1. Read all of these instructions.
2. Save them for later reference.
3. Follow all warnings and instructions marked on the product.
4. Unplug this product from the wall outlet before cleaning. Do not use hquid or aerosol cleaners.
Use a damp cloth for cleaning.
5. Do not use this product near water.
6. Do not place this product on an unstable cart, stand, or table. The product may fall, causing
serious damage to the product.
7. blots and openings in the cabinet and the back or bottom are provided for ventilation; to ensure
reliable operation of the product and to protect it from overheating, these openings must not
be blocked or covered. The openings should never be blocked by placing the product on a bed,
sofa, rug, or other similar surface. This product should never be placed near or over a radiator
or heat register. This product should not be placed in a built-in installation unless proper
ventilation is provided.
8. This products should be operated from the type of power source indicated on the marking
label. If you are not sure of the type of power available, consult your dealer or local power
company.
9. This product is equipped with a 3-wire grounding type plug, a plug having a third (grounding)
pin. This plug will only fit into a grounding-type power outlet. This is a safety feature. If you
are unable to insert the plug into the outlet, contact your electrician to replace your obsolete
outlet. Do not defeat the purpose of the grounding-type plug.
10. Do not allow anything to rest on the power cord. Do not locate this product where persons will
walk on the cord.
11. If an extension cord is used with this product, make sure that the total of the ampere ratings
on the products plugged into the extension cord do not exceed the extension cord ampere
rating. Also, make sure that the total of all products plugged into the wall outlet does not exceed
15 amperes (U.S.A. only).
12. Never push objects of any kind into this product through cabinet slots as they may touch
dangerous voltage points or short out parts that could result in a risk of fire or electric shock.
Never spill liquid of any kind on the product.
13. Do not attempt to service this product yourself, as opening or removing covers may expose you
to dangerous voltage points or other risks. Refer all servicing to service personnel.
1-4
Page 25

IMPORTANT SAFETY INSTRUCTIONS
14. Unplug this product from the wall outlet and refer servicing to qualified service personnel
under the following conditions:
A. When the power cord or plug is damaged or frayed.
B. If liquid has been spilled into the product.
C. If the product has been exposed to rain or water.
D. If the product does not operate normally when the operating instructions are followed.
Adjust only those controls that are covered by the operating instructions since improper
adjustment of other controls may result in damage and will often require extensive work
by a qualified technician to restore the product to normal operation.
E. If the product has been dropped or the cabinet has been damaged.
F. If the product exhibits a distinct change in performance, indicating a need for service.
1-5
Page 26

STANDARD TELEPHONE AND FCC NOTICES
STANDARD TELEPHONE AND FCC NOTICES
These notices are in effect on models sold and used in America.
This equipment is hearing-aid compatible.
When programming emergency numbers and/or making test calls to emergency numbers:
• Remain on the line and briefly explain to the dispatcher the reason for the call before
hanging up.
• Perform such activities in the off-peak hours, such as early morning or late evening.
This equipment complies with Part 68 of the FCC Rules. On the rear panel of this equipment is a
label that contains, among other information, the FCC Registration Number and Ringer Equivalence
Niimber (REN) for this equipment. You must, upon request, provide this information to your
telephone company.
You may safely connect this equipment to the telephone network by means of the standard
modular jack, US(X1 RJllC.
The REN is useful to determine the quantity of devices you may connect to your telephone line and
still have those devices ring when your telephone number is called. In most, but not all areas, the
sum of the RENs of all devices connected to one line should not exceed five (5). To be certain of
the number of devices you may connect to your line, as determined by the REN, you should contact
your local telephone company to determine the maximum REN for your calling area.
If your InstaFAX2100M/2200M causes harm to the telephone network, the telephone company
may discontinue your service temporarily. If possible, they will notify you in advance. But if
advanced notice is not practical, you will be notified as soon as possible. You will be informed of
your right to file a complaint with the FCC.
Your telephone company may make changes in its facilities, equipment, operations or procedures
that could affect the proper functioning of your equipment. If they do, you will be notified in
advance to give you an opportunity to maintain uninterrupted telephone service.
If you experience trouble with InstaFAX2100M/2200M, please contact the manufacturer's
authorized service agency for information on obtaining service or repair. The telephone company
may ask that you disconnect this equipment from the network until the problem has been
corrected or until you are sure that the equipment is not malfunctioning.
If you are not able to solve a problem with your fax machine, contact your Brother service at 1 -800284-4FAX. (U.S.A. only).
Warning
For protection against the risk of electrical shock, always disconnect all cables from the wall outlet
before servicing, modifying or installing the equipment.
1-6
Page 27

STANDARD TELEPHONE AND FCC NOTICES
This equipment may not be used on coin service provided by the telephone company nor
connected to party lines.
This equipment has been tested and found to comply with the limits for a Class B digital
device, pursuant to Part 15 of the FCC Rules. These limits are designed to pro vide reasonable
protection against harmful interference in a residential installation. This equipment generates,
uses, and can radiate radio frequency energy and, if not installed and used in accordance
with the instructions, may cause harmful interference to radio commuriications. However,
there is no guarantee that interference will not occur in a particular installation. If this
equipment dloes cause harmful interference to radio or television reception, which can be
determined by turning the equipment off and on, the user is encouraged to try to correct the
interference by one or more of the following measures:
• Re-orient or relocate the receiving anterma.
• Increase the separation between the equipment and receiver,
• Connect the equipment into an outlet on a circuit different from that to which the
receiver is connected.
• Consult the dealer or an experienced radio/TV technician for help.
Brother cannot accept any financial or other responsibilities that may be the result of your use
of this information, including direct, indirect, special or consequential damages. There are no
warranties extended or granted by this document.
The serial number may be found on the label affixed to the back of the unit. For your convenience,
note the number below and retain this owner's manual to serve as a permanent record of your
purchase, in the event of a theft or fire, or for future reference.
MODEL NO. InstaFAX2100M/2200M SERIAL NO. -----------------------------------------------------
NAME OF DEALER
DATE OF PURCHASE.
7-7
Page 28

Page 29

II. Introduction
1. INTRODUCTION
This is a modern desktop facsimile unit which can be used for
sending and receiving faxes via the public telephone lines. In
addition to standard transmission and reception, the unit has a
range of functions which facilitate fax transmission and reception
and will help keep your business operating efficiently.
This owner^s manual has been included with your fax machine to
help you make use of the functions provided.
2. FEATURES
Your fax machine has many useful features. These include:
• High speed transmission (9600 b.p.s).
• A 48-character LCD screen and helpful prompts. When you have to make a selection, all
the available choices are automatically briefly displayed on the screen scrolling.
• Many dedicated function keys.
• Anti curl system, which stretches out the ciirls of recording roll paper (effective 1 inch/3
cm core).
• Auto Document Feeder (ADF), which allows you leave unattended faxes for transmission.
You can set up to 30 documents in the ADF.
• A Tel-Index function, which is a built-in name and number directory list facility.
• The polling function, with which you can request transmission of faxes from other stations.
Polling can also be protected by a security code.
• Various reports to confirm that your document has successfully been sent to its destination.
(For example, transmission verification reports, etc....)
• A delayed transmission feature which lets you send faxes when telephone rates are low.
• A password security function to prevent "junk" faxes, and to avoid the sending of faxes
to the wrong party.
• Four resolution levels (standard/fine/super fine/photo) to provide superior quality
document transmission.
• Character smoothing on in-coming fax transmissions.
• A super COVERPAGE feature enabling you to send information describing your fax
transmission to the receiving party.
• The facility for interrupting and then resuming an operation.
• Copier capability.
• FAX/TEL switch, which allows you to use one telephone line to both Fax and Telephone.
_
___________________________________________________________________________________ ll-l-l
Page 30

11-2. FEATURES
• Three confidential mailboxes for storing confidential messages.
• Reception into memory^ which allows you to receive fax messages even if your machine
runs out of paper.
• A broadcasting function, which lets you send one fax to several different fax units in one
operation.
• The P.P.I (Plain Paper Interface) allows you print a transmission on plain paper (optional).
• Logo registeration function, with which you can add your own logo to the super
COVERPAGE and the Call Back Message.
- only for InstaFAXZlOOM -■
• Memory capacity for storing up to approximately 15 pages. (Brother standard chart).
• You can increase your machine's memory size up to 768 KB (optional.).
- only for InstaFAX2200M -
• Memory capacity for storing up to approximately 30 pages. (Brother Standard Chart).
• You can increase your machine's memory size up to 1MB (optional).
• Ultra-high speed transmission (14400 b.p.s)
• Super Gray Scale
..........
Allows text to appear on the same document with a photo with no
loss of text clarity. Also prevents patterns from forming in the photo
image reproduction.
11-2-1
Page 31

3. THE CONTROL PANEL KEYS
7J-3. THE CONTROL PANEL KEYS
One-touch keys
Number keys
11-3-1
Page 32

11-3. THE CONTROL PANEL KEYS
Key
T£L INDEX
PAUSE/REDtAL
HOLD
IRNE
1 SEINE
1 PHOTO
Explanation
Used when dialing to select a number stored in the unit memory. (This cannot
be used for broadcasting or sequential polling.)
Used to redial the number dialed most recently. This key is also used to
insert a delay during manual dialing or when registering a one-touch or
speed dialing number. (Only one pause can be entered in each number to
be dialed.)
Used to put an in-coming call on hold. (Pressing this key a second time will
cancel the hold status.)
Used to select a previously registered speed dial munber by pressing the
appropriate two-digit combination. (This key must be pressed prior to
entering the two-digit speed dialing combination you wish to contact.)
Used to enter any FAX/TEL number during manual dialings and for
entering a number when making registrations settings^ and when searching
through the Telephone Index. These keys are also used to enter names—
each key corresponds to 2 or 3 letters of the alphabet. The "1"," * " and "#"
keys can be used for entering special characters, punctuation marks, and
symbols. (Pressing the "#" key is used to change to "tone" while in "pulse"
setting.)
Used to move the cursor left or right when typing in names and numbers or
settings. Also used to scroll forwards or backwards through the Telephone
Index. In function menu, used to scroll forwards by pressing (->) cursor key.
Used to select the resolution level before pressing the ST ART key or the COPY
key. (Either S.FINE or PHOTO can be selected when making copies.)
When no lights are lit unit is in Standard Mode.
/7-3-2
COPY
srop
BROADCAST
dJCOVERPAGE
Used to start copying operations.
Used to stop the transmission, to cancel all current settings, and to cancel
any function setting operations underway. After this key has been pressed,
the LCD returns to the original display. (This key cannot be used to stop
reception of documents or phone calls.)
Used to start a fax transmission and to print out lists and reports.
Used to send a fax transmission to several destinations or to poll several
stations. (This key cannot be used for turn-around polling.)
Used to send a super COVERPAGE with your fax transmission.
Continued on next page
Page 33

II-3. THE CONTROL PANEL KEYS
I
------
□□ ECM
Key
1 CALL
M£MOHY
Explanation
Used to enable the Call Reservation feature.
Used to lead a document into the machine's memory. You can also use this
key to select the ECM (Error Correction Mode).
Used to confirm a function setting, or to interrupt a transmission operation.
Used to restore existing function settings, and to delete numbers or letters
during the registration of one-touch and speed dialing numbers, etc.
Pressing this key with the cursor located at the beginning of a one-touch or
speed dialing number will clear the number which has been registered. This
key is also used to obtain information and data from the confidential
mailboxes available.
Used to enable various functions in the machine.
Used to select the fax reception mode from among the following options—Auto
Answer reception mode, manual reception mode, or the FAX/TEL mode. The
LED will light to indicate the current status.
Used to set a time for a delayed transmission or delayed polling.
ONE TOUCH KEY
SHIFT
(only for InstaFAX2200M)
HOOK
IZZI
mo
• « «
Used to poll (or to be polled by) a remote unit for a document. This key is
also used to transfer an in-coming call to another extension.
Used to send a fax with a password. This key is also used for chain dialing
when registering FAX/TEL numbers for one-touch or speed dialing.
Used to dial phone numbers that you have previously registered.
Used to access an extra series of fax or phone numbers for any of the one
touch keys. (For example, shift key + "00" will dial the number "30".)
Used to dial telephone or fax number without lifting the handset.
Used to control speaker monitor volume, (high and low)
Ring volume control of handset. (High, middle, or low) This control is on the
left side of the handset base.
Zi-3-3
Page 34

11-4. FUNCTIONS
4. FUNCTIONS
Pressing the FUNCTION key will bring the primary function menu items up on the LCD one at a
time. The unit will scroll through all of the first level items automatically. The (->) cursor key can
be used to scroll through this list of items quickly.
First level function items are as follows:
1. ONE-TOUCH/SPEEDDIAL
2. REGISTRATION
3. ACTIVITY REPORT
4. LISTS AND REPORTS
5. USER OPTIONS
6. CURRENT SETTINGS
7. CONFIDENTIAL MAIL BOX
8. RELAY BROADCAST
9. CANCEL TRANSMISSION
Select the function you want to use by pressing the relevant number key. Your selection will
appear on the LCD. After you have confirmed your choice, press the SET key.
After the S ET key has been pressed, secondary items for the function you have selected will appear
on the LCD. The procedure for choosing a secondary item is the same as that for selecting a primary
function. These menu items and brief explanations are provided below.
1. ONE-TOUCH/SPEED DIAL
Number
1
2
ONE-TOUCH DIAL
SPEED DIAL
Menu
Explanation
Registering/Changing/Erasingone-touch dial
Registering/Changing/Erasing speed dial
Ref.
IV-4-1
IV-5-1
11-4-1
Page 35

2. REGISTRATION
IM. FUNCTIONS
Number
01
02
03
04
05
06
■ 07
08
09
10
n
12 LOGO
- Be sure to use two digits numbers when entering the numbers shown above, (EX. For "01
COVERPAGE COMMENT", press the "0" key followed by the "1" key.)
COVERPAGE
COMMENT
DATE-TIME
INITIAL TIMER
F/T & REMOTE ID
STATION ID
RECEIVE PASSWORD
RELAY ID
CONFIDENTIAL
GROUPING
ACTIVITY REPORT
INTERVAL
NOT USED
Menu
Explanation
Registering/Changing/Erasing coverpage
user comment for super COVERPAGE
Setting/Changing date and time for the unit's
clock
Setting/Changing initial timer
Setting/Changing fax/tel and remote
activation ID
Setting/Changing machine ID
Setting/Changing password for the unit
Setting/Changing ID for relay broadcasting
Registering/Changing confidential mail box
(Name^ retieval ID, and conf. ID)
Registering/Changing group dialing
Setting Activity report printout interval
Registering Logo
Ref.
V-4-3
IV-1-1
V-6-3
IV-3-3
IV-1-2
V-7-2
V-12-2
V-13-1
rV-4-3
IV-1-14
V-14-1
3. ACTIVITY REPORT
4. LISTS AND REPORTS
Number Menu
1
2
3
4
5
6
7
8
ALL DIAL
ONE-TOUCIIDIAL
SPEED DIAL
TEL-INDEX
COVERPAGE
CALL BACK MSG
USER OPTIONS
MEMORY STATUS
Explanation
Printing out both one-touch and speed dial list
at once
Printing out one-touch dial list
Printing out speed dial list
Printing out telephone index list
Printing out super COVERPAGE format
Printing out Call Back Message format
Printing out user options list
Printing out memory status list
Ref.
V-19-1
IV-4-4
IV-5-2
IV-7-2
V-4-2
V-5-2
V-19-2
V-9-2
H-4-2
Page 36

U-4. FUNCTIONS
5. USER OPTIONS
Number
01
02
03
04
05
06
07
08
09 NOT USED
10 LOGO
11
12
- Be sure to use two digits numbers when entering the numbers shown above, (EX. For "01 RING
DELAY", press the "0" key followed by the "1" key.)
RING DELAY
TONE/PULSE
AUTO REDIAL
XMT VERIFICATION
REPORT
F/TRING TIME
BEEPER
PASSWORD
PROTECTION
SMOOTHING
P.P.I OUTPUT
P.P.T. Redurtion
Menu
Explanation
Setting/Changing ring delay shorter (1 ring/
longer (4 rings)
Setting/Changing tone or pulse for telephone
line
Setting/Changing auto redial on or off
Setting/Changing transmission verification
report on or off
Setting/Changing the period of pseudo-ring
back tone
Setting/Changing the beeper on or off
Setting password protection on or off
Setting smoothing on or off
Setting Lugo on or off
Setting P.P.I. output mode
Setting P.P.I. reduction mode
Ref.
IV-1-10
IV-1-6
rV-1-10
IV-1-12
IV-1-9
IV-1-11
V-7-2
V-3-1
V-14-1
V-18-1
V-18-1
6. CURRENT SETTINGS
Number
1
2
CONTRAST
RESOLUTION
11-4-3
Menu
Explanation
Setting current contrast to super light or auto
mode
Setting resolution (Standard/Fine/Super
fine/Photo) for each pages up to 30 pages
Ref.
V-2-1
V-1-2
Page 37

7. CONFIDENTIAL MAIL BOX
IM. FUNCTIONS
Number
1
2
3
8. RELAY BROADCAST
Requesting the set up of a relay broadcast with a distant relay ternainal. (Ref. V-12-1)
9. CANCEL TRANSMISSION
Used to cancel transmission or polling operations which have already been programmed.
(Ref. V-17-1)
CONF. TRANSMIT
CONF. PRINT OUT
REMOTE RETRIEVAL
Menu
Explanation
Sending confidential mail to another Brother
machine
Printing out confidential mail from the
memory
Retrieving (polling) confidential mail which
is in another Brother machine
Ref.
V-13-5
V-13-4
V-13-6
II-4-4
Page 38

Page 39

III. Setting up
1. SELECTING A LOCATION FOR YOUR FAX MACHINE
The following points should be kept in mind when selecting a place to set up your fax machine.
• Place the fax machine on a flat, stable surface sTich as a desk or stand.
• Select a place where the machine will not be subjected to bumping or excessive vibration.
• Do not set it up in a high-traffic area.
• Locate the unit near a telephone wall jack and a standard grounded outlet.
• Avoid setting up the machine near heaters, air conditioners, water, chemicals or refrigerators.
• Avoid direct sunlight, excessive heat, moisture, or dust.
• Do not connect the unit to electrical outlets controlled by wall switches or automatic timers.
Disruption of power can wipe out information in the unit's memory.
• Do not connect the unit to electrical outlets on the same circuit as large appliances and other
equipment that might disturb the power supply.
• Avoid interference sources, such as loudspeakers or the base units of cordless telephones.
• Be sure to disconnect the handset when moving the unit.
III-l-l
Page 40

111-2. UNPACKING THE MACHINE
2. UNPACKING THE MACHINE
Unpack the unit and accessories from the box. Check that you have all the items shown in the
illustration below.
Telephone line cord
Receive wire extension
ÌZ/-2-1
Page 41

3. CONNECTING THE HANDSET
1) Insert the handset line cord into the base of the handset as
shown. Listen for the dick which will indicate that the plug is
securely in position.
III-3. ASSEMBLING THE HANDSET
2) Draw the handset line cord through the gap provided to
prevent the cord from being pinched between the base and the
fax unit. Set the fax unit on its side, so the slot for sliding the
handset base into position is accessible. Insert the handset into
the slot provided. Insert until the handset base is fixed in
position.
III-3-1
Page 42

III-3. ASSEMBLING THE HANDSET
3) Insert the remaining end of the handset line cord into the
"HANDSET BASE" socket located at the rear of the machine.
Again, listen for the click when inserting the plug into the
socket.
4) Insert the curled cord into the base of the handset as illustrated.
ni-3-2
Page 43

7/7-3. ASSEMBLING THE HANDSET
5) Insert the other end of the curled cord into the handset itself. A
click will sound when the plug is in position.
777-3-3
Page 44

III-4. INSTALLING THE WIRE EXTENSIONS
4. INSTALLING THE WIRE EXTENSIONS
1) Pinch the ends of the reseive wire extension together slightly
and insert the prongs into the holes provided at the rear of the
machine as shown in the illustration.
2) Pull the ends of the document wire extension apart slightly and
insert them into the holes provided on the machine as shown in
the illustration.
111-4-1
- Install the -wire extensions with the curved parts of the wire
extension pointing upward.
Page 45

5. LOADING PAPER
1) Grasp both ends of the tray for inserting original documents
1II-5. LOADING PAPER
and lift up to open the machine as shown in the illustration.
IIP5-1
Page 46

III-5. LOADING PAPER
2) Insert the plastic paper handlers into the ends of the tube
holding the paper. (When replacing an empty paper roll, be
sure not to lose track of these paper handlers, as they are
necessary for fitting the roll into place in the machine.)
IiI-5-2
3) Load the roll of paper into the machine, inserting the paper
handlers so they fit firmly into the sockets provided, as shown
in the illustration. Check to be sure the paper is coming off the
roll correctly, from the bottom, not from the top of the roll.
Page 47

1II-5. LOADING PAPER
4) Pull the paper evenly away from the roll, and insert it between
the metal guide and the plastic ribs located below the metal
guide. Check the paper as it leads from the roll into the guide
to be sure there is not too much tension nor too much slack in
the paper.
Be sure not to mistakenly push the release levers for the cover down
into the lower position. These release levers must he in the upper
position (as shown in the illustration provided) or the machine
will not close properly.
III-5-3
Page 48

I1I-5. LOADING PAPER
If you have inserted the plug into the power supply before you have
loaded the machine with paper, an alarm will sound and a CHECK
RECORDING PAPER message will appear on the screen.
- Use 1" core thermal Roll paper.
(You may experience some difficulty if you try to use paper of less
than V core.)
III-5-4
Page 49

1II-6. CONNECTING YOUR FAX TO THE POWER OUTLET
6. CONNECTING YOUR FAX TO THE POWER OUTLET
Important
The machine must always be connected to the power outlet
before you connect it to a telephone line,
Similarly, when moving the unit, the telephone line connection
should be removed before unplugging the power cord. This is
because the machine relies on the ground from the plug to
protect you from any hazardous electrical conditions occuring
on the telephone network.
This machine can be plugged into any standard grounded power
outlet. Make sure the socket is grounded and that it is not on the
same line as any large appliances or office machines such as
refrigerators or photocopiers. The power requirements for this fax
machine can be found in the Specifications section on page VIII-1-
1.
There is no ON/OFF switch. When the machine is plugged in, the
date/time display appears on the LCD, You can set the correct time
and date on this display by following the instructions on page IV-
1-1 in the section Configuring the machine.
- When the machine is plugged in, the recording paper will be fed
through the automatically.
111-6-1
Page 50

1II-7. CONNECTING TO A TELEPHONE LINE
7. CONNECTING TO A TELEPHONE LINE
If you plan to use a single telephone line connection follow the
instructions below. This is straightforward if your telephone receiver
is connected using modular telephone jacks.
1) Plug one end of the telephone line cord into the back of the fax
machine. Use the TEL LINE socket located farthest to the left.
2) Plug the other end of the cord into the telephone wall jack
socket. Make sure this end clicks into place.
Jacks
Multi Line Connections
(PBXs)
If you have the older 4-prong telephone wall jack, you must use a
modular 4-prong adapter (USOC RJAIX). Plug the adapter into the
wall jack and then plug the telephone cord into the adapter, as
shown in the illustration below.
Most offices use a central telephone system. While it is often
relatively simple to connect the machine to a key system or a PBX
(private branch exchange), we suggest that you contact the company
which installed your telephone system and ask them to connect the
fax machine for you.
It is advisable to have a separate line for the fax machine. You can
then leave the machine in AUTO ANSWER mode to receive faxes
at any time of the day or night.
III-7-Î
If the fax machine is to be connected to a multi-line system, ask your
installer to connect the unit to the last line on the system. This will
prevent the unit from being activated each time a telephone call is
received.
Page 51

777-7. CONNECTING TO A TELEPHONE LINE
If you have call waiting, ringmaster, or any other custom calling
feature on your telephone line it may create a problem in the
operation of your fax unit.
As with most fax units this machine must be connected to a two
wire system. If your line has more than two wires proper
connection of the fax machine can not be made.
Connecting to a
private branch
exchange
The following points should be kept in mind if you are installing the
machine to work with a private branch exchange (PBX).
1) It is not guaranteed that the unit will operate correctly under all
circumstances with approved PBXs. Any cases of difficulty
should be reported first to the company that installed your
telephone system.
2) If all incoming calls will be answered by a switchboard operator,
it is recommended that the AUTO ANSWER function be set to
be manual, (see page IV-1-7) All incoming calls should initially
be regarded as telephone calls.
3) The unit may be used with either the pulse or tone dialing
telephone types.
III-7-2
Page 52

III-8. MAKING A TRIAL COPY
8. MAKING ATRIAL COPY
Now that your fax machine is ready for use, it is a good idea to test
it by making a copy.
You can copy any document up to 8.5 inches/216 mm (A4 size)
wide. Follow the instructions below.
1) Set the document face down into the feeder. Adjust the guides
located on either side of the document if it is less than 8.5 inches
wide.
2) The following display appears on the LCD screen.
COPY
FAX
COPY
3) Press the COPY key. The fax machine draws the original through
and prints a copy.
The default setting for making copies is SUPER FINE. To change
this setting when copying photographs, press the RESOLUTION key
to light 'THOTO" LED, then press the COPY key.
- When the copy has been printed, the automatic paper cutter will
cut the page from the paper roll.
- The machine cannot read text or images closer than 118" from any
edge of the document.
- Do not pull on the paper while copying is in progress. This may
ruin the copied image.
ENTERFAX NO.
PRESS
COPY KEY
Page 53

ni-9. ADDITIONAL SET-UP OPTIONS
9. ADDITIONAL SET-UP OPTIONS
Connecting to an Connect an external telephone to the "EXT. DEVICE" jack as
external telephone shown.
You can remotely activate the machine using your external
telephone. This is described in the sub-section ^'Reception hy
Enhanced Remote Activation" (see page IV-3-2).
You can also connect a TAD to the Ext. Device plug instead of a
telephone.
III-9-1
Page 54

Page 55

IV. Basic uses
This chapter describes the most common operations that you will perform with your fax machine,
such as sending and receiving faxes, and using the one-touch, speed dial, and Telephone Index dial
facilities that allow you to recall and dial regularly used fax numbers.
1. CONFIGURING THE MACHINE
When you first plug in the power cord to the outlet the following
text should appear on the LCD screen;
(Make sure there is no document in the feeder.)
WARMING UP
PLEASE WAIT
06/01/1992 00:00
FAX/COPY : SET DOC.
Setting the date and
time
\
_
J
ABC
—5—1
1 E
L _ _1
i 7 II B ir 9 (
IZX3IZOCO
1
-----------
I tNTEBRUPT I
1
Carry out the procedure described below to set the correct date and
time for the machine.
1) Press the FUNCTION key. Then press the 2 key on the number
]
keys.
2.REGISTRATION
PRESS SET KEY
2) Press the SET key. Then press the 0 key followed by the 2 key.
02.DATE-TIME
PRESS SET KEY
3) FrewtheSETkey.
YEAR : XX
INPUT / PRESS SET TO END
4) Enter the last two digits of the current year (for example enter
1992as "92") using the number key s and then press the S ET key.
MONTH : XX
INPUT / PRESS SET TO END
Page 56

lV-1. CONFIGURING THE MACHINE
5) Enter the current month as a 2-digit number (for example enter
July as "07") using the number keys. When you have correctly
set the month press the SET key.
¡mizoizo
6) Enter the day, also as a 2-digit number (for example enter as
r? li a II 9 1
I » ii:Ljm
"01") in the same way as you entered the year and month. When
you have correctly set the day press the SET key.
DAY : XX
INPUT / PRESS SE! TO END
TIME ; XX:XX
INPUT / PRESS SET TO END
- tl 2 II 3 I (
------
' ! (NTERRUPT
I 4 l| 5 ~lt 6 I I
l~^l » II f~\ L
7) Now enter the current time in hours and minutes using the
number keys. When you have correctly set the time press the SET
key. The date and time that you have just set are briefly displayed
and then the screen starts scrolling through the registrations''
menu.
- When setting the time
Remember that the machine uses the 24 hour clock
- If the power is cut off
Should the power outlet for the unit he cut off, the date and time
setting will be backed up for one hour. After one hour, the date
and time setting will be cleared and you will have to register it
again.
Registering your name To store your name and fax number in the machine so that they will
andnumber automatically printed (along yvith the page number) at the top of
each page of every document that you send, proceed as follows:
1) Press the FUNCTION key.
2) Then press the 2 key on the number keys.
2 I
2.REGISTRATION
PRESS SET KEY
I 5 I
IV-1-2 _
3) Press the SET key. Then press the 0 key followed by the 5 key.
05.STATION ID
PRESS SET KEY
Page 57

4) Press the SET key.
FAX:
II^PUT / PRESS SET TO END
IV-1. CONFIGURING THE MACHINE
A-IL-l. XJ
[xnrxncxj
OH,m
5
1 4 u
JL
W « T
1 7 II JL
or
0
JL
jlJ
6 1
5) Enter your fax number (which can be up to 20 digits long) using
the number keys. The procedure for entering numbers is
described in detail in the section information using the
keys in this chapter.
6) Press the SET key when you have entered the fax number
correctly.
If you wish to input a "+" (INTERNATIONAL DIALING CODE
PREFIX) at the first position, press the "Chain" key and continue to
enter the number, using the correct international dialing code, and
omitting any "ZERO" at the beginning of the national area dialing
code.
TEL:
INPUT / PRESS SET TO END
7) Now enter your telephone number (which can be up to 20 digits
long) using the number keys.
8) Press the S ET key when you have entered the telephone number
correctly.
rxir~5~ii:xj
NAME;
INPUT / PRESS SET TO END
9) Enter the name you wish to appear on the faxes that you send
using the number keys. The name can be up to 20 characters
long including spaces. The procedure for entering names is
described in detail in the section Entering information using the
keys in this chapter.
10) Press the SET key when you have entered your name.
- The telephone number is only used for the Call Back Message^ or
siiper COVERPAGE.
- If you do not enter a fax number you cannot enter anything else.
- You cannot enter a "-"using the PAUSE key when registering
your fax and telephone number. Use the (<—/—>) cursor key instead
to enter a space. It will be printed as but not he displayed.
IV-1-3
Page 58

lV-1, CONFIGURING THE MACHINE
Entering information
using the keys
Entering numbers
i 7 II b' II T r
I « l[~0 ll * I
MAIL
The way in which you enter numbers and names into the machine's
memory is the same in all cases.
To enter a number into the machine, simply type in the number
using the number keys. A horizontal cursor marks the place where
the next digit you enter will be. Every time that you enter a digit, the
cursor is moved one place to the right. You can also move the cursor
left or right using the (^/—>) cursor keys.
Press the CLEAR key to delete the number indicated by the cursor
position, and all numbers to the right of the cursor.
To modify an existing digit, use the cursor keys to move the
cursor to the position you want to modify, and input a new digit
over the old one.
- You cannot insert a space into a number that has been input. You
must re-enter it with the space included.
- If you do not press any key for one minute, or if you press the
STOP key, any changes you have made are disregarded and the
original number is retained.
Entering names
I tt II 0 ir~m
IV-1-4
To enter names, use the keys on the number keys and / -A) cursor
keys.
Either two or three letters are assigned to each key on the number
keys. Also, although they are not marked, some special characters,
punctuation marks and symbols are assigned to the keys "1" key,
" key, and key.
"l"key
................
"2"key
...............
"3"key
...............
"4"key
...............
"5"key...............JKL5
"6" key
..............
"7"key
...............
"8"key
...............
"9"key
...............
"0"key
...............
..................
"#"key
...............
A E 6 0 A N 1
ABC2
DEF3
GHI4
M N06
PRS7
TUV8
WXY9
QZO
(space) !"#$%&'()* + ,- ./
:;< = >?@[]^_
Page 59

IV-1. CONFIGURING THE MACHINE
To enter any character press the appropriate key until the character
appears.
1) For example, to enter the name "Fred)", press the 3 key three
o
times.
NAME: F
INPUT / PRESS SET TO END
2) Press the 7 key twice.
ZJ
NAME:
INPUT
3) Press the 3 key twice.
FR
/ PRESS SET TO END
IZ]
NAME:
INPUT
4) Press the (->) cursor key once to move the cursor to right.
-To enter successive characters which are assigned to the same
key, you must use the cursor key to move the cursor to the
right.
FRE
/ PRESS SET TO END
NAME; FRE_
INPUT / PRESS SET TO END
5) Press the 3 key once.
NAME: FRED
INPUT / PRESS SET TO END
6) Press the * key twice.
- When you press the 1 key, * key, or# key, the lower line of the
screen shows the characters assigned to that key. Press the
key n times to use the n*^ character in the row.
NAME: FRED!
MARK-
i INTERRUPT I
7) Press the SET key.
IV-1-5
Page 60

IV-1. CONFIGURING THE MACHINE
- You can only overwrite characters. Insertions cannot be made.
- You can overwrite with a space by pressing the * key once.
- If you want to change a character, use the cursor keys to
move the cursor underneath the character and enter a new
character.
- Press the CLEAR key to delete the character indicated by the
cursor position, and all characters to the right of the cursor.
Selecting tone or pulse dialing
j
-------------------
I la !
I I
I
-----------------------
I INTtfiñUFT I
' I
I
_______________
I INTEfíRUPT I
I ^ I O''
1
1
I
ABC
_2
There are two different dial types, and you must select the type of
signal suitable for your telephone line.
The default setting is "Tone".
1) Press the FUNCTION key. Then press the 5 key on the number
keys.
5.USER OPTIONS
PRESS SET KEY
2) Press the SET key. Then press the 0 key followed by the 2 key.
02.TONE-PULSE
PRESS SET KEY
3) Press the SET key.
CURRENT :
1. TONE
4) Press the 1 key for tone dialing, the 2 key for pulse dialing.
TONE-PULSE
PRESS SET
TONE
2. PULSE
: PULSE
KEY
I---------------------1
j INTERRUPT I
ma^mm
i
_______________
IV-1-6
5) Press the SET key to confirm your selection.
I
Page 61

IV-1. CONFIGURING THE MACHINE
Setting the auto answer switch
AUTOANS
FAX/TEL switch
— 1 T-”
AirmAtJC ! ^
START
] MANVAL
— RT
\ AUTOANS
I MANUAL
— F/T
I AUTOANS
I MANUAL
— F/T
I AUTOANS
MANUAL
F/T
AUTO ANS
You can select answering mode for fax reception - your choice are
automatically, manually, or FAX/TEL auto switching.
You can set the unit to answer in-coming calls automatically by
turning on the auto answer feature. To do this, press the AUTO ANS.
key to light the AUTO ANS LED.
If you want all calls to be answered manually, press the AUTO ANS
key to light the MANUAL LED.
If you want to select FAX/TEL, Auto changing switch, press the
AUTO ANS. key, and light both the AUTO ANS. and MANUAL
LEDs.
The initial setting is "Auto Ans."
The unit is equipped with a switching feature that can distinguish
between telephone calls and fax transmissions. Improving
communications when the machine is used on a single telephone
line. To activate this function on your machine, press the AUTO ANS
key until both LEDs are lit the AUTO ANS and MANUAL LEDs.
If the other party is sending an automatic transmission, the unit
detects the CNG tone and enters fax reception mode automatically.
If the other party is sending a manual transmission or telephone
call the unit rings for a specified period (10 or 20 or 30 seconds
which you can select as the F/T ringing time). Within the F/T
ringing time, if you pick up the handset, you can talk with the other
party. When the other party wants to send a manual transmission,
press the START key and you will receive the document. If you
cannot pick up the handset within the F/T ringing time, the unit
will enter FAX reception mode automatically. So you can receive a
document by manual transmission even if you are away from the
machine.
Also, if you have given your F/T & Remote ID number to the other
party they can always send a manual transmission and put your
machine into FAX reception mode by entering the ID number (only
using a tone dial unit), (see F/T & remote ID)
IV-1-7
Page 62

lV-1, CONFIGURING THE MACHINE
The following flow chart illustrates the situations which may arise
in the operation of the FAX/TEL switch on the unit.
LINE CONNECTION
FAX/TEL SWITCHING
RING DELAY ; This refers to the number of rings before the phone line is connected in response
to a telephone call or fax transmission. You have the option of setting this to either
1 or 4 rings.
F/T RINGING ; After the line is connected^ the machine begins to ring a second time, for a
selectable period of 10,20 or 30 seconds. This additional ringing period provides
you with extra time to pick up the telephone for a phone conversation or to
receive the manual transmission of a fax. During this period, the other party can
hear "pseudo-ring" back tone.
IV-1-8______________________________________________________________________________________
Page 63

IV-1. CONFIGURING THE MACHINE
- The cost of the transmission (borne by the sending party) will be
calculated from the point in time at which the beep signals that
the line connection has been made.
- After beep signal, there is no sound for about 4 seconds to detect
a CNG which is sent by other party, until the line is disconnected.
Setting the F/T ringing period
I
--------
1
I - I
L
_____
I
-------------------
I INTERRUPT I
I
---------------------
!
J
T
1
ML
ZED
;
-----------
I INTERRUPT I
1
O , r-n
DEF
■ r r~3~n
You can select the F/T Ringing period by following the procedure
below.
- The initial setting is 30 seconds.
1) Press the FUNCTION key. Then press the 5 key.
5.USER OPTIONS
PRESS SET KEY
2) Press the SET key. Then press the 0 key followed by the 5 key.
05.F/T - RING TIME
PRESS SET KEY
3) Press the SET key.
CURRENT : 30SECS.
1.10 2.20 3.30
4) Press the 1 key to select 10 seconds, the 2 key for 20 seconds, or
the 3 key for 30 seconds.
F/T-RING TIME : 20SECS
PRESS SET KEY
5) Press the SET key to confirm your selection.
IV-1-9
Page 64

ÌV-1. CONFIGURING THE MACHINE
Setting the ring
delay
I
INT£ftRUPT f
^ I
i j
INTBdRUPT
You can select the number of times the telephone will ring before
the machine will switches to reception mode.;
- The initial setting is Longer.
1) Press the FUNCTION key. Thcn^ press the 5 key on Lhe number
keys.
5.USER OPTIONS
PRESS SET KEY
2) Press the SET key. Then, press the 0 key followed by the 1 key.
01.RING DELAY
PRESS SET KEY
3) Press the SET key.
CURRENT : LONGER
1.SHORTER 2.LONGER
] °rr^~~|
Turning auto redial
on and off
4) Press the 1 key for a shorter ring delay (1 ring), the 2 key for a
longer ring delay (4 rings).
RING DELAY : SHORTER
PRESS SET KEY
5) Press the SET key to confirm your selection.
If you are sending a fax automatically (see Sending a fax in this
chapter) you can set up the machine to redial the number
automatically if the destination number is engaged. The unit will
redial the last used number up to 3 times at 5-minute intervals.
- The initial setting is "ON".
1) Press the FUNCTION key. Then press the 5 key on the number
keys.
5.USER OPTIONS
PRESS SET KEY
IV-l-lO
Page 65

IV-1. CONFIGURING THE MACHINE
j INTERRUPT I
1 1
I
---------------------
--3 1
DEF
I
1
I" INTERRUPT 1
L_!TTT_J
or I 2
2) Press the SET key then the 0 key followed by the 3 key.
03.AUTO REDIAL
PRESS SET KEY
3) Press the SET key.
CURRENT
l.ON
I
4) Press the 1 key to turn auto-redialing on, the 2 key to turn auto
redialing off.
: ON
2.OFF
AUTO REDIAL : OFF
PRESS SET KEY
5) Press the SET key to confirm your selection.
- Even if auto-redial is "ON" it cannot he used to send an automatic
transmission when the interrupt function has been used.
- Auto redial cannot he used for manual transmission.
Turning the beeper
on and off
1 !
mo
The unit has a beeper which sounds to indicate operating errors and
when keys have been pressed. You may decide that you would
rather operate the machine without this facility. To turn the beeper
on or off proceed as follows.
- The initial setting is "ON".
1) Press the FUNCTION key. Then, press the 5 key on the number
keys.
5.USER OPTIONS
PRESS SET KEY
2) Press the SET key. Then press the 0 key followed by the 6 key.
06.BEEPER
PRESS SET KEY
iv-i-n
Page 66

IV-1. CONFIGURING THE MACHINE
j INTERRUPT
I
L__________
TJorl^XJ
INTERRUPT t
Turning the
transmission
verification report
on and off
INTERRUPT t p
L - - -J
■~o II T"
3) Press the SET key.
CURRENT:
l.ON
4) Press the 1 key to turn the beeper on, the 2 key to turn the beeper
off.
BEEPER :
PRESS SET
5) Press the SET key to confirm your selection.
You can establish the success or failure of a fax transmission by
printing out the transmission verification report. This report is
automatically printed for each transmission if you turn the
transmission verification feature on. If you do not want this report
generated you can disable the function.
1) To turn this function on or off, press the FUNCTION key
followed by the 5 key. Press SET key. Then press the 0 key
followed by the 4 key.
□
04.XMT VERIFICATION
ON
2.OFF
OFF
KEY
PRESS SET KEY
r —1
1 tmaRROPT 1
L j
IV-1-12
or
2) Press the SET key.
CURRENT : OFF
l.ON 2.OFF
3) Press the 1 key to turn transmit verification on, or the 2 key to
turn it off.
XMT VERIFICATION : ON
PRESS SET KEY
4) Press the SET key.
- The initial setting is "OFF".
- When the transmission error occured, this report is always
printed out.
Page 67

lV-1. CONFIGURING THE MACHINE
TRANSMISSION VERIFICATION REPORT
TIME : 06/01/1992 14:li
NAME : BROTHER
FAX : 052-811-5981
TEL : 052-824-2554
DATE,TIME
FAX NO./NAME
DURATION
PAGE tS)
RESULT
MODE
- Coverpage and Callback Message does not count as part of Page Count.
Activity report
An activity report lists the last fifty most recent activities, that is,
transmissions that the machine has sent or received. The report
shows the date, time, fax number or name of the other machine,
transmission duration, the number of pages sent or received,
whether the transmission was successful and the transmission
type.
Activity reports are printed out automatically for each time interval
which you register using the following procedure.
1) Press the FUNCTION key. Then press the 2 key.
06/01 14:16
HEAD QTR.
00:01:33
01 COVERPAGE
OK
FINE
2.REGISTRATION
PRESS SET KEY
CALL BACK MSG
I
-----------
! INTERRUPT I
1
2) Press the SET key. Then press the 1 key followed by the 0 key.
10.ACTIVITY INTERVAL
PRESS SET KEY
3) Press the SET key.
BASIS TIME
IKPUT / PRESS
4) Enter the basis time. This is the start of the time interval for
which the machine will print out the activity report. When you
have entered the time press the SET key.
:
00:00
SET TO END
Page 68

IV-1. CONFIGURING THE MACHINE
5) Select the interval and press the appropriate key (1-7).
INTERVAL SELECT NO.
l.OFF . 2.1H 3.2H 4.4H
INTERVAL SELECT NO
5.8H 6.12H 7.24H
INTERVAL - 12H
PRESS SET KEY
INTEFIRUPT I
! I
t I
t
______
DEF
START
6) Press the SET key to confirm your setting.
- If you want to look at an activity report before the end of the time
interval, print it out manually as follows.
1) To print out an activity report manually press the FUNCTION
key followed by the 3 key.
I
3.ACTIVITY REPORT PRINT
PRESS START KEY
2) Press the START key. The report is now printed.
ACTIVITY REPORT
PRINTING
3) The screen returns to its normal display message.
Page 69

2. SENDING A FAX
IV-2. SENDING A FAX
There are two methods of sending a fax transmission - automatic
and manual.
Automatic
transmission
To transmit a document automatically, set the document face down
in the document feeder. The following screen appears:
FAX
COPY
Dial the fax number of the destination using one-touch, speed dial.
Telephone Index, or manual dialing. Then, press the START key.
The document is read through the machine automatically.
On successful completion of transmission, the machine will beep.
If the transmission verification is "ON", then you will get a report
at the end of each transmission.
If the telephone connection was not successful, and auto redial was
set to "on", the machine will try to send again automatically. (See
page IV-1-10.) If the auto redial was set to "off", the transmission
will fail.
If the transmission was not successful then, the unit will print out
a Transmission Verification Report (error) automatically. If the
distant end is busy or there is no response the LCD will read either
"NO RESPONSE OR BUSY", and the unit will print out a
transmission verification Report (busy) automatically.
CNG Tone is sent in Automatic Transmission.
ENTER
PRESS
FAX NO.
OOPY KEY
TRANSMISSION VERIFICATION REPORT
DATE,TIME
FAX NO./NAME
DURATION 00:01:33
PAGE (S)
RESULT
MODE
06/01 14:16
HEAD QTR.
01 COVERPAGE CALL BACK MSG.
ERROR
FINE
TIME ;: 06/01/1992 14:18
NAME ;
: BROTHER
FAX ;: 052-811-5981
TEL :: 052-824-2554
lV-2-1
Page 70

IV-2. SENDING A FAX
Manual transmission
HOOK
or
"2 3 ^ -
START
To transmit a document manually, set the document face down in
the document feeder. The following screen appears;
FAX
COPY
Either press the HOOK key or pick up the handset. Now dial the
number of the destination using one-touch, speed. Telephone
Index, or manual dialing. When you hear the answering fax tone
press the START key and, if necessary, hang up the handset.
The document is drawn through the machine automatically.
Upon successful completion of the transmission the machine will
beep.
- Auto Redial is not effective for manual transmission.
- Only the following current settings are effective for manual
transmission:
• Resolution
ENTER
FAX NO.
PRESS COPY KEY
HOOK
or
Points to
Remember When
Sending a Fax
• super COVERPAGE
• Call Reservation
- In case of dialing by Telephone Index, before pressing HO OK key
or picking up the handset, you should select the number from the
Telephone Index, (see page IV-8-1)
Bear in mind the following points whenever you send a fax.
• Adjusted the guides located on either side of the document, if it
is less than 8.5 inches /216 mm wide. (Min. width 5.8 inches/148
mm.)
• Do not send documents on any of the following types of paper:
- Thick paper
- Very thin paper, such as tissue or tracing paper
- Wet, wrinkled, torn, curled, or slick paper
- Thick photographic or coated paper
- Paper with tape or staples, or with metal or textiles attached
if you must send a document on any of these types of paper, copy
them first with a photocopy machine and then use the copies to
send your faxes. (Do not make your copies on this convenience
copier, as the paper restrictions for the fax function apply to the
copier as well.)
fy-2-2
Page 71

JV-2. SENDING Л FAX
• The range of optimum thicknesses for sheets used in the ADF is
2.8 X 10'^- 3.9 X 10'^ inches (0.07 - 0.10 mm) and the range for
weight is 0.07 x 10'^- 0.114 x 10'^ Ibs/inch^ (52 - 80g/m^). If you
are using only one sheet of paper, the thickness of the paper
should be between 2.8x10'^-3.9x10'^ inches (0.07 - 0.12mm)
and the weight, between 0.114 x 10'^ - 0.182 x 10'^ Ibs/inch^ (80
- 128g/m^).
• If the receiving fax machine is not set to AUTO ANSWER,
someone may answer the telephone. If this happens, ask the
other party to start fax reception by pressing their START key.
(Remember you must use the handset to speak to the other
party, as the unit does not have speakerphone.) Press the START
key and then hang up after you hear the fax tone.
• If a document stops during feeding, press the STOP key to
remove it. If the jammed paper is not ejected after pressing the
STOP key, open the cover and remove the document.
Loading multiple
pages for transmitting
or copying
• Remember that the fax machine
cannot read text or images closer
than 1/8" from any edge of a
document when copying or sending
a fax.
• Donot load more than 30 documents
into the feeder at one time.
• Be sure to remove all paper clips
before sending your document.
• Send glossy paper one page at a
time.
• Do not attempt to transmit paper of differing sizes or thickness
in one transmission.
The maximum document width to be input is 8.5" (216mm). The
maximum width of the printed (or scanned) area is 8.2" (208mm).
The maximum document length is 35,4" (900mm), the minimum is
3.9" (100mm).
If the document you are about to
transmit or copy is more than one page,
fan the sheets of paper and insert them
face down, ao that the first page is at the
bottom and will be fed first.
208 (mm)
Current setting for
sending a fax
In order to make the clearest, most effective fax transmissions
possible, the following current settings have been provided for
your use. They are described in greater detail in the unit shown in
parenthesis.
IV-2-3
Page 72

IV-2. SENDING A FAX
These current settings should be made after setting the document
face down in the document feeder (if needed), but before entering
the fax number.
Set the Doc. in the
feeder
Enter Fax No.
Press START key
START
t
Effective “current setting”
• Resolution: This can be changed from standard to fine (for
newsprint and drawings), super fine (for highly detailed
drawings), photo (for sending pictures), by pressing the resolution
key. (See page V-1-1)
• Contrast: This can be changed automatically.
If you want to send a super-light document, you can select "super
light" mode manually, (see page V-2-1)
• super COVER?AGE: This exclusive Brother feature lets you
send an extra sheet which includes your name and fax number as
well as those of the destination. In addition, a message such as an
"urgent!", "confidential", or your own message can be included
with this information. (See page V-4-1)
• Timer: This option allows you to set a time at which you want
your documents to be sent. This means it is possible to send a
document when you are not in the office (e.g. at night when
telephone rates are low). (See page V-6-1)
• Polling: Fax units can use this function to request documents
from other units. Several sub-options are also available to let you
make the most effective use of this feature. (See page V-8-1)
lV-2-4
• Password: This security function lets you send and receive faxes
in a closed network, and prevents reception of junk faxes. (See
page V-7-1)
• Call Reservation: This allows telephone conversation with the
other party after sending message. (See page V-5-1)
• Relay Broadcasting: This allows documents to be sent to a central
machine (a Brother machine with memory) for storage and relay
transmission to other local machines. You can save the expense of
numerous long-distance calls. (See page V-12-1)
• Confidential mailbox: This allows you to send a document
which will be stored in the receiving unit's memory until the
receiving party inputs an access code. (See page V-13-1)
Page 73

IV-2. SENDING A FAX
• Broadcasting: This featurecanbe used to send the same document
to several different locations in a single operation. (See page V-11-
1)
• Memory : This allows you to send document(s) from memory,
(see page V-9-1)
• ECM: This is error correction mode which checks the integrity of
a fax transmission while it is in progress and takes corrective
action, (see page V-10-1)
Redialing
Automatic redialing
If the number that you have dialed is engaged you can redial it
without having to re-enter the number. There are two different
ways of doing this, depending on whether you are using manual or
automatic transmission.
Automatic redialing can only be used for faxes that were sent using
automatic transmissions - not for telephone calls. You can turn
automatic redialing on or off (see page IV-1-10).
When using automatic transmission to send a fax, if the destination
number is engaged, the machine will automatically redial the
number up to three (3) times at five (5) minutes intervals.
- Before using automatic redialing/, you can send a different fax
message or make a copy of a document using the "Interrupt"
feature.
(See page V-16-1.)
- To cancel automatic redialing, press STOP key.
IV-2-5
Page 74

lV-2. SENDING A FAX
Manual redialing
or
PAUSE/REDIAL
srAflr
HOOK
HOOK
If you are manually sending a fax or using the unit as a telephone
and you obtain a busy signal^ carry out the following procedure.
1) Replace the handset or press the HOOK key.
2) Pick up the handset or press the HOOK key.
3) When you hear the dialing tone press the REDIAL key. The
machine now redials the number it dialed last.
4) If you are sending a fax, press the START key when you hear the
answering fax tone. If you are making a telephone call, simply
proceed when the called party answers.
JV-2-6
Page 75

3. RECEIVING A FAX
Automatic reception
] MANUAL
— F/T
I AUTOANS I
Manual reception
---------
1 M/U!
AUTOANS ‘ C5^'
1 AUTOANS
MANUAL
FfT
AUTOANS
lV-3. RECEIVING /i FAX
Fax reception can be either manual or automatic. You will probably
want to receive faxes automatically, as this is the more
straightforward method. However, if you are using a single
telephone line for both telephone and fax reception you will have
several options. You can either use the unit in manual reception and
monitor all in-coming calls, or you can use the FAX/TEL switch
and let the machine decide if the call is a fax message or not.
To receive faxes automatically set the AUTO ANS function to ON
(the AUTO ANS. LED is lit), (see page IV-1-7). There is no need for
any further intervention - the machine will answer all calls
automatically at any time. Having successfully received a fax the
machine beeps once.
To receive faxes manually set the AUTO ANS function to OFF (the
MANUAL LED is lit), (see page lV-1 -7). The procedure for receiving
a fax is as follows:
HOOK
START
Reception with FAX/TEL switching
1) When the telephone rings either pick up the handset or press the
HOOK key.
2) If you hear a fax tone press the START key.
3) Replace the handset if necessary.
Having successfully received a fax the machine will beep once.
There are two types of reception with FAX/TEL switching as
described in the configuration section (see page IV-1-7) at the start of
this chapter.
1) Automatic transmission from the other party.
2) Manual transmission from the other party.
- Pick up the handset while the machine is ringing. Follow the
same procedure as for manual reception. If you do not pick up the
handset, the machine will he changed to automatic reception
mode after the specified ringing time. (Refer to the section on the
FAX/TEL switch elsewhere in this chapter.)
______________________________________________________
IV-3-1
Page 76

IV-3. RECEIVING A FAX
Reception by Enhanced Faxes can be received through the use of an external telephone or
Remote Activation an extension telephone.
Remote activation
You can activate the fax machine from a remote telephone. This is
useful if you are using the machine on an extension of a key
telephone system.
Remote activation allows you to receive a call on a telephone which
is either connected from the fax unit or is parallel connected to your
telephone line (extension telephone), but is not located near the fax
unit. If an in-coming call is a fax transmission, simply press F/T &
REMOTEID of the external/extension telephone (tone-type) to
enable reception of the fax.
- If you accidently pick up your extension or external telephone by
mistake when you are transmitting or receiving a FAX. there
might be some slight distortion on the document.
- If you are using an extension or external telephone, be sure to use
" it"and!or 'W'for the F/T& Remote ID. (This will help you avoid
operation errors.)
Reception into memory If the unit has run out of paper it will automatically store any fax
transmissions it receives in its memory. Also, if it runs out of paper
midway through receiving a transmission, it will store the part of
the document that it is unable to print. The following message
appears on the LCD display:
IV-3-2
CHECK RECORDING PAPER
Load the machine with paper and the unit will print any stored
documents or parts of documents.
No data is lost provided you do not turn off the machine prior to
printing out the stored documents.
Page 77

IV-3. RECEIVING A FAX
Registering F/T &
Remote ID
Ezzazaal | 2 |
/NTERfiUPT I
I
_______
I
Use the following procedure to register an F/T & Remote ID.
The initial setting is "
1) Press the FUNCTION key. Then press the 2 key on the number
keys.
2.REGISTRATION
PRESS SET KEY
2) Press the SET key. Then press the 0 key followed by the 4 key.
04.F/T & REMOTE ID
PRESS SET KEY
3) Press the SET key.
F/T & REMOTE ID : 2^*
INPUT / PRESS SET TO END
Enter your chosen F/T & REMOTE ID number. When you have
entered it correctly/ press the SET key.
- When you connect the external telephone to a TAD (telephone
answering device), the "F/T & REMOTE ID" you enter must be
different from the TAD operation ID.
- If you are making use of an extension or external telephone, be
sure to use the "#" and/or " symbols. This will help prevent
the fax unit from being turned on (accidentaly into reception
mode) when you are dialing.
IV-3-3
Page 78

iV-4. USING ONE-TOUCH NUMBERS
4. USING ONE-TOUCH NUMBERS
If you regularly send faxes to the same destinations, it is useful to
be able to dial these numbers without having to input them in every
time using the number keys. A one-touch key enables you to send
a fax (or make a telephone call) to a particular destination without
having to enter the number every time - you simply press the
relevant one-touch key and the machine automatically dials the
number you require. The InstaFAX2200M can store up to sixty (60)
fax or telephone numbers as one-touch numbers. The
InstaFAX2100M can store up to thirty (30) fax or telephone numbers
as one-touch numbers.
There are thirty one-touch keys, numbered 00 (30) to 29 (59), and a
shift key which enables you to store different two destinations
numbers under each one-touch key. (This applies only to the
InstaFAX2200M.)
(For example, to dial the number stored as one-touch numbered 13,
press the one-touch 13 key in the InstaFAX2100M/2200M. To dial
the number stored as one-touch number 39 hold down the SHIFT
key and press the one-touch 09 key in the InstaFAX2200M.)
Registering one-touch To store a fax or telephone number as a one-touch number proceed
numbers as follows.
laiJMtWi
]
1) Press the FUNCTION key. Then, press the 1 key on the number
keys.
1.ONE-TOUCH / SPEED DIAL
PRESS SET KEY
2) Press the SET key. Then press the 1 key.
1.ONE-TOUCH DIAL
PRESS SET KEY
3) Press the SET key.
ONE-TOUCH DIAL
SELECT ONE-TOUCH KEY
IV-4-1
Page 79

ONE TOUCH KEY
IV-4. USING ONE-TOUCH NUMBERS
4) Now press one of the one-touch keys, or hold down the SHIFT
key and press a one-touch key. Pressing a key on its own permits
you to register one of the numbers 00 to 29. On the
InstaFAX2200M, holding down the SHIFT key allows you to
register the numbers 30 to 59. The display changes to show the
one-touch key number.
★ 05
INPUT / PRESS SET TO END
means one-touch
5) Enter the number (which can have up to 20 digits). When you
have entered the fax or telephone number, press the SET key.
NAME:_
INPUT / PRESS SET TO END
6) Enter the name (up to 24 characters) in the way described in the
section entitled Entering information using the keys. Press the
SET key when you have finished.
or
L
_________
STOP
CURRENT : FAX
TEL 3.0FF
]or
DBF
!□
l.FAX 2
7) Press the 1 key for Fax, the 2 key for Telephone, or the 3 key for
off.
This selection is only used for the dial list. Selecting "ofF is used
for group keys (see page IV-4-3.), or chain dialing keys (see page
IV-6-1).
CURRENT : FAX
PRESS
8) Press the SET key to confirm the setting.
J
9) You can either continue and register another one-touch dial
number, or end registration by pressing STOP.
ONE-TOUCH DIAL
SELECT ONE-TOUCH KEY
SET KEY
IV-4-2
Page 80

IV-4. USING ONE-TOUCH NUMBERS
RGgiStering one-touch You can also store many destinations under a single one-touch key
numbers as a group key as a group. This feature is very useful for the broadcast transmission
function (see page V-11-1), sequential polling function (see page V8-5), and relay broadcasting function, (see page V-12-1)
Defining and storing a To define and store a group of destinations use the following
group procedure.
1) Press the FUNCTION key. Then press the 2 key.
]
2.REGISTRATION
PRESS SET KEY
I INTERRUPT 1
WXY
IZI
INTERRUPT
ONE TOUCH KEY
XDCOCXD
2) Press the SET key. Then press the 0 key followed by the 9 key.
09.GROUPING
PRESS SET KEY
3) Press the SET key.
GROUPING
SELECT GROUP KEY
4) Press the one-touch key to which you wish to assign the group
that you are defining. If you have previously assigned onetouch or group to this key, you are asked whether you want to
change or not. (If you have already assigned groups to six onetouch keys the unit will keep and display a message informing
you that no new groups can be registered.)
NEW GROUP
ENTER GROUP N0
5) You can assign up to six groups numbered 1 to 6. Press the group
number, using number keys.
GROUP 01
PRESS SET KEY
lV-4-3
6) Press the SET key.
G01:_
INPUT / PRESS SET TO END
Page 81

nrni 0 II-O
1 INTERRUPT 1
OLIOIZO
lV-4. USING ONE-TOUCH NUMBERS
7) Enter the members of your new group using already registered
speed dial numbers and one-touch keys (you can include up to
129 stations in one group fur 2100M and 159 stations in one
group for 2200M). The name of each destination is shown as you
enter it on the lower line. The one-touch or speed dial numbers
that you have entered are shown on the upper line. After each
entry the cursor key must be pressed to lock in that entry.
- A one-touch number xvill he represented by a** * " in front of the
one-touch location number. Speed dialing numbers are represented
by a in front of the speed dial location number.
G01:#02#04±07
FRENCH OFFICES
8) Press the SET key to confirm your group selection.
NAME:_
INPUT / PRESS SET TO END
9) Enter a name for the new group using the number keys (within
24 characters).
Sending one-touch faxes
Printing a list of
one-touch numbers
tsUHAiMJt I
NAME:EUROPEAN 0FFICES_
INPUT / PRESS SET TO END
10) Press the SET key.
To send a fax to a destination whose number is stored under a one-
Louch key simply follow the steps for sending a fax, either manually
or automatically, and instead of dialing the number with the keys
just press the relevant one-touch key (or hold down the shift key
and press the one-touch key). The stored fax number is dialed
automatically. To begin transmission just press the START key.
To print out a directory listing of the names and numbers stored as
one-touch dial numbers.
1) Press the FUNCTION key. Then press the 4 key on the number
]
keys.
4.LISTS AND REPORTS
PRESS SET KEY
IV-4-4
Page 82

lV-4. USING ONE-TOUCH NUMBERS
i
-----------
t INTERRUPT I
T
HJ
2) Press the SET key, then press the 2 key.
3) Press the START key to print out a list of the one-touch names
and numbers. The screen displays a message informing you
that it is printing out the list of one-touch dial numbers.
4) Press the CLEAR key to return to the functions menu.
ONE-TOUCH DIAL LIST
2.ONE-TOUCH DIAL
PRESS START KEY
LIST - ONE-TOUCH DIAL
PRINTING
NUMBER
*00
*01
*02
*03
*04
*05
*06
*07
FAX/TEL NUMBER
20182858815
9083568880
31489787788
1467823
71498709892
0117361236
0899067856
6753452
FAX
FAX
TAX
FAX
FAX
TEL
TEL
TEL
TIME
NAME
FAX
TEL
DESTINATION
HEAD QTR
NJ OFFICE
FIANCE DEPT
DESIGN DEPT
LA OFFICE
UK OFFICE
PARIS OFFICE
ABC CAMPANY
06/01/1992 18:40
BROTHER
052-811-5981
052-824-2554
GROUP
G1
G1
G1
G1
lV-4-5
Page 83

IV-4. USING ONE-TOUCH NUMBERS
Changing or Erasing
one-touch names and
numbers
ONE TOUCH KEY
MAIL \
■ ssiaii
________
I
You can change or erase one-touch dial names and numbers by the
following step.
1) Select the one-touch dial option from the functions menu and
press the relevant one-touch key.
■ ^05:BIC US
CHANGE ? l.YES
2) Press the 1 key. To alter a one-touch dial name and number,
enter the new number and name as described in the sections
Entering information using the keys.
name & number, position the cursor at the extreme left end of
the number and press the CLEAR key.
2. NO
To delete a one-touch dial
IV-4-6
Page 84

IV-5. USING SPEED DIAL NUMBERS
5. USING SPEED DIAL NUMBERS
In addition to one-touch numbers you can also store another
hundred fax or telephone numbers that you can access using two-
number cnmbinaHons-thesparp known as speed dial numbers. To
dial one of these numbers you simply press the SPD. DIAL key
followed by the appropriate two-digit speed dial numbers, and the
machine dials the number you require. Speed dial numbers are
numbered 00 to 99 (Even if the first digit is 0 you must type it when
accessing the number - you cannot just type the S P D. DIAL key+the
1 key to call up the speed dial number 01.)
RogiStGring SpGGd dial To store a fax number as a speed dial number proceed as follows.
numbers
liiiiWiSJM
1
1) Press the FUNCTION key. Then press the 1 key.
1.ONE-TOUCH / SPEED DIAL
PRESS SET KEY
I
_______
ru—irr~ir~r-l
r^l 5 iLlfn
I 7~ir~T II T 1
I «~ll 0 II * 1
I 4 H 8 1
I 7 .11 ir^
1
2 I! 3 1 I
-----' I mennuPT i
r-iri—inn
--------------------------------------
2) Press the SET key, then press the 2 key.
2.SPEED DIAL
PRESS SET KEY
3) Press the SET key.
SPEED DIAL
SELECT N0. #
means “speed”)
4) Now enter the two-digit speed dial number you want to set.
#10
INPUT / PRESS SET TO END
1
5) Enter number (which can have up to 20 digits).
When you have entered the number, press the SET key.
NAME:_
INPUT / PRESS SET TO END
IV-5-1
Page 85

lV-5. USING SPEED DIAL NUMBERS
6) Enter the name (which can have up to 15 characters) in the way
described in the section entitled Entering information using the
keys. Press the SET key when you have finished.
CURRENT : FAX
l.FAX 2.TEL 3.0FF
7) Press the 1 key for Fax^ the 2 key for Telephone, or the 3 key for
off. This selection is only used for the dial list. Selecting "off'' is
used for group keys (see page IV-4-3) or chain keys (see page IV-
6-1).
or f-rn
CURRENT : FAX
PRESS SET KEY
INTERRUPT
8) Press the SET key to confirm your choice. The screen again
shows:
SPEED DIAL
SELECT NO. #
STOP
Sending speed dial
faxes
Printing a list of speed To print out a directory listing of the names and numbers stored as
dial numbers speed dial numbers.
I laWWif»:«
]
9) You can either continue and register another speed dialnumber,
or end registration by pressing the STOP key.
To send a fax to a destination whose number is stored under a speed
dial key simply follow the steps for sending a fax, either manually
or automatically, and instead of dialing the number with the keys
just press the SPD. Dl AL key followed by the appropriate two digit
speed dial code. The stored fax number is dialed automatically. To
begin transmission just press the START key.
1) Press the FUNCTION key. Then press the 4 key.
4.LISTS AND REPORTS
PRESS SET KEY
) INTERRUPT
2) Press the SET key, then press the 3 key.
3.SPEED DIAL
PRESS START KEY
IV-5-2
Page 86

/V-5. USING SPEED DIAL NUMBERS
STAfJr
mtL I
SPEED DIAL LIST
NUMBER FAX/TEL NUMBER
#00 1-2018285881
#01
#02
#03
#04
#0^5
20135640856
001-3-3148978778
12358769
5892786
3) Press the START key to print out a list of the speed dial names
and numbers. The screen reverts to the LIST menu.
LIST - SPEED DIAL
PRINTING
4) Press the CLEAR key to return to the functions menu.
TIME : 06/01/1992 18:40
NAME : BROTHER
FAX : 052-811-5981
TEL : 052-824-2554
GROUP
G1
G1
FAX
FAX
FAX
TEL
TEL
DESTINATION
AUSTRALIA OFFICE
D.D.LTD.
GERMAN OFFICE
W.CAMPANY
M.CAMPANY
Changing or Erasing speed dial names and numbers
rn-ir~2—
rT~i\ 5 n tn
COCOQE]
MAIL
Egtia
lV-5-3
You can change or erase speed dial names and numbers by following
these steps.
Select the speed dial option from the functions menu.
1) Press the relevant two digit speed dial code.
#05:BR0THER
CHANGE ? l.YES 2.N0
2) Press the 1 key. To alter a speed dial name and number, enter the
new number and name as described in the sections Entering
information using the keys. To delete a speed dial name &
number, position the cursor at the extreme left end of the
number and press the CLEAR key.
Page 87

ACTIVITY REPORT
lV-5. USING SPEED DIAL NUMBERS
TIME : 06/01/1991 16:00
NAME : BROTHER
FAX : 052-811-5981
TEL : 052-824-2554
DATE TIME
12/15 10:00
12/15 10:12
12/15 10:15 FIANCE DEPT,
12/15 10:20
12/15 10:33
12/15
12/15 13:06 LA OFFICE
12/15 13:20
12/15
12/15
12/15 15:20
12/15 15:31 033542765
12/15
12/15
12/16
12/15
12/16
12/16
12/16
12/16
11:47
14:37
15:02 FINANCE CENTER
15:40
15:55
10:41
11:18
12:09
14:05
14:22
15:59
FAX NO./NAME
BROTHER BOSTON
NJ OFFICE
BIE MANCHESTER
DHL JAPAN
001-12018663756
lA OFFICE 4:07
HEAD QUARTER
DISIGN DEPT. 45
AUSTRALIA OFFICE
TOKYO OFFICE
FINANCE CENTER
OSAKA OFFICE
33-1-3876543
HEAD QUARTER
8765432
ABC CAMPANY
COVERPAGE
CV
POLLING
POL
DURATION
10:30
1:30 1
3:45 5
11:33 17 CV
30 1
1:20 3
5:54
1:05
1:06
1:05 1
57
58
46
1:12 2
51
8:23
2:35 3
48
CA
CALL BACK MSG
RET
RETRIEVAL
PAGE (S)
20 CV CA
7
5
2
2
1
1 OK
0 CV ERROR
2 OK
1
10
1
RESULT
OK TX
OK TX
ERROR TX 24 33
OK TX POL
OK TX
OK RX POL
OK TX
OK
ERROR
OK
OK TX RET
ERROR
CANCEL
OK
OK
OK
OK
COMMENT
TX
TX 24 12
TX
RX RET 19 87
TX
TX
TX ECM
TX
RX ECM
TX
RX
TX
IV-5-4
Page 88

IV-6. CHAIN DIALING
6. CHAIN DIALING
Setting chain dialing
In addition to the one-touch and speed dialing functions available
on the unit, a further convenient option called "chain dialing" can
be used with either of the quick dialing functions.
When you send an automatic-transmission, the machine allows
you to use a single one-touch dial or speed dial number. However,
if you register a one-touch or speed dial as a "chain dialing"
number, the machine allows you to use two different one-touch or
speed dial numbers (a chain dial number followed by a one-touch,
speed dial number or manual dialing (within 20 numbers)).
When dialing overseas fax or telephone numbers, there may be
situations in which a company can offer you better rates than the
telephone company you normally use. Chain dialing lets you
choose the telephone company whose line charge is lower if you
register the access code to a second telephone company as a chain
dial number. This is also important when using a telephone credit
card.
Instructions on how to use this option are provided below,
CHAIN t
PASSWORD !
When you register a one-touch or speed dial number, simply press
the CHAIN key before entering the number.
(■ ©mark appears on the screen, ©means “chain dialing.”
•:k05
INPUT / PRESS SET TO END
After that, the procedure is the same as for one-touch or speed dial
numbers.
- You can register numbers with up to 19 digits,
- You cannot send a transmission using cjiain dialing only. A one-
touch, speed dialing number, or manual dialing (within 20
numbers) number must also be used.
Send i ng using chain Press the first key registered as chain dial then press second key that
you wish to chain. Then press START.
IV-6-1
Page 89

7. USING THE TELEPHONE INDEX
All the names and numbers that you register as one-touch dial or
speed dial numbers are stored in an alphabetical directory list. You
can search through this list to find whether a particular person's or
company's number is recorded and automatically dial any listed
telephone or fax number.
Looking up a number
TÉL IHP^X
TolookupanumberinthedirectorypresstheTEL-INDEXkey. You
are prompted to enter the initial letter of the name you are looking
up. Use the keys on the number to enter a letter in the same way as
entering a name^ for example press the 2 key once to enter A, twice
for B or three times for C. The LCD screen shows the first name
stored under the letter you have entered.
H( HEAD QTR.
To look through the names stored under the selected letter, use the
right cursor key. Each time you press the key the next name in the
alphabetical list is shown. To go through the list in the opposite
direction (that is, from Z to A) use the left cursor key. To choose a
different initial letter use the appropriate letter key,
lV-7. USING THE TELEPHONE INDEX
PRESS OR STOP KEY
Sending a fax
TEL INDEX
I
-----
START
- Names are sorted as follows:
d) A-Z (alphabet)
® Special characters (AE OU Me AN)
(3) Numbers (0-9)
® Punctuation marks and Symbols
- If you did not enter a name for one-touch or speed dial number,
the fax/telephone number is used as the name, and ""number"
appears on the LCD.
To send an automatic fax to a number recalled from the Telephone
Index simply set your document face down in the automatic
document feeder, press the TEL-INDEX key, use the appropriate
letter key and (<— / —^) cursor keys, if necessary, to display the name
anh number you require and then press the START key.
IV-7-1
Page 90

lV-7. USING THE TELEPHONE INDEX
In case of manual transmission, before pressing HOOK key or
picking up the handset, you should press TEL-INDEX key and look
up the dial, and confirm it by pressing TEL-1NDEX key again. After
that press HOOK key or pick up the handset, and press TEL- INDEX
key again.
Printing out the
telephone index
I ESZHlt
fwrennupr
T~l
To print out a directory listing of all the names and numbers stored
in the telephone index.
1) Press the FUNCTION key. Then press the 4 key on the number
keys.
4.LISTS AND REPORTS
PRESS SET KEY
2) Press the SET key, then press the 4 key.
4.TEL. INDEX
PRESS START KEY
LIST - TEL. INDEX
PRINTING
jy-7-2
Page 91

TELEPHONE INDEX LIST
IV-7. USING THE TELEPHONE INDEX
DESTINATION
ABC CAMPANY
ALL OFFICES
AUSTRALIA OFFCE
DESIGN DEPT
D.D.LTD.
FIANCE DEPT
GERMAN OFFICE
HEAD QTR *00 20182858815
LA OFFICE
M.COMPANY
NJ OFFICE
PARIS OFFICE
UK OFFICE
W.CAMPANY
C:CHAIN
NUMBER
*07
*19
#00
*03
#01
*02
#02
*04
#04
*01
*06 0899067856
*05 0117361236
#03 12358769
FAX/TEL NUMBER
6753452
*** GROUP 1 ***
1-2018285881
1467823
20135640856 FAX
31489787788
001-3-3148978778
71498709892
5892786
9083568880
TIME
NAME
FAX
TEL
06/01/1992 18:45
BROTHER
052-8I1-5981
052-824-2554
GROUP
TEL
FAX
FAX
PAX
FAX G1
FAX
FAX G1
TEL
FAX
TEL G1
TEL
TEL
G1
G1
G1
IV-7-3
Page 92

IV-8. USING THE UNH AS A TELEPHONE
8. USING THE UNIT AS A TELEPHONE
As well as sending fax transmissions, this fax machine can also be
used to make telephone calls. You can either dial numbers manually
or use one-touch dialing, speed dialing ui the telephone index.
Manual dialing
HOOK
or
One-touch dialing
HOOK
□
or
ONE TOUCH KEY
Speed dialing
or
SPD. DIAL
Ì
HOOK
Pick up the handset and dial the telephone number normally using
the number keys.
Alternatively, press the HOOK key to enable dialing and then dial
the telephone number using the number keys. When the receiving
party answers, pick up the handset and proceed with your call.
You can use any of the one-touch telephone numbers that you have
registered. Simply pick up the handset (or press the HOOK key), and
press the appropriate one-touch key. On the InstaFAX2200M you
need to hold down the SHIFT key for numbers 30 through 59.
If you use the HOOK key, pick up the handset when your call is
answered.
You can also make use of the speed dial feature. Simply pick up the
handset (or press the HOOK key), press the SPD. DIAL key and type
the appropriate 2 digit speed dial number.
If you used the HOOK key, pick up the handset when your call is
answered.
Using the telephone
index
lV-8-1
To dial a telephone number from the telephone index, first press the
TEL'INDEX key and enter the initial letter of the name you are
searching for. Use the cursor keys to search forwards and backwards
through the directory. When the name you are searching for is
displayed on the LCD, press the TEL-INDEX key, pick up the
handset (or press the HOOK key) and then press the TEL-IN DEX key
again. The unit will then dial the displayed number.
If you used the HOOK key, pick up the handset when your call is
answered.
Page 93

IV-8. USING THE UMITAS .4 TELEPHONE
Using keys with the
telephone
Using an external
telephone
Using an external
telephone answering
device
PAUSE key- Use this key to put a pause between numbers.
(You cannot use the PAUSE key continuously.)
HOLD key- Use this key to put a telephone call on hold.
Flash key#key-
You can use the fax machine with an external telephone or with an
external TAD (telephone answering device).
Connect the external telephone as described in the "ADDITIONAL
SET UP OPTIONS" (see page III-9-1).
Connect your external telephone answering device (TAD) to the
EXT. DEVICE jack as shown in the illustration below.
Use this key to transfer a call and put it on hold.
Use this key to switch the dialing type to "tone",
in case it had previously been set to "pulse".
AUTOANS I
MANUAL
] «
ffT
AUTOANS
Set the Auto Ans. switch to "Manual" (so that only the "Manual"
LED is lit).
The external TAD is now ready for use.
The unit will enter the document reception mode automatically
when another party tries to send a fax transmission with a CNG
tone to your machine. CNG is generated by most Group 3 FAX
machines.
If the sending party (using a tone type unit) presses your F/T &
REMOTE ID code, fax reception is switched to the main unit.
• If the ICM section of your external TAD is full, the TAD will not
answer the telephone. As a result the unit cannot receive the
transmission.
ÍV-8-2
Page 94

IV-8. USING THE UNIT AS A TELEPHONE
If your external TAD has a paging function^ the unit may prevent
the paging function from working.
Some fax machines may not be able to signal your fax machine
to switch on automatically during a transmitting. To cover this
possibility we recommend that you record a message on your
TAD requesting the sending party to enter the F/T & Remote ID
code key on his unit before transmission.
A sample message; "Our answering machine is coimected to a
fax unit at present^ so if you would like to send a fax, please press
the XX (your F/T & REMOTE ID) by tone signal and send your
fax after you hear the FAX tone. If you would like to leave a
message, please do so after this message. Thank you."
IV-8-3
Page 95

}/. Advanced uses
1. RESOLUTION
There are four different resolution settings available-STANDARD,
FINE, SUPER FINE, and PHOTO. Note that the photo mode on the
InstaFAX2200M is always in super gray scale. The standard
resolution is adequate for sending ordinary text documents. Fine
resolution is intended for the transmission of graphic images and
documents that have small print. SUPER FINE is for use with
finely-detailed graphic images such as complex line drawings and
similar artwork. PHOTO resolution mode is specifically designed
for the transmission of photographic images. The photo mode in
the InstaFAX2200M (super gray scale) improves upon the normal
photo mode by allowing the transmission of text on the same
document with a photo without any loss of text clarity. Tt also
prevents patterns from forming in the photo image. Whichever
mode you use, the quality of the printed document's at the distant
location will not be adversely affected.
You can select a resolution setting in two ways. Firstly, you can
press the RESOLUTION key on the key panel prior to sending your
document and light the LED corresponding to the resolution mode
you want to select. Your document is then transmitted using the
same resolution mode you have selected. Secondly, you can use the
CURRENT SETTING function to select a resolution setting for each
page of a document individually. Both setting methods will be
effective for one transmission only. If the receiving fax machine
cannot print at the resolution that you specified, transmission will
take place at a lesser resolution. (The resolution LEDs change to
show you which resolution is being used to print the current
document or page that you are sending is being printed.)
Single resolution transmission
\FtNE
]S.FINE
1 PHOTO
START
- "Super Fine" resolution can only he used between Brother
machines.
- If no LED is lit, the unit is in standard resolution.
Place your document in the document feeder and dial the number
as you do for an ordinary fax transmission. Before pressing the
START
Press once for FINE mode, twice for SUPERFINE and three times
for PHOTO mode. Pressing the RESOLUTION key fourth time
returns the machine to the standard resolution mode. There are
three LED lights positioned next to the RESOLUTION key to
indicate the current resolution setting. If all three are not lit, the unit
will transmit at the standard resolution. For each of the other three
resolution modes, the appropriate light comes on when the mode
has been selected.
When you have selected the resolution mode press the START key.
Your document will be sent at the specified resolution.
_______________________________________________________
key select a resolution by pressing the RESOLUTION key.
V-1-1
Page 96

V-l. RESOLUTION
After transmission has been completed the unit reverts to standard
resolution mode. The three resolution LEDs are not lit.
Multiple resolution
transmission
1 FINE
1 S.FÌNE
I PHOTO
)
-----------
I INTERRUPT I
1
If your fax transmission document runs to several pages^ some with
graphics, some with text and others with photographic images, you
can specify a resolution mode for each individual page.
1) Set the document in the feeder. Use the RESOLUTION key to set
the resolution you require for the first page of your document.
2) Press the FUNCTION key followed by the 6 key.
6.CURRENT SETTINGS
PRESS SET KEY
3) Press the SET key, then the 2 key.
2.RESOLUTION
PRESS SET KEY
4) Press the SET key. The screen display now alternates between
the following two messages, prompting you to specify a
resolution for page 2 of your document.
Г^~11 Д il-XJ
[-тпг^[::д
I 7 II e irrh
I * II 0 ir^
V-1-2
PAGE 02 : STANDARD
1.STANDARD 2. FINE
FLIP-FLOP
PAGE 02
3.PHOTO
5) Enter the number corresponding to the resolution you wish to
set for page 2.
-OR-
STANDARD
4.S.FINE
PAGE 02 : FINE
PRESS SET KEY
6) Press the SET key to confirm your choice. The display now
prompts you to select a resolution for page 3. Specify your
choice in the same way. The display continues to prompt you for
resolution settings for successive pages up to a maximum of 30.
When you have selected settings for all the pages In your
transmission press the STOP key.
- The jyuper COVERPAGE and Cull Buck Messages are nut counted
when determining the page number for scanning resolution.
Page 97

V-1. RESOLUTION
~23^ 1
q
START
The resolution of in-coming documents
Copier resolution
iRwe
]S.FINE
I PHOTO
COPY
FAX
COPY
- A«y pages for which you did not set a resolution will he
transmitted at the same resolution as the last page for which you
did set a resolution.
6) Select the fax number in the usual way and press the START key.
Your document is sent at the specified resolutions.
After transmission has been completed the unit reverts to standard
resolution mode. The three resolution LEDs arc not lit.
The resolution of fax transmissions that you receive depends
entirely on the capabilities of the fax machine from which the
document was transmitted and the settings selected by the person
sending it. Your fax machine can receive and print documents in
three modes, STANDARD, FINE and SUPERFINE. The mode
being used to print the document (or the current page) is indicated
by the LED lights.
The photo LED is not lit when receiving document in photo mode.
You can use the convenience copier in SUPERFINE or PHOTO
modes. However, you can only use a single mode for each copy
operation. Pages of a document that are to be copied at a resolution
different to that of the rest of the document must be loaded and
copied separately.
Set the document in the feeder. Select a mode by pressing the
resolution key, and then press the COPY key. If you make a copy
without having first selected a resolution, the machine will
automatically copy using "SUPER FINE" mode. The SUPER FINE
LED will come on to show that this mode is being used.
ENTER
PRESS
FAX NO.
COPY KEY
After you have made your copy the unit reverts to the standard
resolution mode. The three LEDs are not lit.
V-1-3
Page 98

V-2. SETTING THE CONTRAST
2. SETTING THE CONTRAST
The unit has an "Auto-Contrast" feature^ so you do not have to
select the contrast setting before sending. However, if you want to
send a very light document, set the contrast to "SUPER LIGHT"
manually.
1) To select the "SUPER LIGHT" contrast mode, first set your
document in the feeder.
(
-----------
I wssimi
1
2) Press the FUNCTION key followed by the 6 key. The following
message appears.
3) Press the SET key followed by the 1 key.
5.CUKKLMi SETTINGS
PRESS SET KEY
¡.CONTRAST
PRESS SET KEY
I INTERRUPT I
T~1
4) Press the SET key. The current contrast setting is displayed.
CURRENT : AUTO
l.AUTO 2.SUPER LIGHT
5) Press the 2 key to select SUPER LIGHT mode.
CONTRAST ; SUPER LIGHT
PRESS SET KEY
STOP 6) Press the SET key to confirm your selection. Then press the
I
STOP key.
7) Now you can send your transmission or make your copy.
- This setting is only effective for one transmission or copy
operation.
V-2-1
Page 99

V-3. SMOOTHING
3. SMOOTHING (ENHANCED IMAGE RESOLUTION)
The fax machine has the capability to smooth the outlines of text
characters on the faxes that you receive. This is a useful feature as
it allows you to enhance the presentation quality of text documents
that are sent to you without having to rely on the sender to alter the
resolution setting on his machine.
There are two possible smoothing settings - ON or OFF. Select OFF
to prevent the fax machine from performing any smoothing, and
select ON to activate smoothing.
The procedure for turning smoothing ON or OFF is shown below.
I
_______
I INTERRUPT
LlZl
INTERRUPT 1
5 I
J
1) Press the FUNCTION key. Press the 5 key on the number keys.
5.USER OPTIONS
PRESS SET KEY
2) Press the SET key. Press the 0 key followed by the 8 key.
08.SMOOTHING
PRESS SET KEY
3) Press the SET key.
CURRENT : ON
2.OFF
or
T~~\
l.ON
4) Press 1 to select the smoothing mode, and press 2 to turn the
smoothing function off.
SMOOTHING : OFF
PRESS SET KEY
INTERRUPT
5) Press the SET key to confirm your selection.
The smoothing setting will remain in effect until you change it.
- The initial setting is "ON",
- Smoothing is a receive function and will not increase time on
reception.
V-3-1
Page 100

V-4. USING THE SUPER COVERPAGE FACILITY
4. USING THE SUPER COVERPAGE FACILITY
When you send a fax it is often useful to send an accompanying
cover sheet at the same time. This sheet is known as the super
COVERPAGE and tells the person receiving the fax your name, fax
number and telephone number. These are the name and numbers
that you will have registered in the machine as part of the
configuration process. If you have not registered your name, fax
number and telephone number (Station ID), you cannot send the
super COVERPAGE.
You can also choose to show on the super COVERPAGE the
number of pages you are faxing.
You can include an optional comment on the super COVERPAGE.
You can select one of five cuiiiinents, three that are preset and two
original messages which you can create yourself. You can also
choose no comment.
Sending a fax
with a super
COVERPAGE
1
-------
\COVERPAGE
The steps for sending a fax transmission with a super COVERPAGE
are as follows.
1) Set the document face down in the feeder.
FAX : ENTER FAX NO.
COPY : PRESS COPY KEY
2) Press the COVERPAGE key on the panel. The screen prompts
you to select one of the five available comments or select to send
the fax without a comment. Comments 5 and 6 are the comments
that you have registered yourself.
SELECT COMMENT (1-6)
2.PLEASE CALL
The six available comments are;
1. (comment off)
2. PLEASE CALL
3. URGENT !
4. CONFIDENTIAL
5. (your original comment)
6. (your original comment)
I T l[ B II 9 I
V-4-1
X3IZO
~D~ir
as for 5 and 6, you can register your original comment as described
"Entering information using keys".
3) Make your selection by pressing the appropriate number key
from 1 to 6. The screen briefly displays the option you have
chosen.
 Loading...