

SERVICE
FOR
MANUAL
BROTHER
MODEL
4-8561
EF
,
MA4-B581
571
BROTHER
INDUSTRIES, LTD.,
NAGOYA. JAPAN
.
CONTENTS
Page
1.
FEATURES
2. SPECIFICATIONS I . . . . . . . . . . . . . . . . . . . . . . . . . . . . . . . . . . . . . . . . . . . . . . . . 2
I·
.................................................. .
DESCRIPTION OF
3.
[!]
Needle bar mechanism · · · · · · · · · · · · · · · · · · · · · · · · · · · · · · · · · · · · · · · · · · · · 9
[g)
Under looper mechanism · · · · · · · · · · · · · · · · · · · · · · · · · · · · · · · · · · · · · · · · · · · 9
[a]
Over looper mechanism · · · · · · · · · · · · · · · · · · · · · · · · · · · · · · · · · · · · · · · · · · · · 9
MECHANISM
I·
..................................... 9
III Double chain stitch looper mechanism· · · · · · · · · · · · · · · · · · · · · · · · · · · · · · · · · ·
00
Knives mechanism · · · · · · · · · · · · · · · · · · · · · · · · · · · · · · · · · · · · · · · · · · · · · · · ·
liD
Feed mechanism · · · · · · · · · · · · · · · · · · · · · · · · · · · · · · · · · · · · · · · · · · · · · · · · ·
[1]
Presser foot mechanism · · · · · · · · · · · · · · · · · · · · · · · · · · · · · · · · · · · · · · · · · · · ·
4. DISASSEMBLING PROCEDURES
[l]
Cover · · · · · · · · · · · · · · · · · · · · · · · · · · · · · · · · · · · · · · · · · · · · · · · · · · · · · · · ·
[g)
Presser foot and feed mechanism· · · · · · · · · · · · · · · · · · · · · · · · · · · · · · · · · · · · · ·
~
Knives mechanism · · · · · · · · · · · · · · · · · · · · · · · · · · · · · · · · · · · · · · · · · · · · · · · ·
I·
. . . . . . . . . . . . . . . . . . . . . . . . . . . . . . . . . . . . .
III Under looper mechanism · · · · · · · · · · · · · · · · · · · · · · · · · · · · · · · · · · · · · · · · · · · 14
00
Over looper mechanism · · · · · · · · · · · · · · · · · · · · · · · · · · · · · · · · · · · : · · · · · · · · 14
liD
Double chain stitch looper mechanism· · · · · · · · · · · · · · · · · · · · · · · · · · · · · · · · · ·
[1]
Needle bar mechanism · · · · · · · · · · · · · · · · · · · · · · · · · · · · · · · · · · · · · · · · · · · · ·
5. ASSEMBLING
[!]
Needle bar mechanism · · · · · · · · · · · · · · · · · · · · · · · · · · · · · · · · · · · · · · · · · · · ·
00
Under looper mechanism · · · · · · · · · · · · · · · · · · · · · · · · · · · · · · · · · · · · · · · · · · · 18
[a]
Over looper mechanism · · · · · · · · · · · · · · · · · · · · · · · · · · · · · · · · · · · · · · · · · · · ·
AND
ADJUSTMENT PROCEDURES
I·
........................
III Double chain stitch looper mechanism· · · · · · · · · · · · · · · · · · · · · · · · · · · · · · · · · · 20
I]]
Knives mechanism · · · · · · · · · · · · · · · · · · · · · · · · · · · · · · · · · · · · · · · · · · · · · · · ·
liD
Feed and presser foot mechanism · · · · · · · · · · · · · · · · · · · · · · · · · · · · · · · · · · · · · 23
[1]
Looper thread take-up and thread· guide mechanism · · · · · · · · · · · · · · · · · · · · · · · · 24
[ID
Double chain stitch looper thread take-up and thread guide mechanism · · · · · · · · · · 25
[ID
Cover · · · · · · · · · · · · · · · · · · · · · · · · · · · · · · · · · · · · · · · · · · · · · · · · · · · · · · · · 26
10
10
11
12
12
12
13
13
15
15
16
16
19
21
.~"""..
6. STITCH LENGTH
7.
SEWING
[!]
00
[a]
III Twin needle
8. TROUBLE SHOOTING
[!]
[g)
[a]
III Needle breakage · · · · · · · · · · · · · · · · · · · · · · · · · · · · · · · · · · · · · · · · · · · · · · · · · 36
[§]
liD
[1]
[ID
AND
DIFFERENTIAL FEED ADJUSTMENT
INSTRUCTION
Single needle two thread · · · · · · · · · · · · · · · · · · · · · · · · · · · · · · · · · · · · · · · · · · · 28
Single needle three thread · · · · · · • · · · · · · · · · · · · · · · ·. · · · · · · · · · · · · · · · · · · · 29
Twin needle four thread · · · · · · · · · · · · · · · · · · · · · · · · · · · · · · · · · · · · · · · · · · ·
five
Thread breakage (Overlock Stitch Needle) · · · · · · · · · · · · · · · · · · · · · · · · · · · · · · · 32
Thread breakage (Looper Thread) · · · · · · · · · · · · · · · · · · · · · · · · · · · · · · · · · · · · · 33
Skip stitching (Overlock Stitch) · · · · · · · · · · · · · · · · · · · · · · · · · · · · · · · · · · · · · ·
Improper thread tension · · · · · · · · · · · · · · · · · · · · · · · · · · · · · · · · · · · · · · · · · · · 36
Wrong chaining-off (Overlock Stitch) · · · · · · · · · · · · · · · · · · · · · · · · · · · · · · · · · · · 36
Excessive wrinkles . . . . · · · · . · · · · · · . · · · · · · · · · · · · · · · . . · · · · · · · · · · · · · · · 3 7
Slipage
of
cloth
I·
........................................... 28
thread · · · · · · · · · · · · · · · · · · · · · · · · · · · · · · · · · · · · · · · · · · · ·
I·
............................................ 32
.....
· · . ·
...
· · · · · · · · · · · · · · · · · · · · · · · · · · · · · · · · · · · · · 37
I·
............... 27
31
31
34
1. FEATURES
1.
These models have the same sewing performance
MA4-B551)
tions.
so
they can be used for normal stitching, ruffling, bulky stitching and many other applica-
as
the high-speed types (Models EF4-BS11, B531 and
2. Differential feed ratio can be changed by a
range.
···
7mm
3. High-lift specifications
for denim bulky and other thick materials.
4. Blade engaging angle can be easily adjusted for sharp cutting performance.
5.
Oil level in the oil pan can be easily checked with the special oil guage on the front.
Superb design and colour brighten working environment and ensure to lessen the operator's fatigue.
6.
* Most
of
the gauge parts, expendable parts, attachments and other devices
changeable with those
of
in presser foot rise and
Models EF4-B511, B531 and MA4-B551.
"banana
type"
device which assures a wide differential
7mm
in maximum stitch width
of
these models are inter-
···
are available
-~
-
1-
2.\
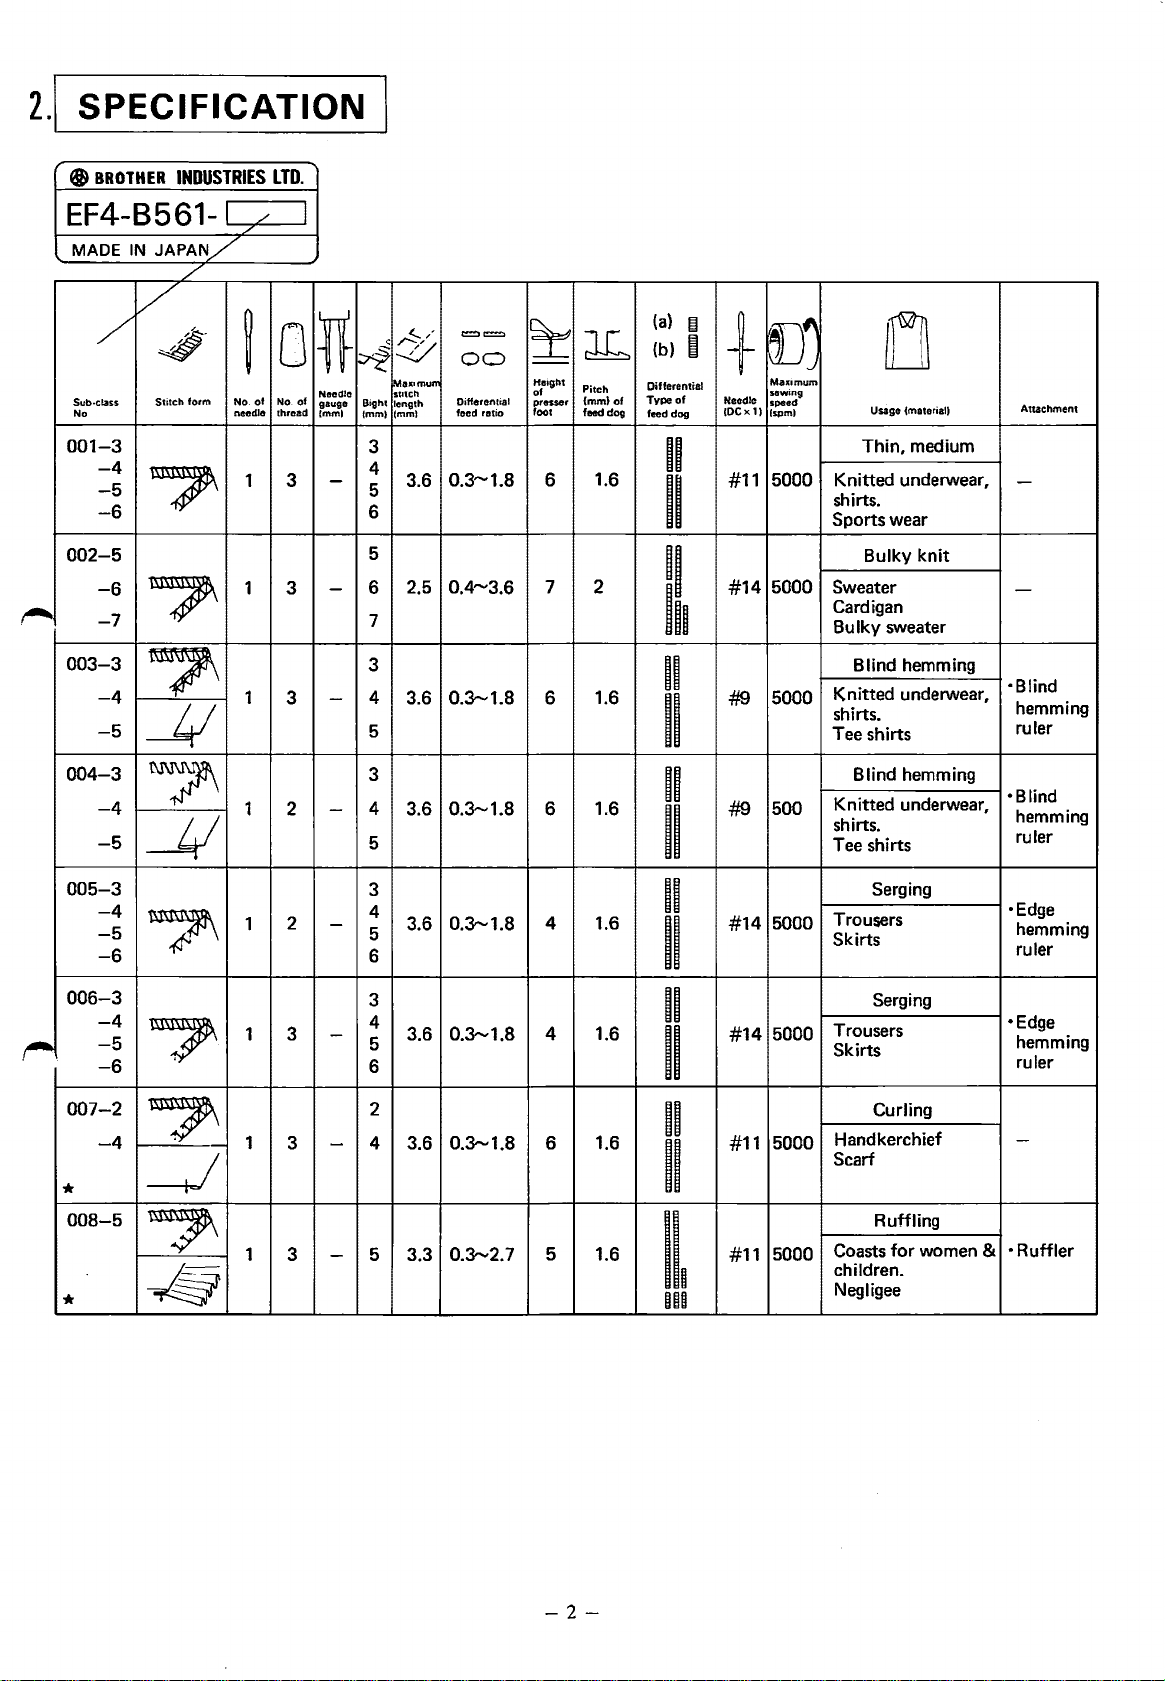
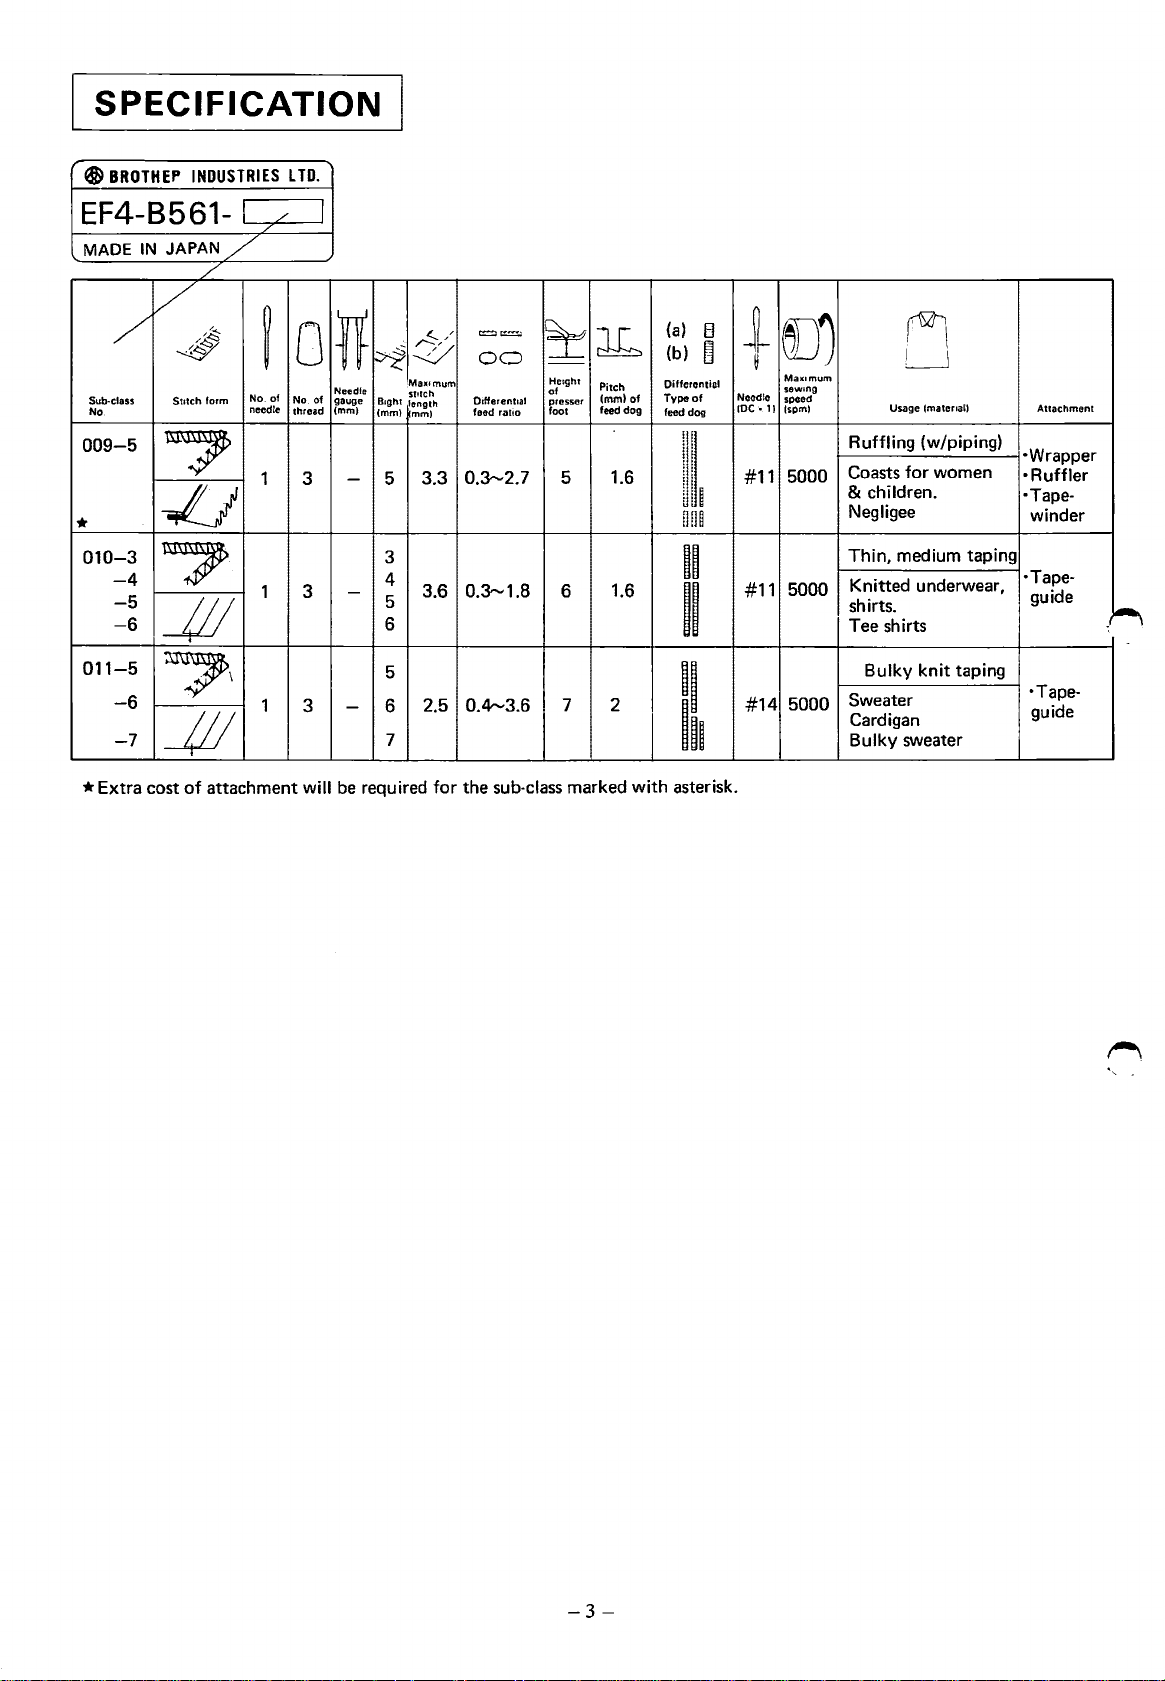
SPECIFICATION
$
BROTHER
INDUSTRIES
LTD.
EF4-B561-
MADE IN
/
Sub-class
No
001-3
-4
-5
-6
002-5
-6
~
-7
003-3
-4
-5
004-3
-4
-5
JAPAN/
/
v
41'
Stitch
form
?
?
?
_LV
?
_1/
/ I
/
0
No.
of
3
lf
Needle
gauge
(mml
-
-
-
-
~
No.
of
needle thread
1 3
1 3
1
1 2
c
~
~
Maoumum
stotch
Bight
length
(mm) feed ratio
(mml
3
4
3.6
5
6
5
2.5
6
7
3
4
3.6
5
3
4
3.6
5
==
00
Differential
0.3"'1.8
0.4"'3.6
O.J......1.8
0.3
......
1.8
~
l6
Height
Pitch
of
(mm)of
presser
foot
feed dog
6
7
6
6
1.6
2
1.6
1.6
(a)
(b)
Differential
Type
of
feed dog
II
II
II
hi
II
II
II
II
~
i
+
Needle
IDCx1)
#11
#14
#9
#9
[)j
Maxomum
sewing
speed
(spm)
5000
5000 Sweater
5000
500
Usage (material)
Thin, medium
Knitted underwear,
shirts.
Sportswear
Bulky
Cardigan
Bulky
Blind hemming
Knitted underwear,
shirts.
Tee shirts
Blind hemming
Knitted underwear,
shirts.
Tee shirts
n
Attachment
-
knit
-
sweater
·Blind
hemming
ruler
·Blind
hemming
ruler
~
005-3
-4
-5
-6
006-3
-4
-5
-6
007-2
-4
*
008-5
*
?
?
?
_J
?
-lfjJr
1
1 3
1 3
1
3
2
4
-
5
6
3
4
-
5
6
2
4
-
3.6
3.6
3.6
O.J......1.8
O.J......1.8
O.J......1.8
4 1.6
1.6
4
1.6
6
II
II
II
II
II
#14
#14
#11
5000
5000
5000
Serging
Trousers
Skirts
Serging
Trousers
Skirts
Curling
Handkerchief
Scarf
•Edge
hemming
ruler
•Edge
hemming
ruler
-
II
Ruffling
Coasts
for
3
-
5 3.3
O.J......2.7
5 1.6
II~
on
#11
5000
children.
Negligee
women &
• Ruffler
-2-
SPECIFICATION
~
BROTHEP
INDUSTRIES L TO.
EF4-8561-
MADE
IN
JAPAN/
/
v
/
Sub-class
No
009-5
~
Stotch
/~
form
7
-4
-5
-6
-6
-7
J__j
7
_jjj
?\
_jjj
cost
of
*
010-3
011-5
*Extra
/ I
/
~
No.
of
needle
1 3
1 3 -
1
attachment
0
No
of
thread
3
will
l1
~
Needle
gauge
Boght
(mml
(mm)
-
5
3
4
5
6
5
- 6
7
be
required
~/
~
Maxomum
stotch
length
mml
==
00
Oifferentoal
feed ratio
0.3--2.7 5
3.3
0.3--1.8 6
3.6
0.4--3.6
2.5
for
the sub-class marked
~
~
--
Height
Pitch
of
lmmlof
presser
feed dog
foot
7 2
1.6
1.6
(a)
El
(b)
~
Differential
Type
of
feed
dog
~~~
u
n~
n
II
II
hi
with
asterisk.
t
Needle
IDC·ll
#11
#11
#14
eJJ)
Maxomum
sewong
speed
(spml
Ruffling (w/piping)
5000
5000
5000
Coasts
& children.
Negligee
Thin,
Knitted
shirts.
Tee shirts
Sweater
Cardigan
Bulky
Bulky
LJ
tmateroall
Usage
for
women
medium taping
underwear,
knit
taping
sweater
Attachment
·Wrapper
•
Ruffler
·Tapewinder
·Tapeguide
·Tapeguide
~~
-
-3-
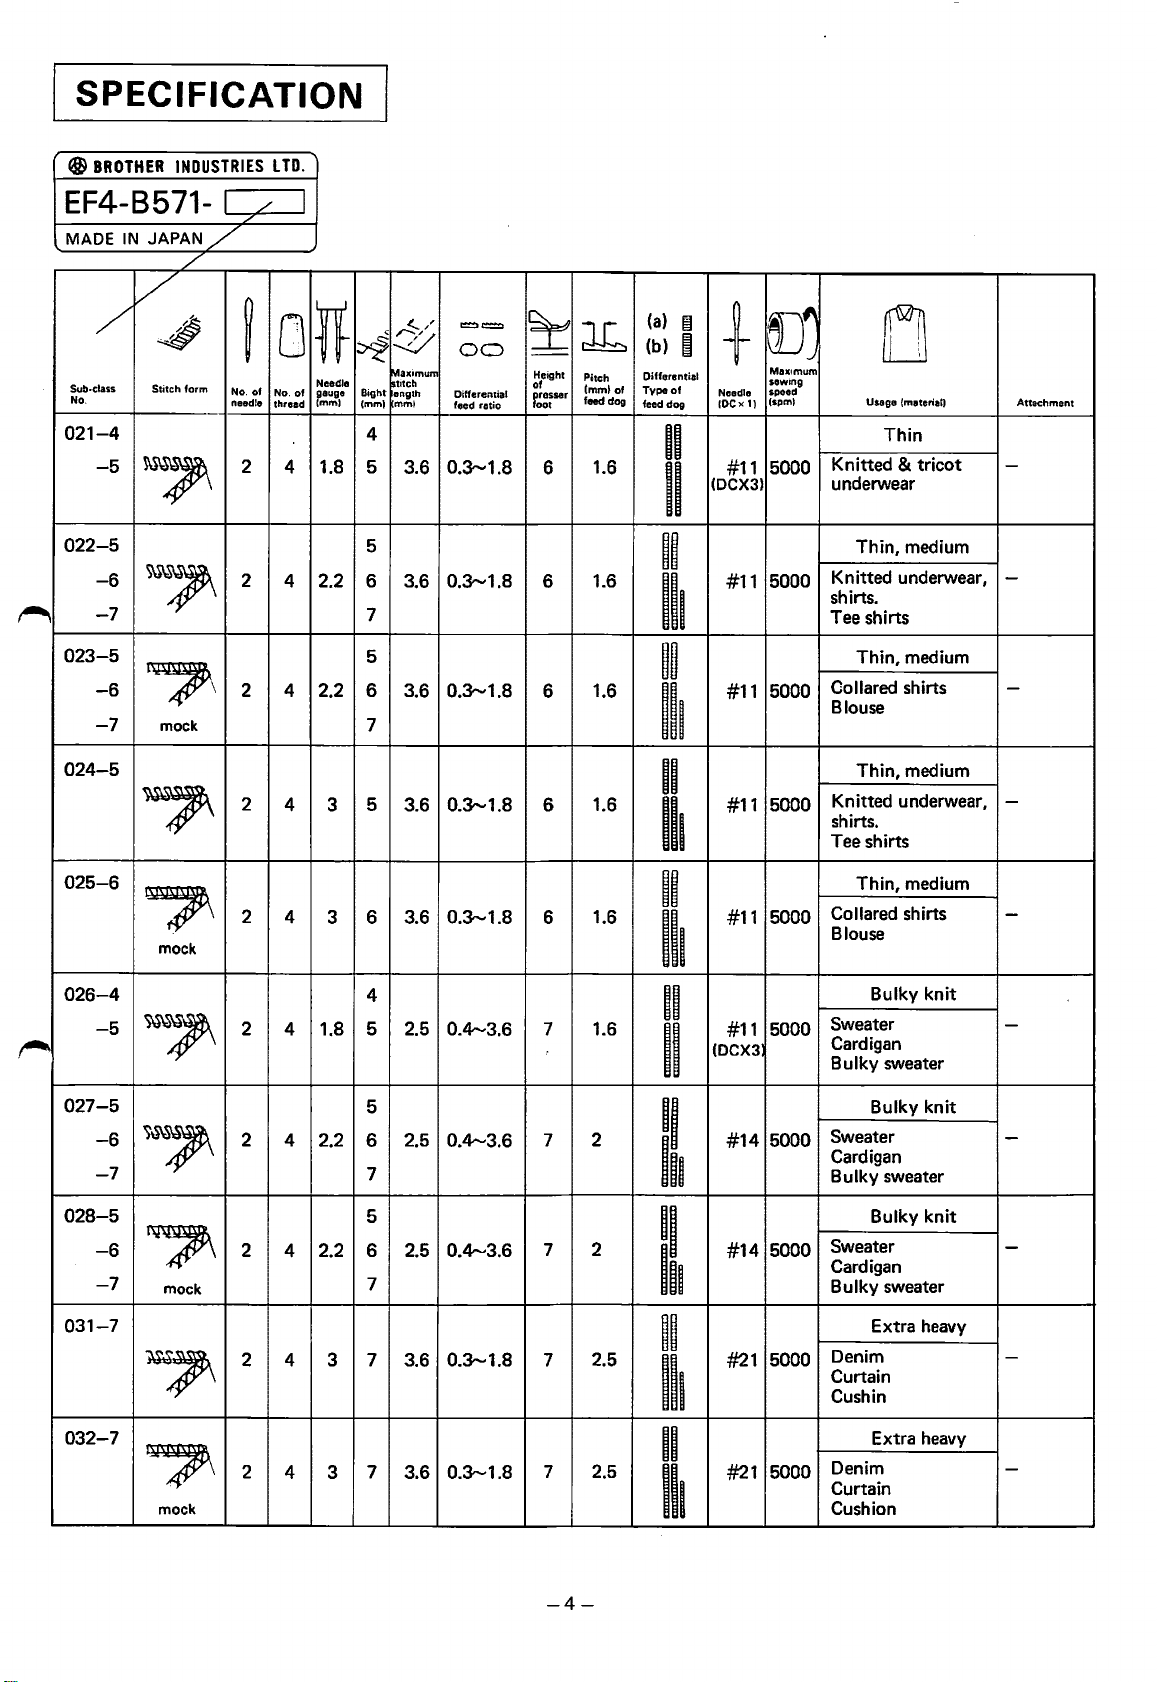
SPECIFICATION
fa&
BROTHER
EF4-B571-
MADE
INDUSTRIES L TO.
IN
JAPAN_/
/
/_
J
/
v
/
Sub-class
No.
021-4
-5
~
Stitch
?
form
No.
noodle
0
~
of
2
lf
Needle stitch
No.
of
p.auge
mml
thread
4 1.8 5
,.!::-/
:y
~
Ma>cimum
Bight
ength
(mm)
mmt
4
3.6
==
00
Differential
feed
ratio
0.3-1.8
~
lb
Height
Pitch
of
lmm)of
rcresser
feed dog
001
6
1.6
(a)
~
(b) e
Difforential
Type
of
dog
feed
II
II
[J'
Max1mum
+
SOWing
speed
Noodle
(spml
(0Cx1)
5000
#11
(DCX3)
J
0
Usage (material)
Thin
Knitted & tricot underwear
Attachment
~
r---
022-5
-6
-7
023-5
-6
-7
024-5
025-6
026-4
-5
027-5
-6
-7
?
?
mock
?
?
mock
?
?
5
2
4 2.2 6
7
5
2 4 2.2 6
7
2
4 3
2
4
2 4 1.8 5 2.5 0.4--3.6 7 1.6
2 4
5
3 6 3.6
4
5
2.2 6
7
3.6
3.6
3.6
2.5
0.3-1.8
0.3-1.8
0.3-1.8
0.3-1.8
0.4-3.6
6
6
6
6
7 2
1.6
1.6
1.6
1.6
~~
#11
Ill
~~
ll1
II
ll1
II
ll1
n
II
II
IIi
#11
#11
#11
#11
(DCX3
#14
5000
5000
5000
5000
5000
5000
Thin,
medium
Knitted underwear,
shirts.
Tee shirts
Thin, medium
Collared shirts
Blouse
Thin, medium
Knitted underwear,
shirts.
Tee shirts
Thin, medium
Collared shirts
Blouse
Bulky knit
Sweater Cardigan
Bulky sweater
Bulky knit
Sweater
Cardigan
Bulky sweater
-
-
-
-
-
028-5
-6
-7
031-7
?
mock
~~
2
4
2 4 3 7
2.2
5
2.5
3.6
0.4-3.6
0.3-1.8
6
7
7 2
7
2.5
II
hi
~~
ll1
032-7
?
mock
2
4 3
7
3.6
0.3-1.8
7 2.5
-4-
II
ll1
#14
#21
#21
5000
5000
5000
Bulky knit
Sweater
Cardigan
Bulky sweater
Extra heavy
Denim
Curtain
Cushin
Extra heavy
Denim
Curtain
Cushion
-
-
-
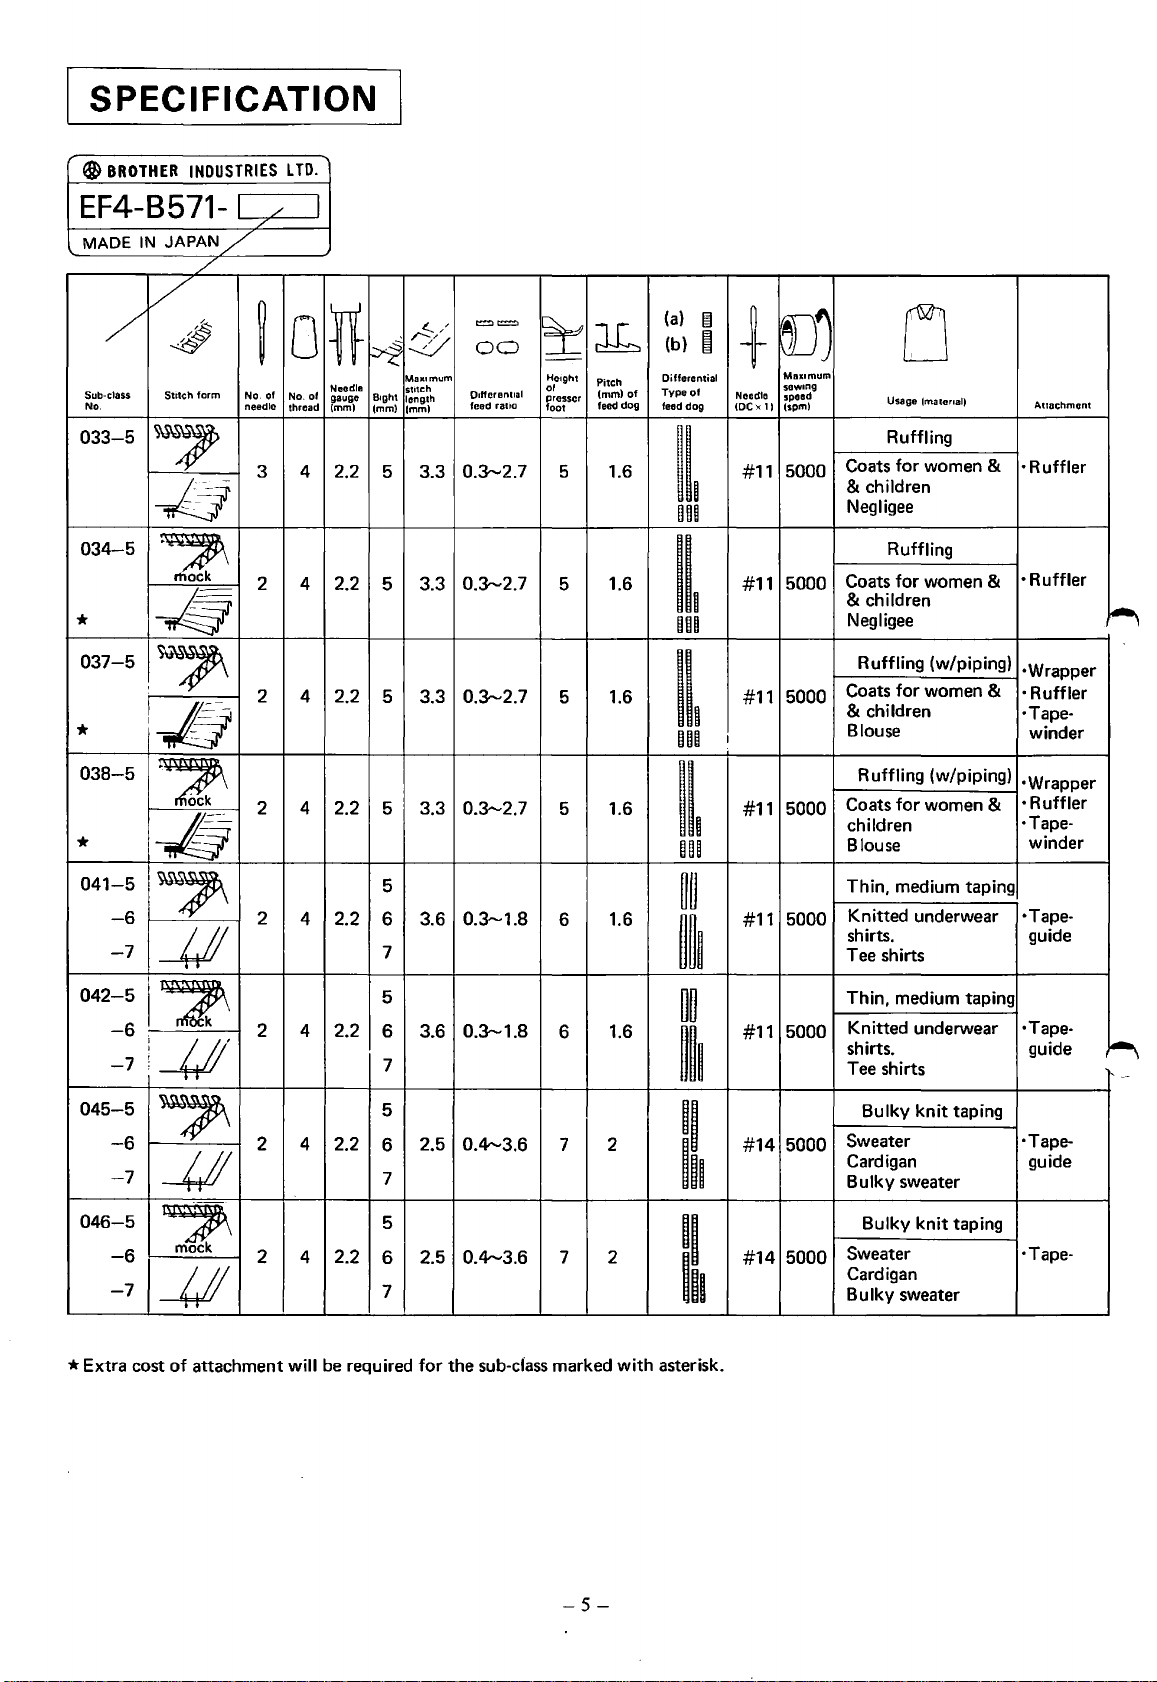
SPECIFICATION
~BROTHER
INDUSTRIES l TO.
EF4-B571-
MADE
IN
JAPAN/
/
v
/
Sub-class
No.
033-5
034-5
*
037-5
*
038-5
~
Stitch
form
7
-
-/f!J
~
mock
~
I?
J!j
-
7
*
041-5
042-5
045-5
-Jj
?
-6
-7
_jj/
~
-6
~~~
-7
?
-6
-7
-U
/ I
/
0
~
No.
of
needle
3 4 2.2
2 4 2.2
2 4 2.2
2 4 2.2
2
2 4 2.2
2 4 2.2
lf
Needle
No.
of
gauge
thread (mml
4 2.2
/::-/
~
~
Maxtmum Height
stitch
Bight
length
lmml
lmml
5 3.3
5 3.3
5
5 3.3
5
6 3.6
7
5
6
7
5
6
7
==
00
Otfferent•al
feed rat•o
0.3--2.7 5 1.6
0.3--2.7
0.3--2.7
3.3
0.3--2.7
0.3--1.8
0.3--1.8
3.6
2.5
0.4--3.6 7 2
~
~
--
Pitch
of
(mm)of
prosser
feed dog
foot
5
5 1.6
5 1.6
6 1.6
6
1.6
1.6
(a)
~
(b) ;
Differential
Type
of
feed dog
ij~l
HH~
It
no
It
no
ijt
n~
~~
~~I
~~
~~~
II
hi
eD)
Mu•mum
+
sewtng
Needle
speed
(spml
IOCx
11
5000
#11
5000
#11
5000
#11
I
5000
#11
5000
#11
5000
#11
#14
5000
Coats
& children
Negligee
Coats
& children
Negligee
Ruffling (w/piping)
Coats
& children
Blouse
Ruffling (w/piping)
Coats
children
Blouse
Thin, medium taping
Knitted underwear ·Tapeshirts. guide
Tee shirts
Thin,
Knitted underwear
shirts. guide
Tee
Bulky
Sweater
Cardigan guide
Bulky
I
I
u
Usage lmatonall
Ruffling
for
women &
Ruffling
for
women &
for
women &
for
women &
medium taping
shirts
knit
taping
sweater
Anachment
·Ruffler
• Ruffler
~
·Wrapper
• Ruffler
·Tapewinder
•Wrapper
• Ruffler
•Tapewinder
•Tape-
~
--
·Tape-
046-5
-6
-7
*Extra
AA
_jj/
cost
of
mock
attachment
2
4
will
be
2.2
required
5
2.5
6
7
0.4--3.6 7 2
for
the sub-dass marked
with
-5-
II
hi
asterisk.
#14
5000
Bulky
Sweater
Cardigan
Bulky
sweater
knit
taping
·Tape-
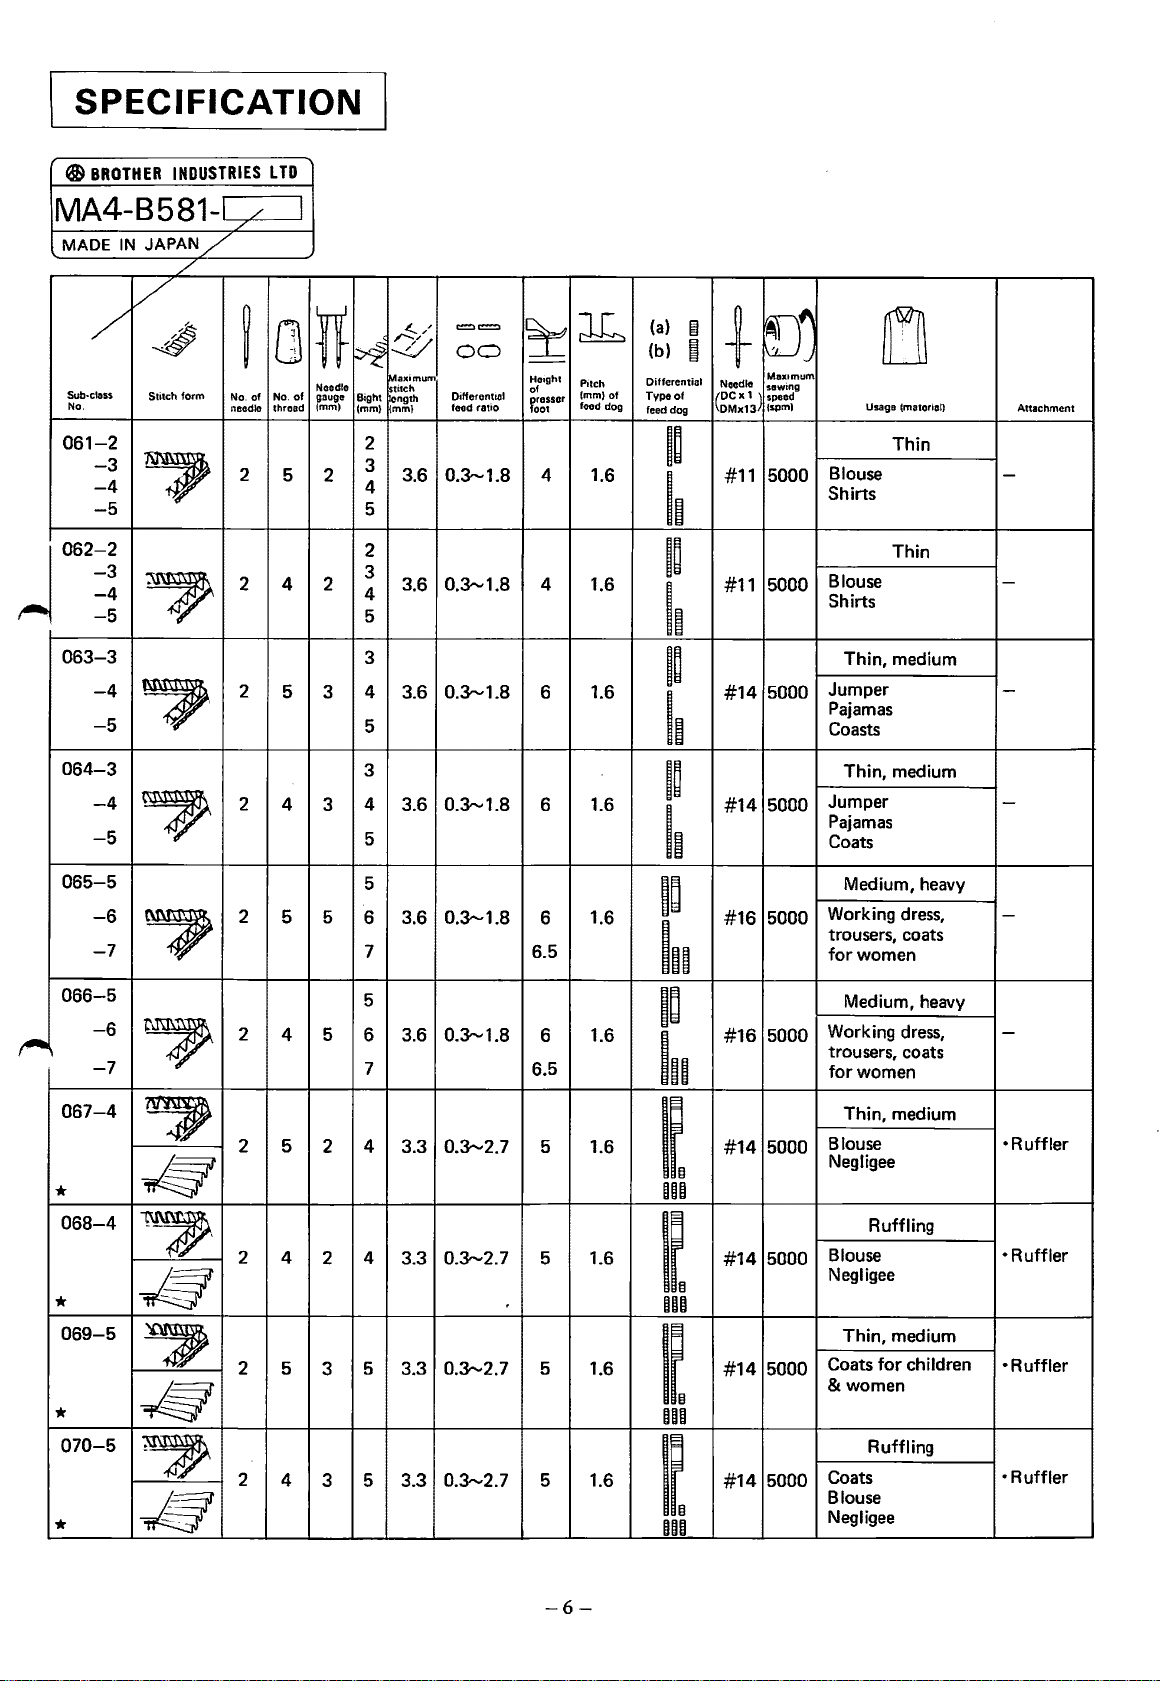
SPECIFICATION
@)BROTHER
INDUSTRIES
MA4-B581- /
MADE
IN
JAPAN/
/
v
~
I"-
Sub-class
No.
061-2
062-2
063-3
064-3
065-5
066-5
067-4
*
068-4
*
069-5
*
070-5
*
/
~
Stitch
-3
-4
?
-5
-3
-4
-5
7
-4
7
-5
-4
?>
-5
-6
-7
?
-6
?
-7
,
~
~
./!#}'
,
-~iff~
,
./tfJ
form
-
LTD
/
No.
needle
2 4
2 5
2
I
[]
~
of
2
2
2
2
2
2
2
lf
Needle
No.
of
gauge
(mm)
thread
5
2
4 2
5
3
4
3
5 5
5
4
5 2 4
2
3
4
3
~/
~
~
~aJ:imum
stitch
Bight
length
(mm)
(mmJ
2
3
4
5
2
3
4
5
3
4
5
3
4
5
5
6
7 6.5
5
6 3.6
7
4
5
5 3.3
==
00
Differential
feed ratio
3.6
0.3--1.8
0.3-1.8
3.6
0.3-1.8
3.6
0.3--1.8
3.6
0.3--1.8
3.6
0.3--1.8
3.3
0.3--2.7 5
0.3--2.7 5 1.6
3.3
3.3
0.3--2.7
0.3--2.7 5 1.6
:t=
-
Height
of
~rosser
oot
4
4
6
6 1.6
6
6
6.5
5
db
Pitch
(mm)of
feed dog
1.6
1.6
1.6
1.6
1.6
1.6
1.6
(a)
1§1
(b)
I
Differential
Type
of
feed dog
~~
~~
+
Maxomum
Noodle
sewing
speed
(DCK
1)
(spmJ
DMx13
5000
#11
Blouse
Shirts
I~
~~
#11
5000
Blouse
Shirts
I~
~~
#14
5000
I~
~~
#14
5000
I~
~~
#16
5000
In
~~
In
#16
#14
5000
5000
~~
no
#14
5000
~~
no
5000
#14
~~
no
5000
#14
~~
no
Thin, medium
Jumper
Pajamas
Coasts
Thin, medium
Jumper
Pajamas
Coats
Medium, heavy
Working
trousers, coats
for
women
Medium, heavy
Working
trousers, coats
for
women
Thin, medium
Blouse
Negligee
Blouse
Negligee
Thin,
Coats
& women
Coats
Blouse
Negligee
~
Usage (material)
Thin
Thin
dress,
dress,
Ruffling
medium
for
children
Ruffling
Attachment
-
-
-
-
-
-
•
Ruffler
• Ruffler
·Ruffler
• Ruffler
-6-
SPECIFICATION
0
BROTHER
INDUSTRIES L TO.
MA4-B581-
MADE IN
JAPAN/
/
v
/
Sub-class
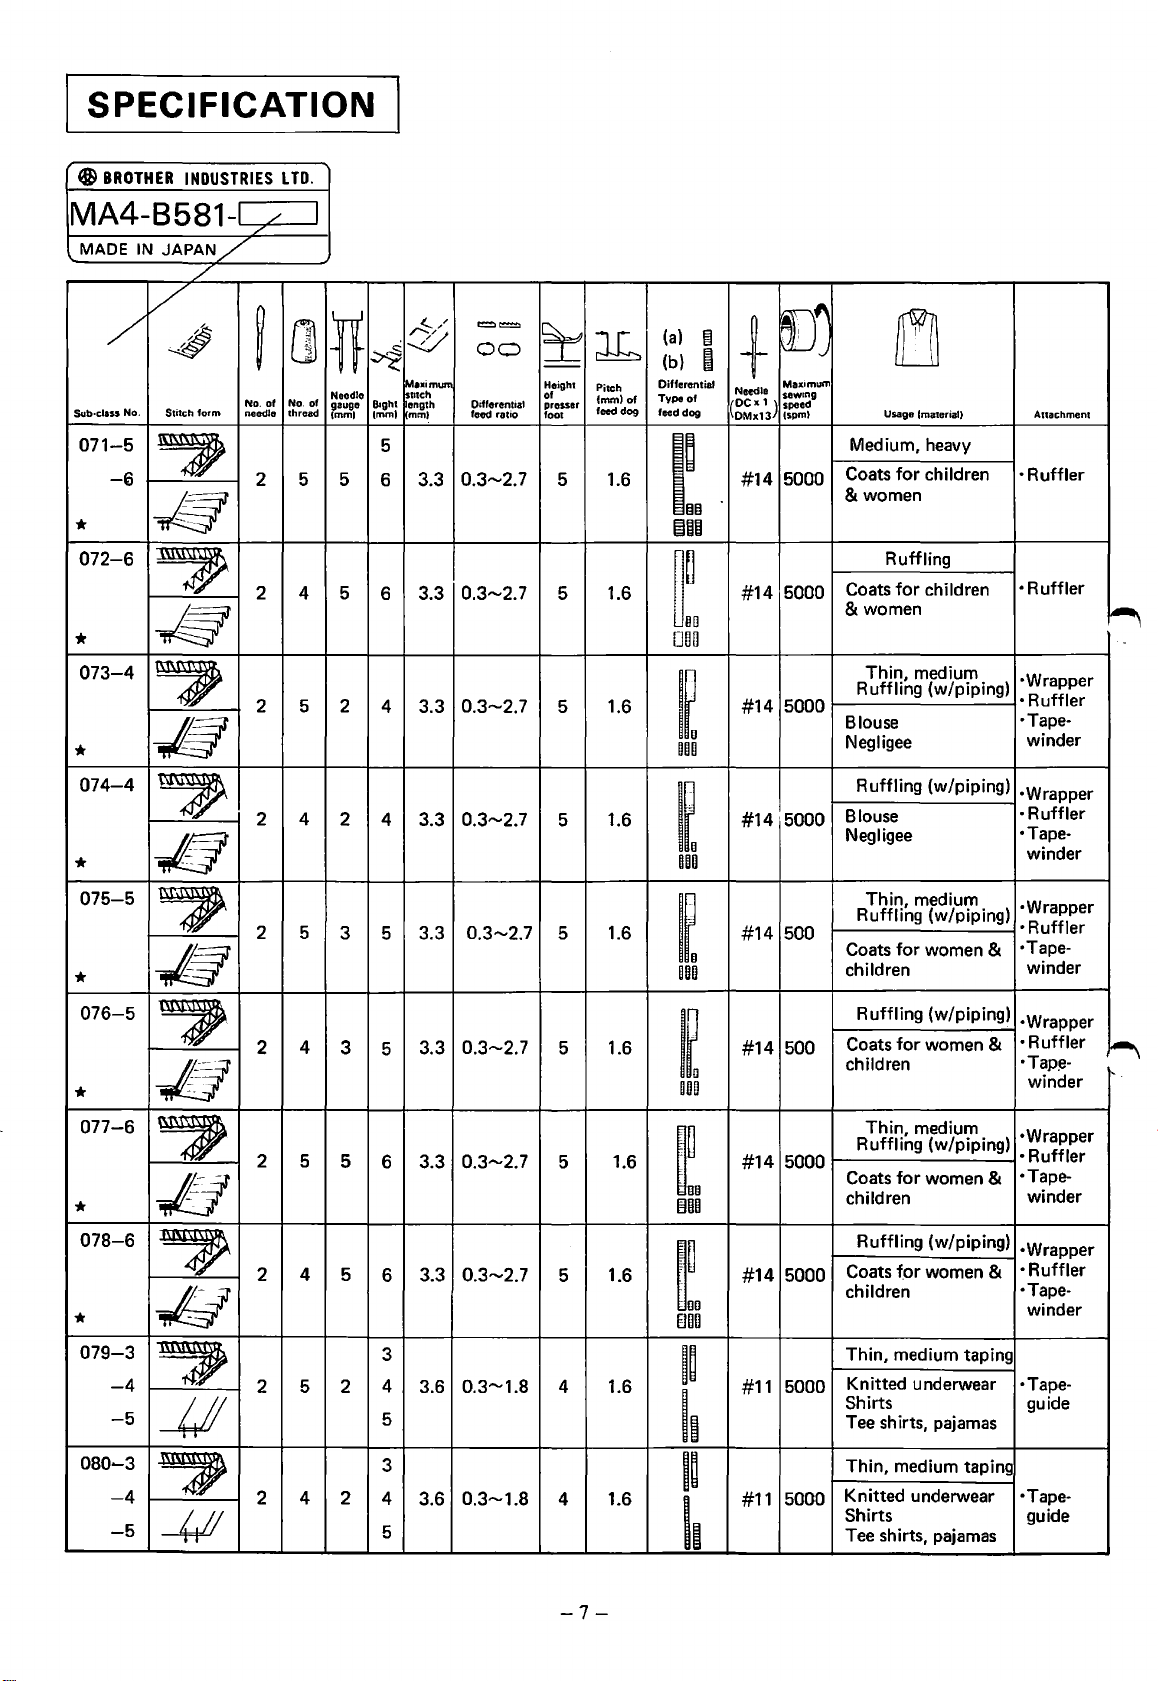
071-5
*
072-6
*
073-4
*
074-4
*
075-5
*
076-5
*
077-6
*
078-6
*
079-3
080
No.
-5
-/@
?
-./@
?
.n
.n
n
-£1
H
-IY
-4
-5
......
3
-4
-5
~
Stitch form
~
~
,
,
-
~
-
~
~
-U
~
~
/ I
/
.
[]
~
No.
of
needle
2 5 5
2 4 5
2 5 2
2 4
2 5
2
2 5
2 4 5
2 5 2
2
No. of
thread
4
4 2
ll
Neodlo
gauge
(mml
2 4 3.3
3
3
5
==
0
~
Maximum
StitCh
Bight
length
(mm)
(mml
5
6
6
4 3.3
5
5
6
6
3
4
5
3
4
5
00
Differential
feed ratio
0.3--2.7 5 1.6
3.3
0.3--2.7 5 1.6
3.3
0.3--2.7
0.3--2.7
3.3
0.3--2.7 5 1.6
3.3 0.3--2.7 5 1.6
0.3--2.7 5
3.3
3.3
0.3--2.7
0.3--1.8 4 1.6
3.6
0.3--1.8 4 1.6
3.6
~
~
--
Height
Pitch
of
(mmlof
presser
feed dog
foot
5 1.6
5 1.6
5
1.6
1.6
(a)
~
(b)
e
Differential
Type
of
feed dog
~~0
~00
~~u
000
~~
no
~~
000
~~
000
~~
000
~~
gg
(j00
~~
oo
[100
~~
I~
~~
I~
()j
+
Maximum
Nndle
sew•ng
speed
(spml
(~~=,~)
Medium, heavy
#14
#14
#14
#14
#14
#14
#14
#14
#11
#11
5000
5000
5000
5000
500
500
5000
5000
5000
5000
Coats
& women
Coats
& women
Thin, medium
Ruffling (w/piping)
Blouse
Negligee
Ruffling (w/piping)
Blouse
Negligee
Thin,
Ruffling (w/piping)
Coats
children
Ruffling
Coats
children
Thin,
Ruffling
Coats
children
Ruffling (w/piping)
Coats f.or women &
children
Thin, medium taping
Knitted underwear
Shirts guide
Tee
Thin, medium taping
Knitted
Shirts
Tee
m
(material)
Usage
for
children
Ruffling
for
children
medium
for
women &
(w/piping)
for
women &
medium
(w/piping)
for
women &
shirts, pajamas
underwear
shirts, pajamas
Anachment
•
Ruffler
•
Ruffler
·Wrapper
•
Ruffler
·Tapewinder
·Wrapper
•
Ruffler
·Tapewinder
•Wrapper
•
Ruffler
·Tapewinder
•Wrapper
•
Ruffler
·Tap~-
winder
·Wrapper
• Ruffler
·Tapewinder
•Wrapper
•
Ruffler
•Tapewinder
·Tape-
·Tapeguide
~
-7-
SPECIFICATION
~BROTHER
INDUSTRIES L TO.
MA4-B581-
MADE
IN
JAPAN/
/
v
/
~
form
7;~
-4
-5
_IJ
A--~
-4
_Jj/
-5
~~7,
-6
-7
-U
Stitch
t~~~
~
Sub-class No.
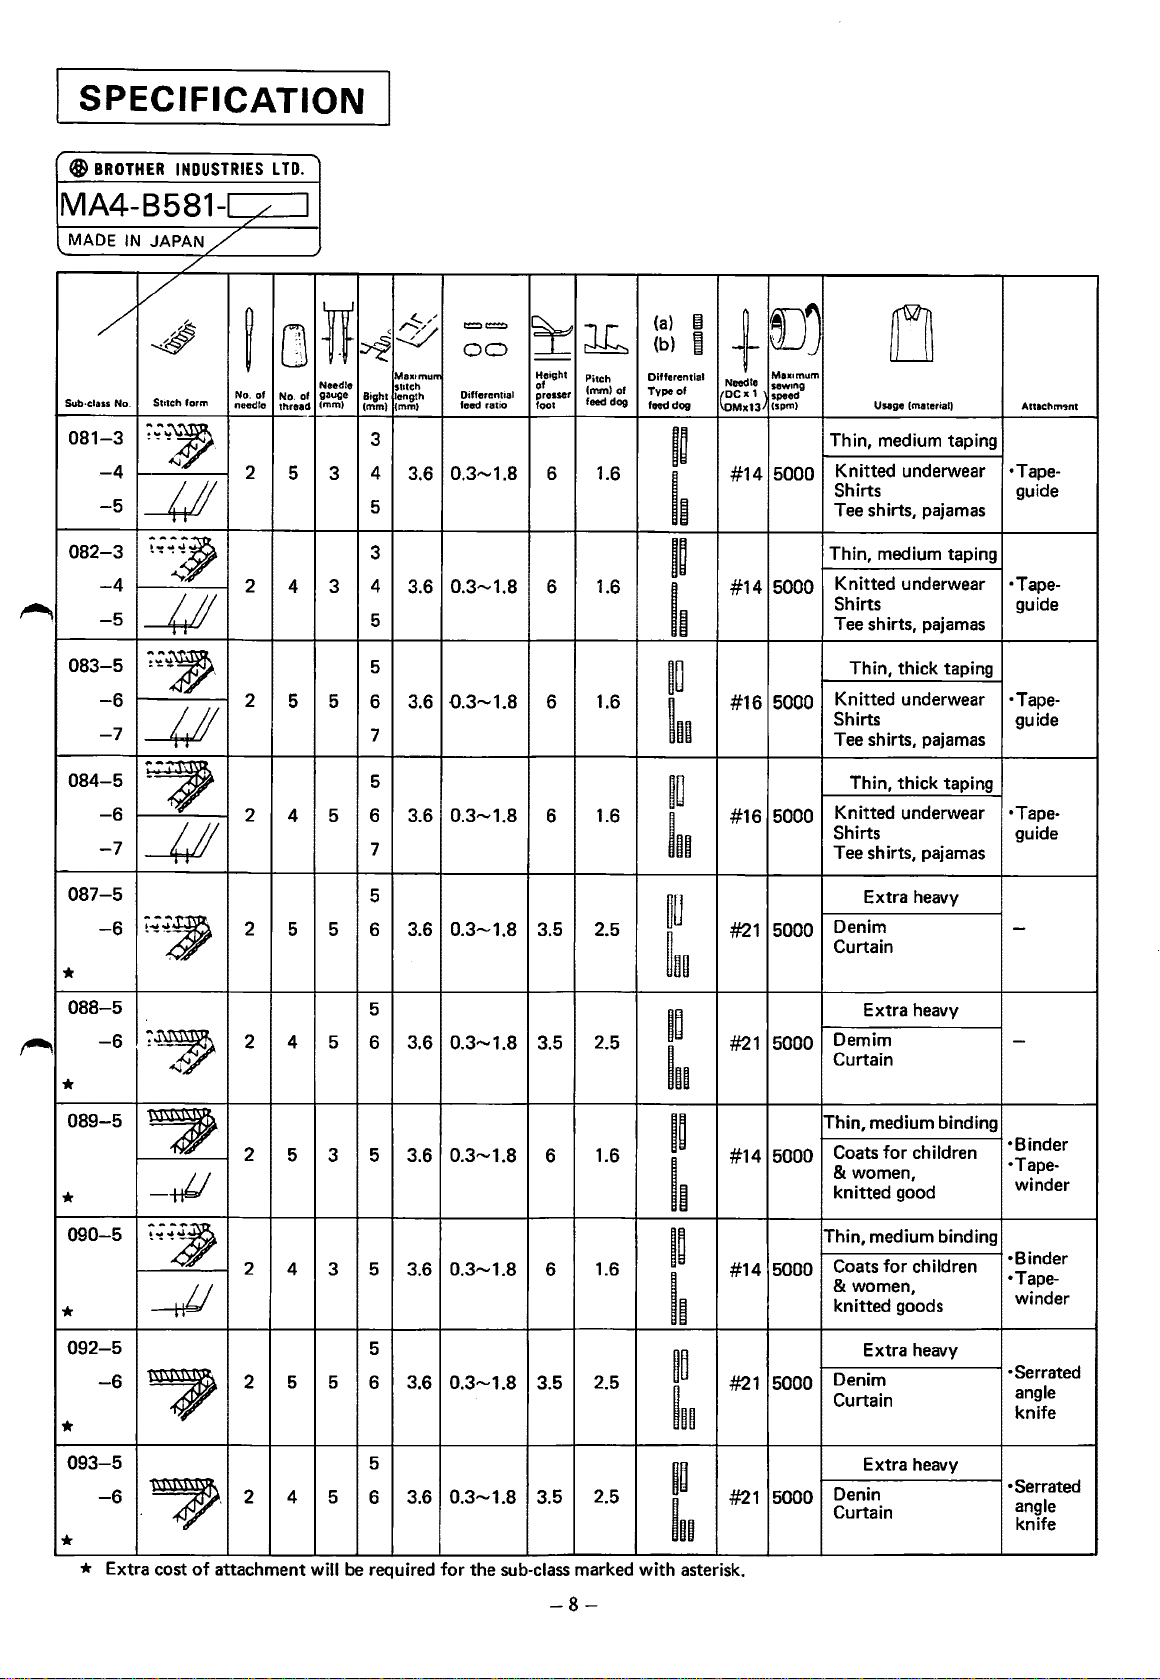
081-3
082-3
083-5
/ I
/
ij
No.
of
needle
2
2
2
[]
.
No.
of
thread
5
4 3
5 5
~
ll
Needle
gauge
Bight
(mm)
(mm)
3
~/
~
MaKimurT
slltch
length
(mml
3
4 0.3
5
3
4
5
5
6 3.6
7
==
00
Differential
feed ratio
3.6 6
0.3
3.6
.0.3
.....
.....
.....
1.8
1.8
1.8
~
~
--
Haight
Pitch
of
lmml
prosser
feed
foot
6 1.6
6
dog
1.6
1.6
(a)
~
(b)
I
Differential
of
Type
of
foeddog
~~
I~
~~
I~
~~
I
me
[)j
+
Needle
sewong
speed
(ocx1
(spm)
0Mx131
#14
#14
#16
Ma~tomum
Thin, medium taping
5000
5000
5000
Knitted underwear
Shirts guide
Tee
shirts, pajamas
Thin,
Knitted
Shirts
Tee
shirts, pajamas
Thin,
Knitted
Shirts
Tee
shirts, pajamas
~
Usage (material)
medium taping
underwear
thick
taping
underwear
Anachm"Jnl
·Tape-
·Tapeguide
·Tape-
guide
084-5
087-5
*
088-5
*
089-5
*
090-5
*
092-5
*
093-5
*
*
'?
-6
-7
_IJ
-6
A-~
~~~
7,
-6
,
_,tf
~~"!~
--~
-riJ
-6
?
-6
·~
Extra
cost
2
2
.
2
2
2
2 5 5
2 4
of
attachment
5
4 5
5
4 5
5
4 3 5 3.6
6 3.6
7
5
5 6 3.6
5
3.6
6
3 5 3.6
5
6 3.6
5
5
will be required
3.6
6
0.3
.....
0.3
.....
0.3
.....
0.3
.....
0.3
.....
0.3
.....
0.3-1.8
for
the
1.8
1.8
1.8
1.8
1.8
1.8
3.5
3.5
sub-class marked
1.6
6
3.5 2.5
2.5
3.5
1.6
6
1.6
6
2.5
2.5
~~
#16
5000
In
~u
~80
~~
#21
#21
5000
5000
In
~~
#14
5000
I~
~~
#14
5000
I~
~~
~~~
IC
iou
with
asterisk.
#21
#21
5000
5000
Thin,
thick
taping
Knitted
Shirts guide
Tee
Denim
Curtain
Demim
Curtain
Thin,
Coats
&
knitted
Thin,
Coats
&
knitted
Denim
Curtain
Den
Curtain
underwear
shirts, pajamas
Extra
heavy
Extra
heavy
medium
women,
medium
women,
Extra
Extra
in
for
good
for
goods
binding
children
binding
children
heavy
heavy
·Tape-
-
-
•Binder
·Tape-
winder
•Binder
•Tapewinder
·Serrated
angle
knife
•Serrated
angle
knife
-8-

3.
DESCRIPTION
[j]
NEEDLE
BAR
MECHANISM
®
®-~-"
(j)------/
(@--
@------
OF
MECHANISM
CD
• In case that crank shaft 0 may rotate
8 , needle arm driving crank rod 0 connected with crank shaft moves up and down.
cam
•
As
the upper portion
needle bar crank shaft
• Needle bar clamp • connected needle bar crank shaft
into the top
• Needle bar C) that
upper
12J
UNDER
of
f).
LOOPER
of
needle arm driving crank rod
(t
gets the oscillating movement.
needle bar crank shaft and gets up and down movement.
is
held by needle bar clamp
MECHANISM
to
the direction indicated with arrow, with needle bar and upper knife eccentric
Ct
is
connected with needle
(t
with needle bar crank shaft (;) and needle bar link
fj
is
guided by needle bar bushing lower
13]
OVER
LOOPER
®
@---
arm
driving lever 8 with its pin
CD
and needle bar bushing
MECHANISM
~@
-CD
~®
-----@)
-®
is
~,
fitted
L
_____
• In case that crank shaft 0 may rotate to the direc-
tion indicated with arrow, with under looper ec-
8,
centric cam
moves up and down.
• Under looper 8 fitted into under looper holder
gets the oscillating movement with the intermediate
action
of
under looper connecting lever 8 connected
with under looper connecting rod
looper lever shaft
under looper connecting rod C)
(t
Ct
and under
•.
-9-
• In
case
tion indicated with arrow, with over looper eccentric
cam
8,
and down.
Over looper driving lever
•
ment with the intermediate action
connecting lever
necting rod
• Its oscillation motion makes the over looper
describe an ideal orbit about over looper holder
and over looper holder guide assembly
looper holder pin
that crank shaft 0 may rotate
over looper connecting rod
(t
gets the oscillating move-
of
8 connected with over looper con-
C) and over looper lever shaft
fj.
____,
to
the direc-
Ct
moves up
over looper
CD
via over
•.
"'
(;)
~
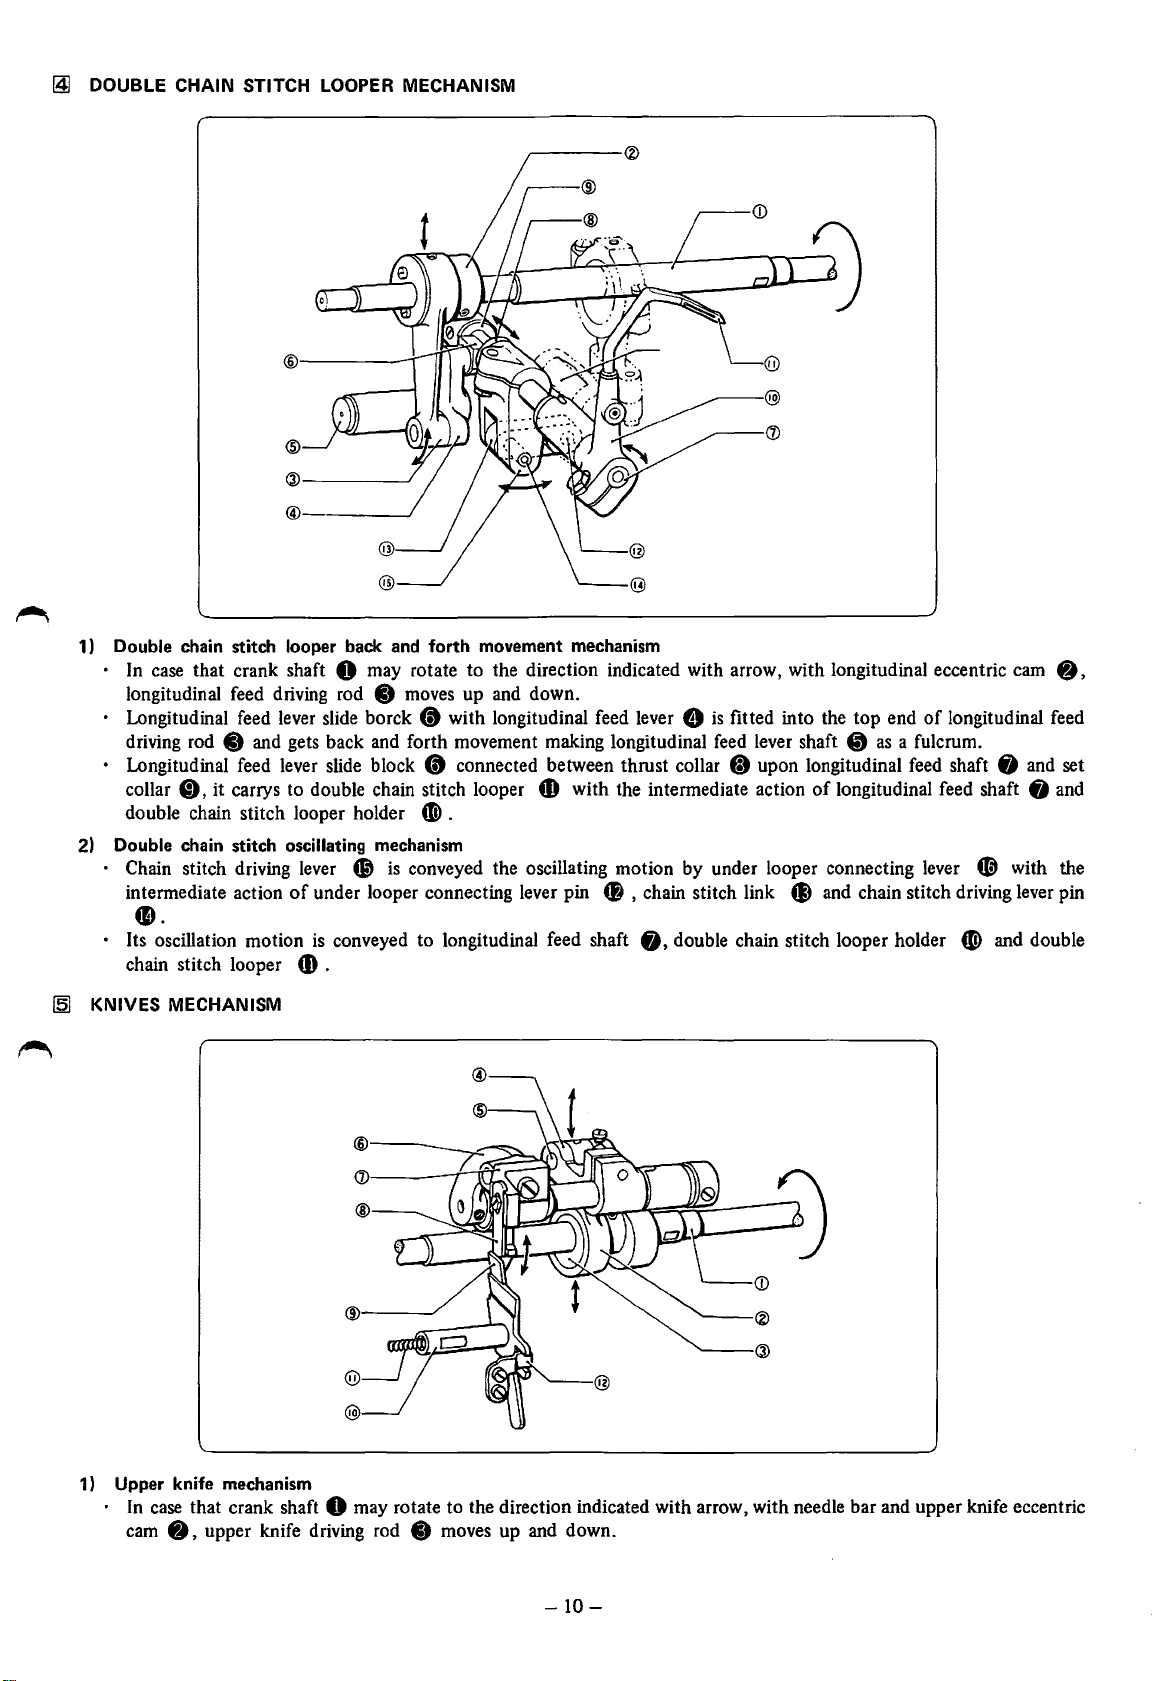
DOUBLE CHAIN STITCH LOOPER MECHANISM
1) Double chain stitch looper back and
• In case that crank shaft 0 may rotate to the direction indicated with arrow, with longitudinal eccentric cam
longitudinal feed driving rod • moves up and down.
• Longitudinal feed lever slide borck • with longitudinal feed lever e
driving rod
• Longitudinal feed lever slide block • connected between thrust collar
collar
double chain stitch looper holder
2) Double chain stitch oscillating mechanism
• Chain stitch driving lever
intermediate action
••
• Its oscillation motion
chain stitch looper
~
KNIVES MECHANISM
• and gets back and forth movement making longitudinal feed lever shaft •
• ' it carrys to double chain stitch looper m
~
of
under looper connecting lever pin
is
conveyed to longitudinal feed shaft
m .
forth
movement mechanism
with
the intermediate action
(0
.
is
conveyed the oscillating motion
f)
is
fitted into the
(;)
upon longitudinal feed shaft
by
under looper connecting lever
, chain stitch link
fj,
double chain stitch looper holder C) and double
41
top
end
of
as
a fulcrum.
of
longitudinal feed shaft • and
and chain stitch driving lever pin
8,
longitudinal feed
fj
and set
41
with the
1) Upper knife mechanism
· In case
cam
that
crank shaft 0 may rotate to the direction indicated with arrow, with needle bar and upper knife eccentric
8,
upper knife driving rod • moves up and down.
-10-
• The top end
knife driving lever
• Upper knife
knife driving lever 8 and upper knife driving arm
2) Lower knife mechanism
• Lower knife
knife holder spring
plays role
12J
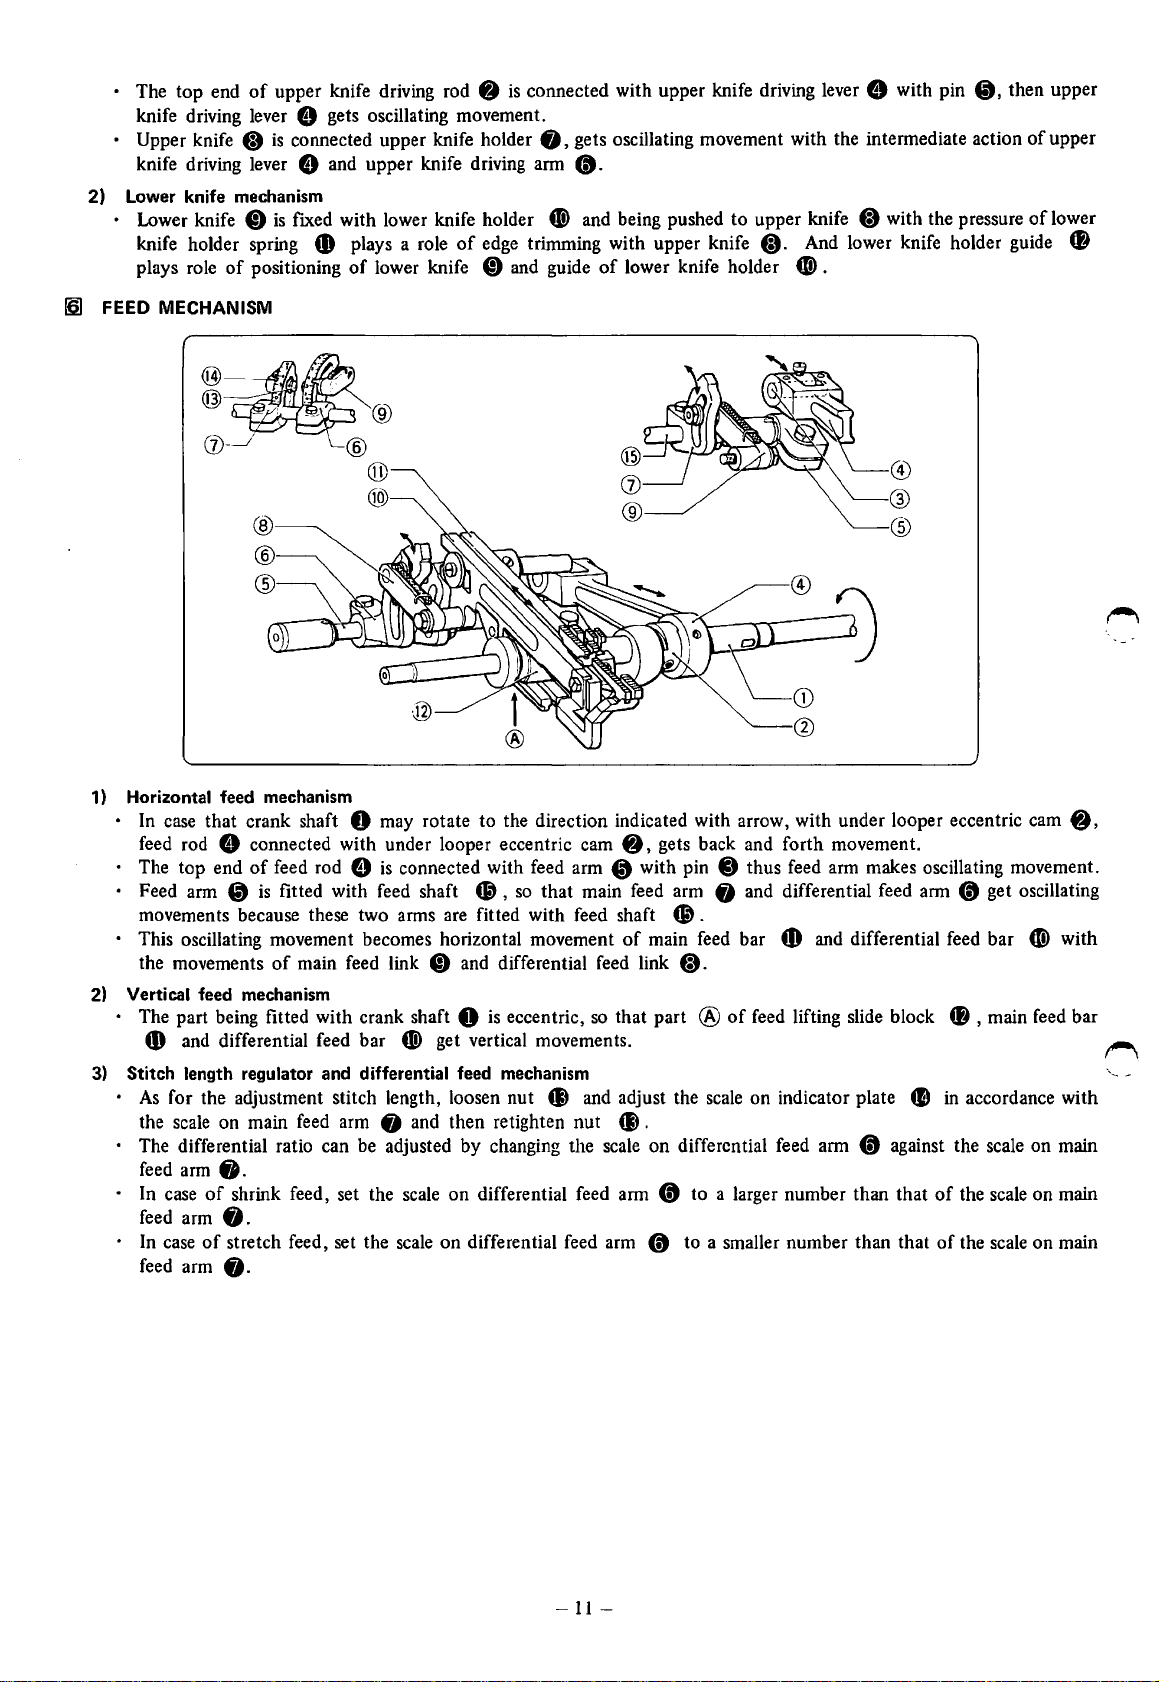
FEED MECHANISM
of
tD
CD
of
positioning
upper knife driving rod 8
e gets oscillating movement.
is
connected upper knife holder
is
fixed with lower knife holder
fD
plays a role
of
lower knife
of
edge trimming with upper knife
CD
is
connected with upper knife driving lever 8 with pin
8,
gets oscillating movement with the intermediate action
(3.
f)
and guide
and being pushed to upper knife
tD.
of
lower knife holder
f).
tD
with the pressure
And lower knife holder guide
8,
then upper
of
of
upper
lower
fB
@)
@
~
•.
I :
~:v'
:
---
®
(j)- ®
@
@)
1) Horizontal feed mechanism
• In case that crank shaft 0 may rotate to the direction indicated with arrow, with under looper eccentric cam
feed rod e connected with under looper eccentric cam • ' gets back and forth movement.
• The top end
• Feed arm
movements because these two arms are fitted with feed shaft
• This oscillating movement becomes horizontal movement
the movements
2)
Vertical feed mechanism
• The part being fitted with crank shaft 0
4)
and differential feed bar
3)
Stitch length regulator and differential feed mechanism
•
As
for the adjustment stitch length, loosen nut
the scale on main feed arm
• The differential ratio can be adjusted by changing the scale on differential feed arm
feed arm
• In case
feed arm
• In case
feed arm
of
feed rod 8
CD
is
fitted with feed shaft
of
main feed link
fj.
of
shrink feed, set the scale
8.
of
stretch feed, set the scale
fj.
is
connected with feed arm
69,
so
that main feed arm
CD
and differential feed link
is
eccentric,
f)
get vertical movements.
ell
fj
and then retighten
on
differential feed arm
on
differential feed arm
4D
with pin C) thus feed arm makes oscillating movement.
fj
and differential feed arm
69.
of
main feed bar
fD
and differential feed bar
tD.
so
that part @
and adjust the scale on indicator plate
nut
Cl).
(t
(t
of
feed lifting slide block
to a larger number than that
to a smaller number than that
®
®
@
(t
get oscillating
f)
, main feed bar
CD
in
accordance with
(t
against the scale on main
of
the scale on main
of
the scale on main
CD>
8,
with
\
..
_.
__
-
11-

iZJ
PRESSER FOOT
MECHANISM
• In case that presser foot lifter lever 0
•
Main
presser arm connected with pin 8
•
If
presser bar lifter 8
arm roller
presser arm
4.
DISASSEMBLING
[I] COVER
\\
~
~
®
Procedures
Turn the pulley until the needle bar
the highest position, and then turn out presser
foot
2 Remove needles
3 Remove cloth plate
4 Remove cloth guide (L)
bill
0 above needle plate.
is
depressed down
fD
are raised with roller
CD
is
released from the pressure
®
DCX I
CXI3
8.
• . 2
8.
is
depressed down, presser foot supporter 0
is
raised with presser foot supporter
as
per above figure, presser bar lever
fD
knocked into presser bar lever
of
presser bar spring e.
PROCEDURES
Q'ty
of
screw
is
raised to
2
2
is
lowered with spring hook
•.
8,
presser arm roller shaft
as
a fulcrum presser bar lever shaft
5 Open feed mechanism cover (B)
feed mechanism cover
6 Remove front cover guide
7 Remove front cover
8 Remove front cover supporter
(t.
fj.
@).
CD
and remove
Ci).
f)
and presser
t),
thus main
®
®
Q'ty
screw
8.
of
4
2
2
2
-12-

!2]
PRESSER
Procedures
Remove presser foot
(In case
remove presser foot 0
2 Turn the pulley until the needle bar
the highest position.
131
KNIVES MECHANISM
FOOT AND FEED MECHANISM
0 .
of
safety stitch, after pull
.)
out
is
raised to
pin
8,
Q'ty
screw
of
1
3 Remove needle plate
4 Remove differential feed dog
5 Turn the pulley until the under looper
mostly and remove main feed dog
6 Remove chain feed dog.
0 . 2
8.
to
the left
t).
(0
Q'ty
screw
of
~--
~f.:.#---@
~Wr.;..ll...\'01
• Q'ty
Procedures
nut
0 and
8.
Loosen screw
to
the left direction, then tighten it.
2 Remove upper knife
3 Remove upper knife holder C) .
4 Remove
5 Remove lower knife
turn
lower knife holder 8
8.
t)
as
holding it
by
screw
hand.
uu--(j)
--
of
®
...
~.
~
®
6 Remove lower knife holder guide
7 Remove lower knife holder 8
hand. (Pull
8 also.)
8 Remove lower knife holder. supporter
(At
first loosen bolt
support bracket
out
spring for lower knife holder 1
Q)
under the needle plate
CD>
.)
e.
as
holding it by
~.
Q'ty
screw
·~
-
..
of
2
~
2
-13-

~
UNDER
Procedures
Turn the pulley until under looper
left mostly, and the remove movable needle
guard
2 Set under looper 8 at the center position
~
the operation range, and then remove under 1
looper
LOOPER
8.
8.
MECHANISM
8 to the
in
Q'ty
screw
2
of
®
G)
Procedures
3 Remove looper thread take up (L)
4 Remove under looper holder
5 Remove over looper thread take-up (R)
under looper thread take-up (R)
6 Remove under looper thread guide
8.
(D
8.
@).
@)
and
Q'ty
screw
of
~
OVER
Procedures
Remove inside cover 0 .
(Set over looper 8 to the left mostly.)
2 Remove over looper
LOOPER
MECHANISM
8.
Q'ty
screw
2
of
Procedures
3 Remove over looper driving lever
looper holder guide assembly
time.
@)
and over
8 at the same
Q'ty
screw
1·3
of
-14-

12]
DOUBLE CHAIN STITCH
Procedures
1 Remove needle guard
(B)
LOOPER
0 .
MECHANISM
2 Remove needle guard (F) 8 from needle guide
(B)
0.
3 Remove double chain stitch-looper O. 1
4 Remove double chain stitch looper holder
5 Remove thread guide
(R)
{it
and (L)
8.
8.
Q'ty
screw
1
1
Q'ty
t).
of
screw
1
2
2
of
1
1
Procedures
6 Remove thread handler
7 Remove thread take-up bracket
(Put screw driver into the hole
stitch looper take-up and loosen set screw.)
8 Remove double chain stitch looper take-up
fj.
~.
of
double chain
7 NEEDLE
BAR
MECHANISM
@
®
Procedures
1 Remove needle thread take-up 0 .
2 Remove needle thread guide (A)
3 Remove needle thread take-up supporter
4 Remove chain stitch needle thread guide 8
(B581).
5 Remove face plate
(Stopper spring
out.)
{it
8.
is
naturally
8.
to
be removed
t)
.
Q'ty
screw
1
1
1
4
3(B581)
of
Procedures
6 Remove needle mechanism cover
not
to
spoil the packing. 7
(Put
feed mechanism cover
body.)
7 Loosen screw for needle bar clamp
out
needle
bar~
lower.
«;>
8,
on
®
®
the
fj
taking care
machine
and pull-
Q'ty
screw
of
~
-15-

,-......
5.
ASSEMBLING
[]]
NEEDLE BAR MECHANISM
Procedures
1 Insert needle bar 0 into needle bar clamp 8 .
2 Turn the pulley until the needle bar clamp 8 is raised
fasten the needle bar
lower
e.
3 Install face plate 8 to the machine body.
(Install stopper spring
cranky.)
4 Install needle mechanism cover 8
take care
5 Install needle thread take-up supporter 0
6 Install needle thread guide (A)
7 Install needle thread take-up
take-up supporter
• Normally, it should be fastened in the center
adjustable range.
Lower its position
sion.
Raise its position to decrease the needle thread
sion.
not
make any clearance.
0 at a height where the needle clamp 0 is barely hidden in needle bar bushing
..
0 .
to
increase the needle thread ten-
ADJUSTMENT
at the same time, and adjust it when face plate cover 8 is closed without
to
the machine body firmly putting
to
needle bar clamp
0)
to
face plate
f.D)
to needle thread
of
8.
its
ten-
PROCEDURES
to
the highest position, and then temporarily
of
Q'ty
screw
face plate
8.
of
CD
@)
@
lightly, then
~
(B571)
Q'ty
of
3 (B581)
screw
4
7
I Safety Stitch I Install chain stitch thread guide m
face plate
• Normally, it should be fastened in the center
adjustable range.
Raise its position
around the looper.
Also raise its position to increase the needle thread
tension.
Lower its position to decrease the needle thread tension.
CD.
if
the needle thread winds itself
of
to
its
-16-

Procedures
Q'ty
screw
of
8 Insert needles all the way into needle clamp
tighten screws.
9 Install needle plate
10 Check part ®
whether the machine
use (H).
11
Standard needle for adjustment
• In case
• In case
Ill
The below items
taken simultaneously.
12 In case
specifications, adjust the distance between the needle
point and the
the needle
high-lift specifications must be adjusted
of
of
the
of
the
of
sewing machines made
is
up
11.5 mm between them.
~
.
on
the
over looper driving lever and see
is
for standard use (S)
is
as
follows.
twin-needle, use the left needle.
safety stitch, use the hemming needle.
of
f)
and \Safety Stitch\ should be
top
of
needle plate
highest. The sewing machines
to
to
or
the
11
mm
to
a distance
0 and
high-lift
standard
when
of
the
2
I Safety
Stitch
I Turn
13 In case
with screw.
In case
bar clamp with screw.
In case
should be in the center
needle bar clamp with screw.
of
the
of
the twin-needle, temporarily fasten needle
of
the
the
slightly into needle plate and adjust it
so
needles will be in the center
plate slot,
single needle, tighten needle
safety stitch; after make sure needle
pulley slowly, lower needle
of
needle
by
turning needle bar.
bar
clamp
of
needle plate slot, tighten
Safety stitch (B581)
-17-

~
UNDER LOOPER MECHANISM
CD
Procedures
I Remove needles and needle plate.
0
on
under
is
under
looper
bottom,
in
2 Temporarily fasten under looper holder
looper lever shaft
3 Insert under looper 0
holder
4 Measure under looper 8 tilt
adjust it until the measurement difference
range
with screw (D.
5 Install the standard needle for adjustment into needle
clamp.
O.
of 1 to
8 .
all
1.5 mm, and
the way into
at
its point and
then
fasten under looper 8
the
Q'ty
screw
of
Scale
Ill The below items
simultaneously.
6 In case
specifications, adjust the distance between the under
looper point and the needle center to 4.5
under looper
machine
to
positioning)
of
of
the high-lift specifications must be adjusted
a distance
I Safety Stitch I In case
7 With the point
of
needle, make an adjustment
under looper will push needle 0.01
slightly contact needle) in the upward travel
However,
adjusted to
(Longitudinal positioning)
* 0.05
in case
touch
to
0.07mm
for chemical fabrics.
of
8 and
sewing machines made to the standard
is
at
the left most position. The sewing
of
2.2mm
of
distance
In case
distance
is
4.7mm.
of
is
2.2mm.
of
under looper in line with the center
of
sewing for thick materials, must be
about 0
for
cotton
fj
should be taken
mm
when the
between them. (Sidewise
standard specifications,
high-lift specifications,
so
that
the point
"'0.05mm
of
needle.
to
0.05 mm between them.
fabrics; 0.08 to O.l·mm
that
that
of
{i.e.,
I Twin Needles I Iqstall the right needle into needle clamp,
loosen screw for needle bar clamp,
the needle bar until the under looper
both
depth
needles
or
then
point hits
the same
deeper, and
needle bar clamp. Also check the height
of
needle bar at the same time.
(See the figure at right.) -
by
approximately
the right needle slightly
retighten screw for
turn
slightly contact needle
18-

Procedures
8 Turn the pulley until under looper to the left mostly,
and then temporarily fasten movable needle guard
to under looper holder
9 Match the under looper point with the needle center
on the needle's upward travel, move movable needle
guard
e until it contacts needle, adjust the clearance
between the under looper point and needle to
0.05mm, and fasten movable needle guard
* 0.02 to 0.05mm for cotton fabrics; 0
for chemical fabrics.
131
OVER
LOOPER
0.
MECHANISM
8.
to
0.03mm
0 to
e
Q'ty
screw
of
2
Procedures
1 Fit over looper holder guide assembly
looper lever shaft
2 Temporarily fasten over looper holder guide assembly
3
Move
the over looper driving lever
driving lever
(Tum the pulley,
4 Insert over looper • all the way into over looper holder 8 , and temporarily fasten it.
(Tum the pulley in order
5 Install needle plate. 2
Select the correct distance A and B from the table below according to your machine specifications,
6
make an adjustment by moving the over looper holder guide assembly
A measurement),
then fasten them securely.
e at the same time.
•
is
in alignment with over looper lever shaft e' and then temporarily fasten it.
make sure that the machine smoothly.)
to
make sure that the machine runs smoothly. )
by
moving over looper driving lever
0 onto flame e and over looper driving lever 8 onto over
0.
f}
up
or
down until there
f}
to up or down (decide B measurement), and
is
the least resistance
0
to
the right or left, (decide
so
over looper
Q'ty
* When changing your machine from the standard specifications to the high-lift specifications, replace
over looper and over looper holder assembly, and make an adjustment.
e
~
A
B
Standard
7.2 8.2
5.6
Single needle
High-lift
5.6
Twin needles
(four threads)
Standard High-lift
7.2
5.6
8.2 7.2
5.6 5.6
Twin needles
(mock safety)
Standard
High-lift
8.2 7.2
5.6 5
Standard High-lift
(Unit: mm)
Safety stitch
8.2
5
of
screw
3
~
.
-19-

Procedures
~
Meeting
I
Single
Twin
needles (mock safety) I
I
7
Remove
8
Make
«;),
the point
looper about
point
B A
needle (two threads) I
needle plate.
sure
that, when
0.1
over
looper
of
over looper
mm
below its projected part.
Over
spreader
able. Its meeting distance
that
of
Replace
stitch over looper.
CD
will
pass
fj
for two threads
over
looper.
over
looper with mock safety
meets under looper
clear
of
under
is
Q'ty
A:
Distance between over looper point and needle
when over looper point
B:
Distance between
over
when
is
abail-
the
same
as
of
screw_,.-------------------..
2
looper
Meeting
is
at needle plate top.
over
looper point
is
at left extremity.
point
~!
~
and
needle center
~enter
~
In
case
of
9
tion ®
forth, direction
or down,
* If there
tion ®, stitches may
ing
in direction
less
Install inside cover to flame. 2
10
DOUBLE CHAIN STITCH LOOPER MECHANISM
~
above-mentioned measurement
in
the
figure
at right,
@
move
and
fasten them.
is
a clearance
loops.
Even
if there
@,
loops
clearance between needle and over looper.
move
over looper driving
of
more than
skip
due to the failure
is
a clearance
can
be picked up, but there
is
wrong, direc-
over
looper back or
0.1
mm
of
0.1
lever
in
of
catch-
to 1 mm
up
direc-
is
2
Thread
a
-20-

Procedures
Temporarily fasten double chain stitch looper holder 0
on longitudinal feed shaft 8
2 Install double chain stitch looper 0 by inserting it
the way into double chain stitch looper holder
of
inclination
I~stall
3
double chain stitch needle into needle clamp.
the looper depends on the screw recess.
0.
all
The
Q'ty
screw
of
1
Ill The below items
taneously.
4
In
case
of
so
that the distance between the looper point and the
center
looper comes to the leftmost position. In
lift specifications, that distance
(Sidewise potioning)
5 Position the looper
line with the needle center on the needle's upward travel,
the looper point will
needle, and then fasten double chain stitch looper holder.
(Longitudinal positioning)
*
6 Install double chain stitch needle guard (F) 8 to that
of
O.Smm.
7 Temporarily fasten double chain stitch needle guard (B)
to needle plate support bracket.
of
When
stitch-skips occur, adjust it that the looper point
will hit needle about
(B) (i) in order to make clearance about 0.3 to
of
8
and
(i) should be taken simul-
standard specifications, make
needle
is
1.5mm when double chain stitch
is
1.3
so
that, when the looper point
be
at about 0 to 0.05 mm from
0.05 to 0.1
mm
mm.
an
adjustment
case
deep.
of
high-
is
in
8 Match the looper point with the needle center on the
needle's upward travel, hold double chain stitch needle
guard (B) in contact with the needle, adjust the clearance
between the looper point and the needle
and fasten double chain stitch needle guard
~
KNIVES MECHANISM
to 0 to
(B)
0.05 mm,
securely.
®
L__®
-21-

Procedures
2
3 Insert spring
4
5
Ill
6
7
~
Temporarily fasten lower knife holder support
needle plate support bracket
Temporarily fasten lower knife holder guide 0
plate support bracket
Ci)
into lower knife holder
knife holder into lower knife holder support
8
tighten screw
sliding
Temporarily fasten lower knife
holder
Install needle plate
The below items 8 and 8 should be taken simul-
taneously.
Loosen screws for lower knife holder guide
lower the tip
out
e.
just
(but
not
on
of
lower knife holder guide
8.
8.
tight enough to keep it from
securely).
(t
on the lower knife
needle plate support bracket
so
0
on
needle
8,
fit lower
0,
0,
raise
lower knife
on
and
8.
or
8 will be longitudinally equi-distant in the needle plate
slot for lower knife, and temporarily fasten it.
or
Raise
is
securely.
lower lower knife
level with the needle plate
(t
until
the
top
of
top,
and fasten lower knife
lower knife
Q'ty
screw
of
"
2
2
~
2
2
1
"
Top
Top
Needle plate
of
lower knife
oflower
knife
8 Remove needle.
9 Turn the pulley until needle bar is raised
position, fit
10 Temporarily fasten upper knife
••
11
Temporarily fasten upper knife holder
knife driving arm
(Toutch upper knife
12 Loosen screw and
so
as
temporarily tighten it.
13
Lower upper knife
upper knife will engage lower knife
~
14 When upper and lower knives are engaged, adjust
angle
of
knife will match the upper left angle
and fix it securely.
15
For
adjusting the engagement
loosen the screw and
turn the lower knife holder about the
is
a clearance corresponding
0.01 mm, then retighten the screw and bolt.
(As per figure
nut
• on upper knife driving arm Q).
CD
in upper knife holder
fD
Q).
to
lower knife lightly.)
bolt
for lower knife holder support 0
to fit lower knife face and upper knife face and
f)
all
the
way, and adjust
0.5-
lower knife so
next
that
the lower left angle
of
upper and lower knife,
bolt
which fasten lower knife holder,
to
the thickness
page.)
to
the highest
on
the upper
1
mm
deep.
of
lower knife,
bolt
until there
so
that
the
of
upper
of 0 to
2
2
2
{
®
-22-

Procedures
0
-O.Oimm
0
(Note)
This adjustment
it
is
not
do it very carefully.
16
Make
sure it that upper and lower knives are engaged
and lower knife
and then fasten lower knife holder.
17
Place the thread between upper and lower knives in the
fore and rear parts, and
sharply cut.
1§1
FEED AND
is
necessary
is
PRESSER
carefully done before shipment
to
pressed against upper knife
X
do it. However,
see
that the thread can be
FOOT MECHANISM
if
X
it
by
so
is
needed,
spring
that
Thread
Procedures
1 Remove needle plate.
2 Adjust chain feed dog
case
of
(In
a height
3 Turn the pulley until under looper to the left mostly, temporarily fasten main feed dog
bar
O.
4 Temporarily fasten differential feed dog 8 on differential feed bar C).
5 Install needle plate on needle plate support bracket.
6 Turn the pulley until feed dogs are raised to the highest position, and adjust them to the following height
above the top
However,
thicker thread and knitting wool and/or chaining-off hardly come out, adjust chain feed dog to
of
0.3
"'0.5mm
of
l.Omm for thin materials
1.3
mm for medium materials
1.5
mm for thick materials
in
case
0 at the same level
below main feed dog.)
needle plate.
of
denim specification
as
main feed dog.
of
safety stitch, its height
is
1.3mm.
-23-
• on main feed
Q'ty
of
2
2
screw
1

Procedures
,-------------------------------------------------------~
I Safety Stitch I
Note:
~
1
.z::wmmm
GJ$~~~~~~~~~w~w~wi="
.
~
CD
When
sewing safety stitches, make sure
each other. Otherwise, chaining-off cannot be sewn.
Use
a scale
In case
piping ruffler specifications only), install needle plate
prevent from slipping
as
shown below to check their levelness.
of
needle gauge 2mm and Smm (as for needle gauge Smm, it
out
1
==1.=i0tmm
of
chaining-off stitches.
for thin
1.3 mm for medium materials
1.5 mm for. thick materials
materJs
that
main and differential feed dogs are level with
l
mm~,....-4-~-~-z-L-L-L
Q'ty
of
screw
J 0.3-0.SIIIID
.ru;gi~~)&d?ff&
is
available for ruffler and
in
light toutch with feed dog
Needle gauge 2 mm Needle gauge 5 mm
in
order to
7 Install presser foot
(In case
1ZJ
LOOPER
Procedures
1 Install looper thread take-up (L) 0
2 Install over looper thread take-up (R) C) and under looper thread take-up (R) 8 to over looper lever
shaft
3 Install under looper thread guide
4 Adjust each thread take-up and thread guide to their standard positions
needle up highest.
of
safety stitch, install presser foot 0 to presser foot supporter
THREAD TAKE-UP AND THREAD GUIDE MECHANISM
•.
* When looper thread take-up (R)
thread will be delivered. When under loooer thread guide
delivered.
When
(t
on main presser arm
to
(t
is
it
is
moved leftward, more thread will be delivered.
•.
under looper lever shaft
to thread guide support
raised, less thread will be delivered. When it
0)
8.
•.
as
shown above after raising the
is
moved to the rieht,
with pin ~ .)
is
lowered, more
less
thread will be
Q'ty
of
screw
1
1
-24-

lal
DOUBLE CHAIN STITCH
Procedures
Fit double chain stitch thread take-up 0
shaft.
2 Install thread handler
parallel to it.
3 Install thread take-up
(Insert thread handler 8 onto double chain stitch thread
take-up
stitch thread take-up.)
0
in
accordance with the slot
* Thread consumption and timing
adjusted by moving thread handler
(When the top
thread tension decreases, and when it
looper thread increases.)
4 Turn the pulley until needle bar
position.
of
LOOPER
THREAD TAKE-UP AND THREAD GUIDE MECHANISM
onto
8 to thread take-up bracket
bracket@) to machine body.
of
double chain
of
thread release are
8.
thread handler
is
raised, the looper
is
lowered, the
is
raised to the highest
crank
@)
Q'ty
screw
2
of
Unclockwise
Loosen
Clockwise
Tighten
~
The below items
taneously.
5 Set double chain stitch thread take-up O
where thread handler
6 Adjust the distance between the top end
chain stitch thread take-up
@)
to
6mm,
* When double chain stitch thread take-up
(counterclockwise), the looper thread tension
creases; and when it
looper thread tension decreases.
7 Install thread guide (R)
up bracket @), making sure that they are equi-distant
from the reference line on thread take-up holder
thread slot.
C)
and
8
is
and fasten it.
is
8 and (L)
(3
should be taken simul-
at
in the center
of
the slot.
of
0 and thread take-up bracket
is
advanced
moved back (clockwise), the
C)
on
thread take- 2
a point
double 2
in-
in
the
-25-

191
COVER
Procedures
1 Temporarily fasten front cover supporter 0 on machine body.
2 Temporarily fasten front cover
3 Temporarily fasten front cover guide
*
Make
an
in
place
~Ill
The following items from 8 to
4 Adjust front cover
Overlock Stitch
adjustment
as
before.
I
8
so
so
8 on oil reservoir. (Close front cover)
• parallel to machine body.
that, when front cover 8 comes
fj
must be made while checking.
it
is
parallel to machine body and has a clearance about O.Smm.
off
front cover guide
I Safety Stitch I
Parallel
.,,
it can be put back
about
Q'ty
0.5
of
2
2
2
mm
screw
5
Make
an adjustment
is
down lowest, there
between front cover 8 and upper knife e.
6 Adjust the clearance between front cover 8 and
front cover guide
so
that, when upper knife 8
is
0
to
a clearance
0.5 to 1 mm.
of
0.5-1
about O.Smm
mm
-26-
Make
an adjustment
upper knife e and double chain stitch looper • and
their clearance will be
7 Front cover 8
porter
0 and stopper spring
so
that front cover will be between
as
shown above.
CD
is
held securely by front cover sup-
8.

6.
STITCH LENGTH
AND
DIFFERENTIAL
FEED
ADJUSTMENTS
[i] STITCH LENGTH ADJUSTMENT
A desired stitch length can be selected by means
main feed arm 0 and differential feed arm 8 indicate stitch length in millimeters, but actual stitch length varies with
of
the kind and thickness
Procedures
1 Pull and open feed mechanism cover (B) 8 on the back
2 Loosen nut
3
Move
desired stitch length.
4 Retighten nut
e.
feed ling indicator plate
8 securely.
the material and the differential fedd.
fit
until its red mark
of
the
scale
on main feed arm 0 and the numerals on the scales
of
the machine.
is
in line with that number on the
scale
which represents your
of
12J
DIFFERENTIAL
Differential ratio produced
stretching and shirring.
Calculation method
Differential ratio
* In
case
of
FEED ADJUSTMENT
by
the movement
of
differential ratio:
= The scale on differential feed arm
The scale on main feed arm
the maximum stitch length in normal stitching refer below.
of
differential feed arm
2 In case
is
In case
Set the scale on differential feed arm 0
way
Set the scale on differential feed arm 8 to a smaller
number than that
of
as
the scale on main feed arm
of
to
be dicided depending on normal stitching,
normal stitching
in
the
0.
stretching
of
the scale on main feed
arm
same~
0 .
-27-

*
Even
in case you adjust stitch length by changing the movement
ratio unchanged
Note:
If
ferential feed arm 8 are set
scale value greater than those shown
at right, the feed dogs will hit the
edges
as
before without fail.
the main feed arm 0 and dif-
to
any
of
the slots in needle plate.
·3
In case
Set
number than
of
of
slwrring
the scale
main feed arm
-
s
~
Normal stitching
Denim
Ruffler
Bulky
on
differential feed arm 8
that
of
the scale
0,
make sure
Main
on
to
feed arm
3.6mm
3.3mm
2.5mm
to
a larger
main feed arm O.
remain differential
Differential
feed arm
6.5mm
9.0mm
9.0mm
7.
SEWING INSTRUCTION
[I]
SINGLE-NEELDE, TWO-THREAD
* Thread tension means the tension
No.
1
2 medium-thick
3
Note
Edges tend to curl when sewing thin materials. So decrease the
hemming width
to such an extent
Better stitches can be obtained
a little above the normal level.
Note on Item 2:
Edges will not curl when sewing medium materials. Hemming width may be increased up
to 3.6mm.
Cloth
Wool, polyester,
thin trouser fabrics
Wool, polyester,
trouser fabrics
Knit fabrics,jersey
on
Item
1:
(to
that
Thread Needle
Cotton
Wooly nylon
about 3
to
the stitches will not be
of
the thread pulled in the running direction after the tension disc.
of
shape.
Differential
1--
size
#60/2
"
#11
"
"
4mm)
and reduce the thread tensions
out
by
increasing the over looper tension
ratio
1
"
1.5
Stitch length
3--
2--3
"
3.6
Needle thread Looper thread
tension tension
18--
28
"
10--20
~
to
6mm,
8--
18
"
15--
25
Looper thread
Needle thread
and stitch length up
Note
on
Item 3:
It wooly nylon thread is used for
neatly.
The smaller the stitch length the better will be the finished stitches.
Needle thread: Synthetic thread
(
Looper thread: Wooly nylon thread
both
the needle and the loopers, or only for the loopers, cloth edges
Needle thread: Wooly nylon thread
(
Looper thread: Wooly nylon thread
-28-

~Looper
thread
C Looper thread
Even if wooly nylon thread
stitches because the thread tension
~
SINGLE-NEEDLE, THREE-THREAD
No.
1
2
3 Thin knit fabrics Synthetic
4
5
6
7
Notes
Cloth
Knit under wear
material
"
"
Thick knit fabrics
Knit underwear
material
(Blind hemming)
"
on
Items I to 3:
Thread
Cotton
Synthetic
Wooly nylon
Needle:
Looper: Woolen
Cotton
Wooly nylon
~Needle
Needle
#60/2
#60
#60
Synthetic
#60
#60/2
is
#9
#11
"
#14
#9
"
"
thread
used
size
as
needle thread, there will be no skipped
is
small.
Differential
ratio tension
1
"'
Stitch length
1.5
"
1-2
"
2-3
1
"'
2.2"'2.8
1.5
"
Stitches will change when the over looper thread take-up (R) is raised or lowered
Be
careful not
to
lower the thread take-up
so
much because stitches at high speed will become different at low speed
or vice versa.
2"'
2.5
"
2-25
"
2"'2.5
"
Needle thread
"'73
43
40-70
40-70
30
"'50
so--so
15-25
10--20
as
shown below.
~Needle
Over looper
thread tension thread tension
6
"'22
4-18
4--18
4-15 4-15
4-15
8"'
15
2
"'10
thread
Under looper
6"'22
4-18
4-18
4
"'15
22
.....
32
6-18
Raise when thread
©
If
the work becomes damaged:
1)
Decrease the presser pressure
A smaller pressure
2) Make the angle
is
of
feed dogs less sharp.
effective for preventing work slipping in ordinary sewing, too.
to
2 to 3kg,
When buffing the feed dogs, hold them horizontally.
Remember not to
buff
them too much because excessive
buffing will lower feed efficiency.
©
If
fiber breaks
I)
Cool the needle thread.
2)
Use
a smaller needle (selecting one in the range
#7
to
3)
Use
a well-shaped light ball point (Schmetz), S-point
{Organ), or knit needle
#9).
by
needle:
KN
(Organ).
is
tense. Lower when thread
or
by about
of
I2
to
IS screw threads.
~Smooth
of
comers
is
loose.
~
-29-

Note on Item
When using wooly nylon thread for the needle,
crease the thread tension especially low. Stitch
skipping
avoided
4:
is
liable to occur,
by
using a
DC
X27 needle.
but
can be effectively
de-
xo
~-Under
r harldy enter.
DC
XI
Note on Item
Stitches tend
rubber-interlaced parts. In
ment by lower the over looper and under looper
thread take-up (R).
looper
can
f
5:
to
become loose on thick knitwork or
that
case, make an adjust-
fn
Lower
Under looper can
easily enter.
OCX27
6~
'\
/
Pass the thread through the two holes
without winding.
©
If
stitches skip (Needle and under looper):
1)
Use a DC
Make
2)
needle.
X27 needle.
an adjustment by only slightly bending the
-
Make
under looper contact
0.1 to 0.15
needle
deep.
mm
Pull out needle guard and
adjust clearance between
needle and under looper
0 to 0.03mm.
to
in
the thread guide
Note on Item
1}
Sew
2) Do not pull the work with
stitches will be made away from the desired line.)
3}
Push a thicker part
hand.
Machine adjustments:
1}
Adjust the presser pressure to 2 to 3kg,
threads.
2}
Adjust the clearance between the presser foot and the blind hemming
ruler so that the work will easily pass.
3) Adjust the clearance between the blind hemming ruler. An assembly's
tip and the blind hemming ruler so that the work will easily pass.
4}
Adjust hemming width by turning the blind hemming ruler adjusting
screw.
Note
on
If
wooly nylon
the needle thread tension
in
the thread guide without winding.
6:
Precautions on blind hemming
at constant speed.
Item 7:
is
used for blind hemming, stitches will not skip because
your right hand.
of
material under the presser foot with your left
is
small. Pass the thread through the two holes
(If
or
by about 12
the work
to
is
15
pulled,
screw
Q Blind Hemming ruler
Clearance
Clearance
-30-

13]
DOUBLE-NEEDLE, FOUR THREADS
No.
Double-needle
four threads
Mock safety
No.
Double-needle
four threads
Mock safety
Qoth
Knit underwear
1
material
Thin knitwork
2
Bulky material
3
Broadcloth Cotton #SO
4
Jersey
5
Left needle Right needle
thread tension thread tension
60-SO
1
40--60
2
70--90
3
4
so
--so
s
so"'
70
Cotton
Synthetic
Needle: Synthetic
Looper: Woolen
Polyester
30--
2S-4S
35-SS
4S
2S-SO
Thread
51)
--70
#60/2
#60
#60
#50
Over looper Under looper
thread tension thread tension
6
--1S
4-16
3--10
s
10--20
Needle size
--1S
Note on Item I:
Cotton threads in the range
thread tension must be reduced
thread tends
to
break. In that case, do not tighten the needle thread
tension but adjust the positions
if
the thread tension must be increased.
Note on Item
2:
About the same tension may be used for
of
#60/2 to #70/2
as
much
of
the thread take-up and thread guide
are
weak
as
possible. A poor quality
sewing
with synthetic and
so
that the
cotton threads.
Note on Item 3:
Make
the same adjustment
Note on Item
If
the over looper thread tension
4:
as
mentioned in Item 5 for three threads.
is
too small, double-needle four-thread
stitches may sometimes be made. In such a case, raise the over looper
thread take-up (R) to decrease thread delivery.
Note on Item 5:
When sewing jersey with chemical thread, it may break due to heat.
# 9
#11
#14
#11
#14
s
6-1S
s
8--1S
8--18
Differential ratio
o.s
1.5--2
"'20
--15
1
--1.5
1--2
2--3
--1
Stitch length
2--2.5
"
2.~--
2.8•
2
"'2.5
2.5-3
Raise
~
DOUBLE-NEEDLE, FIVE THREADS (Safety
No.
1
2
3
4
s
No.
1
2
3
4
s
Cloth
Broad cloth
Broad cloth
Jersey
Gaberdine
Denim
Double chain stitch
needle thread tension
20--
50
1S--
4S
2S-
60
35-
60
so--
uo
Thread
#so
Cotton
Polyester
Needle: Polyester #SO
Looper: Wooly nylon
Cotton
#so
Cotton
#so
Double chain stitch
looper thread tension
S-IS
5-10
s-20
6"'
1S
10-20
#80
Stitches
Needle size
Over needle
thread tension
Only)
#11
"
#14
#16
#21
40-
302S,...,
so
--100
70-1SO
Differential ratio
Over looper
thread tension
90
so
so
-31-
o.s
--1
"
1.5-2
1
"
10--
S--20
s-1s
7-20
10
--2S
2S
Stitch length
2-2.5
"
2.2-2.8
2.S
"'3
"
Under looper
thread tension
s
--20
s
-1S
S--20
10-30
1S
--30

Note
on
Items 1 and 2:
Broadcloth tends to pucker
Use
a single type presser foot for efficient feeding.
Note on Item 3:
If wooly nylon thread
Jersey tends to deviate much
Remarks:
on
Note
Denim also tends to deviate much
threads).
8.
TROUBLE
[]]
THREAD BREAKAGE (Overlock Stitch
If
a single type presser foot
may break, and chaining-off thread break may occur.
Item
5:
Use
gauge parts for denim specification.
so
is
used for double chain stitches, it can resist stretching up to 130 to 150%.
SHOOTING
that the thread tension must be decreased
so
decrease the presser pressure
is
used except when sewing thin materials, initial stitches may skip, the thread
so
that the presser pressure must be decreased to 2 to 3
Needle)
(to
2 to 3kg) and use a double type presser foot.
as
much
as
possible.
kg
{by about
12
to
15
screw
CHECK POINT
1 Wrong threading.
2
3 Poor thread quality.
4
5
6
7 Needle plate has flaws.
8 Under looper has flaws.
l
Excessive pressure
l
l
Needle groove or needle eye poorly finished
l
Wrong position
l
Needle thread passage has flaws.
l
of
tension disc.
of
looper thread take-up.
-
-
-
-
-
-
-
-
ADJUSTMENT
Refer to "Threading diagram."
Adjust to proper pressure.
Use
thread
of
good quality.
Change needle for a good one.
Adjust to proper position.
Change thread guide for a new one.
Change it for a new one or smooth surface
with oil stone or buff.
Fmws~
Change it for new one or smooth surface
with oil stone or buff.
PAGE
28
-
24
18
lf==Blunt
9 Wrong timing
of
needle and looper.
-
-32-
Adjust to proper timing, needle clearance
and position
of
Flaws
19
needle guard.

• THREAD BREAKAGE (Double
Chain
Stitch
Needle)
CHECK POINT
Wrong threading.
1
l
Excessive pressure
2
l
Poor thread quality.
3
l
Needle groove or needle eye poorly fmished.
4
l
Wrong position
5
l
Wrong position
6
l
7 Needle thread passage has flaw.
l
8 Double chain stitch looper has flaw.
9 Wrong adjustment
of
tension disc.
of
chain stitch needle thread guide. -
of
looper thread take-up.
of
needle guard.
-
-
-
-
-
-
-
-
ADJUSTMENT
Refer to threading diagram.
Adjust to proper pressure.
Use
thread
of
good quality.
Change needle for a good one.
Adjust to proper position.
Adjust to proper position.
.Change thread guide for a new one.
Change it for a new one or smooth surface
with oil stone
or
buff.
~Blunt
Flaws
Adjust to proper clearance between needle
and needle guard.
PAGE
31
16
25
20
21
10
Wrong timing
THREAD BREAK (Looper Thread)
121
Wrong threading.
l
2
Excessive pressure
l
3 Poor thread quality.
l
4
Wrong position
l
5
Looper thread passage has flaw.
l
6
Needle plate has flaw.
of
needle and looper.
CHECK
POINT
of
of
looper thread take-up.
tension disc.
-
\
~
-
~Clearance
Adjust to proper timing.
ADJUSTMENT
Refer
to
threading diagram.
Adjust to proper pressure.
Use
thread
Adjust to proper position.
Change thread guide for a new one.
Change it for a new one and smooth surface
with oil stone
of
good quality.
or
buff.
21
28
24
-33-

13]
SKIP STITCHING (Overlock Stitch)
CHECK POINT
1 Wrong threading.
l
Excessive pressure
2
l
In case skipping between over looper and needle.
*
Wrong position
1
l
Little movement into the left
2
of
tension disc.
of
looper thread take-up.
of
over looper.
I
3
Large clearance between needle and over looper. -
I
Incorrect height
4
l
* In case
Large clearance between under looper and over -
1
looper.
Top
2
of
l
of
over looper blunt or bent.
of
needle bar.
skipping between over looper and under looper.
-
-
-
-
-
-
ADJUSTMENT
Refer
to
threading diagram.
Adjust to proper pressure.
Adjust
to
proper position.
Adjust the position
movement.
Adjust over looper and under looper for
proper clearance between needle and over
looper.
Adjust
to
proper height.
Adjust
to
proper clearance.
Chnange it for a new one or smooth with
oil stone or buff.
of
over looper for proper
PAGE
28
24
19
18.
17
20
19
19
* In case
Large clearance between under looper and needle. -
1
Top
2
Incorrect height
3
Wrong timing
4
of
skipping between under looper and needle.
l
of
under looper blunt
of
needle bar.
l
of
under looper.
or
bent.
-
-
-
Blunt~
Adjust
to
proper clearance.
Change it for a new one or smooth with oil
stone or buff.
~
Blunt
Flaws
~·
Adjust
to
proper height.
Adjust to proper timing.
18
18
17
18
-34-

• SKIP STITCHING (Double
Chain
Stitch)
CHECK POINT
Wrong threading.
Refer to threading diagram.
ADJUSTMENT
l
of
2 Excessive pressure
tension disc. Adjust to proper pressure.
l
3 Wrong position
of
looper thread take-up. Adjust to proper position.
l
* In
case
of
skipping on rightward movement
Large clearance between looper and needle. Adjust to proper position.
2 Wrong position
of
needle guard.
of
looper.
Adjust to proper position.
-~""-clearance
PAGE
31
25
21
21
3 Top
4 Wrong timing
of
looper blunt or bent.
- Change
of
double chain stitch looper. - Adjust
it
for a new one
oil stone or buff.
~Blunt
u .Flaws
to
proper timing.
or
smooth with
Standard specifications 1.5
High-lift specifications 1.3
21
21
mm
mm
-35-

~
NEEDLE BREAKAGE
CHECK
1
Poor thread quality.
l
2
Needle size
3
Needle
4
Needle and looper
too
small.
l
is
not
center
!
I
5
Wrong adjustment
~
IMPROPER THREAD TENSION
CHECK POINT
1 Poor thread quality.
!
2 Needle size
3
Too weak pressure
4 Wrong position
too
small.
l
!
of
POINT
of
needle plate slot.
out
of
proper relation.
of
needle guard.
of
tension disc.
thread take-up.
-
-
-
-
-
-
-
-
-
ADJUSTMENT
Use
thread
of
good quality.
Change it for more large one.
Adjust to proper position.
Adjust the position
looper properly.
Adjust to proper position for needle guard.
ADJUSTMENT
Use
thread
Change it for more large one.
Adjust to proper pressure.
Adjust
of
to
proper position.
of
needle guard and
good quality.
PAGE
17.
19
19.21
PAGE
28
24.25
18
I§] WRONG CHAINING-OFF
CHECK POINT
1 Wrong threading.
!
2
Excessive pressure
l
3
Too weak pressure
l
4 Wrong position
5
6
7
8 Wrong timing between needle and looper.
l
Wrong position
l
Wrong installment
!
Needle plate has flaws.
(Overlock
of
tension disc.
of
tension disc.
of
looper thead take-up.
of
needle thread take-up.
of
chain feed dog.
Stitch)
-
-
-
-
-
-
-
-
ADJUSTMENT
Refer to thread diagram.
Adjust
to
proper pressure 28
Adjust
Adjust
Adjust
Adjust
Change it for
stone oil and buff.
to
proper pressure. 28
to
proper position.
to
proper position.
to
proper position.
.a
new one, or smooth with
~·
Adjust
to
proper timing.
PAGE
24
16
24
18.
19
-36-

• WRONG CHAINING-OFF (Double
Chain
Stitch)
CHECK POINT
Wrong threading.
1
!
Excessive pressure
2
l
Too weak pressure
3
!
4 Wrong position
l
Wrong position
5
!
Wrong installment
6
differential feed dog.
l
Wrong position
7
8 Existance
for chaining
of
clearance on the pressing pari
off
of
tension disc.
of
tension disc.
of
needle thread guide.
of
looper thread take-up.
of
main feed dog and
of
main feed dog.
of
presser foot.
-
-
-
-
-
-
-
-
ADJUSTMENT
Refer to threading diagram.
Adjust to proper pressure.
Adjust
to
proper pressure.
Adjust to proper position.
Adjust to proper position.
Adjust installment with the same level.
Adjust needle plate in light toutch with
main feed dog.
Change
it
for a new one.
~
PAGE
31
16
25
24
24
~
9 Wrong timing between needle and looper.
1ZJ
EXCESSIVE WRINKLES
CHECK POINT ADJUSTMENT
1 Excessive pressure
!
2
Needle size too big.
of
tension disc.
j
3 Wrong differential ratio.
!
4 Bight too wide.
!
5
Knives are not sharp.
[S]
SLIPAGE OF CLOTH
-
-
-
-
-
-
Adjust to proper timing.
Adjust
Change it for a proper one suitable to
needle and materials.
Adjust to proper ratio.
Adjust to proper bight.
Change it for a new one or reglind.
(In case
knife
to
proper ·pressure.
of
engagement
is
wrong, adjust engagement
of
upper and lower
of
21
PAGE
28
27
22
these.)
CHECK POINT
1
Excessive pressure
2
!
Knives are not sharp.
of
pressure foot.
-
-
Adjust to proper pressure.
Change it for a new one
(In
case
knife
ADJUSTMENT
of
engagement
is
wrong, adjust engagement
l
3 Feed dog too high.
-
-37-
Adjust
to
lower level than standard level.
or
reglind.
of
upper and lower
of
PAGE
22
these.)
24

--
---~--~

MEMO
n
...
_
..

BROT
HER
HEAD
NA
GOYA .
TE
LEX.
I
8030034
Printed
INDU
OFFICE:
JAPAN
BROTHER
March 1
in
Japan
STRIES.
N0.3
LTD
.
5. 9 CHO
J59743 ·59908·58870
ME HORITA-OORI
978
MIZUHO
-KU
 Loading...