

Page 1

ADVANCED
USER’S GUIDE
MFC-J825DW
DCP-J925DW
Version A
UK/IRE/GEN
Page 2

User's Guides and where do I find it?
Which manual? What's in it? Where is it?
Product Safety Guide Read this Guide first. Please read the Safety
Instructions before you set up your machine.
See this Guide for trademarks and legal
limitations.
Quick Setup Guide Follow the instructions for setting up your
machine and installing the drivers and software
for the operating system and connection type
you are using.
Basic User's Guide Learn the basic Fax (MFC-J825DW only),
Copy, Scan and PhotoCapture Center™
operations and how to replace consumables.
See troubleshooting tips.
Advanced User's Guide Learn more advanced operations: Fax
(MFC-J825DW only), Copy, security features
(MFC-J825DW only), printing reports and
performing routine maintenance.
Software User's Guide Follow these instructions for Printing, Scanning,
Network Scanning, PhotoCapture Center™,
Remote Setup (MFC-J825DW only), PC-Fax
(MFC-J825DW only), Disc Print, Web Services
(Scan), and using the Brother ControlCenter
utility.
Printed / In the box
Printed / In the box
Printed / In the box
PDF file / CD-ROM
PDF file / CD-ROM
Network Glossary This Guide provides basic information about
advanced network features of Brother
machines along with explanations about
general networking and common terms.
Network User's Guide This Guide provides useful information about
wired and wireless network settings and
security settings using the Brother machine .
You can also find supported protocol
information for your machine and detailed
troubleshooting tips.
Mobile Print/Scan Guide This Guide provides useful information about
printing data from your mobile phone and
transmitting scanned data from the Brother
machine to your mobile phone.
1
Visi t us at ht tp:/ / s oluti ons.brother. c om/.
PDF file / CD-ROM
PDF file / CD-ROM
PDF file / Brother
Solutions Center
1
i
Page 3

Table of Contents
1 General setup 1
IMPORT A N T N OT E.... .. ................ ....................... ........................ ..........................1
Memory s to ra g e....... ... ....................... ....................... ....................... ......................1
Automatic Daylight Saving Time (MFC-J825DW only)..........................................1
Sleep Mo d e ...... ... ....................... ....................... ....................... .............................2
Auto Power Down (DCP-J925DW only) ................................................................2
LCD displ a y ........... .. .......... ....................... ....................... ....................... ...............3
Changing LCD language (DCP-J925DW only).................... .............. ............ ..3
Settin g th e Dim Ti me r for th e bac kl ig h t ................ ........................ ...................3
Mode Timer (MFC-J825DW only)................................ .............. ............ .. ..............3
2 Security features (MFC-J825DW only) 4
Memory S e cu r i ty.. ....................... ....................... .............................. ......................4
Setting and changing the Memory Security password ....................................4
Turning Memory Security on/off ......................................................................5
3 Sending a fax (MFC-J825DW only) 6
Additional sending options.....................................................................................6
Sending faxes using multiple settings.............................................................6
Stop faxi n g..... .. ....................... ....................... ............................... ...................6
Contrast...........................................................................................................6
Changing fax resolution................................ .. .............. .............. ............ .. .......7
Setting your changes as a new default............ .. .. .. ..........................................7
Restoring fax settings to the factory default ....................................................7
Additional sending operations.......... ............................ . .. .. .. ............................ . .. .. ..8
Sending a fax manually...................................................................................8
Sending a fax at the end of a conversation....................... ................ ..............8
Dual Access (Monochrome only)............. ........................................................8
Broadcasting (Monochr ome only)................................. . .. .. .. ............................9
Real Time Tr a n sm i ss i o n............................ ....................... ....................... ......10
Overseas Mode .............................................................................................11
Delayed Faxing (Monochrome only )........ ............................ . .. .. .. ...................11
Delay ed B a tch Tra n s mi s si o n ( Monochro m e o nly ).............. ........................ ...11
Checki n g a nd ca n c e lli n g wa i ti n g jobs. .. ................ ........................ .................1 2
Polling overview...................................................................................................12
Polled Transmit (Monochrome only )........ ......................................................12
ii
Page 4

4 Receiving a fax (MFC-J825DW only) 14
Memory Receive (Monochrome only).................................................................. 14
Out of Paper Reception.................................................................................14
Fax Forwarding..............................................................................................14
Fax Storage...................................................................................................15
Print ing a fa x fr om th e memory ........... .......... ....................... ....................... ..15
PC-Fax Receive (Windows
Turning off Memory Receive operat ions........... .. . .. .. .. ....................................17
Changing Memory Receive operations................................... ......................17
Remote Retrieval......... ....................... ........................ ....................... ..................1 8
Setting a Remote Access Code.....................................................................18
Using your Remote Access Code..................................................................18
Remote Fax commands................................................................................19
Retrieving fax messages................................................................ . .. .. .. ........20
Changing your Fax Forwarding number........................................................20
Additional receiving operations............................................................................21
Print ing a re d uc ed inc o ming fax . .. ........................ ....................... ..................21
Polling overview...................................................................................................21
Polling r e ce ive .............. .............................. ........................ ....................... ....2 1
®
only).................................................................16
5 Dialling and storing numbers (MFC-J825DW only) 24
Voice operations......................... ................ .............. . .. .. .. ....................................24
BT Call Sign (U.K. only).................................................................................24
Additional dialling operations...............................................................................25
Combi n ing Qu i c k Dial num b e rs....................... ....................... .......................25
Additi o n al way s to store numbers..... .............................. ........................ .............2 6
Storing Speed Dial numbers from Outgoing Calls ......................................... 26
Storing Speed Dial numbers from the Caller ID history................................. 26
Setting up groups for Broadcasti ng................................................ . .. .. .. ........27
6Printing reports 29
Fax reports (MFC-J825DW only)................. .. .. .. .............. ............ .. .............. ........29
Transmission Verification Report...................................................................29
Fax Journal (activity report).................. ............ .. .............. .............. ............ .. .29
Reports................................................................................................................30
How to print a report......................................................................................30
iii
Page 5

7 Making copies 31
Copy settings.......................................................................................................31
Stop cop y i ng...... ....................... ........................ ....................... ......................3 1
Changing copy speed and quality .................................................................31
Enlarging or reducing the copied image........................................................32
Making N in 1 co p ies o r a pos t e r (Pag e Lay o u t ) ......... .......... ....................... .3 3
2 in 1 ID Copy................................................................................................34
Sorting c o pie s using the ADF ............. ....................... ....................... .............35
Adjusting Density...........................................................................................35
Ink Save Mo de................. .............................. ........................ ....................... .36
Thin Paper Copy............................................................................................36
Book Cop y......... ................. ....................... ....................... ....................... ......37
Waterm a rk C opy.......................... ....................... .............................. .............37
Duplex ( 2 -s i d ed) c o p yi ng. ... ......... ....................... ....................... ....................39
Settin g yo u r fav o ur it e s... .. ................ ........................ ....................... ...............40
8 Printing photos from a memory card or
USB Flash memory dr ive 41
PhotoCapture Center ™ operations ............... ............................ . .. .. .. ...................41
Memory cards, USB Flash memory drive and folder structures....................41
Movie printing................................................................................................42
Print Images.........................................................................................................42
Print Index (Thumbnails) ...............................................................................42
Printing Photos..............................................................................................43
Enhance Photos.................... .. ................ ......................................................43
DPOF pr inting.. ................ .............................. ........................ ....................... .4 5
PhotoCapture Center™ print settings..................................................................46
Print Qua l i ty........................ .............................. ....................... ......................4 6
Paper options ............................ .......................................... . .. .. .. ...................46
Adjusting Brightnes s , Cont r as t and Colour..... .............. ............ .. .............. .....47
Cropping. .......................................................................................................48
Borderless printing.........................................................................................49
Date Pri nt.... .......... ....................... ....................... ....................... ....................49
Setting your changes as a new default............ .. .. .. ........................................49
Restoring all settings to the factory default....................................................49
Scan to a memory card or USB Flash memory drive ..........................................50
Auto Cro p ............... ....................... ....................... ........................ .................5 0
How to set a new default ...............................................................................51
How to reset to the factory default.................................................................51
9 Printing photos from a camera 52
Printing photos directly from a PictBridge camera................... ................ ............52
PictBr i dge r e qui r em e n ts .. ....................... ........................ ....................... ........5 2
Settin g yo u r dig it a l ca me r a..................... ............................... ....................... .53
Printing Images.......... ................ .......................................... . .. .. .. ...................54
DPOF pr inting.. ................ .............................. ........................ ....................... .5 4
Printing photos direc tly from a digital camera (without PictBridge).......... ............55
Printing Images.......... ................ .......................................... . .. .. .. ...................55
iv
Page 6

A Routine maintenance 56
Cleaning and checking the machine................................ ............ .. .............. ........56
Cleaning the outside of the machine .............................................................56
Cleani n g the ma c h i n e’s p rin t e r pla te n ......................... ....................... ...........5 7
Cleaning the paper feed rollers ..................................................................... 58
Cleani n g the p a per p ic k -u p rol ler s................... ....................... .......................59
Checki n g the in k v o l um e ..................... ........................ ....................... ...........60
Packing and shipping the machine..................... .. .. ................ . .. .. .. ......................60
B Glossary 63
C Index 67
v
Page 7

General setup 1
1
IMPORTANT NOTE 1
In this manual, the LCD messages of the MFC-J825 DW are used unles s specif ied.
Most of the illustrations in this User’s Guide show the MFC-J825DW.
1
Memory stor age 1
(MFC-J825DW users only)
Your menu settings are stored permanen tly,
and in the event of a power failure will not be
lost. Temporary settings (for ex ample,
Overseas Mode) will be lost. If you have
chosen Set New Default for your FAX,
SCAN or PHOTO’s preferr ed s ett ings , those
settings will no t be lost. Also, during a power
failure the machine will retai n the dat e and
time and programmed fax timer jobs (for
example, Delayed Fax) for up to 24 hours.
(DCP-J925DW users only)
Your menu settings are stored permanen tly,
and in the event of a power failure will not be
lost. If you have chosen Set New Default,
settings in the Photo and Scan modes will
not be lost. Temporary setting s wil l be lost.
Automatic Daylight Saving Time (MFC-J825DW only)
You can set the machine to change
automa ti ca l ly fo r daylight sa v ing ti me . It will
reset itself forward one hour in t he Spring and
backward one hour in the Autumn. Make sure
you have set the correct date and time in the
Date&Time setting.
a Press Menu.
b Press a or b to display
General Setup.
c Press General Setup.
d Press a or b to display
Auto Daylight.
1
e Press Auto Daylight.
f Press Off (or On).
g Press Stop/Exit.
1
Page 8

Chapter 1
Sleep Mode 1
You can choose how long the machine will
remain idle before it goes into Sleep Mode
(from 1 to 60 minutes). The timer will restart if
any operation is carried out on the machine.
a Press Menu.
b Press a or b to display
General Setup.
c Press General Setup.
d Press a or b to display Sleep Mode.
e Press Sleep Mode.
f Press 1 Min, 2 Mins, 3 Mins,
5 Mins, 10 Mins, 30 Mins or
60 Mins to choose the length of time
the machine is idle bef ore entering sleep
mode.
Auto Power Down (DCP-J925DW only)
The Auto Power Down feature will turn the
machine off one hour after entering Sleep
Mode. When this featur e is Off, the mach ine
will not power off automatically.
Note that the machine will not power off
automaticall y when:
the machine is connected to a wired
network
the machine is connected to a wireless
network
the WLAN is sele cted in the Network I/F
setting
a Press Menu.
b Press a or b to display
General Setup.
1
g Press Stop/Exit.
c Press General Setup.
d Press a or b to display
Auto Power Down.
e Press Auto Power Down.
f Press On (or Off).
g Press Stop/Exit.
2
Page 9
General setup
LCD display 1
Changi ng LC D language (DCP-J925DW only) 1
You can change the LCD language.
a Press Menu.
b Press a or b to disp l ay
Initial Setup.
c Press Initial Setup.
d Press a or b to disp l ay
Local Language.
e Press Local Language.
f Press your language.
Mode Timer (MFC-J825DW only)
The machine has four temporary mode keys
on the co ntrol panel: FAX, SCAN, COPY and
PHOTO. You can change t he amou nt of time
the machine takes after th e last Scan , Copy
or PhotoCapture operat ion before it returns to
FAX mode. If you choose Off, th e machine
stays in the mode you used last.
1
1
g Press Stop/Exit.
Setting the Dim Timer for the backlight 1
You can set h ow long th e LCD backlight stays
on after the last key press.
a Press Menu.
b Press a or b to disp l ay
General Setup.
c Press General Setup.
d Press a or b to displ ay LCD Settings.
e Press LCD Settings.
f Press Dim Timer.
g Press 10 Secs, 20 Secs, 30 Secs or
Off.
a Press Menu.
b Press a or b to display
General Setup.
c Press General Setup.
d Press a or b to display Mode Timer.
e Press Mode Timer.
f Press 0 Sec, 30 Secs, 1 Min,
2 Mins, 5 Mins or Off.
g Press Stop/Exit.
h Press Stop/Exit.
3
Page 10

Note
Note
Security features
2
(MFC-J825DW only)
Memory Security 2
Memory Security lets you prev ent
unauthorized acc ess to the machine. You will
not be able to continue to schedule Delayed
Faxes or Polling jobs. Howev er , any
pre-scheduled Delayed Faxes will be sent
even if you turn on Memory Security, so they
will not be lost.
While Memory Security is On, the following
operations are available:
Receiving faxes into memory (limited by
memory capacity)
Fax Forwarding (if Fax Forwarding was
already On)
Remote Retrieval (if Fax Storage was
already On)
While Memory Security is On, the following
operations are NOT available:
2
Setting and changing the Memory Security password 2
If you have a lready set the p asswor d, you
will not need to set it again.
Setting a passw or d for the fir st tim e 2
Make a careful note of your password.
a Press Menu.
b Press a or b to display Fax.
c Press Fax.
d Press a or b to display
Miscellaneous.
e Press Miscellaneous.
Printing received faxes
Sending faxes
Copying
PC printing
Scanning
PhotoCapture
PC Fax Receive
Operation from control panel
• To print the faxes in memory, you must
turn off Memory Security.
• You mus t t ur n off PC Fax Receive be fore
you can turn on Memory Security.
• If you forget the Memo ry Secur ity
password, please call Brother c us tomer
service for support.
f Press Mem Security.
g Enter a 4-digit number f or the passw ord
by pressing the buttons on the
Touchscreen.
Press OK.
h When the LCD shows Verify:,
re-enter the password by pressing th e
buttons on the Touchscreen.
Press OK.
i Press Stop/Exit.
4
Page 11

Security features (MFC-J825DW only)
Note
Note
Changing your Memory Security password
a Press Menu.
b Press a or b to disp l ay Fax.
c Press Fax.
d Press a or b to disp l ay
Miscellaneous.
e Press Miscellaneous.
f Press Mem Security.
g Press Set Password.
h Enter the registered 4-digit number for
the current password by pressing the
buttons on the Touchscreen.
Press OK.
i Enter a 4-digit number for a new
password by pressin g the buttons on the
Touchscreen.
Press OK.
Turning Memory Sec urity
2
on/off 2
Turning on Memory Security 2
2
a Press Menu.
b Press a or b to choose Fax.
c Press Fax.
d Press a or b to display
Miscellaneous.
e Press Miscellaneous.
f Press Mem Security.
g Press Set Security.
h Enter the registered 4-digit pass word by
pressing the buttons on the
Touchscreen.
Press OK.
The machine goes offline and the LCD
shows Memory Security.
j When the LCD shows Verify:,
re-enter the new password by pressin g
the buttons on the Touchscreen.
Press OK.
k Press Stop/Exit.
If there is a power failur e the data will st ay
in memory for approximately 24 hours.
Turning off Memory Security 2
a Press Unlock.
b Enter the registered 4-digit pass word by
pressing the buttons on the
Touchscreen.
Press OK.
Memory Security is automatically turned
off.
If you enter t he wro ng passwor d, t he LCD
shows Wrong Password and stays
offline. The machine will stay in Secure
mode until the registered passwor d is
entered.
5
Page 12

Note
Note
Sending a fax
3
(MFC-J825DW only)
Additional sending options
Sending faxes using multiple settings 3
When you send a fax you can choose a
combination of settings, such as
Fax Resolution, Contrast,
Glass ScanSize, Real Time TX and
Preview.
You can also choose: Call History,
Speed Dial, Broadcasting,
Delayed Fax, Batch TX, Polled TX,
Polling RX, Overseas Mode,
Set New Default, and Factory Reset.
Some settings are only available when
sending mono faxes.
a Press (FAX).
The LCD shows:
3
3
• Most settings ar e tempor ar y and the
machin e returns to its d efault s ettings after
you send a fax.
• You can save some of the settings you
use most often by setting them as the
default. These settings will s tay until you
change them again. (See Setting your
changes as a new default uu page 7.)
Stop faxing 3
To stop faxing, press Stop/Exit.
Contrast 3
If your document is ver y light or very dark, you
may want to change the contrast. For most
documents the factory sett ing Auto can be
used. It automatically chooses the suitable
contrast for your document .
Choose Light when sending a light
document. Choose Dark when sending a
dark document.
b Press d or c to display a setting you
want to change. When the setting is
displayed, press it.
c Press an option.
d Go back to b to change more settings.
6
a Press (FAX).
b Press d or c to display Contrast.
c Press Contrast.
d Press Auto, Light or Dark.
Even if you choose Light or Dark, the
machine will send the fax usi ng the Auto
setting in any of the following conditions:
• When yo u send a colour fax.
• When yo u choo se Photo as the Fax
Resolution.
Page 13
Sending a fax (MFC-J825DW only)
Note
Changi ng fax resolution 3
The quality of a fax can be improved by
changing the fax resolution.
a Press (FAX).
b Press d or c to disp l ay
Fax Resolution.
c Press Fax Resolution.
d Press the resolut ion yo u want.
You can choose four different reso lution
settings for monochrome faxes and two
for colour.
Monochrome
Standard Suitable for most typed
documents.
Fine Good for small print and
transmits a little slower than
Standard resolution.
Setting your chan ges as a new default 3
You can save t he s ett ings for the fax opt ions
you use most often by setting them as default,
such as Fax Resolution, Contrast,
Glass ScanSize, Preview and
Real Time TX. These settings will st ay until
you change them again.
a Press (FAX).
b Press d or c to choose the menu option
that you want to change. Press your new
option.
Repeat this step for each setting you
want to change.
c After changing the last setting, pr es s
d or c to display Set New Default.
d Press Set New Default.
e Press Yes.
3
S.Fine Good for small print or artwork
and transmits slower than Fine
resolution.
Photo Use when the document has
varying shades of grey or is a
photograph. Photo has the
slowest transmission.
Colour
Standard Suitable for most typed
documents.
Fine Use when the document is a
photograph. The transmission
time is slower than Standard
resolution.
If you choose S.Fine or Photo and then
use the Colour Start key to send a fax,
the machine will send the fax using the
Fine setting.
f Press Stop/Exit.
Restoring fax settings to the factory defa ult 3
You can restore all the fax set tings you have
changed to the f actory default. These settings
will stay until you change them again.
a Press (FAX).
b Press d or c to display
Factory Reset.
c Press Factory Reset.
d Press Yes.
e Press Stop/Exit.
7
Page 14

Chapter 3
Note
Note
Additional sending operations
Sending a fax ma nually 3
Manual transmission let s you hear the
dialling, ri nging and fax-receiv ing tones while
sending a fax.
To send a multiple page fax, use t he ADF .
a Press (FAX).
b Load your document.
c To listen for a dial tone, pick up the
handset of the external telephone.
d Dial the fax number using the external
telephone.
e When you hear the fax tone, press
Mono Start or Colour Start.
If you are using the scanner glass, press
Send on the Touchscreen to send the
fax.
f Replace the handset of the external
phone.
Sending a fax at the end of a
3
conversation 3
At the end of a conversation, you can send a
fax to the other party before you both hang
up.
a Ask the other party to wait for fax tones
(beeps) and then to press the Start or
Send key before hanging up.
b Press (FAX).
c Load your document.
d Press Mono Start or Colour Start.
If you are using the scanner glass,
press Send to send the fax.
e Replace the handset of the external
phone.
Dual Access (Monochrome only) 3
You can dial a number and start scanning the
fax into memory—even when the machine is
sending from memory, recei vi ng faxes or
printing PC dat a. The LCD shows the new j ob
number.
The number of pages you can scan into the
memory will vary depending on the data that
is printed on them.
If the Out of Memory message
appears, press Stop/Exit to cancel or
Mono Start to send the pages scanned so
far.
8
Page 15

Sending a fax (MFC-J825DW only)
Broadcasting (Monochrome only) 3
Broadcasting is when the same fax message
is automatically sent to more than one fax
number. You can include Groups, S peed Di al
numbers, and up to 50 manually dia lled
numbers in the same broadcast.
After the broadcast is finished, a Broadcast
Report will be printed.
Before you begin the broadcast 3
Speed Dial numbers must be stored in the
machine's memory before they can be used
in a broadcast. (uuBasic User’s Guide:
Storing Speed Dial numbers)
Group numbers must also be stored in the
machine's memory before they can be used
in a broadcast. G roup numbers inc lude many
stored Speed Dial num bers for easier dialli ng.
(See Setting up groups for Broadcasting
uu page 27.)
g You can add numbers to the broadcast
in the following ways:
Press Add Number and enter a
number by pressing the buttons on
the Touchscreen.
Press OK.
Press Speed Dial.
Press to search by
Alphabetical Order or
Numerical Order. Press the entries
that you want to add to the
broadcast.
Press OK.
h After you have entered all the fax
numbers by repeating step g, press OK.
i Press Mono Start.
Faxin g from the ADF
The machine starts scanning the
document.
Faxing from the scanner glass
3
How to broadcast a fax 3
a Press (FAX).
b Load your document.
c Press d or c to disp l ay
Advanced Settings.
d Press Advanced Settings.
e Press a or b to displ ay Broadcasting.
f Press Broadcasting.
When the LCD shows Next Page?, do
one of the following:
To send a single page, press No (or
press Mono Start again).
The machine starts sending the
document.
To send more than one page, press
Yes and place the next page on the
scanner glass.
Press Mono Start.
The machine starts scannin g the
page. (Repeat this step for each
additional page.)
9
Page 16

Chapter 3
Note
Note
Real Time Transmission 3
• If you did not use up any of the numbers
for Groups, you can “broad ca st” faxes to
as many as 250 different numbers.
• The machi ne’s available mem ory will var y
depending on the types of jobs in the
memory and the number of locations used
for broadcasting. If you broadcast to the
maximum numbers available, you will not
be able to use dual access and delayed
fax.
• If the Out of Memory message
appears, press Stop/Exit to ca ncel or
Mono Start to send t he pages scanned so
far.
Cancelling a Broadcast in progress 3
a Press Stop/Exit.
b Do one of the following:
When you are sending a fax, the machine will
scan the documents into the memory bef or e
sending. Then, as soon as the telephone line
is free, the machine will start dialling and
sending.
Sometimes, you may want to send an
important document immediately, without
waiting for m emory transmission. You can do
this by turn i n g on Real Time TX.
a Press (FAX).
b Load your document.
c Press d or c to display
Advanced Settings.
d Press Advanced Settings.
e Press a or b to display Real Time TX.
To cancel the enti re broadcast, press
Entire Broadcast. Go to stepc.
To cancel the current job, press the
button that displays the number
being dialled. Go to step d.
To exit without cancelling, press
Stop/Exit.
c When the LCD asks if you want to
cancel the entire broadcast, do one of
the following:
Press Yes to confirm.
To exit without cancelling, press No
or Stop/Exit.
d Do one of the following:
To cancel the cu rrent job, press Yes.
To exit without cancelling, press No
or Stop/Exit.
f Press Real Time TX.
g Press On.
h Press .
• If you are sending a colour fax or if the
memory is full and you are sending a black
& white fax from the ADF , the machine will
send the document in real time (even if
Real Time TX is set to Off). Faxes
from the scanner glass cannot be sent
until you clear some of the memory.
• In Real Ti me Transmission, the automatic
redial feature does not work when you are
using the scanner glass.
10
Page 17

Sending a fax (MFC-J825DW only)
Note
Overseas Mo de 3
If you are having difficulty sending a fax
overseas due to possible interference on the
telephone line, we recommend that you tur n
on Overseas Mode. After you send a fax
using this feature, the feature will
automatically t ur n itself off.
a Press (FAX).
b Load your document.
c Press d or c to disp l ay
Advanced Settings.
d Press Advanced Settings.
e Press a or b to disp l ay
Overseas Mode.
f Press Overseas Mode.
h Enter the time you want the fax to be
sent (in 24-hour form at) by pressing the
buttons on the Touchscreen.
(For example, enter 19:45 for 7:45 PM.)
Press OK.
The number of pages you can scan into
the memory depends on the amount of
data that is printed on each page.
Delayed Batch Transmission (Monochrome only) 3
Before sending the delayed faxes, your
machine will help you economiz e by sorting
all the faxes in the memory by destination and
scheduled time. All delayed faxes that are
scheduled to be sent at the same time to t he
same fax number will be sent as one fax to
save transmission time.
3
g Press On (or Off).
h Press .
Delayed Faxing (Monochrome only) 3
You can store up to 50 faxes in the memory
to be sent within 24 hours. These faxes will
be sent at the time of d ay you ent er in ste p h.
a Press (FAX).
b Load your document.
c Press d or c to disp l ay
Advanced Settings.
d Press Advanced Settings.
a Press (FAX).
b Press d or c to display
Advanced Settings.
c Press Advanced Settings.
d Press a or b to display Batch TX.
e Press Batch TX.
f Press On.
g Press Stop/Exit.
e Press a or b to disp l ay Delayed Fax.
f Press Delayed Fax.
g Press On.
11
Page 18

Chapter 3
Checking and cancelling waiting jobs 3
You can check which jobs are still waiting in
the memory to be sent, or cancel a job.
(If there are no jobs, the LCD shows
No Jobs Waiting.)
a Press Menu.
b Press a or b to display Fax.
c Press Fax.
d Press a or b to display
Remaining Jobs.
e Press Remaining Jobs.
Any waiting jobs appear on the LCD.
f Press a or b to scroll through the jobs
and press the job you want to cancel.
Press OK.
Polling overview 3
Polling lets you set up your machine so other
people can receive faxes from you, but they
pay for the cal l. It also lets you call somebody
else’s fax machine and receive a fax from it,
so you pay for the call. The polling feature
needs to be set u p on both machines for t his
to work. Not all fax machines support polling.
Polled Transmit (Monochrome only) 3
Polled transmit lets you set up your machine
to wait with a document so another fax
machine can call and retriev e it.
The document will be stored and can be
retrieved by any other fax mach ine until you
delete it from the memory. (See Checking
and cancelling waiting jobs uu page 12.)
g Do one of the following:
To cancel, press Yes.
If you want to cancel another job go
to step f.
To exit without cancelling, press No.
h When you have finished, pre ss
Stop/Exit.
Setup for polled transmit 3
a Press (FAX).
b Load your document.
c Press d or c to display
Advanced Settings.
d Press Advanced Settings.
e Press a or b to display Polled TX.
f Press Polled TX.
g Press Standard.
h Press d or c to display the settings and
press on the s etting you want t o change.
Then choose your option. After each
setting is accepted, you can cont inue to
change more settings.
12
i Press Mono Start.
Page 19

Sending a fax (MFC-J825DW only)
j If you are using the scanner glass, the
LCD will prompt you to choose one of
the following options:
Press Yes to scan another page.
Go to step k.
Press No or Mono Start to send the
document.
k Place the next page on the scanner
glass and press Mono Start.
l Repeat steps j and k for each
additional page.
Your machine will automat ic ally s end
the fax when it is polled.
Setup for polled transmit with secure code
Secure Polling lets you restrict who can get
the documents you set up to be polled.
j Press Mono Start.
k If you are using the scanner glass, the
LCD will prompt you to choose one of
the following options:
Press Yes to scan another page.
Go to step l.
Press No or Mono Start to send the
document.
3
l Place the next page on the scanner
glass and press Mono Start.
m Repeat steps k and l for each
additional page. Your machine will
automatically send the fax.
3
Secure Polling only works with Bro ther f ax
machines. If another person wants to ret rieve
a fax from your machine, they will have to
enter the secure code.
a Press (FAX).
b Load your document.
c Press d or c to disp l ay
Advanced Settings.
d Press Advanced Settings.
e Press a or b to disp l ay Polled TX.
f Press Polled TX.
g Press Secure.
h Enter a four-digit number.
Press OK.
i Press d or c to display the settings and
press on the s etting you wan t to change.
Then choose your option. After each
setting is accepte d, you can con tin ue to
change more settings.
13
Page 20

IMPORTANT
Receiving a fax
4
(MFC-J825DW only)
Memory Receive (Monochrome only)
You can only use one Memory Receive
operation at a time:
Fax Forwarding
Fax Storage
PC-Fax Receive
Off
You can change your selection at any time. If
received faxes are still in the machine’s
memory when you change the Memory
Receive opera tion, a messag e will appear on
the LCD. (See Changing Memory Receive
operations uu page 17.)
Out of Paper R eception 4
As soon as the paper tray becomes empty
during fax reception, the LCD shows
No Paper Fed. Put some paper in the
paper tray. (uuBasic User’s Guide: Loading
paper and other print media)
If you don't put paper in the paper tray, the
machine will carry on receiving the fax, with
the remaining page s being stored in memory,
if enough memory is available.
4
Fax Forwarding 4
4
When you choose Fax Forward, your
machine stores the receiv ed fax in the
memory. The machine will then dial the fax
number you have programmed and forward
the fax message.
a Press Menu.
b Press a or b to display Fax.
c Press Fax.
d Press a or b to display
Setup Receive.
e Press Setup Receive.
f Press a or b to display
Memory Receive.
g Press Memory Receive.
h Press Fax Forward.
i Enter the forwarding number (up to
20 digit s) by pressing the buttons on the
Touchscreen.
Press OK.
j Press Backup Print:On or
Backup Print:Off.
Further incoming faxes will also be stored in
memory until the memory is full. To print the
faxes, put fresh paper in the tray . When the
memory is full, the machine will stop
automatically answering calls.
14
• If you choose Backup Print:On, the
machine will also print the fax at your
machine so you will have a cop y. This is a
safety feature in case there is a power
failure before the fax is forward ed or a
problem at the receiving machine.
• When you receive a colour fax, your
machine prints the colour fax at your
machine but does not send the fax to the
fax forwarding number you program med .
k Press Stop/Exit.
Page 21

Receiving a fax (MFC-J825DW only)
Note
Note
Fax Storage 4
If you choose Fax Storage, your machine
stores received faxes in the memory. You will
be able to retrieve fax messages from
another location using the remote retrieval
commands.
If you have tur ned on Fax Storage, a backup
copy will automatically be printed at the
machine.
a Press Menu.
b Press a or b to disp l ay Fax.
c Press Fax.
d Press a or b to disp l ay
Setup Receive.
e Press Setup Receive.
Printing a fax from the memory 4
If you have chosen Fax Stor age, you c an stil l
print a fax from the memory when y ou ar e at
your machine.
a Press Menu.
b Press a or b to display Fax.
c Press Fax.
d Press a or b to display
Print Document.
e Press Print Document.
f Press Mono Start.
g Press Stop/Exit.
4
f Press a or b to disp l ay
Memory Receive.
g Press Memory Receive.
h Press Fax Storage.
i Press Stop/Exit.
Colour faxes cannot be stored in the
memory. When you receive a colour fax
your machine prints the colou r fax at your
machine.
When you print a fax from the memory, the
fax data will be er ased from your machin e.
15
Page 22

Chapter 4
Note
PC-Fax Rec ei v e (Windows® only) 4
If you turn on the PC-Fax Receive feature
your machine will store received faxes in
memory and send them to your PC
automaticall y. You can then us e your PC to
view and store these faxes.
Even if you hav e turned off your PC (at night
or on the weekend, for example), your
machine will receive and s tore y our faxes in
its memory. The number of received faxes
that are stored in the memory will appear on
the LCD.
When you start your PC and the PC-FAX
Receiving software r uns , your machine
transfers your faxes to your PC automatically.
To transfer the received faxes to your PC you
must have the PC-FAX Receiving software
running on your PC.
(uuSoftware User’s Guide: PC-FAX
receiving)
If you choose Backup Print:On the
machine will also print the fa x.
j Press <USB> or, for network users, the
name of the PC you want to receive
faxes to.
k Press OK.
l Press Backup Print:On or
Backup Print:Off.
m Press Stop/Exit.
• PC-Fax Rec eiv e is not supported by Mac
OS.
• Before you can set up PC-F ax Receiv e
you must install the MFL-Pro Suite
software on your PC. Make sure your PC
is connected and turned on.
(uuSoftware User’s Guide: PC-FAX
receiving)
• If you get an error mess age and the
machine cannot pr int the faxes in memory,
you can use this setting to transfer your
faxes to your PC. (uuBasic User’s Guide:
Transferring your faxes or Fax Journa l
report)
a Press Menu.
b Press a or b to display Fax.
c Press Fax.
d Press a or b to display
Setup Receive.
e Press Setup Receive.
f Press a or b to display
Memory Receive.
g Press Memory Receive.
h Press PC Fax Receive.
i The LCD shows the message
Run PC-Fax on your computer.
Press OK.
• When you receive a colour fax, your
machine prints the colour fax at your
machine but does not send the fax to your
PC.
• To change the destination PC, repeat
steps a to m.
16
Page 23

Receiving a fax (MFC-J825DW only)
Note
Turning of f Me m ory Receive operations 4
a Press Menu.
b Press a or b to disp l ay Fax.
c Press Fax.
d Press a or b to disp l ay
Setup Receive.
e Press Setup Receive.
f Press a or b to disp l ay
Memory Receive.
g Press Memory Receive.
h Press Off.
i Press Stop/Exit.
The LCD will give you more options if
there are received faxes still in the
machine’s memory. (See Changing
Memory Receive operations
uu page 17.)
Changing M em ory Receive operations 4
If received faxes remain in your machine’s
memory when you change the Memory
Receive Operations, the LCD will ask you
one of the following questions:
Erase All Doc?
Print All Fax?
• If you press Yes, faxes in the memory
will be erased or printed before the
setting changes. If a backup cop y has
already been printed it will not be
printed again.
• If you press No, faxes in the memory
will not be erased or printed and the
setting will be unchan ged.
If received faxes are left in the machine's
memory when you change to
PC Fax Receive from another option
[Fax Forward or Fax Storage], pre ss a or
b to choose the PC.
The LCD will ask you the followi ng ques tion:
Send Fax to PC?
• If you press Yes, faxes in the memory
will be sent to your PC before the
setting changes. You will be asked if
you want to turn on Backup Print. (For
details, see P C-Fax Receive
(Windows
®
only) uu page 16.)
4
• If you press No, faxes in the memory
will not be erased or transferr ed to your
PC and the setting will be unchang ed.
17
Page 24

Chapter 4
Note
Note
Note
Remot e Retri ev al 4
You can call your machine from any
touch-tone telephone or fax machine and
then use the remote ac cess code and remote
commands to retrieve fax messages.
Setting a Remote Access Code 4
The Remote Access Code lets you access
the remote retrieval fe atures when y ou ar e
away from your machine. Before you can use
the remote access and retrieval f eatures, you
have to set up your own code. The factory
default code is the inactive c ode (--- ).
a Press Menu.
b Press a or b to display Fax.
c Press Fax.
Using yo ur Remote Access Code 4
a Dial your fax number from a touch-tone
telephone or another fax machine.
b When your machine answers, enter
your remote access code (3 digits
followed by ) at once.
c The machine signals if it has received
messages:
1 long beep — Fax messages
No beeps — No messages
d When the machine gives two short
beeps, enter a command.
The machine will hang up if you wait
longer than 30 seconds to enter a
command.
The machine will beep three t imes if you
enter an invalid command.
d Press a or b to display
Remote Access.
e Press Remote Access.
f Enter a three-digit code using numbers
0-9, l, or # by pressing the buttons on
the Touchscreen.
Press OK.
(The preset ‘l’ cannot be changed.)
Do not use the same code as your
Remote Activation Code (l 51) or
Remote Deactivation Code (#51).
(uuBasic User’s Guide: Operation from
external and extension tele phones)
g Press Stop/Exit.
You can change your code at any ti me by
entering a new one. If you want to make
your code inact ive, press Clear in step f
to restore the inactive setting (---l) and
press OK.
e Press 90 to stop Remote Access when
you have finished.
f Hang up.
If your machine is set to Manual mode
and you want to use the remote retrieval
features, wait f or about 100 seconds aft er
it starts ringing , and then enter the remote
access code within 30 seconds.
18
Page 25

Receiving a fax (MFC-J825DW only)
Remot e Fax comm ands 4
Follow the commands below to access fe atures when you are away from the machi ne. When you
call the machine and ent er your remote access code (3 digits f ollowed by ), the system will give
two short beeps and you must enter a remote command.
Remote commands Operation details
95 Change the Fax Forwarding or Fax
Storage settings
1 OFF You can choose Off after you have retrieved or erased all
your messages.
2 Fax Forwarding One long beep means the change is accepted. If you hear
4 Fax Forwarding number
6 Fax Storage
three short beeps, the change was not accepted because
something has not been set up (for example, a Fax
Forwarding number h as not been registered). You can
register your Fax Forwarding number by entering 4. (See
Changing your Fax Forwarding number uu page 20.) Once
you have registered the number, Fax Forwarding will work.
4
96 Retrieve a fax
2 Retrieve all faxes Enter the number of a remote fax machine to receive stored
fax messages. (See Retrieving fax messages uu page 20.)
3 Erase faxes from the memory If you hear one long beep, fax messages have been erased
from the memory.
97 Check t he receiving status
1 Fax You can check whether your machine has received any
faxes. If yes, you will hear one long beep. If no, you will hear
three short beeps.
98 Change the Receive Mode
1 External TAD If you hear one long beep, your change has been accepted.
2 Fax/Tel
3 Fax Only
90 Exit Pressing 9 0 allows you to exit remote retrieval. Wait for the
long beep, then replace the handset.
19
Page 26

Chapter 4
Note
Note
Retrieving fax messages 4
You can call your machine from any
touch-tone telephone and have your fax
messages sent to another machine. Before
you use this feature, you have to tur n on Fax
Storage.
a Dial your fax number.
b When your machine answers, enter
your remote access code (3 digits
followed by ) at once. If you hear one
long beep, you have messages.
c When you hear two short beeps,
press 962.
d Wait for a long beep, and then use the
dial pad to enter the number of the
remote fax machine where you want
your fax messages sent, f ollowed by ##
(up to 20 digits).
Changing your Fax Forwardin g number 4
You can change the default setting of your fax
forwarding number from another touch-tone
telephone or fax machine.
a Dial your fax number.
b When your machine answers, enter
your remote access code (3 digits
followed by ) at once. If you hear one
long beep, you have messages.
c When you hear two short beeps,
press 954.
d Wait for the long beep, enter the new
number (up to 20 digits) of the remote
fax machine you want your fax
messages forwarded to using the dial
pad, then enter ##.
You cannot use l and # as dial numbers.
However, press # if you want to create a
pause.
e Hang up after you hear your machine
beep. Your machine will call the other
fax machine, which will then print your
fax messages.
You cannot use l and # as dial numbers.
However, press # if you want to cre a te a
pause.
e Press 9 0 to stop Remote Access when
you have finished.
f Hang up after you hear your machine
beep.
20
Page 27

Receiving a fax (MFC-J825DW only)
Additional receiving operations
Printing a reduced incoming fax 4
If you choose On, the machine automatically
reduces each page of an incoming f ax to fit on
one page of A4 or Letter size paper. The
machine calculates the reduct ion r atio by
using the page size of the fax an d your Paper
Size setting. (uuBasic User’s Guide: Paper
Size)
a Press Menu.
b Press a or b to disp l ay Fax.
c Press Fax.
d Press a or b to disp l ay
Setup Receive.
e Press Setup Receive.
f Press a or b to disp l ay
Auto Reduction.
Polling overview 4
4
Polling lets you set up your machine so other
people can receive faxes from yo u, but they
pay for the call. It al so lets you cal l somebody
else’s fax machine and rec eiv e a fax from it,
so you pay for the call. The polling f eature
needs to be set up on both machines for this
to work. Not all fax machines su ppor t polling.
Polling receive 4
Polling receive let s you call another fax
machine to receive a fax.
Setup to receive polling 4
a Press (FAX).
b Press d or c to display
Advanced Settings.
c Press Advanced Settings.
d Press a or b to display Polling RX.
e Press Polling RX.
4
g Press Auto Reduction.
h Press On (or Off).
i Press Stop/Exit.
f Press Standard.
g Enter the fax number you are polling
using Speed Dial or the dial pad on the
control panel.
h Press Mono Start or Colour Start.
21
Page 28

Chapter 4
Setup to receive polling with secure code
Secure Polling let s you res tric t who can get
the documents you set up to be polled.
Secure Polling only wor k s with Brot her fax
machines. If you want to get a fax from a
secured Brother machine you have to enter
the secure code.
a Press (FAX).
b Press d or c to display
Advanced Settings.
c Press Advanced Settings.
d Press a or b to display Polling RX.
e Press Polling RX.
f Press Secure.
Setup to receive delayed polling 4
4
Delayed polling let s you set th e machine to
begin polling r ec eiv e at a later time. Y ou c an
only set up one delayed polling operation.
a Press (FAX).
b Press d or c to display
Advanced Settings.
c Press Advanced Settings.
d Press a or b to display Polling RX.
e Press Polling RX.
f Press Timer.
g Enter the time (in 24-hour format) you
want to start polling.
For example, enter 21:45 for 9:45 PM.
Press OK.
g Enter a four-digit secure code by
pressing the buttons on the
Touchscreen.
This is the same as the sec urity cod e of
the fax machine you are polling.
Press OK.
h Enter the fax number you are polling
using Speed Dial or the dial pad on the
control panel.
i Press Mono Start or Colour Start.
h Enter the fax number you are polling
using Speed Dial or the dial pad on the
control panel.
i Press Mono Start or Colour Start.
The machine makes the polling call at
the time you entered.
22
Page 29

Receiving a fax (MFC-J825DW only)
Sequential polling (Monochrome only)
Sequential polling lets you request
documents from several fax machines in one
operation.
a Press (FAX).
b Press d or c to disp l ay
Advanced Settings.
c Press Advanced Settings.
d Press a or b to disp l ay Polling RX.
e Press Polling RX.
f Press Standard, Secure or Timer.
g Do one of the following :
If you chose Standard, go to
step h.
If you chose Secure, ent er a four-
digit number, press OK, go to step h.
If you chose Timer, ent er the ti me
(24-hour format) you want to begin
poll in g and pres s OK, go to step h.
h Press d or c to disp l ay
Advanced Settings.
i Press Advanced Settings.
j Press a or b to displ ay Broadcasting.
m After you have entered all the fax
4
numbers by repeating step l, press OK.
n Press Mono Start.
The m achi n e polls each n umber or
group in turn for a document.
Press Stop/Exit while the machine is di alling
to cancel the polling process .
To cancel all sequential polling receive jobs,
see Checking and cancelling waiting jobs
uu page 12.
Cancelling a Sequential Polling Job 4
4
a Press Stop/Exit.
b Do one of the following:
To cancel the entire sequential
polling job, press
Entire Seq. Poll. Go to step c.
To cancel the current job, press the
button that displays the number
being dialled. Go to step d.
To exit without cancelling, press
Stop/Exit.
c When the LCD asks if you want to
cancel the entire sequential polling job,
do one of the following:
Press Yes to confirm.
To exit without cancelling, press No
or Stop/Exit.
k Press Broadcasting.
l Do one of the following :
Press Add Number and enter a
number by pressing the buttons on
the Touchscreen.
Press OK.
Press Speed Dial. Press
to choose Alphabetical Order or
Numerical Order. Press a or b to
select a number.
Press OK.
d Do one of the following:
To cancel the cu rrent job, press Yes.
To exit without cancelling, press No
or Stop/Exit.
23
Page 30

Note
Note
Dialling and storing numbers
5
(MFC-J825DW only)
Voice operations 5
Voice calls can be made wit h an extension or
external telephone by dialling manually.
BT Call Sign (U.K. only) 5
This machine feat ure lets you use the BT Call
Sign subscriber service which allows you to
have at least two separate telephone
numbers on one telephone line. Each
telephone number has its own dis tinctive
ringing pattern , so you know which telephone
number is ringing. This is one way you can
have a separate telephone number for y our
machine.
To enable the machine to work with BT Call Sign (with your external telephone onl y )
a Press Menu.
b Press a or b to display Fax.
c Press Fax.
d Press a or b to display
Miscellaneous.
e Press Miscellaneous.
f Press a or b to display BT Call Sign.
g Press BT Call Sign.
5
5
Your machine has a BT Cal l Sign compati ble
distinctive ringing function, allowing you to
dedicate a second t elephone number ( on t he
same telephone line) jus t f or receiving faxes.
• You can switc h BT Call S ign off
temporarily, then turn it bac k on. When
you get a new fax nu mber, make sure you
reset this function. This machine will
automatically answer inc om ing c alls that
use your new fax number.
• When you set the BT Call Sign feat ur e to
On, the receive mode is set to Manual
automatically. Manual mode will not
respond to incoming telephone calls,
since the number you use for telephone
calls will use the normal ring pattern.
h Press On (or Off).
i Press Stop/Exit.
If you tu rn off BT Call Sign, the receive
mode stays in Manual. You will need to
set receive mode again.
(uuBasic User’s Guide: Choose the
Receive Mode)
24
Page 31

Additional dialling
Note
Dialling and storing numbers (MFC-J825DW only)
operations
Combining Quick Dial numbers 5
Sometimes, you may want to choose from
several long distance carrie rs when you send
a fax. Rates may vary dep ending on th e time
and destination. To take advantage of low
rates, you can store the acc ess codes of longdistance carriers and credit card numbers as
Speed Dial numbers. You can store these
long dialling sequences by dividing them and
setting them up as separate Speed Dial
numbers in any combination. You can even
include manual dialling using the dial pad.
(uuBasic User’s Guide: Storing Speed Dial
numbers)
For example, you might have stored “ 01632”
on Speed Dial: 03 and “960555” on
Speed Dial: 02. You can use them both to dial
“01632-960555” if you pres s the following
buttons on the Touchscreen:
5
If you must wait for another dial tone or
signal at any point in the dialling
sequence, create a pause in the number
by pressing Redial/Pause. Each key
press adds a 3.5-second delay.
5
a Press .
b Press #03.
c Press Send a fax.
d Press Speed Dial.
e Press #02.
f Press Send a fax.
g Press Mono Start or Colour Start.
You will dial “01632-9605 55” .
To temporarily change a number, you can
substitute part of the number with manual
dialling using t he dial pad. For exa mpl e, t o
change the number to 01632-960556 you
could press , press #03, press
Send a fax, and then press 960556 using
the dial pad.
25
Page 32

Chapter 5
Note
Additional ways to store numbers
Storing Speed Dial numbers from Ou tg oing Calls 5
You can also store Speed Dial numbers from
the Outgoing Call hist or y.
a Press Redial/Pause.
You can also choose the number by
pressing .
b Press the Outgoing Call t ab.
c Press a or b to display the name or
number you want to store.
d Press the name or number you want to
store.
e Press More.
j To choose where the number will be
stored, do one of the following:
5
To accept the displayed next
available Speed Dial location, press
OK.
To enter a different Speed Dial
location, press and a 2-digit
number by pressing the buttons on
the Touchscreen.
Press OK.
If the 2-digit Speed Dial location you
choose is already taken, the OK b utton on
the LCD will not work. Choose a different
location.
k When the LCD displays your settings,
press OK to confirm.
l Press Stop/Exit.
f Press Add to Speed Dial.
g Do one of the following:
Enter the name (up to 16 characters )
by pressing the buttons on the
Touchscreen.
(uuBasic User’s Guide: Entering
Text)
Press OK.
To store the number without a name,
press OK.
h Press OK to confirm the fax or telephone
number you want to store.
i Do one of the following:
Enter the second fax or telephone
number (up to 20 digits) by pressing
the buttons on the Touchscreen.
Press OK.
Storing Speed Dial numbers from the Ca ller ID histo r y 5
If you have the Caller ID subscriber service
from your telephone company, you can also
store Speed Dial numbers from incoming
calls in the Caller ID History.
(uuBasic User’s Guide: Caller ID (U.K. and
Ireland only))
a Press Redial/Pause.
You can also choose the number by
pressing .
b Press the Caller ID hist. tab .
c Press a or b to display the number you
want to store.
d Press the number you want to store.
e Press More.
26
If you do not want to store a second
number, press OK.
f Press Add to Speed Dial.
Page 33

Dialling and storing numbers (MFC-J825DW only)
Note
g Do one of the following :
Enter the name (up to 16 characters)
by pressing the buttons on the
Touchscreen.
(uuBasic User’s Guide: Entering
Text)
Press OK.
To store the number without a name,
press OK.
h Press OK to confirm the fax or telephone
number you want to store.
i Do one of the following :
Enter a second fax or telephone
number (up to 20 digits) by pressing
the buttons on the Touchscreen.
Press OK.
If you do not want to store a second
number, press OK.
Setting up groups for Broadcasting 5
Groups, which can be stored on a Speed Dial
location, allow you to send the same fax
message to many fax numbers by pressing
, the two-digit locat ion, Send a fax
and Mono Start.
First, you'll need to store each fax number in
Speed Dial location. (uuBasic User’s Guide:
Storing Speed Dial numbe rs) The n you can
include them as number s in the Group. Each
Group uses up a Speed Dial location. You
can have up to six Groups, or you can assign
up to 198 numbers to a large Group.
(See Broadcasting (Monochrome only)
uu page 9.)
a Press .
b Press More.
5
j To choose where the number will be
stored, do one of the following:
To accept the displayed next
available Speed Dial location, press
OK.
To enter a different Speed Dial
location, press and a 2-digit
number by pressing the buttons on
the Touchscreen.
Press OK.
If the 2-digit Speed Dial location you
choose is already taken , the OK button on
the LCD will not work. Choose a different
location.
k When the LCD displays your settings,
press OK to confirm.
l Press Stop/Exit.
c Press Setup Groups.
d Enter the group name (up to
16 characters) by pressing the buttons
on the Touchscreen.
Press OK.
e When the LCD displays the next
available Group number, press OK.
This Group number and name will
automatically be assigned to th e next
available Speed Dial location.
f Add Speed Dial numbers to the Group
by pressing them to display a red
checkmark. Press OK.
If you want to list the numbers in
alphabetical order, pres s .
g When the LCD displays the Group
Name and numbers, press OK to
confirm.
27
Page 34

Chapter 5
Note
Note
h Do one of the following:
To store another Group for
broadcasting, repeat steps b to g.
To finish storing Groups for
broadcasting, press Stop/Exit.
You can print a list of all the Speed Dial
numbers. Group numbers will be marked
in the GROUP column. (See Reports
uu page 30.)
Changing a Group name 5
a Press .
b Press More.
c Press Change.
Deleting a Group 5
a Press .
b Press More.
c Press Delete.
d Press a or b to display the Group you
want to de l ete .
e Press the Group Name.
f Press OK.
Press Yes to conf irm.
g Press Stop/Exit.
Deleting a number from a Group 5
a Press .
d Press a or b to display the Group you
want to change.
e Press the Group.
f Press Name:.
g Enter the new name (up to
16 c haracters) by pressing the buttons
on the Touchscreen.
(uuBasic User’s Guide: Entering Text)
Press OK.
(For example, type NEW CLIENTS.)
How to change the stored name or
number:
If you want to change a character, press
d or c to position the cursor under the
character you want to change, and then
press . Re-enter the character.
b Press More.
c Press Change.
d Press a or b to display the Group you
want to change.
e Press the Group.
f Press Add/Del.
g Press a or b to display the number you
want to delete from the Group.
h Press the check box of the number you
want to de l ete to un ch e c k it .
Press OK to conf irm.
i Press OK.
j Press Stop/Exit.
h Press OK.
i Press Stop/Exit.
28
Page 35

6
Printing reports 6
Fax reports (MFC-J825DW only)
Use the buttons on th e Touchscreen to set up
the Transmission Verif ication Report and the
Journal Period.
Transmission Verification Report 6
You can use the Transmission Verification
Report as proof that you sent a fax.
(uuBasic User’s Guide: Transmission
Verification Report)
Fax Journal (activity report) 6
You can set the machine to print a journal at
specific intervals (ev er y 50 faxes , 6, 12 or
24 hour s , 2 or 7 days). If you set the int er v al
to Off, you can still print the report by
following the steps in How to print a report
uu page 30. The factory setting is
Every 50 Faxes.
a Press Menu.
b Press a or b to disp l ay Fax.
c Press Fax.
g Press d or c to choose an interval.
If you choose Every 50 Faxes, go to
6
step j.
6, 12, 24 hours, 2 or 7 days
The machine will print the report at
the chosen time and then erase all
jobs from it s me m o ry . If the
machine's memory is filled with the
maximum 200 jobs before the time
you chose has pass ed, the machine
will print the Journal early and then
erase all jobs from the memory. If
you want an extra report before it is
due to print, you can print it without
erasing the jobs from the memory.
Every 50 Faxes
The machine will print the Journa l
when the machine has stored
50 jobs.
6
h Enter the time to sta rt prin ting in 24-hour
format.
Press OK.
(For example: enter 19:45 for 7:45 PM.)
i If you choose Every 7 Days, the LCD
will ask you to choose the first day for
the 7-day countdown.
j Press Stop/Exit.
d Press a or b to disp l ay
Report Setting.
e Press Report Setting.
f Press Journal Period.
29
Page 36

Chapter 6
Reports 6
The following reports ar e ava ilable:
XMIT Verify (MFC-J825DW only)
Prints a Transmission Verific ation Report
for your last transmission.
Quick Dial (MFC-J825DW only)
Lists names and numbers stored in the
Speed Dial memory, in alphabetical or
numerical order.
Fax Journal (MFC-J825DW only)
Lists information about the last incoming
and outgoing faxes.
(TX: Transmit.) (RX: Receive.)
User Settings
Lists your settings.
Network Config
How to print a report 6
a Press Menu.
b Press a or b to display
Print Reports.
c Press Print Reports.
d Press the report you want.
e (Quick Dial
Alphabetical Order or
Numerical Order.
1
MFC-J825DW only
1
Only) Press
f Press Mono Start.
g Press Stop/Exit.
Lists your Network settings.
WLAN Report
Prints a WLAN connection report.
Caller ID hist. (MFC-J 825DW only)
Lists the available Caller ID information
about the last 30 received faxes and
telephone calls.
30
Page 37

7
Note
Making copies 7
Copy settings 7
You can change the co py settings temporarily
for multiple copies.
(MFC-J825DW only) The machine returns to
its default settings after 1 minute, or if the
Mode Timer returns the machine to Fax
mode. (See Mode Timer (MFC-J825DW only)
uu page 3.)
To change a setting, press COPY or Copy,
and then press d or c to scroll through the
copy settings. When the setting you want is
displayed, press it and choose your option.
When you are finished choosing settings,
press Mono Start or Colour Start.
• You can save some of the settings that
you use most often by setting them as
default. These settings will stay until you
change them again. (See Setting your
favourites uu page 40.)
Changing copy speed and quality 7
You can choose from a range of speed and
quality. The factory setting is Normal.
Fast
Fast copy spee d and lowest amou nt of i nk
used. Use to save time printing
documents to be proof-read, large
documents or many copies.
Normal
Normal is the recommended mode for
ordinary print outs. This produces good
copy quality with good copy speed.
Best
Use Best mode to copy precise images
such as photographs. This provides the
highest resolution and slowest speed.
a Press (COPY) or Copy.
7
• The Ink Save Mode,
Thin Paper Copy, Book Copy and
Watermark Copy features are
supported by technolog y from Reallusi on,
Inc.
Stop copying 7
To stop copying, press Stop/Exit.
b Load your document.
c (MFC-J825DW)
Enter the number of copies you want
using the dial pad.
(DCP-J925DW)
Enter the number of copies you want
either by pressing the number box
directly and entering the number you
want or by pressing or .
d Press d or c to display Quality.
e Press Quality.
f Press Fast, Normal or Best.
g If you do not want to change additional
settings, press Mono Start or
Colour Start.
31
Page 38

Chapter 7
Note
Enlarging or reducing t he copied image 7
You can choose a n enlargement or reduction
ratio. If you choose Fit to Page, your
machine will adjust the siz e automatically to
the paper size you set.
a Press (COPY) or Copy.
b Load your document.
c Enter the number of copies you want.
d Press d or c to display
Enlarge/Reduce.
e Press Enlarge/Reduce.
f Press 100%, Enlarge, Reduce,
Fit to Page or
Custom (25-400%).
g Do one of the following:
If you chose Enlarge or Reduce,
press the enlargement or reduction
ratio you want.
h If you do not want to change additional
settings, press Mono Start or
Colour Start.
• Page Layout is not available with
Enlarge/Reduce.
• Page Layout, Book Copy, Sort,
Thin Paper Copy, Duplex Copy and
Watermark Copy are not available with
Fit to Page.
• Fit to Page does not work correctly
when the document on the scanner glass
is skewed more than 3 degrees. Using the
document guidelines on the left and top,
place your document in the upper left
hand corner, wit h the document face down
on the scanner glass.
• Fit to Page is not available when
using the ADF.
• Fit to Page is not available for Legal
sized documents.
If you chose Custom (25-400%),
enter an enlargement or redu ction
ratio from 25% to 400%.
Press OK.
If you chose 100% or Fit to Page,
go to step h.
198% 10x15cmiA4
186% 10x15cmiLTR
141% A5iA4
100%
97% LTRiA4
93% A4iLTR
83% LGLiA4
69% A4iA5
47% A4i10x15cm
Fit to Page
Custom(25-400%)
32
Page 39

Making copies
IMPORTANT
Note
Making N in 1 c opies or a poster (Page Layout) 7
The N in 1 copy feature can help you save
paper by letting you copy two or four pages
onto one printed page.
You can also produce a poster. When you
use the poster feature your machine divides
your document into sections, then enlarges
the sections so yo u can assemble them into a
poster. If you want to print a poster, use the
scanner glass.
• Make sure the paper size is set to A4 or
Letter.
• If you are producing multiple colour
copies, N in 1 copy is not available.
• (P) means Portrait and (L) means
Landscape.
• Poster copy is not available when us ing
transparencies.
• Watermark Copy, Book Copy, Sort,
Thin Paper Copy, Ink Save Mode
and Enlarge/Reduce are not available
with Page Layout.
f Press d or c to display Off(1in1),
2in1(P), 2in1(L), 4in1(P),
4in1(L), Poster (2x1),
Poster (2x2), Poster (3x3) or
2in1(ID)
1
For de tai ls abou t 2 i n 1 ( ID), see 2 in 1 ID Copy
uu page 34.
1
.
g If you do not want to change additional
settings, press Mono Start or
Colour Start to scan the page.
If you placed the document in the ADF
or are making a poster, the machine
scans the document and starts print ing.
If you are using the scanner glass, go
to step h.
h After the machine scans the page,
press Yes to scan the next page.
i Place the next page on the scanner
glass. Press Mono Start or
Colour Start to scan the document.
Repeat steps h and i for each page of
the layout.
j After all the pages have been scanned,
press No to fi n i sh.
7
• Duplex Copy is not available with Pos ter
copy.
a Press (COPY) or Copy.
b Load your document.
c Enter the number of copies yo u want.
d Press d or c to disp l ay Page Layout.
e Press Page Layout.
33
Page 40

Chapter 7
Note
Place the document face down in the
direction shown bel ow:
2in1(P)
2in1(L)
4in1(P)
4in1(L)
Poster (3x3)
2 in 1 ID Copy 7
You can copy both sides of your identificat ion
card onto one page, keeping the origin al card
size. Make sure the paper size is set to A4 or
Letter.
Poster (2x1)
Poster (2x2)
You can copy an identification car d to the
extent permitted under applic able laws.
(uuProduct Safety Guide: Unlawf ul use
of copying equipment)
a Press (COPY) or Copy.
b Place your identi fication card face down
at the left corner of the scanner glass.
1
1 3 mm or greater (top, left)
c Enter the number of copies you want.
d Press d or c to display Page Layout.
34
Page 41

Making copies
Note
Note
e Press Page Layout.
f Press d or c to disp l ay 2in1(ID).
g Press 2in1(ID).
h Press Mono Start or Colour Start.
The machine starts scanning the first
page.
i After the machine has scan ned one
side, press Yes. Turn over the
identification card and pr es s
Mono Start or Colour Start to scan the
other side.
• Watermark Copy, Book Copy, Sort,
Duplex Copy, Thin Paper Copy,
Ink Save Mode and Enlarge/Reduce
are not available with 2in1(ID).
• If you are producing multiple colour
copies, 2 in 1 (ID) copy is not available.
Adjusting Dens ity 7
You can adjust the copy density to make
copies darker or lighter.
a Press (COPY) or Copy.
b Load your document.
c Enter the number of copies you want.
d Press d or c to display Density.
e Press Density.
f Press d or c to make a lighter or darker
copy.
Press OK.
g If you do not want to change additional
settings, press Mono Start or
Colour Start.
7
Sorting copie s using the ADF7
You can sort multiple copies. Pages will be
stacked in the order 321, 321, 321, and so on.
a Press (COPY) or Copy.
b Load your document.
c Enter the number of copies yo u want.
d Press d or c to disp l ay Stack/Sort.
e Press Stack/Sort.
f Press Sort.
g If you do not want to change additional
settings, press Mono Start or
Colour Start.
Fit to Page, Page Layout and
Book Copy are not available with Sort.
35
Page 42

Chapter 7
Note
Note
Ink Save M ode 7
Ink Save Mode can help you save ink. The
machine prints the colours lighter and
emphasises the outlines of t he ima ges as
shown below:
The amount of ink saved will vary depending
on the document.
Ink Save Mode: O ff
7
g If you do not want to change any
additional settin gs, press Mono Start or
Colour Start.
• Watermark Copy, Book Copy,
Thin Paper Copy and Page Layout
are not available with Ink Save Mode.
• Ink Save Mode may make your
printouts look differ ent f r om your original
document.
Thin Paper Copy 7
If your document is a duplex copy on thin
paper, choose Thin Paper Copy so the
print on the other side does not bleed
through.
a Press (COPY) or Copy.
Ink Save Mode: O n 7
a Press (COPY) or Copy.
b Load your document.
c Enter the number of copies you want.
d Press d or c to display
Advanced Settings.
b Load your document.
c Enter the number of copies you want.
d Press d or c to display
Advanced Settings.
e Press Advanced Settings.
f Press Thin Paper Copy.
g Press Mono Start or Colour Start.
Fit to Page, Page Layout,
Ink Save Mode, Book Copy and
Watermark Copy are not available with
Thin Paper Copy.
e Press Advanced Settings.
f Press Ink Save Mode.
36
Page 43

Making copies
Note
Note
Book Copy 7
Book copy corrects dark borders and skew
when copying from the scanner glass. Your
machine can correct the data automatically.
a Press (COPY) or Copy.
b Load your document.
c Enter the number of copies yo u want.
d Press d or c to disp l ay
Advanced Settings.
e Press Advanced Settings.
f Press Book Copy.
g If you do not want to change additional
settings, press Mono Start or
Colour Start.
Waterm ark Copy 7
You can place a logo or text into your
document as a Watermark. You can select
one of the temp l a te wa t e r ma r ks , data fr o m
your media cards or USB Flash memory
drive, or scanned data.
Fit to Page, Page Layout,
Thin Paper Copy, Ink Save Mode
and Book Copy are not available with
Watermark Copy.
Using a template 7
a Press (COPY) or Copy.
b Load your document.
c Enter the number of copies you want.
7
Page Layout, Sort, Duplex Copy,
Ink Save Mode, Fit to Page ,
Thin Paper Copy and
Watermark Copy are not available with
Book Copy.
d Press d or c to display
Advanced Settings.
e Press Advanced Settings.
f Press Watermark Copy.
g Press Edit Template.
h Change the settings by pressing the
options displayed on the Touchscreen i f
required. Press OK.
i Press OK to confirm to use watermark.
j If you do not want to change additional
settings, press Mono Start or
Colour Start.
37
Page 44

Chapter 7
IMPORTANT
Note
Using media cards or USB Flas h memory drive data
a Press (COPY) or Copy.
b Load your document.
c Enter the number of copies you want.
d Press d or c to display
Advanced Settings.
e Press Advanced Settings.
f Press Watermark Copy.
g Press Use Image.
h Insert a media card or USB Flash
memory drive. Press Media.
i Press the data you want to use for the
watermark.
j Change any additio nal settings from t he
options shown on the LCD. Press OK.
k Press OK to confirm to use watermark.
l If you do not want to change additional
settings, press Mono Start or
Colour Start.
Using a scanned paper document as
7
your watermark
7
a Press (COPY) or Copy.
b Enter the number of copies you want.
c Press d or c to display
Advanced Settings.
d Press Advanced Settings.
e Press Watermark Copy.
f Press Use Image.
g Press Scan. Place the page that you
want to use as a watermark on the
scanner glass.
h Press Mono Start or Colour Start.
i Take out the watermark document you
scanned and load the document you
want to copy.
j Press Transparency, and then press
d or c to change the Transparency of
the watermark.
Press OK.
k Press OK.
DO NOT take out the memory card or
USB Flash memory dr ive while the status
LED is blinking to avoid damaging the
card, USB Flash memory drive, or the
data stored on them.
38
l Press OK to confirm to use the
watermark.
m If you do not want to change any
additional settin gs, press Mono Start or
Colour Start.
You cannot enlarge or reduce the
scanned watermark.
Page 45
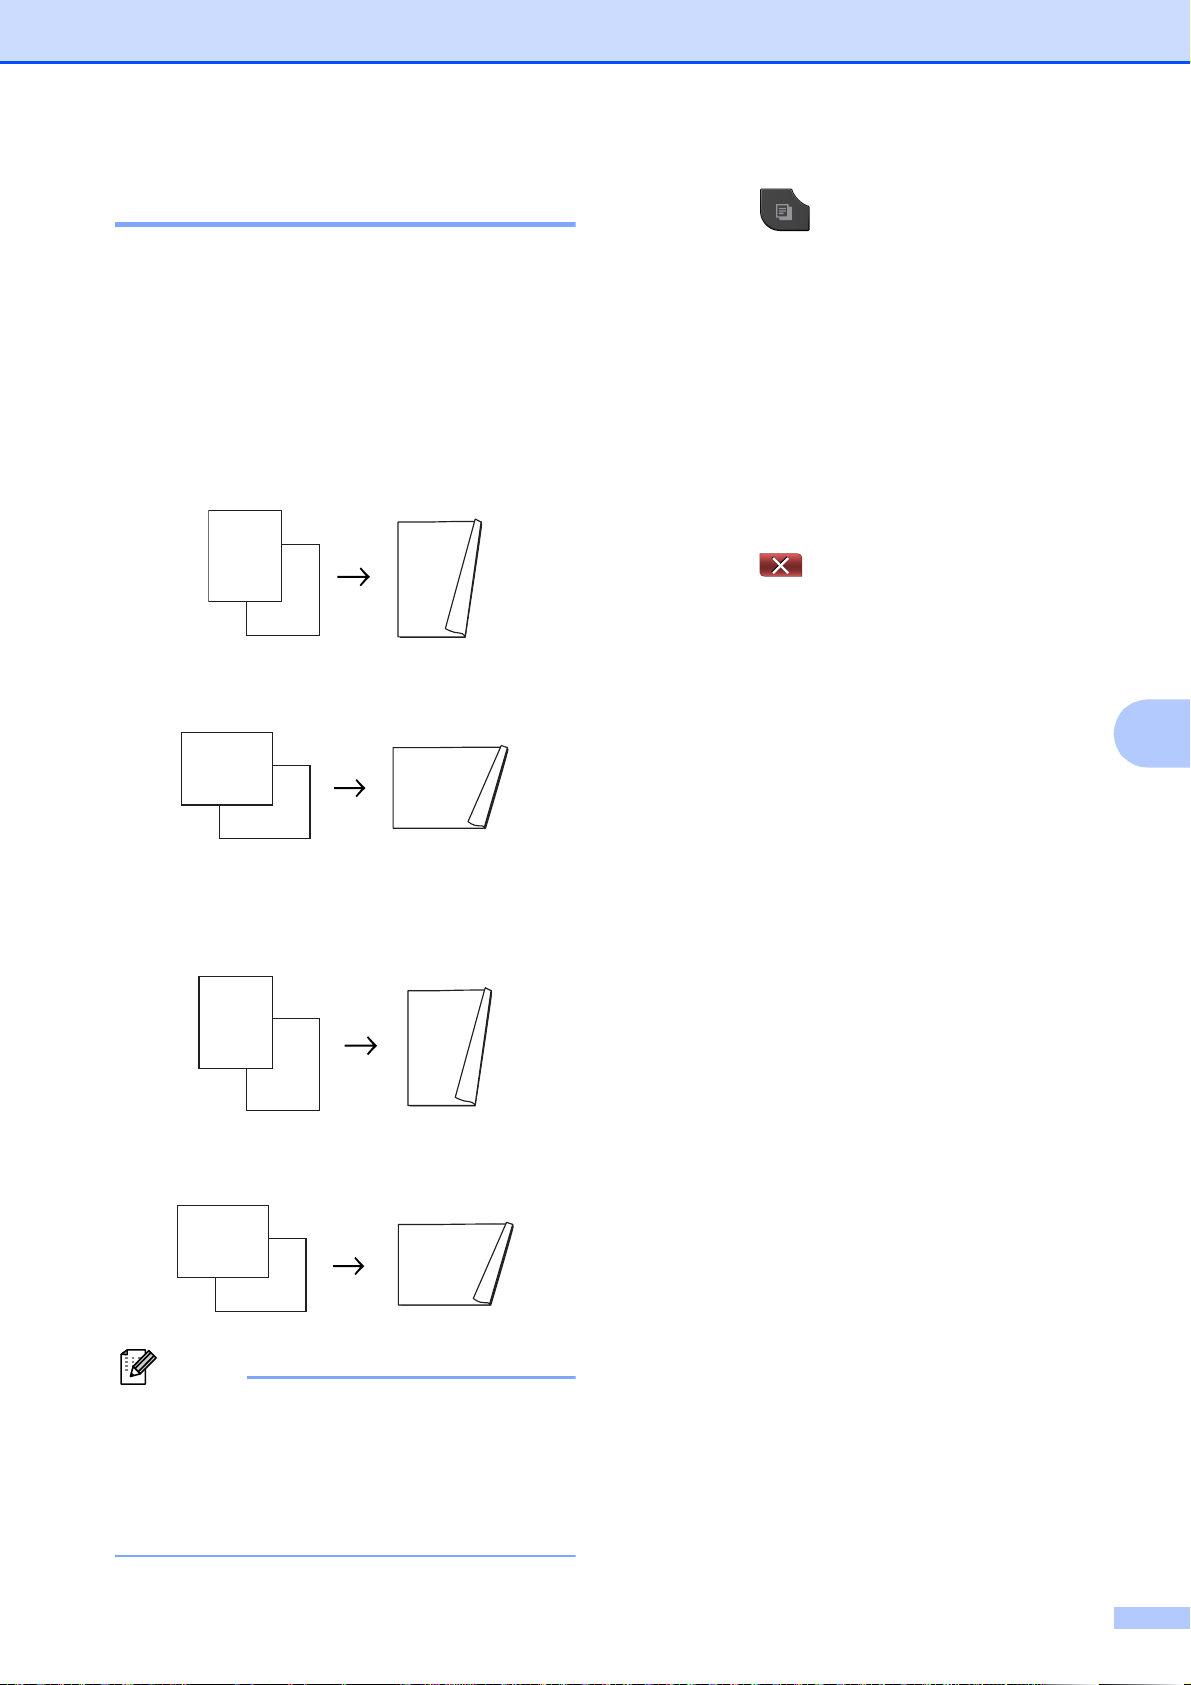
Making copies
Note
1
2
1
1
2
1
1
2
1
2
1
2
1
1
2
1
1
2
1
2
Duplex (2-sided) copying 7
You can reduce the amount of paper used for
copies by copying on both sides of the paper .
We recommend you load your document in
the ADF for duplex copying. For 2-sided
documents and book s use the s canner glass.
(long e dg e fl ip )
Portrait
Landscape
a Press (COPY) or Copy.
b Press d or c to display Duplex Copy.
c Press Duplex Copy.
d Press On to turn on the duple x settin g s.
e Press Portrait LongEdgeFlip,
Landscape LongEdgeFlip,
Portrait ShortEdgeFlip or
Landscape ShortEdgeFlip.
f Press after reading the message
on the LCD.
g Load your document.
h Enter the number of copies you want.
If you want t o sort multiple co pies, press
d or c to display Stack/Sort and
press Stack/Sort, then press Sort.
7
i Press Mono Start or Colour Start.
If you placed the document in the ADF,
(short edge flip)
Portrait
the machine scans the pa ges and star ts
printing.
If you are using the scanner glass, go
to step j.
j The LCD shows:
Turn over the document
Landscape
(or Flip the book), then
press Scan. When you finish,
press Complete.
Place the next page on the scanner
glass and press Scan. Press
Mono Start or Colour Start.
The machine starts printing.
k If you pressed Sort for multiple copie s,
• 2in1(ID), Poster, Fit to Page and
Book Copy are not available with
Duplex Copy.
• You can only use plain paper sizes A4, A5
or Letter.
repeat step j for each additional page.
After all the pages have been scanned,
press Complete.
The machine starts printing.
39
Page 46

Chapter 7
Note
Note
DO NOT touch printed pages until they are
ejected the second time. The machine will
print and ej ect the fir st si de, and t hen pull t he
paper back in to print the second side.
If your document causes paper jams, try
using one of the special duplex copy
settings. Press Advanced a fte r s te p d.
Choose Duplex1 or Duplex2.
Duplex1 helps avoid paper jams when
copying by allowing more time for the ink
to dry.
Choosing Duplex2 allows more time for
the ink to dry while also using less ink.
Setting your favourites 7
You can store the copy settings that you use
most often by setting the m as a favourite. You
can set up to three favourites.
g Do one of the following:
If you wan t to re name your set ti n g ,
press to delete characters. Then
enter the new name (up to
12 characters).
(uuBasic User’s Guide: Entering
Text)
Press OK.
If you do not want to rename your
setting, press OK.
Retrieving your favourite setting 7
When you are ready to use one of your
favourite set of settings, you can recall it.
a Press (COPY) or Copy.
b Press d or c to display Favorite.
c Press Favorite.
a Press (COPY) or Copy.
b Choose the copy option and settings
you want to store.
c Press d or c to display
Favorite Settings.
d Press Favorite Settings.
e Press Store.
Set Watermark Copy to Off or
Template when storing
Favorite Settings.
f Press the location where you want to
store your settings for Favorite:1,
Favorite:2 or Favorite:3.
d Press the favourite setting you want to
retrieve.
Rename your favourite setting 7
After you stored your favourit e sett ing, you
can rename it.
a Press (COPY) or Copy.
b Press d or c to display
Favorite Settings.
c Press Favorite Settings.
d Press Rename.
e Press the favourite setting you want to
rename.
f Enter the new name (up to
12 characters). (uuBasic User’s Guide:
Entering Text)
g Press OK.
40
Page 47

Printing photos from a memory
8
card or USB Flash memory drive
PhotoCapture Center™ operations
Memo ry cards, USB Flash memory drive and folder structures 8
Your machine is designed to be compatible
with modern digital camera image files,
memory cards and USB Flash memory
drives; however, please read the poi nts
below to avoid errors:
The image file extension must be .JPG
(other image file extensions like .JPEG,
.TIF, .GIF and so on will not be
recognized).
Direct PhotoCapture Center ™ printing
must be performed separatel y fro m
PhotoCapture Center ™ operations us ing
the PC. (Simultaneous operation is not
available.)
The machine can read up to 999 fil es
a memory card or USB Flash memory
drive.
1
The folder inside memory cards or USB Flash
memo r y dr i v e i s also count ed.
1
on
8
Please be aware of the following:
8
When printing an index or image, the
PhotoCapture Center™ will print all the
valid images, eve n if one or more images
have been corrupted. Corrupted im ages
will not be printed.
(memory card users)
Your machine is designed t o read memory
cards that have been f ormatted by a digital
camera.
When a digital camera formats a memory
card it creates a speci al folder into whi ch it
copies image data. If you need to modify
the image data stored on a memory card
with your PC, we recommend that y ou do
not modify the folder structure created by
the digital camera. When saving new or
modified image files to the memory card,
we also recommend you use the same
folder your digi tal camera us es. If the data
is not saved to the same folder, the
machine may not be able to read the file or
print the image.
(USB Flash memory drive users)
This machine supports USB Flash
memory drives that have been formatted
by Windows
®
.
8
The DPOF file on the memory cards must
be in a valid DPOF format. (See DPOF
printing uu page 45.)
41
Page 48

Chapter 8
Note
Note
Movie printing 8
You can print images from movi e files that are
stored on a memory card or USB Flash
memory drive.
Movie files a re aut omat ically split by d uration
into 9 par ts, and placed in 3 rows so you can
see and print the scenes.
• You cannot choose a particular movie
scene.
• You can use AVI or MOV movie file
formats (Motion JPEG only). However, if
an AVI file size is 1 G B or more (the
shooting time is about 30 minutes) or a
MOV file size is 2 GB or more (the
shooting time is about 60 minutes), these
files cannot be printed.
Print Images 8
Print Index (Thumbnails) 8
The PhotoCapture Center™ assigns
numbers for images (such as No.1, No.2,
No.3, and so on).
The PhotoCapture Center™ uses these
numbers to identify each picture. You can
print a thumbnail pag e to show all the pictu res
on the memory card or USB Flash memory
drive.
Only file names that are 20 characters or
less will be printed correctly on the index
sheet.
a Make sure you have put the memory
card or USB Flash memory drive in the
correct slot.
Press (PHOTO) or Photo.
b Press Index Print.
c Press Index Sheet and choose
6 Images/Line or 5 Images/Line.
6 Images/Line 5 Images/Line
Print time for 5 Images/Line will be
slower than 6 Images/Line, but the
quality is better.
42
Page 49

d Do one of the following :
Note
Note
Printing photos from a memory card or USB Flash memory drive
Press Print Settings to change
the paper ty pe or the paper s ize y ou
are using.
If you do not want to change the
paper settings, go to g.
e Press Paper Type.
Choose the paper type you are using,
Plain Paper, Inkjet Paper,
Brother BP71, Brother BP61 or
Other Glossy.
f Press Paper Size.
Choose the paper siz e you are using, A4
or Letter.
g Press Colour Start to print.
Printing Photos 8
Before you can print an in dividual image, you
have to know the image number.
a Make sure you have put the memory
card or USB Flash memory drive in the
correct slot.
• You can enter the number s at one time by
using a comma or a hyphen. For example,
enter 1,3,6 t o print images No.1, No.3 and
No.6. E n ter 1-5 to print images No .1 to
No.5.
• You can enter up to 12 characters
(including commas) for the ima ge
numbers you want to print.
f Enter the number of copies you want
either by pressing the number box
directly and entering the number you
want or by pressing + or -.
g Do one of the following:
Press Print Settings to change
the print settings. (See page 46.)
If you do not want to change any
settings, press Colour Start to print.
8
Enhance Phot os 8
You can edit and add effects to your photos
and view them on the LCD before printing.
Press (PHOTO) or Photo.
b Print the Index. (See Print Index
(Thumbnails) uu page 42.)
c Press Index Print.
d Press Print Photos.
e Enter the image number that you want to
print from th e thumbnails printed on the
Index page.
After you have chosen the image
numbers, press OK.
The Enhance Photo feature is
supported by technology from Reallusi on,
Inc.
a Make sure you have put a memory card
or USB Flash memory drive in the
correct slot.
Press (PHOTO) or Photo.
b Press Enhance Photo.
43
Page 50

Chapter 8
Note
Note
(Night Scene)
• Four thumbnails are displayed at a time
with the current page number and total
number of pages listed under the
thumbnails.
• Press d or c repeatedly to select each
page of photos, or hold down to scroll
through all pages of photos.
• Press to start Slide Show.
c Press a photo from the thumbnails.
d Press Enhance or Trim. You can also
choose both together. Press OK.
e Do one of the following:
If you chose Enhance, go to step f.
If you chose Trim, go to step g.
f Press the effect you wish to add.
Press OK.
Go to ste p h.
• You have 10 ways to add effects to your
photo.
(Auto Correct)
The machine decides the suitable
effect for your photo.
(Enhance Skin)
Night Scene is best used for adjusting
night view photographs to make them
more vivid. Press d or c to adjust the
level of contrast.
(Fill Light)
Fill Light is best used for adjusting
photographs against the light.
Press d or c to adjust the level of
contrast.
(Whiteboard)
Whiteboard is best used for adjusting
photographs. It detects letters on a
whiteboard in your photo and makes
them more legible.
(Monochrome)
You can convert your photo to
monochrome.
(Sepia)
You can convert the colour of your
photo to sepia.
Auto Correct & Remove Red-Eye
(
The machine decides the suitable
effects for your photo. A lso, it will
attempt to remove red-eye from your
photo.
• There are some cases when red-eye may
not be removed.
• When the fa ce is too smal l in the image.
• When the face is turning too far up,
down, left or right.
)
44
Best used for adjusting portrait
photographs. It adjusts human skin
colour. Press d or c to adjust the level
of contrast.
(Enhance Scenery)
Best used for adjusting landscape
photographs. It highl ights green and
blue areas in your photo. Press d or c
to adjust the level of contrast.
(Remove Red-Eye)
The machine wi ll attempt to remove
red-eye from yo ur photo. If red-eye
detection fails, you can press the
Try Again button to re-detect.
• After adding each effect, y ou c an enlarge
the view of the image b y pressing . To
go back to the original size, press .
• While the image is enlarged, you can
move around the image with up ( ),
down (), left ( ) and right ().
•
Press
Cancel
to return to the list of effects.
• If your photo is v er y small or has irregular
proportions you may not be able to trim or
enhance the photo. The LCD will display
Image Too Small. or
Image Too Long.
Page 51

Printing photos from a memory card or USB Flash memory drive
Note
Note
g Adjust t he r ed frame around your photo.
The part inside of the red frame will be
printed.
Press + or - to enlarge or reduce the
frame size.
Press a, b, d or c to move the
position of the frame.
Press to rotate the frame.
Press OK when you have finished
adjusting the frame setting.
Press OK to confirm.
If your photo is very small or has irregular
proportions you may not be able to trim or
enhance the photo. The LCD will display
Image Too Small. or
Image Too Long.
h Enter the number of copies yo u want
either by pressing the number box
directly and entering the number y ou
want or by pressing + or -.
Press OK.
DPOF printing 8
DPOF stands for Digital Pri nt Order Format.
Major digital camera manufacturers (Canon
Inc., Eastman Kodak Company, FUJIFILM
Corporation, Panasonic Corporation and
Sony Corporation ) creat ed this s tandard to
make it easier to print images from a digital
camera.
If your digital camera su pports DPOF
printing, you wil l be able to choos e on the
digital camera dis play the images and
number of copies you want to print.
When a memory card containing DP OF
information is put int o your machine, you can
print the chosen image easily.
a Make sure you have put the memory
card in the correct slot.
Press (PHOTO) or Photo.
The machine will ask you if you wan t to
use DPOF settings.
b Press Yes.
8
i Do one of the following .
Press Print Settings to change
the print settings. (See page 46.)
If you do not want to change any
settings, press Colour Start to print.
c Do one of the following:
Press Print Settings to change
the print settings. (See page 46.)
If you do not want to change any
settings, press Colour Start to print.
A DPOF File error can occur if the print
order that was created on the camer a has
been corrupted. Delete and recreate the
print order using your camera to correct
this problem. For instructions on how to
delete or recreate the print order, refer to
your camera manufacturer's su ppor t
website or accompanying documentation.
45
Page 52

Chapter 8
Note
PhotoCapture Center™ print settings
You can change the pr int settings temporarily
for the next print.
(MFC-J825DW only ) The machine ret ur ns to
its default settings aft er 3 minutes, or if t he
Mode Timer returns the machine to Fax
mode. (See Mode Timer (MFC -J825DW only)
uu page 3.)
You can save the print settings you use
most often by s ett ing them as the default.
(See Setting your changes as a new
default uu page 49.)
Pape r options 8
8
Paper T ype 8
a Press Print Settings.
b Press a or b to display Paper Type.
c Press Paper Type.
d Press the paper type you are using,
Plain Paper, Inkjet Paper,
Brother BP71, Brother BP61 or
Other Glossy.
e If you do not want to change additional
settings, press .
Press Colour Start to print.
Paper a nd print s ize 8
Print Quality 8
a Press Print Settings.
b Press a or b to display
Print Quality.
c Press Print Quality.
d Press Normal or Photo.
e If you do not want to change additional
settings, press .
Press Colour Start to print.
a Press Print Settings.
b Press a or b to display Paper Size.
c Press Paper Size.
d Press the paper size you are using,
10x15cm, 13x18cm, A4 or Letter.
Do one of the following:
If you chose Letter or A4, go to
step e.
If you chose another size of paper,
go to step f.
46
Page 53

Printing photos from a memory card or USB Flash memory drive
e Press the Print Size.
Example: Printed pos ition for A4 paper
1
8x10cm
4
13x18cm
2
9x13cm
5
15x20cm
3
10x15cm
6
Max. Size
f If you do not want to change additional
settings, press .
Press Colour Start to print.
Contrast 8
You can choose the contrast setting.
Increasing the contrast will make an image
look sharper and more vivid.
a Press Print Settings.
b Press a or b to display Contrast.
c Press Contrast.
d Press d or c to change the contrast.
Press OK.
e If you do not want to change additional
settings, press .
Press Colour Start to pri n t.
Colou r Enhanc em e nt 8
You can turn on the colour enhancement
feature to print more vivid im ages . Printing
time will be slower with this feature and also,
depending on the image you are printing, it
may use more ink.
a Press Print Settings.
8
Adjusting Brightness, Contrast and Colo ur 8
Brightness 8
a Press Print Settings.
b Press a or b to disp l ay Brightness.
c Press Brightness.
d Press d or c to make a darker or lighter
print.
Press OK.
e If you do not want to change additional
settings, press .
Press Colour Start to print.
b Press a or b to display
Color Enhance.
c Press Color Enhance.
d Do one of the following:
If you want to customize the
White Balance, Sharpness or
Color Density, press On, a nd
then go to step e.
If you do not want to customize,
press Off.
Go to step h.
e Press White Balance, Sharpness or
Color Density.
f Press d or c to adjust the degree of the
setting.
Press OK.
47
Page 54

Chapter 8
Note
g Do one of the following:
If you want to customize another
colour enhancement, repeat
steps e to f.
If you want to change other settings,
press to display the print
setting menu and press the setting
you want to change. (See page 46.)
h If you do not want to change additional
settings, press .
Press Colour Start to print.
• White Bala nce
This setting adjusts the hue of the white
areas of an image. Lighting, camera
settings and other influences will affect the
appearance of whi te. The whit e areas of a
picture may be slightly pink, yellow or
some other colour. By using this setting,
you can correct that effect and bring the
white areas back to pure white.
Cropping 8
If your photo is too long or wide to fit the
available space on your chosen layout, part
of the image will automatically be cropped.
The factory setting is On. If you want to print
the whole image, turn this setting to Off.
When you set Cropping to Off, also set
Borderless to Off. (See Borderless
printing uu page 49.)
a Press Print Settings.
b Press a or b to display Cropping.
c Press Cropping.
d Press Off (or On).
e If you do not want to change additional
settings, press .
Press Colour Start to print.
Cropping: On
8
• Sharpness
This setting enhances the detail of an
image, similar to adjusting t he fine focus
on a camera. If the image is not in true
focus and you cannot see the fine details
of the picture, then adjust the sharp nes s .
• Colour Density
This setting adjusts the total amount of
colour in the image. You ca n incre as e or
decrease the amount of colour in an
image to improve a washed out or weak
picture.
Cropping: Off 8
48
Page 55

Printing photos from a memory card or USB Flash memory drive
Note
Borderless printing 8
This feature exp ands the printable area to the
edges of the paper. Printing time wil l be
slightly slower.
a Press Print Settings.
b Press a or b to disp l ay Borderless.
c Press Borderless.
d Press Off (or On).
e If you do not want to change additional
settings, press .
Press Colour Start to print.
Date Print 8
You can print the date if it is already in the
data on your photo. The date will be printed
on the lower right corner. If the data doesn’t
have the date information, you cannot use
this function.
a Press Print Settings.
b Press a or b to disp l ay Date Print.
c Press Date Print.
Setting your chan ges as a new default 8
You can save the pr int set tings y ou use most
often by setting them as the default settings.
These settings will stay until you change
them again.
a Press your new setting.
Repeat this step for each setting you
want to change.
b After changing the last setting, pr es s
a or b to choose Set New Default.
c Press Set New Default.
d Press Yes to conf i rm.
e Press Stop/Exit.
Restoring all settings to the factory defa ult 8
You can restore the PhotoCapture s ett ings
you have changed back to the factory default
for, Print Quality, Paper Type,
Paper Size, Brightness, Contrast,
Color Enhance, Cropping, Borderless
and Date Print.
8
d Press
On
(or
Off
).
e If you do not want to change additional
settings, press .
Press Colour Start to print.
The DPOF setting on your camera must
be turned off to use the Date Print
feature.
a Press Print Settings.
b Press a or b to display
Factory Reset.
c Press Factory Reset.
d Press Yes to conf i rm.
e Press Stop/Exit.
49
Page 56

Chapter 8
Note
Note
A4
1
2
3
4
1
24 3
A4
1
21
Scan to a memory card or USB Flash memory drive
Auto Crop 8
You can scan multiple documents plac ed on
the scanner glass. An individual document
can be previewed on the LCD before you
save it. When you choose Auto Crop, the
machine will s can each document and create
separate files or single-page files. For
example, if you place three document s on the
scanner glass, the machine will scan and
create three separate fi les . I f you want t o
create a three-pag e file, choos e PDF or TIFF
for File Type.
(If you choose JPEG, each document is
created as three separate files.)
b Load your document.
c Press (SCAN) or Scan.
8
d Press d or c to display to Media.
e Press to Media.
f Press d or c to display Auto Crop.
g Press Auto Crop.
h Press On.
i If you do not want to change additional
settings, press Mono Start or
Colour Start to start scanning.
j The number of the sc anned documents
appears on the LCD.
Press OK.
k Press d or c to preview each doc ument
data.
1 10 mm or great er (top, left, right)
2 20 mm or greater (bottom)
Auto Crop is supported by technology from Reallusion, Inc.
a Make sure you have put the memory
card or USB Flash memory drive in the
correct slot.
l Press Save All to save the data.
• Auto Crop is available for paper with
right angles of 90 degrees at all four
corners. If one of the ang les is not square,
Auto Crop cannot detect the document.
• If your document is too long or wide, this
setting does not work correctly.
• You must place the documents away from
the edges of the scanner glass as shown
in the illustration .
• You must place the documents at least
10 m m apart from each other.
• Auto Crop adjusts the skew of the
document on t he scanner glass , but if y our
document is skewed more than
10 degrees, this setting will not work.
• The ADF must be empty to use the
Auto Crop.
•The Auto Crop feature is availa ble for up
to a maximum of 16 documents
depending on the size of your documents .
50
Page 57

Printing photos from a memory card or USB Flash memory drive
IMPORTANT
How to reset to the factory
DO NOT take out the memory card or
USB Flash memory drive while the status
LED is blinking to avoid damaging the
card, USB Flash memory drive or the dat a
stored on them.
How to set a new defa u lt 8
You can save the Scan to Media settings
(Quality, File Type and Auto Crop)
you use most often by setting them as the
default setting s. These settings will stay unt il
you change them again.
a Press (SCAN) or Scan.
b Press d or c to disp l ay to Media.
c Press to Media.
default 8
You can restore al l the Scan to Media settings
that you have recently changed, (Quality,
File Type and Auto Crop), back to the
factory default.
a Press (SCAN) or Scan.
b Press d or c to display to Media.
c Press to Media.
d Press d or c to choose
Factory Reset.
e Press Factory Reset.
f Press Yes to conf i rm.
g Press Stop/Exit.
8
d Press d or c to disp l ay
Set New Default.
e Press Set New Default.
f Press Yes to confirm.
g Press Stop/Exit.
51
Page 58

9
Printing photos from a camera 9
Printing photos directly from a PictBridge camera
Your Brother machine supports the
PictBridge standa rd, allowing you to connect
to and print photos directly from any
PictBridge compatible digital camera.
If your camera is using the USB Mass
Storage standard, you can als o pri nt phot os
from a digital camera without PictBridge.
(See Printing photos directly from a digital
camera (without Pict B r idge) uu page 55.)
PictBridge require m ents 9
To avoid errors, remember the following
9
points:
The machine and the digital camera must
be connected using a s uitable USB cable.
The image file extension must be .JPG
(other image file extensions lik e .JP E G,
.TIF, .GIF and so on will not be
recognized).
PhotoCapture Center™ operations are
not available when using the PictBridge
feature.
52
Page 59

Printing photos from a camera
Setting your digital camera 9
Make sure your camera is in PictBridge
mode. The following PictBridge set tings may
be available f r om the LCD of yo ur P ictBridge
compatible camera.
Depending on your camera some of these
settings may not be available.
Camera Menu
Selections
Paper Size A4, Letter, 10 15 cm,
Paper Type Plain Paper, Glossy Paper,
Layout Borderless: On,
DPOF setting
Options
Printer Settings
(Default setting)
Inkjet Paper, Printer S ettings
(Default setting)
Borderless: Off,
Printer Settings
(Default setting)
1
-
2
2
2
Settings Options
Paper Size 10 15 cm
Paper Type Glossy Paper
Layout Borderless: On
Print Quality Fine
Colour Enhancem ent Off
Date Print Off
When your camera does not have any
menu selections, these sett ings are als o
used.
The name and availability of each setting
depends on the specification of your
camera.
Please refer to the documentat ion s upplied
with your camera for more detailed
information on changing PictBridge settings.
Print Quality Normal, Fine,
Printer Settings
(Default setting)
Colour
Enhancement
Date Print O n, Off,
1
See DPOF printing uu page 54 for more details.
2
If your camera is set to use the Printer Settings
(Default setting), the machine will print your photo
using the following settings.
On, Off,
Printer Settings
(Default setting)
Printer Settings
(Default setting)
2
2
2
9
53
Page 60

Chapter 9
Note
IMPORTANT
Note
Printing Images 9
Remove any memory cards or USB Flash
memory drive from the machine before
connecting a digital camer a.
a Make sure that your camera is turned
off. Connect your camera to the USB
direct interface (1) on the machine using
the USB cable.
1
DPOF printing 9
DPOF stands for Digital Print Order Format.
Major digital camera manufacturers (Canon
Inc., Eastman Kodak Company, FUJIFILM
Corporation, Panasonic Corporation and
Sony Corporation) created this standard to
make it easier to print images fro m a digital
camera.
If your digital camera sup por ts DP OF
printing, you will be able to choose on the
digital camera disp lay the images and
number of copies you want to print.
A DPOF File error can occur if the print
order that was created on the camera has
been corrupted. Delete and recreate the
print order using your camera to correct
this problem. For instructions on how to
delete or recreate the print order, refer to
your camera manufacturer's support
website or accompanying documentation.
1 USB direct interface
b Turn on the camera.
When the machine has recognized the
camera, the LCD shows
Camera Connected.
c Choose the photo you want to print
following the instructions from your
camera.
When the machine starts printin g a
photo, the LCD will show Printing.
To prevent damage to your machine, do
not connect any device ot her than a digital
camera or USB Flash memory drive to the
USB direct interface.
54
Page 61
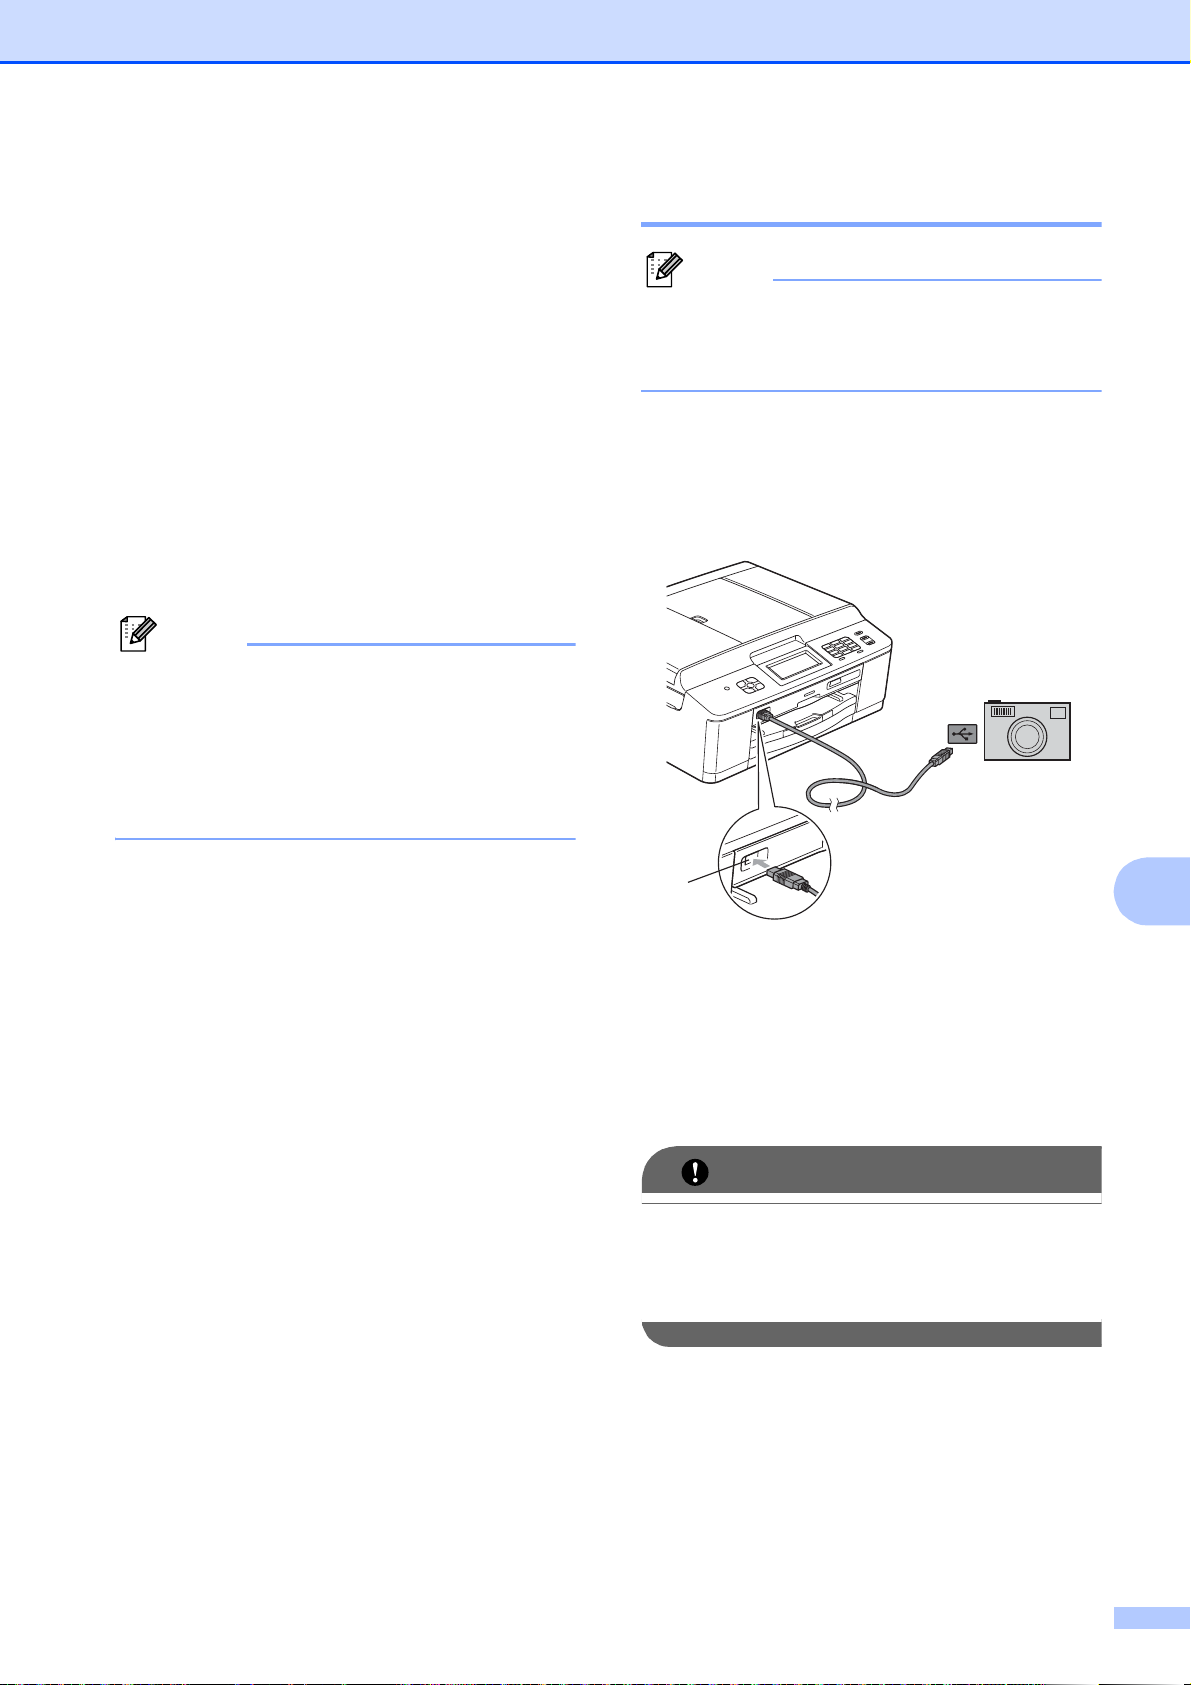
Printing photos from a camera
Note
Note
IMPORTANT
Printing photos directly from a digital camera (without PictBridge)
If your camera supports the USB Mass
Storage standard, you can connect your
camera in storage mode . This enables you to
print photos from your camera.
(If you would like to print photos in Pict Bridge
mode, see Printing photos directly from a
PictBridge camera uu page 52.)
The name, availabi lity and operation differ
among digital camer as. Please refer to the
documentation supplie d with your camera
for detailed informa tion, such as how to
switch from Pict Bridge mode to USB mass
storage mode.
Printing Images 9
Remove any memory cards or USB Flash
9
memory drive from the machine before
connecting a digital camer a.
a Make sure that your camera is turned
off. Connect your camera to the USB
direct interface (1) on the machine using
the USB cable.
1
1 USB direct interface
b Turn on the camera.
c Follow the steps in Print Images
uu page 42.
To prevent damage to your machine, do
not connect any device ot her than a digital
camera or USB Flash memory drive to the
USB direct interface.
9
55
Page 62
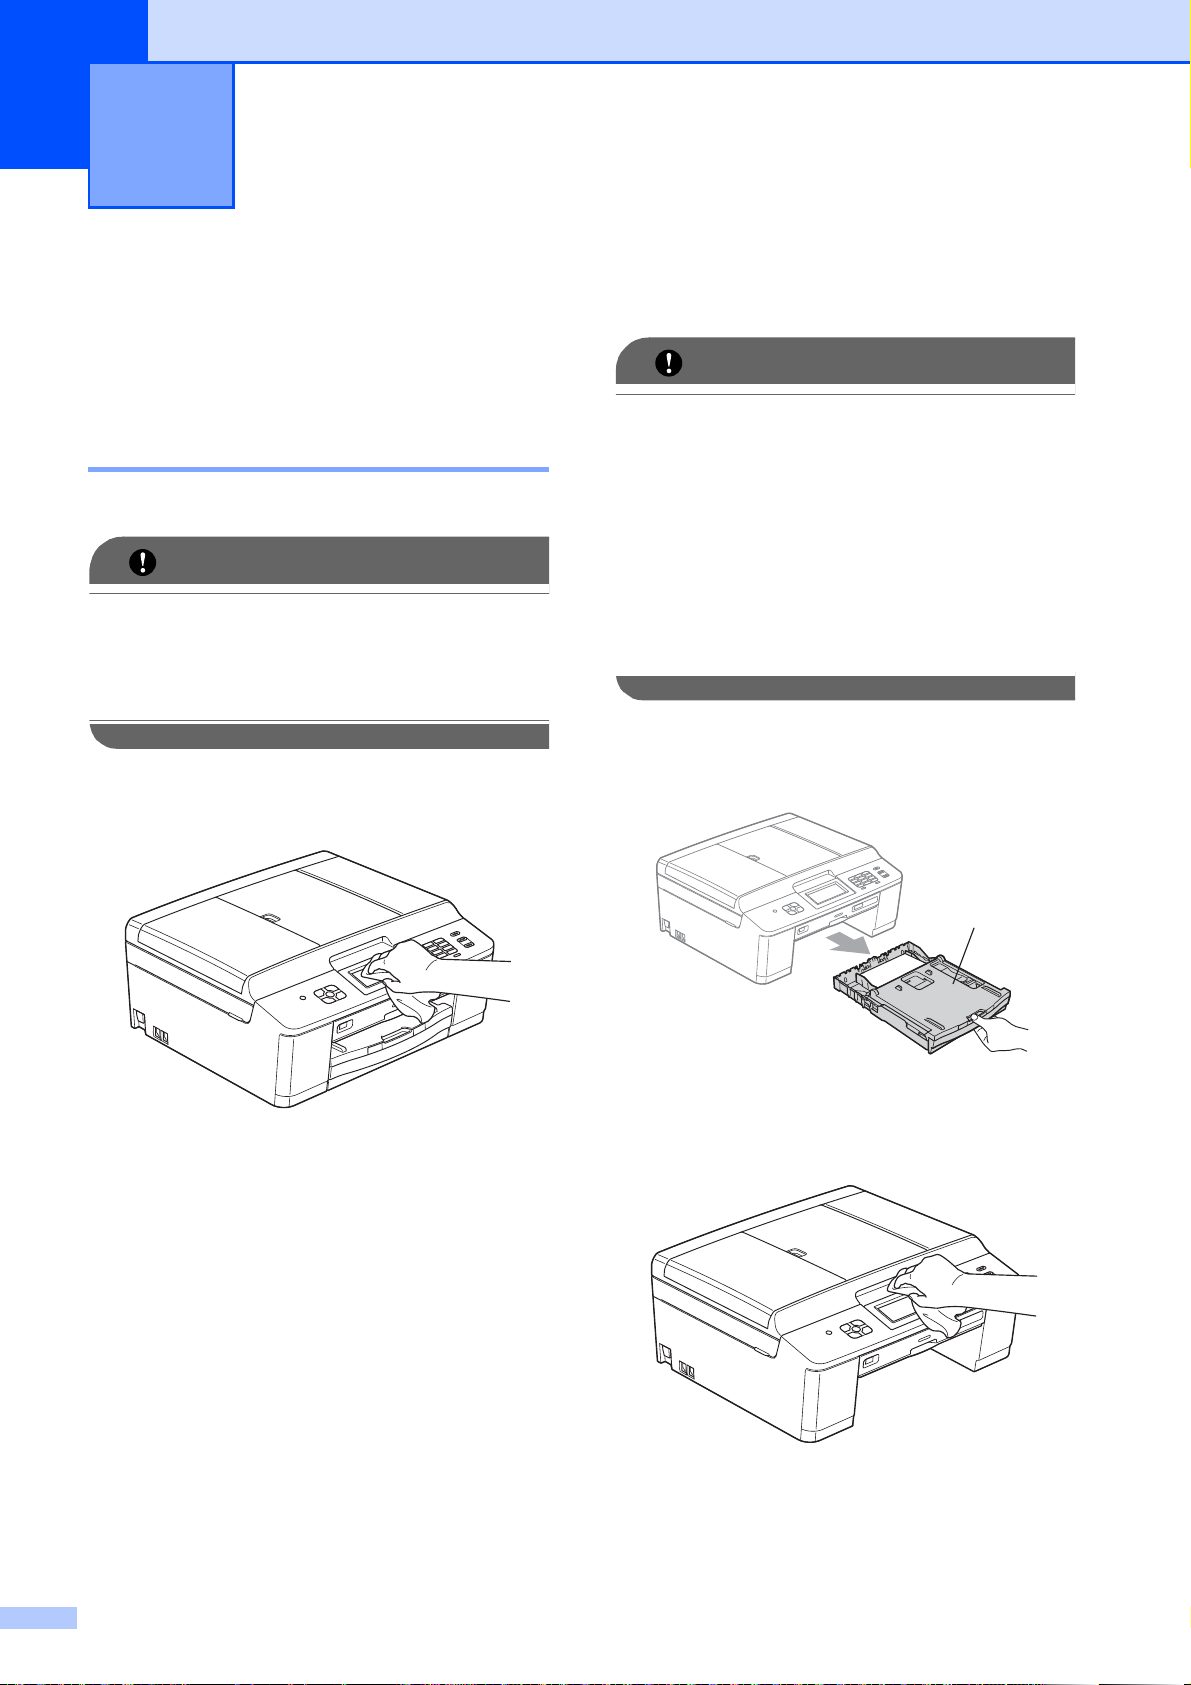
A
IMPORTANT
IMPORTANT
Routine maintenance A
Cleaning and checking the machine
Cleaning the outside of the machine A
Clean the Touchscreen as follows:
• Turn off the power switch when you c lean
the Touchscreen.
• DO NOT use any type of liquid cleaners
(including ethanol).
a Clean the Touchscreen with a dry, soft
lint-free cloth .
Clean the outside of the machine as
follows:
A
• Use neutral detergents. Cleaning with
volatile liqui ds su ch as thinner or benzine
will damage the outside surface of the
machine.
• DO NOT use cleaning materials that
contain ammonia.
• DO NOT use isopropyl alcohol to remove
dirt from the control panel. It may crack the
panel.
a Pull the pap er tray (1) completely out of
the machine.
1
b Wipe the outside of the machine with a
dry, soft lint-free cloth to remove dust.
56
c Lift the output paper tray cover and
remove anything that i s stuck ins ide the
paper tray.
Page 63
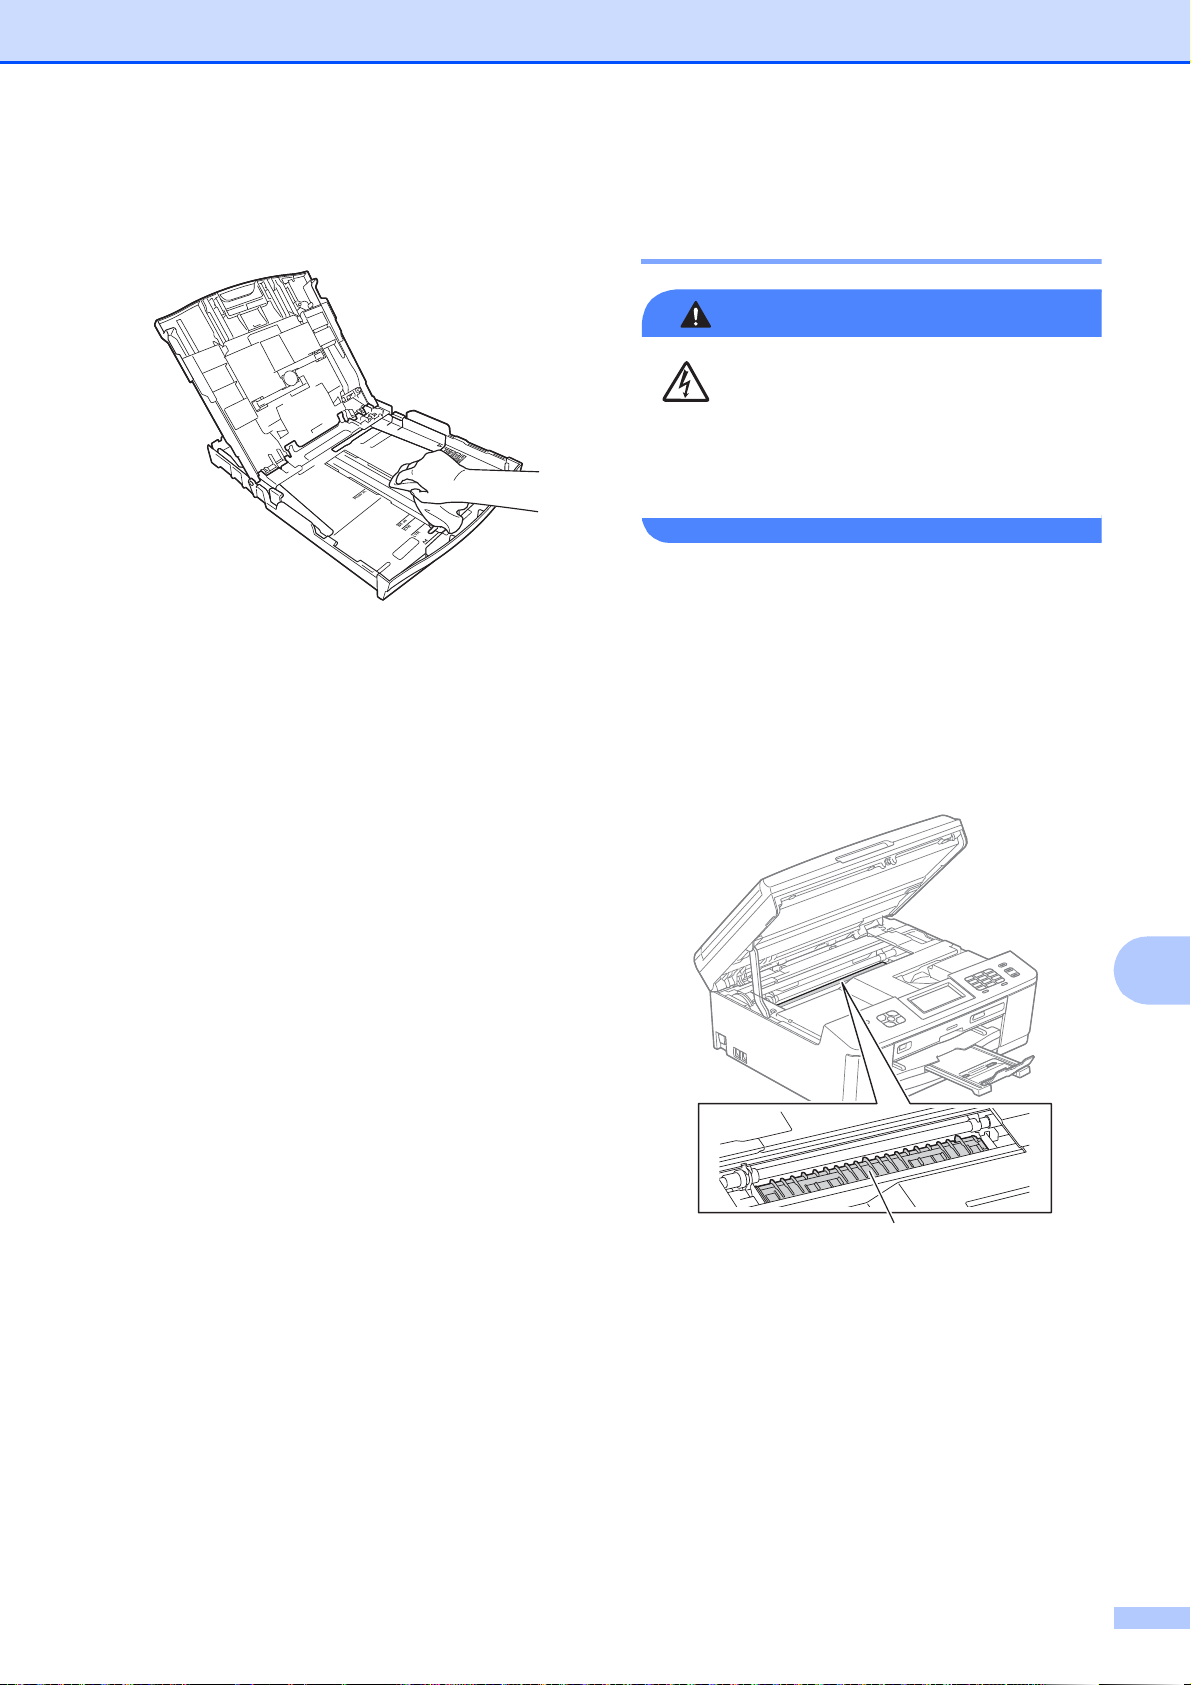
Routine maintenance
WARNING
d Wipe the paper tray with a dry, soft
lint-free cloth to remove dust.
e Close the output paper tray cov er and
put the paper tray firmly back in the
machine.
Cleaning the machine’s printer platen A
Be sure to unplug the machine from the
electrical so cket before cleani ng the printer
platen to avoid an electric al sh oc k.
a Using both hands, grasp t he plastic tabs
on both side of the machine to lift the
scanner cover into the open positio n.
b Clean the machine’s printer platen (1)
and the area around it, wiping off any
scattered ink with a soft , dry lint-free
cloth.
1
c Using both hands, grasp t he plastic tabs
on both sides of the machine and gently
close the scanner cover.
d Re-connect the power cord.
A
57
Page 64

Cleaning the paper feed
Note
Note
1
rollers A
If the pa per feed r ollers are s tained wit h ink, it
may cause paper feed problems.
a Unplug the machine from the electrical
socket. Pull the paper tray (1)
completely out of the machine.
c Lift the Jam Clear flap (2), and then
clean the back side of the Paper Feed
Rollers (1) with a soft lint-free cloth
slightly moistened with wat er .
After cleaning, wipe the rollers with a
dry, soft lint-free cloth to remove all
moisture.
1
If the paper support flap is open, close it,
and then close the paper support.
b Clean the front side of the Paper Feed
Rollers (1) with a soft lint-free cloth
slightly moistened with water, using a
side-to-side motion.
After cleaning, wipe the rollers with a
dry, soft l i n t-free cloth to remove all
moisture.
1
2
d Put the paper tray firmly back in the
machine.
e Re-connect the power cord.
Do not use the machine again until the
rollers are completely dry. Using the
machine before the rollers are dry may
cause paper feed problems.
58
Page 65

Routine maintenance
Note
Cleaning the paper pick-up rollers A
a Unplug the machine f rom the elec tric al
socket.
b Pull th e paper tray complet ely out of the
machine.
If the machine starts to multi-feed the last
few sheets of paper in the tray, clean the
Base Pad (1) with a soft lint-free cloth
slightly moistened with water.
After cleaning, wipe the pad with a dry,
soft lint-free cloth to remove all moisture.
1
c Open the Jam Clear Cover(1) at the
back of the m a c hine.
1
d Clean the Pape r Pick-up Rollers (1) with
a soft lint-free cloth moist ened with
water.
Slowly turn the rollers so that the whole
surface is cleaned.
After cleaning, wipe the rollers with a
dry, soft l i n t-free cloth to remove a l l
moisture.
A
1
e Close the Jam Clear Cover.
Make sure the cover is closed
completely.
f Put the paper tray firmly back in the
machine.
g Re-connect the power cord.
59
Page 66

Checking the ink volume A
Note
IMPORTANT
Packing and shipping
Although an ink volume icon appears on the
LCD, you can use the ink menu to see a large
graph showing the ink that is lef t in each
cartridge.
a (DCP-J925DW only)
Press d or c to display Ink.
b Press or Ink.
c Press Ink Volume.
The LCD shows the ink volume.
d Press Stop/Exit.
You can check the ink volume from your
computer.
uuSoftware User’s Guide: Printing
(Windows
uuSoftware User’s Guide: Printing and
Faxing (Macintosh)
®
)
the machine
When you transport the machine, use the
packing materials that came with your
machine. Follow the instruct ions below to
correctly package your machine. Damage
caused to your machine during transit may
not be covered by your warranty.
It is important to allow the machine to
“park” the print head after a print job.
Listen carefully to the machine before
unplugging it to make sure that all
mechanical noise has stopped. Not
allowing the machi ne to finish this pr ocess
may lead to print problems and possible
damage to the print head.
a Open the ink cartridge cover.
b Remove all four ink cartridges . Pres s
the ink release lever above each
cartridge to release it.
(uuBasicUser’sGuide: Replacing the
ink cartridges)
A
60
c Install the orange protective par t and
then close the ink cartridge cover.
Page 67

IMPORTANT
• Make sure t he plastic tab on th e righ t si de
1
of the orange protective part (1) clicks
securely into place (2).
2
• If you are not able to find the orange
protective part, ship the machine without
it. DO NOT install t he ink cartrid ges as an
alternative before shi pping.
Routine maintenance
e Lift the machine from the fro nt and hook
the tab of the or ange protective par t into
the keyed opening (1) on the bottom of
the paper tray. Then latch the pr otective
part over the rais ed por tion of the paper
tray (2).
2
1
d Open the scanner cover an d remove t he
Disc Tray. Place the disc tray in the
folded piece of cardboard and tape it
together.
f Unplug the machine from the t elep hone
wall socket and take the telephone line
cord out of the machine.
g Unplug the machine from the el ec tric al
socket.
h Using both hands, use the plastic tabs
on both sides of the machine to lift the
scanner cover into the open positio n.
Then unplug the int erface cable from the
machine, if it is connected.
A
61
Page 68

i Using both hands, grasp t he plastic tabs
Note
on both sides of the machine and gently
close the scanner cover.
j Wrap the ink cartridges in the bag and
tape it on to the paper tray.
l Pack the machine and the printed
materials in the original ca rton with the
original packing material as shown
below.
If you are returning your machine to
Brother as part of the Exchange Service,
pack only the machine. Keep all separate
parts and printed materials to use with
your “Exchange” machine.
k Wrap the machine in the bag.
62
m Close the carton and tape it shut.
Page 69

Glossary B
B
This is a comprehensiv e list of features and terms that appear in B rother manuals. Availability of
these features depends on the model you purcha se d.
ADF (automatic document feeder)
The document can be placed in the ADF
and scanned one page at a time
automatically.
Auto Reduction
Reduces the size of incoming faxes.
Automatic fax transmission
Sending a fax without picking up the
handset of an external telephone.
Automatic Redial
A feature that enables your machine to
redial the last fax number after five
minutes if the fax did not go through
because the line was busy.
Backup Print
Your machine prints a copy of every fax
that is received and stored in its memor y .
This is a safety feature so you will not lose
messages during a power failure.
Batch Transmission
(Black and white faxes only) As a cost
saving feature, all delay ed faxes to th e
same fax number can be sent as one
transmission.
Beeper Volume
Volume setting for the beep when you
press a key or make an error.
Brightness
Changing the Brightness makes the whole
image lighter or darker.
CNG tones
The special tones (beeps) sent by fax
machines during automatic transmission
to tell the receiving machine that a fax
machine is calling.
Coding method
Method of coding the information
contained in the document. All fax
machines must use a minimum standard
of Modified Huffman (MH). Your machine
is capable of greater compressi on
methods, Modified Read (MR), Modified
Modified Read (MMR) and JPEG, if the
receiving machine has the same
capability.
Colour Enhancement
Adjusts the colour in the image for bett er
print quality by improving sharpness,
white balance and colour density.
Communication error (Comm. Error)
An error during fax sending or receiving,
usually caused by line noise or stat ic .
Compa tibility grou p
The ability of one fax unit to c ommunicat e
with another. Compatibility is assured
between ITU-T Groups.
Contrast
Setting to compensate for dark or light
documents, by making faxes or copies of
dark documents lighter and light
documents darker.
B
Broadcasting
The ability t o send the sam e fax m essage
to more than one location.
Caller ID
A service purchased from the tele phone
company that l ets you see the number (or
name) of the party calling you.
Delayed Fax
Sends your fax at a specified time later.
Density
Changing the Density makes the whole
image lighter or darker.
63
Page 70

Dual Access
Your machine can s can outgoi ng fax es or
scheduled jobs into memory at the same
time it is sending a fax from memory or
receiving or printing an incom ing fax.
Fax/Tel
You can receive faxes and telephone
calls. Do not use this mode if you are
using a telephone answering devic e
(TAD).
ECM (Error Correction Mode)
Detects errors during fax transmission
and resends the pages of t he fax t hat had
an error.
Extension telep ho ne
A telephone using the same line as your
fax but plugged into a separate wall
socket.
External telephone
A TAD (telephone answering device) or
telephone that is connected to your
machine.
F/T Ring Time
The length of time that the Brother
machine rings (when the Receive Mode
setting is Fax/Tel) to notify you to pick up
a voice call that it answered.
Fax Detect
Enables your machi ne to respond to CNG
tones if you interrupt a fax call by
answering it.
Fine resolution
Resolution is 203 196 dpi. It is used for
small print and graphs.
Greyscale
The shades of grey available for copying,
scanning and faxing photographs.
Group number
A combination of Spee d Dial nu mbers that
are stored in a Speed Dial location for
Broadcasting.
Innobella™
Innobella™ is a range of genuine
consumables offered by Brother. Fo r best
quality results Broth er recommends
Innobella™ Ink and Paper.
Journal Period
The pre-programmed time period
between automatically printed Fax
Journal Reports. You can print the Fax
Journal on demand without interrupting
the cycle.
Fax Fo r wa rding
Sends a fax received into the memory to
another pre-programmed fax num ber .
Fax Journal
Lists information about the last 200
incoming and outgoing faxes. TX means
Transmit. RX means Receive.
Fax Preview
If you choose F ax Preview you will be able
to view received faxes on the LCD by
pressing the Fax Preview button on the
LCD.
Fax Storage
You can store received faxes in memory.
Fax tones
The signals sent by sending and r eceiving
fax machines while communicat ing
information.
LCD (Liquid Crystal Display)
The display screen on the machine that
shows interactive messages during OnScreen Programming and shows the date
and time when the machine is idle.
Manual fax
When you lift the handset of y our external
telephone you can hear the receiving fax
machine answer before you press
Mono Start or Colour Start to begin
sending the fax.
Memory Receive
Receives faxes into the machine's
memory when the machine is out of pap er.
Menu mode
Programming mode for changing your
machine's settings.
64
Page 71

Glossary
OCR (optical character recognition)
ScanSoft™ PaperPort™ 12S E with OCR
or Presto! PageManager software
application conver ts an im age of te xt to
text you can edit.
Overseas Mode
Makes temporary changes to the fax
tones to accommodate noise and static on
overseas telephone lines .
Pause
Allows you to place a 3.5 second delay in
the dialling sequence whil e you are
dialling using the dial pad or whil e you are
storing Speed Dial numbers. Press the
Redial/Pause key on the control panel or
the Pause button on the Touchscreen as
many times as needed for longer pauses.
PhotoCapture Center™
Allows you to p rint digital photos from your
digital camera at hi gh resolut ion for photo
quality printin g.
Photo resolution (Mono only)
A resolution setting th at uses varying
shades of grey for the best represe ntation
of photographs.
PictBridge
Allows you to print photos directly from
your digital camera at high resolu tion for
photo quality printing.
Polling
The process of a fax machine calling
another fax machine t o retrieve waiting fax
messages.
Pulse
A form of rotary dialling on a telephone
line.
Quick Dial List
A listing of names and numbers stored in
Speed Dial memory, in numerical order.
Real Time Transmission
When memory is full, you can send faxes
in real time.
Remaining jobs
You can check which jobs are waiting in
memory and cancel jobs individually.
Remote Access Code
Your own four-digit code (--- ) that allows
you to call and access your machine from
a remote location.
Remote Activation Code
Press this code (l 5 1) when you answer
a fax call on an extension or external
telephone.
Remote Deactivati on Code
(For Fax/Tel mode only)
When the machin e answers a v oice call, it
pseudo/double-rings. You can pick up at
an extension telephone by pressi ng this
code (#51).
Remote Retrieval Access
The ability to access your machine
remotely from a touch-tone telephone.
Resolution
The number of vertical and horizontal lines
per inch. See: Standard, Fine, Super Fine
and Photo.
Ring Delay
The number of rings before the machine
answers in Fax Only and Fax/Tel
modes.
Ring Volume
Volume setting for the machine's ring.
Scanning
The process of sending an electronic
image of a paper document into your
computer.
Scan to Me dia
You can scan a monochrome or colour
document on to a memory card or USB
Flash memory d rive. Monochrome images
will be in TI FF or PDF file fo rm a t an d
colour images may be in P DF or JP EG file
format.
B
65
Page 72

Search
An electronic, numerical or alphabetical
listing of stored Speed Dial and Group
numbers.
Speed Dial
A pre-programmed number for easy
dialling.
Standard resolutio n
203 98 dpi (monoch rome). 203 196 dpi
(colour). It is used for regular sized text
and the quickest transmission.
Station ID
The stored information that appears on
the top of faxed pages. It includes the
sender's name and fax number.
Super Fine resolution (Mono only)
203 392 dpi. Best for very small print
and line art.
TAD (telephone answering device)
You can connect an external TAD to your
machine.
Temporary settings
You can choose certain options for each
fax transmission and copy without
changing the default settings.
Tone
A form of dialling on the telephone line
used for touch-tone telephones .
Transmission
The process of sending faxes over the
phone lines from your machine to the
receiving fax machine.
User Settings
A printed report that shows the current
settings of the machine.
WLAN Report
A printed report that shows the result of
the WLAN Connection.
Xmit Report (T r a nsmission Ver ificat ion
Report)
A listing for each fax sent, that shows its
date, time and number.
66
Page 73

C
Index
Numerics
2 in 1 ID Copy ..........................................34
A
Access codes, storing and dialling ...........25
Apple Macintosh
See Soft w a re Use r's Gu i d e.
B
Broadcasting ..............................................9
setting up Groups for
............................27
C
Caller ID
Caller ID History report
Cancelling
Fax Forwarding
Fax Storage
jobs awaiting redial
Cleaning
paper feed rollers
printer platen
ControlCenter
See Soft w a re Use r's Gu i d e.
Copy
2 in 1 ID
book
density
duplex
enlarge/reduce
favourite settings
ink save mode
page layout (N in 1)
poster
quality
sort (ADF only)
thin paper
using ADF
Watermark
using a media card
using a paper document
using a template
using a USB Flash memory drive
................................................34
......................................................37
..................................................35
...................................................39
....................................................33
...................................................31
.............................. 17, 19
..........................................17
.........................................57
......................................32
...................................40
.......................................36
......................................35
..............................................36
.............................................35
............................................37
.........................30
...............................12
..................................58
..............................33
............................38
....................38
................................37
......38
D
Dialling
Groups (Broadcasting)
Direct printing
from a non-PictBridge came r a
from a PictBridge camera
Dual Access
Duplex (2-sided)
copy
...................................................... 39
.............................................. 8
........................... 9
F
Fax codes
changing
Remote Access Code
Fax Forwarding
changing remotely
programming a number
Fax Storage
printing from memory
turning off
turning on
Fax, from PC
See Software User's Guide.
Fax, stand-alone
receiving
Fax Forwa r d i ng
into PC
into the memory
out of paper reception
printing from memory
reducing to fit on paper
retriev i n g fro m a remo te site
sending
at end of conversation
Broadcasting
cancelling from memory
contrast
delayed batch transmis si on
delayed fax
from memory (Dual Access)
manual
overseas
Real Time Transmission
Resolution
return to factory setting
set new default
............................................... 18
.......................... 18
..........................19, 20
........................ 14
............................................. 15
........................... 15
............................................. 17
............................................. 15
................................. 19
.............................................. 16
................................ 14
....................... 14
........................ 15
................................................... 6
......................... 8
....................................... 9
............................................... 6
........................................ 11
................................................ 8
............................................ 11
........................................... 7
.................................... 7
............. 55
..................... 52
..................... 21
.......19, 20
.................... 12
............... 11
................ 8
................... 10
....................... 7
C
67
Page 74

G
Groups for Broadcasti ng ..........................27
I
ID Copy ....................................................34
Ink cartridges
checking ink volume
..............................60
L
LCD (Liquid Crystal Display)
Dim Timer
Language
...............................................3
................................................3
M
Macintosh
See Software User's Guide.
Manual
transmission
Memory Security
Memory Storage
Mode, entering
Timer
Movi e printing
.......................................................3
............................................8
................................. 5, 12
........................................1
...........................................42
N
Network
Printing
See Network User's Guide.
Scanning
See Software User's Guide.
P
Enhance Skin
Fill Light
Monochrome
Night Scene
Remove Red-Eye
Sepia
Trim
Whiteboard
Print se tti n g s
Borderless
Brightness
Colour enhancement
Contrast
Cropping
Date Print
Paper type & size
Quality
Return to factory setting
Set new default
Printing
index
photos
Scan to Media
auto crop
memory card
USB Flash memory
PictBridge
DPOF Printing
Power failure
Presto! PageManager
See Software User's Guide. Also see Help
in the Presto! PageManager application.
Print
fax from memory
report
Printing
See Software User's Guide.
................................................. 43
................................................... 43
............................................... 46
.................................................. 42
............................................... 43
.................................................... 30
.................................... 43
............................................. 43
..................................... 43
....................................... 43
.............................. 43
........................................ 43
......................................... 49
......................................... 47
......................... 47
............................................. 47
............................................ 48
.......................................... 49
.............................. 46
.................... 49
................................. 49
........................................... 50
..................................... 50
........................... 50
...................................... 54
............................................. 1
.................................. 15
Packing and shipping the machine ..........60
PaperPort™12SE with OCR
See Software User's Guide. Also see Help
in the PaperPort™12SE application.
PhotoCapture Center ™
Adding Effect
DPOF printing
from PC
See Software User's Guide.
Photo Effects
Auto Correct
Enhance Scenery
68
.........................................43
.......................................45
.......................................43
...............................43
Page 75

Q
T
Quick Dial
Broadcasting
deleting Groups
using Groups
Group dial
changing
setting up Groups for
Broadcasting
Speed Dial
setting up from Caller ID history
setting up from outgoing calls
...........................................9
.................................28
.......................................9
............................................28
......................................27
R
Reducing
copies
incoming faxes
Remote Retrieval
commands
getting your faxes
remote access code
Remote Setup
See Soft w a re Use r's Gu i d e.
Reports
Caller ID
Caller ID History Report
Fax Journal
how to print
Network Configuration
Quick Dial List
Transmission Verificati on
User Settings
WLAN Report
Resolution
setting for next fax
...................................................32
......................................21
.....................................18
............................................19
.................................20
..............................18
....................................................29
................................................30
........................30
...........................................30
Journal Period
....................................29
...........................................30
..........................30
.......................................30
........................................30
........................................30
..................................7
........26
............26
............... 29, 30
Troubleshooting
checking ink volume
............................. 60
W
Windows
See Software User's Guide.
Wireless Network
See Quick Setup Guide and Network
User's Guide.
®
C
S
Scanning
See Soft w a re Use r's Gu i d e.
Shipping the machine
Sleep Mode
Speed Dial
setting up from Caller ID history
setting up from outgoing calls
................................................2
..............................60
............26
...............26
69
Page 76

Visit us on the World Wide Web
http://www.brother.com/
These machines are approved for use in the country of purchas e only . Local Brother companies
or their dealers will only support machines purchased in their own countries.
 Loading...