

Page 1
USER’S GUIDE
Digital
Cordless
Handset
BCL-D10
Page 2

© 2006 Brother Industries, Ltd.
Page 3

Brother numbers
IMPORTANT
For technical help, you must call the country where you bought the machine/cordless handset.
Calls must be made from within that country.
FAQs (frequently asked questions)
The Brother Solutions Center is our one-stop resource for all your Fax Machine/Multi-Function
Center needs. You can download the latest software documents and utilities, read FAQs and
troubleshooting tips, and learn how to get the most from your Brother product.
http://solutions.brother.com
For Customer Service
In USA: 1-800-284-4329 (voice)
1-901-379-1215 (fax)
1-800-284-3238 (TTY service for the hearing-impaired)
Service Center Locator (USA only)
For the location of a Brother authorized service center, call 1-800-284-4357.
i
Page 4

Ordering accessories and supplies
For best quality results use only genuine Brother accessories, which are available at most Brother
retailers. If you cannot find the accessory you need and you have a Visa, MasterCard, Discover,
or American Express credit card, you can order accessories directly from Brother. (In the USA,
you can visit us online for a complete selection of the Brother accessories and supplies that are
available for purchase.)
In USA: 1-888-879-3232 (voice)
1-800-947-1445 (fax)
http://www.brothermall.com
Description Item
Cordless Handset BCL-D10
Battery BCL-BT10
User’s Guide LP5403001
Compilation and Publication Notice
Under the supervision of Brother Industries Ltd., this manual has been compiled and published,
covering the latest product descriptions and specifications.
The contents of this manual and the specifications of this product are subject to change without
notice.
Brother reserves the right to make changes without notice in the specifications and materials
contained herein and shall not be responsible for any damages (including consequential) caused
by reliance on the materials presented, including but not limited to typographical and other errors
relating to the publication.
ii
Page 5

Brother® One Year Limited Warranty and Replacement Service
(USA only)
Who is covered:
This limited warranty (“warranty”) is given
only to the original end-use/retail purchaser
(referred to in this warranty as “Original
Purchaser”) of the accompanying product,
consumables and accessories (collectively
referred to in this warranty as “this
Product”).
If you purchased a product from someone
other than an authorized Brother reseller in
the United States or if the product was used
(including but not limited to floor models or
refurbished product), prior to your
purchase you are not the Original
Purchaser and the product that you
purchased is not covered by this warranty.
What is covered:
This Product includes a battery,
Except as otherwise provided herein,
Brother warrants that the Product and
battery will be free from defects in materials
and workmanship, when used under
normal conditions.
This warranty applies only to products
purchased and used in the United States.
For products purchased in, but used
outside, the United States, this warranty
covers only warranty service within the
United States (and does not include
shipping outside the United States).
4 Conditions beyond the control of Brother,
such as common carrier provided services,
and
5 Problems arising from other than defects in
materials or workmanship.
This limited warranty is VOID if this Product
has been altered or modified in any way
(including but not limited to attempted warranty
repair without authorization from Brother
and/or alteration/removal of the serial
number).
What to do if you think your Product is
eligible for warranty service:
Report your issue to our Customer Service
Hotline at 1-800-284-4329
with a copy of your dated bill of sale showing
that this Product was purchased within the U.S
What Brother will ask you to do:
After contacting Brother you may be required
to deliver (by hand if you prefer) or send the
Product properly packaged, freight prepaid, to
the Brother Service Center together with a
photocopy of your bill of sale. You are
responsible for the cost of shipping,
packing product, and insurance (if you
desire). You are also responsible for loss
or damage to this Product in shipping.
Supply Brother
What is the length of the Warranty Periods:
Product: one year from the original
purchase date.
Battery: 90 days from the original purchase
date or the rated life, whichever comes first.
What is NOT covered:
This warranty does not cover:
1 Physical damage or normal wear and tear
to this Product;
2 Damage caused by improper installation,
improper or abnormal use, misuse, neglect
or accident (including but not limited to
transporting this Product without the proper
preparation and/or packaging);
3 Damage caused by another device, power
surges or lightening;
What Brother will do:
If the problem reported concerning your
Product is covered by this warranty and if you
first reported the problem to Brother within the
applicable warranty period, Brother will repair
or replace the Product at no charge to you for
parts or labor. The decision as to whether to
repair or replace the Product is made by
Brother in its sole discretion. Brother reserves
the right to supply a refurbished or
remanufactured replacement Product and use
refurbished parts provided such replacement
products conform to the manufacturer’s
specifications for new product/parts. The
repaired or replacement Product will be
returned to you freight prepaid or made
available for you to pick up at the Brother
Service Center.
iii
Page 6

Brother® One Year Limited Warranty and Replacement Service
(USA only)
If the Product is not covered by this warranty
(either stage), you will be charged for shipping
the Product back to you and charged for any
service and/or replacement parts/products at
Brother's then current published rates.
The foregoing are your sole (i.e., only) and
exclusive remedies under this warranty.
What happens when Brother elects to
replace your Product:
When a replacement Product is authorized by
Brother, and you have delivered the Product to
the Brother Service Center, the Brother
Service Center will provide you with a
replacement Product or Brother will send to
you a replacement Product with the
understanding that you will, after receipt of the
replacement Product, supply the required
proof of purchase information, together with
the Product that Brother agreed to replace.
You are then expected to pack the Product
that Brother agreed to replace in the package
from the replacement Product and return it to
Brother using the pre-paid freight bill supplied
by Brother in accordance with the instructions
provided by Brother. Since you will be in
possession of two Products, Brother will
require that you provide a valid major credit
card number. Brother will issue a hold against
the credit card account number that you
provide until Brother receives your original
Product and determine that your original
Product is entitled to warranty coverage. Your
credit card will be charged up to the cost of a
new Product only if: (i) you do not return your
original Product to Brother within five (5)
business days; (ii) the problems with your
original Product are not covered by the limited
warranty; (iii) the proper packaging
instructions are not followed and has caused
damage to the product; or (iv) the warranty
period on your original Product has expired or
has not been sufficiently validated with a copy
of the proof of purchase (bill of sale). The
replacement Product you receive (even if
refurbished or remanufactured) will be
covered by the balance of the limited warranty
period remaining on the original Product, plus
an additional thirty (30) days. You will keep the
replacement Product that is sent to you and
your original Product shall become the
property of Brother. Retain your original
Accessory Items and a copy of the return
freight bill, signed by the courier.
Limitations:
Brother is not responsible for damage to or
loss of any equipment, media, programs or
data related to the use of this Product. Except
for that repair or replacement as described
above, Brother shall not be liable for any
direct, indirect, incidental or consequential
damages or specific relief. Because some
states do not allow the exclusion or limitation
of consequential or incidental damages, the
above limitation may not apply to you.
THIS WARRANTY IS GIVEN IN LIEU OF ALL
OTHER WARRANTIES, WRITTEN OR
ORAL, WHETHER EXPRESSED BY
AFFIRMATION, PROMISE, DESCRIPTION,
DRAWING, MODEL OR SAMPLE. ANY AND
ALL WARRANTIES OTHER THAN THIS
ONE, WHETHER EXPRESS OR IMPLIED,
INCLUDING IMPLIED WARRANTIES OF
MERCHANTABILITY AND FITNESS FOR A
PARTICULAR PURPOSE, ARE HEREBY
DISCLAIMED.
This Limited Warranty is the only warranty
that Brother is giving for this Product. It is
the final expression and the exclusive and
only statement of Brother's obligations to
you. It replaces all other agreements and
understandings that you may have with
Brother or its representatives.
This warranty gives you certain rights and
you may also have other rights that may
vary from state to state.
This Limited Warranty (and Brother's
obligation to you) may not be changed in
any way unless you and Brother sign the
same piece of paper in which we (1) refer
to this Product and your bill of sale date, (2)
describe the change to this warranty and
(3) agree to make that change.
Important: We recommend that you keep
all original packing materials, in the event
that you ship this Product.
© 2006 Brother International Corporation
iv
Page 7

Important Information
Federal Communications Commission (FCC) Compliance Notice
(USA only)
This equipment is hearing-aid compatible.
Responsible
Party:
declares, that the products
Product Name: BCL-D10
comply with Part 15 of the FCC Rules. Operation is subject to the following two conditions: (1) This
device may not cause harmful interference, and (2) this device must accept any interference
received, including interference that may cause undesired operation.
This equipment has been tested and found to comply with the limits for a Class B digital device,
pursuant to Part 15 of the FCC Rules. These limits are designed to provide reasonable protection
against harmful interference in a residential installation. This equipment generates, uses, and can
radiate radio frequency energy and, if not installed and used in accordance with the instructions,
may cause harmful interference to radio communications. However, there is no guarantee that
interference will not occur in a particular installation. If this equipment does cause harmful
interference to radio or television reception, which can be determined by turning the equipment
off and on, the user is encouraged to try to correct the interference by one or more of the following
measures:
Reorient or relocate the receiving antenna.
Increase the separation between the equipment and receiver.
Brother International
Corporation
100 Somerset Corporate
Boulevard
Bridgewater, NJ 08807-0911
USA
TEL: (908) 704-1700
Connect the equipment into an outlet on a circuit different from that to which the receiver is
connected.
Call the dealer or an experienced radio/TV technician for help.
This transmitter must not be co-located or operated in conjunction with any other antenna or
transmitter.
v
Page 8

The available scientific evidence does not show that any health problems are associated with
using low power wireless devices. There is no proof, however, that these low power wireless
devices are absolutely safe. Low power Wireless devices emit low levels of radio frequency
energy (RF) in the microwave range while being used. Whereas high levels of RF can produce
health effects (by heating tissue), exposure to low-level RF that does not produce heating
effects causes no known adverse health effects. Many studies of low-level RF exposures have
not found any biological effects. Some studies have suggested that some biological effects
might occur, but such findings have not been confirmed by additional research. This equipment
has been tested and found to comply with FCC radiation exposure limits set forth for an
uncontrolled equipment and meets the FCC radio frequency (RF) Exposure Guidelines in
Supplement C to OET65.
IMPORTANT
Changes or modifications not expressly approved by Brother Industries, Ltd. could void the
user’s authority to operate the equipment.
Industry Canada Compliance Statement (Canada only)
This class B digital apparatus complies with Canadian ICES-003.
Cet appareil numerique de la classe B est conforme a la norme NMB-003 du Canada.
Operation is subject to the following two conditions: (1) This device may not cause interference,
and (2) this device must accept any interference, including interference that may cause undesired
operation.
The available scientific evidence does not show that any health problems are associated with
using low power wireless devices. There is no proof, however, that these low power wireless
devices are absolutely safe. Low power Wireless devices emit low levels of radio frequency
energy (RF) in the microwave range while being used. Whereas high levels of RF can produce
health effects (by heating tissue), exposure to low-level RF that does not produce heating effects
causes no known adverse health effects. Many studies of low-level RF exposures have not found
any biological effects. Some studies have suggested that some biological effects might occur, but
such findings have not been confirmed by additional research. This equipment has been tested
and found to comply with IC radiation exposure limits set forth for an uncontrolled equipment and
meets RSS-102 of the IC radio frequency (RF) Exposure rules.
Trademark
The Brother logo is a registered trademark of Brother Industries, Ltd.
Brother is a registered trademark of Brother Industries, Ltd.
© 2006 Brother Industries, Ltd. All rights reserved.
All other brand and product names mentioned in this User’s Guide are registered
trademarks of their respective companies.
vi
Page 9

1 General Information
Using the documentation....................................................................................... 1
Symbols and conventions used in the documentation .................................... 1
Introduction............................................................................................................ 1
Optional Cordless Handset....................................................................................2
Carton Components ........................................................................................2
Connecting the power cord to the cradle.........................................................2
Installing the battery ........................................................................................ 2
Registering additional cordless handsets ........................................................3
Deregistering cordless handsets ........................................................................... 4
Choosing a location ...............................................................................................5
Important safety instructions..................................................................................5
Control panel overview ..........................................................................................6
LCD display screen ......................................................................................... 7
2 Telephone
Basic operation...................................................................................................... 8
Making a telephone call...................................................................................8
Answering calls................................................................................................ 8
Hold .................................................................................................................8
Search .............................................................................................................8
Call History/Redial ........................................................................................... 9
Caller ID history .............................................................................................10
Pause ............................................................................................................ 11
Storing numbers for easy dialing ......................................................................... 11
Storing numbers ............................................................................................ 11
Storing numbers from the Call History...........................................................12
Storing Tel-Index numbers from the Caller ID history ................................... 12
Changing numbers ........................................................................................ 13
Advanced operation.............................................................................................13
Transferring a call at the end of a conversation ............................................13
Intercom calling .............................................................................................14
Three-way calling ..........................................................................................14
3 Menu and Features
On-screen programming......................................................................................15
Menu keys ...........................................................................................................15
Memory storage.............................................................................................15
Menu Table.......................................................................................................... 16
Entering Text .......................................................................................................17
General setup ...................................................................................................... 18
Ring Volume.................................................................................................. 18
Beeper Volume.............................................................................................. 18
Speaker Volume............................................................................................ 18
Handset Volume............................................................................................ 18
Handset Volume
(For Volume Amplify).................................................................................18
Ring Pattern................................................................................................... 19
Automatic Daylight Savings Time..................................................................19
vii
Page 10

LCD Contrast.................................................................................................19
Date and Time ...............................................................................................20
Voice Enhance ..............................................................................................20
Echo Control..................................................................................................20
4 Troubleshooting and Routine Maintenance
Troubleshooting ...................................................................................................21
If you are having difficulty with your cordless handset ..................................21
Error messages ...................................................................................................22
Routine maintenance...........................................................................................23
Charging the battery ......................................................................................23
Cleaning ........................................................................................................23
Replacing the battery..................................................................................... 24
5 Specifications
General ................................................................................................................25
Cordless handset...........................................................................................25
Battery ........................................................................................................... 25
Battery cradle ................................................................................................26
AC adapter ....................................................................................................26
Basic Feature.......................................................................................................26
viii
Page 11

General Information 1
1
Using the
1
Introduction 1
documentation 1
Thank you for buying a Brother machine!
Reading the documentation will help you
make the most of your cordless handset.
Symbols and conventions
used in the documentation 1
The following symbols and conventions are
used throughout the documentation.
Bold Bold typeface identifies specific
keys on the control panel of the
cordless handset or the
machine (base unit).
Italics Italicized typeface emphasizes
an important point or refers you
to a related topic.
Courier
New
Text in the Courier New font
identifies messages on the
LCD of the cordless handset.
Warnings tell you what to do to
prevent possible personal injury.
Cautions specify procedures you
must follow or avoid to prevent
possible damage to the cordless
handset or other objects.
Notes tell you how you should
respond to a situation that may arise
or give tips about how the operation
works with other features.
The cordless handset offers several functions
that can be used to enhance the calling
features of your Brother machine.
Redial:
Allows you to choose one of the last 10
numbers dialed for redialing.
Store numbers:
You can store up to 100 names with each
having a number available for Tel-Index.
Transfer:
Transfer calls between the cordless
handset and the machine (base unit). If
you have additional optional cordless
handsets (4 max.) you can also transfer a
call to another cordless handset.
Intercom:
Use the intercom feature to make internal
calls between the cordless handset and
the machine (base unit). If you have
additional optional cordless handsets (4
max.) you can also make an intercom call
to another cordless handset.
Three-way calling:
Three-way calling allows two users to
speak with a third party from the machine
(base unit) and the cordless handset at
the same time.
Caller ID:
If you have the Caller ID subscriber
service from your telephone company the
incoming caller will be identified on the
LCD display of the cordless handset. You
can also store this number as a Tel-Index
number.
1
Page 12
Chapter 1
Optional Cordless
Handset 1
Your brother machine can support 3
additional cordless handsets for a total of 4
cordless handsets. If you have purchased an
optional cordless handset please follow the
steps below to setup and register your
optional cordless handset with the machine
(base unit). For the cordless handset that was
included with your machine please follow the
setup steps in the Quick Setup Guide.
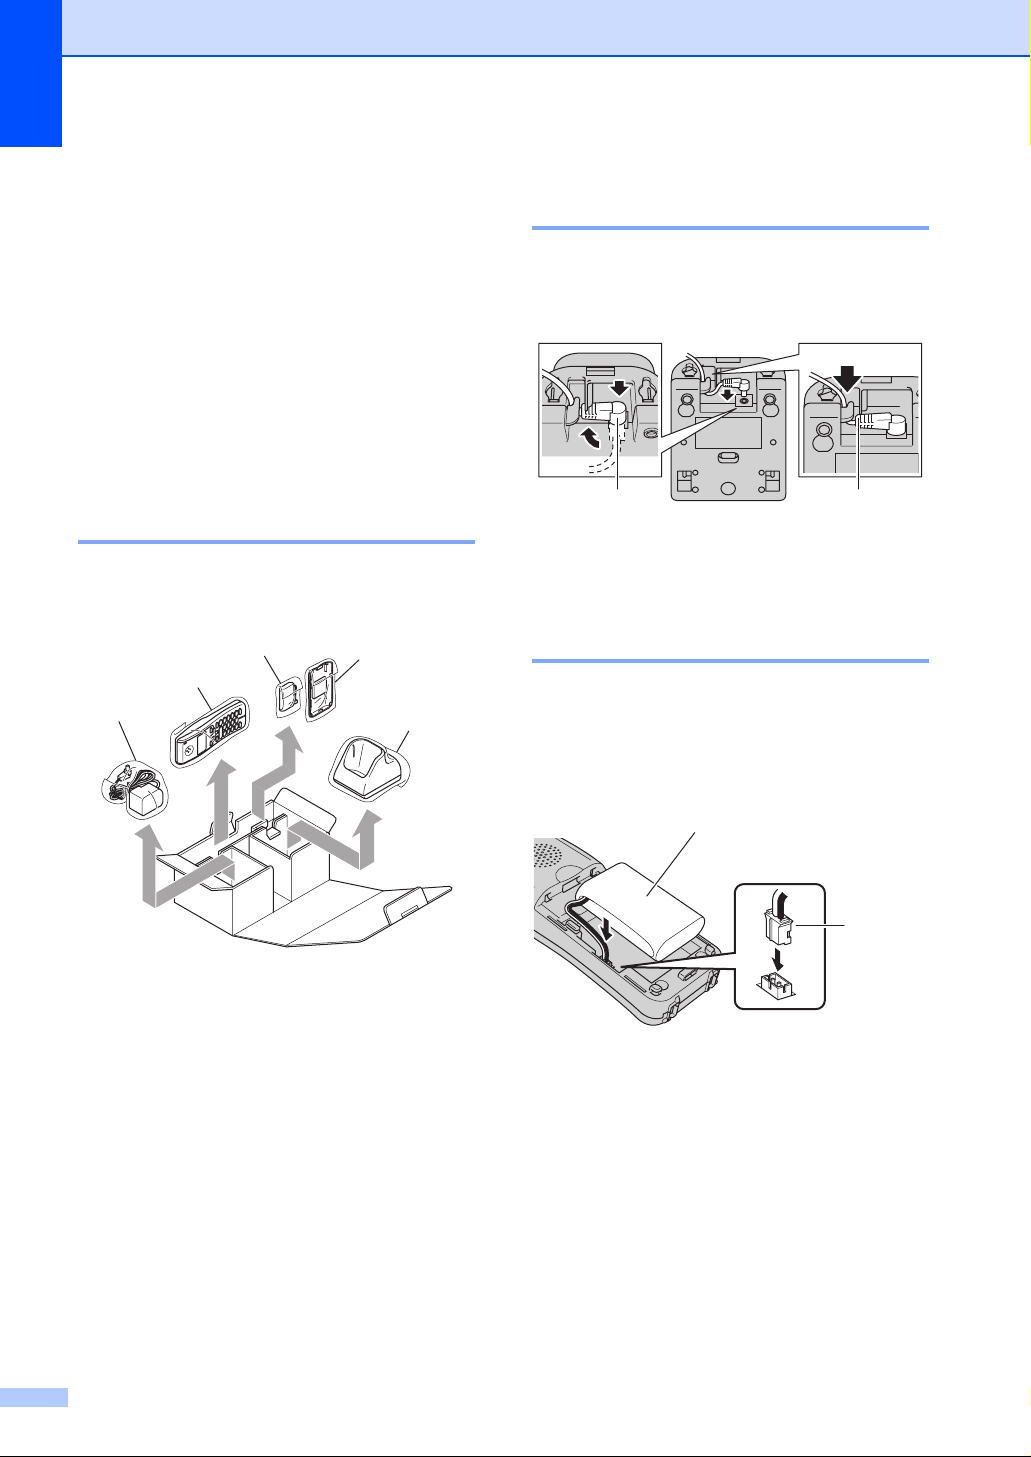
Carton Components 1
Make sure you have all the components
below.
3
2
1
4
5
Connecting the power cord to
the cradle 1
a Plug the connector into the jack (1) and
route the cable through the hook (2) as
shown below.
1 2
b Plug the adapter into the AC power
outlet.
Installing the battery 1
a Insert the connector (1) of the new
battery (2) in the direction shown below.
1AC adapter
2 Cordless Handset
3Battery
4 Battery Cover
5Cradle
2
2
1
Page 13

General Information
b Place the battery in the correct position
as shown below.
c Slide the battery cover back on.
Registering additional
cordless handsets 1
You can register 3 additional cordless
handsets for a total of 4 cordless handsets to
the machine (base unit). The cordless
handset that was included with your machine
is already registered with the machine (base
unit).
For non-Color LCD models
a Press Menu/OK on the cordless
handset.
Note
If you see Enter Register HS mode
on Base Unit on the LCD of the
cordless handset, go to step c.
b Press a or b to choose Register HS.
Press Menu/OK.
c Press Menu, 0, 6 on the control panel of
the machine (base unit).
1
1
Note
• Be careful that you do not catch the
battery connector cord.
• After replacement, you should set the date
and time.
(See Date and Time on page 20.)
d Charge the battery for 12 hours. (See
Charging the battery on page 23)
d Press OK on the control panel of the
machine (base unit).
You will hear one long beep when the
cordless handset is registered correctly.
Note
• If you hear three short beeps, the cordless
handset did not register. Repeat steps b
and d.
• If you want to install another cordless
handset, repeat steps a through d.
e Press Stop/Exit on the control panel of
the machine (base unit).
3
Page 14

Chapter 1
For Color LCD model 1
a Press Menu/OK on the cordless
handset.
Note
If you see Enter Register HS mode
on Base Unit on the LCD of the
cordless handset, go to step c.
b Press a or b to choose Register HS.
Press Menu/OK.
c Press Menu on the control panel of the
machine (base unit).
d Press a or b to choose
Initial Setup.
Press OK.
e Press a or b to choose
Register Handset.
Press OK.
f Press a or b to choose Register.
Press OK.
You will hear one long beep when the
cordless handset is registered correctly.
Note
• If you hear three short beeps, the cordless
handset did not register. Repeat step b
and f.
• If you want to install another cordless
handset, repeat steps a through f.
g Press Stop/Exit on the control panel of
the machine (base unit).
Deregistering cordless
handsets
If you want to register a handset that has
already been registered, with another
machine (base unit), you should deregister it
first, and then register it with the other
machine (base unit). (See Registering
additional cordless handsets on page 3.) If
you are using more then one cordless
handset, deregistration will remove all
handsets registered with the machine (base
unit).
For non-Color LCD model
a Press Menu, 0, 6 on the control panel of
the machine (base unit).
b Press Erase.
Then, confirm the Delete by pressing 1.
c Press Stop/Exit.
For Color LCD model
a Press Menu on the control panel of the
machine (base unit).
b Press a or b to choose
Initial Setup.
Press OK.
c Press a or b to choose
Register Handset.
Press OK.
d Press a or b to choose Terminate.
Press OK.
Then, confirm the Delete by pressing 1.
1
1
e Press Stop/Exit.
4
Page 15

General Information
Choosing a location 1
Choose a location where the temperature
remains between 50° F and 95° F
(10° and 35° C).
DO NOT put the cordless handset and
cradle near heaters, air conditioners,
water or chemicals.
DO NOT expose the cordless handset and
cradle to direct sunlight, excessive heat,
moisture, or dust.
DO NOT use the cordless handset near
electro-medical equipment.
We recommend at least 9.8 ft (3 m)
between the machine (base unit) or
cordless handset and other electronic
devices.
mouse USB memory
headset
Bluetooth product
9.8 ft
(3 m)
Important safety
instructions 1
Use only the AC adapter and the cradle
supplied with this cordless handset.
This product must be installed near an AC
power outlet that is easily accessible.
Use only a genuine Brother rechargeable
battery.
DO NOT dispose of a used battery in a fire.
It may explode.
Corrosive fluid rarely leaks out. If it gets in
your eyes wash them with water at once.
Call a doctor if you are concerned.
Do not allow the battery to touch any
conductive materials. It can cause a short
circuit of the battery.
WARNING
1
(MFC-845CW)
CAUTION
DO NOT take off the white plastic that
covers the battery.
5
Page 16

Chapter 1
Control panel overview1
8
1
2
3
4
5
6
7
9
10
11
12
13
1 LCD (liquid crystal display)
Displays messages on the screen to help you
set up and use your cordless handset.
2 Redial/Pause
Redials any of the last 10 numbers you called.
It also puts a pause in Quick-Dial numbers.
3 Headphone jack
You can connect an external headphone with
microphone (not included) to the cordless
handset. To access the headphone jack fold
open the headphone jack cover located on the
left side of the cordless handset. You can
connect any standard headphones that use a
2.5 mm mini style plug.
4 Clear
Press to back up the cursor and delete a letter.
5 Talk
Press to make or receive a phone call.
6 Dial Pad
Use these keys to dial a telephone number and
as a keyboard for entering information into the
cordless handset.
7 Speaker Phone
Turns the speaker phone on or off.
8 Charging LED
Turns green when the cordless handset is
being charged.
9 Flash/Callwait
Use this key to answer another phone call
when you hear beeps during the conversation.
This feature requires the Call Waiting
subscriber service offered by many local
telephone companies.
(Canada only) You can make a call from the
Caller ID history in combination with a prefix
number by pressing this key.
10 Menu keys:
Volume keys
d c
You can press these keys to adjust the ring,
speaker or handset volume of the cordless
handset.
a
Lets you look up numbers that are stored in
the cordless handset’s dialing memory.
6
Page 17

General Information
a or b
Press to scroll through the menus and
options.
11 Menu/OK
Lets you access the Menu to program or store
your settings in the cordless handset.
12 Off
Press to hang up or cancel the current
operation.
13 Hold/Intercom
Lets you place telephone calls on hold. Also,
press this key to speak on the intercom or to
transfer an incoming call to the cordless
handset.
LCD display screen 1
The LCD shows the current cordless handset
status.
12 3 4 5
1 Cordless status
A four level indicator shows the current
cordless handset signal strength.
0Max
2 Speaker Phone
Lets you see when you are speaking with the
Speaker Phone.
3 Cordless handset number
Lets you see the cordless handset numbers
that have been registered with the machine
(base unit).
4 Ring volume status
Lets you see when the ring volume is set to off.
5 Battery status
A four level indicator shows the available
battery.
1
0Max
7
Page 18

2
Telephone 2
Basic operation 2
Making a telephone call 2
a Pick up the cordless handset.
b Enter a number using the dial pad or
choose a number stored in the dialing
memory.
c Press (Talk).
d Speak clearly toward the microphone.
e Press (Off) to hang up.
c Replace the cordless handset.
When the machine (base unit) or the cordless
handset rings, instead of lifting the cordless
handset, and pressing (Talk) you
can also press Speaker Phone on the
cordless handset. Speak clearly toward the
cordless handset. To end the call, press
(Off).
If you have a bad connection, your caller
might hear your voice echoed during the call.
If you experience this problem, pick up the
cordless handset and press Speaker Phone
to use the handset.
Note
Even if you answer a fax call, the machine
(base unit) will receive the fax
automatically. (See Easy Receive in the
User’s Guide.)
Hold 2
f Replace the cordless handset.
Note
If you want to make a telephone call
without lifting the cordless handset, press
Speaker Phone and enter the number
using the dial pad.
Answering calls 2
a Pick up the cordless handset from the
cradle to answer the call. If your
cordless handset is not in the cradle you
must press (Talk) to
answer the call.
b To end the call, press (Off).
8
If you want to put a call on hold, press the
Hold/Intercom key. To release the call from
hold press Hold/Intercom again. You can
also transfer a call to the machine (base unit)
or to another cordless handset if you have an
additional optional cordless handset. (See
Transferring a call at the end of a
conversation on page 13.)
Search 2
You can search for names you have stored in
the Tel-Index memories.
a Pick up the cordless handset.
b Press a and do one of the following:
Press a or b to choose the name
you want to call.
Page 19

Use the dial pad to enter the first
letter of the name, press Menu/OK,
and then press a or b to choose the
name you want to call.
Telephone
Call History/Redial 2
The last 10 numbers you called will be stored
in the call history. You can choose one of
these numbers to make a call, add it to
Tel-Index, or delete it from the history.
a Pick up the cordless handset.
b Press Redial/Pause.
You can also choose Call History
by pressing Menu/OK.
c Press a or b to choose a number and
do one of the following:
To make a call, press
(Talk).
To store or delete the number, press
Menu/OK and go to step d.
d Do one of the following:
If you want to store the number,
press a or b to choose
Set Tel-Index.
Press Menu/OK.
(See Storing numbers from the Call
History on page 12.)
If you want to delete the number,
press a or b to choose Delete.
Press Menu/OK.
Then, confirm the Delete by
pressing 1.
If you want to delete all the stored
numbers, press a or b to choose
All Delete.
Press Menu/OK.
Then, confirm the Delete by
pressing 1.
2
9
Page 20

Chapter 2
Caller ID history 2
This feature requires the Caller ID subscriber
service offered by many local telephone
companies. (See Caller ID in the machine’s
User’s Guide.)
The last 30 numbers you received will be
stored in the Caller ID history. You can
choose one of these numbers to make a call,
add it to Tel-Index, or delete it from the
history.
a Pick up the cordless handset.
b Press Menu/OK.
c Press a or b to choose
Caller ID hist..
Press Menu/OK.
d Press a or b to choose a number and
do one of the following:
To make a call, press
(Talk).
To store or delete the number, press
Menu/OK and go to step e.
e Do one of the following:
If you want to store the number,
press a or b to choose
Set Tel-Index.
Press Menu/OK.
(See Storing numbers from the Call
History on page 12.)
If you want to delete the number,
press a or b to choose Delete.
Press Menu/OK.
Then, confirm the Delete by
pressing 1.
If you want to delete all the stored
numbers, press a or b to choose
All Delete.
Press Menu/OK.
Then, confirm the Delete by
pressing 1.
Note
• This feature may not be available in
certain areas of the USA and Canada.
• (USA only) If you redial from the Caller ID
history outside your area code you must
set up your AREA CODE in advance. (See
Setting up your area codeonpage10.)
• (Canada only) You can make a call from
the Caller ID history in combination with a
prefix number. After you enter a prefix
number manually, press Flash/Callwait.
Press a or b to choose a number and
press (Talk).
Setting up your area code (USA only) 2
Your cordless handset will automatically dial
"1" plus the area code for any number that
does not originate in your area code. The
cordless handset can identify local calls from
your area code by entering your area code in
the Area Code setting. With this setting, calls
returned from the caller ID history to your
area code will be dialed using only 7-digits. If
you must dial the area code to call within your
area code, do not enter this setting. If your
dialing plan does not follow the standard 1 +
area code + 7-digit number dialing system for
calling outside your area code, you may
experience problems returning calls
automatically from the caller ID history. If this
is not the procedure followed by your dialing
plan you will not be able to return calls
automatically.
a Press Menu/OK.
b Press a or b to choose Area Code.
Press Menu/OK.
c Use the dial pad to enter your area code.
Press Menu/OK.
d Press (Off).
10
Page 21

Telephone
Pause 2
Press Redial/Pause to put a 3.5-second
pause between numbers. If you are dialing
overseas, you can press Redial/Pause as
many times as needed to increase the length
of the pause.
Storing numbers for
easy dialing 2
You can set up your cordless handset for
easy dialing. When you dial a Tel-Index
number, the LCD shows the name, if you
stored it, or the number.
Note
If you lose electrical power, the Tel-Index
numbers that are in the memory will not be
lost.
Storing numbers 2
You can store up to 100 locations with a
name and a number. When you dial you will
only have to press a few keys (for example:
a , a or b and (Talk)).
a Pick up the cordless handset.
2
b Press a .
c Press a or b to choose
Set Tel-Index.
Press Menu/OK.
d Do one of the following:
Enter the name (up to 14 characters)
using the dial pad.
Press Menu/OK.
(To help you enter letters, see
Entering Text on page 17.)
To store the number without a name,
press Menu/OK.
e Enter the telephone number (up to 20
digits).
Press Menu/OK.
f Do one of the following:
To store another number, go to
step c.
To finish the setting, press
(Off).
11
Page 22

Chapter 2
Storing numbers from the Call
History 2
You can also store numbers from the call
history.
a Pick up the cordless handset.
b Press Menu/OK.
c Press a or b to choose
Call History.
Press Menu/OK.
d Press a or b to choose the number you
want to store.
Press Menu/OK.
e Press a or b to choose
Set Tel-Index.
Press Menu/OK.
f Do one of the following:
Enter the name (up to 14 characters)
using the dial pad.
Press Menu/OK.
(To help you enter letters, see
Entering Text on page 17.)
To store the number without a name,
press Menu/OK.
g Press Menu/OK to confirm the number.
Storing Tel-Index numbers
from the Caller ID history 2
If you have the Caller ID subscriber service
from your telephone company you can also
store Tel-Index numbers from incoming calls
in the Caller ID history. (See Caller ID in the
User’s Guide.)
a Pick up the cordless handset.
b Press Menu/OK.
c Press a or b to choose
Caller ID hist..
Press Menu/OK.
d Press a or b to choose
Set Tel-Index.
Press Menu/OK.
e Do one of the following:
Enter the name (up to 14 characters)
using the dial pad.
Press Menu/OK.
(To help you enter letters, see
Entering Text on page 17.)
To store the number without a name,
press Menu/OK.
f Press Menu/OK to confirm the number.
12
Page 23

Telephone
Changing numbers 2
You can change or delete a name or number
that has already been stored.
a Pick up the cordless handset.
b Press a .
c Press a or b to choose the location you
want to change.
Press Menu/OK.
d Do one of the following:
Press a or b to choose Change.
Press Menu/OK and go to step e.
Press a or b to choose Delete.
Press Menu/OK.
Then, confirm the Delete by
pressing 1 and (Off).
e Do one of the following:
Enter the name (up to 14 characters)
using the dial pad.
Press Menu/OK.
(See Entering Text on page 17.)
If you do not want to change the
name, press Menu/OK.
Advanced operation 2
You can transfer a call, make an intercom call
or use three-way calling. If you have optional
cordless handsets you must register the
handset with the machine (base unit). See
Registering additional cordless
handsets on page 3. The cordless handset
that was included with your machine (base
unit) is already registered as Handset 1.
Base Unit machine
Handset#1 cordless handset 1
included with the
machine
Handset#2 optional cordless
handset 1
Handset#3 optional cordless
handset 2
Handset#4 optional cordless
handset 3
Transferring a call at the end
of a conversation 2
You can transfer a call after you speak.
2
Note
If you want to change a character, press
d or c to position the cursor under the
incorrect character and press Clear.
Re-enter the correct letter.
f Do one of the following:
Enter the new number.
Press Menu/OK.
If you do not want to change the
number, press Menu/OK.
g Press (Off).
From the machine (base unit) 2
a When you have finished speaking,
press Hold/Intercom.
b Press the number of the cordless
handset you want to transfer to.
c After you confirm the other person is on
the line, hang up.
Note
If no one is on the line, press
Hold/Intercom to release the call from
hold.
13
Page 24

Chapter 2
From the cordless handset 2
a Press Hold/Intercom when you have
finished speaking.
b Press a or b to choose Base Unit.
Press Menu/OK.
c After you confirm the other person is on
the line, hang up.
Note
• If no one is on the line, press
Hold/Intercom to release the call from
hold.
• If you have the optional cordless handset,
you can choose another cordless handset
in step b.
Intercom calling 2
The intercom feature allows you to make
internal calls between the cordless handset
and the machine (base unit). If you have
additional optional cordless handsets (4
max.) you can also make an intercom call to
another cordless handset.
Making a call from the machine (base
unit)
a Press Hold/Intercom.
b Press the number of the cordless
handset you want to speak with.
c After you have finished speaking, hang
up.
Making a call from the cordless
handset
a Pick up the cordless handset.
b Press Hold/Intercom.
c Press a or b to choose Base Unit.
Press Menu/OK.
d After you have finished speaking, hang
up.
Note
If you have the optional cordless handset,
you can choose another cordless handset
in step c.
Three-way calling 2
You can speak with another person on the
other handset and a third party in a three-way
call. After you speak with the third party, you
can make a call to the other handset.
Calling the cordless handset from the
machine (base unit)
a Press Hold/Intercom when you have
finished speaking.
b Press the number of the cordless
handset you want to speak with.
c After you confirm the other person is on
the line, press Hold/Intercom.
Calling the machine (base unit) from
2
the cordless handset
a Press Hold/Intercom when you have
finished speaking.
b Press a or b to choose Base Unit.
Press Menu/OK.
c After you confirm the other person is on
the line, press Hold/Intercom.
2
Note
If you have the optional cordless handset,
you can choose other options in step b.
2
2
14
Page 25

3
Menu and Features 3
On-screen
programming 3
Your cordless handset is designed to be easy
to use with LCD on-screen programming
using the menu keys. User-friendly
programming helps you take full advantage of
all the menu selections your cordless handset
has to offer.
Since your programming is done on the LCD,
we have created step-by-step on-screen
instructions to help you program your
cordless handset. All you need to do is follow
the instructions as they guide you through the
menu selections and programming options.
Menu keys 3
To access the menu mode:
a Press Menu/OK.
b Press a or b to choose an option.
c Press Menu/OK when that option
appears on the LCD.
The LCD will then show the next option.
Access the menu.
Go to the next menu level.
Accept an option.
Delete an incorrect letter when
you need to enter text into the
cordless handset.
Go back to the previous menu
level.
Scroll through the current menu
level.
Exit the menu.
15
d Press a or b to choose the option.
e Press Menu/OK.
When you have finished setting an
option, the LCD shows Accepted.
Memory storage 3
Even if there is a battery power failure, you
will not lose your menu settings because they
are stored permanently. You may have to
reset the date and time.
Page 26

Chapter 3
Menu Table 3
The menu table will help you understand the menu selections and options that are found in the
cordless handset's programs. The factory settings are shown in Bold with an asterisk.
Level1 Level2 Options Descriptions Page
Setup Volume Beeper On*
Off
Volume Amplify On
Off*
Ringer Pattern — Signal 1*
Signal 2
Signal 3
Signal 4
Signal 5
Melody 1
Melody 2
Call History — Delete
All Delete
Set Tel-Index
Caller ID hist. — Delete
All Delete
Set Tel-Index
Auto Daylight — On
Off*
LCD Contrast — 1
2
3
4*
5
6
7
Date&Time — — Puts the date and time on the
Register HS — — Registers the cordless handset
Voice Enhance — On*
Off
Adjusts the volume level of the
beeper.
For the hearing-impaired, you
can set the volume to the On
setting.
You can choose a ring pattern. 19
You can choose a number from
the call history and then make a
phone call to it, add it to
Tel-Index, or delete it.
You can choose a number from
the Caller ID history and then
make a phone call to it, add it to
Tel-Index, or delete it.
Changes for Daylight Savings
Time automatically.
Adjusts the contrast of the LCD. 19
LCD.
into the machine (base unit).
Changing this setting to Off will
increase the battery life but may
reduce voice quality.
18
18
9
10
19
20
3
20
16
Page 27

Menu and Features
Entering Text 3
When you are storing a name or a number in
the Tel-Index memory, you may need to enter
text into the cordless handset. Most dial pad
keys have three or four letters printed on
keys. The keys for 0, # and l do not have
printed letters because they are used for
special characters.
By pressing the proper dial pad key
repeatedly, you can access the character you
want.
Press
Key
2 ABC2
3 DEF 3
4 GH I 4
5 JKL5
6 MNO6
7 PQRS
8 TUV8
9 WXY Z
one
time
two
times
three
times
four
times
Special characters and symbols
Press l, # or 0, repeatedly until you see the
special character or symbol you want.
Press l for (space) ! " # $ % & ' ( ) l
+ , - . / m
Press # for : ; < = > ? @ [ ] ^ _
Press 0 for É À È Ê Î Ç Ë Ö 0
3
Putting spaces
To enter a space in a telephone number,
press c once between numbers. To enter a
space in a name, press c twice between
characters.
Making corrections
If you entered an incorrect letter and want to
change it, press d to move the cursor under
the incorrect character. Then press Clear.
Re-enter the correct character. You can also
back up and insert letters.
Repeating letters
If you need to enter a letter that is on the
same key as the letter before, press c to
move the cursor to the right before you press
the key again.
17
Page 28

Chapter 3
General setup 3
Ring Volume 3
You can choose a range of ring volume
levels, from High to Off.
a Press d or c to adjust the volume
level.
This setting will stay until you change it
again.
Note
• If you choose Off, will appear on the
LCD.
• Even if you choose Off, the cordless
handset will ring in the lowest volume level
when you receive a transferred call.
Beeper Volume 3
When the beeper is on, the cordless handset
will beep when you press a key or make a
mistake.
a Press Menu/OK.
b Press d or c .
This setting will stay until you change it
again.
c Press (Off).
Handset Volume 3
You can adjust the cordless handset volume
any time you are talking on the telephone.
a Press d or c .
This setting will stay until you change it
again.
Handset Volume
(For Volume Amplify) 3
Before you begin to use the cordless
handset, you must decide if you need to set
the cordless handset volume to
Volume Amplify:On for a user who is
hearing-impaired. The AMPLIFY volume
level complies with FCC standards. Before
you use this setting, see Choosing the
Handset Volume (For Volume Amplify) in the
machine’s User’s Guide.
b Press a or b to choose
Setup Volume.
Press Menu/OK.
c Press a or b to choose Beeper.
Press Menu/OK.
d Press a or b to On or Off.
Press Menu/OK.
e Press (Off).
Speaker Volume 3
You can choose a range of speaker volume
levels, from High to Low.
a Press Speaker Phone.
18
a Press Menu/OK.
b Press a or b to choose
Setup Volume.
Press Menu/OK.
c Press a or b to choose
Volume Amplify.
Press Menu/OK.
d Do one of the following:
If none of the users are hearing-
impaired, press a or b to choose
Off, and then press Menu/OK and
go to step f.
If some or all of the users are
hearing-impaired, press a or b to
choose On, and then press
Menu/OK.
Page 29

Menu and Features
e Do one of the following:
If all the users are hearing-impaired,
press a or b to choose
Permanent, and then press
Menu/OK.
If only some of the users are hearing-
impaired, press a or b to choose
Temporary, and then press
Menu/OK.
f Press (Off).
It is important that you do NOT choose
Permanent unless ALL the users are
hearing-impaired. Otherwise, the default
setting of Volume Amplify may damage
the hearing of some users.
Ring Pattern 3
You can choose a ring pattern from five signal
(regular ring patterns) or two types of
melodies.
WARNING
a Press Menu/OK.
b Press a or b to choose
Ringer Pattern.
Press Menu/OK.
c Press a or b to choose Signal 1,
Signal 2, Signal 3, Signal 4,
Signal 5, Melody 1 or Melody 2.
Press Menu/OK.
Automatic Daylight Savings
Time 3
You can set the cordless handset to change
automatically for daylight savings time. It will
reset itself forward one hour in the Spring and
backward one hour in the Fall. Make sure you
have set the correct date and time in the
Date&Time setting.
a Press Menu/OK.
b Press a or b to choose
Auto Daylight.
Press Menu/OK.
c Press a or b to choose On or Off.
Press Menu/OK.
d Press (Off).
LCD Contrast 3
You can adjust the LCD contrast for a sharper
and more vivid display. If you are having
difficulty reading the LCD, try changing the
contrast setting.
a Press Menu/OK.
b Press a or b to choose
LCD Contrast.
Press Menu/OK.
c Press d or c to adjust the contrast.
Press Menu/OK.
d Press (Off).
3
d Press (Off).
Melody name
Melody 1
Melody 2
Grandfather’s clock
The four seasons concerto
“Spring” 1
19
Page 30

Chapter 3
Date and Time 3
The cordless handset displays the date and
time.
a Press Menu/OK.
b Press a or b to choose Date&Time.
Press Menu/OK.
c Enter the two digits for the month on the
dial pad.
(e.g. Enter 0 3 for March.)
d Enter the last two digits for the day on
the dial pad.
(e.g. Enter 0 1 for the first day of the
month.)
e Enter the last two digits of the year on
the dial pad.
Press Menu/OK.
(e.g. Enter 0 6 for 2006.)
f Enter the time in 24-hour format on the
dial pad.
Press Menu/OK.
(e.g. Enter 1 5 2 5 for 3:25 P.M.)
g Press (Off).
Voice Enhance 3
The voice enhance setting offers the best
reception quality under all conditions. This
setting is On as factory default. If you
normally use the cordless handset in close
proximity to the machine (base unit) then you
can set voice enhance Off to increase the
battery life. With this setting Off you may
experience reduced reception quality.
Echo Control 3
Under some conditions you may experience
an echo when using the cordless handset.
You can reduce or remove the echo by
choosing a level in the echo control setting
from the control panel of the machine (base
unit). It will take about one minute for the level
setting to change. During this time you can
not answer a call.
For non-color LCD model
a Press Menu, 1, 8 on the control panel of
the machine (base unit).
b Press a or b to choose level1,
level2, level3 or level4.
Press OK.
c Press Stop/Exit.
For color LCD model
a Press Menu on the control panel of the
machine (base unit).
b Press a or b to choose
General Setup.
Press OK.
c Press a or b to choose
Echo Control.
Press OK.
d Press a or b to choose level1,
level2, level3 or level4.
Press OK.
e Press Stop/Exit.
3
3
a Press Menu/OK.
b Press a or b to choose
Voice Enhance.
Press Menu/OK.
c Press a or b to choose Off (or On).
Press Menu/OK.
d Press (Off).
20
Page 31

Troubleshooting and Routine
4
Maintenance
Troubleshooting 4
IMPORTANT
For technical help, you must call the country where you bought the cordless handset. Calls must
be made from within that country.
If you think there is a problem with your cordless handset, check the chart below and follow the
troubleshooting tips.
Most problems can be easily resolved by yourself. If you need additional help, the Brother
Solutions Center offers the latest FAQs and troubleshooting tips. Visit us at
http://solutions.brother.com
If you are having difficulty with your cordless handset 4
Difficulties Suggestions
The cordless handset does not
operate.
Dialing or receiving does not work. Check that the phone line connection of the machine (base unit).
Bad phone line connection Check that there are no electronic devices between the machine (base unit) and
The battery does not charge. Check that the battery is installed properly in the cordless handset. (See
The battery performance is still
poor after recharging.
.
Check that the battery is charged properly. (See Charging the
battery on page 23.)
Check that the machine (base unit) is plugged in and the On/Off key on the
machine (base unit) is on.
Check that the battery is charged properly. (See Charging the
battery on page 23.)
Come closer to the machine (base unit). The cordless handset may be too far from
the machine (base unit).
the cordless handset.
Come closer to the machine (base unit). The cordless handset may be too far from
the machine (base unit).
During the conversation, try to adjust the angle of the antenna to improve
reception.
Move away from walls.
Try to change the Echo Control setting. (See Echo Control on page 20.)
Replacing the battery on page 24.)
Check that the cordless handset is placed properly in the cradle and LED turns
green. (See Charging the battery on page 23.)
Clean the charger contacts for both cordless handset and the cradle. (See
Cleaning on page 23.)
It is time to replace the battery. (See Replacing the battery on page 24.)
4
21
Page 32

Chapter 4
Difficulties Suggestions
The cordless handset beeps during
a call.
You cannot make an internal call. The cordless handset or the machine you want to call to may be on an internal call
You cannot register the optional
cordless handset.
Come closer to the machine (base unit). The cordless handset may be too far from
the machine (base unit).
Your battery may be low. If you want to continue the call, transfer the call to the
machine (base unit) and use the Speaker Phone key to answer. (See
Transferring a call at the end of a conversation on page 13.) And then, charge the
battery. (See Charging the battery on page 23.)
or an outside call. Wait until the line is free.
Check that both the cordless handset and the machine (base unit) are in standby
mode.
Error messages 4
As with any sophisticated office product, errors may occur. If this happens, your cordless handset
identifies the error and shows an error message. The most common error messages are shown
below.
You can correct most errors by yourself. If you need more help, the Brother Solutions Center offers
latest FAQs and troubleshooting tips.
Visit us at http://solutions.brother.com
.
Error Message Cause Action
Base Unit in
use
Cannot
register
handset
Line in use Another person is on the phone line
<Low battery>
Put handset
on cradle
No Caller ID You have not subscribed to the
The machine (base unit) is being
used for intercom calling.
The machine (base unit) is being
set up for cordless handset
registration.
The machine (base unit) is being
used for Message Center functions
such as OGM recording or ICM
playing.
You failed to register the cordless
handset.
using the machine’s (base unit)
speaker phone or another cordless
handset.
The machine (base unit) is
receiving faxes.
The battery of the cordless handset
is low.
Caller ID service from your
telephone company.
Wait until the line is free.
Wait until the registration is finished.
Wait unil machine (base unit) is back in standby
mode.
Try to register the cordless handset again. (See
Registering additional cordless
handsets on page 3.)
Wait until the line is free.
Wait until the line is free.
Charge the battery. (See Charging the
battery on page 23.)
If you want to use the Caller ID feature call your
telephone company. (See Caller ID in the User’s
Guide.)
22
Page 33

Troubleshooting and Routine Maintenance
Error Message Cause Action
Searching for
Base Unit
(Base Unit
not detected)
The cordless handset is too far from
the machine (base unit).
The On/Off key on the machine
(base unit) is off.
You have not registered the
cordless handset.
Bring the cordless handset closer to the machine
(base unit).
Check that the machine (base unit) is plugged in
and the On/Off key on the machine (base unit) is
on.
Register the cordless handset. (See Registering
additional cordless handsets on page 3.)
Routine maintenance 4
Charging the battery 4
If your battery is getting low, you should
charge the battery. You can see the battery
strength at the bottom right of the LCD.
a Plug the AC adapter into the AC power
outlet.
b Place the cordless handset in the cradle
with the dial pad facing forward.
CAUTION
Use neutral detergents. Cleaning with
volatile liquids such as thinner or benzine
will damage the outside surface of the
cordless handset.
DO NOT use cleaning materials that
contain ammonia.
DO NOT use isopropyl alcohol to remove
dirt from the control panel. It may crack the
panel.
Clean the charger contacts as follows: 4
a Unplug the cradle from the AC power
outlet.
b Clean the charger contacts (1) for both
the cordless handset and the cradle with
a cotton swab.
1
4
Cleaning 4
Clean the outside of the cordless handset
with a soft cloth. You should also clean the
charger contacts. If the charger contacts are
not clean, the battery may not be charged.
23
Page 34

Chapter 4
Replacing the battery 4
If your battery performance is getting worse,
make sure that you have charged the battery
correctly. If the battery performance is still
poor, it is time to replace it.
WARNING
Use a genuine Brother rechargeable
battery (BCL-BT10). If not, it may cause
damage or personal injury.
CAUTION
DO NOT take off the white plastic that
covers the battery.
a Press the area indicated (1) on the
battery cover (2) and slide it off the
cordless handset.
2
1
b Remove the old battery and pull out the
connector.
c Insert the connector (1) of the new
battery (2) in the direction shown below.
d Place the battery in the correct position.
e Slide the battery cover back on.
Note
• Be careful that you do not catch the
battery connector cord.
• After replacement, you should set the date
and time. (
Time on page 20
See
Date and
.
)
f Charge the battery for 12 hours. (See
Charging the battery on page 23)
CAUTION
1
8
R
0
0
C
Y
C
E
RBRC
Ni-MH
.
8
2
2
L
E
TM
7
3
8
8
.
24
2
ATTENTION:
The product you have purchased is
powered by Nickel Metal Hydride battery
which is recyclable. At the end of their
useful lives, under various state and local
1
laws, it is illegal to dispose of this battery
into your municipal waste stream. Please
call 1-800-8-BATTERY or visit
www.rbrc.com
for information on how to
recycle this battery.
Page 35

Specifications 5
5
General 5
Cordless handset 5
Frequency 5.8 GHz
Technology FHSS (Frequency Hopping Spread Spectrum)
Multi Handset Capability Up to 4 handsets
Dimensions
6.06 in.
(154 mm)
1.24 in.
(31.6 mm)
Weight (including battery) 5.43 oz (154 g)
LCD (liquid crystal display) 16-Digit, 3-Line (+1-Line for Pict), Backlit (Orange)
Charge Indicator Yes (LED)
Full Charge Time 12 hours
While in Use (TALK)
While Not in Use (Standby) 200 hours
1
When Voice Enhance is set to On.
2
When Voice Enhance is set to Off.
4 hours
6 hours
1
2
1.95 in.
(49.6 mm)
Battery 5
Type BCL-BT10
Rating Ni-MH 3.6 V 730 mAh
25
Page 36

Chapter 5
(
Battery cradle 5
Dimensions
2.64 in.
67 mm)
3.35 in. (85 mm) 2.72 in. (69 mm)
Weight 2.53 oz (71.6 g)
Power Consumption
Charging: Average 2 W
(during charge)
AC adapter 5
Type BCL-ADA
Input AC 100 to 240 V 50/60 Hz
Output DC 11.0 V
Basic Feature 5
Tel-Index Up to 100 names × 1 numbers
Redial Yes
Melody ringer patterns Yes (2 melodies, 5 signals)
2 Way Intercom Handset-to-Handset and Handset-to-Base Unit
Talk Time display Yes
26
Page 37

6
Index
A
Accessories and supplies .......................... ii
B
Battery
charging
installing
power failure
recycling
replacing
Brother
accessories and supplies
Brother numbers
Customer Service
FAQs (frequently asked questions)
product support
Warranties
................................................23
..................................................2
.........................................15
................................................24
...............................................24
........................ ii
......................................i
.................................... i
.......... i
........................................ i
.............................................. iii
C
Cleaning ...................................................23
Control panel overview
..............................6
D
Date and time ...........................................20
Daylight saving time
Dialing
call history
caller ID history
pause
tel-index
...............................................9
....................................................11
..................................................8
.................................19
.....................................10
E
Echo Control ............................................20
Error messages on LCD
..........................22
H
HELP
LCD messages
using menu keys
menu table
.....................................15
................................15
............................................15
L
LCD (liquid crystal display) ..................7, 15
contrast
................................................. 19
M
Maintenance, routine ............................... 23
Memory storage
Menu table
...................................... 15
............................................... 16
O
Optional cordless handset ......................... 2
deregistering
registering
........................................... 4
............................................... 3
P
Programming your cordless handset ....... 15
R
Redial/Pause ............................................. 9
Ring pattern
............................................. 19
S
Safety instructions ..................................... 5
T
Telephone ................................................. 8
call history
caller ID history
hold
intercom
three-way calling
transferring
Tel-Index
changing
deleting
storing
from call history
from caller ID history
Text, entering
special characters
.............................................. 9
..................................... 10
......................................................... 8
............................................ 1, 14
.............................. 1, 14
........................................... 13
............................................... 13
................................................. 13
................................................... 11
................................. 12
......................... 12
.......................................... 17
................................ 17
27
Page 38

Troubleshooting .......................................21
error messages on LCD
if you are having difficulty
........................22
......................21
V
Voice enhance .........................................20
Volume, setting
beeper
handset
ring
speaker
...................................................18
.................................................18
volume amplify
...................................18
........................................................18
.................................................18
W
Warranties
6
USA
........................................................ iii
World Wide Web
......................................... i
28
Page 39

Brother International Corporation
100 Somerset Corporate Boulevard
Bridgewater, NJ 08807-0911 USA
P.O. Box 6911
Visit us on the World Wide Web
http://www.brother.com
These machines are made for use in the USA only. We cannot recommend using them overseas
because it may violate the Telecommunications Regulations of that country and the power
requirements of your cordless handset AC adapter may not be compatible with the power
available in foreign countries. Using USA models overseas is at your own risk and may void
your warranty.
LP5403001
USA
Printed in China
 Loading...