

Page 1
caution
Do not immerse the unit in water.
If you spill liquid over it, dry it
immediately with a soft,
lint-free cloth.
Do not clean the unit with any
liquid containing alcohol, detergent,
abrasive or corrosive materials.
They may scratch the plastic parts
and corrode the electronics.
Do not subject the unit to
excessive force, shock, dust,
temperature or humidity, which
may result in malfunction, a shorter
electronic life span, damaged
batteries or distorted parts.
Do not tamper with the unit’s
internal components. Doing so
may cause unnecessary damage.
The unit contains no userserviceable parts.
Read the instructions thoroughly
before operating the unit.
battery precautions
Dispose of old batteries properly.
Do not dispose of old batteries
in a fire.
Do not leave batteries lying around
where a young child or pet could
play with or swallow them. If the
batteries are swallowed, contact
a physician immediately.
•
•
•
•
•
•
•
64144 9
Merrimack, New Hampshire, USA 03054
800-846-3000 • www.Brookstone.com
1
3
Batteries may explode if mistreated.
Do not attempt to recharge or
disassemble the batteries.
Use only fresh batteries of the
required size and type. Do not mix
old and new batteries, different
types of batteries or rechargeable
batteries of different capacities.
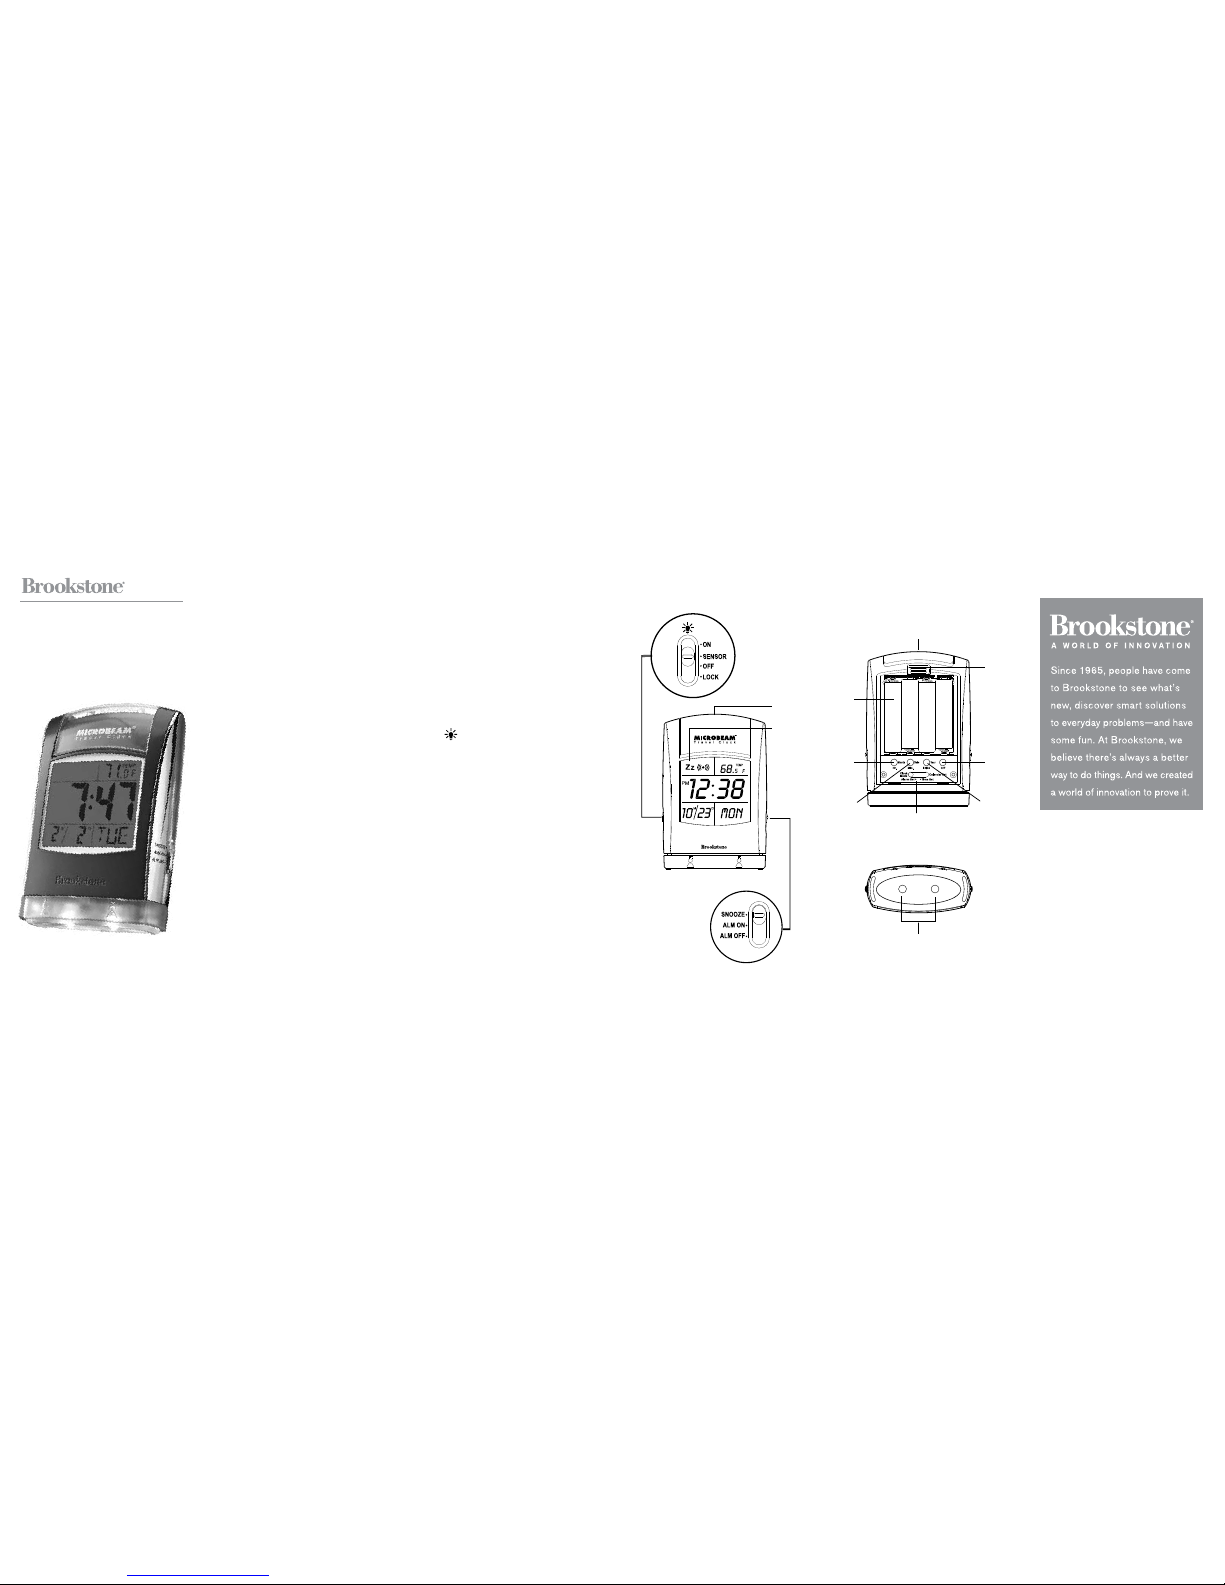
Location oF controLs
DISP LAY
SNOOZ E/BACKLI GHT
/ON/S ENSOR/O FF/LOCK
SNOOZ E/ALM ON /ALM OFF
MONTH /HR.
DATE/MI N.
CLOCK M ODE/ALARM SET/
TIME SET/CALENDAR SET
YEAR/12 /24
C°/F°
BATTERY CO MPARTME NT
BATTERY DO OR LATCH
TWO SU PER-BR IGHT LEDS
pLease saVe
tHes e instruction s
•
•
1.
2.
3.
4.
5.
6.
7.
8.
9.
10.
11.
12.
Travel Clock
with Flashlight
2
4
12
2
11
10
5
6
7
8
9
JUS T P ICK IT UP FOR LI GHT!
Page 2

one (1) year Limited Warranty
Brookstone® warrants thi s product against
defects in materials and/or workmanship under
normal use for a period of ON E (1) YEAR from
the date of purchase by the original purchaser
(“Warranty Period”). If a defect arises and a
valid claim is rece ived w ithin the Warranty
Period, at its option, Brookstone will either
1) repair the defect at no charge, using
new or re furbished repla cement parts, o r
2) replace the product with a new product that
is at least functionally equivalent to the original
product, or 3) provide a store credit in the
amount of the purchase price of the original
product. A replacement product or part, including
a user-installable part installed in accordance with
instructions provided by Brookstone, assumes
the remaining warranty of the original product.
When a product or pa rt is exchanged, a ny
replacement item becomes your property and the
replaced item becomes Brookstone’s property.
When a store credit is given, the original product
must be returned to Brookstone and becomes
Brookstone’s property.
Obtaining Service: To obtain warranty service,
call Brookstone Limited Warranty Servic e at
1-800-292-9819. Please be prepared to describe
the product that needs service and the nature of
the problem. A purchase receipt is required. All
repairs and replacements must be authorized in
advance. Service options, parts availability and
response times will vary. You are responsible for
delivery and the cost of delivery of the product
or any parts to the authorized service center for
replacement, per our instructions.
Limits and Exclusi ons: Covera ge under this
Limited Warranty is limited to the United States of
America, including the District of Columbia and the
U.S. Territories of Guam, Puerto Rico, and the U.S.
Virgin Islands.This Limited Warranty applies only
to products manufactured for Brookstone that can
be identified by the “Brookstone” trademark, trade
name, or logo affixed to them or their packaging.
The Limited Warranty does not apply to any nonBrookstone products. Manufacturers or suppliers
other than Brookstone may provide their own
warranties to the purchaser, but Brookstone,
in so far as permitted by law, provides these
products “as is.” This warranty does not apply to:
a) damage caused by failure to follow instructions
relating to product’s use or the installation of
components; b) damage caused by accident,
abuse, misuse, fire, floods, earthquake or other
external causes; c) damage caused by service
performed by anyone who is not a representative
of Brookstone; d) accessories used in conjunction
with a covered product; e) a product or part
that has been modified to alter functionality or
capability; f) items intended to be periodically
replaced by the purchaser during the normal
life of the product including, without limitation,
batteries or light bulbs; g) any product sold
“as is” including , without limitat ion, floo r
demonstration models and refurbished items;
or h) a product that is used commercially or for a
commercial purpose.
BROO KSTONE SHALL NOT BE L IABLE
FOR INCI DENTAL OR CONSEQU ENTIAL
DAMAGES RESU LTI NG FROM THE USE
OF THIS PRODUCT, OR ARISING OUT OF
ANY BREACH OF THIS WARRANTY. TO THE
EXTENT PERMITTE D BY APPLICABLE LAW,
BROOKSTONE DI SCLAIMS ANY AN D ALL
STATUTORY OR IM PLIED WAR RANTIES,
INC LUDI NG, WITH OUT LIM ITATION,
WARRAN TIES OF MER CHANTABIL ITY,
FITNESS FOR A PARTICULA R PUR POSE
AND WARRANTI ES AGAI NST HI DDEN
OR LATE NT DE FECTS. I F BR OOKSTONE
CANNOT LAWFULLY DISCLAIM STATUTO RY
OR IMPLIE D WARRANTIES, THEN TO THE
EXTENT PERMITTED BY LAW, ALL SUCH
WARRANTI ES SHAL L B E LIM ITED IN
DURATION TO THE DURATION OF THI S
EXPRESS WARRANTY.
Some states disallow the exclusion or limitation of
incidental or consequential damages or how long
an implied warranty lasts, so the above exclusions
or limitations may not apply to you. This warranty
gives you specific legal rights and you may also
have other rights, which vary from state to state.
USING THE ALARM (ALM ON)
1. Slide the SNOOZE /ALM ON /ALM
OFF to SNOOZE. Zz
appears
on the DISPLAY when the alarm
is activated.
Note: If the /ON/SENSOR/OFF/
LOCK is in the LOCK position, the
alarm cannot be activated.
2. When the alarm sounds, slide the
SNOOZE/ALM ON/ALM OFF to
ALM OFF to turn off the alarm.
Note: The alarm will not sound again.
USING THE M ICROBEAM™
DUAL LEDS (SENSOR)
1. Slide the /ON/SENSOR /OFF/
LOCK to SENSOR.
2. Lift the unit and the flashlight will
turn on for 10 minutes.
3. Place the unit down and the
flashlight will turn off.
USING THE M ICROBEAM™
DUAL LEDS (ON)
1. Slide the /ON/SENSOR /OFF/
LOCK to ON. The flashlight
remains on.
2. Slide the
/ON/SENSOR/OF F/
LOCK to OFF to turn the
flashlight off.
LOCKING THE MICROBEAM™
DUAL LEDS FOR TRAVEL (LOCK)
Slide the /ON/SENSOR/OFF/
LOCK to LOCK. The flashlight will not
turn on when the unit is lifted.
Note: If the /ON/SENSOR/OFF/
LOCK is in the LOCK position, the
calendar cannot be set.
4. Press the MONTH/H R. to set
the month.
5. Press the DATE/MIN. to set
the date.
6. Press the YEAR/12/24 to set
the year.
Note:
The day of the week automatically
adjusts when setting the date.
The highest possible year is 2069.
7. Slide CLOCK MODE/ALARM
SET/TIME SET/CALENDAR SET
to CLOCK MODE.
8. Replace the battery cover.
SETTING THE ALARM
Lift the BATTERY DOO R LATCH.
Remove the battery cover.
Slide the CLOCK MODE/ALARM
SET/TIME SET/CALENDAR SET
to ALARM SET.
Note: If the /ON/SENSOR/OFF/
LOCK is in the LOCK position, the
alarm cannot be set.
4. Press the MONTH/H R. to set
the hour.
5. Press the DATE/MIN. to set
the minutes.
6. Slide the CLOCK MODE/ALARM
SET/TIME SET/CALENDAR SET
to CLOCK MODE.
7. Replace the battery cover.
•
•
1.
2.
3.
cLock operation
INSTALLING THE BATTERIES
Lift the BATTERY DOO R LATCH.
Remove the battery cover.
Insert 4 AAA batteries (not included)
into the BATTERY COM PARTMENT
according to polarity indicators inside
the BATTERY COMPARTMENT.
Replace the battery cover.
SETTING THE CLOCK
Lift the BATTERY DOO R LATCH.
Remove the battery cover.
Slide CLOCK MODE/ALARM SET/
TIME SET/CALENDAR SET
to TIME SET.
Note: If the /ON/SENSOR/OFF/
LOCK is in the LOCK position, the
clock cannot be set.
4. Press the YEAR/12/24 to select
either 12- or 24-hour mode.
5. Press the MONTH/H R. to set hour.
6. Press the DATE/MIN. to set minutes.
7. Slide the CLOCK MODE/ALARM
SET/TIME SET/CALENDAR SET
to CLOCK MODE.
8. Replace the battery cover.
SETTING THE CALENDAR
Lift the BATTERY DOO R LATCH.
Remove the battery cover.
Slide the CLOCK MODE/ALARM
SET/TIME SET/CALENDAR SET
to CALENDAR SET.
1.
2.
3.
4.
1.
2.
3.
1.
2.
3.
SELECTING C°/F°
Lift the BATTERY DOO R LATCH.
Remove the battery cover.
Press C°/F° to select Celsius
or Fahrenheit.
ACTIVATING THE BACKLIGHT
Press the SNOOZE/BACKLIGHT to
activate the backlight.
Note: If the /ON/SENSOR/OFF/
LOCK is in the LOCK position, the
backlight cannot be activated.
LOW BATTERY INDICATOR
The low battery indicator appears on
the DISPLAY when the battery
life is low.
care and maintenance
Wipe with a soft, dry cloth.
If the unit is heavily stained or
soiled, wipe with a moistened cloth.
To avoid damage, do not use
any cleaning agents or
abrasive cleaners.
speciFications
Battery Power: 4 AAA Batteries
Light: 2 LED Bulbs
Dimensions (approx): 1"w x 2 1/4"d
x 3 ¾" h
Weight (approx): 4.5 oz. with Batteries
1.
2.
3.
•
•
•
 Loading...