

Page 1
Stunt Copter
ULTRA-LIGHT. ULTRA-FAST. FOR ALL SKILL LEVELS.
Page 2

1
Table of conTenTs
Warnings and Cautions . . . . . . . . . . . . . . . . . . . . . . . . . . . . . . . . . . . . . . . . . . . . . . . . . . . . . . . . . . . . . .2
FCC Information . . . . . . . . . . . . . . . . . . . . . . . . . . . . . . . . . . . . . . . . . . . . . . . . . . . . . . . . . . . . . . . . . . . 6
Location of Parts and Controls . . . . . . . . . . . . . . . . . . . . . . . . . . . . . . . . . . . . . . . . . . . . . . . . . . . . . . .7
Remote Control Battery Installation . . . . . . . . . . . . . . . . . . . . . . . . . . . . . . . . . . . . . . . . . . . . . . . . . . .9
Charging the Interchangeable Battery. . . . . . . . . . . . . . . . . . . . . . . . . . . . . . . . . . . . . . . . . . . . . . . 10
Helicopter Battery Installation . . . . . . . . . . . . . . . . . . . . . . . . . . . . . . . . . . . . . . . . . . . . . . . . . . . . . . 11
Operation: Preparing for Flight . . . . . . . . . . . . . . . . . . . . . . . . . . . . . . . . . . . . . . . . . . . . . . . . . . . . . 12
Syncing Your Helicopter . . . . . . . . . . . . . . . . . . . . . . . . . . . . . . . . . . . . . . . . . . . . . . . . . . . . . . . . . . . 12
Flying Tips . . . . . . . . . . . . . . . . . . . . . . . . . . . . . . . . . . . . . . . . . . . . . . . . . . . . . . . . . . . . . . . . . . . . . . . . 13
Understanding Helicopter Trim Adjustments . . . . . . . . . . . . . . . . . . . . . . . . . . . . . . . . . . . . . . . . . 14
Channel Select Button. . . . . . . . . . . . . . . . . . . . . . . . . . . . . . . . . . . . . . . . . . . . . . . . . . . . . . . . . . . . . 17
Basic Pilot Flight Controls (3 Channel Flight) . . . . . . . . . . . . . . . . . . . . . . . . . . . . . . . . . . . . . . . . 17
Stunt Pilot Flight Controls (4 Channel Flight) . . . . . . . . . . . . . . . . . . . . . . . . . . . . . . . . . . . . . . . . 19
Advanced Flight Controls . . . . . . . . . . . . . . . . . . . . . . . . . . . . . . . . . . . . . . . . . . . . . . . . . . . . . . . . . . 21
Advanced Flight Maneuvers . . . . . . . . . . . . . . . . . . . . . . . . . . . . . . . . . . . . . . . . . . . . . . . . . . . . . . . . 22
Parts Replacement Instruction. . . . . . . . . . . . . . . . . . . . . . . . . . . . . . . . . . . . . . . . . . . . . . . . . . . . . . 23
Helicopter Propeller System. . . . . . . . . . . . . . . . . . . . . . . . . . . . . . . . . . . . . . . . . . . . . . . . . . . . . . . . 23
Replacing Connecting Rod and Direction Connecting Rod. . . . . . . . . . . . . . . . . . . . . . . . . . . . 25
Replacing the Upper Propeller Blade. . . . . . . . . . . . . . . . . . . . . . . . . . . . . . . . . . . . . . . . . . . . . . . . 26
Replacing the Tail Propeller Blade . . . . . . . . . . . . . . . . . . . . . . . . . . . . . . . . . . . . . . . . . . . . . . . . . . 27
Warranty. . . . . . . . . . . . . . . . . . . . . . . . . . . . . . . . . . . . . . . . . . . . . . . . . . . . . . . . . . . . . . . . . . . . . . . . . . 29
Page 3
2
caUTIon
• TO REDUCE THE RISK OF ELECTRIC SHOCK, DO NOT REMOVE COVER.
THERE ARE NO SERVICEABLE PARTS INSIDE.
• TO REDUCE THE RISK OF FIRE OR ELECTRIC SHOCK, DO NOT EXPOSE
THIS UNIT TO RAIN OR MOISTURE.
The lightning flash with arrow-head symbol within an equilateral triangle
is intended to alert the user to the presence of uninsulated “dangerous
voltage” within the unit’s enclosure that may be of sufficient magnitude
to constitute a risk of electric shock.
The exclamation point within an equilateral triangle is intended to alert
the user to the presence of important operating and maintenance
(servicing) instructions in the literature accompanying the unit.
IMPoRTanT safeTY InsTRUcTIons
All of the safety and operating instructions should be read, adhered to and followed
before the unit is operated.
save These InsTRUcTIons
Page 4

3
DanGeR
To reduce the risk of electric shock, burns, fire or injury:
1. Do not use while bathing or in a shower.
2. Do not place or store unit where it can fall or be pulled into a tub or sink.
3. Do not place in, drop or submerge in water or other liquid.
4. Do not reach for unit that has fallen into water. Unplug it immediately.
5. Care should be taken so that objects do not fall and liquids are not
spilled onto the unit.
WaRnInG
1. Close supervision is necessary when this appliance/product is used near children
or mentally disabled individuals.
2. Use this unit only for its intended use as described in this manual.
3. Unplug this unit during lightning storms or when unused for long periods of time.
4. Never drop or insert an object into any opening.
5. Protect the adapter cord from being walked on or pinched, particularly at plug
outlets, convenience receptacles and the point where it exits the unit.
6. Do not allow adapter cord to touch hot surfaces. Wrap cord loosely around the
unit when storing.
7. The unit should be situated away from direct sunlight or heat sources such as radiators,
electric heaters, heat registers, stoves, or other units (including amplifiers) that produce
heat. Avoid placing on top of stereo equipment that radiates heat.
8. Never block the air openings of the unit with materials such as clothing,
plastic bags or papers, or place it on a soft surface such as a bed or couch,
where the air openings may be blocked.
9. Do not overload electrical outlet. Use only the power source as indicated.
10. Do not carry this unit by cord or use cord as handle.
Page 5

4
HELICOPTER WARNING
The helicopter blades revolve at high speeds and can cause damage to the user, spectators
and animals. Stand away from the helicopter to reduce the risk of getting into the flight path. Warn
spectators that you will be flying your helicopter so that they are aware of its position. Before flight,
inspect the rotor blades to make certain that the blades are securely fastened to the helicopter.
WARNING!
• Choking/Cutting Hazard. Small Parts/Sharp Rotor Blades.
• Keep hands, hair and loose clothing away from the propeller when the power switch
is turned to the ON position.
• Turn off the remote control and helicopter power switches when not in use.
• New alkaline batteries in the remote are recommended for maximum performance.
baTTeRY WaRnInGs
RECHARGEABLE BATTERY
• This helicopter uses an interchangeable Li-Po rechargeable battery. If the
battery no longer stays charged, dispose of battery properly according to local
disposal requirements.
• The adapter is built specifically for the helicopter’s Li-Po battery. Do not use it to
charge any other battery.
11. Never operate this unit if it has a damaged cord or plug, if it is not working
properly, or if it has been dropped or damaged, or dropped into water. If the
unit’s power supply cord or plug is damaged, do not attempt to fix it yourself.
12. To avoid the risk of electric shock, do not disassemble or attempt to repair
the unit. Incorrect repair can cause risk of electric shock or injury to persons
when unit is used.
13. Do not operate in the presence of explosive and/or flammable fumes.
14. Never remove the adapter plug from the socket by pulling the power cord.
Page 6

5
• ALWAYS handle Li-Po batteries with extreme caution. NEVER place the Li-Po
helicopter battery in a place where the contact tabs could inadvertently be connected
to each other via coins, keys, tools or any other metallic objects. If anything happens
to complete the circuit across the connect tab, the batteries will likely be damaged
and may cause injury.
• Do not directly solder the battery or pierce it with a nail or other sharp object.
• Do not short circuit the battery’s supply terminals.
• Do not disassemble or alter the battery.
• Charge the battery every six months.
• Recycle used batteries after covering the battery terminals with insulation tape or
inserting the battery into an individual polybag.
REMOTE CONTROL BATTERIES
Remote control requires 6 AA batteries (not included). Please read the important
battery safety warning below.
1. Do not mix alkaline, standard (carbon-zinc) and rechargeable batteries (Nickel
Metal Hydride).
2. Do not mix old and new batteries.
3. Non-rechargeable batteries are NOT to be recharged.
4. Exhausted batteries should be removed immediately and must be recycled
or disposed of properly according to state or local government ordinances
and regulations.
5. The supply terminals are not to be short-circuited.
6. Only batteries of the same or equivalent type as recommended are to be used.
7. Batteries are to be inserted with the correct polarity (see inside this manual
for diagram).
8. Do not dispose of batteries in a fire as batteries may leak or explode.
Page 7

6
fcc InfoRMaTIon
This device complies with Part 15 of the FCC Rules. Operation is subject
to the following two conditions:
1. This device may not cause harmful interference.
2. This device must accept any interference received including interference
that may cause undesired operation.
Warning: Changes or modifications to this unit not expressly approved by the
party responsible for compliance could void the user’s authority to operate the
equipment. Note: This equipment has been tested and found to comply with the
limits for a Class B digital device, pursuant to Part 15 of the FCC Rules. These
limits are designed to provide reasonable protection against harmful interference in
a residential installation. This unit generates, uses, and can radiate radio frequency
energy and if not installed and used in accordance with the instructions, may cause
harmful interference to radio communications. However, there is no guarantee that
interference will not occur in a particular installation. If this equipment does cause
harmful interference to radio or television reception, which can be determined by
turning the equipment off and on, the user is encouraged to try and correct the
interference by one or more of the following measures:
• Reorient or relocate the receiving antenna.
• Increase the separation between the equipment and receiver.
• Connect the equipment to an outlet on a circuit different from that to which
the receiver is connected.
• Consult the dealer or an experienced radio/TV technician for help.
Page 8
7
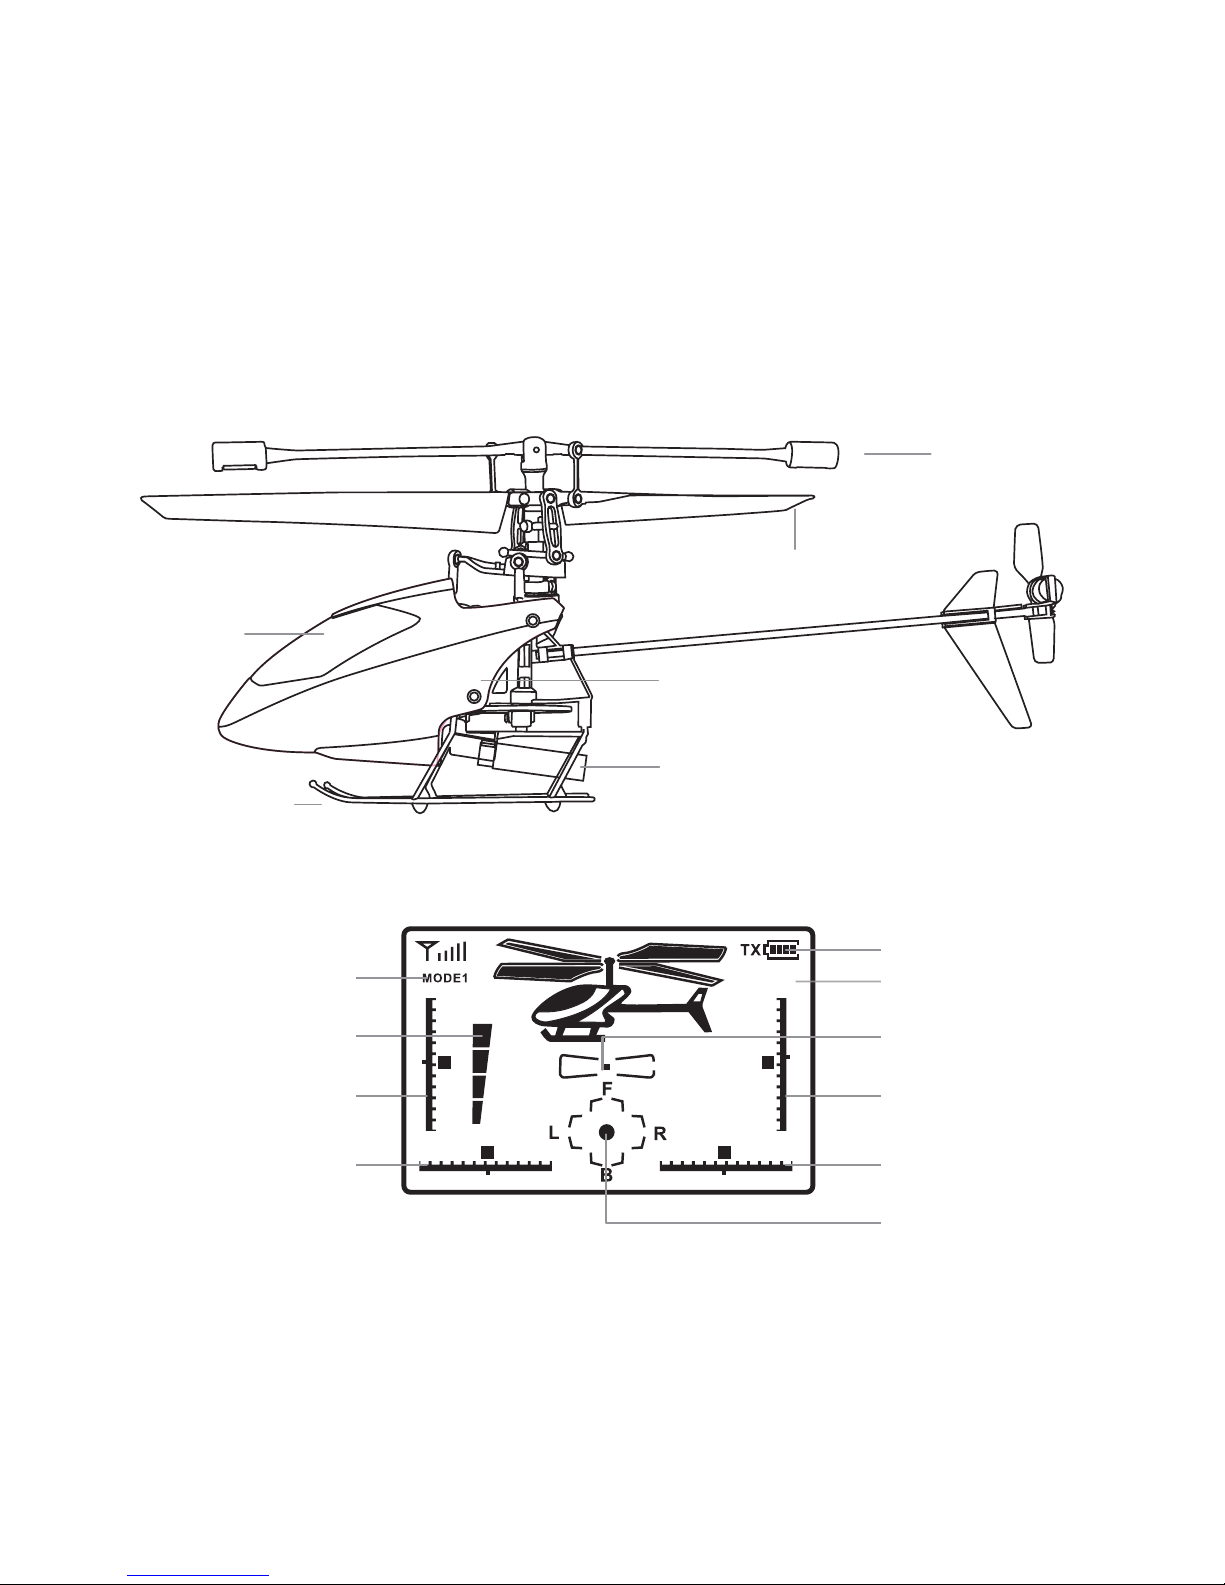
locaTIon of PaRTs anD conTRols (coPTeR)
Interchangeable
Head
Landing Gear
Stabilizer Bar
Main Rotor Blades
Tail Rotor
Blade
Power Indicator Light
Interchangeable Battery
Remote Control Display
4
Mode (Speed)
Throttle Indicator
Throttle Trim Indicator
Direction Trim Indicator
Battery
Turning Direction
Forward &
Backward Trim
Banks Trim Indicator
Forward & Backward
Banks Left and Right
Channel
Page 9
8
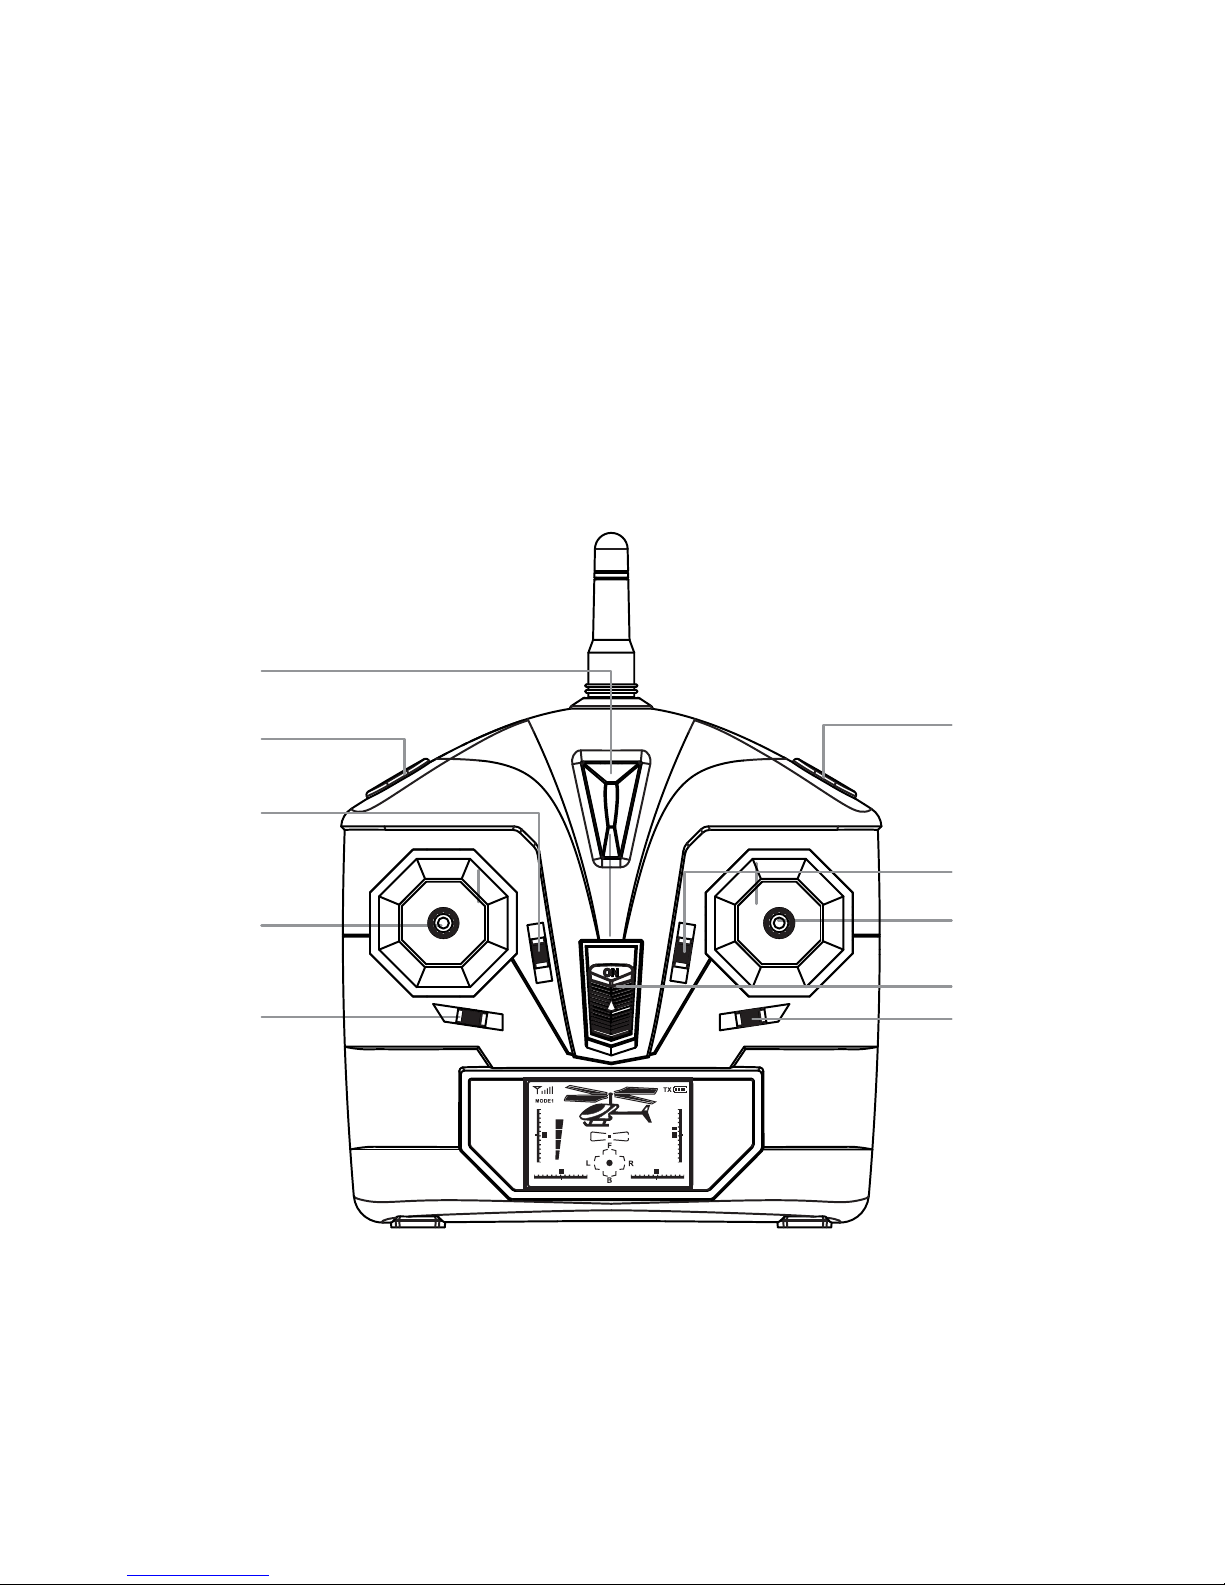
locaTIon of PaRTs anD conTRols
(ReMoTe conTRol)
Antenna
Power Indicator Light
Mode (Speed) Button
Throttle Sensitive Trim
Throttle, Left & Right
Turning Control
Direction Trim
Channel Select Button
Forward & Backward Trim
Forward & Backward,
Banks Left & Right
Control
Power On/Off
Banks Trim
Page 10
9
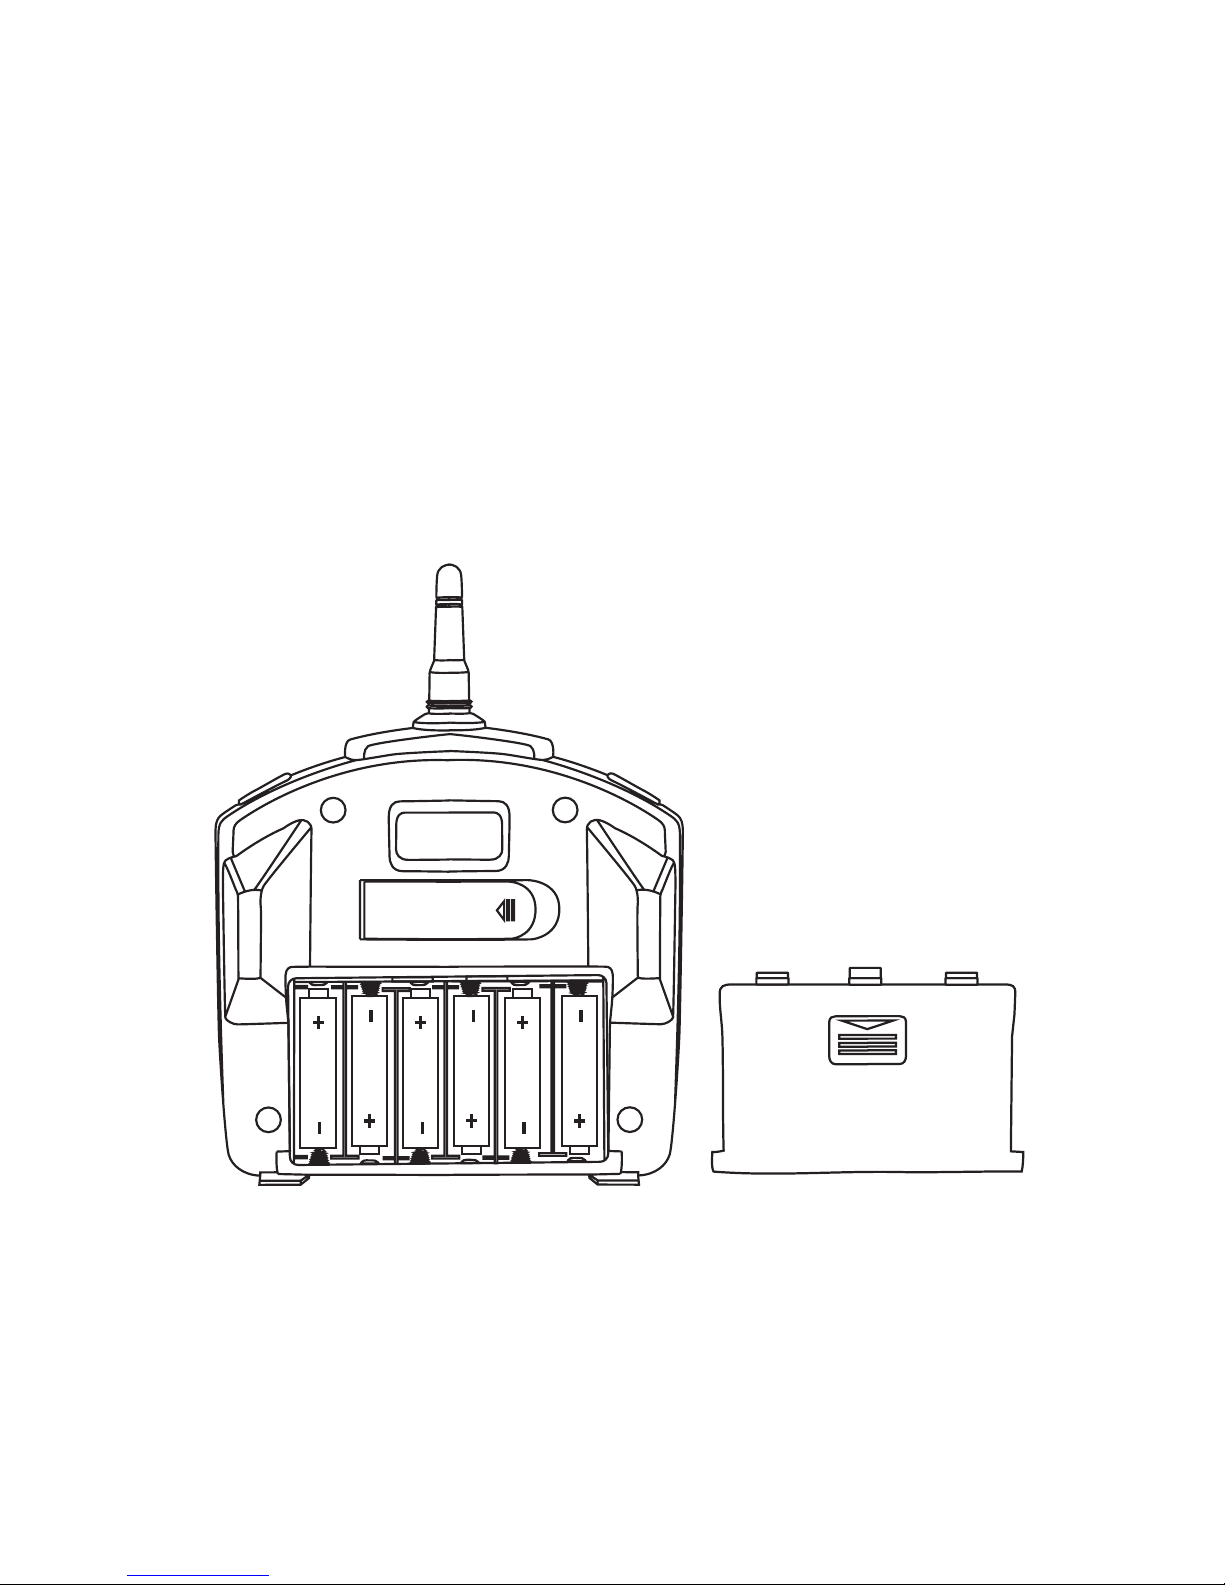
ReMoTe conTRol baTTeRY InsTallaTIon
1. Remove the battery cover and battery pack from the remote control.
2. Install 6 AA alkaline batteries into the battery pack according to the polarity
indicators and then install the pack in the remote as shown in the diagram below.
3. Replace the battery cover.
Battery Compartment
Battery Cover
Page 11
10
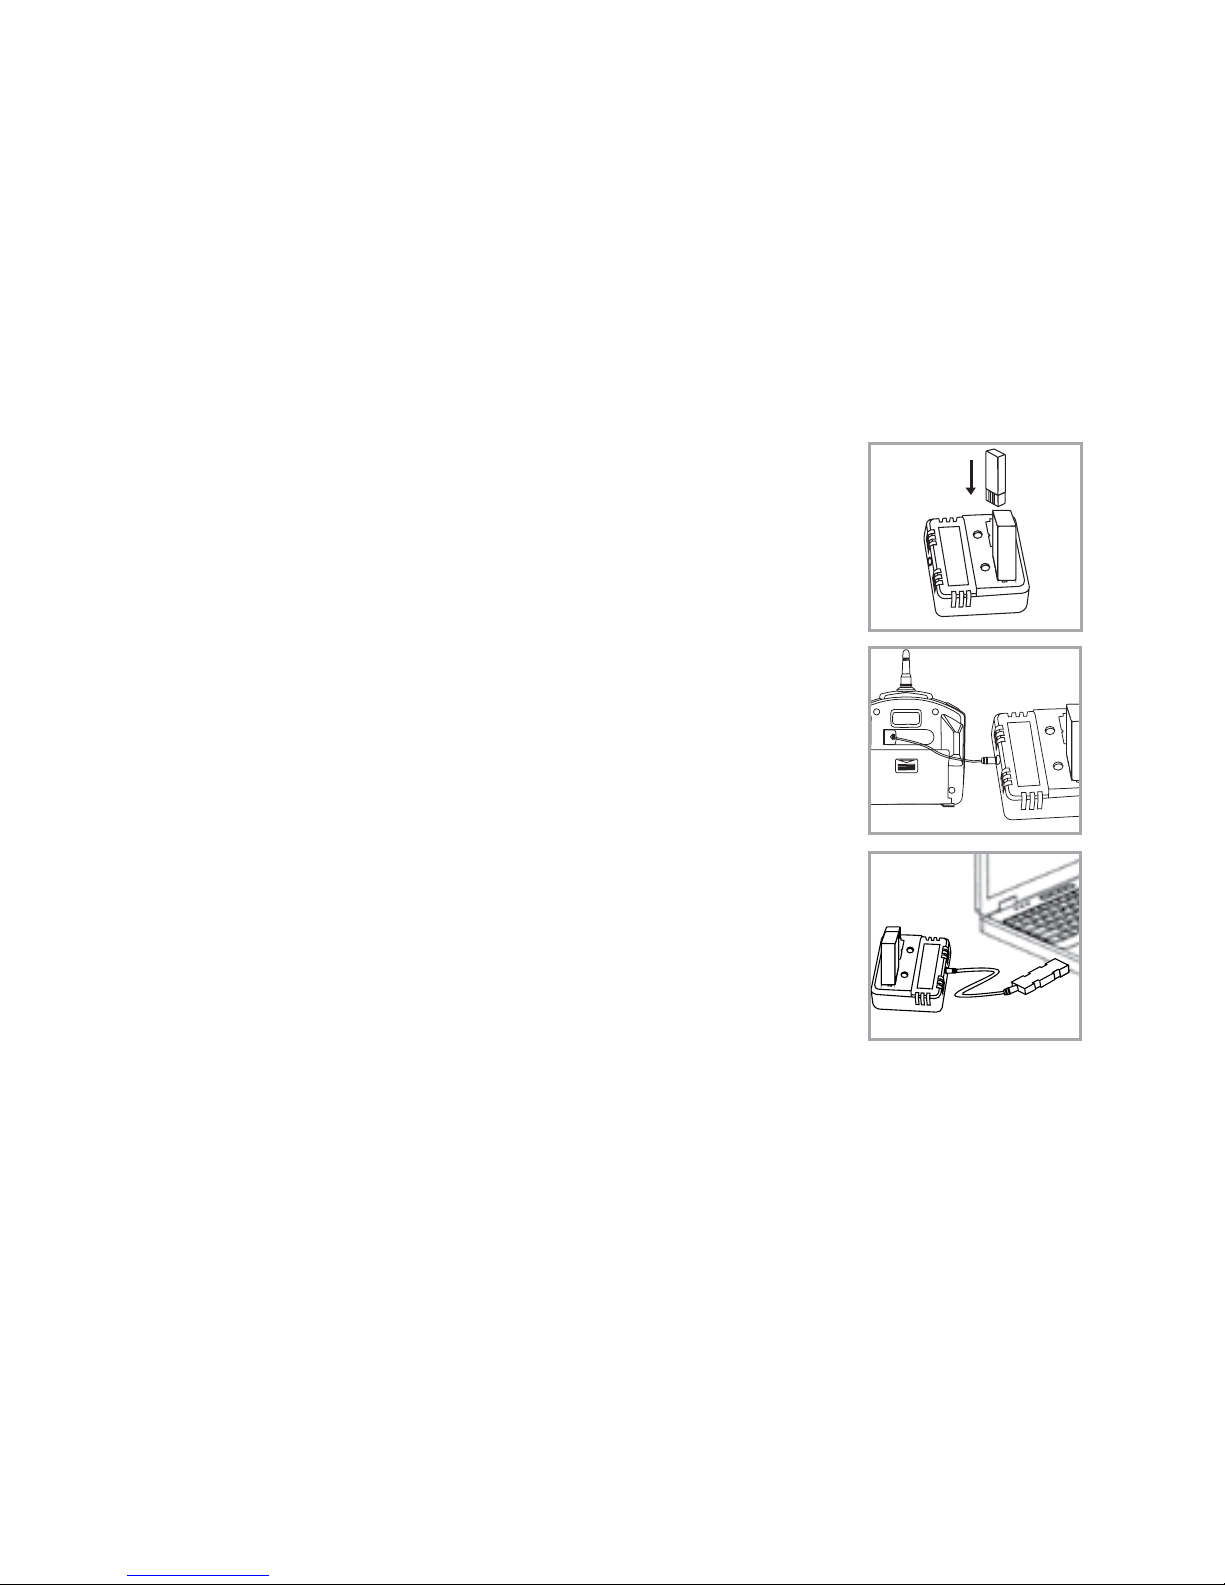
chaRGInG The InTeRchanGeable baTTeRY
This helicopter comes with 2 interchangeable batteries, make sure to fully charge
the batteries before you fly the helicopter.
1. Plug one or both batteries into the included charger (A).
Charging from remote control (B):
• Connect the charging plug on the back of remote
control to the charging socket, switch on your remote,
the red LED light will illuminate on the charger. If the
battery is fully charged, the red LED light will turn off.
Charging from the USB cable (C):
• Plug the included USB cable into a USB port
on your computer. Please make sure that your
computer is turned on. When the batteries are
charging, the red LED light will illuminate on the
charger. If the battery is fully charged, the red
LED light will turn off.
Note: Length of charging time will vary depending
on percentage of the helicopter battery power left and, if
you are charging from the remote, the condition of the batteries in the remote.
Average charging time is approximately 45 minutes with new batteries in the remote.
The helicopter operates for approximately 6-8 minutes per charge.
Important! Always disconnect charger cord after charging. Never leave charger
cord connected to helicopter overnight or for extended periods of time.
A
C
B
Page 12
11
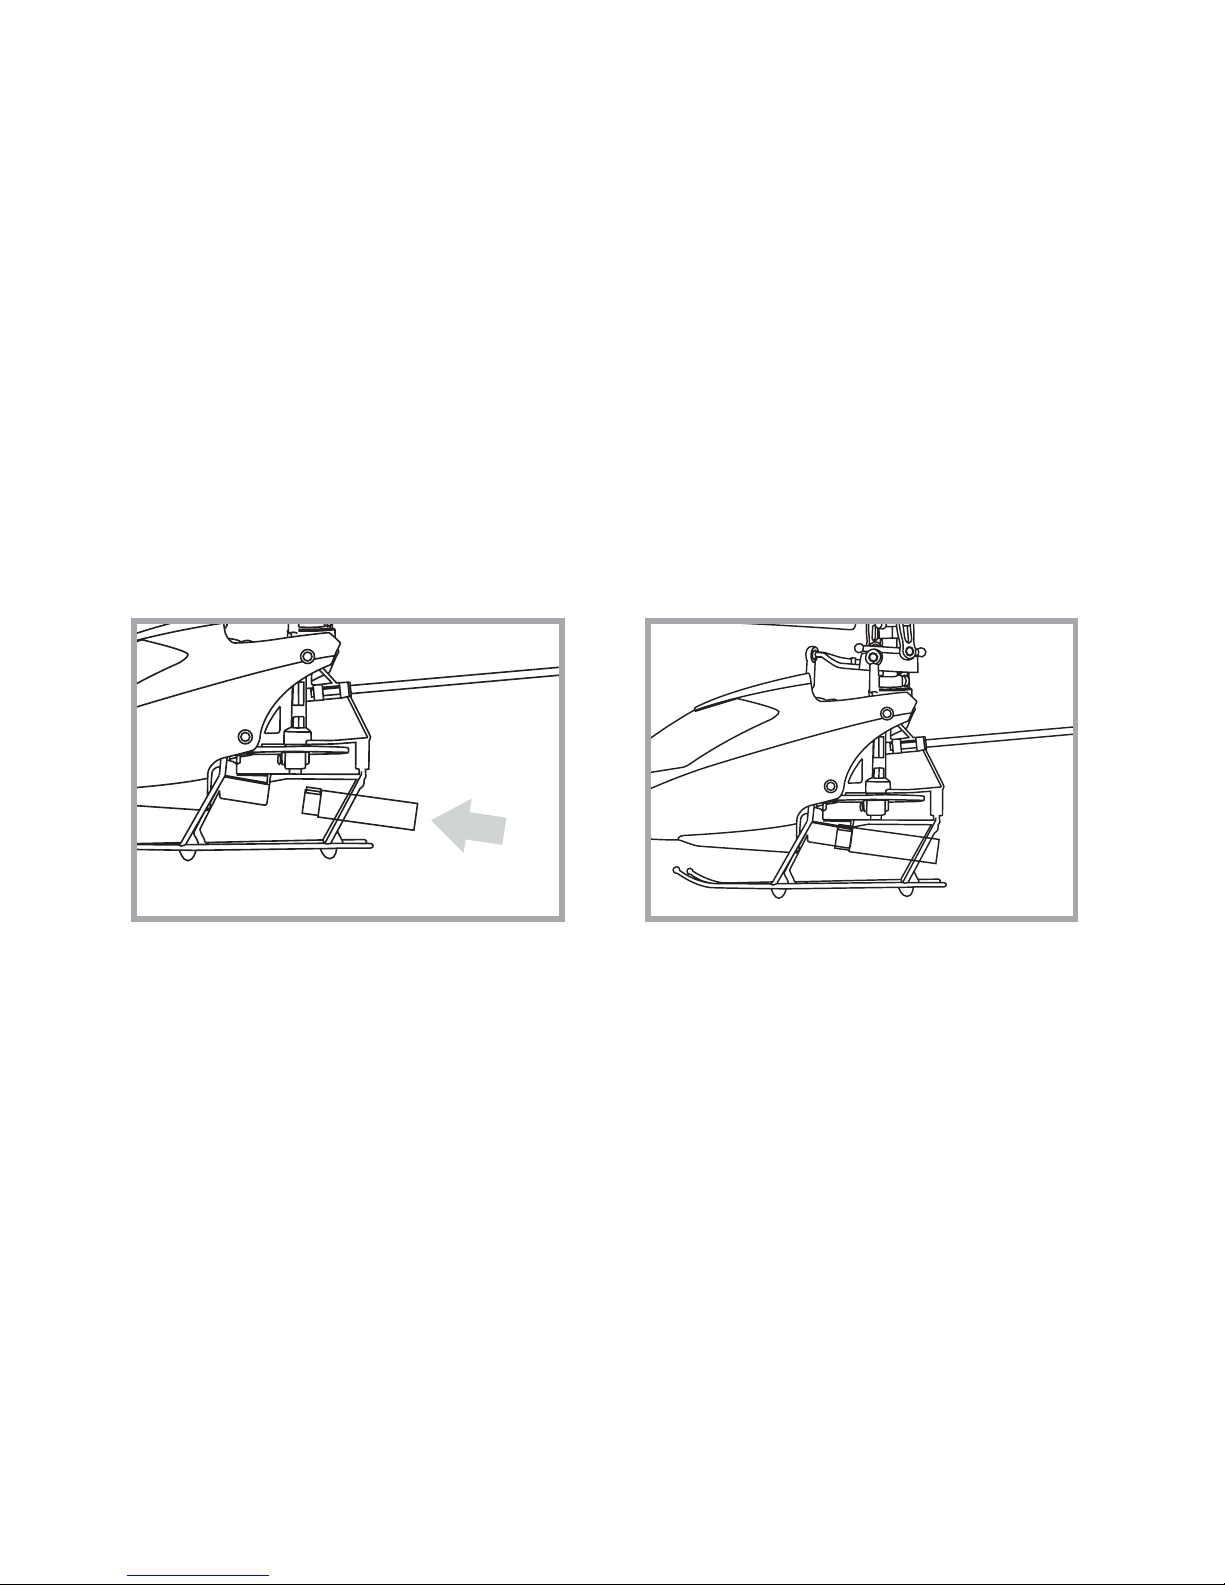
helIcoPTeR baTTeRY InsTallaTIon
1. When the interchangeable battery is fully charged load it into the battery
compartment of the helicopter.
2. Keep the battery’s metal edge facing the helicopter’s battery socket.
Slide the battery into the helicopter’s battery socket until it stops.
3. When the battery is seated correctly, the red LED light will flash.
Page 13

12
oPeRaTIon: PRePaRInG foR flIGhT
• Verify that there are 6 “AA” batteries inside the remote control unit and the
helicopter's battery has been installed correctly.
• Make sure to be in a large space with an open radius of at least 50 feet.
• Make sure the empty space has no obstacles or nearby water. Set your
helicopter on a clean flat surface before take-off.
WARNING! DO NOT ATTEMPT TO FLY YOUR HELICOPTER OUTDOORS IF
THERE IS RAIN, SNOW, HEAVY WINDS, THUNDER OR LIGHTNING. IT COULD
DAMAGE YOUR HELICOPTER AND POSSIBLY EVEN CAUSE BODILY HARM.
sYncInG YoUR helIcoPTeR
Your helicopter utilizes an automatic 2.4G channel selection system that allows
up to 8 people to fly side by side in the same wireless range.
For One Person Play:
1. Before starting, make sure that the power on the remote is in the OFF position.
Also make sure that there are no other 2.4G devices in the area.
2. Install the interchangeable battery into the helicopter and set it down on a flat
surface. The red LED indicators inside the helicopter body should flash.
3. Put the remote throttle to the “zero” position (all the way down), then turn ON
your remote. The remote will “Beep” in 3-5 seconds. When you hear a long
“Beep,” the red LED indicators inside the body should stay solid red.
This indicates that your product has been successfully synced.
Page 14

13
For Multi Person Play:
1. Before starting, make sure that the power on the remote is in the OFF position.
Also make sure that there are no other 2.4G devices in the area.
2. Each person will have to sync their helicopter individually, at a different time, to
avoid interference. Follow steps 1 to 3 under “Syncing your helicopter,” making
sure no one else is attempting to sync at the same time.
3. After syncing one helicopter, that helicopter should be left ON until all players
have succeeded in syncing their helicopters.
4. Should there be a mistake or interference in syncing, all players must turn
off their remotes and helicopters and start the syncing process again.
flYInG TIPs
• It is recommended that you operate the helicopter in a wide indoor/outdoor
space. You should allow at least a 25-foot radius range.
• This helicopter is designed for either INDOOR OR OUTDOOR USE.
• Parental guidance or adult supervision is suggested at all times.
• If you are flying the helicopter with others, make sure all spectators are
behind you.
• For best performance, it is recommended that you operate the helicopter
in zero wind conditions. Close all open doors or windows, and turn off any
nearby fans. Wind can greatly affect the performance of the helicopter.
Page 15
14
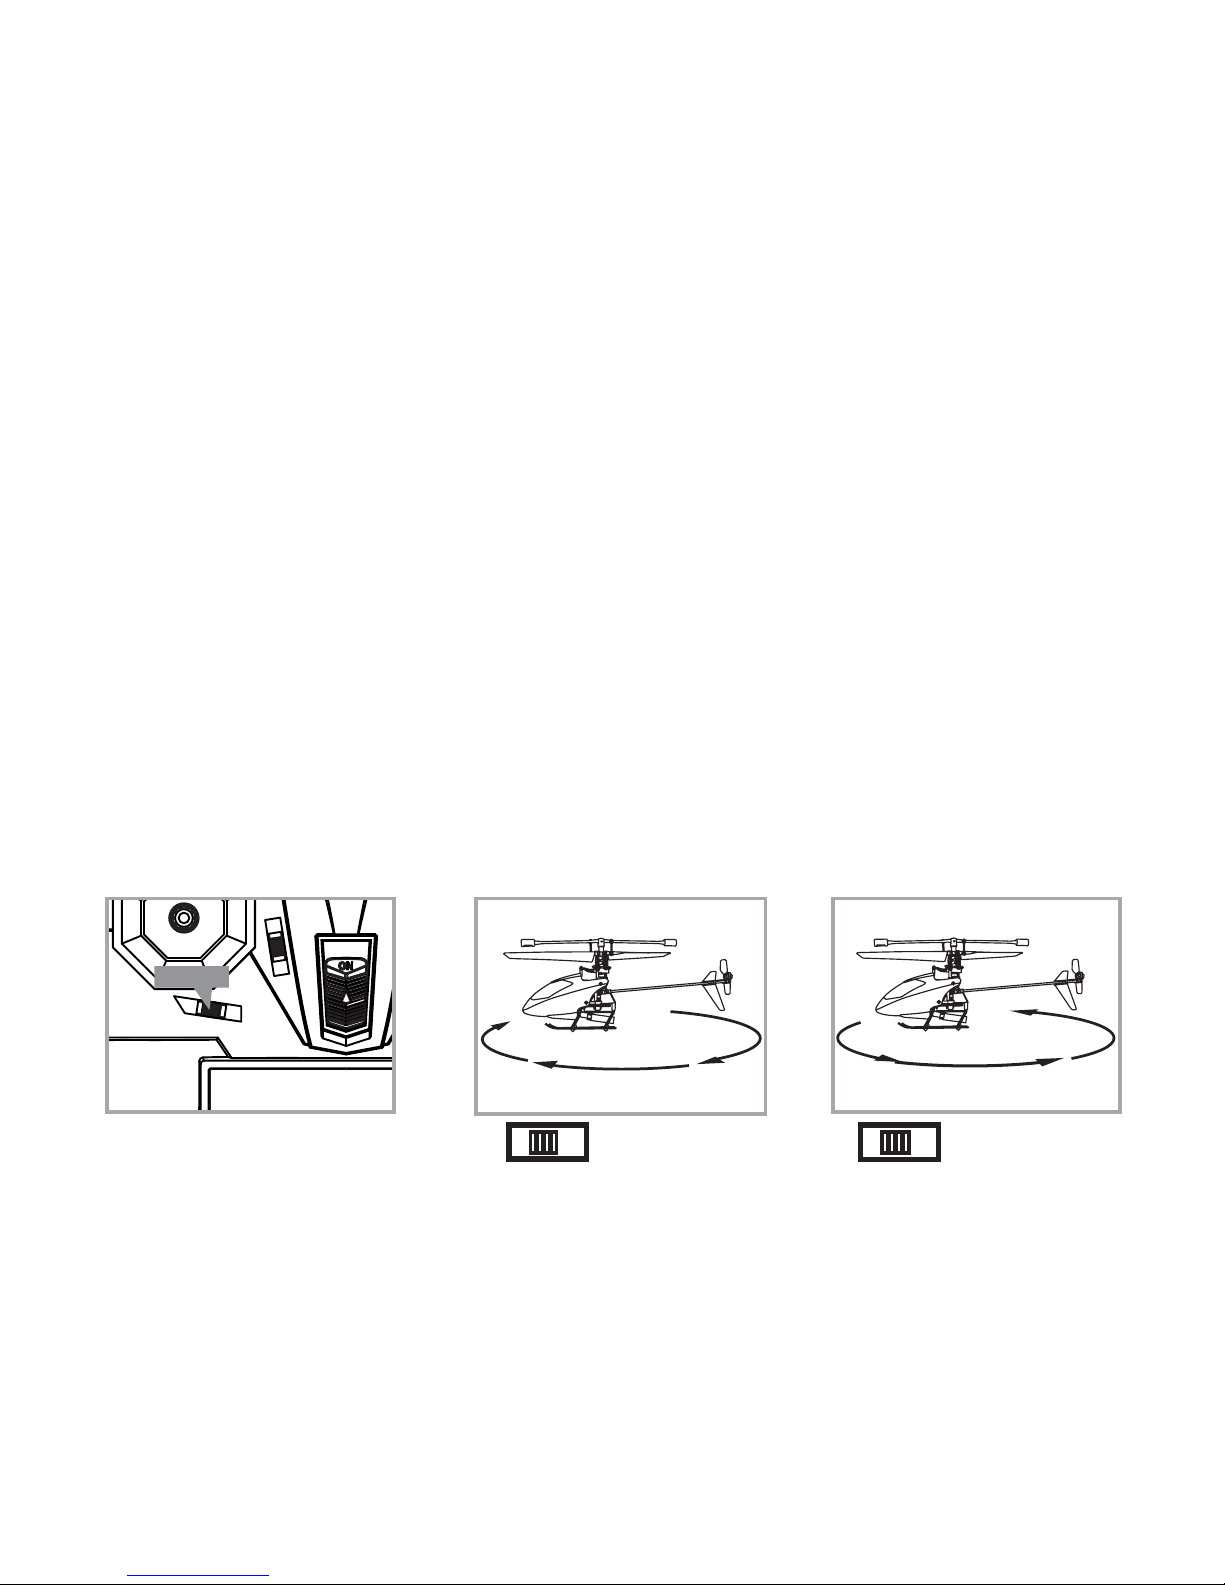
UnDeRsTanDInG helIcoPTeR TRIM aDJUsTMenTs
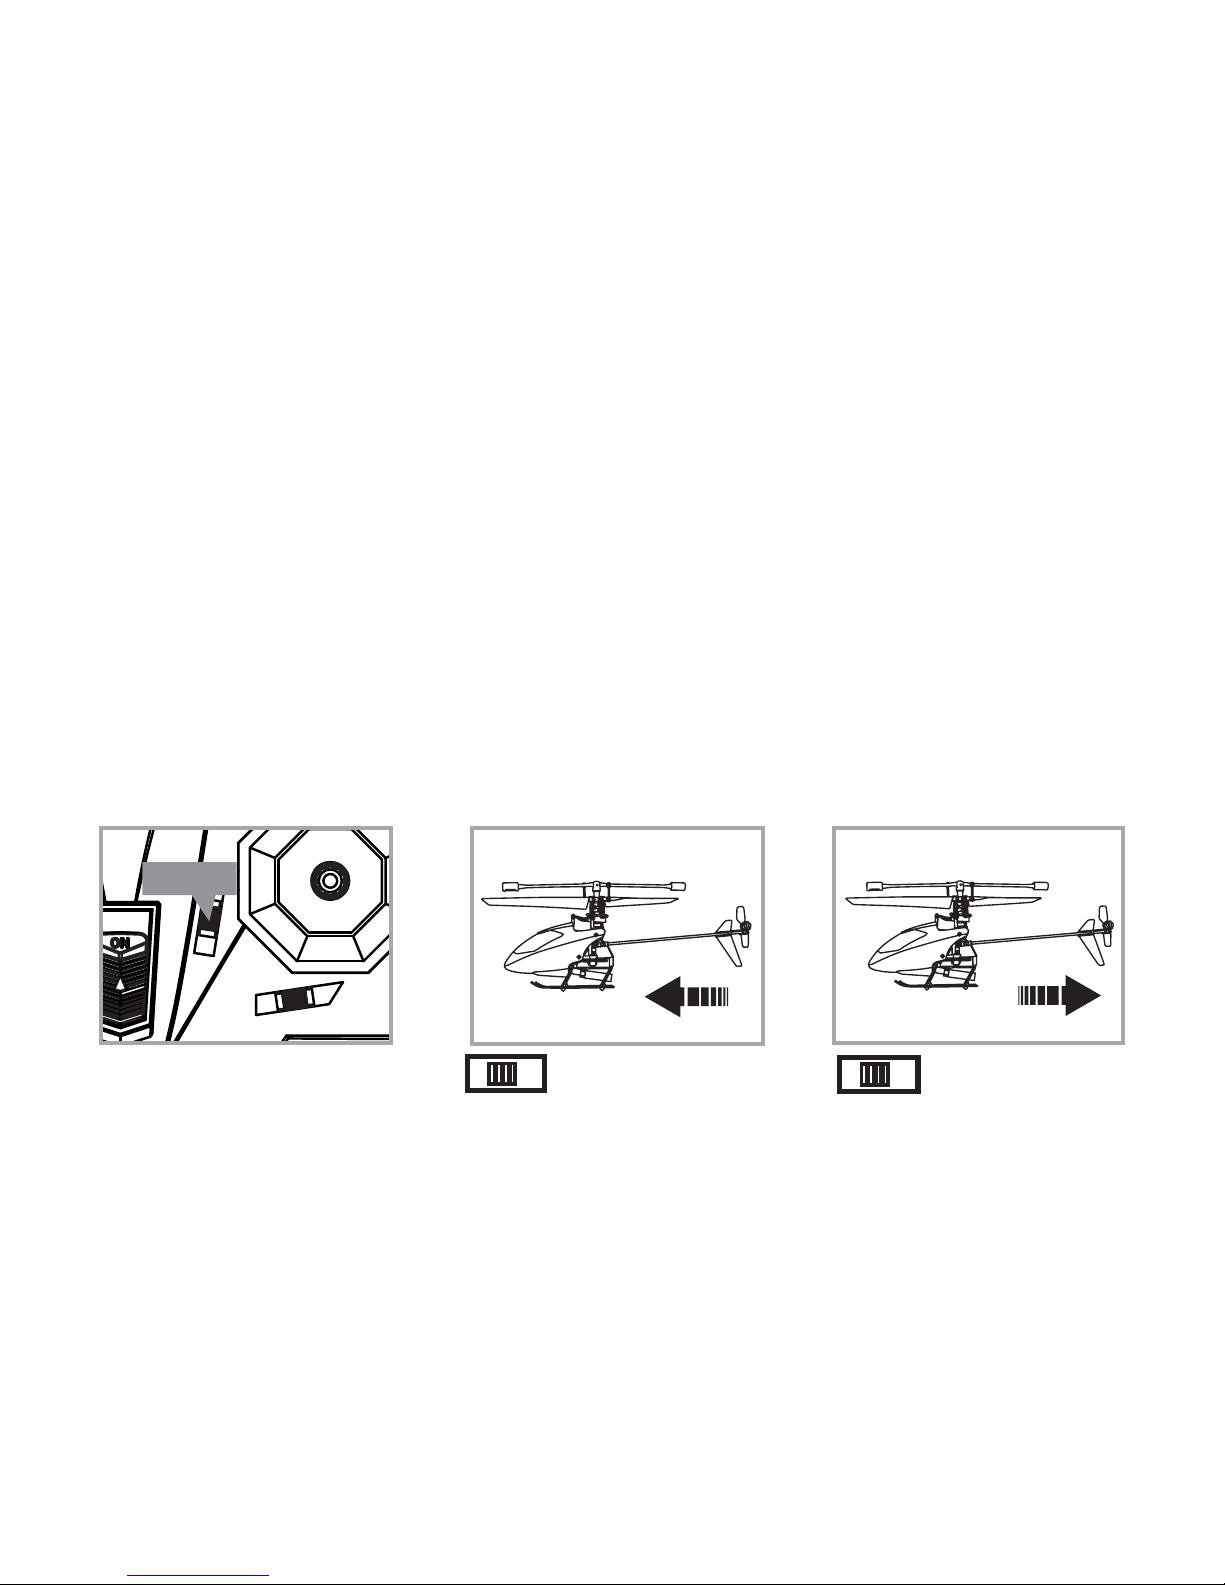
Turn Left/Right Trim
• If your helicopter nose rotates to the left or right uncontrollably, you may need
to utilize the DIRECTION TRIM buttons.
• If your helicopter over rotates CLOCKWISE (to the right), push and release the
DIRECTION TRIM button repeatedly to left side until the turning stops and
proper flight is maintained.
• If your helicopter over rotates COUNTER-CLOCKWISE (to the left), push and
release the DIRECTION TRIM button to right side in the same manner until
the problem is resolved.
• From time to time you may have to adjust the DIRECTION TRIM to left and
right to ensure the helicopter will fly straight and respond accurately to control
commands.
im
Direction Trim
It over rotates to the right…
Direction Trim Controls Push to left Push to right
It over rotates to the left…
Page 16
15
Forward/Backward Trim
• If your helicopter is moving forwards or backwards automatically, you may need
to adjust the FORWARD/BACKWARD TRIM buttons.
• If your helicopter flies forward, push and release the FORWARD/BACKWARD
TRIM button back repeatedly until the moving stops and proper flight
is maintained.
• If your helicopter flies backwards, push and release the FORWARD/BACKWARD
TRIM button forward in the same manner until the problem is resolved.
• From time to time you may have to adjust the FORWARD/BACKWARD
TRIM to ensure the helicopter will hover in mid-air and respond accurately
to your commands.
Banks Left/Right Trim
d
Forward/ Backward
Trim
Forward/backward
Trim Controls
Push to go backward
Push to go forward
Page 17
16
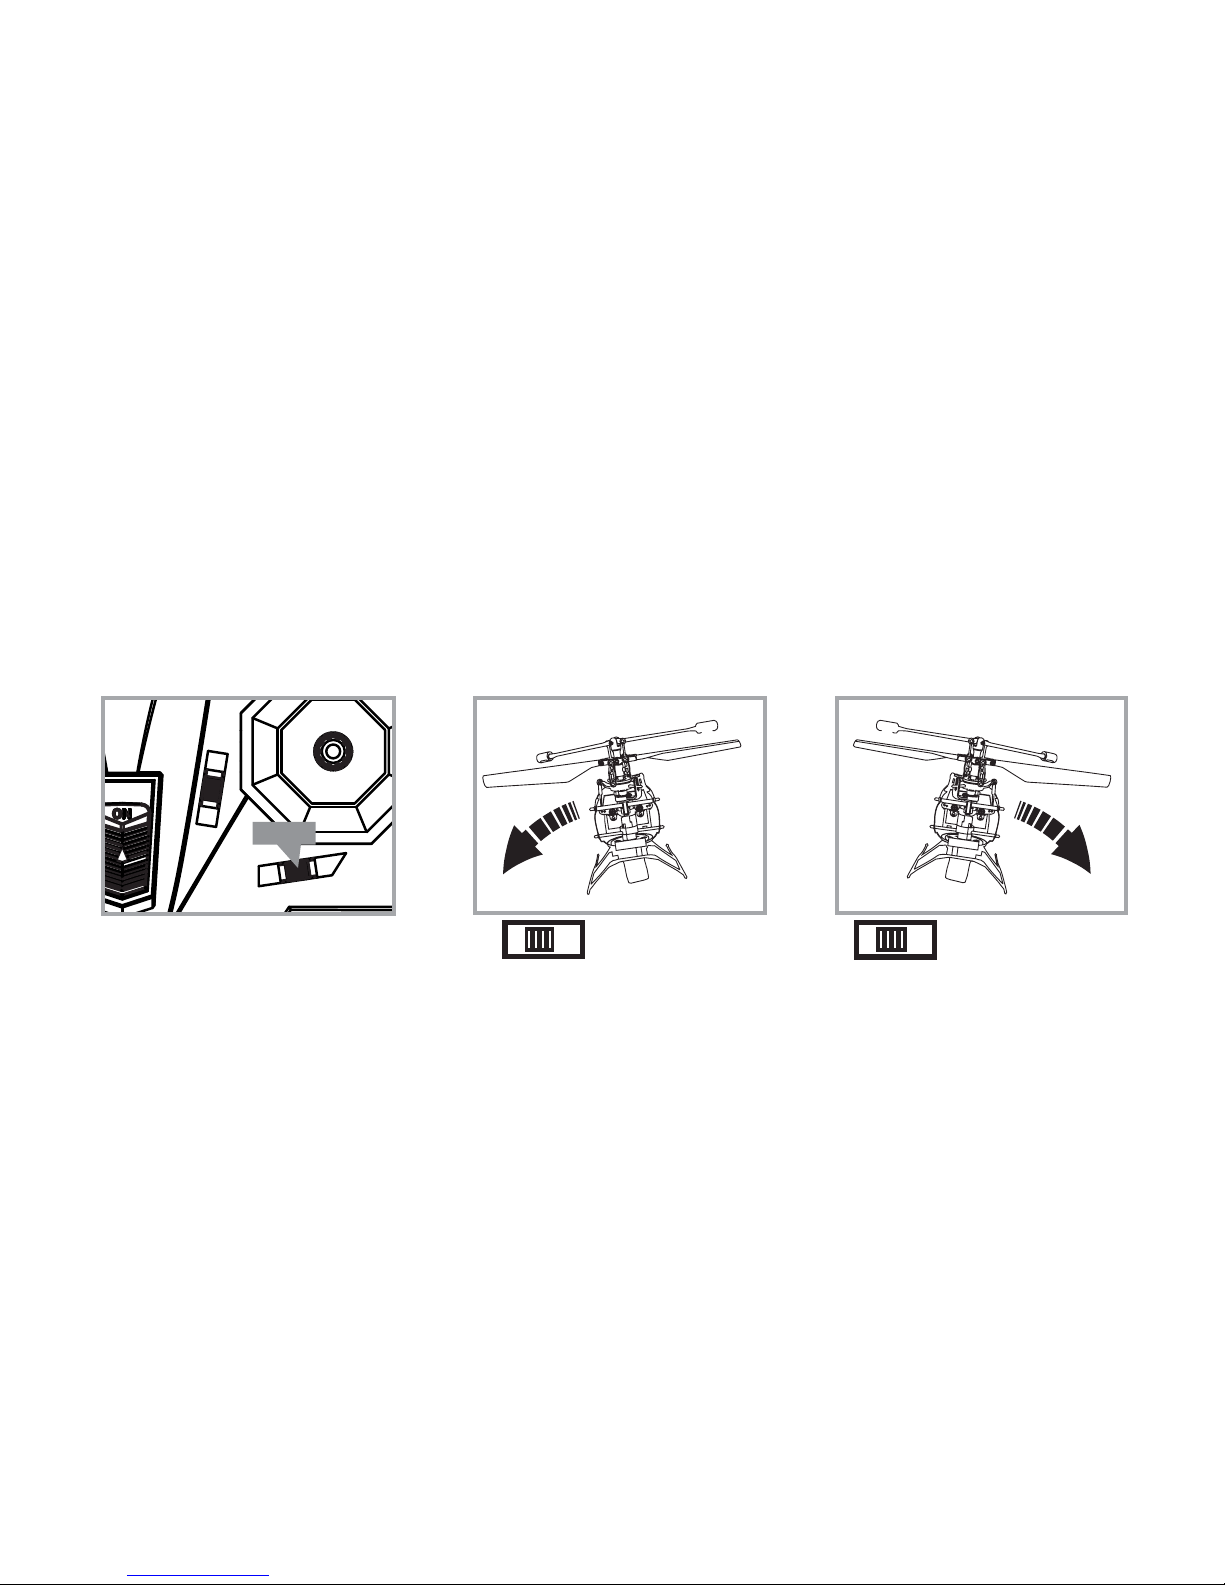
• If your helicopter is not steadily hovering and is banking to the left or right
automatically, you may need to adjust the BANKS TRIM buttons.
• If your helicopter banks to the left, push and release the BANKS TRIM button
repeatedly to the right until the banking stops and proper flight is maintained.
• If your helicopter banks to the right, push and release the BANKS TRIM button
to the left in the same manner until the problem is resolved.
• From time to time you may have to adjust the BANKS TRIM to left/right
to ensure the helicopter will steadily hover in mid-air and respond accurately
to your commands.
Throttle Speed Trim
• If you find the throttle is too sensitive when you fly the helicopter, you may need
to utilize the THROTTLE SPEED TRIM.
• Push and release the THROTTLE SPEED TRIM button back to lower the sensitivity
of the throttle. Push and release the THROTTLE SPEED TRIM button forward to
increase the sensitivity of the throttle. The middle position is recommended.
Forward/backward
Trim Controls
Push to go right Push to go left
Banks Trim
Page 18

17
channel selecT bUTTon
Press the CHANNEL SELECT button on the top right of the remote to toggle
between Basic Pilot (3 channel flight) and Stunt Pilot (4 channel flight).
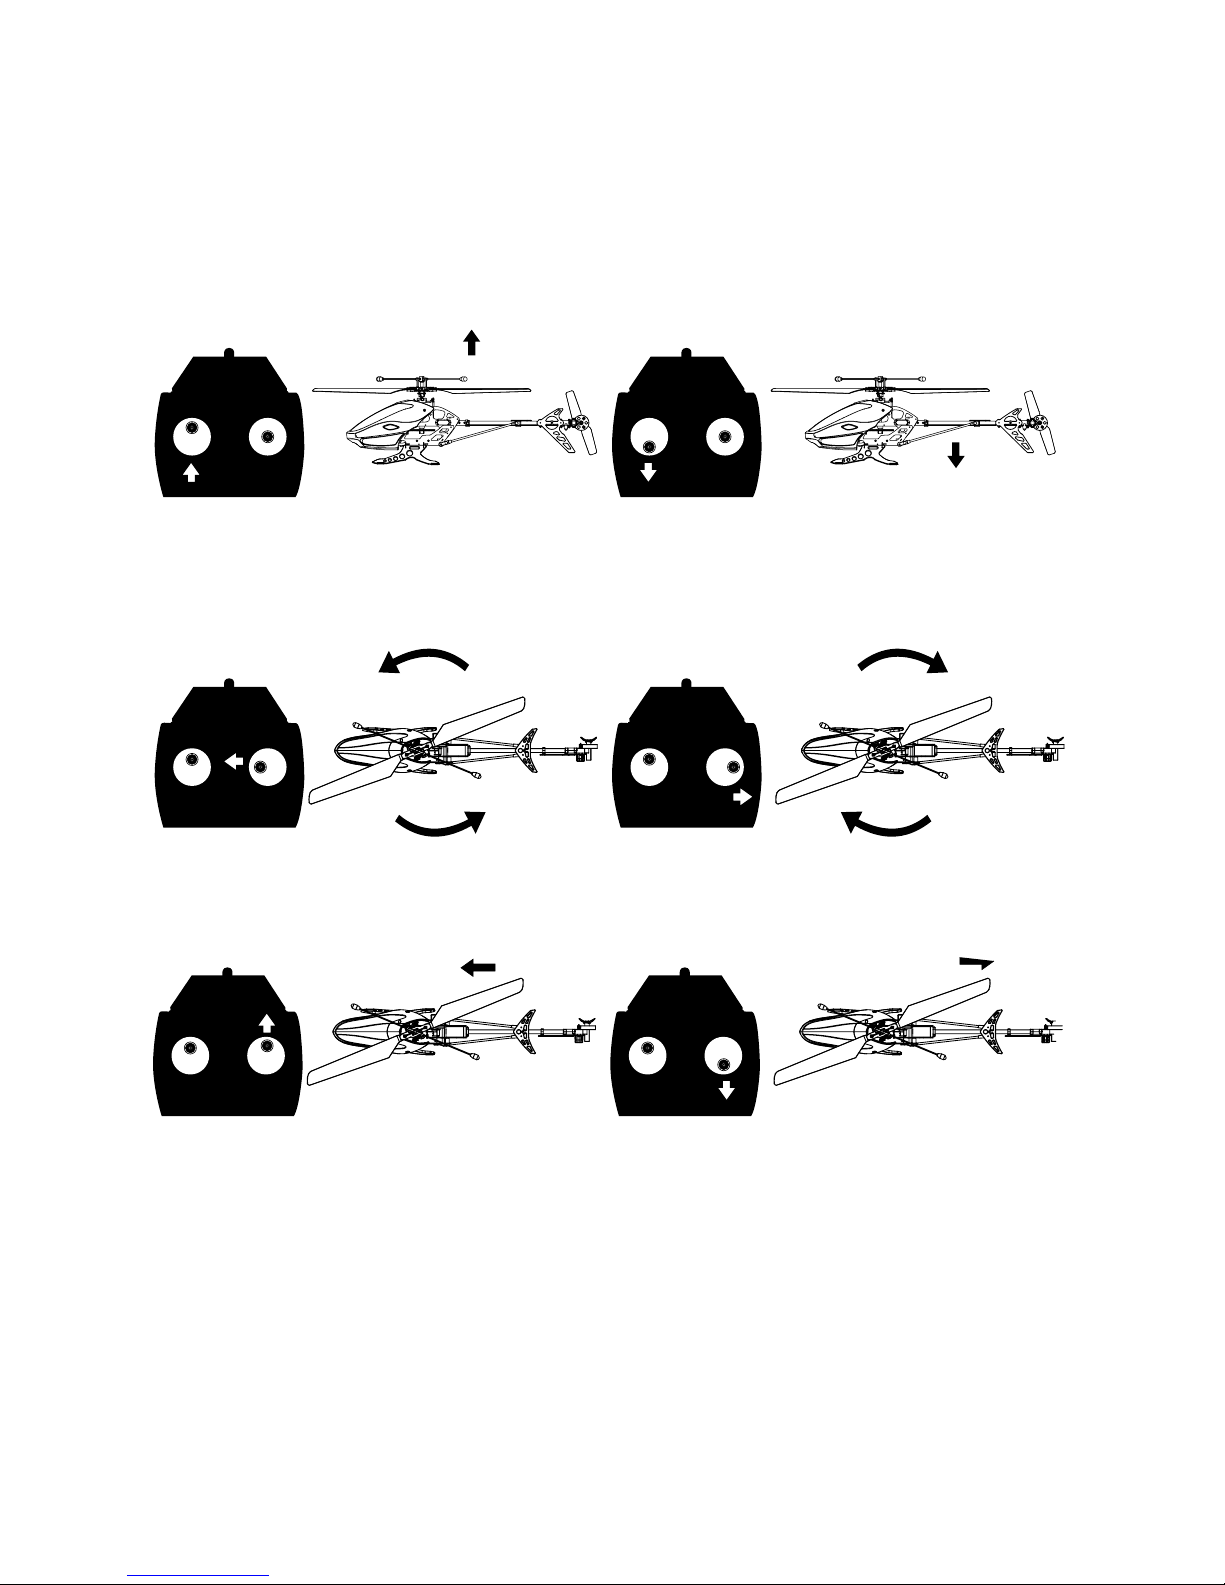
basIc PIloT flIGhT conTRols (3 channel flIGhT)
On the following page is a list of Basic Pilot flight functions on your wireless
remote control and how they will affect your helicopter. While learning to fly your
helicopter, it is best to start with a large space until you get used to the basic
controls. As you master flying the helicopter you can graduate to more advanced
maneuvering in the 4 channel Stunt Mode.
Page 19
18
Move the Throttle up to increase
the speed of the main rotor and the
helicopter will rise up.
Move the Throttle down to decrease
the speed of the main rotor and the
helicopter will descend.
Move the Direction Control left and
the helicopter will turn left.
Move the Direction Control right
and the helicopter will turn right.
Move the Direction Control up and
the helicopter will move forward.
Move the Direction Control down and
the helicopter will move backward.
Page 20
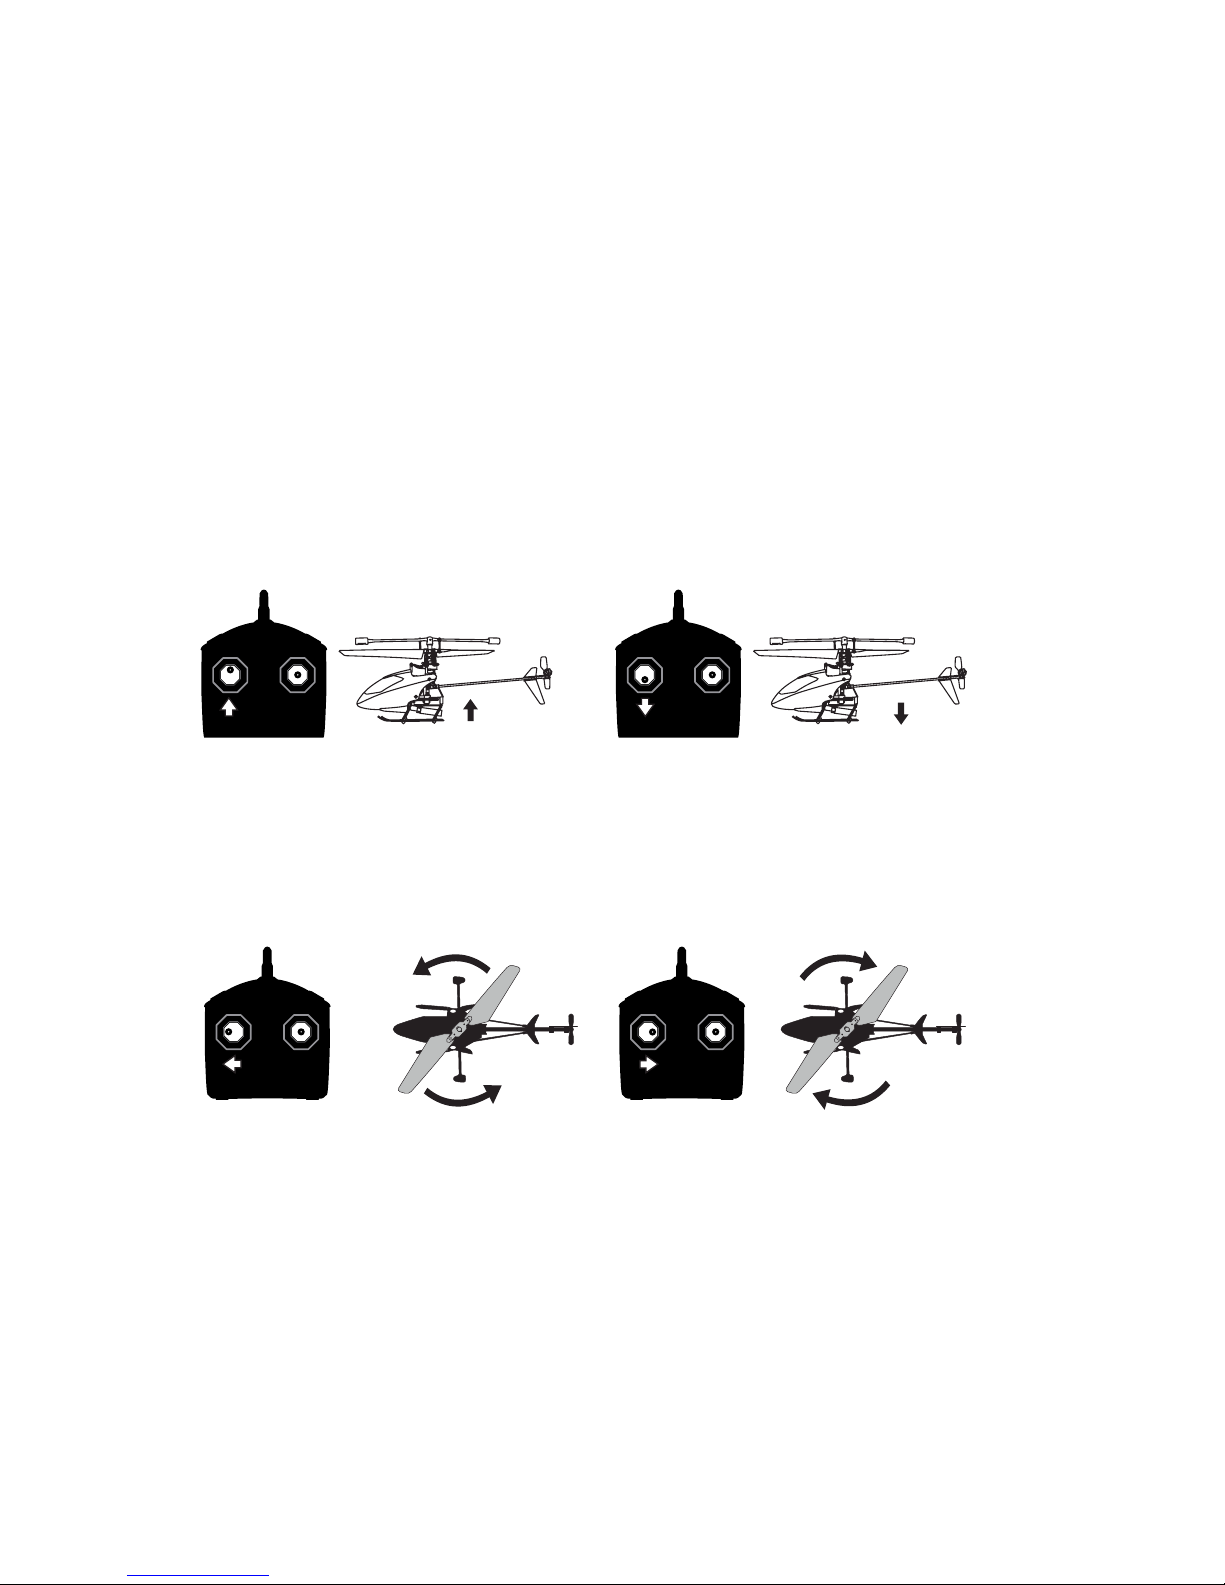
Move the Throttle forward to increase
the speed of the main rotor and the
helicopter will rise up.
Move the Throttle backward to
decrease the speed of the main rotor
and the helicopter will descend.
Move the Throttle left and the
helicopter will turn left.
Move the Throttle right and the
helicopter will turn right.
sTUnT PIloT flIGhT conTRols (4 channel flIGhT)
Are you ready for Stunt Pilot 4 Channel Flight? Be careful... Some of the control locations
have changed from Basic 3 Channel Flight—and it takes some practice. While learning
to fly your helicopter it is best to start with a large space until you get used to the basic
controls. Start slow, and when you are ready, you can graduate to even more daredevil
maneuvers. Practice makes perfect!
19
Page 21
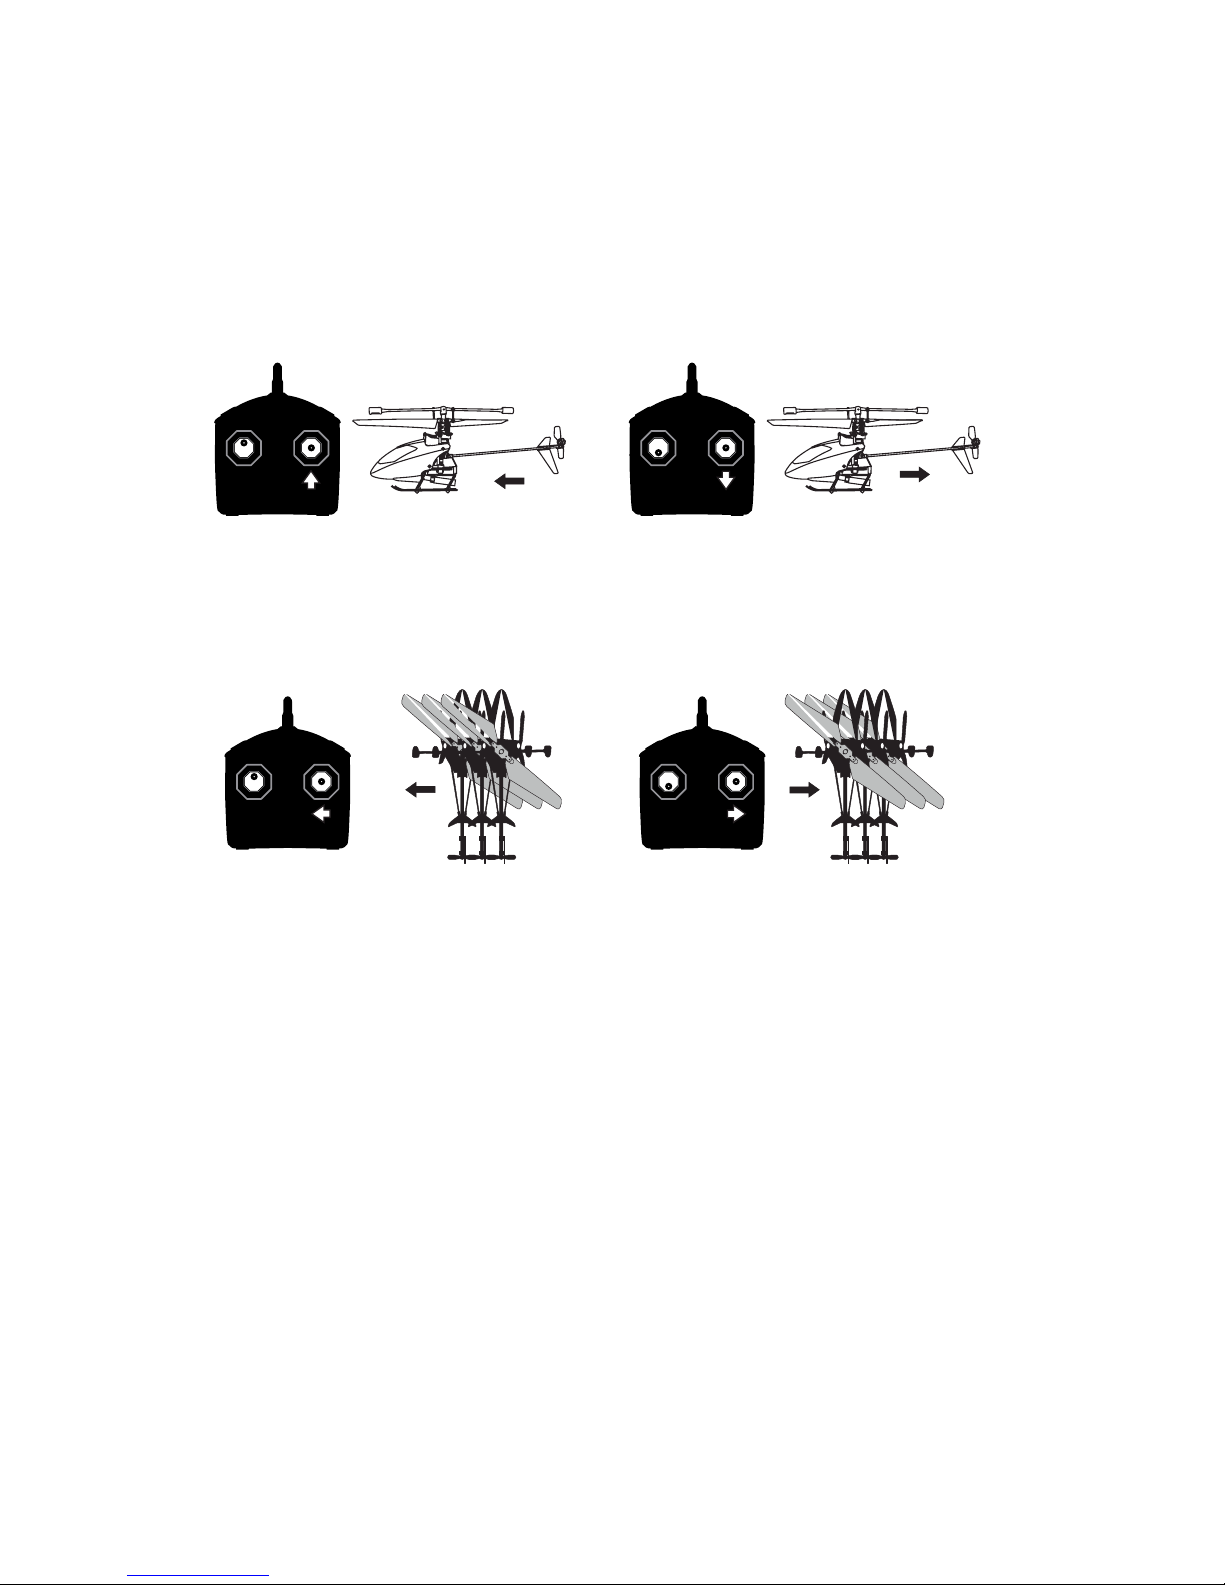
Move the Direction Control up and
the helicopter will move forward.
Move the Direction Control down and
the helicopter will move backward.
Move the Direction Control left and
the helicopter will bank to the left.
Move the Direction Control right and
the helicopter will bank to the right.
20
Page 22

aDvanceD flIGhT conTRols
Once you have mastered the basic flight controls of your helicopter it’s time to
try your hand at some more advanced flying techniques like forward and reverse
sweeping turns.
1. To make a forward sweeping turn, first push the Direction Control stick
all-the-way forward until the control stick touches the upper edge of the remote
(see the diagram on the following page). You should be moving straight forward
at this point.
2. Now begin to slowly roll the Directional Control stick along the outer edge in a
clockwise manner to sweep right or Counter-Clockwise along the outer edge to
sweep left (see the diagram on the following page).
3. To do reverse sweeps simply reverse the Directional Control stick by moving
it first to the lower edge of the remote, then begin to roll the control stick
slowly along the outer edge in the direction that you want the helicopter to
sweep in reverse. Remember, you must first have reverse momentum before
attempting a sweep or you will simply turn in place.
4. Once you get familiar with flying your helicopter you can begin to fly higher
and faster, making quicker turns and practicing new tricks.
21
Page 23
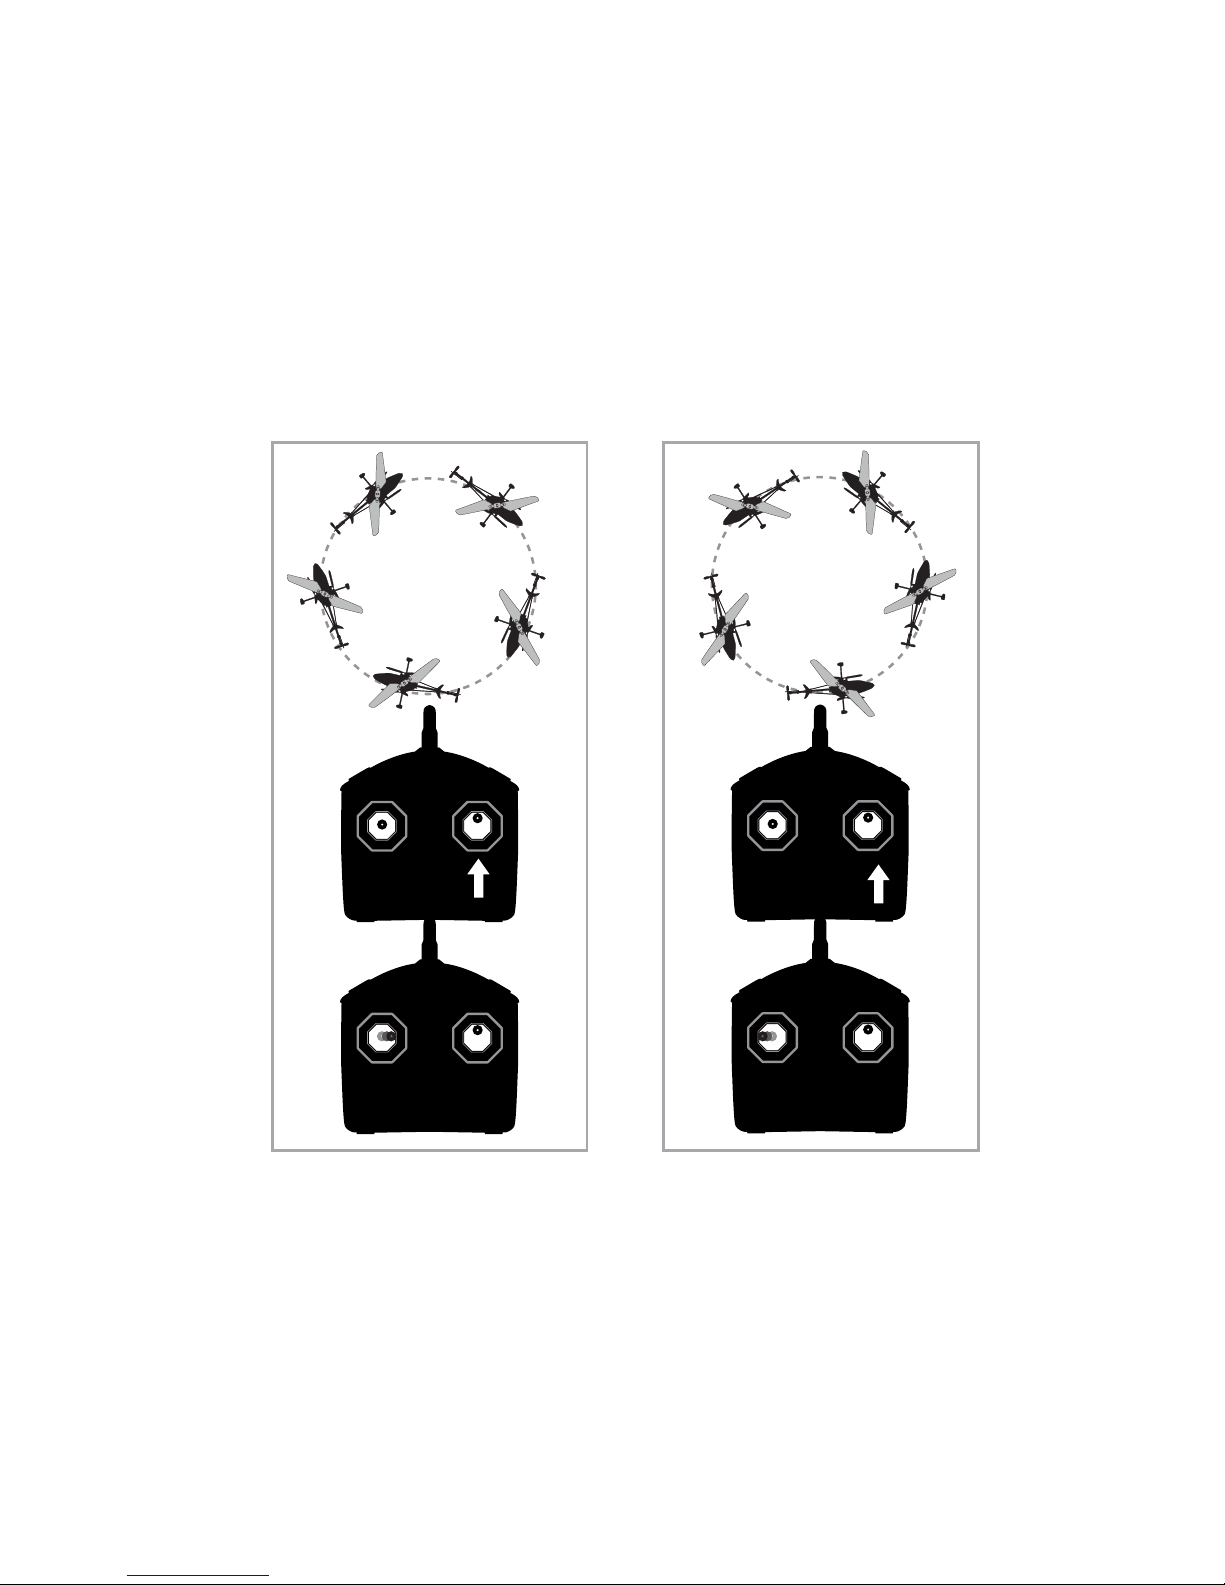
aDvanceD flIGhT ManeUveRs
Clockwise
Sweep
Counter-
Clockwise
Sweep
Push the throttle to
forward and then
push the control stick
straight forward
Keep the throttle in
position and then
move to right
Push the throttle to
forward and then
push the control stick
straight forward
Keep the throttle in
position and then
move to left
22
Page 24

23
PaRTs RePlaceMenT InsTRUcTIon
CONTENTS:
1 upper propeller blade
1 tail rotor
4 connecting rods
helIcoPTeR PRoPelleR sYsTeM
Your helicopter propeller system is a precision instrument that may need repair
or replacement from time to time for optimal flight function. Crash landing from
high-speed aerial flights may cause damage to your helicopter's propeller or
propeller connecting rods.
TROUBLESHOOTING:
If your helicopter loses its ability to fly correctly, please inspect the propeller
system carefully for the following three common issues:
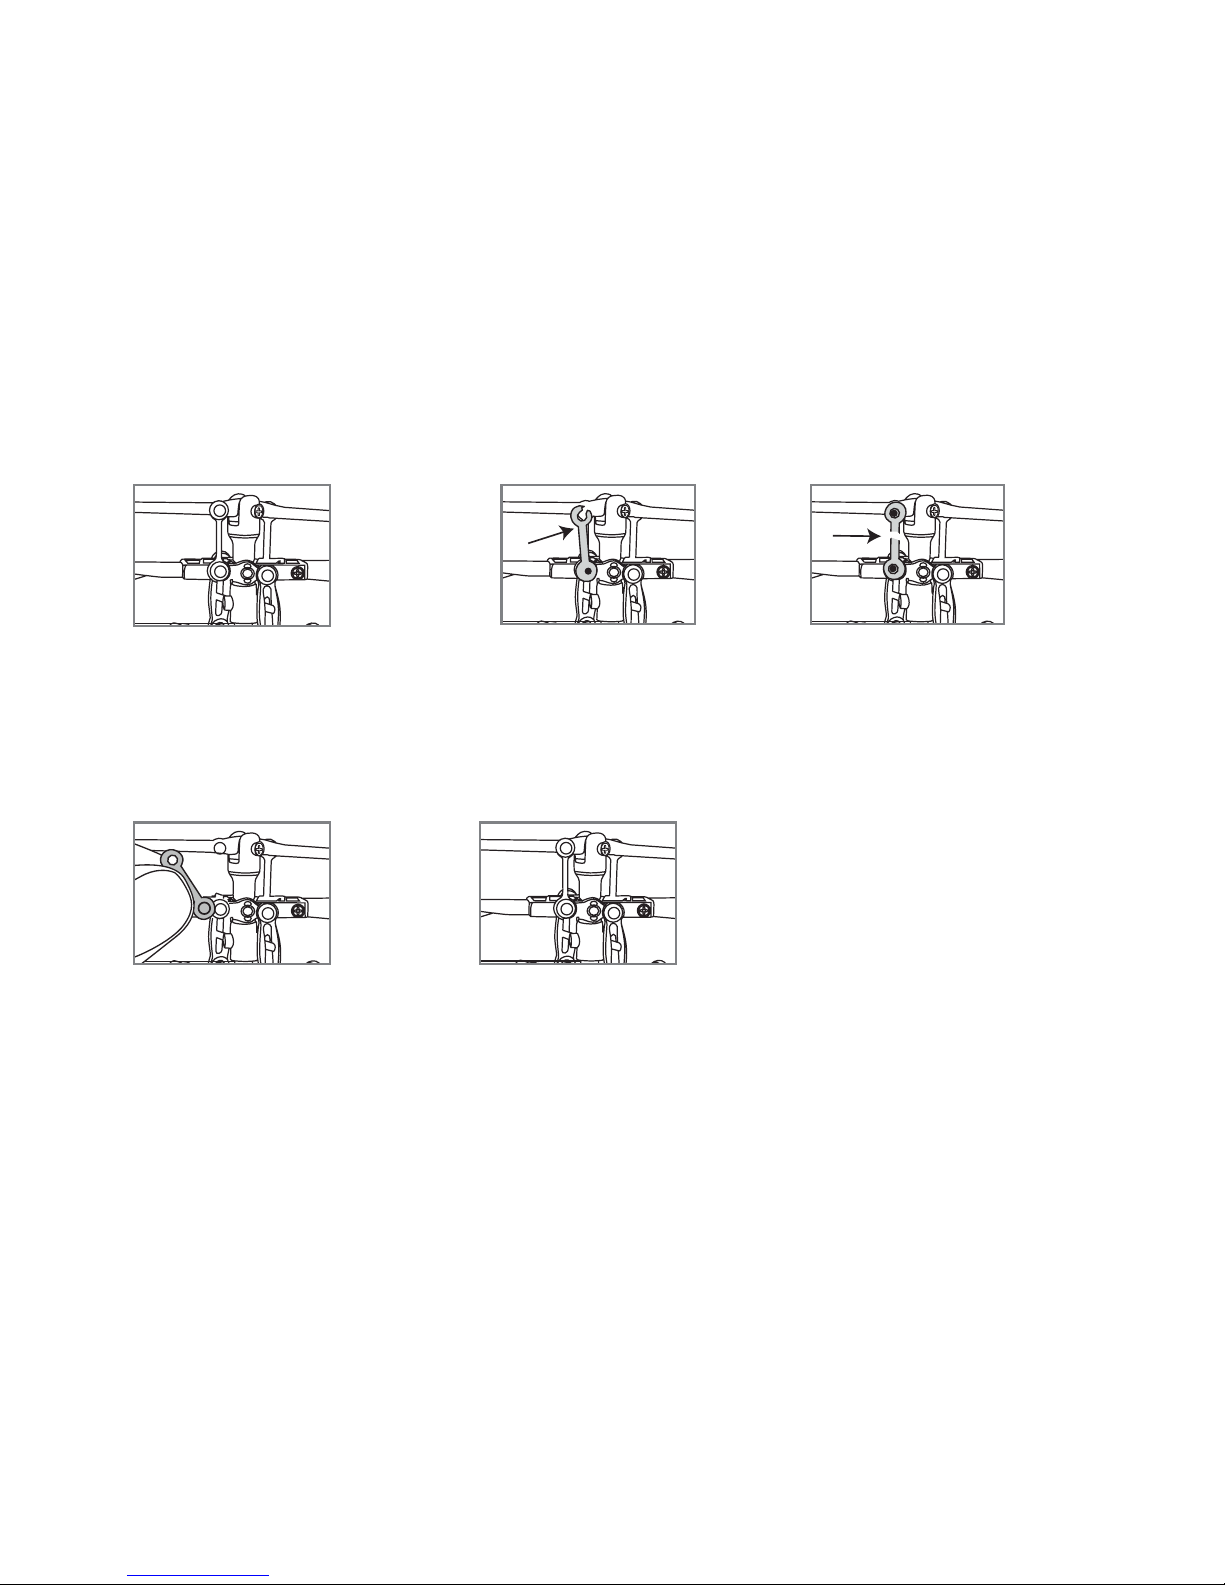
1. Broken connecting rod. Replacing Connecting Rod: The connecting rod is
a small “handcuff” style device that stabilizes the “upper” propellers. There are
2 connecting rods on the upper propeller. Please see Diagram 1 on page 25.
If a connecting rod is broken or missing simply replace it by “peeling” off the
broken one and replacing it with a new one. You may have to use slight pressure
when reattaching both ends of the new connecting rod. Make sure that the new
connecting rod is secured and locked in place. See Diagram 2 on page 25. When
changing the connecting rod, make sure there is no damage to the actual blade or
arm that holds the connecting rod in place. If there is, you must replace the entire
blade system.
Page 25

24
2. Broken propeller. Replacing Propeller: The propeller is subject to damage as you
learn to properly fly and control your helicopter. If, after a crash, your helicopter
loses control easily or flies erratically you should carefully inspect your entire
propeller system for any sign of damage. Most common are: cracked or chipped
blades, broken “connecting rod,” frozen balance bar (this is when the balancing
bar and blade are jammed and cannot move freely up and down). To replace
the propeller blades follow diagrams 3 through 6 on page 26.
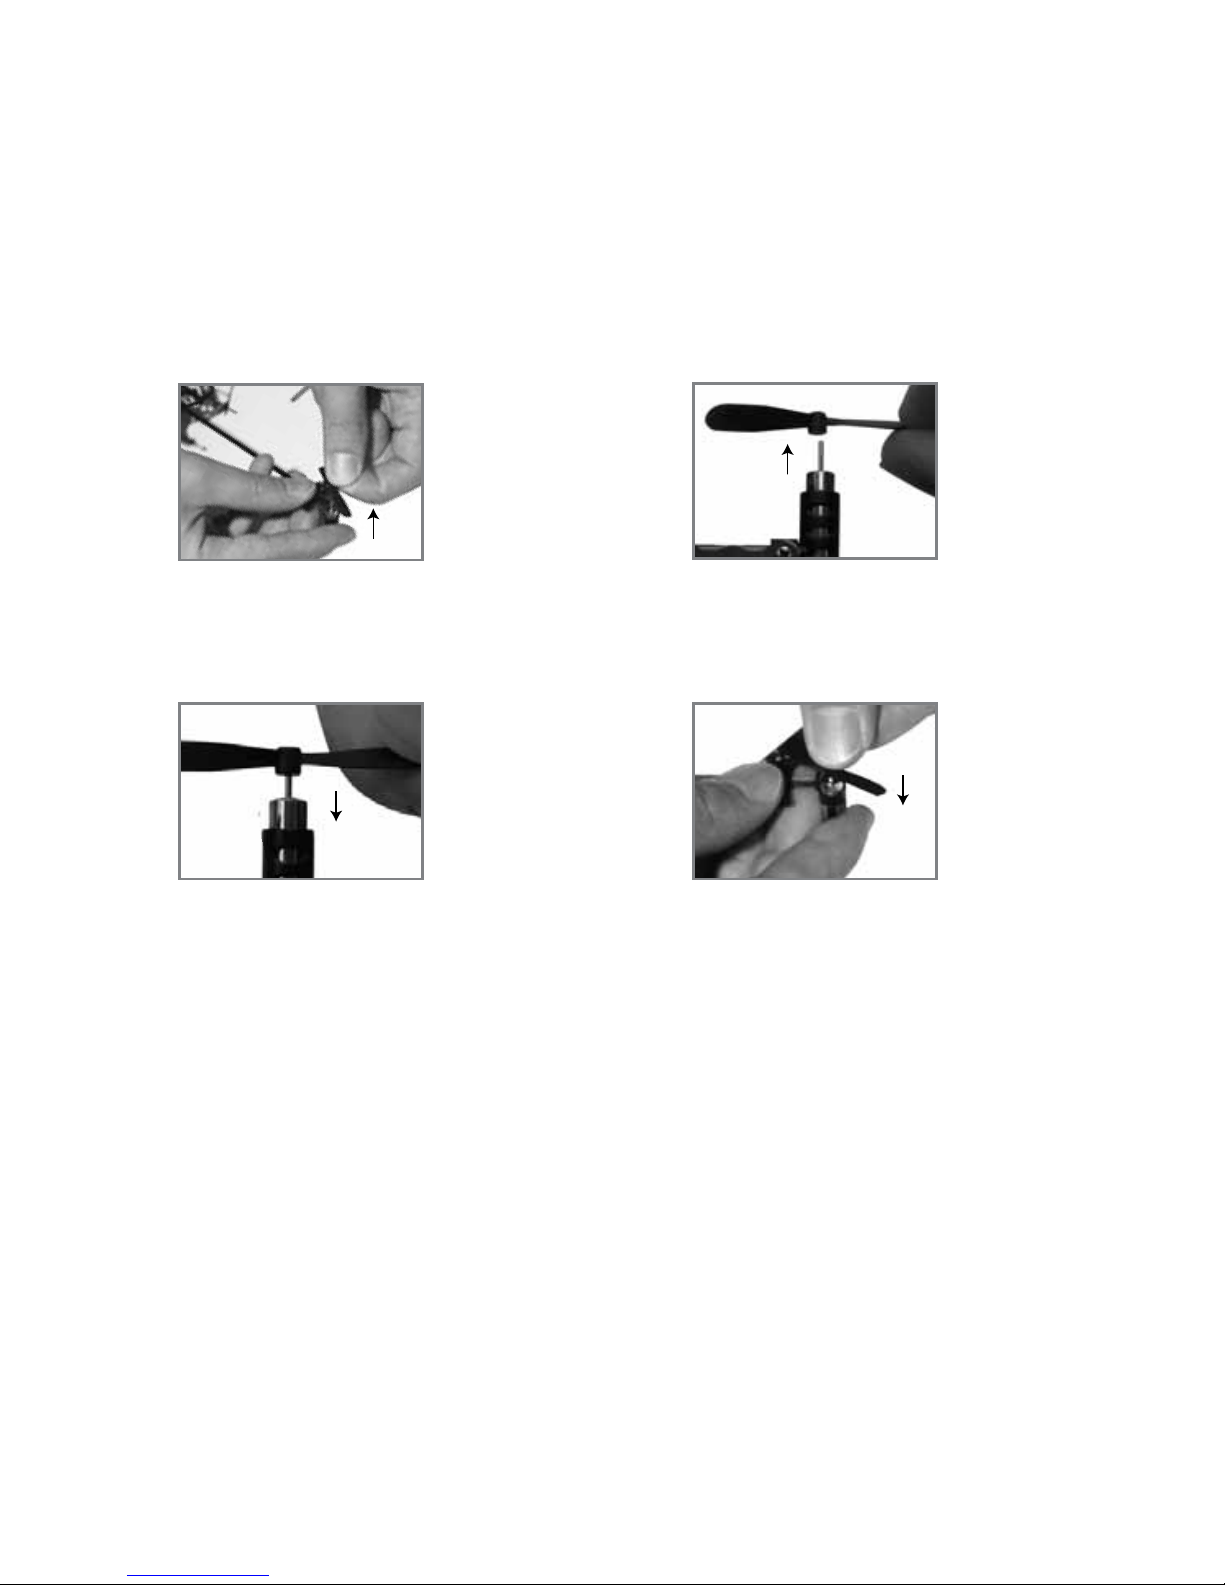
3. Broken tail propeller. Replacing Tail Propeller Blade: If, after a crash, your
helicopter tail propeller blade is damaged, please replace it by following
diagrams 8 through 11 on page 27.
Page 26
25
RePlacInG connecTInG RoD
anD DIRecTIon connecTInG RoD
There are 2 propeller connecting
rods on the propeller and 2
direction connecting rods.
Broken connecting rod.
Broken connecting rod.
Replacing connecting rod. Proper connection.
Diagram 1
Diagram 2
Page 27
26
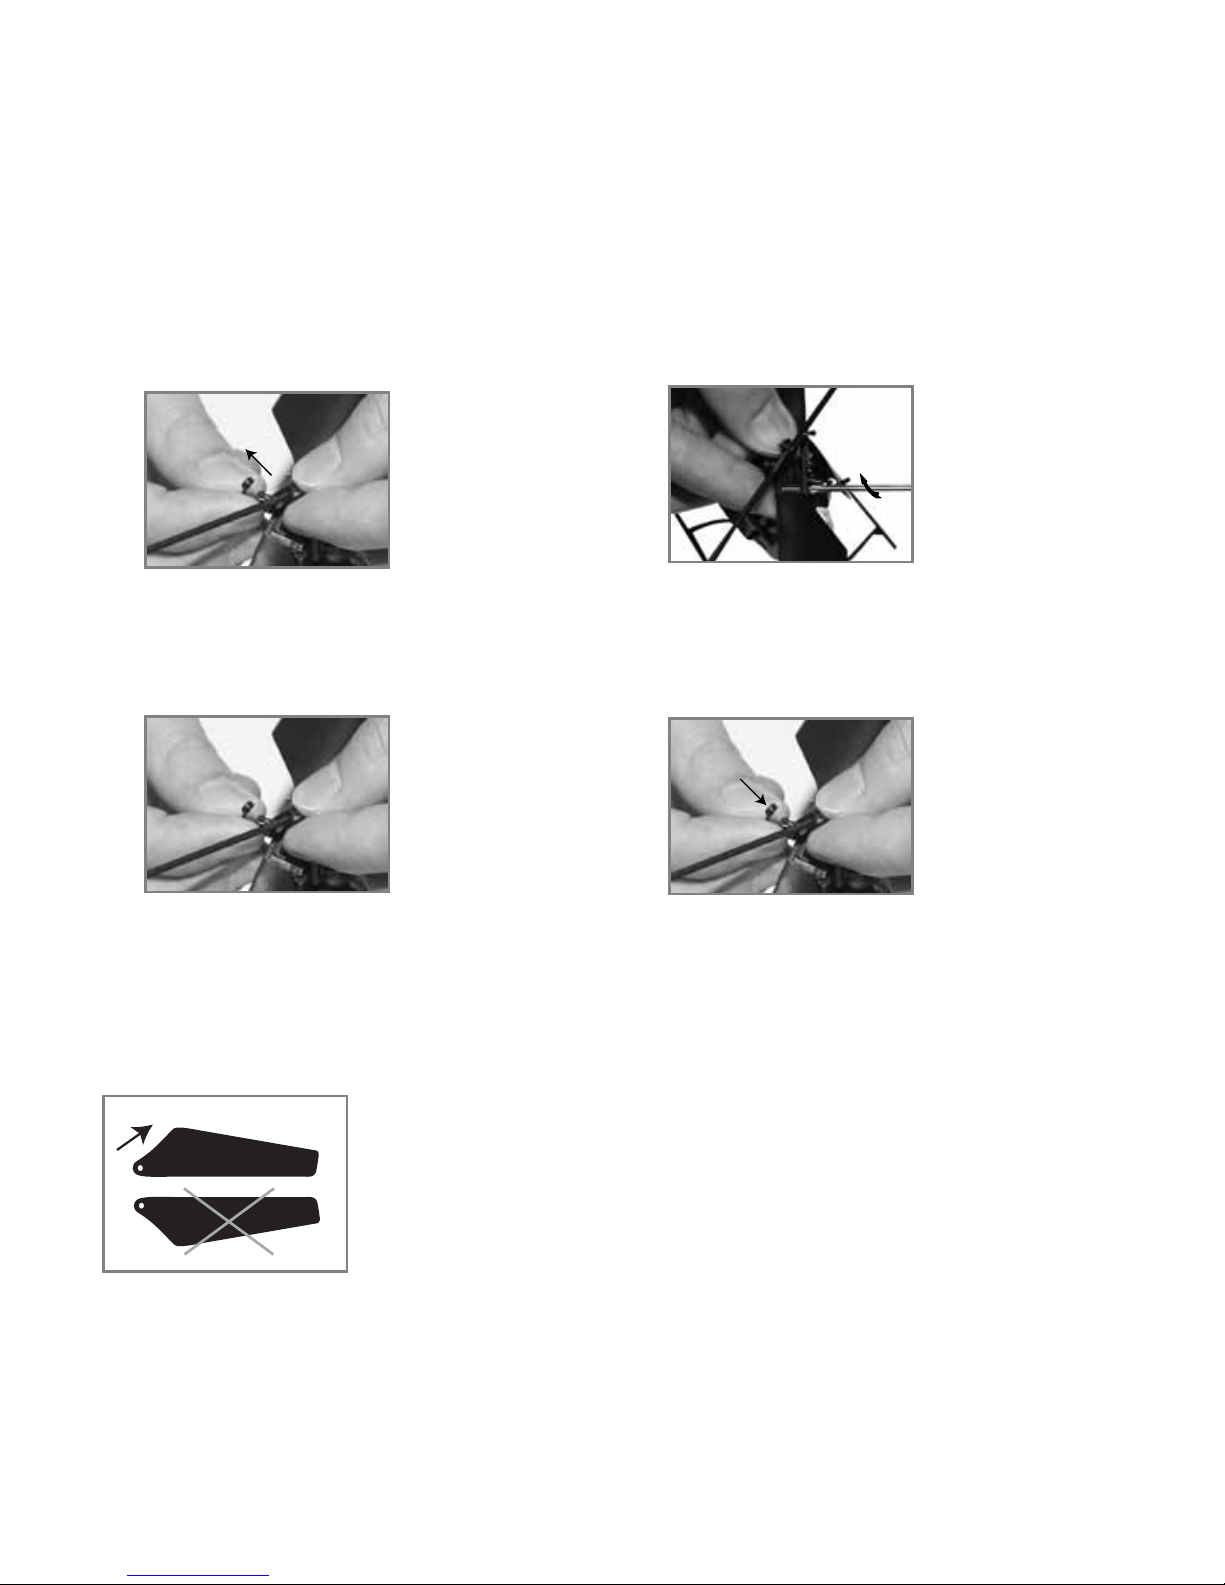
Using the included screwdriver, turn
counter clockwise to remove the screw.
Remove the broken blade and
carefully replace with a new one.
Using the included screwdriver, turn
clockwise to tighten the screw.
When you tighten the screw you should
test the blade to make sure that it still
has free movement. If the blade cannot
move freely, slightly loosen the screw.
Please note the design of the upper blade.
RePlacInG The UPPeR PRoPelleR blaDe
Diagram 7
Upper Blade
3
5 6
4
Page 28
27
Hold the very middle part of the tail
propeller and pull it straight up.
Remove the broken
tail propeller blade.
Carefully replace with a new one
and put it in proper position.
Push straight down
as shown above.
RePlacInG The TaIl PRoPelleR blaDe
8
10
11
9
Page 29

28
noTes
Page 30

One (1) Year Limited WarrantY
Brookstone® warrants this product against defects in materials and/or workmanship
under normal use for a period of ONE (1) YEAR from the date of purchase by the
original purchaser (“Warranty Period”). If a defect arises and a valid claim is received
within the Warranty Period, at its option, Brookstone will either 1) repair the defect
at no charge, using new or refurbished replacement parts, or 2) replace the product
with a new product that is at least functionally equivalent to the original product, or
3) provide a store credit in the amount of the purchase price of the original product.
A replacement product or part, including a user-installable part installed in accordance
with instructions provided by Brookstone, assumes the remaining warranty of the
original product. When a product or part is exchanged, any replacement item becomes
your property and the replaced item becomes Brookstone’s property. When a store
credit is given, the original product must be returned to Brookstone and becomes
Brookstone’s property.
Obtaining Service: To obtain warranty service, call Brookstone Limited Warranty Service
at 1-800-292-9819. Please be prepared to describe the product that needs service
and the nature of the problem. A purchase receipt is required. All repairs and
replacements must be authorized in advance. Service options, parts availability and
response times will vary. You are responsible for delivery and the cost of delivery of
the product or any parts to the authorized service center for replacement, per our
instructions.
Limits and Exclusions: Coverage under this Limited Warranty is limited to the United
States of America, including the District of Columbia and the U.S. Territories of
Guam, Puerto Rico, and the U.S. Virgin Islands. This Limited Warranty applies only
to products manufactured for Brookstone that can be identified by the “Brookstone”
trademark, trade name, or logo affixed to them or their packaging. The Limited
Warranty does not apply to any non-Brookstone products. Manufacturers or
29
Page 31

suppliers other than Brookstone may provide their own warranties to the purchaser,
but Brookstone, in so far as permitted by law, provides these products “as is.”
This warranty does not apply to: a) damage caused by failure to follow instructions
relating to product’s use or the installation of components; b) damage caused by
accident, abuse, misuse, fire, floods, earthquake or other external causes; c) damage
caused by service performed by anyone who is not a representative of Brookstone;
d) accessories used in conjunction with a covered product; e) a product or part
that has been modified to alter functionality or capability; f) items intended to be
periodically replaced by the purchaser during the normal life of the product including,
without limitation, batteries or light bulbs; g) any product sold “as is” including, without
limitation, floor demonstration models and refurbished items; or h) a product that is
used commercially or for a commercial purpose.
BROOKSTONE SHALL NOT BE LIABLE FOR INCIDENTAL OR CONSEQUENTIAL
DAMAGES RESULTING FROM THE USE OF THIS PRODUCT, OR ARISING
OUT OF ANY BREACH OF THIS WARRANTY. TO THE EXTENT PERMITTED BY
APPLICABLE LAW, BROOKSTONE DISCLAIMS ANY AND ALL STATUTORY OR
IMPLIED WARRANTIES, INCLUDING, WITHOUT LIMITATION, WARRANTIES
OF MERCHANTABILITY, FITNESS FOR A PARTICULAR PURPOSE AND
WARRANTIES AGAINST HIDDEN OR LATENT DEFECTS. IF BROOKSTONE
CANNOT LAWFULLY DISCLAIM STATUTORY OR IMPLIED WARRANTIES, THEN
TO THE EXTENT PERMITTED BY LAW, ALL SUCH WARRANTIES SHALL BE
LIMITED IN DURATION TO THE DURATION OF THIS EXPRESS WARRANTY.
Some states disallow the exclusion or limitation of incidental or consequential damages
or how long an implied warranty lasts, so the above exclusions or limitations may not
apply to you. This warranty gives you specific legal rights and you may also have other
rights, which vary from state to state.
30
Page 32

796083
Find thousands more
great ideas online
Merrimack, New Hampshire USA 03054 • 800-846-3000 • Brookstone.com
 Loading...