

Page 1

FLIGHTFORCE
EXPEDITION DR ONE
™
for ages
+
14
Page 2

TABLE OF CONTENTS
Warnings and Cautions .................................. 1
FCC Information ........................................ 7
Location of Parts and Controls .......................... 9
Operation .............................................. 11
Replacing The Propeller Blades ......................... 22
Troubleshooting ........................................ 23
Care and Maintenance ................................. 25
Expedition Drone Specifications ........................ 25
Warranty .............................................. 26
Page 3
CAUTION
• TO REDUCE THE RISK OF ELECTRIC SHOCK, DO NOT
REMOVE COVER.
THERE ARE NO SERVICEABLE PARTS INSIDE.
• TO REDUCE THE RISK OF FIRE OR ELECTRIC SHOCK, DO
NOT EXPOSE THIS UNIT TO RAIN OR MOISTURE.
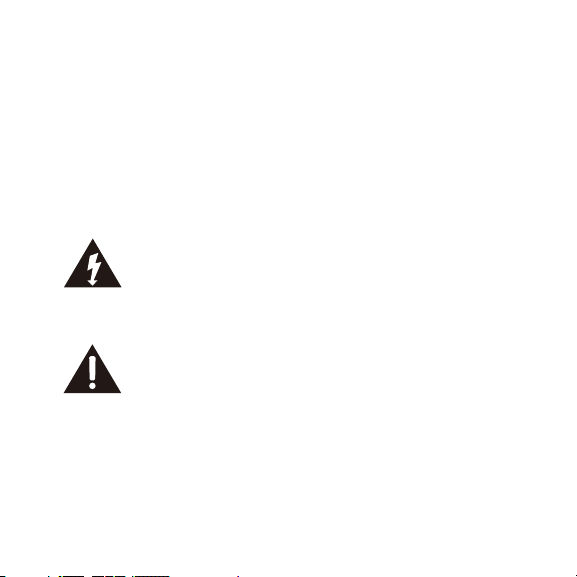
The lightning flash with arrow-head symbol within
an equilateral triangle is intended to alert the user
to the presence of uninsulated “dangerous voltage”
within the unit’s enclosure that may be of sufficient
magnitude to constitute a risk of electric shock.
The exclamation point within an equilateral triangle
is intended to alert the user to the presence of
important operating and maintenance (servicing)
instructions in the literature accompanying the unit.
IMPORTANT SAFETY INSTRUCTIONS
All of the safety and operati
adhered to and followed before the unit is operated.
ng instructions should be read,
1
Page 4

DRONE WARNINGS:
1. The Drone is designed for INDOOR or OUTDOOR flight.
2. The Drone’s blades revolve at high speeds and can cause
damage to the user, spectators and animals. Stand away from
the Drone to reduce the risk of getting into the flight path and
always maintain visual contact with the Drone while flying.
3. Warn spectators that you will be flying your Drone so that they
are aware of its position.
4. Before flight, inspect the rotor blades to make certain that the
blades are securely fastened to the Drone.
5. Before flying check your local laws and regulations pertaining
to drone usage.
6. It is recommended to operate the Drone in a wide-open
space. The ideal space should have a 200-foot radius.
7. Parental guidance or adult supervision is suggested at all
times.
8. If you are flying the Drone with others, make sure all
spectators are behind you.
9. For best performance, it is recommended that you operate the
Drone in zero wind conditions, as wind can greatly affect the
performance of the aircraft.
10. Record responsibly. Respect the privacy of individuals when
recording video or taking photos with the Drone.
11. Obtain permission from individuals before circulating videos or
photos taken with the Drone.
2
Page 5
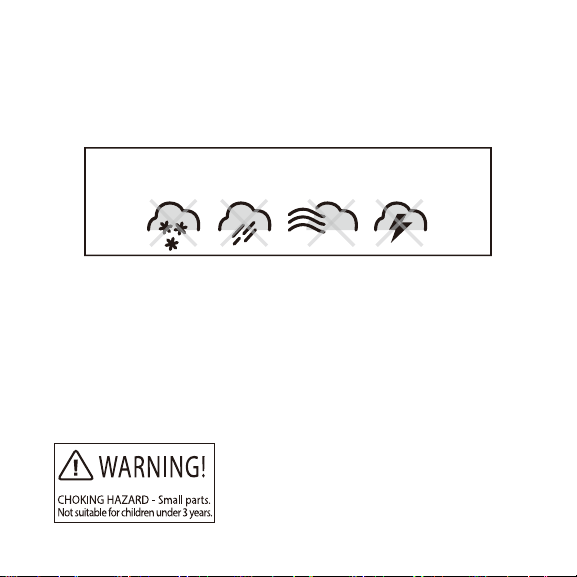
CAUTION: DO NOT ATTEMPT TO FLY THE DRONE IF THERE
IS RAIN, SNOW, HEAVY WINDS, THUNDER OR LIGHTNING
OUTDOORS. IT COULD DAMAGE YOUR PRODUCT AND MAY
CAUSE BODILY HARM.
DO NOT FLY THE DRONE IN FOUL WEATHER!
WARNING
WARNING!
• Choking/Cutting Hazard. Small Parts/Sharp Rotor Blades.
• Keep hands, hair and loose clothing away from the propeller
when the power switch is turned to the ON position.
• Not suitable for children under 14 years old. Parental
supervision recommended when flying the Drone.
3
Page 6

BATTERY WARNINGS
RECHARGEABLE BATTERY (DRONE):
This device contains a removable Lithium-Polymer battery. The
included charger is built specifically for the Expedition Drone
Li-Poly battery. Do not use it to charge any other battery. The
battery must be recycled or disposed of properly. Contact your
local waste management office for information on battery
recycling or disposal.
BC
DANGER
To reduce the risk of electric shock, burns, fire or injury:
1. Do not use while bathing or in a shower.
2. Do not place or store unit where it can fall or be pulled into a
tub or sink.
3. Do not place in, drop or submerge in water or other liquid.
4. Do not reach for a unit that has fallen into water. Unplug it
immediately.
5. Care should be taken so that objects do not fall and liquids are
not spilled onto the unit.
4
Page 7

WARNING
1. Close supervision is necessary when this appliance/product is
used by or near children or mentally disabled individuals.
2. Use this unit only for its intended use as described in this
manual.
3. Unplug this unit during lightning storms or when unused for
long periods of time.
4. Never drop or insert an object into any opening.
5. Protect the power cord from being walked on or pinched,
particularly at plug outlets, convenience receptacles and the
point where it exits the unit.
6. Do not allow cord to touch hot surfaces. Wrap cord loosely
around the unit when storing.
7. The unit should be situated away from direct sunlight or heat
sources such as radiators, electric heaters, heat registers,
stoves, or other units (including amplifiers) that produce heat.
Avoid placing on top of stereo equipment that radiates heat.
8. Never block the air openings of the unit with materials such
as clothing, plastic bags or papers, or place it on a soft surface
such as a bed or couch, where the air openings may be blocked.
5
Page 8

9. Do not overload the electrical outlet. Use only the power
source as indicated.
10. Do not carry this unit by its cord or use the cord as a handle.
11. Never operate this unit if it has a damaged cord or plug, if it is
not working properly, or if it has been dropped or damaged, or
dropped into water. If the unit’s power supply cord or plug is
damaged, do not attempt to fix it yourself.
12. To avoid the risk of electric shock, do not disassemble or
attempt to repair the unit. Incorrect repair can cause risk of
electric shock or injury to persons when the unit is used.
13. Do not operate in the presence of explosive and/or flammable
fumes.
14. Never remove the plug from the outlet by pulling the power
cord.
6
Page 9

FCC INFORMATION
Caution: Changes or modifications not expressly approved by
the party responsible for compliance could void the user’s
authority to operate the equipment.
This equipment has been tested and found to comply with the
limits for a Class B Digital Device, pursuant to Part 15 of the FCC
Rules. These limits are designed to provide reasonable protection
against harmful interference in a residential installation. This
equipment generates, uses, and can radiate radio frequency
energy and, if not installed and used in accordance with the
instructions, may cause harmful interference to radio
communications. However, there is no guarantee that interference
will not occur in a particular installation.
If this equipment does cause harmful interference to radio or
television reception, which can be determined by turning the
equipment off and on, the user is encouraged to try to correct the
interference by one or more of the following measures:
• Reorient or relocate the receiving antenna.
• Increase the distance between the equipment and receiver.
7
Page 10

• Connect the equipment to an outlet on a circuit different from
that to which the receiver is connected.
• Consult the dealer or an experienced radio/TV technician for
help.
This equipment complies with Part 15 of the FCC Rules.
Operation is subject to the following two conditions:
1. This equipment may not cause harmful interference.
2. This equipment must accept any interference received,
including interference that may cause undesired operation.
Modifications not authorized by the manufacturer may void the
user’s authority to operate this device.
8
Page 11

LOCATION OF PARTS AND CONTROLS
Propeller
Carbon Ballast
Landing Skid
Propeller GearFoam
HD CameraBattery
9
Page 12

LOCATION OF PARTS AND CONTROLS
10
Page 13

MOBILE WI-FI CONTROL OPERATING
INSTRUCTIONS
1. Go to the iTunes® App StoreSM (for Apple devices) or Google
TM
Play
(for Android devices) and download the Expedition App.
2. Turn on the drone. The indicator light will be flashing, which
means that the drone is waiting for a connection signal
from your mobile phone.
3. Enter into the settings of mobile phone, turn on the Wi-Fi and
search the “Expedition_XXX” and connect it. After a
successful connection, the red light of drone will be solid.
4. Open the Expedition App on you device.
11
Page 14

5. Touch “CONTROLS,” push the engine (on the left side) up and
down to make the connection with mobile device.
12
Page 15

CHARGING DRONE BATTERIES
USE THE WALL CHARGER TO CHARGE THE DRONE BATTERY
3.7V 500mAh Li-po Battery
Please use the included charger to charge the battery. Connect
the battery plug into the charger.
CAUTION
LED Indicator LED
Idle and Charge
Completion
Charger Specifications
Input
5V 420-450mA 4.2+0.03V
Charging Current
Charging
Full Voltage
13
Page 16

BATTERY AND CHARGER SPECIFICATION
Battery usage and charge duration reference
Battery Type
Battery Specification
Drone Flight Time
Charge Time
Lithium-Polymer Battery
3.7V 500mAh
Approx. 8-10 Minutes
Approx. 35 Minutes (Charging current approx. 0.5A)
GETTING READY TO TAKE OFF
Li-Polymer Battery
3.7V 500mAh
Flat Surface
Step 1
Insert the battery into the drone, and plug the battery wire into
the drone. When the two indicator lights are flashing, put the
drone flat on the ground.
14
Page 17

Step 2
Open the App and switch the button to ON. The drone is ready to fly.
Important: Make sure the drone is placed on a flat
surface. After connecting, the gyroscope will need to be
calibrated before take off.
CALIBRATION INSTRUCTION
Steps:
1. Make sure the drone is placed on a flat surface.
2. After connecting, pull the two rockers (on the App) to the
lower right corner for 2-3 seconds for calibration.
3. When calibrated, the flashing LED light will become solid.
15
Page 18

BASIC MANUEVERS AND PRACTICE EXERCISES
PLEASE PRACTICE AND LEARN CONTROLS BEFORE ACTUAL FLYING
Please be familiar with the unit before you fly it. Read the
instructions carefully, get familiar with all controls, and keep
repeating until you are confident with these controls.
1. Place the drone in a clear open space with the tail of drone
pointing to you.
2. Practice operating the control sticks (as shown below).
Repeat practicing “Throttle High/Low,” “Turn Left/Right,”
“Forward/Backward,” and “Move Left/Right.”
3. This simulation flight practice is very important, please keep
practicing until you are comfortable with these controls.
16
Page 19

Direction
Elevator
Turn right
Turn left
Fly forward
Fly backward
Throttle
Rudder
Move left
Ascent
Descent
Move right
17
Page 20

THROTTLE CONTROL PRACTICE
1. Move the throttle (on the left side of the screen) to the middle
to lift the drone a few feet off the ground. Lower the throttle to
slowly land the drone again. Repeat until you are comfortable
with this action.
2. To practice hovering flight, try to keep the drone steady just
2-3 feet off the ground.
18
Page 21

DIRECTION CONTROL PRACTICE
• Practice flying forward and back using the directional control
panel (on the right side of the screen). Keep a low height and
practice moving a few feet in each direction.
If the drone flies away, please lower the throttle stick
(on left) to land the drone.
19
Page 22

RUDDER CONTROL PRACTICE
1. Slowly raise the throttle stick.
2. Move the nose of the drone right or left. Then slowly move the
rudder stick in the opposite direction to fly back to the original
position.
PRECISION CONTROL PRACTICE
Once you are familiar with all actions from the above exercises,
practice within a circle to improve your accuracy. Reduce the size
of the circle as you become more familiar with the controls.
DIRECTIONAL CHANGE AND HOVERING PRACTICE
Once you are familiar with the above exercises, stand by the
drone and continue practicing. Then repeat the exercises by
standing in front of the drone.
20
Page 23

CORRECTING FLIGHT USING
PRE-PROGRAMMED MOVEMENTS
Slowly raise the throttle stick as the drone lifts off the ground.
You can use the pre-programmed movements to correct the
actions. These controls are the slider bars next to the throttle and
directional control pads.
1. Correcting using Rotational movement
As the drone lifts off, the nose may lean left or right.
When the drone leans right, adjust the trim to left side.
When the drone leans left, adjust the trim to right side.
2. Correcting using Forward/Backward Tilt movement
As the drone lifts off, the nose may
lean forward or backward.
When the drone leans forward
adjust the tilt back.
When the drone leans backward,
adjust the tilt forward.
3. Correcting using Side Step
Movement
As the drone lifts off, if the unit may
shift left or right.
When the drone shifts right, side step to left side.
When the drone shifts left, side step to right side.
Turn right
Move left
Turn left
Fly forward
Fly backward
Move right
21
Page 24

REPLACING THE PROPELLER BLADES
The Expedition Drone’s propeller system is a precision
instrument that may need repair or replacement for optimal
flight function. Crash landing from high-speed aerial flights may
cause damage to your Expedition Drone’s propellers.
1. Before making any repairs, turn off the power and
disconnect the battery.
2. The Expedition Drone has four blades labeled with an
embossed A or B, two green propellers on front, and two
black propellers on the rear.
3. When replacing the propeller blades, remove the blade from
the rotor shaft with a screwdriver (not included). Make sure
to match the indication letter and color.
4. Push the gear up to its fully installed position prior to
securing the screw in the new propeller.
5. Replace the damaged blade with the new blade.
22
Page 25

TROUBLESHOOTING
Problem Cause Solution
After connecting the
1
drone to the battery,
the LED indicators
keep flashing, but there
is no response when
operating
Unable to pair to App
Pair the App and
drone (refer to P.11)
No response after
2
battery is connected to
drone
Motor does not
3
respond to throttle
stick, receiver LED
flashes
Main rotor continues to
4
spin after landing
1. Check if the power of
remote control or
receiver is connected
2. Check the remote
control and receiver
voltage
3. Poor contact on battery
terminals
Drone battery depleted
Throttle stick is not in the
lowest position
1. Turn on control and make
sure drone battery is inserted
properly
2. Use fully charged batteries
3. Re-seat the battery and
make sure there is good
contact between batteries
Fully charge the battery, or
replace with a fully charged
battery
Make sure the throttle stick is in
the lowest position
23
Page 26

Problem Cause Solution
Main rotor spins but is
5
unable to take off
Strong vibration of
6
drone
1. Deformed propellers
2. Drone battery depleted
Deformed propellers Replace main propellers
1. Replace main propellers
2. Charge or replace with a fully
charged battery
7 The drone still keeps
turning after rudder
trim, or inconsistent
speed during side step
8 The drone shifts
forward or backward
Can not fly the drone
9
after crash
When App closed, or
10
could not control the
drone, or could not pair
with the drone
24
1. Damaged rotors
2. Damaged drive motor
Gyroscope is not centered
or calibrated
1. Motor fell out
2. Rotors came loose
The drone needs to get
reset
1. Replace the main wing
2. Replace the main motor
Restart the drone and
control to recalibrate the
gyroscope
1. Install the motor again
2. Tighten the rotors
Unplug the battery and re-plug
Page 27

CARE AND MAINTENANCE
• Always disconnect the battery from the drone when it will not
be used for an extended period of time.
• To clean, gently wipe the drone with a clean damp cloth.
• Parental guidance recommended when installing or replacing
the batteries.
EXPEDITION DRONE SPECIFICATIONS
Li-Poly Rechargeable Battery: 3.7V, 500mAh
Flight speeds: 3
Flying range: up to 196 feet (60 meters)
Flight time between charges: 8 minutes
Power type: USB rechargeable (includes cable)
Includes 8 spare blades
Dimensions: 11.4 x 11.4 in (29 x 29 cm), 4.1 oz (116g)
25
Page 28

ONE(1) YEAR LIMITED WARRANTY
Brookstone® warrants this product against defects in materials and/or workmanship
under normal use for a period of ONE (1) YEAR from the date of purchase by the
original purchaser (“Warranty Period”). If a defect arises and a valid claim is
received within the Warranty Period, at its option, Brookstone will either 1) repair
the defect at no charge, using new or refurbished replacement parts, or 2) replace
the product with a new product that is at least functionally equivalent to the original
product, or 3) provide a store credit in the amount of the purchase price of the
original product. A replacement product or part, including a user-installable part
installed in accordance with instructions provided by Brookstone, assumes the
remaining warranty of the original product. When a product or part is exchanged,
any replacement item becomes your property and the replaced item becomes
Brookstone’s property. When a store credit is given, the original product must be
returned to Brookstone and becomes Brookstone’s property.
Obtaining Service: To obtain warranty service, call Brookstone Limited Warranty
Service at 1-800-292-9819. Please be prepared to describe the product that
needs service and the nature of the problem. A purchase receipt is required. All
repairs and replacements must be authorized in advance. Service options, parts
availability and response times will vary. You are responsible for delivery and the
cost of delivery of the product or any parts to the authorized service center for
replacement, per our instructions.
Limits and Exclusions: Coverage under this Limited Warranty is limited to the United
States of America, including the District of Columbia and the U.S. Territories of
Guam, Puerto Rico, and the U.S. Virgin Islands. This Limited Warranty applies only
to products manufactured for Brookstone that can be identified by the “Brookstone”
trademark, trade name, or logo affixed to them or their packaging. The Limited
Warranty does not apply to any non-Brookstone products. Manufacturers or suppliers
26
Page 29

other than Brookstone may provide their own warranties to the purchaser, but
Brookstone, in so far as permitted by law, provides these products “as is.” This
warranty does not apply to: a) damage caused by failure to follow instructions
relating to product’s use or the installation of components; b) damage caused by
accident, abuse, misuse, fire, floods, earthquake or other external causes; c)
damage caused by service performed by anyone who is not a representative of
Brookstone; d) accessories used in conjunction with a covered product; e) a
product or part that has been modified to alter functionality or capability; f) items
intended to be periodically replaced by the purchaser during the normal life of the
product including, without limitation, batteries or light bulbs; g) any product sold “as
is” including, without limitation, floor demonstration models and refurbished items;
or h) a product that is used commercially or for a commercial purpose.
BROOKSTONE SHALL NOT BE LIABLE FOR INCIDENTAL OR CONSEQUENTIAL
DAMAGES RESULTING FROM THE USE OF THIS PRODUCT, OR ARISING
OUT OF ANY BREACH OF THIS WARRANTY. TO THE EXTENT PERMITTED BY
APPLICABLE LAW, BROOKSTONE DISCLAIMS ANY AND ALL STATUTORY
OR IMPLIED WARRANTIES, INCLUDING, WITHOUT LIMITATION, WARRANTIES
OF MERCHANTABILITY, FITNESS FOR A PARTICULAR PURPOSE AND
WARRANTIES AGAINST HIDDEN OR LATENT DEFECTS. IF BROOKSTONE
CANNOT LAWFULLY DISCLAIM STATUTORY OR IMPLIED WARRANTIES,
THEN TO THE EXTENT PERMITTED BY LAW, ALL SUCH WARRANTIES SHALL
BE LIMITED IN DURATION TO THE DURATION OF THIS EXPRESS WARRANTY.
Some states disallow the exclusion or limitation of incidental or consequential damages
or how long an implied warranty lasts, so the above exclusions or limitations may not
apply to you. This warranty gives you specific legal rights and you may also have
other rights, which vary from state to state.
27
Page 30

Find thousands more
great ideas online
317881
Merrimack, New Hampshire, USA 03054 • 800-846-3000 • Brookstone.com
 Loading...