

Page 1
C3PK1-1
PREMIUM GRILLS
CHARCOAL GRILL
C3-1 GRILL WITH BLACK CART AND ONE BLACK SHELF
Page 1
Page 2

IMPORTANT INFORMATION
IMPORTANT
This manual should be read thoroughly by the installer and by anyone who will use
or maintain the grill.
Installer - Write the model number, serial number, and date of installation in the manual.
If available, attach a copy of the receipt. Leave this manual with the grill owner.
Grill Owner - Read and retain this manual. It contains instructions on using and maintaining your grill, plus information on ordering replacements parts. Attach a copy of
your receipt to this manual. Your receipt established the proof of purchase required
for warranty replacement parts.
WARNING
Follow the instruction in this manual for proper installation and maintenance of the
grill. Improper installation, adjustment, alteration, service or maintenance can cause
injury or property damage. For assistance or additional information consult a
qualied installer, service agency or the gas supplier.
WARNING: FOR YOUR SAFETY
Do not store or use gasoline or other ammable vapors or liquids in the vicinity of
this or any appliance.
CAUTION:
Parts may have sharp edges. Wear leather work gloves and handle parts carefully
during unpacking, assembly and installation.
B102223-0-0714Page 2
Page 3

Thank you for purchasing a Independence Charcoal Grill.
Welcome to the beauty, durability, and prestige of an Independence Charcoal
Grill by Broilmaster. With award-winning excellence built into every feature
and durability that surpasses other Premium charcoal grills, Broilmaster has
manufactured the ultimate grills for discriminating outdoor chefs for over 30 years.
At Broilmaster, we continually strive to enhance the performance and quality
of our products for your grilling enjoyment. Every effort will be made to ensure
that Broilmaster continues to be your choice as the Premium grill of the future.
Visit www.broilmaster.com and click on the Hall of Fame to see a sampling of
our long-time customers. We hope you enjoy years of great meals prepared on
your Broilmaster. And we hope to add your photo to the Hall of Fame one day.
Thank You!
Broilmaster is a registered trademark of
Empire Comfort Systems, Inc.
918 Freeburg Ave.
Belleville, Illinois 62220
Telephone 800-851-3153
B102223-0-0714 Page 3
Page 4

TABLE OF CONTENTS
Y
ou have chosen the nest grill for your outdoor cooking pleasure.
Please take time to read this entire manual before assembling your Premium Broilmaster Grill.
ASSEMBLY INSTRUCTIONS .....................................................................................................
C3PK1 SERIES PARTS DIAGRAM ...........................................................................................
CART HARDWARE PACK - B102002 .......................................................................................
GRILL HEAD HARDWARE PACK - B102165 ...........................................................................
SHELF HARDWARE PACK - B101658 ......................................................................................
UNPACK AND REMOVE LID ...................................................................................................
CART BASE ASSEMBLY .........................................................................................................
CART WALLS ASSEMBLY ......................................................................................................
ATTACH WALLS TO BASE ......................................................................................................
INSTALL REAR BRACE AND REAR CART COVER ..............................................................
INSTALL FRONT CART COVER .............................................................................................
ATTACH BOTTOM CASTING TO CART .................................................................................
HEAT SHIELD PLACEMENT ...................................................................................................
REMOVE CARRIAGE BOLTS ..................................................................................................
ATTACH SIDE SHELF .........................................................................................................
19-22
REAR SUPPORT BRACKET PLACEMENT ............................................................................
ADJUSTING DOOR LATCHES ................................................................................................
ATTACH TOP SMOKE VENT ASSEMBLY ..........................................................................
25-26
ATTACH UPPER SPARK ARRESTER PLATE ........................................................................
HANDLE INSTALLATION ........................................................................................................
REINSTALL LID ........................................................................................................................
INSTALL CHARCOAL GRATES ..............................................................................................
INSTALL COOKING GRIDS .....................................................................................................
INSTALL ASH PAN ...................................................................................................................
COMPLETED ASSEMBLY .......................................................................................................
OWNER’S MANUAL FOR C3PK1 GRILLS ........................................................................
OPERATION - CHARCOAL GRILLS ..............................................................................
34-44
34-35
MAINTENANCE ...................................................................................................................
COOKING TIPS ...................................................................................................................
IMPORTANT SAFETY INFORMATION ..........................................................................
38-39
WARRANTY TERMS ...........................................................................................................
GRILL MAINTENANCE HISTORY ..................................................................................
41-42
MASTER PARTS DISTRIBUTOR LIST ...............................................................................
HOW TO ORDER REPAIR PARTS .....................................................................................
5
6
7
8
9
10
11
12
13
14
15
16
17
18
23
24
27
28
29
30
31
32
33
36
37
40
43
43
B102223-0-0714Page 4
Page 5
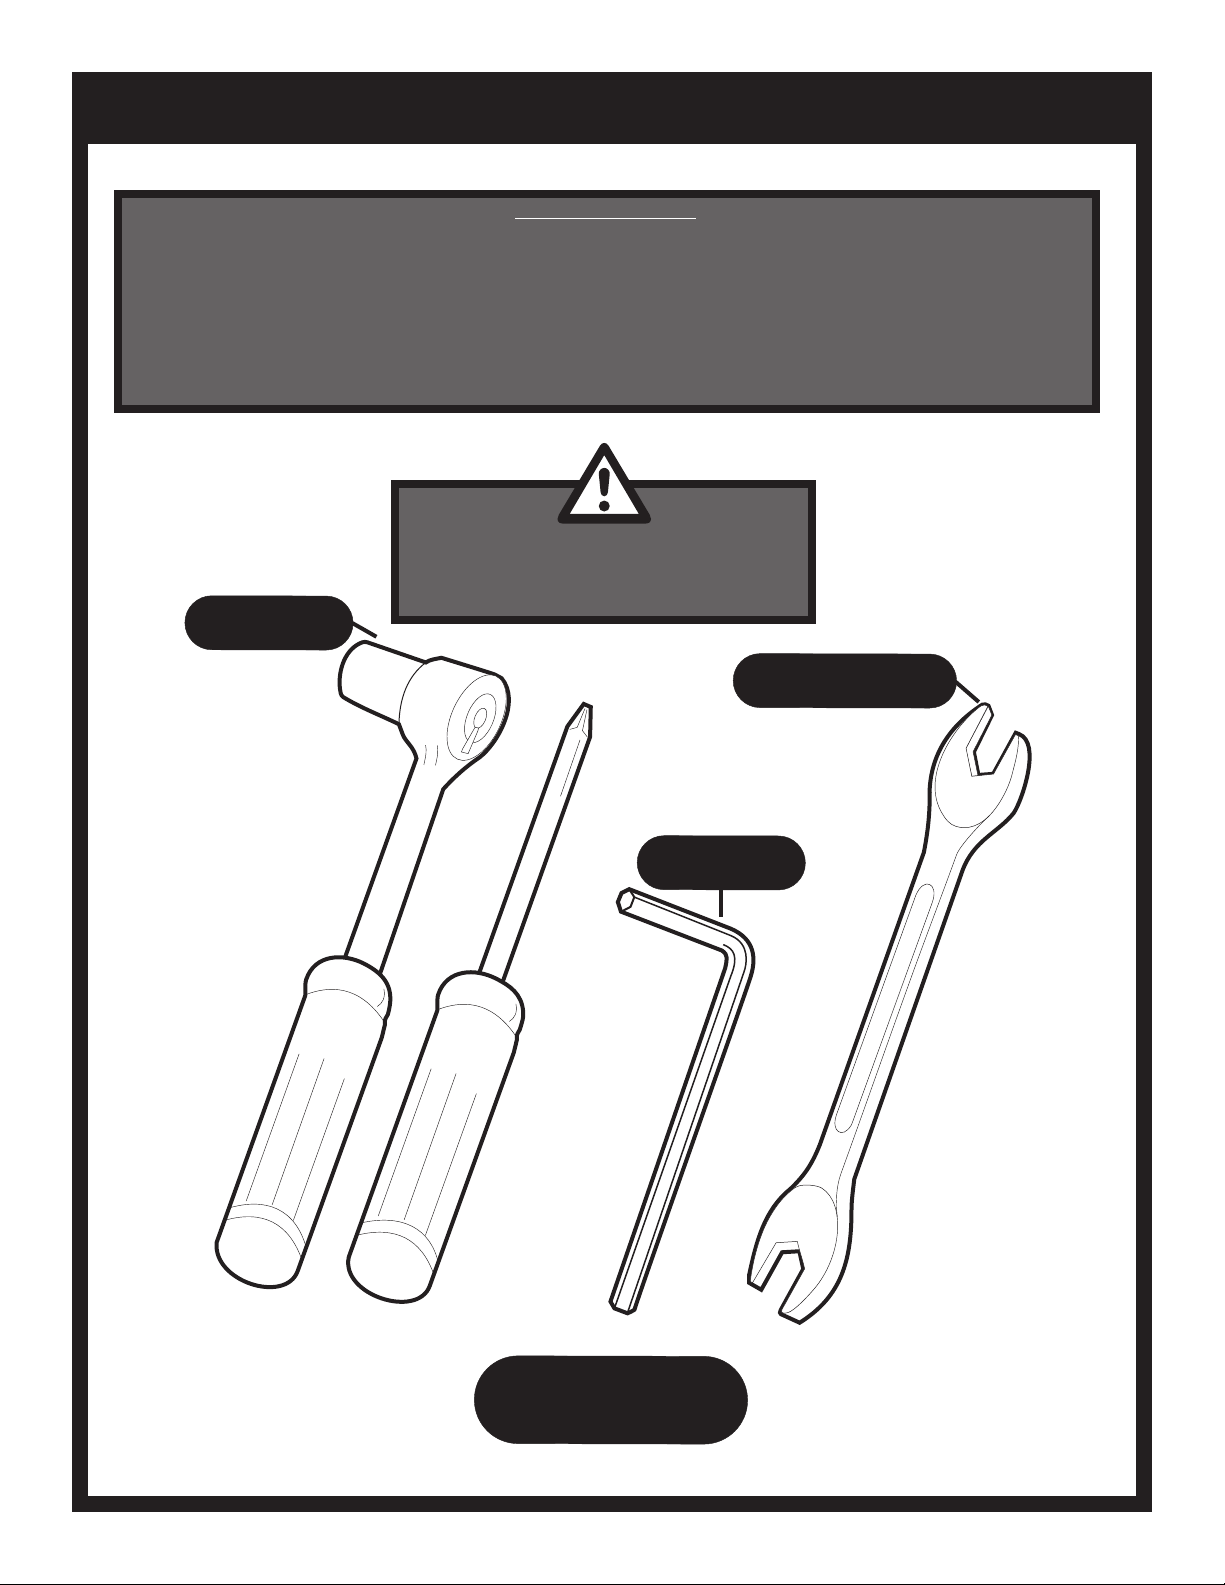
ASSEMBLY INSTRUCTIONS
BEFORE YOU BEGIN
This Grill Head requires Broilmaster Mounting (Cart, Post, or a Built-In Kit).
See Mounting Instructions to assemble mounting before Assembling Grill Head.
Compare the parts in the box to the parts list provided in this manual. If any are missing, contact your
Broilmaster dealer before beginning assembly.
All Broilmaster grills require some assembly. For the best results, follow the step-by-step instructions.
Parts may have sharp edges. For your safety
wear leather work gloves and handle parts
carefully during unpacking and assembly.
3/8”and 7/16”
REQUIRED
CAUTION:
3/8”, and 7/16”
REQUIRED
TOOLS
REQUIRED
1/8”
REQUIRED
B102223-0-0714 Page 5
Page 6
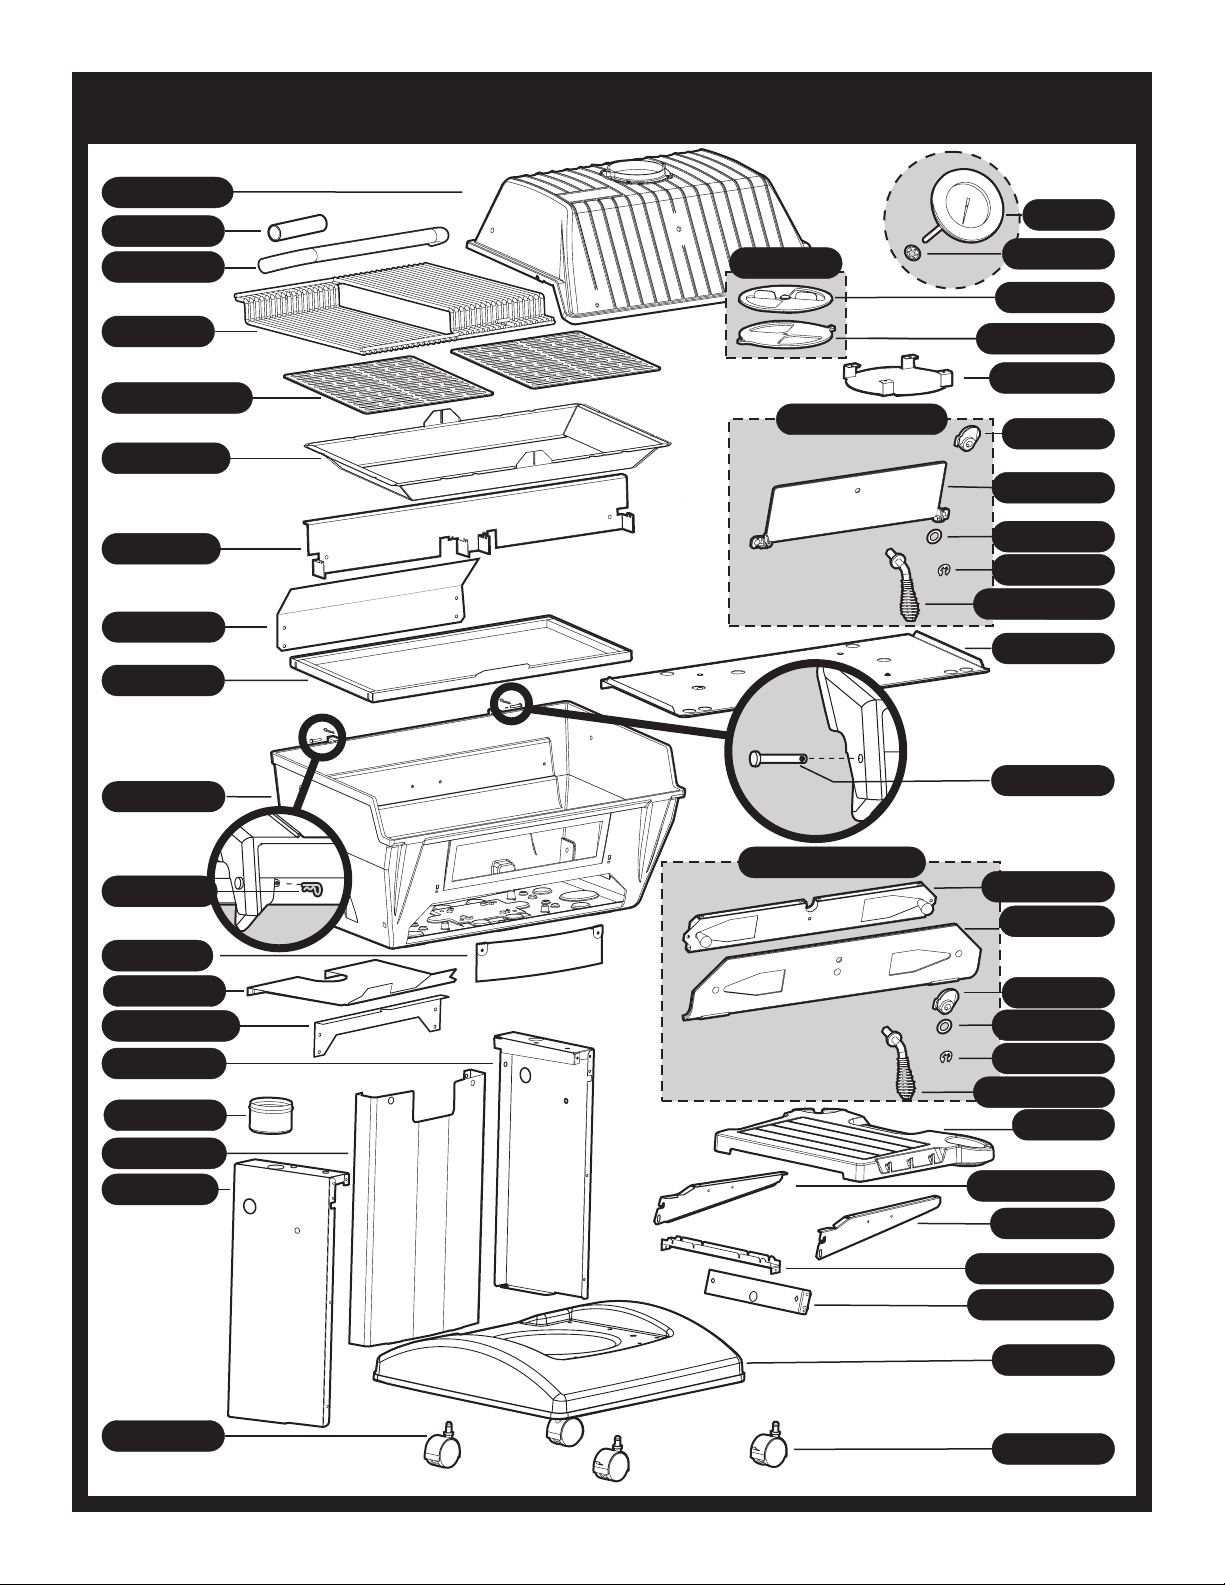
C3PK1 SERIES PARTS DIAGRAM
B101882 (1)
GRILL BODY TOP
B073097 (1)
FOAM GRIP
B070486 (1)
LID HANDLE
DPA111 (1)
COOKING GRID (2) PIECES
B101875 (2)
CHARCOAL GRATE
B101892 (1)
CHARCOAL TRAYFRAME
B102111 (1)
REAR PIVOT BRACKET
B102090 (1)
REAR CART COVER
B101737 (1)
ASHPAN
B102114 (1)
TOP VENT ASSEMBLY
CHARCOAL LOAD DOOR ASSEMBLY
B102109 (1)
DP119 (1)
HEAT INDICATOR
B101665 (1)
PUSH NUT
B101865(1)
VENTTOP
B069756 (1)
B069756 (1)
HOSE & LPS REGULATOR
VENT BASE
B102112 (1)
SPARK ARRESTOR
B101976 (1)
LATCH PAWL
B101862 (1)
DOOR, CHARCOAL LID
B101988 (1)
WASHER
B101990 (1)
E-CLIP
B102144 (1)
LATCH ROD
ASSEMBL
B102110 (1)
ASH PAN SHELF
Y
B101878 (1)
GRILL BODY BOTTOM
B057805 (2)
COTTER PIN
B102091 (1)
FRONT CART COVER
B102122 (1)
CART SHIELD
B101583 (1)
REAR BRACE
B102051 (1)
RIGHT SIDE PANEL
B101473 (1)
GREASE CUP
B101585 (1)
FRONT PANEL
B102050 (1)
LEFT SIDE PANEL
B102109 (1)
ASH PAN DOOR (COMPLETE ASSEMBLY)
B057804 (2)
HINGE PIN
B101861 (1)
BAFFLE TRACK ASSEMBLY
B101870 (1)
DOOR, ASH PAN
B101976 (1)
LATCH PAWL
B101988 (1)
WASHER
B101990 (1)
E-CLIP
B102144 (1)
LATCH ROD ASSEMBLY
B100561 (1)
SIDE SHELF
B100568 (1)
SUPPORT BRACKET FRONT
B100569 (1)
SUPPORT BRACKETBACK
B100993 (1)
SHELF SUPPORT STIFFENER
B101969 (1)
BRACKETATTACH ASSEMBLY
B101415 (1)
PLASTIC BASE
B101417 (2)
CASTER W/O BRAKE
B101416 (2)
CASTER WITH BRAKE
B102223-0-0714Page 6
Page 7
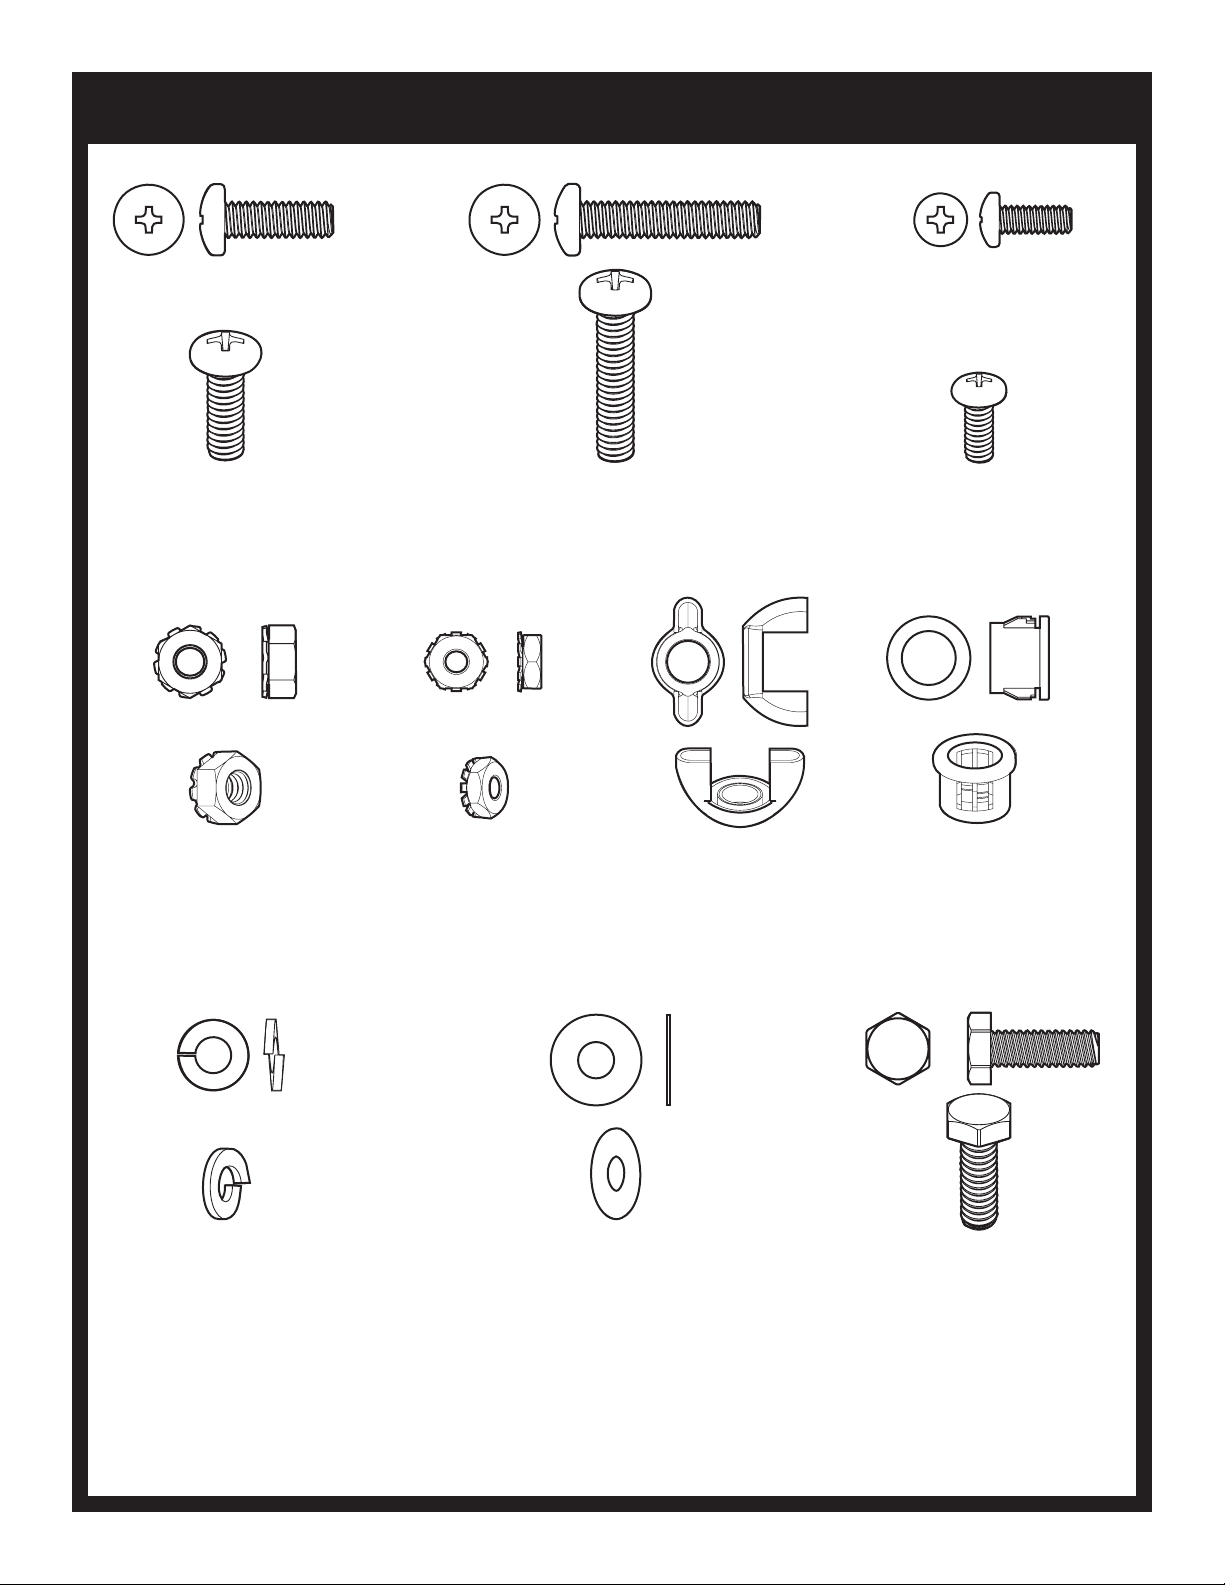
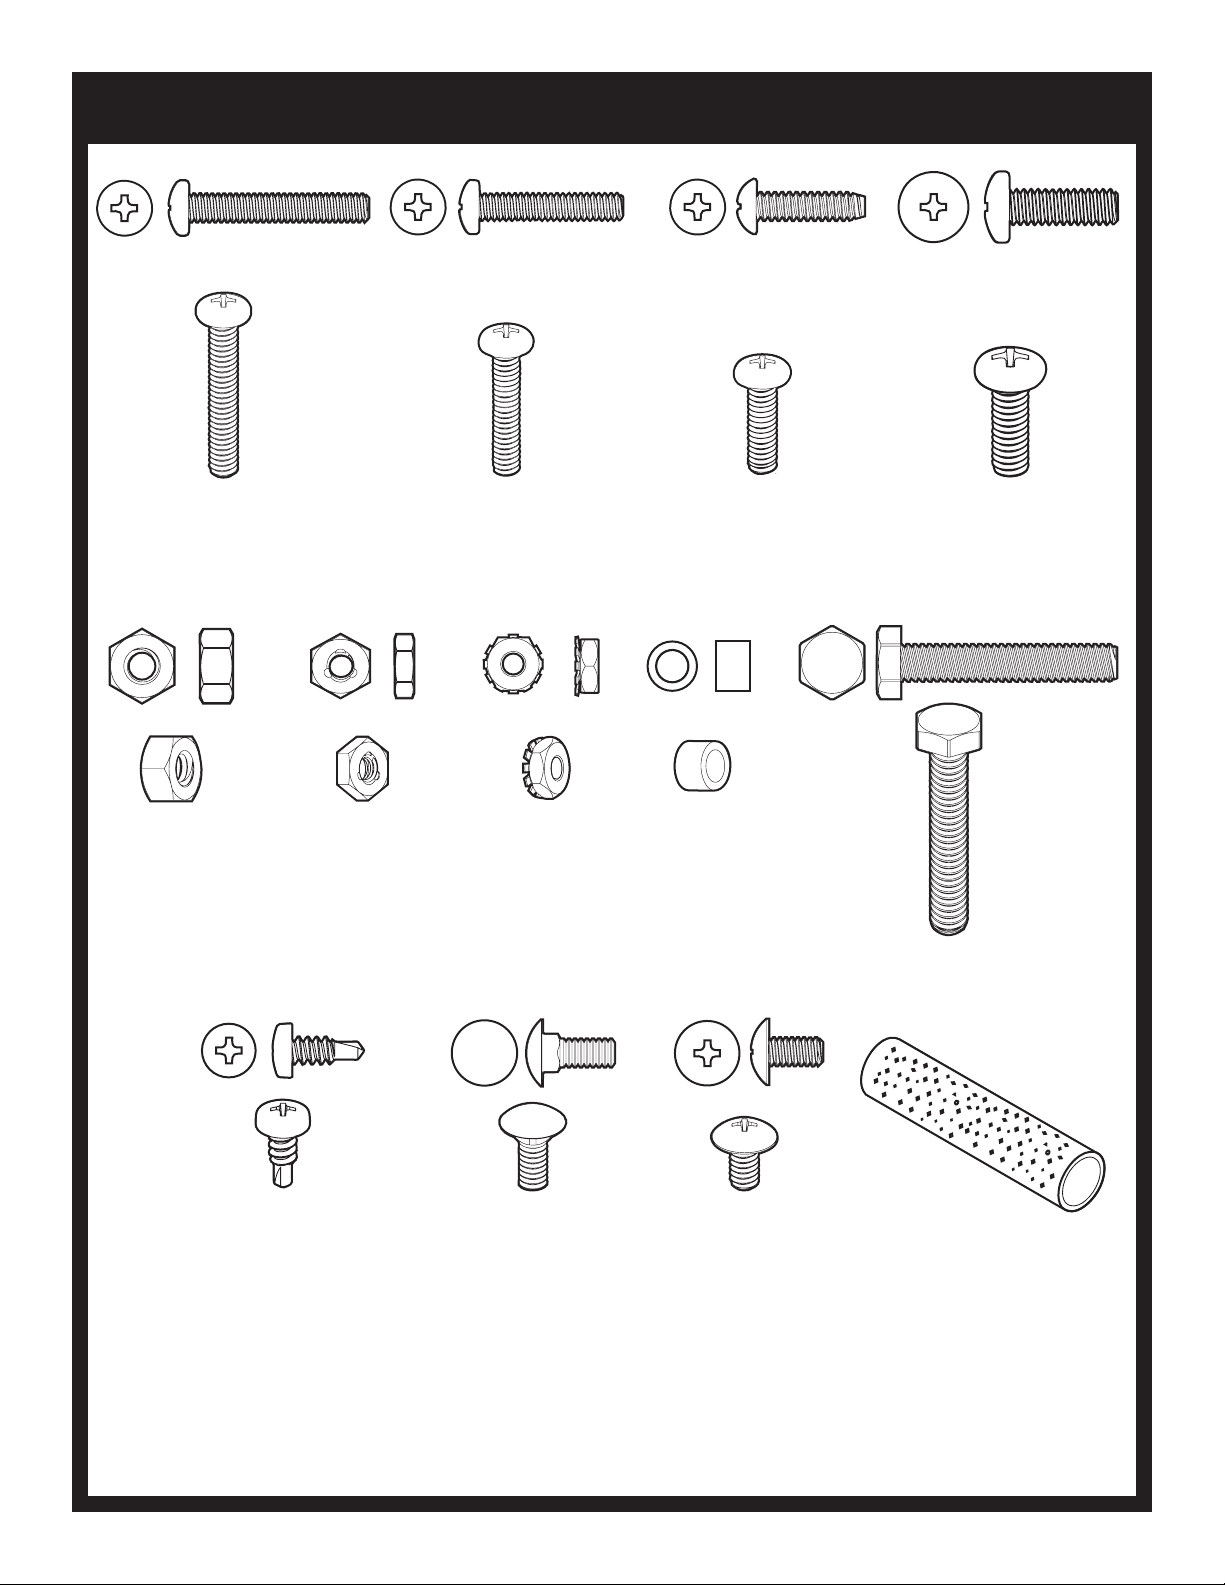
CART HARDWARE PACK - B102002
PHILLIPS PAN HEAD SCREW,
SS,1/4-20 X 3/4
B072217
(8)
KEPS NUT,
SS,1/4-20
B100385
(4)
PHILLIPS PAN HEAD SCREW,
KEPS NUT,
SS,10-24
B073967
(8)
SS,1/4-20 X 1-1/4
B100113
(1)
(NOT USED)
WING NUT,
1/4-20
R1123
(1)
(NOT USED)
PHILLIPS PAN HEAD SCREW,
SS, 10-24 X 1/2
R4056
(6)
SNAP BUSHING,
1/2"
R896
(1)
(NOT USED)
LOCK WASHER,
1/4 ID X 1/2 OD
B100139
(1)
(NOT USED)
FLATWASHER,
SS,1/4 ID X 5/8
OD
B076332
(4)
HEX HEAD BOLT,
SS,1/4-20 X 3/4
B063096
(4)
(NOT USED)
Standard hardware items such as bolts, screws, washers, and nuts can be purchased at your local hardware store. Do not order individual pieces of standard hardware. A replacement hardware pack may be
ordered using the hardware pack part number at the top of the page.
B102223-0-0714 Page 7
Page 8
GRILL HEAD HARDWARE PACK - B102165
PHILLIPS PAN HEAD SCREW,
SS,10-24 X 1-1/4
B102117
(2)
HEX NUT,
SS,1/4-20
B076331
(2)
HEX LOCKNUT,
SS,10-24
R4021
(2)
PHILLIPS PAN HEAD SCREW,
SS,10-24 X 1
B073978
(2)
KEPS NUT,
SS,10-24
B073967
(6)
PHILLIPS PAN HEAD SCREW,
SS,10-16 X 3/4
B100563
(4)
SPACER
B662325
(1)
PHILLIPS PAN HEAD SCREW,
SS,1/4-20 X 3/4
B072217
(1)
HEX HEAD BOLT,
SS,1/4-20 X 1-1/2
B102098
(4)
SELF-DRILLING
PHILLIPS PAN HEAD SCREW,
SS,10-16 X 1/2
R4059
(2)
CARRIAGE BOLT
SS,10-24 X 1/2
B101770
(2)
TRUSS-HEAD SCREW
SS,10-24 X 3/8
B100130
(4)
FOAM GRIP
B073097
(1)
Standard hardware items such as bolts, screws, washers, and nuts can be purchased at your local hardware store. Do not order individual pieces of standard hardware. A replacement hardware pack may be
ordered using the hardware pack part number at the top of the page.
B102223-0-0714Page 8
Page 9
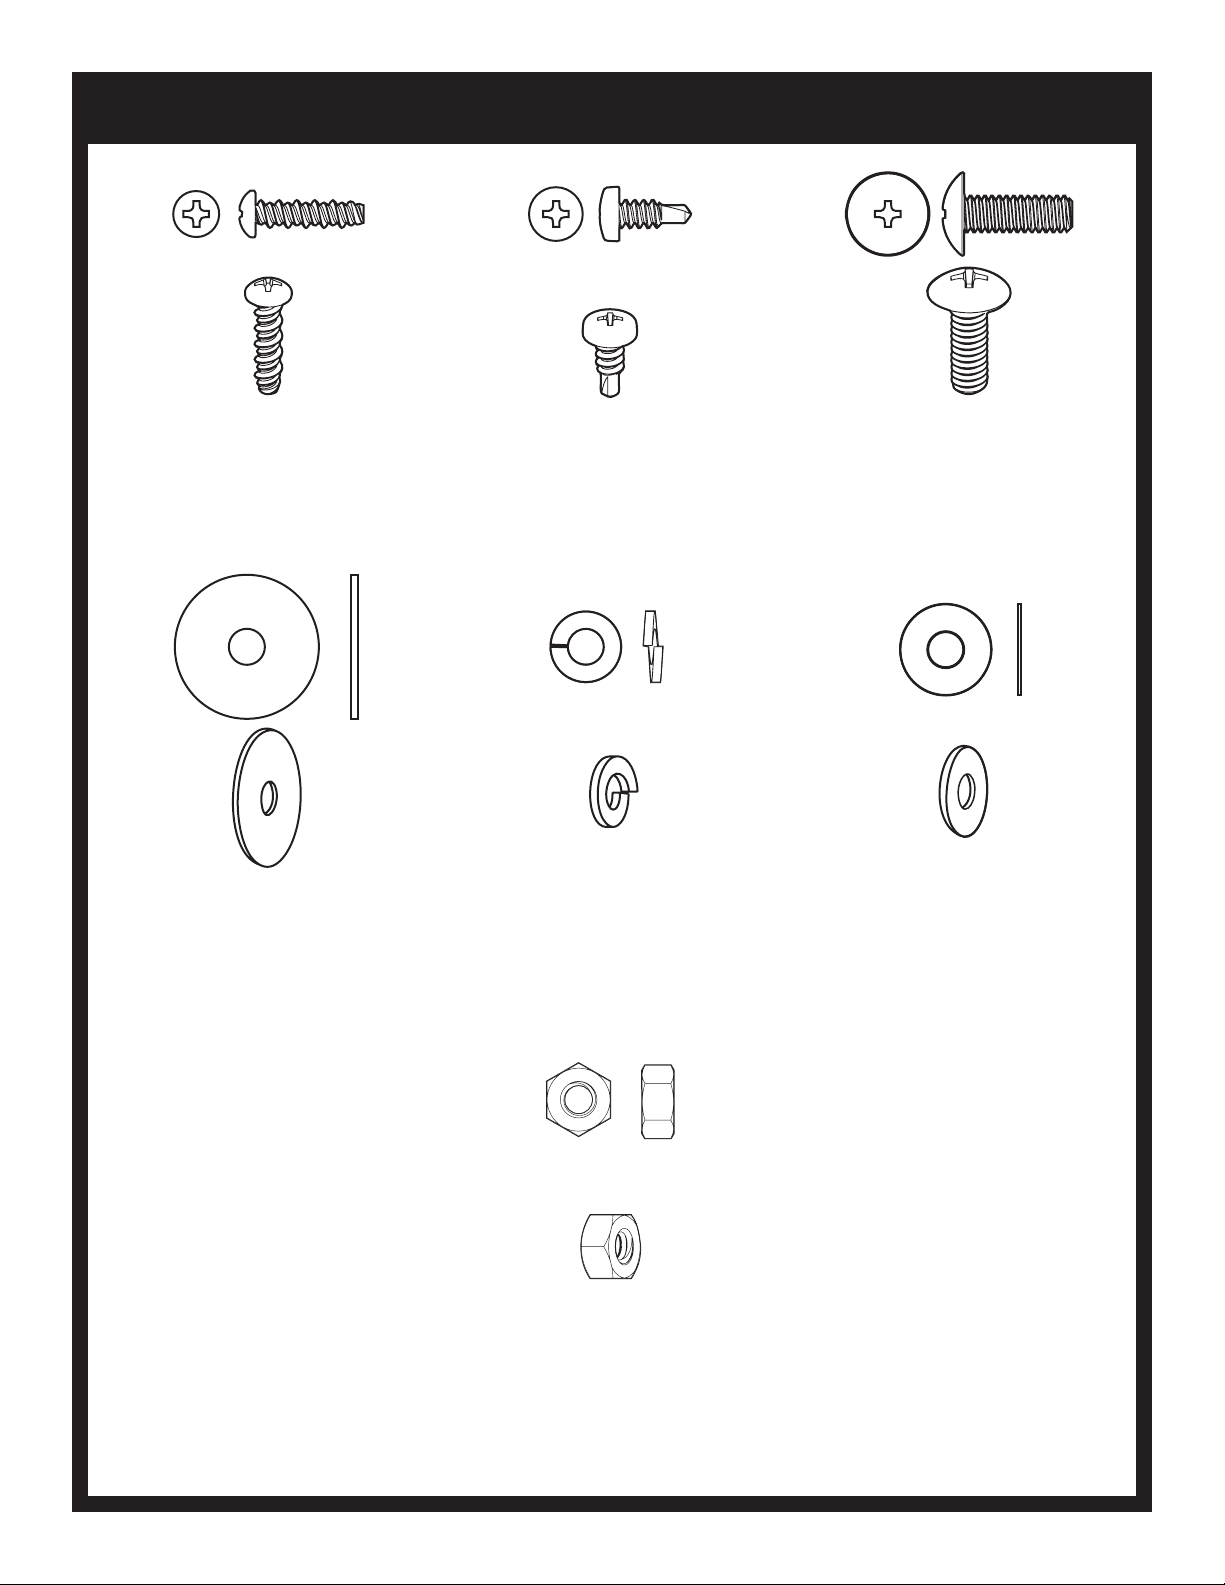
SHELF HARDWARE PACK - B101658
PHILLIPS PAN HEAD SCREW,
10-16 X 3/4
B100563
(4)
FLATWASHER,
SS,1/4 ID X 1
OD
B101640
(2)
SELF-DRILLING PHILLIPS PAN HEAD SCREW,
SS,10-16 X 1/2
R4059
(2)
LOCK WASHER,
1/4 ID X 1/2 OD
B076333
(2)
PHILLIPS TRUSS HEAD SCREW,
SS,1/4-3/4
B072217
(2)
FLATWASHER,
1/4 ID X 5/8 OD
B076332
(2)
HEX NUT,
SS,1/4-20
B076331
(2)
Standard hardware items such as bolts, screws, washers, and nuts can be purchased at your local hardware store. Do not order individual pieces of standard hardware. A replacement hardware pack may be
ordered using the hardware pack part number at the top of the page.
B102223-0-0714 Page 9
Page 10
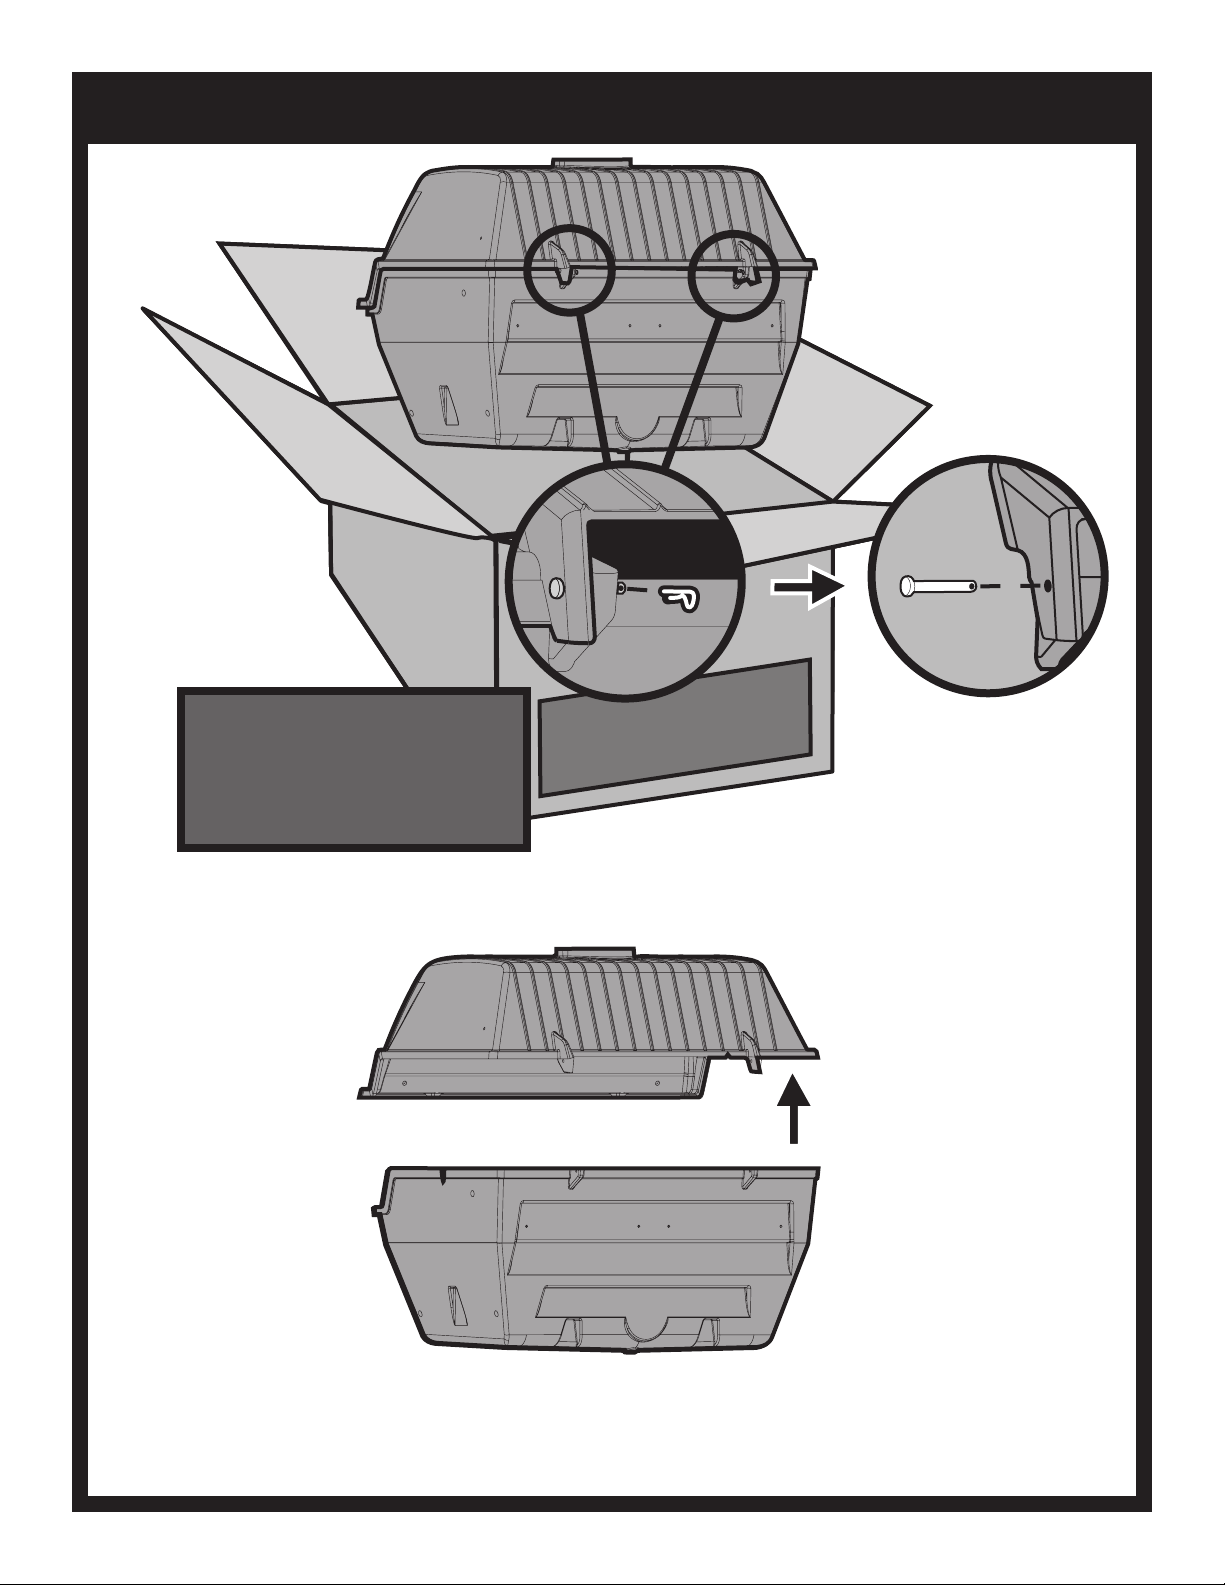
UNPACK AND REMOVE LID
REMOVING LID
To ease assembly, remove Grill Lid.
Remove the two Pins and Clips at the
rear of the Grill Lid and set aside.
After Pins and Lid have been
removed, remove the contents from
inside the Grill.
BROILMASTER
PREMIUM GRILLS
B102223-0-0714Page 10
Page 11
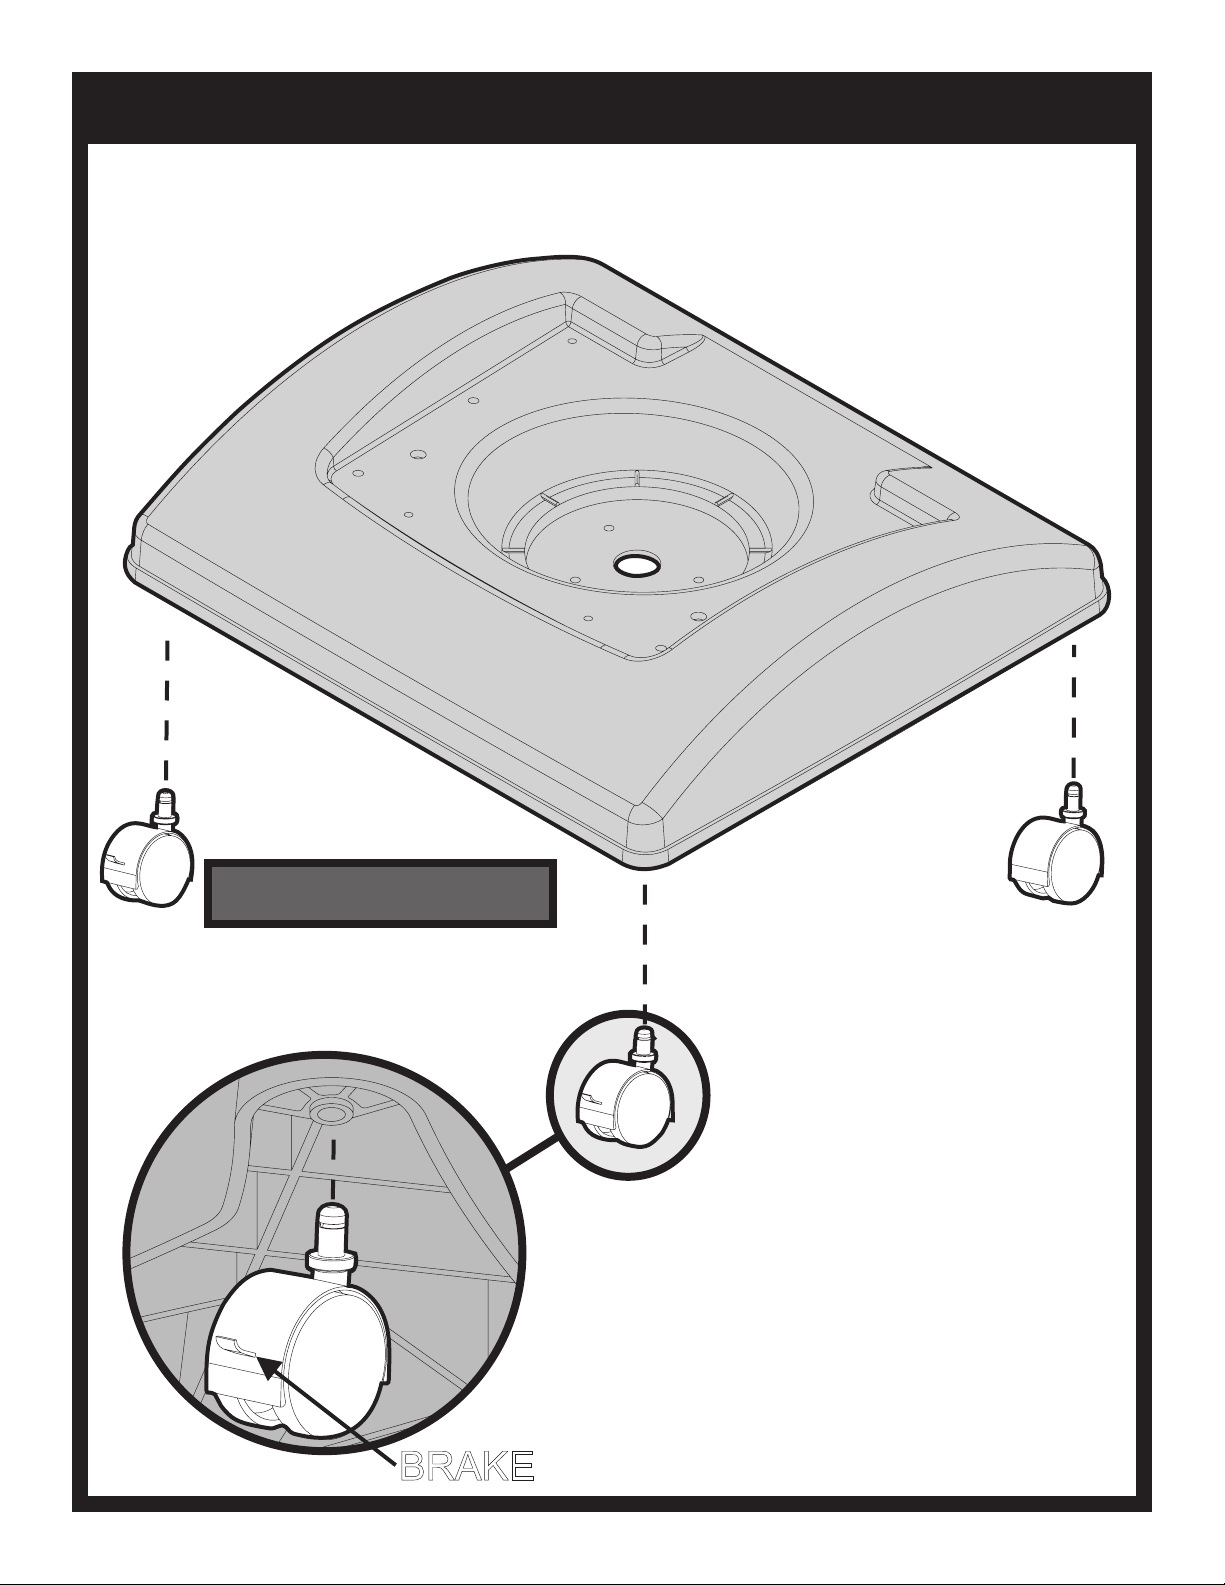
FRONT
Install the two Casters with Brakes in
the front of the Base.
BRAKE
CART BASE ASSEMBLY
B102223-0-0714 Page 11
Page 12
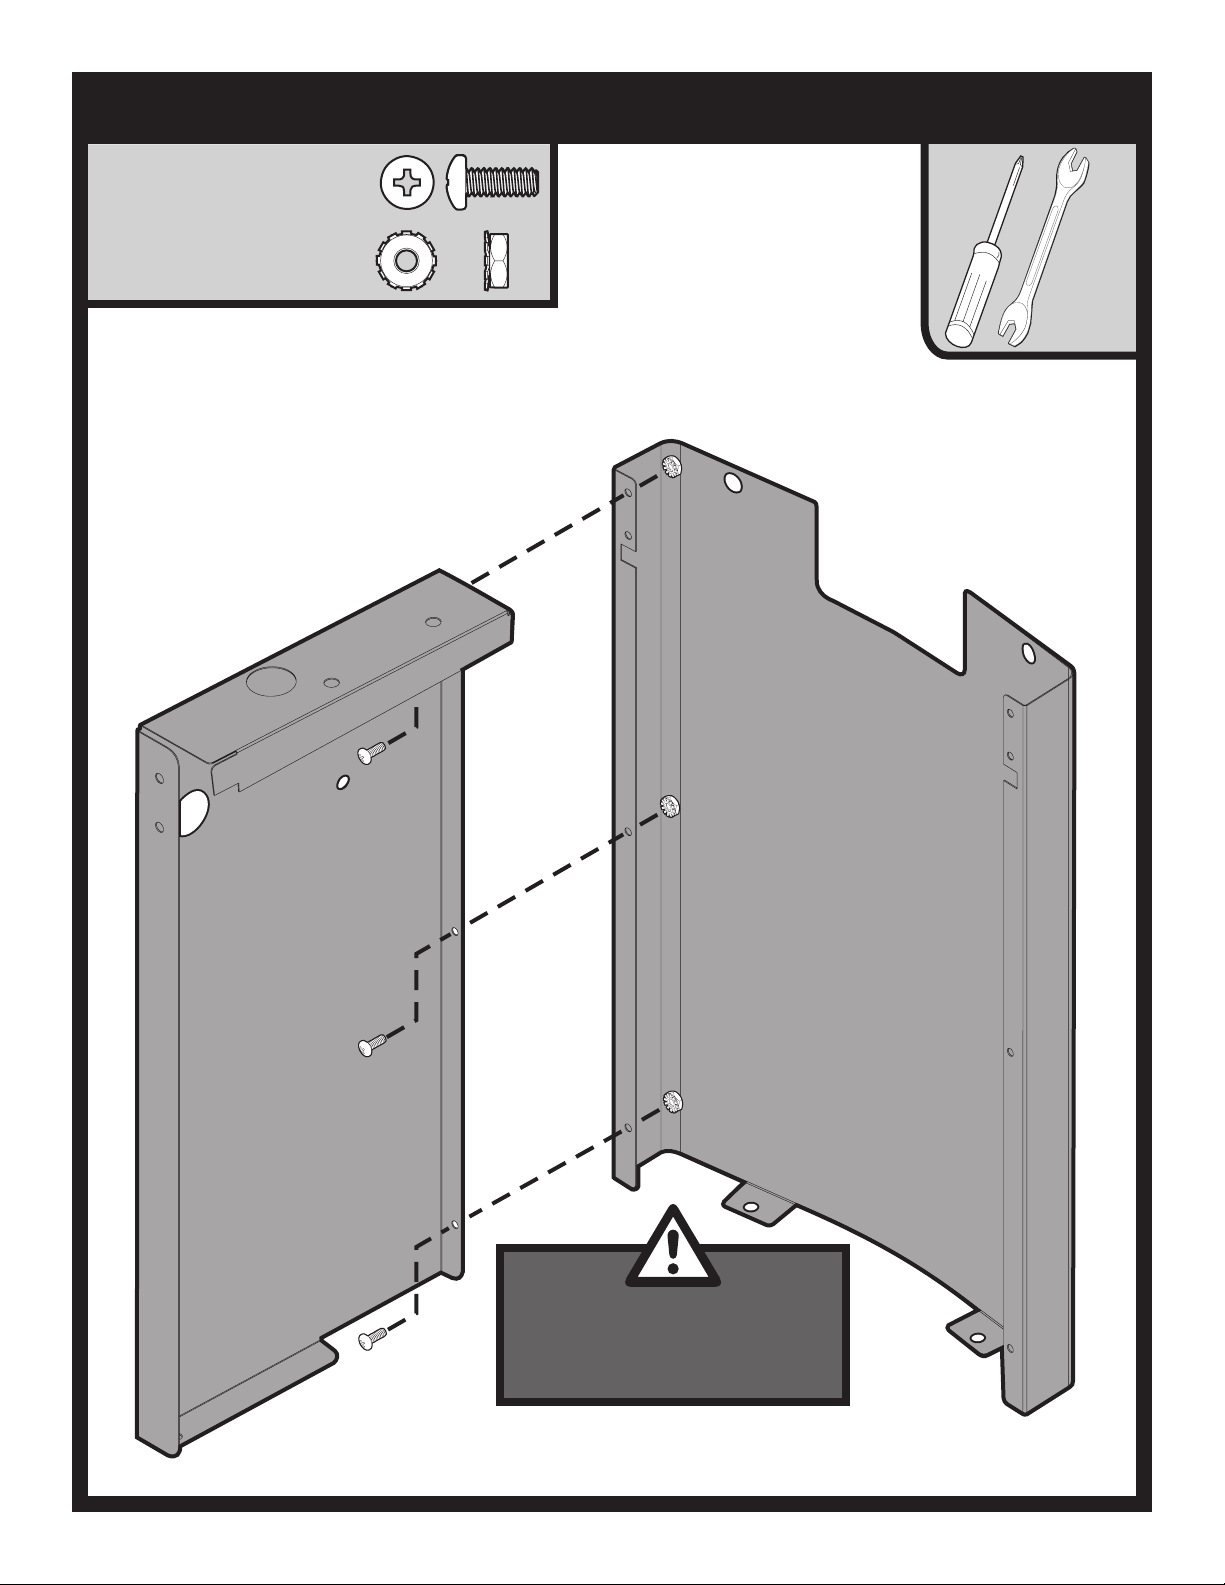
CART WALLS ASSEMBLY
PHILLIPS PAN HEAD SCREW,
SS,10-24 X 1/2
R4056 (6)
KEPS NUT,
SS, 10-24
B073967(6)
3/8”
Be careful when handling parts, as
they may contain sharp edges. Work
gloves are recommended to prevent
injury.
Remove protective plastic covering.
B102223-0-0714Page 12
Page 13
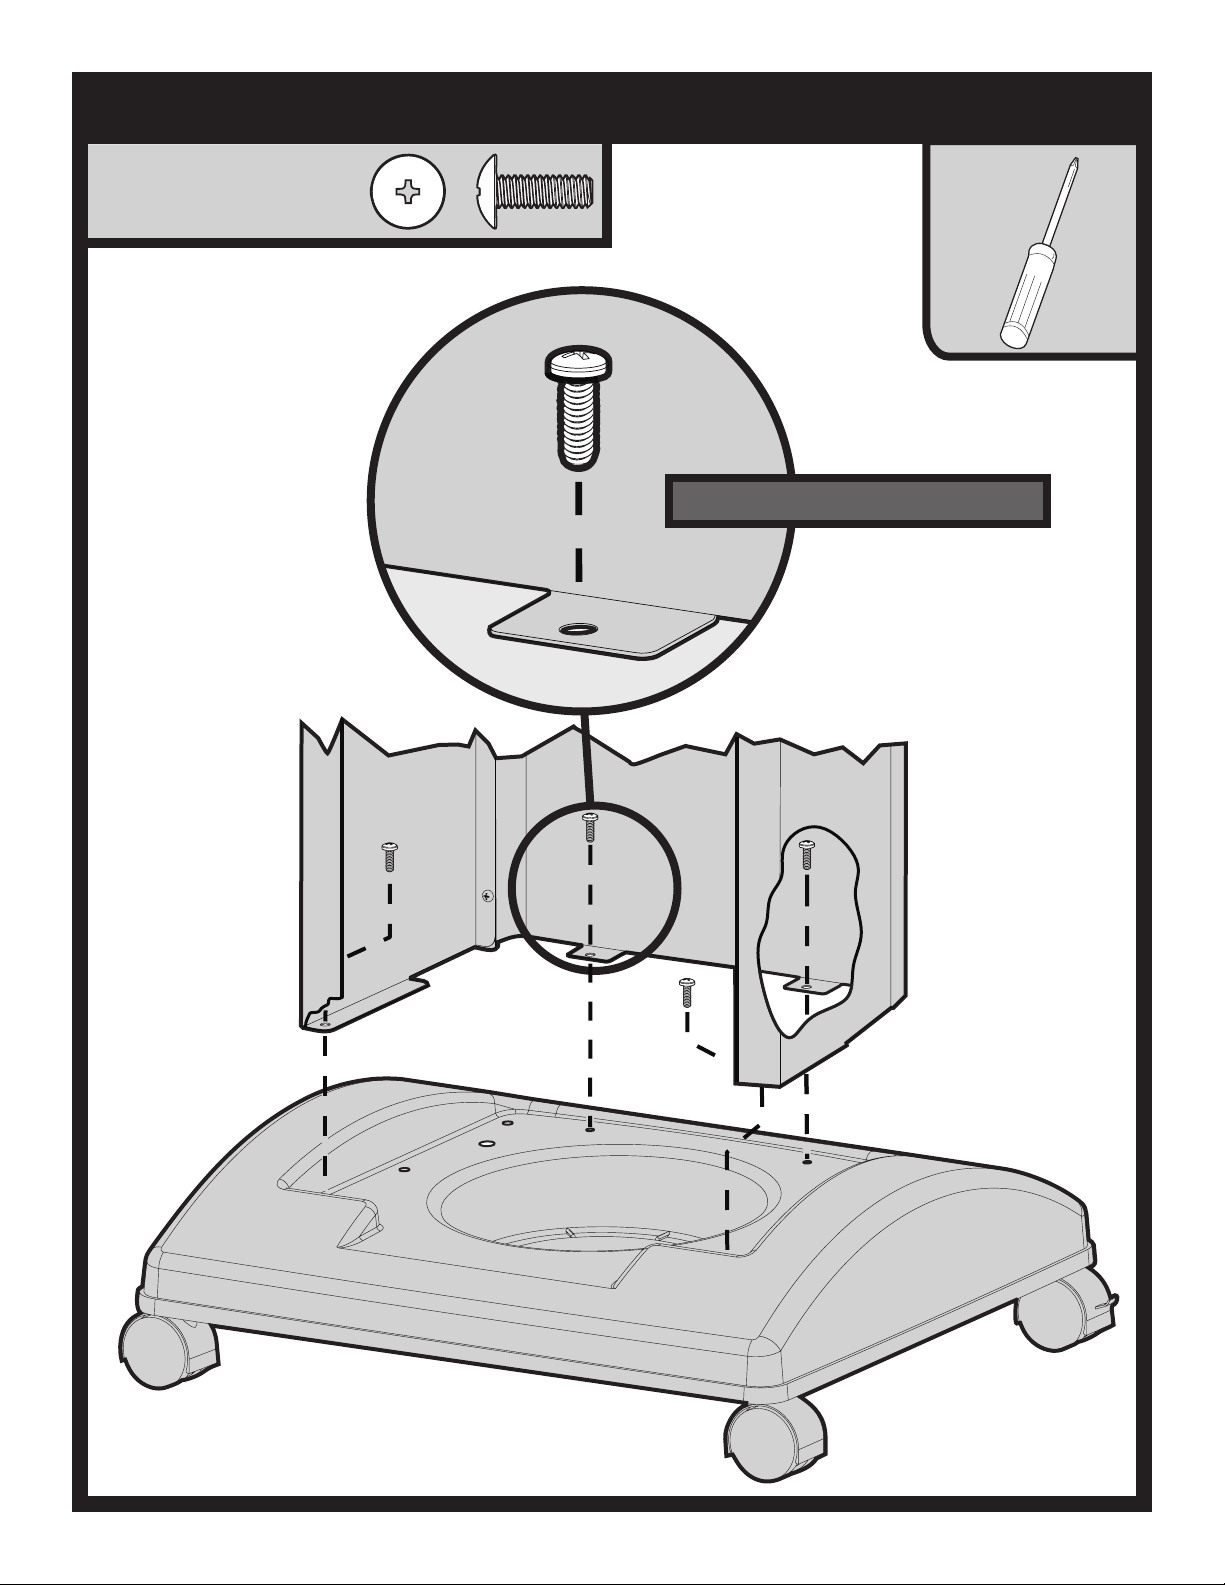
ATTACH WALLS TO BASE
PHILLIPS PAN HEAD SCREW,
SS,1/4-20 X 3/4
B072217 (4)
Install all four Screws before tightening.
B102223-0-0714 Page 13
Page 14
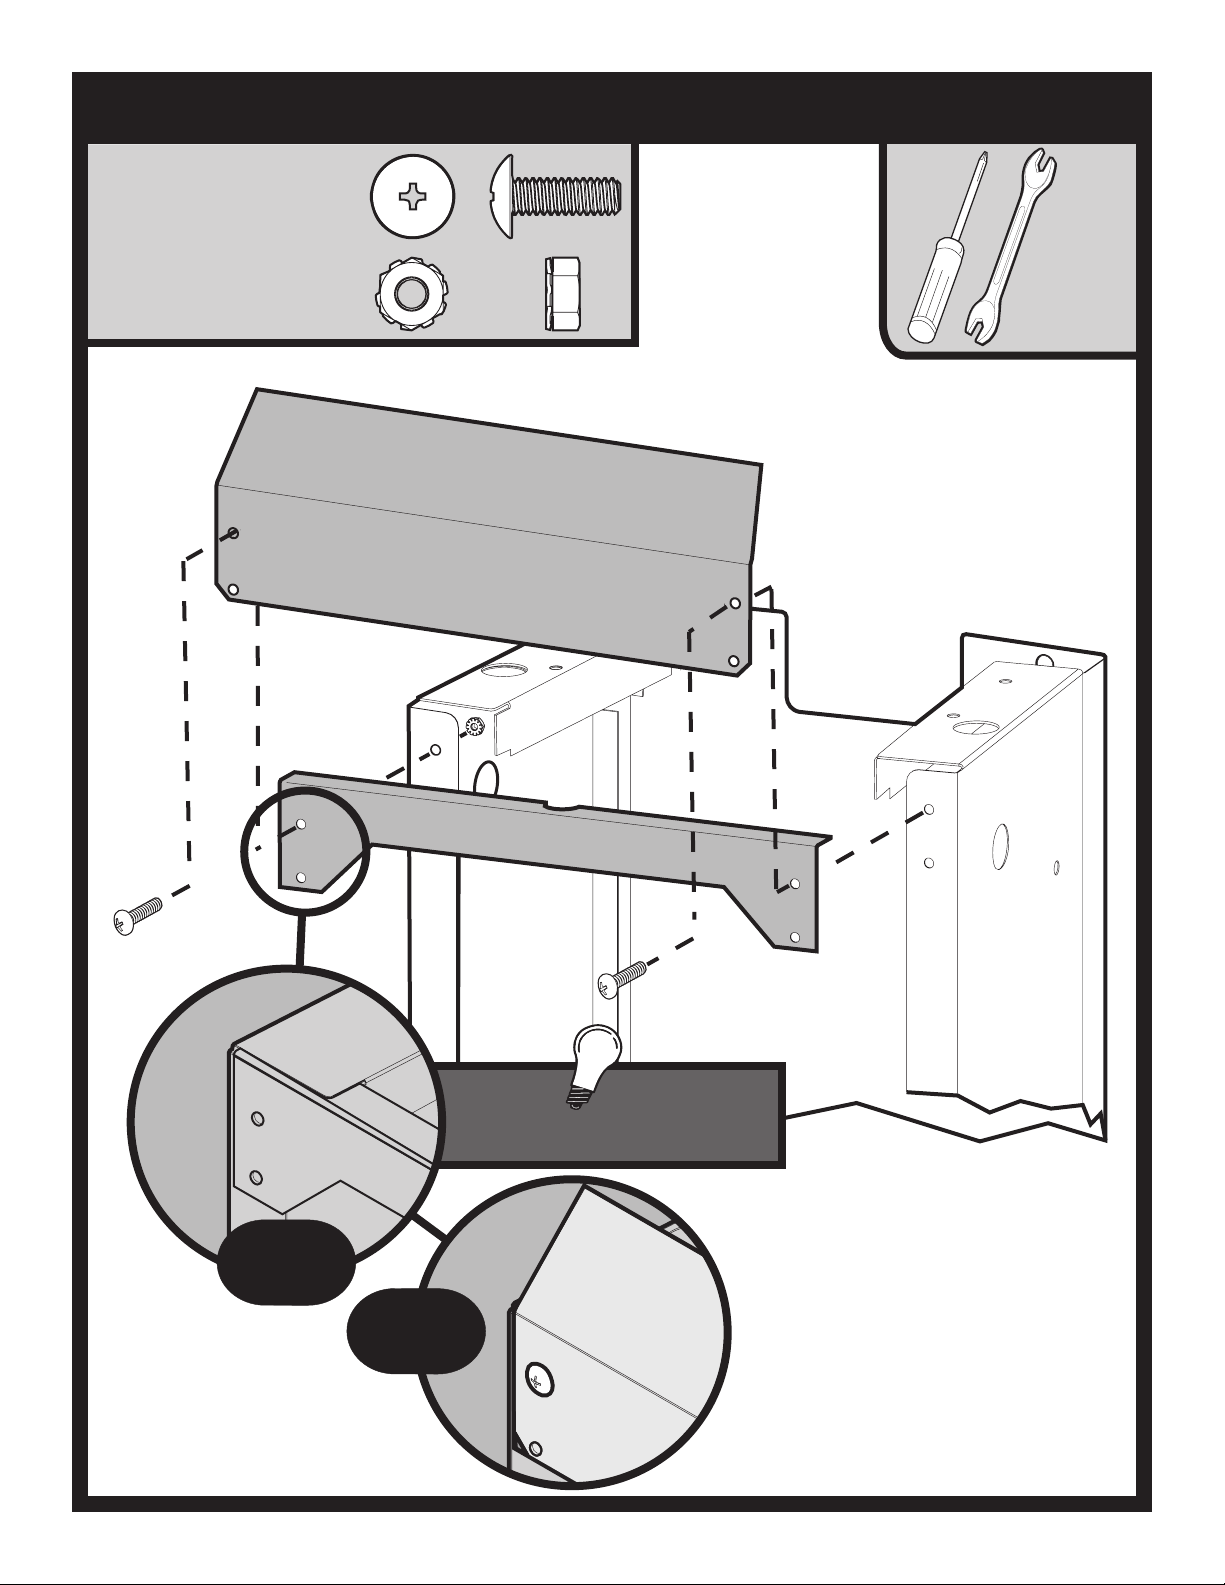
INSTALL REAR BRACE AND REAR CART COVER
PHILLIPS PAN HEAD SCREW,
SS,1/4-20 X 3/4
B072217 (2)
KEPS NUT,
SS, 1/4-20
B100385 (2)
REAR CART COVER
7/16”
1
REAR BRACE
Make sure the Rear Brace goes in the
cutout of the Support Bracket.
2
B102223-0-0714Page 14
Page 15

INSTALL FRONT CART COVER
SELF-DRILLING PHILLIPS PAN HEAD SCREW,
SS, 10-16 X 1/2
R4059 (2)
Fold Tabs on Front Cart Cover as shown.
FRONT CART
COVER
CART FRONT
Insert Front Cart Cover behind the Cart front
so that the tabs allow it to hang in place.
B102223-0-0714 Page 15
Page 16

ATTACH BOTTOM CASTING TO CART
HEX HEAD BOLT
SS, 1/4-20 X 1-1/2
B102098 (4)
FLAT WASHER,
SS, 1/4 ID X 5/8 OD
B076332 (4)
.
7/16”
B102223-0-0714Page 16
Page 17

HEAT SHIELD PLACEMENT
PHILLIPS PAN HEAD SCREW,
SS,1/4-20 X 3/4
B072217 (2)
KEPS NUT,
SS, 1/4-20
B100385 (2)
7/16”
1
2
3
Make sure Heat Shield is resting on the
cutout in the Side Panels before
tightening the screws and nuts.
B102223-0-0714 Page 17
4
Page 18

REMOVE CARRIAGE BOLTS
7/16”
Choose left or right or preferred side that Side
Shelf will be attached to. Remove the two
bottom Carriage Bolts on side chosen of grill.
Retain Carriage bolts on the opposite side to
secure air tightness of grill.
B102223-0-0714Page 18
Page 19

ATTACH SIDE SHELF
PHILLIPS TRUSS HEAD SCREW,
SS, 1/4-20 X 3/4
B072217 (2)
FLAT WASHER,
1/4 ID X 5/8 OD
B076332 (2)
FLAT WASHER,
SS, 1/4 ID X 1 OD
B101640 (2)
LOCK WASHER,
1/4 ID X 1/2 OD
B076333 (2)
HEX NUT,
SS, 1/4-20
B076331 (2)
.. . .
. . .
..
. .
B102223-0-0714 Page 19
Page 20

ATTACH SIDE SHELF
PHILLIPS PAN HEAD SCREW,
10-16 X 3/4
B100563 (4)
B102223-0-0714Page 20
Page 21

ATTACH SIDE SHELF
SELF-DRILLING PHILLIPS PAN HEAD SCREW,
SS, 10-16 X 1/2
R4059 (2)
Leave Screws loose
until next step.
B102223-0-0714 Page 21
Page 22

ATTACH SIDE SHELF
Hang the side Brackets on the lower
Pins of the Bracket attach assembly.
Tighten the two 10-16 x 1/2 Phillips
screws from previous step.
B102223-0-0714Page 22
Page 23

REAR SUPPORT BRACKET PLACEMENT
PHILLIPS TRUSS HEAD SCREW,
SS, 10-24 X 3/8
B100130 (4)
KEPS NUT,
SS, 10-24
B073967(4)
Align the four holes and attach the
Rear Support Bracket to the back
inside of the lower grill body.
3/8”
B102223-0-0714 Page 23
Page 24

ADJUSTING DOOR LATCHES
1/8”
The doors should be checked for a
tight fit when doors are latched. If the
door latches need to be adjusted
loosen the set screw on the latch pawl
with a Allen wrench. Slide the pawl in
or out on the shaft to adjust for the
proper tension when the door is
closed. Retighten set screw.
B102223-0-0714Page 24
Page 25

ATTACH TOP SMOKE VENT ASSEMBLY
PHILLIPS PAN HEAD SCREW,
SS,1/4-20 X 3/4
B072217(1)
HEX NUT,
SS, 1/4-20
B076331 (2)
. . .
7/16”
Attach the Vent Base and Vent Top with
one truss head screw and two hex
nuts. Hand tighten first nut against vent
base. Tighten second nut against the
first (as a jamb nut) using a wrench.
B102223-0-0714 Page 25
Page 26

3/8”
Attach vent stop using one pan-head
screw and spacer on the right side of
the top vent opening. Tighten with lock
nut from underside of grill body top.
Use hand tools.
Place the smoke vent assembly on top
vent opening and secure with one pan-
head screw and one locknut on
underside of grill body top. Do not
tighten so much that the vent cannot
swing open and close freely. Use hand
tools.
ATTACH TOP SMOKE VENT ASSEMBLY
PHILLIPS PAN HEAD SCREW,
SS,10-24 X 1-1/4
B102117(2)
SPACER
B662325(1)
.
HEX LOCKNUT,
SS,10-24
R4021(2)
. .
B102223-0-0714Page 26
Page 27

ATTACH UPPER SPARK ARRESTER PLATE
PHILLIPS PAN HEAD SCREW,
SS,10-16 X 3/4
B100563(4)
Secure the upper spark arrester plate to
the inside of the grill body top using
four screws.
B102223-0-0714 Page 27
Page 28

HANDLE INSTALLATION
PHILLIPS PAN HEAD SCREW,
SS,10-24 X 1
B073978 (2)
Tip: For ease of installation, lightly
lubricate the inside of the Foam Grip with
Liquid Soap before twisting it on to
Handle.
B102223-0-0714Page 28
Page 29

REINSTALL LID
HINGE PIN,
(FROM PREVIOUS STEPS)
B057804 (2)
COTTER PIN,
(FROM PREVIOUS STEPS)
B057805 (2)
B102223-0-0714 Page 29
Page 30

INSTALL CHARCOAL GRATES
Place the Charcoal Grate Frame in the
lower Grill Body bottom on the lower
casting ledge front and back.
Set the Charcoal Grates into place in
the bottom of the charcoal grate frame.
B102223-0-0714Page 30
Page 31

INSTALL COOKING GRIDS
1
COOKING GRID POSITION
Set Cooking Grids in proper position.
Depending upon your cooking and
eating preference when applying
different positions of your grids it
allows a variety of cooking methods.
2
COOKING GRID POSITION
3
COOKING GRID POSITION
B102223-0-0714 Page 31
Page 32

INSTALL ASH PAN
Open the lower access door and slide the
ash pan into place and close and latch
the door.
B102223-0-0714Page 32
Page 33

COMPLETED ASSEMBLY
Thank you for purchasing a Independence Charcoal Grill and we
hope you enjoy years of great meals prepared on your Broilmaster.
Please feel free to visit the Broilmaster Facebook page
and share photos of your Broilmaster grill.
Thank You!
B102223-0-0714 Page 33
Page 34

OWNER’S MANUAL FOR C3PK1 GRILLS
OPERATION - CHARCOAL GRILLS
Grill Location
This grill is designed for outdoor use only.
Never operate your grill in any building, garage, or other
enclosed area. Never operate your grill in a recreational vehicle
or boat. Never operate your grill under any combustible materials,
such as carports, covered porches, awnings, or overhangs.
Check local codes and ordinances that may require where to
place an outdoor cooking appliance from a structure.
CAUTION
Keep the sides of the grill at least 48 inches from any
combustible material. Placing a hot grill too close to a
building or other combustible material may lead to re,
property damage, or personal injury. Combustible materials include fences, patio furniture, and your home.
Keep the area around the grill clear to ensure proper ventilation.
Before lighting the grill, position it on a level surface away from
direct wind.
Never move a hot grill.
WARNING
Do not install or operate this grill where gasoline or other
ammable materials are used or stored. Failure to comply
with this warning could result in explosion or re causing
property damage or personal injury.
Before Lighting
1. Place grill on a level non-combustible surface, away
from combustibles such as buildings, vehicles, carports,
awnings or overhangs.
2. Do not locate in windy settings. High wind can affect the
cooking performance of the grill.
3. Clear the area around the grill of all combustibles such as
dry leaves and bags – including the charcoal bag.
4. Empty the ash pan before each use to maintain proper
air ow. The ash pan must be in place before lighting the
grill.
5. Do not remove ashes from grill until charcoal is fully
extinguished and grill has completely cooled – usually 24
hours.
6. Store any coals and ashes removed from the grill in an
approved non-combustible metal container with an airtight lid to prevent re-ignition.
B102223-0-0714Page 34
Page 35

OPERATION - CHARCOAL GRILLS
Lighting
1. Follow the instructions below to build a re. Use only
high-quality charcoal – either hardwood lump or briquettes.
Broilmaster Premium Natural Hardwood Lump Charcoal
burns longer and hotter – with much better avor.
2. Make sure the ash pan is clean to start. Open lower door
and slide out ash pan. Dispose of ashes in an approved
metal container as described in the safety section.
Do not remove hot coals. Replace the ash pan, close
and latch door.
IMPORTANT
Initial Use: The rst time you use your Broilmaster Charcoal
Grill, keep the cooking temperature between 350 to 400
degrees maximum. This will season the paint and set gasket
glues properly. Let burn for at least 60 minutes at 350 to 400
degrees to burn off any manufacturing oils and paints before
placing food on the grill.
Never use grill without ash pan in place.
3. Filling Charcoal Tray
• Full Firebox Tray: Pile the charcoal in a pyramid shape
on the charcoal tray with enough charcoal so when
spread out it is not higher than tray sides but covers
the entire charcoal tray (about 5 to 7 pounds). Never
let charcoal burn against the casting sides of the
grill, it could damage the grill casting. Use this for
larger amounts of food cooking over the entire area,
hotter cooking temperatures, or longer cooking times.
• Half Firebox Tray: Pile the charcoal on one side of the
charcoal tray with enough charcoal so to cover half of
the charcoal tray but not higher than tray sides when
spread out (about 3 to 4 pounds). Use this for smaller
amounts of food, when cooking at milder tempera-
tures or indirect cooking. Use the Broilmaster rebox
divider (sold separately) to cook on one small section
of your grill.
6. After coals have been lit for about seven to ten minutes,
or when several coals are burning, close the lid and, with
the dial open fully, swing open the smoke vent on top full
for maximum air ow. Let burn with lid closed for about ve
minutes or until most coals are burning.
7. Carefully open the lid and spread coal as desired with metal rod or optional ash tool.
WARNING
Wear heat resistant gloves when handling hot grill. Hot
grill could cause severe burns.
Replace the cooking grids at the desired height and close
the lid.
8. When the heat indicator reaches the desired temperature,
reduce the air ow by adjusting the top smoke vent and the
lower air intake vents. Adjust air vents during cooking to
control and ne tune temperatures.
Adding Charcoal or Wood
Flavoring Chunks
1. Add charcoal to maintain or to increase cooking tempera-
tures. Or add wood avoring chunks for a special wood
avor.
2. With heat resistant gloves or oven mitts carefully open the
reload door. Use caution since ames may are up when
air comes in contact with re. Always slightly crack one or
two inches a few times before fully opening to introduce
fresh air slowly.
3. With a set of long-handled cooking tongs, add charcoal or
wood chunks through the reload door opening. When nished, close and latch the reload door. Always keep doors
closed while in use. Open only when needing to reload.
Shutting the Grill Down
When nished cooking, close the lid and close both top and
bottom vents completely. The re will self extinguish. Never
use water to extinguish the coals. It may take several hours for
the grill to cool down due to the thick heavy casting holding in
the heat.
Restarting the Grill
(Divider Accessory Shown)
Place the divider between the grates and in the holding
tabs on the frame. This will separate the rebox in half for
better control. Divider must be removed to slide out ash tray.
4. Fully open both lower air intake vents.
5. With the lid open and the charcoal piled in tray, use natural charcoal starter cubes, a charcoal chimney start or an
electric charcoal starter. Always follow the manufacturer’s
warnings and instructions. Do not lean over grill when
lighting or cooking.
Do not use lighter uid (it will void the warranty).
B102223-0-0714 Page 35
1. When restarting the grill, most of the charcoal that was
started with will still be in the charcoal tray if the vents were
closed after previous use. The charcoal can be reused.
With the ash tool, stir the charcoal so that any ash buildup falls through into the ash pan. Add more charcoal as
necessary to ll the tray as described in the lighting instructions.
2. Empty the ash pan into an approved metal container and
replace.
Page 36

MAINTENANCE
Cleaning the Grill
WARNING
Never clean a hot grill. Make sure that the grill is cool and
all coals are completely extinguished prior to removing
any parts. A hot grill could cause severe burns.
WARNING
Accumulated grease is a re hazard. Empty ash tray
before each use and clean any grease build-up as needed.
Grids
The grids are best cleaned with a long handled brass or stainless steel brush (NOT STEEL) during the preheating period.
Inside the Grill
Remove cooking grids charcoal frame, grates and ash pan.
Use a brass brush and or scraper to clean and loosen debris
from the bottom sides and lid. Be careful not to damage gasket material. Use a wet dry vacuum to pick up loose debris.
If desired you can wash the inside of the grill. Wash the inside
with a mild detergent and warm water and scrub using a brass
brush. Be careful not to damage gasket material. Rinse well
and wipe dry.
Ash Pan
Any grease build-up should be scraped out with a putty knife
or scraper tool, and the debris brushed into a non-combustible
container. Wash with a mild detergent and warm water. Rinse
well and wipe dry.
Grill Exterior
Clean regularly with a solution of mild detergent and warm water. Touch up paint is available from your dealer. Broilmaster
protective covers are recommended. Stainless steel can be
cleaned with a spray on stainless steel cleaner found in most
hardware stores or home center. Never use aerosol sprays or
ammable cleaners on or near a hot grill.
Clean the grill exterior regularly with a solution of mild detergent
and hot water.
To protect your grill from the elements, use a Broilmaster protective cover Clean stainless steel components with a stainless
steel cleaner available in most hardware stores.
IMPORTANT
Do not use harsh or abrasive cleaners on the exterior
of your grill or mounting. This could damage the paint or
nish on the grill.
Heat Indicator Calibration
The heat indicator can be calibrated if needed. Remove the
heat indicator from the grill and place the probe end in a pot of
boiling water. It should read 212 degrees. Set the heat indicator by turning the nut on the back slightly until it reads 212
degrees, and recheck again. Clean any build-up from indicator
probe once a season to prevent loss of accuracy.
Gasket
The gasket material installed on the lid and doors is designed
to last for years under normal use. If the gasket shows signs of
deterioration or excessive wear, it should be replaced using the
appropriate Broilmaster Replacement Gasket Kit:
DPP307 Door Gasket Kit
DPP308 Lid Gasket Kit
Gasket Replacement Instructions
WARNING
Make sure that the grill is cool and all coals are
completely extinguished prior to removing any parts or
servicing. A hot grill could cause severe burns.
1. Ensure the grill is cool before starting.
2. Remove the cooking grids.
3. With a at edged scraping tool or putty knife, remove the
old gasket material.
4. Remove any gasket or adhesive residue with household
adhesive remover. Always follow the manufacturer’s safety
instructions when using these products.
5. Allow the grill to dry for 30 minutes.
6. Replace the gasket material by removing the backing tape
from the new gasket. Take care to not touch the adhesive
side. Starting in a rear corner, lay the gasket along the out-
er edge and press rmly. Do not pull or stretch the gasket
when applying.
7. Trim any excess gasket material as needed.
8. Close the lid and/or doors and let dry for 24 hours.
IMPORTANT
Initial Use: The rst time the grill is used with the new gasket,
operate the grill at temperatures of 350 to 400 degrees
maximum. This will season and set the gasket adhesive
properly. Let burn for at least 60 minutes.
Buy a good grill brush. Inexpensive grill brushes tend to lose
their metal bristles, which can stick to your cooking grids and
become embedded in foods.
A grill builds up a patina of smoke residue. The “seasoning” is
normal and actually enhances the avor of your foods. If the
build-up grows too think, it can ake off and fall onto your food.
To remove excess build-up, let the grill cool completely and then
brush thoroughly with a high-quality grill brush.
B102223-0-0714Page 36
Page 37

OPEN AREA IS SHADED
QUICK TEMPERATURE REFERENCE
COOKING TIPS
Cook Food To Proper Temperatures
Cooking food safely requires that you raise the internal temperature of the meat high enough and for a long enough period of
time to kill any food-borne bacteria that may cause illnesses.
Color is not the best indicator that food is safe to eat. Use a high-quality probe thermometer to be sure your food is properly
cooked. Place the tip of an instant-read thermometer into the center of the thickest part of the food but at least 1/2 inch deep.
Read the temperature after about 10 seconds. Follow the temperature guidelines for the type of food you’re cooking.
The following guidelines are from the U.S. Food and Drug Administration Center for Food Safety and Applied Nutrition.
COOK TO INTERNAL TEMPERATURE
Category Food Temperature (°F) Rest Time
Ground Meat &
Meat Mixtures
Fresh Beef,
Veal, Lamb
Poultry
Pork and Ham
Seafood
Beef, Pork, Veal, Lamb 160 None
Turkey, Chicken 165 None
Steaks, roasts, chops 145 3 minutes
Chicken & Turkey, whole 165 None
Poultry breasts, roasts 165 None
Poultry thighs, legs, wings 165 None
Duck & Goose 165 None
Stufng (cooked alone or
in bird)
Fresh pork 145 3 minutes
Fresh ham (raw) 145 3 minutes
Precooked ham (to reheat) 140 None
Fin Fish 145 or cook until esh is opaque and separates easily with a fork. None
Shrimp, lobster, and crabs Cook until esh is pearly and opaque. None
Clams, oysters, and mussels
Scallops Cook until esh is milky white or opaque and rm. None
Cook until shells open during cooking. None
165 None
TEMP. RANGE COOKING TYPE LOWER AIR VENTS
220°-275°
300°-375°
400°-475°
500°-600°
The above vent adjustments are a guide. The temperatures may vary due to wind, outside ambient temperatures and amount of
charcoal used. You may have to set and adjust to suit your conditions.
*Low temperatures are best achieved by using the divider accessory DPA304 and controlling the air on one side.
B102223-0-0714 Page 37
SLOW COOKING /
SMOKING *
BAKING /
ROASTING
BAKING /
ROASTING
GRILLING /
SEARING
TOP SMOKE
VENT
Page 38

IMPORTANT SAFETY INFORMATION
Be sure the grill is cool before using any type of aerosol cleaner on or around the grill. The chemical
that produces the spraying action could, in the presence of heat, ignite or cause metal parts to
corrode. Do not operate the grill under unprotected combustible construction. Use only in well
ventilated areas. Do not use in buildings, garages, sheds, breezeways or any enclosed areas.
Keep the area around the grill free from combustible materials, trash, or combustible uids and
vapors such as gasoline or charcoal lighter uid. Do not obstruct the ow of combustion and
ventilation air. Keep the back of the cart free and clear from debris.
Never use the grill in windy conditions. If located in a consistently windy area (oceanfront, mountain
top, etc.) a windbreak will be required.
Always adhere to the specied clearance.
Keep electrical cords always from the heated areas of the grill.
Do not use the grill for cooking excessively fatty meats or products, which promote are-ups.
Keep Children Away from the Grill at All Times
Never leave children unattended near the grill. Teach them to stay away even when you are not
cooking, as the grill can remain hot after it is turned off.
Never allow children near the grill at any time. Do not store items of interest to children around or
below the grill or in the cart.
Never allow children to crawl inside of a cart or island enclosure.
B102223-0-0714Page 38
Page 39

IMPORTANT SAFETY INFORMATION
Practice Safe Grilling
Do not wear loose tting clothing or ammable clothing (such as synthetics) around the grill. Never
let clothing, pot holders, or other ammable materials come in contact with or too close to any grate,
burner or hot surface. Fabric may ignite and result in personal injury.
Use only dry pot holders. Using a damp pot holder on a hot surface may cause burns from steam.
Do not use towels or bulky cloth in place of pot holders. Do not let pot holders touch hot cooking
grids. Never use a sponge on a hot surface, as it may cause steam burns.
Protect your hand with an oven mitt or pot holder when opening the grill lid. Never lean over an
open grill.
Use heat-proof cookware and tools specically designed for grilling. Other types of material may
shatter with sudden temperature changes or melt from extreme heat. Use tools with insulated
handles and keep them away from the grill to avoid heat build-up.
Do not spray aerosol oil or butter or pour liquid oil into the grill. Doing so will cause a ash re that
can burn you.
Grease is ammable. Let grease cool before attempting to handle it. Avoid letting grease deposits
collect in the bottom of the grill. Clean your grill often.
Do not heat unopened food containers - such as cans, jars, and sealed pans. Pressure build-up
may cause the container to burst.
Clean the grill with caution. Avoid steam burns; do not use a wet sponge or cloth to clean the grill
while it is hot. Some cleaners produce noxious fumes or can ignite if applied to a hot surface.
B102223-0-0714 Page 39
Page 40

WARRANTY TERMS
Empire Comfort Systems Inc. warranties this Broilmaster Premium Grill to be free from defects at the time of pur-
chase and for the periods specied below. Broilmaster Premium Grills must be installed by a qualied technician
and must be maintained and operated safely, in accordance with the instructions in the owner’s manual. This warranty applies to the original purchaser only and is not transferable. All warranty repairs must be accomplished by a
qualied gas appliance technician.
Limited Lifetime Parts Warranty – Against Rust-Through
If the items listed below fail because of defective workmanship or material, Empire will repair or replace at Empire’s option. The limited lifetime warranty provides one-time replacement of a covered component.
• Aluminum Grill Housing (except paint)
• Stainless Steel Rod Cooking Grids and Stainless Steel Griddles
• Select Stainless Steel Components – Cart, Mounting
Limited Five-Year Parts Warranty – Against Rust-Through
If the items listed below fail because of defective workmanship or material, Empire will repair or replace at Empire’s option.
• Stainless Steel Charcoal Grates
Limited One-Year Parts Warranty
If the items listed below fail because of defective workmanship or material, Empire will repair or replace at Empire’s option.
• Paint on Aluminum Grill Head
• All other components not specically mentioned above
Note: Using lighter uid will void the warranty. Always light charcoal with a chimney, lighter cubes, or an electric
starter.
Duties Of The Owner
The appliance must be installed by a qualied installer and operated in accordance with the instructions furnished with
the appliance. A bill of sale, cancelled check, or payment record should be kept to verify purchase date and establish warranty period. Ready access to the appliance for service.
What Is Not Covered
• Damages that might result from the use, misuse, or improper installation or storage of this appliance.
• Travel, diagnostic costs and freight charges on warranted parts to and from the factory.
• Claims that do not involve defective workmanship or materials.
• Unauthorized service or parts replacements.
• Removal and reinstallation cost.
• Inoperable due to improper or lack of maintenance.
• The costs of a service call to diagnose a problem and labor for replacement or repairs.
How To Get Service
To make a claim under this warranty, please have your receipt available and contact your installing dealer. Provide the
dealer with the model number, serial number,and purchase verication. The installing dealer is responsible for providing
service and will contact the factory to initiate any warranted parts replacements. Empire will make replacement parts available at the factory. Shipping expenses are not covered. If, after contacting your Empire dealer, service received has not
been satisfactory,
Contact: Consumer Relations Department
Replacement, Empire Comfort Systems Inc.,
PO Box 529, Belleville, Illinois 62222, or send an e-mail to
info@empirecomfort.com with “Consumer Relations” in the subject line.
Your Rights Under State Law
This warranty gives you specic legal rights, and you may also have other rights, which vary from state to state.
Broilmaster is a Division of Empire Comfort Systems, Inc.
B102223-0-0714Page 40
Page 41

GRILL MAINTENANCE HISTORY
Date Maintenance Performed
B102223-0-0714 Page 41
Page 42

GRILL MAINTENANCE HISTORY
Date Maintenance Performed
B102223-0-0714Page 42
Page 43

MASTER PARTS DISTRIBUTOR LIST
To order parts under warranty, please contact your local Broilmaster dealer. See the dealer locator at www.broilmaster.com.
To provide warranty service, your dealer will need your name and address, purchase date and serial number, and the
nature of the problem. Please keep your receipt to establish ownership and date of purchase.
To order parts after the warranty period, please contact your dealer or one of the Master Parts Distributors listed below.
The Master Parts Distributor list changes from time to time. For the current list go to www.broilmaster.com and click on
the Parts button.
Note: Master Parts Distributors are independent businesses that stock the most commonly ordered repair parts.
Dey Distributing
1401 Willow Lake Boulevard
Vadnais Heights, MN 55101
Victor Division of F. W. Webb Company
200 Locust Street
Hartford, CT 06114
Phone: 651-490-9191
Toll Free: 800-397-1339
Website: www.deydistributing.com
Parts: Heater, Hearth and Grills
Phone: 860-722-2433
Toll Free: 800-243-9360
Fax: 860-293-0479
Toll Free Fax: 800-274-2004
Websites: www.fwwebb.com & www.victormfg.com
Parts: Heater, Hearth and Grills
East Coast Energy Products
10 East Route 36
West Long Branch, NJ 07764
Phone: 732-870-8809
Toll Free: 800-755-8809
Fax: 732-870-8811
Website: www.eastcoastenergy.com
Parts: Heater, Hearth and Grills
Able Distributors
2501 North Central Avenue
Chicago, IL 60639
Phone: 773-889-5555
Toll Free: 800-880-2253
Fax: 773-466-1118
Website: www.abledistributors.com
Parts: Heater
HOW TO ORDER REPAIR PARTS
Parts Not Under Warranty
Parts can be ordered through your Service Person, Dealer, or a Master Parts Distributor. See this page for the Master Parts
Distributors list. For best results, the service person or dealer should order parts through the distributor. Parts can be shipped
directly to the service person/dealer.
Warranty Parts
Warranty parts will need a proof of purchase and can be ordered by your Service Person or Dealer. Proof of purchase is required
for warranty parts.
All parts listed in the Parts List have a Part Number. When ordering parts, rst obtain the Model Number and Serial Number from
the name plate on your equipment. Then determine the Part Number (not the Index Number) and the Description of each part
from the following illustration and part list. Be sure to give all this information . . .
Model Number / Dealer Part Description
Serial Number / Dealer Phone Number Part Number
Do not order bolts, screws, washers or nuts. They are standard hardware items and can be purchased at any local hardware
store.
Shipments contingent upon strikes, res and all causes beyond our control.
Your Broilmaster Premium Gas Grill is identied by model number, serial number, and gas type. This information is
provided on a product identication label located on the grill’s control panel. For your convenience, complete this
section for future reference when contacting your dealer.
B102223-0-0714 Page 43
Page 44

PREMIUM GRILLS
BROILMASTER
A Division of Empire Comfort Systems, Inc.
918 Freeburg Ave.
Belleville, Illinois 62220
Visit our web site at www.broilmaster.com
If you have a general question about our products, please e-mail us at info@empirecomfort.com.
If you have a service or repair question, please contact your dealer.
B102223-0-0714Page 44
 Loading...