

Britax Safe'n'Sound, Safe-n-sound Baby Capsule, Safe-N-Sound BABY CAPSULE BS0040A-i20133 Series Instructions For Installation & Use
Page 1
BABY CAPSULE
Birth to 12 months (approx.)
Instructions for Installation & Use
NOTE: Style may vary from image shown.
IMPORTANT: KEEP THIS BOOKLET IN THE PLACE
PROVIDED ON THE CHILD RESTRAINT BASE
Series No. BS0040B-020133
Birth to
12 months
(approx.)
Instructions for Installation & Use
1
Page 2
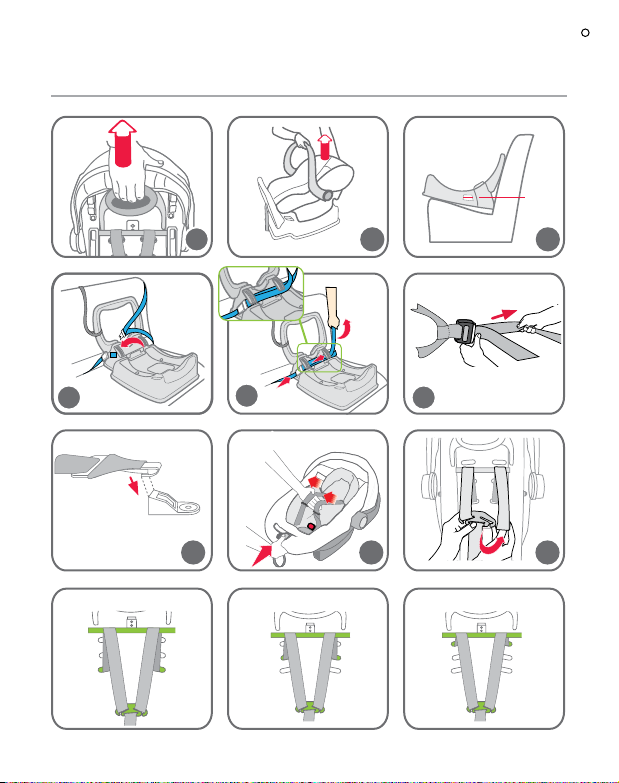
QUICK SETUP
Level
1
4
5
7 8 9
AVERAGE SIZE BABY GROWING BABY
Instructions for Installation & Use
2
2
Press
3
Pull
6
LARGER BABY
Page 3
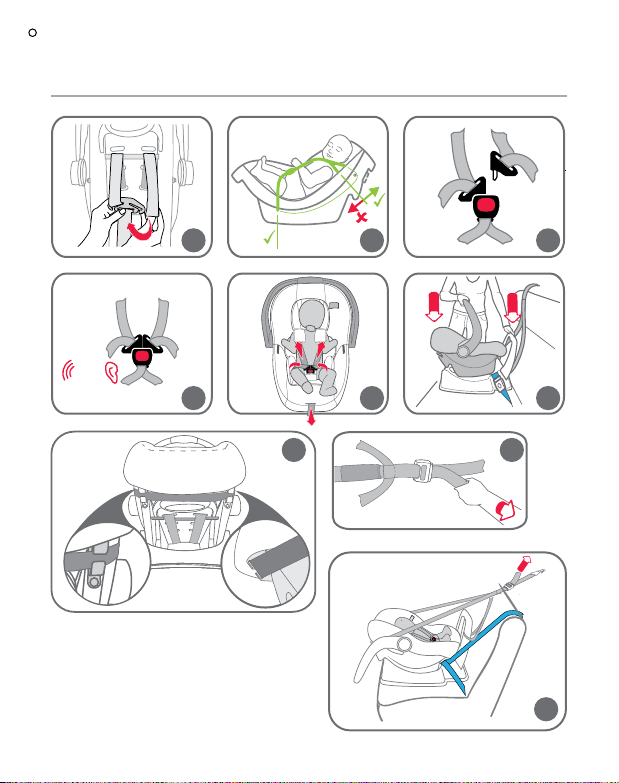
QUICK SETUP
Click
10
13
16
11
14
Instructions for Installation & Use
12
15
17
18
3
Page 4

INTRODUCTION
To be used only in a rearward-facing position until the infant’s shoulders reach the
shoulder height marker (approximately 12 months of age).
Continue to use this infant restraint until the child reaches this limit.
Infants are at risk of serious injury if they face forward too early.
يتم استخدامه فقط في الوضعية المواجهة إلى الخلف حتى يصل كتفي الرضيع إلى
علامة ارتفاع الأكتاف (تقريبًا في عمر 12شهر).
استمر في استخدام حاجز الرضع هذا لحين وصول الطفل إلى هذا الحدّ.
يكون الرضّع في مخاطرة للتعرض إلى الإصابات الخطيرة إذا تم توجيههم إلى الأمام
بصورة مبكرة أكثر من اللازم.
只采用后向式安装,直到婴儿的肩膀达到肩高标记(大约12个月的宝宝)
在儿童达到该座椅上限以前必须不断使用这一婴儿汽车座椅。
婴儿过早乘坐前向式座椅则可能受到严重的伤害。
Να χρησιμοποιείται μόνο σε θέση στραμμένο προς τα πίσω μέχρι οι ώμοι του
βρέφους να φτάσουν τον δείκτη ύψους του ώμου (περίπου 12 μηνών).
Συνεχίστε να χρησιμοποιείτε αυτό το σύστημα συγκράτησης νηπίων μέχρι το παιδί
να φτάσει σε αυτό το όριο.
Τα νήπια κινδυνεύουν με σοβαρό τραυματισμό αν κοιτάζουν προς τα εμπρός πολύ
νωρίς.
Magagamit lamang sa isang nakaharap sa likuran na posisyon hanggang sa
maabot ng balikat ng sanggol ang marka ng taas ng balikat (humigit-kumulang 12
na buwang edad).
Ipagpatuloy ang paggamit ng pampigil ng sanggol na ito hanggang sa maabot ng
bata ang limitasyong ito.
Ang mga sanggol ay nasa seryosong peligro ng pagkapinsala kung sila ay haharap
ng masyadong maaga.
Instructions for Installation & Use
4
Page 5

INTRODUCTION
Chỉ được sử dụng ở vị trí hướng mặt về phía sau cho đến khi vai em bé cao tới
vạch ghi độ cao của vai (khoảng 12 tháng tuổi).
Hãy tiếp tục sử dụng ghế em bé này cho đến khi em cao tới giới hạn này.
Bé sơ sinh có nguy cơ bị chấn thương nghiêm trọng nếu hướng mặt về phía trước
quá sớm.
( 12 )
Sólo debe utilizarse orientado hacia atrás hasta que los hombros del niño
alcancen el marcador de altura (aproximadamente a los 12 meses de edad).
Utilice este sistema de seguridad infantil hasta que el niño alcance ese límite.
El niño corre el riesgo de sufrir lesiones graves si se utiliza la silla orientada hacia
adelante antes de tiempo.
僅可後向安裝使用,直至嬰兒肩膀達到肩高標記(大約12個月大)。
孩子應一直采用後向式坐姿,直至其達到後向式坐姿的上限。
孩子若過早乘坐前向式汽車座椅,可能會對其造成嚴重的傷害。
Da utilizzare solo in posizione rivolta all'indietro fino a quando le spalle del bambino
raggiungono il marcatore di altezza (circa 12 mesi di età).
Continuare a utilizzare questo sistema di ritenuta per neonati fino a quando il
bambino raggiunge questo limite.
I neonati sono a rischio di lesioni gravi se messi in posizione frontale troppo presto.
Instructions for Installation & Use
5
Page 6

INTRODUCTION
The Baby Capsule and base is installed so that the infant is facing rearwards. This
provides best position in a crash for infants.
No child restraint can guarantee absolute protection from injury in every crash. However,
to ensure that your child gets all the protection designed into the restraint, PLEASE
READ AND FOLLOW THESE INSTRUCTIONS EXACTLY and use only Safe-n-Sound
recommended parts and accessories.
Carefully read all the instructions for installation in this book. If in doubt about the method
of installation, consult Britax childcare or agent or a child restraint fitter or, in New
Zealand, to consult the agent for the vehicle.
Regional Road Rules restrict the use of child restraints, like this Baby Capsule, in the
front seat of the car. Check your local Road Rules.
Always store the instruction book in the place provided in the base when the Baby
Capsule is removed.
The Baby Capsule is suitable for fitting to a variety of Britax, Steelcraft and BOB Strollers
using one of the adaptor systems. For compatible Strollers refer to www.britax.com.au.
Britax CLICK & GO™ Adaptor is required for some strollers.
Britax Childcare Pty. Ltd. continues to provide care for your children when travelling in
motor cars with a range of child restraints suitable throughout their childhood.
Instructions for Installation & Use
6
Page 7

PAGE
8
WARNINGS AND IMPORTANT MESSAGES
10
SHOULDER HEIGHT MARKERS AND A GROWING CHILD
12
SHOULDER HEIGHT MARKERS AND THE NEXT STEP
13
SPECIAL FEATURES
16
SUITABLE FOR USE
17
USING THE BABY CAPSULE
21
INSTALLING THE BASE
25
HOW TO INSTALL - TOP TETHER STRAP
27
BABY CAPSULE SETUP
32
HOW TO USE
39
HOW TO INSTALL IN AN AIRCRAFT
42
CARE & MAINTENANCE
47
ACCESSORIES
49
INSTALLATION OF CAR'S UPPER ANCHORAGE POINT
54
ALTERNATIVE INSTALLATION IF SEATBELT LOOSENS
56
TRAVEL SYSTEM
57
TRAVEL SYSTEM - INTEGRAL LATCH
60
TRAVEL SYSTEM - BRITAX CLICK & GO™ADAPTOR
65
TRAVELLING TIPS
66
IN CASE OF CRASH
Instructions for Installation & Use
INDEX
7
Page 8

• Use the restraint exactly as shown in the instructions.
• Supervision of children is needed because they may be able to undo the buckles and
adjusters.
• DO NOT LEAVE CHILDREN UNATTENDED IN THE CAR.
• Do not alter or modify this restraint.
• Repairs must only be done by the manufacturers or agent.
• Fit the restraint firmly to the car seat.
• Fit the harness firmly to the child.
• A loose restraint or harness is dangerous.
• DO NOT USE A REAR-FACING CHILD RESTRAINT WHERE AN AIRBAG IS
FITTED IN FRONT OF THE SEATING POSITION. For other airbags, refer to the car
owner’s handbook for warnings and instructions.
• To ensure infant’s back is evenly supported do not put more than one nappy on the
baby and make sure the nappy is not thickly folded at the back.
• Do not allow the restraint to come into contact with polishes, oils, bleach and other
chemicals.
• Destroy the restraint if it has been in a severe crash, even if no damage is visible.
• Do not harness an infant wrapped in a blanket or swaddled. Any blanket or wrap
must only be placed over the harness and infant.
• Always secure the loose end of the top tether strap. Do not use the child restraint
where this strap may fall into the seat back or off the side of the seat.
• ALWAYS ATTACH HOOK AND REMOVE SLACK.
• DO NOT USE THIS RESTRAINT WITHOUT THE COVER.
• This Baby Capsule is only approved for use with the included base or an accessory
base (additional purchase) of the same series number - 40/B/2013. It is not approved
for use with a base that utilises ISOFIX compatible anchorages. Series injury may
result from use of this Baby Capsule with a non-approved base.
Instructions for Installation & Use
8
Page 9

IMPORTANT :
• TO BE USED WITH A LAP-SASH OR LAP ONLY SEATBELT IN THE BACK OF
MOST CARS WITH FORWARD FACING SEATS.
• Do not use the child restraint facing forwards. Do not use excessively upright or
reclined.
• This restraint must be used in conjunction with a lap or lap-sash seat belt.
• Seatbelt extenders are not recommended to be used if the seatbelt is not long
enough to secure the child restraint. If seatbelts are too short then seek advice from
a child restraint fitter and consider their recommendations before using a seatbelt
extender, If you use a seatbelt extender then ensure that the seatbelt buckle does not
sit above the base moulding or prevent the Capsule locking onto the base.
• THIS RESTRAINT IS NOT SUITABLE FOR USE WHERE THE TOP TETHER
STRAP MAY FALL INTO A SPLIT IN THE SEAT BACK OR OFF THE SIDE OF THE
SEAT.
• THIS RESTRAINT MUST BE ATTACHED TO A CHILD RESTRAINT UPPER
ANCHORAGE POINT IN THE CAR. REFER TO CAR OWNER'S HANDBOOK FOR
LOCATION OF UPPER ANCHORAGE POINTS. REFER TO A CHILD RESTRAINT
FITTING STATION IF NO UPPER ANCHORAGE POINTS ARE IN THE MOTOR
CAR.
• The restraint should not be purchased or sold as a second hand item. It is
recommended not to use child restraints older than 10 years as the protection in an
accident may be reduced.
• This child restraint is not approved for use with any connectors that connect to the
car's ISOFIX low anchorages.
• Make sure the handle is latched properly every time you pick up the Baby Capsule.
• The restraint is not intended to be a substitute baby cot or bed. It is only designed to
enable safe transportation of children in motor vehicles. Do not leave a baby in the
restraint for long periods of time.
Instructions for Installation & Use
9
Page 10
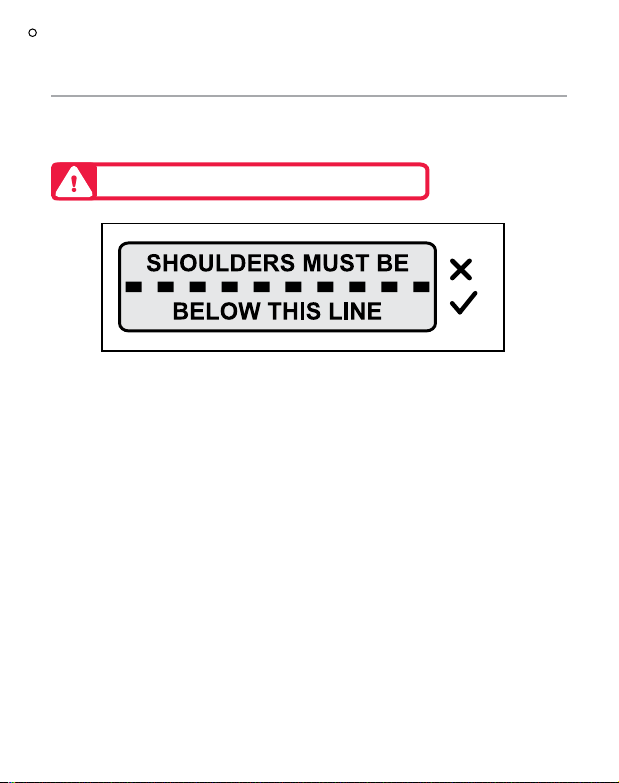
SHOULDER HEIGHT MARKERS AND A
GROWING CHILD
NEW BABY
Shoulders below the Shoulder
Height Marker.
Maximum Shoulder Height Marker.
FRONT OF VEHICLE
The Baby Capsule is not suitable for your child when
their shoulders are above the shoulder height marker.
If the babies neck muscles are unable to support
their head then the child should remain rear facing,
choose a child restraint that will take larger babies in
rear facing.
DO NOT MOVE TO THE NEXT RESTRAINT UNTIL
SHOULDERS REACH THE SHOULDER HEIGHT
MARKER.
OLDER BABY
Shoulders in-line with the Shoulder
Height Marker- then you will need to
move to the next child restraint.
Maximum Shoulder Height Marker.
Instructions for Installation & Use
10
Page 11
SHOULDER HEIGHT MARKERS AND A
GROWING CHILD
Shoulder height markers are provided on this restraint for a visual indication that the
child is safe to ride in this restraint.
IMPORTANT: Follow this advice.
DO NOT MOVE TO THE NEXT RESTRAINT UNTIL THE BABY'S SHOULDERS
REACH THE SHOULDER HEIGHT MARKER.
When the baby's shoulders reach this marker, the child is now too big for the Baby
Capsule. It is now time to move to the next child restraint, see next page.
Instructions for Installation & Use
11
Page 12
SHOULDER HEIGHT MARKERS AND
THE NEXT STEP
Next type of restraint that can be used in the car for your
child.
When your child has outgrown the seat, you can then either use:
• Convertible Child Seat: Suitable for approximately
12 months, continue to keep your child rear
facing until the shoulders reach the lower
shoulder height marker. Then turn to forward
facing until the child reaches the upper shoulder
height marker - approximately 4 years of age.
Some convertible child seats may allow for the
child to remain rearward facing until 2 to 3 years
of age.
OR
• Dedicated Forward Facing Seat with in-built
harness: Suitable for children who have outgrown
their Baby Capsule (approximately 6 months old),
up to approximately 4 years of age, or 8 years of
age depending on the restraint.
OR
• Convertible Booster Seat with in-built harness
that faces forward: Suitable for children who have
out grown their rear facing seat (approximately
6 months old). This seat can be used up to
approximately 4 years of age with built-in harness
and then be converted to a booster seat and
used up to approximately 8 years of age.
Instructions for Installation & Use
12
Convertible
Child Seat
Forward-Facing
Seat with
in-built harness
Convertible
Booster Seat
Page 13
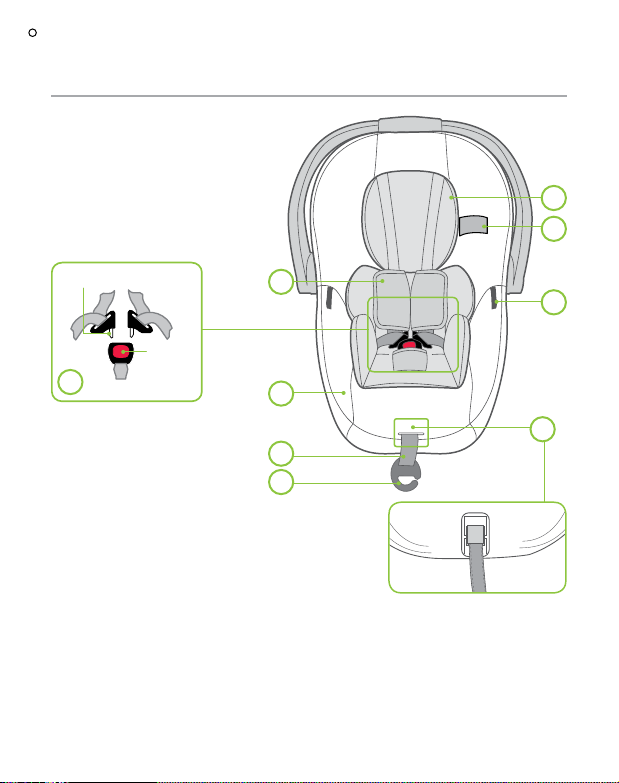
BABY CAPSULE
SPECIAL FEATURES
1
2
Harness Tongues
Harness
8
Buckle
9
7
6
1. Padded Insert (style may vary)
2. Shoulder Height marker
3. Buckle Tongue Holders (if fitted) (holders
are on both sides of the Padded Insert or
the sides of the cover)
4. Harness Adjuster (under cover)
5. Harness adjustment strap hook (disconnected)
6. Harness adjustment strap
7. Cover
8. Harness Tongues and Buckle (Red button)
9. Shoulder Pads (if fitted)
5
Instructions for Installation & Use
3
4
13
Page 14
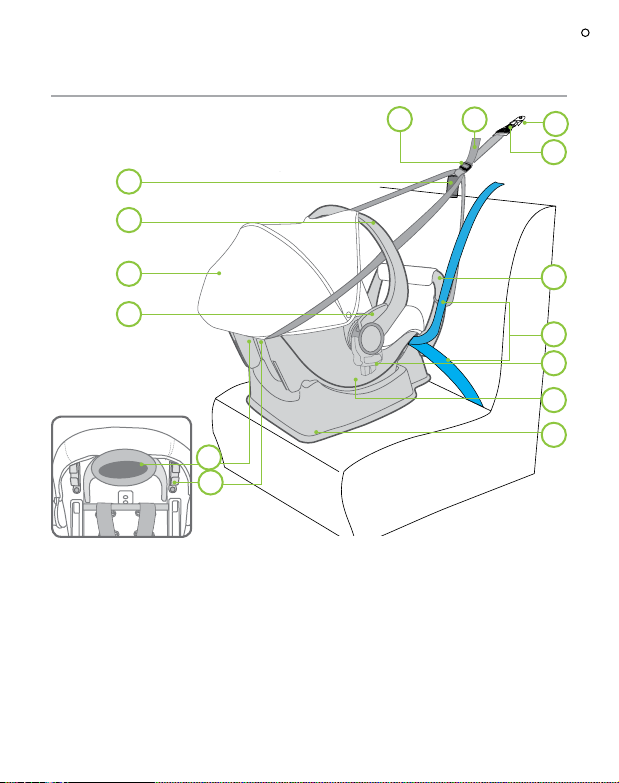
SPECIAL FEATURES
22
21
20
19
10. Car's Upper Anchorage fitting
11. Attachment Clip
12. Stabilising Bar
13. Car Seat belt
14. Britax CLICK & GO™ Adaptor
15. Baby Capsule
16. Base
17. Top Tether Strap guides
Instructions for Installation & Use
14
18
17
23
24
10
11
12
13
14
15
16
18. Baby Capsule Release Handle
(Located at the back of the Baby Capsule)
19. Carry Handle release latch
20. Canopy
21. Carry Handle
22. Top Tether Storage Pocket
23. Top Tether Adjuster
24. Top Tether strap
Page 15
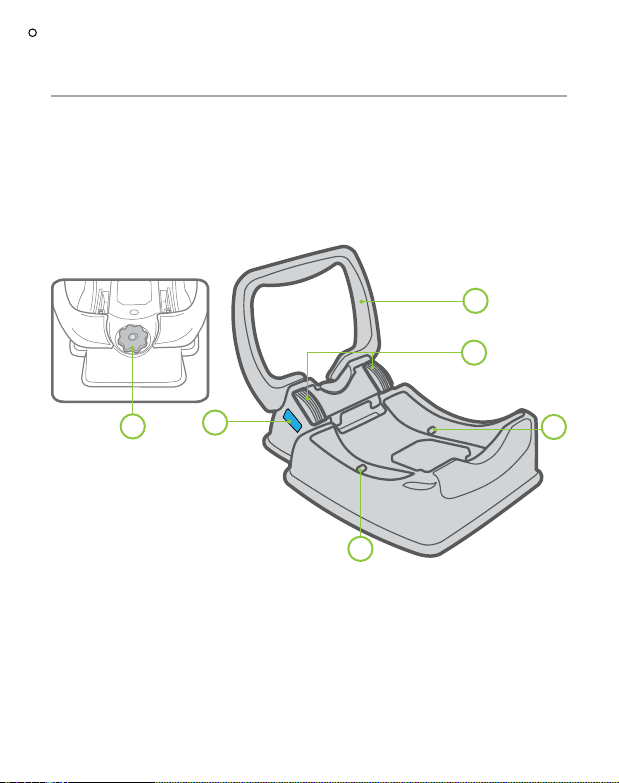
BASE
12
25
28
25. Belt Guide Hooks
26. Capsule Latching Points
27. Rearward-Facing Belt Path Label (shown in blue)
28. Levelling Knob
Top Tether not shown for illustration purposes.
27
26
Instructions for Installation & Use
26
15
Page 16

SUITABLE FOR USE
If the baby’s neck muscles are unable to support
their head, then the child should remain rear-facing,
choose a restraint that will suit larger babies in a
rear-facing mode.
To ensure that the space is sufficient, the purchaser should check the measurements
between the vehicle’s rear and front seats in which the child restraint is intended to be used.
Ensure babies and toddlers are adequately shaded from direct sunlight through side or rear
windows.
Check the car is ventilated by opening windows or using the car's ventilation system taking in
external air. Recirculation setting is not suitable for providing ventilation.
THE TETHER STRAP MUST ALWAYS BE FITTED WHEN THE CHILD RESTRAINT IS
USED IN A VEHICLE.
Do not use the restraint without the top tether strap correctly attached.
The top tether strap must be attached to an anchorage point using an extension strap if
necessary.
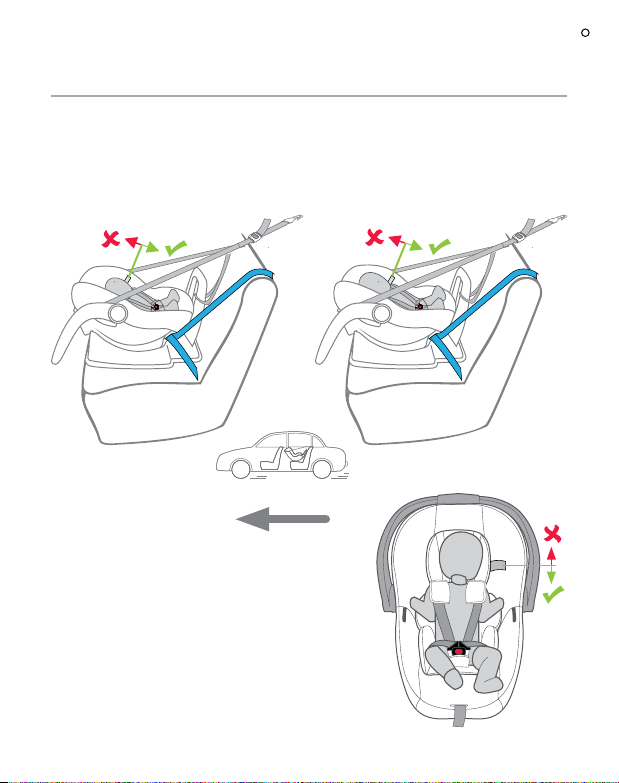
The Baby Capsule may just touch the front seat, but must not in such a way that the
installation angle is affected.
Do not allow the front seat to alter the installed
position of the restraint, It is permissible to allow
the restraint to touch the seat in front of it.
Do not recline the seat excessively, it must be
installed at the correct angle (see page 21 - 22).
Do not use on any vehicle seat which faces
sideways or rearwards.
570mm
475mm
Instructions for Installation & Use
16
Page 17
USING THE BABY CAPSULE
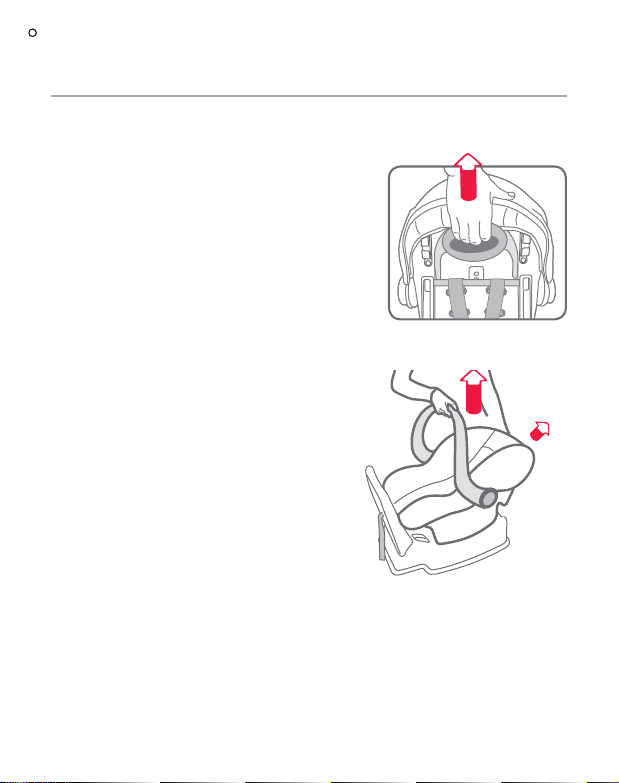
REMOVING BABY CAPSULE FROM BASE
A. Grasp the handle with one hand. With the other
hand, lift the catch located at the front of the Baby
Capsule.
B. With the catch still lifted raise the Baby Capsule
clear of the base.
Lift
Pull
Catch
Instructions for Installation & Use
17
Page 18
B
3
USING THE BABY CAPSULE
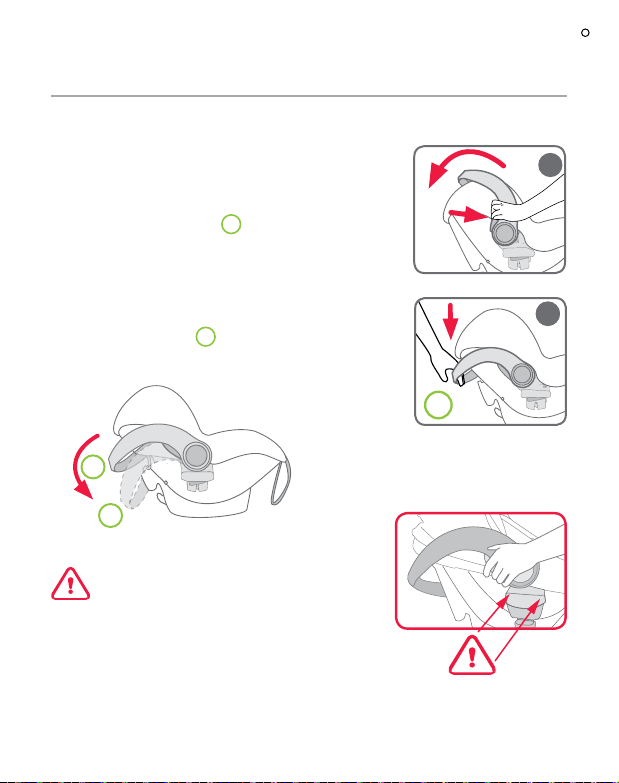
ADJUSTMENT OF HANDLE POSITION WITH BRITAX
CLICK & GO™ ADAPTOR
A. Squeeze the carry handle release latches on both
sides of the handle and rotate handle to the first
position -“rocking position” .
B. Squeeze the latch again and start to rotate the
handle then remove both hands from the latches
and use one hand at the top of the handle to rotate
down further until the handle latches in the second or
“non-rocking position” . The Capsule is now locked to
the stroller.
2
3
Push down until it clicks into place.
To avoid pinching your fingers follow the steps
above.
2
B
3
A
Instructions for Installation & Use
18
Page 19
USING THE BABY CAPSULE
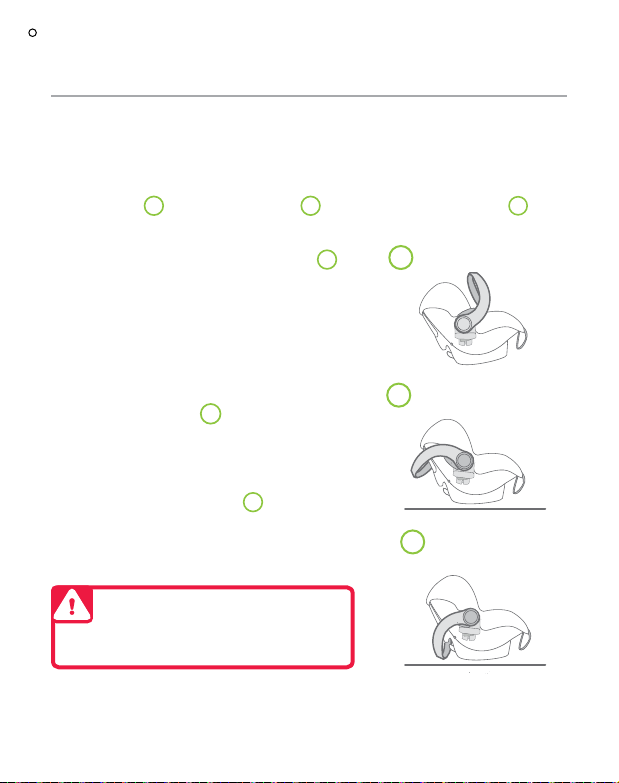
ADJUSTMENT OF HANDLE POSITION
The Baby Capsule features a sturdy carry handle which can be used in conjunction with
the curved base to convert it to a rocker. At the base of the handle there are two large
buttons which control the three positions of the handle. These positions are the "carry (or
travel) position" , the "rocking position" , and the "non-rocking position" .
1 2
3
A. To convert from carry to "rocking position" ,
depress the large buttons on each side and rotate
the handle towards the front of the Baby Capsule.
When you have started rotating the handle release
the buttons and continue rotating the handle round
until it locks into position.
B. Ensure the handle is locked in position securely.
The "rocking position" enables the Baby
Capsule to rock without the possibility of the Baby
Capsule tipping over.
C. To convert to a "non-rocking" position depress
both buttons and rotate the handle to the fixed
position. Ensure the handle is locked in position
securely.
2
3
2
IMPORTANT :
Do not place the Baby Capsule on a table or a
work-top where it could fall off.
1
Carry Position
2
Rocking Position
3
Non-rocking
Position
Instructions for Installation & Use
19
Page 20
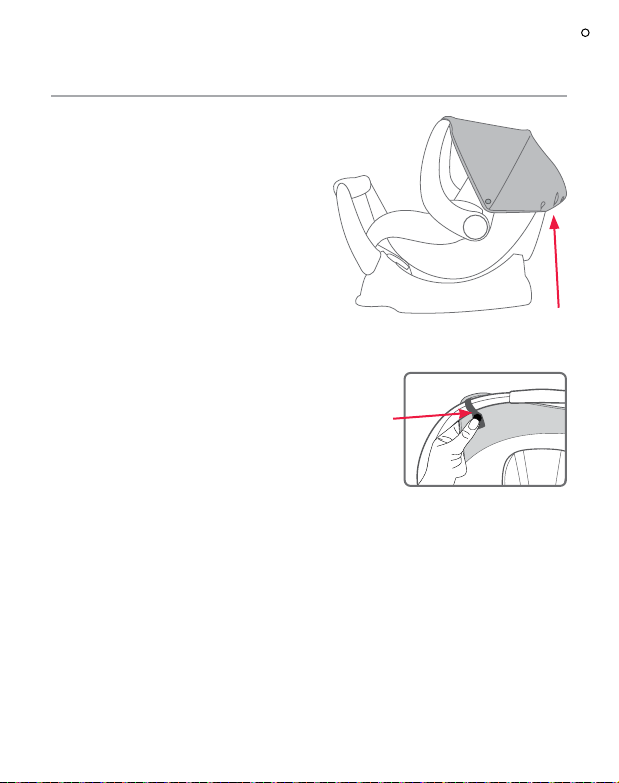
USING THE BABY CAPSULE
TO FIT AND USE THE
CANOPY
A. Fit Canopy over Baby Capsule with
elastic at the end.
B. Loop elastic around carry handle and
clip in press studs. Check the elastic
around the back of the Capsule has
not lifted.
D. The Canopy can be rotated to cover
the baby or folded by rotating to
the desired position using the carry
handle.
TO REMOVE CANOPY
A. Unclip the press studs from carry
handle and remove canopy.
Unclip press
studs on
carry handle
to remove
canopy
Elastic around
Baby Capsule
Instructions for Installation & Use
20
Page 21
INSTALLING THE BASE
INSTALL INTO VEHICLE
Remove all packaging from the Baby Capsule.
Consult the car owner’s handbook for location of top tether anchorage points.
If there is no child restraint anchor fitting or child restraint anchor point refer to pages 49
to 53 for the installation of the anchor fitting as well as the use of extension straps.
An anchor fitting is required to attach the top tether strap to fully install the Capsule to
the car. The top tether strap must be used with this Baby Capsule when used in the car.
For installing the Base to the car, select a seating position with a child restraint anchor
fitting directly behind the seating position.
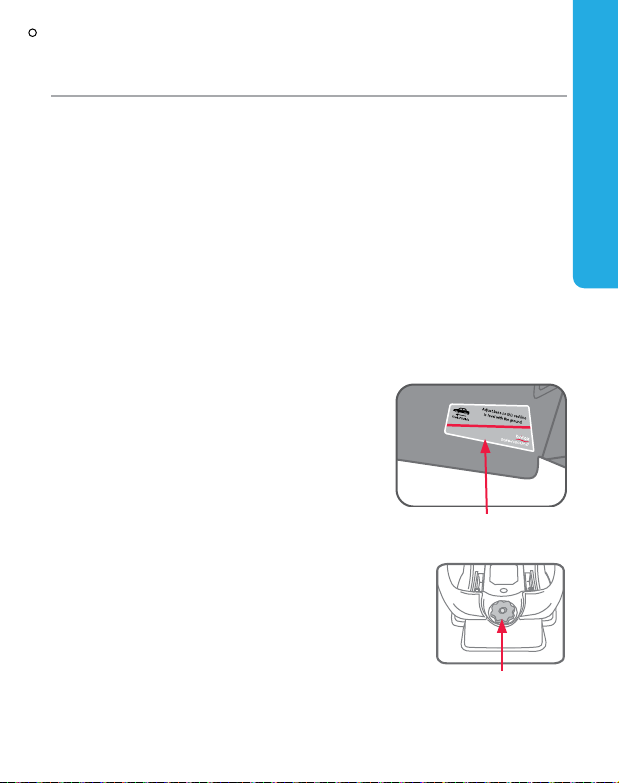
ADJUSTING THE BASE ANGLE
A. Place the base and Baby Capsule on vehicle seat
in a seating position where a child restraint anchor
fitting is installed. The Level Indicator Line should
be level with the road, (i.e. parallel with the road
surface). Check and adjust the Levelling knob of
the base if necessary.
Level Indicator Line on
B. If your car’s seat is contoured then you may need
to adjust the angle of the base so your baby is not
too upright.
The angle may be altered by turning the base
levelling knob located at the rebound bar end
which will cause the levelling foot to extend from
the underside of the base.
both sides of base.
Levelling Knob
REARWARD FACING
Instructions for Installation & Use
21
Page 22

INSTALLING THE BASE
Always leave a
rearward slope angle of
approximately 10° to 15°
REARWARD FACING
10° to 15°
MANUAL PACKING
The angle may also be altered by placing a firm packing between the seat and the
underside of the base (packing can be a firmly rolled up towel)
For some vehicles with flat seats, packing may be required at the front edge of the base
to get some recline. The stabilising bar does not need to touch the car's seat back but
should be close.
Always leave a rearward slope angle of approximately 10° to 15°
Packing
ROAD
10° to 15°
ROAD
Instructions for Installation & Use
22
Page 23

INSTALLING THE BASE
HOW TO INSTALL BASE
USING LAP SASH SEATBELT
A. Place the base into the car in the
selected seating position with the
Stabilising bar against the vehicle
seatback as shown.
Confirm the base angle as
desired, otherwise adjust as
shown on page 25 to 26.
B. Extend the seat belt to maximum
length. For a lap-sash seat belt,
position the tongue in the middle
of the fully extended belt. Feed
the seatbelt through the blue
REAR-FACING SEATBELT PATH
labels on each side and under
Belt Guide Hooks.
REARWARD FACING
Blue REARWARD-
FACING
BELT PATH label
Belt Guide
Hooks
Instructions for Installation & Use
23
Page 24

INSTALLING THE BASE
C. Engage the seat belt tongue to
the buckle. Push downwards and
rearward on the restraint base to
compress it into the vehicle seat.
Whilst compressed in the seat, pull
REARWARD FACING
on the lap belt to remove slack.
D. If a lap-sash seat belt is used then
allow the excess sash belt to feed
back in to the retractor.
If the seat belt will not stay tight in every day use, then fit a
gated 3-bar slide (not supplied with seat) to the lap-sash belt
to prevent loosening. See pages 54 and 55. Ensure the 3-bar
slide is removed when the Baby Capsule base is not installed
to allow other uses to use the seatbelt as a lap-sash seatbelt.
E. Locate the child restraint upper anchorage
fitting in the vehicle that is directly behind
the rear seat location chosen. Refer to
the car owner’s manual for the location (If
there is no upper anchorage fitting then
refer to pages 49 to 53 for instructions in
adding an anchor fitting).
F. Connect the top tether strap attachment
clip to the anchor fitting in the car as
detailed on page 25. Install top tether strap
to the Baby Capsule as shown on page 25.
Belt Guide Hooks
Pull Sash portion
of seatbelt to
remove slack
Car's Upper
Anchorage
Fitting
Top tether strap
Attachment Clip
Instructions for Installation & Use
24
Page 25

HOW TO INSTALL - TOP TETHER STRAP
REARWARD FACING
TOP TETHER
Once the Capsule is fitted to the base, refer to
page 32.
A. Lengthen the strap fully by pressing the
adjuster button (1) and pull the strap (2)
so that the strap is ready to attach to the
Capsule.
THIS TOP TETHER STRAP MUST ALWAYS
BE FITTED WHEN THE BABY CAPSULE IS
USED IN THE CAR.
B. Feed the Top tether strap through the
inside of the handle, around the front of the
Capsule and through the Top Tether Strap
guides in the front of the Baby Capsule.
Top Tether Strap guides
Top tether strap
C. Adjust the top tether strap by pulling as shown
in Fig. 1 to remove all slack in the straps. Do not
over tighten.
D. Roll up excess strap and place into the storage
pocket attached to the top tether.
2
1
FIG.1.
Attachment Clip
Car's Upper
Anchorage Fitting
Top tether strap
Top tether strap
placed in storage
pocket
Instructions for Installation & Use
25
Page 26

HOW TO INSTALL - TOP TETHER STRAP
IMPORTANT :
The Top tether strap must be fitted at all times when the baby is in the car.
TOP TETHER
Always secure the loose end of the top tether strap to prevent it hanging out of the
car or being accessible by the child.
REARWARD FACING
THIS RESTRAINT IS NOT SUITABLE FOR USE WHERE THE TOP TETHER
STRAP MAY FALL INTO A SPLIT IN THE SEAT BACK OR OFF THE SIDE OF
THE SEAT.
ALWAYS ATTACH TOP TETHER HOOK AND REMOVE SLACK IN THE TOP
TETHER STRAP.
CAUTION:
CHILDREN CAN BE INJURED OR RESTRAINTS AND TOP TETHER STRAP
DAMAGED BY UNSECURED CARGO IN A COLLISION. SECURE OR REMOVE
HAZARDOUS CARGO BEFORE USING THIS CHILD RESTRAINT.
REMOVING THE BASE FROM THE CAR
When removing the base, release the attachment clip from the car's upper anchor fitting
then remove the vehicle seatbelt.
Instructions for Installation & Use
26
Page 27

BABY CAPSULE SETUP
Harness Tongues
Harness
Buckle
HARNESS FEATURES
1. Outer crotch strap slot
2. Middle crotch strap slot
3. Inner crotch strap slot
4. Lap strap slot
5. Harness tongues & buckle
6. Shoulder harness strap
7. Lower shoulder strap slots
8. Middle shoulder strap slots
9. Upper shoulder strap slots
10. Maximum shoulder height marker.
11. Harness Adjuster (under cover flap)
9
8
7
6
4
2
3
1
11
10
5
4
Instructions for Installation & Use
27
Page 28

BABY CAPSULE SETUP
CROTCH STRAP
The Baby Capsule is fitted with three crotch strap
positions. Correct location of crotch strap will assist to
correctly and securely position the infant and will help
prevent the infant from slipping further down the Baby
Capsule or slumping.
NOTE: The inner crotch strap slot location is shorter
than other positions. This can be used to position the
buckle lower on the baby.
As baby grows the crotch strap must be moved towards
the outer slot.
ADJUSTMENT OF CROTCH STRAP
Remove infant from the Baby Capsule prior to making
adjustments.
A. Remove the Baby Capsule from base as instructed
on page 17.
B. Lift Baby Capsule cover to reveal crotch strap slot.
C. From the top side of Baby Capsule turn the crotch
3-bar slide and push it through each slot as shown
right until the Crotch strap assembly is free from the
Baby Capsule.
D. Locate desired slot in shell, cover and padded insert
(if fitted)
E. Insert Crotch strap through desired slot and feed
back through other slot as shown right.
F. Ensure crotch strap is not twisted and positions the
red button outwards.
Instructions for Installation & Use
28
INNER CROTCH
STRAP SLOT
Fabric
Cover
Crotch 3-bar Slide
MIDDLE CROTCH
STRAP SLOT
Crotch
buckle
Fabric
Cover
Crotch
3-bar
Slide
OUTER CROTCH
STRAP SLOT
Crotch buckle
Baby Capsule Body
Crotch
buckle
Baby
Capsule
Body
Baby
Capsule
Body
Fabric Cover
Crotch
3-bar
Slide
Page 29

BABY CAPSULE SETUP
ADJUSTING THE SHOULDER STRAPS
Remove infant from the Baby Capsule prior to making
adjustments.
A. At the rear of the Baby Capsule, remove one of the
harness shoulder straps from metal strap connector
by slipping strap through open slot. The metal strap
connector is shown in diagram right.
B. Pull the shoulder strap through slot to the front of the
Baby Capsule, through all the trims.
C. Feed shoulder strap back through desired slot in
padded insert cover and then You MUST thread the
shoulder strap OVER bar into the corresponding
slot in the shell. Re-attach the straps to metal strap
connector at the back of the seat. The slot MUST
position the shoulder strap level with or the next slot
above the baby’s shoulder.
If a Padded Insert is used, that will need to be re-
positioned and the strap re-inserted when changing
the slot position.
D. Refit the shoulder strap to the metal strap connector.
Ensure webbing is installed correctly over the bar.
Repeat straps A,B and C for the other strap.
Ensure both shoulder straps use the same height
slot pairs.
ALWAYS OVER THE BAR
Metal Strap Connector
IMPORTANT :
When replacing straps, cover and padded insert, ensure none of the straps are
twisted and that all straps are secure by pulling each harness strap.
A
C
D
Instructions for Installation & Use
29
Page 30

BABY CAPSULE SETUP
SETTING UP THE HARNESS
This section covers the setting up of the harness to fit the infant. Fitting the harness is
not required. Securing of the infant is covered later in the instructions.
The Baby Capsule is fitted with three shoulder strap positions. As the baby grows the
shoulder straps must be moved to higher slots.
A. Sit the Baby Capsule on flat ground with
the handle rotated fully back to prevent
rocking.
B. Lengthen the harness straps by pressing
the harness adjuster (under the flap)
and pulling both shoulder harness straps
evenly. Release the buckle.
C. Move the two harness tongues to the
sides of the Baby Capsule and store
in the buckle tongue holder (if fitted)
(holders are on both sides of the padded
insert or the sides of the cover). Move
the harness buckle towards the harness
adjuster.
D. Place baby into Baby Capsule lying on
its back so that the buckle is between the legs.
E. Determine which Baby Capsule straps require adjustment to
fit the harness correctly:
Confirm crotch strap position required, followed by shoulder
straps position. Adjust as required following the instructions:
Crotch Strap - page 28
Shoulder Strap - page 29
Always remove baby from Baby Capsule prior to making
adjustments.
Press the
harness adjuster
and pull the
harness straps
to slacken.
Buckle Tongue
Holder (if fitted)
Instructions for Installation & Use
30
Page 31

BABY CAPSULE SETUP
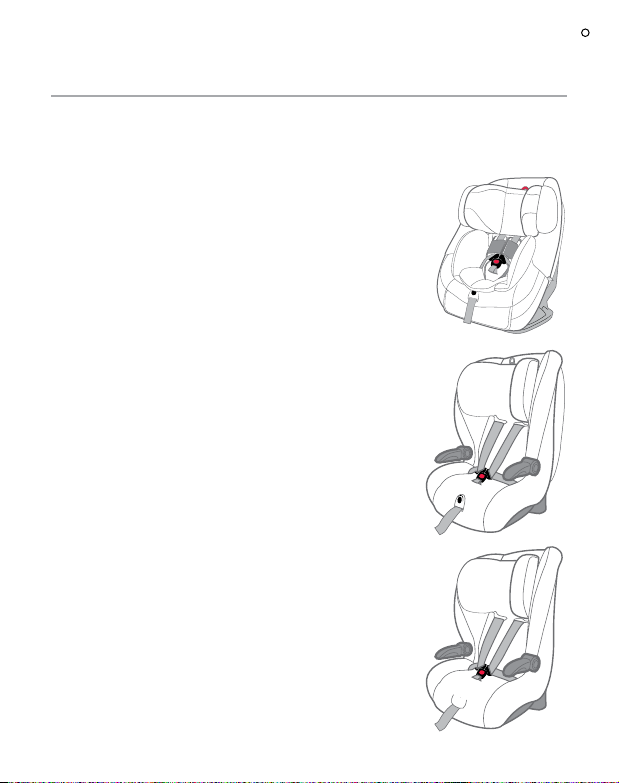
F. Adjusting the shoulder harness, it is better to
change one strap at a time so that the other strap
will be a guide for re-assembly.
The shoulder straps must be in the slots which are
nearest to the child’s shoulders, but not lower than
the child’s shoulders.
AVERAGE SIZE
BABY
GROWING
BABY
LARGER
BABY
IMPORTANT :
• Always adjust the height of the shoulder straps as the child grows
• Do not use the Capsule with the harness shoulder straps set at different
heights or fed through mismatching slots.
• Ensure the harness straps are not twisted and that all straps are secured by
pulling each harness strap.
Instructions for Installation & Use
31
Page 32

HOW TO USE
PLACING INFANT IN CAPSULE
When positioning baby into Baby Capsule
make sure baby's back is fully supported onto
the flat section and the baby's nappy area
(bottom) is resting in the bottom curvature as
shown. It is recommended that bulky nappies
are not used when baby is travelling in the
Baby Capsule as they can cause incorrect
positioning of the baby's back in the Baby
Capsule.
A. Loosen shoulder straps by pressing the
harness adjuster and pull both shoulder straps
evenly. Pull out the desired amount of slack.
Press the harness adjuster
and pull both harness
straps evenly to loosen.
B. Place the two harness tongues
into the Buckle Tongue Holder
(if fitted).
Move the harness buckle
towards the harness adjuster for
easier fitment next time you put
the infant in the Capsule.
Bottom curvature of Baby
Capsule
Buckle Tongue
Holder (if fitted)
Instructions for Installation & Use
32
Page 33

HOW TO USE
C. Place baby into Baby Capsule lying on its back so that the
buckle is between the baby’s legs. Ensure that baby’s arms
and legs are free. Make sure baby is dressed to allow the
Harness Buckle to be pulled up between baby’s legs e.g.
a jump suit.
NOTE:
1. Discontinue using the Padded Insert when shoulder straps
are in the top slots or if the Pad causes over heating,
discomfort or you need more room for baby to grow.
2. Correct fitment of the harness is very important as it
restrains the baby in the Baby Capsule. The harness must
fit firmly around upper torso of the baby and be positioned
to leave the baby’s arms and legs free.
CAUTION:
Do not harness an infant wrapped in a blanket or swaddled as this increases the risk
of ejection and injury or death in a crash. The harness needs to fit firmly to the baby,
any blanket or other covering may be placed over the harness after the harness is
adjusted. Arms and legs must be free and not bound. The legs must sit on each side
of the crotch strap.
Instructions for Installation & Use
33
Page 34

HOW TO USE
D. Place each arm through each shoulder strap of the harness.
Position the buckle of the crotch strap as shown right.
E. Fit either harness buckle tongues into the harness buckle
followed by the other tongue. A click is heard when the last
tongue is fully engaged.
Should the second tongue not insert - press the red button
and reinsert the tongues. Ensure secure engagement by
pulling harness straps. If the harness buckle does not engage
correctly then it may require cleaning or need replacement
- refer to page 43. The buckle tongues are fully engaged
when both tongues are inserted and 'click' is heard.
Tongue
Instructions for Installation & Use
34
Buckle
Click
Page 35

HOW TO USE
F. Ensure slack is removed from the lap straps by
pulling the shoulder harness straps through the
buckle tongues, then pull the Harness Adjustment
Strap to take up the slack in the harness, adjusting
to a firm but comfortable fit. Make
sure that the baby’s arms and
legs are free and the crotch
strap is between the legs.
Check that slack in the straps
is minimal.
Do not use the restraint if
straps do not tighten. Contact
Customer Service.
CAUTION: A LOOSE HARNESS IS DANGEROUS
The end of the harness adjustment strap is connected to the cover to avoid tripping
over the end when carrying the Capsule. Ensure the harness adjustment strap
hook is attached when carrying the Capsule.
The infant should be harnessed correctly whenever placed in the Baby Capsule.
Do not carry an unrestrained infant in the Baby Capsule.
Pull Harness Straps
through the buckle in
direction of arrows
Pull harness adjustment
strap to remove slack.
Hook the harness adjuster strap on to the
loop to prevent tripping over the strap.
WARNING: DO NOT LEAVE CHILDREN
UNATTENDED IN THE CAR.
Instructions for Installation & Use
35
Page 36

HOW TO USE
PLACING BABY & BABY CAPSULE ONTO BASE
A. Position the Baby Capsule over the top of the
installed base. Make sure the Harness Adjustment
Strap is not caught between Baby Capsule and
Base then lower the Baby Capsule into position.
B. Push down on the Baby Capsule until an audible
click is heard. Pull upwards on the Baby Capsule
to check it is correctly locked into position.
IMPORTANT:
Lift again to check engagement.
C. Attach the top tether strap around the Baby
Capsule by feeding through the handle and onto
the top tether strap guides as shown.
D. The handle may be rotated into other
positions if desired, although this may be
difficult due to the front seat position.
E. Always secure the loose end of the top
tether strap in the pocket on the top
tether strap to prevent it hanging out of
the car or being accessible by the child.
Instructions for Installation & Use
36
Click
Top Tether Strap guides
Top tether strap
Page 37

HOW TO USE
REMOVING BABY & BABY CAPSULE FROM BASE
A. Loosen the top tether strap. Ensure that the adjuster and/or harness straps do not
fall on the baby.
B. Remove the top tether strap from the tether strap guides on the Baby Capsule.
C. Place top tether strap between the stabilising bar and the car seat back so that it will
not fall behind the seat or get trapped in the door.
This will keep the top tether strap visible and ready
for use when the Baby Capsule is put back in the car.
D. Rotate the Carry Handle to the “carry position” as
shown. Ensure the handle is locked.
E. Grasp the handle with one hand then pull the Baby
Capsule release catch with the other hand. With the
catch lifted raise the Baby Capsule clear of the base.
Always ensure the handle is locked in position
before lifting.
F. When the Baby Capsule is clear of the base, carefully
remove it from the car.
Ensure the harness adjustment strap hook is connected
to the loop.
CAUTION:
The end of the harness adjustment strap is
connected to the cover to avoid tripping over
the end when carrying the Capsule. Ensure
the harness adjustment strap hook is attached
when carrying the Capsule.
Instructions for Installation & Use
Hook the harness adjuster strap
on to the loop to prevent tripping
over the strap.
Lift
Pull
Catch
37
Page 38

HOW TO USE
REMOVING BABY FROM BABY CAPSULE
A. Rotate the carry handle to the "non-rocking position"
and ensure the Canopy is fully open.
B. Press the Harness Adjuster while pulling both shoulder
straps evenly to loosen the harness.
C. Press the red button on Harness Buckle to release both
harness tongues. Place buckle tongues through buckle
tongue holder's (if fitted) on each side of the cover or
padded insert otherwise place straps on each side of the
Capsule clear of the infant.
D. Feed the infants’s arms through each side of the harness.
Lift the baby out of the Capsule.
Buckle Tongue
Holder (if fitted)
NOTE: Once the baby gets heavier you may wish to leave the Capsule in the
car. In this case you will need to disconnect or loosen the top tether strap before
removing the baby.
Instructions for Installation & Use
38
Page 39

HOW TO INSTALL IN AN AIRCRAFT
HOW TO INSTALL USING AIRCRAFT LAP BELT
The Baby Capsule without base is suitable for use on aircraft.
The Baby Capsule must be used in accordance with the aircraft operators procedures,
and any directions or instructions from the aircraft operator, pilot or crew.
The Baby Capsule may not fit in smaller aircraft and cannot be used with aircraft
seatbelts that contain airbags unless they can be disabled.
Inform the aircraft operator that a child restraint is intended to be used on the aircraft
when booking the flight as the child restraint may not be suitable for use in that
operator’s specific aircraft.
For use of the child restraint in cars in countries other than Australia and New Zealand,
The user should consult the country’s local authorities, car hire companies, car insurance
companies, etc. for advice. The child restraint may not be acceptable for use in all cars.
FIT THE BABY CAPSULE TO THE
AIRCRAFT SEAT
The top tether strap is not required to be used to fit
the child restraint in aircraft. You do not need the base
onboard the aircraft. We recommend that you store the
excess strap and hook in the pocket provided and checkin the base with your luggage for use at the destination.
A. Position the Baby Capsule rearward facing, align
it centrally within the allocated seating position. If
possible, lift the armrests out of the way to improve
access to installing the aircraft lap belt and to suit the
width of the Capsule.
B. Carefully remove cover on the side to reveal
AIRCRAFT REARWARD-FACING BELT
PATH label marked in green.
NOTE: Never use this path in a car. Always replace cover after use.
Instructions for Installation & Use
AIRCRAFT
REARWARD-FACING
BELT PATH
marked in green.
B
AIRCRAFT USE
39
Page 40

HOW TO INSTALL IN AN AIRCRAFT
C. Place handle in "non-rocking" position,
that is, fully backwards. Fully lengthen lap
belt. Thread the lap belt into AIRCRAFT
REARWARD-FACING BELT
PATH lap belt path (green marker) as
shown, ensuring that lap part is below the
hook as shown, on each side. Engage lap
belt buckle and tongue.
D. Push down on the Baby Capsule and
AIRCRAFT USE
remove all slack from the lap belt. Pull belt
strap to tighten, ensure a firm fit of the Baby
Capsule to the seat.
Do not use this restraint with aircraft seatbelt
that contain airbags unless they can be
disabled.
Do not use with a seatbelt extender that
causes the buckle to enter the hook area of
the aircraft belt path.
Ensure lap
belt is under
the hook on
each side
Remove slack
C
D
Instructions for Installation & Use
40
Page 41

HOW TO INSTALL IN AN AIRCRAFT
The Baby Capsule base may be included with 'checked in' luggage (for use after
flight). Aircraft label is located on the underneath of the Baby Capsule. It demonstrates
suitability for use on aircraft.
REPLACE COVER OVER AIRCRAFT BELT PATH
Refit cover and replace all clips.
Ensure belt path marker is covered after use.
AIRCRAFT USE
Instructions for Installation & Use
41
Page 42

CARE & MAINTENANCE
REGULAR CARE OF THIS RESTRAINT:
Please check the following items regularly to ensure the safety of your child:
A. Check the webbing straps for fraying,
B. Check there are no cracks in moulding,
C. Check the harness adjuster is operating and is clamping the webbing,
D. Ensure the buckle is free of fluff, liquid or other matter that may enter the buckle slots.
Clean the buckle if it is sluggish to engage. See next page.
E. If any part of the restraint is cracked, broken or not operating seek repair immediately
- contact Britax Customer Service 1300 303 330
CLEANING CAR SEAT
HARDWARE: Use only mild soap to clean all metal and plastic parts of your child
restraint, using a damp sponge or cloth. Do not use chemicals or cleaning agents. Do
not try and place any hardware into a washing machine.
STRAPS/HARNESS: We recommend spot cleaning straps and harness with a damp
sponge or cloth using only cold or warm water. Never place any straps or harness into a
washing machine or tumble dryer.
Instructions for Installation & Use
42
Page 43

CARE & MAINTENANCE
BUCKLE OPERATION
To ensure the buckle remains operational the inside must be kept free of liquids, sand,
dirt, fluff, food or similar substances. If the buckle is not operating or you do not hear a
strong audible click when the second tongue is inserted, the buckle needs to be washed
or replaced. The buckle is fully engaged when both tongues are inserted. Contact
Customer Service for assistance.
TO CLEAN HARNESS BUCKLE:
If sticky liquids such as baby formula, fruit juice, etc. get
inside your harness buckle, it may become sluggish. An
indication of a sluggish harness buckle is that you cannot
hear a click when engaging the final harness tongue. To
restore the harness buckle to good working order it needs to
be cleaned as follows:
A. Remove the harness buckle from the restraint: From the
underside of the restraint pull each crotch strap 3-bar
slide, turn the 3-bar slide on its side and push back
through the slot.
B. Place the harness buckle under warm (max. 40 degrees
Celsius) running water as shown below. Let the water run
through the mouth of the buckle for five minutes. Check
the harness buckle is clean by engaging the harness
tongues and buckle several times until you hear a click.
C. If you still cannot hear a strong audible click then repeat
the cleaning process several times.
D. Refit the harness buckle to the restraint ensuring the red
button facing outwards and the 3-bar slide is fed through
the same slots.
If the Harness Buckle cannot be returned to its
original working condition then contact BRITAX
Customer Service for assistance.
Instructions for Installation & Use
Cover
A
B
Click
C
Body
3-bar
slide
43
Page 44

CARE & MAINTENANCE
COVER (STYLE MAY VARY)
The restraint has a flame retardant cover which is removable for cleaning. Cleaning
instructions are on the care label attached to the cover. If a fluffy cover is fitted then
washing the cover prior to use will remove excess fluff.
The cover has been designed to protect your child when seated in the restraint. Care
should be taken if children either eat or drink while in the restraint as some food or drink
products may cause damage or marking to the cover. Wash or clean immediately.
Do not pull sticky items from covers as the cover may be damaged - soak in water and
gently remove.
VERY IMPORTANT:
Only replace the cover with a Safe-n-Sound
supplied replacement cover with identical
shoulder height markers or a replacement
cover meeting AS/NZS 8005.
Instructions for Installation & Use
44
Page 45

CARE & MAINTENANCE
TO REMOVE THE COVER
A. Remove the Canopy by unclipping the
press studs from the carry handle (see
page 20). Remove any baby insert
pad and head pillows (if supplied) as
described on page 48 to 49.
B. Disconnect the shoulder harness
straps from the Metal Strap Connector
and feed through shoulder slots in
both Baby Capsule and cover. Refer
to page 38.
C. Feed the shoulder harness straps
and tongues through lap strap slots
in the cover only. There is no need to
remove the harness straps from the
Baby Capsule.
D. Lift the cover around the rim of the
Baby Capsule at the harness adjuster
end, feed the crotch buckle through
the slot in cover and pull the harness
adjuster strap out of the slots.
E. Remove the cover for cleaning.
Unclip press
studs on
carry handle
to remove
canopy
Metal Strap Connector
Pull elastic cover over Baby
Capsule
Instructions for Installation & Use
45
Page 46

CARE & MAINTENANCE
TO REPLACE THE COVER
A. Place the cover over the Baby Capsule
ensuring all slots in cover line up with slots
in Baby Capsule.
B. Ensure that there are no twists in all straps
underneath the Baby Capsule.
C. Feed the shoulder harness straps through
the lap strap slots and then You MUST
thread the shoulder strap OVER bar and
then re-attach the straps to metal strap
connector at the back of the seat. Refer to
page 30 to 31 for harness setup for your
baby. Feed shoulder harness straps though
the Baby Capsule. Attach the shoulder
harness straps to the strap connector.
D. Feed the crotch buckle through the slot
in trim and then through the crotch pad
attached to the cover.
Feed the harness adjuster strap through the
slots in the cover.
E. Refit and clips around the cover to the Baby
Capsule.
F. Engage shoulder harness tongues and
crotch buckle. Pull to check harness is
attached. Ensure the straps are not twisted.
G. Replace any baby insert pad and head
pillows (if supplied). To Replace Canopy
refer to page 20.
Instructions for Installation & Use
46
Pull elastic cover over Baby Capsule
ALWAYS OVER THE BAR
Metal Strap Connector
Feed crotch
buckle
through slot
Feed though crotch
pad attached to cover
Page 47

ACCESSORIES
Only use accessories designed and recommended by Britax Childcare Pty Ltd for this
product series number - 40/B/2013 and BS0040B-020133.
Use of aftermarket accessories, that is, accessories not provided with this child restraint
can reduce the safety of the child restraint and may cause injury or death. Always
follow the instructions covering the use of accessories in this section or the instructions
provided with accessory. If an aftermarket accessory is used that is not recommended
by Britax then ensure that the accessory is for this restraint, compliant with AS/NZS 8005
and stated as suitable for use with this child restraint.
The following instructions apply to accessories that may be supplied with this restraint
at point of purchase. If not, a variety of Safe-n-Sound accessories are available from
various retailers of Safe-n-Sound products.
PADDED INSERT - Style may vary
Some models have a separate Padded Insert
inside the Capsule for additional comfort.
CAUTION:
Shoulder straps and/or lap straps must pass
through any harness slots in the insert.
Depending on the style of insert, it may need
to be fitted by removing the shoulder straps,
refer to page 29.
Failure to do this might result in the harness
not holding the child securely.
Head
Pillow
Shoulder
Pads
Padded
Insert
SHOULDER PADS - Style may vary
The shoulder pads may require release by press studs. If fully fitted to the shoulder strap
then you will need to disconnect the shoulder strap as described on page 30 to 31.
Instructions for Installation & Use
47
Page 48

ACCESSORIES
HEAD PILLOW - Style may vary
The head pillow is only required for supporting the
smaller baby and can no longer be used once the
harness shoulder straps are in the top pair of slots.
The pillow is fitted to the Capsule by elastic and clips
on the back of the pillow being threaded through the
slots above the harness shoulder strap. Ensure the
elastic and clips are threaded through slots in the
backrest of the main moulding.
CANOPY
Refer to page 20.
EXTRA BASE
An Extra Base is available as a separate purchase
for a second car. This allows the Capsule to be
easily and quickly switched between cars. The top
tether strap is supplied with the Base.
An ISOFIX compatible base must not be used
with this Capsule. Use a base with the series
number 40/B/2013 and BS0040B-020133 marking
only.
Elastic with
clips over Baby
Capsule and
through slots
Shoulder harness
Head
Pillow
Instructions for Installation & Use
48
Page 49

INSTALLATION OF CAR'S UPPER
ANCHORAGE POINT
Consult the vehicle owner’s handbook for location of anchorage fittings or anchorage
points and the possible use of spacers. Some vehicles may have an anchor fitting
fitted by the vehicle manufacturer. If anchorage points cannot be found refer to car
manufacturer or local child restraint fitting station or traffic authority for optimum position
of upper anchorage point and the use of spacers.
UPPER ANCHORAGE STRAP
IMPORTANT:
THE ATTACHMENT CLIP COVER MUST ALWAYS BE USED
AS IT PREVENTS THE RISK OF INCORRECT FITMENT OF THE
ATTACHMENT CLIP TO THE UPPER ANCHORAGE POINT.
ALWAYS ENSURE THAT THE ATTACHMENT CLIP IS CORRECTLY
ENGAGED TO THE UPPER ANCHORAGE POINT AND NOT
HOOKED OR FITTED TO ANY OTHER OBJECT BEFORE EACH
USE OF THE RESTRAINT. THIS IS ESPECIALLY IMPORTANT IN
VEHICLES SUCH AS STATION WAGONS, VANS, HATCH BACKS
OR VEHICLES WITHOUT A FIXED PARCEL SHELF, SINCE THE
ANCHOR POINT IS USUALLY NOT VISIBLE.
IMPORTANT INSTALLATION NOTE:
In some vehicles the upper anchorage point in the rear vertical panel can only be
installed in one way. Please refer to vehicle owner’s handbook or a child restraint fitting
station for correct method.
Instructions for Installation & Use
49
Page 50

INSTALLATION OF CAR'S UPPER
ANCHORAGE POINT
Extension Strap distance to be measured.
Length 300mm (Use Safe-n-Sound part 0035 or equivalent).
Length 600mm (Use Safe-n-Sound part 0036 or equivalent).
Available from all major child restraint retailers.
Distance to measure to
the upper anchorage
point
Adjustable upper
Anchorage strap.
The shaded areas of this diagram illustrate the possible locations of the upper
anchorage point. Within each shaded area is an upper anchorage point showing
the correct way to install the fitting. Ensure the upper anchorage point is aligned as
illustrated unless stated otherwise in the vehicle owner’s handbook.
Instructions for Installation & Use
50
FRONT OF VEHICLE
Page 51

INSTALLATION OF CAR'S UPPER
ANCHORAGE POINT
IF THE CAR IS FITTED WITH CHILD
RESTRAINT UPPER ANCHORAGE
POINT
Locate the upper anchorage point behind
the rear seating position. (Consult the car
owners handbook for the location of the upper
anchorage point). The upper anchorage point
should be directly behind and central to the
restraint. Remove thread plug from the parcel
shelf/floor/roof, etc. and install attachment bolt
and fitting as shown in Fig 1.
CAUTION: DO NOT OVERTIGHTEN
ATTACHMENT BOLT. OVERTIGHTENING
MAY FRACTURE OR BREAK BOLT.
MAXIMUM TORQUE IS 20 Nm(14.75 ft.lb.)
Note: Minimum of five full turns of attachment
bolt is required before tightening force is
applied.
UPPER ANCHORAGE FITTING
Fig.1.
Vehicle trim
Attachment Bolt
Lock washer
Anchor fitting
Spacer(s) if
required
Vehicle metal
structure
Front of Vehicle
Instructions for Installation & Use
51
Page 52

INSTALLATION OF CAR'S UPPER
ANCHORAGE POINT
IF THE CAR IS NOT FITTED WITH CHILD
RESTRAINT UPPER ANCHORAGE
POINTS
For Sedans only - Drill 9mm diameter hole
in the parcel shelf on the centre line of the
seating position as shown in Fig 3. Before
drilling the hole, check the underside for
accessibility. Install the attachment bolt as
shown in Fig 2. It is recommended that this
installation be carried out by a child restraint
fitting station or licenced motor mechanic.
For vehicles other than Sedans - In
Australia, consult your nearest child
restraint fitting station or traffic authority
for vehicle inspection to find the best,
correct position for the placement of the
upper anchorage point, and for the correct
attachment bolt length and use of spacers.
In New Zealand, consult the agent for the
vehicle. Note to Queensland purchasers:
The installation of anchorage points must be
approved by authorised officers appointed
by Queensland Transport. Authorised
officers can be sourced from all Queensland
Transport Customer Service and
Queensland Ambulance Service Centres.
UPPER ANCHORAGE
FITTINGS FOR SEDANS ONLY
Fig.2.
Vehicle trim
Attachment Bolt
Anchor fitting
Spacer(s) if
required
Vehicle metal
structure
Reinforcing
washer (cone
downwards).
Lock washer
Secure nut
Front of Vehicle
Instructions for Installation & Use
52
Page 53

INSTALLATION OF CAR'S UPPER
ANCHORAGE POINT
ONLY USE A 5/16 UNC GRADE 5 BOLT. IF THE
BOLT IS NOT THE CORRECT LENGTH THE CAR
MANUFACTURER’S HAND BOOK CAN PROVIDE
ADVICE ON THE CORRECT LENGTH BOLT.
CHILD RESTRAINTS MUST NOT BE ATTACHED
TO UNSOUND METAL OR TO WOOD, OR
SYNTHETIC STRUCTURES. WHEN DRILLING 9
MM HOLE DO NOT DRILL THROUGH FUEL LINES,
FUEL TANKS, ELECTRICAL WIRING, OR RADIO
SPEAKERS.
WEBBING STRAPS MUST BE PROTECTED FROM
SHARP CORNERS AND EDGES. THE ANCHOR
FITTING MUST BE USED ONLY AS DESCRIBED
ABOVE. IT MUST NOT BE HOOKED ONTO ANY
OTHER OBJECT.
NOTE: Marking on
the top of a Grade 5
Bolt. Do not use any bolt
without these marks.
Front of Vehicle
Fig.3.
Centre line of
seating position
200mm
min.
CAR INSTALLATION ACCESSORIES
(From retailers of Safe-n-Sound products)
EXTRA ANCHOR KITS: Available for using the restraint in additional cars.
Re-order no: 0038
EXTENSION STRAPS: May be required for cars without a fixed parcel shelf.
Re-order no: 0035 (length 300mm) or
0036 (length 600mm)
GATED 3-BAR SLIDE (Locking clip): For converting lap-sash seat belt to lap belt, and
to obtain a better fit to the car where the fitted lock-off may not be suitable. Most cars will
not need this. Re-order no: 0215.
Instructions for Installation & Use
53
Page 54

ALTERNATIVE INSTALLATION IF SEATBELT
LOOSENS
LAP-SASH SEAT BELT
If a seat belt will not stay tight, then a
Gated 3-Bar Slide may be used to prevent
loosening.
Obtain this part from most retailers of Safe-n
Sound products.
There may be two types of Gated Slides
available, Curved and Flat.
Before using the restraint, convert the lapsash seat belt by using the Gated 3-Bar Slide.
A. Hold the lap and sash straps together and fold as
shown. Slide the inner strap into the Gated 3-Bar
Slide followed by the outer strap.
B. The two straps should slide freely in the Gated 3-Bar
Slide slot.
C. Repeat previous step A for the other
slot in the Gated 3-Bar Slide.
Curved
Hollow side
Inner
strap
Flat
Faces
towards
restraint
Instructions for Installation & Use
54
Ensure the Lap portion of seat
belt is nearest to the restraint
Page 55

ALTERNATIVE INSTALLATION IF SEATBELT
D. Feed the straps through the Gated 3-Bar Slide to
remove any slack.
LOOSENS
When fitting the Curved Gated Slide, the seat belt route
can only go one way, as shown above.
Use this seat belt configuration to install the child restraint
according to the instructions on pages 27 to 28.
Remove all slack in the lap belt to ensure the base is held
firmly against the seat back. This may require adjustment of
the strap through the gated 3-bar slide.
IMPORTANT:
Remove the gated 3 bar
slide from the seat belt as
soon as the child restraint
is removed so that an adult
can use the seat belt as a
lap-sash seatbelt.
Instructions for Installation & Use
Sash belt
portion
Lap belt
portion
55
Page 56

TRAVEL SYSTEM
This Baby Capsule is designed to be connected to compatible strollers. The following
pages provide general instructions about using the Baby Capsule with a stroller which
may differ slightly for some strollers. Refer to the attachment instructions provided
with your stroller. Use the stroller in accordance with the instructions supplied with the
stroller. This Baby Capsule will not fit all strollers.
There are two methods of connecting the Baby Capsule to the stroller. Check with the
stroller instructions or promotional literature to see which system applies.
• Integral latch which fits to the arm bar or tray, or
• Britax CLICK & GO™ Adaptor that fits to the receivers on the stroller side
armrests.
The stroller instruction manual will provide full instructions on use of the stroller.
DO NOT LEAVE THE CHILD IN THE BABY CAPSULE FOR EXTENDED PERIODS.
THE TRAVEL SYSTEM BABY CAPSULE IS DESIGNED TO PROVIDE MOBILITY
OUTSIDE OF THE CAR BUT IT SHOULD NOT BE USED IN PLACE OF AN
APPROPRIATE COT.
THE BABY CAPSULE MUST ONLY BE USED WITH STROLLERS WITH COMPATIBLE
ATTACHMENTS. WE RECOMMEND SAFE-N-SOUND AND STEELCRAFT
STROLLERS.
IF IN DOUBT ABOUT THE METHOD OF INSTALLATION, CONTACT BRITAX
CHILDCARE CUSTOMER SERVICE ON 1300 303 330 AU/ 0508 688 822 NZ.
Always ensure the baby is secured in the Capsule with the harness at all times.
Do not carry an unrestrained baby in the Baby Capsule.
Instructions for Installation & Use
56
Page 57

TRAVEL SYSTEM
INTEGRAL LATCH
INSTALLATION INSTRUCTIONS PREPARING THE BABY
CAPSULE - LATCH METHOD
You may need to remove the Britax CLICK & GO™ Adaptors (see page 62 to 62) to
enable fitment on some strollers when using the integral latch system.
A. Remove baby from Baby Capsule.
B. Rotate handle into "carry position", then lift the release catch with the other hand.
C. With the release catch depressed lift the Baby Capsule clear of the base hooks, and
remove from the car.
PREPARING THE STROLLER
A. Ensure the Stroller has been assembled correctly.
B. Open the Stroller, apply the brakes.
C. Before fitting the Baby Capsule check and ensure all latches are engaged to prevent
the stroller folding inadvertantly.
D. Lower the backrest to the fully reclined position.
E. Remove the arm bar cover and store in the basket pocket.
* Refer to page 19 for handle position
Arm Bar cover removed
Instructions for Installation & Use
57
Page 58

TRAVEL SYSTEM
INTEGRAL LATCH
INSTALLING THE BABY CAPSULE INTO THE STROLLER LATCH METHOD
A. Ensure that the arm bar (or tray) is fully locked in position on both sides of the
armrests.
B. Position the Baby Capsule over the Stroller with the baby’s head end of the Baby
Capsule over the Stroller arm bar (or tray).
C. Lower the Baby Capsule and ensure that it locates onto the Arm Bar, (or tray) and
the latches engage.
Arm Bar
Latch
Latches
Instructions for Installation & Use
58
Arm Bar
Tray
Page 59

TRAVEL SYSTEM
INTEGRAL LATCH
D. Then lower the foot end of the Baby Capsule until it rests on the seating surface of
the stroller.
E. Check the Capsule is securely attached to
the stroller arm bar by lifting the Capsule
before use.
F. Fold the Baby Capsule handle down if
required.
NOTE: Do not lift the stroller by the
Capsule as it may disengage.
Refer to the Stroller instruction book for all
other instructions.
REMOVING THE BABY CAPSULE FROM THE STROLLER
A. Rotate the Baby Capsule handle to the "carry position" and grip firmly in one hand.
B. Raise the Baby Capsule release catch located on the rear of the Baby Capsule.
C. Lift the Baby Capsule clear of the stroller.
ENSURE THE BABY IS SECURED IN THE BABY CAPSULE WITH THE HARNESS
AT ALL TIMES. THE BABY CAPSULE IS FITTED WITH A CANOPY WHICH CAN BE
USED WHEN THE CAPSULE IS CONNECTED TO THE STROLLER. THE CANOPY
CAN ALSO BE USED IN THE CAR.
Stroller seating surface
* Refer to page 19 for handle position
Instructions for Installation & Use
59
Page 60

TRAVEL SYSTEM
BRITAX CLICK & GO™ADAPTOR
ATTACHING THE BABY CAPSULE TO THE STROLLER
FRAME
If the Baby Capsule is fitted with Britax CLICK & GO™ Adaptor, then fit as follows:
A. Remove Stroller seat or Carry cot from stroller frame
(refer to your stroller instructions).
B. The Baby Capsule will only fit the stroller in one direction.
The Baby Capsule must face the Stroller handle. With
the Baby Capsule handle in the upright position, just
place the CLICK & GO™ adapters over the stroller frame
sockets and push the Baby Capsule into the socket. The
adapters will lock the Capsule to the stroller.
Secure your baby into the Baby Capsule with the
harness provided on the Baby Capsule.
IMPORTANT :
Only use Baby Capsule with compatible Britax/Steelcraft Stroller or with other
brand strollers that have an approved Britax CLICK & GO™ receiver.
Pull upwards on both sides of the Baby Capsule to confirm it is locked into the
frame. If not locked on both sides, repeat above steps.
B
Instructions for Installation & Use
60
Page 61

TRAVEL SYSTEM
BRITAX CLICK & GO™ADAPTOR
RELEASING THE BABY CAPSULE FROM
THE STROLLER FRAME
A. Squeeze both carry handle release latches
and rotate the handle upwards, into the “carry
position”.
B. Squeeze the left and right triggers of the
CLICK & GO™ adaptors on your Baby
Capsule with both hands. De-latch the Baby
Capsule from the stroller frame.
C. Lift and remove the Baby Capsule away from the frame.
CAUTION:
Never fold the stroller frame with an Baby Capsule attached.
Remove the Baby Capsule before folding the stroller frame.
Rotate
handle
upwards
Squeeze
A
A
B
* Refer to page 19 for handle position
Instructions for Installation & Use
61
Page 62

TRAVEL SYSTEM
BRITAX CLICK & GO™ADAPTOR
HOW TO REMOVE THE BRITAX
CLICK & GO™ADAPTOR
To remove the Britax CLICK & GO™ Adaptor,
ensure handle is in “rocking position” .
Cover removal is not necessary.
A. Lift out the plastic flaps on both sides of
the Baby Capsule cover next to the handle
pivot.
B. Carefully remove the screw with a screw
driver. Remove the Locking Pin. Pull out
the adaptor from carry handle.
Pull out Locking Pin
2
Plastic flaps
Pull down away
from under handle
C. Store for future use with these instructions.
* Refer to page 19 for handle position
Instructions for Installation & Use
62
Page 63

TRAVEL SYSTEM
BRITAX CLICK & GO™ADAPTOR
HOW TO REPLACE THE BRITAX CLICK & GO™ADAPTOR
A. To attach the Britax CLICK & GO™ Adaptor to the Baby Capsule ensure the Capsule
Handle is in “Rocking position” , disconnect the elastic under the handle and pull
the trim away from the side of the Capsule to align the holes.
2
Handle pivot
B. Align the Adaptor in the recess under the handle
pivot, push up and click into place.
C. Insert Locking Pin into hole. Align both top and
bottom holes.
D. Locate screw into the bottom hole and tighten
with screw driver. Do not overtighten.
* Refer to page 19 for handle position
2
B
Push in under handle
Push in Locking Pin
C
D
Instructions for Installation & Use
63
Page 64

TRAVEL SYSTEM
BRITAX CLICK & GO™ADAPTOR
E. Replace the trim by tucking the plastic flaps back
underneath the shell edge.
Plastic flaps
Instructions for Installation & Use
64
Page 65

TRAVELLING TIPS
SAFETY
Never hold a baby in arms when riding in a motor vehicle. In this position the baby could
be thrown against the dashboard, windscreen or other occupant and suffer serious injury
or death.
When riding in a motor vehicle never nurse a baby and use the same seat belt for both
of you. In this position the baby or child could be crushed.
Never breast feed a baby while car is in motion.
Children must be secured in appropriate restraints at all times when the car is in motion.
Children travelling unrestrained and standing up in the car are in danger of serious injury
or death. Traffic regulations in all states require children to be secured in child restraints
or adult seat belts where available.
Plan your trip with frequent comfort stops to reduce stress on babies, young children and
driver. Keep the car well ventilated to reduce heat stress. Car windows should be kept
open to maintain a good flow of fresh air.
Never leave babies or toddlers in a stationary car because of the risk of heat exhaustion.
Ensure babies and toddlers are adequately shaded from direct sunlight through side or
rear windows.
Check the car is ventilated by use of open windows or using the car's ventilation system
taking in external air. Recirculation setting is not suitable for providing ventilation.
Be on guard against carbon monoxide poisoning which can occur through only a slight
leak in the exhaust system while travelling in a closed car.
Securely stow all heavy objects, feeding bottles, etc. that could become missiles during
an accident and cause injury to any occupant.
CLOTHING/BATHING
Since it is often warmer in the car, dress the baby in light clothing.
Do not harness an infant wrapped in a blanket or swaddled. Any blanket or wrap must
only be placed over the harness and infant.
Instructions for Installation & Use
65
Page 66

IN CASE OF CRASH
If your restraint has been involved in a severe crash, you should destroy the restraint
even if no damage is obvious. Some insurance companies offer vehicle insurance which
covers or partially covers the replacement of your child restraint. Contact your insurance
company for further details. Your insurance company may require you to keep the child
restraint for assessment, but do not use the child restraint after a severe crash. To assist
you in making an accident insurance claim cut the following statement and include it with
your claim.
NOTICE TO INSURANCE COMPANY CHILD
RESTRAINT INVOLVED IN AN ACCIDENT
This Safe-n-Sound child restraint is manufactured to Australian/New Zealand Standards AS/
NZS1754-2013 which requires us to advise users of child restraints to "Destroy the entire
restraint if it has been in use in a severe crash, even if no damage is obvious". The joint
Australian/New Zealand Standards committee CS/85, advise that this statement applies
whether a child was in the child restraint or not. We consider a "severe crash" as being one
There is no method of determining if the restraint has been damaged and we concur with the
Australian/New Zealand Standards in recommending destruction of the child restraint.
This notice is to advise you of the requirements of the Australian/New Zealand Standards and
Britax Childcare Pty. Ltd.
(Incorporated in Victoria)
A.B.N 55 006 773 600
Head office and registered address:
Level 4, 650 Lorimer Street, Port Melbourne, 3207 VIC
PO Box 147 Sunshine Victoria 3020
Telephone: 1300 303 330
www.britax.com.au
where the main body structure of the vehicle is distorted.
our obligation in complying with the standards.
Please assist the owner of this restraint in their claim.
New Zealand Office
Britax Childcare NZ Limited.
Telephone: 0508 688 822
www.britax.co.nz
Instructions for Installation & Use
66
Page 67

IN CASE OF CRASH
CRASH EXCHANGE
We would never want you to experience an accident, but unfortunately accidents do
happen.
If you experience an accident you may be eligible for a free replacement.
The Safe-n-Sound Crash Exchange Program is a voluntary program designed to ensure
that our children are safe and that any seat that may have experienced a severe crash is
taken out of the market.
There is no method of determining if the restraint has been damaged in a severe crash,
so the restraint should be destroyed as the crash may reduce the child restraints ability
to perform.
Since its inception in 2006, the Crash Exchange program has helped 100’s of families
ensure that their children have new restraints and that the restraints are not sold second
hand placing others at risk.
Our Crash Exchange Terms and Application form are accessible on our website. Please
visit www.britax.com.au for further information.
AUSTRALIA
Britax Childcare Pty. Ltd.
A.B.N 55 006 773 600
Head office and registered address:
Level 4, 650 Lorimer Street, Port Melbourne, VIC 3207
PO Box 147 Sunshine, Victoria 3020
Customer Service 1300 303 330
Email au-custserv@britax.com
www.britax.com.au
NEW ZEALAND
Britax Childcare (NZ) Ltd.
Customer Service 0508 688 822
Email nz-custserv@britax.com
www.britax.com.nz
INTERNATIONAL ENQUIRIES
Contact your local Distributor
Instructions for Installation & Use
67
Page 68

Scan QR code for
installation and
how to use.
The Safe-n-Sound trademark is the property of Britax Childcare Pty. Ltd. (Australia).
The BRITAX and Click & Go trademark are the property of Britax Childcare Holdings Ltd, UK.
We reserve the right to alter this product without notice.
© 2002-2017 Britax Childcare Pty. Ltd. Patent Pending.
Part No.2202467/F
Instructions for Installation & Use
68
47
 Loading...