

Page 1
Roundabout® 55
Canadian User Guide
Guide d’utilisation canadien
IMPORTANT: Thoroughly read and follow all instructions before installing
this child seat. Store this user guide in the pocket behind the cover (See
features pages for reference).
IMPORTANT : Lire attentivement et suivez tous les instructions avant d’installer
ce siège. Garder ce guide dans la pochette dessous la housse (Voir la page des
caractéristiques pour vous référer).
Page 2

Page 3

Table of Contents
Safety Information .......................................................................................2
Warnings ...............................................................................................................2
Important Notes ....................................................................................................4
Certification ...........................................................................................................5
Registration ...........................................................................................................5
Important Child Seat Usage Information ............................................................6
Vehicle Compatibility ..................................................................................8
Compatible Vehicle Seat Belts ............................................................................8
Incompatible Vehicle Seat Belts ..........................................................................12
Vehicle Seating Positions .....................................................................................13
Child Seat Features .....................................................................................14
Child Seat Functions ...................................................................................16
Harness Height Adjustment.................................................................................16
Adjusting Buckle Position ....................................................................................18
Fastening the Buckle ...........................................................................................20
Releasing the Buckle ...........................................................................................20
Using the Chest Clip ...........................................................................................20
Using the Lock-Offs ..............................................................................................21
Infant Body Pillow .................................................................................................21
Recline Positions ..................................................................................................22
Using he Lower Universal Anchorage System (LUAS) ......................................24
Using the Lower Connectors ...............................................................................25
Using the Versa-Tether® ....................................................................................... 26
Rear-Facing Installation ..............................................................................30
LUAS Installation .................................................................................................. 30
Lap-Shoulder Belt Installation ..............................................................................34
Lap Belt Installation ..............................................................................................38
Forward-Facing Installation ........................................................................42
LUAS Installation .................................................................................................. 42
Lap-Shoulder Belt Installation ..............................................................................46
Lap Belt Installation ..............................................................................................50
Aircraft Installation ......................................................................................54
Securing Your Child ....................................................................................55
Care and Maintenance ................................................................................58
Tips and Troubleshooting ...........................................................................65
Warranty .......................................................................................................66
©2010 Britax Child Safety, Inc. All rights reserved. Printed in USA P417400_R2:09.10
This product and its components are subject to change without notice.
Page 4
WARNING!
Section Title
DEATH or SERIOUS INJURY can occur:
• The restraint system must be used in a rear-facing position when it
is used for an infant.
• Use rear-facing for children who weigh between 2.3 and 18.1 kg
(5 – 40 lbs) and whose height is 116.8 cm (46 in.) or less. Use
forward-facing for children who weigh between 9.1 and 24.9 kg
(20 – 55 lbs) and whose height is 116.8 cm (46 in.) or less AND
are at least 1 year of age.
• Snugly adjust the belts provided with this child restraint around
your child.
• Secure the top tether strap provided with this child seat.
• The child restraint must be secured to the vehicle with a lower
connector system, if the restraint system is installed in a seating
position that is equipped with a Lower Universal Anchorage
System (LUAS), or a vehicle seat belt if the restraint system is
installed in a seating position that is not equipped with a LUAS
and by means of a tether strap.
• This child restraint system, even when unoccupied, must be firmly
secured to the vehicle.
• Follow all instructions on this child restraint and in the written
instructions located in the pocket behind the cover.
• Register your child restraint with the manufacturer.
• This child seat cannot be used in positions 1 or 2 when installed
rear-facing (see page 22).
• Use the inner buckle slot when installed rear-facing.
• Use the outer buckle slot when installing the child seat forward-
facing with a child weighing 13.6 kg (30 lbs) and above or if the
buckle is under the child in the inner position.
• This child seat cannot be used in position 3 when installed
forward-facing (see page 22).
• To prevent injury due to deterioration or hidden damage,
discontinue use of this child seat if it is older than seven years or
2
Page 5

Section Title
has been in a moderate or severe crash (see page 4). See Serial
Number and Manufactured Date Label on child seat (page 15).
• This child seat can only be used in the following classes of
vehicles: multi-purpose passenger vehicles, passenger cars or
trucks.
• Based on crash statistics, Britax recommends that parents select
the back seat as the safest location for a properly installed child
seat. Please study Vehicle Seating Positions on page 13 to ensure
your child’s safety and consult your vehicle owner’s manual.
• When using in a vehicle with air bags, refer to your vehicle owner’s
manual for child seat installation instructions and precautions.
• Never use the harness adjuster strap to lift or carry this child seat.
Doing so could cause damage to harness adjuster and webbing.
Always carry this child seat by its shell or tether straps.
• The primary protection for occupants of a vehicle in a collision is
the body of the vehicle itself; a child seat will not protect a child
when a vehicle is seriously impacted. However, correctly installed,
a child seat will substantially improve chances for survival in most
crashes. Make sure all users fully understand the correct ways to
use this child seat in a vehicle.
• Refer to your vehicle owner’s manual or contact the vehicle
manufacturer for the maximum weight rating for their LUAS.
Use vehicle seat belt (not LUAS) for installations with children
who weigh more than the vehicle LUAS limit. Unless specified
otherwise by the vehicle manufacturer, assume a 18.1 kg (40 lb)
child is the vehicle LUAS limit.
• The use of non-Britax Child Safety, Inc., covers, inserts, toys,
accessories, or tightening devices is not approved by Britax. Their
use could cause this child seat not perform as intended in a crash.
3
Page 6
Safety Information
Important Notes
• Verify that the child seat is securely installed and the harness is
properly adjusted around the child each time the child seat is used
• Discontinue use of this child seat if it has been in a moderate
or severe crash. It is not necessary to replace a car seat after a
minor crash defined by the U.S. National Highway Traffic Safety
Administration as (NHTSA):
* The vehicle is driveable from the crash site.
* The vehicle door nearest the child seat was not damaged.
* No vehicle occupants were injured.
* There is no visible damage to the child seat.
* The airbags (if present) did not deploy.
• Adjust the harness to fit the clothes the child is wearing. Remove
bulky coats and/or jackets before putting the child in child seat.
• Cover the child seat when the vehicle is parked in direct sunlight.
Metal parts of child seat could become hot enough to burn a child.
• Store the child seat in a safe place when it is not being used. Avoid
placing heavy objects on top of it.
• Do not leave children alone in a vehicle, even for a short time.
• Do not, except as described in this booklet, attempt to disassemble
any part of the child seat or change the way the harness or vehicle’s
seat belts are used.
• Do not leave loose objects, e.g. books, bags, etc., in the back of
a vehicle. In the event of a sudden stop, loose objects will keep
moving, potentially causing serious injuries.
• Do not leave folding vehicle seats unsecured or unlatched. In the
event of a sudden stop, a loose seat back could cause the child seat
not to perform as intended.
• Do not allow children to play with this child seat.
• Do not use anything to raise the child seat off vehicle seat except as
described in these instructions. In a crash, this could cause the child
seat not to perform as intended.
.
4
Page 7
Safety Information
Certification
This child seat system conforms to all applicable Canadian Motor
Vehicle Safety Standards (CMVSS 213 and 213.1). This Restraint is
Certified For Use in Motor Vehicles and Aircraft.
Registration
Child restraints could be recalled for safety reasons. You must
register this restraint to be reached in a recall. Send your name,
address, e-mail address if available and the restraint’s model
number and manufacturing date to Britax Child Safety, Ltd., P.O
Box 7289, RPO Brunswick Square, Saint John NB E2L 4S6, or call
1-888-427-4829, or register online at www.Britax.ca/registration.
For your convenience, record all the information about your
child seat below. Refer to the Serial Number & Manufactured
Date Label for all information, see page 15.
Model Name and Number:_____________________________________________
Serial Number:_______________________________________________________
Batch Number:_______________________________________________________
Date of Manufacture:__________________________________________________
5
Page 8
Safety Information
2.5 cm
1 inch
Rear-Facing
Important Child Seat Usage Information
All infants must ride rear-facing at least until they have reached
1 year of age and weigh 9.1 kg (20 lbs).
Infant positioning insert may be necessary for small infants
to achieve a snug fit of the harness around your child. Infant
positioning insert sold separately.
Britax advises that parents strongly consider the following when
using this child seat.
• Children should be secured with a harness system until they exceed
the weight or height limits specified.
• Britax recommends that children ride rear-facing to the highest weight
or height specified.
WARNING! REAR-FACING use of this child seat is ONLY for
children who meet ALL of the requirements below. If the child cannot
be secured within these requirements because they are too small, use
of the infant positioning insert or selection of a different child seat (such
as an infant car seat) may be required. If the child cannot be secured
within these requirements because the child is too large, review the
forward-facing guidelines on page 7.
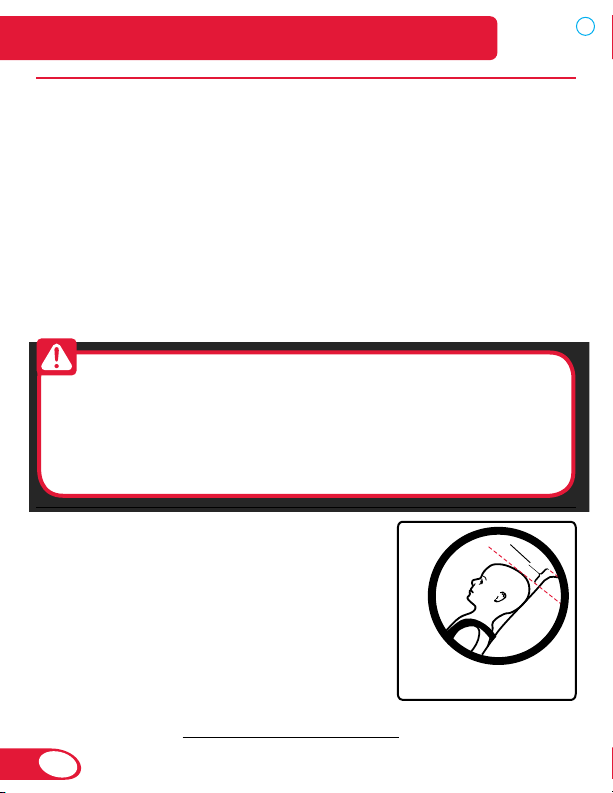
Rear-Facing: 2.3 – 18.1 kg (5 – 40 lbs)
Use rear-facing with children:
• who weigh between 2.3 and 18.1 kg
(5 – 40 lbs) and
• when the top of the child’s head is at
least 2.5 cm (1 in.) below the top of the
child seat shell (Fig. A) and
• when the harness straps are at or slightly
below the child’s shoulders (Fig. A).
A
IMPORTANT: See Harness Height Adjustment on page 16.
6
Page 9
Safety Information
Shoulder level
Above Shoulder Level
Below Shoulder Level
Upright Reclined
Forward-Facing Harness Height
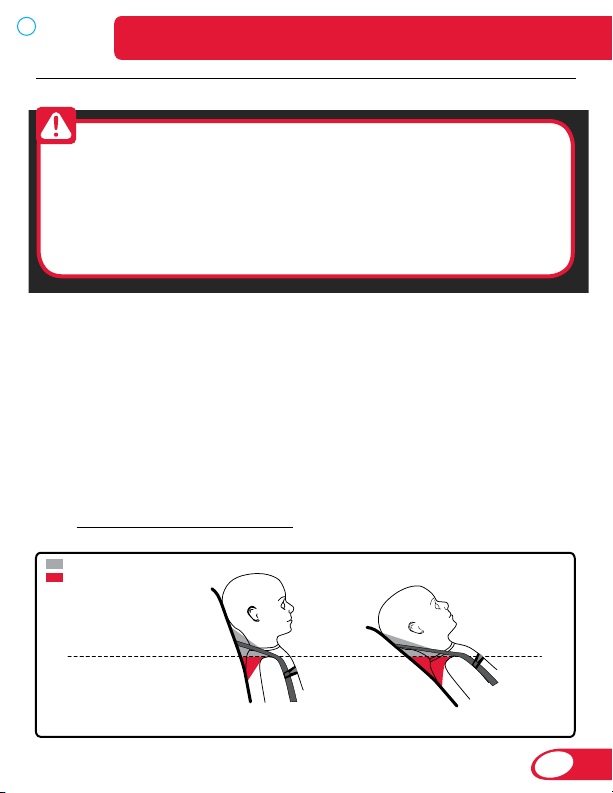
Forward-Facing: 9.1 – 24.9 kg (20 – 55 lbs) and at least 1 year of age
WARNING! FORWARD-FACING use of this child seat
is ONLY for children who meet ALL of the requirements below.
If the child cannot be secured within these requirements
because they are too large, another type of child seat (such
as a booster) may be required. If the child cannot be secured
within these requirements because the child is too small,
review the rear-facing information on page 6.
Use forward-facing only with children:
• who are at least one year of age and
• who weigh between 9.1 and 24.9 kg (20 – 55 lbs) and
• who are 116.8 cm (46 in.) or less in height and
• when the harness straps are at or above the child’s shoulders,
parallel to level ground (Fig. B).
IMPORTANT: When using position 2, it may be necessary to adjust
the harness to a higher position than when the seat is in position 1.
See Harness Height Adjustment on page 16.
b
7
Page 10
Vehicle Compatibility
Compatible Vehicle Seat Belts
NOTE: The information in this section only applies to installation
with vehicle seat belts.
Vehicle seats and seat belts differ from vehicle to vehicle. Refer to
your vehicle owner’s manual for specific information about your
vehicle seat belts and their use with child seats.
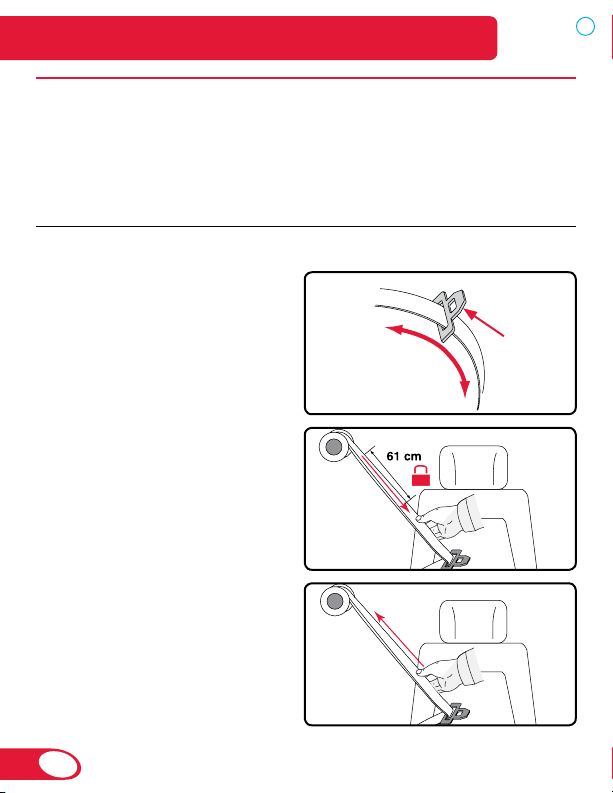
Lap-Shoulder (3-Point) Belt
1.
ALR (Automatic Locking Retractor) with Sliding Latch Plate
a Has a latch plate that freely
slides along the vehicle seat
belt webbing.
b Has a retractor that stops the
Latch
plate
belt from being pulled out
again once the belt webbing
has been pulled out at least
61 cm (24 in.).
c Tightens by feeding the
belt webbing back into the
retractor.
8
Page 11
Vehicle Compatibility
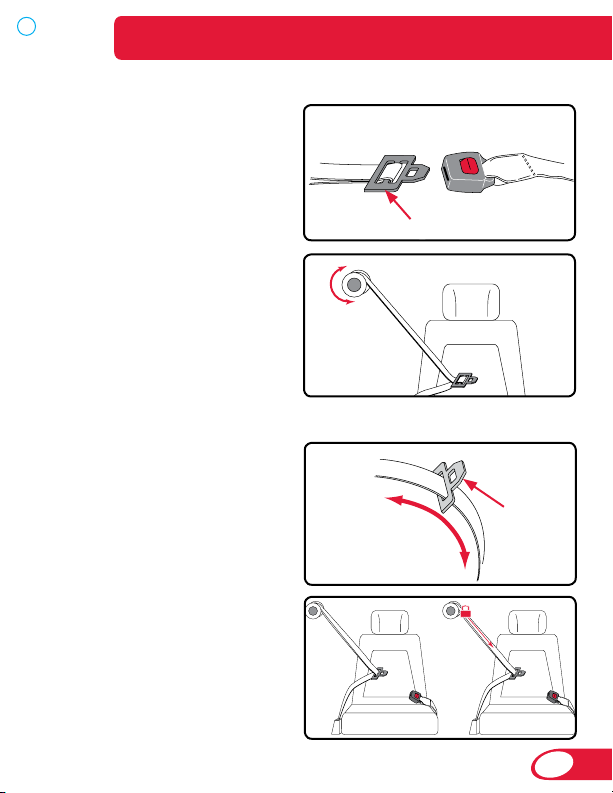
2. ELR (Emergency Locking Retractor) with Locking Latch Plate
a Has a latch plate that locks
the vehicle belt.
* This type of latch plate locks
the vehicle belt when the
vehicle belt and latch plate
lie flat. When using this
type of vehicle belt with a
child seat, ensure the latch
plat and vehicle belt lie flat
against the child seat or
the vehicle belt may remain
unlocked.
b
Has a retractor that locks
Latch
plate
only in an emergency
situation such as sudden
stop or crash.
3.
Switchable Retractor in ALR Mode with Sliding Latch Plate
a Has a latch plate that freely
slides along the vehicle seat
belt webbing.
b Has a retractor that can be
switched to function as an
ALR. Pull the belt all the way
out of the retractor to set the
automatic locking function.
* To use a child seat with this
type of vehicle seat belt, you
will need to switch to the
ALR mode or use child seat
lock-offs.
Latch
plate
9
Page 12

Vehicle Compatibility
4. ELR (Emergency Locking Retractor) with a Sliding Latch Plate
a
Has a latch plate that freely
slides along the vehicle
seat belt webbing.
b Has a retractor that locks
only in an emergency
situation such as sudden
stop or crash.
IMPORTANT: This belt type requires
the use of the lock-offs built into the
seat for rear- and forward-facing
installations. See page 21 for information on using the lock-offs.
Lap Belt
5. ALR (Automatic Locking Retractor)
a
Has a latch plate that is
sewn into the webbing.
Latch
plate
b Has a retractor that stops the
belt from being pulled out
again once the belt webbing
has been pulled out at least
61 cm (24 in. ).
10
Page 13
Tightens by feeding the
c
belt webbing back into the
retractor.
Locking Latch Plate
6.
a
Has a latch plate that
prevents the webbing from
becoming loose.
b Tightens by pulling on the
belt webbing.
Vehicle Compatibility
Latch
plate
Adjuster
11
Page 14
Vehicle Compatibility
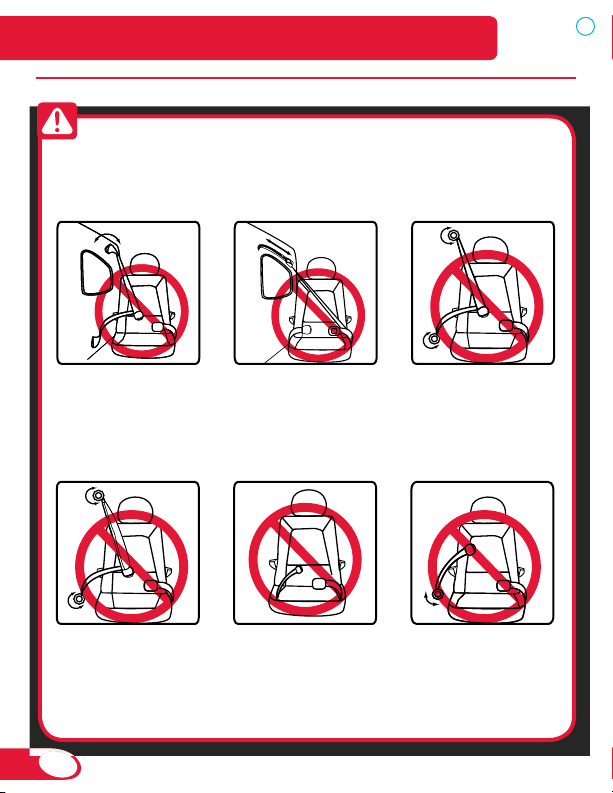
Incompatible Vehicle Seat Belts
WARNING! The following types of vehicle seat belts are NOT
compatible with this child seat. If any of the belt types listed below are
in the chosen seating position, choose another vehicle seating position
or check your vehicle owner’s manual for information on installing a car
seat in your vehicle.
1 Lap-shoulder belts
with top or bottom
anchor points on
the vehicle door.
4 Inflatable lap-
shoulder belts.
12
2 Motorized,
automatic vehicle
seat belts.
5 Lap belts forward
of the vehicle seat
bight.
3 Lap-shoulder
belts that have a
separate retractor
each for the
lap section and
shoulder section.
6 Lap belts with a
sewn-in latch plate
that have a retractor
that locks only in case
of a sudden stop.
Page 15
Vehicle Seating Positions
Vehicle Compatibility
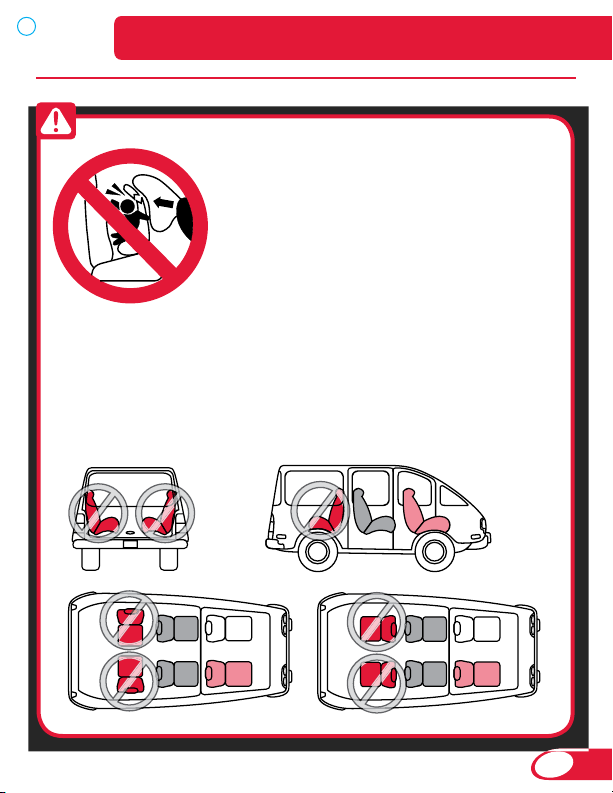
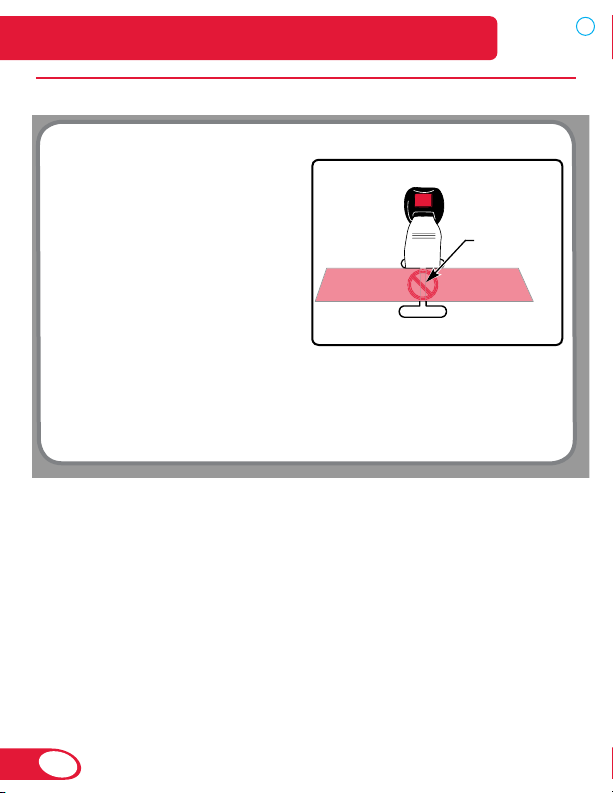
WARNING!
DO NOT place child seat rear-facing in the
front seat of a vehicle with a passenger
air bag unless deactivated. DEATH or
SERIOUS INJURY can occur. See your
vehicle owner’s manual for child seat
installation instructions. The back seat is
the safest place for children 12 and under.
Some vehicles have no seating positions
which are compatible with this child seat. If in doubt, contact the
vehicle manufacturer for assistance.
This child restraint system must be used only in a forwardfacing seating position equipped with a vehicle seat belt or a
lower universal anchorage system. Side-facing or rear-facing
seats CANNOT be used. See the diagram below.
13
Page 16
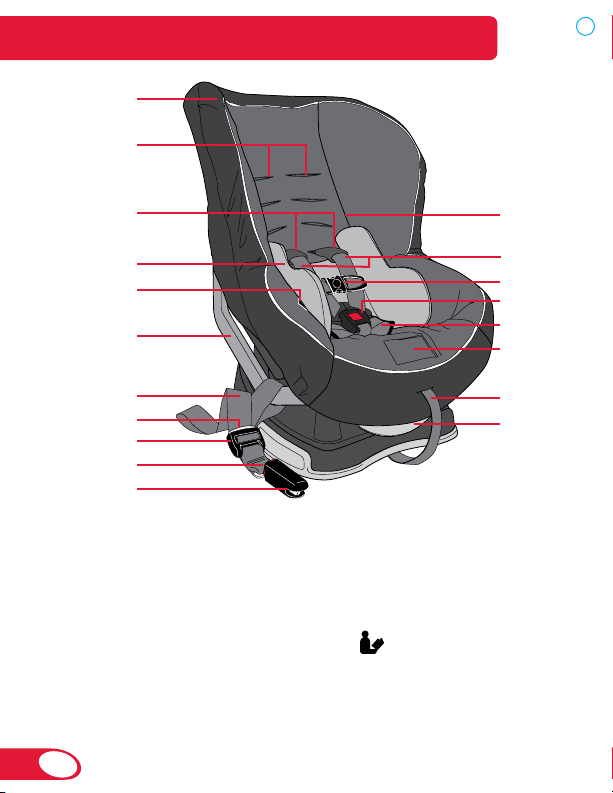
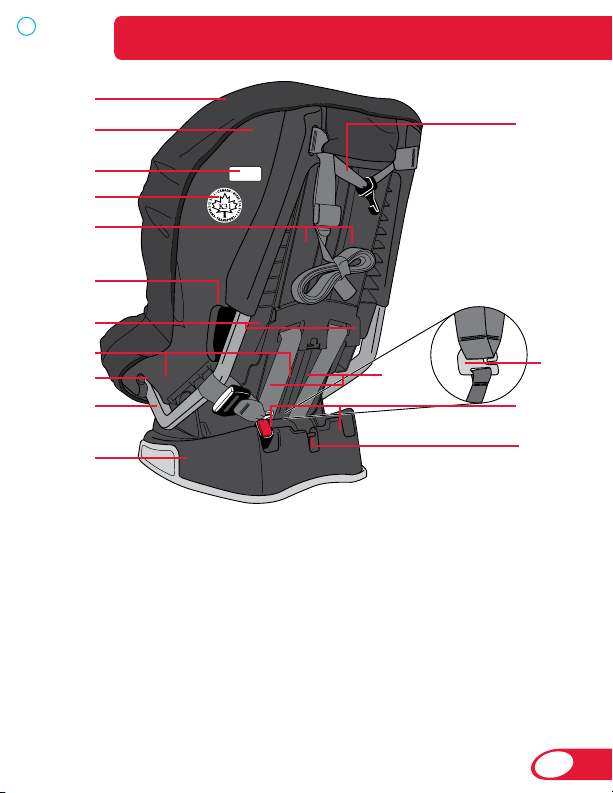
Child Seat Features
1
2
3
4
5
6
7
8
9
10
11
1 Cover
2 Harness Slots
3 Comfort Pads
4 Infant Body Pillow
5 Harness Holder
6 Lower Connector Bar
7 Lower Connector Strap (LUAS
component)
8 Lower Connector Adjuster
Release Button (LUAS
component)
14
12
13
14
15
16
17
18
19
9 Lower Connector Adjuster
(LUAS component)
10 Lower Connector Release
Button (LUAS component)
11 Lower Connector (LUAS
component)
12
13 Harness Straps
14 Chest Clip
User Guide Storage (in
pocket behind cover)
Page 17
20
21
22
23
24
25
26
Child Seat Features
1
28
2
13
6
29
30
27
15 Harness Buckle
16 Belly Pad
17 Harness Adjuster
Lever (under cover)
18 Harness Adjuster Strap
19 Recline Adjustment Handle
20 Shell
21 Serial Number & Manufactured
Date Label
22 National Safety Mark
23 Forward-Facing Belt Slot
31
24 Forward-Facing Lock-Offs (Red
– under cover on front of shell)
25 Rear-Facing Lock-Offs (Blue –
under cover on front of shell)
26 Rear-Facing Belt Slot
27 Base
28 Versa-Tether
Strap)
29 Harness Yoke
30 Lower Connector Storage
31 Versa-Tether® Carry Clip
®
(Top Tether
15
Page 18
Child Seat Functions
1b
1a
Harness Height Adjustment
NOTE:
In rear-facing mode, always position the harness straps at or
below your child’s shoulders. See page 6.
In forward-facing mode, always position the harness straps at or
above your child’s shoulders. See page 7.
1 Loosen the harness.
a Lift harness adjuster lever
b Pull both harness straps forward
2
Unhook both harness straps
from the yoke.
3 Pull one harness strap through
the shell and cover to the front
of the child seat.
16
Page 19
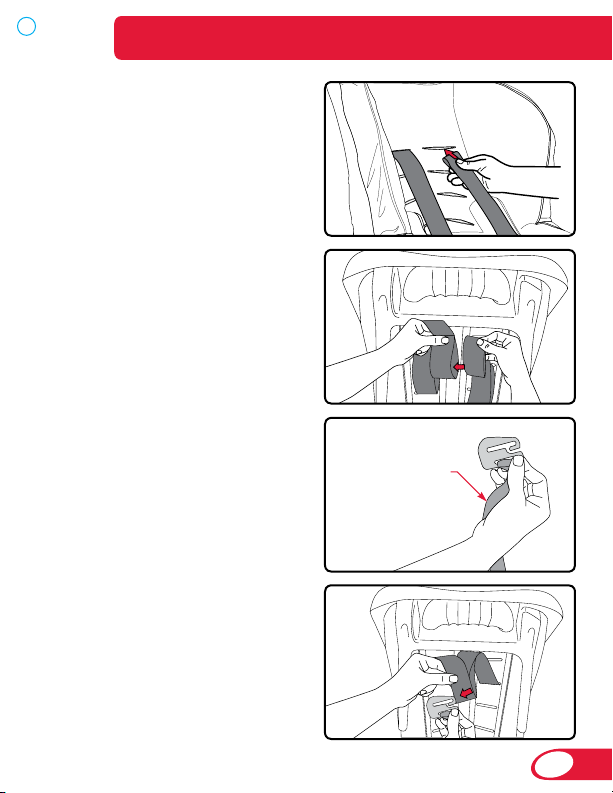
Feed the harness strap through
Adjuster
Strap
4
the desired harness slot in the
cover and shell to the back of
the child seat.
Repeat steps 3 and 4 for
second harness strap.
5 Nest the harness straps by
inserting the right strap loop
into the left strap loop.
6 Before reattaching the
harness straps to the yoke,
hold the harness yoke as
shown, and ensure that the
adjuster strap attached to the
yoke is not twisted.
7 Slide nested harness straps
completely onto the harness
yoke.
Child Seat Functions
17
Page 20
ADJUSTMENT
SLOT
Child Seat Functions
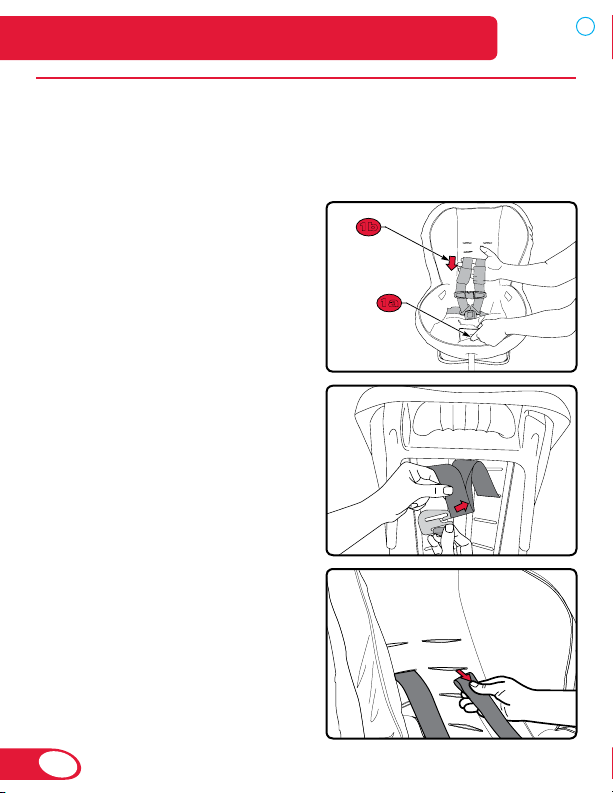
Adjusting Buckle Position
IMPORTANT:
• ALWAYS position the
buckle in the inner slot for
rear-facing use.
• The vehicle belt must pass
in front of the buckle strap
for rear-facing use.
• NEVER leave the buckle in
the adjustment slot.
• Use the outer buckle slot when installing the child seat
forward-facing with a child weighing 13.6 kg (30 lbs)
and above or if the buckle is under the child in the inner
position.
18
Page 21
To adjust the buckle:
1
Unbuckle the harness.
Remove the belly pad and
push the buckle through the
cover.
2 Turn the buckle webbing
and slide it between buckle
positions.
3 Slide the buckle retainer into
the buckle slot, and ensure the
red release button faces out.
Child Seat Functions
19
Page 22
Child Seat Functions
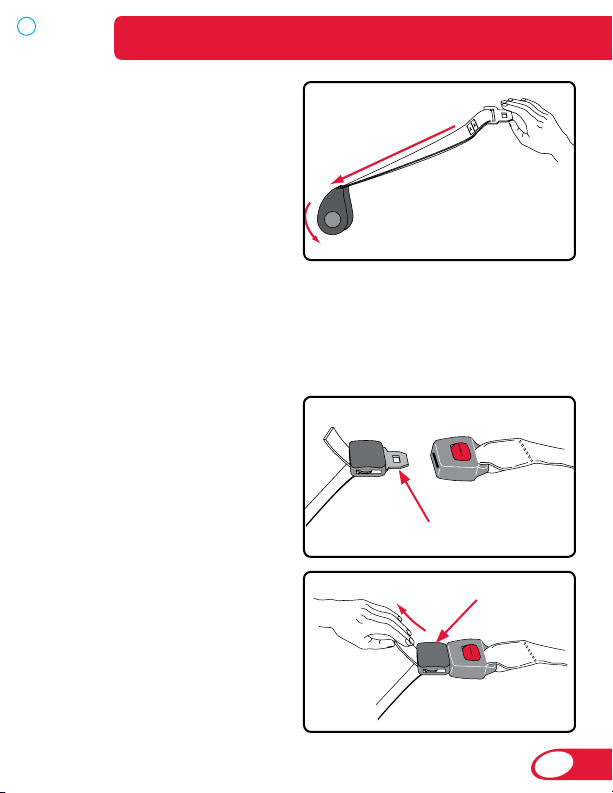
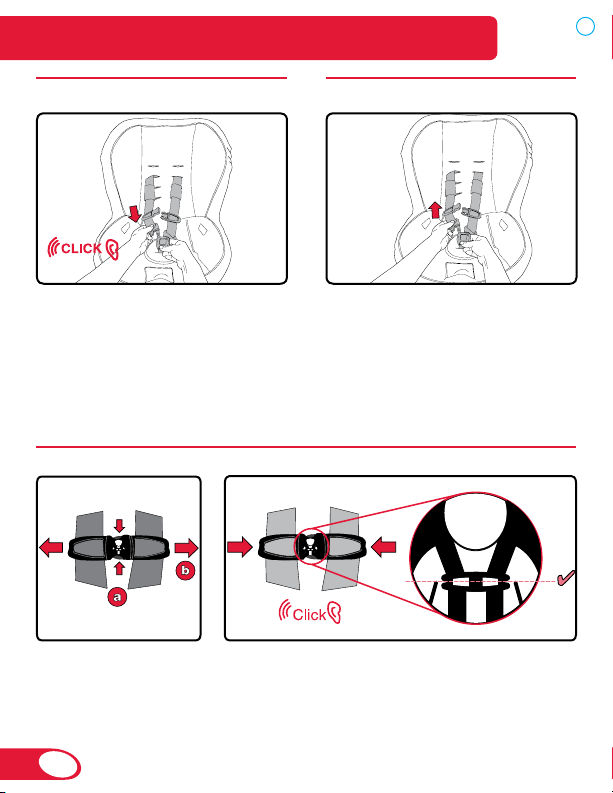
Fastening the Buckle
Insert one tongue at a time into
the buckle.
NOTE: Proper connection is
confirmed with an audible click
after inserting each buckle
tongue.
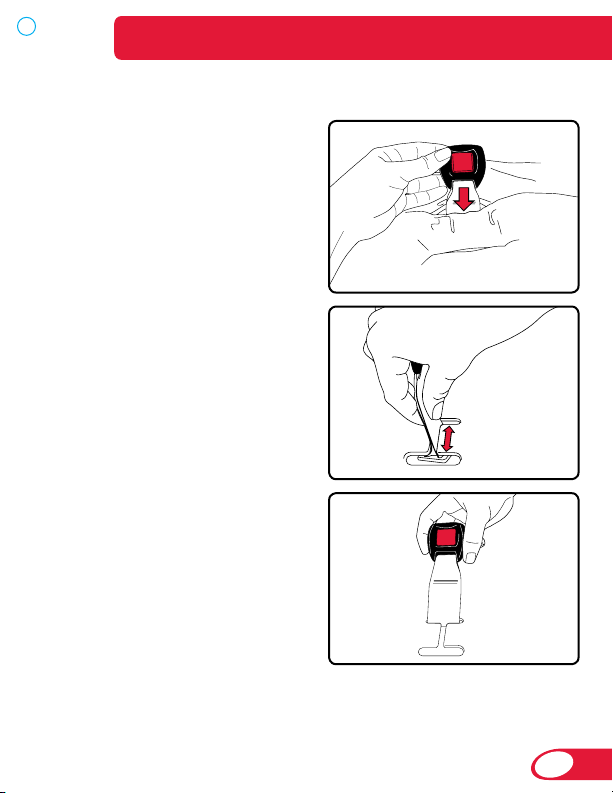
Using the Chest Clip
1 Open the chest
clip.
a Press tabs
b Pull apart
Push together to fasten.
2
NOTE: Always position the chest clip at
armpit level.
Releasing the Buckle
Press the release button and
pull the tongues from the
buckle.
NOTE: Periodically clean
the buckle to ensure proper
operation. See Page 63.
20
Page 23
Child Seat Functions
LOCKING
TAB
CLAMP
1
2
LOCKING
TAB
CLAMP
1
VEHICLE
BELT
2
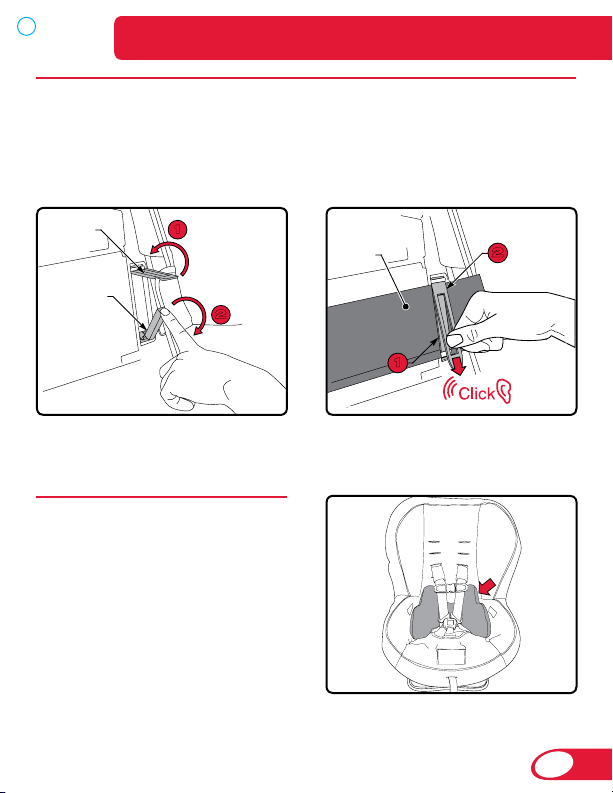
Using the Lock-Offs
IMPORTANT: Both parts of the lock-off must be opened to secure a
vehicle belt.
To Open:
1 Pull the locking tab up
2 Pull the clamp down
Infant Body Pillow
The infant body pillow is
designed to provide better fit
and comfort for infants using
this child seat.
NOTE: Remove the infant
body pillow after child can sit
comfortably in the child seat
without additional support.
To Close:
1 Push the clamp up
2 Push the middle of the
locking tab down until locked
21
Page 24
Child Seat Functions
0°
90°
0°
90°
0
90
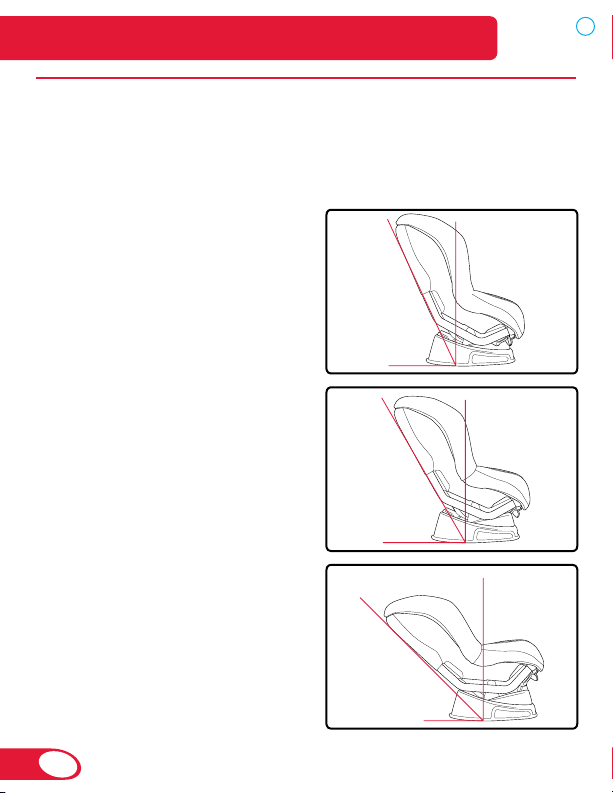
Recline Positions
This child seat has 3 positions. To adjust, pull the recline handle then rotate
the child seat shell into the desired position. Release the recline handle,
then verify the child seat has locked into position.
NOTE: Set the recline position BEFORE installing.
Position 1
Position 2
Position 3
22
Page 25
Child Seat Functions
UP TO 3 INCHES
OF OVERHANG
ACCEPTABLE
OVER 3 INCHES
OF OVERHANG
NOT ACCEPTABLE
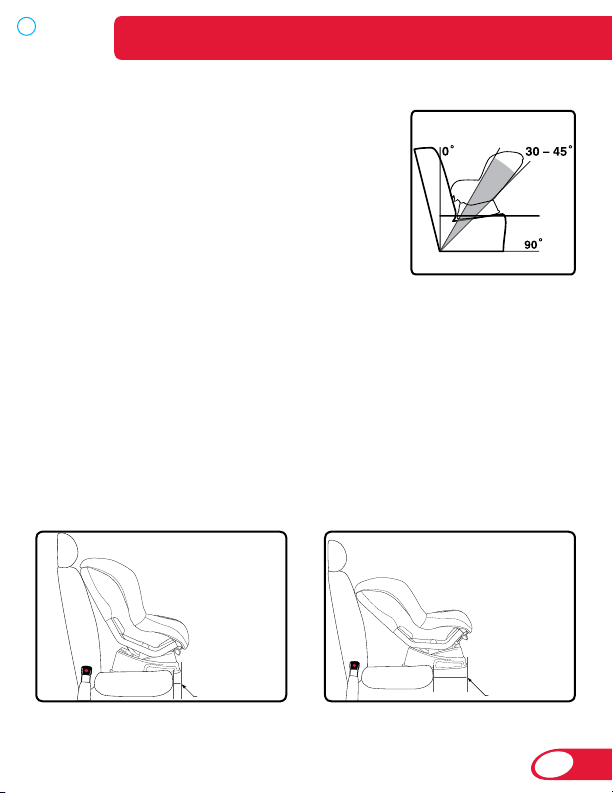
Rear-Facing
When installed in the rear-facing position,
the child seat should be reclined at least
30˚from vertical for children and up to 45˚
from vertical for infants unable to maintain
head and neck control (not to exceed 45˚)
when the car is parked on a level surface.
When installing the seat in rear-facing mode,
recline the seat to position 3 and use the
guide line on the child seat to help achieve
an acceptable recline angle for rear-facing
installations.
Forward-Facing
IMPORTANT: In forward-facing installations, it is important that
the base of the child seat rests completely flat on the vehicle seat.
As illustrated below, it is permissible to allow up to 20% or 7.6 cm
(3 inches) of the base to hang over the edge of the vehicle seat.
Some vehicle seats do not allow enough of the child seat base to
contact the vehicle seat. If this is the case, adjust the recline angle
to a more upright position. Not doing so could cause the child seat
not to perform as intended.
Acceptable overhang Unacceptable overhang
23
Page 26
Child Seat Functions
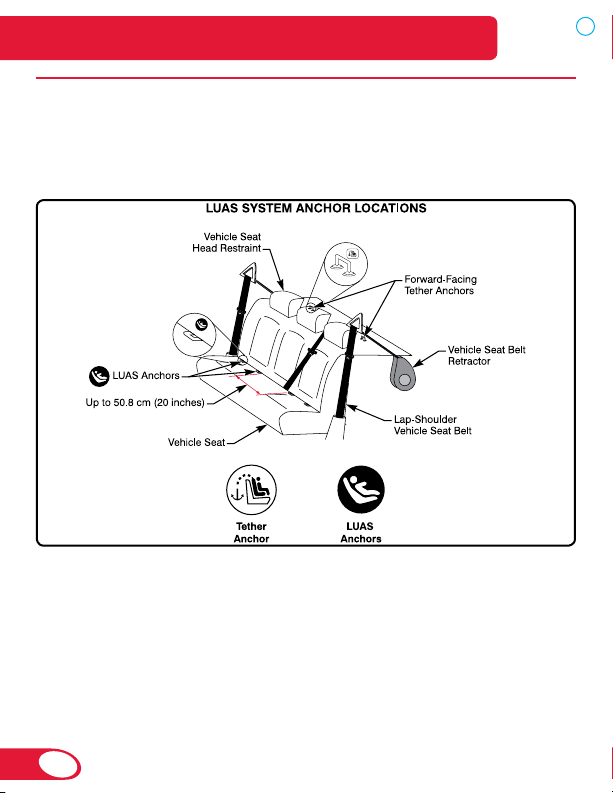
Using the Lower Universal Anchorage System (LUAS)
The Lower Universal Anchorage System or LUAS, is a system
available on this child seat that offers an alternative to vehicle
seat belt installation methods. See pages 14 and 15 for LUAS
components on this child seat.
The figure above shows typical locations for lower anchors and
tether anchors in a vehicle. Check your vehicle owner’s manual to
learn if it is equipped with the LUAS, the maximum weight rating for
the lower anchors, and for information on the lower anchor locations
and seating positions available for use with this child seat.
Standard vehicle seat spacing between LUAS anchors is 27.9 cm
(11 inches). This child seat can be used in a seating position with up
to 50.8 cm (20 inches) of space between LUAS anchors if the vehicle
manufacturer allows.
24
Page 27
Child Seat Functions
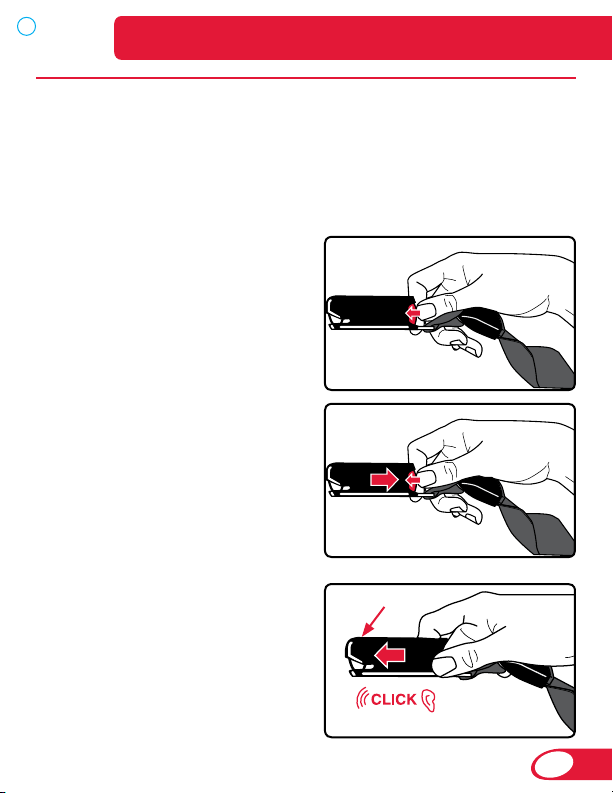
Using the Lower Connectors
Where to find the Lower Connectors
The lower connectors are located in the back of the base of the
child seat. Store the connectors in the slots when not in use.
To remove the lower connector from the storage slot or lower
anchor:
1 Press and hold the red release
button.
2 Pull the lower connector
from the storage slot or lower
anchor.
To attach the lower connector to
the storage slot or lower anchor:
Top
Firmly push the lower connector
into the slot or lower anchor until a
click is heard.
NOTE: The lower connectors store
top down in the slots.
25
Page 28
Child Seat Functions
Using the Versa-Tether
®
WARNING: Failure to follow the guidelines below may
cause the child seat not to perform as intended:
• You MUST always use the Versa-Tether when using the
child seat forward-facing. Using the tether will improve the
stability of your child seat and reduce the risk of injury.
• Attach the Versa-Tether only to tether anchors identified by
your vehicle manufacturer as tether anchorage points. Only
use the designated tether anchor for each seating position.
• If your vehicle does not currently have a tether anchor
attachment, refer to your vehicle owner’s manual or contact
your vehicle man u fac tur er for assistance. DO NOT modify
your vehicle without advice from your vehicle manufacturer.
• Store the Versa-Tether in the pouch on the back of the child
seat when not in use. DO NOT install the child seat with the
Versa-Tether attached to the carry clip.
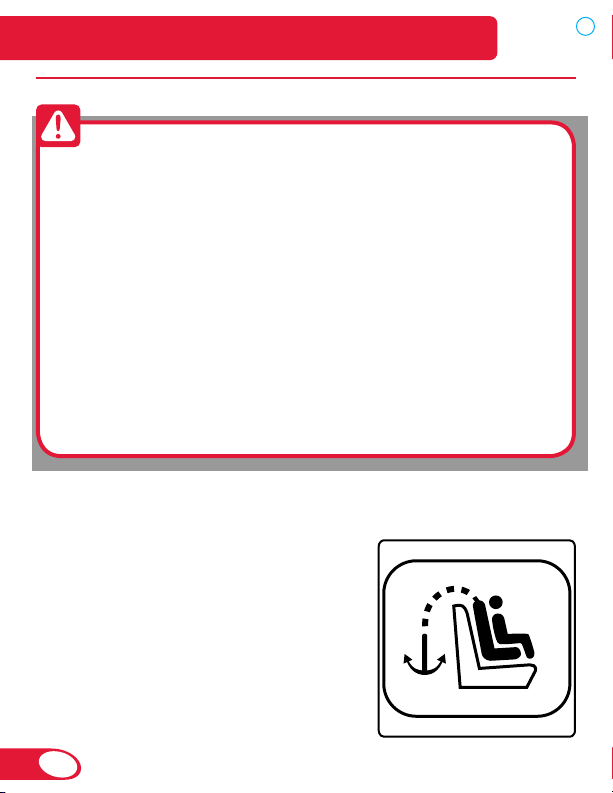
Tether anchor locations vary from vehicle to vehicle. Check your
vehicle owner’s manual and look for the tether anchor symbol
shown in the diagram to help identify
where the top tether anchor points
are located in your vehicle. Britax
recommends that the tether be used at
all times when installing the child seat.
Using the tether will improve the stability
of your child seat and reduce the risk of
injury. See the diagrams on page 27 for
possible rear- and forward-facing VersaTether installation configurations.
26
Page 29
Child Seat Functions
OR
OR
Rear-Facing Rear-Facing
Forward-Facing
Rear-Facing Tether Connector Strap
Because every vehicle model is different, a
location to anchor the tether for rear-facing
installations may vary. Use the rear-facing tether
connector strap to assist in creating an anchor
point.
1 Find a fixed location in the vehicle that is bolted
to the floor.
* If you cannot find a location to create an anchor point, contact the
vehicle manufacturer to identify a tether connection point.
2 Route the strap through the anchor point.
3 Thread the metal D-ring through the loop on the end of the strap.
4 Pull the metal D-ring through until the strap is tight.
5 Use the D-ring as an attachment
point for the tether.
NOTE: Store the tether connector strap in
the tether pouch when not in use.
27
Page 30
Child Seat Functions
b
a
IMPORTANT: The Versa-Tether
®
carry clip is only for
use when you wish to carry the child seat between
locations. Do not install the child seat with the Versa-
Tether attached to the carry clip. Secure the excess
Versa-Tether webbing in the elastic strap during use.
Store the Versa-Tether in the storage pouch when not in
use. Always ensure any excess webbing is contained
within your vehicle.
To attach the Versa-Tether to the carry clip or tether anchor:
1 Firmly press the hook over
the carry clip or tether
anchor point.
NOTE: When using as a carry strap, tighten until the strap is comfortable to carry.
2 Pull the loose end of the
webbing to remove slack from
the Versa-Tether.
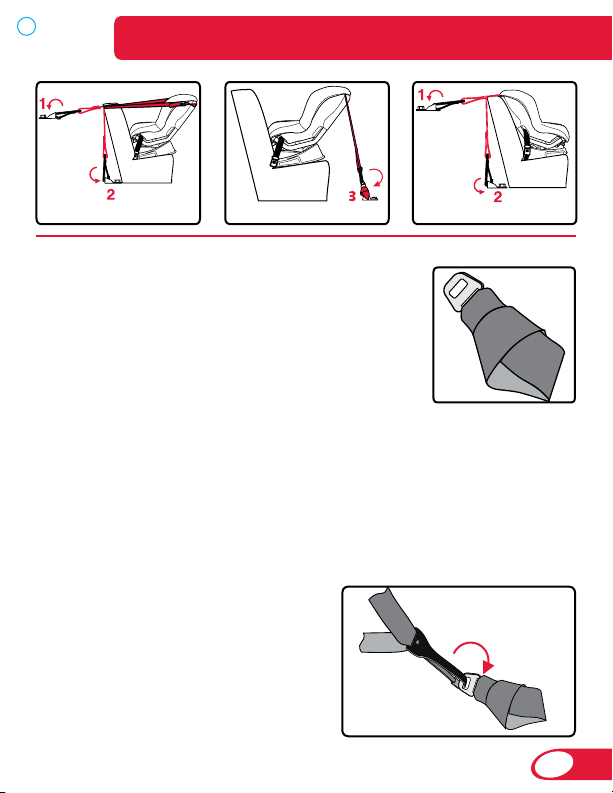
To remove the Versa-Tether from the carry clip:
1 Loosen the Versa-Tether.
a Tilt the lock up
b Pull the tether webbing
28
2 Remove the Versa-Tether®
hook from the carry clip.
Page 31

Child Seat Functions
The Versa-Tether can indicate when the child seat has been in a
moderate or severe crash (see page 4) and replacement of the
child seat is necessary.
Figure 1 shows a tether
acceptable for continued use
(provided the child seat has not
been involved in a crash). The
colored stitching will be intact but
not visible from the back of the
seat.
Figures 2 and 3 show examples
of when the tether has been
damaged and is unacceptable for
continued use. If one or both of
the loops have pulled through the
back of the shell and/or any of the
colored stitching has ripped, the
child seat is no longer acceptable
for use.
IMPORTANT: Discontinue use of
child seat if it has been involved
in a moderate or severe crash,
regardless of whether the loops
have pulled through the back
side of the shell and the colored
stitching has been ripped.
1
2
3
29
Page 32

Rear-Facing Installation
LUAS Installation
Before You Begin:
• Check that your vehicle has lower anchors.
* Refer to your vehicle owner’s manual or contact the vehicle
manufacturer for the maximum weight rating for their lower
anchors. Use vehicle belt (not lower connectors) for installations
with children who weigh more than the vehicle lower anchor limit.
Unless specified otherwise by the vehicle manufacturer, assume a
18.1 kg (40 pound) child is the vehicle lower anchor limit.
• Remove the lower connectors from the storage slots in the base.
Press the adjuster release button and pull the strap to full length.
Repeat for the second strap.
• This child seat must be reclined to position 3 when installed
rear-facing.
* When properly installed in the rear-facing
position, the back angle of the child seat
should be at least 30˚ for children and up
to 45˚ from vertical for infants unable to
maintain head and neck control (not to
exceed 45˚) when the car is parked on a
level surface. Use the blue line as a guide
to achieve the proper recline angle for
rear-facing installations. The blue line will be
parallel to the ground when the child seat angle is at the center
of the angle range (30 – 45˚). If necessary, the proper recline
angle can be achieved by placing a rolled towel or pool noodle
in the vehicle seat bight.
• Britax recommends that the Versa-Tether is used at all times. Using
the tether will improve the stability of the child seat and reduce the
risk of injury. Check your vehicle owner’s manual for tether anchor
locations. See page 27 for possible rear-facing tether configurations.
30
Page 33

Install with LUAS as shown above.
Rear-Facing Installation
31
Page 34

Rear-Facing Installation
1
2
3
1 Place the child seat on the
vehicle seat.
2 Firmly press the lower
connectors onto the adjacent
lower anchors.
• A click confirms attachment.
• Verify that the lower connector
strap is not twisted.
TIP: You may need to turn the front
of the child seat toward you
for easier access to the lower
anchors.
NOTE: If a click is not heard when
connecting either lower connector,
the lower connector strap may be
twisted, or there may be debris in
the lower connector. Correct either
situation before continuing with the
installation process.
3 Push the child seat into the
vehicle seat while pulling
each lower connector strap to
tighten.
4 Rear-facing installations can
be improved by the use of
the Versa-Tether (see pages
26 – 29).
32
Page 35

Rear-Facing Installation
Check lower
connector
attachments
Check that the
child seat is
reclined to position 3
Check that there is
LESS than 2.5 cm (1 in.)
of movement (front to back or
side to side) at the belt path
Checklist
9 Check that all connections are secure.
9 Check that the lower connector straps are not twisted.
9 Check that the child seat cannot be moved front to back or side to side
more than 2.5 cm (1 in.) at the belt path. If the child seat is not secure,
repeat installation or use a different seating location.
9 Check that the back angle of the child seat is 30º – 45º from vertical (not
to exceed 45º) when the car is parked on a level surface
* If necessary, the proper recline angle can be achieved by
placing a rolled towel or pool noodle in the vehicle seat bight.
.
33
Page 36

Rear-Facing Installation
Lap-Shoulder Belt Installation
Before You Begin:
• Check that your vehicle belt is compatible for use with child
seats. See pages 8 – 13 for more information.
* If your vehicle seat belt system includes a locking feature,
use of the lock-offs is not required as long as the vehicle seat
belt system is locked. Check your vehicle owner’s manual
to determine how to lock your vehicle seat belt system when
installing a child restraint.
• This child seat must be reclined to position 3 when
installed rear-facing.
* When properly installed in the rear-facing
position, the back angle of the child seat
should be at least 30˚ for children and up
to 45˚ from vertical for infants unable to
maintain head and neck control (not to
exceed 45˚) when the car is parked on a
level surface. Use the blue line as a guide to
achieve the proper recline angle for rearfacing installations. The blue line will be parallel to the ground
when the child seat angle is at the center of the angle range (30
– 45˚). If necessary, the proper recline angle can be achieved by
placing a rolled towel or pool noodle in the vehicle seat bight.
• Britax recommends that the Versa-Tether is used at all times.
Using the tether will improve the stability of the child seat and
reduce the risk of injury. Check your vehicle owner’s manual for
tether anchor locations. See page 27 for possible rear-facing
tether configurations.
34
Page 37

Rear-Facing Installation
Install with lap-shoulder belt as shown above.
IMPORTANT: The harness buckle strap should lie toward
the back of the child seat during installation.
35
Page 38

1b
1a
LOCKING
TAB
CLAMP
4a
4b
5
Rear-Facing Installation
1 Loosen the harness.
a Lift harness adjuster lever
b Pull both harness straps forward
2 Remove the body pillow,
unbuckle the harness, and
remove the belly pad.
3 Lift back cover, then pull seat
cover forward while pulling the
buckle through to access the rearfacing belt path.
4 Open the blue lock-off closest
to where the vehicle belt will be
buckled.
a Pull the locking tab up
b Pull the clamp down
5 Route the vehicle belt through the
rear-facing belt slots, then buckle.
TIP: Ensure the vehicle belt is not twisted.
Remove excess slack from the bottom
(lap) part of the vehicle belt before
closing the lock-offs.
6 Ensure that both parts of the
vehicle belt are routed through the
lock-off, then close the lock-off.
a Push the clamp up
b Push the middle of the locking tab
down until locked
7 Push the child seat into the vehicle
seat while pulling the top (shoulder)
part of the belt between the belt
slots (pull away from the buckle) to
remove slack.
TIP: The shoulder part of the vehicle belt
must be on top when removing slack.
36
Page 39

Check buckle
connection
Check that the
child seat is
reclined to position 3
Check that there is
LESS than 2.5 cm (1 in.)
of movement (front to back or
side to side) at the belt path
Rear-Facing Installation
8
8 Pull slack through the lock-off
toward the vehicle belt retractor.
9 Rear-facing installations can be
improved by the use of the VersaTether (see page 26 – 29).
10 Replace the cover and belly pad.
Checklist
9 Check that the vehicle belt is securely fastened.
9 Check that the child seat cannot be moved front to back or side to side
more than 2.5 cm (1 in.) at the belt path. If the child seat is not secure,
repeat installation or use a different seating location.
9 Check that the back angle of the child seat is 30º – 45º from vertical (not to
exceed 45º) when the car is parked on a level surface.
* If necessary, the proper recline angle can be achieved by placing a
rolled towel or pool noodle in the vehicle seat bight.
37
Page 40

Rear-Facing Installation
Lap Belt Installation
Before You Begin:
• Check that your vehicle belt is compatible for use with child
seats. See pages 8 – 13 for more information.
• This child seat must be reclined to position 3 when
installed rear-facing.
* When properly installed in the rear-facing
position, the back angle of the child seat
should be at least 30˚ for children and up
to 45˚ from vertical for infants unable to
maintain head and neck control (not to
exceed 45˚) when the car is parked on a
level surface. Use the blue line as a guide to
achieve the proper recline angle for rearfacing installations. The blue line will be
parallel to the ground when the child seat angle is at the center
of the angle range (30 – 45˚). If necessary, the proper recline
angle can be achieved by placing a rolled towel or pool noodle
in the vehicle seat bight.
• Britax recommends that the Versa-Tether is used at all times.
Using the tether will improve the stability of the child seat and
reduce the risk of injury. Check your vehicle owner’s manual for
tether anchor locations. See page 27 for possible rear-facing
tether configurations.
38
Page 41

Install with lap belt as shown above.
Rear-Facing Installation
IMPORTANT: The harness buckle strap should lie toward
the back of the child seat during installation.
39
Page 42

1b
1a
4
5
Rear-Facing Installation
1 Loosen the harness.
a Lift harness adjuster lever
b Pull both harness straps forward
2 Remove the body pillow, unbuckle
the harness, and remove the belly
pad.
3 Lift back cover, then pull seat
cover forward while pulling the
buckle through to access the rearfacing belt path.
4 Route the vehicle seat belt
through the rear-facing belt slots,
then buckle.
TIP: Ensure the vehicle belt is not
twisted.
5 Push the child seat into the
vehicle seat while removing slack
(see pages 8 – 11).
6 Rear-facing installations can be
improved by the use of the VersaTether (see page 26 – 29).
7 Replace the cover and belly pad.
40
Page 43

Check buckle
connection
Check that the
child seat is
reclined to position 3
Check that there is
LESS than 2.5 cm (1 in.)
of movement (front to back or
side to side) at the belt path
Rear-Facing Installation
Checklist
9 Check that the vehicle belt is securely fastened.
9 Check that the child seat cannot be moved front to back or side to side
more than 2.5 cm (1 in.) at the belt path. If the child seat is not secure,
repeat installation or use a different seating location.
9 Check that the back angle of the child seat is 30º – 45º from vertical (not
to exceed 45º) when the car is parked on a level surface
* If necessary, the proper recline angle can be achieved by
placing a rolled towel or pool noodle in the vehicle seat bight.
.
41
Page 44

Forward-Facing Installation
LUAS Installation
Before You Begin:
• Check that your vehicle has lower anchors.
* Refer to your vehicle owner’s manual or contact the vehicle
manufacturer for the maximum weight rating for their
lower anchors. Use vehicle belt (not lower connectors) for
installations with children who weigh more than the vehicle
lower anchor limit. Unless specified otherwise by the vehicle
manufacturer, assume a 18.1 kg (40 pound) child is the vehicle
lower anchor limit.
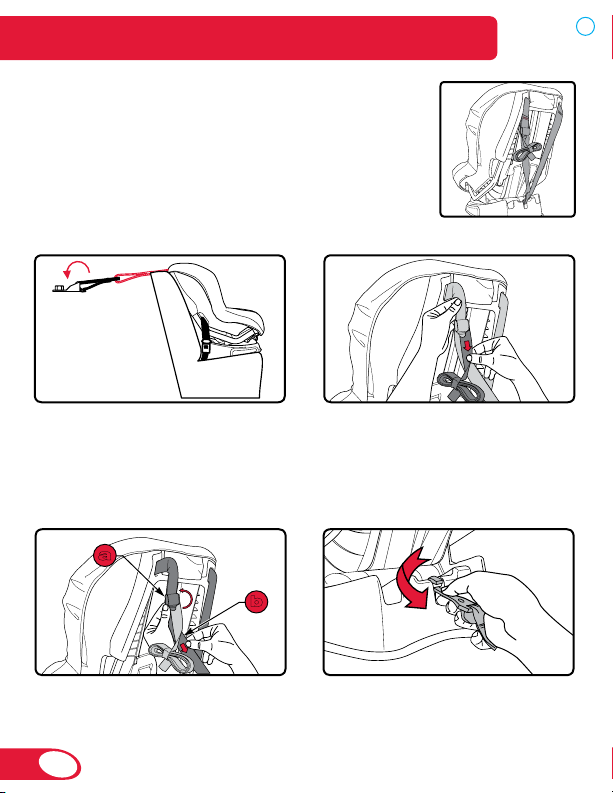
• Remove the lower connectors from the storage slots in the
base. Press the adjuster release button and pull the lower
connector strap to full length. Repeat for the second strap.
• Remove the Versa-Tether from the pouch and place it up
and over the child seat back.
* The Versa-Tether must be used at all times. Using the tether
will improve the stability of the child seat and reduce the risk
of injury. Check your vehicle owner’s manual for tether anchor
locations. Only attach the Versa-Tether to anchor points
designated to the chosen seating position as indicated by your
vehicle owner’s manual.
• Select position 1 or 2 and place the child seat forwardfacing on the vehicle seat.
* Ensure that no more than 20% or 7.6 cm (3 inches) of the base
hangs over the edge of the vehicle seat. See pages 22 – 23 for
more information.
42
Page 45

Install with LUAS as shown above.
Forward-Facing Installation
WARNING!
• Your child seat may not perform as intended if the base of the child
seat is not flat on the vehicle seat.
• This child seat must not be used forward-facing for children less
than one year of age OR who weigh less than 9.1 kg (20 lbs).
43
Page 46

Forward-Facing Installation
1
2
3
4
5
1 Place the child seat on the
vehicle seat.
2 Firmly press the lower
connectors onto the adjacent
lower anchors.
• A click confirms attachment.
• Verify that the lower connector
strap is not twisted.
TIP: You may need to turn the back
of the child seat toward you for
easier access to the vehicle lower
anchors.
NOTE: If a click is not heard when
connecting either lower connector, the
lower connector strap may be twisted,
or there may be debris in the lower
connector. Correct either situation
before continuing with the installation
process.
3
Push the child seat into the
vehicle seat while pulling
each lower connector strap to
tighten.
4 Attach the Versa-Tether to
a designated anchor (see
vehicle owner’s manual) and
remove slack.
5 Store excess webbing in the
elastic strap.
44
Page 47

Forward-Facing Installation
Check Versa-Tether
®
(Top Tether) attachment
Check that no more than
20% or 7.6 cm (3 inches)
of the base hangs over the
edge of the vehicle seat
Check that Versa-Tether
®
(Top Tether) webbing is
stored in the elastic strap
Check that there is
LESS than 2.5 cm (1 in.)
of movement (front to back
or side to side) at the belt path
Check lower
connector attachments
Checklist
9 Check that all connections are secure.
9 Check that the lower connector straps are not twisted.
9 Check that no more than 20% or 7.6 cm (3 inches) of the base hangs
over the edge of the vehicle seat.
9 Check that the child seat cannot be moved front to back or side to side
more than 2.5 cm (1 in.) at the belt path. If the child seat is not secure,
repeat installation or use a different seating location.
9 Check that any excess Versa-Tether® webbing is contained within your
vehicle and secured in the elastic strap.
45
Page 48

Forward-Facing Installation
Lap-Shoulder Belt Installation
Before You Begin:
• Check that your vehicle belt is compatible for use with child
seats. See pages 8 – 13 for more information.
* If your vehicle seat belt system includes a locking feature,
use of the lock-offs is not required as long as the vehicle seat
belt system is locked. Check your vehicle owner’s manual
to determine how to lock your vehicle seat belt system when
installing a child restraint.
• Remove the Versa-Tether from the pouch and place it up
and over the child seat back.
* The Versa-Tether must be used at all times. Using the tether
will improve the stability of the child seat and reduce the risk
of injury. Check your vehicle owner’s manual for tether anchor
locations. Only attach the Versa-Tether to anchor points
designated to the chosen seating position as indicated by your
vehicle owner’s manual.
• Select position 1 or 2 and place the child seat forwardfacing on the vehicle seat.
* Ensure that no more than 20% or 7.6 cm (3 inches) of the base
hangs over the edge of the vehicle seat. See pages 22 – 23 for
more information.
46
Page 49

Forward-Facing Installation
Install with lap-shoulder belt as shown above.
WARNING!
• Your child seat may not perform as intended if the base of the child
seat is not flat on the vehicle seat.
• This child seat must not be used forward-facing for children less
than one year of age OR who weigh less than 9.1 kg (20 lbs).
47
Page 50

Forward-Facing Installation
1b
1a
LOCKING
TAB
CLAMP
4a
4b
5
7
1 Loosen the harness.
a Lift harness adjuster lever
b Pull both harness straps forward
2 Remove the body pillow and
unbuckle the harness.
3 Lift back cover, then pull seat
cover forward to access the
forward-facing belt path.
4 Open the red lock-off closest to
where the vehicle belt will be
buckled.
a Pull the locking tab up
b Pull the clamp down
5 Route the vehicle belt through
the forward-facing belt slots, then
buckle.
TIP: Ensure the vehicle belt is not twisted.
Remove excess slack from the bottom
(lap) part of the vehicle belt before
closing the lock-offs.
6 Ensure that both parts of the
vehicle belt are routed through the
lock-off, then close the lock-off.
a Push the clamp up
b Push the middle of the locking tab
down until locked
7 Push the child seat into the vehicle
seat while pulling the top (shoulder)
part of the belt between the belt
slots (pull away from the buckle) to
remove slack.
TIP: The shoulder part of the vehicle belt
must be on top when removing slack.
48
Page 51

8 Pull slack through the belt slot
8
Check Versa-Tether
®
(Top Tether) attachment
Check that there is
LESS than 2.5 cm (1 in.)
of movement (front to back or
side to side) at the belt path
Check buckle
connection
Check that no more than
20% or 7.6 cm (3 inches)
of the base hangs over the
edge of the vehicle seat
Check that Versa-Tether
®
(Top Tether) webbing is
stored in the elastic strap
toward the vehicle belt retractor.
9 Attach the Versa-Tether to a
designated anchor (see vehicle
owner’s manual) and remove
slack.
10 Store excess webbing in the
elastic strap.
11 Replace the cover.
Forward-Facing Installation
Checklist
9 Check that the vehicle belt is securely fastened.
9 Check that no more than 20% or 7.6 cm (3 inches) of the base hangs
over the edge of the vehicle seat
9 Check that the child seat cannot be moved front to back or side to side
more than 2.5 cm (1 in.) at the belt path. If the child seat is not secure,
repeat installation or use a different seating location.
9 Check that any excess Versa-Tether® webbing is contained within your
vehicle and secured in the elastic strap.
49
Page 52

Forward-Facing Installation
Lap Belt Installation
Before You Begin:
• Check that your vehicle belt is compatible for use with child
seats. See pages 8 – 13 for more information.
• Remove the Versa-Tether from the pouch and place it up
and over the child seat back.
* The Versa-Tether must be used at all times. Using the tether
will improve the stability of the child seat and reduce the risk
of injury. Check your vehicle owner’s manual for tether anchor
locations. Only attach the Versa-Tether to anchor points
designated to the chosen seating position as indicated by your
vehicle owner’s manual.
• Select position 1 or 2 and place the child seat forwardfacing on the vehicle seat.
* Ensure that no more than 20% or 7.6 cm (3 inches) of the base
hangs over the edge of the vehicle seat. See pages 22 – 23 for
more information.
50
Page 53

Install with lap belt as shown above.
Forward-Facing Installation
WARNING!
• Your child seat may not perform as intended if the base of the child
seat is not flat on the vehicle seat.
• This child seat must not be used forward-facing for children less
than one year of age OR who weigh less than 9.1 kg (20 lbs).
51
Page 54

Forward-Facing Installation
1b
1a
4
5
1 Loosen the harness.
a Lift harness adjuster lever
b Pull both harness straps forward
2 Remove the body pillow and
unbuckle the harness.
3 Lift back cover, then pull seat
cover forward to access the
forward-facing belt path.
4 Route the vehicle seat belt
through the forward-facing belt
slots, then buckle.
TIP: Ensure the vehicle belt is not twisted.
5 Push the child seat into the
vehicle seat while removing slack
(see pages 8 – 11).
6 Attach the Versa-Tether to a
designated anchor (see vehicle
owner’s manual) and remove
slack.
7 Store excess webbing in the
elastic strap.
8 Replace the cover.
52
Page 55

Forward-Facing Installation
Check Versa-Tether
®
(Top Tether) attachment
Check buckle
connection
Check that no more than
20% or 7.6 cm (3 inches)
of the base hangs over the
edge of the vehicle seat
Check that Versa-Tether
®
(Top Tether) webbing is
stored in the elastic strap
Check that there is
LESS than 2.5 cm (1 in.)
of movement (front to back or
side to side) at the belt path
Checklist
9 Check that the vehicle belt is securely fastened.
9 Check that no more than 20% or 7.6 cm (3 inches) of the base hangs
over the edge of the vehicle seat
9 Check that the child seat cannot be moved front to back or side to side
more than 2.5 cm (1 in.) at the belt path. If the child seat is not secure,
repeat installation or use a different seating location.
9 Check that any excess Versa-Tether® webbing is contained within your
vehicle and secured in the elastic strap.
53
Page 56

Aircraft Installation
This child seat is certified for aircraft use.
Most airlines in Canada and the U.S. will
allow the use of a child seat as long as it is
labeled as an approved child seat for use in
aircraft and fits properly on the aircraft seat.
Contact the airline about their policy prior to
traveling.
The FAA recommends that a child weighing
up to 18.1 kg (40 lbs) use a certified,
harnessed child seat while traveling on an
aircraft.
Install your child seat in a window seat to
avoid blocking the aisle.
Rear-Facing Installation
For rear-facing aircraft installation (Fig. A),
follow Rear-Facing Lap Belt Installation
instructions on pages 38 – 41.
Forward-Facing Installation
For forward-facing aircraft installation
(Fig. B), follow Forward-Facing Lap Belt
Installation instructions on pages 50 – 53.
If the aircraft lap belt is too short, ask a
flight attendant for a belt extender.
NOTE: Your child may experience
discomfort if the buckle is located in
the seating area of the child seat after
installation.
A
b
54
Page 57

Securing Your Child
WARNING!
• Adjust the belts provided with this child seat so they
fit snugly around your child. A snug strap should not
allow any slack. It lies in a relatively straight line without
sagging. It does not press on the child’s flesh or push the
child’s body into an unnatural position.
• Adjust the harness to fit the clothes the child is wearing.
Remove bulky coats and/or jackets before putting the
child in the child seat.
• Verify that the child seat is secure and the harness is
properly adjusted around the child each time the child
seat is used.
Before You Begin:
• Follow the instructions on pages 16 – 19 to make the proper
adjustments to the harness and buckle.
* Rear-facing 2.3 and 18.1 kg (5 – 40 lbs) position 3 only.
* Forward-facing 9.1 and 24.9 kg (20 – 55 lbs) AND 1 year of age.
Position 1 or position 2 may be used.
55
Page 58

Securing Your Child
1b
1a
3
2a
2b
Loosen the harness.
1
a Lift harness adjuster lever
b Pull both harness straps forward
Open the chest clip.
2
a Press tabs
b Pull apart
3
Release the buckle and attach
the harness straps to the
harness holders.
4 Place the child in the child
seat.
* Ensure the child is positioned
upright in the child seat and not
slouching. Their bottom must touch
the child seat, and their back must
rest flat against the back of the
child seat.
56
Page 59

Position the harness straps
6
5
around the child.
6 Fasten the harness buckle.
* Proper connection is confirmed
with an audible click after inserting
each buckle tongue.
7 Check for proper harness
height, and remove all slack
from the lap part of harness
before tightening.
8 Pull the harness adjuster strap
to tighten the harness.
* The harness should have a
comfortable but snug fit around
the child. A snug strap should not
allow any slack. It lies in a relatively
straight line without sagging. It
does not press on the child’s flesh
or push the child’s body into an
unnatural position. You should not
be able to pinch excess.
9 Fasten the chest clip.
* The correct height for the chest
clip is at the middle of the chest at
armpit level.
Checklist
Before traveling, verify that the:
9 Harness straps are not twisted.
9 Harness is snug.
9 Buckle is fastened.
9 Chest clip is at the child’s armpit level.
Securing Your Child
Pull the harness adjuster away
from the child seat (parallel to the
ground) to tighten.
Do not pull sideways.
57
Page 60

Care and Maintenance
2a
2b
1b
1a
a b
Cover Removal
WARNING! Never remove the buckle tongues from the
harness. They cannot be reattached after removal. If reassembled
incorrectly, the child seat may not perform as intended.
1 Loosen the harness.
a Lift release lever
b Pull both harness straps forward
2 Open the chest clip.
a Press tabs
b Pull apart
3 Unbuckle the harness.
4 Remove the infant body pillow
if necessary.
5 Remove the belly pad from the
harness buckle.
a Pull the buckle through the belly
pad
b Remove the elastic strap from
around the buckle
58
Page 61

Unhook both harness straps
8
6
from the yoke.
7 Pull the harness straps
through the shell and cover to
the front of the child seat.
8 Detach the plastic hooks from
the bottom edge of the child
seat.
9 Pull the buckle through the
slot in the cover.
Care and Maintenance
59
Page 62

Care and Maintenance
10
Remove the cover from the
10
child seat shell.
Cleaning the Cover
• HAND WASH the cover using cold water and mild soap.
• LINE DRY to prevent the cover from shrinking.
• DO NOT:
* Bleach
* Machine wash
* Machine dry
* Iron
Cleaning the Harness
• SPONGE CLEAN the harness using warm water and mild soap.
• TOWEL DRY
• DO NOT:
* Disassemble the harness
* Bleach
* Machine wash
* Machine dry
* Iron
Cleaning the Shell
• SPONGE CLEAN the shell using warm water and mild soap.
• TOWEL DRY
• DO NOT use abrasive cleaners
60
Page 63

Cover Replacement
1
2
1 Fit the child seat cover around
the child seat shell.
Attach the plastic hooks to the
2
bottom edge of the child seat.
3 Pull the buckle through the
slot in the cover.
* Ensure that the buckle is
through the correct cover slot
for the buckle position.
4 Feed each harness strap
through the desired harness
slots in the cover and shell to
the back of the child seat.
Care and Maintenance
61
Page 64

Care and Maintenance
a b
Adjuster
Strap
Nest the harness straps by
5
inserting the right strap loop
into the left strap loop.
6 Before reattaching the
harness straps to the yoke,
hold the harness yoke as
shown, and ensure that the
adjuster strap attached to the
yoke is not twisted.
7 Slide nested harness straps
completely onto the harness
yoke.
8 Replace the belly pad.
a Pull the elastic strap around the
buckle
b Push the buckle through the
belly pad
62
Page 65

Care and Maintenance
Cleaning the Buckle
If your child eats and drinks while in the child seat, you will need to
check the buckle periodically and rinse out any accumulated debris.
Remove the Buckle
1 Unbuckle the harness.
Remove the belly pad and pull
the buckle through the cover.
3 Guide the buckle retainer up
through the slot in the child seat
shell to remove.
2 Turn the buckle webbing
and slide it between buckle
positions.
To Clean:
• THOROUGHLY RINSE the buckle
using warm water.
• TEST THE BUCKLE by fastening
and unfastening until a click is
heard after inserting each buckle
tongue. If clicks are not heard, repeat the cleaning procedure.
• TOWEL DRY
• DO NOT:
* Soak
* Lubricate
* Use solvents
* Use soap or household detergents
63
Page 66

Care and Maintenance
ADJUSTMENT
SLOT
Re-thread the Buckle
IMPORTANT:
• ALWAYS position the buckle in the
inner slot for rear-facing use.
• The vehicle belt must pass in front of the
buckle strap for rear-facing use.
• NEVER leave the buckle in the
adjustment slot.
• Use the outer buckle slot when installing the child seat forwardfacing with a child weighing 13.6 kg (30 lbs) and above or if the
buckle is under the child in the inner position.
1 Guide the buckle retainer
down through the slot in the
child seat shell.
3 Select the appropriate slot for
the size of your child and turn
the buckle webbing and slide
it into the chosen slot.
4 Ensure that the buckle strap
is not twisted and that the
button faces out.
64
2 Slide the buckle webbing
into the slot between buckle
positions.
Page 67

Tips and Troubleshooting
Troubleshooting
Problem: The harness is hard to adjust.
Possible Solution: The yoke may be caught on the Versa-Tether
®
webbing or other component of the child seat. Remove the obstruction
and try adjusting the harness again. Always store the Versa-Tether in
the pouch provided when not in use. When the Versa-Tether is in use,
always secure excess webbing in the elastic strap. See pages 26 – 29.
Problem: The adjuster strap is fraying at the sides.
Possible Solution: Pull the harness adjuster strap away from the child
seat (parallel to the ground) to tighten. Do not pull sideways. Doing so
may cause the harness adjuster strap to fray at the sides. See page 57.
Problem: The buckle will not fasten with a click after each tongue
is inserted.
Possible solution: There may be debris in the buckle mechanism.
Clean the buckle as shown on page 63 and try fastening the buckle
again.
Please contact Consumer Services at 1.888.427.4829 if you have an
issue not listed here.
65
Page 68

Warranty
This child seat was manufactured by Britax Child Safety, Inc. Britax® warrants this
product to the original retail purchaser as follows:
LIMITED ONE-YEAR WARRANTY
This product is warranted against defective materials or work man ship for one year
from the date of original purchase. Proof of purchase is required. Your exclusive
remedy for this warranty is that Britax will, at its option, provide repair or replacement
components for this product. Britax reserves the right to discontinue or change
fabrics, parts, models or products, or to make substitutions.
To make a claim under this warranty, you must contact Britax Consumer Services at
1-888-427-4829 or write to us using the address on the back cover of this booklet.
PLEASE COMPLETE AND MAIL THE OWNER REGISTRATION
CARD WITHIN (30) DAYS OF PURCHASE
You may also register online at www.Britax.ca/registration.
WARRANTY LIMITATIONS
This warranty does not include damages which arise from negligence, misuse or
use not in accordance with the product instruction.
The use of non-Britax Child Safety, Inc. covers, inserts, toys, accessories, or
tightening devices is not approved by Britax. Their use could cause this child seat
to fail Federal Motor Vehicle Safety Standards or not perform as intended in a crash.
Their use automatically voids the Britax warranty.
LIMITATION OF DAMAGES
The warranty and remedies as set forth above are exclusive and in lieu of all others,
oral or written, express or implied. In no event will Britax, or the retailer selling this
product, be liable to you for any damages, including incidental or consequential
damages, arising out of the use or inability to use this product.
LIMITATIONS OF WARRANTIES AND OTHER WARRANTY TERMS
AND PROVINCIAL LAWS
Any implied warranties, including implied warranties of merchantability and fitness
for a particular purpose, shall be limited to the duration and terms of the express
written warranty. Some provinces do not allow limitations on how long an implied
warranty lasts or the exclusion or limitation of incidental or consequential damages,
so the above lim i ta tions may not apply to you. This warranty gives you specific legal
rights, and you may have other rights, which vary from province to province. Neither
Britax, nor the retailer selling this product, authorizes any person to create for it any
other warranty, obligation, or liability in connection with this product.
66
Page 69

67
Page 70

Page 71

Table des matières
Informations de sécurité .............................................................................70
Avertissement .......................................................................................................70
Notes importantes ................................................................................................72
Certification ...........................................................................................................73
Enregistrement .....................................................................................................73
Informations d’utilisation importantes au sujet du siège pour enfant ...............74
Compatibilité du véhicule ...........................................................................76
Ceintures du véhicule compatibles .....................................................................76
Ceintures du véhicule Incompatibles ..................................................................80
Places assises du véhicule ..................................................................................81
Caractéristiques du siège pour enfant ......................................................82
Fonctions du siège pour enfant .................................................................84
Ajuster la hauteur du harnais ...............................................................................84
Ajuster la position de la boucle ...........................................................................86
Attacher la boucle ................................................................................................88
Détacher la boucle ...............................................................................................88
Utiliser l’attache à la poitrine ...............................................................................88
Utiliser les verrous ................................................................................................89
Coussin de corps pour bébé ...............................................................................89
Positions d’inclinaison ..........................................................................................90
Utiliser le dispositif d’ancrage universel (DUA) ..................................................92
Utiliser les attaches inférieures ............................................................................93
Utiliser la courroie d’ancrage Versa-Tether® ....................................................... 94
Installation en mode orienté vers l’arrière ................................................98
Installation à l’aide du DUA .................................................................................. 98
Installation à l’aide de la ceinture baudrier & sous-abdominale .......................103
Installation à l’aide de la ceinture sous-abdominale ..........................................106
Installation en mode orienté vers l’avant ..................................................110
Installation à l’aide du DUA .................................................................................. 110
Installation à l’aide de la ceinture baudrier & sous-abdominale .......................114
Installation à l’aide de la ceinture sous-abdominale ..........................................118
Installation dans un avion .......................................................................... 122
Attacher votre enfant...................................................................................124
Soin et entretien ..........................................................................................126
Conseils et dépannage ...............................................................................133
Garantie ........................................................................................................134
©2010 Britax Child Safety, Inc. Tous droits réservés. Imprimé aux États Unis P417400_R2:09.10
Ce produit et ces composants sont sujet à changer sans préavis.
Page 72

MISE EN GARDE!
Section Title
Peut entrainer la MORT ou des BLESSURES GRAVES :
• Le système de retenue doit être utilisé en position orienté vers l’arrière
lorsqu’il est utilisé pour un bébé.
• Utiliser ce siège pour enfant orienté vers l’arrière pour enfant qui pèsent
entre 2.3 et 18.1 kg (5 – 40 lbs) et ont une taille de 116.8cm (46po) ou
moins. Utilser ce siege orienté vers l’avant pour enfant qui pèsent entre 9.1
et 24.9 kg (20-55lbs) et ont une taille de 116.8cm (46po) ou moins ET que
l’enfant ait atteint l’âge d’un an.
• Ajustez les ceintures incluses avec ce système de retenue pour enfant,
autour de votre enfant.
• Attachez la courroie d’ancrage fournie avec ce siège pour enfant.
• Le système de retenue pour enfant doit être attaché au véhicule avec le
système d’attaches inférieures, si le système de retenue est installé dans
une place assise équippé du dispositif d’ancrage universel (DUA), ou la
ceinture d’un siège du véhicule si l’ensemble de retenue est installé dans
une place assise qui n’est pas équipée d’un DUA et à l’aide de la courroie
d’ancrage.
• Cet ensemble de retenue pour enfant, même s’il n’est pas occupé, doit
être attaché fermement au véhicule.
• Suivez toutes les instructions inscrites sur cet ensemble de retenue pour
enfant en plus des instructions écrites du manuel dans la pochette sous la
housse.
• Enregistrez votre ensemble de retenue avec le fabricant.
• Ce siège pour enfant ne peut être utilisé sur les positions 1 ou 2 lorsqu’il
est installé orienté vers l’arrière (voir page 91).
• Utilisez la fente intérieure de la boucle lorsque le siège est installé en
mode orienté vers l’arrière.
• Utilisez la fente extérieure de la boucle lorsque vous installez le siège pour
enfant en position orientée vers l’avant avec un enfant dont le poids est
supérieur à 13,6 kg (30 lbs) et plus ou si la boucle se trouve sous l’enfant
dans la position du millieu.
• Ce siège pour enfant ne peut être utilisé en position 3 lorsqu’il est installé
en mode orienté vers l’avant (voir page 91).
• Pour prévenir les blessures provenantes d’une déterioration ou d’un avarie
non-apparente, veuillez cesser d’utiliser ce siège pour enfant sept ans
après la date d’achat ou lorsqu’il a subit un accident modéré ou sévère
70
Page 73

(voir page 72). Voir l’étiquette de No de Série et la date de fabrication sur
le siège pour enfant (page 84).
• Ce siège pour enfant ne peut être utilisé que pour les classes de véhicule
suivantes : véhicules de promenade tout-usage, véhicules de promenade
ou camions.
• Selon les statistiques d’accidents de la route, Britax recommande que
les parents choisissent le siège arrière comme emplacement le plus
sécuritaire pour installer correctement un siège pour enfant. Veuillez
étudier les places assises du véhicule à la page 82 pour assurer la sécurité
de votre enfant et consultez le manuel d’utilisateur du véhicule.
• Lorsque vous utilisez un véhicule avec des coussins gonflables, veuillez
vous référer au manuel de l’utilisateur du véhicule pour les instructions et
précautions pour l’installation d’un siège pour enfant.
• Ne jamais utiliser la sangle d’ajustement du harnais pour soulever
ou transporter ce siège pour enfant. Faire ceci pourrait endommager
l’ajusteur et la sangle du harnais. Veuillez toujours transporter ce siège
pour enfant par la coque ou les courroies d’ancrage.
• La première protection des occupants d’un véhicule lors d’une collision
est la coque du véhicule; un siège pour enfant ne protège pas l’enfant
lorsque le véhicule subit une collision grave. Toutefois, s’il est installé
correctement, un siège pour enfant peut améliorer substantiellement
les chances de survie dans la plupart des accidents. Assurez-vous que
tous les utilisateurs comprennent complètement les façons d’utiliser
correctement ce siège pour enfant dans un véhicule.
• Veuillez vous référer au manuel de l’utilisateur ou contacter le fabricant du
véhicule pour connaitre le poids maximal de leurs barres d’ancrage du
DUA. Utilisez les ceintures de sécurité (pas le DUA) pour les installations
avec un enfant dont le poids est supérieur à la limite de poids du DUA
du véhicule. À moins qu’il le soit spécifié autrement par le fabricant du
véhicule, prennez compte que la limite de poids d’un enfant pour le DUA
est de 18,1 kg (40 lb).
• L’utilisation de housses, pièces assorties, jouets, accessoires ou appareils
de serrement qui ne sont pas fabriqués par Britax Child Safety, Inc., n’est
pas approuvé par celui-ci. Leur utilisation pourrait ne pas permettre au
siège pour enfant de performer tel que prévu lors d’un accident.
71
Page 74

Informations de sécurité
Notes importantes
• Vérifiez que le siège pour enfant est bien installé et que le harnais est ajusté
correctement autour de l’enfant chaque fois que le siège pour enfant est utilisé.
• Veuillez cesser d’utiliser ce siège pour enfant s’il a subit un accident modéré
ou sévère.
un accident mineur tel qu’il est précisé par l’Administration de sécurité sur
l’autoroute nationale des États Unis (U.S. National Highway Traffic Safety
Administration [NHTSA]) si :
* Le véhicule peut être conduit hors du site de l’accident.
* La porte du véhicule la plus près du siège pour enfant n’a pas été
* Aucun occupant du véhicule a subit des blessures.
* Il n’y a aucun endommagement visible au siège pour enfant.
* Les coussins gonflables (s’ils sont présents) ne se sont pas déployés.
• Ajustez le harnais pour qu’il soit ajusté aux vêtements que l’enfant porte. Retirez
les manteaux épais et/ou les vestons avant de placer l’enfant dans le siège pour
enfant.
• Couvrez le siège pour enfant lorsque le véhicule est garé directement sous les
rayons du soleil. Les pièces métalliques du siège pour enfant pourraient devenir
assez chaude pour brûler l’enfant.
• Rangez le siège pour enfant dans un endroit sécuritaire lorsqu’il n’est pas utilisé.
Évitez de placer des objets lourds sur celui-ci.
• Ne pas laisser d’enfant sans surveillance dans un véhicule, même pour une
courte période.
• Ne pas, à l’exception d’instructions écrites dans ce dépliant, essayer de
désassembler toute partie de ce siège pour enfant, ou changer la façon dont les
ceintures du harnais ou du siège du véhicule sont utilisées.
• Ne pas l’aisser d’objets, c-à-d livres, sacs, etc., à l’arrière du véhicule sans
être correctement attaché. Lors d’un arrêt soudain, les objets qui ne sont pas
correctement attachés resteront en mouvement, pouvant causer des blessures
graves.
• Ne pas laisser des sièges de véhicule pliants non-sécurisés ou non-verrouillés.
Lors d’un arrêt soudain, un dossier de véhicule non-verrouillé pourrait empêcher
le siège pour enfant de performer tel que prévu.
• Ne pas laisser d’enfant jouer avec ce siège pour enfant.
• Ne pas utiliser quoi que ce soit pour soulever le siège pour enfant hors d’un
siège du véhicule à l’exception des instructions écrites dans ce manuel. Lors d’un
accident, ceci pourrait empêcher le siège pour enfant de performer tel que prévu.
Il n’est pas nécéssaire de remplacer un siège du véhicule après
endommagée.
72
Page 75

Informations de sécurité
Certification
Ce système de siège pour enfant est conforme aux normes de
sécurité des véhicules automobiles du Canada (NSVAC 213 et
213.1). Cet ensemble de retenue est certifié pour être utilisé dans
les véhicules motorisés et les avions.
Enregistrement
Les sièges pour enfant peuvent être repris pour des raisons de
sécurité. Vous devez enregistrer votre siège pour enfant pour être
contacté lors d’une reprise. Remplissez la carte d’enregistrement
et expédiez-la à Britax Child Safety Ltd., Case postale 7289, RPO
Brunswick Square, Saint John NB E2L 4S6 ou Enregistrez le siège
à www.Britax.ca/registration.
Pour votre utilité, écrivez toutes les informations de votre siège
pour enfant ci-dessous. Veuillez vous référer au No de série & date
de fabrication pour toutes les informations, voir page 84.
Nom et numéro du modèl : _______________________________________
Numéro de série :________________________________________________
Numéro de lot : __________________________________________________
Date de fabrication : ______________________________________________
73
Page 76

Informations de sécurité
2,5 cm
1 po
Orienté vers l’arrière
Informations importantes au sujet de l’utilisation du
siège pour enfant
Tous les bébés doivent voyager orientés vers l’arrière jusqu’à ce qu’ils aient
atteint au moins l’âge de 1 an et un poids de 9,1 kg (20 lb).
Une mousse pour bébés à faible poids est vendue separément. Cette mousse peut
être nécessaire pour l’ajustement étroit du harnais autour de votre enfant.
Britax suggère aux parents de considérer fortement ce qui suit lorsqu’ils utilisent ce siège
pour enfant.
• Les enfants doivent être attachés à l’aide d’un système de harnais jusqu’à ce qu’ils
excèdent les limites de poids et de taille spécifées.
• Britax recommende que les enfants voyagent en position orientée vers l’arrière
jusqu’à la limite de taille et de poids spécifiée.
MISE EN GARDE ! L’utilisation en mode ORIENTÉ VERS
L’ARRIÈRE ne s’applique SEULEMENT que pour les enfants qui se conforment
à TOUS les prérequis ci-dessous. Si l’enfant ne peut pas être attaché dans le
siège selon ces prérequis parce qu’il est trop petit, l’utilisation du rembourrage
de positionnement pour bébé ou un autre siège pour enfant (tel qu’un siège
pour bébé) peut être requis. Si le siège ne peut être correctement installé selon
ces prérequis parce que l’enfant est trop grand, veuillez voir les instructions sur
l’installation orientée vers l’avant à la page 76.
Orienté vers l’arrière : 2,3 – 18,1 kg (5 – 40 lb)
Utilisez en mode orienté vers l’arrière pour les enfants :
• dont le poids se situe entre 2,3 et 18,1 kg (5 – 40
lb) et
• lorsque le haut de la tête de l’enfant se tient au
moins à 2,5 cm (1 po) en dessous du haut de la
coque du siège pour enfant (Ill. A) et
• lorsque les sangles du harnais sont au niveau ou
juste en dessous des épaules de l’enfant (Ill. A).
• IMPORTANT : Voir Ajustement de la hauteur du harnais à la page 84.
74
A
Page 77

Informations de sécurité
Niveau des épaules
Au dessus du niveau des épaules
En dessous du niveau des épaules
Position 1 Position 2
Hauteur du harnais en mode
orienté vers l’avant
Orienté vers l’avant : 9,1 – 24,9 kg (20 – 55 lb) et au moins 1 an
MISE EN GARDE ! L’utilisation en mode ORIENTÉ
VERS L’AVANT ne s’applique SEULEMENT que pour les enfants qui
se conforment à TOUS les prérequis ci-dessous. Si l’enfant ne peut
pas être attaché selon ces prérequis parce qu’il est trop grand, un autre
type de siège pour enfant (tel qu’un rehausseur) pourrait être requis. Si
le siège ne peut pas être proprement installé selon ces prérequis parce
que l’enfant est trop petit, veuillez voir les informations sur l’installation
orienté vers l’arrière à la page 74.
Utilisez en mode orienté vers l’avant pour les enfants
• qui ont au moins un an et
• dont le poids se situe entre 9,1 et 24,9 kg (20 – 55 lb) et
• mesurant 116,8 cm (46 po) ou moins et
• lorsque les sangles du harnais sont situés au niveau ou juste
au dessus des épaules de l’enfant, parallèle au sol (Ill. B).
IMPORTANT : Lorsque vous utilisez la position 2, il peut être
nécessaire d’ajuster le harnais vers une position plus élevé que le
celle de la position 1. Voir Ajustement de la hauteur du harnais à la
page 85.
b
75
Page 78

Compatibilité du véhicule
Ceintures de sécurité du véhicule compatibles
NOTE : Les informations dans cette section s’appliquent seulement
à l’installation avec les ceintures du véhicule.
Les ceintures de sécurités peuvent varier d’un véhicule à l’autre.
Veuillez vous réferer au manuel de l’utilisateur du véhicule pour
des informations spécifiques au sujet des ceintures de sécurité de
votre véhicule et leur utilisation avec les sièges pour enfants.
Ceinture baudrier & sous-abdominale (3 points)
1.
Rétracteur autoblocant avec
patte de boucle libre
a Possède une patte de
bouclage qui glisse
librement sur la sangle de la
Patte de
bouclage
ceinture de sécurité.
b Possède un rétracteur qui
empêche la ceinture d’être
tirée de nouveau une fois
que la ceinture est tirée d’au
moins 61 cm (24 po).
c Se ressère en rembobinant
la sangle dans le rétracteur.
76
Page 79

Compatibilité du véhicule
2. Rétracteur à blocage d’urgence avec patte de bouclage fixe
a Possède une patte de
bouclage qui bloque la
ceinture de sécurité.
* Ce type de patte de bouclage
verrouille la ceinture de sécurité
lorsque la ceinture et la patte
de bouclage se reposent à plat.
Lorsque ce type de ceinture de
sécurité est utilisé avec un siège
pour enfant, assurez-vous que la
patte de bouclage repose à plat
contre le siège pour enfant sinon
la ceinture du véhicule pourrait ne
pas être bloquée.
Patte de
bouclage
b Possède un rétracteur qui
se verrouille seulement lors
d’une situation d’urgence
tel un arrêt soudain ou un
accident.
Rétracteur convertible en
3.
mode autobloquant avec patte de bouclage libre
a Possède une patte de bouclage
qui glisse librement sur la sangle
de la ceinture de sécurité.
b Possède un rétracteur qui peut
être converti pour fonctionner en
tant que rétracteur autobloquant.
Tirez la ceinture de sécurité hors
du rétracteur complètement
pour activer la fonction de
blocage automatique.
* Pour utiliser un siège pour
enfant avec ce type de ceinture
de véhicule, vous aurez
besoin de basculer au mode
autobloquant ou utiliser les
verrous du siège pour enfant.
Patte de
bouclage
77
Page 80

Compatibilité du véhicule
4. Rétracteur à blocage d’urgence avec une patte de bouclage libre
a
Possède une patte de
bouclage qui glisse
librement sur la sangle de
la ceinture de sécurité.
b Possède un rétracteur qui
se verrouille seulement lors
d’une situation d’urgence
tel un arrêt soudain ou un
accident.
IMPORTANT : Ce type de ceinture
de sécurité requiers l’utilisation des verrous du siège pour enfant pour les
installations en mode orienté vers l’arrière et l’avant. Voir page 90 pour plus
d’information sur l’utilisation des verrous.
Ceinture sous-abdominale
5. Rétracteur autobloquant
a Possède une patte de
bouclage qui est cousue
dans la sangle.
b Possède un rétracteur qui
empêche la ceinture d’être
tirée de nouveau une fois
que la ceinture est tirée d’au
moins 61 cm (24 po).
78
Patte de
bouclage
Page 81

Se ressère en rembobinant
c
la sangle dans le rétracteur.
Patte de bouclage fixe
6.
a
Possède une patte de
bouclage qui empèche la
courroie de se désserrer.
b Se resserre en tirant sur la
courroie de la ceinture.
Compatibilité du véhicule
Patte de
bouclage
Ajusteur
79
Page 82

Compatibilité du véhicule
Ceintures de sécurités incompatibles
MISE EN GARDE ! Les types de ceintures du véhicule suivants
ne sont PAS compatibles avec ce siège pour enfant. Si n’importe qu’elle de ces
ceintures de sécurité listées ci-dessous sont dans la place assise choisie, veuillez
choisir un autre emplacement ou vérifiez le manuel de l’utilisateur du véhicule au
sujet de l’installation d’un siège pour enfant dans votre véhicule.
1 Les ceintures
baudrier & sousabdominale avec
points d’ancrage du
haut et du bas sur la
porte du véhicule.
4 Ceintures
baudrier & sousabdominales
gonflables.
80
2 Ceintures
de sécurité
du véhicule
automatiques et
motorisées.
5 Ceintures sous-
abdominales en
avant de la jonction
dossier-coussin.
3 Ceintures baudrier &
sous-abdominale avec
un rétracteur séparé
pour chaque section
sous-abdominale et
baudrier.
6 Ceintures sous-
abdominales avec
une patte de bouclage
cousue et un rétracteur
qui ne bloque qu’en
cas d’arrêt soudain.
Page 83

Places assises du véhicule
Compatibilité du véhicule
MISE EN GARDE !
NE PAS placer le siège pour enfant sur le siège
avant du véhicule avec un sac gonflable du côté
passager à moins qu’il ne soit désactivé. Ceci
peut entraîner la MORT ou des BLESSURES
GRAVES. Veuillez voir le manuel de l’utilisateur
du véhicule pour les instructions d’installation.
Le siège arrière reste l’endroit le plus sécuritaire
pour les enfants de 12 ans et moins.
compatibles avec ce siège pour enfant. En cas de doute, contactez le
fabricant du véhicule pour obtenir de l’aide.
Les sièges du véhicule orientés vers l’avant équipés avec une ceinture
de sécurité ou d’un dispositif d’ancrage universel inférieur DOIVENT
être utilisés avec ce siège pour enfant. Les sièges orientés vers l’arrière
ou sur les côtés ne peuvent PAS être utilisés. Voir le diagramme cidessous.
Certains véhicules n’ont aucune place assises
81
Page 84

Caractéristiques du siège pour enfant
1
2
3
4
5
6
7
8
9
10
11
1 Housse
2 Fentes du harnais
3 Coussins de confort
4 Coussin de corps pour bébé
5 Porte-harnais
6 Barre d’attache inférieure
7 Sangle d’attache inférieure
(Pièce du DUA)
8 Bouton de relâchement de
l’ajusteur du système d’attache
inférieur (pièce du DUA)
9 Ajusteur de l’attache inférieure
(pièce du DUA)
82
12
13
14
15
16
17
18
19
10 Bouton de relâchement de
l’attache inférieure (Pièce du
DUA)
11 Attache inférieure (Pièce du
DUA)
12
13 Sangles du harnais
14 Attache à la poitrine
15 Boucle du harnais
16 Coussin abdominal
Rangement du guide de
l’utilisateur (dans la pochette
sous la housse)
Page 85

20
21
22
23
24
25
26
Caractéristiques du siège pour enfant
1
28
2
13
6
29
30
27
17 Levier d’ajustement du harnais
(sous la housse)
18 Sangle d’ajustement du harnais
19 Poignée d’ajustement de
l’inclinaison
20 Coque
21 Étiquette de numéro de série &
date de fabrication
22 Marque de sécurité nationale
23 Fente de ceinture pour
l’orientation avant
24 Verrous pour l’orientation avant
(Rouge - sous la house à l’avant
de la coque)
31
25 Verrous pour l’orientation arrière
(Bleu – sous la house à l’avant
de la coque)
26 Fente de ceinture pour
l’orientation arrière
27 Base
28 Courroie Versa-Tether
supérieur)
29 Chappe du harnais
30 Rangement des attaches
inférieures
31 Prise d’accrochage pour la
courroie Versa-Tether
®
(Ancrage
®
83
Page 86

Fonctions du siège pour enfant
1b
1a
Ajuster la hauteur du harnais
NOTE :
harnais au niveau ou en dessous des épaules de l’enfant. Voir page 74.
En mode orienté vers l’avant, positionnez toujours les sangles du harnais au
niveau ou au dessus des épaules de l’enfant. Voir page 75.
1
2 Décrochez les sangles du harnais
En mode orienté vers l’arrière, positionnez toujours les sangles du
Désserrez le harnais.
a Soulevez le levier d’ajustement
du harnais
b Tirez les deux sangles du harnais
vers l’avant
de la chappe.
3
Tirez une des sangles du
harnais au travers de la coque
et de la housse vers l’avant du
siège pour enfant.
84
Page 87

Passez les sangles du harnais
Adjuster
Strap
4
au travers de la fente du harnais
désirée dans la housse et la
coque vers l’arrière du siège
pour enfant.
Répétez les étapes 3 et 4 pour
la deuxième sangle du harnais.
5 Emboîtez les sangles du
harnais en insérant la boucle
de de sangle droite dans la
boucle de sangle gauche.
6 Avant de réattacher les
sangles du harnais à la
chappe, tenez la chappe
du harnais tel qu’illustré, et
assurez vous que la sangle de
l’ajusteur attaché à la chappe
n ’est pas entortillé.
7 Faites glisser les sangles
du harnais emboîtées
complètement dans la chappe
du harnais.
Fonctions du siège pour enfant
Sangle
d’ajustement
85
Page 88

ADJUSTMENT
SLOT
Fonctions du siège pour enfant
Ajuster la position de la boucle
IMPORTANT :
• Positionnez TOUJOURS la
boucle dans la fente intérieure
pour l’utilisation en mode
orienté vers l’arrière.
• La ceinture du véhicule doit
passer en avant de la sangle de
la boucle pour les utilisation en
mode orienté vers l’arrière.
• Ne JAMAIS laisser la boucle
dans la fente d’ajustement.
• Utilisez la fente extérieure de la
boucle lorsque vous installez le
siège pour enfant en position orientée vers l’avant avec un enfant dont
le poids est supérieur à 13,6kg (30 lb) et plus ou si la boucle se trouve
sous l’enfant dans la position du millieu.
FENTE
D’AJUSTEMENT
86
Page 89

Fonctions du siège pour enfant
Pour ajuster la boucle :
1 Détachez le harnais. Retirez le
coussin abdominal et poussez la
boucle au travers de la housse.
2 Tournez la sangle de la boucle et
faites la glisser entre les positions
de la boucle.
3 Faites glisser l’arrêtoir de la boucle
au travers de la fente de la boucle
et assurez-vous que le bouton
de relâchement rouge fait face à
l’avant du siège.
87
Page 90

Fonctions du siège pour enfant
Attacher la boucle
Insérez une patte à la fois dans
la boucle.
NOTE : Une bonne attache
est confirmée lorsque vous
entendez un déclic après avoir
inséré chaque patte.
Détacher la boucle
Appuyez sur le bouton de
relâchement et retirez les
pattes de la boucle.
NOTE : Nettoyez régulièrement
la boucle pour vous assurer
une bonne opération. Voir
page 131.
Utiliser l’attache à la poitrine
1 Détachez l’attache
à la poitrine.
a Appuyez sur les
onglets
b Détachez
88
Appuyez ensemble pour attacher.
2
NOTE : Toujours positionner l’attache à la
poitrine au niveau des aisselles.
Page 91

Fonctions du siège pour enfant
LOCKING
TAB
CLAMP
1
2
LOCKING
TAB
CLAMP
1
VEHICLE
BELT
2
Utiliser les verrous
IMPORTANT : Les deux parties du verrou doivent être ouvert pour
attacher la ceinture de sécurité.
Pour ouvrir :
ONGLET
BLOC
1 Tirer l’onglet du verrou vers le
haut
2 Tirer le bloc d’attache vers le bas
Pour fermer :
CEINTURE
DU
VÉHICULE
BLOC
1 Pousser le bloc d’attache vers le haut
2 Pousser le centre de l’onglet du
verrou vers le bas jusqu’à ce qu’il soit
verrouillé
Coussin de corps pour
bébé
Le coussin de corps pour bébé
est conçu pour offrir une meilleur
position pour les bébés utilisant ce
siège pour enfant.
NOTE : Retirez le coussin de corps
de bébé lorsque l’enfant peut s’assoir confortablement dans le siège pour bébé
sans support supplémentaire.
ONGLET
89
Page 92

Fonctions du siège pour enfant
0°
90°
0°
90°
0
90
Positions d’inclinaison
Ce siège pour enfant possède 3 positions. Pour ajuster, tirez la poignée d’inclinaison
puis faites pivoter la coque du siège pour enfant dans la position désirée. Relâchez la
poignée d’inclinaison, puis vérifiez que le siège pour enfant s’est verrouillé en position.
NOTE : Ajustez la position d’inclinaison AVANT d’installer.
Position 1
Position 2
Position 3
90
Page 93

Fonctions du siège pour enfant
UP TO 3 INCHES
OF OVERHANG
ACCEPTABLE
OVER 3 INCHES
OF OVERHANG
NOT ACCEPTABLE
Orienté vers l’arrière
Lorsque vous installez en position orienté vers
l’arrière, le siège pour enfant devrait être incliné d’au
moins à 30° de la verticale pour les enfants et jusqu’à
45° de la verticale pour les bébés incapables de
controller leur tête et leur cou (ne pas excéder 45° )
quand la voiture est garé sur une surface à niveau.
Lorsque vous installez le siège en mode orienté vers
l’arrière, veuillez incliner le siège à la position 3 et
utiliser la ligne guide sur le siège pour enfant pour
aider à obtenir un angle d’inclinaison acceptable
pour les installations orientés vers l’arrière.
Orienté vers l’avant
IMPORTANT : Dans les installations orientées vers l’avant, il est important
que la base du siège pour enfant repose completement à plat sur siège
du véhicule. Tel qu’illustré ci-dessous, il est possible de permettre jusqu’à
20% ou 7,6 cm (3 pouces) de la base de dépasser le rebors du siège
du véhicule. Certains sièges de véhicule ne permettent pas à la base du
siège pour enfant d’être en contact avec le siège du véhicule. Si c’est le
cas, ajustez l’angle d’inclinaison vers une position droite. Ne pas faire ceci
pourrait empêcher le siège pour enfant de performer tel que prévu.
JUSQU’À 7.6 cm
DE DÉBORD
ACCEPTABLE
Débord acceptable Débord inacceptable
PLUS DE 7.6 cm
DE DÉBORD
INACCEPTABLE
91
Page 94

Fonctions du siège pour enfant
Utiliser le dispositif d’ancrage universel (DUA)
Le dispositif d’ancrage universel ou DUA, est un système disponible
sur ce siège pour enfant qui offre une installation alternative aux
méthodes d’installation à l’aide d’une ceinture de sécurité. Voir
pages 73 et 74 pour les parties du DUA de ce siège pour enfant.
EMPLACEMENTS DE BARRES D’ANCRAGE DU SYSTÈME DE DUA
Appui-tête du siège
du véhicule
Boulons d’ancrage
pour l’orientation avant
Rétracteur de ceinture
Barre d’ancrage
du DUA
Jusqu’à 50,8 cm (20 po)
Siège du véhicule
du véhicule
Ceinture baudrier &
sous-abdominale du
véhicule
Boulon
d’ancrage
Barre d’ancrage
du DUA
Le diagramme ci-dessus illustre les emplacements typiques des barres
d’ancrage inférieures et de la courroie d’ancrage d’un véhicule. Vérifiez le
manuel de l’utilisateur de votre véhicule pour savoir s’il est équippé du DUA,
le poids maximal des barres d’ancrage, pour obtenir de l’information sur les
emplacements des barres d’ancrage et des places assises qui peuvent être
utilisés avec ce siège pour enfant.
L’espacement standard entre les barres d’ancrage du siège du véhicule
est de 27,9 cm (11 po). Ce siège pour enfant peut être utilisé dans une
place assise avec plus de 50,8 cm (20 po) d’espacement entre les barres
d’ancrage si le fabricant du véhicule le permet.
92
Page 95

Fonctions du siège pour enfant
Utiliser les attaches inférieures
Trouver les attaches inférieures
Les attaches inférieures sont situées à l’arrière de la base du siège
pour enfant. Rangez les attaches dans les fentes lorsqu’elles ne
sont pas utilisées.
Pour retirer les attaches inférieures de la fente de rangement
ou de la barre d’ancrage :
1 Appuyez et tenez le bouton de
relâchement rouge.
2 Retirez l’attache inférieure de
la fente de rangement ou de la
barre d’ancrage.
Pour attacher l’attache inférieure
à la fente de rangement ou à la
barre d’ancrage :
Poussez fermement l’attache
inférieure dans la fente ou sur la
Haut
barre d’ancrage jusqu’à ce que
vous entendez un déclic.
NOTE : Les attaches inférieures se
rangent de haut en bas dans les
fentes.
93
Page 96

Fonctions du siège pour enfant
Utiliser la courroie d’ancrage Versa-Tether®
MISE EN GARDE : Ne pas respecter les consignes
ci-dessous pourrait empêcher le siège pour enfant de
fonctionner tel que prévu :
• Vous devez TOUJOURS utiliser la courroie d’ancrage Versa-Tether
lorsque vous utilisez le siège pour enfant en mode orienté vers
l’avant. L’utilisation de la courroie augmente la stabilité de votre
siège pour enfant et réduit le risque de blessure.
• Attachez la courroie Versa-Tether seulement aux boulons d’ancrage
identifiés par le fabriquant du véhicule en tant que points d’ancrage
supérieur. Utilisez seulement les boulons d’ancrages désignés pour
chaque places assises.
• Si votre véhicule ne possède aucun boulon d’ancrage, veuillez
vous référer au manuel de l’utilisateur du véhicule ou contactez le
fabricant du véhicule pour obtenir de l’aide. NE PAS modifier votre
véhicule sans l’avis du fabricant du véhicule.
• Rangez la courroie Versa-Tether dans sa pochette à l’arrière du
siège pour enfant lorsqu’elle n’est pas utilisée. NE PAS installer le
siège pour enfant avec la courroie d’ancrage Versa-Tether attachée
à la prise d’accrochage.
L’emplacement des boulons d’ancrage varient d’un véhicule à l’autre.
Vérifiez le manuel de l’utilisateur du véhicule et cherchez le symbole du
boulon d’ancrage affiché sur le diagramme
pour vous aider à identifier les points
d’ancrage pour la courroie supérieure dans
votre véhicule. Britax recommande que
la courroie d’ancrage soit utilisée en tout
temps lorsque vous installez le siège pour
enfant. L’utilisation de la courroie augmente
la stabilité de votre siège pour enfant et
réduit le risque de blessure. Veuillez voir
les diagrammes à la page 95 pour les
configurations d’installations possibles avec
la courroie Versa-Tether en mode orienté vers
l’avant et vers l’arrière.
94
Page 97

Fonctions du siège pour enfant
OR
OR
OU
Orientation arrière Orientation arrière
OU
Orientation avant
Sangle d’attache pour la courroie d’ancrage en
mode orienté vers l’arrière
Puisque chaque modèle de véhicule
est différent, le point d’ancrage pour les
installations en mode orienté vers l’arrière peut
varier. Utilisez la sangle d’attache de la courroie
d’ancrage pour l’orientation arrière pour vous
aider à créer un point d’ancrage.
1 Trouvez un emplacement fixe dans le véhicule,
ancré au plancher.
* Si vous n’arrivez pas à créer un point d’ancrage, contactez le
fabricant du véhicule pour identifier un point d’ancrage pour la
courroie.
2 Acheminez la sangle au travers du point d’ancrage.
3 Faites passer l’anneau de métal en forme de « D » au travers de la
boucle au bout de la sangle.
4 Tirez sur l’anneau de métal en forme
de « D » jusqu’à ce que la sangle est
serrée.
5 Utilisez l’anneau en forme de « D »
en tant que point d’attache pour la
courroie d’ancrage.
NOTE: Rangez la sangle d’attache dans
la pochette de la courroie d’ancrage
lorsqu’elle n’est pas utilisée.
95
Page 98

Fonctions du siège pour enfant
b
a
IMPORTANT : La prise d’accrochage de la courroie
Versa-Tether® ne peut être utilisé que lorsque vous transportez
le siège pour enfant. Ne pas installer le siège pour enfant
avec la courroie d’ancrage Versa-Tether attachée à la prise
d’accrochage. Rangez l’excédant de courroie Versa-Tether
avec l’élastique lorsqu’elle est utilisée. Rangez la courroie
d’ancrage Versa-Tether dans la pochette de rangement
lorsqu’elle n’est pas utilisée. Toujours s’assurer que tout
excédant de courroie reste à l’intérieur du véhicule.
Pour attacher la courroie Versa-Tether à la prise d’accrochage
ou au boulon d’ancrage :
1 Appuyez fermement le crochet
sur la prise d’accrochage ou le
boulon d’ancrage.
NOTE : Lorsque vous l’utilisez en tant que sangle de transport, resserrez jusqu’à ce
que la sangle soit confortable pour le transport.
2 Tirez sur les extrémités de
sangles pour retirer le jeu dans la
courroie Versa-Tether.
Pour retirer la courroie Versa-Tether de la prise d’accrochage :
1 Desserrez la courroie Versa-Tether.
a Faites basculer le verrou vers le haut
b Tirez la courroie d’ancrage
96
2 Retirez la courroie Versa-Tether®
de la prise d’accrochage
Page 99

Fonctions du siège pour enfant
La courroie d’ancrage Versa-Tether peut indiquer lorsqu’un siège
pour enfant a subit un accident modéré ou grave (voir page 72) et
que le remplacement du siège pour enfant est nécéssaire.
L’illustration 1 affiche une courroie
d’ancrage acceptable pour une
utilisation continue (autant que le
siège pour enfant n’a pas subit
d’accident). La couture de couleur
reste intacte mais n’est pas visible
de l’arrière du siège.
Les illustrations 2 et 3 affichent des
exemples de courroies d’ancrage
endommagées et qui ne peuvent
être utilisées. Si une ou les deux
boucles est sortie de l’arrière de
la coque et/ou si la couture de
couleur est déchirée, le siège pour
enfant ne peut plus être utilisé.
IMPORTANT : Cessez d’utiliser
le siège pour enfant s’il a subit
un accident modéré ou grave,
même si les boucles n’ont pas
sorties de l’arrière de la coque et
que la couture en couleur n’a pas
déchirée.
1
2
3
97
Page 100

Installation en mode orienté vers l’arrière
Installation à l’aide du DUA
Avant de commencer :
• Vérifiez que votre véhicule possède des barres d’ancrage inférieures.
* Veuillez vous référer au manuel de l’utilisateur ou contacter le fabricant
du véhicule pour connaitre le poids maximal de leurs barres d’ancrage.
Utilisez les ceintures de sécurité (pas les attaches inférieures) pour les
installations avec un enfant dont le poids est supérieur à la limite de poids
des barres d’ancrage du véhicule. À moins qu’il le soit spécifié autrement
par le fabricant du véhicule, prennez compte que la limite de poids d’un
enfant pour les barres d’ancrage est de 18,1 kg (40 lb).
• Retirez les attaches inférieures des fentes de rangement dans la base.
Appuyez sur le bouton de relâchement de l’ajusteur et tirez la sangle jusqu’à
sa pleine longueur. Répétez pour la deuxième sangle.
• Ce siège pour enfant doit être incliné à la position 3 lorsqu’il est installé
orienté vers l’arrière.
* Lorsqu’il est installé correctement en position orienté vers l’arrière,
l’angle du dossier du siège pour enfant devrait être
incliné d’au moins à 30
enfants et jusqu’à 45
incapables de controller leur tête et leur cou (ne
pas excéder 45
surface à niveau. Utilisez la ligne bleu en tant que
guide pour obtenir le bon angle d’inclinaison pour
les installations orientées vers l’arrière. La ligne bleu
sera parallèle au sol lorsque l’inclinaison du siège
pour enfant est au centre de la zone d’angle (30
bon angle d’inclinaison peut être obtenu en plaçant une serviette roulée
ou une nouille de piscine dans la jonction dossier-coussin.
• Britax recommande que la courroie d’ancrage Versa-Tether soit utilisée en tout
temps. L’utilisation de la courroie augmente la stabilité du siège pour enfant
et réduit le risque de blessure. Vérifiez le manuel de l’utilisateur du véhicule
pour trouver les emplacements des boulons d’ancrage. Voir la page 92 pour
les configurations possibles de la courroie d’ancrage en mode orienté vers
l’arrière.
° de la verticale pour les
° de la verticale pour les bébés
°) quand la voiture est garé sur une
° – 45°). Si nécéssaire, le
98
 Loading...