

Brinno TLC 2000, TLC 2020 User manual

Time Lapse Camera
/
TLC 2000
TLC 2020
User Manual
Copyright © 2019 Brinno All Rights Reserved

Register your camera online to earn
an extra 6 months warranty!
Register Online and get
www.brinno.com/support/registration
Register your camera for a free 6 month warranty extension
and receive direct notifi cation of fi rmware updates.

CONTENTS
Before You Start
What's in the Box
Camera Parts
Initial Operation
Install batteries
Battery type
Install microSD card
USB-C Cable
Power On/Off
Check your camera fi rmware
Power saving mode
LED indicator
Set date & time
Start recording
8
10
13
14
15
16
17
18
19
20
21
22

CONTENTS
Stop recording
Menu change (option)
Quick menu mode operation
Display icons (quick menu mode)
1. Scene settings
Scene
2. Menu settings
Menu (quick menu mode)
3. Schedule settings
Schedule mode
Full menu mode operation
Display icons (full menu mode)
1. Capture mode settings
Capture modes
Start/Stop recording-Time Lapse & Step Video
23
24
26
27
28
30
31
33
35
37
38
39
40

CONTENTS
Start/Stop recording-Stop Motion
Start/Stop recording-Still
2. Menu settings
Menu (full menu mode)
3. Interval settings
42
44
45
46
49
Specifications
Battery Setting
Downloading and installing the latest firmware
Support
Tutorial Video
Time Lapse Calculator
Manual in multi-languages
51
52
53
56
57
58

Before You Start

WHAT'S IN THE BOX
USB-C Cable
A A
TLC2000
2 AA Batteries
Lens Cover
8
(TLC2000)
A A
Time Lapse Camera
TLC 2000/TLC 2020
User Manual
User Manual
Screwdriver
microSD
microSD Card
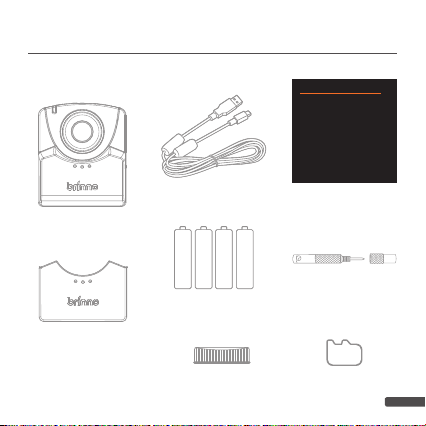
WHAT'S IN THE BOX
USB-C Cable
TLC2020
A A
A A
4 AA Batteries
Battery Cover Adapter
*To be used with the ATH2000
Construction Power Housing
Accessory.
Lens Cover
(TLC2020)
A A
A A
Time Lapse Camera
TLC 2000/TLC 2020
User Manual
User Manual
Screwdriver
microSD
microSD Card
9
9

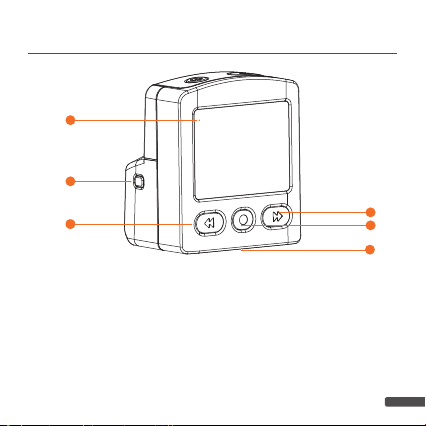
CAMERA PARTS
1
3
4
5
6
7
1. Power Button
2. Shutter/
Back to Preview Button
3. LED Status Indicator
4. Memory Card Door
5. microSD Card Slot
10
2
8
9
TLC2000 TLC2020
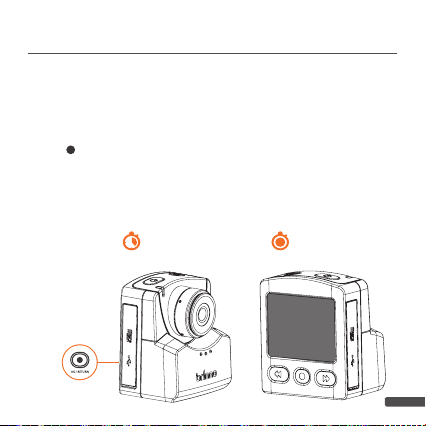
6. Camera Reset Button
7. USB-C Socket
Only can be used as an external power supplier &
data transfer, CANNOT be used to charge batteries.
8. Lens
9. Battery Door
CAMERA PARTS
10
11
12
13
14
15
10. LCD Screen
11. Circuit Indicator
12. Previous Button
13. OK Button
14. Next Button
15. Tripod Mount (size: ¼”)
11
11

Initial Operation
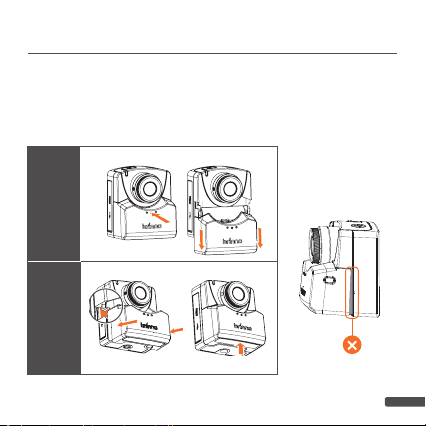
INSTALL BATTERIES
- Press the center of battery door to release the latch inside,
OPEN
and open battery door
- Along the track on the camera and push the center of the
CLOSE
bottom side of battery door to close.
OPEN
CLOSE
.
(TLC2020)
13
13
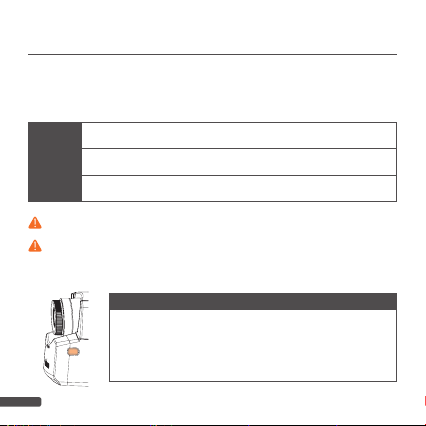
BATTERY TYPE
Battery type:
settings to optimize battery life. For information on how to change
battery type in settings please go to page 52.
Alkaline
NiMH
Lithium
We DO NOT RECOMMEND USING ZINC–CARBON BATTERIES.
Only replace all batteries at a time,
Swapping one used battery out for a fully charged one can cause the camera
to malfunction.
14
Please select the correct battery type in the menu
Default setting. The batteries that come with your camera will be Alkaline.
Most rechargeable batteries are NiMH type.
Energizer Lithium AA batteries.
DO NOT SWAP SINGLE BATTERIES
Circuit Indicator
Press the circuit indicator once to see if the batteries have been
installed correctly, if the button lights up green then you are
ready to start fi lming. If there is no light, you need to make an
adjustment to your battery placement.
.

INSTALL microSD CARD
Open the memory card door and insert microSD card.
Supports up to 128GB microSD card. For 64 or 128 GB microSD card, follow
instruction on the LCD screen to
format the card before using it the first time
TLC 2020
.
15
15

USB-C Socket
The USB-C Socket can only be used as an external power supplier
and data transfer point.
External Power Supplier
Plug your camera into an external
power outlet using the USB-C Cable.
If you are using an external power
supply, we recommend you still
install fully charged batteries as a
back-up.
Refrain from using a power bank or solar panel as external power supplier.
Batteries cannot be recharged while inside the camera. When
batteries are low on energy please remove and replace/recharge
them.
Data Transfer
Plugging your camera into a computer can only be used for data
transfer. Your computer will NOT allow you to record while it is
plugged in and will only allow you to view and download previously
recorded footage.
16
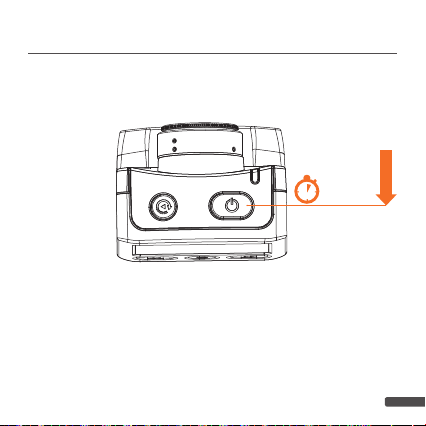
POWER ON/OFF
Open the memory card door and insert microSD card.
Power On
3 secs
1. Power on: hold “
2. Power off: hold “
Power Button
Power Button
” for 3 secs.
” for 3 secs.
17
17
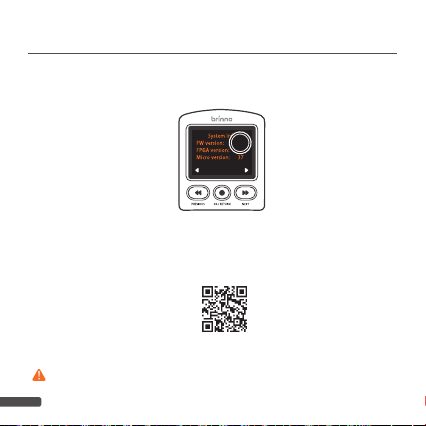
CHECK YOUR CAMERA FIRMWARE
1.
Go to SYSTEM INFO (
your time lapse firmware is the latest version.
You can find and download the latest firmware version on the
2.
Firmware Download Site :
www.brinno.com/support/download#TLC2000series
If your Time Lapse Camera is not the latest firmware, refer to the
to learn details about
18
MENU > MORE > System Info
xxx
EXIT
downloading and installing the latest firmware
) check
page 53
.
POWER SAVING MODE
When the camera is turned on but not recording:
Sleep Mode
The camera goes into sleep mode to save power after 25 seconds
without activity. The LED indicator turns solid
Press “ ” button to wake up the camera.
Power off
The camera shuts down after 60 seconds without activity.
Green
.
After 25 Secs
After 60 Secs
19
19
 Loading...