

Page 1
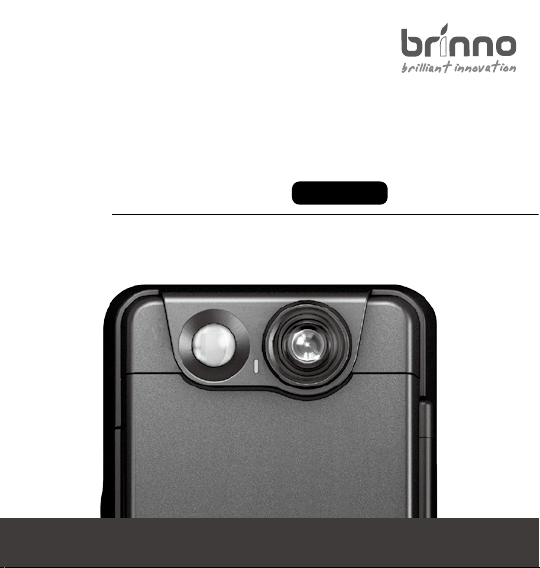
Motion Activated
Camera
User Manual
MAC200 DN
www.brinno.com
1
Page 2

Page 3
Register@online
http://www.brinno.com/support/register.html
contact us: [email protected]
more information: www.brinno.com
Page 4
WEL COME
TO
THE
BRINNO
FA MI LY !
Follow Brinno to receive the
latest product news
facebook.com/BrinnoInc
Page 5

Thank you for purchasing this
Brinno Motion Activated Camera!
The Brinno Motion Activated Camera (MAC200 DN) is
a battery powered, motion activated security camera.
Forget the power cord, Ethernet line or DVR system, it is
your 100% DIY, 100% Wire-free, 100% portable security
anywhere anytime camera. Brinno’s new Hybrid Mode®
provides 10 X’s the Outlook Range over comparable
motion activated cameras.
The dual functionality of a fixed capture interval + Motion
Activation provides you with an unprecedented portable
level of protection. Brinno’s exceptional power saving
technology, provides super long lasting standby time,
combined with our “Rapid Wake Up” functionality, means
you will never miss a shot!
Page 6

Contents
Motion Activated Camera Features
Parts of the Camera
Display Icons
LED indicator
Installation
Initial Set Up
Capture Mode
Motion Activated Mode
Time Lapse Mode
Hybrid Mode
Start Recording
Motion Activated Mode
Time Lapse Mode & Hybrid Mode
To Stop Recording
Basic Installation
01
03
05
07
08
09
12
14
15
17
18
19
20
Page 7

MENU Setting
SD card capacity
Capture Mode
Overwrite
Timer
Playback Rate
Image Quality
Time Stamp
LED Display
Band Filter
Night Vision Mode
Set Latitude
Set Date and Time
FW version
Reset
Default Setting
What Size SD Card Should I Use
Battery Life
Specification
24
25
26
27
30
31
33
34
35
36
37
39
40
41
42
43
44
45
Page 8
Motion Activated Camera Features
14 Months Battery Life
The Brinno MAC200 DN needs only 2D batteries for up to fourteen
months of power. No need for external power = truly portable.
Dual Protection
Brinno’ new Hybrid Mode® provides the dual functionality of a fixed
2x2x
capture interval + flexible Motion Activation, providing you with an
unprecedented level of portable protection.
10x Outlook Range
Motion Activation Mode provides coverage up to 6 meters.
Time Lapse Mode provides over 100 meters of coverage. Images
captured at a Fixed Capture Rate in the Time Lapse mode cover over
10 times the area of a standard Motion Activated Camera.
< 1 Sec. Rapid Wake Up
All Brinno products have excellent power saving technology,
providing super long standby time. Combined with our “Rapid
Wake Up” technology, Brinno ensures you will never miss a shot!
MAC200 DN
01
Page 9
Instant Video/ Fast Playback
The Brinno MAC200 DN captures and converts thousands of photos
into a Time Lapse video inside the camera. Review your daily activity
with the push of a button.
100% DIY
The Brinno MAC200 DN is a battery powered, motion activated
security camera. Forget the power cord, Ethernet line or DVR
system, it is your 100% DIY, 100% Wire-free, 100% portable security,
anywhere, anytime.
Output le format
Fast Playback Time Lapse Video, AVI format, resolution is 720P (1280x720).
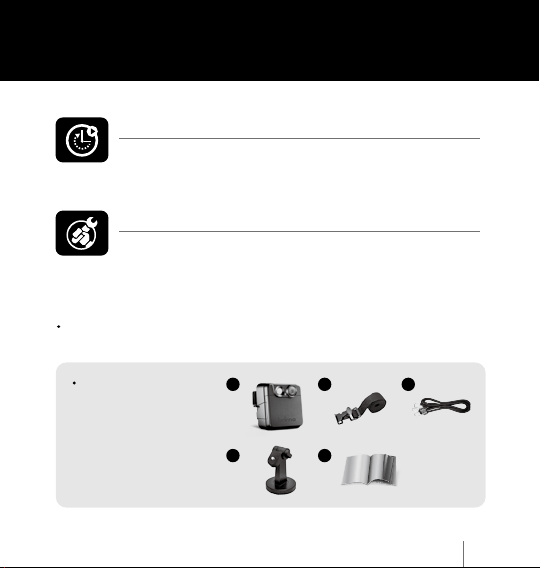
Package Contents
1. Motion Activated
Camera x 1
2. Tree strap x 1
3. Rubber strap x 1
4. Wall Mount x 1
5. User Manual x 1
1
4
2
5
3
MAC200 DN
02
Page 10
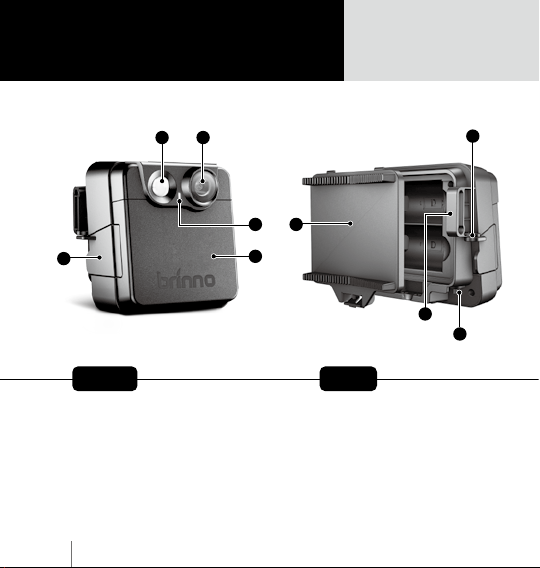
Parts of the Camera
2
316
4
5
Front Back
1. Lens
2. Motion Sensor
3. LED Indicator
4. Operation Control Zone Latch
5. Operation Control Zone Cover
MAC200 DN
03
8
7
9
6. Battery Cover
7. Tree Strap Hole
8. Locking Hole
9. External Power Port
(DC IN 5V)
Page 11
12
10
11
1314 15
16
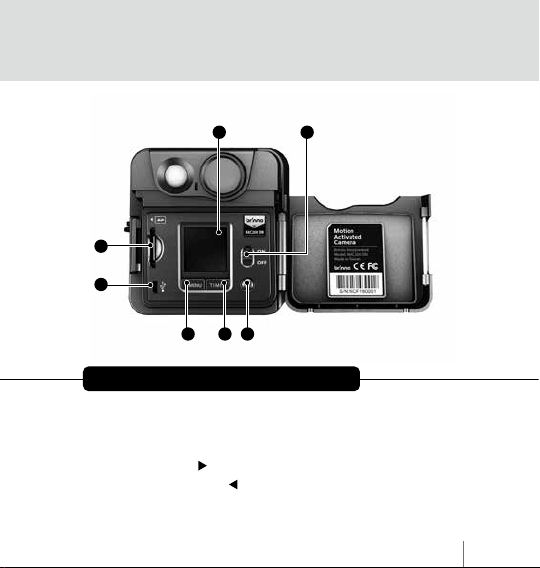
Inside Operation Control Zone
10. SD Card Slot
11. Micro USB port
12. LCD Panel
13. TIME / Next ( ) button
14. MENU / Previous ( ) button
15. OK button
16. Power Switch
MAC200 DN
04
Page 12
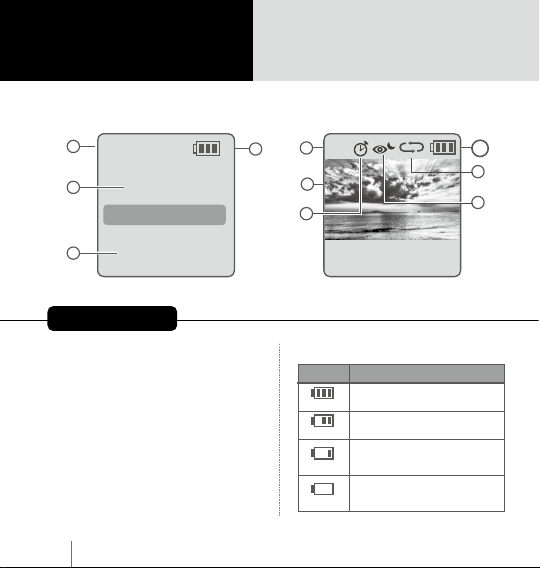
Display Icons
Set Up screen Preview Screen
1
T.Lapse
2
20 Sec
OK
2013/03/01
3
At Set Up screen
1. Capture mode :
•
•
•
2. Capture Interval/ Capture Rate
Displayed in Time Lapse Mode/
Hybrid Mode
3. System date and time
05
22:58:32
Motion mode
Time Lapse
Hybrid
MAC200 DN
4
:
5
M
6
7
READY
4. Battery level
Icon
Battery full charged.
(green)
Battery partially charged.
(green)
Low battery-Replace as
soon as possible.
(yellow)
Out of battery-Replace
battery immediately.
(red)
10
9
8
Description
Page 13
11
12
BATTERY
EMPTY
13 14
SD
ERROR
SD
FULL
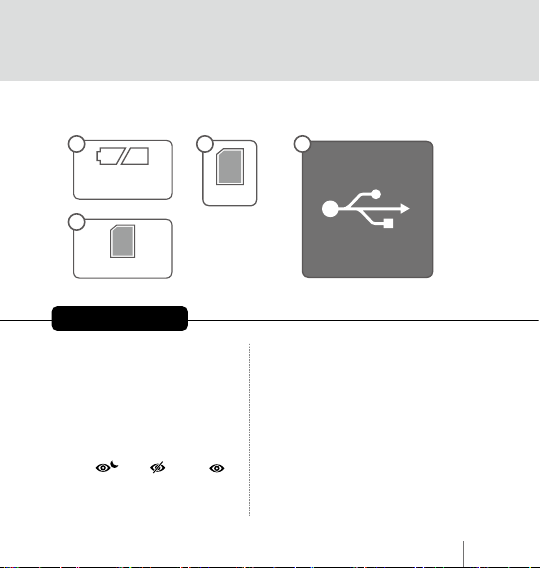
At Preview screen
5. Capture Mode :
• M (Motion mode)
• T (Time Lapse mode)
• H (Hybrid mode)
6. Preview Screen
7. Timer
8. Night Vision Mode
(ON /OFF /AUTO )
9. Overwrite
10. Battery Level
11. Battery Empty
Please replace battery immediately.
12. SD Card Full
Please download files to clear
SD card space.
13. SD Card Error
Please replace SD card.
A
14. Connected to computer via micro
USB camera.
MAC200 DN
06
Page 14
LED indicator
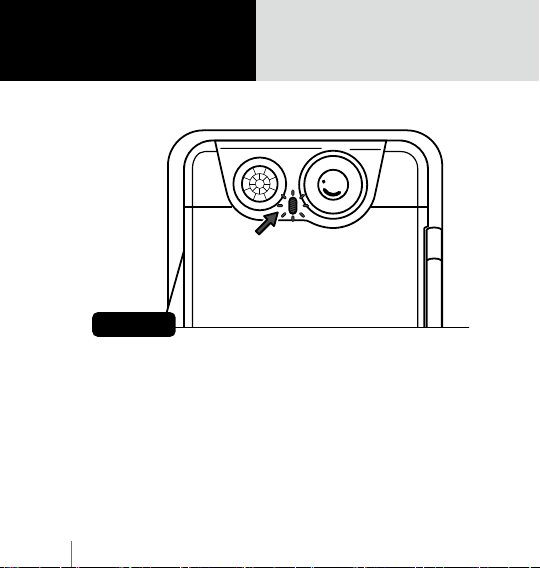
LED color
Green light :
•
Indicates image capture in process.
Red light :
•
Low battery.
•
Low recording memory on your SD card.
Orange light :
•
PIR sensor is warming up.
MAC200 DN
07
Page 15

Installation
MAC200 DN
08
Page 16
Initial Set Up
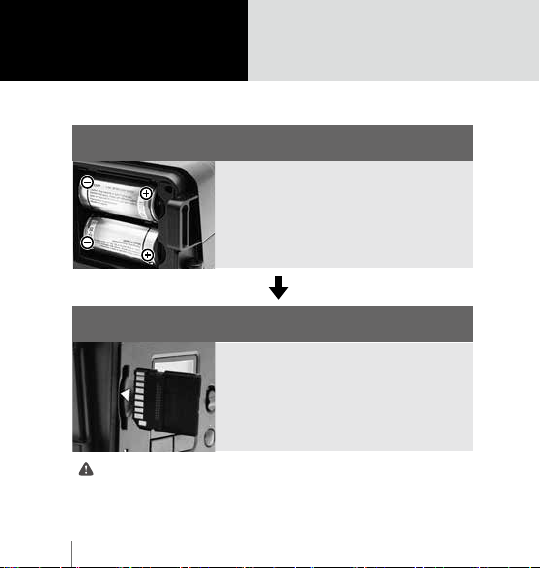
Initial Step-1
Installing the Batteries
Open battery door, insert 2 D
batteries and close battery door.
Initial Step-2
Installing SD Card
Insert the SD card.
We support up to 32GB SD cards. And we recommend you use
the maximum SD card to save your les.
MAC200 DN
09
Page 17
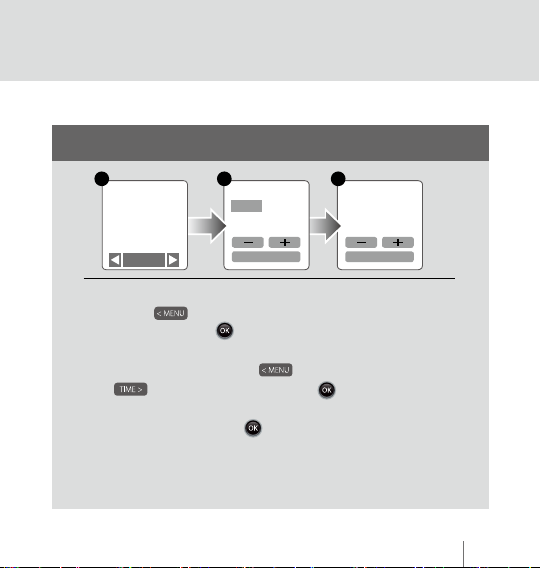
Initial Step-3
1
MENU 12/14
Set Date
& Time
OK
2
Date & Time
2014/08/11
ST 23:59:35
OK : NEXT
1. To turn on the camera as a Motion Activated Camera,
press to go to MENU setting, select Set Date &
Time, and press .
2. The number with the red background is the number
you are setting. Press for a lower number or
for a higher number. Press : Next to conrm
and go to the next number.
3. When nished press to exit and return to the Set
Up Screen.
4. S T: Standard Time
DT: Daylight Saving Time
3
Date & Time
720P
2014/08/11
ST 23:59:35
OK
MAC200 DN
10
Page 18
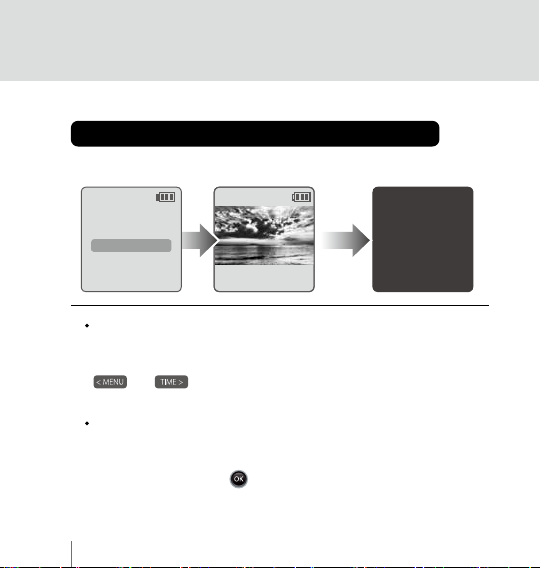
How Our Power Saving Technology Works
At Set Up Screen At Preview Screen
Motion
2
Sec
OK
2011/ 06/ 30
23:56:39
Ready
At Set Up Screen
After 10 seconds without activity on the set up screen, the
camera will go to preview screen automatically. You can press
or to go back to the set up screen.
At Preview Screen
After 60 seconds without activity on the set up or preview
screens, the LCD screen will turn off automatically to save
power. You can press to wake up.
MAC200 DN
11
60
sec
Page 19
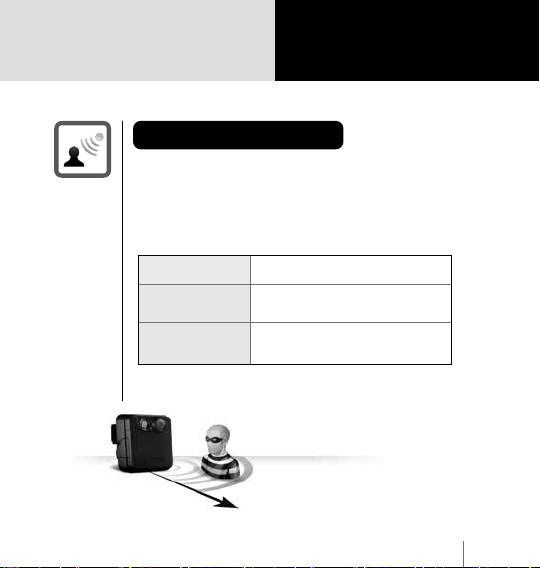
Motion Activated
Mode
Motion Activated Mode
Images captured by Motion Activation are in what
we consider the Hot Zone meaning close to the
device. Motion Activation captures direct threats
up close.
Capture Rate Captures 2-3 frames per second.
Clip Length
Motion Sensor
Detecting Area
Capture Mode
Once activated captures for
5 seconds.
Detecting Angle: 100°
Detecting Distance: 6M
6m ( 20 ft )
MAC200 DN
12
Page 20

Capture Mode
Motion Sensor Activated
Capture for 5 seconds
Motion Sensor Activated
Capture for 5 seconds
Motion Sensor Activated
Capture for 5 seconds
Motion Activated
Mode
No Activities,
capture nished.
Once activated the Motion Activated Camera will
capture for 5 seconds,
Sensor is activated again, it will extend the capture time for
5 more seconds. When the motion ceases and the Motion
Activated Camera nishes capturing, all the frames will be
stored into one AVI le.
MAC200 DN
13
during this period if the Motion
Page 21
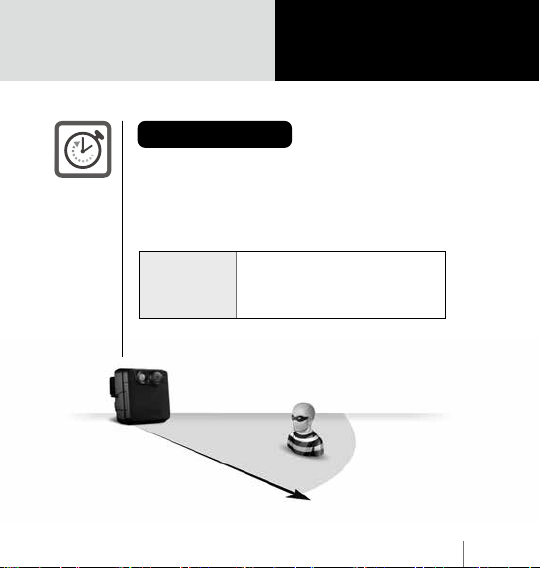
Time Lapse
Mode
Capture Mode
Time Lapse Mode
Images captured at a Fixed Capture Rate are
captured in the Time Lapse mode and cover a
range over 100 meters deep in the capture area.
Capture Rate
Captures 1 frame per second~24
hours ( How to set the Capture
Interval? please refer to page 18)
> 100m ( 3 20 f t )
MAC200 DN
14
Page 22
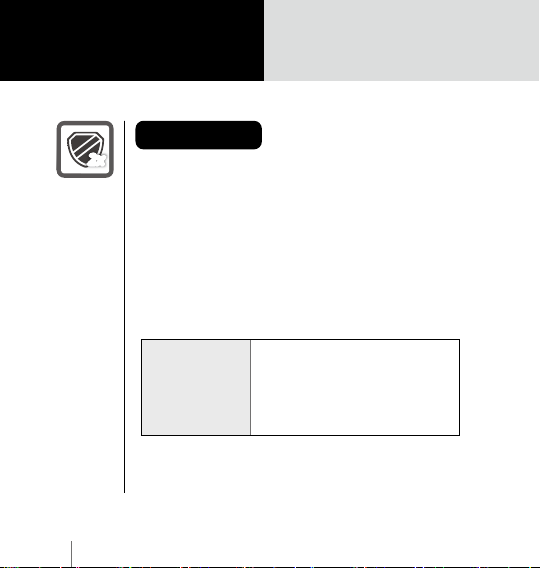
Capture Mode
Hybrid Mode
2x2x
Brinno Hybrid Mode combines Fixed Capture Rate
and Flexible Motion Detection. They provide Dual
Protection in the Hot Zone. In standby mode the
camera works in Time Lapse Mode, and the camera
will capture images at your desired Capture Rate
(2 second~24 hours.) When motion is detected
the camera will switch to Motion Mode and capture 2~3
frames per second.
You will never miss a shot !
Capture Rate
MAC200 DN
15
Hybrid Mode
Time Lapse mode, 1 frame per
2 second~24 hours.
Motion mode, capture 2-3
frames in one second.
Page 23
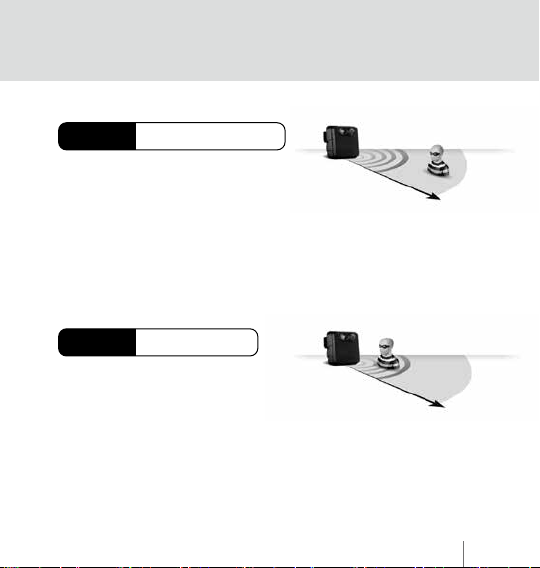
Hybrid Time Lapse Mode
Normally, the Motion Activated
Camera is operating in the Time Lapse
mode. It features an extended-time
and wide angle recording area. The
Playback Rate (the lm frequency) is
custom and based on your setting.
(E.g. 1 minute captures 1 photo.)
Hybrid Motion Mode
When any movement is detected in
the Detecting Zone (Detect angle
= 100°/ Detect distance = 6 M), the
Motion Activated Camera will shift to
the Motion Mode, and captures 2-3
photos per second. At this range it
will record the target in greater detail.
MAC200 DN
16
Page 24
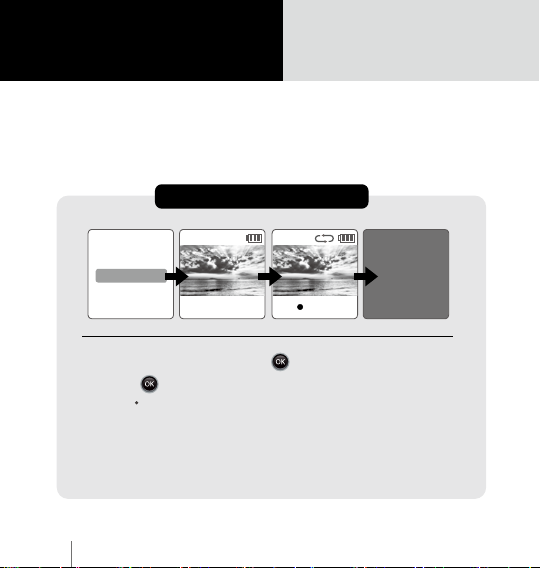
Start Recording
Before starting recording, please select your capture mode :
Motion Mode / Time Lapse / Hybrid Mode.
Motion Activated Mode
Motion
OK
2011/ 06/ 30
23:56:39
1. At the set up screen, press to go to preview screen.
2. Press again to start recording. The LCD will display
the “ REC ” icon.
3. After 5 seconds without any activity, the LCD screen will
turn o to save power.
MAC200 DN
17
Ready
REC
Page 25
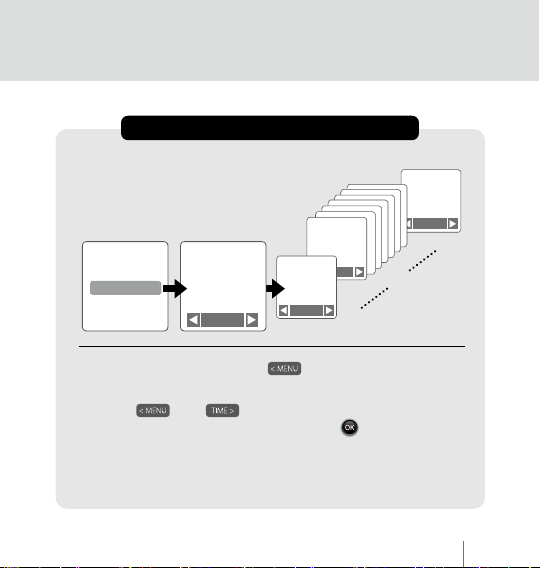
Time Lapse Mode & Hybrid Mode
Time
Custom
Time
T.Lapse
3 Sec
OK
2011/ 06/ 30
23:56:39
Time
ASAP
OK
Time
ASAP
1 Sec
OK
OK
1. At the set up screen, press to set a capture interval
(capture rate).
2. Press and to select a pre-set capture interval
or customize it. When complete, press to conrm and
return to the set up screen.
1 Sec
....
OK
24 hours
MAC200 DN
18
Page 26
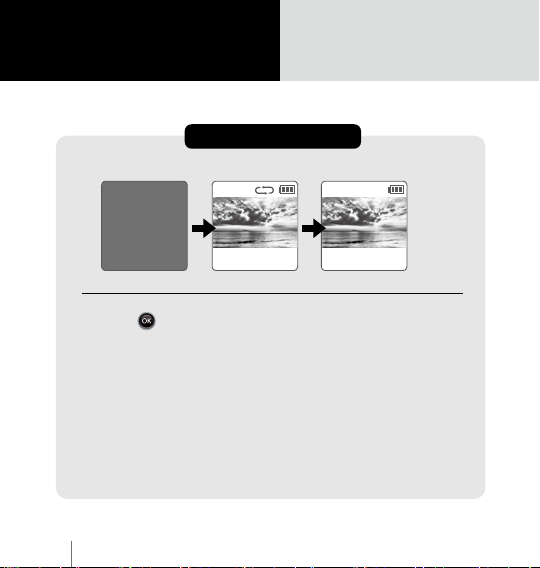
Stop Recording
To Stop Recording
Processing...
1. Hold until the LCD screen turns on.
2. The LCD screen will show the “Processing” icon. The
Motion Activated Camera is saving your data. Please
wait until the icon disappears.
3. Once complete, the LCD panel will return to the
preview screen.
MAC200 DN
19
Ready
Page 27
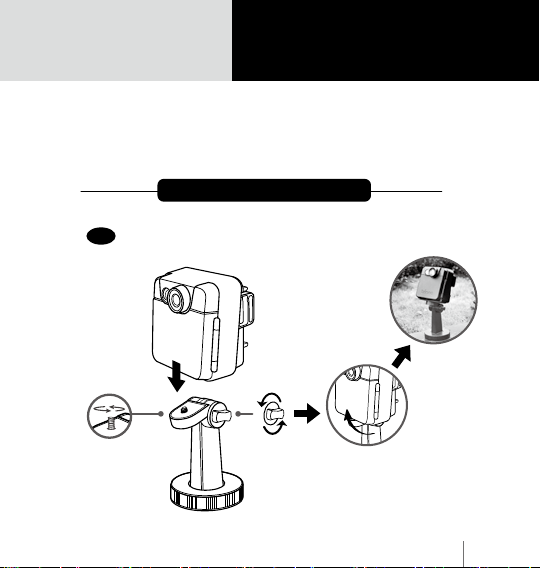
Basic Installation
Mount it anywhere, no power required so anywhere
really means anywhere.
3 ways to mount the camera
A-1
Wall Mount
MAC200 DN
20
Page 28
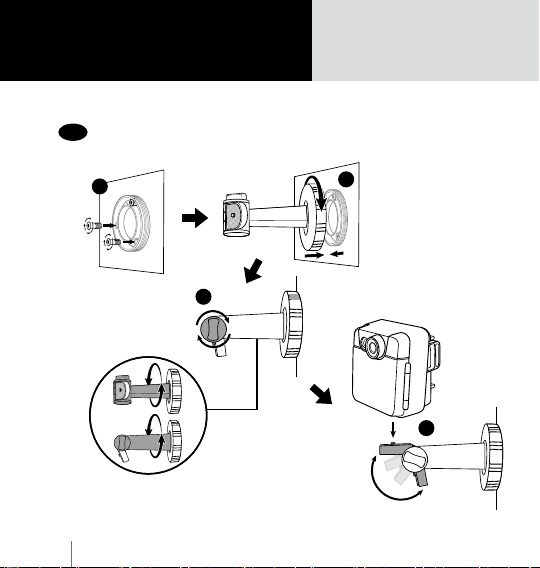
Basic Installation
A-2
Wall Mount
21
1
MAC200 DN
2
3
4
Page 29
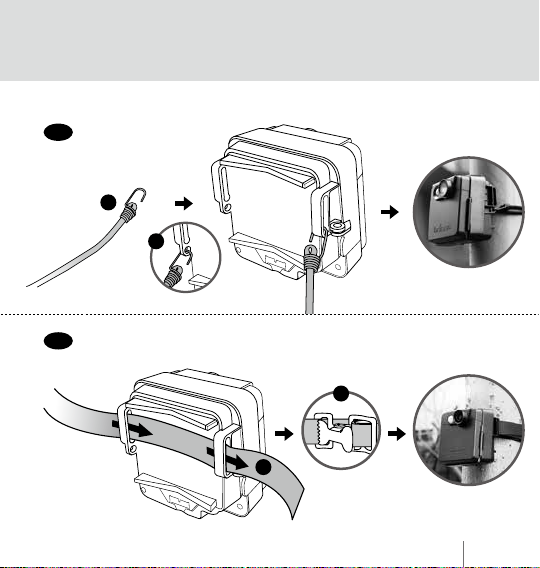
B
Rubber Strap
1
C
Tree strap
2
2
1
MAC200 DN
22
Page 30
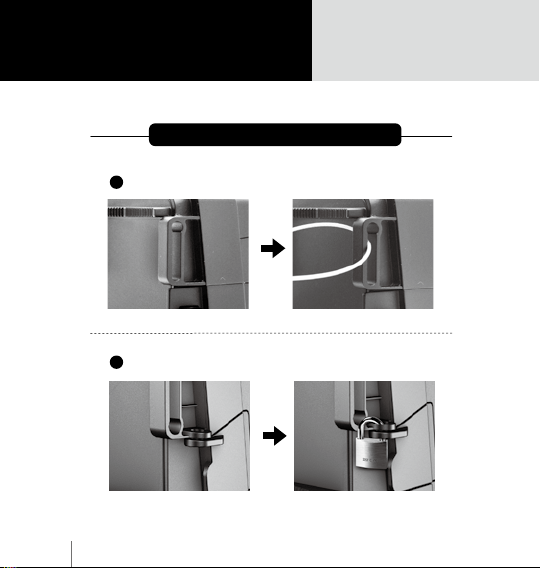
Basic Installation
2 ways to secure the camera safety
1
Security Lock Cable
2
Camera Body Lock
MAC200 DN
23
Page 31
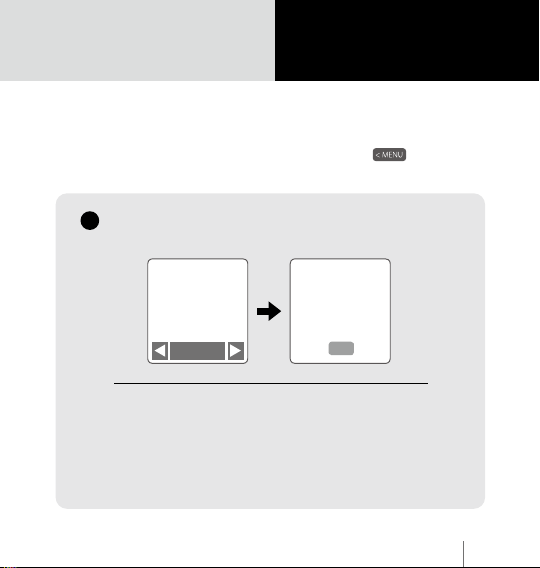
SD card capacity
MENU Setting
Go to the MENU setting
Power on the Motion Activated Camera, press to
go to the MENU setting.
1
SD card capacity
Menu 1/14
Size
=
SD card
capacity
OK
In this mode, the LCD will display the SD card
capacity, telling you how much free space
remains on the SD card.
Used
Free
OK
4GB
=
27%
=
73%
MAC200 DN
24
Page 32
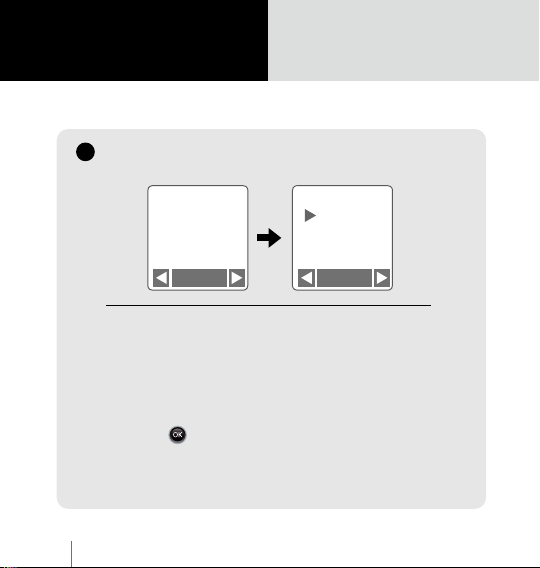
MENU Setting
2
Capture Mode
Capture Mode
25
Menu
2/14
Cap Mode
Capture
Mode
OK OK
You select your capture mode with this function.
1. Select between :
Motion = Motion Activated mode.
T. Lapse = Time Lapse mode.
Hybrid = Hybrid mode.
2. Press to conrm.
MAC200 DN
Motion
T.Lapse
Hybrid
Page 33
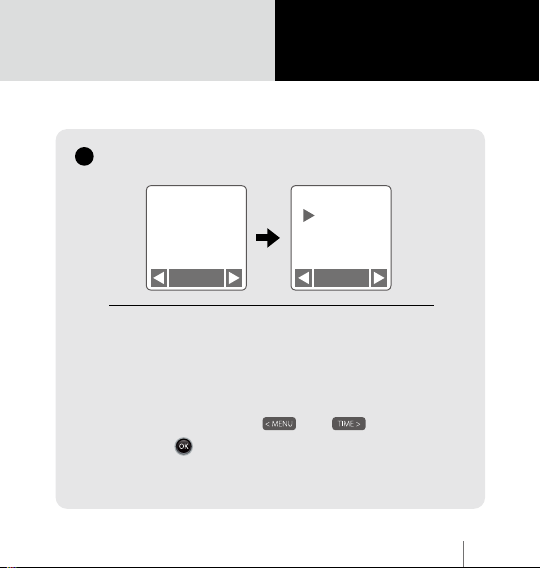
3
Overwrite
Overwrite
MENU Setting
Menu
Overwrite
When the SD card free space is less than 1%,
the Overwrite function will remove old les to
ensure SD card has more than 1% free space.
If you do not want the SD Card to be over
written, and les deleted, select O.
1. Select On or O by and .
2. Press to conrm.
3/14
Overwrite
Mode
OK OK
On
O
MAC200 DN
26
Page 34
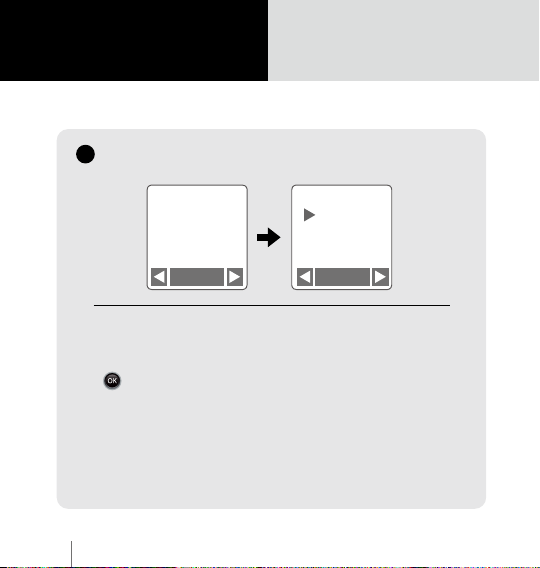
MENU Setting
4
Timer
Timer
Menu
4/14
Timer
0000-0000
Timer
OK OK
This function is used in Time Lapse mode and Hybrid
mode. The Timer will allow you to pre-set a recording
period. (E.g. 8 am–5 pm) Select 0000-0000 and select
to go to the timer setting menu.
Don't want to set a daily recording time frame, select
Cancel to cancel the setting.
MAC200 DN
27
Exit
Cancel
Page 35
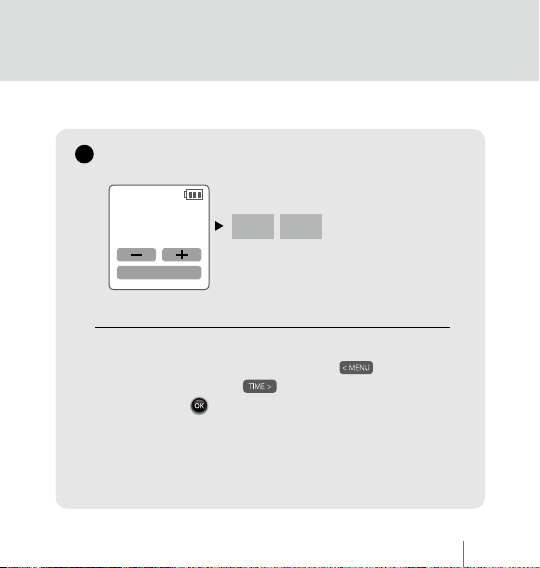
4
Timer
Timer
0000-0000
OK : NEXT
A B
0000-0000
e.g.
0600-1600 morning to afternoon
1600-2330 afternoon to night
2345-0500 overnight
1. Set the start recording time (A area), then set the
stop recording time (B area). Press to lower
the number, press to increase the number
and press to move to the next column.
MAC200 DN
28
Page 36
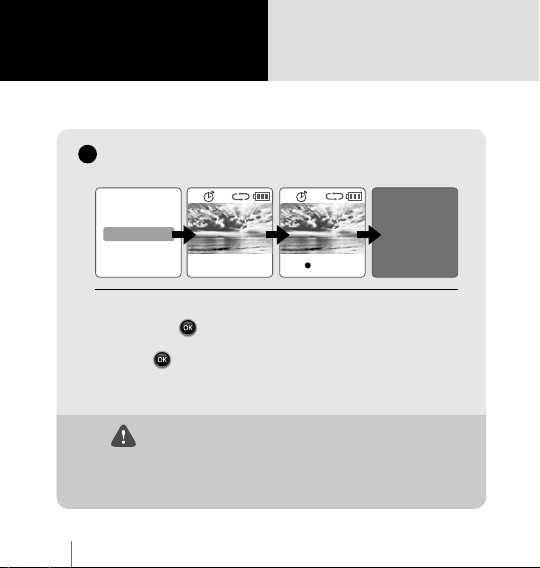
MENU Setting
4
Timer
Timer
M M
Timer
3 Sec
OK
2011/ 06/ 30
23:56:39
2. After setting the times, return to the set up screen
and press to move to the preview screen.
3. Press to start recording. The camera will
automatically activate at the start recording time
you selected.
Once you have activated the Timer, all functions,
like Motion Activated mode, Time Lapse mode
and Hybrid mode, will only work during the time
period selected.
MAC200 DN
29
Ready
REC
sec
5
Page 37
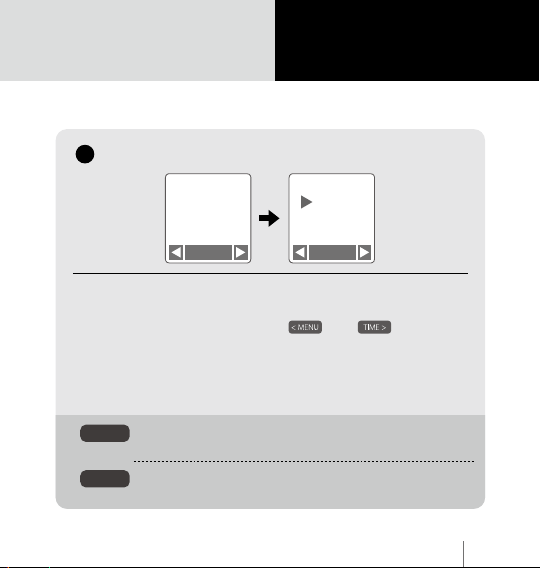
Playback Rate
Playback Rate
5
Menu 5/14
Playback
Rate
OK OK
You can select the videos FPS (frames per second) playback
speed with this setting.
1. Select a FPS number using the and .
2. What Playback Rate should I use?
Generally, 10 FPS is suitable for Time Lapse video, but
depending on your needs you can set it to anywhere
between 1 - 30 FPS.
If the video plays at 1 frame per second, the video will
1 FPS
not look smooth, and the video length will be longer.
If the video plays at 30 frames per second, the video will
30 FPS
look smooth, and the video length will be shorter.
MENU Setting
Frame Rate
1 FPS
5 FPS
10 FPS
MAC200 DN
30
Page 38
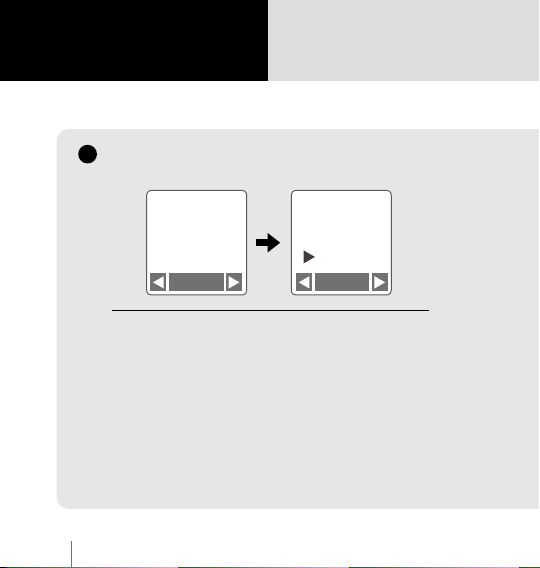
MENU Setting
Image Quality
6
Image Quality
31
Menu 6/14
Image
Quality
OK OK
The image quality setting lets you choose a
image quality to fit your needs. The image
quality setting will determine the number of
frames that can be stored on the SD Card : The
higher the quality the fewer images you can
store on your SD Card.
MAC200 DN
Quality
Best
Better
Good
Page 39
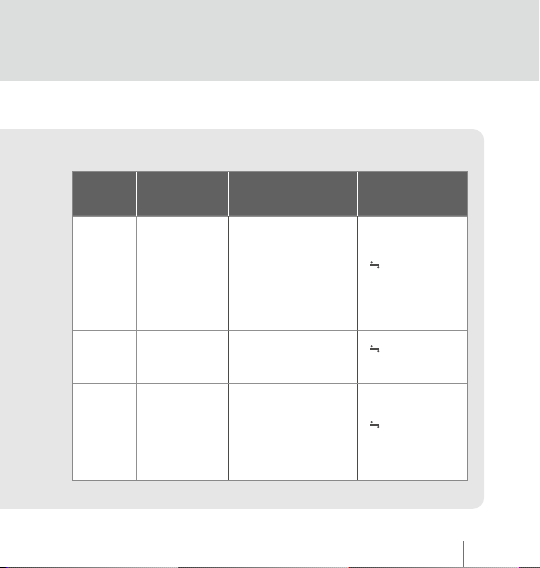
Single frame
Option
size
Best 200~400 KB
Description
Low compression
rate produces the
maximum image
data for the highest
quality images
4GB capacity
SD card
14,000
photos
Better 150~300 KB General usage
High compression
rate produce less
70~150
KB
Good
image data, best
for long capture
periods
20,000
photos
30,000
photos
MAC200 DN
32
Page 40
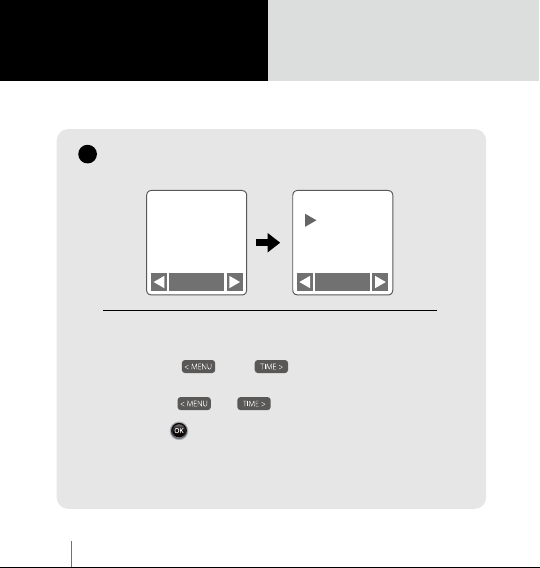
MENU Setting
Time Stamp
7
Time Stamp
33
Menu 7/14
Time
Stamp
OK OK
You can choose if you want the time stamp to
show at bottom of your video. Select On or O
using the and buttons.
1. Select or .
2. Press to conrm.
MAC200 DN
Time Stamp
On
O
Page 41
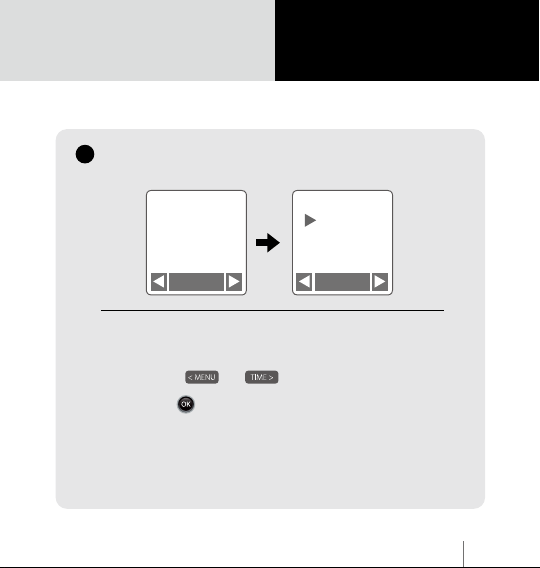
LED Display
8
LED Display
MENU Setting
Menu 8/14
LED
Display
OK OK
You can choose whether or not the LED will ash
while capturing each frame.
1. Select or .
2. Press to conrm.
LED Display
On
O
MAC200 DN
34
Page 42
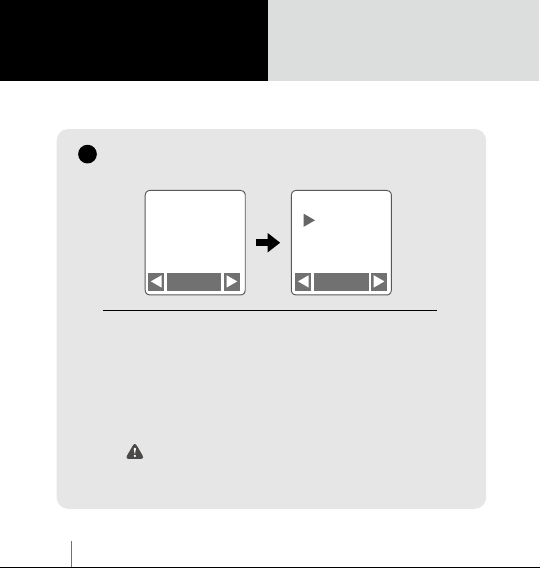
MENU Setting
9
Band Filter
Band Filter
35
Menu 9/14
Flicker Set
Band
Filter
OK OK
Select the correct uorescent lighting frequency to
match your indoor lighting frequency.
1. Select between : None, 50 Hz and 60 Hz options.
2. None : For outdoor enviroments
50 Hz : Europe
60 Hz : USA
We suggest you use None when the scene
is outdoors.
MAC200 DN
None
50 Hz
60 Hz
Page 43
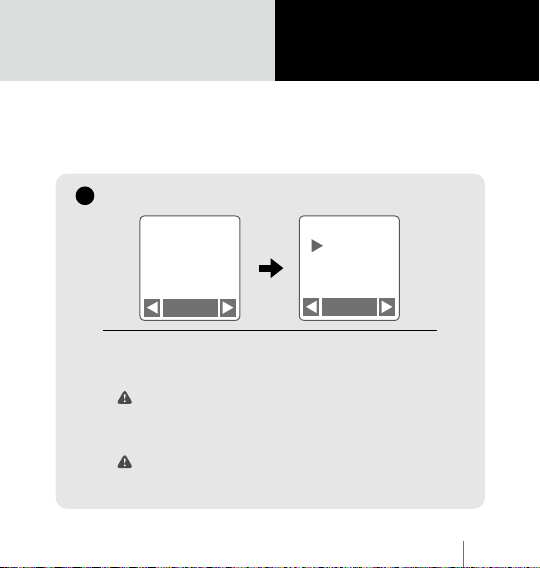
Night Vision Mode
The MAC200 DN is designed to operate in daytime and nighttime
environments. The color quality is improved dramatically in daytime and
with the addition of the Brinno Night view LED accessory, you will be able
to capture events 24’s a day.
10
Night Vision Mode
Menu 10/14
NightVision
Mode
OK
Night vision allows you to use the optional Brinno Night
Vision LED Light to capture images in low light environments.
On: For Night/ Low Light environment use.
IMAGE COLOR MAY VARY SLIGHTLY IN DAYLIGHT.
O: For Daylight use.
Auto: Camera will automatically turn off night vision
at sunrise, automatically turn on night vision at sunset.
LOCATION LATITUDE SETTING REQUIRED, PLEASE
REFER TO PAGE 38 SET LATITUDE.
MENU Setting
NightVision
On
O
Auto
OK
MAC200 DN
36
Page 44
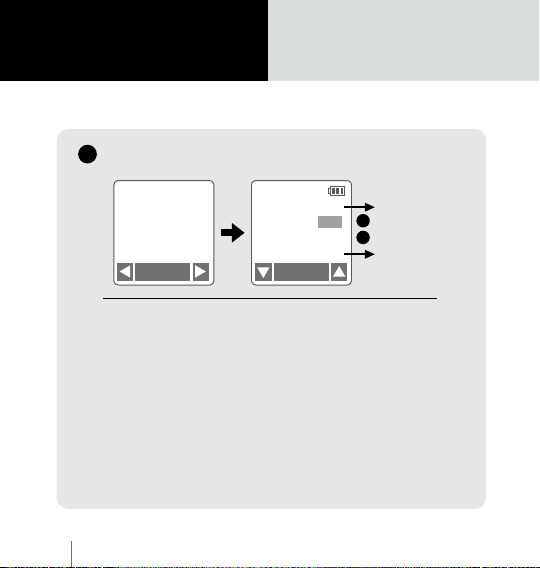
MENU Setting
11
Set Latitude
Set Latitude
37
Menu 11/14
Set
Latitude
OK OK
When you set the Night Vision Mode to AUTO, please
set correct the location latitude, so your camera will
automatically turn night vision on/ o.
1. Select your locations latitude
(TO FIND OUT YOUR LOCATION LATITUDE, PLEASE
REFER TO PAGE 38)
2. If the Sunrise & Sunset time is not correct, you can
change adjust to select a more close time.
(HOW TO KNOW SET CORRECT SUNRISE & SUNSET
TIMES ? PLEASE REFER TO PAGE 38)
MAC200 DN
Latitude
R 05:47:18
Latitude 16N
Adjust 2
S 18:23:48
Sunrise time
1
2
Sunset time
Page 45
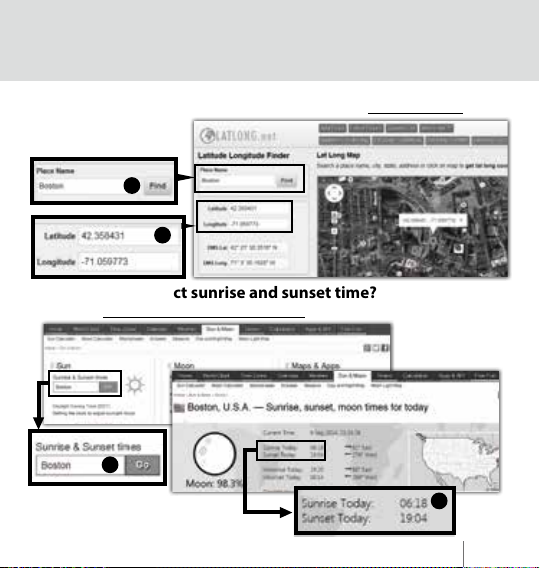
How to nd your location latitude?
1. Type in your location
2. Get your latitude
Please go to: www.latlong.net
1
2
To know your correct sunrise and sunset time?
Please go to: www.timeanddate.com/astronomy
1
1. Type in your location
2. Get the sunrise and sunset time
2
MAC200 DN
38
Page 46
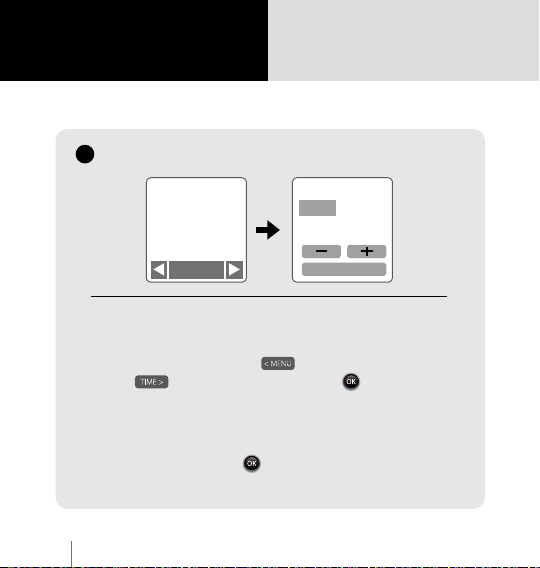
MENU Setting
12
Set Date and Time
Menu
Set the correct date and time for your cameras location.
1. The number with the red background is the number
you are setting. Press - ( ) for a lower number or
+ ( ) for a higher number. Press : Next to
conrm and go to the next number.
ST: Standard time
DT: Daylight Saving time
2. When nished press to exit and return to the set
up screen.
MAC200 DN
39
12/14
Set Date
& Time
OK
Set Date and Time
Date & Time
2014/08/11
ST 23:59:35
OK : NEXT
Page 47
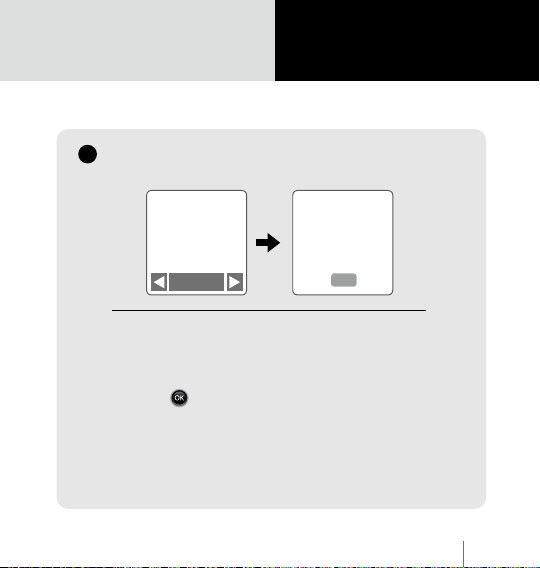
13
FW version
FW version
MENU Setting
Menu 13/14
Firmware
Version
OK
Displays the current version of rmware installed
on the camera.
1. Displays the current version of rmware.
2. Press to exit.
Firmware
X.XX.X
OK
MAC200 DN
40
Page 48
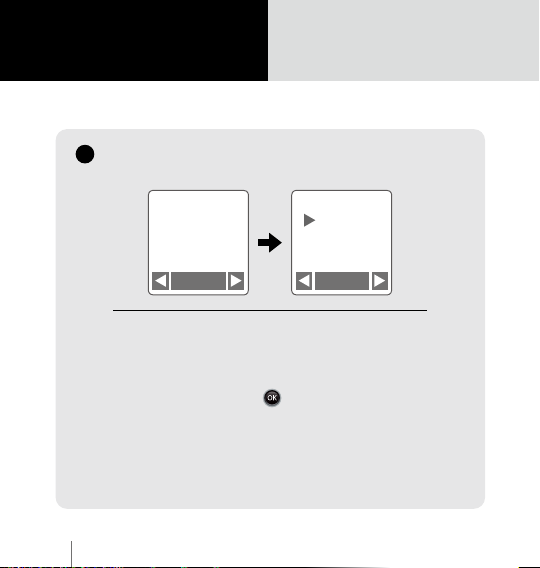
MENU Setting
14
Reset
Reset
41
Menu 14/14
Reset
Reset
OK OK
You can reset your camera back to the factory
default settings.
1.
Select Reset.
2. Select Yes and press to reset your camera.
MAC200 DN
No
Yes
Page 49
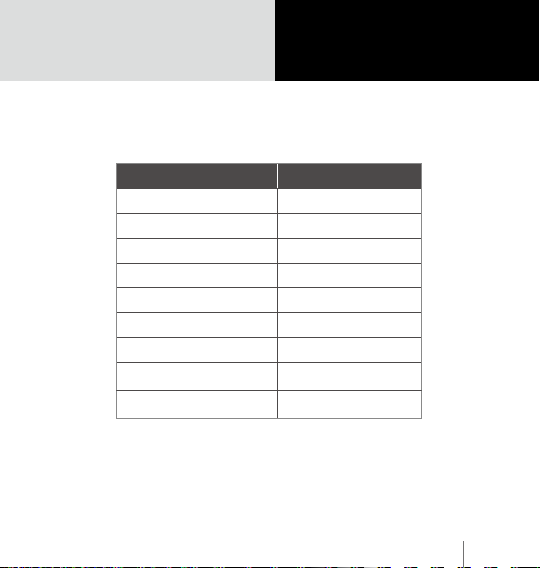
Default setting
Function Setting
Capture Mode Motion Mode
Overwrite On
Timer O
Playback Rate 20 FPS
Image Quality Good
Time Stamp On
LED Display On
Band Filter None
NightVision O
MENU Setting
MAC200 DN
42
Page 50
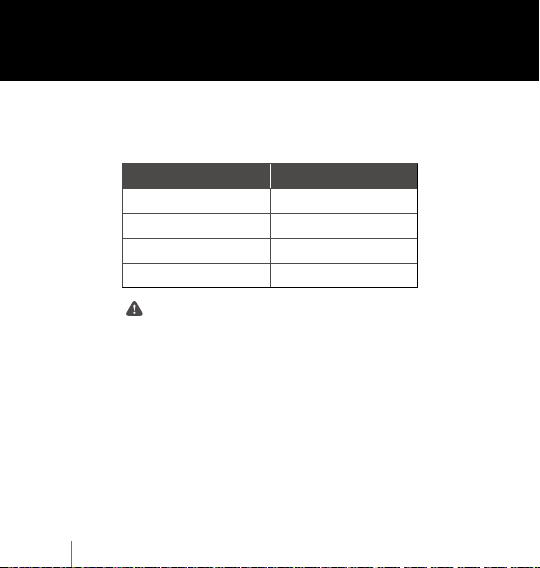
What Size SD Card Should I Use
SD card size Frame
4 GB SD Card 30,000
8 GB SD Card 60,000
16 GB SD Card 120,000
32 GB SD Card 240,000
Base on image quality setting of “Good”
MAC200 DN
43
Page 51
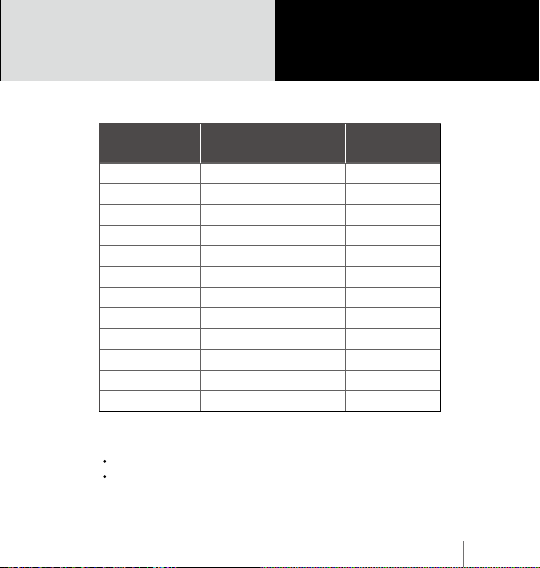
Battery Life
Capture
interval
ASAP 1,845,000 7
1 sec 1,537,500 18
2 sec 1,476,000 34
5 sec 1,317,800 76
10 sec 1,118,000 129
30 sec 696,200 242
1 min 444,570 309
5 min 114,240 397
10 min 59,230 411
1 H 10,185 424
4 H 2,558 426
24 H 427 427
Frames captured to
low battery
Days
Motion mode & Hybrid mode
Stand by time: 427 days
Frames captured to low battery: 1,845,000 frames
MAC200 DN
44
Page 52
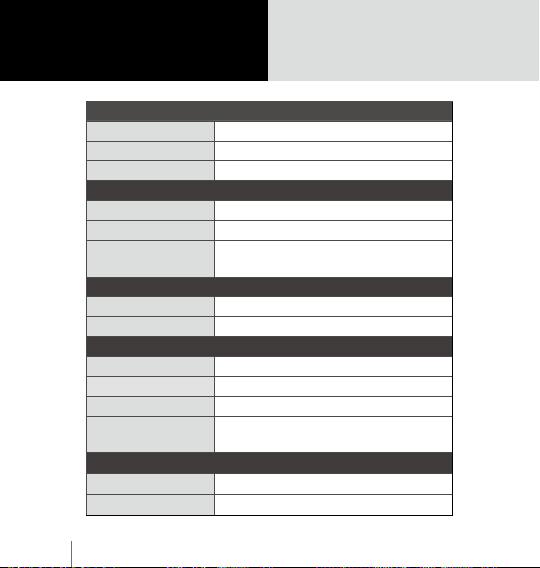
Specification
Model MAC200 DN
LCD Screen 1.44” TFT LCD
Waterproof IPX4
Motion Activated PIR motion detection
Time Lapse Fixed Capture Rate
Hybrid
Detect distance 6M
Detect Angle 100°
Type 1/4” CMOS sensor
Resolution 1.3 Mega pixel
Pixel size 2.8 μm
Sensitivity
Aperture F2.0
Field of View 70°
MAC200 DN
45
Capture Mode
Combine Time Lapse and Motion
Activated mode
PIR Sensor
Image Sensor
2500mV/lux-sec
(Good low light quality)
Optics Lens
Camera
Page 53
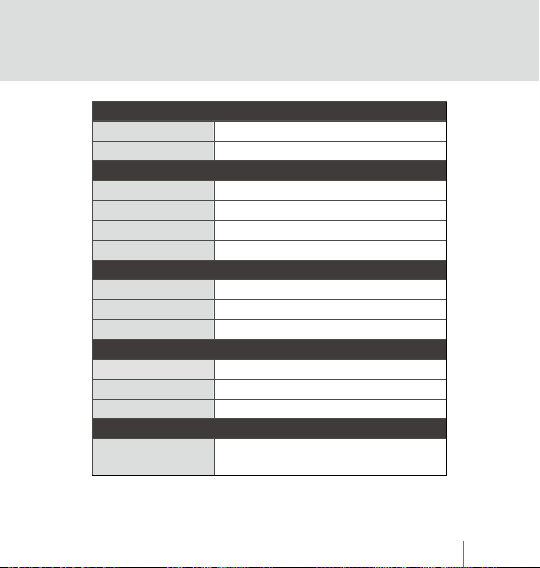
Focal Length 28 mm (35mm equivalent)
Optics Lens
Focus Distance 60 cm (Minimum)
Recording
Video Fast Playback Time Lapse Video
Format AVI
720P(1280x720)
Memory Storage SD Card ( Supported up to 32GB)
Power
Power source 2 x D cell Batteries
Battery Life 14 months*
External Power DC IN: 5V
Dimension
Size(DxWxH) 106x110x78 mm (4.13”x4.29”x3.04”)
Weight 275g (without batteries)
Color Black
Operation Temperature
- 20°C ~ 50°C
- 4°F ~ 122°F
1. Batteries last 14 months usage under time lapse mode.
(time interval setting: 5 minutes.)
MAC200 DN
46
Page 54

47
MAC200 DN
Page 55

MAC200 DN
48
Page 56

49
EN_A4 301-0093-10
 Loading...