

Page 1
PHV MAC
User Manual
Wirefree Security
Page 2
www.brinno.com/support/register.html
Page 3

Introducing
Features
Package Contents
Device Parts
Display Icons
Initial Setup- Install batteries
Initial Setup- Set Date and Time
Installation
Live View
Playback-Photo Visitor Log
Low light enhancement
Auto-detect switch
Micro USB port
LED indicator
File format - AVI
File format - JPEG
About overwrite history
Go to menu setting screen
Menu setting-
File Format
Band lter
Set the Date & Time
Reset
Limitations of the Ambient light sensor
Specication
contents
04
05
06
07
08
09
10
12
15
16
18
18
19
19
20
22
24
26
27
27
27
28
28
29
30
03
Page 4

Thank you for purchasing a Brinno product!
The primary entrance point to most homes is the front door. Most
homes have a peephole as a means of seeing who is at the door.
The peephole hasn't changed much since it was invented in 1932.
Brinno has perfected the Peephole with their latest Motion Ac tivated
Digital Peephole Camera/ Viewer; the PHVMAC. The PHVMAC will
detect when someone approaches your door, turn itself on and display
a clean crisp image on the 3 inch TFT LCD inside the door and store a
time and date stamped video of the person on a Micro SD Card. The
PHVMAC uses the traditional Peephole thus not alerting anyone outside
the door they are being photographed. Battery saving technology
allows the PHVMAC to last for approximately 9000 peeps, so even if
you are away on a two week or two month vacation the PHVMAC will
continue to record who was at your door. When returning home you
simply push a button to review who was at your door that day. You
can easily go back and review any day at the push of a button. All the
photos are time and date stamped and stored as a video le, and can
be down loaded to a PC any time for long term storage. Want to know
if they really tried to deliver your package? Now you will know. Want to
catch the kids playing “Knock Knock” ? It’s easy. Low light and bright
light settings allow you to adjust for the time of day, dusk or high noon.
An easy to use menu and simple Icons on the LCD panel allow you set
it up the way you want it and review the photos quickly and simply.
Now you really know who was at your front door when you were away.
04
Introducing
Page 5

PHV MAC Features
3" LCD panel to display any visitor's image
•
Time and date stamped photos, or videos, of everyone
•
who comes to your door
One button replay on the LCD panel of the day’s
•
visitors, any days visitors
Activated by motion, the Camera records photos or
•
videos of visitors even when no one is home
The Micro SD Card ( if included with purchase ), will
•
store the photos of anyone who approaches your door
4 AA batteries last for 9,000 triggers
•
Low light enhancement
•
The Ambient light sensor works through the peephole
•
The traditional Peephole is used so as not to alert
•
visitors they are being recorded
Use the LCD Panel to see whoever is at your front door
•
without them seeing you!
For more info:
Features
05
Page 6
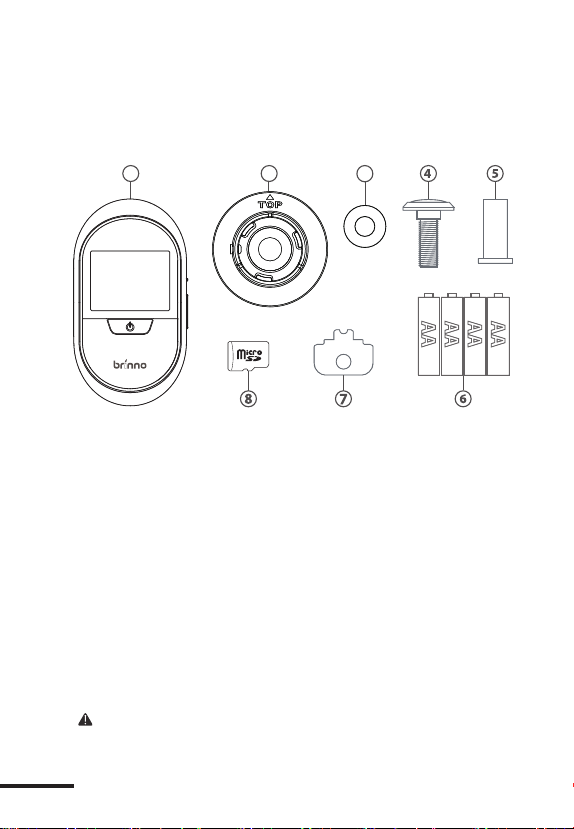
Package Contents
1 2 3
Motion Activated PeepHole Camera
1.
Base ange
2.
Washer(Only for PHV MAC12)
3.
PeepHole lens
4.
PeepHole barrel
5.
4 AA Batteries
6.
Tightening tool
7.
Micro SD card(If included with purchase)
8.
For best results please use the peephole included.
06
Package Contents
Page 7
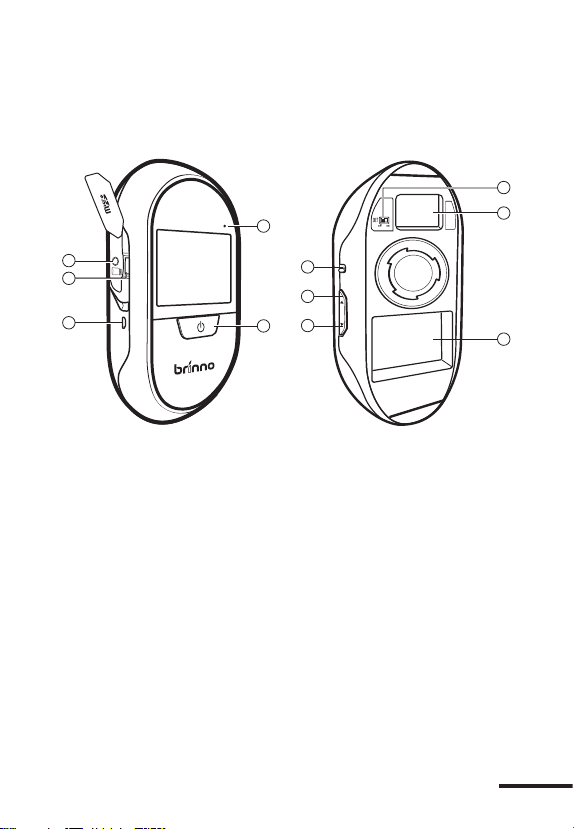
Device Parts
9
4
10
1
2
3
Locking screw
1.
Micro SD card slot
2.
Micro USB port (Page 17)
3.
LED indicator (Page 17)
4.
Power button
5.
Low light enhancement switch (Page 16)
6.
Up button
7.
Down button
8.
Auto- detect switch (Page 16)
9.
Extension port
10.
Battery sockets
11.
5
6
7
8
Device Parts
11
07
Page 8
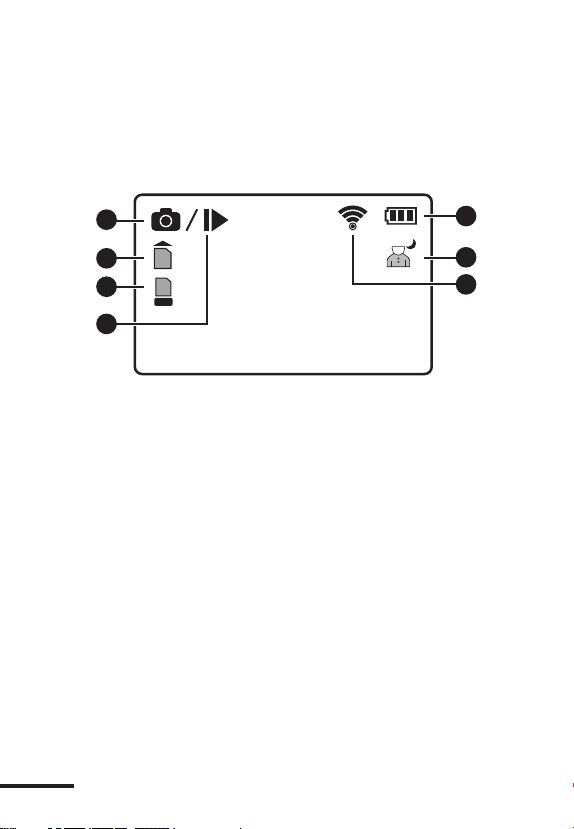
Display Icons
1
2
SD
3
SD
FULL
4
Image recording
1.
No Micro SD card / Micro SD card error
2.
(Please replace SD card)
Micro SD card full
3.
(Please download les to clear SD card space.)
Playback
4.
Battery status
5.
Low light enhancement active
6.
Motion activated
7.
08
Display Icons
5
6
7
Page 9
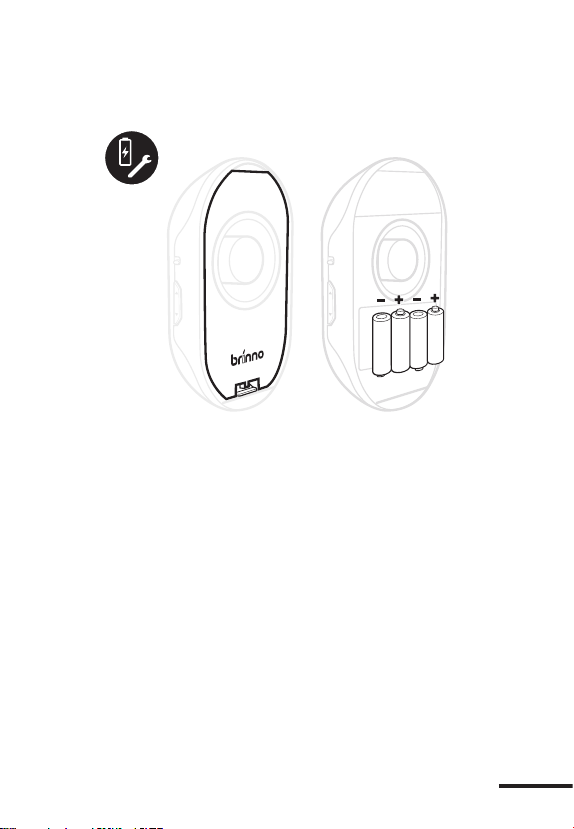
Initial Setup- Install batteries
Open battery cover
1.
Install 4 AA batteries
2.
Initial Setup-Install batteries
09
Page 10
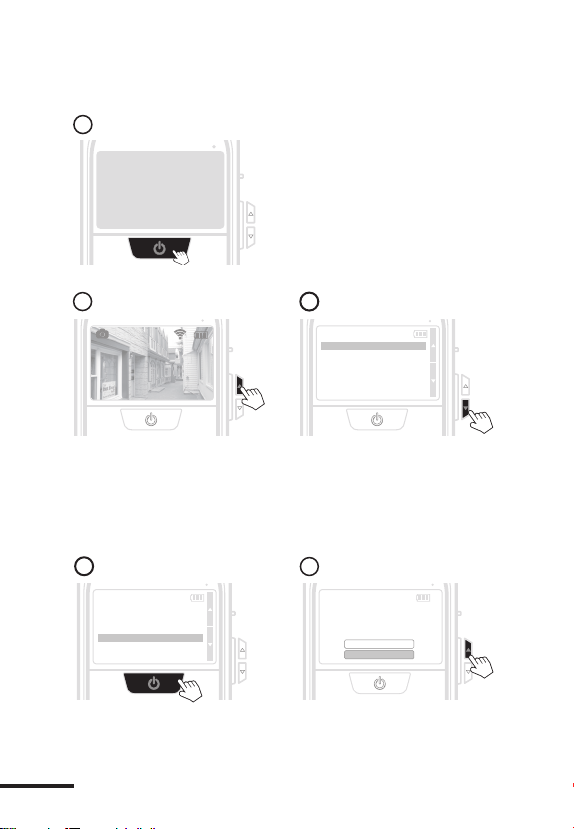
Initial Setup- Set Date & Time
1
Press the Power button
1.
for 1 second to go to the
preview screen.
2
3 sec
At the preview screen, hold the Up button for 3 seconds,
2.
3
Menu Setting
Motion Activated Screen
File Format
Band Filter
Set Date&Time
Reset
EXIT
V X.XX.X
the menu setting screen will appear.
On the Main Menu setting screen, use the Down button
3.
to go to the Set Date & Time option.
4
Menu Setting
Motion Activated Screen
File Format
Band Filter
Set Date&Time
Reset
EXIT
Press Power button to select the Time & Date menu.
4.
Choose the Set option, using the Up button.
5.
10
Initial Setup-Set Date & Time
V X.XX.X
5
Date & Time
2013/05/01
17:30
Set
Exit
Page 11
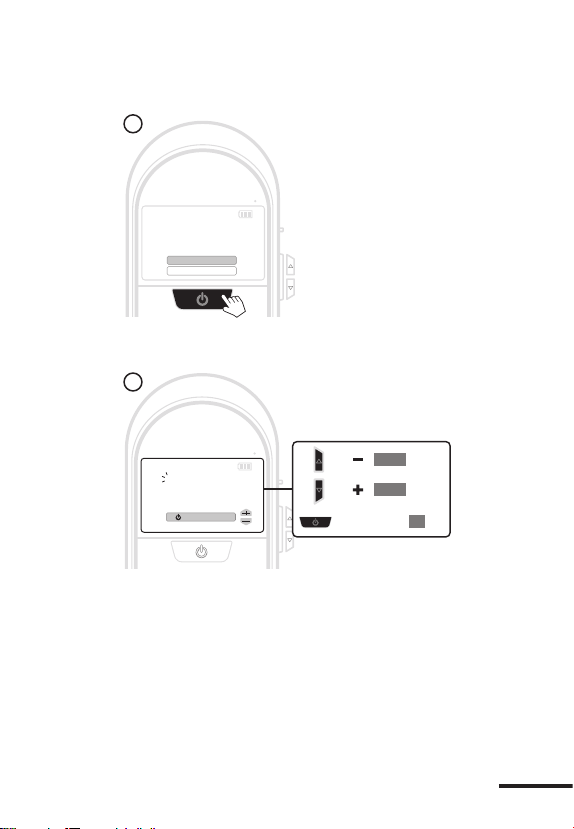
Initial Setup- Set Date & Time
6
Date & Time
2013/05/01
17:30
Set
Exit
Press Power button to select the Set option.
6.
7
:
:
Next
:
2012/ 05 /0
2014/ 05 /0
2013/ 05 /0
Date & Time
2013/05/01
17:30
: OK to next
Set the date and time
7.
Using the Up and Down buttons . As the date ashes,
press the Up button to get a higher number, and press the
Down button to get a lower number. Press Power button
to go to the next eld.
When nished, press the Power button to exit.
1
1
1
Initial Setup-Set Date & Time
11
Page 12
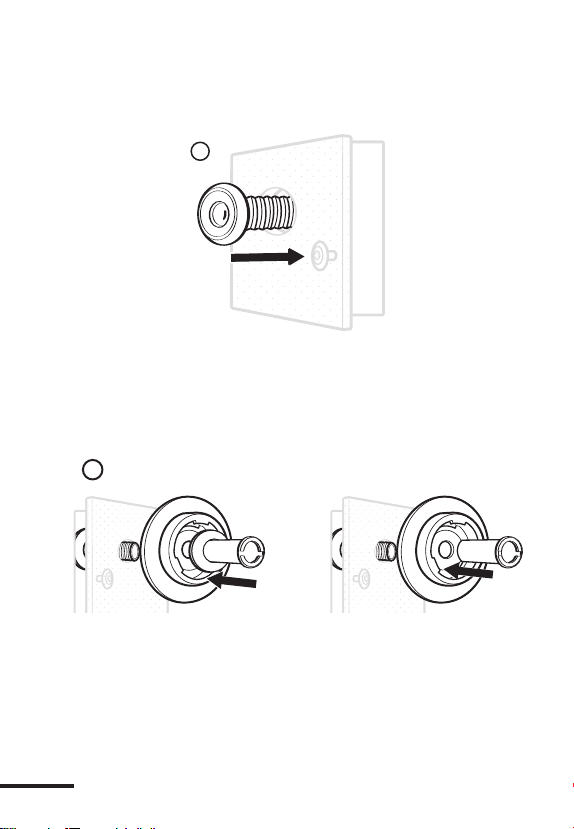
Installation
1
Insert Peephole lens in the outside of the door.1.
PHV MAC12
2
For the 12mm peephole
(North America users most likely.)
Insert the PeepHole barrel through
the Washer and Base Flange and
insert both into the hole on the
inside of the door. Tighten the
PeepHole Barrel with your ngers.
12
Installation
PHV MAC14
For the 14mm peephole
Insert the peephole barrel
through base flange and
insert both into the hole on
the inside of the door.Tighten
the PeepHole Barrel with your
ngers.
Page 13
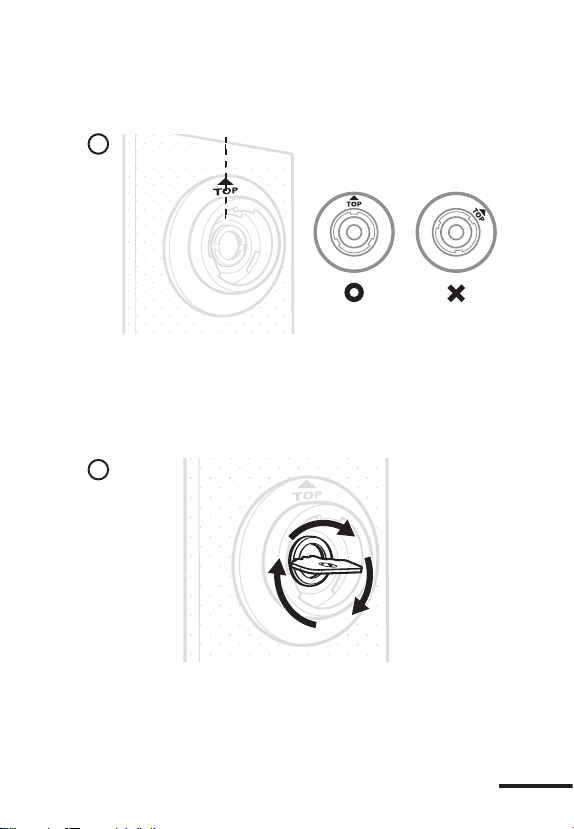
Installation
3
3.
When the barrel is snug, rotate the Base Flange until
the TOP icon is at 12 o’clock (vertical).
4
4.
Use the Tightening Tool included to tighten the
PeepHole barrel.
Installation
13
Page 14
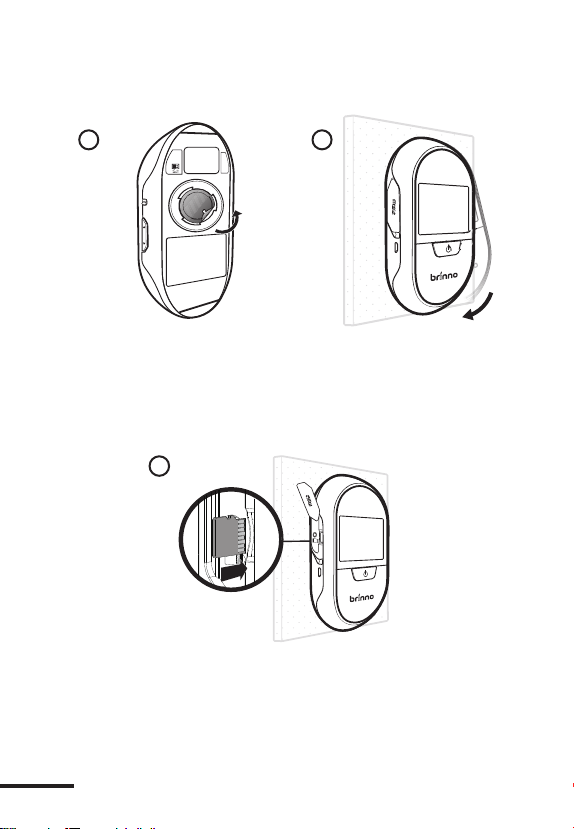
Installation
5 6
5.
Remove PE lm over the camera lens on the back.
6.
Place the PHV MAC on the ange on a slight counter
clock wise angle and rotate the PHV MAC clockwise
until horizontal and you feel it lock in place.
7
7.
Insert the Micro SD Card in the slot as shown.
Use the screwdriver to tighten the Locking Screw, if
necessar y.
You are now ready to turn on the Motion Activated
PeepHole Camera!
1414
Installation
Page 15
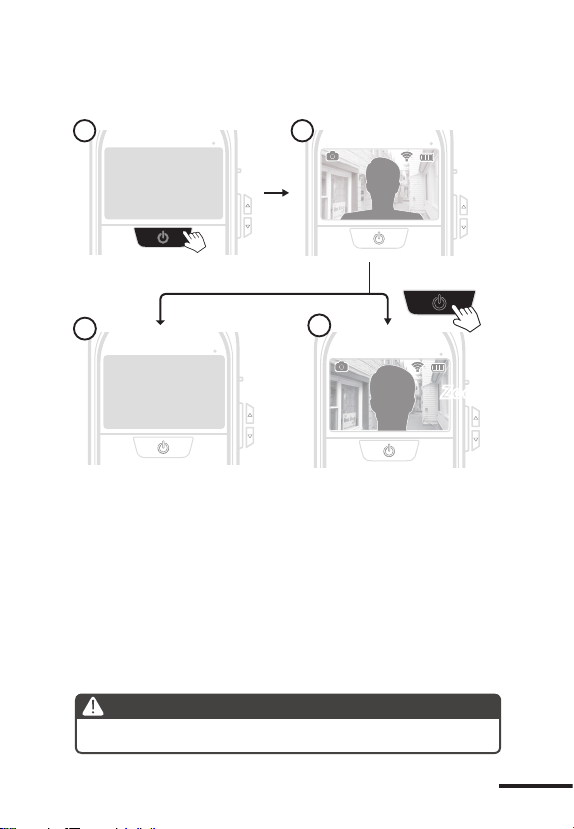
Live View
1
2
10 Sec.
3-1
1.
Press the Power button.
2.
The LCD Panel Screen will display who is at the
3-2
door
3-1.
After 10 seconds, the screen will shut o to save the
power.
3-2.
To Zoom in on the person at the door, press the
Power button again. You can toggle in and out
of zoom mode with the Power button.
Note
During the Live View, the PHV MAC is still recording.
ZoomZoom
Live View
15
Page 16
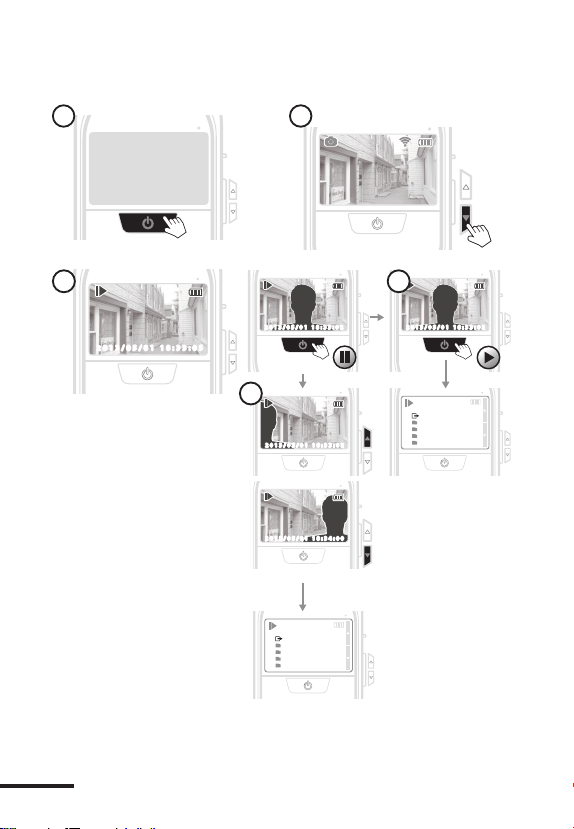
Playback - Photo Visitor Log
1
3
2013/05/0 1 18:33:052013/05/01 18:33:05
2
3-2
2013/05/01 18:33:022013/05/01 18:33:02 2013/05/0 1 18:33:022013/05/01 18:33:02
3-1
previous
2 013/05/01 18:33:022 013/05/01 18:33:02
2013/05/0 1 18:34:002013/05/01 18:34:00
next
EXIT
06
05
04
03
EXIT
06
05
04
03
16
Playback - Photo Visitor Log
Page 17
Playback - Photo Visitor Log
Press the Power button.
1.
Enter the “Preview Screen”, and just one press the Down
2.
button to enter auto playback mode.
Press the Power button to “Pause”.
3.
Single page review
3-1
At “Pause ” mode, press the Up button to see the previous
image, and press the Down button to see the nex t image.
When you have seen all your day’s images, the screen will
go to the daily log folder screen.
Auto review
3-2
You can press Power button again to “Play”. When you
have seen all your day’s images, the screen will go to the
daily log folder screen.
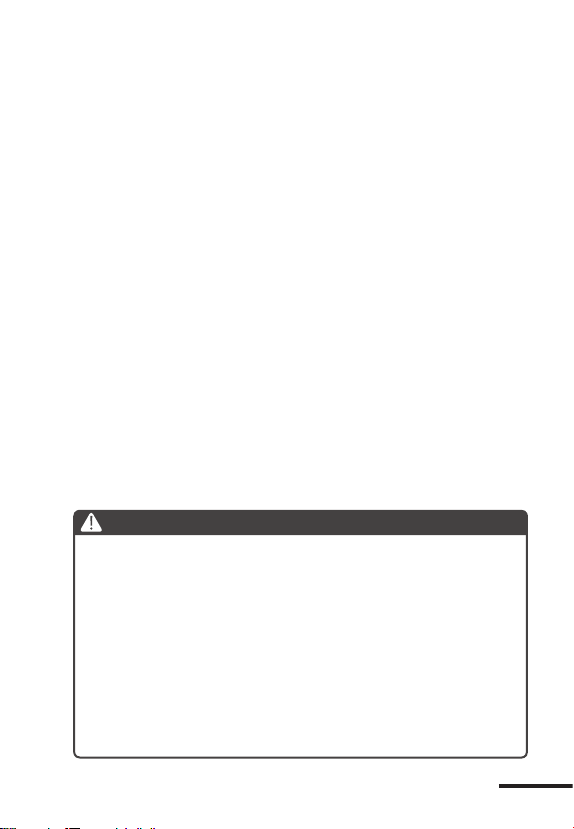
Note
1.
To move to the Daily log folder directly, at pause mode, hold
the Up or Down button.
2.
To leave the auto playback mode,hold the Power button for
3 seconds and the preview screen will display.
3.
At pause mode, after 10 seconds without any activity, it will
go back to preview screen.
4.
Playback mode will only play the format to which you are
currently set.
5.
Playback only support preview function, you can edit or
delete your image by computer.
Playback - Photo Visitor Log
17
Page 18
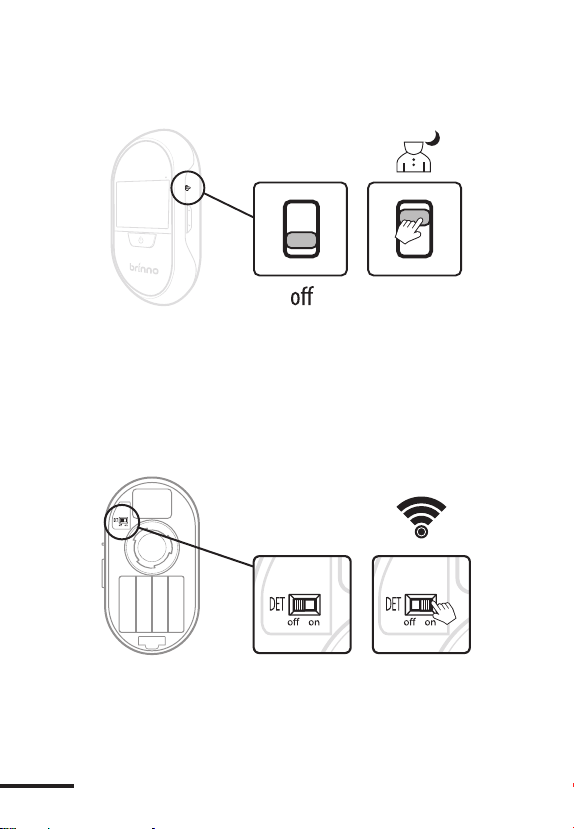
Low light enhancement
on
If the lighting conditions outside your door are poor,
turning on the Low Light Switch will improve the image.
Auto - detect switch
To enable the motion activation feature of the PHV MAC turn the
Detect switch to ON. Now anytime someone approaches your door
the PHVMAC will wake up and store their photos.
For better bat tery life you can switch auto detect o when you are home.
18
Low light enhancement & Auto - detect switch
Page 19
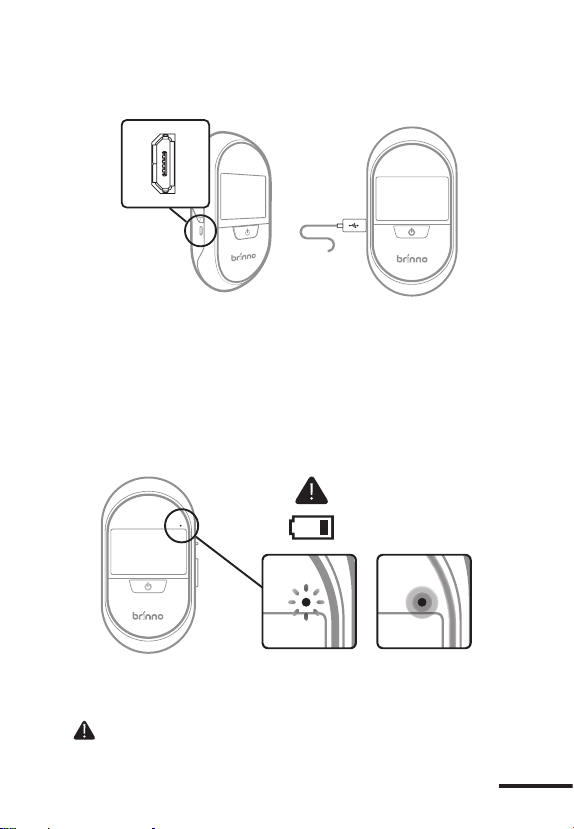
Micro USB port
External Power: For long term use, you can attach an external
power supply (DC 5V) through the Micro USB connector.
File transfer: You can connect the PHV MAC to your computer to
transfer the photos from the Micro SD card to the computer.
OS requirement: Windows XP and above.
LED indicator
LED ashing: Battery low, please replace the batteries.
LED on : The PHVMAC is activating and capturing photos.
When LED is on, the other buttons will not work.
Micro USB port & LED indicator
19
Page 20
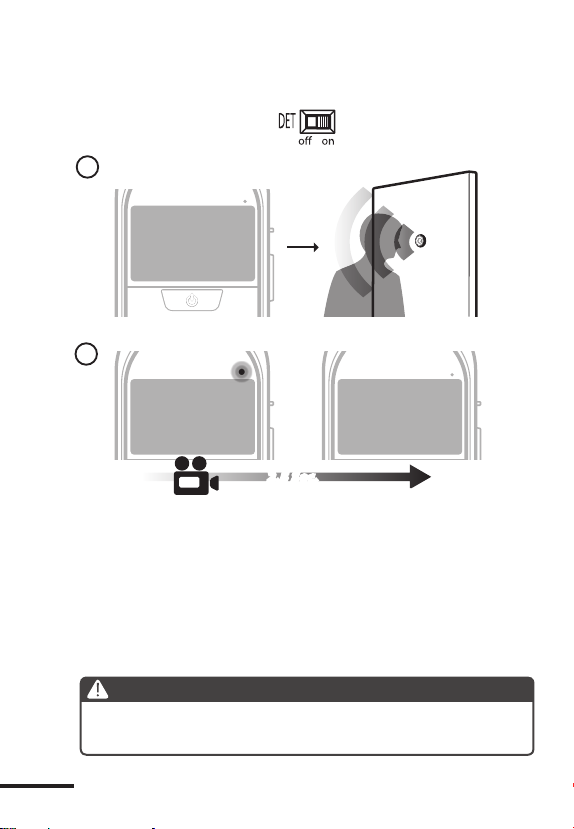
File format - AVI
Auto Recording
1
2
2.5 Sec.
1.
The Motion Activated Peephole Camera will detect
motion outside the door.
2.
The Motion Activated Peephole Camera will wake
up and record 2.5-seconds of video.
Note
During recording time, the screen will not show any images.
Only the red LED will be on , and none of the buttons will work.
20
File format - AVI - Auto recording
Page 21
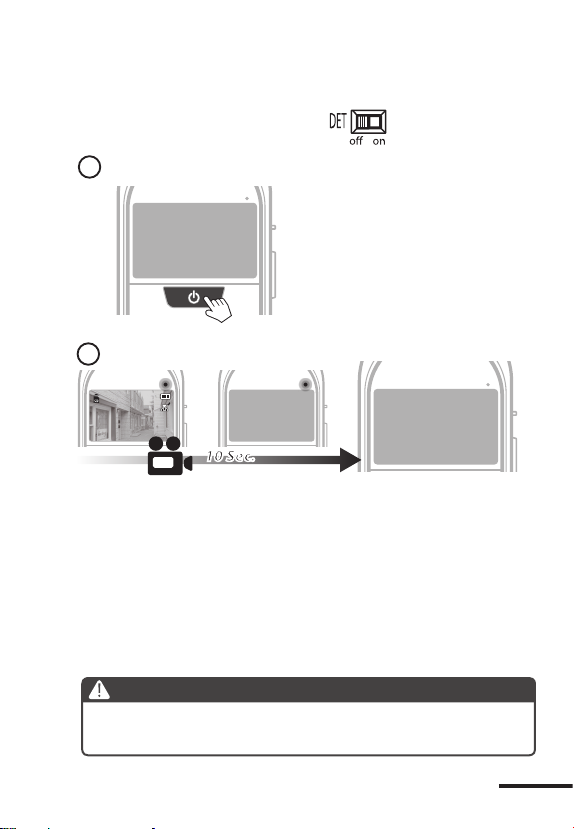
File format - AVI
Manually Recording
1
2
10 Sec.
1.
Press the Power button for 1 second.
2.
The Motion Activated Peephole Camera will wake
up and record video. Per activation, it will take 10-
seconds of video.
Note
During recording time, the screen will not show any images.
Only the red LED will be on , and none of the buttons will work.
21File format - AVI - Manually recording
Page 22
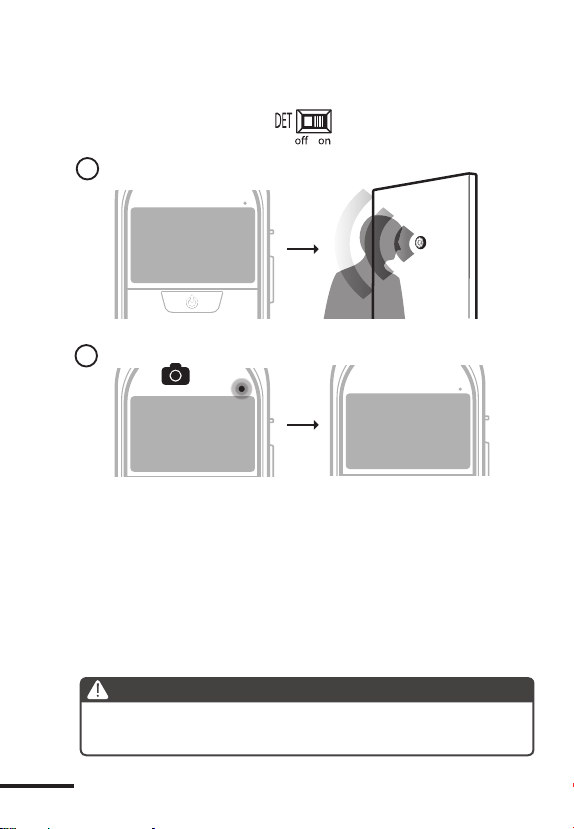
File format - JPEG
Auto Recording
1
2
x6
1.
The Motion Activated Peephole Camera will detect
motion outside the door.
2.
The Motion Activated Peephole Camera will wake
up and snap photo. Per activation, it will take 6
photos.
Note
During recording time, the screen will not show any images.
Only the red LED will be on , and none of the buttons will work.
22
File format - JPEG - Auto recording
Page 23
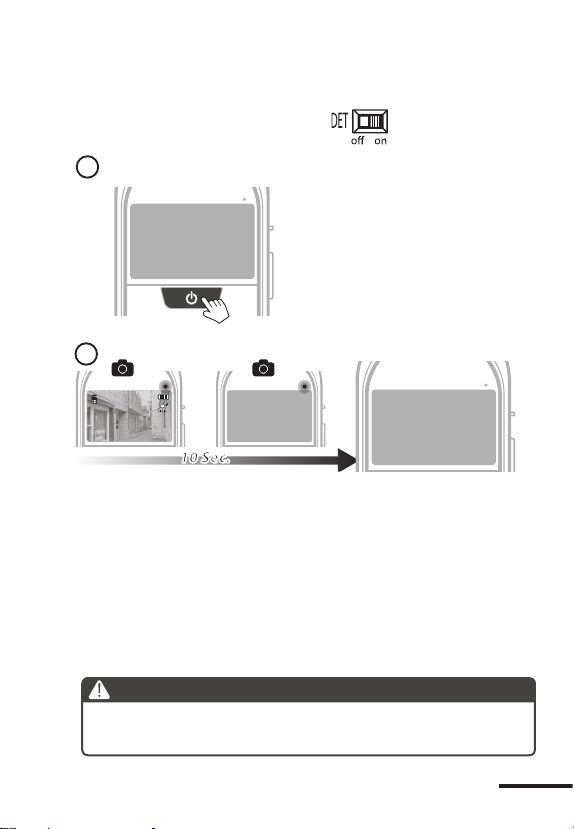
File format - JPEG
Manually Recording
1
2
10 Sec.
1.
Press the Power button for 1 second.
2.
The Motion Activated Peephole Camera will wake
x3x3
up and snap photo. Per activation, it will take 6
photos in 10 seconds. Three are taken immediately,
and another three are taken in the last three
seconds.
Note
During recording time, the screen will not show any images.
Only the red LED will be on , and none of the buttons will work.
File format - JPEG - Manually recording
23
Page 24

About Overwriting History
The Motion Activated PeepHole Camera automatically
captures and saves photos when it is motion activated.
When the memory is full, the Motion Activated PeepHole
Camera will clean the oldest monthly history, then
begin recording new photos. You may want to regularly
download les to a PC to maintain a visual history.
24
About overwriting history
Page 25

Note
25
Page 26
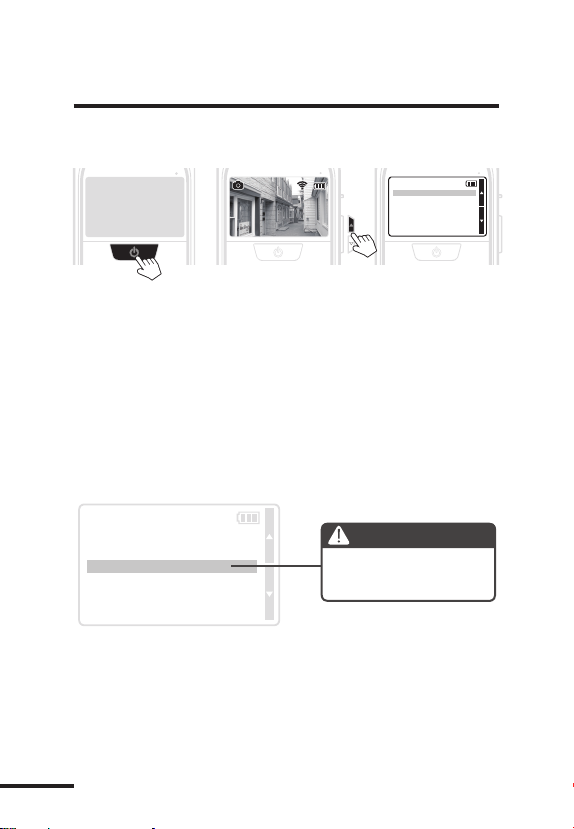
MENU SETTING
Go to Menu Setting screen
Menu Setting
Motion Activated Screen
File Format
Band Filter
Set Date&Time
Reset
V X.XX.X
EXIT
3 sec
Press the Power button to go to the preview screen, at
the preview screen, hold the Up button for 3 seconds,
and you will go to the menu setting screen.
Menu Setting
Motion Activated Screen
File Format
Band Filter
Set Date&Time
Reset
EXIT
26
Go to Menu setting screen
Note
Your selection will be in
orange to indicate.
V X.XX.X
Page 27
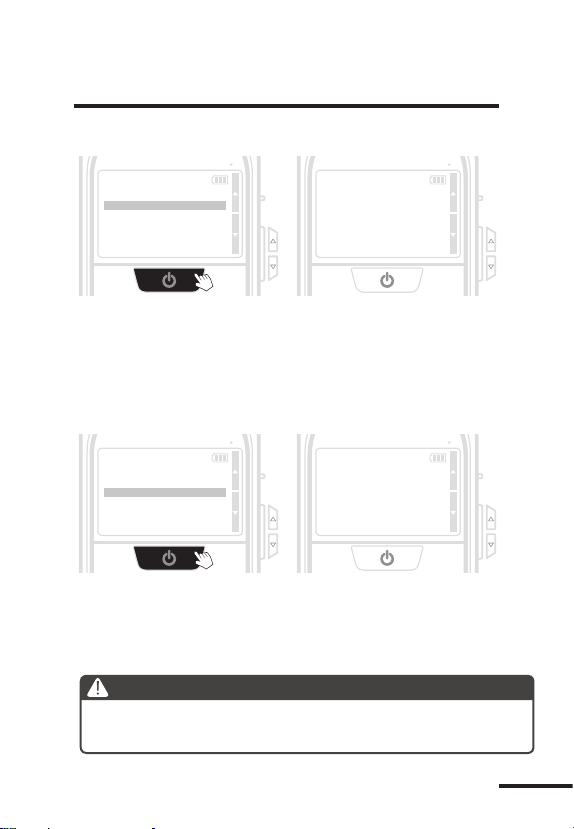
MENU SETTING
File Format
Menu Setting
Motion Activated Screen
File Format
Band Filter
Set Date&Time
Reset
EXIT
1.
Select File format, press the Power button.
2.
There are AVI and JPEG options.
V X.XX.X
File Format
JPEG
AVI
Band Filter
The band lter setting reduces icker on the display from interior lighting.
Menu Setting
Motion Activated Screen
File Format
Band Filter
Set Date&Time
Reset
EXIT
1.
Select Band lter, and press the Power button.
2.
There are three selections:
V X.XX.X
None: For outdoor environment
50 Hz: Europe indoors. 60 Hz: USA indoors.
Note
If the display is ickering, please set the Band lter to the correct
setting for your region
Band Filter
None
50 Hz
60Hz
MENU setting - File Format & Band Filter
27
Page 28
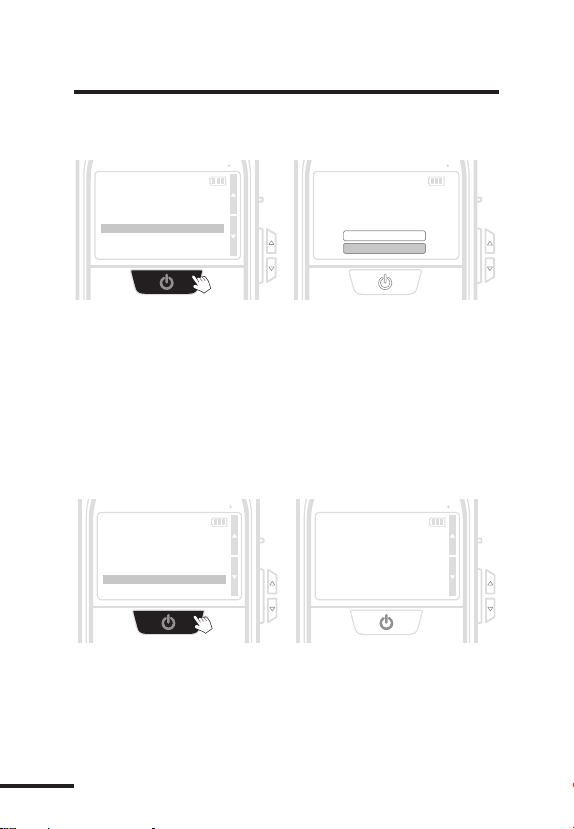
MENU SETTING
Set the Date & Time
Menu Setting
Motion Activated Screen
File Format
Band Filter
Set Date&Time
Reset
EXIT
1.
Select Set Date & Time, and press the Power button.
2.
Select Set and press the Power button to enter:
V X.XX.X
Date & Time
2013/05/01
17:30
Set
Exit
At the text ashes, press the Up button to increase
the number, press the Down button to decrease the
number, and press Power button to go to the next
eld. When nished, press the Power button to exit.
Reset
Menu Setting
Motion Activated Screen
File Format
Band Filter
Set Date&Time
Reset
EXIT
1.
Select Reset, press the Power button.
2.
Yes
V X.XX.X
No
Reset
Yes
No
28
MENU setting - Set the Date & Time & Reset
Page 29
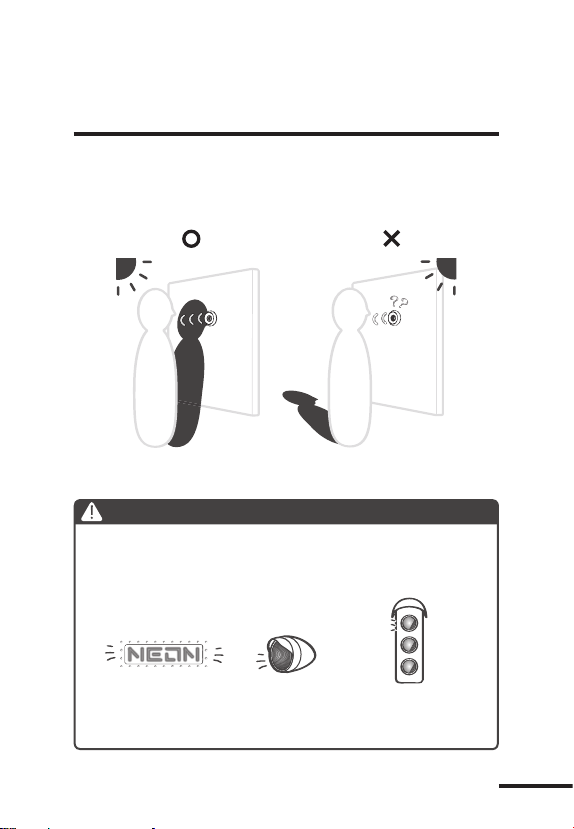
Limitations of
the Ambient light sensor
The ambient light sensor is activated by sudden changes
in light. Back lit environments are recommended. Front lit
environments may impede the sensors ability to trigger.
Easy to trigger
AVOID
Complicated light environments(e.g. ashing neon
lights, ashing head lights, and ashing trac
lights) may confuse the ambient light sensor, and it
may be inadvertently activated.
Flashing
Neon
Dicult to trigger
Flashing
Headlights
Limitations of the Ambient light sensor
Flashing
Trac lights
29
Page 30

Specication
PHV MAC12
Model
PeepHole Barrel
Fits door thick
View angle
Model
PeepHole Barrel
Fits door thick
View angle
LCD Screen
Storage
File Format
Power Source
Contents
Size (WxHxD)
Weight
12 mm
Fits any door 35~57mm(1.38”~2.24”) thick
Regular mode: 92°, Zoom mode: 40°
PHV MAC14
14 mm
Fits any door 40~69mm(1.57”~2.72”) thick
Regular mode: 92°, Zoom mode: 40°
3.0” TFT
Micro SD card(Up to 32GB, 8 GB recommend)
JPEG, AVI
4AA batteries( approx. 9,000 triggers )
PeepHole, Base flange, Tightening tool, 4AA
batteries, User manual
87x158x34 mm (3.39”x6.16”x1.32”)
170g (0.36lb)
30
Specication
Page 31

Page 32

www.brinno.com
7F, No.75, Zhou Zi St., Taipei City 11493, Taiwan
Phone: 886-2-8751-0306 Fax: 886-2-8751-0549
E-mail: [email protected]
301-0066-00
EN A1
 Loading...