

Brinno BCC100 User manual [ml]

TimeLapse
)
(p
:
Y
lo
p
se
to p
Construction Camera
GB
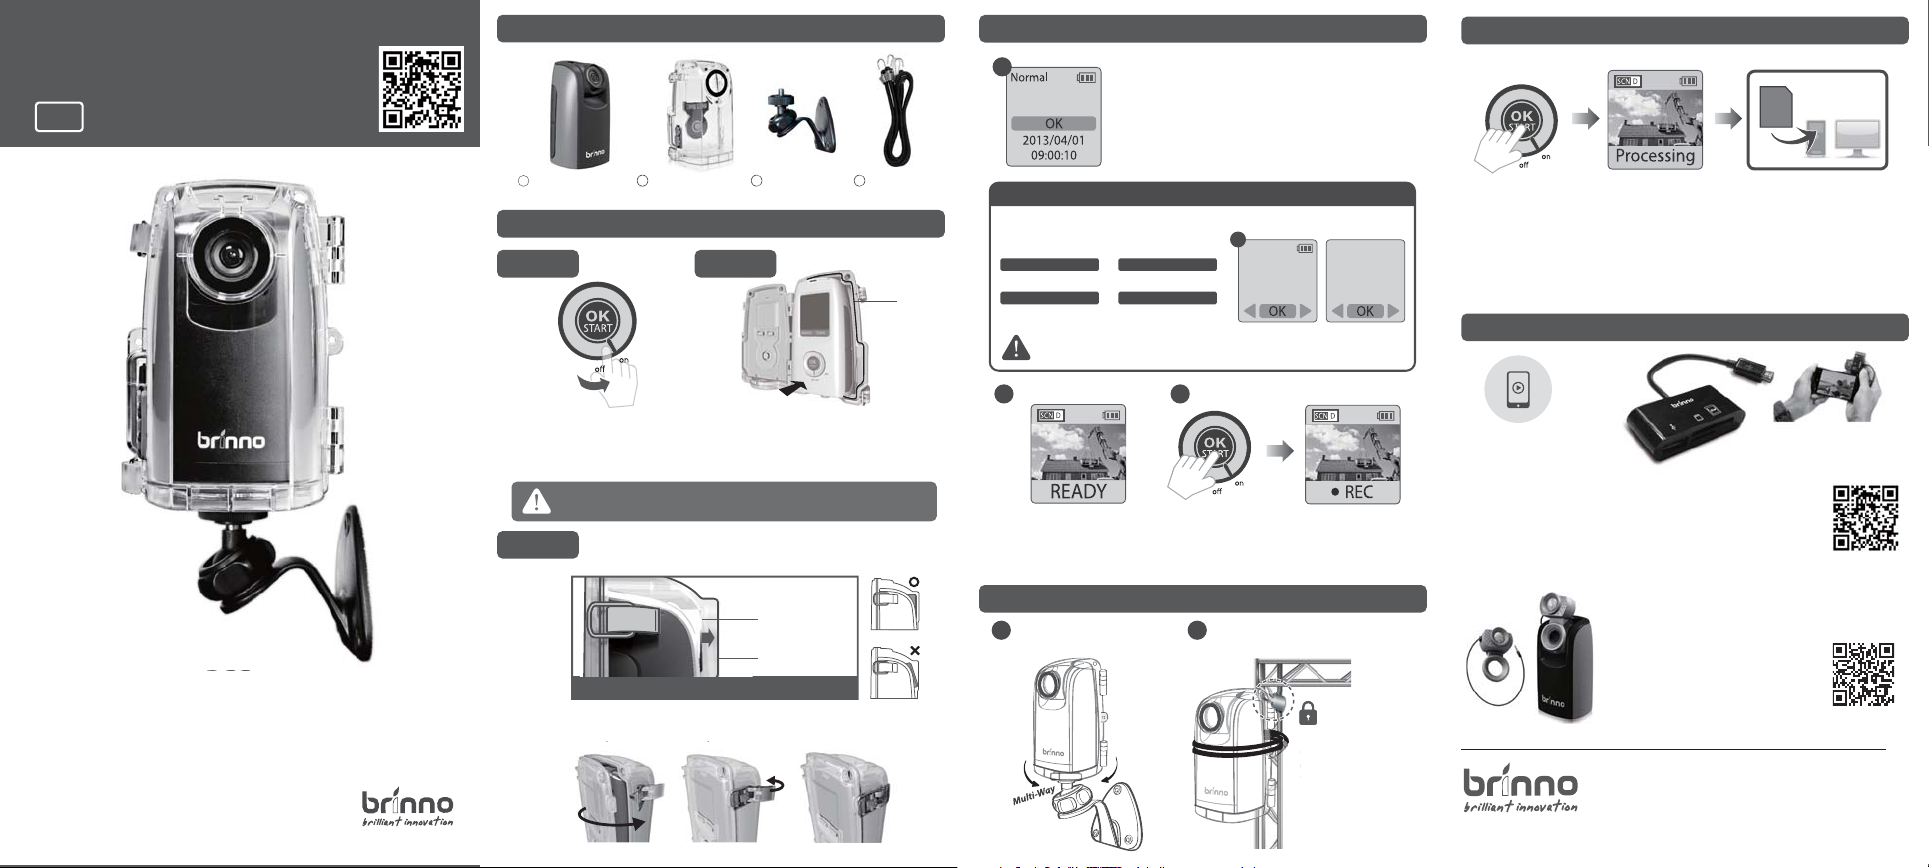
CONSTRUCTION CAMERA - BCC100
STEP 4. Start Recording
Set up screen
1
1 Sec
1. The LCD will display the set up screen.
2. Set the Time Interval and AVI frame rate.
STEP 6. Finish
Preview screen
SD
Quick Guide
w w w . b r i n n o . c o m
BCC100
NL
1
TimeLapse Camera
(TLC200 f1.2)
2 3 4
Weather Resistant
(ATH110)
Housing
Camera Wall
Mount
(AWM100)
BCC100 - Installation
STEP 1. STEP 2.
Insert an SD Card and
switch on the Time Lapse
Camera power.
Keep the inside of the Weather Resistant Housing dry before inserting
the Time Lapse Camera.
STEP 3.
Please make sure the Time Lapse Camera lens is positioned
correctly to t into the transparent lens (Housing).
Close the Weather Resistant Housing door and latch the
buckles (Top and bottom).
Insert the Time Lapse Camera into the
Weather Resistant Housing, conrming
the waterproof seal is aligned correctly.
Camera Lens
Housing Lens
CORRECT FITTING
Rubber Strap
Seal
Suggestion
Depending on big or small construction
project , we suggest below setting:
30 FPS
For weeks
For > 2 months
10 Minutes
For days
5 Seconds 30 FPS 1 Minute 30 FPS
For months
10 Minutes
For more than 6 months using , please choose
Energizer® Ultimate Lithium AA Batteries.
Preview screen
3 4
3. Press OK to proceed
to the Preview Screen,
frame your subject.
STEP 5.
Installation
(TLC200 f1.2+AWM100) (TLC200 f1.2+Rubber Strap)
A
Time Interval
2
Time
10 Sec
30 FPS
Preview screen
4. Press OK again to start the
recording process.
B
Lock :
Lock
You can lock your
ou can
time lapse camera
time la
on site to prevent theft.
on site
AVI frame rate
Frame Rate
30 FPS
While recording, hold the “OK” button until the LCD light turns on
and shows the text “Processing”, it means the camera is processing
le closing. When completed the processing it will display the text
"Ready” This indicates the recording session is complete.
Remove the SD card from the camera, and insert it into your
computer or laptop to enjoy your amazing Time Lapse Videos!
Optional Accessory
O
L
E
P
V
E
E
D
D
e
O
n
T
o
G
h
s
p
t
m
r
a
Brinno Reader
(ABR100)
Play your construction time lapse video on your
smartphone on site.
No need to go back to the oce with the Brinno
High Speed On The Go ( OTG ) Reader (ABR100)
*Your Smartphone needs to OTG for this function.
Motion Sensor
(ATM100)
Upgrade the time lapse camera to a motion
activated camera, detecting any movement
in thearea. Great for Security.
7F, No.75, Zhou Zi St., Taipei City11493, Taiwan
Phone: +886-2-8751-0306 Fax: +886-2-8751-0549
customerservice@brinno.com www.brinno.com
Made in Taiwan
more info of ABR100
more info of ATM100
301-0063-10 EU A1
TimeLapse
)
(
Verg
d
e
u
w
er
el
te voork
om
Constructiecamera
NL
CONSTRUCTIECAMERA - BCC100
STAP 4. Opnemen starten
Instelscherm
1
1 Sec
1. De LCD toont het instelscherm.
2. Stel de tijdsinterval en de AVI-beeldsnelheid in.
STAP 6. Voltooien
Voorbeeldscherm
SD
BCC100
Snelstartgids
w w w . b r i n n o . c o m
1
TimeLapse Camera
(TLC200 f1.2)
2 3 4
Weerbestendige
behuizing
(ATH110)
Muurbeugel
camera
BCC100 - Installatie
STAP 1. STAP 2.
Plaats een SD-kaart en
schakel de voeding van de
TimeLapse-camera in.
Maak de binnenkant van de waterbestendige behuizing droog
voordat u de Time Lapse Camera daar in plaatst.
STAP 3.
Zorg er voor dat de lens van de Time Lapse Camera
goed in de doorzichtige lens van de behuizing past.
CORRIGEEER AANSLUITING
Sluit de weerbestendige behuizing en maak de gespjes
dicht (boven en onder).
Plaats de Time Lapse Camera in de
weerbestendige behuizing en controleer of de
waterbestendige afdichting goed is uitgelijnd.
cameralens
lens behuizing
(AWM100)
Rubberen riem
Seal
Voorstel
Afhankelijk van een klein of groot constructieproject, stellen we u de onderstaande instelling voor :
Voor dagen Voor weken
5 seconde 30 FPS 1 minuut 30 FPS
Voor maanden
10 minuten
Voor gebruik van meer dan 6 maanden, kiest u
de Energizer® Ultimate Lithium AA-batterijen.
Voorbeeldscherm
3 4
Druk op OK om door te
3. Druk opnieuw op OK om
gaan naar het voorbeelds-
30 FPS
Voor > 2 maanden
10 minuten
cherm en plaats uw
onderwerp in een kader.
STAP 5.
Installatie
TimeLapse-camera &
A
wandmontage
Tijdsinterval
2
Time
10 Sec
30 FPS
4.
het opnameproces te
starten.
TimeLapse-camera &
B
rubberen riem
framesnelheid
Frame Rate
30 FPS
Voorbeeldscherm
Vergrendelen :
ren
u kunt uw timelapse-
kunt u
camera ter plaatse
camera t
vergrendelen om diefstal
vergrend
te voorkomen.
AVI-
Houd tijdens het opnemen de knop OK ingedrukt tot de
LCD-verlichting inschakelt en de tekst “Processing” verschijnt; dat
betekent dat de camera het bestand sluit en verwerkt. Na aoop
van het verwerken verschijnt de tekst "Ready". Dit geeft aan dat de
opnamesessie voltooid is.
Verwijder de SD-kaart uit de camera en steek hem in uw computer
of laptop om te genieten van uw geweldige Time Lapse-video's!
Optioneel accessoire
e
l
k
d
k
i
v
o
w
t
o
n
r
O
e
O
n
T
o
G
h
s
p
t
m
r
a
Brinno Reader
(ABR100)
Speei de time lapse-video van uw etstocht af op uw
smartphone.
* met de Brinno Reader (ABR100)
*Ondersteunt smartphones met OTG functie.
Bewegingssensor
(ATM100)
Voer een upgrade van de timelapsecamera uit naar een door beweging
geactiveerd camera die elke beweging
in het gebied detecteert. Uitstekend
voor beveiliging.
7F, No.75, Zhou Zi St., Taipei City11493, Taiwan
Phone: +886-2-8751-0306 Fax: +886-2-8751-0549
customerservice@brinno.com www.brinno.com
Made in Taiwan
 Loading...