

Page 1

OWNER'S MANUAL
AERATOR SPREADER
MODEL:
AS-30 BH
AS-40 BH
Assembly
Installation
Operation
Repair Parts
For use with Lawn/Garden
Tractors
For the latest product updates and setup tips:
Visit us on the web!
www.brinly.com
Important: This manual contains information for the safety of
persons and property. Read it carefully before assembly and
operation of the equipment!
L-1711-BH.-3
Page 2

CONGRATULATIONS on your new Brinly-Hardy Lawn
A
S?
ARTS?
ARTS?
822
w
www.customerservice
Aerator. It has been designed, engineered, and manufactured
to give you the best possible dependability and performance.
Keep all nuts, bolts and screws tight to be sure the equipment
is in safe working condition.
Should you experience any problem you can not easily
remedy, please do not hesitate to contact our knowledgable
customer service department toll-free at 1-877-728-8224. We
have competent, well trained technicians to help you service
your Aerator.
CUSTOMER RESPONSIBILITIES
Please read and retain this manual. Familiarize yourself with
the entire manual before beginning and verify that all
hardware is present. And please, Observe the "Safety Rules".
Follow a regular schedule in maintaining, caring-for and using
your Aerator Spreader.
The instructions will enable you to assemble and maintain
your Aerator Spreader properly. Always observe the
"SAFETY RULES'.
TABLE OF CONTENTS
SAFETY RULES ..............................................................2
REFERENCE....................................................................3
PARTS REFERENCE ......................................................4
PARTS LIST .....................................................................5
ASSEMBLY ......................................................................6-9
OPERATION..... ...............................................................9-10
MAINTENANCE................................................................10
WARRANTY......................................................................11
RULES FOR SAFE OPERATION
!
Know controls and how to stop quickly, READ THE OWNER'S
MANUAL.
Do not allow children to operate the vehicle, do not allow
adults to operate without proper instruction or without having
read the owner's manual.
The vehicle and attachment should be stopped and inspected
for damage after striking a foreign object. The damage
should be repaired before restarting and operating the
equipment.
See tractor equipment owner's manual for safe operation of
the equipment.
CAUTION:
!
To avoid damage to Tines, always engage transport wheels to
raise the Tines when crossing concrete or asphalt walks,
drives, or roads.
Use the Aerator-Spreader only on an established lawn, never
on newly laid sod.
To avoid personal injury and/or equipment damage never
exceed the recommended operating speed range of 3 to 5
MPH.
Tines have sharp points. Wear gloves and handle with care.
Only tow your Aerator-Spreader behind vehicles for which it
was designed, riders and lawn/garden tractors.
Do not stand/ride on Aerator-Spreader, bodily injury could
result.
Never exceed the Hopper weight capacity of 70 pounds for
AS-302 and 100 pounds for AS-402.
Do not attempt to disconnect Aerator from tractor with weight
in Hopper.
When backing-carefully back straight to avoid jack-knifing
which could result in damage to equipment.
LL
UESTION
Do not carry passengers. Keep children and pets a safe
distance away.
Always wear substantial footwear. Do not wear loose fitting
clothing that can get caught in moving parts.
Keep your eyes and mind on your tractor/attachment and area
being covered. Do not let other interests distract you.
Stay alert for holes in the terrain and other hidden hazards.
Do not drive close to creeks, ditches and public highways.
Watch out for traffic when crossing or near roadways.
When using any attachment, don't allow anyone near the
vehicle while in operation.
Keep the vehicle and attachment in good operating condition
and keep safety devices in place.
2.
L-1711-BH.-3
Please call our Customer Service
epartment
77.728.
4
brinly.com
This symbol will help to point out important
safety precautions throughout this manual. It
means - ATTENTION!
!
BECOME ALERT! Your safety is involved.
Page 3

REFERENCE
Tools Required for Assembly:
* ½" wrench (2) * 3/4" wrench (2)
* Pair work gloves OR
* Hammer * 10" Adjustable wrench (2)
A note about nuts used in the assembly of your Aerator Spreader:
1. Jam Nuts and Hex Nuts spin freely on the bolt threads. Usually a lock washer is used
to lock the nut securely in place.
Jam Nut
2. Lock Nuts and Nylon Lock Nuts provide resistence after several turns on the bolt threads.
A wrench is normally required during installation.
Lock Nut
Hex Nut
Nylon Lock Nut
Notes:
L-1711-BH.-3
3.
Page 4

Parts Reference
37
22
13
21
44
2
40
34
25
44
9
11
27
17
57
10
44
40
35
19
56
46
16
6
8
3
26
23
52
31
49
52
38
7
43
1
58
39
13
40
44
24
2
40
18
48
12
31
37
33
1
44
40
23
4
20
46
55
36
14
34
27
37
53
54
11
30
52
15
50
20
44
51
40
4.
42
32
L-1711-BH.-3
47
28
41
47
41
47
45
29
5
Page 5

Parts List
REF. NO.
1
*2
*3
4
5
6
7
8
9
10
11
12
*13
14
15
16
17
18
19
20
21
22
23
*24
25
26
27
28
*29
30
*31
*32
33
*34
35
36
*37
38
39
*40
*41
*42
43
*44
*45
*46
*47
48
49
*50
*51
52
53
54
55
56
57
58
AS-302
PART NO.
R-774
B-1674P
B-6520
B-4030
B-6407
B-5922
B-4701-10
K-653
B-5474-10
B-4709-10
B-4713
B-4715Y
B-6484
B-4719-01
R-1946
B-5472
B-4724-CPT
B-6515-10
B-4726
B-6409-10
B-6411-10
B-6413-10
B-4732
B-4733
B-4747
B-4768
F-383
B-6526
R-2435
B-5456
2M1012P
B-6517
10M0808P
2M1032P
2M0808P
2M1008P
B-6516
2M1016P
30M0800P
30M1000P
31M1600P
11M1028P
40M0800P
40M1000P
40M1600P
45M1111P
45M1717P
50M0524P
B-3861
D-146P
B-4307
F-621
F-577
B-6414-10
B-5804
B-4705-10
AS-402
R-774
B-1674P
B-6520
B-4030
B-6407
B-5922
B-5718-10
K-654
B-5720-10
B-5726-10
B-4713
B-4715Y
B-6484
B-4719-01
R-1946
B-5722
B-4724-CPT
B-6515-10
B-4726
B-6410-10
B-6412-10
B-6413-10
B-4732
B-4733
B-4747
B-4768
F-383
B-6526
R-2435
B-5456
2M1012P
B-6517
10M0808P
2M1032P
2M0808P
2M1008P
B-6516
2M1016P
30M0800P
30M1000P
31M1600P
11M1024P
40M0800P
40M1000P
40M1600P
45M1111P
45M1717P
50M0524P
V-302P
B-3861
D-146P
B-4307
F-621
F-577
B-6414-10
B-5804
B-5461-10
B-5680-10
DESCRIPTION
Flat Washer - Large
5/16" Hex Lock Nut
Transport Lock
1/4" Wing Nut
Aerator Tine Assembly
Brinly Logo Decal
Hopper Assembly
Agitator Kit (Hwd.Incl.)
Agitator Shaft Assembly
Shutter Assembly
1/2" Washer
Calibration Plate
Cap Tube
Shutter Link
Decal Instruction/ "CE" Label
Tine Shaft Assembly
Drive Chain and Offset Link
Upper Lever
Chain Shield
Tow Bar
Wheel Support Assembly
Lift Handle
5/8" Square Bearing (large)
Vinyl Grip (1/8" x 3/4")
Tension Spring
5/8" (Thin) Washer
1/2" Square Bearing (small)
Wheel
Handle Grip (5/16" x 1-1/4")
5/8" (Thick) Washer
Hex Bolt, 5/16" x 3/4"
Hex Bolt, 1/2" x 3-1/2"
Carriage Bolt, 1/4" x 1/2"
Hex Bolt, 5/16" x 2"
Hex Bolt, 1/4" x 1/2"
Hex Bolt, 5/16" x 1/2"
Hex Bolt, 5/16" x 3"
Hex Bolt, 5/16" x 1"
Hex Nut, 1/4"
Hex Nut, 5/16"
Hex Jam Nut, 1/2"
Carriage Bolt, 5/16" x 1-3/4"
Lock Washer, 1/4"
Lock Washer, 5/16"
Lock Washer, 1/2"
Flat Washer, 5/16"
Flat Washer, 1/2"
Cotter Pin, 5/32 x 1-1/2"
Pop Rivet, 3/16" x .277
Drawbar Pin
Hairpin Cotter
"E" Ring, 1"
"E" Ring, 1/2"
"E" Ring, 5/8"
Lower Lever
Pop Rivet, 3/16" x .815
Agitator
Center Strap
QTY.
2
3
1
1
8 or 11
1
1
2
1
1
3
1
2
1
1
1
1
1
1
2
1
1
2 or 3
1
1
3
2
2
1
4
3
2
1
4
2
2
4
1
2
14
4
2
2
14
2
5
6
2
4
1
1
2 or 3
1
1
1
4
2
1
* Parts in Hardware Bag
L-1711-BH.-3
5.
Page 6
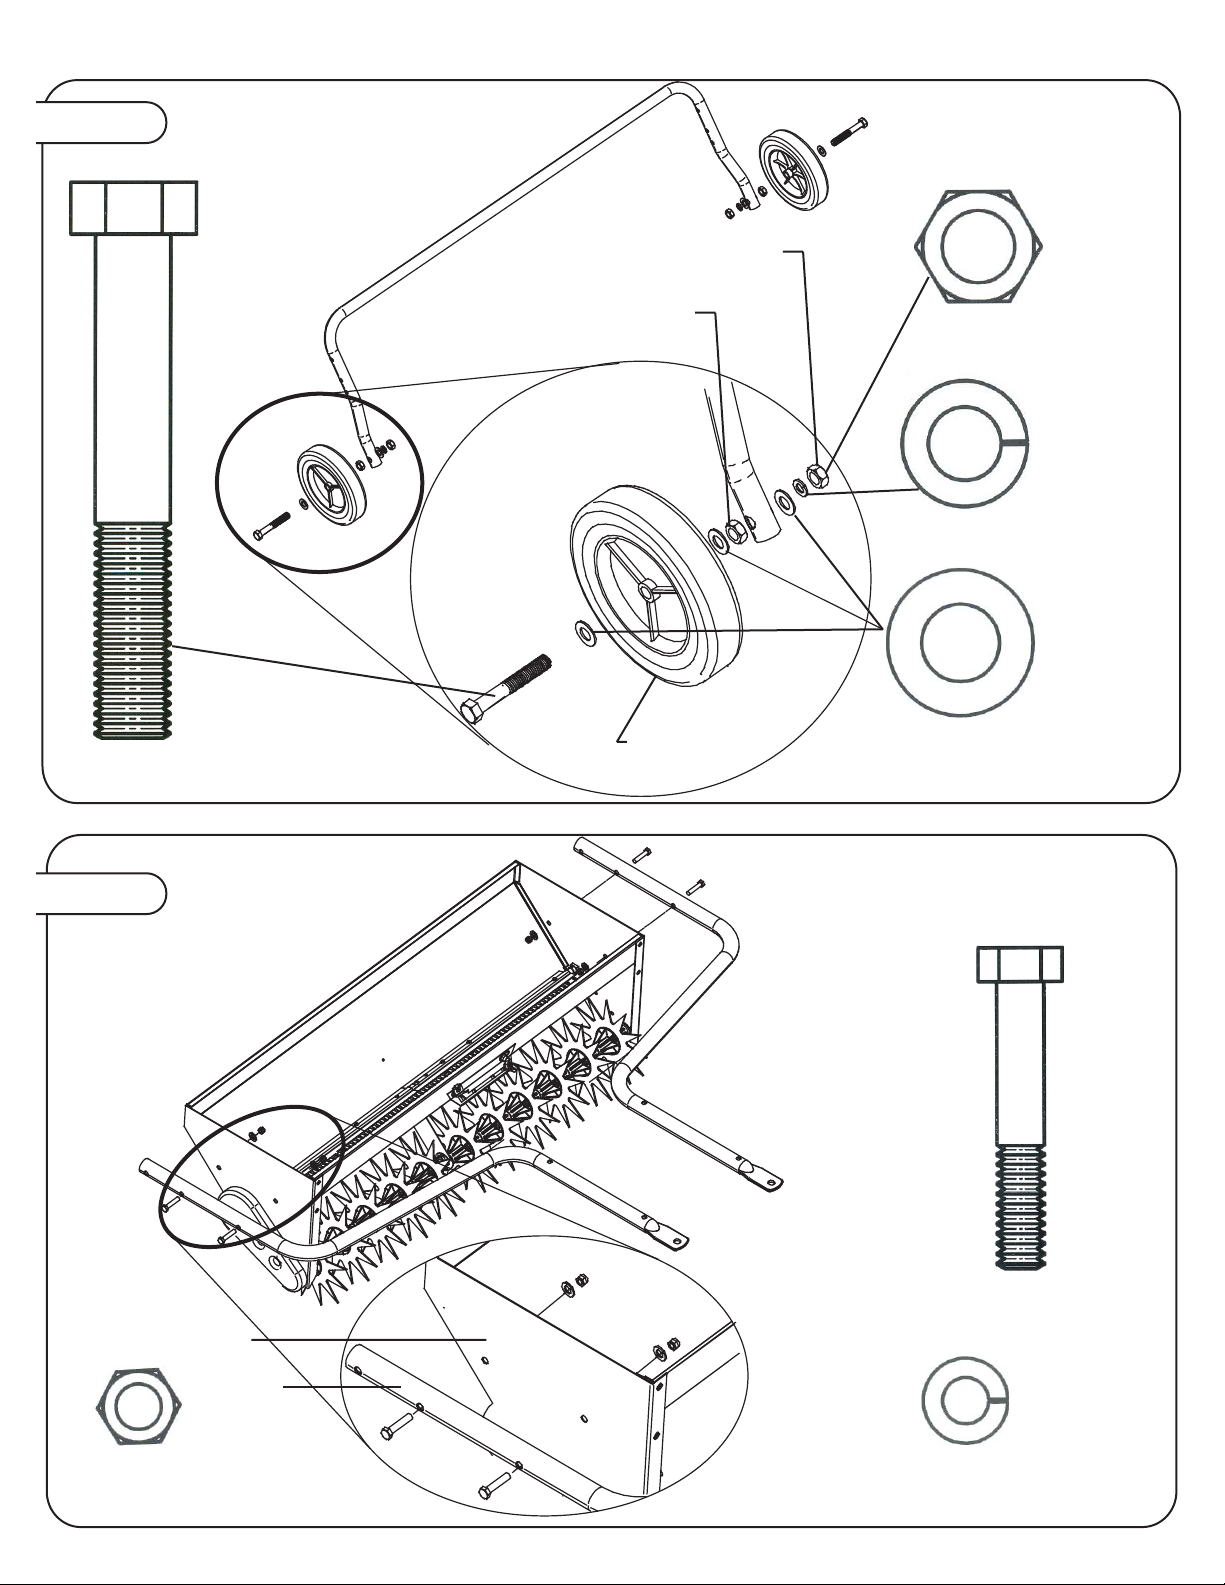
Figure 1.
Tighten securely
Nut to be tight against
tube not against wheel.
Qty. 4
(41)Hex Jam Nut, 1/2"
Qty. 2
(45)Lock Washer, 1/2"
Figure 2.
Qty. 2
(32)Hex Bolt, 1/2" x 3-1/2"
Hopper
Wheel to turn
freely.
Qty. 6
(47)Flat Washer, 1/2"
Qty. 4
(34)Hex Bolt, 5/16" x 2"
Qty. 4
(40)Hex Nut, 5/16"
6.
L-1711-BH.-3
Towbars
Qty. 4
(44)Lock Washer, 5/16"
Page 7
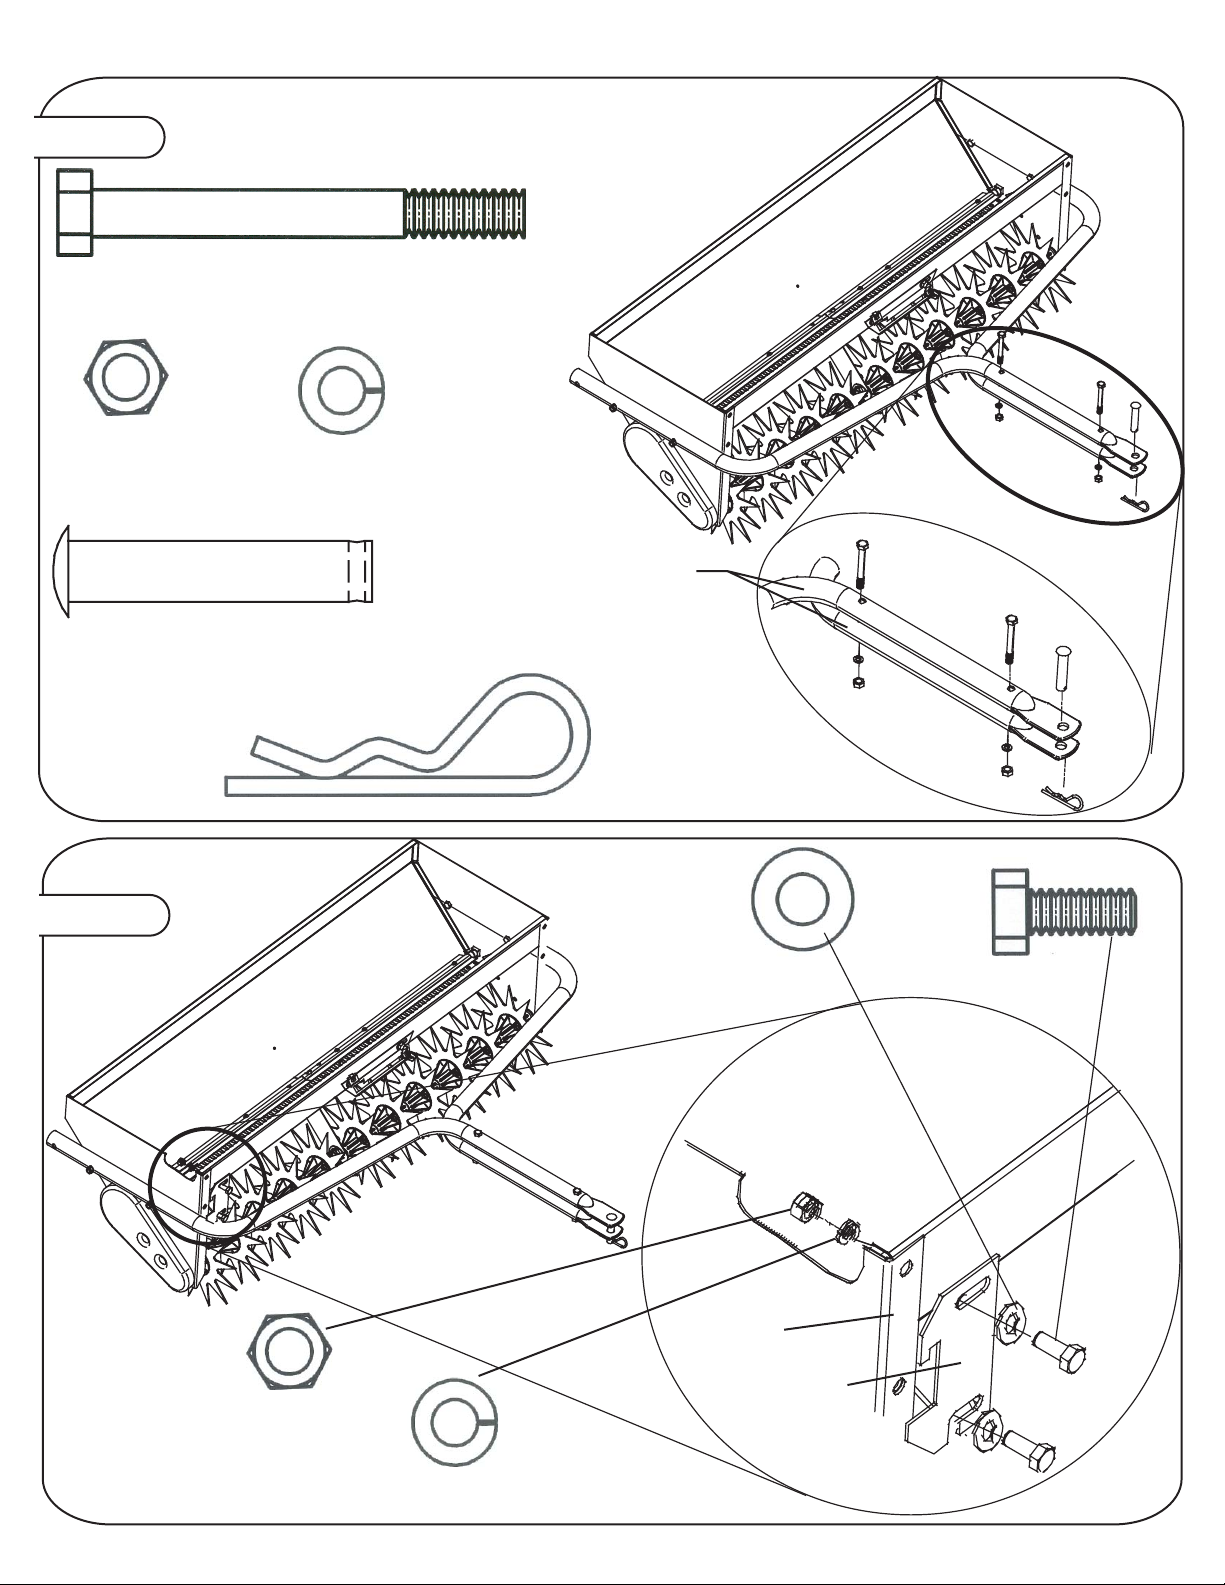
Figure 3.
Qty. 2
(37)Hex Bolt, 5/16" x 3"
Qty. 2
(40)Hex Nut, 5/16"
Qty. 1
(51)Hairpin Cotter
(NOT TO SCALE)
Figure 4.
Qty. 2
(44)Lock Washer, 5/16"
Qty. 1
(50)Drawbar Pin
1/2" x 2-1/2"
Towbars
Qty. 2
(46)Flat Washer, 5 /16"
Qty. 2
(31)Hex Bolt, 5/16" x 3/4"
Qty. 2
(40)Hex Nut, 5/16"
Qty. 2
(44)Lock Washer, 5/16"
Hopper
Transport Plate
L-1711-BH.-3
7.
Page 8
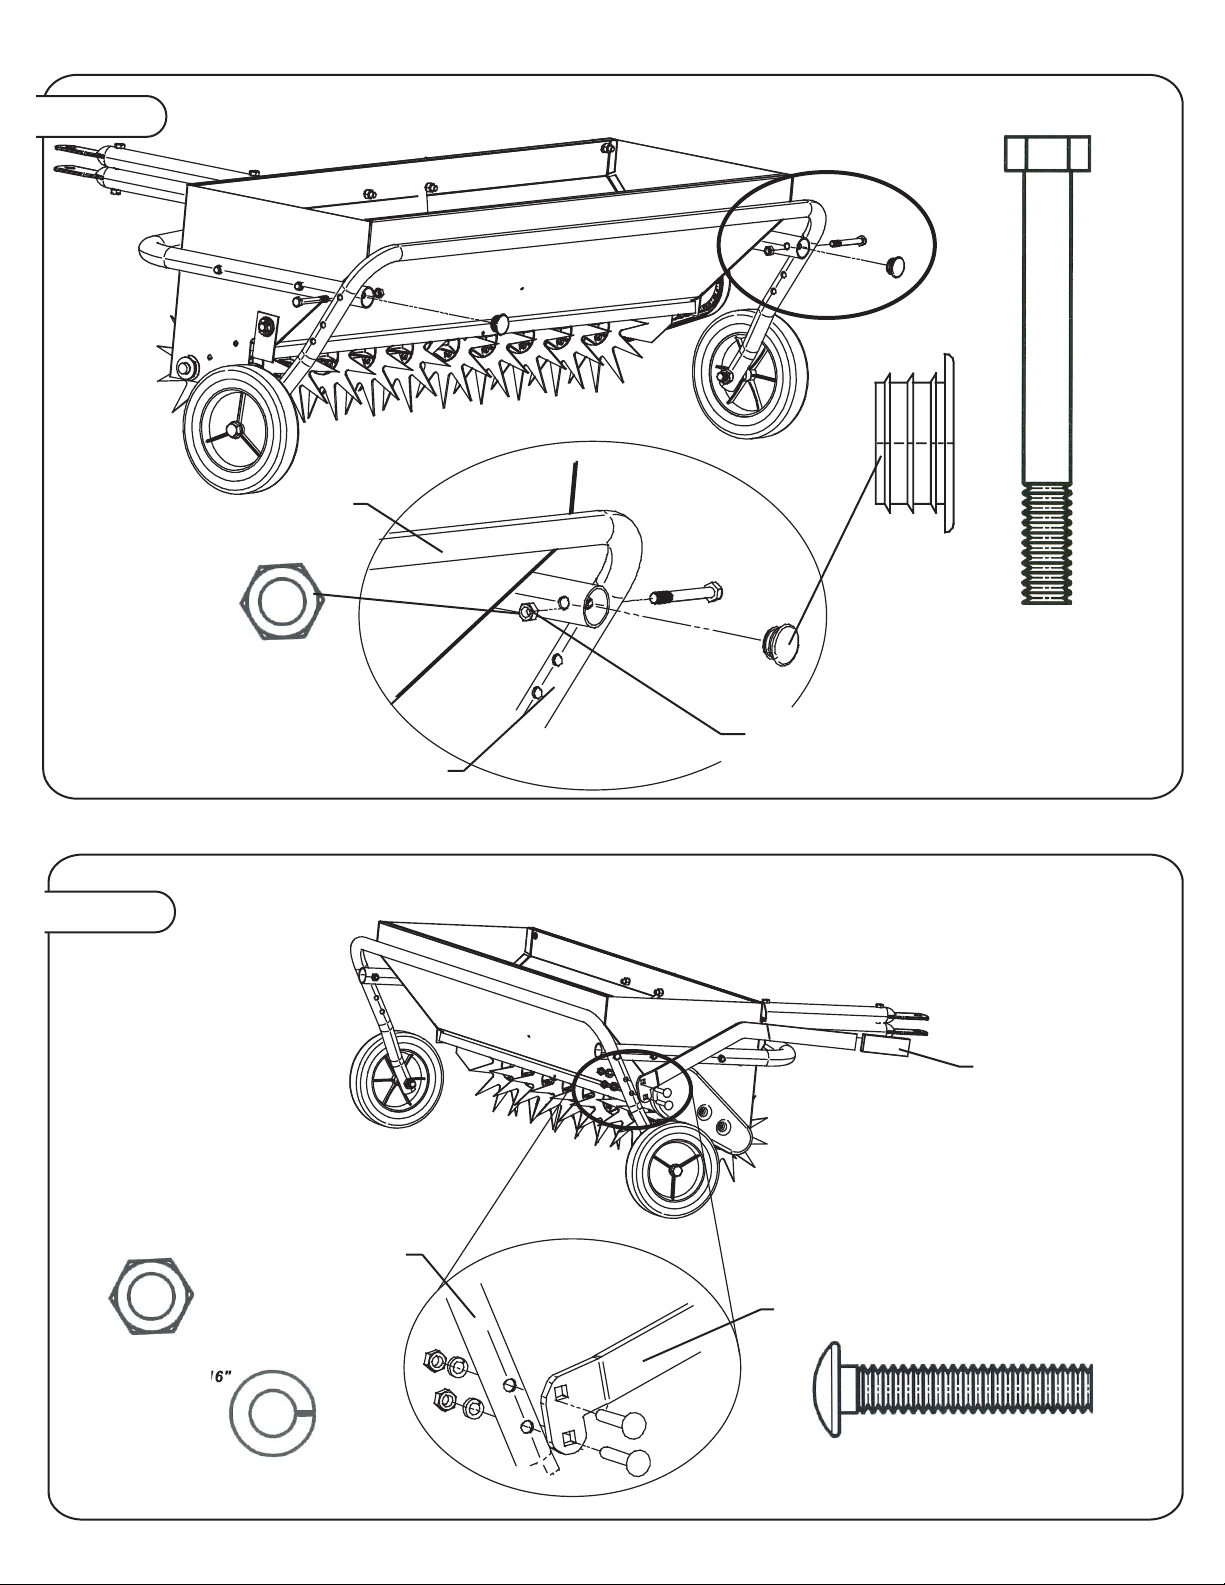
Figure 5.
/1
Towbars
Qty. 2
(2)Hex Lock Nut, 5/16"
Qty. 2
(13)Cap Tube
Qty. 2
(37)Hex Bolt, 5/16" x 3"
Figure 6.
Wheel Support
Wheel Support
Do not over tighten nut, Wheel Support
must pivot.
Install Grip
(not shown)
Lift Handle
8.
Qty. 2
40)Hex Nut, 5
L-1711-BH.-3
Qty. 2
(44)Lock Washer, 5/16"
Qty. 2
(42)Carriage Bolt, 5/16" x 1-3/4"
Page 9
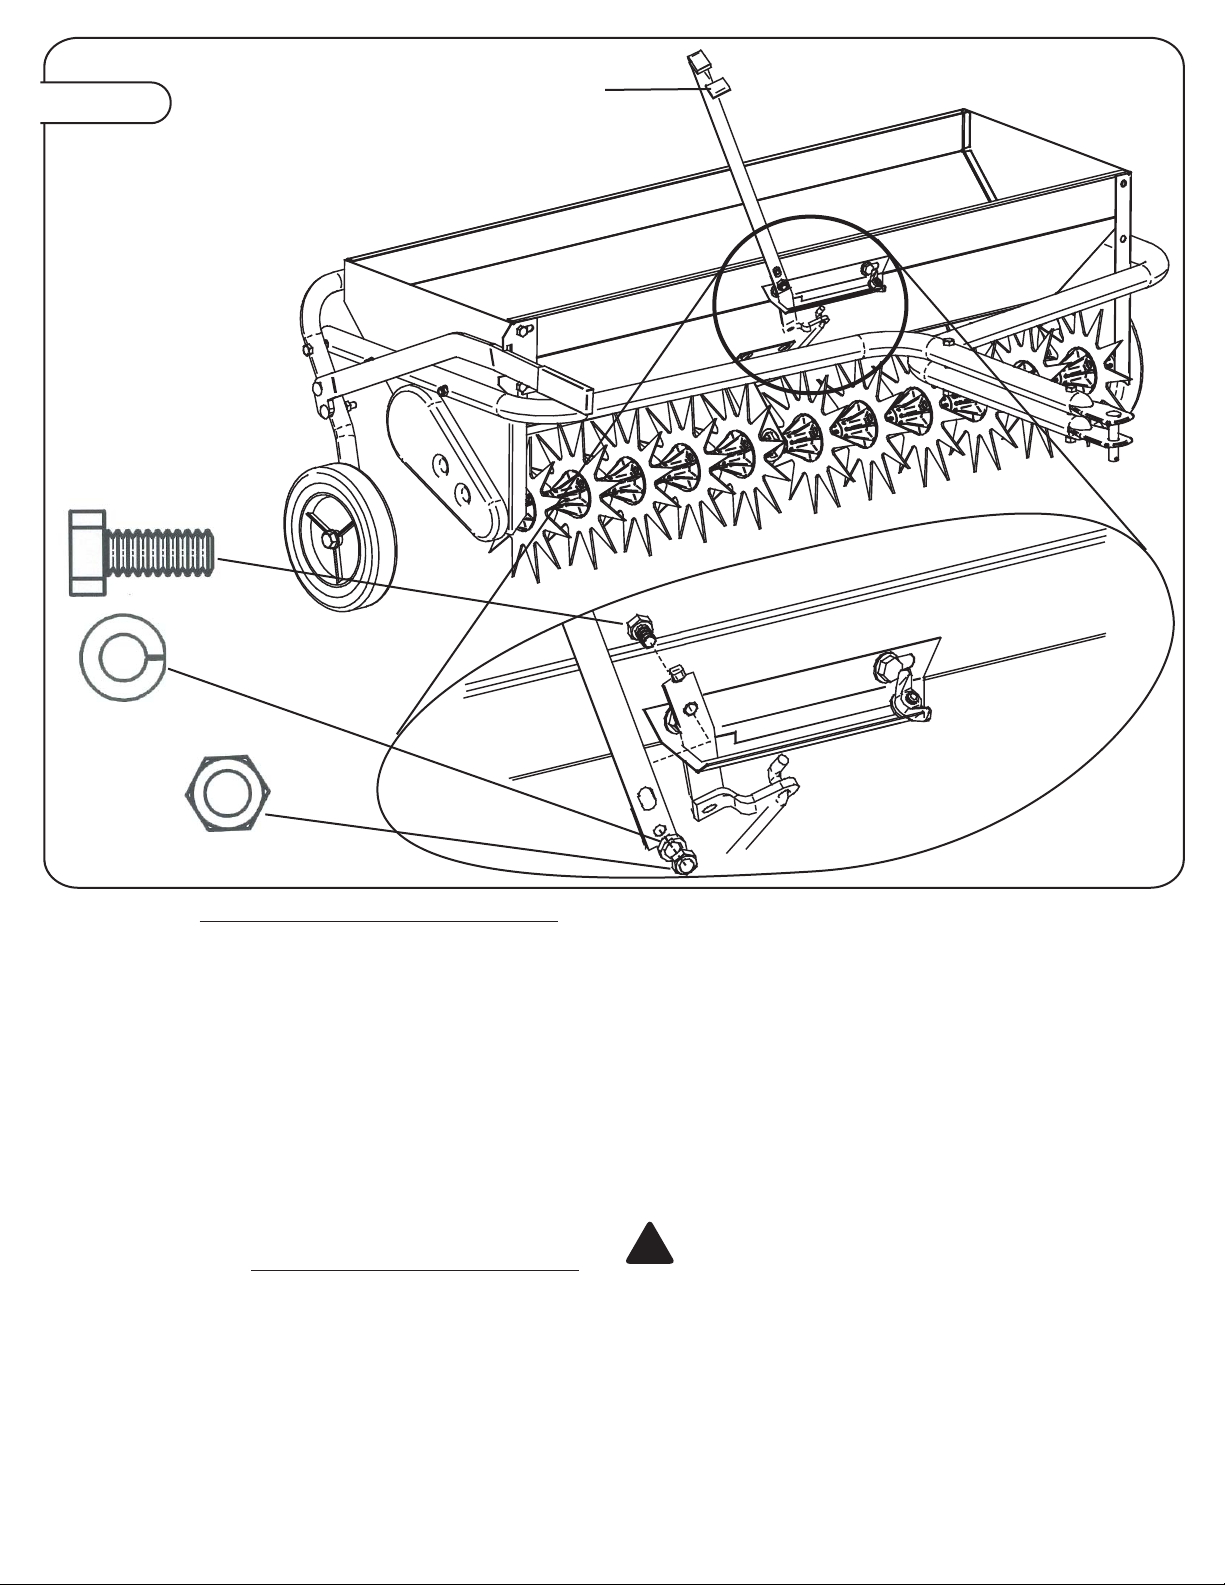
Figure 7.
Qty. 1
(31)Hex Bolt, 5/16" x 3/4"
Make sure Lever points
forward.
Install Grip (not shown)
Qty. 1
(44)Lock Washer, 5/16"
Qty. 1
(40)Hex Nut, 5/16"
OPERATION
WHEN TO USE
Your Aerator-Spreader should not be used when lawn
conditions are too wet or too dry. This can be determined by
digging a small amount of soil (about three inches deep) and
checking it. If soil appears powdery and brittle- its too dry.
Wait until a later date, after a rainfall. If soil appears damp,
roll it up in the palm of your hand- if it forms a ball that
doesn't break up when it hits the ground, it is too wet. Wait
until a later date for soil to dry some. Ideally, the soil should
fall apart.
NOTE: If soil is too wet, the aerator tines will penetrate too
deep and your tractor could loose traction, causing lawn
damage. If soil is too dry, the aerator tines will not penetrate
soil properly.
:
OPERATING TIPS:
Attach the Aerator-Spreader to your tractor using the 1/2"
Drawbar Pin and Hairpin Cotter furnished (See Fig. 3). Pull
Transport Handle towards tractor and lock into raised
position (transport wheels are engaged) (See Fig. 7).
Set the Flow Control to proper setting using the Nylon Wing
Nut (see Alternative Flow Control Setting Chart on p.10) and
move the Control Lever to closed ("0") position.
Fill Hopper with material to be spread at operating site.
Break up all lumps as material as you fill the Hopper.
The recommended operating speed is slightly faster than a
brisk walk- 3 to 5 MPH. Set the throttle/gear selector to
obtain this speed. To obtain this speed Calibrate your tractor
to 3 M.P.H. by:
Measure a distance of 20 feet on flat, level surface.
Adjust tractor throttle and select a gear to cover this
distance in 4.5 seconds.
To adjust for 4 m.p.h., cover same distance in 3.4
seconds.
Drive tractor/mower forward as you open the flow control
with the Control Lever.
CAUTION! Avoid stopping unit with flow control in
"OPEN" position- material will continue to flow
!
through hopper opening. If fertilizer is deposited too
heavily in a small area, soak down thoroughly with a
garden hose to prevent burning of lawn.
Aerating tines must be in the lowered position in order for
Aerator-Spreader to operate. Agitator is driven off of the
aerator tines.
IMPORTANT:
When backing up, carefully back STRAIGHT to avoid "jackknifing", which can cause damage to your equipment.
L-1711-BH.-3
9.
Page 10

OPERATION Continued...
FLOW CONTROL ADJUSTMENT
Open and Close: The material flow is shut off by moving
Control Lever to the left and locking into "V" notch on
calibration plate.
Flow Setting: To set the flow rate, put the Control Lever in
the shut-off position (in "V" notch). Determine your required
number setting as described below. Loosen the nylon wing
nut and slide to the desired number setting and retighten the
wing nut. Release the control strap and it will open to the
pre-set position.
DETERMINING FLOW CONTROL SETTING
NUMBER
NOTE: Fertilizer application rates as described are affected
by humidity and the moisture content of the material;
therefore, minor setting adjustments may be necessary to
compensate for these conditions.
APPLICATION RATE CHART
MATERIAL AVERAGE FLOW
TYPE RECOMMENDED CONTROL
USAGE SETTING
SEEDS:
Ky. Bluegrass 1 lb/1000 sq. ft. 4
Rye 2 lb/1000 sq. ft. 7
Tall Lawn & 3 lb/1000 sq. ft. 12
#31 Fescue
FERTILIZER:
Lawn 3.2 lb/1000 sq. ft. 5-1/4
Food(33-3-10)
Weed & 3.2 lb/1000 sq. ft. 5-1/4
Feed(33-3-5)
ALTERNATIVE FLOW CONTROL SETTING
To determine the required setting for materials not listed on
chart, proceed as follows:
Determine from material bag, the amount of material to be
spread over a designated area. Example: "The contents of
this bag (25 lbs.) will cover 5000 square feet."
Set the spreader flow control at the approximate flow control
setting.
Place 5 pounds of material in the Hopper. Weigh the
material before and after spreading 100 square feet to
determine amount of material used.
Move unit to measure area, lower aerator tines, open Flow
Control Lever. Drive the 40 ft. course, stop unit and close
Flow Control Lever.
Remove and weigh remaining material. Subtract this weight
from 5 pounds to determine material used: If too much
material is used: Set Flow Control ONE number LOWER
and try again. If too little material is used: Set Flow Control
ONE number HIGHER and try again.
After determining proper setting always record the type of
material and the setting for future use.
ALTERNATIVE FLOW CONTROL SETTING CHART
MATERIAL APPROX. APPROX. FLOW
COARSENESS COVERAGE CONTROL
Sq. Ft. Setting
Wt. Cov.
FERTILIZER:
Very Coarse .5lb. 100 9
(large, heavy 1.0lb. 100 12
pellets, & grain) 1.5lb. 100 15
Medium Coarse .5lb. 100 7
(Pellets & 1.0 lb. 100 10
granules) 1.5 lb. 100 13
Light Material .1 lb. 100 3 1/2
(Nitrogen, etc.) .2 lb. 100 4 1/2
.3 lb. 100 5 1/2
SEEDS:
Large .3 lb. 100 12
(Ky. 31 Fescue, .5 lb. 100 16
etc.) .7 lb. 100 19
Medium .2 lb. 100 7
(Rye, etc.) .4 lb. 100 11
.6 lb. 100 14
Fine .1 lb. 100 4
(Blugrass, Lawn .2 lb. 100 4 1/2
Fescue, etc.) .3 lb. 100 5
Determine the amount of material required to cover 100
square feet as follows:
-Add two zeros to bag weight. Example: 2500
-Divide this number by the number of square feet
on the bag.Example: 2500 divided by 5000 = .5
pounds of material for 100 square feet. NOTE: To
convert this weight to ounces, simply multiply by 16
(16 oz./lb) Example: .5 lb. x 16 = 8 oz.
Determine approximate Flow Control Setting by using chart
below showing type of material to spread.
Measure off a distance of 40 feet in your yard. This is the
distance your 30" spreader must travel in order to cover 100
square feet.(2.5 ft. (30") x 40 ft. = 100 sq ft.) For 40"
spreader measure off a distnce of 30 feet in your yard, the
distance to cover 100 square feet.
(3.33 ft. (40") x 30 ft. = 100 sq ft.)
10.
L-1711-BH.-3
MAINTENANCE:
Should rust appear on any other part of your AeratorSpreader, sand lightly to remove rust and coat lightly with
enamel.
Apply a drop of lubricating oil to each nylon bearing (aerator
tine shaft, agitator shaft, and wheels) before each use.
Be sure to remove all unused fertilizers from hopper
immediately after use and clean with water.
To prevent rust in aerator tines, apply a light coat of oil on
the working areas of tines after each use.
After each use, service unit as described and store in a dry
area, shielding tines to avoid injury.
Page 11

Limited Warranty
Brinly-Hardy Company warrants only to the original retail purchaser that this product will remain free of defects in
workmanship and materials under normal use and service for a period of two (2) years (NOTE: ninety (90) days for
commercial or rental use) commencing with the date of purchase.
Any parts found to be defective within the warranty period will be replaced, with proof of date of purchase, at Brinly-Hardy
Company's expense. Our obligation under this warranty is expressly limited to replacement or repair, at our option of parts,
which are defective in material or workmanship within thirty (30) days of receipt of the parts. This warranty does not apply to
damage caused by unreasonable use, including failure to provide necessary maintenance, nor does it apply to any
transportation or labor charges.
WE MAKE NO OTHER EXPRESS WARRANTY NOR IS ANYONE AUTHORIZED TO MAKE ANY ON OUR BEHALF. ANY
IMPLIED OR STATUTORY WARRANTIES, INCLUDING ANY WARRANTY OF MERCHANTABILITY OR FITNESS FOR A
PARTICULAR PURPOSE, ARE LIMITED TO THE DURATION OF THIS WRITTEN WARRANTY. WE SHALL NOT BE LIABLE
FOR CONSEQUENTIAL OR INCIDENTAL DAMAGES OF ANY KIND.
BRINLY-HARDY COMPANY TOLL-FREE 1-877-728-8224
MADE IN THE U.S.A.
L-1711-BH.-3
11.
 Loading...