

Page 1

INSTRUCTION SHEET
DETHATCHER KIT
MODEL:
DK-422LX
FOR USE WITH SWEEPER MODEL:
STS-422LX
LPSTS-42JD
• Assembly
• Installation
• Operation
• Repair Parts
For use with Riders
and Lawn/Garden Tractors
For the latest product updates & setup tips:
Visit us on the web!
www.brinly.com
Important: This manual contains information for the safety
of persons and property. Read it carefully before
assembly and operation of the equipment!
L-1660-D
Page 2

CONGRATULATIONS on your new Brinly-Hardy Dethatcher Kit! Your kit has been designed, engineered and manufactured to
give you the best possible dependability and performance.
Should you experience any problem you can not easily remedy, please do not hesitate to contact our knowledgable customer
service department toll-free at 1-877-728-8224. We have competent, well-trained technicians and the proper tools to service or
repair your Sweeper and Dethatcher Kit.
Please read and retain this manual. The instructions will enable you to assemble and maintain your dethatcher properly. And
please, always observe the “Safety Rules”.
CUSTOMER RESPONSIBILITIES
Read and Observe the “Safety Rules”.
Follow a regular schedule in maintaining, caring for and using your Brinly-Hardy Products.
TABLE OF CONTENTS
SAFETY RULES ...................................................2
HARDWARE .........................................................3
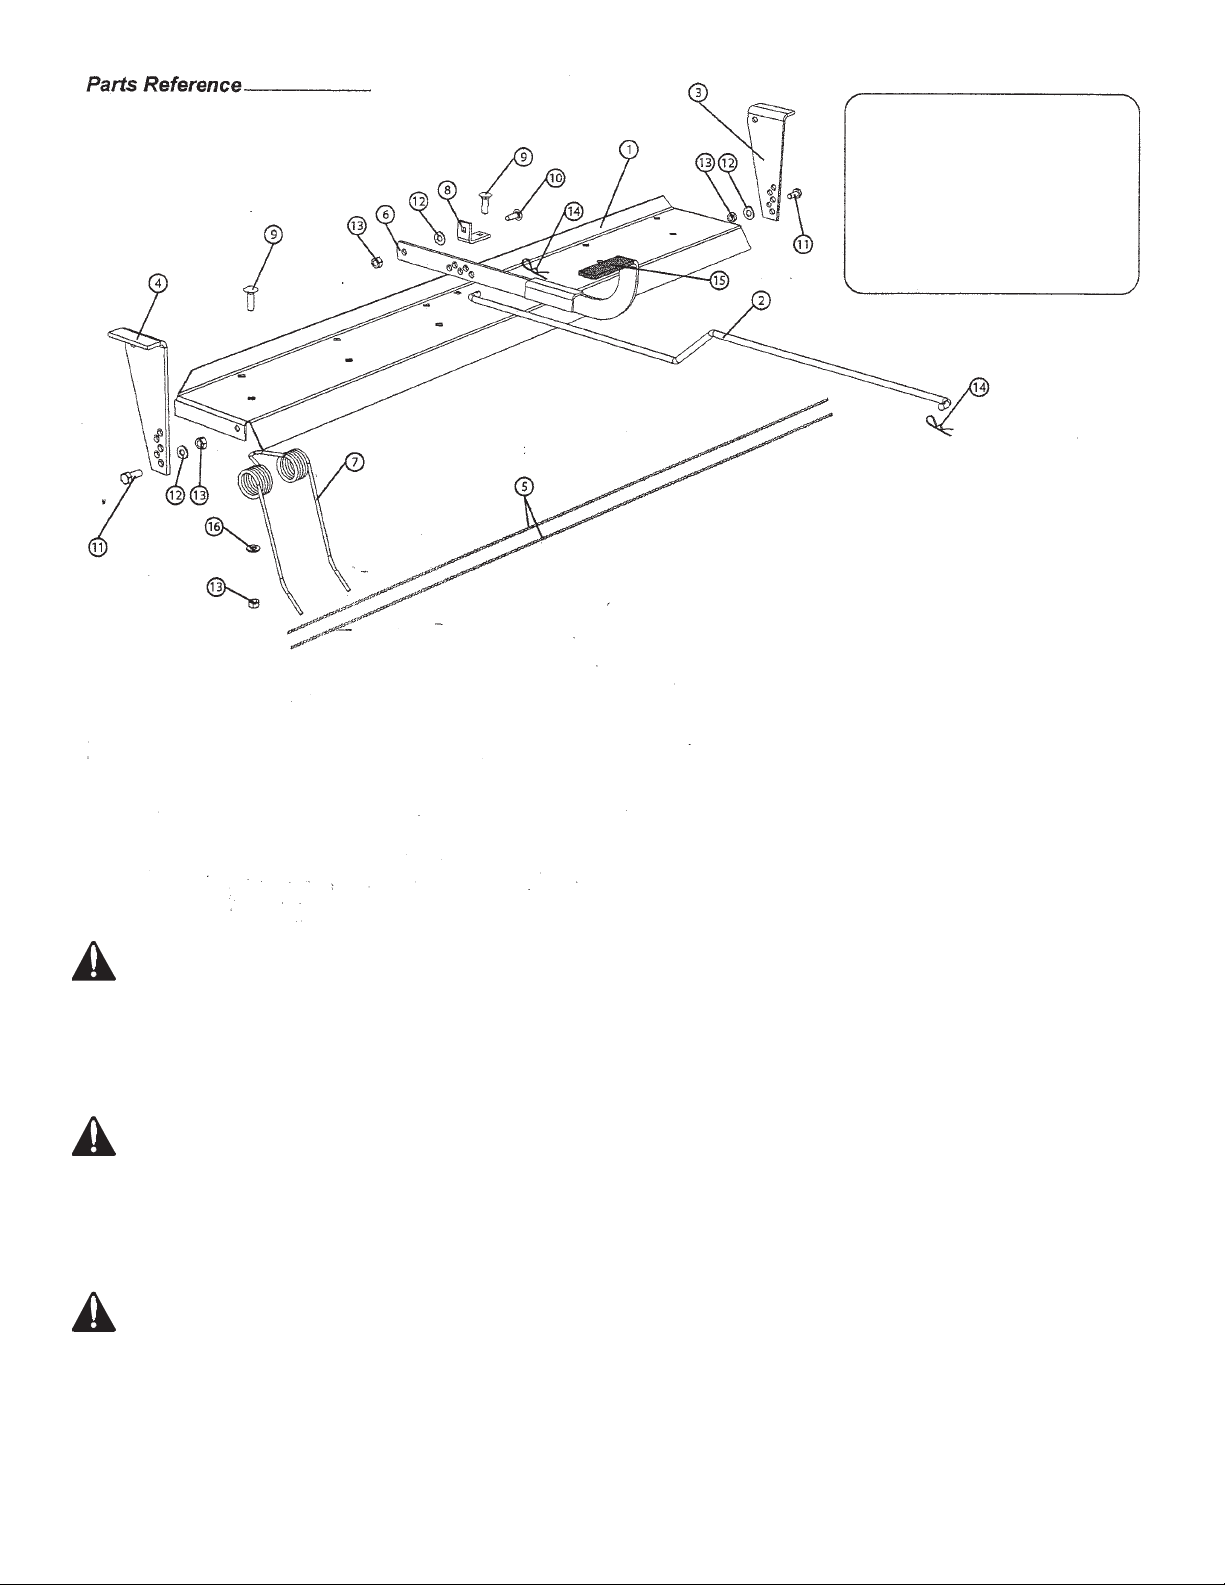
PARTS REFERENCE ...........................................4
PARTS LIST ..........................................................4
MAINTENANCE ....................................................4
OPERA TION .........................................................4
ASSEMBL Y ...........................................................5,6
RULES FOR SAFE OPERATION _____________________________________________________
• Know controls and how to stop quickly, READ THE OWNER’S MANUAL.
• Do not allow children to operate the vehicle, do not allow adults to operate without proper instruction or without having
read the owner’s manual.
• Do not carry passengers. Keep children and pets a safe distance away.
• Always wear substantial footwear. Do not wear loose-fi tting clothing that can get caught in moving parts.
• Keep your eyes and mind on your tractor/attachment and area being covered. Do not let other interests distract you.
• Stay alert for holes in the terrain and other hidden hazards.
• Do not drive close to creeks, ditches and public highways.
• Watch out for traffi c when crossing or near roadways.
• Before you operate any feature of this attachment or towing vehicle, observe your surroundings and look for bystanders.
• When using any attachment, don’t allow anyone near the vehicle while in operation.
• Keep the vehicle and attachment in good operating condition and keep safety devices in place.
• Keep all nuts, bolts and screws tight to be sure the equipment is in safe working condition.
• The vehicle and attachment should be stopped and inspected for damage after striking a foreign object. The damage
should be repaired before restarting and operating the equipment.
• See tractor equipment owner’s manual for safe operation of the equipment.
Caution!
This product is not designed for use in sand or gravel, or to carry extra weight.
Lock nuts must be used where specifi ed. They have a nylon insert in the hole where used.
When backing - carefully back straight to avoid jackknifi ng, which could result in damage to equipment.
OPERATING HINTS _______________________________________________________________
Remove any large objects (branches, rocks, wood, etc.) from the operation area that are too big to be picked up by Sweeper w/
Dethatcher Kit.
Mow lawn before sweeping, especially when leaves are present.
For best results, sweep only when conditions are DRY.
To dump load, carefully back up to pile and pull rope until material is clear of hamper, then drive away from pile. Release rope to
return hamper.
This symbol will help to point out important
safety precautions throughout this manual.
If means - ATTENTION!
BECOME ALERT! Your safety is involved.
L-1660-D
2
Page 3
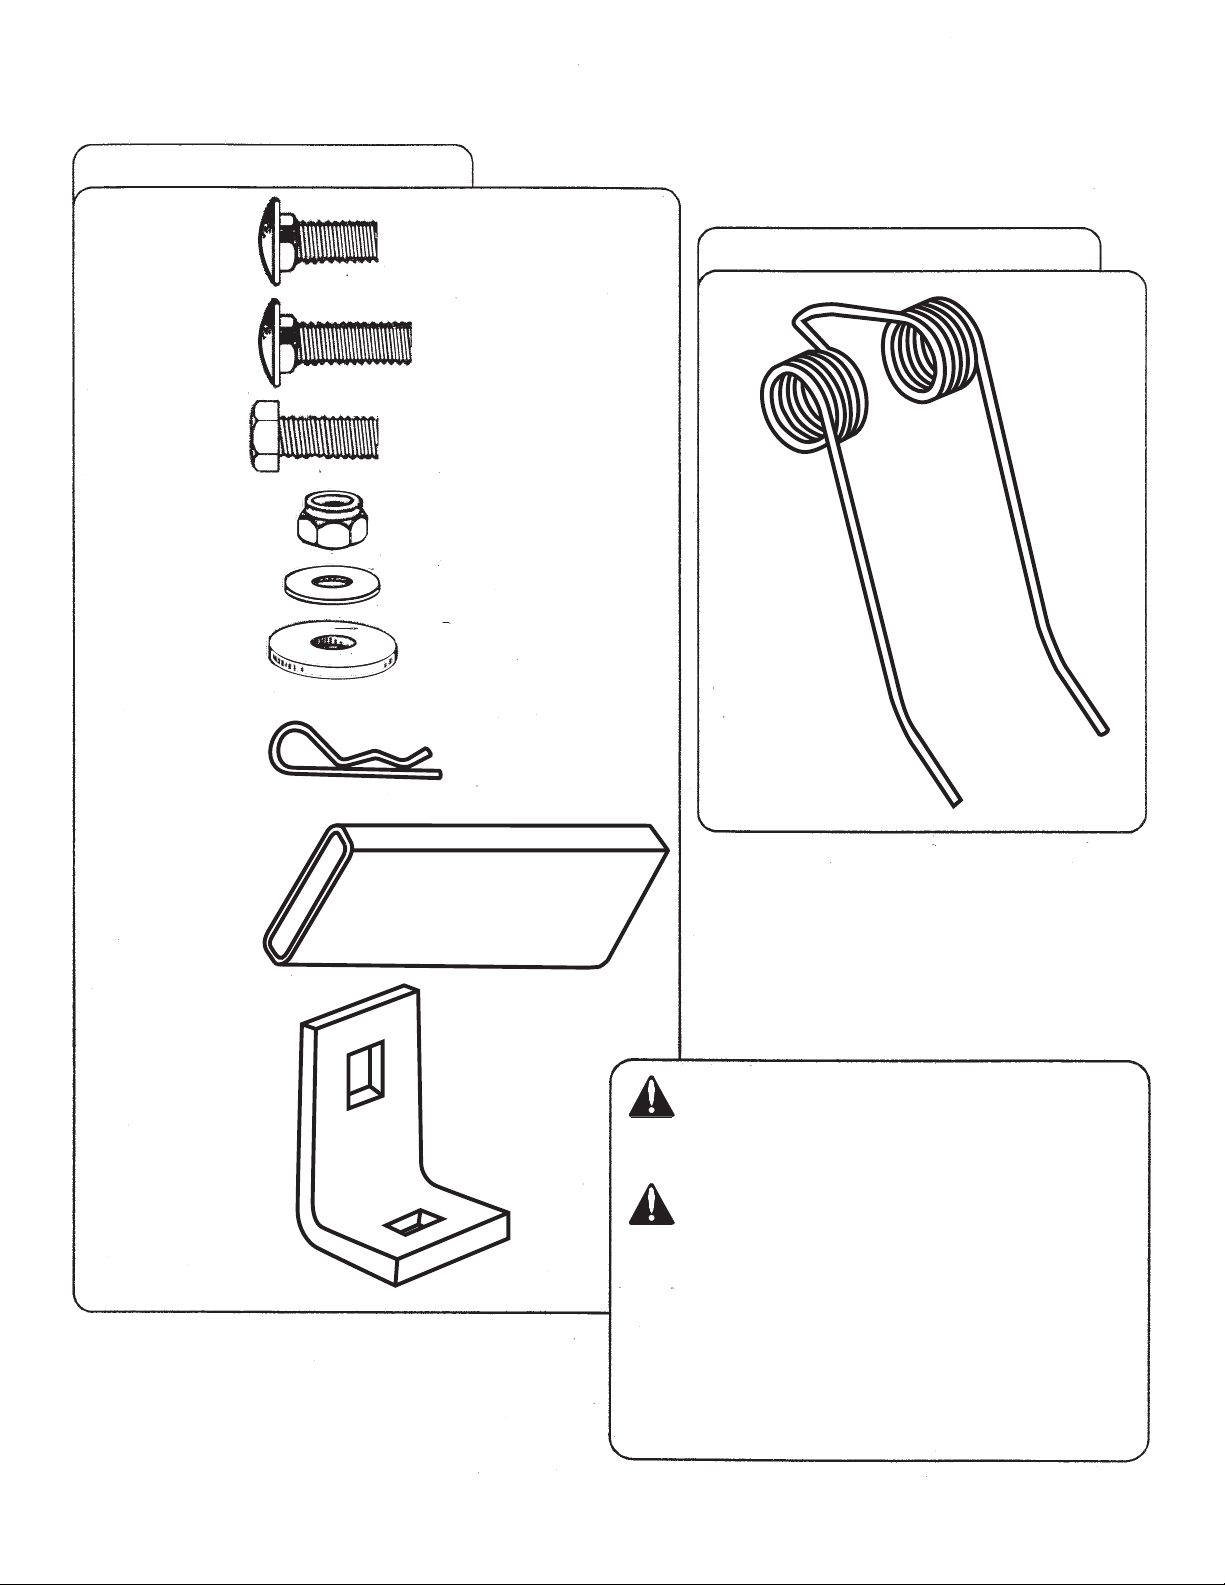
HARDWARE REFERENCE
This page is for reference use only
All items shown full size unless otherwise
specific.
Hardware Bag “A”
9
(13) Carriage Bolt, 5/16” x 3/4”
10
(1) Carriage Bolt, 5/16” x 1”
11
(2) Hex Bolt, 5/16” x 3/4”
13
(16) 5/16” Nylon Lock Nut
12
(3) 5/16” Flat Washer
16
(12) Special Washer (.390 i.d)
14
(2) Hairpin Cotter
(Part No. Z1689)
Hardware Bag “B” (Part No. Z1688)
7
(12) Wire Tine
not to scale
15
(1) Flat Grip (5/16” x 4”)
not to scale
8
(1) Pivot Bracket
not to scale
Tools Required for Assembly:
* 1/2” wrench (2)
* Pair slip joint pliers
* Level
* Tape Measure
IMPORTANT!
This unit mounts to your STS-422 LX or LPSTS-42JD 42” Lawn
Sweeper. Make sure your Sweeper Hitch Clevis Assembly is
assembled as called out in its Owner’s Manual (Page 7, Fig.
4&5).
IMPORTANT: To insure proper adjustment of Dethatcher
Kit, the Sweeper Upper Frame Assembly must be Parallel
to Ground.
With your Tractor/Riding Mower on a flat, level surface, attach
the Sweeper and adjust the Lift Handle of Sweeper to position
Brushes approximately 1” off ground. Using a Level, check
Upper Frame Assembly for “level” FRONT TO BACK. Adjust
the Hitch Clevis Assembly of Sweeper UP or DOWN to
maintain”level” position of Frame. (Refer to Page. 6, Fig 6 of
Sweeper Manual).
3
L-1660-D
Page 4
To Order Parts:
Brinly-Hardy Company
3230 Industrial Parkway
Jeffersonville, IN 47130
877-728-8224
Or visit us on the web:
www.brinly.com
[email protected]
Parts List _______________________
REF. NO. PART NO. DESCRIPTION QTY.
1 R-2308-10 Tray 1
2 R-2309-01 Transport Link 1
3 R-2310L-10 Mount Bracket, L.H. 1
4 R-2310R-10 Mount Bracket, R.H. 1
5 R-2311 Safety Wire 2
6 R-2312-10 Lift Handle 1
** 7 R-628 Wire Tine 12
* 8 R-2315-10 Pivot Bracket 1
* 9 11M1012P 5/16” x 3/4” Carriage Bolt 13
* 10 11M1016P 5/16” x 1” Carriage Bolt 1
* 11 2M1012P 5/16” x 3/4” Hex Bolt 2
* 12 45M1111P 5/16” Flat Washer 3
* 13 B-4786 5/16” Nylon Lock Nut 16
* 14 B-983 Hairpin Cotter 2
* 15 R-1882 Flat Grip (5/16” x 4”) 1
* 16 R-618 Special Washer (.390 i.d.) 12
** -Hardware Bag “A” - Z-1690
** -Hardware Bag “B” - Z-1688
MAINTENANCE ________________________________________________________________________
The key to years of trouble-free service is to keep your Sweeper and Dethatcher Kit clean and dry.
Never allow wet material to remain in Hamper for extended periods of time.
Occasionally check all moving parts for free movement and, if necessary, lubricate with oil.
Should rust develop, sand lightly and then paint area with enamel.
Periodically check all fasteners for tightness.
TRACTOR/RIDING MOWER SPEED _________________________________________________________
The faster the Tractor/Riding Mower speed, the further the material is thrown into the Hamper. Operate at a speed that will throw material
to the back of the Hamper. Under normal conditions, 3-4 M.P.H, or the speed of a brisk walk.
To calibrate your tractor to 3 m.p.h.:
• Measure a distance of 20 feet on a fl at, level surface.
• Adjust tractor throttle and select a gear to cover this distance in 4.5 seconds
• To adjust for 4 m.p.h., cover the same measured distance in 3.4 seconds.
OPERATION: ____________________________________________________________________________
The use of the Dethatcher-Sweeper combination will accomplish Thatch removal and Sweeping at the same time. When adjusted properly ,
the Dethatcher is designed to comb through your lawn-fl ipping out harmful Thatch and collecting it in the Hamper. Tines can be lowered to
actually contact ground for more aggressive operation (such as seedbed preparation, etc.). Refer to Fig. 6. For best results, lawn should be
normal height (not too high) and relatively dry prior to Dethatching.
If you prefer to operate the Sweeper only, simply move the Lift Handle to the vertical position (Tines facing to REAR).
L-1660-D
4
Page 5
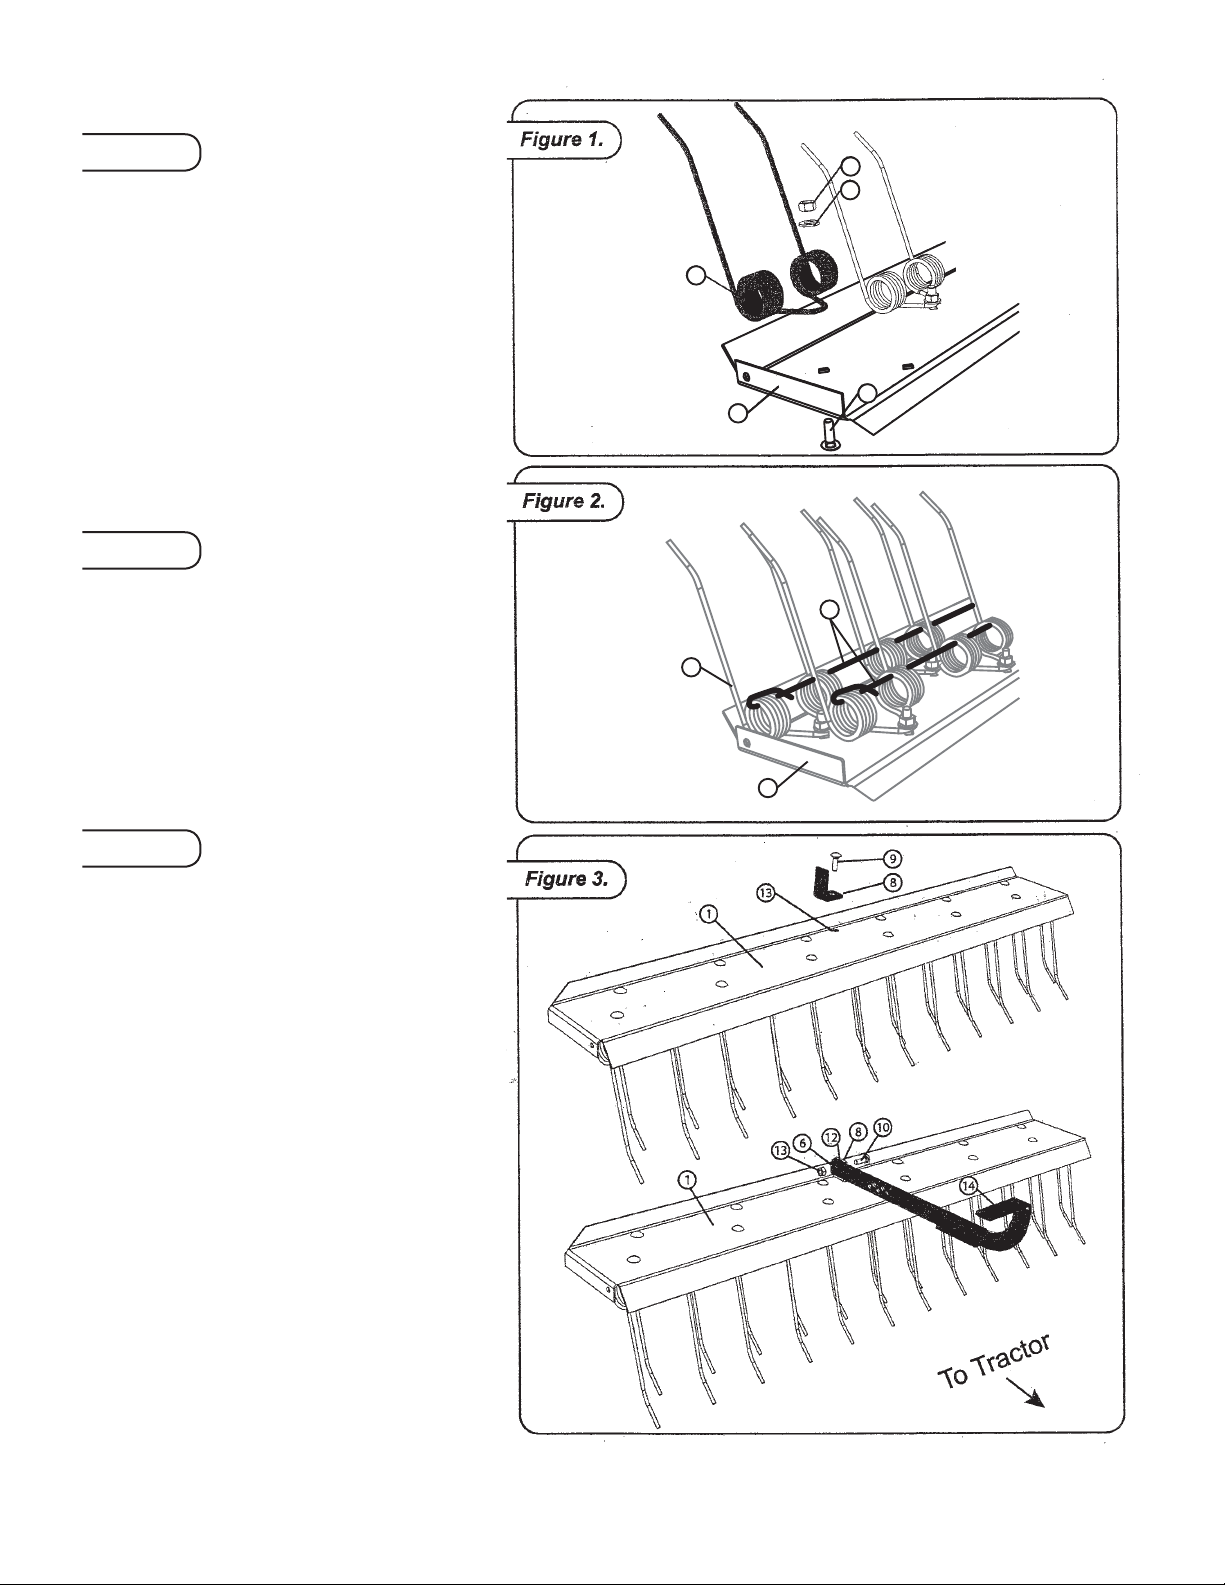
FRONT FRAME & LIFT ASSEMBLY
Figure 1
Use Hardware Bags “A” & “B”
1. Lay the Tray (1) upside down. The front of
the Tray will have three sides (fl anges) facing
UP.
2. Assemble the twelve Wire Tines (7) to under-
side of Tray (1) as shown using 5/16” x 3/4”
Carriage Bolts (9), Special Washers (16 over “U” loops in Tines) and 5/16” Nylon Lock
Nuts (13).
NOTE: Center hole in back row of Tray (1)
(fourth hole from end) is for the pivot Bracket
later in Step 6.
3. With Tine Tips FORWARD and positioned
PARALLEL with front fl ange of Tray (1),
tighten all securely.
Figure 2
4. Feed and center each Safety Wire through
the two rows of Wire Tines (7) (inside of coils)
to opposite sides.
5. Using Pair of Pliers, bend both ends of each
Safety Wire (5) as shown in Fig. 2.
NOTE: Safety Wires connect all Wire Tines
together in case one loosens or breaks. A
safety wire must be installed through both
rows of tines as shown.
13
16
7
9
1
5
7
1
Figure 3
6. Attach Pivot Bracket (8 - short formed leg
against the tray as shown, long leg to face left
side) to center hole at back of the Tray(1)
7. Secure using 5/16” x 3/4” Carriage Bolt (9)
and 5/16” Lock Nut (13). Tighten securely.
8. Attach Lift Handle (6) to outside of Pivot
Bracket (8) using 5/16” x 1” Carriage Bolt
(10), 5/16” Flat Washer (12 - between Pivot
Bracket and Lift Handle) and 5/16” Nylon
Lock Nut (13). Tighten until Lift Handle is
barely free to move.
9. Slide Flat Grip (14) over end of Lift Handle.
5
L-1660-D
Page 6
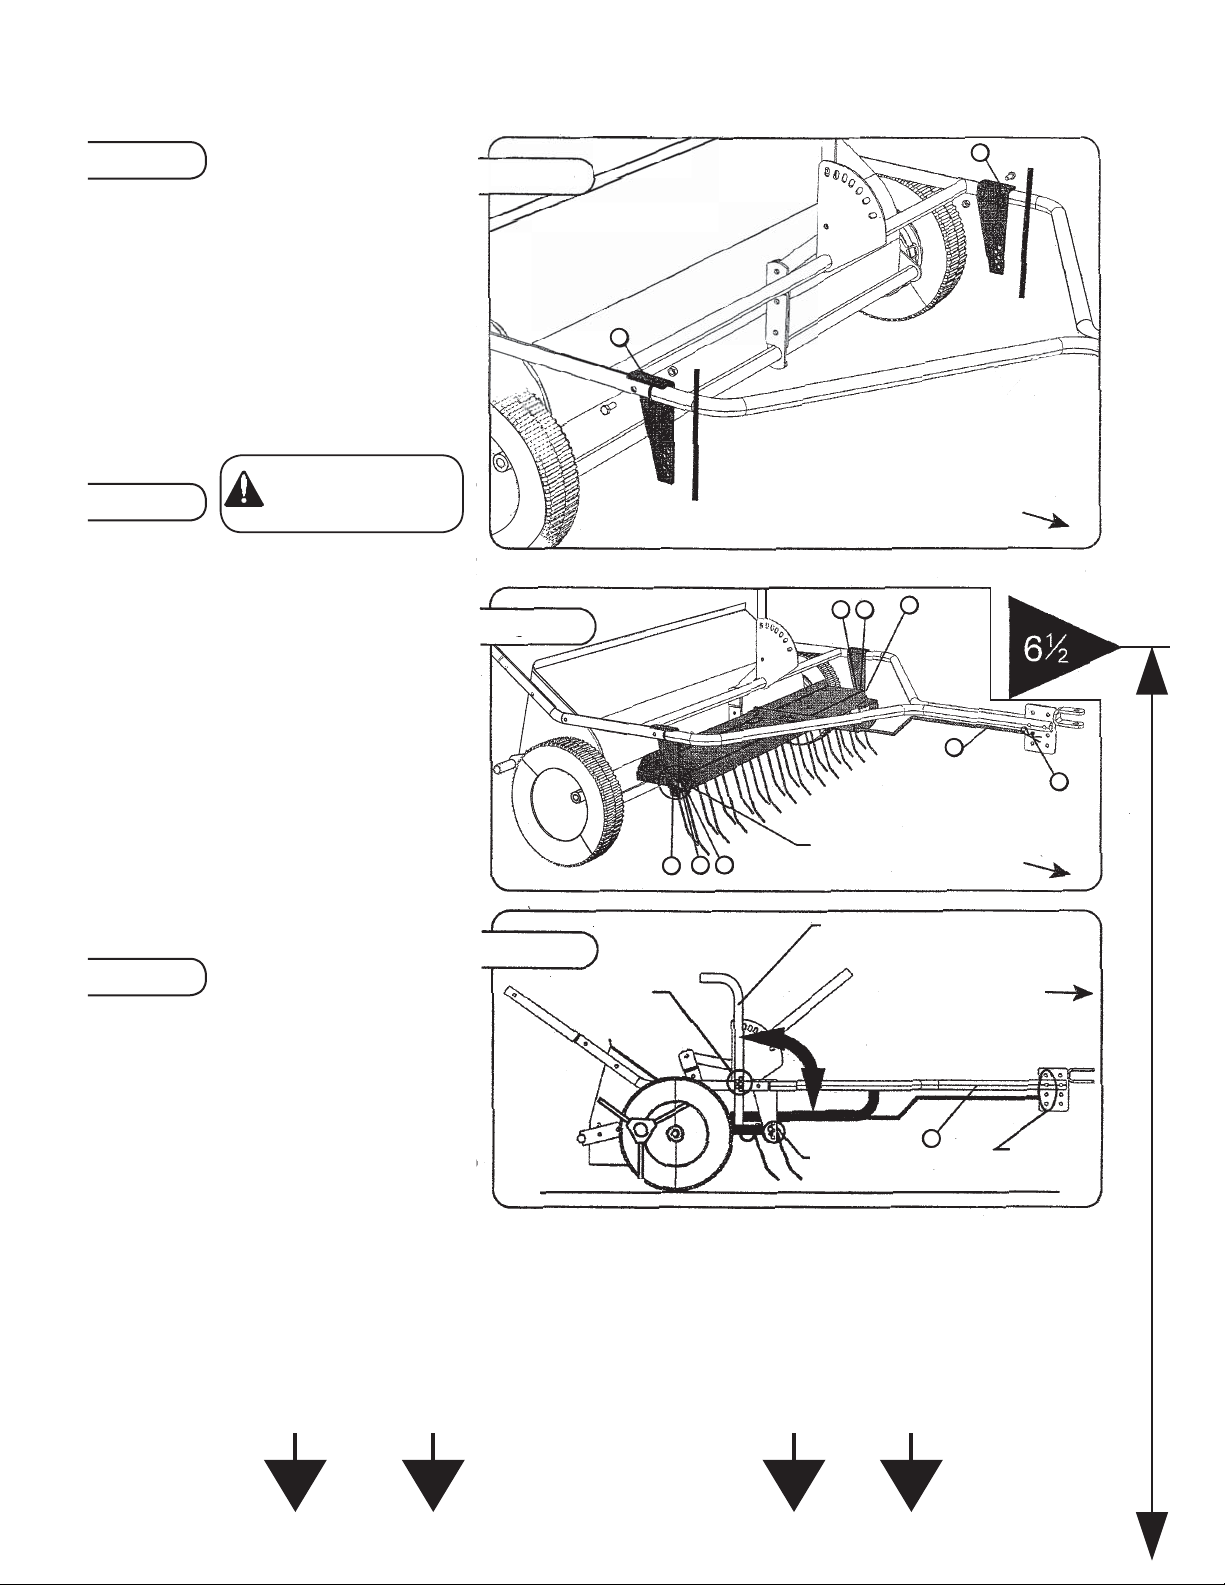
HITCH ASSEMBL Y
Figure 4
Use Hardware Bag “A”
Figure 4
Figure 4
3
10. Remove the two 5/16” x 1-1/2” Hex Bolts
attaching Tow Tubes and Upper Frame
Assembly of Sweeper (at sides).
11. Attach the Left and Right-hand Mount
Brackets (3 & 4) to inside of Tow Tubes on
Sweeper using the previously Removed
hardware. (FINGER TIGHTEN ONLY)
4
12. Notice that the formed legs on Mount
Brackets (3 & 4) assemble over top of Tow
Tubes and the “straight” edge is to front of
Tow Tubes
Sweeper (lower group of adjusting holes
FORWARD).
Figure 5
PLEASE BE SURE YOU
HAVE READ THE NOTE
ON PAGE 3 BEFORE
CONTINUING.
“Straight” edge
to tractor
To Tractor
13. Position the previously assembled
Dethatcher inside Tow Tubes with
Dethatcher Tine T ips facing FORW ARD.
11
14. Notice the series of adjusting holes on the
Right and Left-hand Mount Brackets (3 &
Figure 5
1213
4). Measuring from Ground UP, locate the
holes at each side that are approximately
6-1/2” (this page has a large arrow with a
6-1/2” mark for your convenience).
15. Position the Dethatcher Tray (1) so the
2
holes at sides line up with the selection
made in step 14.
16. Attach at these holes using two 5/16” x
3/4” Hex Bolts (11), 5/16” Flat Washers (12
- between the Tray and Mount Brackets)
and 5/16” Lock Nuts (13). Tighten both
1213
11
Adjusting Holes
(Both Sides)
To Tractor
sides until Dethatcher Tray is barely free
to pivot (TIGHTEN FASTENERS FROM
STEP 10).
Figure 6
17. Connect Transport Link (2) to front hole in
Figure 6
Tip Leveling
Adjustment
Lift Handle in Vertical Position
when attaching Transport Link.
To Tractor
Sweeper Hitch Clevis Assembly(directly
above or below Tow Tubes as shown) and
secure with small Hairpin Cotter (14).
18. Raise Lift Handle (6) to vertical position
and attach opposite end of Transport Link
(2) into CENTER adjusting hole in Lift
Handle (6). Secure with other Hairpin
Cotter (14).
Brush Tips = 1” off ground
Tip Height Adjustment
Tine Tips = 1/2” - 1” off ground
2
DETHATCHER TINE TIP ADJUSTMENT
IMPORTANT: Sweeper must be connected to Tractor Riding Equipment and Brush Height adjusted to approximately 1” off ground.
14
Transport Link
Adjustment
For Step 14
Lower Lift Handle (6), locking Transport Link (2) inside “pocket” of Lift Handle. Tray should be LEVEL to slightly higher at front*.
* If Tray is too HIGH at front, raise Handle to vertical position, remove Hairpin Cotter at Lift Handle and move Transport Link one hole to REAR. Reattach
with Hair Pin Cotter. Check for proper position and move additional hole, if necessary, to obtain proper position.
* If Tray is too LOW at front, raise Handle to vertical position, remove Hairpin Cotter at Lift Handle and move Transport Link one hole to FRONT. Reattach
with Hair Pin Cotter. Check for proper position and move additional hole, if necessary, to obtain proper position.
BOTTOM EDGE TO GROUND
L-1660-D
6
 Loading...