


ROTISSERIE
ASADOR ESTILO ROTISSERIE
FOUR & SIX BURNER GRILLS
OWNER’S MANUAL
MANUAL DEL PROPIETARIO
ASSEMBLY AND OPERATING INSTRUCTIONS
INSTRUCCIONES DE ARMADO Y OPERACIÓN
 WARNING
READ AND FOLLOW ALL
WARNINGS AND INSTRUCTIONS IN THIS MANUAL TO AVOID PERSONAL INJURY, INCLUDING DEATH OR PROPERTY DAMAGE.
SAVE THIS
MANUAL FOR
FUTURE REFERENCE
 ADVERTENCIA
LEA Y SIGA TODAS LAS
ADVERTENCIAS E INSTRUCCIONES EN ESTE MANUAL PARA EVITAR LESIONES PERSONALES, INCLUSO MUERTE O DAÑOS MATERIALES.
GUARDE ESTE MANUAL PARA REFERENCIA FUTURA

IMPORTANT SAFETY
WARNINGS
WE WANT YOU TO ASSEMBLE AND USE YOUR ROTISSERIE AS SAFELY AS POSSIBLE. THE PURPOSE OF THIS SAFETY ALERT SYMBOL  IS TO ATTRACT YOUR ATTENTION TO POSSIBLE HAZARDS AS YOU ASSEMBLE AND USE YOUR ROTISSERIE.
WHEN YOU SEE THE SAFETY ALERT SYMBOL 
PAY CLOSE ATTENTION TO THE INFORMATION WHICH FOLLOWS!
 READ ALL SAFETY WARNINGS AND INSTRUCTIONS CAREFULLY BEFORE ASSEMBLING AND OPERATING YOUR ROTISSERIE.
 WARNING
ELECTRICAL GROUNDING INSTRUCTIONS:
This appliance (rotisserie motor) is equipped with a three-prong (grounding) plug for your protection against electrical shock hazard. It should be plugged directly into a properly grounded three-prong receptacle. DO NOT cut or remove the grounding prong from this plug.
•Always check the grill prior to each use as indicated in the “Pre-Start Check List” section of the Charmglow® Owner’s Manual.
•Keep children and pets away. DO NOT allow children to use or play near the grill or rotisserie.
•DO NOT leave the grill unattended while in use.
•DO NOT use the side burner when using a rotisserie. Burner lid could be hot from prior use.
•To avoid body injury, DO NOT touch spit rod while in use or soon after use, rod can be EXTREMELY HOT.
•Keep any electrical supply cords away from water or hot surfaces.
•DO NOT operate with a damaged cord or plug.
•Turn rotisserie motor switch to “OFF” before removing plug from outlet.
•Unplug the rotisserie motor when not in use and before cleaning.
•DO NOT exceed 12 lbs. of food on the rotisserie.
•Keep a fire extinguisher acceptable for use with gas products close by. Refer to your local authority to determine proper size and type.
•For household use only. DO NOT use the grill or this rotisserie for anything other than its intended purpose.
•DO NOT use while under the influence of drugs or alcohol.
•When using an AC current rotisserie, it must be electrically grounded in
accordance with local codes, or in the absence of local codes:
•In the US: The National Electrical Code – ANSI-NFPA No. 70 – Latest Edition
•In Canada: the Canadian Electrical Code – CSA C22.1
 USE CAUTION AND COMMON SENSE WHEN OPERATING YOUR GAS GRILL. FAILURE TO ADHERE TO THE SAFETY WARNINGS AND GUIDELINES IN THIS MANUAL
COULD RESULT IN SEVERE BODILY INJURY OR PROPERTY DAMAGE.
SAVE THIS MANUAL FOR FUTURE REFERENCE.
1
ASSEMBLY INSTRUCTIONS
 READ ALL SAFETY WARNINGS & ASSEMBLY INSTRUCTIONS CAREFULLY BEFORE ASSEMBLING OR OPERATING YOUR ROTISSERIE.
READ THE OWNERS MANUAL TO THE GRILL
BEFORE ASSEMBLING OR USING THIS ROTISSERIE.
The following tools are required to assemble this ProSeries® Gas Outdoor Grill Rotisserie:
•Phillips & Flathead Screwdrivers
•Adjustable Wrench
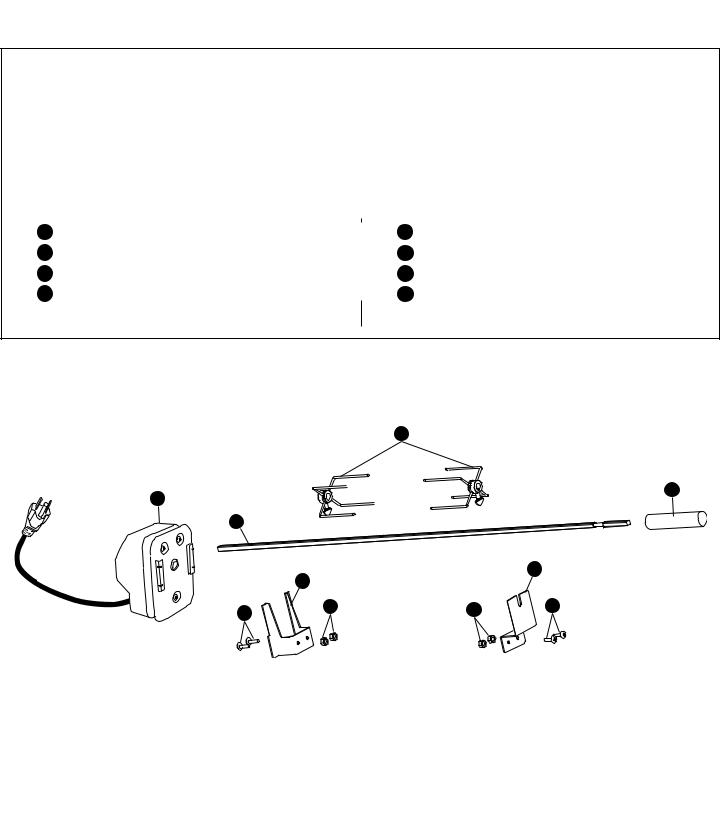
PARTS LIST:
1
2
3
4
1 Motor
1Spit Rod
2Forks
1 Handle
5
6
7
8
4 |
Screws |
1 |
Motor Mount Bracket |
4 |
Nuts |
1 |
Right Support Bracket |
3
4
1
2
|
6 |
|
8 |
|
|
|
|
5 |
7 |
7 |
5 |
|
|
||
|
|
|
FOR MISSING PARTS, PLEASE CALL CUSTOMER SERVICE AT 800-527-0717.
(Proof of purchase will be required.)
Inspect contents of the box to ensure all parts are included and undamaged.
2
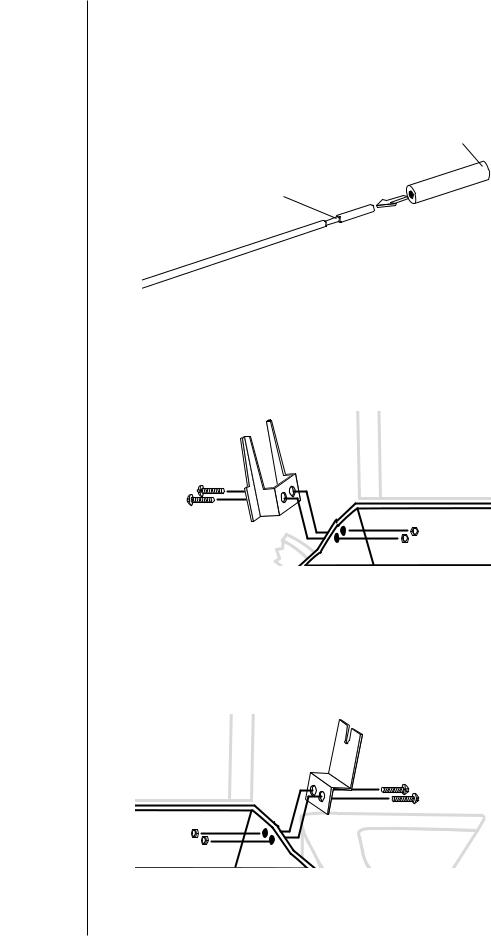
ASSEMBLY STEPS
Step 1
Open grill hood and remove cooking grills. Refer to your ProSeries™ owners manual.
Handle
Grooved
Section
Step 2
Press the handle onto the end of the spit rod with the grooved section.
Step 3
Attach the motor mount bracket on the left hand side of the grill using two screws and two nuts.
Step 4
Attach the spit rod bracket to the right side of the grill using screws and two nuts.
3
 Loading...