

Briggs & Stratton VICTA Assembly And Owner's Manual

Not for
Reproduction
WARNING! Read this manual before operating your Blower Vac
Blower Vac
Assembly and
Owner’s Manual
Not for
Reproduction
IMPORTANT INFORMATION
Congratulations on your purchase of a top quality VICTA Blower.
This instruction manual will aid in the assembly, operation and maintenance of your new Blower.
Please read carefully to ensure safety and the long life of your product.
Keep this instruction manual in a safe place for future reference or if service is required on your unit.
General safety regulations
WARNING Read all safety warnings and all instructions before use! Failure
to follow the warnings and instructions may result in fire and/or serious
injury. Save all warnings and instructions for future reference.
Do not operate the unit before reading this manual!
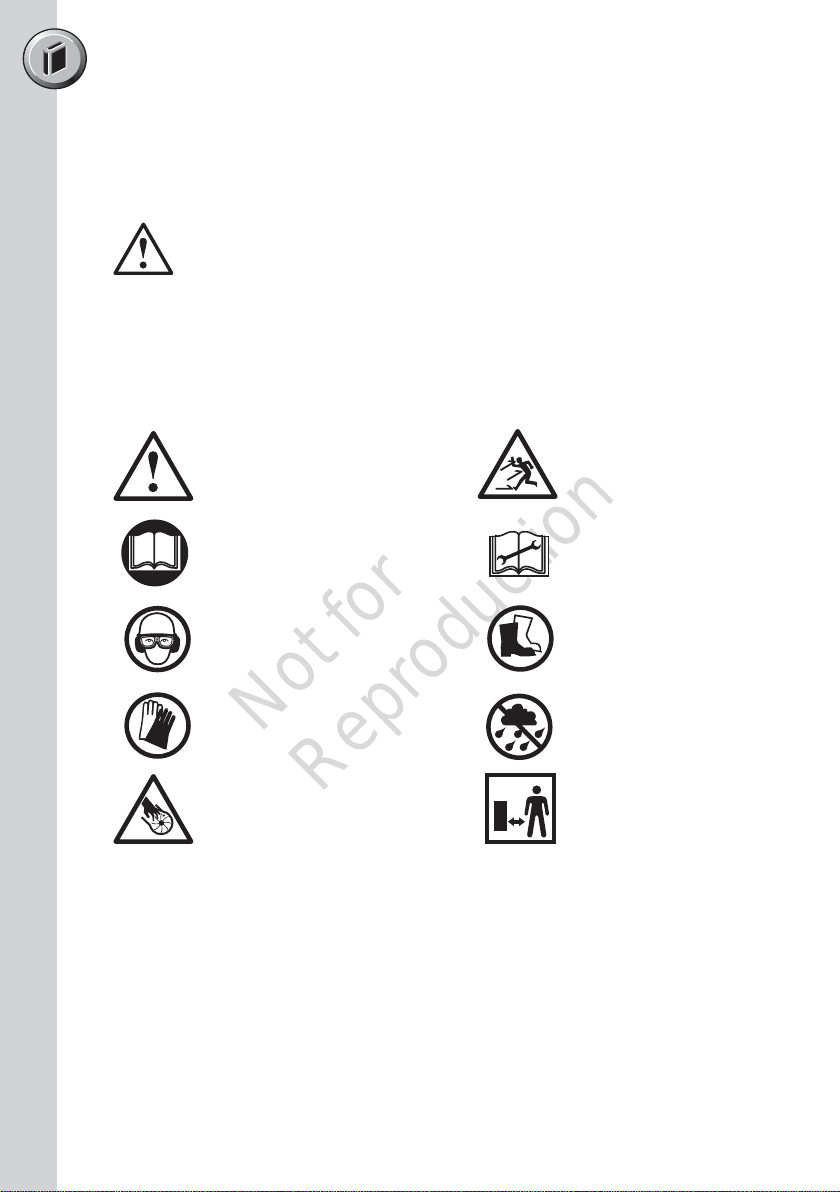
Warning!
Read the directions for
use before operating
the machine.
Wear safety goggles,
a helmet and ear
protection.
Wear safety gloves.
Warning! Rotating parts!
Be sure impeller cover is
fitted secure.
Be careful of objects being
thrown out!
Read the manual
before carrying out any
maintenance work.
Wear sturdy, enclosed safety
boots.
Protect the machine
from rain and damp.
Do not use in rain.
Bystanders must be at
least 15 metres away from
operating unit.
• Read the instructions carefully. Ensure you are familiar with all controls and learn how
to operate the machine properly.
• Stay alert and watch what you are doing when operating a power tool. Do not operate
the blower under the influence of alcohol, drugs or medication or when you are tired
or sick.
• Operate the blower at reasonable hours only - not early in the morning or late at night
when people might be disturbed. Check with your local council for operation times.
• Do not operate the blower indoors or in confined spaces.
• While the blower is running, always keep hands and feet away from blower tube.
(Keep away from any bystanders or animals when in use.)
• Use only manufacturer’s genuine recommended replacement parts and accessories.
Not for
Reproduction
Table of Contents
Quick Start
Features & Definitions
Safety & Handling
Assembly Procedures
Operating Instructions
Maintenance & Care
Troubleshooting
Quick Start Guide 1
Feature Definitions 2
Safety Instructions 3
Hazards 5
Personal Safety Equipment 5
Assembly 6
Fuelling Procedures 7
Starting Instructions 8
Stopping Instructions 8
Blowing Tips 9
Air Filter 10
Spark Plug 11
General Maintenance 11
Cleaning & Storage 12
Maintenance Chart 13
Troubleshooting 14
NOTE – WARRANTY DETAILS ARE NOT WRITTEN WITHIN THIS OPERATOR’S
MANUAL. REFER TO OTHER DOCUMENTS SUPPLIED WITH THIS MACHINE FOR
WARRANTY DETAILS.
THE WARRANTY DOCUMENTS MAY INCLUDE TECHNICAL SPECIFICATIONS
THAT ARE SPECIFIC TO EACH MODEL THAT ARE NOT WRITTEN WITHIN THIS
OPERATOR’S MANUAL.
Not for
Reproduction
QUICK START
Quick Start Guide
Check the position & operation of controls to ensure you are
comfortable before you start using the machine.
Check all components are assembled as per assembly instructions on
page 6.
Before every use, check the machine for the following:
• That there are no leaks in the fuel system
• That all screws are securely fastened
• Blower nozzles and impeller cover are secured in the correct position
Quick Start Guide
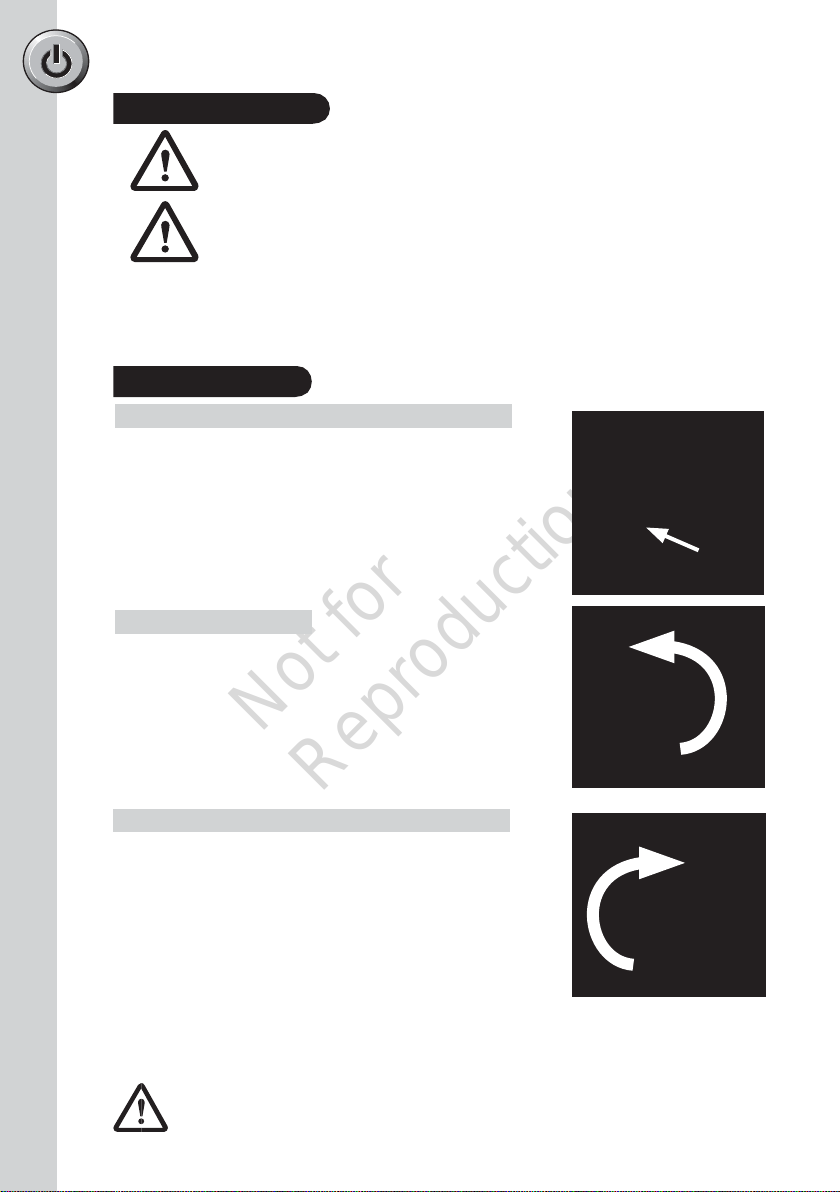
1 – Get ready…
• Place the Blower on a hard, level surface.
• Press the PRIMER 10 times.
1.
PRIMER
2 – Set
• Set the choke lever to "COLD" position.
3 – Go!
• Pull the starter cord until you feel it resist.
Then tug sharply on the starter cord 2 or 3 times.
The engine may start or run for a short period set
*
on cold. Choke can be set to hot while the engine
is running.
• Now, set the choke lever to the "HOT" position.
equired, tug sharply on the starter cord 2 or 3
• If r
times or until the engine starts
In cold conditions, the engine may require 5-10
* *
seconds running at idle. Pulling the trigger during
warm-up may help starting.
1
CAUTION! ENSURE FEET, LEGS & HANDS ARE CLEAR OF THE
IMPELLER COVER AND BLOWER TUBE/NOZZLE
2.
2.
3.
Not for
Reproduction
Unit details
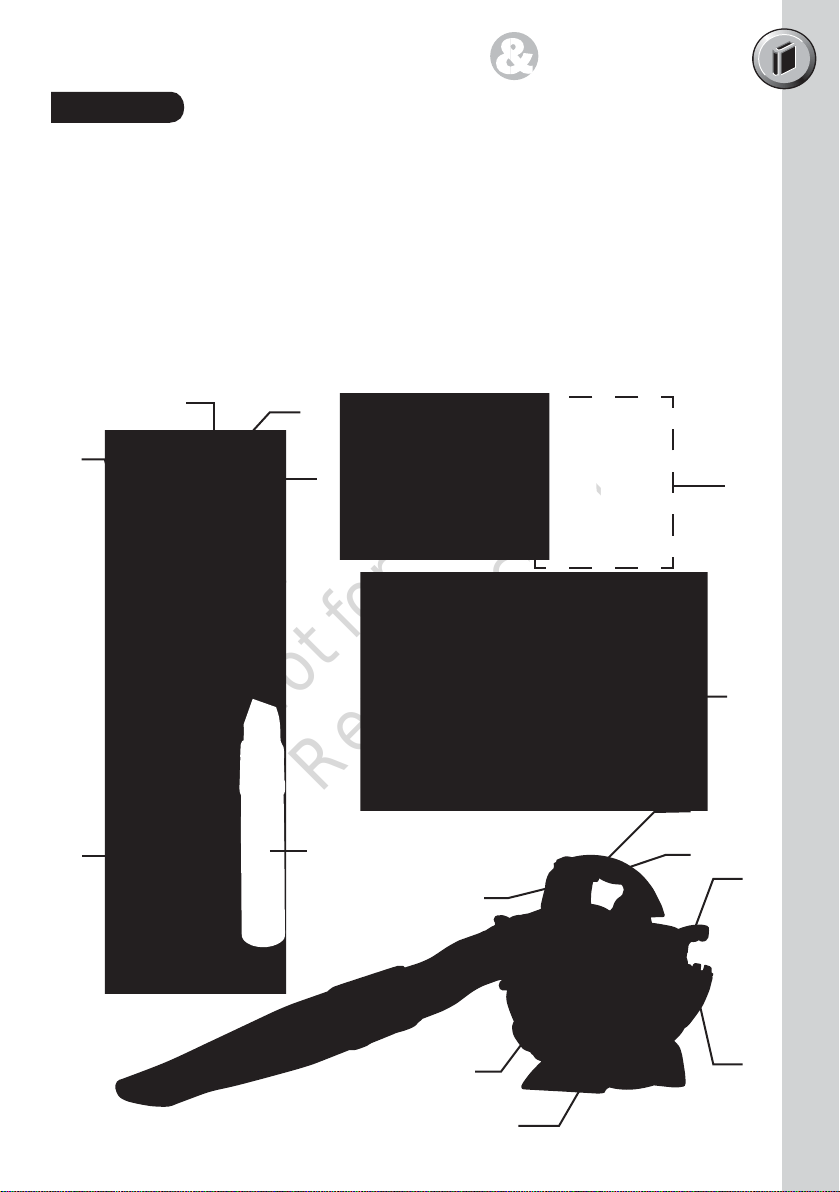
FEATURES DEFINITIONS
1.
2. Cruise control
3. On/off switch
4. Throttle trigger
5. Spark plug
6. Starter handle
7. Primer
8. Choke
9. Intake grill
Engine
11
9
3
17
10. Handle
11. Air filter cover
12. Fuel tank
13. Foot
14. Vac bag
15. Flat end tube
16. Round end tube
17. Upper blow tube
18. Vac bag tube
19. Suction end tube assembly
7
8
19
18
1
14
15
16
10
4
6
2
5
13
12
2

Not for
Reproduction
Safety Instructions
Transporting the blower
• Proper handling of the blower will reduce the risk of personal injury.
When transporting the blower make sure to always switch off the blower, remove any fuel
and the blower tube.
Before using the blower
• The operation of any power tool can result in foreign objects being thrown into your eyes, which
can result in severe eye damage. Before using the blower, always wear goggles or safety glasses
with side shield and a full-face shield when needed. Always wear nonslip safety shoes, ear muffs
and a dust mask when operating.
• Do not start the blower until you have studied the instruction manual.
• Know the blower controls and learn how to stop operating the unit quickly in an
emergency by pressing the STOP switch.
• Before using the blower ensure it is not worn or damaged.
• Ensure all screws and fasteners are tightened before use
• Discontinue use and switch off blower if operation is irregular. Have the blower inspected
by authorised service technician before restarting.
Operating the blower
• When using the blower, hold the handle firmly at all times. Discontinue use if discomfort
occurs from vibration. Avoid long exposure without rest periods.
• Keep all body parts away from the blower nozzle end. Make sure the unit is OFF and spark
plug is disconnected when clearing jammed material.
• Keep your work area clean and well lit.
• Do not operate power tools in explosive atmospheres, such as in the presence of
flammable liquids, gases or dust. Power tools can create sparks which may ignite the
dust or fumes.
• Keep children, bystanders and pets away when operating the power tool. Ensure there is a
minimum distance of 15 metres.
• Dress properly. Do not wear loose clothing or jewellery. Keep your hair, clothing and
gloves away from moving parts. Loose clothes, jewellery or long hair can be caught in
blower impeller & cause damage or injury.
• Operate only in daylight or good artificial light.
• Keep hands away from nozzle end and impellor cover when the blower is running.
• Walk with the blower. Never run.
• To maintain full control of the blower, keep a proper footing at all times with your weight
evenly balanced over both feet and never over reach.
• Always keep the handle dry and free from oil and grease.
3
 Loading...