

Page 1

POST OFFICE BOX 702
MILWAUKEE, WI 53201 USA
©2010 Briggs & Stratton Corporation
BRIGGS&STRATTON
CORPORATION
MS - 0750 - 5/10
www.ThePowerPortal.com (Dealers)
BRIGGSandSTRATTON.COM (consumers)
272147 - Vanguard ™ Single Cylinder OHV Air-Cooled Engines
272144 - Vanguard
™
Twin Cylinder OHV Air-Cooled Engines
275429 - Vanguard
™
Twin Cylinder OHV Liquid-Cooled Engines
MS-1055 - Vanguard
™
3-Cylinder OHV Liquid-Cooled Diesel Engines
Other Briggs & Stratton
Commercial Power Repair Manuals:
Briggs & Stratton
VANGUARD
™
3-CYLINDER OHV LIQUID-COOLED GASOLINE ENGINES
5/10
Vanguard
™ 3-Cylinder OHV
Liquid-Cooled Gasoline Engines
Quality Starts With A
Master Service Technician
Page 2

FORWARD
This manual was written to assist engine technicians and service personnel with the repair and
maintenance procedures for Briggs & Stratton® engines. It assumes that persons using this manual have
been properly trained in and are familiar with the servicing procedures for these products, including the
proper use of required tools and safety equipment and the application of appropriate safety practices.
Persons untrained or unfamiliar with these procedures or products should not attempt to perform such
work.
Proper maintenance and repair is important to safe, reliable operation of all engines and engine-driven
systems. The troubleshooting, testing, maintenance, and repair procedures described in this manual are
appropriate for the Briggs & Stratton® engines described herein. Alternative methods or procedures may
pose risk to personal safety and the safety and/or reliability of the engine and are not endorsed or
recommended by Briggs & Stratton.
All information, illustrations, and specifications contained in this manual were based on the data available
at the time of publication. Briggs & Stratton Corporation reserves the right to change, alter, or otherwise
improve the product or the product manuals at any time without prior notice.
Briggs & Stratton offers two complementary publications to enhance understanding of engine technology,
maintenance, and repair. (Neither publication, however, is a substitution for a recognized training program
for engine technicians.)
• For consumers, Small Engine Care & Repair (p/n 274041) provides a comprehensive overview of how
small air-cooled engines work, basic troubleshooting, and step-by-step maintenance procedures.
• For engine technicians and consumers alike, an in-depth study of engine theory and operation can be
found in the textbook Small Engines (p/n CE8020).
Both publications can be purchased at BRIGGSandSTRATTON.COM or through a local Authorized Briggs
& Stratton Service Dealer.
Copyright © 2010 Briggs & Stratton Corporation
All rights reserved.
No part of this manual may be reproduced or transmitted in any form or by any means, electronic or
mechanical, including photocopying or recording by any information storage and retrieval system, without
prior written permission from Briggs & Stratton Corporation.
Page 3

This engine repair manual includes the following
engine models:
• MODEL 430000
• MODEL 580000
6
Page 4

SECTION 1 - Safety
SECTION 2 - Cylinder Heads and Valves
SECTION 3 - Governor, Timing Gears, and Gear Case
SECTION 4 - Flywheel and Rear Seal Retainer
SECTION 5 - Cylinder Block Disassembly
SECTION 6 - Cylinder Block Inspection and Repair
SECTION 7 - Crankshaft, Camshaft, and Bearings
1
2
3
4
5
6
7
SECTION 8 - Pistons, Rings, and Connecting Rods
SECTION 9 - Cylinder Block Assembly
SECTION 10 - Fuel System and Related Components
SECTION 11 - Ignition, Electrical System
SECTION 12 - Lubrication System
SECTION 13 - Cooling System
SECTION 14 - Engine Specifications
8
9
10
11
12
13
14
Page 5

THISPROPER SERVICE AND REPAIR IS IMPORTANT
TO THE SAFE, ECONOMICAL AND RELIABLE
Page 6

SECTION 1 - SAFETY AND MAINTENANCE
SAFETY INFORMATION - - - - - - - - - - - - - - - - - - - - - - - - - - - - - - - - - - - - - - - - - - - - - - - - - - - - - - - - 4
1
1
3
Page 7
1
1
SAFETY INFORMATION
This repair manual contains safety information
that is designed to:
• Make you aware of hazards associated
with engines.
• Inform you of the risk of injury associated
with those hazards.
• Tell you how to avoid or reduce the risk of
injury.
Signal Words in Safety Messages
The safety alert symbol is used to identify
safety information about hazards that can result
in personal injury.
A signal word (
is used with the alert symbol to indicate the
likelihood and the potential severity of injury. In
addition, a hazard symbol may be used to
represent the type of hazard.
DANGER indicates a hazard which, if not
avoided, will result in death or serious
injury.
DANGER, WARNING, or CAUTION)
WAR NING
Before attempting to service this equipment,
read and understand this manual and the
operating instructions of the engine and the
equipment it powers.
Failure to follow instructions could result in
property damage, serious injury (including
paralysis) or even death.
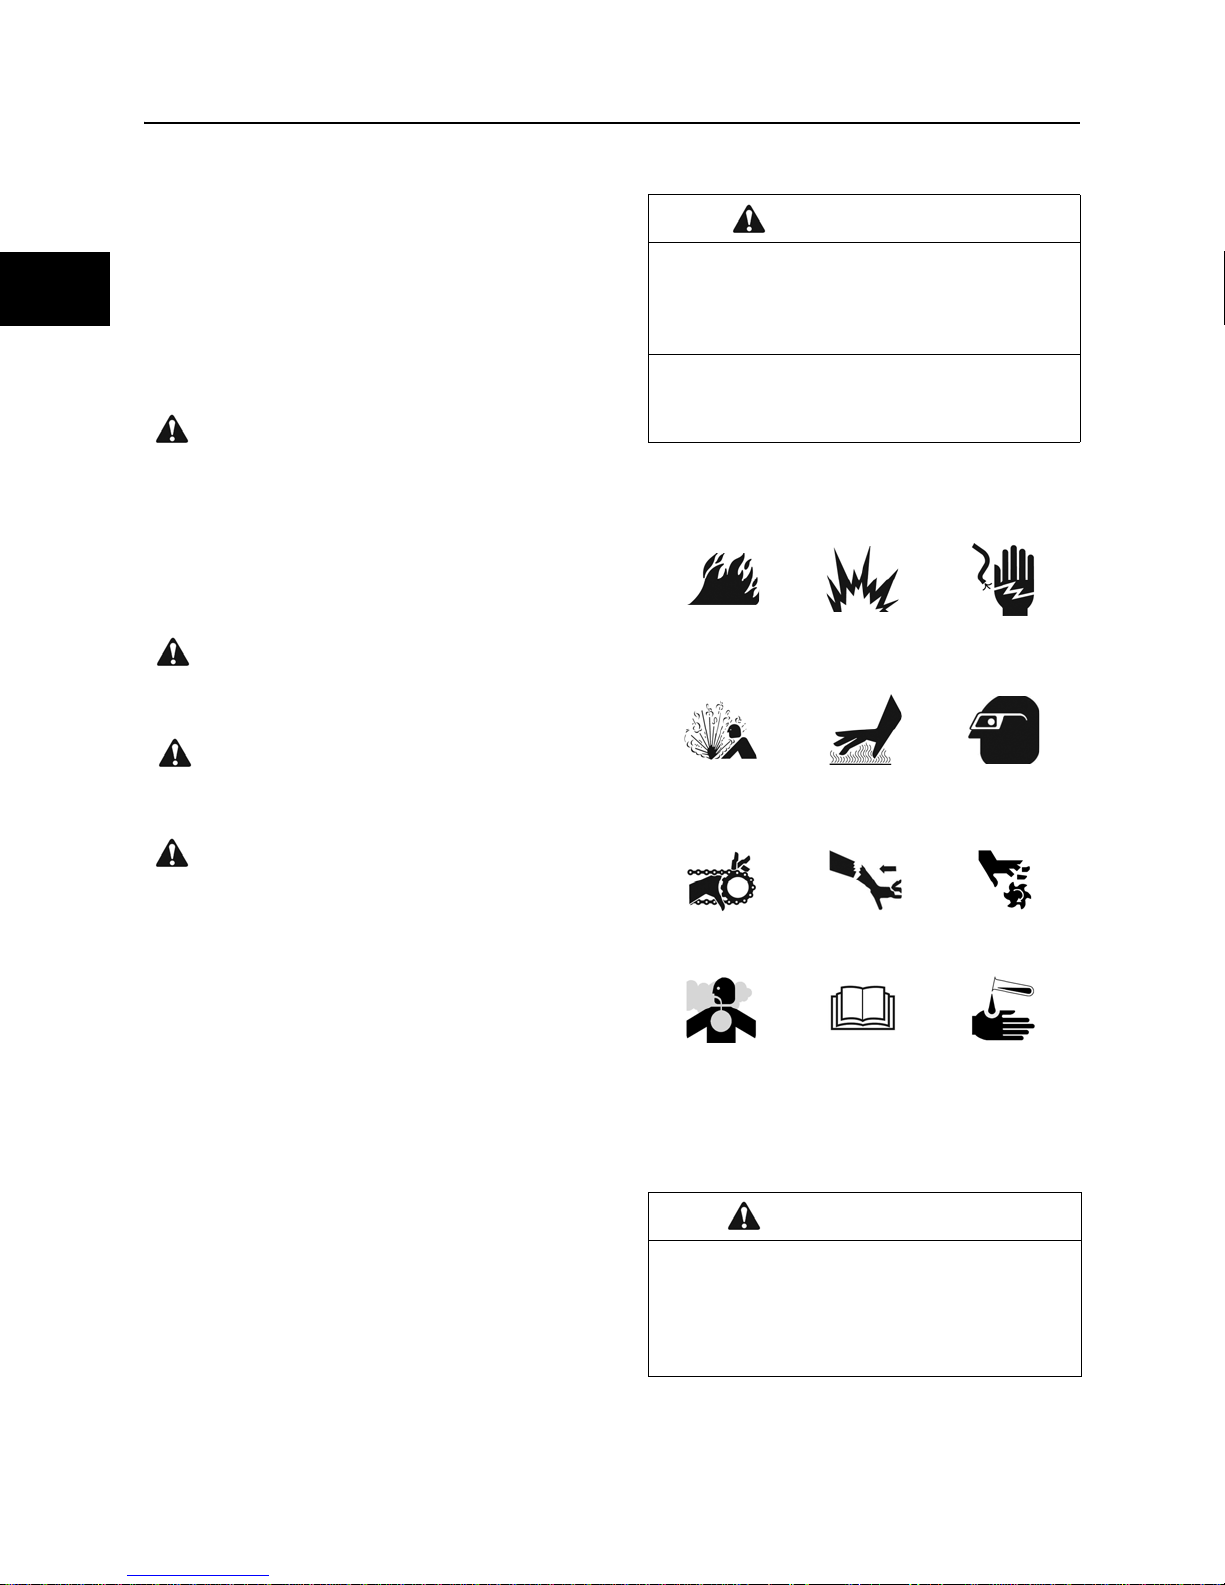
Hazard Symbols and Meanings
FIRE EXPLOSION
ELECTRIC
SHOCK
WARNING indicates a hazard which, if
not avoided, could result in death or
serious injury.
CAUTION indicates a hazard which, if
not avoided, could result in minor or
moderate injury.
NOTICE indicates a situation that could
result in damage to the product.
Prior to work, read and understand the section(s)
of this manual that pertain to the job. Follow all
safety warnings.
• Always use fresh gasoline. Stale fuel can
cause gum deposits in the carburetor
and cause leakage, flow restrictions, or
other problems.
• Check fuel lines and fittings frequently for
cracks or leaks and replace if necessary.
EXPLOSIVE
PRESSURE
ENTANGLEMENT KICKBACK AMPUTATION
TOXIC
FUMES
Battery posts, terminals, and related accessories contain lead and lead compounds - chemicals known to the State of California to cause
cancer and reproductive harm. Wash hands
after handling.
HOT
SURFACE
READ
MANUAL
WARNING
GOGGLES
CHEMICAL
BURNS
4
Page 8
WARNING
WAR NING
Certain components in this product and its
related accessories contain chemicals known
to the State of California to cause cancer, birth
defects, or other reproductive harm. Wash
hands after handling.
WARNING
Briggs & Stratton does not approve or authorize the use of these engines on 3-wheel All
Terrain Vehicles (ATVs), motor bikes, fun/recreational go-karts, aircraft products, or vehicles intended for use in competitive events.
Use of these engines in such applications
could result in property damage, serious injury
(including paralysis), or even death.
WARNING
The engine exhaust from this product contains
chemicals known the State of California to
cause cancer, birth defects, and other reproductive harm.
WAR NING
Running engines produce heat.
Severe burns can occur on contact.
• Allow muffler, engine cylinder fins, and
radiator to cool before touching.
• Remove accumulated combustibles from
muffler area and cylinder area.
• It is a violation of California Public
Resource Code, Section 4442, to use or
operate the engine on any forest-covered,
brush-covered, or grass-covered land
unless the exhaust system is equipped
with a spark arrester, as defined in Section
4442, maintained in effective working
order. Other States and Federal jurisdictions may have similar laws. Contact the
original equipment manufacturer, retailer,
or dealer to obtain spark arrester
designed for the exhaust system installed
on this engine.
Fuel and its vapors are extremely flammable and explosive.
Fire or explosion can cause severe
burns or death.
When adding fuel:
• Turn engine OFF and let engine cool for at
least 2 minutes before removing the fuel
cap.
• Fill fuel tank outdoors or in a well-ventilated area.
• Do not overfill fuel tank. To allow for
expansion of the gasoline, do not fill above
the bottom of the fuel tank neck.
• Keep gasoline away from sparks, open
flames, pilot lights, heat and other ignition
sources.
• Check fuel lines, tank, cap, and fittings frequently for cracks or leaks. Replace if necessary.
• If fuel spills, wait until it evaporates before
starting engine.
When starting engine:
• Make sure spark plug, muffler, fuel cap,
and air cleaner are in place.
• Do not crank engine with spark plug
removed.
• If fuel spills, wait until it evaporates before
starting engine.
• If engine floods, set choke (if equipped) to
OPEN/RUN position. Place throttle (if
equipped) in FAST and crank until engine
starts.
When operating equipment:
• Do not tip engine or equipment at an
angle which would cause fuel to spill.
• Do not choke carburetor to stop engine.
• Never start or run the engine with the air
cleaner assembly (if equipped) or the air
filter (if equipped) removed.
When changing oil:
• If you drain the oil from the top oil fill tube,
the fuel tank must be empty or fuel can
leak out and result in a fire or explosion.
When transporting equipment:
• Transport with fuel tank empty or with fuel
shut-off valve set to OFF.
When storing gasoline or equipment with
fuel in the tank:
• Store away from furnaces, stoves, water
heaters, or other appliances that have a
pilot light or other ignition source because
they can ignite gasoline vapors.
1
1
5
Page 9
WAR NING
WAR NING
1
1
Unintentional sparking can result in fire
or electrical shock.
Unintentional start-up can result in
entanglement, traumatic amputation, or
severe lacerations.
Before performing adjustments or repairs:
• Disconnect spark plug wire and keep it
away from spark plug.
• Disconnect the negative (-) battery terminal.
When testing for spark:
• Use approved spark plug tester.
• Do not check for spark with spark plug
removed.
WAR NING
Engines give off carbon monoxide, an
odorless, colorless, poison gas.
Breathing carbon monoxide can cause
nausea, fainting, or death.
• Start and run engine outdoors.
• Do not start or run engine in an enclosed
area, even if doors and windows are open.
WAR NING
Starting engine creates sparking.
Sparking can ignite nearby flammable
gases.
Explosion and fire could result.
• If there is a natural or LP gas leak in the
area, do not start engine.
• Do not use pressurized starting fluids
because vapors are flammable.
Charging batteries produce hydrogen
gas. Do not store or charge a battery
near an open flame or device that utilizes a pilot light or can create a spark.
WAR NING
Damaged, worn, or loose fuel components can leak fuel. Explosion or fire
could result.
• All fuel components should be in good
condition and properly maintained.
• Repairs should only be made with factory
approved parts.
• Repair work should be done by a qualified
technician.
• Flexible supply lines should be checked
regularly to make sure they are in good
condition.
WAR NING
Rapid retraction of starter cord (kickback) will pull hand and arm toward
engine faster than you can let go.
Broken bones, fractures, bruises, or
sprains could result.
• When starting engine, pull the starter cord
slowly until resistance is felt and then pull
rapidly to avoid kickback.
• Remove all external equipment/engine
loads before starting engine.
• Direct-coupled equipment components,
such as but not limited to blades, impellers, pulleys, and sprockets, must be
securely attached.
WAR NING
Rotating parts can contact or entangle
hands, feet, hair, clothing, or accessories.
Traumatic amputation or severe lacerations can result.
• Operate equipment with guards in place.
• Keep hands and feet away from rotating
parts.
• Tie up long hair and remove jewelry.
• Do not wear loose-fitting clothing, dangling
drawstrings, or items that could become
entangled in the equipment.
6
WAR NING
Prolonged or repeated contact with used
motor oil could cause injury.
• Used motor oil has been shown to cause
skin cancer in certain laboratory animals.
• Thoroughly wash exposed areas with
soap and water.
Page 10

SECTION 2 - CYLINDER HEAD AND VALVES
REMOVE CYLINDER HEAD - - - - - - - - - - - - - - - - - - - - - - - - - - - - - - - - - - - - - - - - - - - - - - - - - - - - - - 9
DISASSEMBLE CYLINDER HEAD - - - - - - - - - - - - - - - - - - - - - - - - - - - - - - - - - - - - - - - - - - - - - - - - -10
REMOVE VALVES - - - - - - - - - - - - - - - - - - - - - - - - - - - - - - - - - - - - - - - - - - - - - - - - - - - - - - - - - - - - -11
INSPECT CYLINDER HEAD - - - - - - - - - - - - - - - - - - - - - - - - - - - - - - - - - - - - - - - - - - - - - - - - - - - - - -12
DISASSEMBLE ROCKER ARM SHAFT - - - - - - - - - - - - - - - - - - - - - - - - - - - - - - - - - - - - - - - - - - - - - -15
ASSEMBLE ROCKER ARM SHAFT- - - - - - - - - - - - - - - - - - - - - - - - - - - - - - - - - - - - - - - - - - - - - - - - -16
ASSEMBLE CYLINDER HEAD - - - - - - - - - - - - - - - - - - - - - - - - - - - - - - - - - - - - - - - - - - - - - - - - - - - -17
INSTALL CYLINDER HEAD - - - - - - - - - - - - - - - - - - - - - - - - - - - - - - - - - - - - - - - - - - - - - - - - - - - - - -18
ADJUST VALVES- - - - - - - - - - - - - - - - - - - - - - - - - - - - - - - - - - - - - - - - - - - - - - - - - - - - - - - - - - - - - -20
2
7
Page 11
2
2
8
Page 12
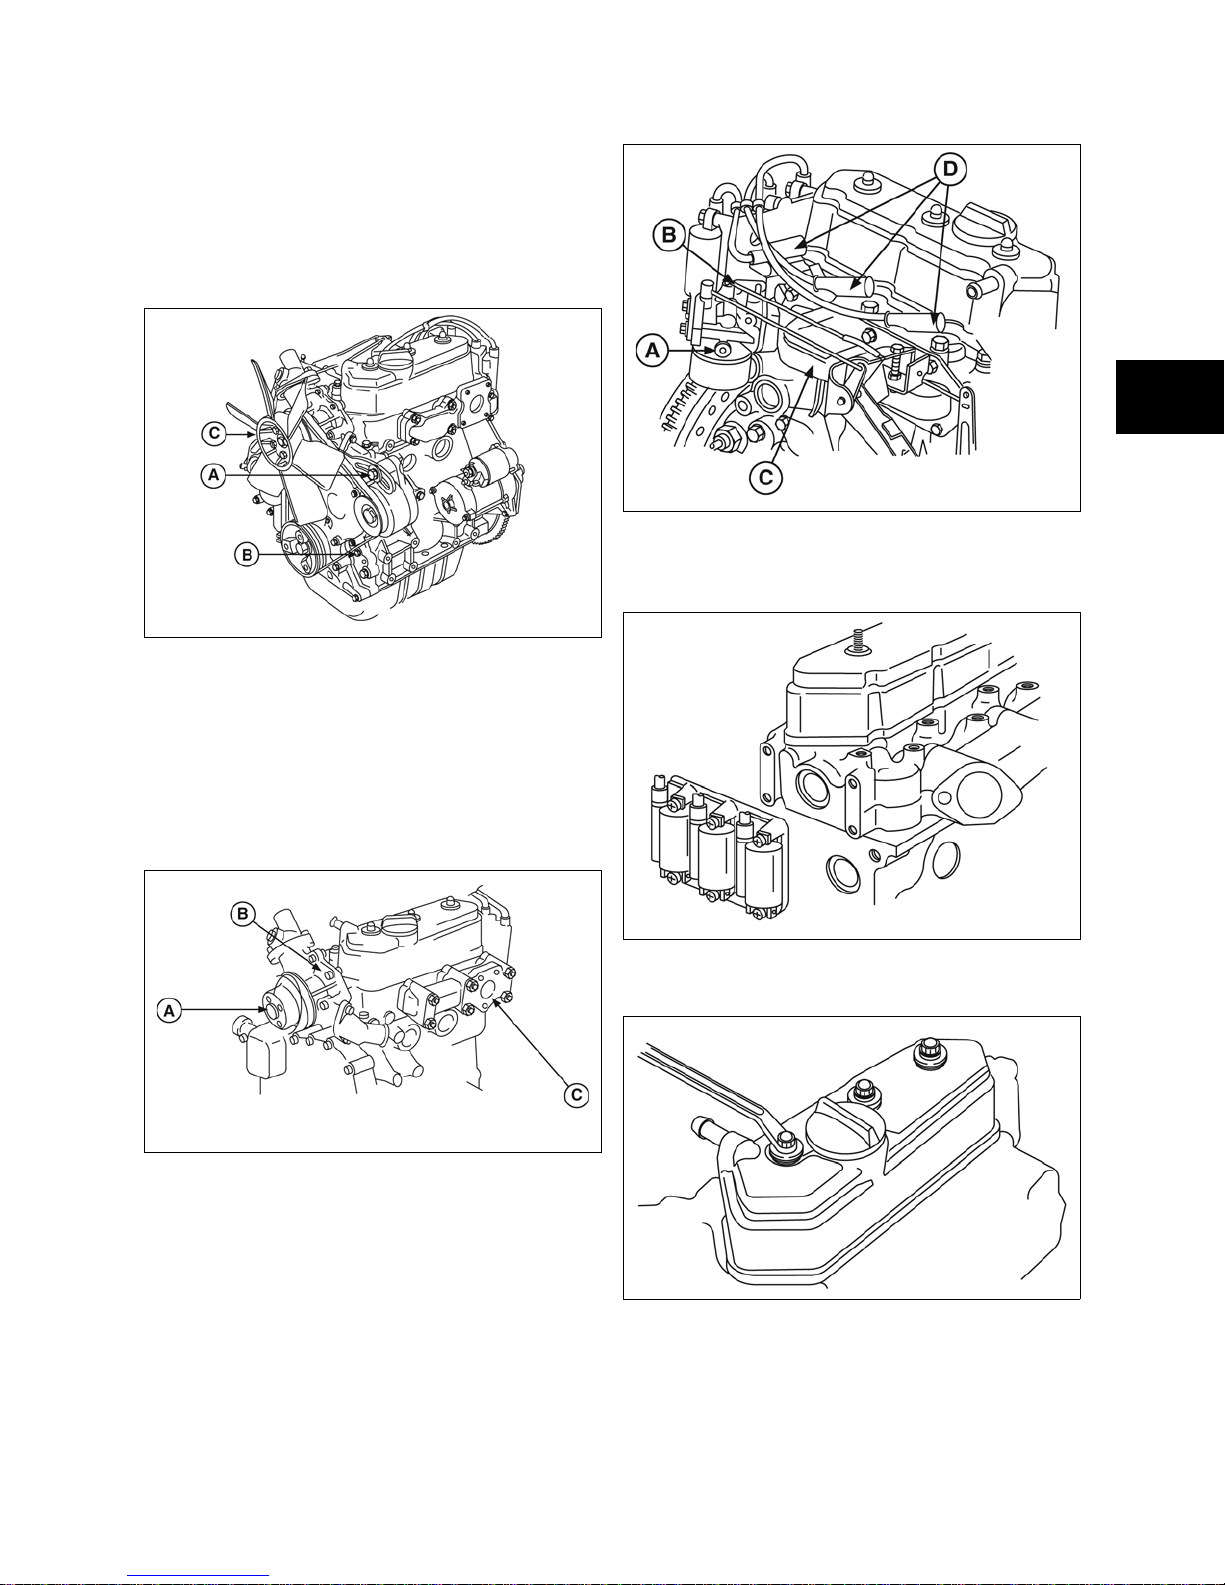
Remove Cylinder Head
1. Drain cooling system and disconnect radiator
hoses and bypass hose at water pump.
2. Remove the alternator adjusting bracket
screw (A, Figure 1), V-belt (B), and fan (C),
from the engine.
Figure 1
3. Remove the water pump pulley (A, Figure 2),
water pump (B), and exhaust manifold (C)
from the engine.
2
Figure 3
6. Remove the ignition coil bracket (Figure 4)
and the ignition coils.
NOTE: Remove the exhaust system before
removing exhaust manifold.
Figure 2
4. Remove the fuel line (A, Figure 3) and
governor link and spring (B).
5. Remove the intake manifold (C) and spark
plug wires and spark plugs (D).
Figure 4
7. Remove the valve cover (Figure 5).
Figure 5
8. Set the Number 1 piston at Top Dead Center
(TDC).
9
Page 13
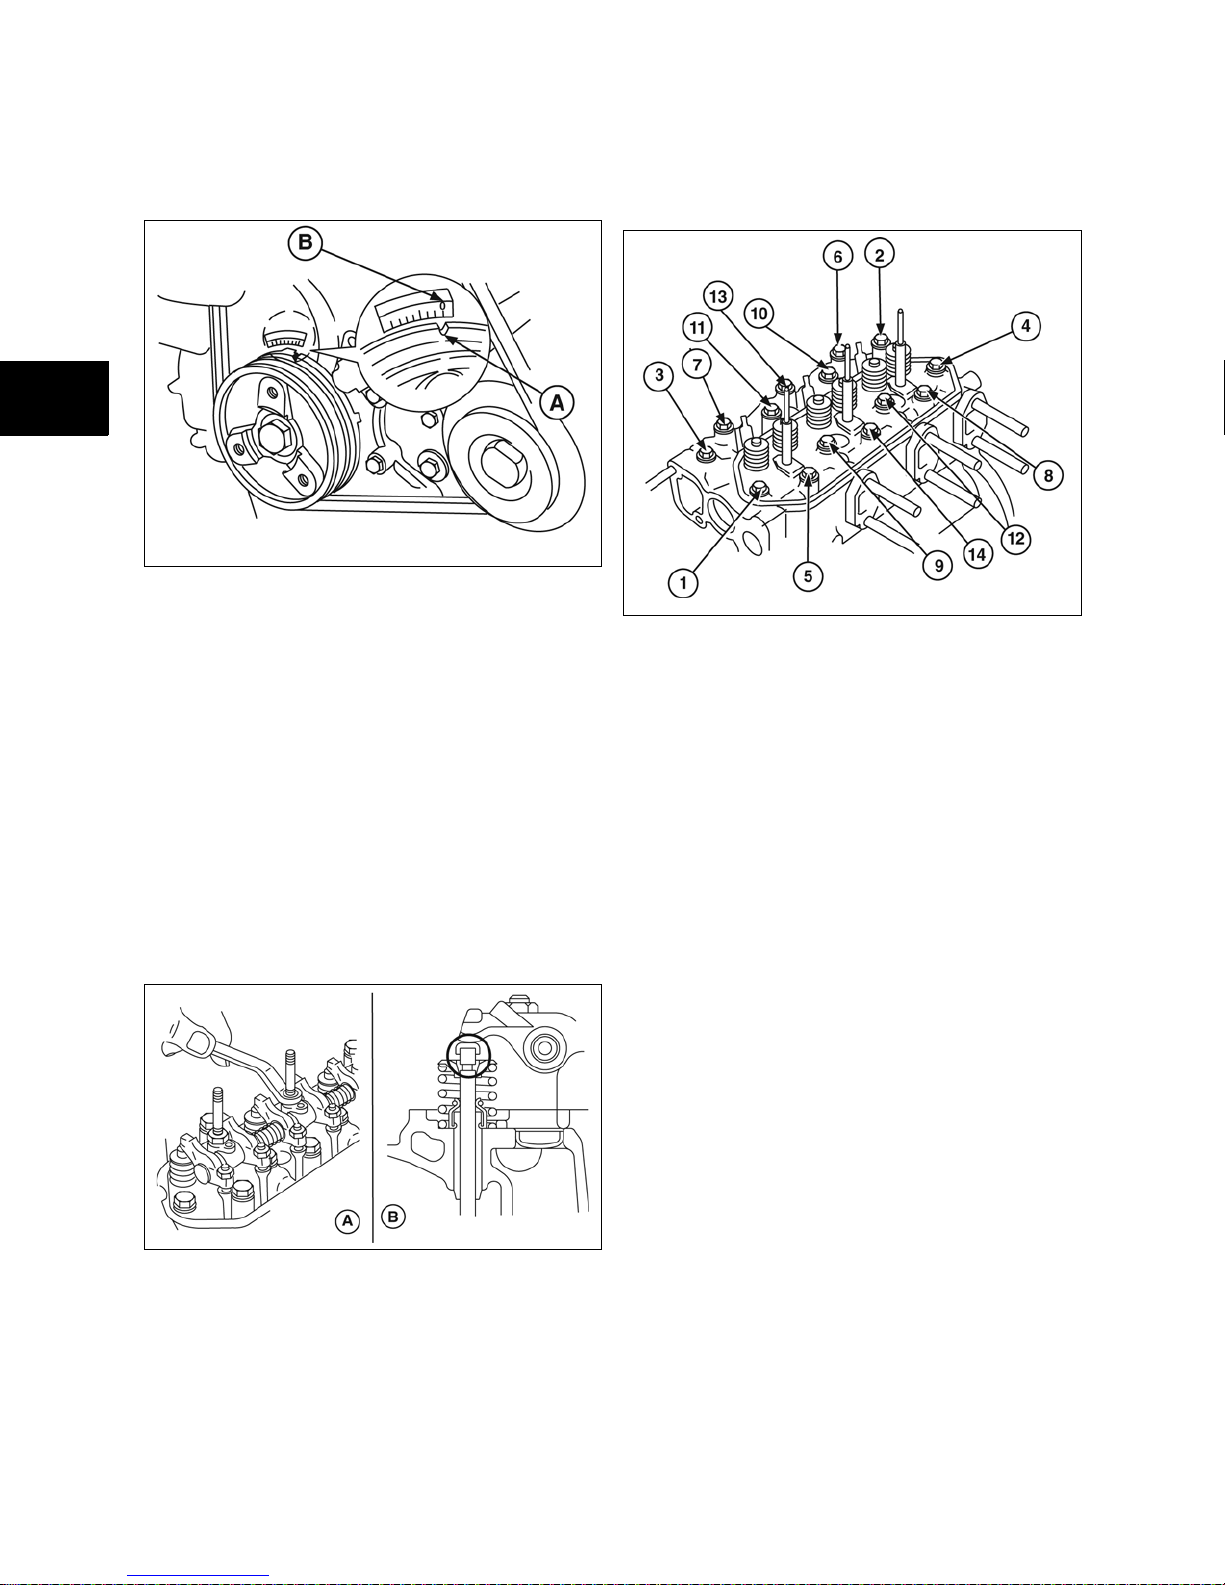
9. Rotate crankshaft pulley until timing mark on
pulley is aligned with reference point (A,
Figure 6) on timing cover (B).
Disassemble Cylinder Head
1. Loosen cylinder head bolts in the order
shown (Figure 8).
2
Figure 6
• If intake and exhaust valves have
clearance, the Number 1 piston is at TDC
(compression stroke).
• If intake and exhaust valves do not have
clearance, turn crankshaft pulley one
complete revolution. Valves will then have
clearance.
10. Remove rocker arm assembly (A, Figure 7)
and push rods.
11. Remove valve stem caps (B).
NOTE: Mark push rods so that they may be
reassembled in their original position.
2
Figure 8
Figure 7
10
Page 14
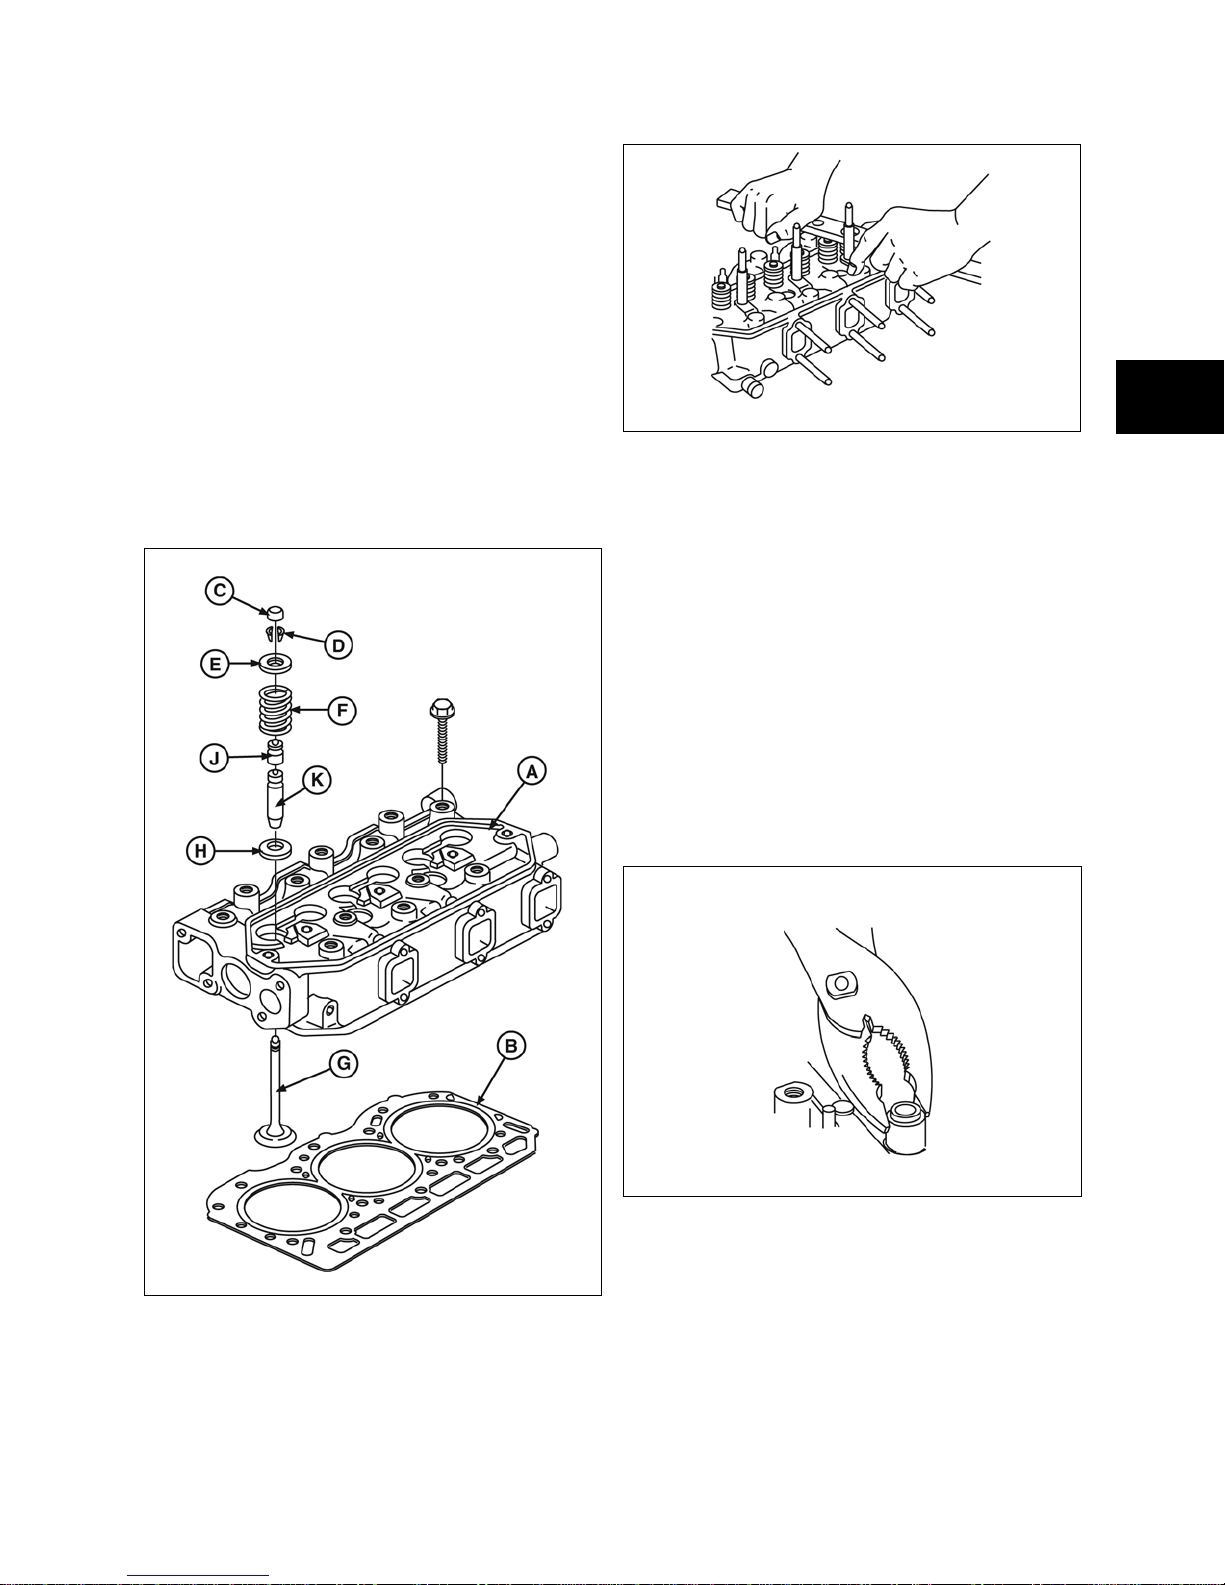
Remove Valves
2. Refer to the following cylinder head
components (Figure 9) when proceeding to
the next part of the disassembly process:
• (A) - Cylinder Head Assembly
• (B) - Cylinder Head Gasket
• (C) - Valve Stem Cap
• (D) - Valve Spring Retainer Locks
• (E) - Valve Spring Retainer
• (F) - Valve Spring
• (G) - Valve
• (H) - Valve Spring Seat
• (J) - Valve Stem Seal
• (K) - Valve Guide
2
Figure 10
NOTE: Place a shop rag or short section of fuel line
under valves inside combustion chamber to hold
valve in place while compressing spring.
4. Use Valve Spring Compressor #19417 to
compress valve springs. Remove the
following parts:
• Valve Spring Retainer Locks
• Valve Spring Retainer
• Valve Spring
• IN and EX valve
• Valve spring seats
5. Remove and discard valve stem seals
(Figure 11).
Figure 9
3. Remove valves (Figure 10).
11
Figure 11
Page 15
2
Inspect and Repair
Inspect Cylinder Head
NOTE: Be sure all gasket material is removed from
surfaces before checking. Use a gasket scraper if
necessary.
1. Inspect cylinder head for cracks or damage.
2. Use a straight edge (A, Figure 12) to check
cylinder head lower surface for distortion.
• Replace if damaged or if reject gauge
enters valve guide.
2
Figure 14
6. Use Bushing Driver #19367, and press out
valve guide bushing from combustion
chamber (Figure 15).
Figure 12
3. If mounting surfaces are distorted more than
0.1 mm (0.004 in), the cylinder head must be
replaced (Figure 13).
Figure 13
NOTE: It is not recommended that cylinder head
mounting surfaces be resurfaced.
4. Inspect intake and exhaust manifold
mounting surfaces in the same manner. Use
same specifications as cylinder head.
5. Inspect valve guide bushing for damage.
Check valve guide bushings for wear using
Reject Gauge #19382, (A, Figure 14).
Figure 15
7. Check valve guide bushing OD. Then
compare with the following specifications:
• Standard Bushing OD: 11.05 mm (0.435
in.)
• Replacement Bushing OD: 11.08 mm
(0.4362 in.)
8. If bushing OD measurement indicates that a
replacement bushing has already been
installed, the cylinder head must be replaced.
9. Using Bushing Driver #19416, press in new
valve guide bushing until tool bottoms on
cylinder head (Figure 16).
12
Page 16
2
Figure 16
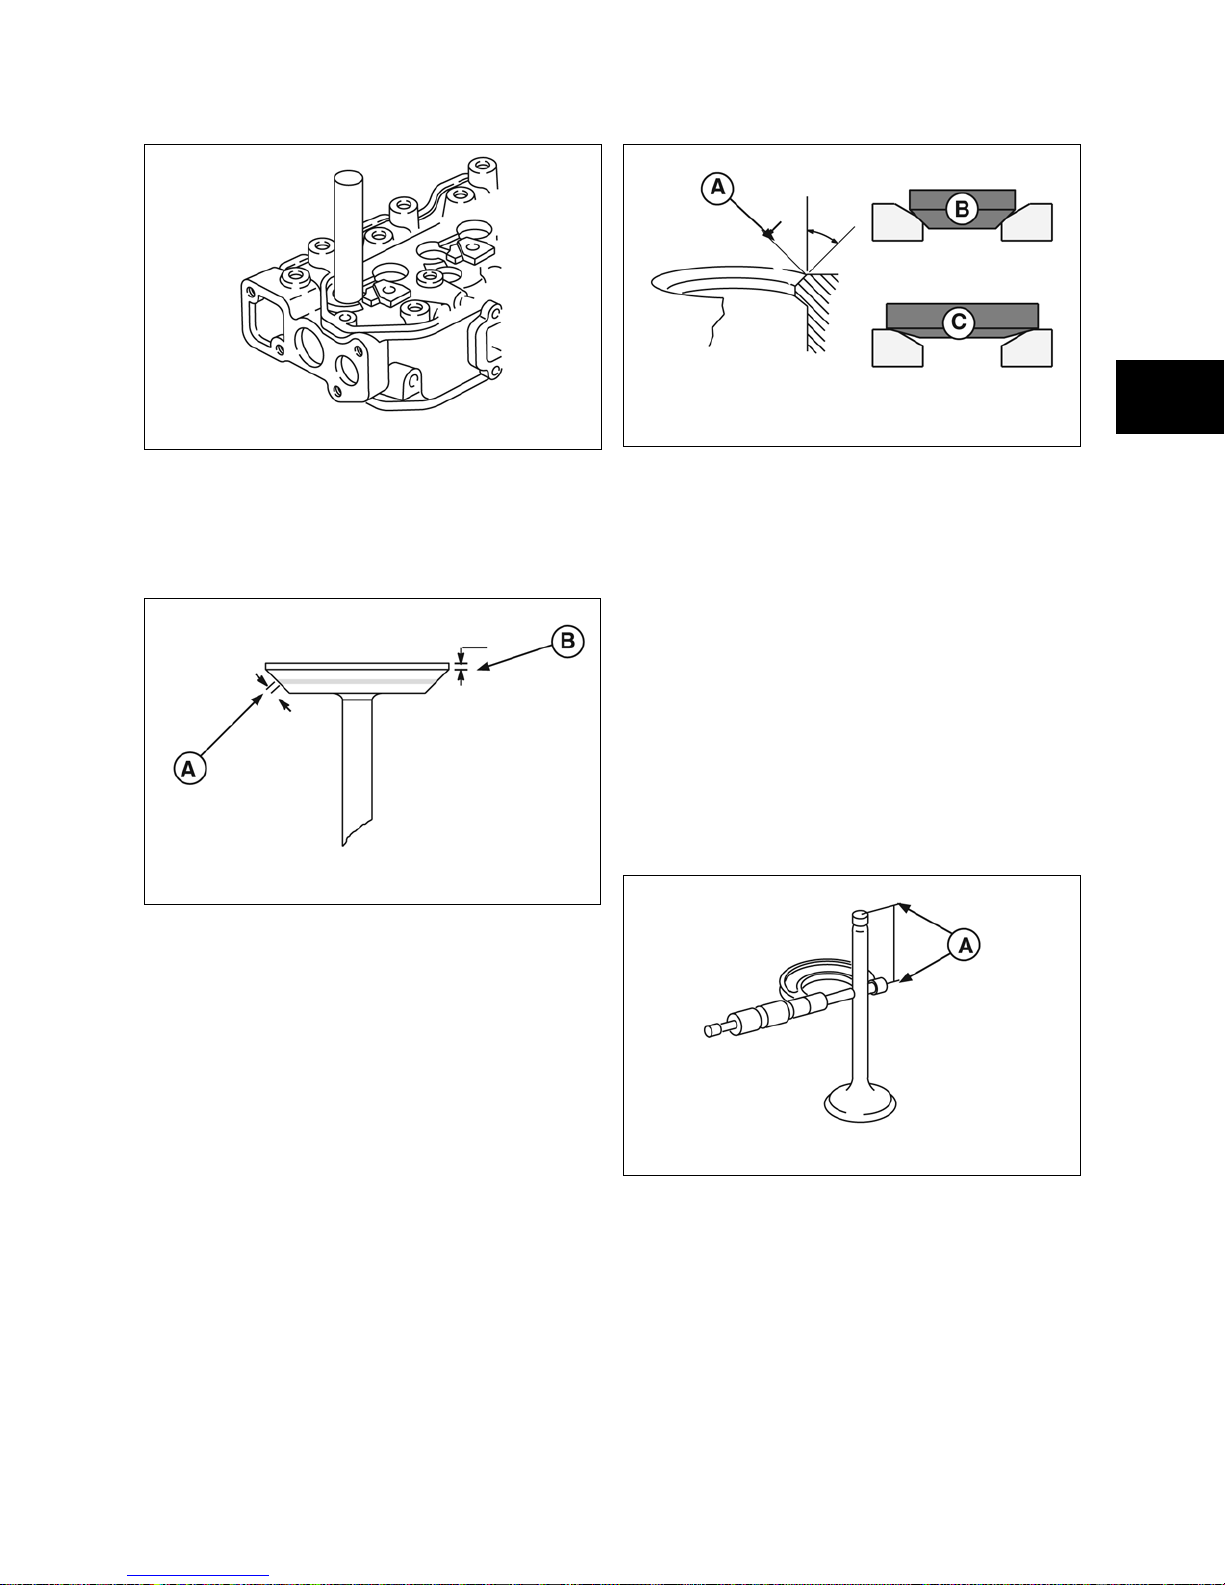
10. Valve faces may be resurfaced to 30°. Check
valve seat dimensions before resurfacing. (A,
Figure 17) should be 0.05 - 0.06” (1.2 -
1.6mm) and (B) should be at least 0.0312”.
Figure 17
• Lap valves and seats with Valve Lapping
Tool #19258 and Valve Lapping
Compound #94150.
11. Valve seats may be reconditioned using
Valve Seat Cutter #19446.
Figure 18
• Use a 45° (B) cutter to narrow seat from
bottom.
• Use a 15° (C) cutter to narrow seat from
top.
NOTE: If valve seat is loose or cracked, replace
cylinder head.
12. Measure valve stem diameter at specified
distance from end of valve (A, Figure 19).
• Replace IN if less than 0.2343 in. (5.952
mm).
• Replace EX if less than 0.2342 in. (5.948
mm).
NOTE: Inspect valve guide bushings first. If valve
guides are worn, they must be replaced before
refacing valve seats.
If valve seat is wider than 0.05 - 0.06” (1.2 - 1.6mm)
(A, Figure 18), a narrowing cutter should be used to
ensure that contact area of valve seat is centered
on face of valve.
13
Figure 19
13. Inspect valve stem cap for wear (Figure 20).
Replace if cap is worn recessed.
Page 17
2
2
Figure 20
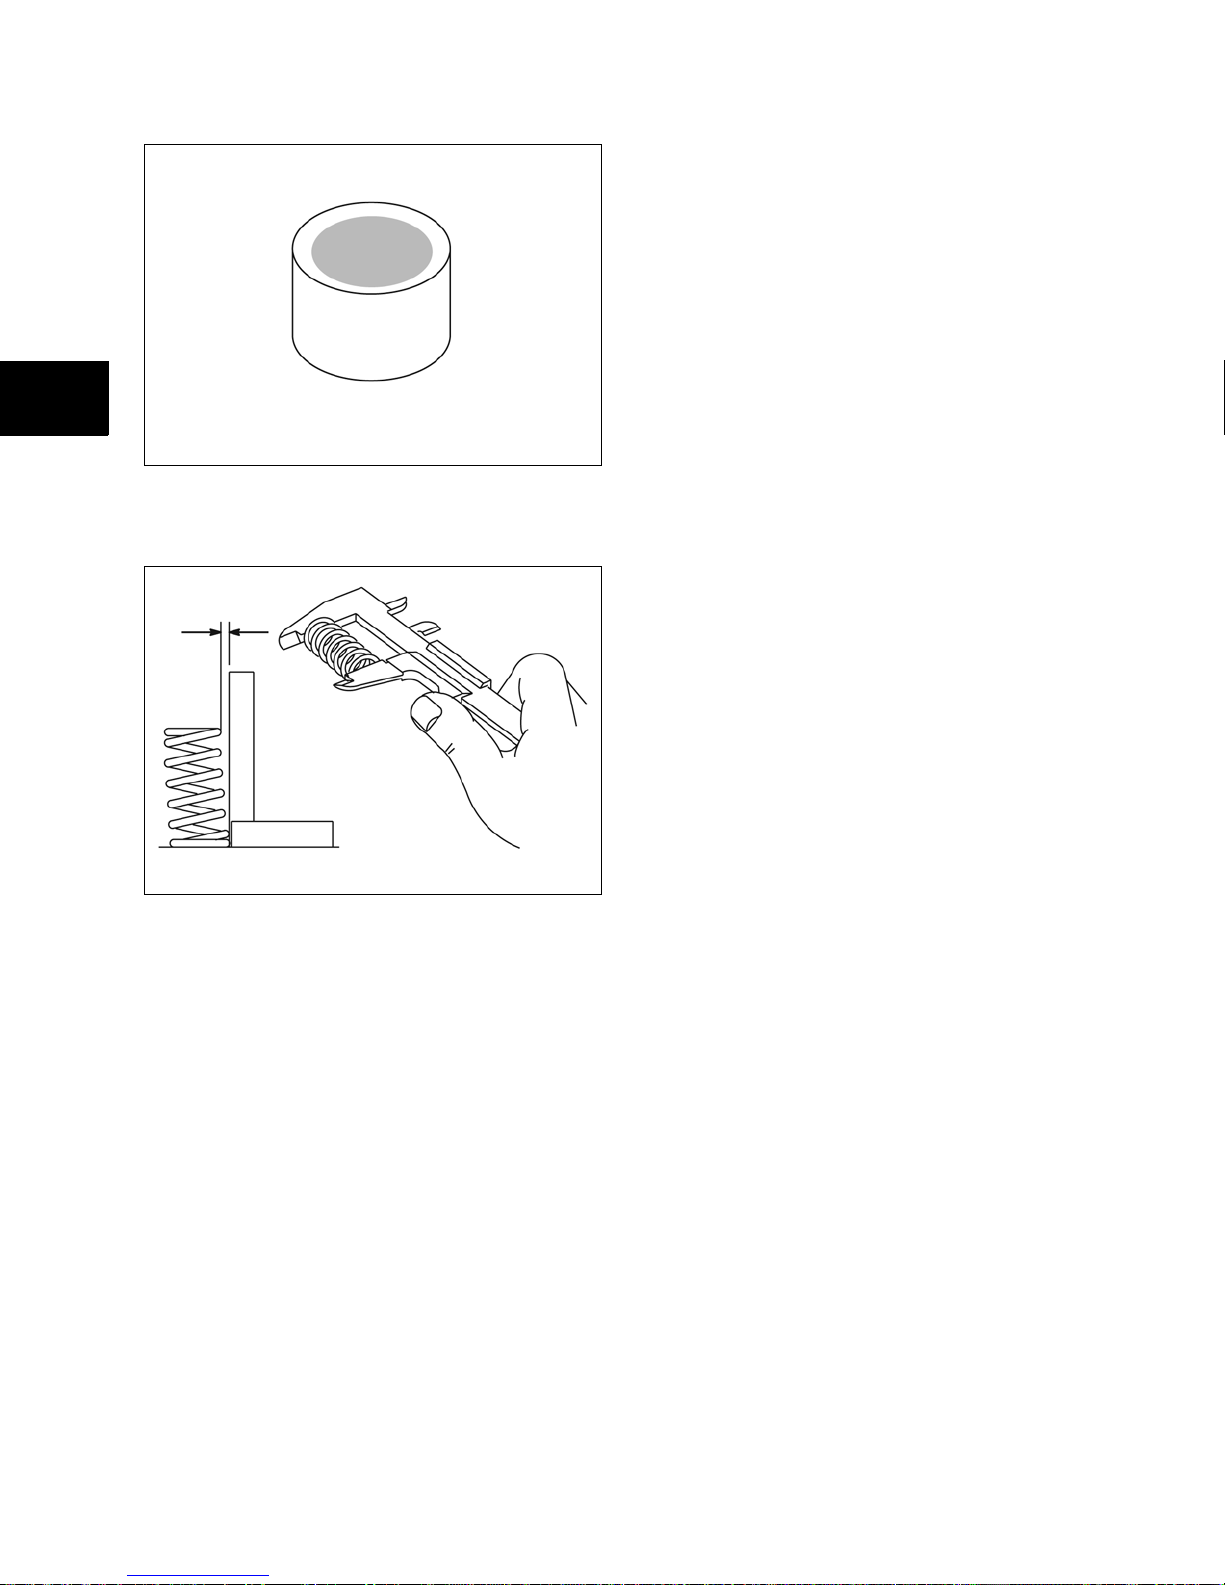
14. Inspect valve springs for squareness and
free length (Figure 21).
Figure 21
• Replace if out of square more than 0.040
in. (1.0 mm).
• Replace if free length is less than 0.150 in.
(29.2 mm).
14
Page 18
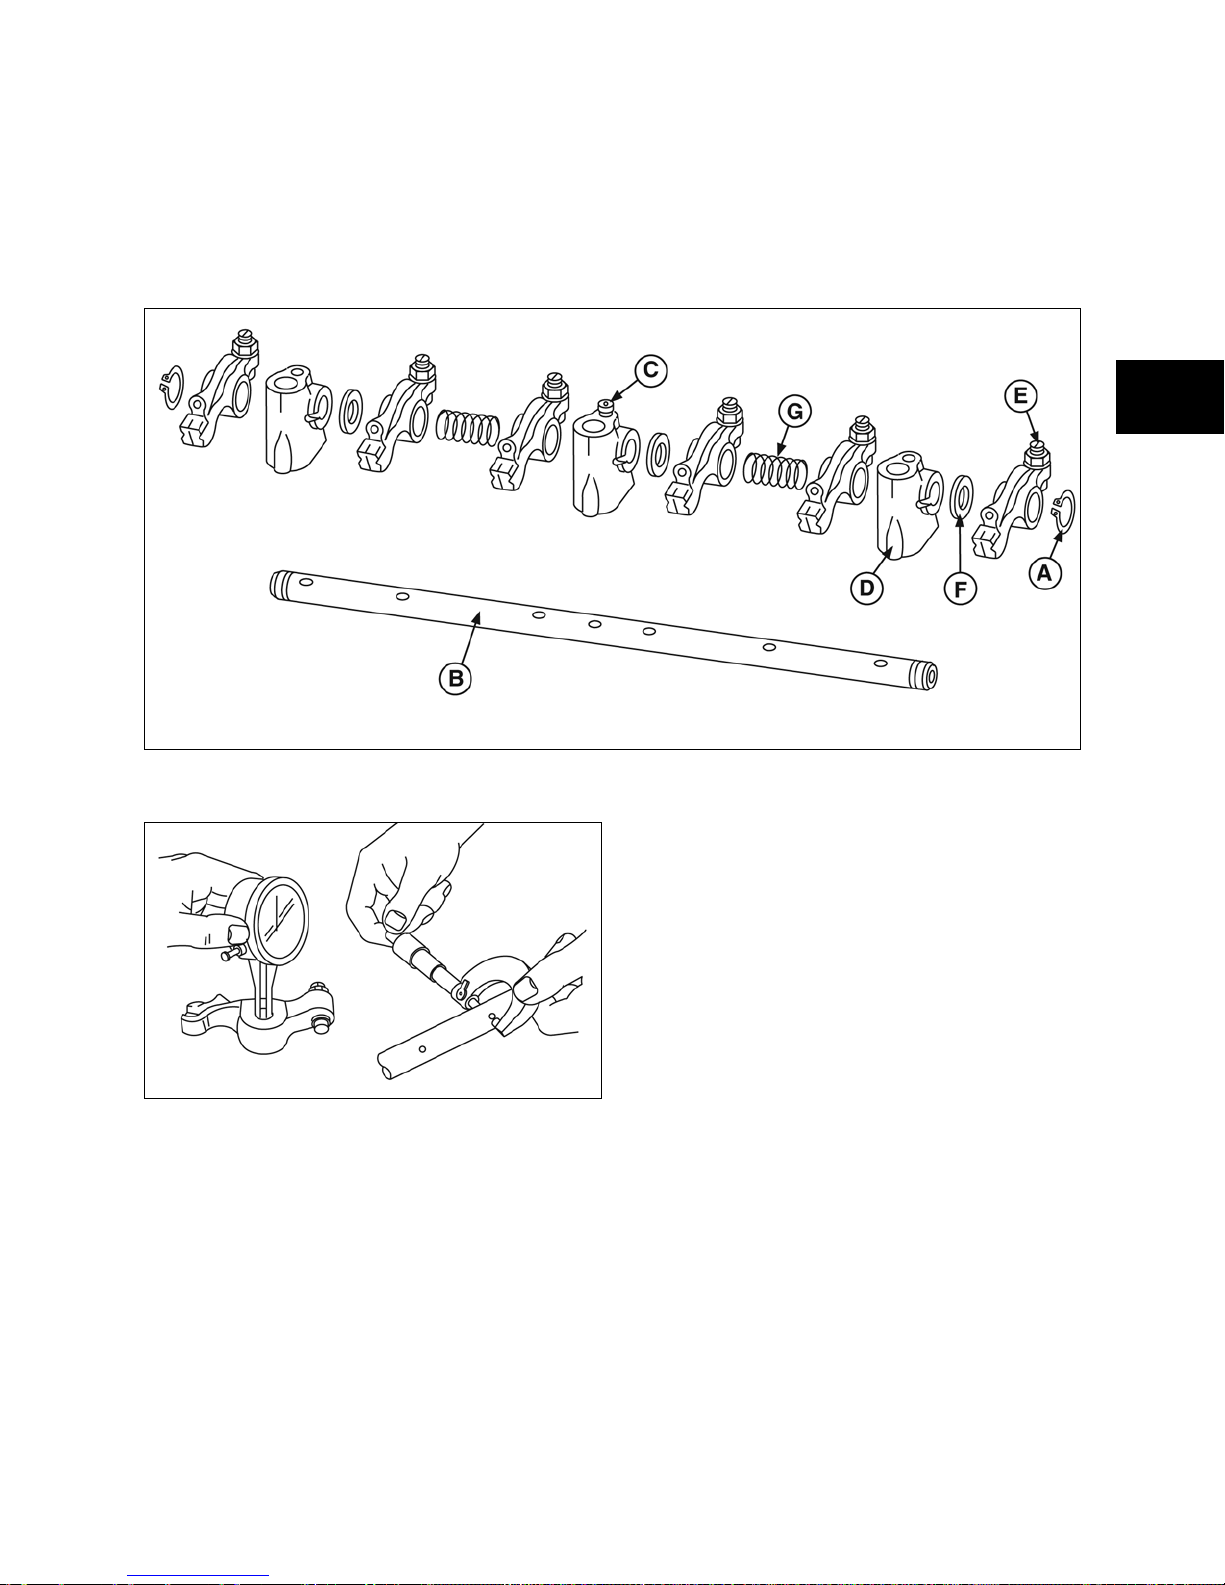
Disassemble Rocker Arm Shaft
Remove snap rings (A, Figure 22) from ends of
rocker arm shaft (B). Remove set screw (C) from
center rocker arm support (D). Disassemble rocker
arm assembly. Note position of rocker arms (E),
thrust washers (F) and springs (G).
2
Figure 22
1. Check rotor arms and shaft (Figure 23).
Figure 23
2. Check rocker arm bearing. Replace if greater
than 0.395 in. (10.03 mm).
3. Check rocker arm shaft. Replace if less than
0.392 in. (9.957 mm).
4. Check rocker arm studs for stripped threads
and replace if required.
15
Page 19
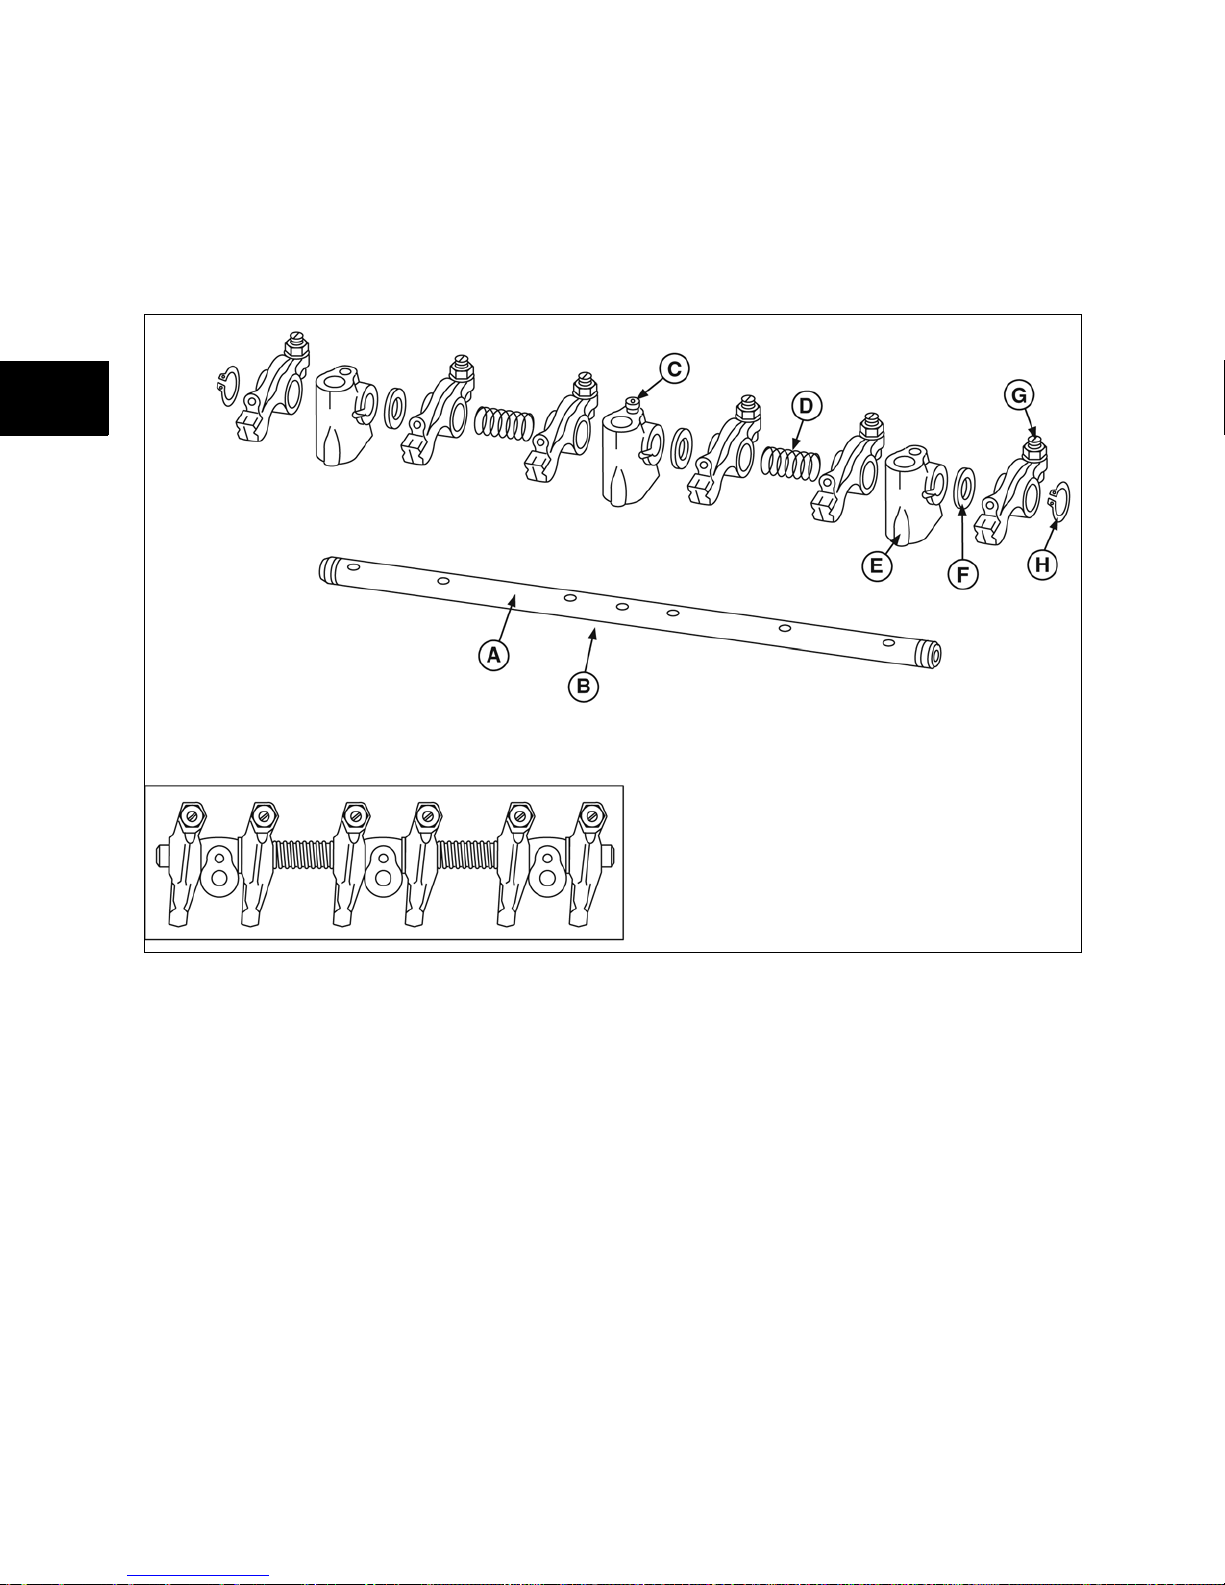
Assemble Rocker Arm Shaft
1. Oil all components before assembling.
2. Small grooves in rocker shaft (A) next to oil
holes (B) must face down.
3. Assemble rocker arm (G) components, noting
order of assembly shown in Figure 24.
2
2
Figure 24
4. Note position of three thrust washers (F),
springs (D), snap rings (H)
5. Install set screw (C) in center rocker arm
shaft support (E).
16
Page 20
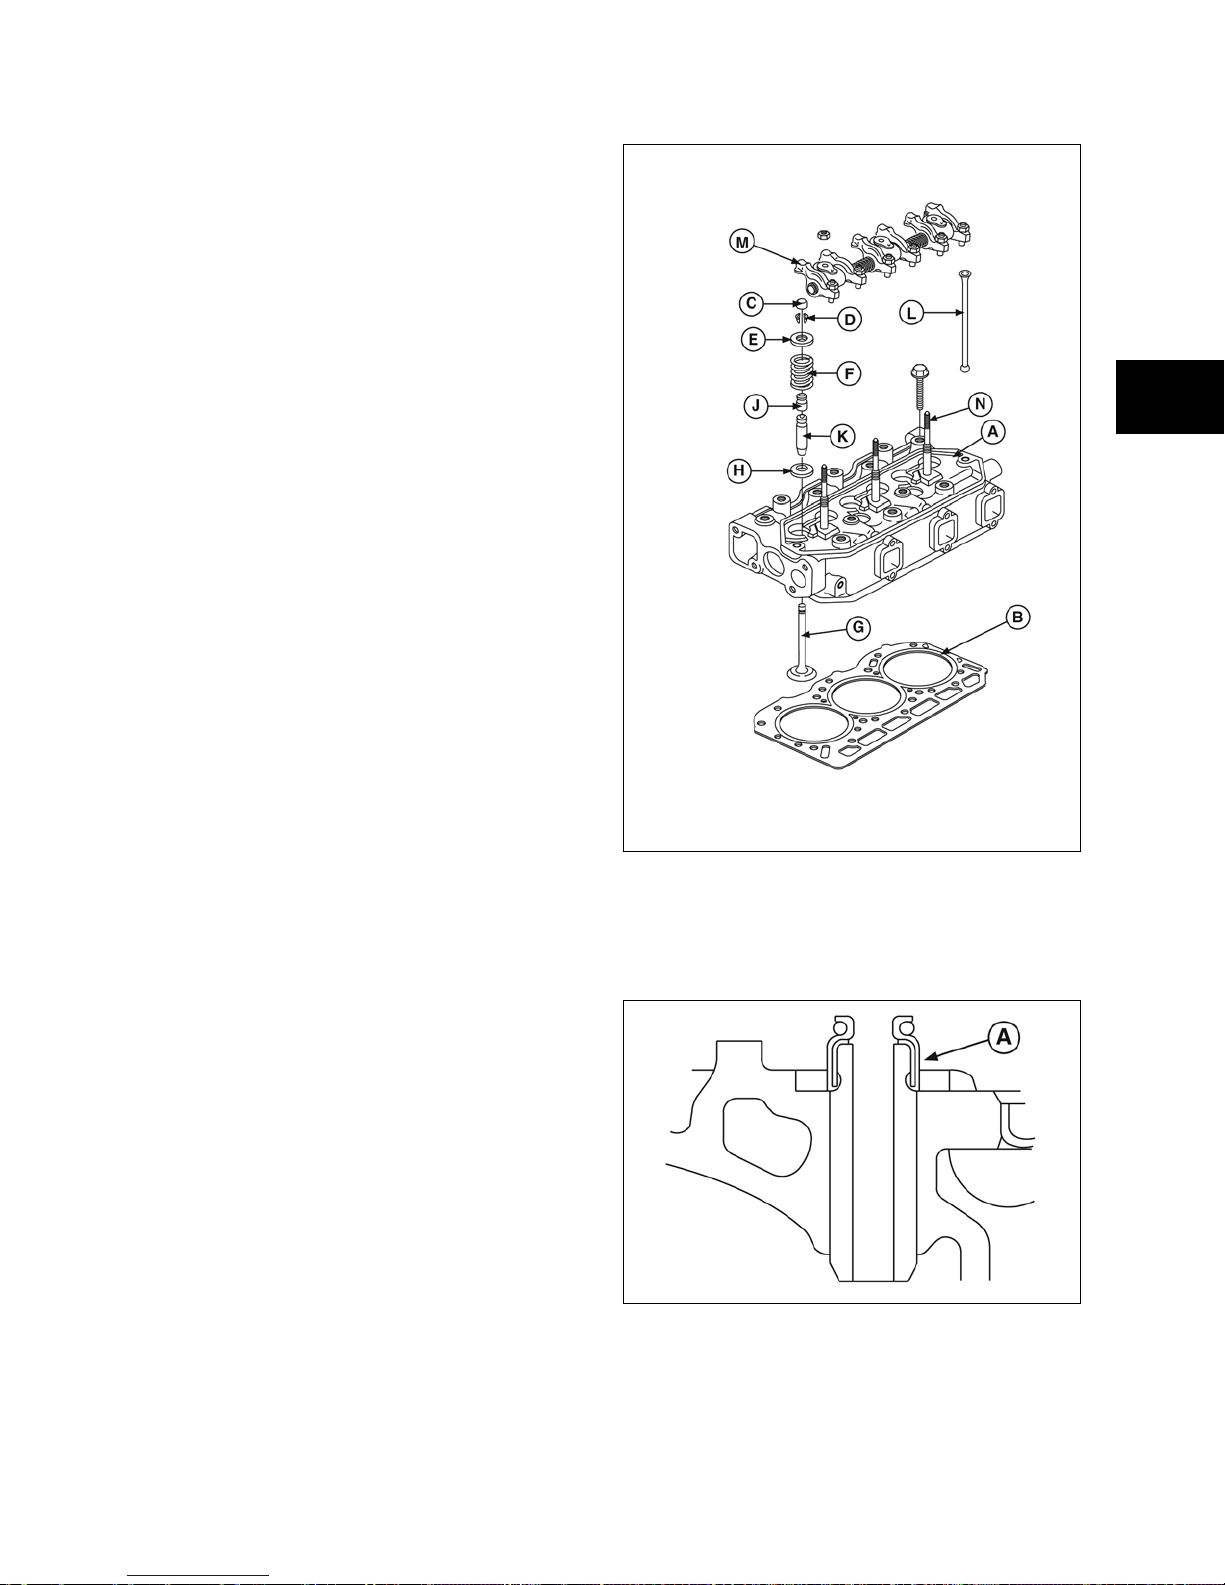
Assemble Cylinder Head
Cylinder Head Components (Figure 25)
• (A) - Cylinder Head
• (B) - Cylinder Head Gasket
• (C) - Valve Stem Cap
• (D) - Valve Spring Retainer Locks
• (E) - Valve Spring Retainer
• (F) - Valve Spring
• (G) - Valve
• (H) - Valve Spring Seat
• (J) - Valve Stem Seal
• (K) - Valve Guide
• (L) - Push Rod
• (M) - Rocker Arm Assembly
• (N) - Rocker Arm Stud
2
Figure 25
1. Install new valve stem seals (A, Figure 26).
Oil inner surface and lip of seal before
installing. Press seal on to valve guide
bushing until it bottoms.
Figure 26
2. Install valve spring seats (Figure 27).
17
Page 21

2
2
Figure 29
Figure 27
NOTE: Lightly coat valve stems with Valve Guide
Lubricant #93963, before installing valves.
3. Install valves.
4. Install valve springs (Figure 28) with Valve
Spring Compressor #19417.
Figure 28
NOTE: After installing valve spring retainer locks,
tap valve spring retainer lightly with a soft hammer
to ensure locks are seated.
Install Cylinder Head
1. Place cylinder head gasket over alignment
dowels on cylinder block (Figure 29).
NOTE: Make sure coolant, oil passages, and head
bolt holes are aligned.
2. Install cylinder head assembly.
3. Lubricate threads of cylinder head bolts with
engine oil.
4. Torque head bolts in 10 ft. lbs. (13.0 Nm)
increments in sequence shown (Figure 30).
Figure 30
NOTE: Current style head bolts are 9 mm diameter.
Early style head bolts are 8 mm diameter. Torque
specifications are different. Torque bolts to values
listed in Section 14 - Engine Specifications.
5. Lubricate push rods with engine oil then
install with recessed end up.
6. Install valve stem caps on valve stems. Install
rocker arm assembly (Figure 31).
18
Page 22

Figure 33
2
Figure 31
7. Install washers and torque nuts to values
listed in Section 14 - Engine Specifications.
NOTE: Make sure rocker adjustments studs are
seated in recessed end of push rods.
Install ignition coil bracket and ignition coils (Figure
32). Torque screws to values listed in Section 14 Engine Specifications.
8. Install ignition coil bracket and ignition coils
(Figure 32). Torque screws to values listed in
Section 14 - Engine Specifications.
10. Insert governor spring into original hole in
governor lever.
NOTE: Normal spring position is in center hole in
the governor lever (Figure 34).
NOTE: Governor spring must be installed in correct
hole in governor control lever by engine model.
• Model 430400 - Top Hole
• Model 580400 - Bottom Hole
Figure 32
9. Install intake manifold with new gasket. Install
governor link and spring (Figure 33). Torque
screws to values listed in Section 14 - Engine
Specifications.
19
Figure 34
11. Install exhaust manifold with new gasket
(Figure 35). Torque screws to values listed in
Section 14 - Engine Specifications.
Page 23
2
2
Figure 35
12. Install water pump with new gasket (Figure
36). Torque screws and nuts to values listed
in Section 14 - Engine Specifications.
Figure 36
13. Install water pump pulley (Figure 37). Install
fan (if equipped). Torque screws to values
listed in Section 14 - Engine Specifications.
Figure 38
NOTE: Belt deflection limit is 3/8-1/2 in./22 lb. (10.0-
12.0 mm/10 kg).
Adjust Valves
1. Before adjusting valves, make sure that the
Number 1 cylinder is at Top Dead Center
(TDC) - Compression Stroke (Figure 39).
Figure 39
Figure 37
14. Install V-belt (Figure 38). Install alternator
adjusting bolt. Torque bolt to values listed in
Section 14 - Engine Specifications.
20
2. Adjust valves and check (Figure 40).
• Valve Clearance (cold) IN and EX - 0.007
in. (0.18 mm).
• Torque adjusting screws and jam nuts
to values listed in Section 14 - Engine
Specifications.
Page 24
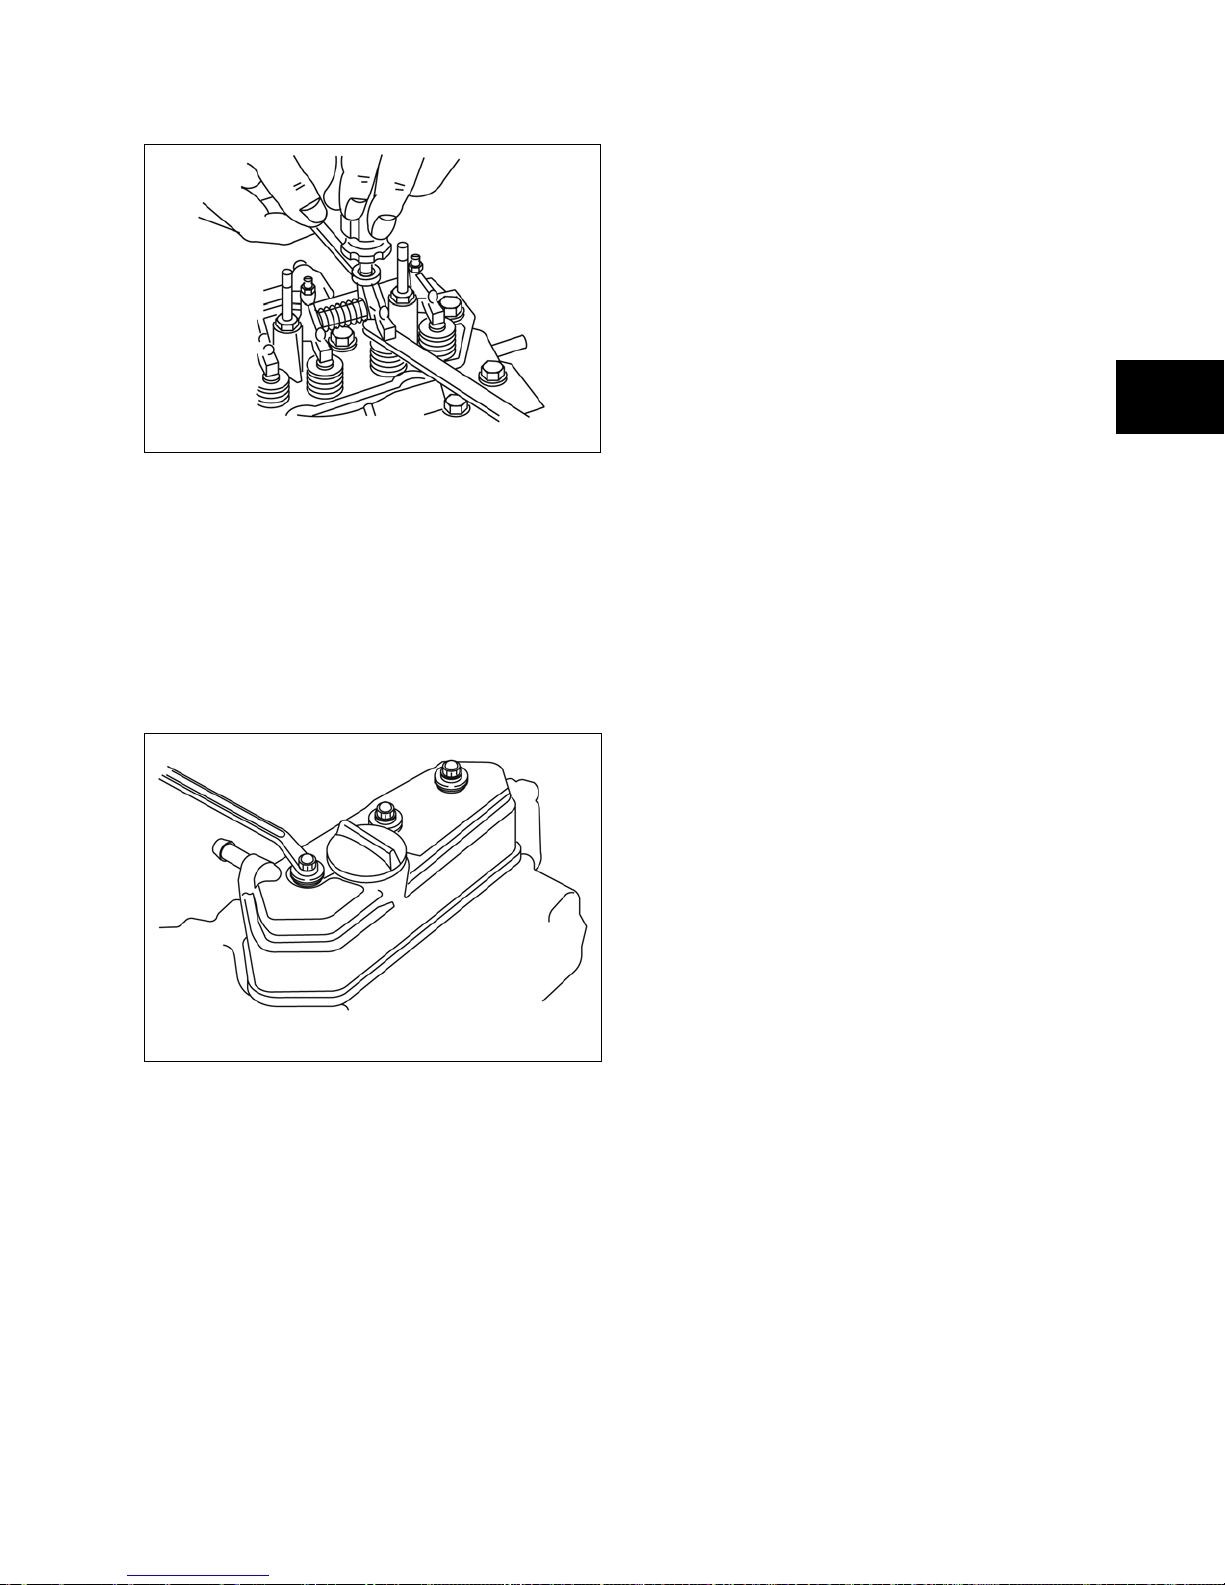
Figure 40
3. With Number 1 piston at TDC of compression
stroke, check and adjust valve clearances for
cylinders (Figure 41).
4. Rotate crankshaft one complete turn 360°
clockwise to check and adjust remaining
valves.
5. Install valve cover (Figure 41).Torque cover
nuts to values listed in Section 14 - Engine
Specifications.
2
Figure 41
6. Install spark plugs. Torque spark plugs
to values listed in Section 14 - Engine
Specifications.
21
Page 25

2
2
22
Page 26

SECTION 3 - GOVERNOR, TIMING GEARS, AND GEAR CASE
REMOVE TIMING GEAR COVER AND GEARS - - - - - - - - - - - - - - - - - - - - - - - - - - - - - - - - - - - - - - - -24
INSPECT GEARS - - - - - - - - - - - - - - - - - - - - - - - - - - - - - - - - - - - - - - - - - - - - - - - - - - - - - - - - - - - - -25
REMOVE GEAR CASE- - - - - - - - - - - - - - - - - - - - - - - - - - - - - - - - - - - - - - - - - - - - - - - - - - - - - - - - - -26
DISASSEMBLE GOVERNOR SHAFT ASSEMBLY - - - - - - - - - - - - - - - - - - - - - - - - - - - - - - - - - - - - - -27
REPLACE TIMING GEAR COVER OIL SEAL - - - - - - - - - - - - - - - - - - - - - - - - - - - - - - - - - - - - - - - - - -27
ASSEMBLE GOVERNOR SHAFT ASSEMBLY - - - - - - - - - - - - - - - - - - - - - - - - - - - - - - - - - - - - - - - - -27
ASSEMBLE TIMING GEAR CASE AND GEARS- - - - - - - - - - - - - - - - - - - - - - - - - - - - - - - - - - - - - - - -28
ADJUST GOVERNOR - - - - - - - - - - - - - - - - - - - - - - - - - - - - - - - - - - - - - - - - - - - - - - - - - - - - - - - - - -31
TROUBLESHOOTING - - - - - - - - - - - - - - - - - - - - - - - - - - - - - - - - - - - - - - - - - - - - - - - - - - - - - - - - - -31
ELECTRONIC GOVERNOR - - - - - - - - - - - - - - - - - - - - - - - - - - - - - - - - - - - - - - - - - - - - - - - - - - - - - -32
INSPECT GOVERNOR ACTUATOR - - - - - - - - - - - - - - - - - - - - - - - - - - - - - - - - - - - - - - - - - - - - - - - -33
3
REMOVE GOVERNOR ACTUATOR - - - - - - - - - - - - - - - - - - - - - - - - - - - - - - - - - - - - - - - - - - - - - - - -33
INSTALL GOVERNOR ACTUATOR - - - - - - - - - - - - - - - - - - - - - - - - - - - - - - - - - - - - - - - - - - - - - - - - -33
23
Page 27
3
TIMING GEARS, GEAR CASE, ELECTRONIC GOVERNOR
3
Remove Timing Gear Cover and Gears
NOTE: Make sure the Number 1 cylinder is at Top
Dead Center (TDC), compression stroke. See
Section 2.
1. Remove V-belt and fan (if equipped).
2. Drain oil from engine.
NOTE: Before removing governor spring, note hole
position of governor spring in governor lever.
3. Remove governor link spring (A, Figure 1)
and governor link from carburetor.
4. Remove governor spring from governor lever
(B).
5. Loosen nut (C) and remove governor lever
from governor shaft.
24
Figure 1
Page 28
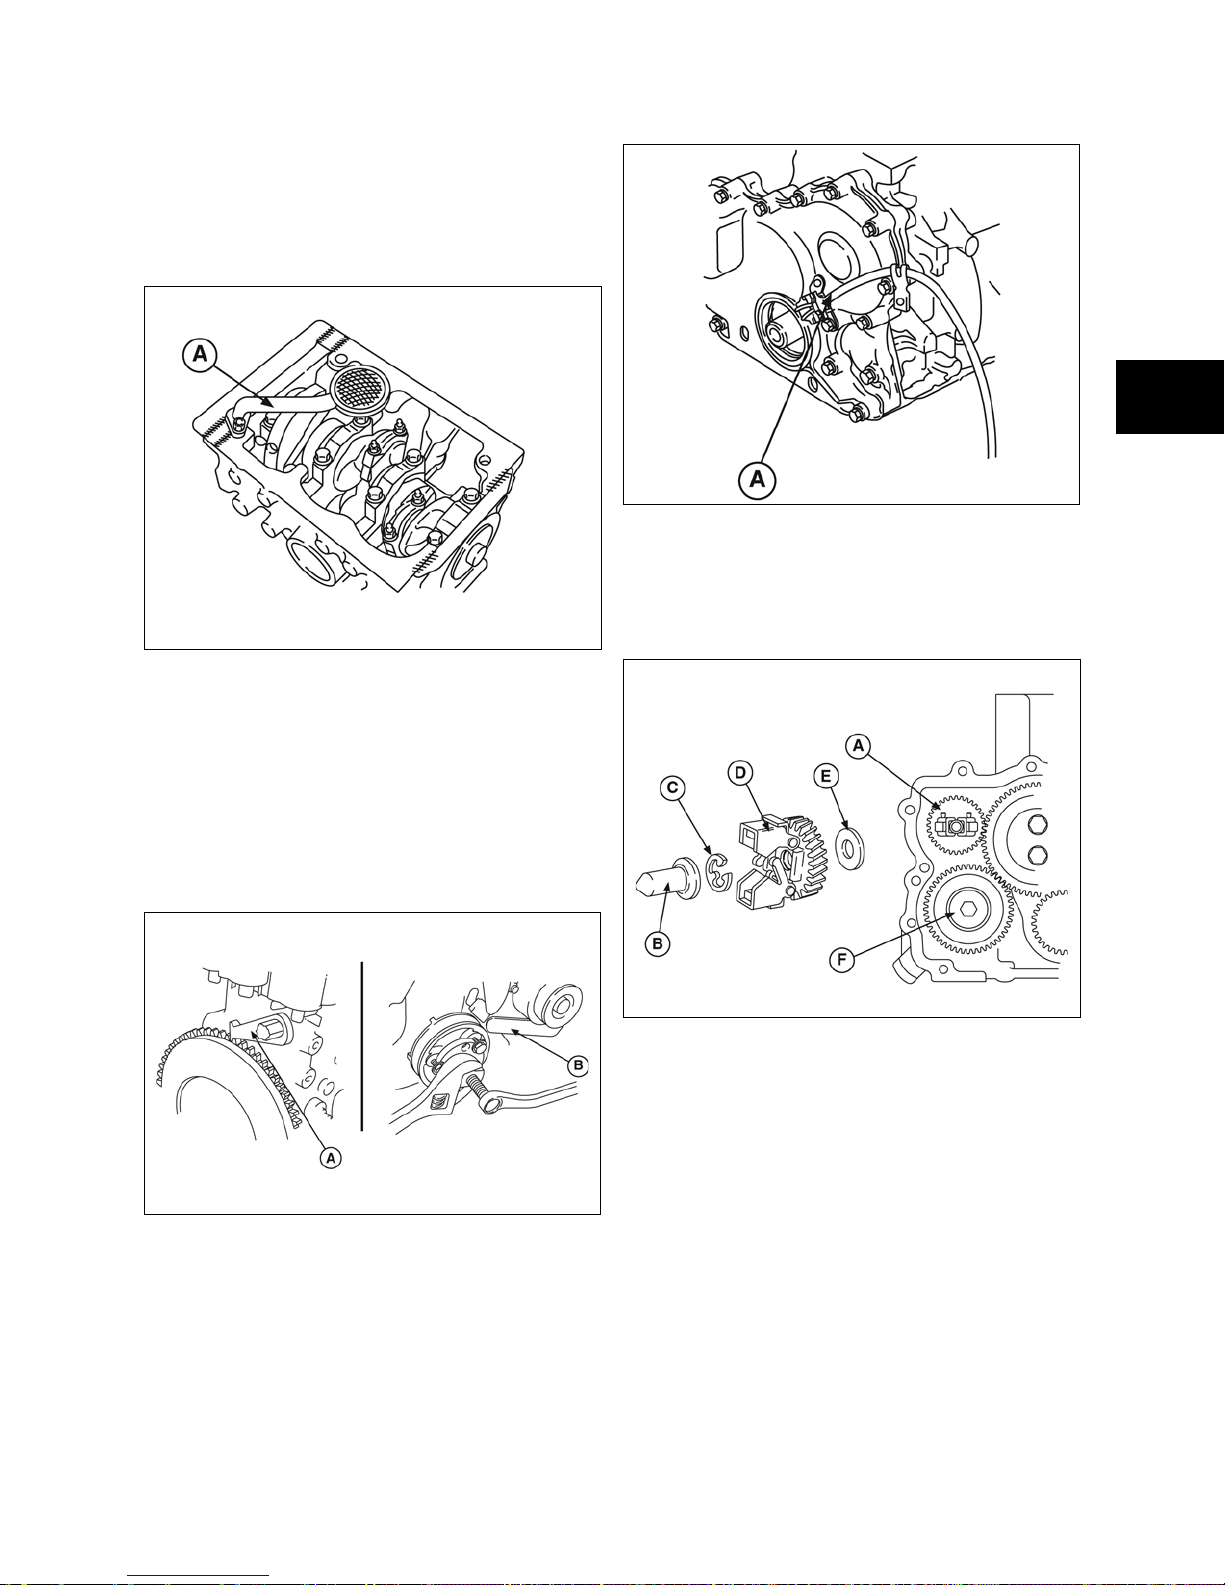
6. Remove oil pan screws and nuts.
7. Remove oil pan and discard gasket.
8. Remove oil pick-up tube (A, Figure 2) and
strainer. Discard gasket.
Figure 2
9. Remove bell housing adapter screw (if
equipped) and install Flywheel Holder
#19418 (A, Figure 3).
3
Figure 4
12. Remove governor gear (A, Figure 5),
governor cup (B), E-ring (C), governor gear
(D), and thrust washer (E).
13. Remove oil pump drive gear (F).
NOTE: Leave tool installed.
10. Remove crankshaft pulley using Tool #19420
(B).
Figure 3
11. Remove trigger (A, Figure 4) and wire.
Remove timing gear cover (B) and discard
timing gear gasket.
Figure 5
14. Check governor gear and oil pump drive gear
for damaged teeth.
Inspect Gears
1. Inspect gear teeth for wear or damage.
2. Check gear back lash between idler gear (A,
Figure 6) and crankshaft gear (B) using a dial
indicator.
• Set tip of indicator on gear tooth, then rock
idler gear back and forth noting indicator
reading.
• Crankshaft must not turn while checking.
25
Page 29

7. If gears are worn, it is recommended that
they be replaced as a set.
3
Figure 6
3. If back lash exceeds 0.008 in. (0.2 mm)
check idler gear bearing and shaft for wear
(Figure 7).
Reject dimensions for Idler Gear:
• ID - 0.345 in. (34.17 mm)
• OD - 1.335 in. (33.91 mm)
Figure 7
3
Figure 8
Remove Gear Case
1. Remove three screws (A, Figure 9) and
camshaft retainer.
2. Remove remaining five screws (B).
4. If idler gear bearing and shaft are within
specification, replace with new idler gear and
recheck.
5. If back lash exceeds 0.008 in. (0.2 mm) with
NEW idler gear, crankshaft gear is worn.
NOTE: If crankshaft gear is worn the crankshaft
must be replaced.
6. Hold idler gear and check gear backlash
between camshaft timing gear (A, Figure 8)
and idler gear (B) using a dial indicator.
NOTE: Idler gear must not turn while checking.
26
Figure 9
3. Remove timing gear case and discard
gasket.
4. Remove oil pump rotor (Figure 10) from
cylinder block.
Page 30
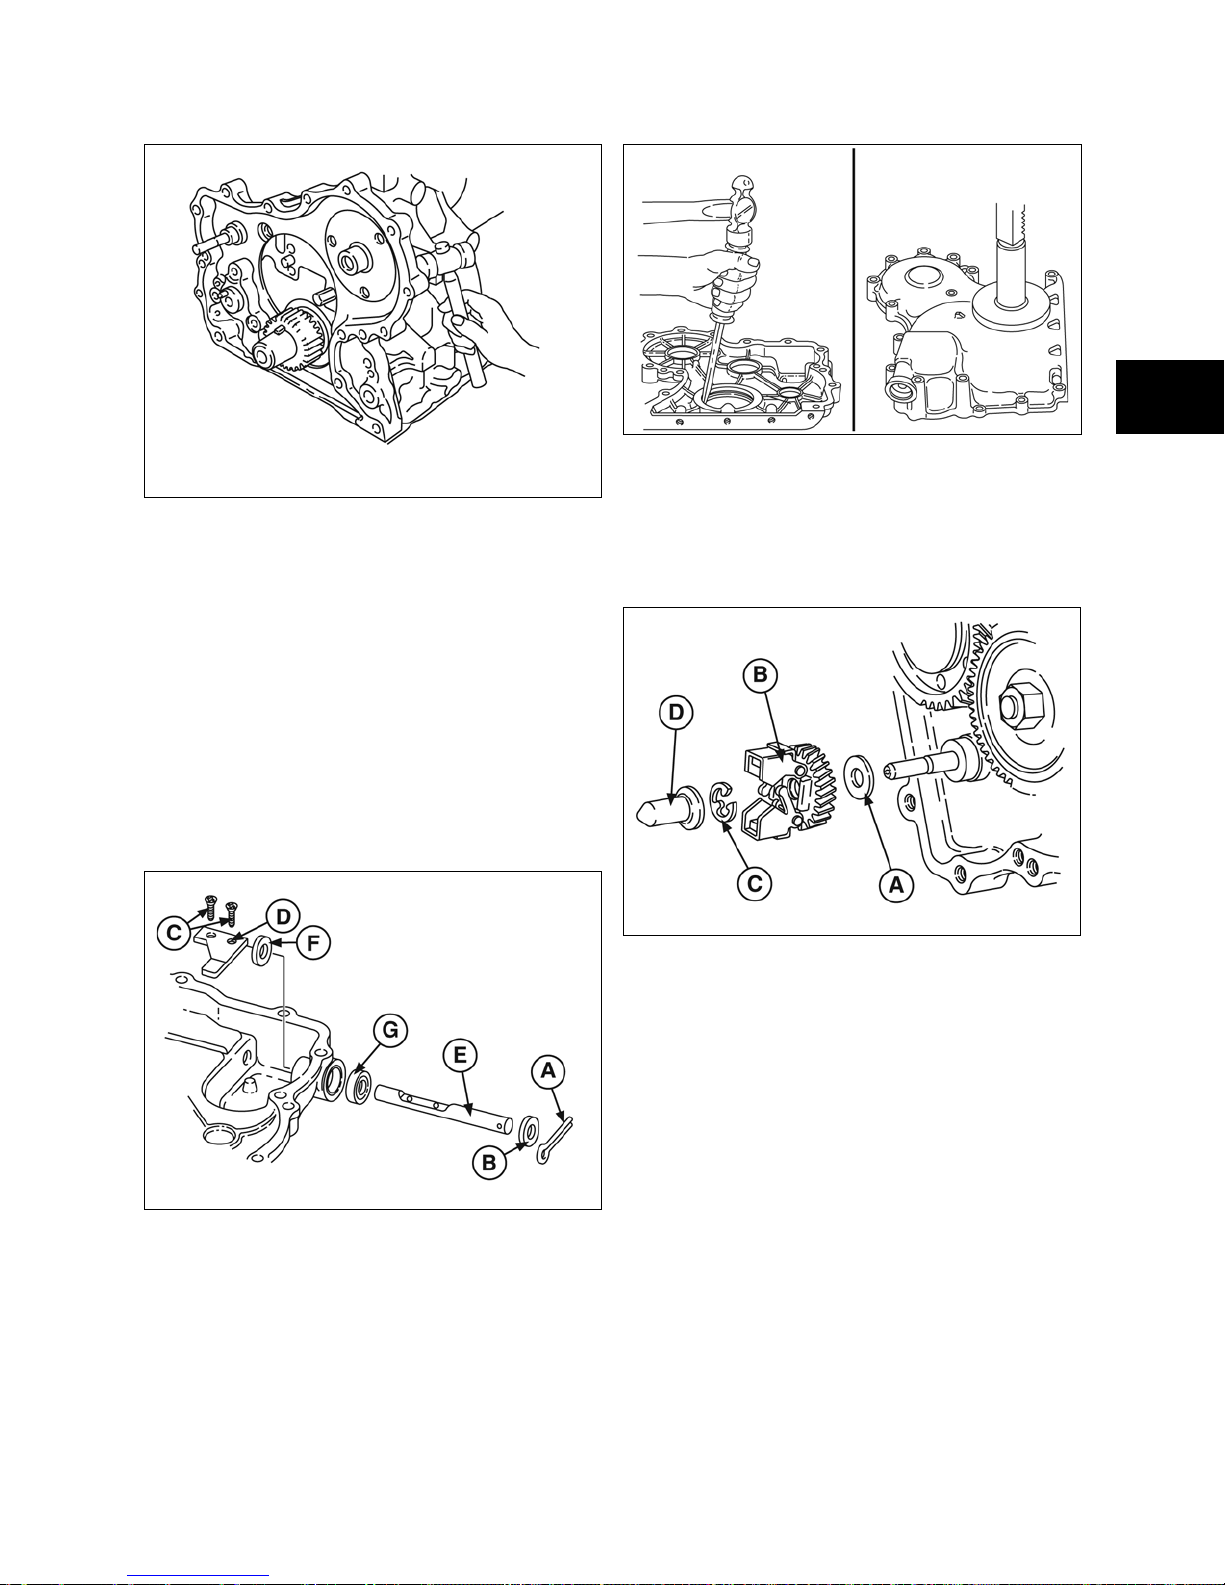
Figure 12
3
Figure 10
Disassemble Governor Shaft Assembly
1. Remove cotter pin (A, Figure 11) and washer
(B). Discard cotter pin.
2. Remove screws (C) and governor paddle (D)
using Torx® Driver #19445. Discard screws.
NOTE: Governor paddle screws are Torx® tamper
proof screws.
3. Remove shaft (E) and spacer (F).
4. Remove and discard oil seal (G).
Figure 11
Replace Timing Gear Cover Oil Seal
1. Drive out oil seal.
2. Use Seal Driver #19423 to install new oil seal
(Figure 12).
Assemble Governor Shaft Assembly
1. Install thrust washer (A, Figure 13) on shaft
followed by the governor gear (B), E-ring
(C), and governor cup (D).
Figure 13
NOTE: Lubricate governor shaft with engine oil
before installing.
2. Install new oil seal (A, Figure 14) with seal
lips in.
3. Install governor shaft (B) and spacer (C).
4. Install governor paddle (D) using new screws
(E). Use Torx® Driver #19445. Torque to
values listed in Section 14 - Engine
Specifications.
5. Install washer (F) and new cotter pin (G).
NOTE: Governor shaft must rotate freely.
27
Page 31

3
3
Figure 14
Assemble Timing Gear Case and Gears
1. Clean and lubricate oil pump rotor (A, Figure
15) with engine oil and install on cylinder
block.
NOTE: ID mark (B) on rotor must face cylinder
block.
Figure 16
NOTE: It may be necessary to rotate oil pump drive
to engage oil pump rotors.
NOTE: Position camshaft retainer so that the center
hole does not interfere with the camshaft.
3. Note position, length, and number of screws
(Figure 16).
• M6 x 1.1 in. (M6 x 28 mm): 4 (A)
• M6 x 0.7 in. (M6 x 18 mm): 3 (B)
• M6 x 0.6 in. (M6 x 16 mm): 1 (C)
4. Torque screws to values listed in Section 14 Engine Specifications.
5. Make sure crankshaft key is at the 12 o’clock
position (A, Figure 17).
Figure 15
2. Install timing gear case with new gasket.
Install camshaft retainer (A, Figure 16).
28
Figure 17
6. Assemble idler gear shaft with arrow up (A,
Figure 18).
Page 32

Figure 18
3
Engine models 430000 and 580000 built after date
code 990111007 are equipped with right angle
helical timing gears. Timing marks are identified by
letters (A, AA, B, BB, etc.), instead of numbers.
The timing procedure is the same.
7. With crankshaft key at the12 o’clock position,
assemble idler gear so that timing mark 11
(AA) is aligned with timing mark 1 (A) on
crankshaft gear, timing mark 22 (BB) is
aligned with timing mark 2 (B) on camshaft
gear (Figure 19).
Figure 20
10. Install timing gear cover with new gasket.
Note position, length, and number of screws
(Figure 21). Torque screws to values listed in
Section 14 - Engine Specifications.
• M6 x 2.5 in. (M6 x 65 mm): 2 (A)
• M6 x 2.1 in. (M6 x 55 mm): 3 (B)
• M6 x 1.1 in. (M6 x 30 mm): 7 (C)
• M6 Nut: 2 (D)
Figure 19
8. Install oil pump gear.
9. Torque screws to values listed in Section 14 Engine Specifications. Camshaft gear (A,
Figure 20), idler gear (B), and oil pump gear
(C).
29
Figure 21
11. Install crankshaft pulley with timing mark at
12 o’clock position (No. 1 cylinder) (Figure
22).
NOTE: Ensure alignment pin in crankshaft gear is
seated in hole in pulley.
Page 33

12. Remove flywheel holder (A) and install
trigger assembly and wire (B).
3
Figure 22
13. Install oil pick-up tube and strainer with new
gasket.
14. Apply a small bead of Permatex® No. 2 or
other similar sealant (A, Figure 23).
3
Figure 24
19. Insert governor spring into original hole in
governor lever.
NOTICE: Governor spring must be installed in
correct hole in governor control lever by engine
model (Figure 25).
• Model 430400 - Top Hole (A)
• Model 580400 - Bottom Hole (B)
Figure 23
15. Install oil pan with new gasket. Torque
screws and nuts to values shown in Section
14 - Engine Specifications.
16. Install V-belt and fan (if equipped).
17. Install governor lever (A, Figure 24) on to
governor shaft. Do not tighten governor nut
at this time.
18. Install governor link with spring (B).
30
Figure 25
Page 34

Adjust Governor
1. Move governor control lever (A, Figure 26)
up to end of travel and hold in this position
(throttle wide open).
2. Rotate governor shaft (B) clockwise to end of
travel.
3. Torque governor nut (C) to value listed in
Section 14 - Engine Specifications.
3
Figure 27
• If dimension is greater than 1 mm, perform
governor adjustment.
• If engine continues to hunt at top no load
speed, decrease governor sensitivity by
moving governor spring to next hole on
governor lever (Figure 28).
Figure 26
Troubleshooting
If engine hunts at top no load speed, check
governor adjustment as follows:
1. Stop engine.
2. Move equipment control to “FAST” position.
3. Disconnect governor link spring and link.
4. Rotate throttle wide open position.
NOTE: Position of governor link must be within 1
mm of center of hole in throttle (Figure 27).
NOTE: Moving spring away from governor shaft
pivot point decreases sensitivity. Moving spring
towards governor shaft pivot point increases
sensitivity.
Figure 28
31
Page 35

Electronic Governor
The ignition module and related wiring for the
electronic governor is supplied by the equipment
manufacturer.
NOTE: Engines equipped with an electronic
governor do not have mechanical governor
components.
3
3
A - Governor Actuator
B - Governor Link
C - Governor Link Spring
D - Wiring Harness
32
Page 36

Inspect Governor Actuator
1. Disconnect harness at connector (A, Figure
29).
2. Touch test leads (B) to terminals of a known
good 12 volt battery.
• Actuator lever (C) should quickly move the
throttle to a wide open position (D).
3. Remove test leads from battery terminals.
• Actuator lever should quickly move throttle
lever to idler position.
4. Replace actuator if not to specification.
Install Governor Actuator
1. Assemble governor link spring and link to
actuator lever (Figure 31).
NOTE: Open ends of spring must face cylinder
head.
2. Assemble actuator to mounting bracket
loosely. Do not tighten screws.
3
Figure 31
Figure 29
Remove Governor Actuator
1. Disconnect governor link spring and link (A,
Figure 30).
2. Remove two screws (B) and actuator (C).
3. Rotate throttle lever clockwise to end of travel
and hold in this position.
4. Slide actuator until governor link is positioned
slightly to rear of hole in throttle lever bushing
(Figure 32).
5. Torque mounting screws to values listed in
Section 14 - Engine Specifications.
6. Assemble governor link and spring to throttle
lever.
Figure 30
33
Figure 32
Page 37

3
3
34
Page 38

SECTION 4 - FLYWHEEL AND REAR SEAL RETAINER
REMOVE OIL PAN AND FLYWHEEL- - - - - - - - - - - - - - - - - - - - - - - - - - - - - - - - - - - - - - - - - - - - - - - -36
REMOVE REAR SEAL RETAINER - - - - - - - - - - - - - - - - - - - - - - - - - - - - - - - - - - - - - - - - - - - - - - - - -36
REPLACE OIL SEAL - - - - - - - - - - - - - - - - - - - - - - - - - - - - - - - - - - - - - - - - - - - - - - - - - - - - - - - - - - -36
INSTALL REAL SEAL RETAINER AND FLYWHEEL - - - - - - - - - - - - - - - - - - - - - - - - - - - - - - - - - - - - -37
INSTALL OIL PAN - - - - - - - - - - - - - - - - - - - - - - - - - - - - - - - - - - - - - - - - - - - - - - - - - - - - - - - - - - - - -37
4
35
Page 39

4
Removing Pan and Flywheel
1. Drain oil from engine.
2. Remove oil pan screws and nuts (Figure 1).
3. Remove oil pan and discard gasket.
Figure 1
4. Install Flywheel Holder #19418 (A, Figure 2).
Remove flywheel screws and flywheel.
Remove Rear Seal Retainer
1. Remove rear seal retainer and discard
gasket (Figure 3).
Figure 3
Replacing Oil Seal
1. Remove oil seal (Figure 4).
Figure 2
5. Inspect flywheel for cracks or damage.
Inspect flywheel ring gear for worn, chipped,
or cracked teeth.
NOTE: If ring gear is worn or damaged, the flywheel
must be replaced.
36
Figure 4
2. Lubricate outside diameter of oil seal.
3. Using a Seal Driver #19424, install new seal
(Figure 5).
Page 40

4
Figure 5
Installing Rear Seal Retainer and Flywheel
1. Install real seal retainer with new gasket
(Figure 6). Torque screws to values listed in
Section 14 - Engine Specifications.
Figure 6
Figure 7
3. Torque flywheel screws to values listed in
Section 14 - Engine Specifications.
4. Remove flywheel holder.
Install Oil Pan
1. Install oil pan with new gasket.
2. All small bead of Permatex® No. 2 or similar
sealant to crankcase areas (A, Figure 8).
2. Install flywheel (Figure 7).
NOTE: Apply Permatex® No. 2 or similar sealant to
flywheel screws.
37
Figure 8
3. Torque screws and nuts to values listed in
Section 14 - Engine Specifications.
Page 41

4
38
Page 42

SECTION 5 - CYLINDER BLOCK DISASSEMBLY
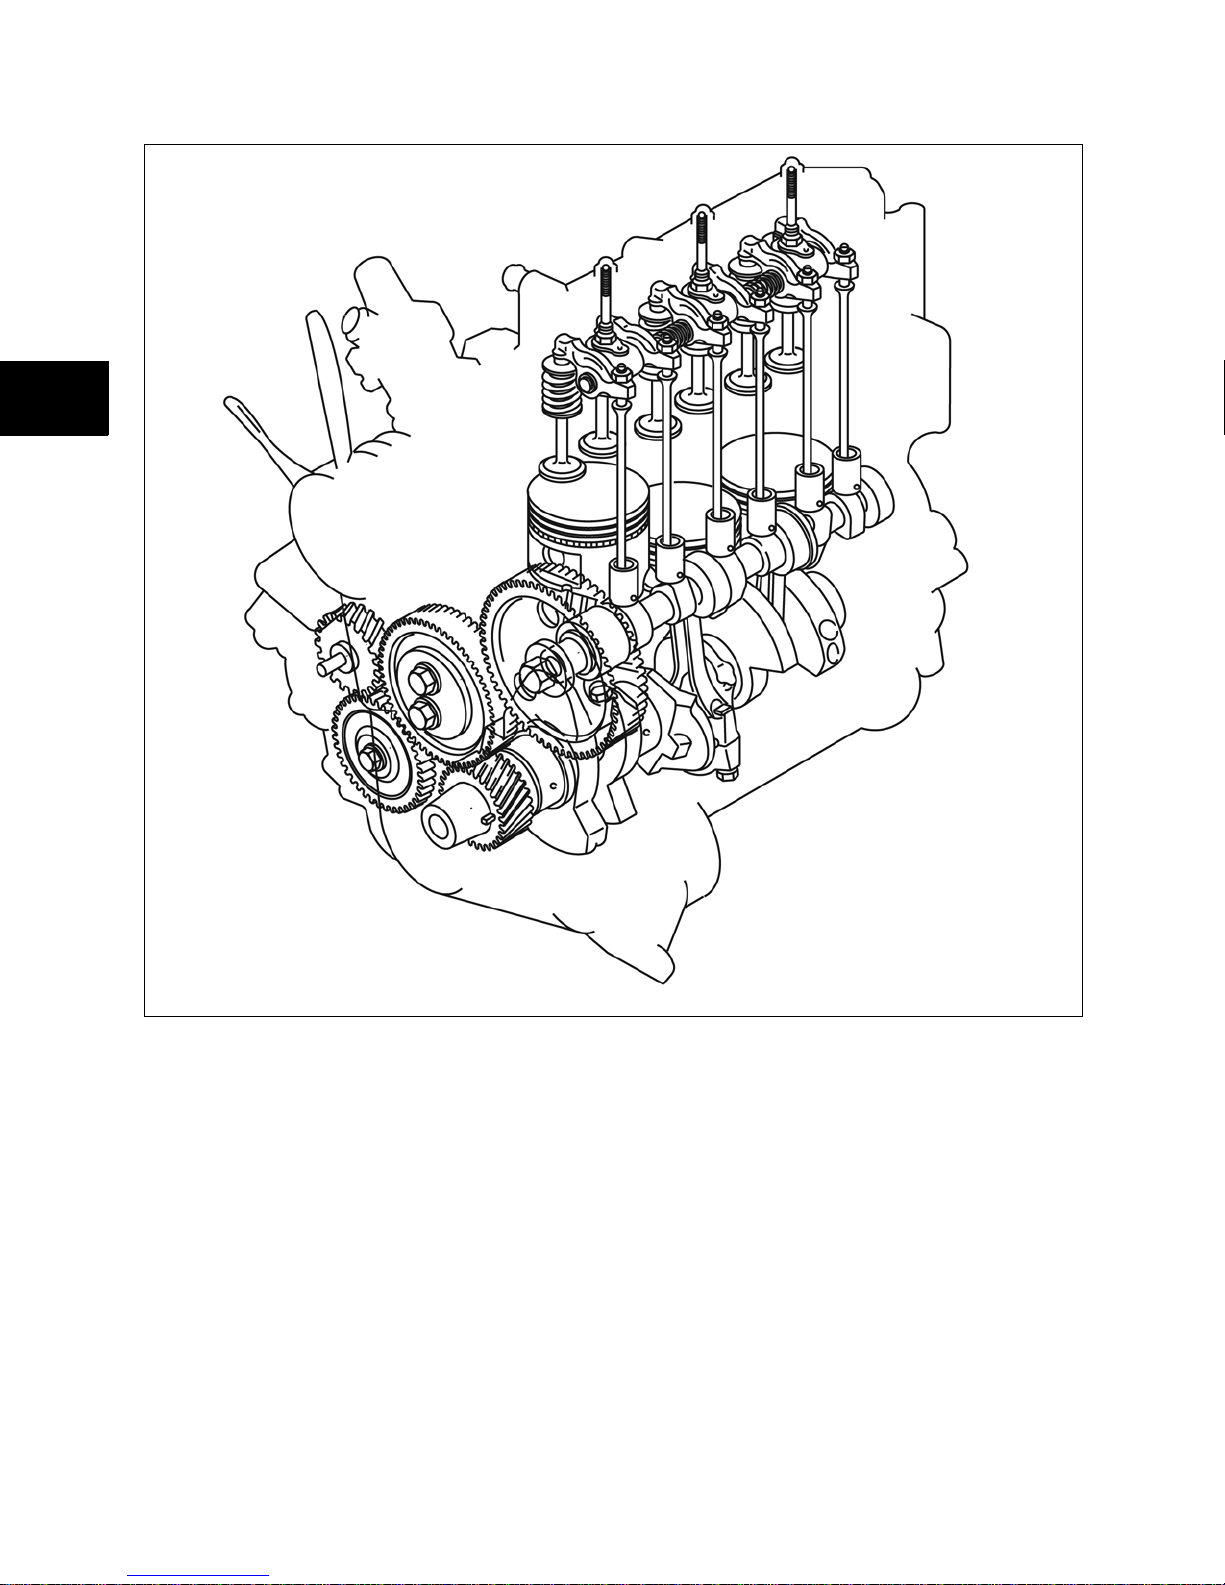
CYLINDER BLOCK
CYLINDER BLOCK DISASSEMBLY - - - - - - - - - - - - - - - - - - - - - - - - - - - - - - - - - - - - - - - - - - - - - - - -40
5
39
Page 43

5
Cylinder Block Disassembly
An automotive type engine stand is recommended
when complete engine disassembly is required.
See drawings below for dimensions to make an
engine stand mounting fixture. The engine stand
shown below is manufactured by Snap-On®.
40
Page 44

1. Remove cylinder head. See Section 2.
2. Remove oil pan, timing cover, gears, and
case. See Section 3.
3. Remove flywheel and rear seal retainer. See
Section 4.
4. Remove starter motor (Figure 1).
Figure 1
5. Remove alternator bracket and alternator
(Figure 2).
5
Figure 3
7. Remove camshaft (Figure 4).
NOTE: Use care when removing camshaft to
prevent damaging cam bearing, journals, and lobes.
Figure 2
6. Remove valve lifters (Figure 3).
NOTE: Number lifters so that they may be
reinstalled in the same position.
41
Figure 4
8. Remove oil pick-up tube and strainer (Figure
5). Discard gasket.
Page 45

5
NOTE: Main bearing caps are numbered 1 through
4.
Figure 5
9. Remove connecting rod and piston
assemblies (Figure 6).
NOTE: Remove carbon or ridge from cylinder and
number connecting rod/piston assemblies before
removing from cylinders.
• Remove connecting rod cap with lower
bearing.
• Push connecting rod and piston out
through top of cylinder.
• Reassemble connecting rod cap to
connecting rod to prevent interchanging
components.
Figure 7
11. Remove crankshaft (A, Figure 8).
• Remove crankshaft thrust washers (#3
main bearing).
• Remove upper main bearings from
saddles and place with respective bearing
caps.
Figure 8
Figure 6
10. Remove crankshaft main bearing caps,
keeping main bearings with their respective
caps (Figure 7).
42
Page 46

SECTION 6 - CYLINDER BLOCK INSPECTION AND REPAIR
CHECK CYLINDER BLOCK - - - - - - - - - - - - - - - - - - - - - - - - - - - - - - - - - - - - - - - - - - - - - - - - - - - - - -44
CHECK CYLINDER BORE FOR WEAR - - - - - - - - - - - - - - - - - - - - - - - - - - - - - - - - - - - - - - - - - - - - - -44
REPLACE CAMSHAFT BEARINGS - - - - - - - - - - - - - - - - - - - - - - - - - - - - - - - - - - - - - - - - - - - - - - - - -45
REPLACE CAMSHAFT PLUG - - - - - - - - - - - - - - - - - - - - - - - - - - - - - - - - - - - - - - - - - - - - - - - - - - - - -45
6
43
Page 47

Inspect Cylinder Block
1. Remove all traces of sealant and gasket
material from mounting surfaces. Inspect
cylinder block for damage, cracks, and
stripped threads.
2. Inspect cylinder block deck for distortion
(Figure 1).
• Distortion Limit - 0.003 in. (0.08 mm).
6
Figure 1
3. If cylinder block exceeds limits shown, it may
be resurfaced (Figure 2).
6
Figure 3
NOTE: Always resize to exactly 0.010 in. (0.25mm)
over standard bore size. If this is done accurately,
the service oversize rings and pistons will fit
perfectly and proper clearances will be maintained.
3. Check valve lifter bore (Figure 4).
• Standard Dimension - 0.709 in. (18.02
mm)
• Reject Dimension - 0.711 in. (18.05 mm)
4. Check valve lifter (Figure 4).
• Standard Dimension - 0.708 in. (17.98
mm)
• Reject Dimension - 0.705 in. (17.91 mm)
Figure 2
Inspect Cylinder Bore for Wear:
1. Measure cylinder bore in 6 points at right
angles (Figure 3).
2. If cylinder bore is worn more than 0.003 in.
(0.075 mm) or more than 0.0015 in. (0.035
mm) out of round, it must be resized.
44
Figure 4
5. Check Camshaft bearing (Figure 5).
• Replace if greater than 1.42 in. (36.06 mm)
Page 48

Figure 5
Replace Camshaft Bearing
1. Using Camshaft Bearing Puller #19421,
remove camshaft bearing (Figure 6).
Replace Camshaft Plug
1. Remove rear camshaft plug (Figure 8).
NOTICE: Use a wood dowel or brass rod to prevent
damage to the camshaft bearing.
6
Figure 8
2. Using Camshaft Bearing Driver #19422,
install new camshaft plug flush with cylinder
block (Figure 9).
Figure 6
2. Using Camshaft Bearing Driver #19422.
install camshaft bearing (Figure 7).
Figure 7
45
Figure 9
NOTE: If cylinder block is being resized, the
following parts should be removed so that the
cylinder block can be thoroughly cleaned.
3. Remove oil pressure switch (A, Figure 10),
water gallery plug (B), and oil filter adapter
(C).
Page 49

6
6
Figure 10
4. Remove timing gear oil nozzle (A, Figure 11).
Figure 11
5. When reinstalling oil nozzle, oil hole must be
positioned at a 45° angle, pointing towards
the idler gear (A, Figure 12).
Figure 12
46
Page 50

SECTION 7 - CRANKSHAFT, CAMSHAFT AND BEARINGS
INSPECT CRANKSHAFT - - - - - - - - - - - - - - - - - - - - - - - - - - - - - - - - - - - - - - - - - - - - - - - - - - - - - - - -48
CHECK MAIN BEARING CLEARANCES - - - - - - - - - - - - - - - - - - - - - - - - - - - - - - - - - - - - - - - - - - - - -49
CHECK CONNECTING ROD BEARING CLEARANCES - - - - - - - - - - - - - - - - - - - - - - - - - - - - - - - - - -50
CHECK CRANKSHAFT END PLAY - - - - - - - - - - - - - - - - - - - - - - - - - - - - - - - - - - - - - - - - - - - - - - - - -50
INSPECT CAMSHAFT - - - - - - - - - - - - - - - - - - - - - - - - - - - - - - - - - - - - - - - - - - - - - - - - - - - - - - - - - -51
7
47
Page 51

Inspect Crankshaft
1. Inspect crankshaft journals for grooves or
signs of scoring. If found, crankshaft must
be re-ground or replaced.
2. Check the main bearing and crankpin
journals for wear and taper (Figure 1).
7
Figure 1
• Standard Size (Main) - 1.6525 - 1.6535 in.
(41.976 - 42.000 mm)
• Standard Size (Crankpin) - 1.4557 - 1.4567
in. (36.976 - 37.000 mm)
• Maximum out of round and taper - 0.0008
in. (0.02 mm)
3. If crankshaft journals are not within
specification, the crankshaft may be reground and 0.010 in. (0.25 mm) undersize
bearings installed. See illustrated parts list for
part numbers.
4. Check the crankshaft for run-out at #3 main
bearing journal (Figure 2).
7
Figure 2
• Maximum Run-out - 0.0023 in. (0.06 mm)
NOTE: If run-out exceeds specification shown, the
crankshaft must be replaced.
5. Check crankshaft timing gear teeth for
damage (Figure 3). If timing gear teeth are
damaged or worn, the crankshaft must be
replaced.
NOTE: See Section 3 for procedure to check
crankshaft timing gear for wear.
48
Figure 3
Page 52

Check Main Bearing Clearances
NOTE: If main bearings show signs of flaking or
scoring, bearings must be replaced.
NOTE: Main bearing saddles in cylinder block, main
bearing caps, main bearings, and crankshaft
journals must be clean and free of oil.
1. With upper main bearings installed, install
crankshaft.
2. Lay a strip of plastigage lengthwise on journal
(A, Figure 4).
NOTE: Do not lay plastigage across hole in
crankshaft journal.
Figure 4
7
Figure 5
4. Remove the bearing cap. Measure the
plastigage at its widest point (A, Figure 6). If
the clearance is not within specification,
replace the bearings.
• Standard Main Bearing Clearance -
0.0008 - 0.0017 in. (0.020 - 0.044 mm)
• Reject Main Bearing Clearance - 0.0028
in. (0.07 mm)
3. Assemble main bearing cap with bearing
(Figure 5) and torque to values listed in
Section 14 - Engine Specifications.
NOTE: Do not allow crankshaft to rotate.
Figure 6
5. Repeat procedure for each main bearing.
49
Page 53

7
Check Connecting Rod Bearing Clearances
NOTE: If connecting rod bearings show signs of
flaking or scoring, bearings must be replaced.
NOTE: Connecting rod bearings and crankpin
journals must be clean and free of oil.
1. With upper bearing assembled to the
connecting rod, install the connecting rod.
2. Lay a strip of plastigage lengthwise on journal
(A, Figure 7).
NOTE: Do not lay plastigage across hole in
crankshaft journal.
4. Remove the connecting rod cap. Measure the
plastigage at its widest point (A, Figure 9). If
the clearance is not within specification,
replace the bearings.
• Standard Main Bearing Clearance -
0.0008 - 0.0017 in. (0.020 - 0.044 mm)
• Reject Main Bearing Clearance - 0.0028
in. (0.07 mm)
7
Figure 9
Figure 7
3. Assemble connecting rod cap with bearing
and torque to values listed in Section 14
(Figure 8).
NOTE: Do not allow crankshaft to rotate.
5. Repeat procedure for each main bearing.
Check Crankshaft End Play
1. With thrust washers installed, check
crankshaft end play at #3 main bearing
(Figure 10).
• Standard Crankshaft End Play - 0.0008 -
0.009 in. (0.020 - 0.23 mm)
• Limit Crankshaft End Play - 0.012 in. (0.30
mm)
2. If end play exceeds limit,0.005 in. (0.13 mm),
over size thrust washers are available. See
illustrated parts list for part numbers.
Figure 8
50
Page 54

Figure 12
7
Figure 10
Inspect Camshaft
1. Measure camshaft lobe height (Figure 11). If
lobes are not to specification, replace the
camshaft.
• Standard Intake/Exhaust - 1.183 - 1.186 in.
(30.065 - 30.135 mm)
• Reject Intake/Exhaust - 1.179 in. (29.965
mm)
Figure 11
3. Measure camshaft run-out (Figure 13).
• Maximum Run-out - 0.0012 in. (0.03 mm)
4. If a run-out exceeds specification, the
camshaft must be replaced.
Figure 13
2. Measure camshaft journals (Figure 12).
51
Page 55

7
7
52
Page 56

SECTION 8 - PISTON, RINGS AND CONNECTING ROD
DISASSEMBLE PISTON AND CONNECTING ROD - - - - - - - - - - - - - - - - - - - - - - - - - - - - - - - - - - - - -54
INSPECT PISTONS AND RINGS - - - - - - - - - - - - - - - - - - - - - - - - - - - - - - - - - - - - - - - - - - - - - - - - - -54
CHECK PISTON PIN AND CONNECTING ROD - - - - - - - - - - - - - - - - - - - - - - - - - - - - - - - - - - - - - - - -55
ASSEMBLE PISTON AND CONNECTING ROD - - - - - - - - - - - - - - - - - - - - - - - - - - - - - - - - - - - - - - - -56
ASSEMBLE PISTON RINGS TO PISTON - - - - - - - - - - - - - - - - - - - - - - - - - - - - - - - - - - - - - - - - - - - -56
8
53
Disassemble Piston and Connecting Rod
1. Remove compression rings using Ring
Expander #19340 (Figure 1).
Page 57

8
Figure 1
2. Oil ring may be removed by hand by spiraling
top scraper into center ring groove, then into
top groove and off piston. Repeat for bottom
scraper, then remove expander.
3. Disassemble piston from connecting rod
using Piston Pin Fixture #19419.
NOTE: Piston pin stop (A, Figure 2) must be
removed from support (B) when disassembling
piston and connecting rod.
If the cylinder bore is to be resized there is no
reason to check the piston as a new oversized
piston will be used.
If the cylinder is not going to be resized, and the
piston shows no signs of scoring, the piston should
be checked.
1. Check side clearance of ring grooves using
NEW rings (A, Figure 3). If a 0.0045 in. (0.11
mm) feeler gauge can be inserted, the ring
groove is worn. The piston must be
replaced.
Figure 3
4. Insert threaded driver (C) through piston pin
from FRONT side of piston and thread into
pilot.
5. Place piston with driver onto support with
arrow on piston facing up.
6. Press out piston pin.
Figure 2
2. Check ring end gap (Figure 4).
3. Clean carbon from end of rings and insert
approximately 1.0 in. (25 mm) into cylinder.
Figure 4
4. Check piston pin bore (Figure 5).
Inspect Piston and Rings
54
Page 58

3. Check crankpin bearing end of connecting
rod (Figure 8).
8
Figure 5
• Replace if greater than 0.710 in. (18.03
mm) or 0.0004 in. (0.01 mm) out of round.
Check Piston Pin and Connecting Rod
1. Check piston pin (Figure 6).
Figure 6
• Replace if less than 0.708 in. (17.98 mm)
or 0.0004 in. (0.01 mm) out of round.
2. Check piston pin bearing (Figure 7).
Figure 8
• Maximum out of round: 0.0008 in. (0.02
mm)
• If out of round exceeds specification
shown, the connecting rod must be
replaced.
4. Check for bent or twisted connecting rod
(Figure 9).
Figure 9
NOTE: Thrust faces must be free of any burrs or
nicks or connecting rod will not lay flat on surface
plate.
• With connecting rod on a surface plate,
any distortion will be evident by a rocking
motion.
• If a 0.002 in. (0.05 mm) feeler gauge can
be inserted at piston pin end of
connecting rod, the rod must be replaced.
Figure 7
• Replace if greater than 17.98 mm (0.708
in.) or 0.01 mm (0.004 in.) out of round.
55
Page 59

8
Assemble Piston and Connecting Rod
1. Assemble piston to connecting rod using
Piston Pin Fixture #19419.
NOTE: Arrow on piston (A, Figure 10) and ID mark
(B) on rod must face same side.
2. Lubricate piston pin with engine oil. Then,
insert threaded driver (C) through piston pin
(D) and thread into pilot (E).
3. With arrow on piston and ID mark on rod
facing up, insert pilot through piston and
connecting rod.
Assemble Piston Rings to Piston
1. Install oil ring expander first.
2. Spiral bottom oil control ring into top ring
groove, center ring groove, and then into
position below expander (Figure 12).
3. Repeat for upper oil control ring.
Figure 12
Figure 10
4. Insert piston pin stop (A, Figure 11) in bottom
of piston support (B).
Figure 11
5. With arrow on piston up, place assembly onto
support.
6. Press in piston pin until pilot bottoms on stop.
7. After assembly, make sure the piston rotates
freely on connecting rod.
4. Using ring expander, install center
compression ring then, top compression ring
with ID marks up (Figure 13).
5. Stagger ring end gaps.
6. Rotate oil control ring ends 180° from each
other.
Figure 13
56
Page 60

SECTION 9 - CYLINDER BLOCK ASSEMBLY
INSTALL CRANKSHAFT- - - - - - - - - - - - - - - - - - - - - - - - - - - - - - - - - - - - - - - - - - - - - - - - - - - - - - - - -58
INSTALL PISTONS AND CONNECTING RODS - - - - - - - - - - - - - - - - - - - - - - - - - - - - - - - - - - - - - - - -59
GENERAL ASSEMBLY- - - - - - - - - - - - - - - - - - - - - - - - - - - - - - - - - - - - - - - - - - - - - - - - - - - - - - - - - -59
INSTALL TIMING GEAR CASE, CAMSHAFT, AND GEARS - - - - - - - - - - - - - - - - - - - - - - - - - - - - - - -60
INSTALL OIL PAN - - - - - - - - - - - - - - - - - - - - - - - - - - - - - - - - - - - - - - - - - - - - - - - - - - - - - - - - - - - - -62
INSTALL ALTERNATOR - - - - - - - - - - - - - - - - - - - - - - - - - - - - - - - - - - - - - - - - - - - - - - - - - - - - - - - -62
GENERAL ASSEMBLY - - - - - - - - - - - - - - - - - - - - - - - - - - - - - - - - - - - - - - - - - - - - - - - - - - - - - - - - -62
9
57
Page 61

9
Install Crankshaft
1. Install main bearings in cylinder block.
NOTE: Upper bearing has an oil groove
(A, Figure 1) and oil holes (B).
Figure 1
2. Install upper main bearings in their respective
saddles.
3. Ensure bearing is seated in saddle and tang
in bearing is aligned with notch in saddle.
Lubricate bearings with engine oil.
4. Install lower main bearings in bearing caps
(Figure 2).
Figure 3
9. Install main bearing caps. Lubricate threads
of screws with engine oil.
10. Install bearing caps in their respective
positions with arrows facing front.
11. Start with Number 3 bearing cap (Figure 4)
and torque bearing caps one at a time in
sequence shown to values listed in Section
14 - Engine Specifications.
Figure 2
5. Be sure bearing is seated in bearing cap and
tang in bearing is aligned with notch in
bearing cap.
6. Lubricate bearings with engine oil.
7. Install crankshaft with gear facing front of
cylinder block (Figure 3). Take care not to
damage journals or bearings.
8. Install crankshaft shims on No. 3 main
bearings web with grooves facing out.
Lubricate journals with engine oil.
58
Figure 4
12. Recheck crankshaft end play.
• Crankshaft end play - 0.001 - 0.009 in.
(0.025 - 0.23 mm)
NOTE: After torquing bearing cap, make sure
crankshaft rotates freely before proceeding to next
bearing cap.
Page 62

Install Pistons and Connecting Rods
1. Install connecting rod bearings. Be sure tang
on bearing is seated in notch (A, Figure 5) in
connecting rod and cap.
2. Install a piece of vinyl tubing (B) over each
connecting rod screw to prevent damage to
screw threads or crankpin when installing
piston and connecting rod.
Figure 5
3. Rotate crankshaft so that crankpin is at
bottom of stroke. Lubricate cylinder walls,
pistons and rings, bearings, and crankpins.
4. Using Tool Ring Compressor #19070, install
piston and connecting rod assemblies with
arrow on piston facing front.
5. Install connecting rod cap with ID mark
(A, Figure 6) facing front. Lubricate threads
and torque nuts to values listed in Section 14
- Engine Specifications.
General Assembly
1. Install gasket, oil pick-up tube and strainer
(Figure 7). Torque screws to values listed in
Section 14 - Engine Specifications.
9
Figure 7
2. Install gasket and rear seal retainer
(A, Figure 8). Torque screws to values listed
in Section 14 - Engine Specifications.
3. Install starter motor (B) and torque screws to
values listed in Section 14 - Engine
Specifications.
Figure 6
NOTE: After torquing rod cap, make sure
crankshaft rotates freely before proceeding to next
cylinder.
59
Figure 8
4. Install flywheel and flywheel holder
(A, Figure 9).
5. Apply sealant to flywheel screws and torque
to values listed in Section 14 - Engine
Specifications.
Page 63

9
Figure 9
Figure 11
Install Timing Gear Case, Camshaft, and Gears
1. Lubricate oil pump rotor (A, Figure 10) with
engine oil and install in cylinder block.
• ID mark (B) on rotor must face cylinder
block.
Figure 10
2. Install timing gear case with new gasket
(Figure 11).It may be necessary to rotate oil
pump drive to engage oil pump rotors.
3. Note position, length, and quantity of screws
as shown.
• M6 x 1.1 in. (M6 x 28mm): 4 (A).
• M6 x 1.5 in. (M6 x 16mm): 1 (B).
4. Torque screws to values listed in Section 14 Engine Specifications.
5. Lubricate and install camshaft in cylinder
block. Take care not to damage lobes or cam
bearing.
6. Install camshaft retainer (A, Figure 12).
7. Install three screws (B) and torque to values
listed in Section 14 - Engine Specifications.
NOTE: Position camshaft retainer so that the center
hole does not interfere with camshaft.
Figure 12
8. Rotate crankshaft so that they key is at the 12
o’clock position (A, Figure 13).
60
Page 64

9
Figure 13
9. Assemble idler gear shaft (A, Figure 14) with
ID mark (B) up.
Figure 14
Engine models 430000 and 580000 after date code
990111007 are equipped with right angle helical
timing gears. Timing marks are identified by letters
(A, AA, B, BB, etc.), instead of numbers. The
timing procedure is the same.
10. With the crankshaft key at the 12 o’clock
position, assemble idler gear so that timing
mark 11 (AA) is aligned with timing mark 1
(A) in crankshaft gear, timing mark 22 (BB)
is aligned with timing mark 2 (B) on camshaft
gear (Figure 15).
Figure 15
11. Install camshaft gear (A, Figure 16), idler
gear (B), and oil pump gear (C). Torque
screws to values listed in Section 14 - Engine
Specifications.
Figure 16
12. Install timing gear cover with new gasket.
13. Note position, length, and number of screws
(Figure 17).
• M6 x 2.5 in. (M6 x 65 mm): 2 (A).
• M6 x 2.1 in. (M6 x 55 mm): 3 (B).
• M6 x 1.1 in. (M6 x 30 mm): 7 (C).
• M6 Nuts: 2 (D).
61
Page 65

9
Figure 17
14. Torque screws to values listed in Section 14 Engine Specifications.
15. Install crankshaft pulley with timing mark at
12 o'clock position (Number 1 cylinder).
NOTE: Be sure alignment pin in crankshaft gear is
seated in hole in pulley.
16. Torque screw to values listed in Section 14 Engine Specifications.
17. Remove flywheel holder.
18. Install trigger assembly (A, Figure 18) and
wire.
Figure 19
3. Torque screws to values listed in Section 14 Engine Specifications.
Install Alternator
1. Install alternator bracket and alternator
(Figure 20).
Figure 20
2. Torque screws to values listed in Section 14 Engine Specifications.
Figure 18
Install Oil Pan
1. Install oil pan with new gasket.
2. Apply a small bead of sealant to crankcase
areas (A, Figure 19).
62
General Assembly
1. Lubricate tappets with engine oil and install in
cylinder block.
2. See Section 2 for installation of cylinder head
and related components.
3. See Section 3 for governor adjustment
procedure.
Page 66

SECTION 10 - CARBURETOR AND RELATED COMPONENTS
MANUAL CHOKE CARBURETOR - - - - - - - - - - - - - - - - - - - - - - - - - - - - - - - - - - - - - - - - - - - - - - - - - -66
REMOVE CARBURETOR - - - - - - - - - - - - - - - - - - - - - - - - - - - - - - - - - - - - - - - - - - - - - - - - - - - - - - - -66
DISASSEMBLE CARBURETOR - - - - - - - - - - - - - - - - - - - - - - - - - - - - - - - - - - - - - - - - - - - - - - - - - - -66
CLEAN CARBURETOR - - - - - - - - - - - - - - - - - - - - - - - - - - - - - - - - - - - - - - - - - - - - - - - - - - - - - - - - -68
INSPECT CARBURETOR - - - - - - - - - - - - - - - - - - - - - - - - - - - - - - - - - - - - - - - - - - - - - - - - - - - - - - - -68
CHECK THROTTLE, CHOKE SHAFT, AND BODY - - - - - - - - - - - - - - - - - - - - - - - - - - - - - - - - - - - - -68
ASSEMBLE CARBURETOR - - - - - - - - - - - - - - - - - - - - - - - - - - - - - - - - - - - - - - - - - - - - - - - - - - - - - -69
INSTALL THROTTLE SHAFT - - - - - - - - - - - - - - - - - - - - - - - - - - - - - - - - - - - - - - - - - - - - - - - - - - - - -69
INSTALL CHOKE VALVE - - - - - - - - - - - - - - - - - - - - - - - - - - - - - - - - - - - - - - - - - - - - - - - - - - - - - - - -69
INSTALL FLOAT - - - - - - - - - - - - - - - - - - - - - - - - - - - - - - - - - - - - - - - - - - - - - - - - - - - - - - - - - - - - - -70
INSTALL CARBURETOR - - - - - - - - - - - - - - - - - - - - - - - - - - - - - - - - - - - - - - - - - - - - - - - - - - - - - - - -70
10
INITIAL CARBURETOR ADJUSTMENT - - - - - - - - - - - - - - - - - - - - - - - - - - - - - - - - - - - - - - - - - - - - - -71
FINAL CARBURETOR ADJUSTMENT - - - - - - - - - - - - - - - - - - - - - - - - - - - - - - - - - - - - - - - - - - - - - - -71
AUTOMATIC CHOKE CARBURETOR - - - - - - - - - - - - - - - - - - - - - - - - - - - - - - - - - - - - - - - - - - - - - - -73
REMOVE CARBURETOR - - - - - - - - - - - - - - - - - - - - - - - - - - - - - - - - - - - - - - - - - - - - - - - - - - - - - - - -73
DISASSEMBLE CARBURETOR - - - - - - - - - - - - - - - - - - - - - - - - - - - - - - - - - - - - - - - - - - - - - - - - - - -73
CLEAN CARBURETOR - - - - - - - - - - - - - - - - - - - - - - - - - - - - - - - - - - - - - - - - - - - - - - - - - - - - - - - - -75
INSPECT CARBURETOR - - - - - - - - - - - - - - - - - - - - - - - - - - - - - - - - - - - - - - - - - - - - - - - - - - - - - - - -75
CHECK THROTTLE, CHOKE SHAFT, AND BODY - - - - - - - - - - - - - - - - - - - - - - - - - - - - - - - - - - - - - -76
ASSEMBLE CARBURETOR - - - - - - - - - - - - - - - - - - - - - - - - - - - - - - - - - - - - - - - - - - - - - - - - - - - - - -76
CHECK VACUUM CHOKE BREAK - - - - - - - - - - - - - - - - - - - - - - - - - - - - - - - - - - - - - - - - - - - - - - - - -78
ADJUST CHOKE PRE-LOAD LEVER - - - - - - - - - - - - - - - - - - - - - - - - - - - - - - - - - - - - - - - - - - - - - - -78
CHECK P.T.C. HEATER - - - - - - - - - - - - - - - - - - - - - - - - - - - - - - - - - - - - - - - - - - - - - - - - - - - - - - - - -79
INSTALL CARBURETOR - - - - - - - - - - - - - - - - - - - - - - - - - - - - - - - - - - - - - - - - - - - - - - - - - - - - - - - -79
INSTALL VACUUM LIMITER - - - - - - - - - - - - - - - - - - - - - - - - - - - - - - - - - - - - - - - - - - - - - - - - - - - - - -79
63
Page 67

INITIAL CARBURETOR ADJUSTMENT - - - - - - - - - - - - - - - - - - - - - - - - - - - - - - - - - - - - - - - - - - - - -280
FINAL CARBURETOR ADJUSTMENT - - - - - - - - - - - - - - - - - - - - - - - - - - - - - - - - - - - - - - - - - - - - - - 280
ELECTRIC FUEL PUMP - - - - - - - - - - - - - - - - - - - - - - - - - - - - - - - - - - - - - - - - - - - - - - - - - - - - - - - - -81
CHECK FUEL PUMP OUTPUT - - - - - - - - - - - - - - - - - - - - - - - - - - - - - - - - - - - - - - - - - - - - - - - - - - - -82
TEST EQUIPMENT - - - - - - - - - - - - - - - - - - - - - - - - - - - - - - - - - - - - - - - - - - - - - - - - - - - - - - - - - - - -82
10
TEST FUEL PUMP WIRING - - - - - - - - - - - - - - - - - - - - - - - - - - - - - - - - - - - - - - - - - - - - - - - - - - - - - -82
ANTI-AFTERFIRE SOLENOID - - - - - - - - - - - - - - - - - - - - - - - - - - - - - - - - - - - - - - - - - - - - - - - - - - - -83
TEST ANTI-AFTERFIRE SOLENOID - - - - - - - - - - - - - - - - - - - - - - - - - - - - - - - - - - - - - - - - - - - - - - - -83
TEST SOLENOID- - - - - - - - - - - - - - - - - - - - - - - - - - - - - - - - - - - - - - - - - - - - - - - - - - - - - - - - - - - - - -83
FUEL FILTER - - - - - - - - - - - - - - - - - - - - - - - - - - - - - - - - - - - - - - - - - - - - - - - - - - - - - - - - - - - - - - - -84
CARBURETOR MAIN JETS - - - - - - - - - - - - - - - - - - - - - - - - - - - - - - - - - - - - - - - - - - - - - - - - - - - - - -84
ELECTRONIC FUEL INJECTION SYSTEM - - - - - - - - - - - - - - - - - - - - - - - - - - - - - - - - - - - - - - - - - - -85
EFI COMPONENTS - - - - - - - - - - - - - - - - - - - - - - - - - - - - - - - - - - - - - - - - - - - - - - - - - - - - - - - - - - - -85
TROUBLESHOOTING - - - - - - - - - - - - - - - - - - - - - - - - - - - - - - - - - - - - - - - - - - - - - - - - - - - - - - - - - -89
ELECTRICAL SYSTEM - - - - - - - - - - - - - - - - - - - - - - - - - - - - - - - - - - - - - - - - - - - - - - - - - - - - - - - - -89
FAULT CODES - - - - - - - - - - - - - - - - - - - - - - - - - - - - - - - - - - - - - - - - - - - - - - - - - - - - - - - - - - - - - - -90
FLASH CODE ON MIL INDICATOR - - - - - - - - - - - - - - - - - - - - - - - - - - - - - - - - - - - - - - - - - - - - - - - -91
TROUBLESHOOTING CHARTS - - - - - - - - - - - - - - - - - - - - - - - - - - - - - - - - - - - - - - - - - - - - - - - - - - -92
64
Page 68

10
MANUAL CHOKE CARBURETOR
AUTOMATIC CHOKE CARBURETOR
65
Page 69

10
Manual Choke Carburetor
Remove Carburetor
1. Disconnect fuel line (A, Figure 1).
2. Remove air cleaner tube from carburetor air
horn. Disconnect fuel solenoid wire, if
equipped.
Figure 1
6. Remove choke link (A, Figure 3) from choke
lever.
Figure 3
7. Remove nuts, air horn (A, Figure 4),
carburetor (B), and insulator (C). Discard
gaskets (D).
3. Unhook governor link spring (B) from throttle
lever and disconnect governor link (C).
4. Disconnect choke link (D) at choke lever.
Proceed to Step 7.
NOTE: Early style choke links were manufactured
with a “Z” bend (Figure 3). To remove choke link the
governor control bracket must be removed.
Proceed to Steps 5 and 6.
5. Disconnect governor spring (A, Figure 2).
Remove two screws and governor control
bracket (B) from intake manifold.
Figure 4
Disassemble Carburetor
1. Remove anti-afterfire solenoid (A, Figure 5),
bowl screw (B), washer (C), and carburetor
bowl (D).
Figure 2
66
Page 70

Figure 5
4. Remove fixed high speed jet (A, Figure 8).
5. Remove emulsion tube (B).
10
2. Drive out float hinge pin (A, Figure 6) from
choke plate side of carburetor (B) with a
small punch. Remove float (C) and fuel inlet
valve (D).
Figure 6
3. Remove carburetor bowl gasket
(A, Figure 7).
Figure 8
NOTE: Consult the illustrated parts list for correct
part number for special high altitude jet, if required.
6. Remove idle jet (A, Figure 9).
Figure 9
7. If idle mixture screw (A, Figure 10) is
equipped with adjustment limiter cap, use
pliers to remove it before removing idle
mixture valve.
8. Remove idle mixture screw and spring (B).
Figure 7
67
Page 71

10
Figure 10
9. Remove screw and choke plate
(A, Figure 11).
10. Remove choke shaft (B) and spring (C).
Figure 11
NOTE: If engine is equipped with an electronic
governor system, DO NOT remove throttle plate or
throttle shaft. This is a precision assembly and
should not be disassembled.
Figure 12
Clean Carburetor
Remove gasket material from mounting surfaces.
Gummy or dirty carburetors should be cleaned in a
carburetor cleaner. DO NOT soak rubber,
neoprene, or plastic parts in cleaner.
NOTICE: If engine is equipped with an electronic
governor system, DO NOT clean carburetor in
carburetor cleaner. The carburetor is equipped with
sealed ball bearings for the throttle shaft, which will
be damaged if the carburetor is immersed in
carburetor cleaner. Ball bearings are not
replaceable.
Inspect Carburetor
Inspect all parts for wear, cracks, nicks, and burrs.
Inspect float for leaks. Replace all damaged parts.
Inspect Throttle, Choke Shaft, and Body for
Wear
1. Lay carburetor on flat surface and check
throttle and choke shaft clearance
(Figure 13).
11. If engine is not equipped with an electronic
governor, proceed to step 12.
12. Mark throttle plate (A, Figure 12) before
removing so that it may be reinstalled in the
same position. Sides of throttle plate are
beveled.
13. Remove two screws, throttle plate, throttle
shaft (B) with collar (C) and seal (D). Discard
seal.
68
NOTE: Throttle shaft and choke shaft clearance
must not exceed 0.010 in. (.25 mm).
Page 72

10
Figure 13
2. Inspect throttle shaft and choke shaft for wear
(Figure 14).
Figure 14
• Replace if worn.
• If carburetor body is worn, replace
carburetor.
Assemble Carburetor
Figure 15
Install Choke Valve
1. Assemble spring (A, Figure 16) to choke
shaft (B) and insert in body.
2. Rotate shaft clockwise to pre-load spring.
3. Install choke plate with hole facing fuel inlet
side of body (C).
Figure 16
4. Assemble the emulsion tube (A, Figure 17),
the fixed high speed jet (B), and the idle jet
(C).
NOTE: When assembling carburetor, use new
seals and gaskets.
Install Throttle Shaft
1. Install seal (A, Figure 15) with grooved side
out.
2. Assemble collar (B) to throttle shaft and insert
in body.
3. Install throttle plate and screws (C).
69
Page 73

10
4. Install idle mixture screw (A, Figure 20) and
spring (B).
Figure 17
Install Float
1. Assemble inlet valve (A, Figure 18) to float.
2. Install float hinge pin (B) from throttle side of
carburetor.
Figure 18
3. Install gasket (A, Figure 19) and float bowl
(B).
Figure 20
NOTE: DO NOT tighten idle mixture screw.
Install Carburetor
1. Assemble insulator (A, Figure 21) with
gaskets, carburetor (B), and air horn (C) with
gasket (D) to intake manifold.
Figure 21
Figure 19
70
2. Torque nuts to values listed in Section 14 Engine Specifications.
3. Install governor link, spring, and choke link.
NOTE: Proceed to Step 5 if choke link is early style
with “Z” bend.
4. Reinstall air cleaner tube and fuel line.
5. Install choke link. Assemble governor control
bracket to intake manifold. Torque screws to
values listed in Section 14 - Engine
Specifications.
Page 74

6. Assemble governor spring (A, Figure 22) to
governor control lever (B).
NOTE: Governor spring must be installed in correct
hole in governor control lever by engine model.
• Model 430400 - Top Hole
• Model 580400 - Bottom Hole
Figure 22
Initial Carburetor Adjustment
1. Turn idle mixture screw clockwise until it just
seats. DO NOT FORCE. Turn screw counterclockwise 1/2 turn (Figure 23). This setting
will permit engine to start.
NOTE: Final adjustment will be made with engine
running.
Final Carburetor Adjustment
NOTICE: All carburetor adjustments must be made
with the air cleaner installed.
1. Start and run engine at low speed for
approximately five minutes. Or, if equipped
with a temperature gauge, until needle
moves from C or COLD position.
2. With control lever on equipment in SLOW
position, hold throttle lever (A, Figure 24)
against idle speed screw and adjust idle
speed to 1200 RPM.
Figure 24
3. SLOWLY turn idle mixture screw clockwise
until engine speed just starts to slow (lean
mixture).
4. Then SLOWLY turn idle mixture screw
counter-clockwise until engine speed just
starts to slow (rich mixture).
5. Turn idle mixture screw (A, Figure 25) to mid
point between rich and lean.
10
Figure 23
71
Figure 25
Page 75

6. Hold throttle lever against idle speed screw
and readjust idle speed to 1500 RPM, or
equipment manufacturer’s specification.
NOTE: If carburetor is equipped with an idle mixture
limiter cap, install at this time.
7. Position limiter cap (B) so that stop(s) on the
limiter cap are at mid point between stop(s)
on carburetor body and press into position.
10
Automatic Choke Carburetor
The automatic choke consists of a vacuum choke
break and a thermostat. The Intake manifold
vacuum activates the vacuum choke break which
partially opens the choke plate, to prevent over
choking while the engine is being started. A vacuum
limiter, located in the vacuum line, regulates
vacuum to the vacuum choke break.
The thermostat contains a Positive Temperature
Coefficient heater (P.T.C.) and a bi-metal spring
which opens the choke plate gradually as the
engine is running. When the keyswitch is turned
“ON,” the battery current activates the P.T.C. heater
which heats the bi-metal spring.
The P.T.C. Heater is a heat sensitive
semiconductor porcelain. As the P.T.C. heater
temperature rises, resistance increases, which
regulates battery current to the heater and
maintains the proper temperature for the bi-metal
spring.
72
Page 76

Automatic Choke Carburetor
Remove Carburetor
1. Disconnect fuel line and remove air cleaner
tube from carburetor air horn. Disconnect
vacuum line (A, Figure 26) from vacuum
choke break. Disconnect wires from fuel shut
off solenoid and automatic choke.
2. Unhook governor link spring (B) from throttle
lever and disconnect governor link (C).
Disassemble Carburetor
1. Remove fuel shut off solenoid (A, Figure 28)
and gasket (B). Remove float bowl (C) and
bowl shim gasket (D).
10
Figure 28
NOTE: The float hinge pin (A, Figure 29) is swaged
in one side. When removing, drive hinge pin from
side opposite swage.
Figure 26
3. Remove two nuts and ground wire
(A, Figure 27) from solenoid, air horn (B),
carburetor (C), and insulator (D). Discard
gaskets.
Figure 27
2. Drive out float hinge pin with a small punch.
Remove float and fuel inlet valve (B).
3. Remove idle passage plug (C).
Figure 29
4. Remove rubber float bowl gasket
(A, Figure 30).
73
Page 77

10
7. Remove screw and choke pre-load lever
(A, Figure 33).
Figure 30
5. Remove fixed main jet (A, Figure 31) and
gasket (B). Discard gasket.
Figure 33
8. Remove two screws, choke plate (B) and
choke shaft (C).
9. Remove two screws and vacuum choke
break (A, Figure 34).
Figure 31
6. Remove three screws, thermostat retainer
(A, Figure 32) and ground wire (B). Discard
thermostat gasket (C).
Figure 32
Figure 34
10. Remove idle jet plug (A, Figure 35) and idle
jet (B).
74
Page 78

Figure 37
10
Figure 35
11. Remove idle mixture screw (A, Figure 36)
and o-ring (B). Discard o-ring.
Figure 36
NOTE: If engine is equipped with an electronic
governor system, DO NOT remove throttle plate or
throttle shaft. This is a precision assembly and
should not be disassembled.
Clean Carburetor
Remove gasket material from mounting surfaces.
Gummy or dirty carburetors should be cleaned in a
carburetor cleaner. DO NOT soak rubber,
neoprene, or plastic parts in cleaner.
NOTICE: If engine is equipped with an electronic
governor system, DO NOT clean carburetor in
carburetor cleaner. The carburetor is equipped with
sealed ball bearings for the throttle shaft, which will
be damaged if the carburetor is immersed in
carburetor cleaner. Ball bearings are not
replaceable.
Inspect Carburetor
Inspect all parts for wear, cracks, nicks, and burrs.
Inspect float for leaks. Replace all damaged parts.
If engine is not equipped with an electronic
governor, proceed to Step 12.
12. Mark throttle plate (A, Figure 37) before
removing so that is may be reinstalled in the
same position. The sides of the throttle plate
are beveled.
13. Remove two screws, throttle plate, throttle
shaft (B), and seal (C). Discard seal.
75
Page 79

10
Inspect Throttle, Choke Shaft, and Body
1. Lay carburetor on flat surface and check
throttle and choke shaft clearance (Figure
38).
NOTE: Throttle shaft and choke shaft clearance
must not exceed 0.010 in. (0.25 mm).
Figure 40
2. Install idle mixture screw (A, Figure 41) with
new o-ring (B).
NOTE: Do not tighten idle mixture screw.
Figure 38
2. Inspect throttle shaft and choke shaft for wear
(Figure 39).
Figure 41
3. Install idle jet (A, Figure 42) and plug (B).
Figure 39
• Replace if worn.
• If carburetor body is worn, replace
carburetor.
Assemble Carburetor
When assembling the carburetor, use new seals
and gaskets.
1. Install throttle shaft (A, Figure 40) and new
seal (B). Install throttle plate and screws (C).
76
Figure 42
Page 80

4. Assemble vacuum choke break
(A, Figure 43) to bracket. Note correct
position of pivot arm (B).
Figure 43
10
Figure 45
10. Hold choke plate closed and rotate
thermostat until match marks are aligned
(Figure 46). Tighten screws.
5. Install choke shaft through pivot arm bushing
and into carburetor body (Figure 44).
NOTE: Specification between arms: 0.094 in. (2.5
mm).
Figure 44
6. Install choke plate.
7. Install thermostat with new gasket
(A, Figure 45).
8. Insert hook (B) on thermostat spring between
arms on choke shaft.
9. Assemble thermostat retainer leaving screws
loose.
NOTE: Make sure choke plate remains closed while
pre-loading thermostat spring.
Figure 46
11. Assemble choke pre-load lever (A, Figure
47) to choke shaft.
77
Figure 47
Page 81

10
12. Install float. Assemble inlet valve to float
(A, Figure 48).
13. Install float hinge pin (B), idle passage plug
(C), fixed main jet with new gasket (D), and
new bowl gasket (E).
Figure 48
14. Install float bowl with new gaskets (Figure
49).
Figure 50
1. Connect vacuum pump to choke break and
activate pump to specification shown.
• Specification - 4.0 -5.5 in. Hg. vac. (10.0-
14.0 cm. Hg. vac.).
Choke plate should partially open and pump gauge
should maintain vacuum.
2. Check dimension from edge of choke plate to
edge of carburetor throat (Figure 51).
Figure 49
Check Vacuum Choke Break
A Mityvac® vacuum pump or equivalent is required
when checking and adjusting the vacuum choke
break.
78
Figure 51
• Specification - 0.550-.590 in. (14.0-15.0
mm).
If dimension is not to specification, the choke preload lever must be adjusted.
Adjust Choke Pre-Load Lever
1. Release vacuum pump so that the choke
closes.
2. Manually open choke to end of travel and
hold in this position.
3. Carefully bend pre-load lever (A, Figure 52).
• Bend lever to left in increase dimension
(B).
Page 82

• Bend lever to right to decrease dimension
(C).
4. Recheck and adjust as necessary.
Figure 52
Check P.T.C. Heater
The Digital Multimeter # 19464 is required to test
the P.T.C. heater.
1. Set the multimeter to the Ω position.
2. Check resistance between tab terminal on
thermostat and ground wire as shown (Figure
53).
• Specification - 2.0-4.0 Ω @ (70° F)
3. Replace thermostat if not to specification.
Install Carburetor
1. Assemble insulator with gaskets, carburetor
and air horn to intake manifold.
NOTE: Attach thermostat ground wire (A, Figure
54) to air horn.
10
Figure 54
2. Torque nuts to specifications shown in
Section 14 - Engine Specifications.
3. Install governor link and governor link spring.
4. Reinstall air cleaner tube, vacuum line,
harness connectors, and fuel line.
Figure 53
Install Vacuum Limiter
To install a vacuum limiter on engines not originally
equipped with one, proceed as follows:
1. Cut vacuum line approximately 2.0 in. (50
mm) from vacuum break side and install
vacuum limiter with blue end facing intake
manifold (Figure 55).
Figure 55
79
Page 83

10
Initial Carburetor Adjustment
1. Turn idle mixture screw clockwise until it just
seats. DO NOT FORCE. Turn screw counterclockwise 1/2 turn (Figure 56). This setting
will permit engine to start.
NOTE: Final adjustment will be made with engine
running.
Figure 56
3. SLOWLY turn idle mixture screw clockwise
until engine speed just starts to slow (lean
mixture).
4. Then SLOWLY turn idle mixture screw
counter-clockwise until engine speed just
starts to slow (rich mixture).
5. Turn idle mixture screw to mid point between
rich and lean (Figure 58).
Figure 58
Final Carburetor Adjustment
NOTICE: All carburetor adjustments must be made
with the air cleaner installed.
1. Start and run engine at low speed for
approximately five minutes. Or, if equipped
with a temperature gauge, until needle
moves from C or COLD position.
2. With control lever on equipment in SLOW
position, hold throttle lever (A, Figure 57)
against idle speed screw and adjust idle
speed to 1200 RPM.
6. Hold throttle lever against idle speed screw
and readjust idle speed to 1500 RPM, or
equipment manufacturer’s specification.
NOTE: If carburetor is equipped with an idle mixture
limiter cap, install at this time.
7. Position limiter cap so that stop(s) on the
limiter cap are at mid point between stop(s)
on carburetor body and press into position.
Figure 57
80
Page 84

Electric Fuel Pump
NEW STYLE PUMP
OLD STYLE PUMP
10
81
Page 85

10
Check Fuel Pump Output
NOTE: A graduated container is required when
testing the fuel pump.
1. Disconnect fuel line at carburetor.
2. Turn ignition switch to ON position and note
fuel flow into graduated container.
Figure 60
Test Fuel Pump Wiring
1. With keyswitch in OFF position, disconnect
fuel pump equipment wiring harness
connector.
2. Insert meter test leads into wiring harness
connector (Figure 61).
Figure 59
3. If fuel flow is less than specification, replace
fuel pump.
NOTE: A plugged fuel filter and/or low battery
voltage may cause insufficient fuel flow.
4. If there is no fuel flow when keyswitch is in
ON position, check fuel pump wiring.
Test Equipment
The Digital Multimeter #19464 is required to test the
fuel pump.
The fuel pump test will be performed with the meter
in the V== (DC Volts) position (Figure 60).
Figure 61
3. Turn the keyswitch to the ON position.
4. Meter should display battery voltage at
connector.
5. If meter does not display battery voltage,
problem is with wiring harness and/or fuel
pump relay (as supplied by equipment
manufacturer), and/or ignition module. Check
for loose or broken wires.
82
Page 86

Anti-Afterfire Solenoid
Some carburetors are equipped with an antiafterfire solenoid controlled by the equipment
ignition switch. When the equipment switch is in the
OFF position, the solenoid valve plunger closes,
stopping fuel flow through the fixed main jet or high
speed nozzle. When the switch is in the ON and
START position, the solenoid valve opens, allowing
normal fuel flow. The solenoid is operating properly
if a click is heard when equipment ignition switch is
turned ON and OFF. If solenoid is not working
(defective solenoid or equipment wiring), the engine
will not start or run.
10
NOTE: Anti-afterfire solenoid requires a minimum of
9 volts DC to function.
NOTICE: Engines equipped with an anti-afterfire
solenoid are equipped with an air horn gasket with a
ground clip imbedded in the gasket (A, Figure 62).
An Anti-afterfire solenoid will not function if ground
clip is removed or damaged.
Figure 62
Figure 63
2. With keyswitch in OFF position, disconnect
equipment wiring harness connector from
solenoid.
3. Insert red meter test lead into wiring harness
connector and attach black test lead to
ground (Figure 64).
Figure 64
Test Anti-Afterfire Solenoid
If solenoid does not click, the problem may be in the
equipment wiring. To determine whether the
problem is with wiring, perform this test.
1. Set multimeter to the V== (DC volts) position
(Figure 63).
83
4. Turn keyswitch to ON position.
5. Meter should display battery voltage at
connector. Test solenoid.
6. If meter does not display battery voltage,
problem is with wiring harness, Check for
loose or broken wires.
Test Solenoid
1. Remove solenoid from carburetor.
2. Place either terminal of a 9 volt transistor
battery on the solenoid connector and other
terminal on body of solenoid or ground wire
(Figure 65).
3. Plunger should retract freely.
Page 87

10
4. When battery is removed, plunger should
return freely.
5. Replace solenoid if plunger sticks or doesn’t
move.
Figure 65
Fuel Filter
Carburetor Main Jets
The carburetor main jet orifice size is stamped in
the body of the jet (Figure 67).
Figure 67
Figure 66
• Replace in-line fuel filter every 600 hours.
• In-line fuel filter has an arrow to indicate
fuel flow direction, Always install arrow
towards carburetor.
84
Page 88

ELECTRONIC FUEL INJECTION (EFI)
SYSTEM
WARNING
The EFI fuel system remains under
high pressure, even when the engine
has stopped.
Failure to release pressure before servicing could result in fire or explosion.
• Before attempting to service any part of
the fuel system, the pressure must be
relieved.
• Remove the spark plug.
• Disconnect negative battery cable.
• Ensure the engine is cold.
EFI Components
The system includes the following components:
• Air Temperature Sensor
• Crankshaft Position Sensor
• Crankshaft Reluctor Wheel
• Engine Control Unit (ECU)
• Engine Coolant Temperature Sensor
• Fuel Pump
• Fuel Filter
• Fuel Rail
• Fuel Injectors
• Heated Oxygen Sensor
• Ignition Coils
• Malfunction Indicator Light (MIL)
• Manifold Absolute Pressure (MAP) Sensor
10
The EFI system controls two aspects of engine
operation:
• The amount of fuel delivered to the engine
• The amount of ignition timing advance
The end result is optimum engine performance and
maximum fuel economy while maintaining exhaust
emission standards.
The Kiehn EFI system is equipped with an engine
control unit (ECU) with a self-diagnostic function. If
a malfunction in the system occurs, the ECU will
identify the source and store the corresponding fault
code(s).
A malfunction indicator lamp (MIL) will illuminate,
indicating that the system needs service. The MIL
will remain illuminated until the fault code(s) are
read and the memory is reset.
The EFI system also employs a fail-safe function
(limp home mode). If a major system malfunction
were to occur, the engine would continue running at
reduced capacity, based on parameters within the
ECU, to prevent damage and avoid leaving the
operator stranded.
Air Temperature Sensor
The air temperature sensor (Figure 1) provides
continuous updates to the ECU on the air
temperature entering the intake manifold. The ECU
makes small corrections, based on certain
temperature ranges, to increase or decrease the
amount of fuel injected above the base injection
time.
Figure 1
NOTICE: If an abnormal crankshaft pulse is
detected, the ECU will shut the engine down to
prevent damage from occurring.
85
Page 89

10
Crankshaft Position Sensor
The crankshaft position sensor (Figure 2) provides
the ECU the signals needed to calculate RPM. This
sensor controls the timing for the system to inject
fuel as each intake valve opens, and controls when
to apply voltage to the spark plug for the proper
ignition-timing advance.
Engine Control Unit (ECU)
The Engine Control Unit (ECU) (Figure 4) collects
information from the intake manifold pressure
sensor, engine RPMs and various other sensors to
determine the amount of compensation needed to
the base injection time.
The ECU ensures the proper amount of fuel and
ignition timing advance is delivered under various
engine loads and RPMs. The fuel injection time is
synchronized to the intake valve opening sequence.
Figure 2
Crankshaft Reluctor Wheel
The reluctor wheel (Figure 3) is attached to the back
of the crankshaft accessory drive pulley. This wheel
works with the Crankshaft Position Sensor to
provide a momentary interruption in the magnetic
field, producing the voltage spike used by the ECU
to determine RPM. The large gap in the reluctor
wheel identifies top dead center on the number 1
cylinder. The ECU sequences through the firing
order until the last injector has been opened.
Figure 4
Engine Coolant Temperature Sensor
The coolant temperature sensor (Figure 5) provides
the engine’s current operating temperature to the
ECU. Under cold start conditions, the ECU makes
corrections to the base injection time to keep the
injectors open longer, delivering more fuel during
warm up.
Figure 3
86
Figure 5
Page 90

Fuel Pump
An electric fuel pump (Figure 6) transfers fuel in the
EFI system. Depending on the application, the
pump may be inside the fuel tank, or in the fuel line
near the tank. Through a relay, the ECU activates
the fuel pump to pressurize the system. The fuel
pump remains on while the engine is running.
Figure 6
Fuel Rail
The fuel rail (Figure 8) is a formed tube assembly
that feeds fuel to the top of the injectors. A valve in
the rail allows for testing the operating pressure or
relieving fuel system pressure when servicing.
When the rail is assembled to the manifold, formed
cups in the rail lock the injectors into place. A small
retaining clip provides a secondary lock.
10
Figure 8
Fuel Filter
EFI engines use a high volume, high-pressure, inline fuel filter (Figure 7).
Figure 7
Fuel Injectors
The fuel injector (Figure 9) is an electromagnetic
device that opens when voltage is delivered from
the ECU. The longer the voltage is applied, the
longer the injector will stay open. The injector
sprays a fine mist of highly atomized fuel at the
back of the intake valve through the intake port.
Figure 9
87
Page 91

10
Heated Oxygen Sensor
The oxygen sensor (Figure 10) is the last in-line
device to the ECU, providing information about the
effectiveness of the ECU’s output commands. The
oxygen sensor is placed in the exhaust system to
detect whether the engine is operating in a rich or
lean state.
The sensor creates an electrical signal when it
senses a difference in the level of oxygen in the
exhaust compared to the outside atmosphere.
An integral heating element brings the sensor up to
operating temperature quickly.
Figure 10
Ignition Coil
The ECU triggers the ignition coil (Figure 11) to fire,
sending voltage to each spark plug when needed.
Malfunction Indicator Light (MIL)
If the self-diagnostic feature detects a fault, the fault
code is displayed on the malfunction indicator lamp
(MIL) (Figure 12) and is recorded in the ECU. The
fault is stored until the memory is reset.
Figure 12
Manifold Absolute Pressure (MAP) Sensor
The manifold absolute pressure (MAP) sensor
(Figure 13) measures the amount of vacuum in the
intake manifold. This sensor uses a constant
absolute pressure to eliminate the effects of
changing atmospheric conditions.
The sensor uses a 5 volt input reference and, as
pressure changes, it increases or decreases the
amount of voltage returned to the ECU, which
mathematically determines the engine load and
regulates the amount of fuel to be injected.
Figure 11
88
Figure 13
Page 92

Troubleshooting
When troubleshooting an engine with EFI, basic
engine operating problems must be addressed
before turning to the EFI system components.
Engine starts hard or fails to start when cold
1. Fuel pump inoperative
2. Engine temperature sensor inoperative
3. Insufficient fuel pressure
4. Crankshaft position sensor inoperative
5. Crankshaft position sensor offset incorrect
6. Old/stale fuel
7. Low system voltage
8. Injectors clogged or restricted
9. Coils inoperative
10. Spark plugs fouled, worn, or damaged
Engine starts hard or fails to start when hot
1. Fuel pressure low
2. Fuel pump inoperative
3. Insufficient fuel pressure
4. Crankshaft position sensor inoperative
5. Crankshaft position sensor offset incorrect
6. Injectors clogged or restricted
7. Spark plugs fouled, worn, or damaged
Electrical System
The EFI system is 12VDC with negative ground. A
fully-charged 12 volt battery with a minimum of 350
cold cranking amps is required to maintain reliable
system operation. Battery condition and state of
charge should always be checked first when
troubleshooting the EFI system.
EFI-related problems are more likely caused by the
wiring harness or connections than by the EFI
components. Even small amounts of corrosion or
oxidation on the terminals can interfere with the
milliamp currents used in system operation.
Cleaning the connectors and grounds will solve
problems in many cases.
If a fault code indicates a problem with an EFI
component, disconnect the ECU connector and test
for continuity between the component connector
terminals and the corresponding terminals in the
ECU connector.
10
Engine misses, hesitates, or stalls under load
1. Fuel injectors/fuel filter/fuel line dirty or
restricted
2. Air cleaner dirty
3. Fuel pressure or fuel volume insufficient
4. Vacuum (intake air) leak
5. Governor setting incorrect
6. Spark plugs fouled, worn or incorrect gap
7. Plug wires loose or worn
Low Power
1. Air cleaner dirty
2. Fuel pressure insufficient
3. Governor setting incorrect
4. Exhaust system plugged or restricted
5. Injector(s) dirty or clogged
89
Page 93

FAULT CODES
10
FAULT
CODE
02 Crankshaft Position Sensor
09 Intake Manifold Pressure
12 Water Temperature Sensor
13 Intake Air Temperature
17 Oxygen Sensor
24 Battery Voltage
27 VCC Circuit
33 Fuel Injector #1
COMPONENT MIL Flashes
Sensor
Sensor
Long Flash Short Flash
34 Fuel Injector #2
35 Fuel Injector #3
37 Ignition Coil #1
38 Ignition Coil #2
39 Ignition Coil #3
41 Fuel Pump Relay
45 Heated Oxygen Sensor
58 Water Temperature
Warning Lamp
90
Page 94

Fault Code on MIL Indicator
The MIL will display sequences of flashes that
indicate a fault within the EFI system.
The number of flashes represents the number of the
code.
For example, if there was an issue with battery
voltage, the fault code 24 would be displayed on the
MIL.This is represented by two long flashes
followed by four short flashes, as shown below.
If more than one fault condition has occurred, a twosecond pause will occur between each of the code
flashes.
10
91
Page 95

10
TROUBLESHOOTING ENGINE PERFORMANCE ISSUES
92
Page 96

10
93
Page 97

10
94
Page 98

10
95
Page 99

10
96
Page 100

10
97
 Loading...