

Page 1
Manual No. 199145GS
Revision 1 (03/21/2006)
Model / Modelo
020258
BRIGGS & STRATTON POWER PRODUCTS GROUP, LLC
JEFFERSON,WISCONSIN, U.S.A.
Operator’s Manual
Manual del Operario
Questions? Help is just a moment away!
Preguntas? La ayuda es justa un momento lejos!
Call: Pressure Washer Helpline
Llame: Línea Directa del Lavador a Presión
1-800-743-4115 M-F 8-5 CT
web: www.briggsandstratton.com
Before using this product, read this
manual and follow all Safety Rules
and Operating Instructions.
WARNING
Antes de utilizar el producto, lea este manual
y siga todas las Reglas de Seguridad
e Instrucciones de Uso.
ADVERTENCIA
Page 2
2
TABLE OF CONTENTS
Section 1 - Safety Rules . . . . . . . . . . . . . . . . . . . . . . . . . . 2-5
Section 2 - Features and Controls . . . . . . . . . . . . . . . . . . . 6
Section 3 - Assembly . . . . . . . . . . . . . . . . . . . . . . . . . . . . 7-8
Section 4 - Operation . . . . . . . . . . . . . . . . . . . . . . . . . . 9-12
Section 5 - Product Specifications. . . . . . . . . . . . . . . . . . . 13
Section 5 - Maintenance. . . . . . . . . . . . . . . . . . . . . . . . 13-15
Section 6 - Storage . . . . . . . . . . . . . . . . . . . . . . . . . . . . . . 16
Section 7 - Troubleshooting. . . . . . . . . . . . . . . . . . . . . . . . 17
Warranties . . . . . . . . . . . . . . . . . . . . . . . . . . . . . . . . . . 18-19
EQUIPMENT
DESCRIPTION
Read this manual carefully and become familiar
with your pressure washer. Know its
applications, its limitations and any hazards
involved.
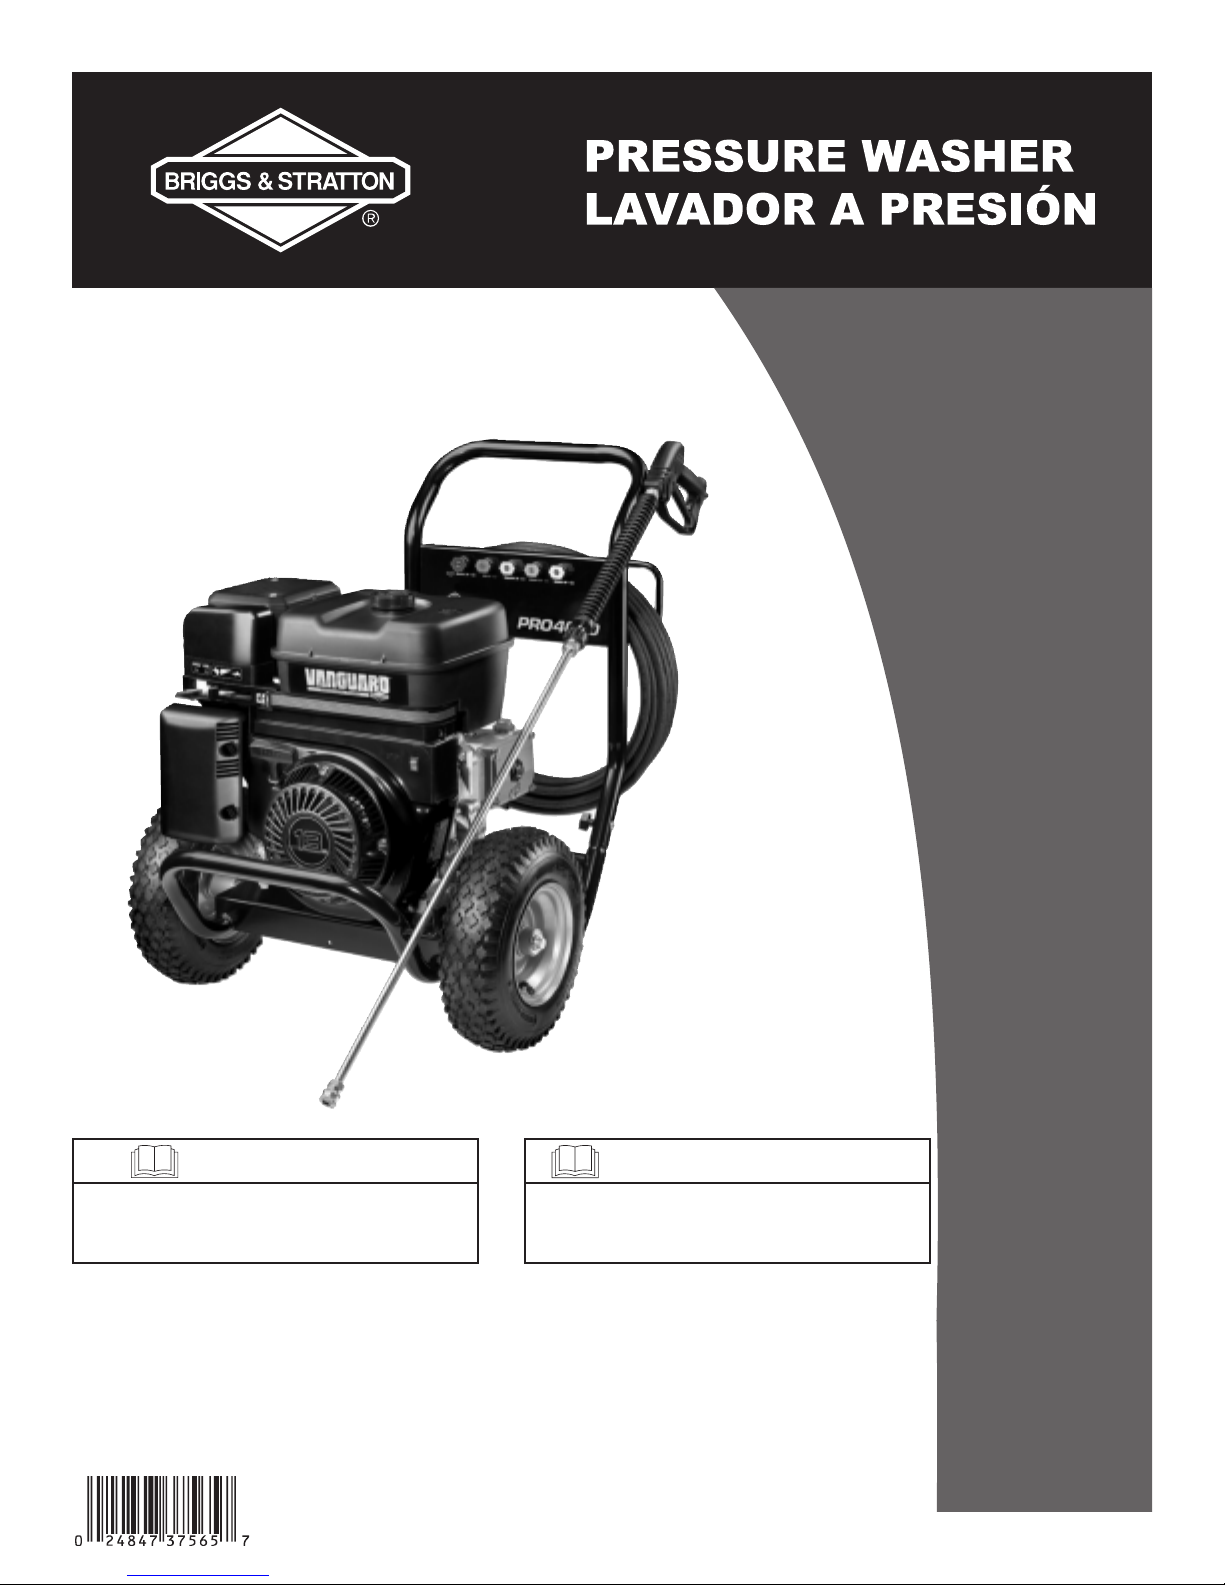
This manual contains information for a high pressure
washer that operates at 4,000 PSI at a flow rate of
4.0 gallons per minute.This powerful, high quality system
features large 13” wheels, a pump equipped with an
automatic cool down system, chemical injection system,
nozzle extension with quick connect nozzles, safety goggles,
heavy duty 50’ high pressure hose, and more.
Every effort has been made to ensure that information in
this manual is accurate and current. However, we reserve
the right to change, alter or otherwise improve the
product and this document at any time without prior
notice.
SAFETY RULES
This is the safety alert symbol. It is used to
alert you to potential personal injury
hazards. Obey all safety messages that follow
this symbol to avoid possible injury or death.
The safety alert symbol ( ) is used with a signal word
(DANGER, CAUTION,WARNING), a pictorial and/or a
safety message to alert you to hazards. DANGER indicates
a hazard which, if not avoided, will result in death or serious
injury. WARNING indicates a hazard which, if not
avoided, could result in death or serious injury. CAUTION
indicates a hazard which, if not avoided, might result in
minor or moderate injury. CAUTION, when used
without the alert symbol, indicates a situation that could
result in equipment damage. Follow safety messages to
avoid or reduce the risk of injury or death.
Hazard Symbols and Meanings
The engine exhaust from this product contains
chemicals known to the State of California to cause
cancer, birth defects, or other reproductive harm.
WARNING
Safety Rules
1
Section
SAVE THESE INSTRUCTIONS
Copyright © 2006 Briggs & Stratton Power Products
Group, LLC. All rights reserved. No part of this material
may be reproduced or transmitted in any form by any
means without the express written permission of Briggs &
Stratton Power Products Group, LLC.
Fire
Explosion
Toxic Fumes
Hot Surface
Moving Parts
Electrical Shock
Slippery Surface
Fall
Kickback
Flying Objects
Fluid Injection
Operator’s Manual
Page 3
3
Section 1: Safety Rules
• Keep water spray away from electric wiring or fatal electric
shock may result.
Spray contact with electrical wiring can result in
electrocution.
WARNING
• Operate pressure washer ONLY outdoors.
• Keep exhaust gas from entering a confined area through
windows, doors, ventilation intakes or other openings.
• DO NOT operate pressure washer inside any building or
enclosure, even if doors or windows are open.
• Use a respirator or mask whenever there is a chance that
vapors may be inhaled.
• Read all instructions with mask so you are certain the mask will
provide the necessary protection against inhaling harmful vapors.
Running engine gives off carbon monoxide, an
odorless, colorless, poison gas.
Breathing carbon monoxide can cause nausea,
fainting or death.
Some chemicals or detergents may be harmful if
inhaled or ingested, causing severe nausea,
fainting or poisoning.
WARNING
• Keep spray nozzle between 8 to 24 inches away from cleaning
surface.
• Operate this unit on a stable surface.
• The cleaning area should have adequate slopes and drainage to
reduce the possibility of a fall due to slippery surfaces.
• Be extremely careful if you must use the pressure washer from
a ladder, scaffolding or any other relatively unstable location.
• Firmly grasp spray gun with both hands when using high
pressure spray to avoid injury when gun kicks back.
Use of pressure washer can create puddles and
slippery surfaces.
High pressure spray could cause you to fall if
you are too close to the cleaning surface.
WARNING
WHEN ADDING FUEL
• Turn pressure washer OFF and let it cool at least 2 minutes
before removing gas cap.
• Fill fuel tank outdoors.
• DO NOT overfill tank.Allow space for fuel expansion.
• Keep fuel away from sparks, open flames,pilot lights, heat, and
other ignition sources.
• DO NOT light a cigarette or smoke.
WHEN OPERATING EQUIPMENT
• DO NOT tip engine or equipment at angle which causes fuel
to spill.
• DO NOT spray flammable liquids.
WHEN TRANSPORTING OR REPAIRING EQUIPMENT
• Transport/repair with fuel tank EMPTY or with fuel shutoff
valve OFF.
WHEN STORING FUEL OR EQUIPMENT WITH FUEL
IN TANK
• Store away from furnaces, stoves, water heaters, clothes
dryers or other appliances that have pilot light or other
ignition source because they can ignite fuel vapors.
Fuel and its vapors are extremely flammable and
explosive.
Fire or explosion can cause severe burns or
death.
WARNING
Page 4
4
Section 1: Safety Rules
• DO NOT wear loose clothing, jewelry or anything that may
be caught in the starter or other rotating parts.
• Tie up long hair and remove jewelry.
Starter and other rotating parts can entangle
hands, hair, clothing, or accessories.
WARNING
• ALWAYS point gun in safe direction and squeeze spray gun
trigger, to release pressure and avoid kickback each time,
before starting engine. Engage trigger lock when not in use.
• When starting engine,pull cord slowly until resistance is felt
and then pull rapidly to avoid kickback.
• After each starting attempt, where engine fails to run,always
point gun in safe direction and squeeze spray gun trigger to
release high pressure.
• Firmly grasp spray gun with both hands when using high
pressure spray to avoid injury when gun kicks back.
Rapid retraction of starter cord (kickback) will
pull hand and arm toward engine faster than
you can let go.
Broken bones, fractures, bruises or sprains could
result.
WARNING
• NEVER aim spray gun at people, animals or plants.
• DO NOT allow CHILDREN to operate pressure washer.
• NEVER repair high pressure hose. Replace it.
• NEVER repair leaking connections with sealant of any kind.
Replace o-ring or seal.
• Keep high pressure hose connected to pump and spray gun
while system is pressurized.
• ALWAYS point gun in safe direction and squeeze spray gun
trigger, to release high pressure, every time you stop engine.
Engage trigger lock when not in use.
The high pressure stream of water that this
equipment produces can pierce skin and its
underlying tissues, leading to serious injury and
possible amputation.
Spray gun traps high water pressure, even when
engine is stopped and water is disconnected,
which can cause injury.
WARNING
WHEN ADJUSTING OR MAKING REPAIRS TO YOUR
PRESSURE WASHER
• Disconnect spark plug wire from spark plug and place wire
where it cannot contact spark plug.
WHEN TESTING FOR ENGINE SPARK
• Use approved spark plug tester.
• DO NOT check for spark with spark plug removed.
Unintentional sparking can result in fire or
electric shock.
WARNING
• DO NOT touch hot surfaces and avoid hot exhaust gases.
• Allow equipment to cool before touching.
• Keep at least 5 ft. (152 cm) clearance on all sides of pressure
washer including overhead.
• Code of Federal Regulation (CFR) Title 36 Parks, Forests, and
Public Property require equipment powered by an internal
combustion engine to have a spark arrester, maintained in
effective working order, complying to USDA Forest service
standard 5100-1C or later revision. In the State of California a
spark arrester is required under section 4442 of the California
Public resources code. Other states may have similar laws.
Running engines produce heat.Temperature of
muffler and nearby areas can reach or exceed
150°F (65°C).
Severe burns can occur on contact.
Exhaust heat/gases can ignite combustibles,
structures or damage fuel tank causing a fire.
WARNING
• Always wear safety goggles when using this equipment or in
vicinity of where equipment is in use.
• Before starting the pressure washer, be sure you are wearing
adequate safety goggles.
High pressure spray can cause paint chips or
other particles to become airborne.
WARNING
Page 5
5
Section 1: Safety Rules
• DO NOT point spray gun at glass when in jet spray mode.
• NEVER aim spray gun at plants.
High pressure spray may damage fragile items including
glass.
CAUTION
• DO NOT tamper with governed speed.
• DO NOT operate pressure washer above rated pressure.
Excessively high or low operating speeds increase risk
of injury and damage to pressure washer.
CAUTION
• DO NOT secure spray gun in open position.
• DO NOT leave spray gun unattended while machine is
running.
• NEVER use a spray gun which does not have a trigger lock or
trigger guard in place and in working order.
• Always be certain spray gun, nozzles and accessories are
correctly attached.
A pressure washer produces a high pressure spray
which increases risk of injury and damage to unit.
CAUTION
• If you have questions about intended use, ask dealer or
contact Briggs & Stratton Power Products.
• NEVER operate units with broken or missing parts, or
without protective housing or covers.
• DO NOT by–pass any safety device on this machine.
• Before starting pressure washer in cold weather, check all
parts of the equipment to be sure ice has not formed there.
• NEVER move machine by pulling on hoses. Use handle
provided on unit.
• Check fuel system for leaks or signs of deterioration, such as
chafed or spongy hose, loose or missing clamps,or damaged
tank or cap. Correct all defects before operating pressure
washer.
• This equipment is designed to be used with Briggs & Stratton
Power Products authorized parts ONLY. If equipment is used
with parts that DO NOT comply with minimum specifications,
user assumes all risks and liabilities.
Improper treatment of pressure washer can damage it
and shorten its life.
CAUTION
Page 6
6
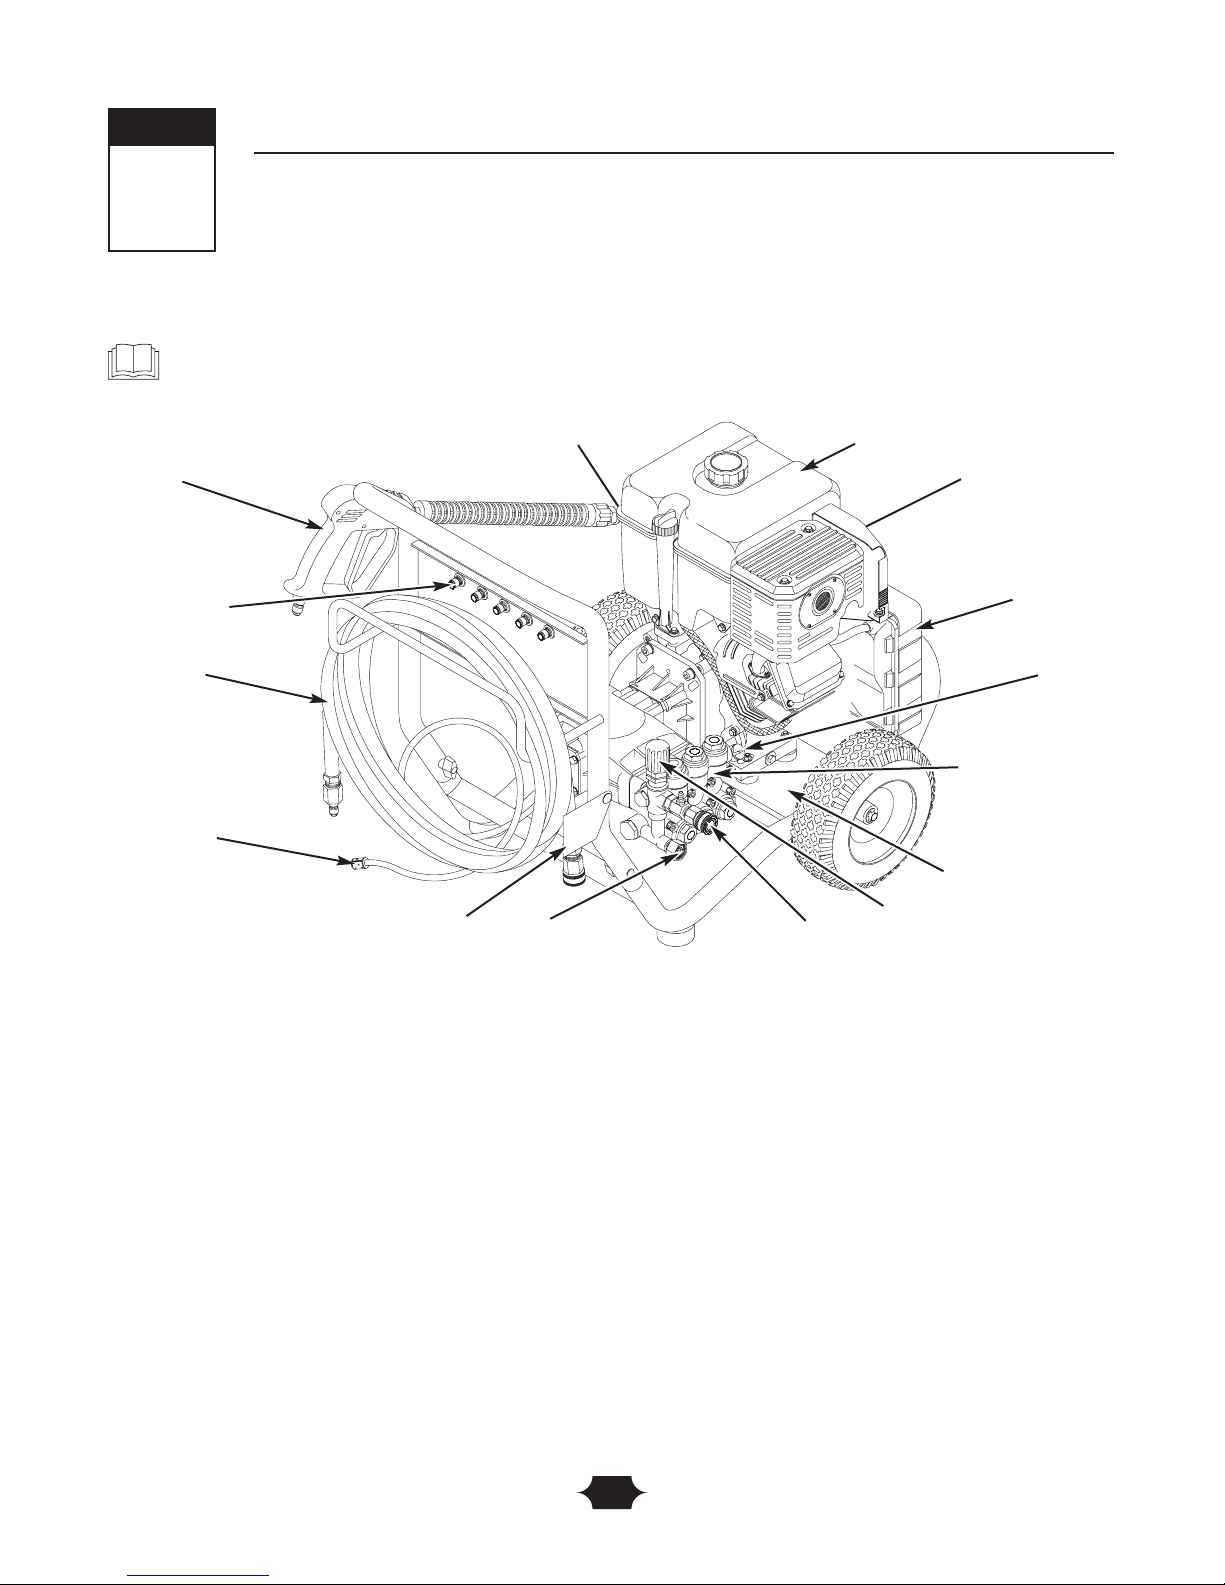
Features and Controls
2
Section
KNOW YOUR PRESSURE WASHER
Read this Operator’s Manual and safety rules before operating your pressure washer.
Compare the illustrations with your pressure washer to familiarize yourself with the locations of various controls
and adjustments. Save this manual for future reference.
Detergent Injection
Siphon/Filter
Spray Gun
Nozzle Extension with
Quick Connect
Throttle Lever
Choke Lever
Fuel Valve
Recoil Starter
Rocker Switch
(on front of engine)
Air Filter
Fuel Tank
Pump equipped
with Automatic
Cool Down
System
High Pressure Outlet
Oil Fill Cap
Spray Tips
Pressure Control Knob
Data Tag
High Pressure Hose
Air Filter — Protects engine by filtering dust and debris out of
intake air.
Automatic Cool Down System — Cycles water through
pump when water reaches 125°-155°F.Warm water will discharge
from pump onto ground.This system prevents internal pump
damage.
Detergent Injection Siphon/Filter — Use to siphon detergent
or other pressure washer chemicals into the low pressure stream.
Choke Lever — Prepares a cold engine for starting.
Data Tag — Provides model, revision and serial number of
pressure washer. Please have these readily available if calling for
assistance.
Fuel Tank — Fill tank with regular unleaded fuel.Always leave
room for fuel expansion.
Fuel Valve — Used to turn fuel on and off to engine.
High Pressure Hose — Connect one end to the water pump
and the other end to the spray gun.
High Pressure Outlet — To connect high pressure hose.
Nozzle Extension with Quick Connect — Allows you to
switch between five different spray tips.
Oil Fill Cap — Fill engine with oil here.
Pressure Control Knob — Varies the pressure of the high
pressure spray.
Pump — Develops high pressure.
Recoil Starter — Use for starting the engine manually.
Rocker Switch — Set this switch to "On" before using recoil
starter. Set switch to "Off" to switch off engine.
Safety Goggles (not shown) — Always use the enclosed
goggles or other eye protection when running your pressure
washer.
Spray Gun — Controls the application of water onto cleaning
surface with trigger device. Includes safety latch.
Spray Tips — Detergent, 0°, 15°, 25°, and 40°: for various high
pressure cleaning applications.
Throttle Lever — Sets engine in starting mode for recoil
starter.
Warning/Operating Instructions Tag — Identifies hazards and
proper procedure to start/stop pressure washer.
Water Inlet — Connect garden hose here.
Water Inlet
Warning/Operating Instructions Tag
Page 7
7
ASSEMBLY
IMPORTANT: Read entire operator’s manual before you
attempt to assemble or operate your new pressure washer.
Unpack the Pressure Washer
1. Remove everything from carton except pressure
washer.
2. Open carton completely by cutting each corner from
top to bottom.
3. Remove pressure washer from carton.
Carton Contents
Items in the carton include:
• Main unit
• High pressure hose
• Handle
• Engine oil (2)
• Spray gun with quick connect fitting
• Nozzle extension with quick connect fitting
• Accessory bag (includes the following):
• Owner’s registration card
• Safety goggles
• Bag containing 5 multi–colored quick connect spray
tips
• Operator’s manual
• Engine operator’s manual
• Handle Fastening Hardware Kit (which includes):
• Carriage Bolts (2)
• Plastic Knobs (2)
If any of the above parts are missing or damaged, call the
pressure washer helpline at 1–800–743–4115.
PREPARING PRESSURE
WASHER FOR USE
If you have any problems with the assembly of your
pressure washer or if parts are missing or damaged, call the
pressure washer helpline at 1-800-743-4115.
To prepare your pressure washer for operation, you
will need to perform these tasks:
1. Fill out and send in registration card.
2. Remove and discard tape from domed oil filler cap on
top of pump.
3. Attach handle to main unit.
4. Add oil to engine.
5. Add fuel to fuel tank.
6. Connect high pressure hose to spray gun and pump.
7. Connect water supply to pump.
8. Connect nozzle extension to spray gun.
9. Select/attach quick connect spray tip to nozzle extension.
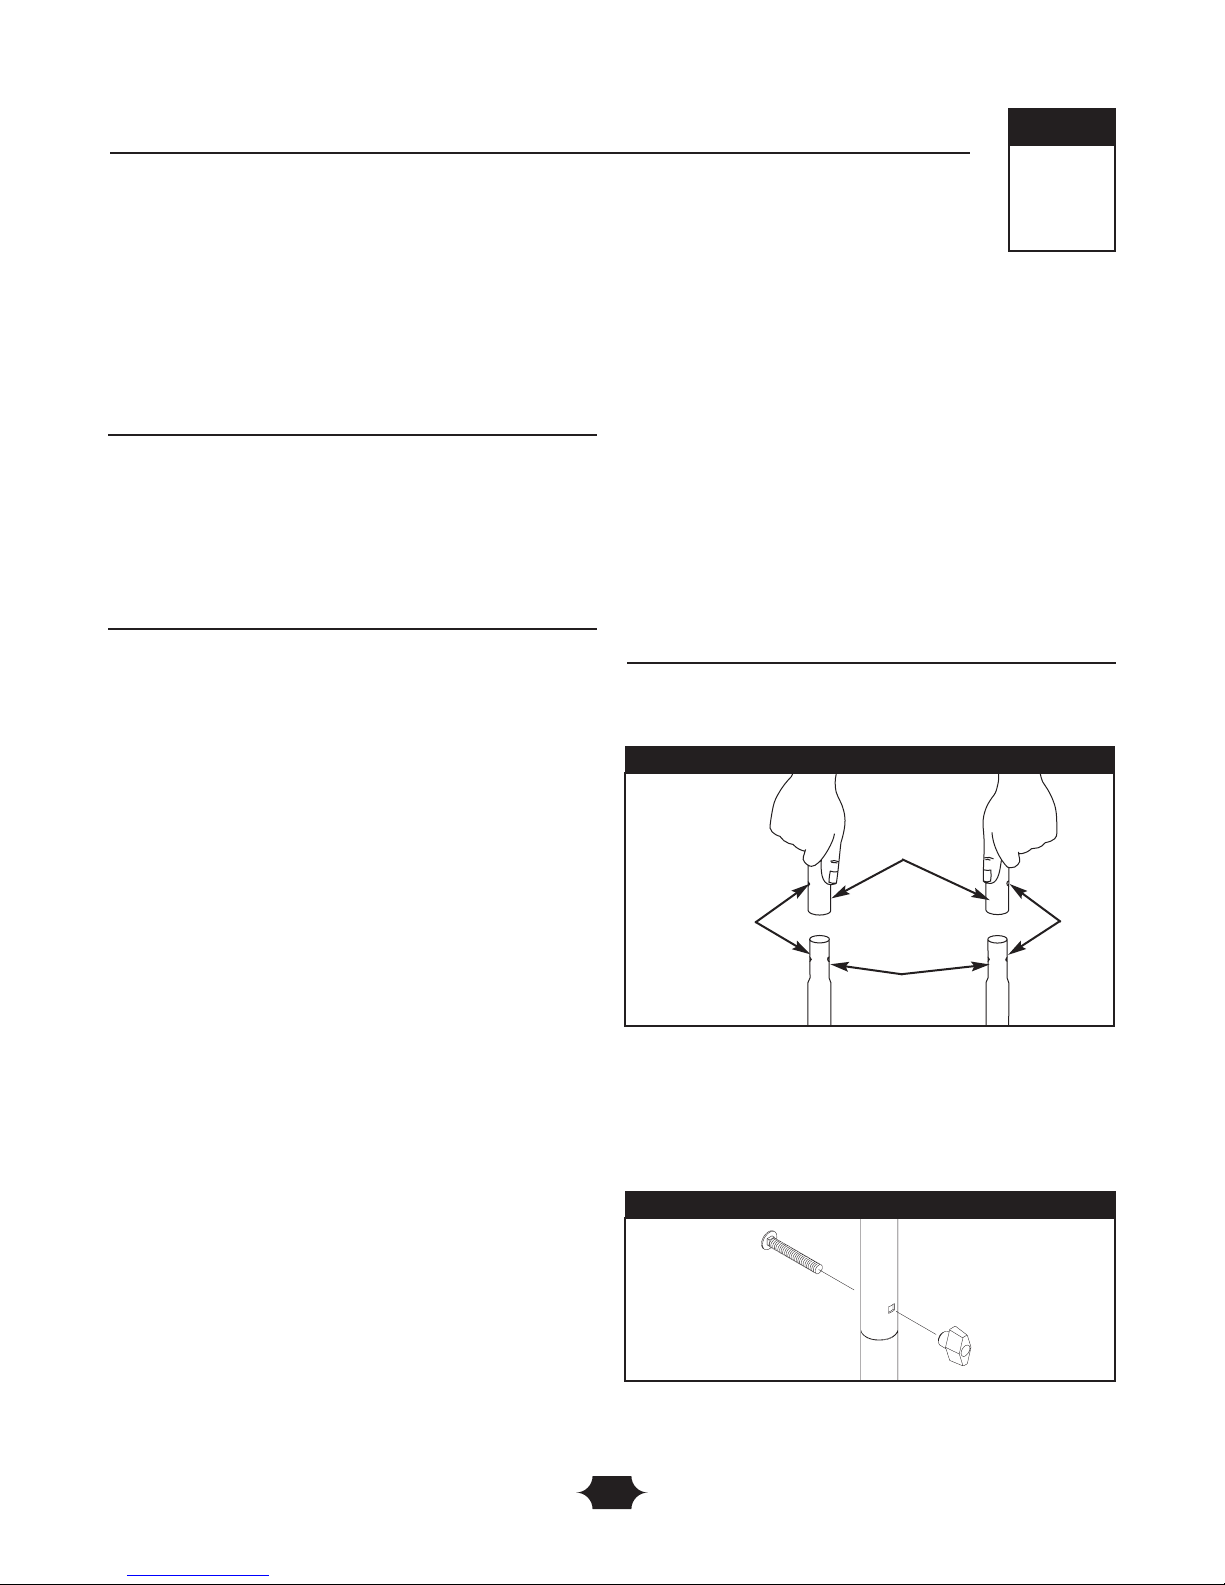
Attach Handle
1. Place handle assembly onto handle supports connected
to main unit. Make sure holes in handle align with holes
on handle supports (Figure 1).
NOTE: It may be necessary to move the handle supports
from side to side in order to align the handle so it will slide
over the handle supports.
2. Insert carriage bolts through holes from outside of unit
and attach plastic knob on inside of handles (Figure 2).
Tighten by hand.
3. Insert multi–colored spray tips in spaces provided in
handle.
3
Section
Assembly
Figure 2 — Secure Handle
Align Holes
Handle
Handle
Supports
Figure 1 — Attach Handle to Base
Page 8
8
Add Engine Oil and Fuel
• Place pressure washer on a level surface.
• Refer to engine operator’s manual and follow oil and fuel
recommendations and instructions.
NOTE: Check oil often during engine break–in. Refer to
engine operator’s manual for recommendations.
Connect Hose and Water Supply to
Pump
IMPORTANT:To avoid pump damage, you must assemble
the nozzle extension to the spray gun and attach all hoses
before you start the engine.
1. Remove and discard tape from domed oil filler cap on
top of pump.
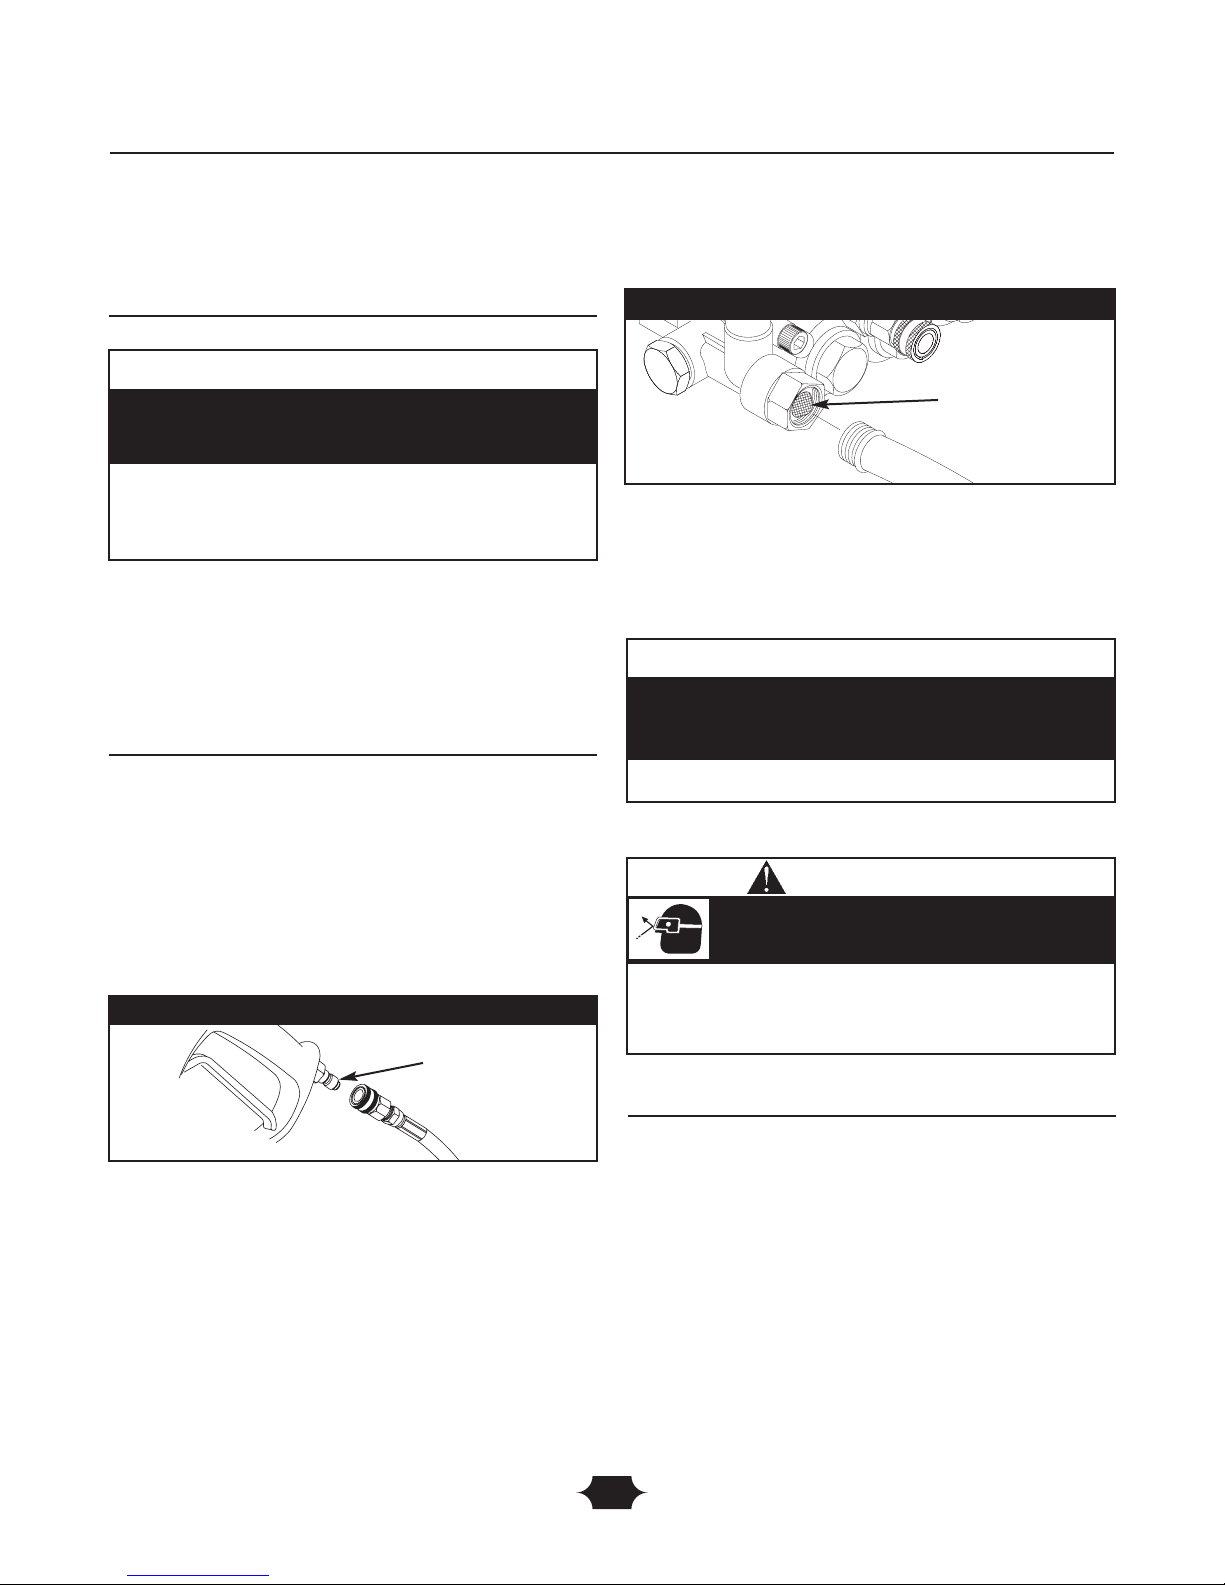
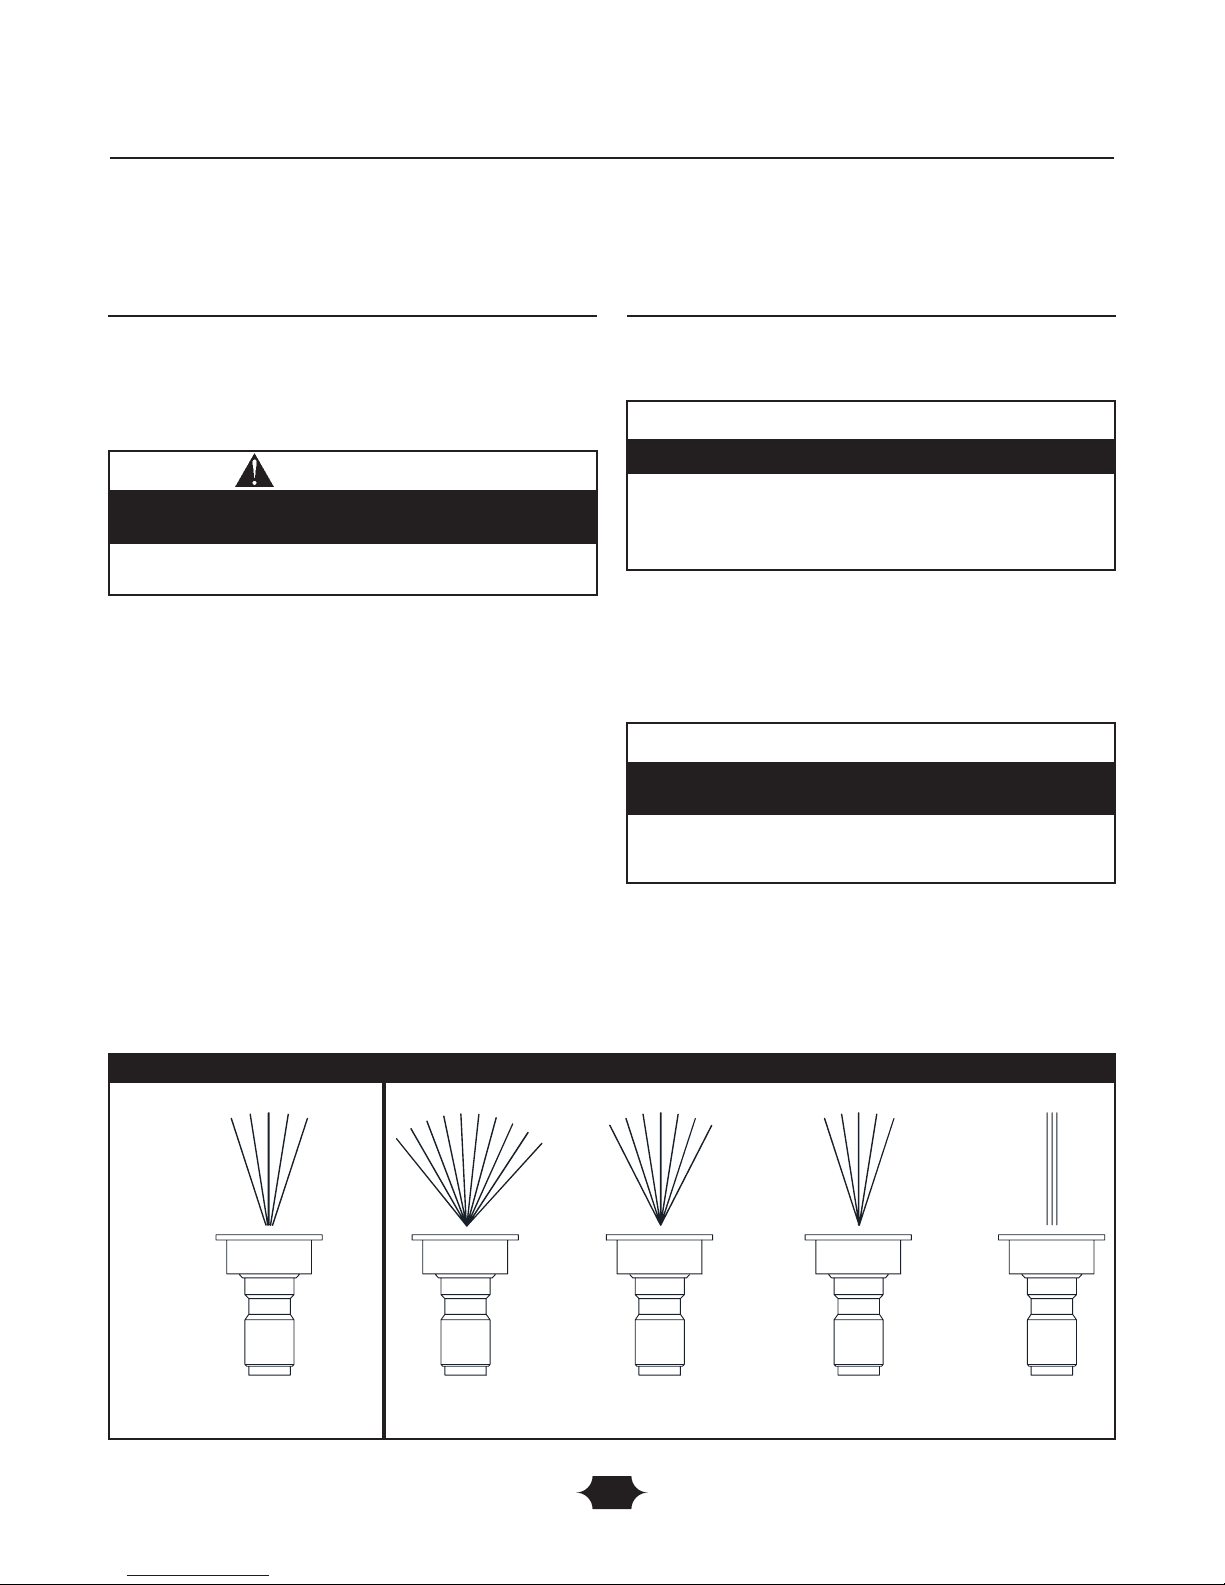
2. Uncoil high pressure hose and attach quick connect end
of hose to base of spray gun (Figure 3).Pull down on
collar of quick connect, slide onto spray gun and let go
of collar.Tug on hose to be sure of a tight connection.
NOTE: Remove and discard all pump shipping caps before
attaching hoses.
3. Similarly, attach other end of high pressure hose to the
high pressure outlet on pump. Pull down on collar of
quick connect, slide onto pump and let go of collar. Pull
on hose to be sure of a tight connection.
4. Before connecting garden hose to water inlet, inspect
inlet screen (Figure 4). Clean screen if it contains
debris or replace if damaged. DO NOT run pressure
washer if inlet screen is missing or damaged.
5. Run water through garden hose for 30 seconds to
clean out any debris.Turn off water.
IMPORTANT: DO NOT siphon standing water for the
water supply. Use ONLY cold water (less than 100°F).
6. Connect garden hose (not to exceed 50 feet in length)
to water inlet.Tighten by hand (Figure 4).
7. Turn ON water,point gun in a safe direction and squeeze
trigger to purge pump system of air and impurities.
Checklist Before Starting Engine
Review the unit’s assembly to confirm you have performed
all of the following:
1. Make sure handle is secure.
2. Check for properly tightened hose connections.
3. Check to make sure there are no kinks, cuts, or
damage to high pressure hose.
4. Check that oil has been added to proper level in
engine crankcase.
5. Add proper fuel to fuel tank.
6. Provide a proper water supply (not to exceed 100°F).
7. Be sure to read “Safety Rules” and “How To Use Your
Pressure Washer” before using pressure washer.
CAUTION
• Refer to engine operaor’s manual for oil and fuel fill
information.
• Damage to equipment resulting from failure to follow this
instruction will void warranty.
Any attempt to crank or start the engine before it has
been properly filled with the recommended oil will result
in equipment failure.
Section 3: Assembly
Connect high
pressure hose here
Figure 3 — Connect High Pressure Hose to Spray Gun
Inspect inlet screen.
DO NOT use if
damaged or missing;
clean if dirty.
Figure 4 — Connect Garden Hose to Water Inlet
CAUTION
• Damage to equipment resulting from failure to follow this
instruction will void warranty.
There MUST be at least ten feet of unrestricted garden hose
between the pressure washer inlet and any flow shut off
device, such as a ‘Y’ shut-off connector or other conveniencetype water shut-off valve.
• Always wear safety goggles when using this equipment or in
vicinity of where equipment is in use.
• Before starting the pressure washer, be sure you are wearing
adequate safety goggles.
High pressure spray can cause paint chips or
other particles to become airborne.
WARNING
Page 9
9
HOW TO USE PRESSURE
WASHER
If you have any problems operating your pressure washer,
please call the pressure washer helpline at 1-800-743-4115.
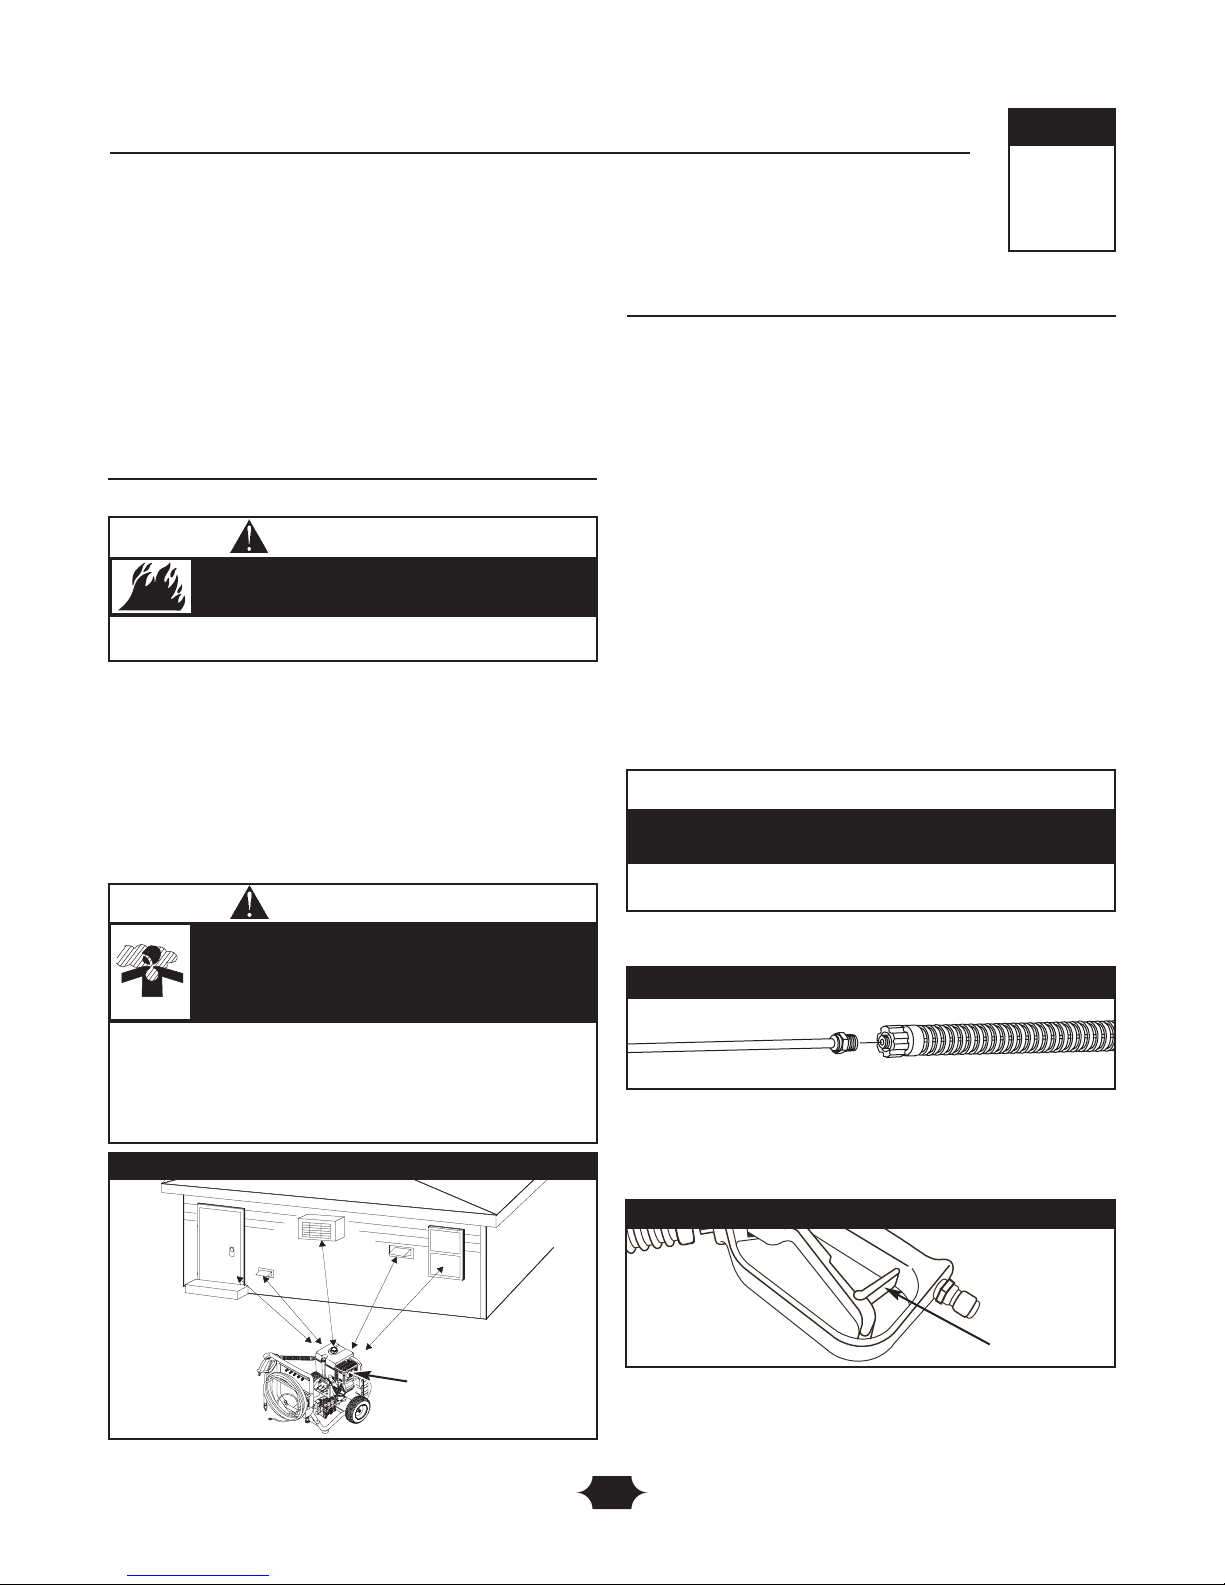
Pressure Washer Location
Pressure Washer Clearance
Place pressure washer in a well ventilated area, which will
allow for removal of deadly exhaust gas. DO NOT place
pressure washer where exhaust gas could accumulate and
enter inside or be drawn into a potentially occupied
building. Ensure exhaust gas is kept away from any
windows, doors, ventilation intakes or other openings that
can allow exhaust gas to collect in a confined area
(Figure 5). Prevailing winds and air currents should be taken
into consideration when positioning pressure washer.
How to Start Engine
The best way to start your pressure washer for the first
time is to follow these instructions step–by–step.This
starting information also applies if have let the pressure
washer sit idle for at least a day.
1. Place pressure washer near an outside water source
capable of supplying water at a flow rate greater than
5.0 gallons per minute and no less than 20 PSI at
pressure washer end of garden hose.
2. Check that high pressure hose is tightly connected to
spray gun and pump. See “Preparing Pressure Washer
for Use” for illustrations.
3. Make sure unit is in level position.
4. Connect garden hose to water inlet on pressure
washer pump.
5. Turn ON water, point gun in a safe direction and
squeeze trigger to purge pump system of air and
impurities.
6. Attach nozzle extension to spray gun (Figure 6).
Tighten by hand.
7. Select desired quick connect spray tip and insert it into
end of nozzle extension (see “How To Use Spray
Tips”).
8. Engage trigger lock on spray gun trigger (Figure 7).
Figure 5 — Pressure Washer Clearance
Exhaust Port
Typical Pressure Washer Shown
• Operate pressure washer ONLY outdoors.
• Keep exhaust gas from entering a confined area through
windows, doors, ventilation intakes or other openings.
• DO NOT operate pressure washer inside any building or
enclosure, even if doors or windows are open.
Running engine gives off carbon monoxide, an
odorless, colorless, poison gas.
Breathing carbon monoxide can cause nausea,
fainting or death.
WARNING
• Keep at least 5 ft. (152 cm) clearance on all sides of pressure
washer including overhead.
Exhaust heat/gases can ignite combustibles,
structures or damage fuel tank causing a fire.
WARNING
Trigger Lock
Figure 7 — Spray Gun with Trigger Lock Engaged
Figure 6 — Connect Nozzle Extension to Spray Gun
CAUTION
• Damage to equipment resulting from failure to follow this
instruction will void warranty.
DO NOT run the pump without the water supply
connected and turned on.
4
Section
Operation
Page 10

10
9. When starting engine,position yourself as recommended
in Figure 8 and start engine according to instructions
given in engine operator’s manual.Also see operating
instructions tag located on the pressure washer.
NOTE:Always keep the throttle lever in the “Fast”
position when operating the pressure washer.
How to Stop Pressure Washer
1. Let engine idle for two minutes.
2. Turn engine off according to instructions given in
engine operator’s manual.
3. ALWAYS point gun in a safe direction and squeeze
spray gun trigger to release retained high water
pressure.
IMPORTANT: Spray gun traps high water pressure, even
when engine is stopped and water is disconnected.
4. Engage trigger lock on spray gun when not in use.
Figure 8 - Recommended Starting Position
• DO NOT touch hot surfaces and avoid hot exhaust gases.
• Allow equipment to cool before touching.
• Keep at least 5 ft. (152 cm) clearance on all sides of pressure
washer including overhead.
• Code of Federal Regulation (CFR) Title 36 Parks, Forests, and
Public Property require equipment powered by an internal
combustion engine to have a spark arrester, maintained in
effective working order, complying to USDA Forest service
standard 5100-1C or later revision. In the State of California a
spark arrester is required under section 4442 of the California
Public resources code. Other states may have similar laws.
Running engines produce heat.Temperature of
muffler and nearby areas can reach or exceed
150°F (65°C).
Severe burns can occur on contact.
Exhaust heat/gases can ignite combustibles,
structures or damage fuel tank causing a fire.
WARNING
• ALWAYS point gun in safe direction and squeeze spray gun
trigger, to release pressure and avoid kickback each time,
before starting engine.
• When starting engine,pull cord slowly until resistance is felt
and then pull rapidly to avoid kickback.
• After each starting attempt, where engine fails to run,always
point gun in safe direction and squeeze spray gun trigger to
release high pressure.
• Firmly grasp spray gun with both hands when using high
pressure spray to avoid injury when gun kicks back.
Rapid retraction of starter cord (kickback) will
pull hand and arm toward engine faster than
you can let go.
Broken bones, fractures, bruises or sprains could
result.
WARNING
• Keep high pressure hose connected to pump and spray gun
while system is pressurized.
• ALWAYS point gun in safe direction and squeeze spray gun
trigger, to release high pressure, every time you stop engine.
Engage trigger lock when not in use.
The high pressure stream of water that this
equipment produces can pierce skin and its
underlying tissues, leading to serious injury and
possible amputation.
Spray gun traps high water pressure, even when
engine is stopped and water is disconnected,
which can cause injury.
WARNING
Section 4: Operation
Page 11
11
How to Use Spray Tips
The nozzle extension quick–connect allows the use of
several different spray tips. Each spray tip provides a
different spray pattern (Figure 9).
Follow these instructions to change spray tips:
1. Engage trigger lock on spray gun.
2. Pull back collar on quick–connect and pull current
spray tip off.
3. Select desired spray tip:
• For gentle rinse, select white 40° or green 25°
spray tip.
• To scour surface, select yellow 15° or red 0° spray
tip.
• To apply detergent, select black spray tip.
4. Pull back on collar,insert new spray tip and release collar.
Tug on spray tip to make sure it is securely in place.
5. For most effective cleaning, keep spray tip from 8 to 24
inches away from cleaning surface.
6. DO NOT get closer than 6 inches when cleaning
automobile tires.
Cleaning and Applying Detergent
IMPORTANT: Use detergents designed specifically
for pressure washers. Household detergents could
damage the pump.
To apply detergent follow these steps:
1. Review spray tip use.
2. Prepare detergent solution as required by manufacturer.
3. Place detergent siphon tube/filter into detergent
container.
4. Make sure black spray tip is installed.
NOTE: Detergent cannot be applied with high pressure
spray tips (White, Green,Yellow, or Red).
Section 4: Operation
• NEVER exchange spray tips without engaging the trigger lock
on the spray gun.
A pressure washer produces a high pressure spray
which increases risk of injury and damage to unit.
CAUTION
White
40°
Green
25°
Black
Yellow
15°
Red
0°
Low Pressure
High Pressure
Figure 9 — Spray Tips
Use to
apply
detergent
CAUTION
• Starting the engine without all the hoses connected and
without the water turned ON will damage the pump.
• Damage to equipment resulting from failure to follow this
instruction will void warranty.
You must attach all hoses before you start the engine.
CAUTION
• When inserting the filter into a detergent solution bottle,
route the tube so as to keep it from inadvertently contacting
the hot muffler.
Keep the chemical injection tube from coming in contact
with the hot muffler.
Page 12

12
5. Make sure garden hose is connected to water inlet.
Check that high pressure hose is connected to spray
gun and pump; start engine.
6. Apply detergent to a dry surface, starting at lower
portion of area to be washed and work upward, using
long, even, overlapping strokes. DO NOT allow
detergent to dry on (prevents streaking).
7. Allow detergent to soak in between 3–5 minutes
before washing and rinsing. Reapply as needed to
prevent surface from drying.
IMPORTANT:You must flush the injection system after each
use by placing the filter into a bucket of clean water, then run
the pressure washer in low pressure for 1-2 minutes.
Pressure Washer Rinsing
After you have applied detergent, scour the surface
and rinse it clean as follows:
1. Engage trigger lock on spray gun.
2. Remove black detergent spray tip from nozzle
extension.
3. Select and install desired high pressure spray tip
following the instructions in “How to Use Spray Tips”.
4. Keep spray gun a safe distance from the area you plan
to spray.
5. Increase (decrease) spray pressure by turning pressure
control knob clockwise (counterclockwise) (See
“Know Your Pressure Washer”). Use lower pressure to
wash items such as a car or boat. Use higher pressure
to strip paint and degrease driveways.
6. Apply high pressure spray to small area and then check
surface for damage. If no damage is found, you can
assume it is okay to continue cleaning.
7. Start at top of area to be rinsed, working down with
same overlapping strokes as used for cleaning.
Cleaning Detergent Siphoning Tube
If you used the detergent siphoning tube, you must flush it
with clean water before stopping the engine.
1. Place detergent siphon tube/filter in a bucket full of
clean water.
2. Engage trigger lock on spray gun.
3. Attach black cleaning detergent nozzle.
4. Flush for 1-2 minutes.
5. Shut off engine.
6. ALWAYS point gun in a safe direction and squeeze
spray gun trigger to release retained high water
pressure.
IMPORTANT: Spray gun traps high water pressure, even
when engine is stopped and water is disconnected.
Automatic Cool Down System
(Thermal Relief)
If you run the engine on your pressure washer for
3-5 minutes without pressing the trigger on the spray gun,
circulating water in the pump can reach temperatures
above 125°F.The system engages to cool the pump by
discharging the warm water onto the ground.
Section 4: Operation
• Keep spray nozzle between 8 to 24 inches away from cleaning
surface.
• Operate this unit on a stable surface.
• Be extremely careful if you must use the pressure washer from
a ladder, scaffolding or any other relatively unstable location.
• Firmly grasp spray gun with both hands when using high
pressure spray to avoid injury when gun kicks back.
High pressure spray could cause you to fall if
you are too close to the cleaning surface.
WARNING
Page 13

13
SPECIFICATIONS
Rated Pressure . . . . . . . . . . . . . . . . . . . . . . . . . 4,000 PSI
Flow Rate . . . . . . . . . . . . . . 4.0 gallons per minute (gpm)
Detergent Use detergent approved for pressure washers
Water Supply
Temperature . . . . . . . . . . . . . . . . . Not to exceed 100°F
Automatic Cool . . . . . . . . . . . . . Will cycle when water
Down System reaches 125°-155°F
Shipping Weight . . . . . . . . . . . . . . . . . . . . . . . . . . 144 lbs.
GENERAL MAINTENANCE
RECOMMENDATIONS
The pressure washer warranty does not cover items that
have been subjected to operator abuse or negligence.To
receive full value from the warranty, the operator must
maintain the pressure washer as instructed in this manual.
NOTE: Should you have questions about replacing
components on your pressure washer, please call
1-800-743-4115 for assistance.
• Some adjustments will need to be made periodically to
properly maintain your high pressure washer.
• All maintenance in this manual and the engine operator’s
manual should be made at least once each season.
• If equipped with inflatable tires, keep the air pressure at
the value marked on the tire or within 15 and 40 psi.
Before Each Use
1. Check engine oil level.
2. Check water inlet screen for damage.
3. Check in-line filter for damage.
4. Check high pressure hose for leaks.
5. Check detergent siphoning tube and filter for damage.
6. Check spray gun, nozzle extension, and nozzles for leaks.
7. Rinse out garden hose to flush out debris.
PRESSURE WASHER
MAINTENANCE
Check and Clean Inlet Screen
Examine the screen on the water inlet. Clean it if the
screen is clogged or replace it if screen is damaged.
Check High Pressure Hose
The high pressure hose can develop leaks from wear,
kinking, or abuse. Inspect the hose each time before using
it. Check for cuts, leaks, abrasions or bulging of cover,
damage or movement of couplings. If any of these
conditions exist, replace the hose immediately.
Check Detergent Siphoning Tube
Examine the filter on the detergent tube and clean if
clogged.The tube should fit tightly on the barbed fitting.
Examine the tube for leaks or tears. Replace the filter or
tube if either is damaged.
Check Gun and Nozzle Extension
Examine the hose connection to the spray gun and make
sure it is secure.Test the trigger by pressing it and making
sure it springs back into place when you release it. Put the
trigger lock in the on position and test the trigger.You
should not be able to press the trigger.
Check In-Line Filter
Refer to Figure 10 and service the in-line filter if it
becomes clogged, as follows:
1. Detach spray gun and nozzle extension from high
pressure hose. Detach nozzle extension from spray gun
and remove o-ring and screen from nozzle extension.
Flush screen, spray gun, and adjustable nozzle extension
with clean water to clear debris.
2. Place in-line filter screen into threaded end of nozzle
extension. Direction does not matter. Push screen in
with eraser end of pencil until it rests flat at bottom of
opening.Take care to not bend screen.
• NEVER repair high pressure hose. Replace it.
• Replacement hose rating MUST exceed maximum pressure
rating of unit.
The high pressure stream of water that this
equipment produces can pierce skin and its
underlying tissues, leading to serious injury and
possible amputation.
WARNING
Nozzle Extension
Filter Screen
O-ring
Figure 10 — Clean In-Line Filter
Maintenance
5
Section
Page 14

14
3. Place o-ring into recess. Push o-ring snugly against
in-line filter screen.
4. Assemble nozzle extension to spray gun, as described
earlier in this manual.
Nozzle Maintenance
A pulsing sensation felt while squeezing the spray gun
trigger may be caused by excessive pump pressure.The
principal cause of excessive pump pressure is a spray tip
clogged or restricted with foreign materials, such as dirt,
etc.To correct the problem, immediately clean the spray
tips following these instructions:
1. Shut off engine and turn off water supply.
2. Remove spray tip from end of nozzle extension.
3. Remove in-line filter from other end of nozzle extension.
4. Use a small paper clip to free any foreign material
clogging or restricting spray tip (Figure 11).
5. Using a garden hose, remove additional debris by back
flushing water through nozzle extension (Figure 12).
Back flush between 30 to 60 seconds.
6. Reinstall spray tip and in-line filter into nozzle extension.
7. Reconnect nozzle extension to spray gun.
8. Reconnect water supply, turn on water, and start engine.
9. Test pressure washer by operating with each quick
connect spray tips.
O–Ring Maintenance
Purchase an O–Ring/Maintenance Kit, part number
191922GS by contacting the nearest authorized service
center. It is not included with the pressure washer.This kit
includes replacement o-rings, rubber washer and water
inlet filter. Refer to the instruction sheet provided in the kit
to service your unit’s o-rings.
ENGINE MAINTENANCE
See the engine operator’s manual for instructions on how
to properly maintain the engine.
KEEP OUT OF REACH OF CHILDREN. DON'T
POLLUTE. CONSERVE RESOURCES. RETURN
USED OIL TO COLLECTION CENTERS.
Use wire here to
remove debris
Figure 11 — Nozzle Maintenance
Figure 12 — Backflushing the Nozzle Extension
• Used motor oil has been shown to cause skin cancer in
certain laboratory animals.
• Thoroughly wash exposed areas with soap and water.
Avoid prolonged or repeated skin contact with used
motor oil.
CAUTION
• NEVER repair leaking connections with sealant of any kind.
Replace o-ring or seal.
The high pressure stream of water that this
equipment produces can pierce skin and its
underlying tissues, leading to serious injury and
possible amputation.
WARNING
Section 5: Maintenance
Page 15

15
PUMP MAINTENANCE
For longest lasting service, follow the instructions given in
the check list (Figure 13).
IMPORTANT: Use 0.55 liter (18.6 ounces) of CAT Pump
6107 multi-viscosity oil. Oil alternatives include Mobil
DTE16,Texaco Rondo 1660-HD150, Amoco Rykon-68,
Shell Tellus T-68, and Exxon Univis-68.
Check Oil Level
1. Place pressure washer on a level surface.
2. While pump and oil is cold, observe oil level visible in
pump’s oil sight gauge.
3. Oil level should be visible and just below red dot.If
necessary, slowly add recommended oil through
pump’s oil filler opening until oil level just touches
bottom of red dot. DO NOT fill above red dot!
Oil Change Procedure
1. Place pressure washer on an outside level surface.
2. Start and run pressure washer for at least 5 minutes.
3. Turn off pressure washer and disconnect spark plug
wire from spark plug.
4. Place suitable container under oil drain hole.
5. Remove pump’s oil filler cap and o-ring (Figure 14).
6. Remove oil drain plug (Figure 15) and let oil drain out
completely.
7. Replace oil drain plug and tighten securely (50 in-lbs
max. torque).
8. Use a funnel to add recommended amount and type of
pump oil.
9. Replace domed oil filler cap and o-ring.Tighten fingertight.
10. Reconnect spark plug wire to spark plug.
11. Take used oil to an oil recycling center.
Section 5: Maintenance
Follow the daily, hourly or calendar intervals, whichever occurs first.
* If other than CAT Pump Model 6107 oil is used, change cycle should be every 300 hours.
** Each system’s maintenance cycle will be exclusive. If system performance decreases, check immediately. If no wear at 1500 hours,
check again at 2000 hours and each 500 hours until wear is observed.Valves typically require changing every other seal change.
Duty cycle, temperature, quality of pumped liquid and inlet feed conditions all affect the life of pump wear parts and service cycle.
** Remember to service the unloader at each seal servicing and check all system accessories and connections before resuming
operation. Contact your local service center if questions arise.
Figure 13 — Pump Preventative Maintenance Check List
Maintenance Item: Daily 50 hours 500 hours 1,500 hours 3,000 hours
Clean Inlet Water Filter X
Check Oil Level/Quantity X
Check for Oil Leaks X
Check for Water Leaks X
Break-in Oil Change X
*Routine Oil Change X
**Seal Change X
Valve Change X
Check Accessories X
Figure 14 — Removing Pump’s Oil Filler Cap
Figure 15 — Removing Pump’s Oil Drain Plug
Page 16

16
PREPARING THE UNIT
FOR STORAGE
Water should not remain in the unit for long periods of
time. Sediments or minerals can deposit on pump parts and
“freeze” pump action. If you do not plan to use the pressure
washer for more than 30 days, follow this procedure:
1. Flush detergent siphon tube by placing filter into a pail
of clean water while running pressure washer in low
pressure mode. Flush for one to two minutes.
2. Shut off engine and let it cool, then remove high
pressure and garden hoses.
3. Empty pump of liquids by pulling engine recoil handle
about 6 times.This should remove most liquid from
pump.
4. Use pump saver to prevent corrosion build up and
freezing of pump.
5. Store unit in a clean, dry area.
Protecting the Pump
To protect the pump from damage caused by mineral
deposits or freezing, use PumpSaver to treat pump.This
prevents freeze damage and lubricates pistons and seals.
NOTE: PumpSaver is available as an optional accessory. It is
not included with the pressure washer. Contact the nearest
authorized service center to purchase PumpSaver.
To use PumpSaver, make sure the pressure washer is
turned off and disconnected from supply water. Read and
follow all instructions and warnings given on the PumpSaver
container.
NOTE: If PumpSaver is not available, draw RV antifreeze
(non-alcohol) into the pump by pouring the solution into a
3-foot section of garden hose connected to inlet adapter
and pulling recoil handle twice.
STORING THE ENGINE
See the engine operator’s manual for instructions on how
to properly prepare the engine for storage.
CAUTION
• Failure to do so will permanently damage your pump and
render your unit inoperable.
• Freeze damage is not covered under warranty.
You must protect your unit from freezing temperatures.
• Always wear eye protection when using PumpSaver.
Read and follow all cautions and warnings on the
PumpSaver can label.
CAUTION
CAUTION
• Protect surfaces from dripping PumpSaver.
PumpSaver will drip from pump after treatment and
will stain wood and concrete.
Storage
6
Section
Page 17

17
TROUBLESHOOTING
Problem Cause Correction
Pump has following problems:
failure to produce pressure, erratic
pressure, chattering, loss of
pressure, low water volume.
1. Low pressure spray tip installed.
2. Water inlet is blocked.
3. Inadequate water supply.
4. Inlet hose is kinked or leaking.
5. Clogged inlet hose strainer.
6. Water supply is over 100°F.
7. High pressure hose is blocked or
leaks.
8. Gun leaks.
9. Spray tip is obstructed.
10. Pump is faulty.
1. Replace spray tip with high
pressure spray tip.
2. Clear inlet.
3. Provide adequate water flow.
4. Straighten inlet hose, patch leak.
5. Check and clean inlet hose
strainer.
6. Provide cooler water supply.
7. Clear blocks in outlet hose.
8. Replace gun.
9. Clean spray tip.
10. Contact authorized service facility.
Detergent fails to mix with spray.
1. Detergent siphoning tube is not
submerged.
2. Detergent siphon tube/filter is
clogged or cracked.
3. Dirty in-line filter.
4. High pressure spray tip installed.
1. Insert detergent siphoning tube
into detergent.
2. Clean or replace detergent
siphoning tube/filter.
3. See "Check In-Line Filter".
4. Replace spray tip with low
pressure spray tip.
Engine shuts down during
operation.
Out of gasoline. Fill fuel tank.
Troubleshooting
7
Section
Page 18

CAT PUMPS WARRANTY
This pump is warranted by the manufacturer to be free from
defects in workmanship and material for ONE YEAR from
date of manufacturer’s shipment except:
• FIVE YEARS for 2SF, 4SF and 66DX pumps and all
portable fresh water PRESSURE WASHER pumps.
• TWO YEARS for 2DX, 3DX, 3SP and all CAR WASH
pumps except FIVE YEARS for 5CP2120W,
5CP2140WCS, 5CP2150W.
• SIX MONTHS for 1LX and all rebuilt pumps.
• 90 DAYS on Accessories.
The sole responsibility for warranty on all motors is that of
their original manufacturers.
This warranty DOES NOT APPLY to malfunctions caused by
the FAULT or NEGLIGENCE of the buyer or third party,
including failure to perform periodic maintenance (oil, seal and
valve change), to the IMPROPER USE of the pump as a
component part, to failures reported to the manufacturer
AFTER the WARRANTY PERIOD has EXPIRED, or to the
NORMAL WEAR of standard wear items in the pump such as
V-packings, seals, cups, o-rings, valves, etc.
This express warranty is in substitution for and in lieu
of all other warranties, whether expressed or implied,
including, without limitation, any warranties or
merchantability or fitness for a particular purpose and
all such warranties are hereby disclaimed and excluded
by the manufacturer.
In order to take advantage of this warranty, you must first
contact your local CAT PUMPS supplier for a Return Goods
Authorization Number (763•780•5440, Fax 763•780•2958).
Any defective product must be returned FREIGHT PREPAID
to CAT PUMPS, 1681 94th Lane N.E., Minneapolis, MN 55449
(or international office of origin) for examination and
disposition. CAT PUMPS agrees to be responsible for return
shipping costs on any approved warranty repair or replacement
product with a carrier selected by CAT PUMPS. (Use original or
comparable carton to avoid damage in shipment.) The serial
number of the product will determine warranty date unless
original purchase invoice can be provided.
The buyer agrees that the sole and exclusive remedy in
law or in equity for breach of any and all warranties and
the sole and exclusive remedy for the manufacturer's
liability of any kind (including, without limitation,
liability for negligence) with respect to the product and
all other performance by the manufacturer will be
limited to the REPAIR OF, OR AT MANUFACTURER’S
OPTION,THE REPLACEMENT OF THE PRODUCT.
Buyer further agrees that manufacturer will, in no
event, have any responsibility or bear any liability for (a)
the cost of labor for the removal of any defective
product or the installation of any replacement product,
or (b) the cost of transportation to the manufacturer of
the defective products returned for evaluation. Finally,
buyer agrees that the manufacturer shall not be liable
for any other loss, damage or expense, including any
special, incidental or consequential loss or damage
(including, without limitation, lost profits), even if the
manufacturer has been advised of the possibility of such
potential loss or damage.
THIS WARRANTY IS SUBJECT TO THE FOLLOWING CONDITIONS:
SPECIFICATIONS: Pump operation must be within RPM, Discharge Pressure and Inlet Pressure specifications. A
pressure relief valve must be correctly installed in the system.
PUMPED LIQUIDS: The warranty is VOID if pump operation commences without sufficient liquid to the pump. Do not
pump harsh acids or alkalines or abrasive liquids. For pumped liquids below 5 pH or above 9 pH,
above 130°F, above 500 CPS (2500 SSU) or other questionable liquids, contact CAT PUMPS for additional
information on alternative construction and installation.
LUBRICATION: The use of Genuine CAT PUMPS special custom-blend, multi-viscosity, ISO-68 hydraulic oil is highly
recommended. WARNING: Use of alternate oils that do not provide proper lubrication will VOID
YOUR PUMP WARRANTY.The warranty is also VOID if pump operation commences without the
proper amount of oil in the crankcase, oil becomes contaminated or pump operates without
periodic oil changes as recommended. Fill Gearbox pumps with required lubricant before initial
start-up. Review individual service manual and data sheet for required amount of oil (lubricant) and
maintenance cycle.
TEMPERATURE: Protect pump from freezing. Do not store in area with freezing conditions. Drain completely of pumped
liquid. Flush with antifreeze. Do not operate pump which contains frozen liquid. Do not store or operate
in excessively high temperature areas or without proper ventilation.
USE OF OTHER THAN CAT PUMPS PARTS VOIDS THE WARRANTY
This supercedes any and all previous warranty statements.
2/06 Rev N
Page 19

BRIGGS & STRATTON POWER PRODUCTS GROUP, LLC PRESSURE WASHER OWNER WARRANTY POLICY
LIMITED WARRANTY
Briggs & Stratton Power Products Group, LLC will repair or replace, free of charge, any part(s) of the pressure washer* that is
defective in material or workmanship or both. Transportation charges on product submitted for repair or replacement under this
warranty must be borne by purchaser. This warranty is effective for the time periods and subject to the conditions stated below.
For warranty service, find the nearest Authorized Service Dealer in our dealer locator map at www.briggspowerproducts.com.
THERE IS NO OTHER EXPRESS WARRANTY. IMPLIED WARRANTIES, INCLUDING THOSE OF MERCHANTABILITY AND
FITNESS FOR A PARTICULAR PURPOSE, ARE LIMITED TO ONE YEAR FROM PURCHASE, OR TO THE EXTENT
PERMITTED BY LAW ANY AND ALL IMPLIED WARRANTIES ARE EXCLUDED. LIABILITY FOR INCIDENTAL OR
CONSEQUENTIAL DAMAGES ARE EXCLUDED TO THE EXTENT EXCLUSION IS PERMITTED BY LAW. Some states or
countries do not allow limitations on how long an implied warranty lasts, and some states or countries do not allow the
exclusion or limitation of incidental or consequential damages, so the above limitation and exclusion may not apply to you. This
warranty gives you specific legal rights and you may also have other rights which vary from state to state or country to country.
2 year
2 year
WARRANTY PERIOD*
Consumer Use
Commercial Use
The warranty period begins on the date of purchase by the first retail consumer or commercial end user, and continues for the
period of time stated above. “Consumer use" means personal residential household use by a retail consumer. “Commercial use"
means all other uses, including use for commercial, income producing or rental purposes. Once equipment has experienced
commercial use, it shall thereafter be considered as commercial use for purposes of this warranty.
NO WARRANTY REGISTRATION IS NECESSARY TO OBTAIN WARRANTY ON BRIGGS & STRATTON PRODUCTS. SAVE
YOUR PROOF OF PURCHASE RECEIPT. IF YOU DO NOT PROVIDE PROOF OF THE INITIAL PURCHASE DATE AT THE TIME
WARRANTY SERVICE IS REQUESTED, THE MANUFACTURING DATE OF THE PRODUCT WILL BE USED TO DETERMINE
THE WARRANTY PERIOD.
*
Technical support, replacement parts and warranty repair for the pump is the exclusive responsibility of CAT PUMPS, 763-780-5440.
ABOUT YOUR WARRANTY
We welcome warranty repair and apologize to you for being inconvenienced. Any Authorized Service Dealer may perform warranty
repairs. Most warranty repairs are handled routinely, but sometimes requests for warranty service may not be appropriate. For
example, warranty service would not apply if equipment damage occurred because of misuse, lack of routine maintenance,
shipping, handling, warehousing or improper installation. Similarly, the warranty is void if the manufacturing date or the serial number
on the pressure washer or engine has been removed or the equipment has been altered or modified. During the warranty period,
the Authorized Service Dealer, at its option, will repair or replace any part that, upon examination, is found to be defective under
normal use and service. This warranty will not cover the following repairs and equipment:
• Normal Wear: Outdoor Power Equipment, like all mechanical devices, needs periodic parts and service to perform well. This
warranty does not cover repair when normal use has exhausted the life of a part or the equipment.
• Installation and Maintenance: This warranty does not apply to equipment or parts that have been subjected to improper or
unauthorized installation or alteration and modification, misuse, negligence, accident, overloading, overspeeding, improper
maintenance, repair or storage so as, in our judgment, to adversely affect its performance and reliability. This warranty also does
not cover normal maintenance such as air filters, adjustments, fuel system cleaning and obstruction (due to chemical, lime, dirt,
and so forth).
• Other Exclusions: This warranty excludes wear items such as quick couplers, seals, o-rings, pumps that have been run without
water supplied or damage or malfunctions resulting from accidents, abuse, modifications, alterations, or improper servicing or
freezing or chemical deterioration. Accessory parts, such as guns, hoses, nozzle extensions (wands), and nozzles, are excluded
from the product warranty. This warranty excludes used, reconditioned, and demonstration equipment and failures due to acts of
God and other force majeure events beyond the manufacturers control.
BRIGGS & STRATTON POWER PRODUCTS GROUP, LLC
JEFFERSON, WI, USA
Effective December 1, 2005 replaces all undated Warranties and all Warranties dated before December 1, 2005
198204E, Rev 0, 2/7/2006
Page 20

20
TABLA DE CONTENIDOS
Sección 1 - Reglas De Seguridad . . . . . . . . . . . . . . . . . . . . . . 20-23
Sección 2 - Características y Controles . . . . . . . . . . . . . . . . . . . 24
Sección 3 - Montaje . . . . . . . . . . . . . . . . . . . . . . . . . . . . . . . . 25-26
Sección 4 - Operación . . . . . . . . . . . . . . . . . . . . . . . . . . . . . . 27-30
Sección 5 - Especificaciones Del Producto . . . . . . . . . . . . . . . . . 31
Sección 5 - Mantenimiento. . . . . . . . . . . . . . . . . . . . . . . . . . . 31-33
Sección 6 - Almacenamiento . . . . . . . . . . . . . . . . . . . . . . . . . . . . 34
Sección 7 - Diagnosticos De Averías . . . . . . . . . . . . . . . . . . . . . . 35
Garantia . . . . . . . . . . . . . . . . . . . . . . . . . . . . . . . . . . . . . . . . . . . . 36
DESCRIPCIÓN DEL EQUIPO
Lea este manual de manera cuidadosa y
familiarícese con su lavadora de presión.Conozca
sus usos, sus limitaciones y cualquier peligro
relacionado con el mismo.
Este manual contiene información referente el lavador a alta
presión que funciona a 4,000 psi, a un promedio de flujo de
4,0 galones por minuto. Este sistema profesional de alto poder y
de alta calidad, posee una llanta de 13 pulgadas, una bomba
equipada con un sistema de enfriamiento, un sistema de inyección
química, una extensión de lanzas que se pueden conectar
rápidamente, gafas de seguridad, una manguera de alta resistencia
de 50 pies y muchísimo más.
Se ha hecho cada esfuerzo posible para asegurarse que la
información que aparece en este manual es exacta y se encuentra
actualizada. Sin embargo, nosotros se reserva el derecho a
cambiar, alterar o de otra manera mejorar, el producto y este
documento en cualquier momento, sin previo aviso.
REGLAS DE SEGURIDAD
Éste es el símbolo de alerta de seguridad. Sirve
para advertir al usuario de un posible riesgo para
su integridad física. Siga todos los mensajes de
seguridad que figuren después de este símbolo
para evitar lesiones o incluso la muerte.
El símbolo de alerta de seguridad ( ) es usado con una palabra
(PELIGRO, ADVERTENCIA, PRECAUCIÓN), un mensaje por
escrito o una ilustración, para alertarlo acerca de cualquier
situación de peligro que pueda existir. PELIGRO indica un riesgo
el cual, si no se evita, causará la muerte o una herida grave.
ADVERTENCIA indica un riesgo el cual, si no se evita,puede
causar la muerte o una herida grave. PRECAUCIÓN indica un
riesgo, el cual, si no se evita,puede causar heridas menores o
moderadas. PRECAUCIÓN, cuando se usa sin el símbolo de
alerta, indica una situación que podría resultar en el daño del
equipo. Siga los mensajes de seguridad para evitar o reducir los
riesgos de heridas e inclusive la muerte.
Símbolos de Peligro y Significados
El escape del motor de este producto contiene
elementos químicos reconocidos en el Estado de
California por producir cáncer, defectos de nacimiento u
otros daños de tipo reproductivo.
ADVERTENCIA
Reglas de Seguridad
1
Sección
CONSERVE ESTAS INSTRUCCIONES
Fuego
Explosión
Gases Tóxicos
Superficie Caliente
Partes en Movimiento
Descarga Eléctrica
Superficies Resbalosas
Caer
Contragolpe
Objetos Voladores
Inyección Líquida
Manual del Operario
Page 21

21
Sección 1: Reglas de Seguridad
• Mantenga la boquilla de rociado de 8 a 24 pulgadas de la superficie de
limpieza.
• Opere y almacene esta unidad sobre una superficie estable.
• El área de limpieza deberá tener inclinaciones y drenajes adecuados
para disminuir la posibilidad de caídas debido a superficies resbalosas.
• Sea extremadamente cuidadoso si usa la máquina lavadora a presión desde
una escalera, andamio o cualquier superficie relativamente inestable.
• Sujete firmemente la pistola rociadora con ambas manos cuando
aplique un rociado a alta presión para evitar lesiones cuando se
produzca el retroceso de la pistola.
El uso de lavadora de presión puede crear los
charcos y superficies resbalosas.
El rociado de la alta presión podría hacerlo caer si
está muy cerca de la superficie de limpieza.
ADVERTENCIA
• Mantenga el chorro del agua alejado de alambrados eléctricos, de lo
contrario podrían ocurrir descargas eléctricas fatales.
El contacto del rocío con alambrado eléctrico puede
tener como resultado electrocution.
ADVERTENCIA
CUANDO AÑADA COMBUSTIBLE
• Apague el lavadora de presión (posición OFF) y déjelo enfriar al menos
por 2 minutos antes de remover la tapa de la gasolina.
• Llene el tanque al aire libre.
• NO llene demasiado el tanque. Permita al menos espacio para la
expansión del combustible.
• Mantenga la gasolina alejada de chispas, llamas abiertas, pilotos, calor y
otras fuentes de ignición.
• NO encienda un cigarrillo o fume.
CUANDO OPERE EL EQUIPO
• NO incline el motor o el equipo, de tal manera que la gasolina se
pueda derramar.
• NO rocíe líquidos inflamables.
CUANDO TRANSPORTE O REPARE EL EQUIPO
• Transporte o repare el equipo con el tanque de combustible vacío, o
con la válvula para apagar el combustible, apagada (posición OFF).
CUANDO ALMACENE O GUARDE EL EQUIPO CON
COMBUSTIBLE EN EL TANQUE
• Almacene alejado de calderas, estufas, calentadores de agua,secadoras
de ropa u otros aparatos electrodomésticos que posean pilotos u
otras fuentes de ignición, porque ellos pueden encender los vapores
de la gasolina.
La gasolina y sus vapores son extremadamente
inflamables y explosivos.
El fuego o una explosión pueden causar quemaduras
severas e inclusive la muerte.
ADVERTENCIA
• Opere el lavadora de presión SOLAMENTE al aire libre.
• Asegúrese de que los gases de escape no puedan entrar por ventanas,
puertas, tomas de aire de ventilación u otras aberturas en un espacio
cerrado en el que puedan acumularse.
• NO opere el lavadora de presión dentro de un edificio o lugar cerrado,
aunque haya puertas o ventanas abiertas.
• Utilice un respirador o máscara siempre que exista la posibilidad de
inhalar vapores.
• Lea todas las instrucciones de la máscara para asegurarse de que le
brindará la protección necesaria contra la inhalación de vapores nocivos.
Al motor funcionar, se produce monóxido de
carbono, un gas inodoro y venenoso.
El respirar el monóxido de carbono, producirá
náusea, desmayo o la muerte.
Algunas sustancias químicas o los detergentes pueden
ser perjudiciales si inhalados o ingeridos, causando la
náusea severa, desmayando o para envenenar.
ADVERTENCIA
Page 22

22
Sección 1: Reglas de Seguridad
• NO use ropa suelta, joyas o elementos que puedan quedar atrapados
en el arranque o en otras partes rotatorias.
• Ate para arriba el pelo largo y quite la joyería.
El arrancador y otras piezas que rotan pueden
enredar las manos, el pelo, la ropa, o los accesorios.
ADVERTENCIA
CUANDO AJUSTE O HAGA REPARACIONES A SU
MÁQUINA LAVADORA DE PRESIÓN
• Siempre desconecte el alambre de la bujía y colóquelo donde no
pueda entrar en contacto con la bujía.
CUANDO PRUEBE LA BUJÍA DEL MOTOR
• Utilice un comprobador de bujías homologado.
• NO comprueba la chispa sin la bujía instalada.
Chispear involuntario puede tener como resultado el
fuego o el golpe eléctrico.
ADVERTENCIA
• Antes de arrancar el motor, apunte SIEMPRE con la pistola rociadora
hacia una dirección segura y apriete el gatillo para descargar la
presión y evitar el retroceso.
• Cuando arranque el motor, tire lentamente del cable hasta sentir una
resistencia y, a continuación, tire rápidamente de él para evitar su
retroceso.
• Después que cada tentativa que empieza, donde motor falla de correr,
siempre señalar el fusil en la dirección segura y el disparador del fusil
del rocío del estrujón para liberar la presión alta.
• Sujete firmemente la pistola rociadora con ambas manos cuando
aplique un rociado a alta presión para evitar lesiones cuando se
produzca el retroceso de la pistola.
El rápido repliegue del cable del arrancador
(retroceso) impedirá que el usuario suelte el cable a
tiempo y tirará de su mano y brazo hacia el motor.
Como resultado, podrían producirse fracturas,
contusiones o esguinces.
ADVERTENCIA
• NUNCA apunte la pistola a la gente, animales o plantas.
• NO permita en ningún momento que NIÑOS operen la máquina
lavadora a presión.
• NUNCA repare la manguera de alta presión. Remplacela.
• NUNCA utilice ningún tipo de sellador para reparar una fuga en una
conexión. Sustituya la junta tórica o la junta.
• Mantenga conectada la manguera a la máquina o a la pistola de
rociado cuando el sistema esté presurizado.
• SIEMPRE que pare el motor, apunte con la pistola rociadora hacia una
dirección segura y apriete el gatillo para descargar la presión y evitar
el retroceso.Active el seguro del gatillo cuando no utilice la pistola.
La corriente de agua de alta presión que produce
este equipo pueden perforar la piel y sus tejidos
profundos, ocasionando lesiones serias y posible
amputación.
La pistola rociadora contiene agua a alta presión incluso
con el motor parado y el agua desconectada, que
puede causar la herida.
ADVERTENCIA
• NO toque las superficies calientes y evite los gases del escape a alta
temperatura.
• Permita que el equipo se enfríe antes de tocarlo.
• Deje un espacio mínimo de 152 cm (5 pies) alrededor del lavadora a
presión, incluida la parte superior.
• El Código de Normativa Federal (CFR,Título 36: Parques,Bosques y
Propiedad Pública) obliga a instalar una pantalla apagachispas en los
equipos con motor de combustión interno y a mantenerla en buenas
condiciones de funcionamiento, conforme a la norma 5100-1C (o
posterior) del Servicio Forestal de la USDA. En el Estado de
California, la ley exige el uso de una pantalla apagachispas (Sección
4442 del Código de Recursos Públicos de California). En otros
estados puede haber leyes similares en vigor.
Los motores al funcionar producen calor. La
temperatura del silenciador y de las áreas cercanas
puede alcanzar o pasar los 150ºF (65ºC).
Quemaduras severas pueden ocurrir al hacer
contacto.
Los gases y el calor de escape pueden inflamar los
materiales combustibles y las estructuras o dañar el
depósito de combustible y provocar un incendio.
ADVERTENCIA
• Utilice siempre gafas de protección cuando utilice este equipo o si se
encuentra cerca de donde se está utilizando.
• Antes de poner en marcha la limpiadora a presión, asegúrese de llevar
gafas de protección adecuadas.
El rociado de alta presión puede hacer que partículas
pequeñas de pintura u otras partículas salgan
disparadas y viajen a altas velocidades.
ADVERTENCIA
Page 23

23
• NO juegue con partes que puedan aumentar o disminuir la velocidad
de mando.
• NO opere la máquina lavadora a presión con un valor de presión
superior a su clasificación de presión.
Hacer funcionar el motor a velocidades excesivas aumenta el
riesgo de lesiones personales.
PRECAUCIÓN
• NO asegure la pistola de rociado en la posición (open = abierto).
• NO abandone la pistola de rociado cuando la máquina esté en
funcionamiento.
• NUNCA utilice una pistola de rociado que no tenga un seguro para
gatillo o protección para gatillo en su lugar y en buenas condiciones.
• Siempre asegúrese de que la pistola de rociado, boquillas y accesorios
estén conectados correctamente.
El lavadora de presión produce un rocío alto de la presión
cuál riesgo de aumentos de la herida y dañe a la unidad.
PRECAUCIÓN
• Si usted tiene alguna pregunta acerca de las finalidades de uso del
generador, pregúntele a su concesionario o contacte a Briggs &
Stratton Power Products.
• NUNCA deberán ser operadas las unidades con partes rotas o
ausentes, o sin la caja o cubiertas de protección.
• NO eluda ningún dispositivo de seguridad de esta máquina.
• Antes de poner en marcha la máquina lavadora a presión en clima
frío, revise todas las partes del equipo y asegúrese de que no se haya
formado hielo sobre ellas.
• NUNCA mueva la máquina halando la manguera de alta presión.
Utilice la manija que viene con la unidad.
• Revise que el sistema de combustible no presente fugas o signos de
deterioro, como mangueras desgastadas o porosas, sujetadores flojos
o ausentes, tapa o tanque dañados. Corrija todos los defectos antes
de operar la máquina lavadora a presión.
• El equipo de alta presión está diseñado para ser utilizado
UNICAMENTE con las partes autorizadas Briggs & Stratton Power
Products. Si utiliza este equipo con partes que no cumplan con las
especificaciones mínimas, el usuario asume todos los riesgos y
responsabilidades.
El tratamiento inadecuado del lavadora de presión puede
dañarlo y acortar su vida productiva.
PRECAUCIÓN
• NO apunte la pistola de rociado al vidrio cuando esté en el modo de
rociado a chorro.
• NUNCA apunte la pistola a plantas.
El rociado de alta presión puede dañar elementos frágiles,
incluyendo el vidrio.
PRECAUCIÓN
Sección 1: Reglas de Seguridad
Page 24

24
CONOZCA SU MAQUINA LAVADORA DE PRESION
Lea el manual del operario y las reglas de seguridad antes de poner en marcha su máquina lavadora a presión.
Compare las ilustraciones con su máquina lavadora a presión para familiarizarse con las ubicaciones de los diferentes controles y
ajustes. Guarde este manual para referencias futuras.
Características y Controles
2
Sección
Pistola de Rociado
Filtro y Tubo para
Recolección de Detergente
Tapa del
Depósito del
Aceite
Filtro de Aire
Tanque del Combustible
Entrada de Agua
Bomba
equipado con
Automático se
Enfría Sistema
Extensión para Boquillas
con Conexión Rápida
Perilla del Cebador
Palanca de la Válvula de
Regulación
Arrancador de Retroceso
Abastezca de Combustible
Válvula
Interruptor Balancín
(en la frente de motor)
Puntas de Rociado
Toma de Alta Presión
Abastezca de Combustible Válvula - Esté acostumbrado a prende el
combustible y lejos al motor.
Arrancador de Retroceso – Usado para arrancar el motor
manualmente.
Automático se Enfría Sistema - Los ciclos regan por bomba cuando
agua alcanza 125º-155ºF. Entibiar agua descargará de la bomba en el suelo.
Este sistema previene el daño interno de bomba.
Bomba – Desarrolla alta presión de agua.
Entrada de Agua – Conexión para la manguera de jardín.
Etiqueta Advertencia/Operador de Instrucciones — Identifica los
peligros y apropiada procedimiento de empezar/parada de lavadora a presión.
Etiqueta de Datos — Proporciona el modelo,revisión y el número de
serie de lavadora de presion.Tenga por favor estos prontamente
disponible cuándo llamar para la ayuda.
Extensión para Boquillas con Conexión Rápida – Le permite usar
cinco boquillas de rociado diferentes.
Filtro de Aire – El elemento de filtro tipo seco limita la cantidad de
suciedad y polvo que se introduce en el motor.
Filtro y Tubo para Recolección de Detergente – Usado para succionar
detergente de la botella de químicos a la corriente de agua de baja presión.
Gatasde Seguridad (no mostrado) - Siempre use las gafas encerradas
u otra protección de ojo cuando correr su arandela de la presión.
Interruptor Balancín — Deberá estar en la posición “On” (En) para
darle arranque al motor. Colóquelo en la posición “Off” (Apagado) para
detener un motor en funcionamiento.
Manguera de Alta Presión – Conecte un extremo a la pistola de
rociado y el otro extremo a la toma de alta presión.
Palanca de Control de la Válvula de Regulación – El motor de
conjuntos a comenzar el modo para el principio de culatazo.
Perilla del Cebador – Usada para arranque de motores fríos.
Pistola de Rociado – Controla la aplicación de agua sobre la superficie
de limpieza con el gatillo. Incluye cerrojo de seguridad.
Presione la Perilla del Control - Varía la presión del rocío alto de la presión.
Puntas de Rociado – Detergente, 0º,15º, 25º, 40º: para diferentes alta
presión aplicaciones de limpieza.
Tanque del Combustible – Llene el tanque con gasolina regular sin
contenido de plomo en este punto.
Tapa del Depósito del Aceite – Llene el motor con aceite aquí.
Toma de Alta Presión – Conexión para la manguera de alta presión.
Etiqueta de Datos
Manguera de
Alta Presión
Presione la Perilla del Control
Etiqueta Advertencia/Operador
de Instrucciones
Page 25

25
MONTAJE
IMPORTANTE: Lea totalmente el manual del operario antes
que intente ensamblar u operar su lavador a alta presión.
Desembale la Lavadora a Presión
1. Saque todo el contenido de la caja de cartón, a excepción de
la lavadora a presión.
2. Abra completamente la caja de cartón cortando cada una de
sus esquinas de arriba abajo.
3. Saque la lavadora a presión de la caja de cartón.
Contenido de la Caja
Los artículos que se encuentran en la caja son:
• Unidad principal
• Manguera de alta presión
• Manecilla
• Pistola rociadora con las piezas de conexión rápida
• Extensión de la lanza con las piezas de conexión rápida
• Aceite para motor
• Caja de accesorios (incluye lo siguiente):
• Tarjeta de registro del propietario
• Bolsa con 5 lanzas de conexiones rápidas multicolores
• Gafas de seguridad
• Manual del operario
• Manual del operario del motor
• Piezas para la manubrio (incluye lo siguiente):
• Pernos del Soporte (2)
• Perilla Plástica (2)
Si una de las partes que se mencionan arriba se encuentran
dañadas o hacen falta, llame a la línea directa del lavador a alta
presión, al 1-800-743-4115.
PREPARANDO EL LAVADOR A
PRESIÓN PARA SU USO
Si usted tiene un problema al ensamblar la unidad o si hacen falta
algunas piezas o se encuentran dañadas, llame a la línea directa del
lavador a presión, al 1-800-743-4115.
A prepara su arandela de la presión para la operación,
usted necesitará a realiza estas tareas:
1. Llene y mande en tarjeta de matrícula.
2. Quite y tire la cinta de la tapa de masilla de aceite de domed
encima de la bomba.
3. Conecte manubrio a unidad principal.
4. Añada aceite al motor.
5. Añada gasolina al tanque de combustible.
6. Conecte manguera a alta presión a pistola rociadora y a bomba.
7. Conecte el suministro de agua a bomba.
8. Conecte boquilla la extensión al pistola rociadora.
9. Selecto/conecta rápido conecta boquilla a la extensión de la
boquilla.
Conecte el Manubrio
1. Coloque el manubrio sobre los soportes del mismo que ya
están adheridos a la unidad principal.Asegúrese de que los
orificios en el manubrio estén alineados con los orificios en
los soportes del mismo manubrio (Figura 16).
NOTA: Tal vez será necesario mover los soportes del manubrio
de un lado a otro para alinear el manubrio de tal manera que
pueda deslizarse sobre los soportes del mismo manubrio.
2. Inserte el perno del soporte a través de los orificios desde
fuera de la unidad y sujete una perilla de plástico desde el
interior de la misma unidad.Apriete la perilla manualmente
(Figura 17).
3. Inserte las puntas de rociado multicolores en los espacios
provistos en la manecilla.
Agregar Aceite al Motor y Gasolina
• Coloque la lavadora a presión sobre una superficie nivelada.
Montaje
3
Sección
PRECAUCIÓN
• Consulte el manual del operario del motor para añadir al motor el
aceite y el combustible recomendado
• El daño a la lavadora a presión, resultado de la desatención a esta
precaución, no será cubierto por la garantía.
Cualquier intento para arancar el motor antes de haberle
proporcionado el mantenimiento apropiado con el aceite
recomendado, podría ocasionar la falla del motor.
Figura 17 - Sujetar el Manubrio
Alinear
Orificios
Manubrio
Soportes del
Manubrio
Figura 16 - Fijar el Manubrio a la Base
Page 26

26
• Consulte el manual del operario del motor para añadir al
motor el aceite y el combustible recomendado.
NOTA:Verifique el aceite del motor de manera frecuente cuando
éste se esfuerce demasiado.Consulte el manual del operario del
motor para conocer cuáles son las recomendaciones al respecto.
Conecte la Manguera y el Suministro de
Agua a la Bomba
IMPORTANTE: Usted deberá armar la extensión para boquillas
y conectar todas las mangueras antes de darle arranque al motor.
La bomba resultará dañada si arranca el motor sin tener todas las
mangueras conectadas y el suministro agua abierto.
1. Quite y tire la cinta de la tapa de masilla de aceite de domed
encima de la bomba.
2. Retroceda la manguera a alta presión y conecte el extremo
de la conexión rápida de la manguera a la base de la pistola
rociadora (Figura 18). Hale el collar de la conexión rápida,
deslícelo en la pistola rociadora y suelte el collar. Hálelo en la
manguera para asegurarse de que este conectado firmemente.
3. De la misma manera, conecte el otro extremo de la manguera a
alta presión, a la salida de alta presión de la bomba. Hale el collar
de la conexión rápida, deslícelo en la bomba y suelte el collar.
Hale la manguera para asegurarse que esta bien conectada.
4. Antes de que conecte la manguera de jardín a la entrada de
agua, inspeccione el colador de la entrada (Figura 19). Limpie
el colador si tiene residuos o solicite su remplazo si está
dañado. NO haga funcionar la máquina lavadora a
presión si el colador de la entrada está dañado.
5. Haga correr el agua a través de la manguera de su jardín por
30 segundos para limpiar cualquier escombro que se
encuentre en ella. Desconecte el agua.
IMPORTANTE: Hace NO agua de parar de siphon para el
abastecimiento de agua. Use agua SOLO fría (menos que 100°F).
6. Conecte la manguera de jardín a la entrada del agua.Apriete
con la mano (Figura 19).
7. ABRA el agua, apunte con la pistola hacia una dirección
segura y apriete el gatillo para eliminar el aire y las impurezas
del sistema de bombeo.
Lista de Revision Previa al Arranque del
Motor
Revise la unidad para asegurarse que ha llevado a cabo los
siguientes procedimientos:
1. Cerciórese el manecilla es seguro.
2. Revise que haya sido depositado aceite y esté al nivel
correcto en la caja del cigüeñal del motor.
3. Deposite la gasolina adecuada en el tanque del combustible.
4. Revise que todas las conexiones de las mangueras (alta presión
y suministro de agua) estén apretadas correctamente y que no
existan dobleces, cortes o daño de la manguera de alta presión.
5. Proporcione el suministro de agua adecuado.
6. Asegúrese de leer las secciones "Reglas de Seguridad" y
"Cómo Darle Arranque a su Máquina Lavadora a Presión"
antes de usar la máquina lavadora a presión.
Conecte aquí la
manguera a alta
presión.
Figura 18 - Conecte la Manguera a alta Presión a la Pistola
Rociadora
PRECAUCIÓN
• El daño a la lavadora a presión, resultado de la desatención a esta
precaución, no será cubierto por la garantía.
DEBE haber por lo menos diez pies de manguera de jardín libre
entre la entrada de agua de la lavadora a presión y cualquier
dispositivo de control de flujo de agua, sea el caso de un
conector 'Y' o de cualquier otro tipo de válvula.
Sección 3: Montaje
Inspeccione la
rejilla de entrada.
NO la use si está
dañada, límpiela si
se encuentra sucia.
Figura 19 - Conecte la Manguera para el Jardín, a la Entrada
de Agua
• Utilice siempre gafas de protección cuando utilice este equipo o si se
encuentra cerca de donde se está utilizando.
• Antes de poner en marcha la limpiadora a presión, asegúrese de llevar
gafas de protección adecuadas.
El rociado de alta presión puede hacer que partículas
pequeñas de pintura u otras partículas salgan
disparadas y viajen a altas velocidades.
ADVERTENCIA
Page 27

27
CÓMO USAR SU LAVADORA A
PRESIÓN
Si tiene problemas operando su máquina lavadora a presión, por
favor llame a la línea de ayuda para máquinas lavadoras a presión
al 1-800-743-4115.
Ubicación del Lavadora a Presión
Espacio Libre Alrededor del Lavadora a Presión
Sitúe el lavadora a presión en una zona bien ventilada que permita
la eliminación de los gases de escape mortales. NO instale el
lavadora a presión en lugares en los que los gases de escape se
puedan acumular o entrar en un edificio que pueda estar
ocupado.Asegúrese de que los gases de escape no puedan entrar
por ventanas, puertas, tomas de aire de ventilación u otras
aberturas en un espacio cerrado en el que puedan acumularse
(Figura 20).Tenga en cuenta los vientos y las corriente de aire
preponderantes cuando elija la ubicación del lavadora a presión.
Cómo Darle Arranque a su Lavadora a
Presión
Para darle arranque a su máquina lavadora a presión movida a
motor por primera vez, siga estas instrucciones paso a paso. Esta
información acerca del arranque inicial también se aplica cuando
vaya a darle arranque al motor después de haber dejado de la
máquina lavadora a presión fuera de uso por al menos un día.
1. Coloque la máquina lavadora a presión en un área cercana a
una suministro de agua exterior capaz de abastecer agua a un
volumen mayor de 5.0 galones por minuto en no menos que
20 PSI en el fin de arandela de presión de la manga del jardín.
2. Revise que la manguera de alta presión se encuentre
conectada firmemente a la pistola de rociado y a la bomba.
Vea “Preparando el Lavador a Presión Para su Uso”.
3. Asegúrese que la unidad esté nivelada.
4. Conecte la manguera de jardín a la entrada del agua.
Aprietela con la mano.
5. ABRA el agua, apunte con la pistola hacia una dirección
segura y apriete el gatillo para eliminar el aire y las impurezas
del sistema de bombeo.
6. Conecte la extensión de la lanza a la pistola rociadora.
Apriétela con las manos (Figura 21).
7. Seleccione la boquilla de conexión rápida que usted desee e
insértela en el extremo de la extensión de la lanza (Vea
"Como Usar las Puntas de Rociado").
8. Coloque el pasador de seguridad al gatillo de la pistola
rociadora (Figura 22).
Figura 21 - Conecte la Extensión de la Lanza a la Pistola
Rociadora
El Pasador de
la Seguridad
Figura 22 - La Pistola Rociadora con el Pasador de Seguridad
en su Posición
PRECAUCIÓN
• El daño a la lavadora a presión, resultado de la desatención a esta
precaución, no será cubierto por la garantía.
NO haga funcionar la bomba si no tiene el suministro
conectado y abierto.
Figura 20 — Espacio Libre Alrededor del Lavadora a Presión
Salida del Escape
Típica Lavadora a
Presión Mostrada
Operación
4
Sección
• Opere el lavadora de presión SOLAMENTE al aire libre.
• Asegúrese de que los gases de escape no puedan entrar por ventanas,
puertas, tomas de aire de ventilación u otras aberturas en un espacio
cerrado en el que puedan acumularse.
• NO opere el lavadora de presión dentro de un edificio o lugar cerrado,
aunque haya puertas o ventanas abiertas.
Al motor funcionar, se produce monóxido de
carbono, un gas inodoro y venenoso.
El respirar el monóxido de carbono, producirá
náusea, desmayo o la muerte.
ADVERTENCIA
• Deje un espacio mínimo de 152 cm (5 pies) alrededor del lavadora a
presión, incluida la parte superior.
Los gases y el calor de escape pueden inflamar los
materiales combustibles y las estructuras o dañar el
depósito de combustible y provocar un incendio.
ADVERTENCIA
Page 28

28
9. Cuando arranque el motor, colóquese en la posición
recomendada en la Figura 23 y siga las instrucciones del
manual del usuario del motor. Consulte también la etiqueta
de instrucciones situada en la limpiadora a presión.
NOTA: Siempre mantenga la control de válvula de admisión en el
“Rápido” (“Fast”) posicione cuándo operar la arandela de la
presión.
Cómo Parar su Lavador a Presión
1. Espere que el motor descanse.
2. Pour éteindre le moteur, suivez les instructions qui figurent
dans le manuel d'utilisation.
3. SIEMPRE fusil de punto en una dirección segura y el
disparador del fusil del rocío del estrujón para liberar la
presión retenida de la pleamar.
IMPORTANTE: La pistola rociadora contiene agua a alta
presión incluso con el motor parado y el agua desconectada.
4. Active el seguro del gatillo de la pistola rociadora cuando no
la utilice.
Sección 4: Operación
Figura 23 - Posición Recomendada para el Arranque
• NO toque las superficies calientes y evite los gases del escape a alta
temperatura.
• Permita que el equipo se enfríe antes de tocarlo.
• Deje un espacio mínimo de 152 cm (5 pies) alrededor del lavadora a
presión, incluida la parte superior.
• El Código de Normativa Federal (CFR,Título 36: Parques,Bosques y
Propiedad Pública) obliga a instalar una pantalla apagachispas en los
equipos con motor de combustión interno y a mantenerla en buenas
condiciones de funcionamiento, conforme a la norma 5100-1C (o
posterior) del Servicio Forestal de la USDA. En el Estado de
California, la ley exige el uso de una pantalla apagachispas (Sección
4442 del Código de Recursos Públicos de California). En otros
estados puede haber leyes similares en vigor.
Los motores al funcionar producen calor. La
temperatura del silenciador y de las áreas cercanas
puede alcanzar o pasar los 150ºF (65ºC).
Quemaduras severas pueden ocurrir al hacer
contacto.
Los gases y el calor de escape pueden inflamar los
materiales combustibles y las estructuras o dañar el
depósito de combustible y provocar un incendio.
ADVERTENCIA
• Antes de arrancar el motor, apunte SIEMPRE con la pistola rociadora
hacia una dirección segura y apriete el gatillo para descargar la
presión y evitar el retroceso.
• Cuando arranque el motor, tire lentamente del cable hasta sentir una
resistencia y, a continuación, tire rápidamente de él para evitar su
retroceso.
• Después que cada tentativa que empieza, donde motor falla de correr,
siempre señalar el fusil en la dirección segura y el disparador del fusil
del rocío del estrujón para liberar la presión alta.
• Sujete firmemente la pistola rociadora con ambas manos cuando
aplique un rociado a alta presión para evitar lesiones cuando se
produzca el retroceso de la pistola.
El rápido repliegue del cable del arrancador
(retroceso) impedirá que el usuario suelte el cable a
tiempo y tirará de su mano y brazo hacia el motor.
Como resultado, podrían producirse fracturas,
contusiones o esguinces.
ADVERTENCIA
• Mantenga conectada la manguera a la máquina o a la pistola de
rociado cuando el sistema esté presurizado.
• SIEMPRE que pare el motor, apunte con la pistola rociadora hacia una
dirección segura y apriete el gatillo para descargar la presión y evitar
el retroceso.Active el seguro del gatillo cuando no utilice la pistola.
La corriente de agua de alta presión que produce
este equipo pueden perforar la piel y sus tejidos
profundos, ocasionando lesiones serias y posible
amputación.
La pistola rociadora contiene agua a alta presión incluso
con el motor parado y el agua desconectada, que
puede causar la herida.
ADVERTENCIA
Page 29

29
Sección 4: Operación
40º
Blanca
25º
Verd eNegra
15º
Amarilla
0º
Roja
La Presión Baja
La Presión Alta
Figura 24 - Boquillas
Cómo Usar las Puntas de Rociado
El conector rápido del prolongador de la boquilla admite varios
tipos distintos de puntas de rociado. Cada punta de rociado
proporciona un patrón de rociado diferente (Figura 24).
Para cambiar las puntas de rociado, siga las instrucciones
que se indican a continuación:
1. Coloque el pestillo de seguridad de la pistola de rociado.
2. Desplace hacia atrás el anillo del conector rápido y tire de la
punta de rociado que esté montada.
3. Seleccione la punta de rociado deseada:
• Para enjuagado suave, seleccione la punta de rociado blanca
de 40º o verde de 25º.
• Para fregar la superficie, seleccione las puntas de rociado
amarilla de 15º ó roja de 0º.
• Para aplicar detergente, seleccione la punta de rociado
negra.
4. Desplace hacia atrás el anillo, inserte la nueva punta de
rociado y suelte el anillo. Tire de la punta de rociado para
comprobar que está bien montada.
5. Para una limpieza más efectiva, mantenga la boquilla de
rociado de 8 a 24 pulgadas de la superficie de limpieza. Si
coloca la boquilla muy cerca, podría dañar la superficie que
está limpiando.
6.
NO coloque la boquilla a menos de 6 pulgadas cuando esté
limpiando llantas.
Limpieza y Aplicación del Detergente
IMPORTANTE: Utilice detergente diseñados
específicamente para máquinas lavadoras a presión. Los
detergentes caseros podrían dañar la bomba.
Para aplicar el detergente, siga los siguientes pasos:
1. Revise el uso de las puntas de rociado.
2. Prepare la solución detergente siguiendo las instrucciones del
fabricante.
3. Coloque el filtro pequeño del tubo de inyección de químicos
en el recipiente del detergente.
4. Asegúrese de que la punta de rociado negra esté instalada en
la extensión para boquillas.
NOTA: NO se puede aplicar detergente con las puntas de
rociado de alta presión (Blanca,Verde,Amarilla o Roja).
Usada para
aplicar
químicos
• NUNCA intercambie puntas de rocío sin haber asegurado el cerrojo
de seguridad del gatillo.
El lavadora de presión produce un rocío alto de la presión
cuál riesgo de aumentos de la herida y dañe a la unidad.
PRECAUCIÓN
PRECAUCIÓN
• Arrancar el motor sin tener todas las mangueras conectadas y sin el
suministro de agua ABIERTO (ON) causará el daño de la bomba.
• El daño a la lavadora a presión, resultado de la desatención a esta
precaución, no será cubierto por la garantía.
Usted deberá conectar todas las mangueras antes de darle
arranque al motor.
PRECAUCIÓN
• Cuando coloque el filtro en la botella del químico, coloque el tubo de
manera que no entre en contacto accidentalmente con el silenciador
caliente.
Evite que el tubo de inyección de químicos entre en contacto
con el silenciador caliente.
Page 30

30
5. Asegúrese que la manguera de jardín esté conectada a la
entrada del agua. Revise que la manguera de alta presión esté
conectada a la pistola de rociado y a la bomba. Dele arranque
al motor.
6. Aplique el detergente sobre la superficie seca, comenzando en
la parte inferior del área y dirigiéndose hacia arriba, utilizando
movimientos largos, parejos y superpuestos. NO permita que
el detergente se seque. Si permite que el detergente se seque,
la superficie podría quedar con manchas.
7. Permita que el detergente penetre de 3 a 5 minutos antes de
enjuagar. Vuelva a aplicar cuando sea necesario para evitar que
la superficie se seque.
IMPORTANTE: Usted deberá lavar el sistema de inyección de
detergente después de cada uso colocando el filtro en un balde de
agua limpia y haciendo funcionar la máquina lavadora a presión de
1 a 2 minutos en el modo de baja presión.
Enjuage de la Máquina Lavadora a Presión
Después de haber aplicado el detergente, refriegue la
superficie y enjuagela de la siguiente manera:
1. Coloque el cerrojo de seguridad a la pistola de rociado.
2. Retire la punta de rociado negra para químicos de la
extensión para boquillas.
3. Seleccione e instale la punta de rociado de alta presión que
desee siguiendo las instrucciones de “Cómo Usar las Punta
de Rociado”.
4. Mantenga la pistola de rociado a una distancia segura del área
que planea rociar.
5. Aumente (disminuya) la presión de rociado al darle vuelta a la
perilla en la dirección de las manecillas del reloj (en dirección
opuesta) (Vea “
Conozca su Maquina Lavadora de Presion”).
Use una presión más baja para lavar cosas como carros o
botes. Use una presión más alta para eliminar pintura y la
grasa de las calzadas.
6. Aplique un rociado de alta presión en un área pequeña,
después revise si la superficie presenta daños. Si no encuentra
daños, puede continuar con el trabajo de limpieza.
7. Comience en la parte superior del área que va a enjuagar,
dirigiéndose hacia abajo con los mismos movimientos
superpuestos que utilizó para la limpieza.
Limpiando el Tubo
Si usted usó el tubo, usted debe lavarlo con agua limpia antes de
parar el motor.
1. Coloque el filtro y la inyección
detergente en un balde lleno
de agua limpia.
2. Coloque el cerrojo de seguridad a la pistola de rociado.
3. Conecte la puntas de rocío negra de baja presión.
4. Lave de 1 a 2 minutos.
5. Apague el motor.
6. SIEMPRE fusil de punto en una dirección segura y el
disparador del fusil del rocío del estrujón para liberar la
presión retenida de la pleamar.
IMPORTANTE: La pistola rociadora contiene agua a alta
presión incluso con el motor parado y el agua desconectada.
Sistema de Enfriamiento Automático
(Alivio Térmico)
El agua que circula dentro de la bomba puede alcanzar
temperaturas entre los 125º-155ºF si hace funcionar el motor de
su máquina lavadora a presión de 3 a 5 minutos sin oprimir el
gatillo de la pistola de rociado. Cuando el agua alcanza dicha
temperatura, el sistema de enfriamiento automático se activa y
enfría la bomba descargando agua caliente en el piso.
• Mantenga la boquilla de rociado de 8 a 24 pulgadas de la superficie de
limpieza.
• Opere y almacene esta unidad sobre una superficie estable.
• Sea extremadamente cuidadoso si usa la máquina lavadora a presión
desde una escalera, andamio o cualquier superficie relativamente
inestable.
• Sujete la pistola de la hidrolavadora firmemente con ambas manos
cuando utilice el rociado a alta presión. De esta manera evitará
lesiones producidas por el posible golpe de la pistola hacia atrás.
El rociado de la alta presión podría hacerlo caer si
está muy cerca de la superficie de limpieza.
ADVERTENCIA
Sección 4: Operación
Page 31

31
ESPECIFICACIONES
Presión de Salida . . . . . . . . . . . . . . . . . . . . . . . . . . . . . 4,000 PSI
Promedio de Flujo . . . . . . . . . . . 4,0 galones por minuto (gpm)
Detergente Use el detergente adecuado para lavadores a presión
Temperatura del Suministro
de Agua . . . . . . . . . . . . . . . . . . . . . . . . . . .Que no pase de 100ºF
Sistema de . . . . . . . . . . . . . . . . . . . . .Funcionará cuando el agua
Enfriamiento Automático alcance de 125º-155ºF
Peso que Embarca . . . . . . . . . . . . . . . . . . . . . . . . . . . . . .144 lbs.
RECOMENDACIONES GENERALES
La garantía de la máquina lavadora a presión no cubre los elementos
que han sido sujetos a abuso o negligencia por parte del operador.
Para hacer válida la cobertura total de la garantía, el operador deberá
mantener la lavadora de presión tal y como se indica en el manual.
NOTA: Debe tiene las preguntas acerca de reemplazar los
componentes en su máquina lavadora a presión, llaman por favor
1-800-743-4115 para la ayuda.
• Algunos ajustes tendrán que hacerse periódicamente para
mantener adecuadamente su máquina lavadora a presión.
• Toda conservación en este manual, en la hoja de información
de bomba, y en el dueño de motor manuals se debe hacer por
lo menos una vez cada temporada.
• Si equipó con llantas que se pode hinchar, mantenga la presión
aérea en el valor marcado en la llanta o dentro de 15 y 40 psi.
Antes de Cada Uso
1. Revise el nivel de aceite del motor.
2. Revise si existen daños en el colador de la entrada de agua.
3. Revise si existen daños en el filtro en línea.
4. Revise si existen fugas en la manguera de alta presión.
5. Revise si existen daños en los filtros de químicos.
6. Revise si existen fugas en el conjunto de la extensión para
boquillas y pistola.
7. Elimine el aire y los contaminantes de la bomba.
MANTENIMIENTO DE LA
LAVADORA A PRESION
Revise y Limpie el Colador de Entrada
Examine el colador de entrada de la manguera de jardín. Límpielo
si está tapado o remplacelo si está roto.
Revise la Manguera de Alta Presión
Las mangueras de alta presión pueden desarrollar fugas debido al
desgaste, dobleces o abuso. Revise la manguera antes de cada uso.
Revise si existen cortes, fugas, abrasiones,levantamiento de la cubierta,
daño o movimiento de los acoplamientos. Si existe cualquiera de estas
condiciones, remplace la manguera inmediatamente.
Chequee el Tubo de Sifón del Detergente
Examine el filtro en el tubo del detergente y límpielo si se encuentra
sucio. El tubo debería quedar apretado en la pieza. Examine el tubo
para ver si existe cualquier tipo de goteo o está roto. Reemplace el
filtro o el tubo si alguno de ellos se encuentra dañado.
Revise la Pistola y la Extensión para
Boquillas
Examine la conexión de la manguera a la pistola y cerciorese de
que esté en buen estado. Pruebe el gatillo oprimiéndolo y
asegurándose de que se devuelve a su sitio cuando lo suelte.
Coloque el cerrojo de seguridad y pruebe el gatillo.Usted no
debe ser capaz de oprimir el gatillo. Remplace la pistola
inmediatamente si falla cualquiera de estas pruebas.
Revise el Filtro en Línea
Consulte la Figura 25 y suministre servicio al filtro en línea si se
tapa siguiendo estos pasos:
1. Retire la pistola y la extensión para boquillas de la manguera
de alta presión. Retire la extensión para boquillas de la
pistola y retire el anillo 'o' y el colador de la extensión para
boquillas. Lave el colador, pistola y extensión para boquillas
con agua limpia para eliminar toda clase de residuos.
2. Coloque el colador del filtro en línea en el extremo con
rosca de la extensión para boquillas. Su dirección no importa.
Coloque el colador ejerciendo presión con el borrador de
un lápiz hasta que se asiente por completo en el fondo de la
abertura.Tenga cuidado de no doblar el colador.
3. Coloque el anillo 'o' en la ranura respectiva. Empuje el anillo 'o'
hasta que quede ajustado contra el colador del filtro en línea.
4. Conecte la extensión para boquillas a la pistola de rociado de
la manera descrita anteriormente en este manual.
Extensión de la Boquilla
Filtro en línea
Anillo ‘O’
Figura 25 - Limpieza del filtro
• NUNCA repare la manguera de alta presión. Remplacela.
• Remplacela con una manguera que cumpla con la capacidad mínima de
presión de su máquina lavadora a presión.
La corriente de agua de alta presión que produce
este equipo pueden perforar la piel y sus tejidos
profundos, ocasionando lesiones serias y posible
amputación.
ADVERTENCIA
Mantenimiento
5
Sección
Page 32

32
Mantenimiento de la Puntas de Rocío
Si siente una sensación pulsante al momento de apretar el gatillo
de la pistola rociadora, puede que sea causada por la presión
excesiva en la bomba. La causa principal de la presión excesiva en
la bomba es cuando la punta de rocío se encuentra atascada o
tapada con materiales extraños, tales como tierra, etc. Para
corregir el problema, limpie inmediatamente la punta de rocío siga
las instrucciones siguientes:
1. Apague el motor y apague el suministro de agua.
2. Remueva la punta de rocío del extremo de la extensión de la
boquilla.
3. Quite el en el filtro de la línea del otro fin de la extensión de
boquilla.
4. Use el pequeño sujeta papeles para liberar cualquier material
extraño que esté tapando la punta de rocío (Figura 26).
5. Usando una manguera de jardín, remueva cualquier desecho
adicional, poniendo agua en la extensión de la boquilla
(Figura 27). Haga ésto de 30 a 60 segundos.
6. Instale de nuevo la punta de rocío y en el filtro en-línea en la
extensión.
7. Conecte de nuevo la extensión de la boquilla a la pistola
rociadora.
8. Conecte de nuevo el suministro de agua,prenda el agua, y
encienda el motor.
9. Pruebe el lavador a presión al hacer funcionar con cada una
de las puntas de rocío de conexiones rápidas que viene con
el lavador a presión.
Mantenimiento de los Anillos 'O'
Compre una O–Juego de Mantenimiento de Anillo, el artículo
numera 191922GS, en avisando el más cercano servicio autorizado
central. NO se incluye con la arandela de la presión. Este juego
incluye los anillos del reemplazo O, arandela de caucho y filtro de
cala de agua. Refiérase a la hoja de la instrucción proporcionada en
el juego para atender a su unidad’los anillos de s O.
MANTENIMIENTO DEL MOTOR
Consulte el manual del operario del motor para las instrucciones
de cómo mantener adecuadamente el motor.
MANTENGA FUERA DE ALCANCE DE NIÑOS.NO
CONTAMINE. CONSERVE los RECURSOS.VUELVA
ACEITE USADO A la COLECCION CENTRA.
Use el alambre
aquí para eliminar
los residuos
Figura 26 - Mantenimiento de la Lanza
Figura 27 - Suministrar Flujo de Agua a la Boquilla
• El aceite usado del motor ha sido mostrado al cancer de la piel de la
causa en ciertos animales del laboratorio.
• Completamente lavado expuso áreas con el jabón y el agua.
Evite el contacto prolongado o repetido de piel con aceite
usado de motor.
PRECAUCIÓN
Sección 5: Mantenimiento
• NUNCA utilice ningún tipo de sellador para reparar una fuga en una
conexión. Sustituya la junta tórica o la junta.
La corriente de agua de alta presión que produce
este equipo pueden perforar la piel y sus tejidos
profundos, ocasionando lesiones serias y posible
amputación.
ADVERTENCIA
Page 33

33
MANTENIMIENTO DEL BOMBA
Para prolongar al máximo la vida útil del equipo, siga las
instrucciones contenidas en la Figura 28.
IMPORTANTE: Use 0,55 litros (18,6 onzas) de aceite
multiviscosidad CAT para bombas modelo 6107.También se
pueden utilizar otros aceites como Mobil DTE16,Texaco Rondo
1660-HD150,Amoco Rykon-68, Shell Tellus T-68 y Exxon Univis-68.
Compruebe el Nivel de Aceite
1. Coloque la limpiadora a presión en una superficie plana.
2. Cuando la bomba y el aceite estén fríos, observe el nivel de
aceite a través del visor de nivel de aceite de la bomba.
3. Si fuera necesario, añada lentamente la cantidad adecuada del
aceite recomendado a través del orificio de llenado de aceite
de la bomba hasta que el nivel llegue apenas debajo de punto
rojo. NO añada aceite en exceso.
Procedimiento de Cambio de Aceite
1. Coloque la limpiadora a presión en una superficie plana y en
el exterior.
2. Ponga en marcha la limpiadora a presión y deje que funcione
por lo menos durante 5 minutos.
3. Apague la limpiadora a presión y desconecte el cable de la
bujía de esta.
4. Coloque un recipiente adecuado debajo del extremo de la
tapa del cuerpo de la bomba.
5. Quite el tapón de llenado de aceite y la junta tórica (Figura 29).
6. Quite el tapón de vaciado de aceite (Figure 30) y deje que
salga todo el aceite.
7. Vuelva a poner el tapón de vaciado de aceite y apriételo
firmemente (par de apriete de 5,65 N·m, ó 50 in-lbs).
8. Use un embudo para añadir la cantidad adecuada del aceite
de bomba recomendado.
9. Vuelva a colocar el tapón de llenado de aceite de caperuza y
la junta tórica.Apriételo con los dedos.
10. Vuelva a conectar el cable de la bujía a esta.
11. Lleve el aceite usado a un cntro de reciclaje de aceite.
Observe fielmente los intervalos naturales, de días o de horas, los que sucedan antes.
* Si se usa un aceite distinto del aceite para bombas CAT modelo 6107, el ciclo de cambio será cada 300 horas.
** Cada ciclo de mantenimiento del sistema será exclusivo. Si el rendimiento del sistema disminuye, compruébelo inmediatamente. Si
no hay signos de desgaste a las 1.500 horas, vuelva a comprobarlo a las 2.000 horas y cada 500 horas hasta que observe los signos
de desgaste. Normalmente, es necesario cambiar las válvulas cuando se cambian otras juntas.Algunos factores como el ciclo de
trabajo, la temperatura, la calidad del líquido bombeado y las condiciones de alimentación de entrada afectan a la vida de las piezas
de desgaste de la bomba y al ciclo de servicio.
** Recuerde realizar el mantenimiento de la válvula de seguridad cada vez que cambie las juntas y comprobar todos los accesorios y
las conexiones del sistema antes de volver a poner el equipo en funcionamiento.Póngase en contacto con su centro local de
servicio si tiene alguna duda.
Figura 28 — Lista de Comprobación de Mantenimiento Preventivo del Bomba
Sección 5: Mantenimiento
Elemento de mantenimiento: Diario 50 horas 500 horas 1.500 horas 3.000 horas
Limpiar el filtro de agua de entrada X
Comprobar el nivel / la cantidad de aceite X
Comprobar si hay fugas de aceite X
Comprobar si hay fugas de agua X
Cambiar el aceite tras el periodo de funcionamiento inicial X
*Cambio de aceite de rutina X
**Cambiar las juntas X
Cambiar las válvulas X
Comprobar los accesorios X
Figura 29 — Quite el Tapón de Llenado de Aceite
Figura 30 — Quite el Tapón de Vaciado de Aceite
Page 34

34
PREPARANDO LA UNIDAD PARA
SU ALMACENAMIENTO
El agua no debe permanecer en la unidad por un largo periodo de
tiempo. Los sedimentos o minerales se pueden depositar en las
piezas de la bomba y "congelar" la acción de la bomba. Si usted no
piensa usar el lavador a presión por mas de 30 días, siga este
procedimiento:
1. Vacíe el tubo de detergente, colocando el filtro en un envase
lleno de agua limpia mientras esté corriendo el agua a baja
presión. Lave por 1 o 2 minutos.
2. Apague el motor y déjelo enfriar, luego quite todas las
mangueras.
3. Vacíe todos los líquidos presentes en la bomba, halando la
manecilla de retroceso hasta seis veces.Esto debería
remover la mayor parte de los líquidos presentes en la
bomba.
4. El salvador de la bomba de la marca del uso a previene la
corrosión construye y helado de bomba.
5. Almacene la unidad en un lugar limpio y seco.
Proteger la Bomba
A protege al PumpSaver de uso de bomba a previene congelar el
daño y lubrica émbolos y sellos.
NOTA: El PumpSaver están disponible sólo como un accesorio
opcional. No es incluido con la arandela de la presión.Avise el más
cercano servicio autorizado central para comprar PumpSaver.
Al uso PumpSaver, cerciórese la arandela de la presión se apaga y
desconecta del agua del suministro. Lea y siga todas instrucciones
y las advertencias dadas en el contenedor de PumpSaver.
NOTA: Si el PumpSaver no está disponible, ponga anticongelante
RV (que no contenga alcohol) en la bomba, en una sección de
3 pies de la manguera del jardín conectada a un adaptador y
halando la manecilla dos veces.
ALMACENANDO EL MOTOR
Consulte el manual del operario del motor para las instrucciones
de cómo preparar adecuadamente el motor para su
almacenamiento.
• Siempre protección de ojo de uso cuando se usa PumpSaver.
Lea y siga todo advierte y las advertencias en el PumpSaver
pueden marcar.
PRECAUCIÓN
PRECAUCIÓN
• Si no lo hace, dañará permanentemente la bomba y la unidad no
podrá funcionar.
• La garantía no cubre el daño de la unidad ocasionado por congelamiento.
Usted deberá proteger su unidad de las temperaturas de
congelamiento.
PRECAUCIÓN
• Proteja superficies de gotear PumpSaver.
PumpSaver goteará de la bomba después que el tratamiento
y manchará madera y cemento.
Almacenamiento
6
Sección
Page 35

35
DIAGNOSTICOS DE AVERÍAS
Problema
Causa
Solución
La bomba presenta los siguientes
problemas: no produce presión,
produce una presión errada,
traqueteo, pérdida de presión, bajo
volumen de agua.
1. Está usando la punta de rociado de
baja presión (negra).
2. La entrada de agua está bloqueada.
3. Suministro de agua inadecuado.
4. La manguera de entrada está doblada o
presenta fugas.
5. El colador de la manguera de entrada
está tapado.
6. El suministro de agua está por encima
de los 100ºF.
7. La manguera de alta presión está
bloqueada o presenta fugas.
8. La pistola presenta fugas.
9. La punta de rociado está obstruida.
10. Bomba defectuosa.
1. Cambie la punta de rociado a una de
las tres punta de rociado de alta
presión.
2. Limpie la entrada.
3. Proporcione flujo de agua adecuado.
4. Remplace la manguera.
5. Revise y limpie el colador de la
manguera de entrada.
6. Proporcione suministro de agua más
fría.
7. Retire las obstrucciones de la
manguera de salida.
8. Remplace la pistola.
9. Limpie la punta de rociado.
10. Póngase en contacto con el centro de
servicio Briggs & Stratton Power
Products.
El detergente no se mezcla con el
rociado.
1. El tubo de succión de detergente no
está sumergido.
2. El filtro de químicos está tapado.
3. Sucio en el filtro de la línea.
4. Está usando la punta de rociado de alta
presión.
1. Coloque el tubo de succión de
detergente en el detergente.
2. Limpie o remplace el filtro/tubo de
succión de detergente.
3. Vea "Cheque En el Filtro de la Línea".
4. Use la punta de rociado de baja
presión (negra).
El motor se apaga durante la
operación.
Sin gasolina. Llene el tanque de combustible.
7
Sección
Diagnosticos de Averías
Page 36

POLÍTICA DE GARANTÍA PARA EL PROPIETARIO DE UNA LAVADORA A PRESIÓN
BRIGGS & STRATTON POWER PRODUCTS GROUP, LLC
GARANTÍA LIMITADA
Briggs & Stratton Power Products Group, LLC reparará o sustituirá sin cargo alguno cualquier componente de la lavadora a presión* que
presente defectos de materiales y/o mano de obra. Los gastos de transporte de las producto enviadas para reparar o sustituir conforme a los
términos de esta garantía correrán a cargo del comprador. El período de vigencia y las condiciones de esta garantía son los que se estipulan a
continuación. Para obtener servicio en garantía, localice el distribuidor de servicio autorizado más próximo en nuestro mapa de distribuidores,
en www.briggspowerproducts.com.
NO EXISTE NINGUNA OTRA GARANTÍA EXPLÍCITA. LAS GARANTÍAS IMPLÍCITAS, INCLUIDAS LAS DE COMERCIABILIDAD O
IDONEIDAD PARA UN FIN CONCRETO, SE LIMITAN A UN AÑO A PARTIR DE LA FECHA DE COMPRA O AL LÍMITE DE TIEMPO
PERMITIDO POR LA LEY. QUEDAN EXCLUIDAS TODAS LAS GARANTÍAS IMPLÍCITAS QUEDA EXCLUIDA LA RESPONSABILIDAD POR
DAÑOS SECUNDARIOS Y DERIVADOS HASTA EL LÍMITE PERMITIDO POR LA LEY. Algunos países o estados no permiten limitar la duración
de una garantía implícita ni excluir o limitar los daños secundarios y derivados. Por tanto, es posible que las limitaciones y exclusiones
mencionadas no sean aplicables en su caso. Esta garantía le otorga determinados derechos legales y es posible que tenga otros derechos que
pueden variar de un país o estado a otro.
2 año
2 año
PERÍODO DE GARANTÍA*
Uso del consumidor
Uso comercial
El período de garantía comienza en la fecha de compra del primer consumidor o usuario comercial final y se prolonga durante el tiempo especificado
anteriormente. "Uso del consumidor" significa uso doméstico personal por parte de un consumidor final. "Uso comercial" significa cualquier otro uso,
incluidos los usos con fines comerciales, de generación de ingresos o alquiler. Una vez que el equipo se haya usado con fines comerciales, se
considerará como equipo de uso comercial a efectos de esta garantía.
NO ES NECESARIO REGISTRAR LA GARANTÍA PARA OBTENER SERVICIO DE BRIGGS & STRATTON PRODUCTS. GUARDE SU RECIBO DE
COMPRA. SI NO APORTA LA PRUEBA DE LA FECHA DE COMPRA INICIAL EN EL MOMENTO DE SOLICITAR EL SERVICIO EN GARANTÍA, SE
UTILIZARÁ LA FECHA DE FABRICACIÓN DEL PRODUCTO PARA DETERMINAR EL PERÍODO DE GARANTÍA.
* La asistencia técnica, las piezas de repuesto y las reparaciones de la bomba realizadas bajo garantía son responsabilidad exclusiva de CAT
PUMPS, 763-780-5440.
ACERCA DE LA GARANTÍA
Esperamos que disfrute de nuestra garantía y le pedimos disculpas por las molestias causadas. Cualquier distribuidor de servicio autorizado
puede llevar a cabo reparaciones en garantía. La mayoría de las reparaciones en garantía se gestionan normalmente, pero algunas veces
la solicitud de servicio en garantía puede no ser procedente. Por ejemplo, la garantía no será válida si el equipo presenta daños debidos al
mal uso, la falta de mantenimiento, el transporte, la manipulación, el almacenamiento o la instalación inadecuados. De manera similar, la
garantía quedará anulada si se ha borrado la fecha de fabricación o el número de serie de la lavadora a presión o del motor, o si el equipo
ha sido alterado o modificado. Durante el período de garantía, el distribuidor de servicio autorizado podrá reparar o sustituir, a su libre
elección, cualquier pieza que, previa inspección, sea defectuosa en condiciones normales de uso y servicio. Esta garantía no cubre las
reparaciones y los equipos que se detallan a continuación:
• Desgaste normal. Al igual que cualquier otro aparato mecánico, los equipos de uso en exteriores necesitan piezas y mantenimiento
periódicos para funcionar correctamente. Esta garantía no cubre las reparaciones cuando el uso normal haya agotado la vida útil de una
pieza concreta del equipo.
• Instalación y mantenimiento. Esta garantía no cubre los equipos ni las piezas cuya instalación sea incorrecta o no haya sido
autorizada, ni aquellos que hayan sido objeto de cualquier tipo de alteración, mal uso, negligencia, accidente, sobrecarga, exceso de
velocidad o mantenimiento, reparación o almacenamiento inadecuados que, a nuestro juicio, haya afectado negativamente a su
funcionamiento y su fiabilidad. La garantía tampoco cubre el mantenimiento normal, como los filtres de aire, los ajustes y la limpieza o la
obstrucción del sistema de combustión (debido a materias químicas, suciedad, carbón, cal, y así sucesivamente).
• Otras exclusiones. Esta garantía excluye los elementos sujetos a desgaste, como las conectores, juntas, las juntas tóricas, las bombas
que se hayan hecho funcionar sin agua y los daños derivados de accidentes, uso indebido, modificaciones, alteraciones, servicio
inadecuado, congelación o deterioro químico. Los accesorios tales como pistolas, mangueras, extensións de boquilla (varillas) y
boquillas quedan excluidos de la garantía del producto. Esta garantía excluye los equipos usados o reacondicionados y los destinados a
demostraciones y los fallos debidos a hechos fortuitos y a otros acontecimientos de fuerza mayor que escapan al control del fabricante.
BRIGGS & STRATTON POWER PRODUCTS GROUP, LLC
JEFFERSON, WI, EE.UU.
Fecha de entrada en vigor:1 de Diciembre de 2005. Sustituye a todas las garantías sin fecha y a las de fecha anterior al 1 Diciembre de 2005.
198204S, Rev 0, 2/7/2006
 Loading...