


Reproductionfor
Copyright © Briggs & Stratton Corporation Milwaukee, WI, USA. All rights reserved.
80030284SEA
Revision: A
1 |
5 |
9 |
|
6 |
|
2 |
|
|
|
|
10 |
|
Reproduction |
|
3 |
7 |
for |
|
Not |
11 |
|
|
|
4 |
8 |
|
2 |
|
BRIGGSandSTRATTON.com |
12 15
|
16 |
13 |
Reproduction |
|
|
|
for |
14 |
|
3
Copyright © Briggs & Stratton Corporation, Milwaukee, WI, USA. All rights reserved. |
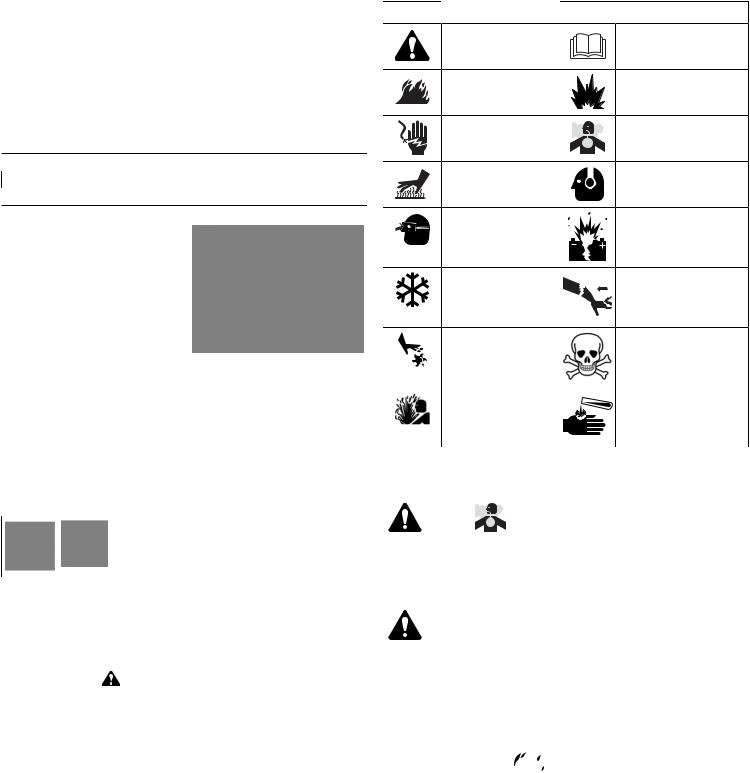
Hazard Symbols and Meanings |
This manual contains safety information to make you aware of the hazards and risks associated with engines and how to avoid them. It also contains instructions for the proper use and care of the engine. Because Briggs & Stratton Corporation does not necessarily know what equipment this engine will power, it is important that you read and understand theseinstructionsandtheinstructionsfortheequipment.Savetheseoriginalinstructions for future reference.
Note: The figures and illustrations in this manual are provided for reference only and may differ from your specific model. Contact your dealer if you have questions.
 Symbol
  Meaning
Safety information about hazards that can result in personal injury.
Fire hazard
 Symbol
 Meaning
Read and understand the Operator's Manual before operating or servicing the unit.
Explosion hazard
For replacement parts or technical assistance, record below the engine model, type, and codenumbersalongwiththedateofpurchase.Thesenumbersarelocatedonyourengine (see the Features and Controls section).
 Date of Purchase
Engine Model - Type - Trim
 Engine Serial Number
Shock hazard |
|
Toxic fume hazard |
Hot surface hazard |
|
Noise hazard - Ear protection |
|
||
|
|
recommended for extended |
|
|
|
|
|
use. |
Look for the 2D barcode located on some engines. When viewed with a 2D-capable device, the code will bring up our website where you can access support information for this product. Data rates apply. Some countries may not have online support information available.
Thrown object hazard - |
Explosion hazard |
Wear eye protection. |
|
Frostbite hazard |
Kickback hazard |
Amputationhazard-moving |
Chemical Hazard |
parts
European Office Contact |
|
Thermal heat hazard |
Corrosive |
|||
|
|
|
||||
Information |
|
|
|
|
|
|
For questions regarding European emissions, please contact our European office at: |
|
|
|
|||
Max-Born-Straße 2, 68519 Viernheim, Germany. |
|
Safety Messages |
|
|||
Recycling Information |
|
|
||||
|
|
|
|
|||
All packaging, used oil, and batteries shouldforbe recycled |
|
WARNING |
|
|||
according to applicable government regulations. |
|
|
||||
This |
can expose you to chemicals including gasoline engine exhaust, which is |
|||||
|
Not |
|||||
|
known to the State of California to cause cancer, and carbon monoxide, which is known |
|||||
|
to the State of California to cause birth defects or other reproductive harm. For more |
|||||
|
information go to www.P65Warnings.ca.gov. |
|
||||
Operator Safety |
|
WARNING |
|
|||
|
|
|
|
|||
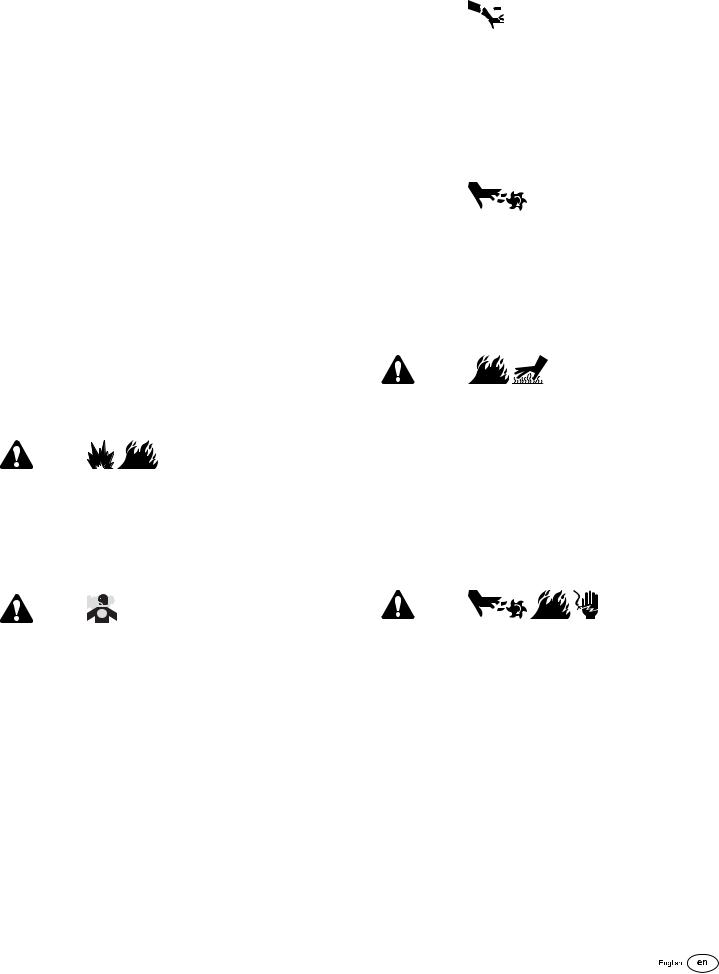
Safety Alert Symbol and Signal Words |
|
|
||||
Briggs & Stratton® Engines are not designed for and are not to be used to power: fun- |
||||||
karts; go-karts; children's, recreational, or sport all-terrain vehicles (ATVs); motorbikes; |
||||||
|
|
Reproductihovercraft; aircraftonproducts; or vehicles used in competitive events not sanctioned by |
||||
Briggs & Stratton. For information about competitive racing products, see www.briggsracing.com.Forusewithutilityandside-by-sideATVs,pleasecontactBriggs &StrattonPowerApplicationCenter,1-866-927-3349.Improperengineapplicationmay result in serious injury or death.
 DANGER indicates a hazard which, if not avoided, will result in death or serious injury.
 WARNINGindicatesahazardwhich,ifnotavoided,couldresultindeathorserious injury.
 CAUTIONindicatesahazardwhich,ifnotavoided,couldresultinminorormoderate injury.
NOTICE indicates a situation that could result in damage to the product.
 WARNING

Fuel and its vapors are extremely flammable and explosive.
Fire or explosion can cause severe burns or death.
When Adding Fuel
•Turn engine off and let engine cool at least 2 minutes before removing the fuel cap.
•Fill fuel tank outdoors or in well-ventilated area.
•Donotoverfillfueltank.Toallowforexpansionofthefuel,donotfillabovethebottom of the fuel tank neck.
•Keepfuelawayfromsparks,openflames,pilotlights,heat,andotherignitionsources.
4 |
BRIGGSandSTRATTON.com |
•Check fuel lines, tank, cap, and fittings frequently for cracks or leaks. Replace if necessary.
•If fuel spills, wait until it evaporates before starting engine.
When Starting Engine
•Ensure that spark plug, muffler, fuel cap and air cleaner (if equipped) are in place and secured.
•Do not crank engine with spark plug removed.
•If engine floods, set choke (if equipped) to OPEN / RUN position, move throttle (if equipped) to FAST position and crank until engine starts.
When Operating Equipment
•Do not tip engine or equipment at angle which causes fuel to spill.
•Do not choke the carburetor to stop engine.
•Never start or run the engine with the air cleaner assembly (if equipped) or the air filter (if equipped) removed.
When Changing Oil
•If you drain the oil from the top oil fill tube, the fuel tank must be empty or fuel can leak out and result in a fire or explosion.
When Tipping Unit for Maintenance
•When performing maintenance that requires the unit to be tipped, the fuel tank, if mounted on the engine, must be empty or fuel can leak out and result in a fire or explosion.
When Transporting Equipment
 WARNING
Rapid retraction of starter cord (kickback) will pull hand and arm toward engine faster than you can let go.
Broken bones, fractures, bruises or sprains could result.
•When starting engine, pull the starter cord slowly until resistance is felt and then pull rapidly to avoid kickback.
•Remove all external equipment / engine loads before starting engine.
•Direct-coupled equipment components such as, but not limited to, blades, impellers, pulleys, sprockets, etc., must be securely attached.
 WARNING
Rotating parts can contact or entangle hands, feet, hair, clothing, or accessories.
Traumatic amputation or severe laceration can result.
•Operate equipment with guards in place.
•Keep hands and feet away from rotating parts.
•Tie up long hair and remove jewelry.
•Do not wear loose-fitting clothing, dangling drawstrings or items that could become caught.
• Transport with fuel tank EMPTY or with fuel shut-off valve in the CLOSED position. |
|
|
||||
When Storing Fuel Or Equipment With Fuel In Tank |
Reproduction |
|
||||
• Store away from furnaces, stoves, water heaters or other appliances that have pilot |
WARNING |
|
||||
lights or other ignition sources because they can ignite fuel vapors. |
Runningenginesproduceheat.Engineparts,especiallymuffler,becomeextremely |
|||||
|
|
|
|
hot. |
|
|
|
|
|
for |
Severe thermal burns can occur |
contact. |
|
|
|
|
|
Combustible debris, such as leaves, grass, brush, etc. can catch fire. |
||
WARNING |
|
|
|
• Allow muffler, engine cylinder and fins to cool before touching. |
||
Starting engine creates sparking. |
|
|
|
• Remove accumulated debris from muffler area and cylinder area. |
||
Sparking can ignite nearby flammable gases. |
|
|
• It is a violation of California Public Resource Code, Section 4442, to use or operate |
|||
Explosion and fire could result. |
|
|
|
the engine any forest-covered, brush-covered, or grass-covered land unless the |
||
|
|
|
|
exhaust system is equipped with a spark arrester, as defined in Section 4442, |
||
|
|
|
|
maintained in effective working order. Other states or federal jurisdictions may have |
||
• If there is natural or LP gas leakage in area, do not start engine. |
similarlaws.Contacttheoriginalequipmentmanufacturer,retailer,ordealertoobtain |
|||||
• Do not use pressurized starting fluids because vapors are flammable. |
a spark arrester designed for the exhaust system installed on this engine. |
|||||
WARNING |
Not |
|
WARNING |
|
||
POISONOUS GAS HAZARD. Engine exhaust contains carbon monoxide, a |
Unintentional sparking can result in fire or electric shock. |
|||||
poisonousgasthatcouldkillyouinminutes.YouCANNOTseeit,smellit,ortaste |
Unintentional start-up can result in entanglement, traumatic amputation, or |
|||||
it. Even if you do not smell exhaust fumes, you could still be exposed to carbon |
||||||
laceration. |
|
|||||
monoxide gas. If you start to feel sick, dizzy, or weak while using this product, |
|
|||||
|
|
|||||
get to fresh air RIGHT AWAY. See a doctor. You may have carbon monoxide |
Fire hazard |
|
||||
poisoning. |
|
|
|
Before performing adjustments or repairs: |
||
|
|
|
|
|||
•OperatethisproductONLYoutsidefarawayfromwindows,doorsandventstoreduce the risk of carbon monoxide gas from accumulating and potentially being drawn towards occupied spaces.
•Installbattery-operatedcarbonmonoxidealarmsorplug-incarbonmonoxidealarms with battery back-up according to the manufacturer's instructions. Smoke alarms cannot detect carbon monoxide gas.
•DO NOT run this product inside homes, garages, basements, crawlspaces, sheds, or other partially-enclosed spaces even if using fans or opening doors and windows for ventilation. Carbon monoxide can quickly build up in these spaces and can linger for hours, even after this product has shut off.
•ALWAYS place this product downwind and point the engine exhaust away from occupied spaces.
•Disconnect the spark plug wire and keep it away from the spark plug.
•Disconnect battery at negative terminal (only engines with electric start.)
•Use only correct tools.
•Do not tamper with governor spring, links or other parts to increase engine speed.
•Replacement parts must be of the same design and installed in the same position as the original parts. Other parts may not perform as well, may damage the unit, and may result in injury.
•Do not strike the flywheel with a hammer or hard object because the flywheel may later shatter during operation.
When testing for spark:
•Use approved spark plug tester.
•Do not check for spark with spark plug removed.
5
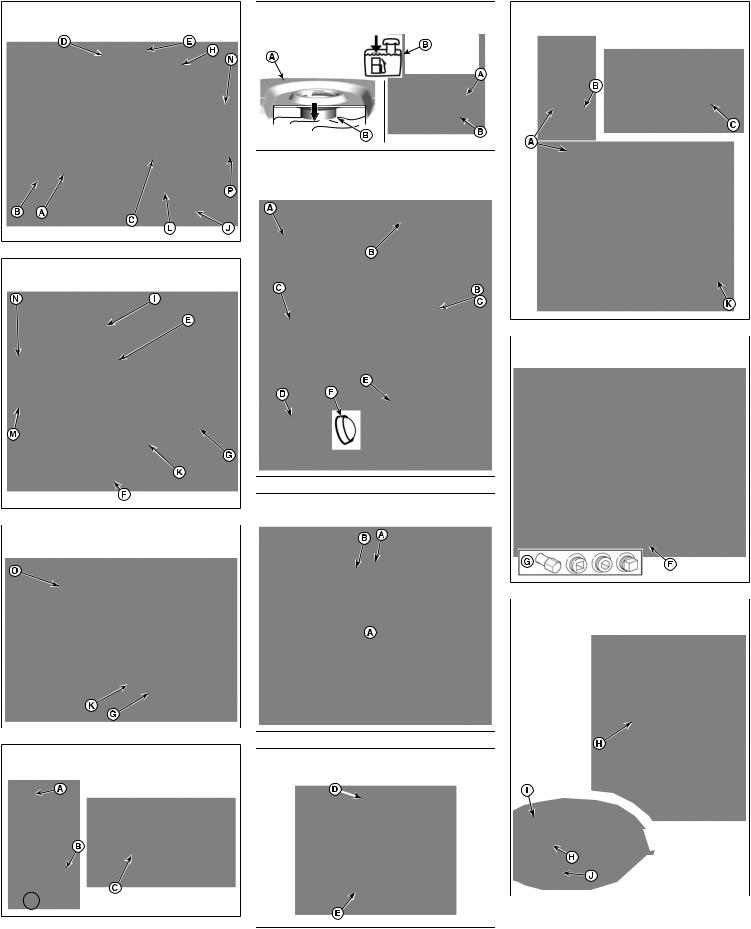
Features and Controls
Engine Controls
Compare the illustration (Figure: 1, 2, 3) with your engine to familiarize yourself with the location of various features and controls.
A.Engine Identification Numbers Model - Type - Code
B.Spark Plug
C.Air Cleaner
D.Starter Cord Handle (if equipped)
E.Dipstick
F.Oil Drain Plug
G.Muffler, Muffler Guard (if equipped), Spark Arrester (if equipped)
H.Air Intake Grille
I.Air Intake Grille
J.Oil Filter (if equipped)
K.Electric Starter (if equipped)
L.Carburetor
M.Fuel Filter (if equipped)
N.Fuel Pump (if equipped)
O.Quick Oil Drain (if equipped)
P.Electronic Control Unit (if equipped)
Outdoor temperatures determine the proper oil viscosity for the engine. Use the chart to select the best viscosity for the outdoor temperature range expected. Engines on most outdoor power equipment operate well with 5W-30 Synthetic oil. For equipment operated in hot temperatures, Vanguard™ 15W-50 Synthetic oil provides the best protection.
A  SAE 30 - Below 40 °F (4 °C) the use of SAE 30 will result in hard starting.
B10W-30 - Above 80 °F (27 °C) the use of 10W-30 may cause increased oil consumption. Check oil level more frequently.
C |
5W-30 |
D |
Synthetic 5W-30 |
E |
Vanguard™ Synthetic 15W-50 |
|
|
|
|
|
|
|
|
|
|
|
|
Reproduction |
||||
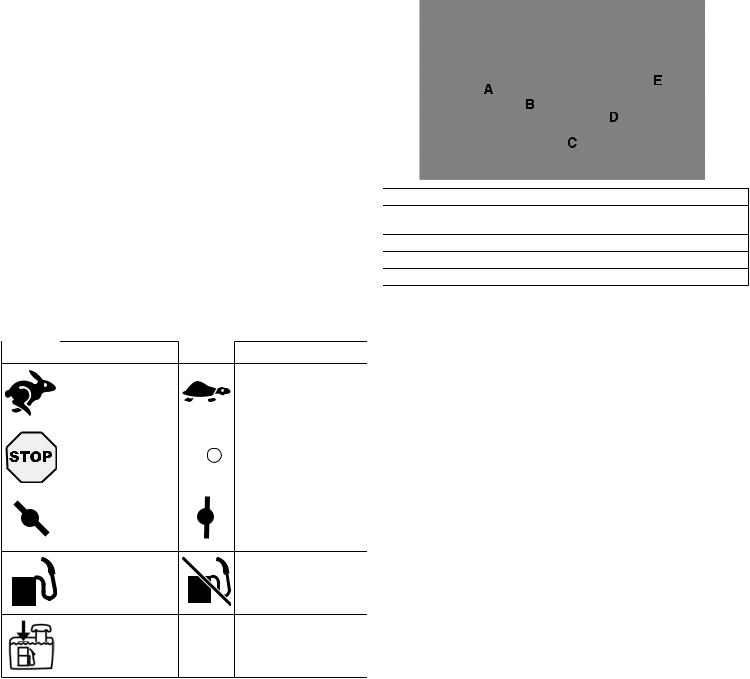
Engine Control Symbols and Meanings |
Check Oil Level |
|||||||||||||||
See Figure: 4 |
||||||||||||||||
|
Symbol |
Meaning |
Symbol |
|
Meaning |
Before adding or checking the oil |
||||||||||
|
|
|
|
|
|
Engine speed - FAST |
|
|
|
|
|
Engine speed - SLOW |
• Make sure the engine is level. |
|||
|
|
|
|
|
|
|
|
|
|
|
|
|
|
for |
• Clean the oil fill area of any debris. |
|
|
|
|
|
|
|
|
|
|
|
|
|
|
|
|
1. |
Remove the dipstick (A, Figure 4) and wipe with a clean cloth. |
|
|
|
|
|
|
Engine speed - STOP |
|
|
|
|
|
ON - OFF |
|
2. |
Install and tighten the dipstick (A, Figure 4). |
|
|
|
|
|
|
|
|
|
|
|
|
|
|
|
|
3. |
Remove the dipstick and check the oil level. Correct oil level is at the top of the full |
|
|
|
|
|
|
|
|
|
|
|
|
|
|
|
|
indicator (B, Figure 4) the dipstick. |
|
|
|
|
|
|
|
|
|
Not |
|
|
4. |
If oil level is low, slowly add oil into the engine oil fill (C, Figure 4). Do not overfill. |
|||
|
|
|
|
|
|
|
|
|
|
|
|
|
|
|
||
|
|
|
|
|
|
Engine start - Choke |
|
|
|
|
|
Engine start - Choke OPEN |
|
After adding oil, wait one minute and then recheck the oil level. |
||
|
|
|
|
|
|
|
|
|
|
|
|
|
||||
|
|
|
|
|
|
CLOSED |
|
|
|
|
|
|
|
|
Note: Do not add oil at the quick oil drain , if equipped. For location, see Features and |
|
|
|
|
|
|
|
|
|
|
|
|
|
|
|
|
||
|
|
|
|
|
|
|
|
|
|
|
|
|
|
|
Controls. |
|
|
|
|
|
|
|
|
|
|
|
|
|
|
|
|
5. |
Reinstall and tighten the dipstick (A, Figure 4). |
|
|
|
|
|
|
Fuel Cap |
|
|
|
|
|
Fuel Shut-off - CLOSED |
||||
|
|
|
|
|
|
|
|
|
|
|
|
|
||||
|
|
|
|
|
|
Fuel Shut-off - OPEN |
|
|
|
|
|
|
|
|
Low Oil Protection System (if equipped) |
|
|
|
|
|
|
|
|
|
|
|
|
|
|
|
|
||
|
|
|
|
|
|
|
|
|
|
|
|
|
|
|
||
|
|
|
|
|
|
|
|
|
|
|
|
|
|
|
Some engines are equipped with a low oil sensor. If the oil is low, the sensor will either |
|
|
|
|
|
|
|
Fuel level - Maximum |
|
|
|
|
|
|
|
|
activate a warning light or stop the engine. Stop the engine and follow these steps before |
|
|
|
|
|
|
|
|
|
|
|
|
|
|
|
restarting the engine. |
||
|
|
|
|
|
|
Do not overfill |
|
|
|
|
|
|
|
|
||
|
|
|
|
|
|
|
|
|
|
|
|
|
|
• Make sure the engine is level. |
||
|
|
|
|
|
|
|
|
|
|
|
|
|
|
|
||
|
|
|
|
|
|
|
|
|
|
|
|
|
|
|
• |
Check the oil level. See the Check Oil Level section. |
|
|
|
|
|
|
|
|
|
|
|
|
|
|
|
• If the oil level is low, add the proper amount of oil. Start the engine and make sure |
|
|
|
|
|
|
|
|
|
|
|
|
|
|
|
|
|
the warning light (if equipped) is not activated. |
Operation
Oil Recommendations
Oil Capacity: See the Specifications section.
NOTICE
This engine was shipped from Briggs & Stratton without oil. Equipment manufacturers or dealers may have added oil to the engine. Before you start the engine for the first time, make sure to check the oil level and add oil according to the instructions in this manual. If you start the engine without oil, it will be damaged beyond repair and will not be covered under warranty.
WerecommendtheuseofBriggs&Stratton®WarrantyCertifiedoilsforbestperformance. Other high-quality detergent oils are acceptable if classified for service SF, SG, SH, SJ or higher. Do not use special additives.
•If the oil level is not low, do not start the engine. Contact a Briggs & Stratton Authorized Service Dealer to have the oil problem corrected.
Fuel Recommendations
Fuel must meet these requirements:
•Clean, fresh, unleaded gasoline.
•A minimum of 87 octane/87 AKI (91 RON). High altitude use, see below.
•Gasoline with up to 10% ethanol (gasohol) is acceptable.
NOTICE Do not use unapproved gasolines, such as E15 and E85. Do not mix oil in gasoline or modify the engine to run on alternate fuels. Use of unapproved fuels will damage the engine components, which will not be covered under warranty.
To protect the fuel system from gum formation, mix a fuel stabilizer into the fuel. See Storage. All fuel is not the same. If starting or performance problems occur, change fuel
6 |
BRIGGSandSTRATTON.com |
providers or change brands. This engine is certified to operate on gasoline. The emissions control system for this engine is EM (Engine Modifications).
High Altitude
Ataltitudesover5,000feet(1524meters),aminimum85octane/85AKI(89RON)gasoline is acceptable.
For carbureted engines, high altitude adjustment is required to maintain performance. Operation without this adjustment will cause decreased performance, increased fuel consumption, and increased emissions. Contact a Briggs & Stratton Authorized Service Dealer for high altitude adjustment information. Operation of the engine at altitudes below 2,500 feet (762 meters) with the high altitude adjustment is not recommended.
For Electronic Fuel Injection (EFI) engines, no high altitude adjustment is necessary.
Add Fuel
See Figure: 5
 WARNING

Fuel and its vapors are extremely flammable and explosive.
Fire or explosion can cause severe burns or death.
When adding fuel
•Turn engine off and let engine cool at least 2 minutes before removing the fuel cap.
•Fill fuel tank outdoors or in well-ventilated area.
•Donotoverfillfueltank.Toallowforexpansionofthefuel,donotfillabovethebottom of the fuel tank neck.
 WARNING
POISONOUS GAS HAZARD. Engine exhaust contains carbon monoxide, a poisonousgasthatcouldkillyouinminutes.YouCANNOTseeit,smellit,ortaste it. Even if you do not smell exhaust fumes, you could still be exposed to carbon monoxide gas. If you start to feel sick, dizzy, or weak while using this product, shut it off and get to fresh air RIGHT AWAY. See a doctor. You may have carbon monoxide poisoning.
•OperatethisproductONLYoutsidefarawayfromwindows,doorsandventstoreduce the risk of carbon monoxide gas from accumulating and potentially being drawn towards occupied spaces.
•Installbattery-operatedcarbonmonoxidealarmsorplug-incarbonmonoxidealarms with battery back-up according to the manufacturer's instructions. Smoke alarms cannot detect carbon monoxide gas.
•DO NOT run this product inside homes, garages, basements, crawlspaces, sheds, or other partially-enclosed spaces even if using fans or opening doors and windows for ventilation. Carbon monoxide can quickly build up in these spaces and can linger for hours, even after this product has shut off.
•ALWAYS place this product downwind and point the engine exhaust away from occupied spaces.
NOTICE This engine was shipped from Briggs & Stratton without oil. Before you start the engine, make sure you add oil according to the instructions in this manual. If you start the engine without oil, it will be damaged beyond repair and will not be covered under warranty.
Determine The Starting System
|
• Keepfuelawayfromsparks,openflames,pilotlights,heat,andotherignitionsources. |
Before starting the engine, you must determine the type of starting system that is on your |
||||
|
• Check fuel lines, tank, cap, and fittings frequently for cracks or leaks. Replace if |
engine. Your engine will have one of the following types. |
||||
|
necessary. |
|
|
|
|
• ReadyStart® System:Thisfeaturesatemperaturecontrolledautomaticchoke.This |
|
• If fuel spills, wait until it evaporates before starting engine. |
|
|
|||
|
|
|
type does not have a primer. |
|||
1. |
Clean the fuel cap area of dirt and debris. Remove the fuel cap. |
|
• ElectronicFuelManagementSystem:ThisfeaturesanElectronicControlUnitthat |
|||
|
monitors engine and temperature conditions. This type does not have a manual |
|||||
2. |
Fill the fuel tank (A, Figure 5) with fuel. To allow for expansion of the fuel, do not fill |
|
choke or a primer. |
|||
|
above the bottom of the fuel tank neck (B). |
|
for |
|
• Choke System: This features a choke to be used for starting in cool temperatures. |
|
3. |
Reinstall the fuel cap. |
|
|
|
Somemodelswillhaveaseparatechokecontrolwhileotherswillhaveacombination |
|
|
|
|
choke / throttle control. This type does not have a primer. |
|||
|
|
|
|
|
||
Start and Stop Engine |
|
To start your engine, follow the instructions for your type of starting system. |
||||
|
Note: Equipment may have remote controls. See the equipment manual for location and |
|||||
See Figure: 6 |
|
|
operation of remote controls. |
|||
|
|
|
|
|||
Start Engine |
|
|
ReadyStart® System |
|||
|
|
|
||||
|
|
|
|
|
||
|
WARNING |
|
|
|
1. |
Check the engine oil. See the Check Oil Level section. |
|
|
|
|
2. |
Make sure equipment drive controls, if equipped, are disengaged. |
|
Rapid retraction of starter cord (kickback) will pull hand and arm toward engine |
||||||
faster than you can let go. |
|
|
|
3. |
Move the fuel shut-off (A, Figure 6), if equipped, to the OPEN position. |
|
Broken bones, fractures, bruises or sprains could result. |
|
4. |
Move the throttle control (B, Figure 6), if equipped, to the FAST position. Operate |
|||
|
|
Not |
|
|||
|
|
|
|
|
|
the engine in the FAST position. |
|
• When starting engine, pull the starter cord slowly until resistance is felt and then pull |
Note:Forstartingincoldweathertemperatures(below32°F),movethecombinationchoke |
||||
|
rapidly to avoid kickback. |
|
|
|
/ throttle lever (B C, Figure 6) to the CHOKE position. |
|
|
|
|
Reproduction |
|||
|
|
|
|
|
5. |
Key Switch, if equipped: Turn the key switch (D, Figure 6) to the ON / START |
|
WARNING |
|
|
|
|
position. |
|
|
|
|
|
Start / Stop Button, if equipped: Push the start / stop button (F, Figure 6). |
|
Fuel and its vapors are extremely flammable and explosive. |
|
|
||||
Fire or explosion can cause severe burns or death. |
|
|
NOTICE To extend the life of the starter, use short starting cycles (five seconds |
|||
When Starting Engine |
|
|
|
maximum). Wait one minute between starting cycles. |
||
|
|
|
|
|
||
•Ensure that spark plug, muffler, fuel cap and air cleaner (if equipped) are in place Note: If the engine does not start after repeated attempts, contact you local dealer or go
and secured.
•Do not crank engine with spark plug removed.
•If engine floods, set choke (if equipped) to OPEN / RUN position, move throttle (if equipped) to FAST position and crank until engine starts.
to BRIGGSandSTRATTON.com or call 1-800-233-3723 (in USA).
Electronic Fuel Management System
1.Check the engine oil. See the Check Oil Level section.
2.Make sure equipment drive controls, if equipped, are disengaged.
3.Move the fuel shut-off (A, Figure 6), if equipped, to the OPEN position.
4.Move the throttle control (B, Figure 6), if equipped, to the FAST position. Operate the engine in the FAST position.
7

5.Rewind Start, if equipped: Turn the key switch (D, Figure 6) to the ON / START position.
6.Rewind Start, if equipped: Firmly hold the starter cord handle (E, Figure 6). Pull the starter cord handle slowly until resistance is felt, then pull rapidly.
 WARNING
Rapid retraction of the starter cord (kickback) will pull your hand and arm toward the engine faster than you can let go. Broken bones, fractures, bruises or sprains could result. When starting engine, pull the starter cord slowly until resistance is felt and then pull rapidly to avoid kickback.
2.After the engine stops, move the fuel shut-off (A, Figure 6), if equipped, to the CLOSED position.
Maintenance
NOTICE If the engine is tipped during maintenance, the fuel tank, if mounted on engine, must be empty and the spark plug side must be up. If the fuel tank is not empty and if the engine is tipped in any other direction, it may be difficult to start due to oil or gasoline contaminating the air filter and/or the spark plug.
 WARNING
7.Electric Start, if equipped: Turn the key switch (D, Figure 6) to the ON / START position.
NOTICE To extend the life of the starter, use short starting cycles (five seconds maximum). Wait one minute between starting cycles.
Note: If the engine does not start after repeated attempts, contact you local dealer or go to BRIGGSandSTRATTON.com or call 1-800-233-3723 (in USA).
Choke System
1.Check the engine oil. See the Check Oil Level section.
2.Make sure equipment drive controls, if equipped, are disengaged.
3.Move the fuel shut-off (A, Figure 6), if equipped, to the OPEN position.
Whenperformingmaintenancethatrequirestheunittobetipped,thefueltank,ifmounted on the engine, must be empty or fuel can leak out and result in a fire or explosion.
We recommend that you see any Briggs & Stratton Authorized Service Dealer for all maintenance and service of the engine and engine parts.
NOTICE All thecomponents used tobuild thisengine mustremain in placeforproper operation.
 WARNING
Unintentional sparking can result in fire or electric shock.
Unintentional start-up can result in entanglement, traumatic amputation, or laceration.
Fire hazard
4. |
|
|
ReproductionFirst 5 Hours |
|||
Move the throttle control (B, Figure 6), if equipped, to the FAST position. Operate |
Before performing adjustments or repairs: |
|||||
|
the engine in the FAST position. |
|
|
|
||
5. Move the choke control (C, Figure 6) to the CLOSED position. For models with a |
• Disconnect the spark plug wire and keep it away from the spark plug. |
|||||
|
combination choke / throttle control (B C), move the control to the CHOKE position. |
• Disconnect battery at negative terminal (only engines with electric start.) |
||||
Note: Choke is usually unnecessary when restarting a warm engine. |
|
• Use only correct tools. |
||||
|
|
|
|
for |
• Do not tamper with governor spring, links or other parts to increase engine speed. |
|
6. Rewind Start, if equipped: Turn the key switch (D, Figure 6) to the ON / START |
• Replacement parts must be of the same design and installed in the same position |
|||||
|
position. |
|
|
|
as the original parts. Other parts may not perform as well, may damage the unit, and |
|
7. |
Rewind Start, if equipped: Firmly hold the starter cord handle (E, Figure 6). Pull |
may result in injury. |
||||
|
the starter cord handle slowly until resistance is felt, then pull rapidly. |
• Do not strike the flywheel with a hammer or hard object because the flywheel may |
||||
|
|
|
|
|
later shatter during operation. |
|
|
|
Not |
|
When testing for spark: |
||
|
WARNING |
|
• Use approved spark plug tester. |
|||
|
|
|
|
|||
Rapid retraction of the starter cord (kickback) will pull your hand and arm toward the |
• Do not check for spark with spark plug removed. |
|||||
engine faster than you can let go. Broken bones, fractures, bruises or sprains could |
|
|||||
result. When starting engine, pull the starter cord slowly until resistance is felt and then |
Emissions Control Service |
|||||
pull rapidly to avoid kickback. |
|
|
|
|||
|
|
|
|
|
||
8. Electric Start, if equipped: Turn the key switch (D, Figure 6) to the ON / START |
Maintenance, replacement, or repair of the emissions control devices and systems |
|||||
|
position. |
|
|
|
maybeperformedbyanyoff-roadenginerepairestablishmentorindividual.However, |
|
|
|
|
|
|
to obtain "no charge" emissions control service, the work must be performed by a factory |
|
NOTICE To extend the life of the starter, use short starting cycles (five seconds |
authorized dealer. See the Emissions Control Statements. |
|||||
|
||||||
maximum). Wait one minute between starting cycles. |
|
|
Maintenance Schedule |
|||
9. As the engine warms up, move the choke control (C, Figure 6) to the OPENposition. |
||||||
|
||||||
|
For models with a combination choke / throttle control (B C), move the control to the |
|
||||
|
FAST position. |
|
|
|
• Change oil 3 |
|
|
|
|
|
|
||
Note: If the engine does not start after repeated attempts, contact your local dealer or go |
|
|||||
to |
BRIGGSandSTRATTON.com or call 1-800-233-3723 (in USA). |
|
Every 8 Hours or Daily |
|||
• Check engine oil level
Stop Engine
 WARNING

Fuel and its vapors are extremely flammable and explosive. Fire or explosion can cause severe burns or death.
•Clean area around muffler and controls
•Clean air intake grille
 Every 25 Hours or Annually
• Clean air filter 1
• Clean pre-cleaner (if equipped) 1
•Do not choke the carburetor to stop the engine.
1.Key Switch, if equipped: With the throttle control in the FAST position, turn the key switch (D, Figure 6) to the OFF position. Remove the key and keep in a safe place out of the reach of children.
Start/StopButton,ifequipped:WiththethrottlecontrolintheFASTposition,push the START / STOP button (F, Figure 6).
 Every 50 Hours or Annually
•Change engine oil 4
•Replace oil filter (if equipped) 4
•Service exhaust system
8 |
BRIGGSandSTRATTON.com |
 Every 100 Hours or Annually
•Change engine oil 5
•Replace oil filter (if equipped) 5
 Annually
•Replace spark plug
•Replace air filter
•Replace pre-cleaner (if equipped)
•Replace fuel filter (if equipped)
•Service fuel system
•Service cooling system 1
•Check valve clearance 2
1 In dusty conditions or when airborne debris is present, clean more often. 2 Not required unless engine performance problems are noted.
3 Only engines without oil filter.
4 Engine without oil filter or with standard black oil filter (see Specifications page for part number).
5 Engines with high-efficiency yellow or orange oil filter (see Specifications page for part number).
Service Exhaust System
 WARNING

Runningenginesproduceheat.Engineparts,especiallymuffler,becomeextremely hot.
Severe thermal burns can occur on contact.
Combustible debris, such as leaves, grass, brush, etc. can catch fire.
•Allow muffler, engine cylinder and fins to cool before touching.
•Remove accumulated debris from muffler area and cylinder area.
•It is a violation of California Public Resource Code, Section 4442, to use or operate the engine on any forest-covered, brush-covered, or grass-covered land unless the exhaust system is equipped with a spark arrester, as defined in Section 4442, maintained in effective working order. Other states or federal jurisdictions may have similarlaws.Contacttheoriginalequipmentmanufacturer,retailer,ordealertoobtain a spark arrester designed for the exhaust system installed on this engine.
Removeaccumulateddebrisfrommufflerandcylinderarea.Inspectthemufflerforcracks, corrosion, or other damage. Remove the deflector or the spark arrester, if equipped, and inspectfordamageorcarbonblockage.Ifdamageisfound,installreplacementpartsbefore operating.
Electronic Fuel Management System
The Electronic Fuel Management System monitors engine temperature, engine speed, |
WARNING |
|
and battery voltage to adjust the choke during engine starting and warm up. There are no |
||
adjustments on the system. If starting or operation problems occur, contact an Authorized |
Replacement parts must be of the same design and installed in the same position as |
|
Briggs & Stratton Dealer. |
Reproduction |
|
|
the original parts. Other parts may not perform as well, may damage the unit, and may |
|
NOTICE Make sure to follow the steps below or the Electronic Fuel Management |
result in injury. |
|
System could be damaged. |
|
|
• Never start the engine if the battery cables are loose. |
|
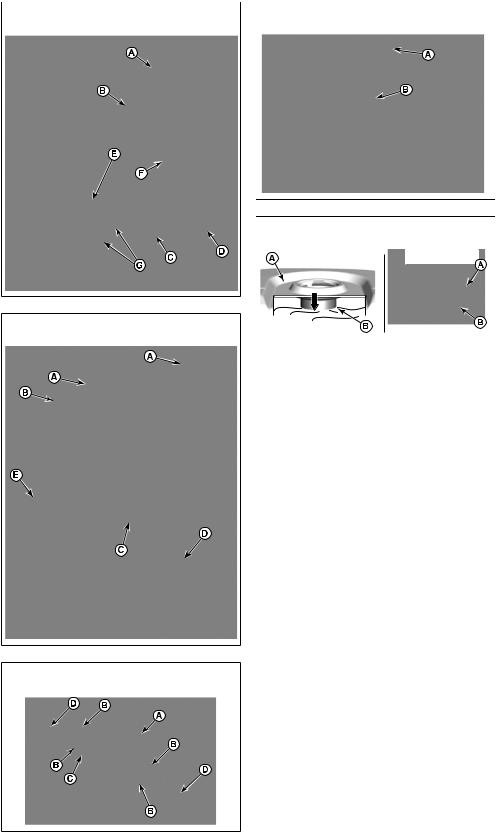
Change Engine Oil |
||
• Turn the key to the off position before disconnecting, removing and / installingthe |
See Figure: 8, 9, 10, 11 |
|
||
battery. |
|
Used oil is a hazardous waste |
and must be disposed of properly. Do not discard |
|
• Never use a battery charger to start the engine. |
|
with household waste. Check with your local authorities, service center, or dealer for safe |
||
• Never disconnect the battery cables while the engine is running. |
disposal/recycling facilities. |
|
||
• When connecting the battery cables, first connect the positive (+) cable and then |
Remove Oil |
|
||
connect the negative (-) cable to the battery. |
|
|
||
• When charging the battery, turn the ignition switch to theoffposition and disconnect |
|
|
|
|
the negative (-) battery cable from the battery. |
for |
1. |
With engine off but still warm, disconnect the spark plug wire (D, Figure 8) and keep |
|
• Do not spray water directly on the Electronic Control Unit. |
|
it away from the spark plug (E). |
|
|
|
2. |
Remove the dipstick (A, Figure 9). |
||
|
|
|||
Carburetor and Engine Speed |
|
Oil Drain Plug, if equipped |
|
|
Never make adjustments to the carburetor or engine speed. The carburetor was set at the |
|
|
|
|
factorytooperateefficientlyundermostconditions.Donottamperwiththegovernorspring, |
1. |
Remove the oil drain plug (F, Figure 10). Drain the oil into an approved container. |
||
linkages,orotherpartstochangetheenginespeed.Ifanyadjustmentsarerequiredcontact |
|
|
|
|
Not |
|
Note: Any of the oil drain plugs (G, Figure 10) may be installed in the engine. |
||
a Briggs & Stratton Authorized Service Dealer for service. |
|
|||
NOTICE The equipment manufacturer specifies the maximum speed for the engine |
|
|
|
|
as installed on the equipment. Do not exceed this speed. If you are unsure what the |
2. |
After the oil has drained, install and tighten the oil drain plug (F, Figure 10). |
||
equipment maximum speed is, or what the engine speed is set to from the factory, |
|
|
|
|
contact a Briggs & Stratton Authorized Service Dealer for assistance. For safe and |
|
|
|
|
proper operation of the equipment, the engine speed should be adjusted only by a |
Quick Oil Drain, if equipped |
|
||
qualified service technician. |
|
|
||
|
|
|
|
|
|
|
1. |
Disconnect the quick oil drain hose (H, Figure 11) from the side of the engine. |
|
Service Spark Plug |
|
2. |
Turn and remove the oil drain cap (I, Figure 11). Carefully lower the quick oil drain |
|
|
|
(H) into an approved container (J). |
||
|
|
|
|
|
See Figure: 7
Check the gap (A, Figure 7) with a wire gauge (B). If necessary, reset the gap. Install and tighten the spark plug to the recommended torque. For gap setting or torque, see the
Specifications section.
Note: In some areas, local law requires using a resistor spark plug to suppress ignition signals.Ifthisenginewasoriginallyequippedwitharesistorsparkplug,usethesametype
for replacement.
Remove Oil section.
2. Remove the oil filter (K, Figure 9) and dispose of properly.
3. Before you install the new oil filter, lightly lubricate the oil filter gasket with fresh, clean oil.
4. Install the oil filter by hand until the gasket contacts the oil filter adapter, then tighten
the oil filter 1/2 to 3/4 turns.
9

5.Add oil. See Add Oil section.
6.Start and run the engine. As the engine warms up, check for oil leaks.
7.Stoptheengineandchecktheoillevel.Correctoillevelisatthetopofthefullindicator (B, Figure 9) on the dipstick.
Add Oil
•Make sure the engine is level.
•Clean the oil fill area of any debris.
•See the Specifications section for oil capacity.
1.Remove the dipstick (A, Figure 9) and wipe with a clean cloth.
2.Slowly pour oil into the engine oil fill (C, Figure 9). Do not overfill. After adding oil, wait one minute and then check the oil level.
Note: Do not add oil at the quick oil drain (H, Figure 11), if equipped.
3.Install and tighten the dipstick (A, Figure 9).
4.Remove the dipstick and check the oil level. Correct oil level is at the top of the full indicator (B, Figure 9) on the dipstick.
5.Reinstall and tighten the dipstick (A, Figure 9).
6.Connect the spark plug wire (D, Figure 8) to the spark plug (E).
8.Install the filter (C, Figure 13) on the intake (D). Push the end of the filter down into the engine base. Make sure filter fits securely in the engine base.
9.Install the air filter cover (B, Figure 13) and secure with fastener(s) (A).
Service Fuel System
See Figure: 14, 15
 WARNING

Fuel and its vapors are extremely flammable and explosive.
Fire or explosion can cause severe burns or death.
•Keepfuelawayfromsparks,openflames,pilotlights,heat,andotherignitionsources.
•Check fuel lines, tank, cap, and fittings frequently for cracks or leaks. Replace if necessary.
•Before cleaning or replacing the fuel filter, drain the fuel tank or close the fuel shutoff valve.
•If fuel spills, wait until it evaporates before starting engine.
•Replacementpartsmustbethesameandinstalledinthesamepositionastheoriginal parts.
Fuel Filter, if equipped
Service Air Filter |
|
|
1. |
Before cleaning or replacing the fuel filter (A, Figure 14), drain the fuel tank or close |
|||
See Figure: 12, 13 |
|
|
|
the fuel shut-off valve. Otherwise, fuel can leak out and cause a fire or explosion. |
|||
|
|
|
|
2. |
Use pliers to squeeze tabs (B, Figure 14) on the clamps (C), then slide the clamps |
||
|
|
|
|
|
away from the fuel filter (A). Twist and pull the fuel lines (D) off of the fuel filter. |
||
|
WARNING |
|
|
3. |
Check the fuel lines (D, Figure 14) for cracks or leaks. Replace if necessary. |
||
Fuel and its vapors are extremely flammable and explosive. |
|
4. |
Replace the fuel filter (A, Figure 14) with an original equipment replacement filter. |
||||
Fire or explosion can cause severe burns or death. |
|
5. |
Secure the fuel lines (D, Figure 14) with clamps (C) as shown. |
||||
• |
Never start and run the engine with the air cleaner assembly (if equipped) the air |
Fuel Strainer, if equipped |
|
||||
|
filter (if equipped) removed. |
|
|
|
|||
NOTICE Do not use pressurized air or solvents to clean thefilter. Pressurized air can |
1. |
Remove the fuel cap (A, Figure 15). |
|||||
2. |
Remove the fuel strainer (B, Figure 15). |
||||||
damage the filter and solvents will dissolve the filter. |
|
||||||
See the Maintenance Schedule for service requirements. |
|
3. |
If the fuel strainer is dirty, clean or replace it. If you replace the fuel strainer, make |
||||
|
|
sure to use an original equipment replacement fuel strainer. |
|||||
|
|
|
|
|
|||
Variousmodelsuseeitherafoamorapaperfilter.Somemodelsmayalsohaveanoptional |
|
|
|
||||
|
|
|
for |
|
|
|
|
pre-cleaner that can be washed and reused. Compare the illustrations in this manual with |
Service Cooling System |
||||||
the type installed on your engine and service as follows. |
|
||||||
Paper Air Filter |
|
|
|
WARNING |
|
||
1. |
Pulluponthecoverhandle(A,Figure12).Rotatethecoverhandletowardtheengine |
|
|
||||
Runningenginesproduceheat.Engineparts,especiallymuffler,becomeextremely |
|||||||
|
and then remove the cover (B). |
Not |
|
hot. |
|
||
2. |
|
|
Severe thermal burns can occur |
contact. |
|||
Remove the pre-cleaner (C, Figure 12), if equipped, and the filter (D). |
|||||||
3. |
To loosen debris, gently tap the filter (D, Figure 12) on a hard surface. If the filter is |
Combustible debris, such as leaves, grass, brush, etc., can catch fire. |
|||||
|
excessively dirty, replace with a new filter. |
|
|||||
|
|
|
|
|
|||
4. |
Wash the pre-cleaner (C, Figure 12) in liquid detergent and water. Allow the pre- |
|
• Allow muffler, engine cylinder and fins to cool before touching. |
||||
|
|
|
|
|
|||
|
cleaner (C) to thoroughly air dry. Do not oil the pre-cleaner.Reproduction |
|
|||||
5. |
Assemble the dry pre-cleaner (C, Figure 12) and the filter (D) to the engine base (E). |
|
• Remove accumulated debris from muffler area and cylinder area. |
||||
|
|
|
|||||
6. |
Alignthetabs(F,Figure12)onthecover(B)withtheslots(G)intheblowerhousing. |
NOTICE Do not use water to clean the engine. Water could contaminate the fuel |
|||||
7. |
Rotate the cover handle (A, Figure 12) back and push down to lock in place. |
system. Use a brush or dry cloth to clean the engine. |
|||||
|
|
|
|||||
|
|
|
|
This is an air cooled engine. Dirt or debris can restrict air flow and cause the engine to |
|||
Paper Air Filter |
|
|
overheat, resulting in poor performance and reduced engine life. |
||||
|
|
1. |
Use a brush or dry cloth to remove debris from the air intake grille. |
||||
1. |
Loosen the fastener(s) (A, Figure 13). |
|
|
||||
|
|
2. |
Keep linkage, springs and controls clean. |
||||
2. |
Remove the cover (B, Figure 13). |
|
|
||||
|
|
3. |
Keep the area around and behind the muffler, if equipped, free of any combustible |
||||
|
|
|
|
||||
3. |
To remove the filter (C, Figure 13), lift the end of the filter and then pull the filter off |
|
debris. |
|
|||
|
the intake (D). |
|
|
4. |
Make sure the oil cooler fins, if equipped, are free of dirt and debris. |
||
|
|
|
|
||||
4.To loosen debris, gently tap the filter (C, Figure 13) on a hard surface. If the filter is
|
excessively dirty, replace with a new filter. |
After a period of time, debris can accumulate in the cylinder cooling fins and cause the |
|
|
engine to overheat. This debris cannot be removed without partial disassembly of the |
||
5. |
Remove the pre-cleaner (E, Figure 13), if equipped, from the filter (C). |
||
engine. Have a Briggs & Stratton Authorized Service Dealer inspect and clean the air |
|||
6. |
Washthepre-cleaner(E,Figure13),ifequipped,inliquiddetergentandwater.Allow |
cooling system as recommended in the Maintenance Schedule. |
|
|
the pre-cleaner to thoroughly air dry. Do not oil the pre-cleaner. |
|
7.Assemble the dry pre-cleaner (E, Figure 13), if equipped, to the filter (C).
10 |
BRIGGSandSTRATTON.com |
Storage
 WARNING

Fuel and its vapors are extremely flammable and explosive.
Fire or explosion can cause severe burns or death.
When Storing Fuel Or Equipment With Fuel In Tank
•Store away from furnaces, stoves, water heaters or other appliances that have pilot lights or other ignition sources because they can ignite fuel vapors.
Fuel System
See Figure: 16
Store the engine level (normal operating position). Fill fuel tank (A, Figure 16) with fuel. To allow for expansion of fuel, do not overfill above the fuel tank neck (B).
Fuelcanbecomestalewhenstoredover30days.Stalefuelcausesacidandgumdeposits to form in the fuel system or on essential carburetor parts. To keep fuel fresh, use Briggs
&Stratton®AdvancedFormulaFuelTreatment&Stabilizer,availablewhereverBriggs
&Stratton genuine service parts are sold.
There is no need to drain gasoline from the engine if a fuel stabilizer is added according to instructions. Run the engine for two (2) minutes to circulate the stabilizer throughout the fuel system before storage.
Engine power will decrease 3.5% for each 1,000 feet (300 meters) above sea level and 1% for each 10° F (5.6° C) above 77° F (25° C). The engine will operate satisfactorily at an angle up to 15°. Refer to the equipment operator's manual for safe allowable operating limits on slopes.
Service Parts - Model: 210000
Service Part |
Part Number |
Air Filter, Paper (see Figure 13) |
796032 |
Air Filter Pre-cleaner, Foam (see Figure 13) |
798911 |
Air Filter, Paper (see Figure 12) |
698413, 5079 |
Air Filter Pre-cleaner, Foam (see Figure 12) |
697292, 5079 |
Oil - SAE 30 (20 oz, 0,6 L) |
100005 |
Oil - SAE 30 (48 oz, 1,4 L) |
100028 |
Oil Filter |
492932 |
Advanced Formula Fuel Treatment & Stabilizer |
100117, 100120 |
Fuel Filter - engine without fuel pump |
394358, 5098 |
Fuel Filter - engine with fuel pump |
691035, 5065 |
Resistor Spark Plug |
491055 |
Long Life Platinum Spark Plug |
5066 |
Spark Plug Wrench |
89838, 5023 |
Spark Tester |
19368 |
If gasoline in the engine has not been treated with a fuel stabilizer, it must be drained into |
|
|
||||
an approved container. Run the engine until it stops from lack of fuel. The use of a fuel |
Service Parts - Model: 310000 |
|||||
stabilizer in the storage container is recommended to maintain freshness. |
||||||
Engine Oil |
|
|
|
Service Part |
Part Number |
|
|
|
|
Air Filter, Paper (see Figure 13) |
796031 |
||
Whiletheengineisstillwarm,changetheengineoil.Seethe ChangeEngineOil section. |
Air Filter Pre-cleaner, Foam (see Figure 13) |
797704 |
||||
Troubleshooting |
|
|
||||
|
|
Air Filter, Paper (see Figure 12) |
698083, 5077 |
|||
|
|
Air Filter Pre-cleaner, Foam (see Figure 12) |
697015, 5077 |
|||
For assistance, contact your local dealer or go to BRIGGSandSTRATTON.com or call |
Air Filter, Flat Washable |
697153, 5078 |
||||
|
|
|||||
1-800-233-3723 (in USA). |
|
|
for |
Oil - SAE 30 (20 oz, 0,6 L) |
100005 |
|
Specifications |
|
|
Oil - SAE 30 (48 oz, 1,4 L) |
100028 |
||
|
|
Oil Filter, Standard - Black |
492932 |
|||
|
|
|
Oil Filter, High Efficiency - Yellow |
795890 |
||
Model: 210000 |
|
Oil Filter, High Efficiency - Orange |
798576 |
|||
|
|
|||||
Displacement |
21.01 ci (344 cc) |
|
Advanced Formula Fuel Treatment & Stabilizer |
100117, 100120 |
||
|
|
|
||||
Bore |
3.437 in (87,30 mm) |
|
Fuel Filter - engine without fuel pump |
394358, 5098 |
||
|
|
|
||||
Stroke |
2.264 in (57,51 mm) |
|
Fuel Filter - engine with fuel pump |
691035, 6065 |
||
|
|
|
||||
Oil Capacity - without filter |
42 - 44 oz (1,24 - 1,30 L) |
Resistor Spark Plug |
491055 |
|||
Oil Capacity - with filter |
Not |
|
Long Life Platinum Spark Plug |
5066 |
||
46 - 48 oz (1,36 - 1,40 L) |
|
|
||||
Spark Plug Gap |
0.030 in (0,76 mm) |
|
Spark Plug Wrench |
89838, 5023 |
||
|
|
|
||||
Spark Plug Torque |
180 lb-in (20 Nm) |
|
Spark Tester |
19368 |
||
|
|
|
||||
Armature Air Gap |
0.010 - 0.014 in (0,25 - 0,36 mm) |
|
|
|||
|
|
ReproductionWe recommend that you see any Briggs & Stratton Authorized Dealer for all maintenance |
||||
Intake Valve Clearance |
0.003 - 0.005 in (0,08 - 0,13 mm) |
and service of the engine and engine parts. |
|
|||
|
|
|||||
Exhaust Valve Clearance |
0.005 - 0.007 in (0,13 - 0,18 mm) |
Power Ratings: The gross power rating for individual gasoline engine models is labeled |
||||
|
|
|
|
|||
Model: 310000 |
|
|
in accordance with SAE (Society of Automotive Engineers) code J1940 Small Engine |
|||
|
|
Power & Torque Rating Procedure, and is rated in accordance with SAE J1995. Torque |
||||
Displacement |
30.59 ci (501 cc) |
|
values are derived at 2600 RPM for those engines with “rpm” called out on the label and |
|||
|
3060 RPM for all others; horsepower values are derived at 3600 RPM. The gross power |
|||||
Bore |
3.563 in (90,49 mm) |
|
curves can beviewedatwww.BRIGGSandSTRATTON.COM.Netpower valuesaretaken |
|||
Stroke |
3.062 in (77,77 mm) |
|
with exhaust and air cleaner installed whereas gross power values are collected without |
|||
|
these attachments. Actual gross engine power will be higher than net engine power and |
|||||
Oil Capacity - without filter |
42 - 44 oz (1,24 - 1,30 L) |
is affected by, among other things, ambient operating conditions and engine-to-engine |
||||
variability. Given the wide array of products on which engines are placed, the gasoline |
||||||
Oil Capacity - with filter |
46 - 48 oz (1,36 - 1,40 L) |
|||||
engine may not develop the rated gross power when used in a given piece of power |
||||||
Spark Plug Gap |
0.030 in (0,76 mm) |
|
equipment. This difference is due to a variety of factors including, but not limited to, the |
|||
|
variety of engine components (air cleaner, exhaust, charging, cooling, carburetor, fuel |
|||||
Spark Plug Torque |
180 lb-in (20 Nm) |
|
||||
|
pump, etc.), application limitations, ambient operating conditions (temperature, humidity, |
|||||
Armature Air Gap |
0.010 - 0.014 in (0,25 - 0,36 mm) |
altitude), and engine-to-engine variability. Due to manufacturing and capacity limitations, |
||||
Briggs & Stratton may substitute an engine of higher rated power for this engine. |
||||||
Intake Valve Clearance |
0.003 - 0.005 in (0,08 - 0,13 mm) |
|||||
|
|
|||||
Exhaust Valve Clearance |
0.005 - 0.007 in (0,13 - 0,18 mm) |
|
|
|||

Warranty |
|
|
|
|
4. |
Dirt which entered the engine because of improper air cleaner maintenance or re- |
|
|
|
|
|
|
assembly; |
||
|
|
|
|
5. |
Striking an object with the cutter blade of a rotary lawn mower, loose or improperly |
||
Briggs & Stratton Engine Warranty |
|
|
installedbladeadapters,impellers,orothercrankshaftcoupleddevices,orexcessive |
||||
|
|
v-belt tightness; |
|||||
Effective January 2018 |
|
|
|
|
6. |
Associatedpartsorassembliessuchasclutches,transmissions,equipmentcontrols, |
|
|
|
|
|
|
|||
Limited Warranty |
|
|
|
|
|
etc., which are not supplied by Briggs & Stratton; |
|
Briggs & Stratton warrants that, during the warranty period specified below, it will repair or |
7. |
Overheating due to grass clippings, dirt and debris, or rodent nests which plug or |
|||||
replace, free of charge, any part that is defective in material or workmanship or both. |
|
clog the cooling fins or flywheel area, or by operating the engine without sufficient |
|||||
Transportationchargesonproductsubmittedforrepairorreplacementunderthiswarranty |
|
ventilation; |
|||||
mustbebornebypurchaser.Thiswarrantyiseffectiveforandissubjecttothetimeperiods |
8. |
Excessivevibrationduetoover-speeding,looseenginemounting,looseorunbalanced |
|||||
and conditions stated below. For warranty service, find the nearest Authorized Service |
|
cutter blades or impellers, or improper coupling of equipment components to the |
|||||
Dealer in our dealer locator map at BRIGGSandSTRATTON.COM. The purchaser must |
|
crankshaft; |
|||||
contact the Authorized Service Dealer, and then make the product available to the |
9. |
Misuse,lackofroutinemaintenance,shipping,handling,orwarehousingofequipment, |
|||||
Authorized Service Dealer for inspection and testing. |
|
|
|
|
|||
|
|
|
|
|
or improper engine installation. |
||
There is no other express warranty. Implied warranties, including those of |
|
|
|||||
|
Warranty service is available only through Briggs & Stratton Authorized Service |
||||||
merchantability and fitness for a particular purpose, are limited to the warranty |
|||||||
period listed below, or to the extent permitted by law. Liability for incidental or |
Dealers. Locate your nearest Authorized Service Dealer in our dealer locator map |
||||||
consequential damages are excluded to the extent exclusion is permitted by law. Some |
at BRIGGSandSTRATTON.COM or by calling 1-800-233-3723 (in USA). |
||||||
states or countries do not allow limitations on how long an implied warranty lasts, and |
80004537 (Rev. D) |
||||||
some states or countries do not allow the exclusion or limitation of incidental or |
|
||||||
|
|
|
|||||
consequential damages, so the above limitation and exclusion may not apply to you. This |
Briggs & Stratton Emissions Warranty |
||||||
warranty gives you specific legal rights and you may also have other rights which vary |
|||||||
from state to state and country to country 4. |
|
|
|
|
|||
Standard Warranty Terms 1, 2, 3 |
|
|
|
|
California,U.S.EPA,andBriggs&StrattonCorporationEmissions |
||
|
|
|
|
Control Warranty Statement - Your Warranty Rights and |
|||
Brand / Product Name |
Consumer |
Commercial |
Obligations |
||||
|
Use |
|
Use |
|
For Briggs & Stratton Engine Models with "F" Trim Designation (Model-Type-Trim |
||
Vanguard™; Commercial Series 3 |
36 months |
36 months |
|||||
Representation xxxxxx xxxx Fx) |
|||||||
Engines Featuring Dura-Bore™ Cast Iron Sleeve |
24 months |
12 months |
The California Air Resources Board, U.S. EPA, and Briggs & Stratton (B&S) are pleased |
||||
All Other Engines |
24 months |
3 months |
to explain the emissions control system warranty on your Model Year 2017-2019 |
||||
1These are our standard warranty terms, but occasionally there may be additional |
engine/equipment.InCalifornia,newsmalloff-roadenginesandlargesparkignitedengines |
||||||
less than or equal to 1.0 liter must be designed, built, and equipped to meet the State's |
|||||||
warranty coverage that was not determined at time of publication. For a listing of |
stringent anti-smog standards. B&S must warrant the emissions control system on your |
||||||
currentwarrantytermsforyourengine,gotoBRIGGSandSTRATTON.comorcontact |
engine/equipment for the periods of time listed below provided there has been no abuse, |
||||||
your Briggs & Stratton Authorized Service Dealer. |
|
|
|
|
neglect, or improper maintenance of your engine/equipment. |
||
2 There is no warranty for engines on equipment used for prime power in place of a |
Your exhaust emissions control system may include parts such as the carburetor or fuel |
||||||
utility; standby generators used for commercial purposes, utility vehicles exceeding |
|||||||
25 MPH, or engines used in competitive racing or on commercial |
rental tracks. |
injection system, ignition system, and catalytic converter. Also included may be hoses, |
|||||
3 Vanguard installed on standby generators: 24 months consumer use, no warranty |
belts, connectors, sensors, and other emissions-related assemblies. Your evaporative |
||||||
commercial use. Commercial Series with manufacturing date |
|
July 2017: 24 |
emission control system may include parts such as: carburetors, fuel tanks, fuel lines, fuel |
||||
|
caps, valves, canisters, filters, vapor hoses, clamps, connectors, and other associated |
||||||
months consumer use, 24 months commercial use. |
|
|
|
|
|||
4 In Australia - Our goods come with guarantees that cannot be excluded under the |
components. |
||||||
Australian Consumer Law. You are entitled to a replacement or refund |
a major |
Where a warrantable condition exists, B&S will repair your engine/equipment at no cost |
|||||
|
|
before |
to you including diagnosis, parts, and labor. |
||||
failure and for compensation for any other reasonably foreseeable loss or damage. |
|||||||
You are also entitled to have the goods repaired or replaced if the goods fail to be |
Manufacturer’s Warranty Coverage: |
||||||
of acceptable quality and the failure does not amount to a major failure. For warranty |
|||||||
service, find the nearest Authorized Service Dealer in our dealer locator map at |
Small off-road engines and large spark ignited engines less than or equal to 1.0 liter, and |
||||||
BRIGGSandSTRATTON.COM, or by calling 1300 274 447, or by emailing or writing |
|||||||
to salesenquiries@briggsandstratton.com.au, Briggs & Stratton Australia Pty Ltd, 1 |
any related emissions components of the equipment, are warranted for two years, or for |
||||||
Moorebank Avenue, Moorebank, NSW , Australia, 2170. |
|
|
|
the time period listed in the respective engine or product warranty statement, whichever |
|||
ThewarrantyperiodbeginsontheoriginaldateofNotpurchasebythefirstretailorcommercial |
is greater. If any emissions-related part on your B&S engine/equipment is defective, the |
||||||
part will be repaired or replaced by B&S. |
|||||||
consumer."Consumeruse"meanspersonalresidentialhouseholdusebyaretailconsumer. |
Owner’s Warranty Responsibilities: |
||||||
"Commercial use" means all other uses, including use for commercial, income producing |
|||||||
or rental purposes. Once an engine has experienced commercial use, it shall thereafter |
|
• As the engine/equipment owner, you are responsible for the performance of the |
|||||
be considered as a commercial use engine for purposes of this warranty. |
|
|
|
||||
|
|
|
required maintenance listed in your Operator's Manual. B&S recommends that you |
||||
|
Reproduction |
||||||
Saveyourproofofpurchasereceipt.Ifyoudonotprovideproofoftheinitialpurchase |
|
retain all receipts covering maintenance on your engine/equipment, but B&S cannot |
|||||
dateatthetimewarrantyserviceisrequested,themanufacturingdateoftheproduct |
|
denywarrantysolelyforthelackofreceiptsoryourfailuretoensuretheperformance |
|||||
will be used to determine the warranty period. Product registration is not required |
|
of all scheduled maintenance. |
|||||
to obtain warranty service on Briggs & Stratton products. |
|
|
|
|
• As the engine/equipment owner, you should however be aware that B&S may deny |
||
About Your Warranty |
|
|
|
|
|
you warranty coverage if your engine/equipment or a part has failed due to abuse, |
|
|
|
|
|
|
neglect, improper maintenance, or unapproved modifications. |
||
This limited warranty covers engine-related material and/or workmanship issues only, and |
|
• You are responsible for presenting your engine/equipment to a B&S distribution |
|||||
not replacement or refund of the equipment to which the engine may be mounted. Routine |
|
center,servicingdealer,orotherequivalententity,asapplicable,assoonasaproblem |
|||||
maintenance, tune-ups, adjustments, or normal wear and tear are not covered under this |
|
exists. The warranty repairs should be completed in a reasonable amount of time, |
|||||
warranty. Similarly, warranty is not applicable if the engine has been altered or modified |
|
not to exceed 30 days. If you have any questions regarding your warranty rights and |
|||||
or if the engine serial number has been defaced or removed. This warranty does not cover |
|
responsibilities, you should contact B&S at 1-800-444-7774 (in USA) or |
|||||
engine damage or performance problems caused by: |
|
|
|
|
|
BRIGGSandSTRATTON.COM. |
|
1.The use of parts that are not original Briggs & Stratton parts;
2. |
Operating the engine with insufficient, contaminated, or an incorrect grade of |
Briggs & Stratton Emissions Control Warranty Provisions |
|
|
lubricating oil; |
ThefollowingarespecificprovisionsrelativetoyourEmissionsControlWarrantyCoverage. |
|
3. |
The use of contaminated or stale fuel, gasoline formulated with ethanol greater than |
ItisinadditiontotheB&Senginewarrantyfornon-regulatedenginesfoundintheOperator's |
|
|
10%, or the use of alternative fuels such as liquefied petroleum or natural gas on |
Manual. |
|
|
engines not originally designed/manufactured by Briggs & Stratton to operate on |
1. |
Warranted Emissions Parts |
|
such fuels; |
|
|
12 |
BRIGGSandSTRATTON.com |

Coverage under this warranty extends only to the parts listed below (the emissions control systems parts) to the extent these parts were present on the B&S engine and/or B&S supplied fuel system.
a.Fuel Metering System
maintenance as set forth in the B&S engine warranty policy. B&S is not liable for warranty coverage of failures of emissions parts caused by the use of add-on or modified parts.
•Cold start enrichment system (soft choke)
•Carburetor or fuel injection system
•Oxygen sensor
•Electronic control unit
•Fuel pump module
•Fuel line, fuel line fittings, clamps
•Fuel tank, cap and tether
•Carbon canister
b.Air Induction System
•Air cleaner
•Intake manifold
•Purge and vent line
c.Ignition System
•Spark plug(s)
•Magneto ignition system
d.Catalyst System
•Catalytic converter
•Exhaust manifold
Look For Relevant Emissions Durability Period and Air Index Information On Your Small Off-Road Engine Emissions Label
Engines that are certified to meet the California Air Resources Board (CARB) small offroad Emissions Standard must display information regarding the Emissions Durability PeriodandtheAirIndex.Briggs&Strattonmakesthisinformationavailabletotheconsumer on our emissions labels. The engine emissions label will indicate certification information.
The Emissions Durability Period describes the number of hours of actual running time for which the engine is certified to be emissions compliant, assuming proper maintenance in accordance with the Operator's Manual. The following categories are used:
Moderate:
Engines at or less than 80 cc displacement are certified to be emissions compliant for 50 hours of actual engine running time. Engines greater than 80 cc displacement are certified to be emissions compliant for 125 hours of actual engine running time.
Intermediate:
Engines at or less than 80 cc displacement are certified to be emissions compliant for 125 hours of actual engine running time. Engines greater than 80 cc displacement are certified to be emissions compliant for 250 hours of actual engine running time.
Extended:
Engines at or less than 80 cc displacement are certified to be emissions compliant for 300 hours of actual engine running time. Engines greater than 80 cc displacement are certified to be emissions compliant for 500 hours of actual engine running time.
|
|
• Air injection system or pulse value |
|
Forexample,atypicalwalk-behindlawnmowerisused20to25hoursperyear.Therefore, |
|
e. |
Miscellaneous Items Used in Above Systems |
|
the Emissions Durability Period of an engine with an intermediate rating would equate |
|
|
to 10 to 12 years. |
||
|
|
• Vacuum, temperature, position, time sensitive valves and switches |
Briggs&Strattonenginesare certifiedtomeettheUnitedStatesEnvironmentalProtection |
|
|
|
• Connectors and assemblies |
|
Agency (USEPA) Phase 2 or Phase 3 emissions standards. The Emissions Compliance |
|
|
|
|
Period referred to the Emissions Compliance label indicates the number of operating |
2. |
Length of Coverage |
|
hours for which the engine has been shown to meet Federal emissions requirements. |
|
|
|
|||
|
|
part repaired or replaced under warranty will be warrantedReproductionfor the remaining |
||
|
Coverage is for a period of two years from date of original purchase, |
the time |
For engines at or less than 80 cc displacement: |
|
|
period listed in the respective engine or product warranty statement, whichever is |
Category C = 50 hours, Category B = 125 hours, Category A = 300 hours |
||
|
greater.B&Swarrantstotheoriginalpurchaserandeachsubsequentpurchaserthat |
|||
|
the engine is designed, built, and equipped so as to conform with all applicable |
For engines greater than 80 cc displacement and less than 225 cc displacement: |
||
|
regulationsadoptedbytheAirResourcesBoard;thatitisfreefromdefectsinmaterial |
Category C = 125 hours, Category B = 250 hours, Category A = 500 hours |
||
|
and workmanship that could cause the failure of a warranted part; and that it is |
|||
|
identical in all material respects to the engine described in the manufacturer's |
|
||
|
application for certification. The warranty period begins the dateforthe engine is |
For engines of 225 cc or more displacement: |
||
|
originally purchased. |
|
Category C = 250 hours, Category B = 500 hours, Category A = 1000 hours |
|
|
The warranty on emissions-related parts is as follows: |
|
80008256 (Rev F) |
|
|
|
|
||
|
|
• Any warranted part that is not scheduled for replacement as required |
|
California,U.S.EPA,andBriggs&StrattonCorporationEmissions |
|
|
maintenance in the Operator's Manual supplied, is warranted for the warranty |
||
|
|
period stated above. If any such part fails during the period of warranty |
Control Warranty Statement - Your Warranty Rights and |
|
|
|
coverage, the part will be repaired orNotreplaced by B&S at no charge to the |
Obligations |
|
|
|
owner.Anysuchpartrepairedorreplacedunderthewarrantywillbewarranted |
ForBriggs&StrattonEngineModelswith"B"or"G"TrimDesignation(Model-Type- |
|
|
|
for the remaining warranty period. |
|
Trim Representation xxxxxx xxxx Bx or xxxxxx xxxx Gx) |
|
|
• AnywarrantedpartthatisscheduledonlyforregularinspectionintheOperator's |
The California Air Resources Board, U.S. EPA, and Briggs & Stratton (B&S) are pleased |
|
|
|
Manual supplied, is warranted for the warranty period stated above. Any such |
||
|
|
|
|
to explain the emissions control system warranty on your Model Year 2017-2019 engine. |
|
|
warranty period. |
|
InCalifornia,newsmalloff-roadenginesandlargesparkignitedengineslessthanorequal |
|
|
• Anywarrantedpartthatisscheduledforreplacementasrequiredmaintenance |
to 1.0 liter must be designed, built, and equipped to meet the State's stringent anti-smog |
|
|
|
standards. B&S must warrant the emissions control system on your engine for the periods |
||
|
|
in the Operator's Manual supplied, is warranted for the period of time prior to |
of time listed below provided there has been no abuse, neglect, or improper maintenance |
|
|
|
the first scheduled replacement point for that part. If the part fails prior to the |
of your engine. |
|
|
|
first scheduled replacement, the part will be repaired or replaced by B&S at no |
||
|
|
charge to the owner. Any such part repaired or replaced under warranty will |
Your exhaust emissions control system may include parts such as the carburetor or fuel |
|
|
|
be warranted for the remainder of the period prior to the first scheduled |
injection system, ignition system, and catalytic converter. Also included may be hoses, |
|
|
|
replacement point for the part. |
|
belts, connectors, sensors, and other emissions-related assemblies. |
•Add-on or modified parts that are not exempted by the Air Resources Board
|
may not be used. The use of any non-exempted add-on or modified parts by |
Whereawarrantableconditionexists,B&Swillrepairyourengineatnocosttoyouincluding |
|
diagnosis, parts, and labor. |
|
|
the owner will be grounds for disallowing a warranty claim. The manufacturer |
|
|
will not be liable to warrant failures of warranted parts caused by the use of a |
Manufacturer’s Warranty Coverage: |
|
non-exempted add-on or modified part. |
Small off-road engines and large spark ignited engines less than or equal to 1.0 liter, and |
|
|
|
3. |
Consequential Coverage |
any related emissions components of the equipment, are warranted for two years, or for |
|
Coverage shall extend to the failure of any engine components caused by the failure |
the time period listed in the respective engine or product warranty statement, whichever |
|
of any warranted emissions parts. |
is greater. If any emissions-related part on your B&S engine is defective, the part will be |
4. |
Claims and Coverage Exclusions |
repaired or replaced by B&S. |
|
||
|
WarrantyclaimsshallbefiledaccordingtotheprovisionsoftheB&Senginewarranty |
Owner’s Warranty Responsibilities: |
|
policy. Warranty coverage does not apply to failures of emissions parts that are not |
|
|
original equipment B&S parts or to parts that fail due to abuse, neglect, or improper |
|
13
• As the engine owner, you are responsible for the performance of the required |
|
the first scheduled replacement point for that part. If the part fails prior to the |
|
first scheduled replacement, the part will be repaired or replaced by B&S at no |
|
maintenance listed in your Operator's Manual. B&S recommends that you retain all |
|
charge to the owner. Any such part repaired or replaced under warranty will |
receiptscoveringmaintenanceonyourengine,butB&Scannotdenywarrantysolely |
|
be warranted for the remainder of the period prior to the first scheduled |
for the lack of receipts or your failure to ensure the performance of all scheduled |
|
replacement point for the part. |
maintenance. |
|
• Add-on or modified parts that are not exempted by the Air Resources Board |
• Astheengineowner,youshouldhoweverbeawarethatB&Smaydenyyouwarranty |
|
|
|
may not be used. The use of any non-exempted add-on or modified parts by |
|
coverage if your engine or a part has failed due to abuse, neglect, improper |
|
the owner will be grounds for disallowing a warranty claim. The manufacturer |
maintenance, or unapproved modifications. |
|
will not be liable to warrant failures of warranted parts caused by the use of a |
• YouareresponsibleforpresentingyourenginetoaB&Sdistributioncenter,servicing |
|
non-exempted add-on or modified part. |
dealer, or other equivalent entity, as applicable, as soon as a problem exists. The |
|
|
warranty repairs should be completed in a reasonable amount of time, not to exceed |
3. |
Consequential Coverage |
30days.Ifyouhaveanyquestionsregardingyourwarrantyrightsandresponsibilities, |
|
Coverage shall extend to the failure of any engine components caused by the failure |
you should contact B&S at 1-800-444-7774 (in USA) or |
|
of any warranted emissions parts. |
BRIGGSandSTRATTON.COM. |
4. |
Claims and Coverage Exclusions |
|
||
|
|
WarrantyclaimsshallbefiledaccordingtotheprovisionsoftheB&Senginewarranty |
Briggs & Stratton Emissions Control Warranty Provisions |
|
policy. Warranty coverage does not apply to failures of emissions parts that are not |
|
original equipment B&S parts or to parts that fail due to abuse, neglect, or improper |
|
ThefollowingarespecificprovisionsrelativetoyourEmissionsControlWarrantyCoverage. |
|
maintenance as set forth in the B&S engine warranty policy. B&S is not liable for |
ItisinadditiontotheB&Senginewarrantyfornon-regulatedenginesfoundintheOperator's |
|
warranty coverage of failures of emissions parts caused by the use of add-on or |
Manual. |
|
modified parts. |
1.Warranted Emissions Parts
Coverage under this warranty extends only to the parts listed below (the emissions
control systems parts) to the extent these parts were present on the B&S engine. |
Look For Relevant Emissions Durability Period and Air Index |
|
a. Fuel Metering System |
Information On Your Small Off-Road Engine Emissions Label |
|
Engines that are certified to meet the California Air Resources Board (CARB) small off- |
||
|
||
• Cold start enrichment system (soft choke) |
road Emissions Standard must display information regarding the Emissions Durability |
|
• Carburetor or fuel injection system |
PeriodandtheAirIndex.Briggs&Strattonmakesthisinformationavailabletotheconsumer |
|
on our emissions labels. The engine emissions label will indicate certification information. |
||
• Oxygen sensor |
||
|
|
• |
Electronic control unit |
|
The Emissions Durability Period describes the number of hours of actual running time |
|
• |
Fuel pump module |
|
for which the engine is certified to be emissions compliant, assuming proper maintenance |
|
|
in accordance with the Operator's Manual. The following categories are used: |
||
|
|
|
|
|
b. |
Air Induction System |
|
Moderate: |
|
|
• |
Air cleaner |
|
Engines at or less than 80 cc displacement are certified to be emissions compliant for 50 |
|
• |
Intake manifold |
|
hours of actual engine running time. Engines greater than 80 cc displacement are certified |
|
|
|
for |
to be emissions compliant for 125 hours of actual engine running time. |
c. |
Ignition System |
Intermediate: |
||
|
|
|
||
|
• |
Spark plug(s) |
Engines at or less than 80 cc displacement are certified to be emissions compliant for 125 |
|
|
• |
Magneto ignition system |
||
|
hours of actual engine running time. Engines greater than 80 cc displacement are certified |
|||
|
|
|
to be emissions compliant for 250 hours of actual engine running time. |
|
d.Catalyst System
Extended:
•Catalytic converter
Engines at or less than 80 cc displacement are certified to be emissions compliant for 300
•Exhaust manifold
|
Not |
hours of actual engine running time. Engines greater than 80 cc displacement are certified |
|
• Air injection system or pulse value |
to be emissions compliant for 500 hours of actual engine running time. |
e. |
Miscellaneous Items Used in Above Systems |
Forexample,atypicalwalk-behindlawnmowerisused20to25hoursperyear.Therefore, |
|
• Vacuum, temperature, position, time sensitive valves and switches |
the Emissions Durability Period of an engine with an intermediate rating would equate |
|
to 10 to 12 years. |
•Connectors and assemblies
|
|
Briggs&Strattonenginesare certifiedtomeettheUnitedStatesEnvironmentalProtection |
|
the engine is designed, built, and equipped so as to conformReproductionwith all applicable Category C = 50 hours, Category B = 125 hours, Category A = 300 hours |
|
|
|
Agency (USEPA) Phase 2 or Phase 3 emissions standards. The Emissions Compliance |
2. |
Length of Coverage |
Period referred to the Emissions Compliance label indicates the number of operating |
|
Coverage is for a period of two years from date of original purchase, or for the time |
hours for which the engine has been shown to meet Federal emissions requirements. |
|
period listed in the respective engine or product warranty statement, whichever is |
For engines at or less than 80 cc displacement: |
|
greater.B&Swarrantstotheoriginalpurchaserandeachsubsequentpurchaserthat |
|
|
|
|
|
regulationsadoptedbytheAirResourcesBoard;thatitisfreefromdefectsinmaterial |
For engines greater than 80 cc displacement and less than 225 cc displacement: |
|
and workmanship that could cause the failure of a warranted part; and that it is |
|
|
identical in all material respects to the engine described in the manufacturer's |
Category C = 125 hours, Category B = 250 hours, Category A = 500 hours |
|
application for certification. The warranty period begins on the date the engine is |
|
|
|
|
|
originally purchased. |
For engines of 225 cc or more displacement: |
Category C = 250 hours, Category B = 500 hours, Category A = 1000 hours
The warranty on emissions-related parts is as follows:
• Any warranted part that is not scheduled for replacement as required maintenance in the Operator's Manual supplied, is warranted for the warranty period stated above. If any such part fails during the period of warranty coverage, the part will be repaired or replaced by B&S at no charge to the owner.Anysuchpartrepairedorreplacedunderthewarrantywillbewarranted for the remaining warranty period.
•AnywarrantedpartthatisscheduledonlyforregularinspectionintheOperator's Manual supplied, is warranted for the warranty period stated above. Any such part repaired or replaced under warranty will be warranted for the remaining warranty period.
•Anywarrantedpartthatisscheduledforreplacementasrequiredmaintenance
in the Operator's Manual supplied, is warranted for the period of time prior to
14
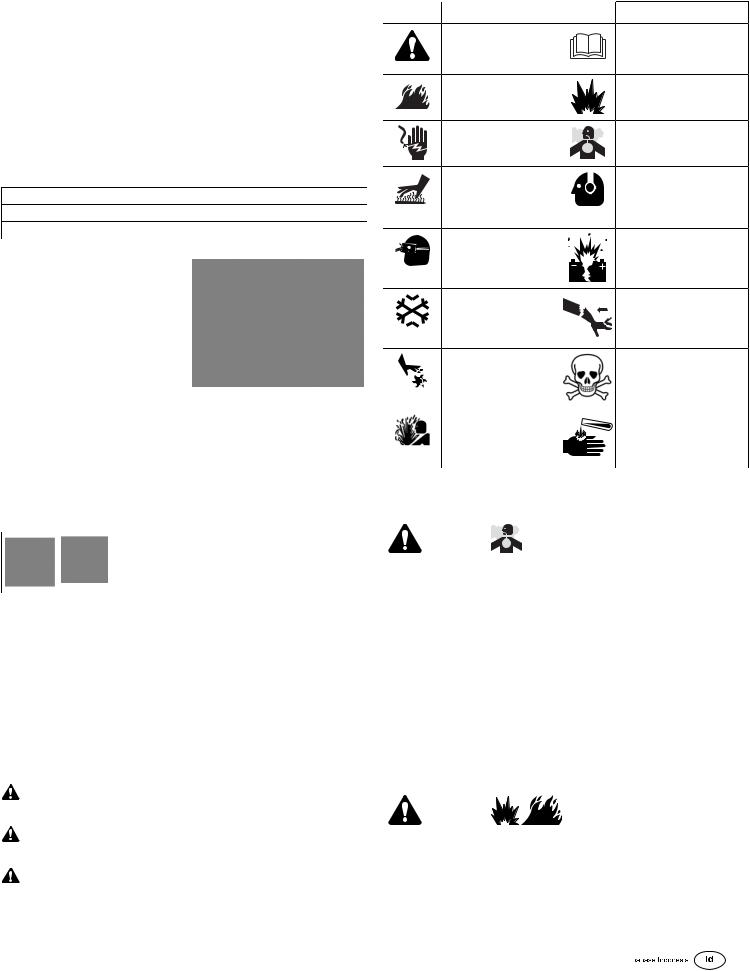
Tanda-tanda Bahaya dan Maknanya
Panduan ini menjelaskan informasi keselamatan pada Anda agar sadar akan bahaya dan |
Simbol |
Makna |
Simbol |
Makna |
|||
|
|
Informasi Keselamatan |
|
|
MembacadanmemahamiBuku |
||
resiko yang berhubungan dengan mesin-mesin dan bagaimana menghindarinya. Selain |
|
|
|
|
|||
itu panduan ini juga memberikan petunjuk-petunjuk untuk menggunakan dan merawat |
|
|
tentang bahaya dapat |
|
|
PanduanPenggunaansebelum |
|
mesin dengan tepat. Perusahaan Briggs & Strattontidak selalu mengetahui peralatan apa |
|
|
menyebabkan cedera |
|
|
menjalankanataumelayaniunit |
|
yangmendukungmesinini,sehinggapentingbilaAndamembacadanmemahamipetunjuk- |
|
|
pribadi. |
|
|
tersebut. |
|
petunjuk yang ada serta panduan untuk peralatan. Simpan buku panduan yang asli |
|
|
Bahaya Kebakaran |
|
|
Bahaya Ledakan |
|
untuk referensi di masa datang. |
|
|
|
|
|
|
|
Perhatikan: Gambar-gambar dan ilustrasi pada buku panduan diberikan hanya untuk |
|
|
|
|
|
|
|
referensisajadanmungkinberbedadarimodelspesifikasiAnda.HubungidistributorAnda |
|
|
Bahaya Sengatan |
|
|
Bahaya Asap Beracun |
|
jika ada pertanyaan. |
|
|
|
|
|
||
Untuk penggantian suku cadang atau bantuan teknis, silakan catat model, tipe, dan kode |
|
|
|
|
|
|
|
nomormesinbesertatanggalpembeliannya.Nomor-nomoriniditempatkandimesinAnda |
|
|
|
|
|
|
|
(lihat bagianfitur dan kontrol). |
|
|
|
Bahaya Permukaan Panas |
|
|
Bahaya Suara – |
|
|
|
|
|
|||
Tanggal Pembelian |
|
|
|
|
|
|
Direkomendasikan |
|
|
|
|
|
|
||
|
|
|
|
|
|
menggunakan tutup telinga |
|
Model Mesin - Tipe – Kondisi |
|
|
|
|
|
|
untuk penggunaan |
|
|
|
|
|
|
berkepanjangan. |
|
Nomor Seri Mesin |
|
|
|
|
|
|
|
|
|
|
Bahaya Dilempar Benda – |
|
|
Bahaya Ledakan |
|
|
|
|
|
|
|
||
|
|
|
|
Menggunakan penutup |
|
|
|
Cari barcode 2D yang ditempatkan pada |
|
|
|
mata. |
|
|
|
beberapa mesin. Jika dilihat dari perangkat |
|
|
|
|
|
|
|
dengan sistem 2D, maka kode akan |
|
|
|
|
|
|
|
memunculkan website kami di mana Anda |
|
|
|
Bahaya Frosbite/Radang |
|
|
Bahaya Bantingan |
|
|
|
|
|
|||
bisa mengakses informasi dukungan untuk |
|
|
|
dingin |
|
|
|
produkini.Kecepatandataberlaku.Beberapa |
|
|
|
|
|
|
|
|
|
|
|
|
|
|
|
Negara mungkin tidak memiliki dukungan |
|
|
|
|
|
|
|
|
|
|
|
|
|
|
|
informasi online. |
|
|
|
|
|
|
|
|
|
|
|
Bahaya Amputasi – |
|
|
Bahaya Bahan Kimia |
|
|
|
|
kehilangan bagian tubuh |
|
|
|
Informasi Kontak Kantor Eropa |
|
|
Bahaya Panas |
|
|
Korosi |
|
|
|
|
|
|
|
||
Untuk pertanyaan mengenai emisi Eropa, silakan hubungi kantor Eropa kami yang |
|
|
|
|
|
|
|
beralamatkan di: |
for |
|
|
|
|
|
|
Max-Born-Straße 2, 68519 Viernheim, Germany. |
Pesan Keselamatan |
|
|
|
|||
Informasi Daur Ulang |
|
|
|
||||
|
|
|
|
|
|
||
Semua kemasan, oli bekas, dan baterai harus didaur ulang |
|
PERINGATAN |
|
|
|
||
sesuai aturan pemerintah yang berlaku. |
|
|
|
|
|
||
Not |
|
|
|
|
|
|
|
Simbol Peringatan dan Kata SinyalReproduction |
|
|
|
||||
Produk ini dapat memaparkan Anda pada bahan kimia, termasuk sisa pembakaran bensinyangmenurutNegaraBagianCaliforniadapatmenyebabkankanker,dankarbon monoksida yang menurut Negara Bagian California dapat menyebabkan cacat lahir pada janin atau bahaya reproduksi lainnya. Untuk informasi lebih lanjut, buka www.P65Warnings.ca.gov.
Keselamatan Operator
 PERINGATAN
Keselamatan
Simbol peringatan keselamatan ( ) digunakan untuk mengidentifikasi informasi keselamatan tentang bahaya yang dapat menyebabkan cedera pribadi. Kata sinyal (BAHAYA,PERINGATAN,atauPERHATIAN)digunakandengansimbolperingatanuntuk mengindikasikan kemungkinan dan potensi keparahan cedera. Selain itu, simbol bahaya dapat digunakan untuk menunjukkan jenis bahaya.
BAHAYA menunjukkan bahaya yang, jika tidak dihindari, akan menyebabkan |
|
|
kematian atau cedera serius. |
PERINGATAN |
|
|
||
PERINGATANmenunjukkanbahayayang,jikatidakdihindari,dapatmenyebabkan |
Bahan bakar dan uapnya sangat mudah terbakar dan meledak. |
|
kematian atau cedera serius. |
Kebakaranatauledakandapatmenyebabkanlukabakaryangparahataukematian. |
|
|
||
PERHATIAN menunjukkan bahaya yang, jika tidak dihindari, dapat menyebabkan |
Saat Menambahkan Bahan Bakar |
|
cedera ringan atau sedang. |
• Matikan mesin dan biarkan menjadi dingin selama 2 menit sebelum melepas tutup |
|
PEMBERITAHUAN menunjukkan situasi yang dapat menyebabkan kerusakan pada |
bahan bakar. |
|
• Lakukanpengisiantangkibahanbakardiluarruanganataudiareaberventilasibaik. |
||
produk. |
15
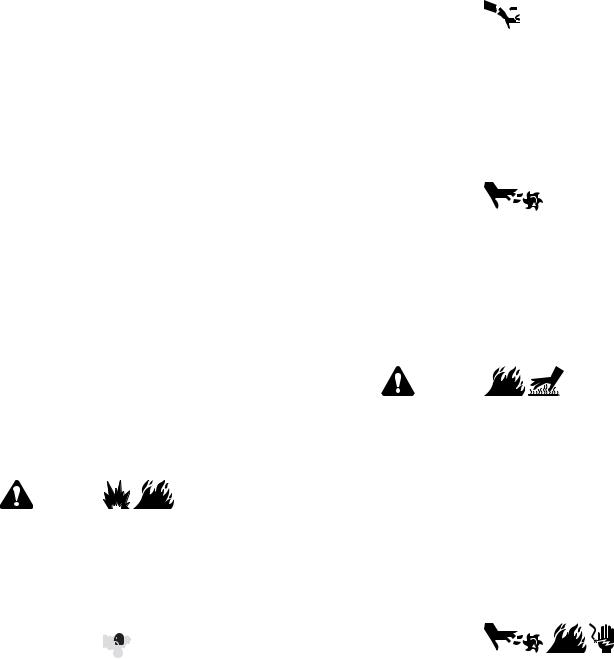
•Jangan isi tangki secara berlebihan. Agar bahan bakar dapat menyebar di dalam tangki, jangan lakukan pengisian di atas bagian dasar leher tangki bahan bakar.
•Jauhkan bahan bakar dari percikan api, nyala api, lampu penunjuk, panas, dan sumber pemicu api lainnya.
•Periksa saluran bahan bakar, tangki, tutup tangki, dan pengepas secara rutin untuk melihat apakah ada keretakan atau kebocoran. Ganti jika perlu.
•Jikabahanbakartumpah,tungguhinggatumpahannyamenguapsebelummenstarter mesin.
Saat Menyalakan Mesin
•Pastikan bahwa busi, knalpot, tutup tangki, dan pembersih udara (jika ada) berada pada tempatnya dan terpasang dengan erat.
•Jangan menghidupkan mesin saat busi dilepas.
•Jika mesin mengalami banjir, setel cuk (jika dilengkapi) ke posisi OPEN / RUN, pindahkan trotel (jika dilengkapi) ke posisi FAST lalu putar sampai mesin menyala.
Saat Mengoperasikan Peralatan
•Jangan miringkan mesin atau peralatan, sehingga menyebabkan bahan bakar tumpah.
•Jangan menggunakan cuk karburator untuk menghentikan mesin.
•Janganstarteratauoperasikanmesindenganpembersihudarayangterpasang(jika dilengkapi) atau filter udara (jika dilengkapi) yang dilepas.
Saat Mengganti Oli
•Jika Anda menguras oli dari tabung pengisian oli atas, tangki bahan bakar harus kosong,karenabilatidak,bahanbakarbisabocorkeluardanmenimbulkankebakaran atau ledakan.
angin atau pintu dan jendela yang terbuka sebagai ventilasi. Karbon monoksida dapat terkumpul dengan cepat di berbagai tempat tersebut dan bertahan selama berjam-jam, bahkan setelah produk ini dimatikan.
•SELALU letakkan produk ini sesuai arah angin dan posisikan saluran gas buang mesin menjauh dari tempat hunian manusia.
 PERINGATAN
Retraksi cepat tali starter (hentakan balik) akan menarik tangan dan lengan ke arah mesin lebih cepat dari yang dapat Anda perkirakan.
Ini dapat berakibat patah tulang, tulang retak, memar, atau terkilir.
•Saat menstarter mesin, tarik tali starter perlahan-lahan sampai dirasakan tertahan dan kemudian tarik dengan cepat untuk menghindari hentakan balik.
•Lepaskan semua beban peralatan/ mesin eksternal sebelum menstarter mesin.
•Komponen peralatan yang digabungkan langsung seperti, namun tidak terbatas pada, pisau, impeler, puli, sproket, dsb, harus terpasang dengan kuat.
 PERINGATAN
Suku cadang yang berputar dapat mengenai atau menarik tangan, kaki, rambut, pakaian, atau aksesori.
Amputasi traumatik atau laserasi berat dapat terjadi.
• Operasikan peralatan dengan pelindung terpasang di tempatnya.
• Saatmelakukanperawatanyangmengharuskanagarunitdimiringkan,tangkibahan |
• Jauhkan tangan dan kaki dari suku cadang yang berputar. |
|||
bakar, jika terpasang pada mesin, harus kosong karena bila tidak, bahan bakar bisa |
||||
• Ikat rambut yang panjang dan lepas perhiasan. |
||||
bocor keluar dan mengakibatkan kebakaran atau ledakan. |
||||
• Jangan mengenakan pakaian yang longgar , tali celana yang menggantung, atau |
||||
|
|
|
||
Saat Memindahkan Peralatan |
|
|
benda yang dapat tersangkut. |
|
|
|
|
||
• AngkutdengantangkibahanbakarKOSONGataukatuppenutupbahanbakarpada |
|
|||
posisi TERTUTUP. |
|
|
|
|
Saat Menyimpan Bahan Bakar Atau Peralatan Dengan Bahan Bakar di Tangki |
PERINGATAN |
|||
Mesinyangaktifmenghasilkanpanas.Bagianmesin,terutamaknalpot,mengalami |
||||
|
|
|
||
• Jauhkan peralatan dari tungku, kompor, alat pemanas air, atau perangkat lainnya |
peningkatan suhu yang drastis. |
|||
yang dilengkapi lampu utama maupun sumber penyalaan lainnya karena dapat |
Menyentuhnya akan menyebabkan luka bakar parah . |
|||
menyulut uap bahan bakar. |
|
for |
||
|
|
Serpihanyangmudahterbakar,sepertidaun,rumput,sikat,dll.dapattersulutapi. |
||
|
|
|
||
|
|
|
• Biarkan knalpot, silinder mesin, dan sirip mendingin sebelum menyentuhnya. |
|
PERINGATAN |
|
|
• Bersihkan tumpukan kotoran dari bagian knalpot dan bagian silinder. |
|
|
|
• Merupakan pelanggaran California Public Resource Code, Pasal 4442, jika |
||
Menstarter mesin akan menghasilkan bunga api. |
|
|||
|
menggunakan atau mengoperasikan mesin di lahan yang tertutup hutan, tertutup |
|||
|
|
|
||
Bunga api dapat menyulut gas yang mudah terbakar di dekatnya. |
semak, atau tertutup rumput kecuali sistem pembuangannya dilengkapi dengan |
|||
|
Not |
pelindung percikan (spark arrester), sebagaimana disebutkan dalam Pasal 4442, |
||
|
|
Reproduction |
||
Ledakan dan kebakaran dapat terjadi. |
yang dirawat dan dapat bekerja dengan baik. Yurisdiksi federal atau negara bagian |
|
|
lainnyamungkinmemilikiundang-undangyangserupa.Hubungiprodusenperalatan |
|
• Jika terdapat kebocoran gas alam atau LP di suatu area, jangan menstarter mesin. |
asli, peritel, atau dealer untuk memperoleh spark arrester yang dirancang untuk |
|
sistem pembuangan yang dipasang pada mesin ini. |
||
• Jangan menggunakan cairan starter bertekanan karena uapnya mudah terbakar. |
||
|
 PERINGATAN
BAHAYA GAS BERACUN. Gas pembuangan mesin mengandung karbon monoksida,yaknigasberacunyangdapatmematikandalamhitunganmenit.Anda TIDAK DAPAT melihatnya, menciumnya, atau merasakannya. Meskipun Anda tidakmenciumasapgasbuang,Andamasihbisaterpapargaskarbonmonoksida. JikaAndamulaimerasatidakenakbadan,pusing,ataulemassaatmenggunakan produkini,matikandanSEGERAcariudarasegar.Kunjungidokter.Andamungkin keracunan karbon monoksida.
•Operasikan produk ini HANYA jika berada di luar ruangan, jauh dari jendela, pintu, dan ventilasi untuk mengurangi risiko akumulasi gas karbon monoksida yang berpotensi masuk ke dalam ruang hunian manusia.
•Pasanglah alarm karbon monoksida bertenaga baterai atau sambungkan alarm karbon monoksida ke stopkontak listrik dengan baterai cadangan berdasarkan petunjuk produsen. Alarm asap tidak dapat mendeteksi gas karbon monoksida.
•JANGAN mengoperasikan produk ini di dalam rumah, garasi, ruang bawah tanah, kolong, gudang, atau ruang yang tertutup sebagian lainnya, bahkan dengan kipas
 PERINGATAN
Bunga api yang timbul secara tidak sengaja dapat menyebabkan kebakaran atau sengatan listrik.
Starteryangtimbulsecaratidakdisengajadapatmengakibatkanbelitan,amputasi traumatik, atau laserasi.
Bahaya kebakaran
Sebelum melakukan penyesuaian atau perbaikan:
•Lepas kabel busi dan jauhkan dari busi.
•Lepaskan terminal negatif baterai (hanya pada mesin dengan starter elektrik.)
•Hanya gunakan alat yang tepat.
•Jangan utak-atik pegas governor, persambungan, atau komponen lainnya untuk menambah kecepatan mesin.
•Komponen pengganti harus sama dan dipasang pada posisi yang sama seperti komponenasli.Komponenlainjugamungkintidakakanberfungsidenganbaik,bisa merusak unit, dan dapat mengakibatkan cedera.
16 |
BRIGGSandSTRATTON.com |
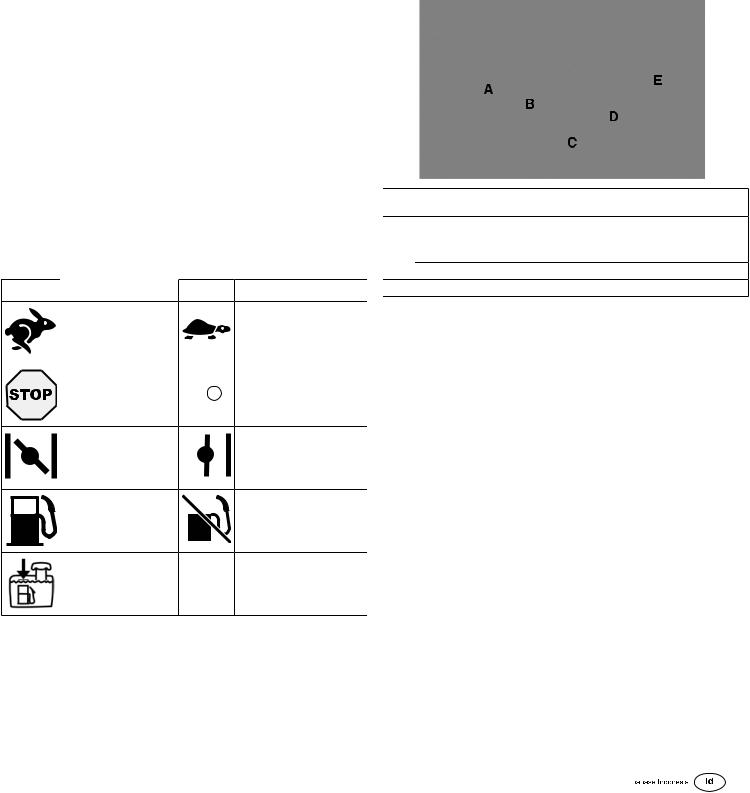
•Jangan membenturkan roda gila dengan palu atau benda yang keras karena roda gila bisa pecah selama pengoperasian berlangsung.
Saat menguji bunga api:
•Gunakan tester busi yang disetujui.
•Jangan periksa cetusan listrik saat busi dilepas.
Fitur dan Kontrol
Kontrol Mesin
BandingkanIlustrasi(Gambar:1,2,3)denganmesinAndauntukmemahamilokasiberbagai fitur dan kontrol.
A.Nomor Identifikasi Mesin Model - Tipe - Kode
PEMBERITAHUAN
Mesin ini dikirim dari Briggs & Stratton tanpa oli. Pabrik peralatan atau dealer mungkin telah menambahkan oli pada mesin. Sebelum menstarter mesin untuk pertama kali, pastikanAndamemeriksalevelolidanmenambahkanolisesuaidenganpetunjukdalam panduan ini. Jika Anda menstarter mesin tanpa oli, mesin akan rusak secara permanen dan tidak akan ditanggung oleh garansi.
Kami menyarankan Anda agar menggunakan Oli Resmi Bergaransi Briggs & Stratton® untuk mendapatkan performa terbaik. Oli detergen berkualitas tinggi lainnya dapat digunakan jika tergolong untuk servis SF, SG, SH, SJ atau yang lebih tinggi. Jangan gunakan bahan aditif khusus.
Suhu luar ruangan menentukan viskositas oli yang tepat untuk mesin. Gunakan bagan berikut untuk memilih viskositas terbaik untuk perkiraan kisaran suhu luar ruangan. Mesin padaperalatandayaluarruanganbekerjabaikdenganOliSintetis5W-30.Untukperalatan yang dioperasikan pada suhu panas, Oli Sintetis Vanguard™ 15W-50 memberikan perlindungan yang terbaik.
L.Karburator
M.Filter Bahan Bakar (jika dilengkapi)
N. Pompa Bahan Bakar (jika dilengkapi) |
|
|
A |
SAE 30 - Pada suhu di bawah 40°F (4°C), penggunaan oli SAE 30 akan |
|
O. Penguras Oli Cepat (jika dilengkapi) |
|
|
|
mengakibatkan penstarteran yang sulit. |
|
P. Unit Kontrol Elektronik (jika dilengkapi) |
|
B |
10W-30 - Pada suhu di atas 80°F (27°C), penggunaan oli 10W-30 dapat |
||
|
|
|
|
|
menyebabkan bertambahnya konsumsi oli. Periksa level oli secara lebih sering. |
Simbol Kontrol Mesin dan Artinya |
C |
5W-30 |
|||
D |
Sintetis 5W-30 |
||||
Simbol |
Arti |
Simbol |
|
E |
Sintetis 15W-50 Vanguard™ |
Arti |
|
||||
|
|
|
Reproduction |
||
Kecepatan mesin - LAMBAT
|
|
|
|
|
|
for |
Periksa Level Oli |
|
|
|
|
|
|
|
Lihat Gambar: 4 |
||
Kecepatan mesin - STOP |
|
|
|
|
|
NYALA - MATI |
Sebelum menambahkan atau memeriksa oli |
|
|
|
|
|
|
|
|
||
|
|
|
|
|
|
|
• |
Pastikan level mesin. |
|
|
|
|
|
|
|
||
|
|
|
|
|
|
|
• Bersihkan daerah pengisian oli dari runtuhan apapun. |
|
|
|
|
|
|
|
|
||
Mesin start - Cuk CLOSED |
|
|
NotMesin start - Cuk OPEN |
1. |
Lepaskan batang celup (A, Gambar 4) dan bersihkan dengan kain bersih. |
|||
|
|
2. |
Pasang dan kencangkan batang celup (A, Gambar 4). |
|||||
|
|
|
|
|
|
|
||
|
|
|
|
|
|
|
3. |
Lepaskan batang celup dan periksa level oli. Level oli yang baik adalah berada di |
|
|
|
|
|
|
|
|
bagian atas dari indikator penuh (B, Gambar 4) pada batang celup. |
Tutup Bahan Bakar |
|
|
|
|
|
PenutupBahanBakar-TUTUP |
4. |
Jika level oli rendah, tuangkan oli perlahan-lahan ke dalam lubang pengisian oli (C, |
|
|
|
|
|
|
Gambar 4). Jangan mengisi terlalu penuh. Setelah menambahkan oli, tunggu |
||
|
|
|
|
|
|
|||
Penutup Bahan Bakar - |
|
|
|
|
|
|
|
sebentar dan kemudian periksa kembali level oli. |
BUKA |
|
|
|
|
|
|
Perhatikan: Jangan tambahkan oli ke penguras oli cepat, jika dilengkapi. Untuk lokasi, |
|
|
|
|
|
|
|
|
||
Level bahan bakar - |
|
|
|
|
|
|
lihat |
Fitur dan Kontrol. |
|
|
|
|
|
|
5. |
Pasang kembali dan kencangkan batang celup (A, Gambar 4). |
|
Maksimum |
|
|
|
|
|
|
||
Jangan mengisi terlalu |
|
|
|
|
|
|
|
|
penuh |
|
|
|
|
|
|
|
|
Operasi
Rekomendasi Oli
Kapasitas Oli: Lihat bagian Spesifikasi.
SistemPerlindunganMinyakRendah(jika dilengkapi)
Beberapa mesin dilengkapi dengan sensor minyak rendah. JIka tingkat minyak rendah, makasensorakanmengaktifkanlampuperingatanataumenghentikanmesinnya.Matikan mesin dan ikuti langkah-langkah berikut sebelum menyalakan kembali mesin.
•Pastikan kualitas mesin.
•Periksa tingkat minyak. Lihat bagian Pemeriksaan Tingkat Minyak.
•JIka tingkat minyak rendah, tambahkan jumlah minyak yang semestinya. Nyalakan mesin dan pastikan lampu peringatan (jika dilengkapi) tidak diaktifkan.
17
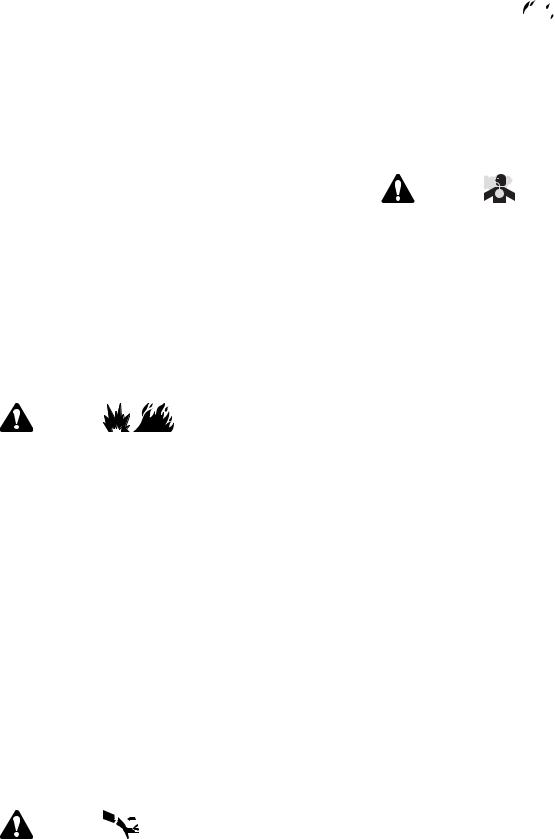
•Jika tingkat minyak tidak rendah, jangan menyalakan mesin. Hubungi Distributor Resmi Briggs & Stratton untuk memperbaiki masalah tingkat minyak.
Rekomendasi Bahan Bakar
Bahan bakar harus memenuhi persyaratan ini:
•Bensin yang bersih, segar, dan tanpa timbal.
•Oktan minimum 87/87 AKI (91 RON). Penggunaan di tempat tinggi, lihat di bawah.
•Bensin dengan kandungan hingga 10% etanol (gasohol) dapat diterima.
PEMBERITAHUAN Jangan gunakan bensin yang tidak disetujui, seperti E15 dan E85.Janganmencampurkanolikedalambensinataumemodifikasimesinuntukberjalan dengan bahan bakar lain. Penggunaan bahan bakar yang tidak disetujui akan merusak komponen mesin, yang tidak akan ditanggung dalam garansi.
Untuk melindungi sistem bahan bakar dari pembentukan ampas, campurkan stabilisator bahanbakarkedalambahanbakar.LihatPenyimpanan.Tidaksemuabahanbakarsama. Jika mesin sulit dihidupkan atau performanya buruk, ganti penyedia bahan bakar atau ganti merek bahan bakar. Mesin ini disertifikasi untuk beroperasi menggunakan bensin. Sistem kontrol emisi untuk mesin ini adalah EM (Engine Modifications [Modifikasi Mesin]).
•Saat menstarter mesin, tarik tali starter perlahan-lahan sampai dirasakan tertahan dan kemudian tarik dengan cepat untuk menghindari hentakan balik.
 PERINGATAN

Bahan bakar dan uapnya sangat mudah terbakar dan meledak.
Kebakaran atau ledakan dapat menyebabkan luka bakar parah atau kematian.
Saat Menstarter Mesin
•Pastikan bahwa busi, knalpot, tutup tangki dan pembersih udara (jika dilengkapi) berada di tempatnya dan terpasang erat.
•Jangan mengengkol mesin dengan kondisi busi dilepas.
•Jika mesin banjir, setel cuk (jika dilengkapi) ke posisi OPEN / RUN, pindahkan trotel (jika dilengkapi) ke posisi FAST lalu engkol sampai mesin menyala.
Ketinggian tinggi |
|
BAHAYA GAS BERACUN. Gas buang mesin mengandung karbon monoksida, |
||
Di ketinggian lebih dari 5000 kaki (1524 meter), bahan bakar minyak minimal 85oktan/85 |
yakni gas beracun yang dapat mematikan dalam hitungan menit. Anda TIDAK |
|||
AKI (89 RON) dapat diterima. |
|
DAPAT melihatnya, menciumnya, atau merasakannya. Meskipun bau asap |
||
|
|
pembuangantidakdapattercium,Andatetapdapatterkenagaskarbonmonoksida. |
||
Untuk mesin karburator, pengaturan ketinggian diperlukan untuk menjaga kinerja kerja. |
Jika Anda mulai merasa sakit, pusing, atau lemah saat menggunakan produk ini, |
|||
Aktivitas tanpa pengaturan ketinggian dapat menyebabkan kinerja kerja menurun, |
matikan dan SEGERA cari udara segar. Kunjungi dokter. Anda mungkin telah |
|||
peningkatankonsumsibahanbakar,danpeningkatanemisi/gasbuang.HubungiDistributor |
keracunan karbon monoksida. |
|||
Resmi Briggs & Stratton untuk informasi tentang pengaturan ketinggian. Aktivitas mesin |
|
|
||
di bawah ketinggian 2500 kaki (762 meter) tidak dianjurkan menggunakan pengaturan |
|
• Operasikan produk ini HANYA di luar ruangan, jauh dari jendela, pintu, dan ventilasi |
||
ketinggian. |
|
|
||
|
|
untuk mengurangi risiko terkumpulnya gas karbon monoksida dan potensi terisap |
||
|
|
|
||
UntukmesinyangmenggunakanInjeksiBahanBakarElektronik(IBBE)tidakmemerlukan |
|
ke dalam ruangan tempat produk berada. |
||
pengaturan ketinggian. |
|
|
• Pasang alarm karbon monoksida yang dioperasikan menggunakan baterai atau |
|
Mengisi bahan bakar |
|
|
pasang alarm karbon monoksida dengan pencadangan baterai sesuai dengan |
|
|
|
petunjuk produsen. Alarm asap tidak dapat mendeteksi gas karbon monoksida. |
||
|
|
• JANGANmenjalankanprodukinididalamrumah,garasi,ruangbawahtanah,kolong, |
||
Lihat Gambar: 5 |
|
|
||
|
|
gudang, atau ruang tertutup sebagian lainnya meskipun menggunakan kipas atau |
||
|
|
|
||
|
|
|
membukapintudanjendelauntuktujuanventilasi.Karbonmonoksidadapatterkumpul |
|
|
|
|
dengan cepat di dalam ruang-ruang tersebut dan tetap ada selama berjam-jam, |
|
PERINGATAN |
|
|
meskipun produk ini telah dimatikan. |
|
Uap bahan bakar merupakan bahan mudah terbakar dan meledak. |
|
• SELALUposisikanprodukiniberlawanandenganarahangindanarahkangasbuang |
||
Kebakaran atau ledakan dapat menyebabkan luka bakar berat atau kematian. |
|
mesin menjauhi ruangan di dekatnya. |
||
|
|
|||
Ketika mengisi bahan bakar |
for |
PEMBERITAHUAN Mesin ini dikirim dari Briggs & Stratton tanpa diisi oli. Sebelum |
||
Anda menstarter mesin, pastikan Anda menambahkan oli sesuai dengan petunjuk di |
||||
|
dalampanduanini.JikaAndamenstartermesintanpaoli,akanmenyebabkankerusakan |
|||
• Matikan mesin dan biarkan mesin dingin selama kurang lebih 2 menit sebelum |
||||
berat dan tidak akan ditanggung oleh garansi. |
||||
membuka tutup bahan bakar. |
|
|||
|
|
|
||
• Isi tangki bahan bakar di luar ruangan atau di tempat berventilasi baik. |
Tentukan Sistem Penstarteran |
|||
• Jangan memenuhi sampai melimpahi tangki bahan bakar. Untuk memungkinkan |
Sebelum menstarter mesin, Anda harus menentukan tipe sistem penstarteran yang ada |
|||
terjadinya ekspansi bahan bakar, jangan mengisi lebih dari leher tangki bagian |
||||
bawah. |
|
pada mesin Anda. Mesin Anda memiliki salah satu tipe berikut. |
||
• Jauhkan bahan bakar dari percikan api, nyalaNotapi, lampu senter,panas, dan sumber |
|
• Sistem ReadyStart®: Ini mengutamakan cUk otomatis yang dikontrol temperatur. |
||
api lainnya. |
|
|
Tipe ini tidak memiliki sistem pemancing. |
|
• Periksa saluran, tangki, tutup bahan bakar, dan peralatan yang digunakan sesering |
|
• SistemPengelolaanBahanBakarElektronik: SisteminimenonjolkanUnitKontrol |
||
mungkinuntukmenghindariretakataukebocoran.Gantidenganyangbarubilaperlu. |
|
Elektronik yang mengawasi mesin dan kondisi suhu. Tipe ini tidak mempunyai cuk |
||
• Bila bahan bakar tumpah, tunggu sampai menguap sebelum menyalakan mesin. |
|
manual atau primer. |
||
|
Reproduction |
|||
|
|
|
• Sistem Cuk: Sistem ini memiliki cuk yang akan digunakan untuk melakukan |
|
1. Bersihkan tutup bahan bakar dari kotoran dan serpihan-serpihan. Buka tutup bahan |
|
penstarteran pada suhu dingin. Beberapa model memiliki kontrol cuk terpisah |
||
bakar. |
|
|
sementara yang lainnya memiliki kombinasi cuk/trotel. Tipe ini tidak memiliki sistem |
|
2. Isi tangki bahan bakar (A,Gambar 5) dengan bahan bakar. Untuk memungkinkan |
|
pemancing. |
||
|
|
|||
terjadinyaekspansibahanbakar,janganmengisilebihdarilehertangkibagianbawah |
Untuk menstarter mesin Anda, ikuti petunjuk untuk tipe sistem penstarteran Anda. |
|||
(B). |
|
Perhatikan: Peralatan dapat memiliki kontrol jarak jauh. Lihat panduan peralatan untuk |
||
3. Pasang kembali tutup bahan bakar. |
|
|||
|
mengetahui mencari lokasi dan pengoperasian jarak jauh. |
|||
Menyalakan dan Mematikan Mesin |
Sistem ReadyStart® |
|||
Lihat Gambar: 6 |
|
1. |
Periksa oli mesin. Lihat bagian Memeriksa Tingkat Oli . |
|
Nyalakan Mesin |
|
2. Pastikan kontrol penggerak peralatan, jika dilengkapi, dalam kondisi dinonaktifkan. |
||
|
|
3. |
Pindahkan penutup bahan bakar (A, Gambar 6), jika dilengkapi, ke posisi OPEN. |
|
PERINGATAN |
|
4. |
Pindahkan kontrol trotel (B, Gambar 6), jika dilengkapi, ke posisi FAST. Operasikan |
|
|
|
mesin pada posisi FAST. |
||
Kembalinya tali starter secara cepat (hentakan balik) akan menarik tangan dan |
|
|||
|
|
|||
lengan ke arah mesin lebih cepat dari saat Anda melepaskannya. |
Perhatikan: Untuk memulai pada temperatur cuaca dingin (di bawah 32° F), pindahkan |
|||
|
|
tuas kombinasi cuk/trotel (B C, Gambar 6) ke posisi CHOKE. |
||
BRIGGSandSTRATTON.com
5.Sakelar Kunci, jika dilengkapi: Putar sakelar kunci (D, Gambar 6) ke posisi ON/START.
Tombol Start/Stop, jika dilengkapi: Tekan tombol start/stop (F, Gambar 6).
PEMBERITAHUAN Untuk memperpanjang masa pakai starter, gunakan siklus penstarteran singkat (maksimum lima detik). Tunggu satu menit di antara siklus penstarteran.
Perhatikan: Jika mesin tidak menyala setelah upaya berulang, hubungi dealer setempat atau buka BRIGGSandSTRATTON.com atau hubungi 1-800-233-3723 (di AS).
PEMBERITAHUAN Untuk memperpanjang masa pakai starter, gunakan siklus penstarteran singkat (maksimum lima detik). Tunggu satu menit di antara siklus penstarteran.
9.Setelah mesin panas, pindahkan kontrol cuk (C, Gambar 6) ke posisi OPEN. Untuk model dengan kombinasi kontrol cuk/trotel (B C), pindahkan kontrol ke posisi FAST.
Perhatikan: Jika mesin tidak menyala setelah upaya berulang, hubungi dealer setempat atau buka BRIGGSandSTRATTON.com atau hubungi 1-800-233-3723 (di AS).
Sistem Pengelolaan Bahan Bakar Elektronik |
Matikan Mesin |
|
|
||
1. |
Periksa oli mesin. Lihat bagian Memeriksa Tingkat Oli . |
PERINGATAN |
2. |
Pastikan kontrol penggerak peralatan, jika dilengkapi, dalam kondisi dinonaktifkan. |
Bahan bakar dan uapnya sangat mudah terbakar dan meledak. |
3. |
Pindahkan penutup bahan bakar (A, Gambar 6), jika dilengkapi, ke posisi OPEN. |
Kebakaran atau ledakan dapat menyebabkan luka bakar parah atau kematian. |
4.Pindahkan kontrol trotel (B, Gambar 6), jika dilengkapi, ke posisi FAST. Operasikan
mesin pada posisi FAST. |
• Jangan menggunakan cuk karburator untuk menghentikan mesin. |
|
5.Starter Putar Balik, jika dilengkapi: Putar sakelar kunci (D, Gambar 6) ke posisi
|
ON/START. |
|
|
1. |
Sakelar Kunci, jika dilengkapi: Dengan kontrol trotel dalam posisi FAST, putar |
|
6. Starter Putar Balik, jika dilengkapi: Tahan dengan kuat gagang kabel starter (E, |
|
sakelar kunci (D, Gambar 6) ke posisi OFF. Lepas kunci dan simpan di tempat yang |
||||
|
Gambar 6). Tarik gagang kabel starter perlahan-lahan sampai resistensi dirasakan, |
|
aman, jauh dari jangkauan anak-anak. |
|||
|
kemudian tarik cepat. |
|
|
|
Tombol Start/Stop, jika dilengkapi: Dengan kontrol trotel di posisi FAST, tekan |
|
|
|
|
|
|
tombol START/STOP (F, Gambar 6). |
|
|
|
|
|
2. |
Setelah mesin berhenti, putar katup penutup bahan bakar (A, Gambar 6), jika |
|
|
PERINGATAN |
|
|
|
dilengkapi, ke posisi CLOSED. |
|
|
|
|
|
|
||
Kembalinya tali starter secara cepat (hentakan balik) akan menarik tangan dan lengan |
Pemeliharaan |
|||||
Anda ke arah mesin lebih cepat dari saat Anda melepaskannya. Hal tersebut bisa |
||||||
mengakibatkan patah tulang, keretakan tulang, memar, atau keseleo. Saat menstarter |
||||||
mesin, tarik tali starter perlahan-lahan sampai dirasakan tertahan dan kemudian tarik |
PEMBERITAHUAN Jika mesin disentuh selama pemeliharaan,maka tangki bahan |
|||||
dengan cepat untuk menghindari hentakan balik. |
|
bakar, yang terpasang pada mesin, harus dalam keadaan kosong dan busi harus |
||||
|
|
|
|
menghadap ke atas. Jika tangki bahan bakar tidak kosong dan mesin disentuh di arah |
||
7. Starter Elektrik, jika dilengkapi: Putar sakelar kunci (D, Gambar 6) ke posisi |
yanglain,kemungkinanmesinakansulitmenyalakarenaoliataubensinakanmencemari |
|||||
|
ON/START. |
|
|
penyaring udara dan/busi. |
||
PEMBERITAHUAN Untuk memperpanjang masa pakai starter, gunakan siklus |
|
|
||||
penstarteran singkat (maksimum lima detik). Tunggu satu menit di antara siklus |
|
PERINGATAN |
||||
penstarteran. |
|
|
|
|||
|
|
Ketika melakukan pemeliharaan yang memerlukan bagian yang disentuh, maka tangki |
||||
|
|
|
|
|||
Perhatikan: Jika mesin tidak menyala setelah upaya berulang, hubungi dealer setempat |
bahan bakar,yang terpasang pada mesin, harus dalam keadaan kosong atau bahan |
|||||
bakar akan bocor dan dapat menyebabkan kebakaran atau ledakan. |
||||||
atau buka BRIGGSandSTRATTON.com atau hubungi 1-800-233-3723 (di AS). |
||||||
|
|
|||||
|
|
|
for |
Kami menyarankan Anda untuk datang ke Distributor Resmi Briggs & Stratton di mana |
||
|
|
|
|
saja untuk semua pemeliharaan and layanan mesin dan bagian-bagian mesin. |
||
Sistem Cuk |
|
|
PEMBERITAHUAN Allthecomponentsusedtobuildthisenginemustremaininplace |
|||
1. |
Periksa oli mesin. Lihat bagian Memeriksa Tingkat Oli . |
|
for proper operation. |
|||
|
|
|
||||
2. |
Pastikan kontrol penggerak peralatan, jika dilengkapi, dalam kondisi dinonaktifkan. |
|
|
|||
3. |
|
Not |
|
|
|
|
Pindahkan penutup bahan bakar (A, Gambar 6), jika dilengkapi, ke posisi OPEN. |
|
PERINGATAN |
||||
4. |
Pindahkan kontrol trotel (B, Gambar 6), jika dilengkapi, ke posisi FAST. Operasikan |
|
||||
Percikan api yang tidak disengaja dapat menyebabkan kebakaran atau sengatan |
||||||
|
mesin pada posisi FAST. |
|
|
|||
|
|
|
listrik. |
|||
5. |
Pindahkan kontrol cuk (C, Gambar 6), ke posisi CLOSED. Untuk model dengan |
|||||
Start-upyangtidakdisengajadapatmenyebabkanlilitan,amputasitraumatik,atau |
||||||
|
|
|
|
|||
|
kombinasi kontrol cuk/trotel (B C), pindahkan kontrol keReproductionposisi CHOKE. |
|||||
luka kulit yang dalam.
Perhatikan: Cuk biasanya tidak diperlukan saat menstarter mesin panas.
6.Starter Putar Balik, jika dilengkapi: Putar sakelar kunci (D, Gambar 6) ke posisi ON/START.
7.Starter Putar Balik, jika dilengkapi: Tahan dengan kuat gagang kabel starter (E, Gambar 6). Tarik gagang kabel starter perlahan-lahan sampai resistensi dirasakan, kemudian tarik cepat.
 PERINGATAN
Kembalinya tali starter secara cepat (hentakan balik) akan menarik tangan dan lengan Anda ke arah mesin lebih cepat dari saat Anda melepaskannya. Hal tersebut bisa mengakibatkan patah tulang, keretakan tulang, memar, atau keseleo. Saat menstarter mesin, tarik tali starter perlahan-lahan sampai dirasakan tertahan dan kemudian tarik dengan cepat untuk menghindari hentakan balik.
8.Starter Elektrik, jika dilengkapi: Putar sakelar kunci (D, Gambar 6) ke posisi ON/START.
Bahaya kebakaran
Sebelum melakukan pengaturan atau perbaikan:
•Lepaskan kabel busi dan jauhkan dari busi.
•Lepaskan baterai terminal negative (hanya mesin dengan tenaga listrik.)
•Gunakan hanya dengan alat-alat yang benar.
•Jangan mengutak-atik alat pengatur, sambungan atau bagian-bagian lain untuk meningkatkan kecepatan mesin.
•Bagian-bagian yang diganti harus mempunyai desain yang sama dan dipasang di tempatyangsamasepertisemula.Bagian-bagianlainnyayangmungkintidakbekerja juga, dapat merusak unit tersebut, dan dapat menyebabkan cedera.
•Janganbenturkanrodagiladenganpaluataubendakeraskarenarodagilanantinya bisa pecah selama aktivitas.
Ketika menguji percikan listrik:
•Gunakan tester busi yang telah disetujui.
•Jangan memeriksa percikan api dari busi yang sudah dilepas.
19
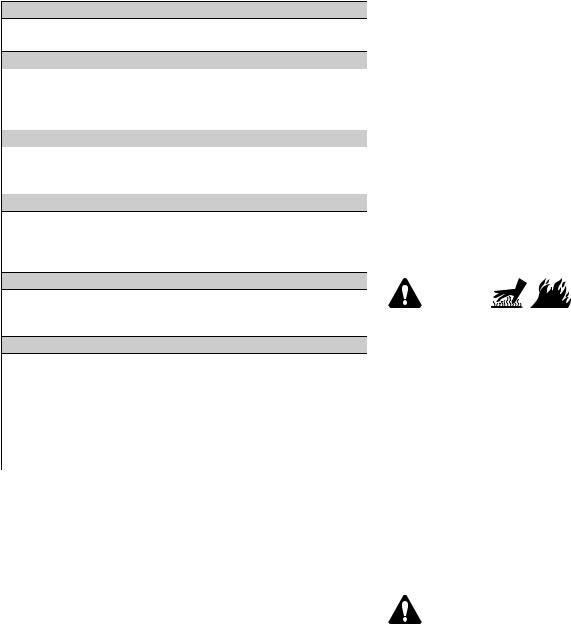
Servis Kontrol Emisi
•Jangan menyemprotkan air secara langsung pada Unit Kontrol Elektronik.
Perawatan, penggantian, atau perbaikan perangkat dan sistem kontrol emisi dapat |
Karburator dan Kecepatan Mesin |
dilakukan oleh lembaga atau individu reparasi mesin off-road. Namun, untuk |
|
mendapatkan servis kontrol emisi "tanpa biaya", pekerjaan harus dilakukan oleh dealer |
|
resmi pabrik. Lihat Pernyataan Kontrol Emisi. |
Jangansekali-kalimelakukanpenyetelanpadakarburatorataukecepatanmesin.Karburator |
|
sudah disetel dari pabriknya untuk bekerja secara efisien dalam kebanyakan kondisi. |
Jadwal Pemeliharaan |
Jangan mengubah-ubah pegas governor, penghubung, atau komponen lain untuk |
mengubah kecepatan mesin. Jika penyesuaian perlu dilakukan, hubungi Dealer Servis |
|
5 Jam pertama |
Resmi Briggs & Stratton untuk diservis. |
|
|
• Ganti oli 3 |
PEMBERITAHUAN Produsen alat menentukan kecepatan maksimum untuk mesin |
saat dipasang pada alat. Jangan melampaui kecepatan ini. Jika Anda tidak yakin |
|
|
berapa kecepatan maksimum mesin, atau berapa kecepatan mesin yang disetel dari |
Setiap 8 Jam atau Setiap hari |
pabriknya,hubungiDealerServisResmiBriggs&Strattonuntukmendapatkanbantuan. |
|
Untukpengoperasianalatsecaraamandanbenar,kecepatanmesinharusdisesuaikan |
• Periksa level oli mesin. |
hanya oleh teknisi servis yang berkualifikasi. |
|
•Bersihkan daerah sekitar knalpot dan kontrol
•Bersihkan Kisi-kisi Masuk Udara
Setiap 25 Jam atau Setiap tahun |
Layanan Busi |
|
Lihat Gambar: 7 |
||
• |
Bersihkan filter udara 1 |
Periksa gap/sela (A, Gambar 7) dengan sebuah kawat pengukur (B). Jika perlu, pasang |
• |
Bersihkan saringan awal udara (jika dilengkapi) 1 |
ulanggap/sela.Pasangdankencangkanbusidengantorsiyangdirekomendasikan.Untuk |
|
|
pengaturan gap/sela atau torsi, lihat bagianspesifikasi. |
Setiap 50 Jam atau Setiap tahun |
Perhatikan:Dibeberapatempat,hukumsetempatmengharuskanpenggunaanbusiresistor |
|
|
|
untuk meredam sinyal pengapian. Jika pada awalnya mesin ini dilengkapi dengan sebuah |
• |
Ganti oli mesin 4 |
busi resistor, maka gunakan jenis busi yang sama untuk penggantian. |
•Ganti filter oli (jika dilengkapi) 4
•Servis sistem pembuangan
Setiap 100 Jam atau Setiap tahun |
|
Layanan Sistem Pembuangan |
||
|
|
|||
• |
Ganti oli mesin 5 |
|
PERINGATAN |
|
• |
Ganti filter oli (jika dilengkapi) 5 |
|
Menjalankan mesin yang menghasilkan panas. Bagian-bagian mesin, khususnya |
|
|
|
for |
peredam suara, menjadi sangat panas. |
|
Setiap tahun |
Luka bakar parah dapat terjadi dari kontak langsung. |
|||
|
||||
|
|
|
||
• |
Ganti busi |
|
Reruntuhanyangmudahterbakar,sepertidaun,rumput,sikat,danlain-laindapat |
|
• |
Ganti filter udara |
|
menimbulkan kebakaran. |
|
|
|
|||
•Ganti saringan awal udara (ika dilengkapi)
• Ganti filter bahan bakar (jika dilengkapi) |
Reproduction |
|||
|
• Biarkan peredam suara, mesin silinder dan sirip menjadi dingin sebelum Anda |
|||
• Servis sistem bahan bakar |
|
menyentuhnya. |
||
• |
Servis sistem pendinginan 1 |
|
• Bersihkan kumpulan serpihan di sekitar peredam suara dan silinder. |
|
• |
Periksa celah katup 2 |
|
• Penggunaan atau pengoperasian mesin di hutan, di semak-semak, atau di daerah |
|
|
|
|
|
rumput dianggap suatu pelanggaran dari Undang-Undang Sumberdaya Publik di |
|
1 |
|
|
California, Pasal 4442,kecuali sistem pembuangan mesinnya dilengkapi dengan |
|
Bersihkan sesering mungkin bila dalam kondisi berdebu atau ada serpihan dari |
pelindungpercikan,sepertiyangditetapkanpadaPasal4442,dandilakukandengan |
||
|
udara. |
|
sistem kerja yang efektif. Negara-negara bagian lainnya atau pemerintah federal |
|
|
2 |
Tidak diperlukan kecuali ditemukan masalah performa mesin. |
mungkin memiliki sistem hukum yang sama. Hubungi produsen, pengecer, atau |
|
|
3 |
Hanya mesin tanpa filter udara. |
|
distributor dari peralatan tersebut untuk mendapatkan pelindung percikan yang |
|
4 |
MesintanpafilteroliataudenganfilteroliNothitamstandar(lihathalaman Spesifikasi |
berfungsi sebagai sistem pembuangan mesin ini. |
|
|
untuk nomor suku cadang). |
|
Bersihkan kumpulan serpihan di sekitar peredam suara dan silinder. Periksa peredam |
|
|
5 |
Mesin dengan filter udara kuning atau oranye yang sangat efisien (lihat halaman |
||
|
Spesifikasi untuk nomor suku cadang). |
|
suara jika ada retak, korosi, atau kerusakan lainnya. Lepaskan pembias atau pelindung |
|
|
|
percikan, jika dilengkapi, dan periksa jika ada kerusakan atau penyumbatan karbon. Jika |
||
|
|
|
|
|
|
|
|
|
menemukan kerusakan, pasang penggantinya sebelum menjalankan mesin. |
Sistem Pengelolaan Bahan Bakar |
Penggantian suku cadang harus mempunyai desain yang sama dan terpasang pada |
|||
Elektronik |
|
|||
|
|
|
|
PERINGATAN |
Sistem Pengelolaan Bahan Bakar Elektronik mengawasi suhu mesin, kecepatan mesin, |
posisi yang sama seperti semula. Suku cadang lain yang tidak berfungsi dengan baik, |
|
dan voltase baterai untuk menyesuaikan cuk selama starter dan memanaskan mesin. |
||
akan dapat merusak bagian tersebut, dan mengakibatkan cedera. |
||
Tidak ada penyesuaian pada sistem. Jika terjadi masalah starter atau operasi, hubungi |
||
|
||
Dealer Briggs & Stratton yang Resmi. |
|
PEMBERITAHUAN PastikanuntukmengikutilangkahberikutatauSistemPengelolaan Bahan Bakar Elektronik dapat rusak.
•Jangan menghidupkan mesin jika kabel baterai longgar.
•Putarkuncikeposisioffsebelummelepassambungan,melepas,dan/ataumemasang baterai.
•Jangan gunakan charger baterai untuk memulai mesin.
Ganti Oli Mesin
Lihat Gambar: 8, 9, 10, 11
Oli bekas adalah produk limbah berbahaya dan harus dibuang dengan benar. Jangan dibuang bersamaan dengan sampah rumah tangga. Hubungi pihak berwenang, pusat layanan, atau distributor terdekat untuk fasilitas pembuangan/daur ulang yang aman.
•Jangan melepaskan kabel baterai selagi mesin menyala.
•Saat menyambungkan kabel baterai, pertama sambungkan kabel positif (+) lalu sambungkan kabel negatif (-) ke baterai.
•Saat mengisi daya baterai, putar anak kunci ke posisi off dan lepaskan kabel baterai negatif (-) dari baterai.
Pindahkan Oli
1.Ketika mesin mati tapi masih panas, cabut kawat busi (D, Gambar 8) dan jauhkan dari busi (E).
2.Lepaskan batang celup (A, Gambar 9).
20 |
BRIGGSandSTRATTON.com |
Penyumbat Oli, jika dilengkapi
1.Lepaskan penyumbat oli (F, Gambar 10). Pindahkan oli ke tempat yang sudah ditentukan.
Perhatikan: Satu penyumbat oli (G, Gambar 10) dapat dipasang di mesin.
2.Setelah oli dipindahkan, pasang dan kencangkan penyumbat oli (F, Gambar 10).
Beragam model menggunakan filter busa atau kertas. Beberapa model juga mempunyai saringan awal udara yang bisa dibersihkan dan digunakan kembali. Berikut perbandingan gambaran pada buku panduan ini dengan jenis yang dipasang di mesin dan servis anda.
Filter Udara Kertas
1.Tarik ke atas pegangan penutup (A, Gambar 12). Putar pegangan penutup ke arah mesin dan lepaskan penutup (B).
2.Lepaskan saringan awal udara (C, Gambar 12), jika dilengkapi, dan filter (D).
Penguras Oli Cepat, jika dilengkapi
1.Lepaskan selang penguras oli cepat (H, Gambar 11) dari sisi mesin.
2.Putardanlepaskanpenutuppenguraspengisioli(I,Gambar11).Turunkanpenguras oli cepat secara perlahan (H) ke dalam wadah yang disetujui (J).
3.Setelah oli dipindahkan, pasang tutup penguras oli cepat (I, Gambar 11). Lepaskan selang penguras oli cepat (H) ke sisi mesin.
Ganti Filter Oli, jika dilengkapi
Beberapamodeldilengkapidengansatufilteroli.Untukintervalpenggantian,lihat Jadwal
Pemeliharaan.
1.Pindahkan oli dari mesin. Lihat Bagian Pengeluaran Oli .
2.Lepaskan filter oli (K, Gambar 9) dan buang dengan benar.
3.Sebelum Anda memasang filter oli yang baru, oleskan sedikit pelumas yang bersih pada gasket filter oli.
3.Untuk menghilangkan reruntuhan, tekan filter dengan hati-hati (D, Gambar 12) di permukaan yang keras. Jika filter sangat kotor, ganti dengan filter baru.
4.Bersihkansaringanawaludara(C,Gambar12)dalamairyangdibericairandeterjen. Biarkan saringan awal udara (C) benar-benar kering. Jangan beri oli pada saringan awal udara.
5.Pasang saringan awal udara yang kering (C, Gambar 12) dan filter (D) ke dasar mesin (E).
6.Sejajarkan tab (F, Gambar 12) pada penutup (B) dengan slot (G) pada rumah lower.
7.Putarpeganganpenutup(A,Gambar12)kebelakangdantekanuntukmenguncinya.
Filter Udara Kertas
1.Kendurkan pengunci (A, Gambar 13).
2.Lepaskan penutup (B, Gambar 13).
3.Untukmelepaskanfilter(C,Gambar13),angkatujungfilterlalutarikfilterkeluarpipa masuk (D).
4. |
Pasang filter oli dengan tangan sampai gasket bersinggungan dengan adaptor filter |
4. Untuk menghilangkan reruntuhan, tekan filter dengan hati-hati (C, Gambar 13) di |
|||
|
oli, kemudian kencangkan filter oli dengan 1/2 hingga 3/4 putaran. |
permukaan yang keras. Jika filter sangat kotor, ganti dengan filter baru. |
|||
5. |
Tambahkan oli. LihatBagian Penambahan Oli . |
|
5. Lepaskan saringan awal udara (E, Gambar 13), jika dilengkapi, dari filter (C). |
||
6. |
Hidupkandanjalankanmesin.Ketikamesinmulaipanas,periksajikaadakebocoran |
6. Bersihkansaringanawaludara(E,Gambar13),jikadilengkapi,dalamairyangdiberi |
|||
|
oli. |
|
|
cairan deterjen. Biarkan saringan awal udara benar-benar kering. Jangan beri oli |
|
7. |
Matikanmesindanperiksaleveloli.Leveloliyangbaikadalahberadadibagianatas |
pada saringan awal udara. |
|||
|
dari indikator penuh (B, Gambar 9) dari batang celup. |
|
7. Pasang saringan awal udara yang kering (E, Gambar 13), jika dilengkapi, pada filter |
||
|
|
|
|
(C). |
|
Tambahkan Oli |
|
|
8. Pasang filter (C, Gambar 13) ke pipa masuk (D). Dorong ujung filter ke bawah ke |
||
|
|
dalam dasar mesin. Pastikan filter dipasang dengan kencang ke dasar mesin. |
|||
• |
Pastikan level mesin. |
|
|
9. Pasang penutup filter udara (B, Gambar 13) dan kencangkan dengan pengencang |
|
• Bersihkan daerah pengisian oli dari runtuhan apapun. |
|
(A). |
|||
• |
Lihat bagian Spesifikasi untuk kapasitas oli. |
|
|
||
1. |
Lepaskan batang celup (A, Gambar 9) dan bersihkan dengan kainforbersih. |
Servis Sistem Bahan Bakar |
|||
2. |
Tuangkan oli perlahan-lahan ke dalam lubang pengisian oli (C, Gambar 9). Jangan |
Lihat Gambar: 14, 15 |
|||
|
|||||
|
mengisi terlalu penuh. Setelah menambahkan oli, tunggu sebentar dan kemudian |
|
|||
|
periksa level oli. |
|
|
PERINGATAN |
|
|
|
|
|
||
Perhatikan: Jangan tambahkan oli ke penguras oli cepat (H, Gambar 11), jika dilengkapi. |
Bahan bakar dan uapnya sangat mudah terbakar, dan meledak. |
||||
3. |
Pasang dan kencangkan batang celup (A, Gambar 9). |
Kebakaran atau ledakan dapat menyebabkan luka bakar parah atau kematian. |
|||
|
|||||
4. |
|
Not |
|
||
Lepaskan batang celup dan periksa level oli. Level oli yang baik adalah berada di |
• Jauhkan bahan bakar dari percikan api, nyala api, lampu penunjuk, panas, dan |
||||
|
bagian atas dari indikator penuh (B, Gambar 9) dari batang celup. |
||||
|
sumber pemicu lainnya. |
||||
5. |
Pasang kembali dan kencangkan batang celup (A, Gambar 9). |
||||
• Sesekali periksa saluran bahan bakar, tangki, tutup tangki, dan sambungan- |
|||||
|
|
|
|
||
6. |
Sambungkan kawat busi (D, Gambar 8) ke busi (E). |
Reproductionsambungan untuk melihat apakah ada keretakan atau kebocoran. Ganti jika |
|||
|
|
|
|
diperlukan. |
|
Servis Filter Udara |
|
|
• Sebelummembersihkanataumenggantifilterbahanbakar,kurastangkibahanbakar |
||
|
|
atau tutup katup pemutus aliran bahan bakar. |
|||
Lihat Gambar: 12, 13 |
|
|
• Jika bahan bakar tumpah, tunggu sampai menguap sebelum menstarter mesin. |
||
|
|
|
|
• Komponen pengganti harus sama dan dipasang pada posisi yang sama seperti |
|
|
|
|
|
komponen asli. |
|
•Jangan menghidupkan dan menjalankan mesin tanpa memasang pembersih udara (jika dilengkapi) atau filter udara (jika dilengkapi).
PEMBERITAHUAN Jangan menggunakan udara bertekanan atau bahan pelarut untuk membersihkan filter. Udara bertekanan dapat merusak filter dan bahan pelarut dapat larut dalam filter.
Lihat Jadwal Pemeliharaan untuk persyaratan servis.
Filter Bahan Bakar, jika dilengkapi
1.Sebelum membersihkan atau mengganti filter bahan bakar (A, Gambar 14), kuras tangki bahan bakar atau tutup katup pemutus aliran bahan bakar. Karena bila tidak, bahan bakar bisa bocor keluar dan menyebabkan kebakaran atau ledakan.
2.Gunakan tang untuk memuntir tab (B, Gambar 14) pada klem (C), dan kemudian geser klem menjauhi filter bahan bakar (A). Puntir dan tarik saluran bahan bakar (D) keluar dari filter bahan bakar.
3.Periksasaluranbahanbakar(D,Gambar14)apakahadakeretakanataukebocoran. Ganti jika diperlukan.
4.Ganti filter bahan bakar (A, Gambar 14) dengan filter pengganti yang asli.
21
5.Kencangkan saluran bahan bakar (D, Gambar 14) menggunakan klem (C) seperti yang ditunjukkan.
Saringan Bahan Bakar, jika dilengkapi
1.Lepas tutup bahan bakar (A, Gambar 15).
2.Lepas tutup saringan bakar (B, Gambar 15).
3.Jika saringan bahan bakar kotor, bersihkan atau ganti. Jika Anda ganti saringan bahan bakar, pastikan untuk menggunakan saringan bahan bakar pengganti yang asli.
Bensin tidak perlu dikuras dari mesin jika penstabil bahan bakar ditambahkan menurut petunjuk. Operasikan mesin selama dua (2) menit untuk mengedarkan bahan penstabil ke seluruh sistem bahan bakar sebelum mesin disimpan.
Jika bensin dalam mesin belum dicampur bahan penstabil bahan bakar, maka bensin harusdikuraskewadahyangdisarankan.Operasikanmesinhinggaberhentikarenabahan bakar habis. Penggunaan penstabil bahan bakar dalam wadah penyimpanan sangatlah disarankan agar kualitasnya tetap terjaga.
Oli Mesin
Ketika mesin masih panas, gantilah oli mesin. Lihat bagian penggantian oli mesin.
Layanan Sistem Pendingin
Pemecahan Masalah
|
Untukbantuan,hubungidealerlokalAndaataubuka BRIGGSandSTRATTON.com atau |
|
PERINGATAN |
hubungi 1-800-233-3723 (di AS). |
|
Spesifikasi |
||
Menjalankan mesin yang menghasilkan panas. Bagian-bagian mesin, khususnya |
||
peredam suara, menjadi sangat panas. |
||
|
Luka bakar parah dapat terjadi dari kontak langsung.
Reruntuhanyangmudahterbakar,sepertidaun,rumput,sikat,danlain-laindapat |
|
Model: 210000 |
|||||
menimbulkan kebakaran. |
|
|
|
Volume Langkah |
|
21.01 ci (344 cc) |
|
|
|
|
|
|
|
||
|
• Biarkan peredam suara, mesin silinder dan sirip menjadi dingin sebelum Anda |
Lubang silinder |
|
3.437 in (87,30 mm) |
|||
|
menyentuhnya. |
|
|
|
Langkah |
|
2.264 in (57,51 mm) |
|
• Bersihkan kumpulan serpihan di sekitar peredam suara dan silinder. |
Kapasitas oli - tanpa filter |
|
42 - 44 oz (1,24 - 1,30 L) |
|||
|
|
|
|
|
|
||
PEMBERITAHUAN Jangan menggunakan air untuk membersihkan mesin.Airdapat |
Kapasitas oli - dengan filter |
|
46 - 48 oz (1,36 - 1,40 L) |
||||
|
|
|
Reproduction |
|
|||
mencemarkansistembahanbakar.Gunakansikatataukainbersihuntukmembersihkan |
Celah Busi |
|
0.030 in (0,76 mm) |
||||
mesin. |
|
|
|
|
|
|
|
Ini adalah mesin pendingin udara. Kotoran atau reruntuhan dapat menghalangi aliran |
Torsi Busi |
|
180 lb-in (20 Nm) |
||||
udara dan menyebabkan mesin terlalu panas, sehingga menghasilkan kinerja yang buruk |
Celah Udara Angker |
|
0.010 - 0.014 in (0,25 - 0,36 mm) |
||||
dan mengurangi umur mesin. |
|
|
|
Kelonggaran Katup Isap |
|
0.003 - 0.005 in (0,08 - 0,13 mm) |
|
1. Gunakan sikat atau kain kering untuk menghilangkan reruntuhan dari udara masuk |
Kelonggaran Katup Buang |
|
0.005 - 0.007 in (0,13 - 0,18 mm) |
||||
|
dari terali. |
|
|
for |
|
|
|
2. Jaga sambungan, per dan kontrol tetap bersih. |
|
|
|
Model: 310000 |
|||
3. |
Menjaga agar daerah sekitar dan bagian belakang peredam suara, jika dilengkapi, |
Volume Langkah |
|
30.59 ci (501 cc) |
|||
|
bebas dari reruntuhan yang mudah terbakar. |
|
|
Lubang silinder |
|
3.563 in (90,49 mm) |
|
4. |
Pastikan pendingin oli berbentuk sirip, jika dilengkapi, bebas dari kotoran dan |
|
|
|
|||
|
serpihan. |
Not |
|
Langkah |
|
3.062 in (77,77 mm) |
|
Dalam jangka waktu tertentu, reruntuhan akan mengumpul dalam silinder pendingin oli |
Kapasitas oli - tanpa filter |
|
42 - 44 oz (1,24 - 1,30 L) |
||||
dan menyebabkan mesin menjadi terlalu panas. Runtuhan ini bisa dihilangkan dengan |
Kapasitas oli - dengan filter |
|
46 - 48 oz (1,36 - 1,40 L) |
||||
membongkar sebagian dari mesin. Silakan datang ke Distributor Resmi Briggs & Stratton |
|
||||||
Celah Busi |
|
0.030 in (0,76 mm) |
|||||
untuk memeriksakan dan membersihkan sistem pendingin udara Anda seperti yang |
|
||||||
direkomendasikan dalamJadwal Pemeliharaan. |
|
|
Torsi Busi |
|
180 lb-in (20 Nm) |
||
Ruang Penyimpanan |
|
|
|
||||
|
|
Kelonggaran Katup Isap |
|
0.003 - 0.005 in (0,08 - 0,13 mm) |
|||
|
|
|
|
|
Celah Udara Angker |
|
0.010 - 0.014 in (0,25 - 0,36 mm) |
|
|
|
|
|
Kelonggaran Katup Buang |
|
0.005 - 0.007 in (0,13 - 0,18 mm) |
|
PERINGATAN |
|
|
|
Daya mesin akan menurun 3,5% untuk setiap 1.000 kaki (300 meter) di atas permukaan |
||
|
|
|
|
lautdan1%untuksetiap10°F(5,6°C)diatas77°F(25°C).Mesinakanberoperasisecara |
|||
Bahan bakar dan uapnya sangat mudah terbakar, dan meledak. |
memuaskan pada sudut hingga 15°. Lihat manual operator peralatan untuk batas |
||||||
Kebakaranatauledakandapatmenyebabkanlukabakaryangparahataukematian. |
pengoperasian aman yang diizinkan pada lereng. |
||||||
|
|
|
|||||
Saat Menyimpan Bahan Bakar Atau Peralatan Dengan Bahan Bakar Di Tangki |
Suku Cadang Servis - Model: 210000 |
||||||
•Jauhkan peralatan dari tungku, kompor, alat pemanas air, atau perangkat lainnya yang dilengkapi lampu pilot maupun sumber penyalaan lainnya karena dapat menyalakan uap bahan bakar.
Sistem Bahan Bakar
Lihat Gambar: 16
Simpan mesin di tempat rata (posisi pengoperasian normal). Isi tangki bahan bakar (A, Gambar 16) dengan bahan bakar. Agar bahan bakar dapat menguap, jangan mengisi di atas leher tangki bahan bakar (B).
Bahanbakarbisabasibiladisimpanlebihdari30hari.Bahanbakarbasiakanmenyebabkan endapanasamdangumterbentukdalamsistembahanbakarataupadakomponenutama karburator. Untuk menjaga bahan bakar tetap segar, gunakan PengolahanBahan Bakar Formula Canggih & Penstabil Briggs & Stratton®, tersedia di semua tempat yang menjual suku cadang asli Briggs & Stratton.
Servis Suku Cadang |
Nomor Suku Cadang |
Filter Udara, Kertas (lihat Gambar 13) |
796032 |
Filter Saringan Awal Udara, Busa (lihat Gambar 13) |
798911 |
Filter Udara, Kertas (lihat Gambar 12) |
698413, 5079 |
Filter Saringan Awal Udara, Busa (lihat Gambar 12) |
697292, 5079 |
Oli - SAE 30 (20 oz, 0,6 L) |
100005 |
Oli - SAE 30 (48 oz, 1,4 L) |
100028 |
Filter Oli |
492932 |
Pengolahan Bahan Bakar Formula Canggih & Penstabil |
100117, 100120 |
Filter Bahan Bakar - mesin tanpa pompa bahan bakar |
394358, 5098 |
Filter Bahan Bakar - mesin dengan pompa bahan bakar |
691035, 5065 |
Busi Resistor |
491055 |
22 |
BRIGGSandSTRATTON.com |

Suku Cadang Servis - Model: 210000 |
pengecualian di atas mungkin tidak berlaku bagi Anda. Garansi ini memberi Anda hak |
|||||
hukumspesifikdanAndajugamungkinmemilikihak-haklainyangberbeda-bedadarisatu |
||||||
Busi Platinum dengan Daya Pakai Lama |
5066 |
negara bagian ke negara bagian lain dan dari satu negara ke negara lainnya 4. |
||||
Kunci Busi |
89838, 5023 |
Ketentuan Garansi Standar 1, 2, 3 |
|
|
||
Penguji Busi |
19368 |
|
|
|||
Merk / Nama Produk |
Penggunaan Penggunaan |
|||||
|
|
|||||
Suku Cadang Servis - Model: 310000 |
|
|
Konsumen |
Komersial |
||
Vanguard™; Seri Komersial 3 |
36 bulan |
36 bulan |
||||
Servis Suku Cadang |
Nomor Suku Cadang |
MesinMenggunakanSelongsongBesiTuangDura-Bore™ 24 bulan |
12 bulan |
|||
Filter Udara, Kertas (lihat Gambar 13) |
796031 |
Semua Mesin Lainnya |
24 bulan |
3 bulan |
||
Filter Saringan Awal Udara, Busa (lihat Gambar 13) |
797704 |
|
1Inilah ketentuan garansi standar kami, tetapi terkadang mungkin ada cakupan |
|||
Filter Udara, Kertas (lihat Gambar 12) |
698083, 5077 |
|
||||
|
garansi tambahan yang belum ditentukan pada saat penerbitan. Mengenai daftar |
|||||
Filter Saringan Awal Udara, Busa (lihat Gambar 12) |
697015, 5077 |
|
syaratgaransiuntukmesinAnda,kunjungiBRIGGSandSTRATTON.comatauhubungi |
|||
|
Dealer Resmi Briggs & Stratton Anda. |
|
|
|||
|
|
|
|
|
||
Filter Udara, Dapat Dicuci Datar |
697153, 5078 |
|
2 Tidak ada garansi untuk mesin pada peralatan yang digunakan sebagai sumber |
|||
Oli - SAE 30 (20 oz, 0,6 L) |
100005 |
|
listrikprimeruntukmenggantikansumberlistrikinduk;generatorsiagayangdigunakan |
|||
|
untuk keperluan komersial, kendaraan serba guna yang melebihi 25 MPH, atau |
|||||
|
|
|
||||
Oli - SAE 30 (48 oz, 1,4 L) |
100028 |
|
mesin yang digunakan dalam balapan kompetitif atau dengan tujuan komersial atau |
|||
Filter Oil , Standar - Hitam |
492932 |
|
penyewaan. |
|
|
|
|
3 Vanguard yang dipasang pada generator siaga: 24 bulan untuk penggunaan |
|||||
Filter Oil, Efisiensi Tinggi - Kuning |
795890 |
|
konsumen, tidak ada garansi untuk penggunaan komersial. Seri Komersial dengan |
|||
Filter Oil, Efisiensi Tinggi - Oranye |
798576 |
|
tanggal produksi sebelum Juli 2017: 24 bulan untuk penggunaan konsumen, 24 |
|||
|
bulan untuk penggunaan komersial. |
|
|
|||
Pengolahan Bahan Bakar Formula Canggih & Penstabil |
100117, 100120 |
|
4 Di Australia - Produk kami disertai garansi yang tidak dapat dikecualikan |
|||
Filter Bahan Bakar - mesin tanpa pompa bahan bakar |
394358, 5098 |
|
berdasarkan Undang-Undang Konsumen Australia. Anda berhak atas penggantian |
|||
|
atau pengembalian uang atas kegagalan yang parah dan atas kompensasi untuk |
|||||
Filter Bahan Bakar - mesin dengan pompa bahan bakar |
691035, 6065 |
|
kerugian atau kerusakan lainnya yang dapat diperkirakan secara wajar. Anda juga |
|||
Busi Resistor |
491055 |
|
berhakatasperbaikanataupenggantianprodukjikaproduktidakmemenuhikualitas |
|||
|
yangdapatditerimadankegagalannyatidakparah.Untuklayanangaransi,temukan |
|||||
Busi Platinum dengan Daya Pakai Lama |
5066 |
|
Dealer Servis Resmi terdekat di peta pencarian dealer kami di |
|
||
|
BRIGGSandSTRATTON.COM, atau dengan menghubungi 1300 274 447, atau |
|||||
Kunci Busi |
89838, 5023 |
|
||||
|
dengan mengirim surel atau menulis surat ke |
|
|
|||
Penguji Busi |
19368 |
|
salesenquiries@briggsandstratton.com.au, Briggs & Stratton Australia Pty Ltd, 1 |
|||
|
Moorebank Avenue, Moorebank, NSW , Australia, 2170. |
|
||||
|
|
|
|
|||
Kami menyarankan agar Anda mengunjungi Dealer Servis Resmi Briggs & Strattonuntuk |
Masa garansi dimulai pada tanggal awal pembelian oleh konsumen ritel atau komersial |
|||||
semua pemeliharaan dan servis mesin dan komponen-komponen mesin. |
pertama. "Penggunaan Konsumen" berarti penggunaan di rumah tangga tempat tinggal |
|||||
|
|
pribadi oleh konsumen ritel. "Penggunaan komersial" berarti semua penggunaan lainnya, |
||||
Daya Penilaian: Daya Penilaian kotor dari model mesin berbahan bakar bensn diberi |
termasukpenggunaanuntuktujuankomersial,menghasilkanpendapatan,ataupenyewaan. |
|||||
nama sesuai dengan lembaga standarisasi di bidang otomotif SAE (Society of Automotive |
Setelah mesin diterapkan dalam penggunaan komersial, penggunaan selanjutnya akan |
|||||
Engineers) dengan kode J1940 Prosedur Penilaian Sumber Daya Mesin Kecil dan |
dianggap sebagai penggunaan komersial untuk tujuan jaminan ini. |
|
||||
Energi/Torsi, dan dinilai sesuai dengan SAE J1995. Nilai sumber daya energy/torsi terdiri |
Simpan tanda bukti pembelian Anda. Jika Anda tidak memberikan bukti tanggal |
|||||
dari 2600 RPM untuk mesin dengan kode “rpm” di label dan 3060 RPM untuk jenis mesin |
||||||
lainnya;nilai tenaga kuda berasal dari 3600 RPM. Kurva daya kotor bisa dilihat di |
pembelian awal pada saat meminta layanan garansi, tanggal pembuatan produk |
|||||
www.BRIGGSandSTRATTON.COM. Nilai daya murni diambil dari pembuangan dan |
akandigunakanuntukmenentukanmasagaransi.Registrasiproduktidakdiperlukan |
|||||
pembersihudarayangdipasangsementaranilaidayakotordiambiltanpaadanyafortambahan. |
untuk mendapat layanan garansi produk Briggs & Stratton. |
|
||||
Dayamesinkotoryangsebenarnyaakanlebihtinggidaridayamesinmurnidandipengaruhi, |
Tentang Garansi Anda |
|
|
|||
antaralainoleh,kondisioperasilingkungandanvariabilitasantarmesin.Mengingatberbagai |
|
|
|
|
||
macam produk mesin yang ada, mesin berbahan bakar bensin mungkin tidak bisa |
Garansi terbatas ini mencakup hanya masalah bahan dan/atau pengerjaan terkait mesin, |
|||||
meningkatkan nilai daya kotor ketika digunakan di bagian tertentu suatu peralatan listrik. |
dan bukan penggantian atau pengembalian dana untuk peralatan tempat mesin mungkin |
|||||
Perbedaan ini disebabkan berbagai faktor termasuk, tapi tidak terbatas pada, variasi |
dipasang.Perawatanrutin,penyeteman,penyesuaian,ataukeausannormaltidaktercakup |
|||||
komponen mesin (pembersih udara, pembuangan, pengisian, pendinginan, karburator, |
dalamgaransiini.Selainitu,garansitidakberlakujikamesintelahdiubahataudimodifikasi |
|||||
pompa bahan bakar, dll), keterbatasan aplikasi, kondisi lingkungan (temperature, |
atau jika nomor seri mesin telah dikaburkan atau dihilangkan. Garansi ini tidak mencakup |
|||||
kelembaban,ketinggian),danvariabilitasantarNotmesin.Karenaketerbatasanproduksidan |
kerusakan mesin atau masalah performa yang disebabkan oleh: |
|
||||
kapasitas, Briggs & Stratton dapat menggantikan mesin ini dengan mesin dengan daya |
1. |
Penggunaan suku cadang yang bukan suku cadang asli Briggs & Stratton; |
||||
nilai yang lebih tinggi. |
|
|||||
Garansi |
|
2. |
Pengoperasian mesin dengan oli pelumas yang tidak memadai, tercemar, atau |
|||
|
|
memiliki grade tidak benar; |
|
|
||
Reproduction |
|
|
||||
|
|
3. |
Penggunaan bahan bakar yang tercemar atau sudah basi, bensin yang diformulasi |
|||
Garansi Mesin Briggs & Stratton |
|
dengan etanol lebih dari 10% atau penggunaan bahan bakar alternatif seperti elpiji |
||||
|
atau gas alam pada mesin yang tidak secara aslinya dirancang/dibuat oleh Briggs |
|||||
Berlaku Januari 2018 |
|
|
& Stratton untuk bekerja dengan bahan bakar tersebut; |
|
||
Garansi Terbatas |
|
4. |
Kotoran yang memasuki mesin akibat perawatan pembersih udara atau perakitan |
|||
|
|
kembali yang tidak benar; |
|
|
||
|
|
|
|
|
||
Briggs & Stratton menjamin bahwa selama masa jaminan yang ditetapkan di bawah, |
5. |
Menghantambendadenganpisaupemotongmesinpemotongrumputrotari,adaptor |
||||
pihaknya akan memperbaiki atau mengganti, secara gratis, setiap komponen yang rusak |
|
pisau, baling-baling, atau perangkat lain yang tersambung ke poros engkol yang |
||||
terkaitdenganbahanmaupunpengerjaanataukeduanya.Biayapengangkutanatasproduk |
|
kendur atau terpasang tidak benar, atau kekencangan v-belt yang berlebihan; |
||||
yang dikirim untuk diperbaiki atau diganti berdasarkan jaminan ini harus ditanggung oleh |
6. |
Komponenataurakitanyangterkaitsepertikopling,transmisi,kontrolperalatan,dll., |
||||
pembeli. Jaminan ini berlaku selama masa jaminan dan diatur berdasarkan ketentuan |
||||||
yang dinyatakan di bawah. Untuk servis garansi, Anda juga dapat menemukan Dealer |
|
yang tidak dipasok oleh Briggs & Stratton; |
|
|
||
ServisResmiterdekatpadapetapencariandealerkamidiBRIGGSandSTRATTON.COM. |
7. |
Panas berlebihan akibat adanya cacahan rumput, tanah atau kotoran, atau sarang |
||||
Pembeli harus menghubungi Dealer Servis Resmi, dan kemudian mengirimkan produk ke |
|
binatangpengeratyangmenyumbatataumenyumpalsirip-sirippendingin,atauarea |
||||
Dealer Servis Resmi untuk diperiksa dan diuji. |
|
|
roda gila atau akibat mengoperasikan mesin tanpa ventilasi yang memadai; |
|||
Tidak ada garansi tertulis lainnya. Garansi tersirat, termasuk kelayakan untuk |
8. |
Getaran berlebihan akibat kecepatan berlebih, dudukan mesin yang kendur, pisau |
||||
diperdagangkandankesesuaianuntuktujuantertentu,terbataspadaperiodegaransi |
|
ataubaling-balingpemotongyangkenduratautidakseimbang,ataupenyambungan |
||||
yangtercantumdibawahini,atausejauhdiizinkanolehhukum. Kewajibankerusakan |
|
yang tidak benar atas komponen peralatan ke poros engkol; |
|
|||
insidental atau tak sengaja dikecualikan sejauh diizinkan oleh hukum. Beberapa negara |
9. |
Penyalahgunaan, kurangnya perawatan rutin, pengiriman, penanganan, atau |
||||
bagianataunegaratidakmengizinkanpembatasanatasmasaberlakunyajaminantersirat, |
||||||
serta beberapa negara bagian dan negara tidak mengizinkan pengecualian atau pembatasanataskerusakaninsidentalmaupunkonsekuensial,sehinggapembatasandan
penggudangan peralatan, atau instalasi mesin yang tidak benar.
23
Servis garansi tersedia hanya melalui Dealer Servis Resmi Briggs & Stratton.
Temukan Dealer Servis Resmi terdekat di peta pencarian dealer kami di
BRIGGSandSTRATTON.COM atau dengan menghubungi 1-800-233-3723 (di AS).
80004537 (Rev. D)
Reproduction |
|
Not |
for |
|
|
24 |
BRIGGSandSTRATTON.com |
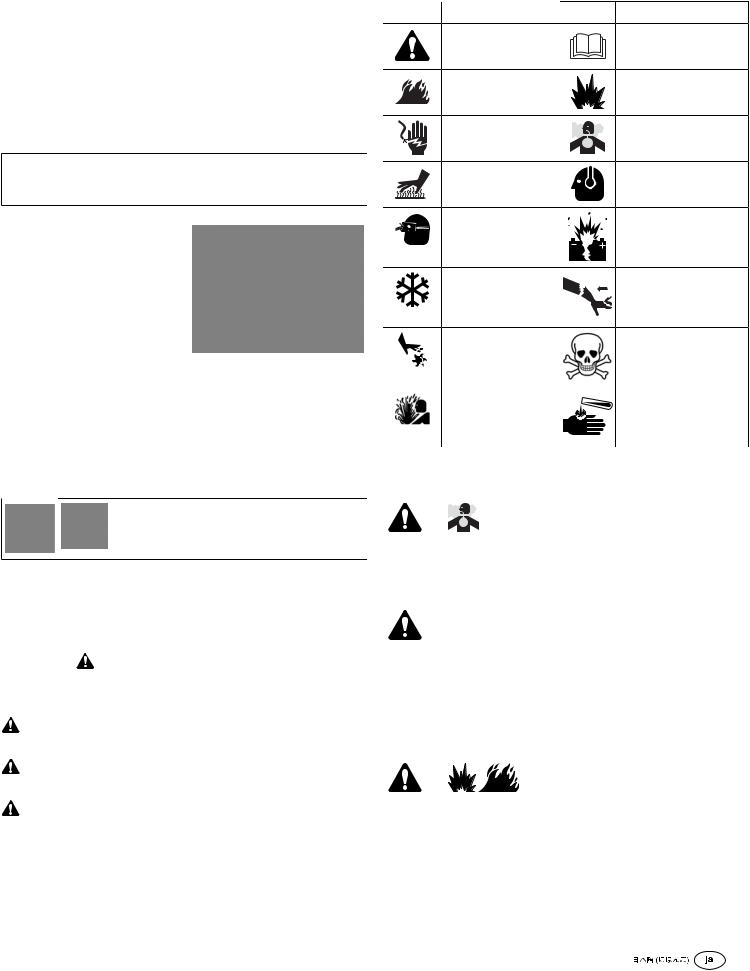
© Briggs & Stratton Corporation, Milwaukee, WI, USA. |
|
|
|
|
|
|
|
||
|
|
|
|
|
|
|
|
|
|
Briggs & Stratton Corporation |
|
|
||
|
|
|
|
|
|
|
|
|
|
|
|
|
|
|
|
|
|
|
|
|
|
|
|
|
|
|
|
|
|
|
|
|
||
|
|
|
|
|
( ) |
|
|
|
|
|
|
|
|
- |
- - |
|
|
||
|
|
|
|
|
|
|
|
|
|
|
|
- |
|
|
|
|
|
|
|
|
|
|
|
|
|
|
|
|
|
|
|
|
|
|
|
|
|
|
|
|
|
|
|
|
|
|
|
|
|
|
|
- |
|
|
|
|
|
|
|||||
|
|
|
|
|
|
|||
|
|
|
|
|||||
|
|
|
|
for |
|
|
|
|
|
|
|
|
|
|
|
||
Max-Born-Straße 2, 68519 Viernheim, Germany. |
|
|
|
|
|
|||
|
Not |
|
|
|
||||
|
|
|
|
|
||||
|
|
|
|
|
|
|||
|
|
|
|
|
|
|
||
|
|
|
|
|
|
|||
|
|
|
|
|
|
|||
|
|
|
|
|
|
|||
|
|
|
|
www.P65Warnings.ca.gov |
||||
|
|
|
|
|
|
|||
|
|
|
|
|||||
|
|
|
|
|
|
|
||
|
|
|
|
|
Briggs & Stratton® |
|||
|
|
ATV |
||||||
|
|
|
ReproductiBriggson& Stratton |
|||||
|
|
|||||||
|
||||||||
www.briggsracing.com |
||||||||
|
|
|
|
|
||||
|
|
|
|
side-by-side ATV Briggs & Stratton |
||||
|
|
|
|
|
||||
|
|
|
|
|
1-866-927-3349 |
|||
|
|
|
||||||
. |
|
|
|
|
|
|
|
|
|
|
|
|
|||||
. |
|
|
|
|
|
|
||
|
|
|
|
|
|
|
||
|
|
|||||||
|
||||||||
. |
|
|
|
|||||
. |
|
|
||||||
|
|
|
|
|
• |
2 |
||
|
|
|
|
|
|
|
|
|
|
|
|
|
|
• |
|
||
|
|
|
|
|
• |
|
||
|
|
|
|
|
|
|
|
|
25

• |
|
|
|
|
|
|
|
• |
|
|
|
|
|
|
|
• |
|
|
|
|
|
||
|
|||
• |
|
||
|
|||
• チョークをOPEN / RUN FAST
• い。
• 素早く引く事により反動を防ぎます。

• |
|
|
|
||||
|
|
|
• |
|
|||
|
|
|
|
|
|||
|
|
|
|
• |
|
||
|
|
|
• |
|
|||
• |
|
||||||
• |
|
||||||
|
|
|
|
||||
|
|
|
Reproduction |
||||
|
|
||||||
|
|
|
|
|
|||
• |
CLOSED |
|
|||||
|
|||||||
|
|
|
|
|
|||
|
|
|
|
|
|||
|
|
|
|
||||
• |
|
||||||
|
|||||||
|
|
||||||
|
|
|
|
for |
• |
|
|
|
|
Not |
• |
|
|||
|
|
• |
4442 |
||||
|
|
|
|
4442 |
|||
|
|
|
|
|
|||
|
|
|
|
|
|||
|
|
|
|
||||
|
|
|
|
OEM |
|||
|
|
|
|
||||
• |
LP |
|
|
||||
|
|
|
|
|
|
|
|
• |
|
|
|
||||
|
|
|
|
|
|
||
|
|
|
|
|
|
||
|
|
|
|
|
|
||
|
|
|
|
|
|
||
|
|
||||||
|
|||||||
|
• |
|
|||||
|
|||||||
• |
|
||||||
|
|||||||
|
|
|
|
|
• |
|
|
• して居住空間に吸い込まれる可能性が
• 機では
• しないでください。このような場所では一酸化炭素は素早く蓄積され、たとえ本製 品の
• がをさせるかも知れません。
• 叩かないで下さい。
26 |
BRIGGSandSTRATTON.com |
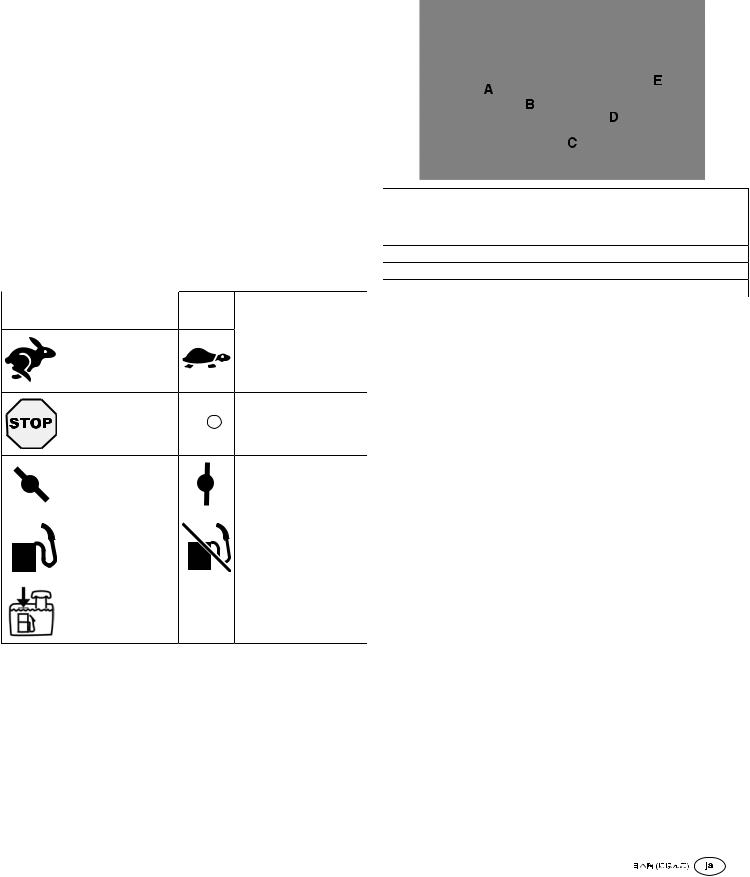
|
Briggs&Stratton® |
||
|
|||
|
|
SF SG SH SJ |
|
|
|
||
1 2 3) |
|
||
|
5W-30 |
||
A. |
ID - |
Vanguard™15W-50 |
|
|
|||
B. |
|
||
|
|||
C. |
|
|
|
D. |
|
|
|
E. |
|
|
|
F. |
|
|
|
G. |
|
|
|
|
|
|
|
H. |
|
|
|
I. |
|
|
|
J. |
( ) |
|
|
K.( )
M. ( )
N. ( ) |
|
|
|
|
|
|
|
A SAE 30 - 4°C SAE 30 |
|||||||||
|
|
|
|
|
|
|
|
|
|||||||||
O. ( ) |
|
|
B |
10W-30 - 27°C 10W-30 |
|||||||||||||
P. ( ) |
|
|
|
|
|||||||||||||
|
|
|
|
|
|
|
|
|
|
|
|
|
|
Reproduction |
|||
|
|
|
|
|
|
|
|
|
|
|
|
|
|
|
|
C |
5W-30 |
|
D |
5W-30 |
|||||||||||||||
E |
Vanguard™ 15W-50 |
||||||||||||||||
|
|
|
|
|
|
|
|
||||||||||
|
|
|
|
|
|
|
|
|
|
|
|
|
|
|
|||
|
|
|
|
|
|
|
- FAST |
|
|
|
|
|
-SLOW |
||||
|
|
|
|
|
|
|
|
|
|
|
|
|
|
for |
4 |
||
|
|
|
|
|
|
|
|
|
|
|
|
|
|
|
|
|
|
|
|
|
|
|
|
|
|
|
|
|
|
|
|
|
|
• |
|
|
|
|
|
|
|
|
- STOP |
|
|
|
|
|
ON - OFF |
• |
|
||
|
|
|
|
|
|
|
|
|
|
Not |
|
1. (A 4) |
|||||
|
|
|
|
|
|
|
|
|
|
|
|
|
|
||||
|
|
|
|
|
|
|
|
|
|
|
|
|
|
|
|
||
|
|
|
|
|
|
|
|
|
|
|
|
|
|
|
|
2. (A 4). |
|
|
|
|
|
|
|
|
- |
|
|
|
|
|
|
- OPEN |
3. |
|
|
|
|
|
|
|
|
|
|
|
|
|
|
|
|||||
|
|
|
|
|
|
|
CLOSED |
|
|
|
|
|
|
|
|
|
(B 4) |
|
|
|
|
|
|
|
|
|
|
|
|
|
|
|
|
4. |
|
|
|
|
|
|
|
|
|
|
|
|
|
|
|
|
|
|
(C 4). 1 |
|
|
|
|
|
|
|
|
|
|
|
|
|
- CLOSED |
|
|
||
|
|
|
|
|
|
|
|
|
|
|
|
( |
|||||
|
|
|
|
|
|
|
- OPEN |
|
|
|
|
|
|
|
|||
|
|
|
|
|
|
|
|
|
|
|
|
|
|
|
) |
||
|
|
|
|
|
|
|
- |
|
|
|
|
|
|
|
5. (A 4). |
||
|
|
|
|
|
|
|
|
|
|
|
|
|
|
|
|
||
|
|
|
|
|
|
|
|
|
|
|
|
|
|
|
( ) |
||
|
|
|
|
|
|
|
|
|
|
|
|
|
|
|
|
||
|
|
|
|
|
|
|
|
|
|
|
|
|
|
|
|
|
|
|
|
|
|
|
|
|
|
|
|
|
|
|
|
|
|
|
|
|
|
|
|
|
|
|
|
|
|
|
|||||||
|
|
|
|
|
|
|
|
|
• |
|
|||||||
|
|
|
|
|
|
|
|
|
• |
|
|||||||
Briggs & Stratton
• の訂正には、Briggs & Stratton
:
•87 /87 AKI (91 RON)
27
 Loading...