

Page 1
www.breville.com.au
Breville is a registered trademark of Breville Pty. Ltd.
ABN 98 000 092 928
Breville Customer Service Centre
Australian Customers
Breville Customer Service Centre
✉
Locked Bag 2000
Botany NSW 2019
AUSTRALIA
Customer Service: 1300 139 798
☎
Fax (02) 9384 9601
Email Customer Service: askus@breville.com.au
New Zealand Customers
Breville Customer Service Centre
✉
Private Bag 94411
Greenmount
Auckland, New Zealand
Customer Service: 09 271 3980
☎
Fax 0800 288 513
Email Customer Service: askus@breville.com.au
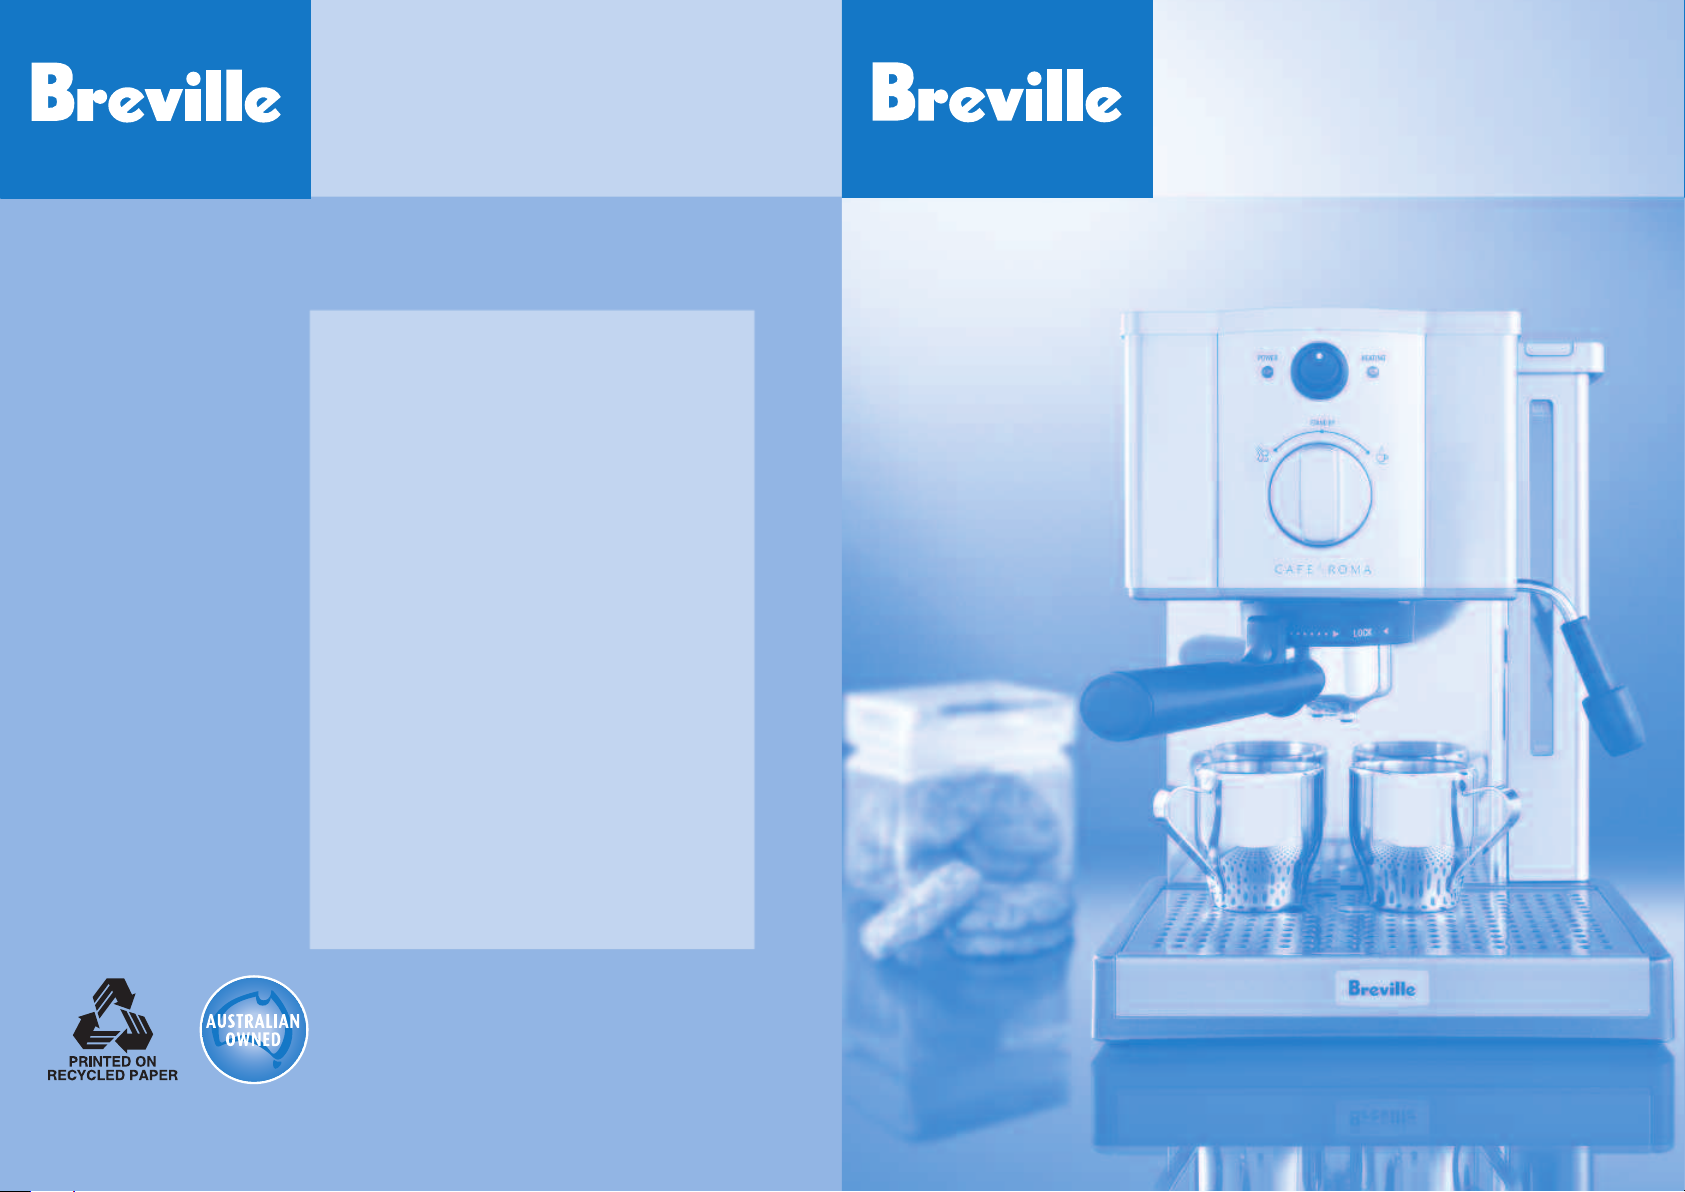
Café Roma
Espresso / Cappuccino Machine
Instructions for use
© Copyright. Breville Pty. Ltd. 2004
Due to continual improvements in design or otherwise,
the product you purchase may differ slightly from the
one illustrated in this booklet.
Model ESP6/ESP8B Issue 1/04
Model ESP6/ESP8B
Page 2

Contents
Page
Breville recommends safety first 4
Know your Breville Espresso / Cappuccino Machine 5
Operating your Breville Espresso / Cappuccino Machine 6
Coffee making tips 10
Care and cleaning 11
Trouble shooting chart 13
Coffees to try 14
2
Congratulations
on the purchase of your new Breville Espresso / Cappuccino Machine.
Page 3

Breville recommends safety firstBreville recommends safety first
Know your Breville Espresso / Cappuccino Machine
We at Breville are very safety conscious. We design and manufacture consumer products with the safety of you,
our valued customer foremost in mind. In addition we ask that you exercise a degree of care when using any
electrical appliance and adhere to the following precautions:
Read all instructions before operating and save for
future reference
• This appliance is for household use only.
• Do not use this appliance for other than its
intended use. Do not use outdoors.
• The appliance is not intended for use by young
children or infirm persons without supervision.
• Young children should be supervised to ensure that
they do not play with the appliance.
• Do not leave the appliance unattended when in use.
• Do not touch hot surfaces. Use handles.
• Always use the appliance on a dry, level surface.
• Do not place this appliance on or near a hot gas
or electric burner, or where it could touch a
heated oven.
• Do not let the cord hang over the edge of a table
or counter, touch hot surfaces or become knotted.
• Do not immerse cord, plug or appliance in water or
any other liquid.
• Always switch the appliance to ‘Off’, switch the
power off at the power outlet and then remove the
plug when the appliance is not being used and
before cleaning.
• Regularly inspect the supply cord, plug and actual
appliance for any damage. If found damaged in any
way, immediately cease use of the appliance and
return the entire unit to your nearest authorised
Breville Service Centre for examination,
replacement or repair.
• Any maintenance other than cleaning should be
performed at an authorised Breville Service Centre.
• The installation of a residual current device
(safety switch) is recommended to provide
additional safety protection when using electrical
appliances. It is advisable that a safety switch
with a rated residual operating current not
exceeding 30mA be installed in the electrical circuit
supplying the appliance. See your electrician for
professional advice.
Special safety instructions
• Only use cold water in the water tank. Do not use
any other liquid.
• Never use the machine without water in it.
• Ensure the filter holder is firmly secured when
using the machine.
• Never remove the filter holder during the brewing
operation as the machine is under pressure your
electrician for professional advice.
Power On/Off switch
‘Power On’ light (red)
illuminates when the
machine is turned on
15 bar Italian designed & made pump system
Thermoblock heating system
Selector control
for Espresso and Steam
Filter holder
2 stainless steel filters
(1 cup filter and 2 cup filter)
Cup warming plate
Removable 1.2 litre water tank
‘Heating’ light (orange)
illuminates to indicate that the
machine is heating and will turn off
when the correct temperature has
been reached. This light will cycle
on and off during operation to
indicate the machine is monitoring
the correct temperature
External water window
Steam wand
with froth enhancer
Steam baffle
Combined measuring spoon
and grid
4
and coffee press
Water level indicatorRemovable drip tray
5
Page 4
Operating your Breville Espresso / Cappuccino Machine
Before using your Espresso /
Cappuccino Machine
Wash the filter holder and the stainless filters in mild
detergent and water. Rinse thoroughly.
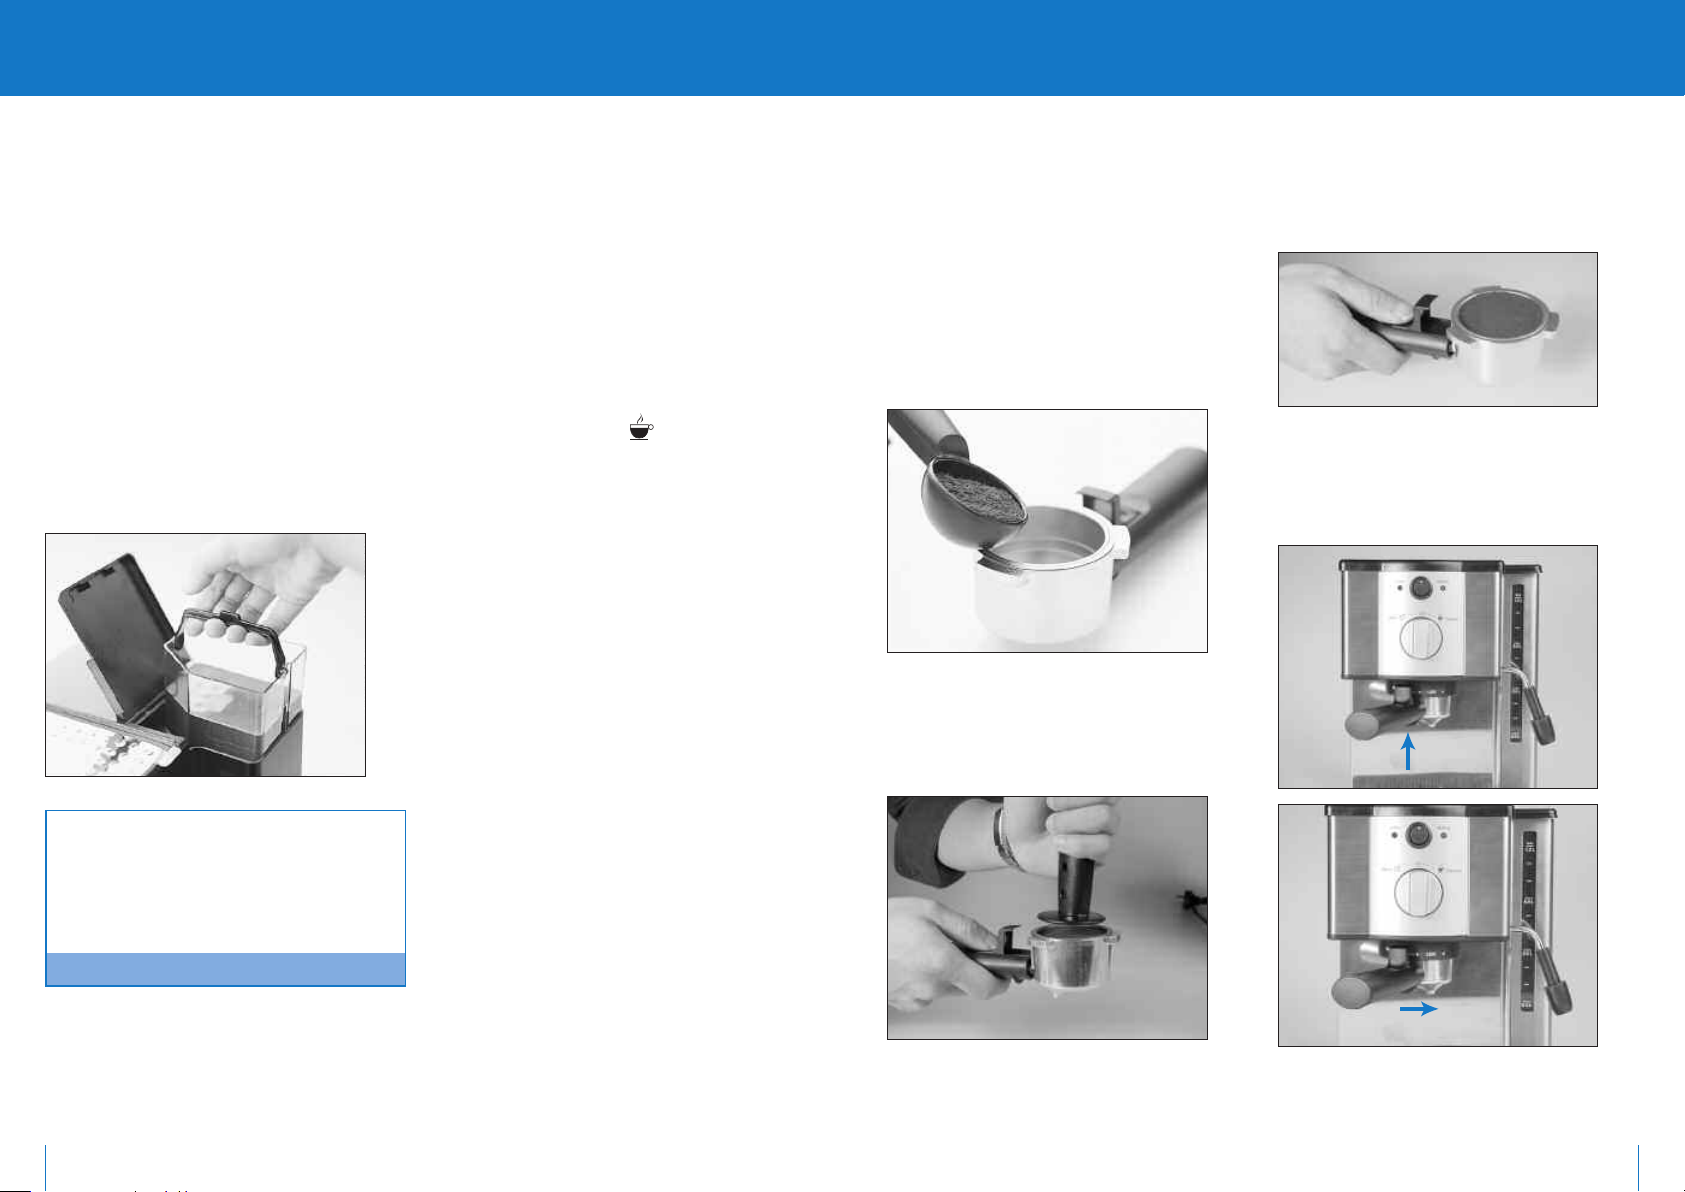
Filling the water tank
• Ensure the power switch and selector control are
set to the standby position.
• Turn off at the power outlet and unplug the
power cord.
• Lift up the water tank lid and remove the water
tank. Fill with cold water to the maximum mark
and replace in the machine, pressing down firmly
so that the water valve opens. Close the water
tank lid.
Pre-heating the machine
For optimal crema, it is recommended to carry out a
complete brewing operation with water but without
any coffee grinds before making your first coffee to
ensure that the machine has been preheated.
• Make sure the selector control is in the
Standby position.
• Plug the power cord into a 230/240V electrical
outlet, switch on and set the power switch to the
‘ON’ position.
• As soon as the orange ‘Heating’ light turns off, set
the selector control to the Espresso position
and run a small amount of water through the
brewing head for a few seconds without the filter
holder in place.
Pre-warming cups
For optimal coffee temperature, pre-warm
the espresso cups by placing them on the cup
warming plate.
Preparing the coffee
• Place the 1 or 2 cup filter into the filter holder and
fill with espresso coffee (use the smaller filter for
1 cup and the larger filter for 2 cups).
• Use 1 level measure of espresso coffee for the
1 cup filter and 2 level measures for the 2 cup
filter. It is important to use the correct amount
of coffee as the filter perforations have been
constructed for optimal pressure build up in
the machine.
• Distribute the coffee evenly and press it lightly
with the bottom of the measuring spoon (if there
is too much coffee, the flow of water can
become blocked).
• Clean any excess coffee from the rim of the filter
holder to ensure a proper fit under the brew head.
• Place the filter retainer clip in the release position,
by pulling the clip back towards your hand.
• Place the filter holder underneath the brew head
so that the handle is positioned to the left of
centre. Lift the filter holder until it contacts the
brew head and rotate to the right.
The water tank should be filled with fresh cold
water before use.
Check water level before use and replace the
water daily.
Do not use mineral or distilled water.
Note
6
7
Page 5

Operating your Breville Espresso / Cappuccino Machine continued
Brewing coffee
• Make sure the selector control is in the
standby position.
• Plug the power cord into a 230/240V electrical
outlet, switch on and set the power switch to
the standby position.
• As soon as the orange ‘Heating’ light turns off, the
machine is heated up.
• Make sure the drip tray is in place.
• Place one or two pre-heated cups beneath the
filter holder.
• Set the selector control to the Espresso position.
• After a few seconds, aromatic coffee will begin
to run through.
• When sufficient coffee has flowed into the cups, set
the selector control to the standby position. This
will stop the flow of coffee.
• If you do not need to use the steam function, set
the power switch to the ‘Off’ position, unplug the
power cord and allow the machine to cool.
• Remove the filter holder from the brew head and
using the filter retainer clip to secure the filter in
the filter holder, turn the filter holder upside down
to empty the used coffee (used coffee grounds
should be thrown away with domestic waste and
not down the sink which may block drains).
Rinse the filter and filter holder with water and
allow to dry.
The machine remains ready for brewing and
maintains a constant heating temperature as
long as the Power switch is left in the ‘On’
position. If the temperature should drop, the
orange control light will illuminate and the
heater will automatically heat up to the correct
brewing temperature.
Note
How to froth milk for a cappuccino or latte
The Breville Café Roma comes complete with a
frothing attachment for easier frothing of milk.
The first step in making a cappuccino/latte is to
make a short espresso (see “Brewing coffee”). Then:
• Fill the stainless steel frothing jug 1⁄3full with
cold milk.
• As soon as the orange ‘Heating’ light turns off,
plunge the steam wand into jug of milk so that the
main head of the froth enhancer is immersed into
the milk.
• Set the selector control to the
Steam position.
• Gently move the frothing jug in a circular motion
around the froth enhancer.
• When the milk has begun to increase in volume,
immerse the froth enhancer deeper into the milk
to further heat the milk.
• Place your hand on the bottom of the stainless
frothing jug. When the jug becomes too hot to
touch, set the selector control to the standby
position to stop the steaming function before
removing the jug. This will ensure that you don’t
burn the milk.
• When steaming milk you will hear a pumping
sound. This is the thermoblock operating and
is normal.
• As you return the selector control to the standby
position, steam will be released from the machine.
This is normal operation.
• Add the steamed milk to each cup of freshly
brewed espresso coffee and spoon on the frothed
milk in the following ratios:
Cappuccino -
Latté -
1
⁄3espresso, 1⁄3steamed milk,
1
⁄3frothed milk
1
⁄3espresso topped with steamed
milk and about 10cm of frothed milk
(traditionally served in a glass)
Always ensure that the frothing attachment
has been firmly pushed onto the steam wand
For best results use fresh cold milk (lite milk
will froth easier).
Always clean the steam wand and froth
enhancer after every use (refer to care
and cleaning).
If brewing more coffee straight after using
the steam function, set the selector control to
the Espresso position to run a small amount
of water through the brewing head for a few
seconds without the filter holder in place.
This will prepare the system for optimal
brewing temperature.
Note
LIQUID SHOULD NOT BE ALLOWED TO RUN OVER THE TOP OF THE FROTH ENHANCER,
OTHERWISE IT WILL NOT FUNCTION.
TO AVOID SPLATTERING OF HOT MILK, DO NOT LIFT THE STEAM NOZZLE ABOVE THE SURFACE
THE METAL PARTS OF THE FILTER HOLDER MIGHT STILL BE VERY HOT. COOL DOWN THESE PARTS
BY RUNNING UNDER COLD WATER.
MAKE SURE Y
8
OU USE THE FIL
TER RETAINER CLIP WHEN DISCARDING THE COFFEE GROUNDS.
OF THE MILK WHILE FROTHING.
ENSURE THE SELECTOR CONTROL IS IN THE STANDBY POSITION BEFORE REMOVING THE
FROTHING JUG.
9
Page 6

Coffee making tips
Care and cleaning
Tips on making the perfect espresso
Don’t just rely on your coffee maker to do
all the work. Making a good cup of coffee
is an art.
Water flow
If you’re making an espresso, make sure the water
flows through the coffee filter at the correct rate. If
it’s too slow, the coffee will be over-extracted - too
dark and bitter, with a mottled and uneven crema on
top. If it flows too quickly, the coffee will be underextracted - the proper flavour won’t have had time to
develop. You can adjust the water flow by tamping
(pressing down) the coffee firmly or by changing the
grind of the coffee.
The coffee
Pre-ground coffee will only retain its flavour for
1 week, provided it is stored in an air tight container,
in a cool, dark area. Whole coffee beans are
recommended and should be ground just before use.
Coffee beans stored in an airtight container will keep
up to 1 month before they begin to lose their flavour.
Do not store in a refrigerator freezer.
The grind
• If using pre-ground coffee, ensure you purchase an
espresso grind for espresso/cappuccino machines.
• If grinding your own beans the coffee must be
ground fine, but not too fine. It can effect the taste
and the rate the water flows through it.
• If the grind is too fine, the water will not flow
through the coffee even under pressure (this grind
looks like powder and feels like flour when rubbed
between fingers).
• If the grind is too coarse, the water flows
through the coffee too fast, preventing a full
flavoured extraction.
Before cleaning, ensure the selector control is in the
‘OFF’ position. Switch off at the power outlet, then
unplug the power cord and allow the unit to cool.
Cleaning the steam wand and
froth enhancer
• The steam wand and froth enhancer should always
be cleaned after frothing milk.
• Remove the froth enhancer and rinse under warm
tap water.
• Wipe the steam wand with a damp cloth.
• Briefly set the selector control to the Steam
position to clear any remaining milk from the
steam wand.
• If the steam wand becomes blocked, wait for the
machine to cool before using a needle or paperclip
to unblock the opening.
Cleaning the filters, filter holder
and brewing head
• Directly after use, remove used coffee grounds and
rinse the stainless filters and filter holder under
running water. Should the fine holes in the filters
become blocked, then a normal dishwashing
brush should be used (do not use a brush with
metal bristles).
• The brewing head should be wiped with a damp
cloth to remove any old espresso grounds.
• It is advisable to periodically run water through the
unit with the filter in place but without any coffee
to clean out any old coffee grounds.
Cleaning the housing / cup warming tray
• The outer housing can be cleaned with a soft,
damp cloth (do not use abrasive agents or cloths
which can scratch the surfaces).
Cleaning the drip tray
• The drip tray should be removed, emptied and
cleaned at regular intervals, particularly when the
water level indicator is exposed indicating the drip
tray is full.
• Remove the grid, steam baffle and water level
indicator from the drip tray, wash all 4 parts with
water and non-abrasive washing liquid before
rinsing and drying.
Do not place any of the components in
the dishwasher.
Note
DO NOT IMMERSE ANY PART OF YOUR BREVILLE ESPRESSO/CAPPUCCINO MACHINE IN WATER
OR ANY OTHER LIQUID.
10
11
Page 7

Care and cleaning
continued
Trouble shooting chart
Decalcifying
After regular use, hard water can cause limestone
build up in and on many of the inner functioning
components, reducing the brewing flow, power of
the machine, and affecting the quality of coffee.
We advise decalcifying the machine on a regular
basis (every 2-3 months) using a liquid decalcifying
agent. Follow the instructions provided, or use
the following as a guide:
Diluted solution (for softer water)
• 1 part decalcifying agent
• 2 parts cold tap water
Concentrated solution (for harder water)
• 1 part decalcifying agent
• 1 part cold tap water
Decalcifying the machine
• Make sure the selector control is in the standby
position and that the plug is disconnected
from the power outlet.
• Remove the filter holder and pour in the
decalcifying solution into the water tank.
• Plug the machine into the power outlet and
turn on.
• Set power switch to the ‘On’ position and the
selector control to the standby position.
• Place a large container under both the water
outlet and the steam wand.
• As soon as the brewing temperature is reached the
orange ‘temperature’ light will switch off. Set the
selector control to the Espresso position and let
half the decalcifying solution run through the
brewing head.
• Turn the selector control to the Steam position
and let the remaining solution run through the
steam wand. When the solution has run through,
set the selector control back to the ‘OFF’ position.
• After decalcifying, rinse the water tank thoroughly
and re-fill with fresh cold water. To rinse the
machine, run half the water through the brewing
head and half through the steam wand.
The machine is ready for use.
The stainless steel filters should not come
in contact with any decalcifying agents.
Do not use powdered decalcifying agents.
Note
Problem Possible causes
Coffee does not run through • Machine is not turned on or plugged in
• Water tank is empty
• Selector control not in Espresso position
• Coffee grind is too fine
• Too much coffee in the filter
• The filter is blocked (see Care and cleaning)
Coffee runs out too quickly • Coffee grind is too coarse
• Not enough coffee in the filter
Coffee runs too slowly • The water tank is empty or low
• Coffee grind is too fine
• Machine is blocked by scale build up (see Care and cleaning)
Coffee runs out around the • Filter holder is not inserted in the brew head properly
edge of the filter holder • There are coffee grounds around the filter rim
• Too much coffee in the filter
• Coffee has been tamped too tightly
The machine is too loud • Water tank is empty
• Water tank is not securely in place
Coffee is too weak or watery • Coffee grind is not fine enough
(use coffee ground for espresso machines)
Coffee is too cold • Machine not preheated
• Cups not preheated
• Milk not heated enough (if making a cappuccino or latte)
No crema • Coffee is not tamped (pressed) firmly enough
• Coffee grind is too coarse
• Coffee is not fresh
No steam is generated • Machine is not turned on
• Water tank is empty
• Selector control not in Steam position
• Steam wand is blocked (see care and cleaning)
Milk is not foamy • Not enough steam
othing
er fr
t
f
a
k is no
Mil
•
esh and cold
t fr
THE WATER TANK SHOULD NEVER BE REMOVED OR COMPLETELY EMPTIED
ALCIFYING.
DURING DE
12
C
13
Page 8

Coffees to try
Cappuccino
A cappuccino is very light and almost luke
warm. It has one-third espresso, one-third milk
and one-third foam. It is traditionally consumed
before noon.
Espresso
Intense and aromatic, an espresso or short
black as it’s also known uses about 7g of
ground coffee. It is served in a small cup or
glass to a level of approximately 35mm.
Cafe latté
Served in a glass, a caffe latté consists of onethird espresso, topped with steamed milk and
about 10mm of foam.
Macchiato
Traditionally served short, the macchiato is also
poured as a long black with a dash of milk or a
dollop of foam.
Long black
A long black is generally served with a double
shot of espresso.
Ristretto
Meaning restricted, a ristretto is an
extremely short espresso of approximately
15mm, distinguished by its intense flavour
and aftertaste.
14 15
 Loading...