

Page 1

the Handy Stand Mixer
Instruction Booklet
™
Suits all BHM600 models
Page 2

CONGRATULATIONS
on the purchase of your new
Breville Handy Stand Mixer™
Page 3

CONTENTS
4 Breville recommends safety first
7 Know your Handy Stand Mixer™
10 Assembly and operation
of your Handy Stand Mixer™
16 Care, cleaning and storage
18 Measuring and weighing
21 Hints and tips
26 Recipes
3
Page 4

BREVILLE RECOMMENDS SAFETY FIRST
At Breville we are very safety conscious. We design and manufacture consumer products with
the safety of you, our valued customer, foremost in mind. In addition we ask that you exercise
a degree of care when using any electrical appliance and adhere to the following precautions.
IMPORTANT SAFE GUARDS FOR YOUR
BREVILLE HANDY STAND MIXER™
CAREFULLY READ ALL
INSTRUCTIONS BEFORE
OPERATING THE APPLIANCE
AND SAVE FOR FUTURE
REFERENCE.
• Carefully read all instructions before
operating the Breville Handy Stand
Mixer™ for the first time and save for
future reference.
• Remove and safely discard any
packaging material and promotional
labels before using for the first time.
• To eliminate a choking hazard for young
children, remove and safely discard the
protective cover fitted to the power plug
of this appliance.
• Do not place the bench mixer near
the edge of the bench or table during
operation. Ensure the surface is level,
clean and free of water and other
substances. Vibration during operation
may cause the appliance to move.
• Do not use the Breville Handy Stand
Mixer™ on a sink drain board.
• Do not place the Breville Handy Stand
Mixer™ on or near a hot gas or electric
burner, or where it could touch a
heated oven.
• Always ensure the Breville Handy
Stand Mixer™ is completely assembled
before operating. Follow the instructions
provided in this booklet.
• Ensure the control switch is in the OFF
position and the Breville Handy Stand
Mixer™ is switched off at the power
outlet and the power cord is unplugged
before attaching the beaters or
dough hooks.
• Do not use attachments other than those
provided with the Breville Handy Stand
Mixer™. Use only the beaters and dough
hooks supplied with this mixer.
• Do not operation this appliance
continuously on heavy loads for more
than 3 minutes. None of the recipes in
this book are considered a heavy load.
• Handle the Breville Handy Stand Mixer™
and attachments with care. Never place
your fingers inside the mixing bowl or
near the beaters or dough hooks
during operation.
• Keep hands, hair, clothing as well as
spatulas and other utensils away from
moving beaters or dough hooks
during operation.
• Should an object such as a spatula or
spoon fall into the bowl while mixing,
immediately turn the mixer stand
control switch to the OFF position, turn
the hand mixer control switch to the 'off'
position, unplug at the power outlet and
remove the object.
• Do not place hands in the mixing bowl
unless the Handy Stand Mixer™ is
disconnected from the power outlet.
Ensure that the control switch are in the
OFF position, the Breville Handy Stand
Mixer™ is switched off and unplugged
from the power outlet before removing
the beaters and dough hooks.
• Ensure the motor, beaters or dough hook
have completely stopped
before disassembling.
4
Page 5

BREVILLE RECOMMENDS SAFETY FIRST
• Always remove the beaters or dough
hooks from the Breville Handy Stand
Mixer™ before cleaning.
• Care should be taken when removing
food from the bowl by ensuring the
motor and the beaters or dough hooks
have completely stopped before
disassembling. Ensure the control switch
is in the OFF position; the appliance
is switched off at the power outlet and
unplugged before unlocking the mixer
motor head before moving it in the up
right position. The beaters or dough
hooks should be released from the
mixer motor head before removing the
mixed food from the mixer bowl and the
beaters and dough hooks.
• Ensure the mixer motor head is locked
into the horizontal (closed) position
when not in use and before storing.
• Always ensure the Control Switch is in
the OFF position, the power is switched
off at the power outlet and the power
cord is unplugged from the power outlet
before attempting to move the appliance,
before assembling or disassembling the
mixer, when the mixer is not in use and
before cleaning or storing.
• Do not move the Breville Handy Stand
Mixer™ whilst in operation.
• The use of any accessory attachments
not recommended by Breville may
cause injuries.
• Do not leave the mixer unattended when
in use.
• Do not place any part of the Breville
Handy Stand Mixer™ except the spatula
in the dishwasher.
• Keep the appliance clean. Follow the
cleaning instructions provided in
this book.
IMPORTANT SAFEGUARDS
FOR ALL ELECTRICAL
APPLIANCES
• Carefully read all instructions before
operating the appliance and save for
future reference.
• Remove and safely discard all packaging
material and promotional labels before
using the appliance for the first time.
• Fully unwind the power cord before use.
• Do not let the power cord hang over
the edge of a bench or table, touch hot
surfaces or become knotted.
• To protect against electric shock, do
not immerse the power cord, power
plug or appliance in water or any other
liquid, unless it is recommended in the
cleaning instructions.
• The appliance is not intended for use
by persons (including children) with
reduced physical, sensory or mental
capabilities, or lack of experience and
knowledge, unless they have been given
supervision or instruction concerning
use of the appliance, by a person
responsible for their safety.
• Children should be supervised to ensure
that they do not play with the appliance.
• It is recommended to inspect the
appliance regularly. Do not use the
appliance if the power supply cord,
plug, connector or appliance becomes
damaged in anyway. Return the entire
appliance to the nearest authorised
Breville Service Centre for examination
and/or repair.
• Any maintenance other than cleaning
should be performed at an authorised
Breville Service Centre.
SAVE THESE
INSTRUCTIONS
5
5
Page 6

BREVILLE RECOMMENDS SAFETY FIRST
• This appliance is for household use only.
Do not use this appliance for other than
its intended use. Do not use in moving
vehicles or boats. Do not use outdoors.
Misuse may cause injury.
• The installation of a residual current
device ( safety switch) is recommended
to provide additional safety protection
when using electrical appliances. It
is advisable that a safety switch with
a rated residual operating current
not exceeding 30mA be installed in
the electrical circuit supplying the
appliance. See your electrician for
professional advice.
• Always turn the appliance to the OFF
position, switch off at the power outlet
and unplug at the power outlet when the
appliance is not in use.
• Before cleaning, always turn the
appliance to the OFF position, switch off
at the power outlet, unplug at the power
outlet and remove the power cord, if
detachable, from the appliance and allow
all parts to cool.
• Do not place this appliance on or near
a hot source, such as hot plate, oven
or heaters.
• Position the appliance at a minimum
distance of 20cm away from walls,
curtains and other heat or steam
sensitive materials and provide adequate
space above and on all sides for
air circulation.
IMPORTANT
Ensure the control switch is in the OFF
position, the mixer is switched off at
the power outlet and unplugged from
the power outlet before attaching the
beaters or dough hooks.
6
SAVE THESE
INSTRUCTIONS
Page 7

KNOW
your Breville Handy Stand Mixer™
Page 8

KNOW YOUR BREVILLE HANDY STAND MIXER™
F&L
E G
D
C
M
I
H
K
B
A
J
8
Page 9

KNOW YOUR BREVILLE HANDY STAND MIXER™
A. Handy Stand Mixer™
That is also a hand mixer. The compact
hand mixer is great for light and easy
jobs. The ultimate convenience.
B. Two motors
One motor that drivers the beaters and
one motor that drives the mixer bowl, for
better control and performance on any
task, even under heavy loads.
C. 12 speeds - LCD display
Shows you the speed 1-12 plus
boost (12).
D. Timer – LCD display
Has a count up timer, which displays
how long you have been mixing for.
E. Mixer Stand (Hand Mixer)
Easily remove the head for a convenient
compact hand mixer.
F. Spring loaded, Soft touch tipped
beaters
Safely scrape the bottom of the bowl for
increased volume.
G. Beaters/dough hooks release button
H. Tilt back button
Allows the hand mixer to be tilted out of
the mixer bowl.
I. Hand mixer release button.
J. Mixer stand
Bench mixer.
K. Motorised bowl
Spins the bowl against the beating
action to get through even the thickest
mix.
L. Twin beater action
Spring loaded, soft tipped to get you
closer to the bowl.
M. Boost button
For a burst of power.
Accessories
Stainless steel
3.5L mixing bowl.
Dough Hooks
For kneading breads and pizza doughs.
ON/OFF control switch
On hand mixer.
Off/ Low/ High control switch
On mixer stand.
Spatula (not shown)
9
Page 10

ASSEMBLY AND
OPERATION
of your Breville Handy Stand Mixer™
Page 11

ASSEMBLY AND OPERATION
OPERATING YOUR BREVILLE
HANDY STAND MIXER™
BEFORE FIRST USE
Machine Preparation
Remove and discard all labeling and
packaging materials attached to your
Handy Stand Mixer™. Ensure that you have
removed all parts and accessories before
discarding the packaging.
Clean parts and accessories using warm
water and a gentle dish washing liquid and
rinse well.
Ensure that the stainless steel bowl, dough
hooks and beaters are washed in warm
soapy water.
NOTE
When first using your Breville Handy
Stand Mixer™ you may notice an
odour coming from the motor. This is
normal and will dissipate with use.
ASSEMBLING THE
HANDY STAND MIXER™
1. Place the Handy Stand Mixer™ on a level
dry surface such as a bench top. Ensure
that both the hand mixer (mixer head)
and the bowl motor dial is in the
off position.
2. Attach the mixer head to the mixer stand
by aligning the two (2) pins in the top
of the stand with the two (2) slots locate
in the base of the hand mixer. Allow the
hand mixer to slot into place. You will
hear a locking noise which indicates that
the hand mixer is in place.
NOTE
Make sure that the hand mixer is
securely attached to the stand before
using.
11
Page 12
PAGE HEADER.....
ASSEMBLY AND OPERATION
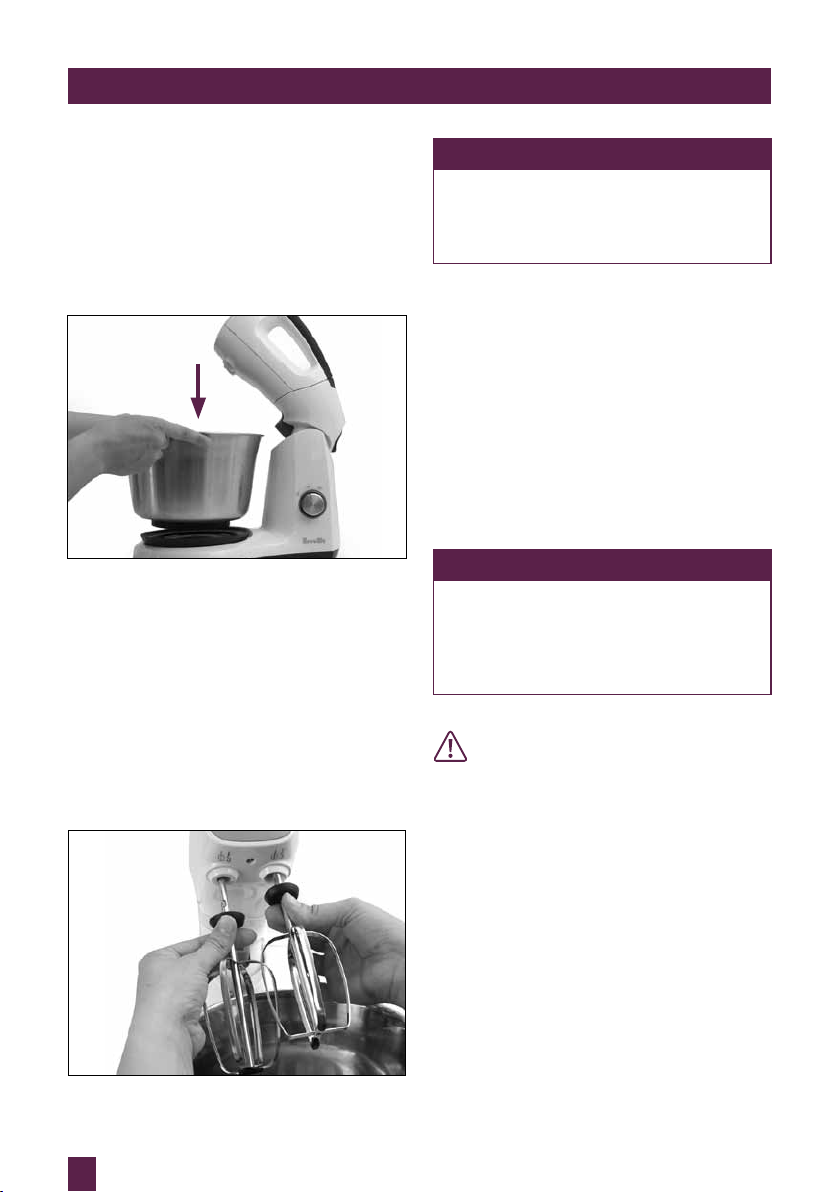
ATTACHING THE BOWL
1. The stainless steel bowl can now be
attached to the mixer stand. Place the
bowl into the turntable and turning it
to the LEFT until it locks into place.
(Product graphic on the stand will
show this).
ATTACHING THE BEATERS
1. Attach the beaters by pressing the tilt
back button and lifting the hand mixer
up until it stops.
2. Insert the beaters/dough hooks into the
correct socket as shown on the front
panel of the mixer head. The beaters
should be inserted with a firm push until
they click into place.
NOTE
It is important that the two beaters are
fully inserted into their appropriate
sockets or your Breville Handy Stand
Mixer™ will not operate correctly.
ATTACHING THE DOUGH HOOKS
1. Attach the dough hooks by pressing the
tilt back button and lifting the motor
head until it stops.
2. Insert the dough hooks into the correct
socket as shown on the underside of the
mixer head. The dough hooks should be
inserted with a firm push until they click
into place.
NOTE
It is important that the two dough
hooks are fully inserted into their
appropriate sockets or your Breville
Handy Stand Mixer™ will not operate
correctly.
CAUTION
Beaters/dough hooks must be inserted
into the correct sockets as they are
not interchangeable and incorrect
insertion will result in damage.
12
Page 13

PAGE HEADER.....
ASSEMBLY AND OPERATION
OPERATING YOUR BREVILLE
HANDY STAND MIXER™
Twin beater Action
The Breville Handy Stand Mixer™ has 2
motors for superior and thorough mixing
result. One motor controls and drives the
beaters while the second motor drives the
bowl in the opposite direction.
1. Ensure that the ON/OFF switch is set in
the off position and that the motor head
is securely attached to the mixer stand
before using.
2. Insert the power cord into a 230/240V
power outlet and switch the power on.
Turn the mixer switch to the on position.
3. Press the tilt back button to lift the
motor head.
5. Insert the beaters or dough hooks into
the mixer head.
NOTE
There is a square and round beater.
Please ensure that the right beater
is inserted in the right slot, there is a
graphic on the mixer to indicate which
beater goes in each slot. The round
ended beater is inserted on the left
hand side and the square ended beater
is inserted on the right hand side.
4. Insert the stainless steel mixing bowl by
placing it on the stand and rotating it in
the clockwise direction to the
locking position.
6. Add ingredients to the mixing bowl
supplied as listed in the recipe.
7. Press the tilt back button to lower the
motor head down lowering in to the
locking position.
13
Page 14
PAGE HEADER.....
ASSEMBLY AND OPERATION
8. Commence mixing by pressing the
(+) speed button to the desired speed
required. You will see the speed of
the mixer on the LCD screen between
the (+/-) speed buttons. Always begin
mixing at a lower speed setting to
prevent splattering. Increase to the
speed suited to the mixing task. The
speed setting can be adjusted during
operation by pressing the (+) or (-)
buttons. Use the mixing guide as
a reference.
9. To operate the motor base turn the dial
to your desired setting. You can choose
from OFF, Low or High.
10. Occasionally stop the mixer during
operation and scrape any food mixture
down the sides of the mixing bowl with
a spatula.
11. When mixing is completed, press the (-)
speed button until the LCD display “0”
and switch the ON/OFF button to the
OFF position.
12. Switch the appliance off at the power
outlet and unplug the power cord.
13. Press the tilt back button and tilt motor
head back on the mixer stand.
14. Remove the beaters/dough hooks by
pressing the eject button on the front
panel of the mixer head while grasping
the shaft of the beaters.
The beaters/dough hooks will be
released automatically. DO NOT try
to pull the beaters/dough hooks out of
the sockets. Use a spatula to remove
mixture from the beaters/dough hooks.
USING THE HAND MIXING.
The hand mixer can be used on its own
(not on the stand) for smaller quantities of
ingredients or quick light tasks that need to
be mixed. To use the hand mixer without the
stand please follow the below instructions:
1. Press the tilt back button and tilt motor
head back on the mixer stand.
2. On the inner side of the stand is a
mixer head release button. Press this to
remove the mixer head from the stand.
3. Ensure that the ON/OFF switch is set in
the off position.
4. Add ingredients to the mixing bowl
supplied as listed in the recipe.
5. Insert the power cord into a 230/240V
power outlet and switch the power on.
6. Insert the beaters or dough hooks into
the mixer head.
14
Page 15

PAGE HEADER.....
ASSEMBLY AND OPERATION
NOTE
There is a square and round beater.
Please ensure that the right beater
is inserted in the right slot, there is a
graphic on the mixer to indicate which
beater goes in each slot. The round
ended beater is inserted on the left
hand side and the square ended beater
is inserted on the right hand side.
7. To turn the mixer on switch the
ON/OFF switch to the ON position.
Commence mixing by pressing the
(+) speed button to the desired speed
required. You will see the speed on the
mixer on the LCD screen between the
(+/-) speed buttons.
8. Always begin mixing at a lower speed
setting to prevent splattering. Increase
to the speed suited to the mixing task.
The speed setting can be adjusted
during operation by pressing the (+) or
(-) buttons. Use the mixing guide as a
reference.
9. Occasionally stop the mixer during
operation and scrape any food mixture
sown the sides of the mixing bowl with
a spatula.
10. When mixing is completed, press the
(-) speed button until the LCD display
“0” and switch the ON/OFF button to
the OFF position. Switch the appliance
off at the power outlet and unplug the
power cord.
TURBO BOOST FUNCTION
Pressing the BOOST button while mixing
provides an extra burst of power, overriding
the speed setting being used. Press the
BOOST button and hold it down for no
more than 30 seconds to avoid overheating.
This function can be used with the hand
mixer and the Handy Stand Mixer™.
NOTE
Always turn the Breville Handy Stand
Mixer™ OFF if you need to scrape
the bowl during use. Then continue
mixing.
CAUTION
Avoid contact with beaters/dough
hooks during operation.
Keep hands, hair, clothing, spatula and
other utensils away from the beaters/
dough hooks to prevent injury or
damage to the mixer.
15
Page 16

CARE, CLEANING
AND STORAGE
of your new Breville Handy Stand Mixer™
Page 17

PAGE HEADER.....
CARE AND CLEANING
CARE CLEANING AND STORING
1. Always ensure that the control switches
are in the OFF position and that the
power is switched off at the power outlet.
Then remove the power cord from the
power outlet.
2. Eject the beaters/dough hooks from
the mixer.
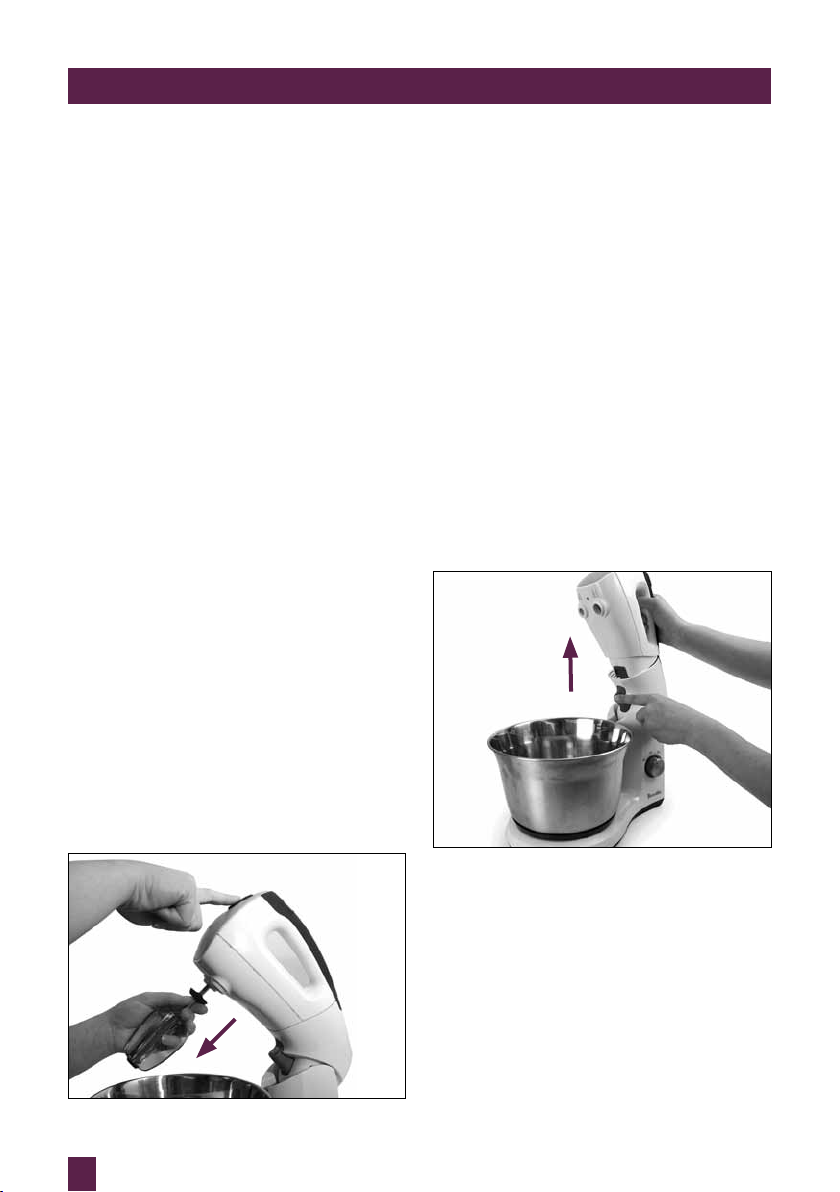
3. To remove the hand mixer from the
stand before cleaning, press the tilt back
button to tilt the mixer head in the up
position. Press the mixer head release
button to remove the mixer head from
the stand.
4. Wipe the hand mixer, mixer stand and
mixer bowl area with a soft, damp cloth
then dry thoroughly.
5. Wipe any access food particles from the
power cord.
6. Wash the beaters, mixer bowl, spatula
and dough hooks in warm soapy water
with a soft clean cloth. Rinse and dry
thoroughly. The spatula may also be
washed in the dishwasher.
7. Do not allow the mixer, beaters or dough
hooks to soak in water for an extended
period of time, as they may damage the
metal finish.
8. Do not place any part of the Handy
Stand Mixer™ except the spatula in the
dishwasher.
NOTE
Do not use abrasive scouring pads
or cleaners when cleaning the mixer
bowl, beaters or dough hooks as these
may scratch the surface. Also ensure
that the mixing bowl, beaters or
dough hooks are not soaked in water
for extended periods of time, i.e. for
several hours or over night, as this may
damage the metal finish. Do not wash
or soak the mixer stand in water or
other liquid. Clean with a damp cloth
and dry thoroughly. Do not allow water
or any liquid to enter the gear system
as damage may result.
CAUTION
Never immerse the Hand Mixer, mixer
stand, power cord or plug in water or
any other liquid.
STORAGE
Your Breville Handy Stand Mixer™ should
be kept in a convenient position on your
kitchen bench top or in an
accessible cupboard.
Always unplug your Breville Handy Stand
Mixer™ from the power outlet before storing.
Place the bowl into the locking position
on the stand. Place the beaters and dough
hooks inside the mixer bowl and lower the
head into the horizontal position.
17
Page 18

MEASURING AND
WEIGHING
with your new BBreville Handy Stand Mixer™
Page 19

MEASURING AND WEIGHING
Care should be taken when weighing and
measuring ingredients to achieve accuracy
and consistency. Recipes in this instruction
book have been developed using Australian
metric weights and measurements.
AUSTRALIAN METRIC
MEASUREMENTS
1 teaspoon
1 tablespoon
1 cup
FOR NEW ZEALAND
CUSTOMERS — NEW ZEALAND
METRIC MEASUREMENTS
1 teaspoon
1 tablespoon
1 cup
ml
5
20
250
ml
5
15
250
The New Zealand tablespoon is 5ml
less than the Australian tablespoon, so
care should be taken when measuring
ingredients to compensate for the variance.
For example, 1 Australian tablespoon = 1
New Zealand tablespoon + 1 New Zealand
teaspoon.
It is important to note that New Zealand
ingredients, especially flour and yeast, can
differ from Australian equivalents.
METRIC MEASURING CUPS
AND SPOONS
If using graduated metric measuring cups,
it is important to spoon the dry ingredients
loosely into the required cup. Do not tap the
cup on the bench or pack the ingredients
into the cup unless otherwise directed. Level
the top of the cup with a knife. When using
graduated metric measuring spoons, level
the top of the spoon with a straight edged
knife or spatula.
METRIC LIQUID MEASURING JUGS
If using a graduated, metric measuring jug,
place jug on a flat surface and check for
accuracy at eye level.
NOTE
In general, water weighs the same in
grams as it measures in milliliters.
METRIC WEIGHING SCALES
For consistent results it is recommended
that a Breville kitchen scales (for details
visit www.breville.com.au) be used to weigh
larger quantities as they provide greater
accuracy than measuring cups.
Tare (zero) the scales with the container
in the position then spoon or pour the
ingredients in until the desired weight
is achieved.
19
Page 20

PAGE HEADER.....
MEASURING AND WEIGHING
THERMOSTAT SETTINGS
°C ELECTRIC °F °C GAS °F GAS MARK
DESCRIPTION OF OVEN
TEMPERATURES
Very Slow 120 250 120 250 1
Slow 150 300 150 300 2
Moderately slow 170 325 160 325 3
Moderate 180 350 180 350 4
Moderately hot 200 400 190 375 5
Hot 220 425 200 400 6
Very Hot 230 450 230 450 7
NOTE
If using fan forced ovens be sure to
turn the temperature down by 15-20 C.
Also check the recipes at the back of
this book.
20
Page 21

HINTS AND TIPS
for your new Breville Handy Stand Mixer™
Page 22

PAGE HEADER.....
HINTS AND TIPS
FOR BETTER BREAD MAKING
• Do check the ingredients and read the
recipe before starting to bake.
• Do measure ingredients accurately –
weigh measurements are more accurate
than volume measurements.
• Do use bread flours unless the recipe
states otherwise.
• Do check used-by-dates on ingredients.
• Do add ingredients in the order stated in
the recipe.
• Do store open ingredients in
airtight containers.
• Do use ingredients at room temperature.
• Don’t use flours that contains a protein
level of less than 11%.
• Don’t use tableware cups, jugs or spoons
for measuring.
• Don’t use hot water or liquids.
• Don’t use self-raising flour to make
yeasted bread unless the recipe states
otherwise.
• If you live in a high altitude area above
900m you will probably need to alter
the yeast quantities in the bread recipe.
The higher the altitude, the lower the
air pressure and the faster the dough
will rise. Try reducing the yeast by ¼
teaspoon.
• If the weather is hot and humid, reduce
the yeast by ¼ teaspoon to avoid over
rising of the dough.
• Flour properties can alter on a seasonal
or storage basis, so it may be necessary
to adjust the water and flour ratio. If
the dough is too sticky, add extra flour
1 tablespoon at a time if the dough is
too dry add extra water 1 teaspoon at a
time. A few minutes is needed for extra
ingredients to be absorbed. Dough with
the correct amount of flour and water
should foam into a smooth round ball
that is damp to the touch but not sticky.
• When hand-shaping dough for rolls,
weigh each piece of dough for more
evenly sized rolls.
SPONGING YEAST
• Instant active dried yeast is used in the
recipes in this book however fresh or
compressed yeast can be substituted.
• Fresh or compressed yeast needs to be
‘sponged’ (fermentation started) before
adding to the other ingredients.
• To substitute, use double the amount
of fresh or compressed yeast for the
amount of dry yeast in a recipe.
• To sponge the yeast: Place the quantity
of fresh compressed yeast in the
quantity of water (warmed) from the
recipe together with 1 teaspoon sugar
into a clean glass bowl, stir to dissolve
and cover with plastic wrap. Allow to
stand in a warm area (30°C) for about
30 minutes or until the mixture starts to
bubble and froth. This mixture should be
used without delay.
WARM AREA FOR RISING
• Yeast, either when sponging or in the
dough, requires warmth to rise.
• To create a ‘warm area’ for dough to rise,
place baking tray over a bowl of fairly
warm water, place prepared dough item
on baking tray, cover loosely with lightly
greased thicker – style plastic wrap or a
tea towel. Ensure kitchen is warm and
free of draughts. Allow the dough to rise
until double in size.
22
Page 23

PAGE HEADER.....
HINTS AND TIPS
FOR BETTER BAKING
• Check the ingredients and read the
recipe before starting to bake.
• Weigh and measure
ingredients correctly.
• Variations may occur in raw ingredients
use so adjust other ingredients and
baking times if required.
• Preheat oven before starting recipe
preparation, this will ensure the correct
temperature is achieved before
baking starts.
• Temperature and cooking times
may vary with some ovens so adjust
accordingly. If using a fan forced oven
reduce the temperatures in the recipes
by 10-20°C.
• When mixing, start the mixer at a
lower speed then gradually increase to
the recommended speed in the recipe
especially when adding dry ingredients.
• When using smaller quantities turn off
the mixer from time to time and scrape
the bowl with a spatula.
• Ensure beaters and mixing bowl are
clean and free of fats when whipping
egg whites as these will impede aeration.
• Spray trays and cake pans with an oil
spray and line with baking paper; this
will make removing your food easier.
• Butter should be softened at room
temperature to make creaming butter
and sugar easier.
• Keep surfaces and ingredients chilled
when making, handling or rolling out
pastry. Butter for pastry making should
be kept refrigerated.
• Avoid stretching pastry when rolling
out as it will shrink when baking. Use
light, even strokes in one direction and
avoid pressing down hard on the rolling
pin. Where possible, rest pastry in the
refrigerator before baking.
• Eggs should be at room temperature to
give better volume when whipping.
• Break eggs individually into another
container before adding to other
ingredients to avoid potential spoilage.
• Separate egg whites carefully to avoid
inclusion of egg yolks. Egg yolks contain
fat and will prevent successful whipping
of egg whites.
• Rinse beaten egg residue from beater
and mixing bowl or other utensils with
cold water immediately after use. Using
hot water will set the egg and make
removal difficult.
• Test if cakes are cooked at the end of
baking time by touching the top lightly,
the cake will spring back if cooked. A
fine skewer can also be inserted carefully
into the centre of the cake, if it comes
out clean the cake is cooked.
• For crisper results when baking biscuits,
remove the baking trays from the oven
and placed directly onto wire racks.
Move the biscuits slightly away from
their baked position on the trays and
cool completely before removing.
23
Page 24

PAGE HEADER.....
HINTS AND TIPS
FOR CAKE AND PASTRY MAKING
Flour, such as plain, self raising and
wholemeal, used for cake and pastry making
should be lower in protein (gluten) than
flour used for bread making.
Plain flour has a lower protein (gluten)
content and gives baked products, such
as cakes, muffins, pastries, scones and
pancakes, a softer texture.
Self–raising flour is a blend of plain flour
and raising agents such as baking powder.
Self raising flour can be used in recipes to
replace plain flour and baking powder. To
make 1 cup self-raising flour sift together
1 cup plain flour and 2 teaspoons baking
powder.
Wholemeal flour contains more parts of the
whole wheat grain — flour, bran and wheat
germ — and can be used in muffins, breads
and pie cases but will have a denser texture.
Corn flour is made from maize (corn) and is
used in some baked products to give a finer
texture and can also be used as a starch to
thicken sauces and desserts.
Rice flour is derived from rice and is used to
give a finer texture in baked products such
as shortbread biscuits.
Baking powder is a mixture of cream of
tartar and bicarbonate of soda and is used as
a raising agent in baking.
Bicarbonate of soda also known as baking
soda is an ingredient in baking powder and
can be used as an additional raising agent or
to darken some baked products.
Butter will give particular flavour and soft
texture to baked products. Margarine can
replace butter to give a similar result. Oil
can be used in some baking to replace butter
but will give texture and flavour differences.
Eggs should be at room temperature to
give better volume when making cakes and
sponges. Standard 60g eggs were used in
the recipes.
Milk should be full cream unless specified.
Light, low fat or skim milk can be used but
will give texture and flavour differences.
Sugar (white crystal sugar) is used to
give flavour, texture and colour to baked
products. Caster sugar is often used in
baking as it is easier to dissolve when
creaming butter and sugar. Brown sugar is
also easy to dissolve and can be used to give
a different flavour and texture. The large
crystals of raw sugar are slower to dissolve
and can be suitable for baked products such
as muffins.
24
Page 25

HINTS AND TIPS
MIXING GUIDE
SPEED SETTING MIXING TASK MIXTURE
1-3 Kneading/Folding in/Light
mixing
Bread dough, Scones, Pastry/Folding
of flour into cakes
4-6 Light Mixing Puddings, Custards, Packet cake
7-9 Creaming/Beating Butter and Sugar/Cream Cheese,
10-12 Whipping/Aerating Beating cream, Egg Whites,
Mixes, Icings
Heavy Batters
Meringue
* Settings should be used as a guide only.
ISSUE TIP
Choice of beaters Do not use a dough hook with a beater - this will damage the
Speed Settings Use the mixing guide above to select a suitable mixing speed
Bowl Speed Use the low bowl speed for speeds 1-6 and the high bowl speed
Mixing Mix for the recommended time in the recipe - avoid over
Egg white Be sure the beaters and bowl are completely clean and dry
Breville Handy Stand Mixer™.
when preparing recipes. Begin mixing at lowest speed then
increase to higher speed to prevent splattering.
for speeds 6-12.
mixing.
Should an object such as a spoon or spatula fall into the bowl
while mixing immediately turn the mixer off, unplug at the
power outlet and remove the object.
before use - a small amount of fat and egg yolk will affect
whipping performance.
Bread dough Add liquid ingredients to the dry ingredients. Use speed 1 to
knead ingredients into a dough ball. DO NOT place hands near
dough hook when mixer is operating.
25
Page 26

RECIPES
for your new Breville Handy Stand Mixer™
Page 27

RECIPES
ALMOND SHORTBREAD CRESCENTS
Makes about 30
INGREDIENTS
250g butter, softened
½ cup caster sugar
2 ¼ cups plain flour
1 cup flaked almonds
Pure icing sugar, for dusting
METHOD
1. Preheat oven to 140°C with fan. Line
two baking trays with baking paper.
2. Combine butter and sugar in the bowl
of the electric mixer. Beat on speed 10,
for 8-10 minutes or until very thick and
creamy.
3. Reduce to speed 2 and gradually add
flour. Mix until well combined.
TIP
When adding the flour, if the mixture
starts to go up the beaters increase
speed.
4. Remove bowl and stir through
almonds. Shape tablespoon amounts
of shortbread mixture into crescent
shapes. Refrigerate 10 minutes.
5. Bake in preheated oven for 30 minutes.
Cool on trays.
Serve dusted with icing sugar.
TRIPLE CHOC COOKIES
Makes approximately 35
INGREDIENTS
180g butter, chopped
150g dark chocolate, chopped
1 ½ cups plain flour
¾ cup cocoa powder
1 ½ cups firmly packed brown sugar
3 x 60g eggs, lightly beaten
200g dark chocolate, chopped
METHOD
1. Pre-heat oven to 170°C with fan. Line 2
baking trays with baking paper.
2. Melt butter and first lot of chocolate in a
small saucepan over a low heat, stirring
constantly until smooth. Allow to cool
slightly, mixture should still be warm.
3. Combine sifted flour, cocoa powder and
sugar into the bowl of the electric mixer.
Mix on speed 4-5 adding chocolate
mixture and eggs. Mix until combined
scraping sides if necessary.
TIP
If mixture starts to go up beaters
increase speed.
4. Stir through chopped chocolate until
combined.
5. Spoon rounded tablespoons of mixture
onto baking trays and press down
slightly. Allow room for spreading.
6. Cook in batches for about 20 minutes
or until firm to touch. Allow to cool on
trays for 1 minute before transferring
to a wire rack. Repeat with remaining
cookie dough.
27
Page 28

RECIPES
GINGERBREAD
Makes 30-40
INGREDIENTS
180g butter
½ cup firmly packed soft brown sugar
½ teaspoon salt
300g treacle
2 tablespoons ground ginger
1 teaspoon ground cloves
1 teaspoon ground cinnamon
1 teaspoon ground nutmeg
3 cups plain flour
½ teaspoon bicarbonate of soda
METHOD
1. Preheat oven to 170°C. Line two trays
with baking paper.
2. In the bowl of the electric mixer, beat
the butter sugar, salt, treacle and spices
together on speed 8 for 2 minutes.
3. Add remaining ingredients and beat
until mixture just forms a thick dough.
4. Place dough onto a floured surface. Roll
out to a 5mm thickness. Using a shaped
cutter approximately 10-12cm in size
cut out shapes and place onto
baking trays.
5. Bake in oven for about 13-15 minutes.
Cool for 5 minutes before transferring
to a wire rack. Repeat with remaining
dough.
Use Gingerbread with Royal Icing
RASPBERRY CUPCAKES
Makes: 12
INGREDIENTS
1 ¾ cups self-raising flour
¾ cup caster sugar
M cup milk
2 x 60g eggs, lightly beaten
125g unsalted butter, melted, cooled
½ teaspoon vanilla extract
1 cup fresh or frozen raspberries
Whipped cream, to serve
Icing sugar, to serve
METHOD
1. Preheat oven to 180°C no fan (160°C)
with fan. Line a 12 cup capacity muffin
tray with patty cases.
2. Combine all ingredients except
raspberries into the bowl of the electric
mixer. Beat on speed 2 until combined
then increase to speed 7 until smooth.
Do not over beat. Gently stir
through raspberries.
3. Divide mixture into patty cases. Cook
in preheated oven for about 20 minutes
or until cooked when tested with a
wooden skewer. Turn onto wire racks
to cool.
4. Using a fine-pointed knife, cut circles
from the tops of the cakes about 1cm
from the edge and 1.5cm down into
cakes. Spoon with whipped cream and
replace tops; dusted with icing sugar.
TIP
If using frozen raspberries, thaw first
on paper towelling.
28
Page 29

RECIPES
RICOTTA PANCAKES
Makes 6 to 8
INGREDIENTS
3 x 60g eggs, separated
200g fresh ricotta
½ cup milk
¾ cup self raising flour
1 ½ teaspoons baking powder
2 tablespoons caster sugar
Unsalted butter for greasing
Fresh berries, to serve
Maple syrup, to serve
METHOD
1. Place egg yolks, ricotta and milk into the
bowl of the electric mixer. Beat on speed
7 until combined. Reduce speed to 2-3
and add sifted flour and baking powder
and mix until just combined.
2. Remove beaters and hand mixer
from base and wash beaters well. In a
separate small bowl beat egg whites
on speed 10 until soft peaks form;
add sugar and beat until sugar has
dissolved. Fold egg whites through
batter until just combined.
3. Heat a heavy base frying pan or griddle
over a low to moderate heat. Lightly
grease with butter.
4. Spoon about 2 heaped tablespoons of
the mixture into pan and cook until
golden brown on both sides.
Serve with fresh blueberries and maple syrup.
PIKELETS
Makes approx 12
INGREDIENTS
1 x 60g egg
¼ cup sugar
1 cup self-raising flour
¾ cup milk
Salted butter for frying
METHOD
1. Combine egg and sugar in the bowl of
the electric mixer. Using as a hand mixer
beat on speed 9-10 until light
and creamy.
2. Add flour and milk and beat until
just combined.
3. Heat a frying pan or skillet on a low/
medium heat; melt a small amount
of butter.
4. Drop spoonfuls of batter in frying pan
and cook on both sides until golden.
Serve with strawberry jam, butter or cream.
TIP
For berry pancakes pour mixture into
pan; top with several fresh berries
before flipping over and cooking other
side.
29
Page 30

RECIPES
BANANA CAKE WITH LEMON ICING
Serves 10
INGREDIENTS
200g butter, room temperature,
1 ½ cups caster sugar
2 x 60g eggs
1 ½ cups (approx 3 large) very ripe mashed
bananas
1 teaspoon vanilla extract
2 ¼ cups self raising flour
1 teaspoon ground cinnamon
½ cup buttermilk
METHOD
1. Preheat oven to 180°C no fan (160°C
with fan). Grease and line base and sides
of a 23cm cake pan.
2. Combine butter and sugar in the bowl
of the electric mixer and beat on speed
9, until well combined. Add eggs, one
at a time, beating well between each
addition. Add bananas and vanilla and
mix well.
3. Reduce speed (2-3), and add sifted
dry ingredients and buttermilk in two
batches; mix until just combined.
4. Spoon mixture into prepared pan and
bake for about 60 minutes or until
cooked when tested with a skewer.
5. Allow cake to cool in pan for 5 minutes
before transferring to a wire rack to
cool completely.
Serve with Lemon Icing
30
GLAZED CITRUS POPPY SEED CAKE
Serves 16
INGREDIENTS
M cup milk
½ cup poppy seeds
250g butter, softened
1 ½ cups caster sugar
1 tablespoon finely grated orange rind
1 tablespoon finely grated lime rind
1 teaspoon vanilla extract
4 x 60g eggs
2 cups self raising flour
Glaze
2 teaspoons orange rind
½ cup orange juice
½ cup lemon juice
1 cup caster sugar
METHOD
1. Preheat oven to 180°C no fan (160°C
with fan). Grease and line and 23cm
cake pan.
2. Combine milk and poppy seeds in a
small bowl and soak for 10 minutes.
3. Using the bowl of the electric mixer,
cream butter, sugar, rind and vanilla on
speed 9 until light and fluffy.
4. Add eggs one at a time, beating well
between each addition.
5. Reduce to speed 3 and add flour and
poppy seed mixture in two batches; mix
until just combined.
6. Spread mixture into prepared pan and
cook in oven for about 1 hour and 20
minutes or until cooked when tested
with a skewer.
7. Meanwhile combine the rind, juices and
sugar in a small saucepan. Stir over a
low heat until the sugar has dissolved;
bring to the boil, simmer for 2 minutes.
8. Turn cake out on to a cooling tray with
a baking tray underneath. Using a
wooden skewer, poke several holes into
the cake then pour the hot syrup over
the hot cake.
Page 31

PAGE HEADER.....RECIPES
MOIST CARROT CAKE WITH CREAM
CHEESE FROSTING
Serves 10
INGREDIENTS
250g butter, softened
1 ½ cups caster sugar
3 x 60g eggs
2 cups self-raising flour
2 teaspoons ground cinnamon
1 teaspoon bicarbonate soda
1 cup desiccated coconut
¾ cup buttermilk
2 cups (approx 3 carrots) finely grated carrot
1 x 440g can crushed canned pineapple in juice,
well drained
1 cup chopped walnuts
METHOD
1. Preheat oven to 180°C no fan (160°C
with fan). Grease and line base and sides
of 2 x 20cm cake pans with
baking paper.
2. Combine butter and sugar in the bowl
of the electric mixer and beat on speed
9 until well combined. Add eggs, one at
a time, beating well between
each addition.
3. Reduce speed to 2-3, and add sifted
flour, cinnamon, bicarb, coconut and
buttermilk in two batches; mix until
just combined. Fold through carrot,
pineapple and walnuts.
4. Spoon mixture into prepared pans
and bake for about 40 minutes or until
cooked when tested with a skewer.
5. Allow cakes to cool in pan for 5 minutes
before transferring to a wire rack to
cool completely.
6. Once cakes are cool spread half of
Cream Cheese Frosting onto one cake
then top with second cake and top with
remaining frosting.
Serve with Cream Cheese Frosting
CLASSIC SPONGE CAKE WITH JAM
AND CREAM
Serves 8
INGREDIENTS
M cup wheaten cornflour
L cup self raising flour
1 teaspoon cream of tartar
4 x 60g eggs
¾ cup caster sugar
300ml carton cream
½ cup strawberry jam, lightly warmed
6-8 fresh strawberries, thinly sliced
METHOD
1. Preheat oven to 180°C no fan (160°C
with fan). Grease and line bases of 2 x
22cm cake pans with baking paper.
2. Sift flours and cream of tartar two times
and set aside.
3. Combine eggs and sugar in the bowl of
the electric mixer. Beat on speed 11-12
for 10 minutes or until the mixture is
very thick.
4. Sift flour over the egg mixture a third
time. Using a metal spoon carefully fold
flour through egg mixture until
just combined.
5. Divide mixture evenly among cake
pans, bake in oven about 17 minutes.
6. Remove cakes immediately from pans
onto baking trays lined with
baking paper.
7. Once cool, beat cream with electric
mixer on speed 8 until thickened. Top
one sponge with warmed jam, fresh
strawberries and some of the whipped
cream. Top with second sponge. Serve
with remaining cream.
31
Page 32

PAGE HEADER.....
RECIPES
PAVLOVA
Serves 8
INGREDIENTS
4 x 60g egg whites
1 cup caster sugar
300ml carton cream
Fresh berries, to serve
Fresh passionfruit pulp, to serve
METHOD
1. Preheat oven to 140ºC no fan (120°C
with fan). Mark a 20cm circle onto a
sheet of baking paper. Turn paper over
and place onto a greased baking tray.
2. Place egg whites in the bowl of the
electric mixer. Beat egg whites on speed
10 until soft peaks form.
3. Gradually add sugar making sure sugar
is dissolved between each addition.
This can take about 10 minutes.
4. Spoon meringue onto paper within
the circle; use a spatula to shape into a
dome shape.
5. Place in oven and bake for about 1 hour
or until dry then turn oven off and allow
pavlova to cool completely in oven with
door slightly ajar.
6. Once cool, beat cream with electric
mixer on speed 8 until thickened. Top
with berries and passionfruit pulp.
CHOCOLATE CAKE
Serves 10
INGREDIENTS
200g good quality dark chocolate
200g butter, softened
1 cup caster sugar
1 teaspoon vanilla extract
2x 60g eggs, lightly beaten
1 ½ cups self-raising flour
¼ cup cocoa powder
1 ¼ cups buttermilk
METHOD
1. Preheat oven to 180°C no fan (160°C
with fan). Grease and line base and sides
of a 22cm cake pan with baking paper.
2. Melt chocolate in a heatproof bowl over
hot water. Set aside.
3. Combine butter, sugar and vanilla in
the bowl of the electric mixer. Beat on
speed 9 until light and fluffy. Add eggs
one and at time, beat until combined.
Add melted chocolate and mix until
combined.
4. Reduce speed to 2-3 and add sifted
dry ingredients and buttermilk in two
batches. Spoon mixture into prepared
pan and bake for about 1 hour and 10
minutes or until cooked when tested
with a wooden skewer.
5. Allow cake to cool in pan for 5 minutes
before transferring to a wire rack to
cool completely.
Serve cake with chocolate ganache
32
Page 33

PAGE HEADER.....
RECIPES
RASPBERRY SOUR CREAM
CHEESECAKE
Serves 8-10
INGREDIENTS
250g packet plain sweet biscuits
125g unsalted butter, melted
750g cream cheese, at room temperature, cut
into cubes
1 cup caster sugar
4 x 60g eggs
1 tablespoon finely grated lemon rind
300ml carton sour cream
200g fresh or frozen raspberries
METHOD
1. Preheat oven to 160°C no fan. Line the
base of a 23cm springform pan with
non-stick baking paper.
Tip: Invert the base of the springform pan
so that the flat side is face up.
2. Blend or process biscuit crumbs until
fine. Place into a bowl, add melted
butter and mix well.
3. Press biscuit mixture into the base and
sides of the pan. Use a straight-sided
glass to spread and press the biscuit
mixture firmly over the base and side of
pan, leaving 1cm at the top of the pan.
Refrigerate 10 minutes.
4. Place softened cream cheese and sugar
into the bowl of the electric mixer. Beat
on speed 9-10 until mixture is smooth.
Add eggs, one at a time, beating well
between each addition. Add lemon rind
and sour cream and beat until smooth.
5. Pour the cream cheese mixture into
the base. Sprinkle with raspberries.
Place the pan on a baking tray and
bake for 1 ¼ -1 ½ hours or until just
set in the centre. Turn oven off. Leave
the cheesecake in oven, with the
door slightly ajar, for 2 hours or until
cooled completely (this will prevent
cheesecake from cracking). Refrigerate
until well chilled.
TIP
If using frozen raspberries, thaw on
paper towelling before placing on
cheesecake.
33
Page 34

PAGE HEADER.....
RECIPES
CELEBRATION FRUIT CAKE
Serves 20
INGREDIENTS
200g dried figs, roughly chopped
200g dried dates, roughly chopped
150g dried currents
150g raisins
150g sultanas
¾ cup brandy
¼ cup golden syrup
200g butter, softened
1 cup firmly packed soft brown sugar
3 x 60 g eggs, lightly beaten
2 cups plain flour
1 teaspoon ground cinnamon
1 teaspoon ground nutmeg
2 tablespoons golden syrup, extra
2 tablespoons brandy, extra
METHOD
1. Combine dried fruit, brandy and golden
syrup in a heavy based saucepan. Cook
on a medium heat, stirring occasionally
until fruit is warmed. Remove from heat
and transfer to a heat proof bowl. Cover
and cool for several hours or overnight.
2. Preheat oven to 160°C no fan (140°C
with fan). Grease and line a 20cm cake
pan with two layers of baking paper.
3. Combine butter and sugar in the bowl
of the electric mixer. Beat on speed 8
until light and fluffy. Add eggs, one at
a time, beating until combined. Reduce
speed and add sifted dry ingredients.
Stir through fruit mixture.
4. Spoon cake mix into prepared pan and
smooth top.
5. Bake in oven for 3-3 ½ hours or
until cooked.
TIP
To test a fruit cake insert and small
metal knife into the cake. Cake should
not have raw mixture on it.
6. Remove cake from oven and cover cake
tightly with foil. Allow cake to cook
upside down in pan. Before serving
warm extra golden syrup and brandy
and brush over cake.
34
Page 35

PAGE HEADER.....
RECIPES
ROYAL ICING
Makes about 2 cups
INGREDIENTS
2 egg whites
Pinch cream of tartar
2 ¼ cups pure icing sugar, sifted
METHOD
1. Combine egg whites and cream of tartar
in the electric mixer bowl. Beat on speed
8 until lightly beaten.
2. Reduce speed to 6 and add icing sugar
a heaped spoonful at a time until well
combined.
3. Place icing into a piping bag and pipe.
Icing will harden on standing.
LEMON ICING
For a 23cm cake
INGREDIENTS
3 cups icing sugar mixture, sifted
1 teaspoon grated lemon rind
2 tablespoons lemon juice
100g butter, melted
METHOD
1. Place icing sugar mixture and lemon
rind into the bowl of the electric mixer.
While on speed 4-5 speed pour in lemon
juice and butter. Mix until combined.
2. Spread on cooled cake.
BUTTER CREAM ICING
For a 23cm cake
INGREDIENTS
125g butter, softened
1 ½ cups icing sugar mixture, sifted
1-2 tablespoons milk
METHOD
1. Place butter into the bowl of the electric
mixer. Using the mixer as a hand mixer
beat on speed until pale and creamy.
2. Reduce speed and gradually add icing
sugar until combined. Adjust thickness
of icing with milk.
TIP
If adding food colouring you may not
need to add any milk at all.
CREAM CHEESE FROSTING
For a 23cm cake
INGREDIENTS
30g butter, softened
125g cream cheese, softened
½ teaspoon vanilla extract
1 ½ cups icing sugar, sifted
METHOD
1. Place butter, cheese and vanilla into the
bowl of the electric mixer. Beat on speed
7-8 for about 1-2 minutes or until
well combined.
2. Reduce speed to 3 and add sugar; once
added increase speed again until
mixed well.
3. Spread on cooled cake.
CHOCOLATE GANACHE
For a 23cm cake
INGREDIENTS
200g good quality dark chocolate, chopped
1 cup cream
METHOD
1. Stir ingredients in small saucepan over a
low heat until smooth. Cool to spreading
consistency.
2. Spread on cooled cake.
35
Page 36

PAGE HEADER.....
RECIPES
QUINOA, LINSEED AND CHIA
BREAD
Makes 1 loaf
INGREDIENTS
1 tablespoon black chia seeds
1 tablespoon linseeds
2 teaspoons white quinoa
2 teaspoons red quinoa
1 ½ cups water
1 ½ teaspoons salt
3 L cups bakers flour
2 teaspoons white sugar
2 teaspoons instant dried yeast
White and brown quinoa extra for crust
METHOD
1. Combine chia, linseed and quinoa in a
small bowl. Add ½ cup of the water and
mix well; set aside for 20 minutes.
2. In the electric mixer bowl add salt, flour,
sugar, yeast, remaining 1 cup water and
soaked seeds. Mix on speed 1 for about
5 minutes. If necessary turn mixer off
and scrape sides to lift any flour.
3. Place dough ball into a lightly oiled
bowl, cover and rest in a warm drought
free place for 30 minutes or until dough
has doubled in size. Turn dough out
on a floured surface and knock back
(punch) the dough to remove excess air,
lightly knead.
4. Preheat oven to 200°C no fan (180°C
with fan).
5. Once doubled in size, turn again onto a
lightly floured surface and lightly knead
just enough to bring dough together.
6. Using your hands gently push the
dough to make a rough rectangle, about
30cmx20cm. Bring one long edge of
the dough into the centre then bring the
other long edge in. Pinch seam together
to seal. Brush with a little water and
sprinkle generously with extra quinoa.
Flip dough over so the seam is down
and repeat with water and quinoa.
Carefully lift onto a baking tray and cut
three shallow slits in top; cover with
a clean tea towel and stand in a warm
place for 20 minutes.
7. Bake in oven for 30-35 minutes or until
golden brown and hollow when tapped
on top. Transfer to a wire rack to cool.
36
Page 37

PAGE HEADER.....
RECIPES
TURKISH GOZLEME WITH LAMB
Makes 6
INGREDIENTS
Filling
1 tablespoon olive oil
1 large brown onion, finely chopped
3 cloves garlic, chopped
500g lamb mince
2 teaspoons cumin powder
1 teaspoon sweet paprika
¾ cup tomato passata
Salt and pepper
150g feta cheese, crumbled
100g tasty cheese, grated
3 cups shredded silverbeet
olive oil cooking spray
lemon wedges, to serve
Dough
3 ½ cups bakers flour, sifted
2 teaspoons salt
2 tablespoons olive oil
¼ cup natural yogurt
375ml lukewarm water
METHOD
1. To make dough: Combine flour and salt
in the bowl of the electric mixer. Turn
mixer onto speed 1 and add oil, yogurt
and water. Mix for 6 minutes.
3. Heat oil in a large frying pan over
medium heat. Add the onions and garlic
and cook until softened. Add lamb
mince and cook, stirring, until browned;
add spices and passata. Cook for 10-15
minutes or until mixture is thick. Allow
to cool
4. Combine cheeses and spinach; set
aside.
5. Preheat a large non-stick frying pan
or flat plate on a BBQ on a medium
heat. On a large piece of baking paper;
roll one piece of dough to a 3mm thick
rectangle. .
6. Place one sixth of the spinach mixture
onto one half of the dough. Top with
one sixth of the meat mixture. Lift
dough over filling to enclose and
pinch to seal the edges. Repeat with
remaining dough and filling and place
onto separate sheets of baking paper.
7. Cooking one at a time. Spray the top
with cooking spray oil and flip up side
down onto another sheet of baking
paper. Place gozleme and baking paper
onto cooking surface and cook for 3-4
minutes or until golden. Spray top with
oil and carefully flip over to cook
other side.
8. Cut into wedges and serve with
lemon wedges.
TIP
Mixture is quite sticky so don’t be
tempted to add more flour.
2. Turn mixture out onto a lightly floured
surface and lightly knead to combine.
Divide dough into 6 equal portions and
knead into small balls. Place balls onto
a tray lined with a baking paper; cover
and rest for 20 minutes
37
Page 38

PAGE HEADER.....
RECIPES
BASIC PIZZA DOUGH
Makes enough for four 30cm thin crust
pizzas or two 30cm thicker crust pizza
INGREDIENTS
3 teaspoons instant dried yeast
3 teaspoons sugar
3 teaspoons salt
1 tablespoon olive oil
1 cup lukewarm water
3 cups bakers flour
METHOD:
1. Add yeast, sugar, salt, olive oil and water
into the bowl of the electric mixer.
2. Add flour and mix on speed 1 for about
4-5 minutes.
3. Turn dough onto a lightly floured
surface and roll into a ball. Place dough
ball into a lightly oiled bowl, cover and
rest in a warm drought free place for
30 minutes or until dough has doubled
in size. Turn dough out on a floured
surface and knock back (punch) the
dough to remove excess air,
lightly knead.
4. For thin crust, divide dough into 4 x
170g dough balls and set aside
until required.
5. For thicker crust, divide dough into 2
even dough balls and set aside until
required
PIZZA TOPPINGS
MARGHERITA PIZZA
Makes 1 pizza
INGREDIENTS
170g pizza dough for thin crust (or one half of the
dough for thicker crust)
¼ cup pizza sauce
½ cup shredded mozzarella cheese, shredded
6 cherry tomatoes, quartered
L cup basil leaves, torn. Plus extra for garnish
4 Bononcini balls, halved
Salt & pepper
Fresh basil leaves to serve
METHOD
1. Preheat oven to 200°C no fan
(180°C with fan).
2. Roll out dough ball on a lightly floured
surface until pizza is to your desired
thickness. Place onto a floured pizza
tray and prick evenly with a fork.
3. Spread tomato sauce over pizza base;
sprinkle evenly with mozzarella cheese,
cherry tomatoes and basil.
4. Season with salt and pepper.
5. Bake for 10-15 minutes or until base is
cooked and crisp and topping is golden
and melted.
Serve topped with torn slices of basil leaves.
38
Page 39

PAGE HEADER.....
RECIPES
HAM & MUSHROOM PIZZA
Makes 1 pizza
INGREDIENTS
170g pizza dough for thin crust (or one half of the
dough for thicker crust)
L cup pizza sauce
¼cup shredded mozzarella cheese
¼ cup Gruyere cheese
50g ham, chopped
70g mushrooms, sliced
Salt & pepper
Drizzle of balsamic vinegar to serve
METHOD
1. Preheat oven to 200°C no fan
(180°C with fan)..
2. Roll out dough ball on a lightly floured
surface until pizza is to your desired
thickness. Place onto a floured pizza
tray and prick evenly with a fork.
3. Spread tomato sauce over pizza base;
sprinkle evenly with mozzarella and
Gruyere cheese, capsicum,
ham and mushrooms.
4. Season with salt and pepper.
5. Bake for 10-15 minutes or until base is
cooked and crisp and topping is golden
and melted.
Serve with a drizzle of balsamic vinegar.
ASPARAGUS & GOATS CHEESE
PIZZA WITH TOASTED WALNUTS
Makes 1 pizza
INGREDIENTS
170g pizza dough for thin crust (or one half of the
dough for thicker crust)
1 tablespoon extra virgin olive oil
1 tablespoon goat’s curd
L cup mozzarella cheese, shredded
6-7 asparagus spears, blanched, sliced
lengthways
1 tablespoon grated parmesan
Salt & pepper
2 tablespoons coarsely chopped toasted walnuts
30g baby spinach leaves
METHOD
1. Preheat oven to 200°C no fan
(180°C with fan).
2. Roll out dough ball on a lightly floured
surface until pizza is to your desired
thickness. Place onto a floured pizza
tray and prick evenly with a fork.
3. Brush pizza base with olive oil and
spread a thin layer of goat’s curd
evenly over.
4. Sprinkle with mozzarella, garlic,
parsley and asparagus and top with
grated parmesan.
5. Bake for 10-15 minutes or until base is
cooked and crisp and topping is golden
and melted.
6. Season with salt and pepper and top
with walnuts and baby spinach leaves
39
Page 40

PAGE HEADER.....
RECIPES
PIDE WITH SPINACH AND FETA
Makes 2 loaves
INGREDIENTS
1 tablespoon instant dried yeast
1 ½ cups lukewarm water
½ teaspoon sugar
3 cups bakers flour
1 teaspoon salt
¼ cup olive oil
1 x 60g egg, beaten
1 tablespoon milk
Nigella or sesame seeds
Lemon wedges, to serve
FILLING
1 bunch English spinach
1 tablespoon olive oil
1 onion, finely chopped
2 cloves garlic, crushed
160g goats feta, crumbled
METHOD
1. Combine yeast, water and sugar in
a bowl and stir until yeast it mixed
through. Set aside in a warm place for 15
minutes or until the mixture
becomes frothy.
2. Place flour, salt, olive oil and yeast
mixture into a bowl of an electric mixer
using the dough hooks; knead for 8
minutes on speed 1.
TIP
Mixture is quite sticky so don’t be
tempted to add more flour.
3. Turn mixture out onto a lightly floured
surface and lightly knead to a ball.
Place dough into lightly oiled bowl;
cover and rest in a warm place for 30
minutes or until doubled in size.
4. Meanwhile, trim spinach and roughly
chop. Wash spinach and leaving the
leaves wet, heat in a frying pan until
just wilted. Drain spinach and cool.
Once cool squeeze out excess liquid.
5. Heat oil in a frying pan over a low/
medium heat. Cook onions and garlic
until softened. Allow to cool slightly.
6. Preheat oven to 250°C.
7. Once doubled in size, turn again onto a
lightly floured surface and lightly knead
just enough to bring dough together.
Cut dough in half. Using your hands
gently stretch the dough to make a
rough rectangle, about 35cmx20cm.
Place onto a sheet of baking paper.
8. Combine onion mixture, spinach and
feta and season with pepper. Place
half of the filling over the dough
lengthways. Pull the sides of the dough
over the filling and pinch the sides
to seal, leaving a little opening in the
middle. Brush with combined egg
and milk and sprinkle with nigella or
sesame seeds. Repeat with remaining
dough and filling.
TIP
Unless you have a large oven we
recommend baking one at a time.
9. Place a baking tray in the oven for 5
minutes to heat. Transfer pide with
baking paper onto the hot tray and
bake for 10-15 minutes or until golden.
Repeat with second pide.
Serve warm with lemon wedges.
40
Page 41

PAGE HEADER.....
RECIPES
CINNAMON SCROLLS
Makes 12
INGREDIENTS
1 ½ teaspoons instant dried yeast
¼ cup warm milk
¼ cup caster sugar
2 ¼ cups bread flour
½ teaspoon cinnamon
¼ teaspoon salt
3 x 60g eggs, lightly beaten
125g butter, softened and cut into cubes
Cinnamon filling
2 tablespoons soft brown sugar
1 tablespoon caster sugar
1 ½ teaspoons cinnamon
25g butter, softened
METHOD
1. Preheat oven to 200°C no fan (180°C
with fan). Grease a L cup capacity
muffin tray.
2. Combine yeast, milk and sugar in a
bowl; stir to combine. Allow to sit in a
warm place for 5 minutes or until frothy.
3. Combine flour, cinnamon, salt, eggs
and yeast mixture into the bowl of the
electric mixer. Using the dough hooks
mix on speed 1 until almost combined.
Add the butter in a few cubes in at a
time until mixed through
(approx 3-4 minutes).
4. Turn dough out onto a floured surface
and lightly knead until combined. Place
in a floured bowl; cover with plastic
wrap and allow to rest in a warm place
for about 45 minutes or until doubled
in size.
5. Meanwhile to make cinnamon sugar,
combine the sugars and cinnamon and
set aside.
6. Once rested, place dough onto a
floured surface and roll out to rectangle
shape approximately 25cm x 45cm.
Using your fingers or a spatula spread
the softened butter over the dough.
Sprinkle the cinnamon mixture over
the dough leaving 1 tablespoon for
the tops.
7. Starting from the long side, roll the
dough up to form a log.
TIP
If the dough is sticking as you are
trying to roll it use a spatula or flat
knife to lift it off bench. The dough
should be very soft.
8. Trim ends of roll then cut into 12 equal
size portions. Place each scroll, cut
side up, into the greased muffin pan.
Sprinkle with remaining cinnamon
sugar.
9. Bake in oven for 20 minutes. Serve hot.
TIP
If some of the butter does not combine
then stop the mixer and scrape butter
onto dough then mix a little more.
41
Page 42

PAGE HEADER.....NOTES
42
Page 43

PAGE HEADER.....
NOTES
43
Page 44

Breville Customer Service Center
Australian Customers
Mail: PO Box 22
Botany, NSW, 2019
AUSTRALIA
Phone: 1300 139 798
Fax: (02) 9384 9601
Email:
Customer Service:
askus@breville.com.au
www.breville.com.au
Breville is a registered trademark of Breville Pty. Ltd. A.B.N. 98 000 092 928.
Due to continued product improvement, the products illustrated/photographed
in this brochure may vary slightly from the actual product.
Copyright Breville Pty. Ltd. 2010.
New Zealand Customers
Mail: Private Bag 94411
Greenmount, Auckland
NEW ZEALAND
Phone:
0800 273 845
Fax: 0800 288 513
Email:
Customer Service:
askus@breville.com.au
Model BHM600 Issue - C12
 Loading...