

the Oracle
®
Instruction Booklet
BES980

CONTENTS
3 Breville recommends safety first
6 Know your Breville product
9 Features of your Breville product
10 Operating your Breville product
24 Coffee making tips & preparation
28 Care & cleaning
34 Troubleshooting
39 Coffees to try
2

BREVILLE RECOMMENDS SAFETY FIRST
At Breville we are very safety conscious. We design and manufacture consumer products with the
safety of you, our valued customer, foremost in mind. In addition we ask that you exercise a degree
of care when using any electrical appliance and adhere to the following precautions.
IMPORTANT SAFEGUARDS
FOR ALL ELECTRICAL
APPLIANCES
• Carefully read all instructions
before operating and save for
future reference.
• Remove any packaging
material and promotional
labels or stickers before using
the Oracle
®
for the first time.
• To eliminate a choking
hazard for young children,
remove and safely discard the
protective cover fitted to the
power plug of this appliance.
• Do not place the product near
the edge of a bench or table
during operation. Ensure the
surface is level, clean and free
of water and other substances.
• Do not let the cord hang over
the edge of a bench or table,
or become knotted. Keep
away from hot gas or electric
burner, or where it could
touch a heated oven.
• This appliance can be used
by children aged from 8 years
and above if they have been
given supervision or
instruction concerning use
of the appliance in a safe way
and understand the hazards
involved. Cleaning and user
maintenance shall not be
made by children unless they
are aged from 8 years and
above and supervised. Keep
the appliance and its cord out
of reach of children aged less
than 8 years.
3

BREVILLE RECOMMENDS SAFETY FIRST
• Appliances can be used
by persons with reduced
physical, sensory or mental
capabilities or lack of
experience and knowledge
if they have been given
supervision or instruction
concerning use of the
appliance in a safe way and
understand the hazards
involved.
• Children shall not play with
the appliance.
• Regularly inspect the
supply cord, plug and actual
appliance for any damage. If
found damaged in any way,
immediately cease use of
the appliance and return the
entire appliance to the nearest
authorised Breville Service
Centre for examination,
replacement or repair.
• Keep the appliance
and accessories clean. Follow
the cleaning instructions
provided in this book. Any
procedure not listed in this
instruction booklet should be
performed at an authorised
Breville Service Centre.
• The installation of a residual
current device (safety switch)
is recommended to provide
additional safety protection
when using electrical
appliances. It is advisable that
a safety switch with a rated
residual operating current not
exceeding 30mA be installed
in the electrical circuit
supplying the appliance.
See your electrician for
professional advice.
SPECIFIC INSTRUCTIONS
FOR BES980 THE ORACLE
• This appliance is
recommended for household
use only. Do not use this
appliance for any purpose
other than its intended
use. Do not use in moving
vehicles or boats. Do not
use outdoors.
• If the appliance is to be:
- left unattended
- cleaned
- moved
- assembled; or
- stored
®
4

BREVILLE RECOMMENDS SAFETY FIRST
Always switch Off the
espresso machine by pressing
the POWER button to Off,
switch Off at the power outlet
and unplug.
• Ensure the product is
properly assembled before
first use.
• Do not use any other liquid
apart from cold mains/town
water. We do not recommend
the use of highly filtered,
de-mineralized or distilled
water as this may affect the
taste of the coffee and how the
espresso machine is designed
to function.
• Ensure the portafilter is firmly
inserted and secured into the
group head before starting
an extraction. Never remove
the portafilter during the
extraction process.
• Do not touch hot surfaces.
Allow the product to cool
down before moving or
cleaning any parts.
• Use caution after milk
texturing as the ‘Auto Purge’
function may purge hot
steam when the steam
wand is lowered.
• Use caution when operating
machine as metal surfaces are
liable to get hot during use.
• Use caution when using the
de-scale feature as hot steam
may be released. Before
de-scaling, ensure drip tray
is empty and inserted. Refer
to page 32 for further
instructions.
SAVE THESE INSTRUCTIONS
5

KNOW YOUR BREVILLE PRODUCT
A. Integrated conical burr grinder
With removable 280g bean hopper.
B. Top-fill 2.5L removable water tank
With integrated water filter and backlit
level indicator.
C. Grind Size dial
Select the desired espresso grind size to
suit your coffee beans.
D. Grind LCD
Displays current grind settings.
E. Main LCD
Displays current settings and simplifies
programming.
F. 1 CUP and 2 CUP buttons
With preset shot durations, manual
override or reprogrammable
durations/volumes.
G. Grind outlet
With auto grind, dose & tamp function.
H. Heated 58mm group head with embedded
element
I. 58mm full stainless steel portafilter
J. Drop down swivel foot
Lifts the machine upwards for
easy maneuverability.
K. Heated cup warming tray
L. HOT WATER button
Press to start and stop the flow of hot water
from the hot water outlet.
M. LONG BLACK dial
With preset and customisable settings.
N. Steam lever
With one touch auto milk texturing
(down position) and manual milk texturing
(up position).
O. Steam LCD
Displays current milk temperature and
texture settings.
P. SELECT dial
Select the desired milk temperature and
texture. Also use this dial in conjunction
with the MENU button to set the
programmable functions.
Q. Cool touch steam wand
With integrated temperature sensor.
R. Dedicated hot water outlet
Delivers hot water for Long Black and preheating cups.
S. Descale access point
T. Tool storage tray
Houses accessories when not in use.
U. Removable drip tray
With Empty Me! indicator.
6

KNOW YOUR BREVILLE PRODUCT
A
B
C
D
E
F
G
H
I
K
L
M
N
O
P
Q
R
S
T
J
U
7
KNOW YOUR BREVILLE PRODUCT
A
B
D
G
H
I
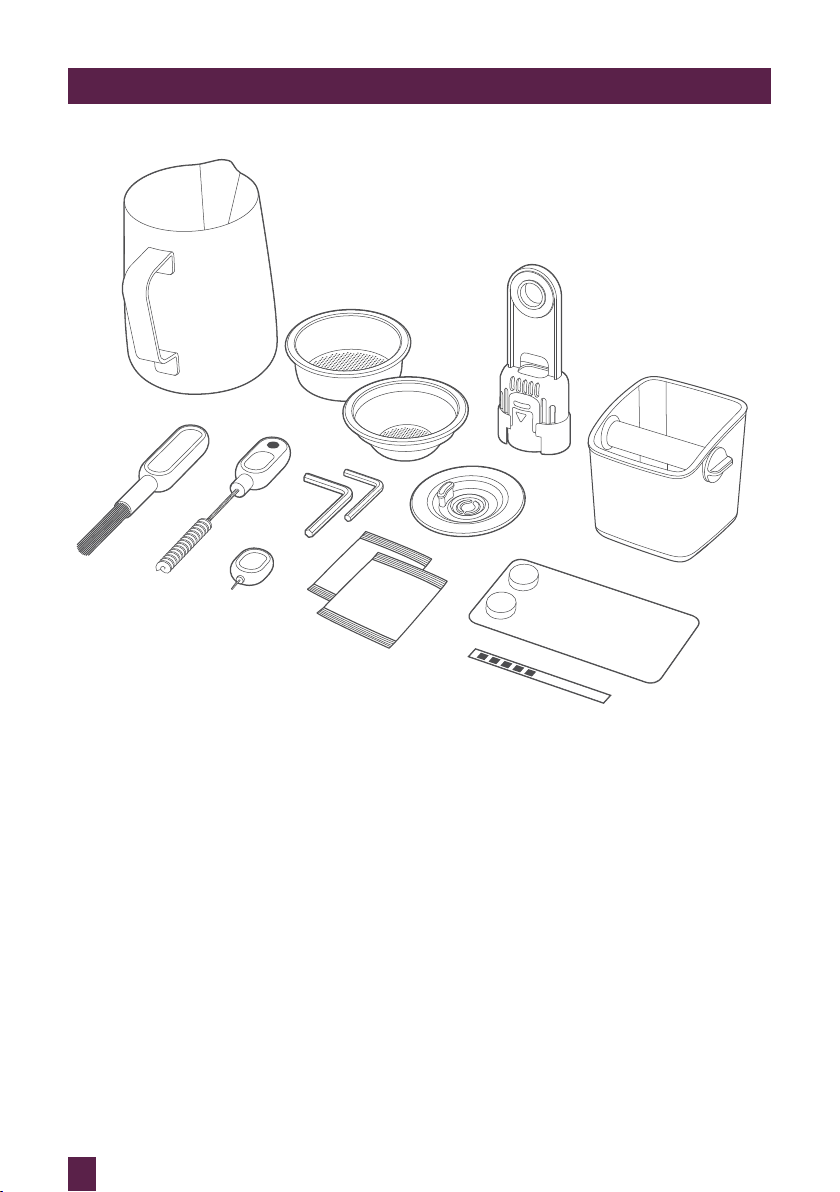
ACCESSORIES
A. Stainless steel milk jug
B. 2 cup filter basket
C. 1 cup filter basket
D. Water filter holder with filter
E. Cleaning disc
F. Mini grinds bin
G. Burr brush
C
J
E
F
K
M
L
H. Grind outlet brush & tamp
removal magnet
I. Cleaning tool for steam wand tip
J. Allen key
K. Steam wand cleaning powder
L. Water hardness test strip
M. Espresso cleaning tablets
8

FEATURES OF YOUR BREVILLE PRODUCT
HANDS FREE AUTOMATIC
GRIND, DOSE & TAMP
Automatically grinds, doses and tamps the
required amount of coffee, mess free.
GRIND SIZE DIAL
Adjustable grind settings from fine to coarse
for optimal espresso extraction.
STAINLESS STEEL CONICAL BURRS
Maximise ground coffee surface area for a
full espresso flavour.
AUTOMATIC HANDS FREE
MILK TEXTURING
Automatically textures milk to the
selected temperature and style from silky
smooth latté to creamy cappuccino. Automatic
purge removes residual milk from the steam
wand when returned to the downward position.
SIMULTANEOUS COFFEE & STEAM
Dedicated stainless steel espresso and steam
boilers for simultaneous milk texturing and
espresso extraction.
PRECISION CONTROL
Electronic PID Temperature Control
Electronic temperature control delivers
precise water temperature for optimum
espresso flavour. Programmable.
Actively Heated Group Head
Commercial size 58mm group head with
embedded element for thermal stability
during extraction.
Regulated Extraction Pressure
Over pressure valve (OPV) limits maximum
pressure for optimal espresso flavour.
Low Pressure Pre-Infusion
Gradually increases water pressure to gently
expand grinds for an even extraction.
Programmable.
Dual Pumps
Dedicated espresso and steam boiler pumps.
Programmable Shot Temperature
Adjust water temperature to achieve optimal
espresso flavour depending on coffee origin
and degree of roast.
ADDITIONAL FEATURES
One Touch Long Black
Delivers hot water directly into the cup
after espresso extraction. Preset and
customisable settings.
Shot Clock
Displays duration of the espresso shot
being extracted.
Auto Start
Switches machine on at a specified time.
Auto Off
Switches machine off after a specified
time from 5 - 20 mins.
9
OPERATING YOUR BREVILLE PRODUCT
BEFORE FIRST USE
Machine Preparation
Remove and discard all labels and packaging
materials attached to your espresso machine.
Ensure you have removed all parts and
accessories before discarding the packaging.
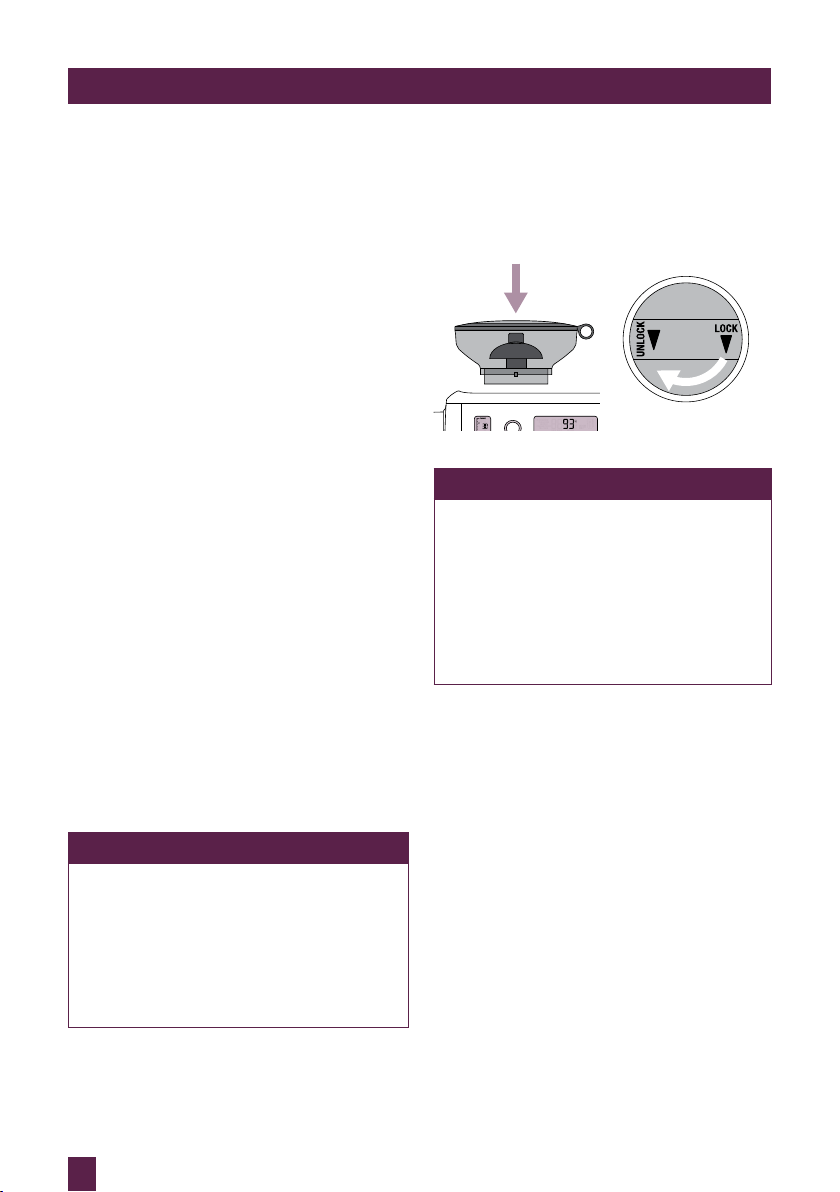
Remove the water tank located at the back of
the machine by pulling down the water tank
handle. Remove the plastic bag containing the
water filter and water filter holder. Clean parts
and accessories (water tank, portafilter, filter
basket, jug) using warm water and a gentle dish
washing liquid. Rinse well then dry thoroughly.
TIP
To easily manoeuvre your machine, use
the drop down swivel foot located under
the drip tray. When turned to UNLOCK,
the swivel foot drops down and lifts the
machine upwards, making it easier to
access the removable water tank or
reposition the machine to another
location.
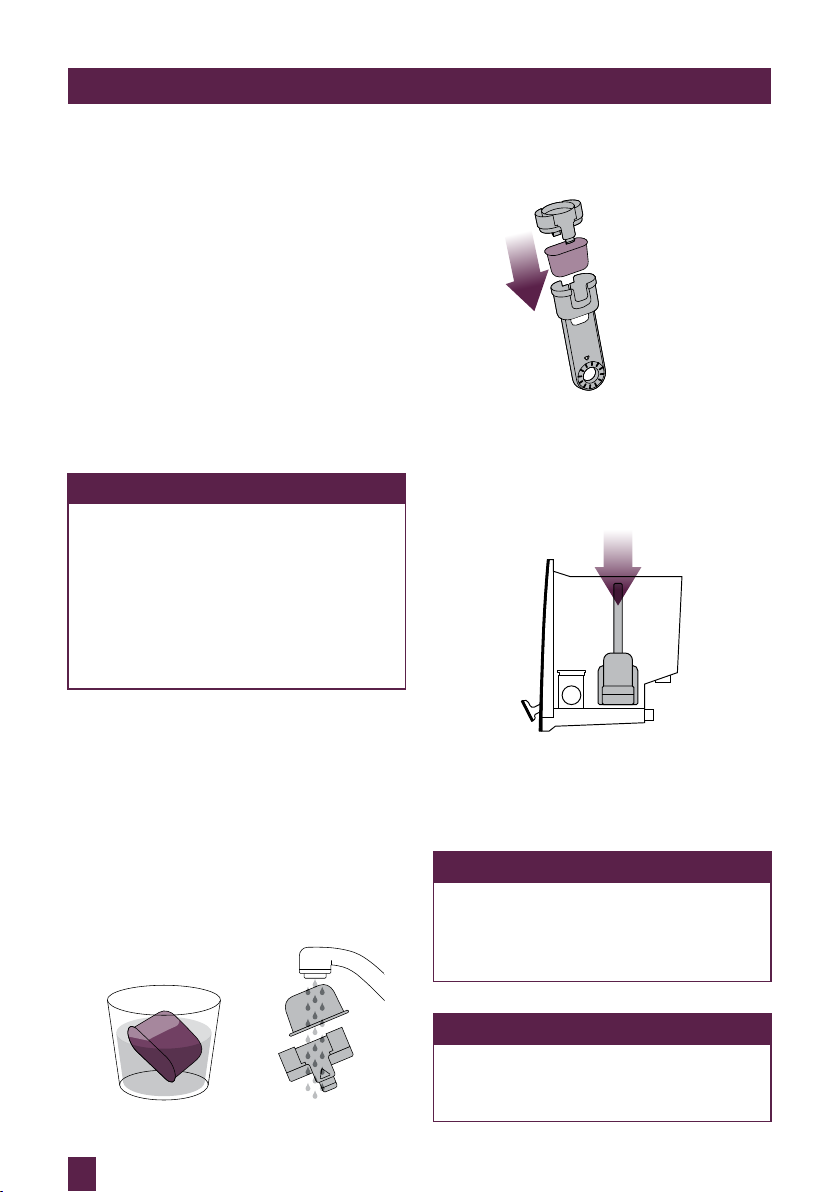
• Insert the filter into the two parts of the
filter holder.
Place filter into
filter holder
• To install the assembled filter holder into
the water tank, align the base of the filter
holder with the adapter inside the water
tank. Push down to lock into place.
INSTALLING THE WATER FILTER
• Remove the water filter and water filter
holder from the plastic bag.
• Soak the filter in a cup of water for
5 minutes then rinse under cold
running water.
• Wash the filter holder with cold water,
taking specific care to rinse the
stainless steel mesh.
Soak filter for 5 minutes Rinse filter & mesh
10
• Fill the water tank with cold water before
sliding back into position at the back of the
machine and locking into place.
NOTE
DO NOT use highly filtered,
demineralised or distilled water in this
machine. This may affect the taste of the
coffee and how the machine operates.
NOTE
To purchase water filters, visit
www.breville.com.au or call Breville
Customer Service Centre.

OPERATING YOUR BREVILLE PRODUCT
FIRST USE
1. Ensure tank is filled with cold water.
You can do this by either opening the
top-fill water tank lid (push to open), or
by removing the water tank at the back
of the machine.
2. Press POWER button to turn the
machine on.
3. The main LCD will display 'Hrd3',
prompting you to set the water
hardness level. Programming this
will determine the regularity of the
'DESCALE' and 'CHANGE FILTER'
alerts.
Setting Water Hardness
• Remove the supplied water hardness
test strip from the wrapper.
• Dip the test strip into a sample
of the water you have filled the
tank with. Wait for one minute.
The water hardness setting is
indicated by the number of red
squares displayed on the test
strip eg. 3 red squares indicates
a water hardness setting of 3.
• Rotate SELECT dial to the required
setting from 'Hrd1' (softest water)
to 'Hrd5' (hardest water). Press
SELECT dial to set. Machine will
beep once to confirm selection.
NOTE
If your water hardness is either 4 or 5
when tested, we strongly recommend
you change to an alternate water source.
Filtered, bottled spring or mineral water
will extend both the life of your built-in
filter and descale intervals as well as
superior taste. Please ensure to test the
water hardness of the alternative water
source you've chosen and input into the
machine accordingly. Avoid using overly
filtered water, like RO water unless some
mineral content is being added back to
the final water. Never use distilled water,
or water with no or low mineral content
as this will affect both the taste the
functioning of your machine.
4. A pumping/vibrating sound will be
heard indicating empty boilers are
being filled with water for the first
time. The main LCD will display the
current boiler temperature and flash
'HEATING'.
5. After approximately 5 minutes,
the machine will reach the default
operating temperature 93˚C and all
6 buttons will illuminate. The machine
is now in STANDBY mode, ready for
the next step, 'Flushing The Machine'.
HOT WATER LONG BLACK
SELECTPOWER
TEMP TEXTURE
11
OPERATING YOUR BREVILLE PRODUCT
Flushing The Machine
When the machine has reached
STANDBY mode:
1. Press 2 CUP button to run water
through the group head for
30 seconds.
2. Press HOT WATER button to run
water through the hot water outlet.
After 30 seconds, press HOT WATER
button again to stop the flow of water.
3. Lift steam lever to the MANUAL
position to release steam through the
steam wand. After 30 seconds, lower
the steam lever to the centre OFF
position.
4. Repeat steps 1–3 twice.
5. Refill water tank and empty drip tray,
if required.
MANUAL will flash on LCD
The machine will not reach operating
temperature (STANDBY mode) if the steam
lever is in the MANUAL position. The steam
LCD will display 'MANUAL'. Lower the steam
lever to the centre OFF position.
Steam operation is ready when the SELECT
dial illuminates.
NOTE
You will not be able to select the
1 CUP, 2 CUP or LONG BLACK functions;
or access the cleaning cycle in the menu
options until the machine has reached
operating temperature (STANDBY mode).
The machine will beep 3 times if one of
these functions is selected.
GRINDING OPERATION
Insert bean hopper into position on top of
the machine. Turn knob to lock into place.
Fill hopper with fresh beans.
TIP
We recommend quality 100% Arabica
beans with a 'Roasted On' date stamped
on the bag, not a 'Best Before' or 'Use By'
date. Coffee beans are best consumed
between 5–20 days after the 'Roasted On'
date. Stale coffee may pour too quickly
from the portafilter spouts and taste bitter
and watery.
SELECTING GRIND SIZE
There are 45 espresso grind size settings
(No. 1 – finest, No. 45 – coarsest) to enable
you to select the right grind size for your
coffee beans and achieve the perfect
espresso extraction.
To select grind size, rotate the grind size
dial counter-clockwise to increase grind
coarseness or clockwise to increase grind
fineness.
We recommend you start at No. 30 and adjust
as required to control espresso flow rate.
12
 Loading...