

Breville Avance BEF200 Instructions And Recipes Manual

Breville is a registered trademark of Breville Pty. Ltd.
ABN 98 000 092 928
Breville Customer Service Centre
Australian Customers
Breville Customer Service Centre
PO Box 22
Botany NSW 2019
AUSTRALIA
Customer Service: 1300 139 798
Fax (02) 9384 9601
Email Customer Service: askus@breville.com.au
New Zealand Customers
Breville Customer Service Centre
Private Bag 94411
Greenmount
Auckland, New Zealand
Customer Service: 0800 273 845
Fax 0800 288 513
Email Customer Service: askus@breville.com.au
www.breville.com.au
© Copyright. Breville Pty. Ltd. 2008
Due to continual improvements in design or otherwise,
the product you purchase may differ slightly from the one
illustrated in this booklet.
Model: BEF200 Issue 1/08
Avance®
Banquet Frypan
Instructions and Recipes
BEF200

3
4
Page
Breville Recommends Safety First 5
Know Your Breville Avance® Banquet Frypan 7
Operating Your Breville Avance® Banquet Frypan 8
Care, Cleaning and Storage 9
Cooking techniques 10
Recipes R1
Contents
Congratulations
on the purchase of your new Breville Avance® Banquet Frypan

5
6
We at Breville are very safety conscious. We design and manufacture consumer products with the
safety of you, our valued customer, foremost in mind. In addition, we ask that you exercise a degree of
care when using any electrical appliance and adhere to the following instructions.
IMPORTANT SAFEGUARDS FOR YOUR BREVILLE AVANCE® BANQUET FRYPAN
Carefully read all instructions before
operation and save for future reference.
Remove and safely discard any packaging
material and promotional stickers before
using the Avance® Banquet Frypan for the
first time.
To eliminate a choking hazard for young
children, remove and safely discard the
protective cover that is fitted to the power
plug of the Avance® Banquet Frypan.
Do not place the Avance® Banquet Frypan
near the edge of a bench or table during
operation. Ensure that the surface is level,
clean and free of water.
Keep the Avance® Banquet Frypan clear
of walls, curtains and other heat or steam
sensitive materials. Minimum 200mm
distance.
Do not place on or near a gas burner, electric
element or in or near a heated oven.
Do not use on a sink drain board.
Always insert Temperature Control Probe
into probe socket before inserting power
plug into power outlet and switching
on appliance. Ensure the probe socket
is completely dry before inserting the
Temperature Control Probe.
The frypan must be used with the
Temperature Control Probe provided. Do not
use any other probe or connector.
To protect against electric shock, do not
immerse power cord or Temperature Control
Probe in water or any other liquid, or allow
moisture to come in contact with these parts.
Ensure the Temperature Control Probe has
cooled before removing from the appliance.
•
•
•
•
•
•
•
•
•
•
•
Always remove Temperature Control Probe
before cleaning the appliance.
If using plastic utensils, do not leave in
frypan when hot.
Do not place hot glass lid under cold water.
Extreme caution must be used when the
appliance contains hot oil or other liquid.
Do not move the appliance during cooking.
Allow the frypan to cool before removing oil
or other liquid.
Do not touch hot surfaces. Use the handles
for lifting and carrying the Avance® Banquet
Frypan.
Do not leave the appliance unattended when
in use.
Always turn the Temperature Control Probe
to ‘MIN’, then switch off at the power
outlet and allow probe to cool, then remove
probe and unplug, if appliance is to be left
unattended, if not in use before attempting to
move appliance and before cleaning.
Keep the appliance clean. Refer to care and
cleaning (page 9).
Do not place anything on top of the Avance®
Banquet Frypan when the lid is in position,
when in use and when stored.
•
•
•
•
•
•
•
•
•
•
Breville recommends safety first Breville recommends safety first continued
IMPORTANT SAFEGUARDS FOR ALL ELECTRICAL APPLIANCES
Fully unwind cord before use.
Do not let the cord hang over the edge of
a table or counter, touch hot surfaces or
become knotted.
This appliance is not intended for use by
persons (including children) with reduced
physical, sensory or mental capabilities, or
lack of experience or knowledge, unless they
have been given supervision or instruction
concerning use of the appliance by a person
responsible for their safety.
Children should be supervised to ensure they
do not play with the appliance.
It is recommended to regularly inspect the
appliance. Do not use the appliance if power
supply, cord, plug, Temperature Control
Probe or appliance becomes damaged in
any way. Return the entire appliance to
the nearest authorised Breville centre for
examination and/or repair.
Any maintenance other than cleaning should
be performed at an authorised Breville
Service Centre.
•
•
•
•
•
•
This appliance is recommended for household
use only. Do not use this appliance for other
than its intended use. Do not use in moving
vehicles or boats. Do not use outdoors.
The installation of a residual current device
(safety switch) is recommended to provide
additional safety protection when using
electrical appliances. It is advisable that a
safety switch with a rated residual operating
current not exceeding 30mA be installed in
the electrical circuit supplying the appliance.
See your electrician for professional advice.
DO NOT OPERATE THE AVANCE
®
BANQUET
FRYPAN ON AN INCLINED SURFACE. DO NOT
MOVE THE AVANCE
®
BANQUET FRYPAN WHILE
IT IS SWITCHED ON.
•
•
7
8
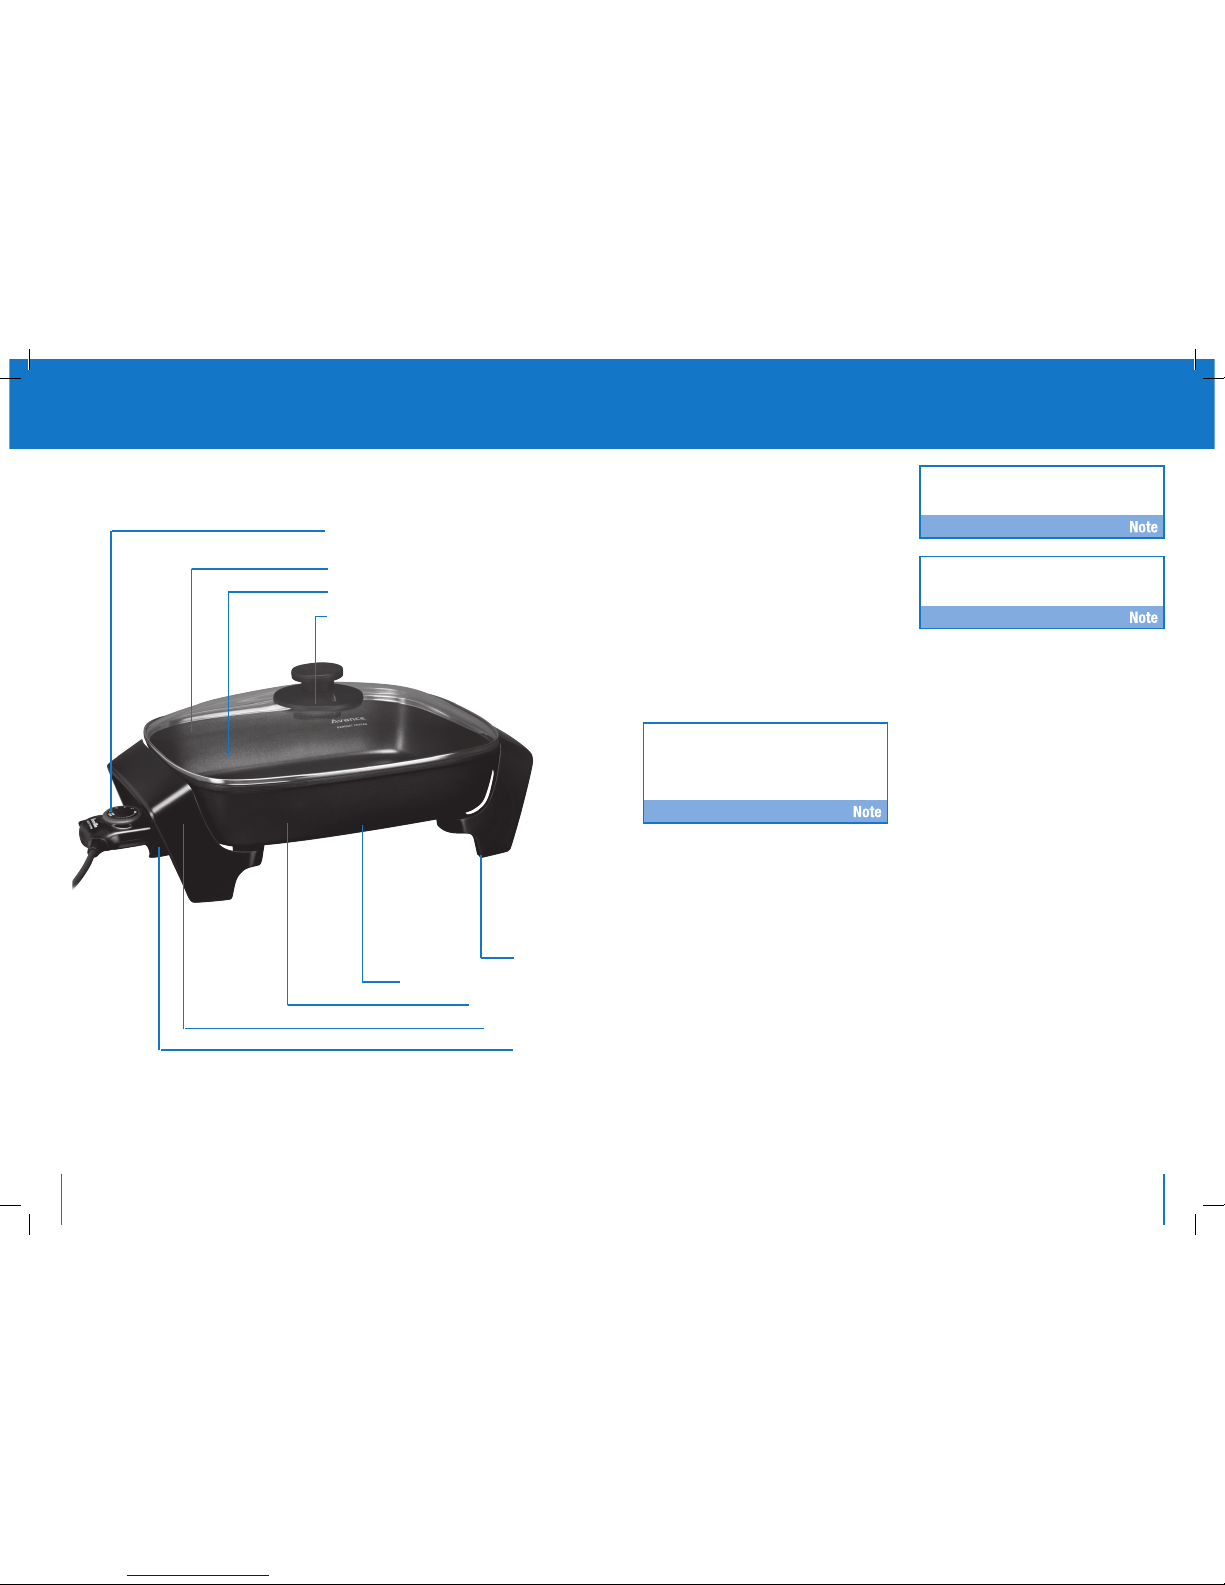
Know your Breville Avance® Banquet Frypan Operating your Breville Avance® Banquet Frypan
Trigger release removable variable Temperature
Control Probe with 10 heat settings
Large rectangular 38cm x 29.5cm frypan
High quality non-stick cooking surface
Dishwasher safe glass lid with adjustable steam vent
Before first use
Remove and safely discard any packaging
material or promotional stickers before using
your Avance® Banquet Frypan for the first time.
It is recommended before the first use to wash
your frypan and lid in hot soapy water. Rinse
and dry thoroughly. Do not immerse the cord,
plug and/or Temperature Control Probe in water
or any other liquid.
Operation of your frypan
Insert the Temperature Control Probe into
the probe socket on the appliance. Plug into
a 230/240V power outlet and switch ‘On’.
Always insert the probe into the appliance
first, then insert plug into power outlet.
Before inserting the Temperature Control
Probe into the probe socket; ensure the
interior of the socket is completely dry. To do
this, shake out excess water then wipe the
interior of the socket with a dry cloth.
Turn the dial on the Temperature Control
Probe clockwise to the desired setting. The
red heating light on the probe will illuminate.
The red heating light will remain illuminated
until the frypan reaches the desired
temperature. Once the temperature has been
reached, the red light will cycle ‘On’ and
‘Off’ during cooking to maintain the desired
temperature.
When cooking is completed, turn the dial
anti-clock-wise until it is aligned with the
‘MIN’. Switch off at the power outlet and
unplug.
Leave the Temperature Control Probe
connected to the appliance until cool.
Remove the Temperature Control Probe and
follow the cleaning instructions to clean the
frypan (page 9).
1.
2.
3.
4.
5.
6.
This frypan must be used with the
Temperature Control Probe provided. Do not
use any other probe or connector.
To adjust the steam outflow from the frypan,
turn the adjustable steam vent attached to the
knob on the glass lid.
Non-slip feet
Powerful 2200 watt die-cast element
Extra deep 78mm pan
Cool touch handles
Pan tilt lever

9
10
CARE
Do not leave plastic cooking utensils in
contact with the hot frypan surface while
cooking.
Do not use metal utensils on the non-stick
coating of the frypan. Only use wooden or
good quality plastic utensils to stir or serve
food.
Before cleaning, switch the frypan to ‘MIN’
and unplug from the power outlet. Remove
the Temperature Control Probe when cooled,
from the probe socket of the appliance.
CLEANING
Temperature Control Probe
If cleaning is necessary, wipe the
Temperature Control Probe over with a
slightly damp cloth. Ensure it is completely
dry before use.
Never immerse the Temperature Control Probe,
plug or cord in water or any other liquid.
Non-stick cooking surface
Cooking on a non-stick surface minimises the
need for oil. As food does not stick, cleaning is
easier.
Any discolouration that may occur on the nonstick surface may detract from the appearance
of the frypan but will not affect the cooking
performance.
Do not use metal (or other abrasive) scourers
when cleaning the non-stick coating. Wash
with hot soapy water. Remove stubborn spots
with a soft plastic washing pad or nylon
washing brush. Rinse and dry thoroughly.
To clean the interior and exterior surface and glass
lid wash in hot soapy water. Remove stubborn spots
with a plastic washing pad or nylon washing brush.
•
•
•
•
Care, Cleaning & Storage
Removing discolouration of the nonstick surface
Combine 2 tablespoons bicarbonate of soda,
1
⁄4 cup household bleach, 1 cup water.
Pour into the frypan, place lid on with the
vent closed, and simmer for 5-10 minutes.
Clean in a well-ventilated area and avoid
breathing in the vapours. Wash as directed
before re-use. In some instances this may
not remove all the staining.
Glass lid
Wash the lid in warm soapy water using a soft
cloth or sponge, rinse and dry thoroughly.
Dishwasher safe
Your frypan and glass lid are dishwasher safe
for easy cleaning. Remove the probe and power
cord before placing frypan into the dishwasher.
Before inserting the Temperature Control
Probe into the probe socket, ensure the
interior of the socket is fully dry. To do this,
shake out excess water then wipe the interior
of the socket with a dry cloth.
STORAGE
Store the frypan upright with the lid in position.
Store the Temperature Control Probe carefully.
Take care not to knock or drop the probe
as this can cause damage. If damage is
suspected, return the Temperature Control
Probe with the frypan to your nearest Breville
Service Centre for inspection.
TIP
For convenient storage of the Temperature
Control Probe, line the frypan with 2 sheets
of kitchen paper and place the probe on the
kitchen paper. This will ensure the probe and
plug do not scratch the non-stick surface.
•
•
•
•
Cooking Techniques
Stir frying
Recommended Temperature Control Probe
setting ‘High Sear’.
An energy efficient and healthy way of
cooking foods. The benefit of this method
is its speed and flavour result. The cooking
action for stir frying is a continual stirring
motion to ensure the food is evenly exposed
to the heat and cooks quickly and evenly in a
couple of minutes.
Stir frying should be carried out using a ‘High
Sear’ setting.
Preheat your frypan before adding any
ingredients, allowing the heating light to
cycle ‘On’ and ‘Off’ several times. This will
allow the frypan to reach and maintain an
even high temperature.
Stir frying is a dry heat cooking method and
is best suited to tender cuts of meat. Timing
is a key factor as over cooking will give a
tough, dry result. Cooking times will depend
on the size and thickness of the meat, as the
bigger the pieces, the more time needed.
Recommended cuts
Beef Lean beef strips prepared from rump,
sirloin, rib eye, fillet.
Chicken Lean chicken strips prepared from
breast fillets, tenderloins, thigh fillets.
Lamb Lean lamb strips prepared from fillet,
lamb leg steaks, round or topside
mini roasts, eye of loin.
Pork Lean pork strips prepared from leg,
butterfly or medallion steaks or fillet.
Veal Eye of loin, fillet, round, rump or
topside.
•
•
•
•
Stir fry tips
Prepare meat strips from recommended cuts
as listed above by removing fat and slicing
thinly across the grain (across direction
of meat fibers). Slicing across the grain
ensures tenderness. Cut into very thin strips,
approximately 5-8cm in length. Partially
freeze meat (approximately 30 minutes) to
make slicing easier.
Buy meat strips already prepared from your
butcher or supermarket.
Stir fry meat strips in small batches (approx
200-300g) to keep juice in meat and avoid
‘stewing’, resulting in tougher meat.
Meat strips should sizzle when added to the
frypan.
Stir fry meat strips for 1-2 minutes. Longer
cooking will toughen meat.
Remove each batch when cooked and allow
frypan to reheat before stir frying the next
batch. By cooking in small batches the heat
of the frypan remains constant, ensuring the
meat doesn’t stew and toughen.
A small amount of oil can be mixed through
the meat strips before adding to the frypan,
along with any other flavouring such as
garlic, ginger and chilli. A little sesame oil
can also add flavour. Mixing the oil with the
meat in this way cuts down on the quantity
used.
Drain off thin marinades from meat strips
before stir frying to prevent stewing and
splatter.
Stir fry vegetables in a little oil (or sprinkling
of water) before meat is added for vivid
colour and crispness.
•
•
•
•
•
•
•
•
•
Suggested times for stir frying vegetables:
Cooking time Ingredient
3 minutes Onion quartered, broccoli flowerets, carrots sliced, soaked Chinese dried
mushrooms
2 minutes Snow peas, capsicum sliced, zucchinis sliced, water chestnuts, bamboo shoots
1 minute Garlic minced, chilli minced, ginger minced, shallots chopped, bean sprouts
These brief cooking times will keep vegetables crisp.
 Loading...