

Page 1
Art.-Nr. 1507590
0451742/0410
/
Funkschalter-Set RCS 1044 N Comfort IP 44
Bedienungsanleitung
RCS 1044 N Comfort IP 44 RF
Remote Control Switch Set
Operating manual
Kit de commutateur radio
RCS 1044 N Comfort IP 44
Manuel d'utilisation
Schakelaarset met afstandsbediening
RCS 1044 N Comfort IP 44
Handleiding
Juego de interruptores de control remoto
RCS 1044 N Comfort IP 44
Instrucciones de uso
Set de interruptor com controlo remoto
RCS 1044 N Comfort IP 44
Manual de serviço
Page 2
/
Funkschalter-Set
RCS 1044 N Comfort IP 44 ..............................3
RCS 1044 N Comfort IP 44 RF
Remote Control Switch Set ............................15
Kit de commutateur radio
RCS 1044 N Comfort IP 44 ............................27
Schakelaarset met afstandsbediening
RCS 1044 N Comfort IP 44 ............................39
Juego de interruptores de control remoto
RCS 1044 N Comfort IP 44 ............................51
Set de interruptor com controlo remoto
RCS 1044 N Comfort IP 44 ............................63
Page 3
3
SICHERHEIT
Bestimmungsgemäße Verwendung
Die Geräte sind als Funkschalter-Set für den Privatgebrauch
konstruiert. Es ist für eine gewerbliche Nutzung nicht geeignet.
Das Funkschalter-Set dient zum Ein- und Ausschalten von
Lampen und Elektrogeräten. Die Empfänger sind für die
Verwendung im Freien geeignet.
Die Geräte dürfen nur einzeln betrieben werden. Nicht mehrere
Schaltersteckdosen hintereinander stecken.
Jede weitere Verwendung gilt als nicht bestimmungsgemäß. Für
Schäden aufgrund nicht bestimmungsgemäßer Verwendung
übernimmt der Hersteller keine Haftung.
Bedienungsanleitung
Lesen Sie diese Bedienungsanleitung vollständig durch,
bevor Sie das Gerät benutzen. Bewahren Sie die
Bedienungsanleitung auf. Falls Sie das Gerät weiterge-
ben, geben Sie die Bedienungsanleitung mit.
Grundlegende Sicherheitshinweise
Kinder erkennen nicht die Gefahren, die bei unsachgemäßem•
Umgang mit Elektrogeräten entstehen können. Lassen Sie
Kinder niemals unbeaufsichtigt Elektrogeräte benutzen.
Erstickungsgefahr! Lassen Sie Verpackungsmaterial nicht•
achtlos liegen. Kinder können Kleinteile verschlucken und
daran ersticken.
Die Schaltersteckdosen nur in herkömmliche Schutzkontakt-•
steckdosen mit einer Wechselspannung von 220 - 240 V und
50 Hz stecken.
Die Schaltersteckdosen nicht in ein Verlängerungskabel ste-•
cken.
Nur Verbraucher innerhalb der angegebenen Leistungsgren-•
zen der Schaltersteckdosen anschließen.
Keine Verbraucher anschließen, deren unbeaufsichtigtes Ein-•
schalten Brände (beipielsweise ein Bügeleisen) oder andere
Schäden auslösen kann.
Page 4
4
Keine Verbraucher anschließen, die einen Motorkondensator •
benötigen (beispielsweise ein Kühlschrank).
Die Schaltersteckdosen nicht abdecken. Unter der Abdeckung •
staut sich die Hitze. Es besteht Brandgefahr.
Die Geräte regelmäßig auf Schäden kontrollieren. Beschä-•
digte Teile nicht ersetzen. Wenden Sie sich an den Hersteller
oder entsorgen Sie die Geräte umweltgerecht.
Die Geräte nicht mit nassen Händen anfassen.•
Um die Schaltersteckdosen spannungslos zu schalten, die •
Schaltersteckdosen vom Stromnetz trennen.
Batterien müssen mit besonderer Vorsicht behandelt werden.
Explosionsgefahr! Nicht wiederau adbare Batterie nicht ver-•
suchen aufzuladen.
Sobald Batterie verbraucht ist, diese aus dem Batteriefach •
entnehmen und umweltgerecht entsorgen.
Batterien nicht ins Feuer werfen oder hohen Temperaturen •
aussetzen.
Batterien nicht öffnen oder kurzzuschließen.•
Batteriesäure, die aus einer Batterie austritt, kann zu Hautrei-•
zungen führen. Bei Kontakt die Flüssigkeit mit viel Wasser abspülen. Wenn die Flüssigkeit in die Augen gelangt, Augen
nicht reiben, sondern sofort gründlich mit Wasser ausspülen
und unverzüglich einen Arzt aufsuchen.
Wenn Sie die Batterie nicht benutzen, entnehmen Sie sie, um •
unnötige Entladung zu vermeiden.
ENTSORGUNG
Elektrogeräte umweltgerecht entsorgen!
Elektrogeräte gehören nicht in den Hausmüll. Gemäß
Europäischer Richtlinie 2002/96/EG über Elektro- und
Elektronikaltgeräte müssen verbrauchte Elektrowerkzeuge getrennt gesammelt und einer umweltgerechten Wiederverwertung zugeführt werden. Möglichkeiten zur Entsorgung
des ausgedienten Geräts erfahren Sie bei Ihrer Gemeinde- oder
Stadtverwaltung.
Page 5

5
Umweltschäden durch falsche Entsorgung der
Batterien!
Batterien gehören nicht in den Hausmüll. Sie können
giftige Schwermetalle enthalten und unterliegen der Sondermüllbehandlung. Geben Sie deshalb verbrauchte Batterien bei
einer kommunalen Sammelstelle ab.
GERÄT
Lieferumfang
Im Lieferumfang enthalten sind:
Eine Fernbedienung mit Batterie und –
zwei Schaltersteckdosen IP 44. –
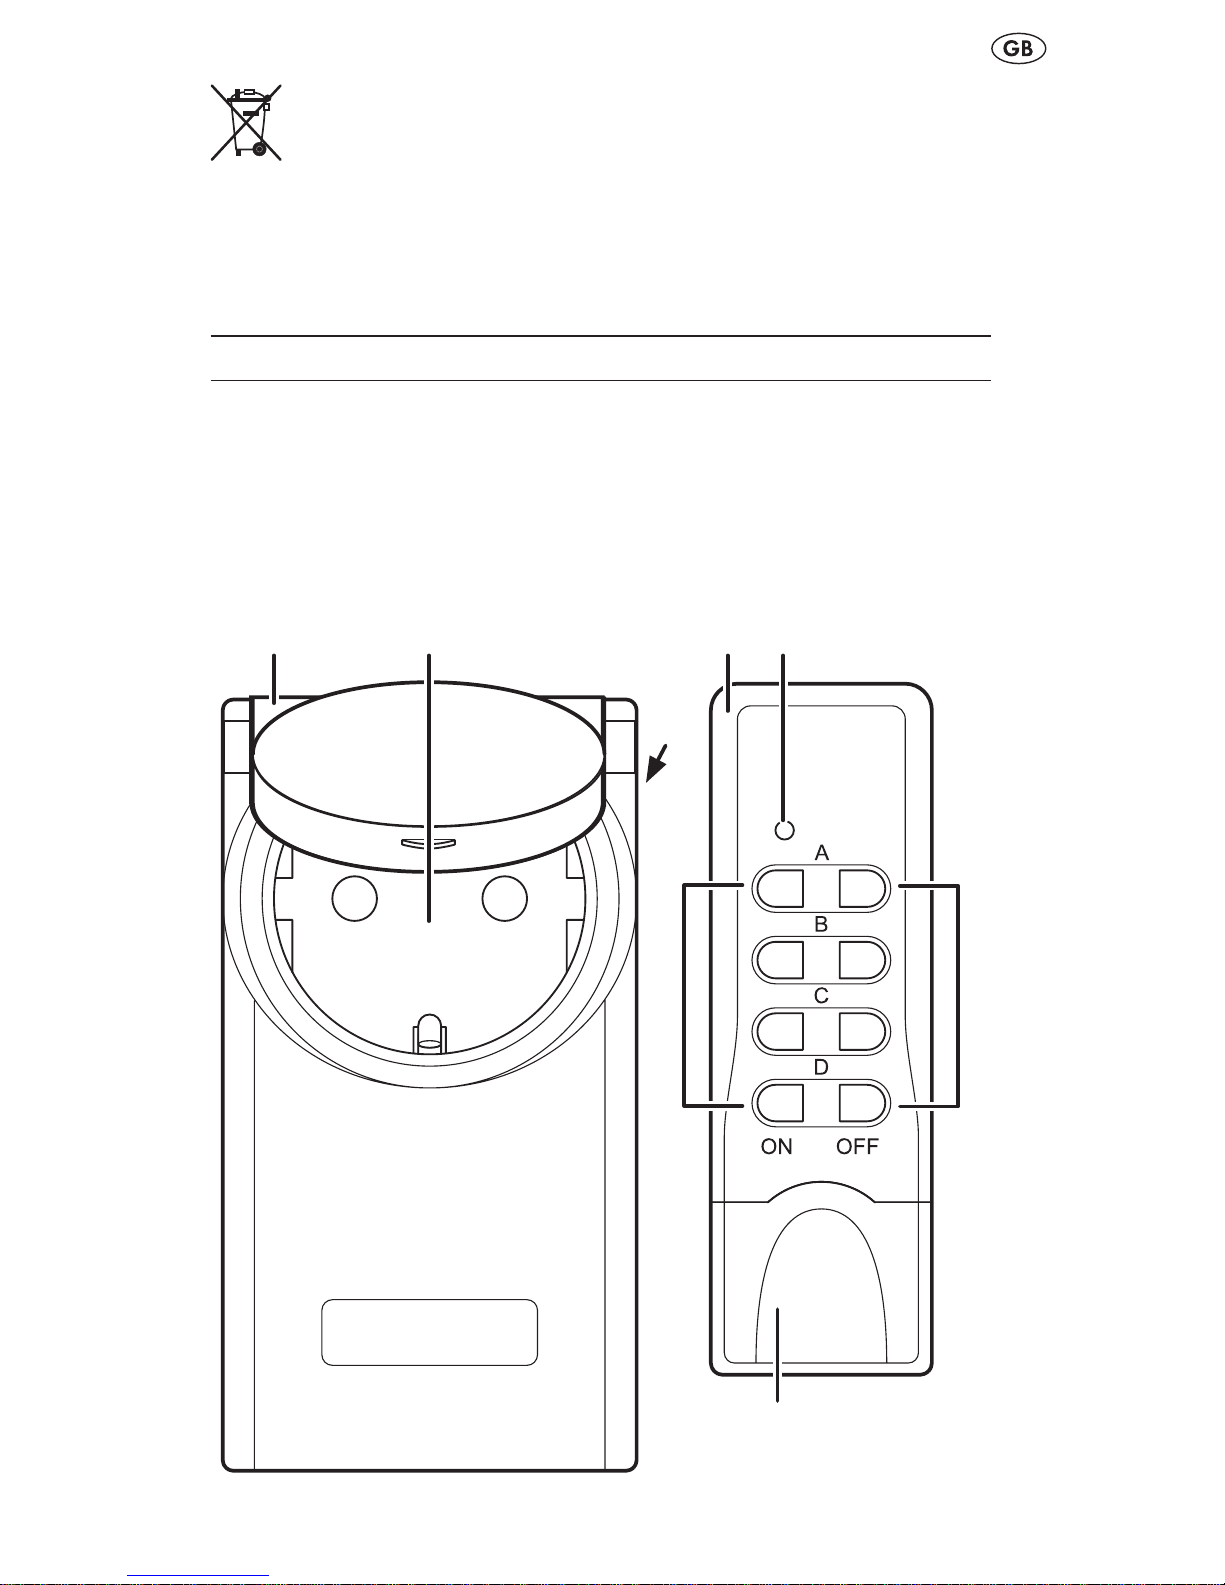
Geräteübersicht
3
45
6
8
1
7
2
Page 6
6
1 Schaltersteckdose 4 Fernbedienung
2 Schutzkontaktsteckdose
IP44 mit Klappdeckel und
Kinderschutz
5
6
7
Funktionsleuchte
Tasten OFF (A, B, C, D)
Deckel des Batteriefachs
3 Schutzkontaktstecker
8 Tasten ON (A, B, C, D)
Geräte vorbereiten
Bevor Sie die Geräte benutzen können, müssen Sie
die Batterie einsetzen, –
den Systemcode zwischen der Fernbedienung und den –
Schaltersteckdosen synchronisieren und
ein Tastenpaar ON/OFF der Fernbedienung einer Schal- –
tersteckdose zuweisen.
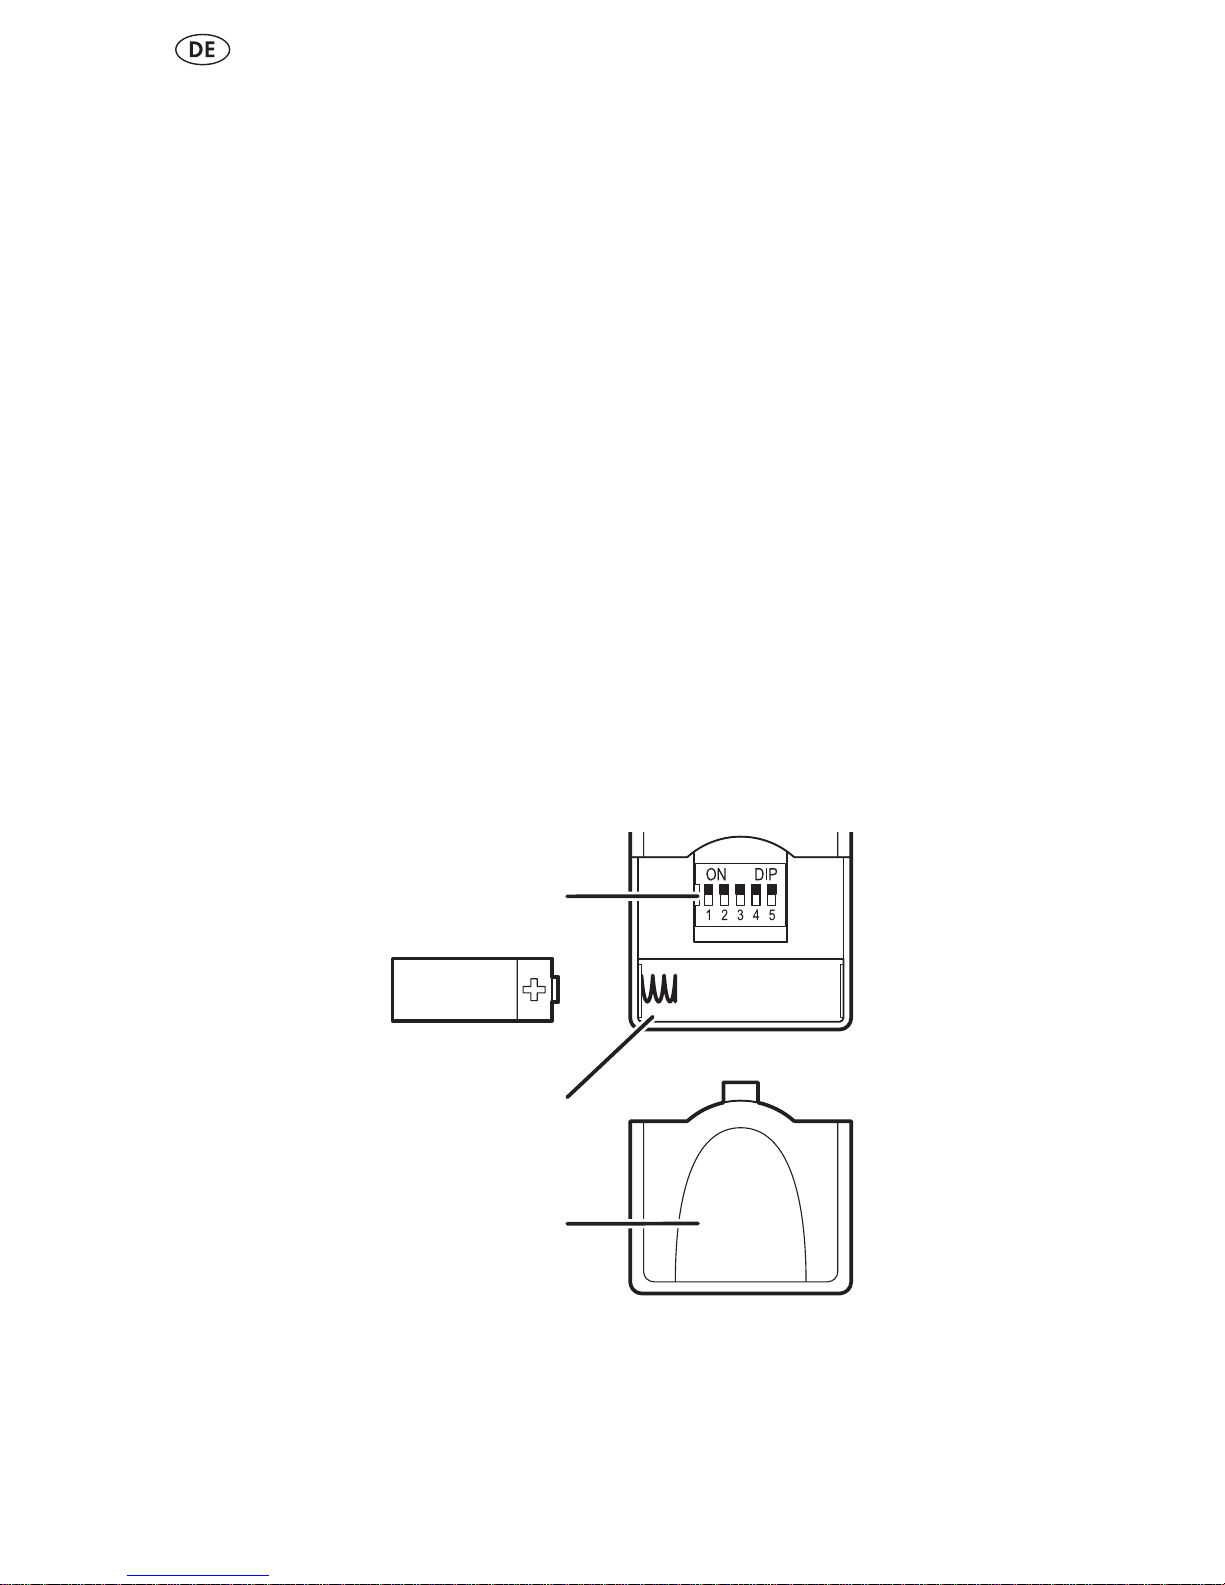
Batterie einsetzen
A Vorsicht!
Achten Sie auf die richtige Polung der Batterie. Eine falsch
eingesetze Batterie kann Sachschäden verursachen.
7
9
10
Den Deckel (7) des Batteriefachs (9) öffnen.1.
Die Batterie einsetzen, wie die Abbildung zeigt.2.
Das Batteriefach (9) schließen.3.
Page 7
7
Eine beliebige Taste der Fernbedienung (4) drücken. Die 4.
Funtkionsleuchte (5) leuchtet, wenn die Taste gedrückt wird.
3 Leuchtet beim Drücken die Funktionsleuchte (5) nicht,
bekommt das Gerät keine Energie von der Batterie.
Überprüfen Sie, ob Sie die Batterie richtig eingesetzt
haben.
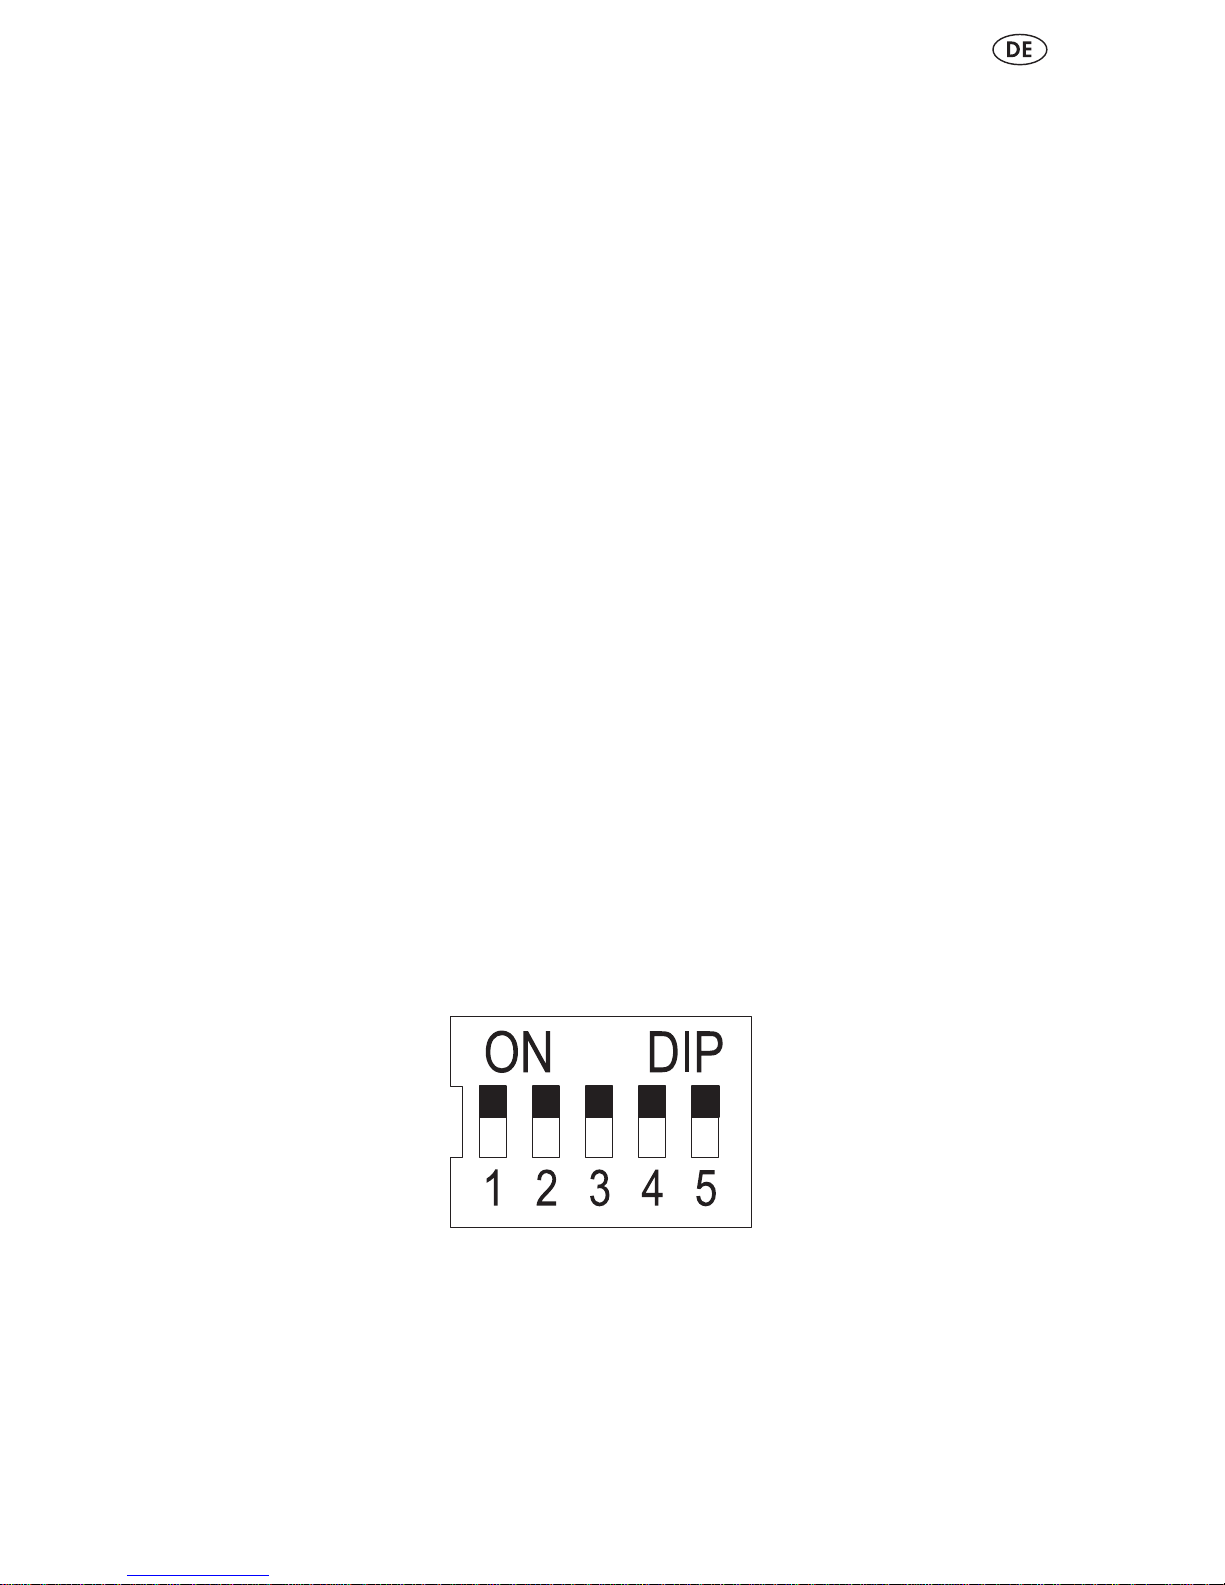
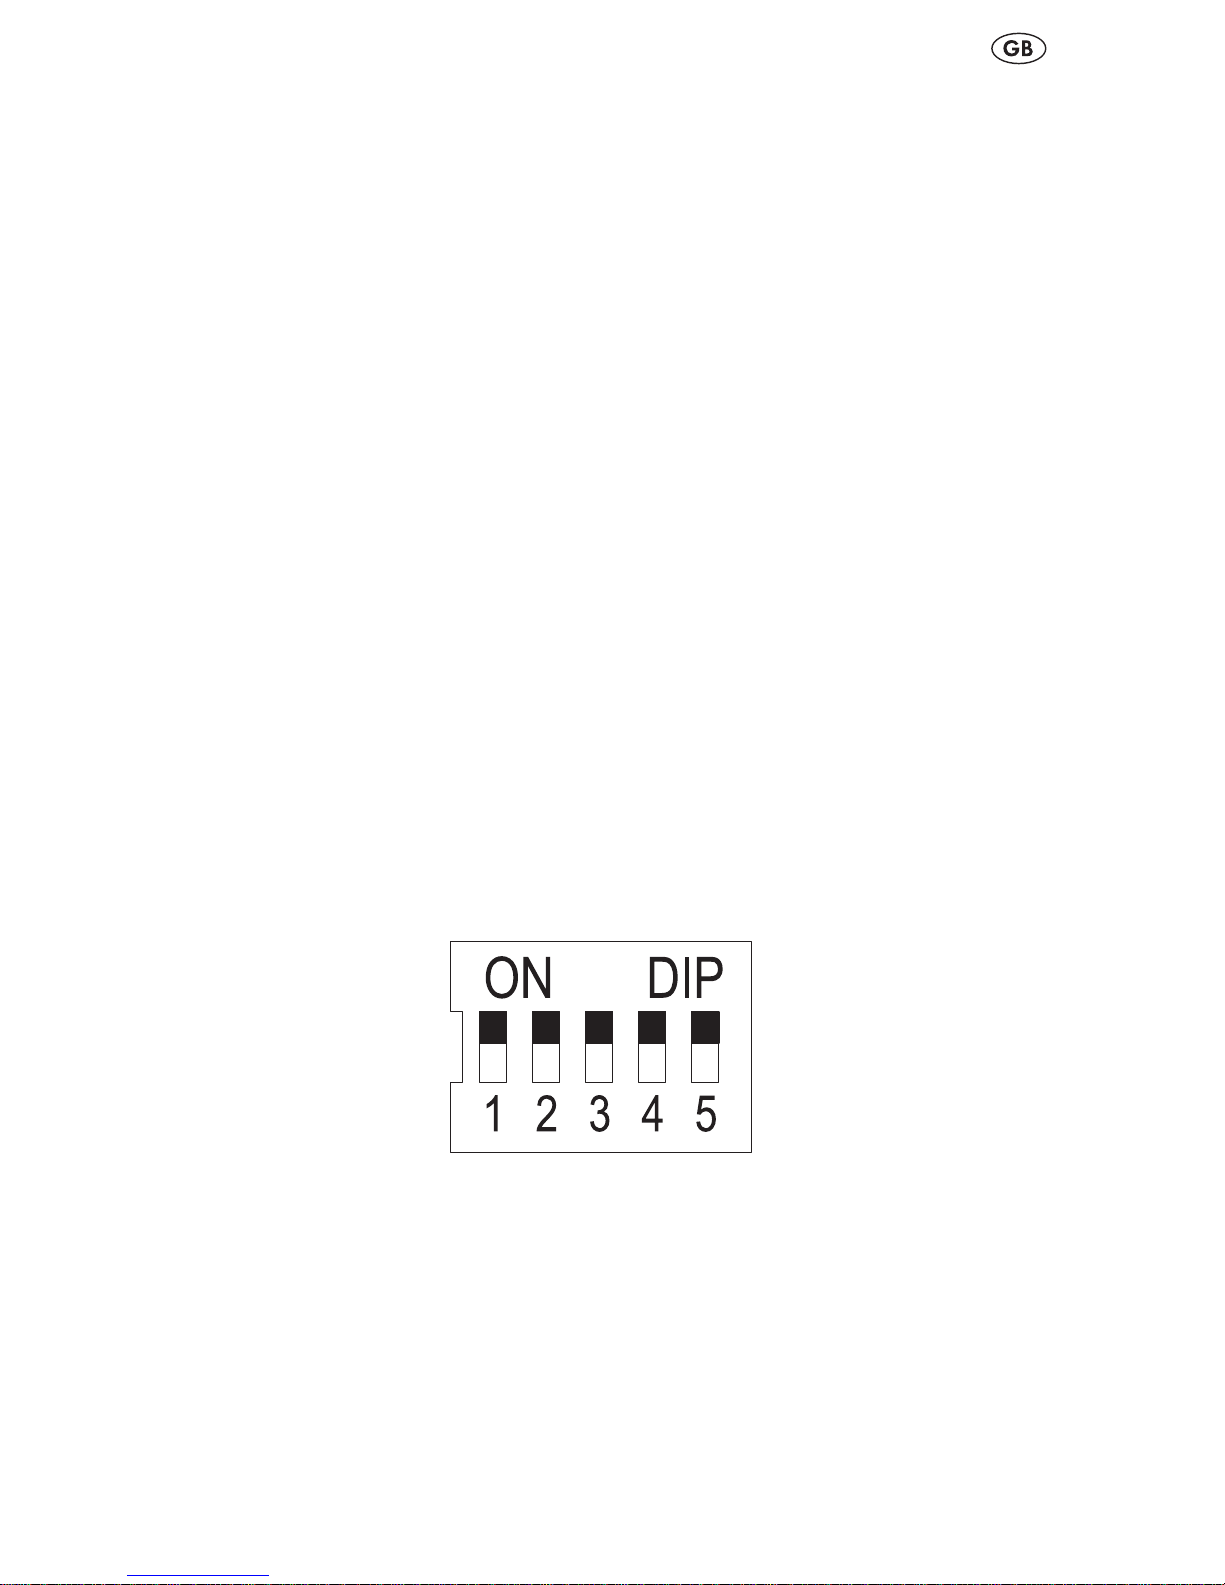
Systemcode synchronisieren
Vor der ersten Verwendung der Geräte muss der Systemcode
synchronisiert werden, damit alle Schaltersteckdosen auf das
Funksignal der Fernbedienung reagieren.
Außerdem muss jeder Schaltersteckdose ein Tastenpaar der
Fernbedienung zugewiesen werden, damit jede Schaltersteckdose einzeln zu bedienen ist.
3 Verstellen Sie die DIP-Schalter mit einem geeigneten
Gegenstand, beispielweise einem kleinen Schraubendreher, indem Sie die DIP-Schalter hoch oder runter schieben.
Systemcode an der Fernbedienung einstellen
Den Deckel (7) des Batteriefachs (9) öffnen.1.
Mit den DIP-Schaltern (10) 1 bis 5 einen beliebigen System-2.
code einstellen.
Das Batteriefach (9) schließen.3.
Page 8
8
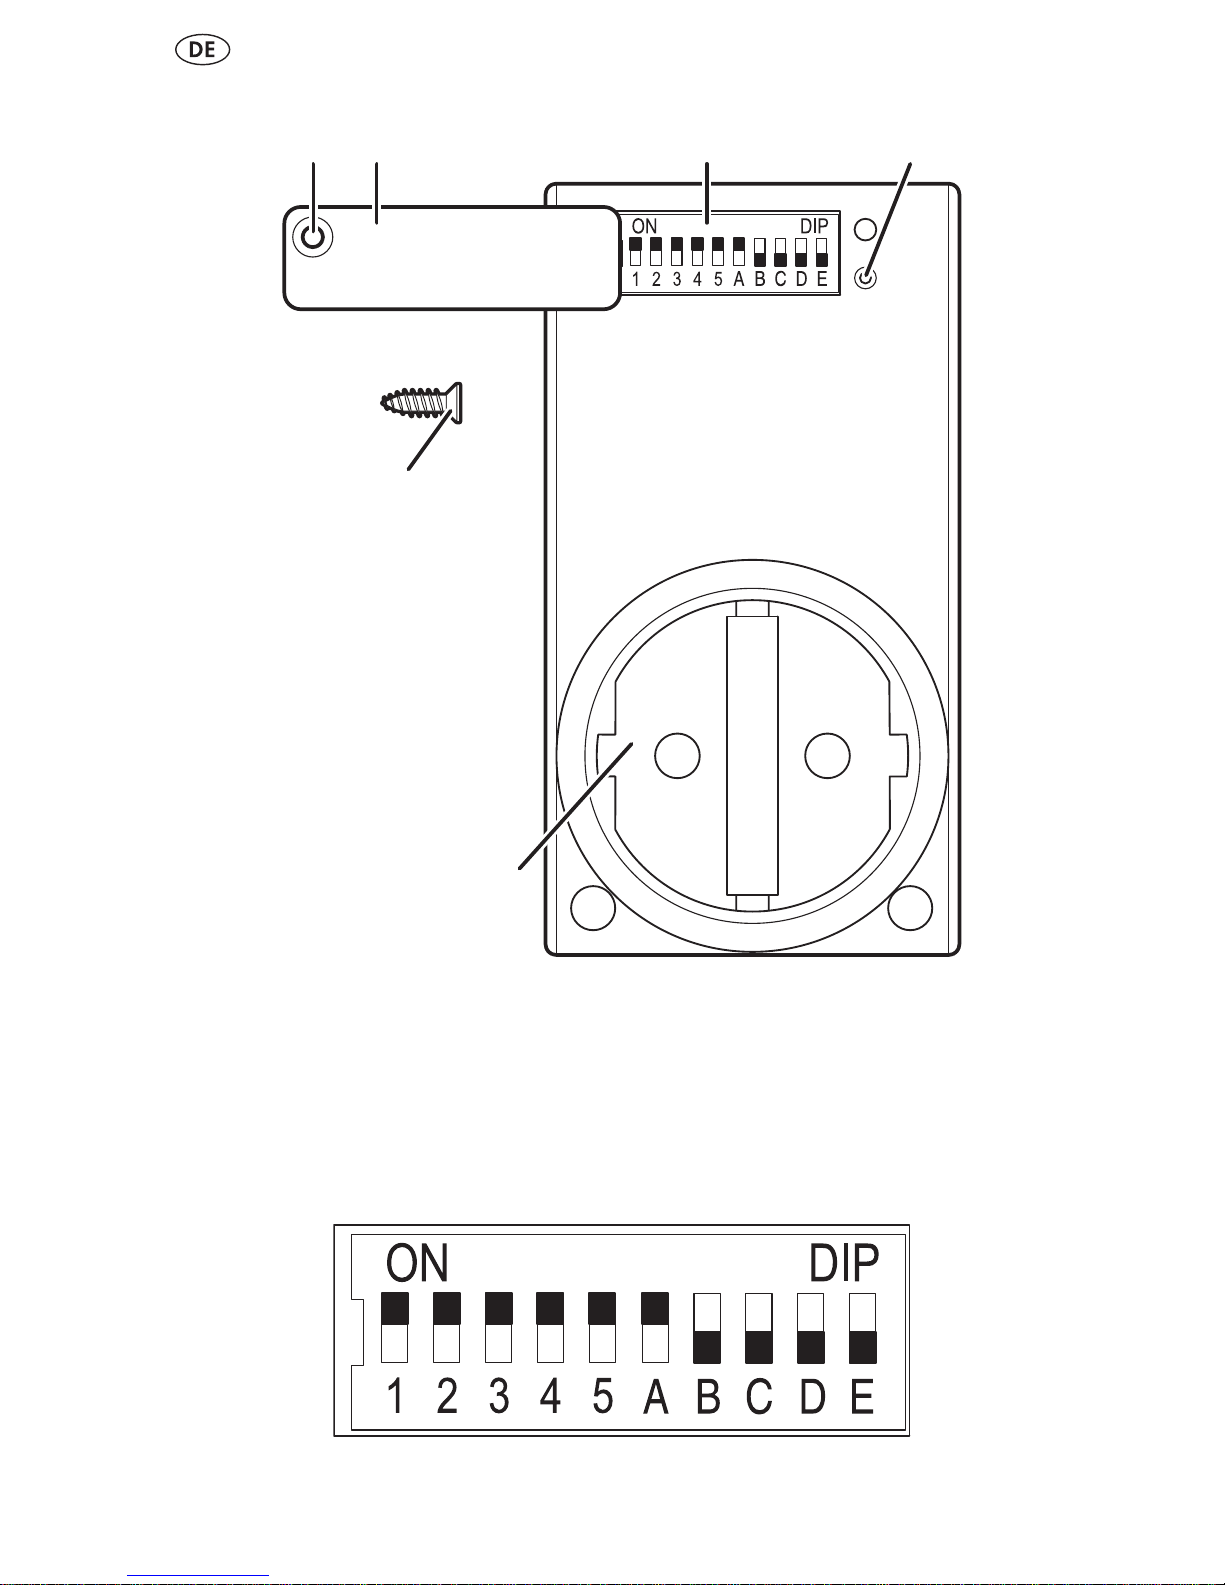
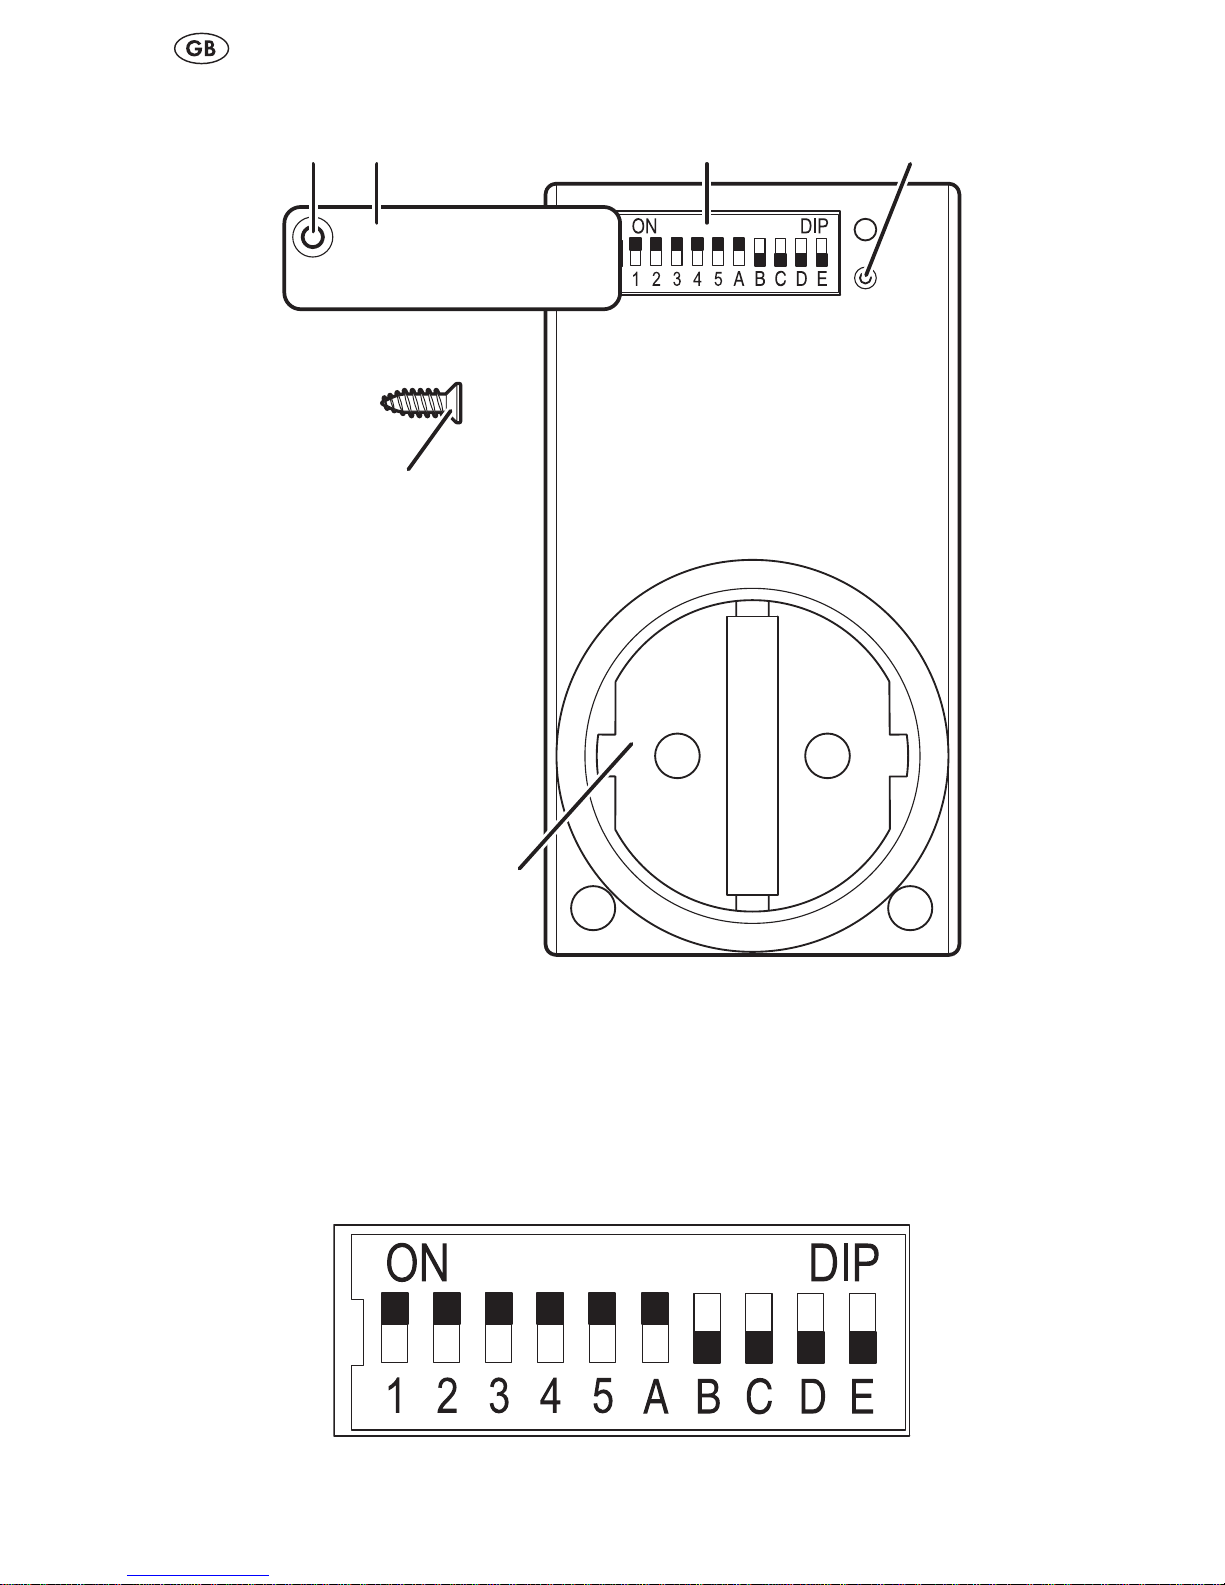
Systemcode an der Schaltersteckdose einstellen
3
1413
15
11 12
Die Schraube (15) der Abdeckung (12) mit einem Kreuz-1.
schlitz-Schraubendreher Größe PH0 herausdrehen.
Die Abdeckung (12) über der Schraubenöffnung (11) leicht 2.
anheben und nach außen schwenken.
Mit den DIP-Schaltern (13) 1 bis 5 den gleichen Systemcode 3.
einstellen wie bei der Fernbedienung.
Page 9
9
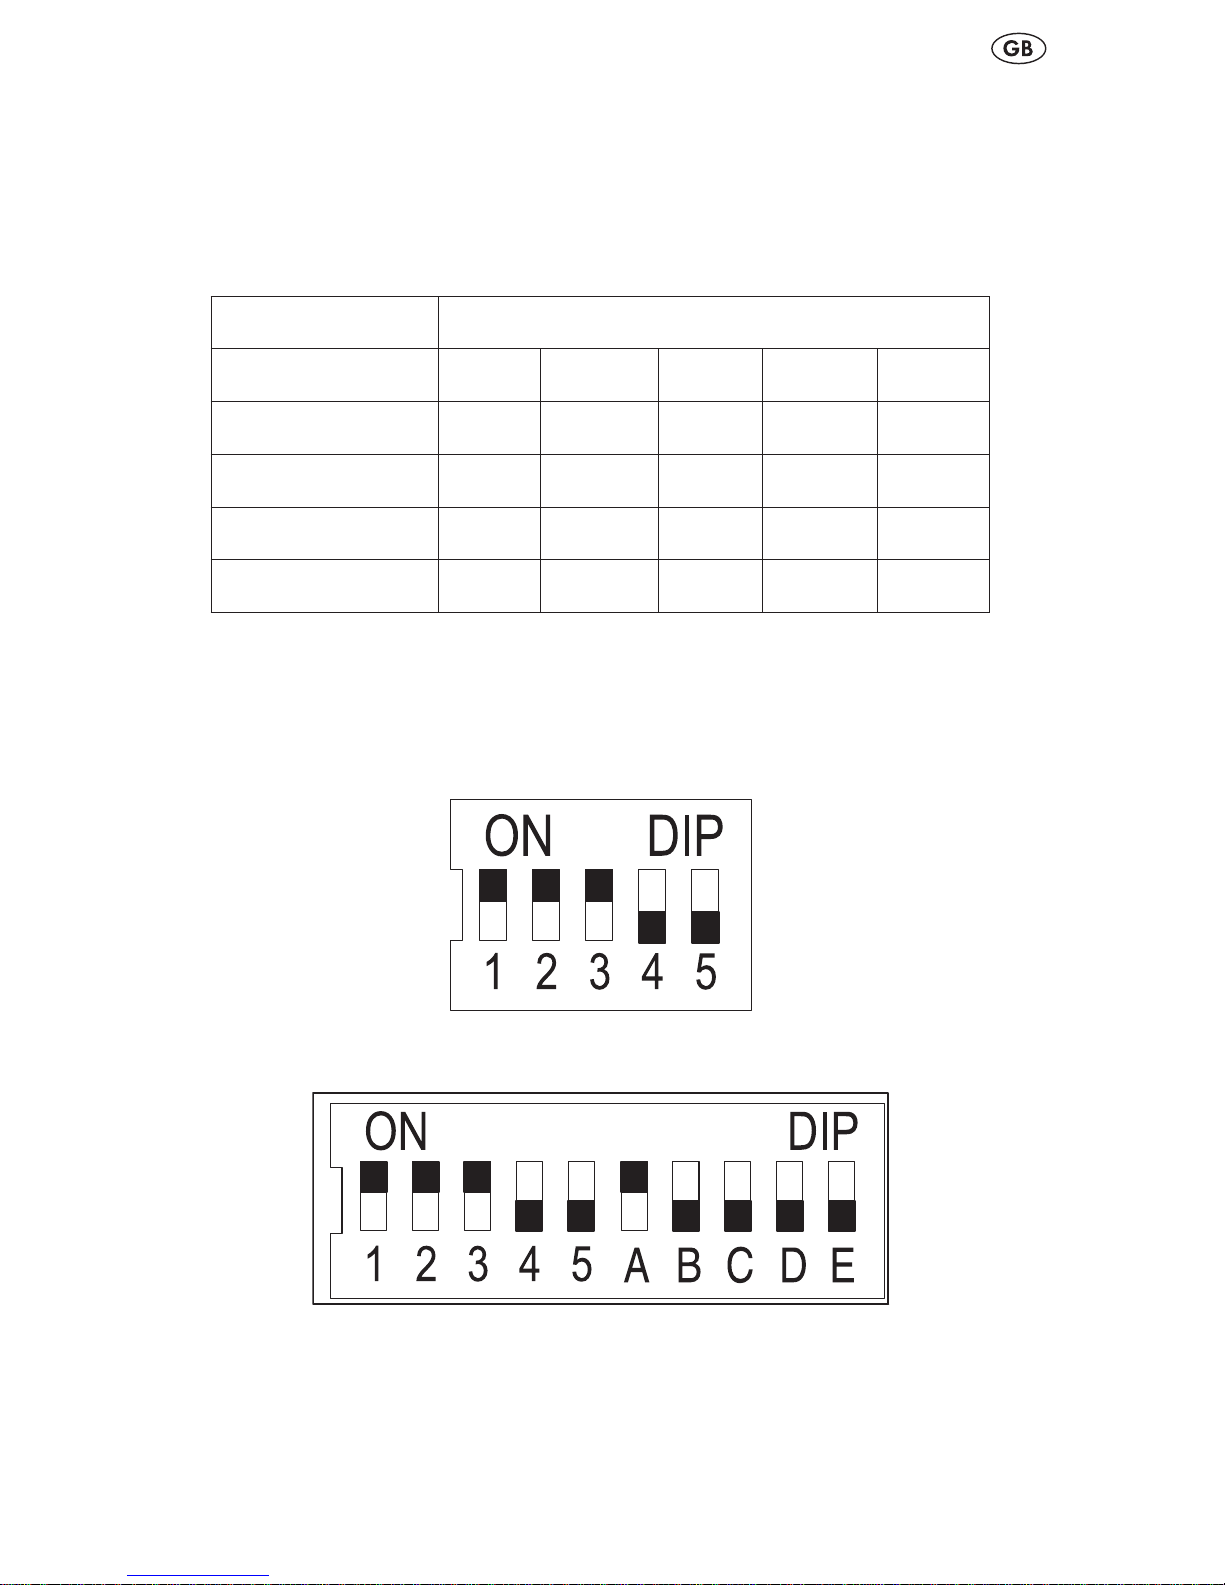
Schaltersteckdose einer Bedientaste zuweisen
Mit den DIP-Schaltern (13) A bis E eine Bedientaste der Fern-1.
bedienung einstellen:
3 Der DIP-Schalter E ist nicht belegt.
Bedientaste DIP-Schalter
ABCDE
A
ON
OFF OFF OFF OFF
B OFF
ON
OFF OFF OFF
C OFF OFF
ON
OFF OFF
D OFF OFF OFF
ON
OFF
Die Abdeckung (12) nach innen schwenken und schließen.2.
Die Schraube (15) durch die Schraubenöffnung (11) in das 3.
Gewinde (14) einsetzen und festziehen.
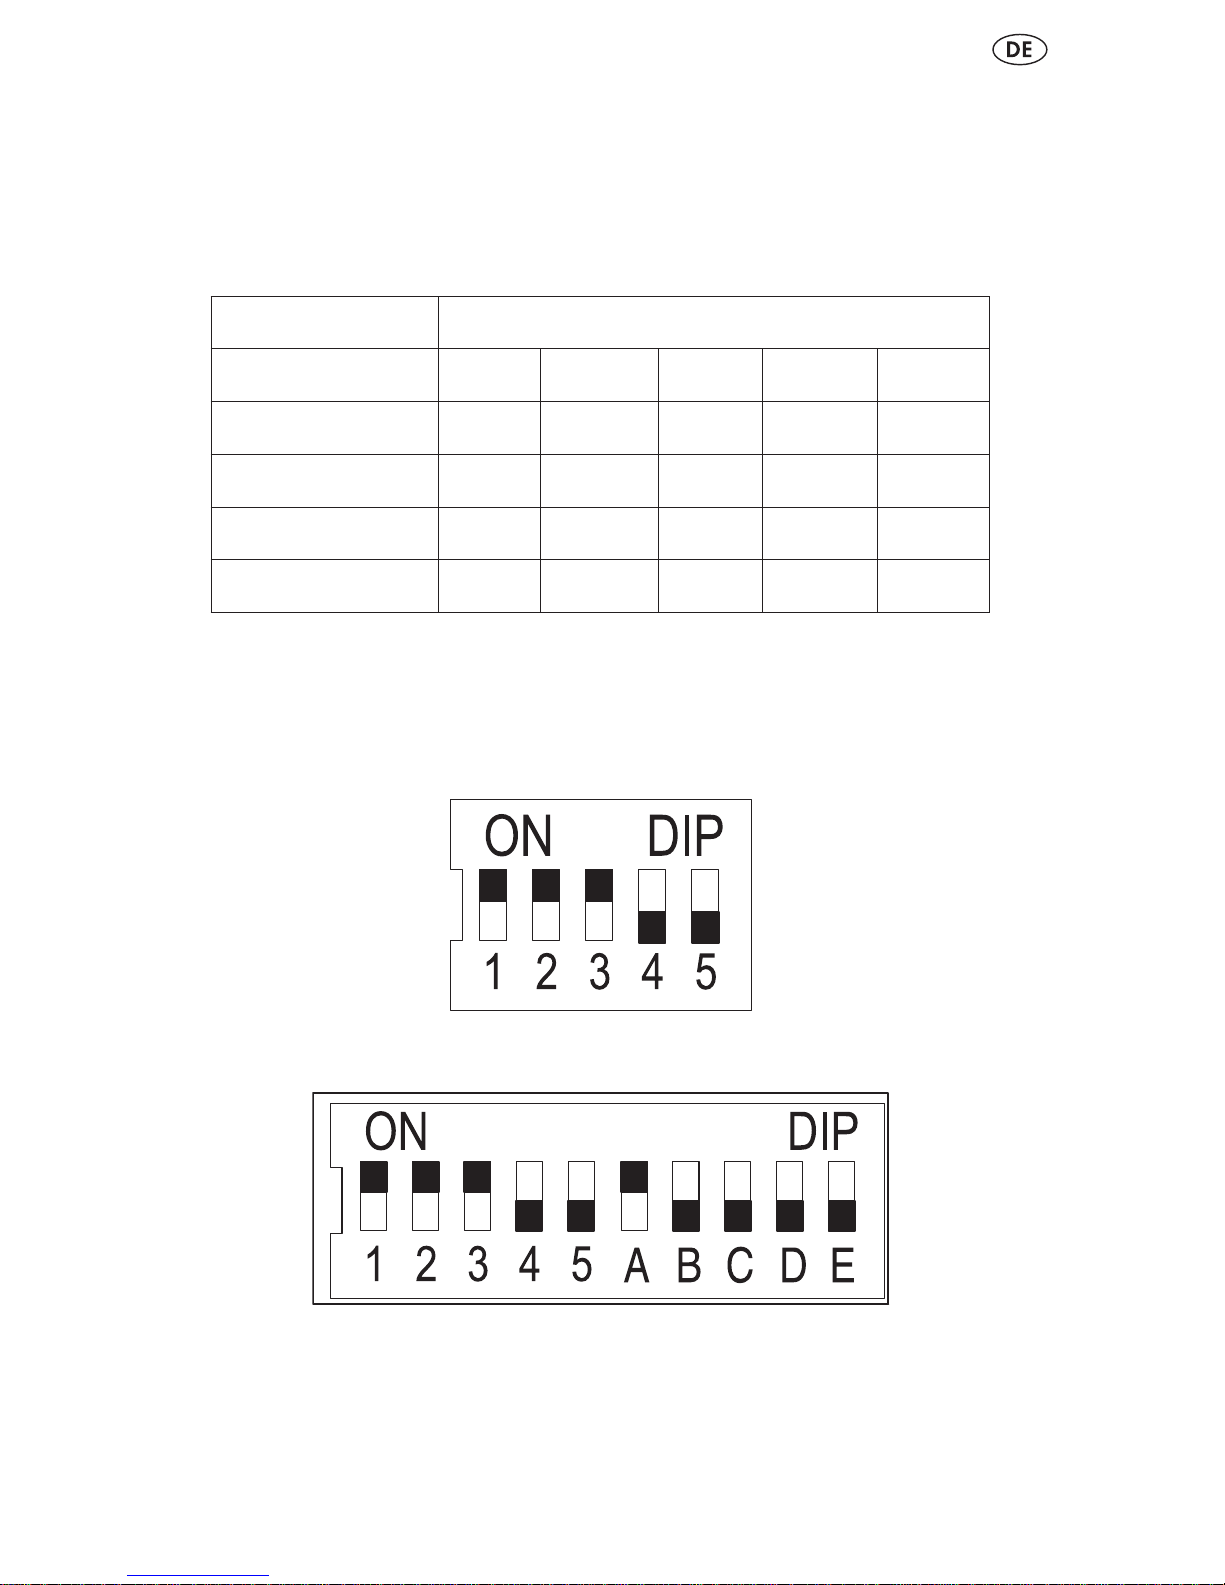
Beispiel
Stellen Sie an der Fernbedienung den Systemcode 123 ein.
Stellen Sie bei allen Schaltersteckdosen den Systemcode 123
ein. Stellen Sie außerdem eine Bedientaste ein. In der Abbildung ist das Tastenpaar A mit dem DIP-Schalter A eingestellt.
Page 10
10
Geräte anschließen
Die Reichweite des Funksignals der Fernbedienung beträgt
max. 25 m und ist abhängig von den baulichen Gegebenheiten.
3 Die Reichweite kann durch bauliche Gegebenheiten
(beispielsweise Stahlbeton), elektrische (beispielsweise
elektrische Leitung) oder elektromagnetische (beispielsweise Telefon) gestört werden. Falls notwendig, entfernen
Sie die Störquelle oder halten Sie einen entsprechenden
Abstand zur Störquelle ein.
Um die Schaltersteckdosen anzuschließen
die Schaltersteckdosen in eine Steckdose stecken.•
Um die Fernbedienung anzuschließen
die Batterie in das Batteriefach (9) einlegen.•
BEDIENUNG
Schaltersteckdose einschalten
Die Schaltersteckdose (1) in eine Steckdose stecken.1.
Den Verbraucher in die Schutzkontaktsteckdose (2) stecken.2.
Die voreingestellte Taste (8) ON (beispielsweise A) drücken, 3.
um die Schaltersteckdose (1) einzuschalten.
Die Funktionsleuchte (5) leuchtet bei jedem Tastendruck.
Schaltersteckdose ausschalten
Die voreingestellte Taste (6) OFF (beispielsweise A) drücken, 1.
um die Schaltersteckdose (1) auszuschalten.
Die Funktionsleuchte (5) leuchtet bei jedem Tastendruck.
REINIGUNG
B Achtung! Gefahr durch elektrischen Schlag.
Vor dem Reinigen das Gerät vom Stromnetz nehmen.
B Achtung! Gefahr durch elektrischen Schlag.
Achten Sie darauf, dass keine Flüssigkeit in das Gerät eindringt.
Eindringende Flüssigkeit kann zu einem Kurzschluss führen.
Page 11
11
A Achtung! Gefahr durch aggressive Reinigungsmittel.
Verwenden Sie zur Reinigung nie aggressive oder scheuernde
Reinigungsmittel.
Reinigen Sie das Gerät mit einem weichen, leicht feuchten Tuch
und mildem Reinigungsmittel.
Stellen Sie vor der nächsten Verwendung sicher, dass das
Gerät vollständig getrocknet ist.
WARTUNG
Überprüfen Sie in regelmäßigen Abständen die Batterie auf
Schäden.
TECHNISCHE DATEN
Betriebsspannung 230 V ~ 50 Hz
Schaltspannung 230 V ~ 4,35 A
Schaltleistung Schaltersteck-
dose
max. 1000 W
Schutzart IP44
Reichweite Funksignal max. 25 m
Betriebsfrequenz 433,92 MHz
Umgebungstemperatur 0 ° bis 35 °C
Lagertemperatur - 40 ° bis 70 °C
Batterie 12 Volt, Typ A 23
EG-konform
Page 12
12
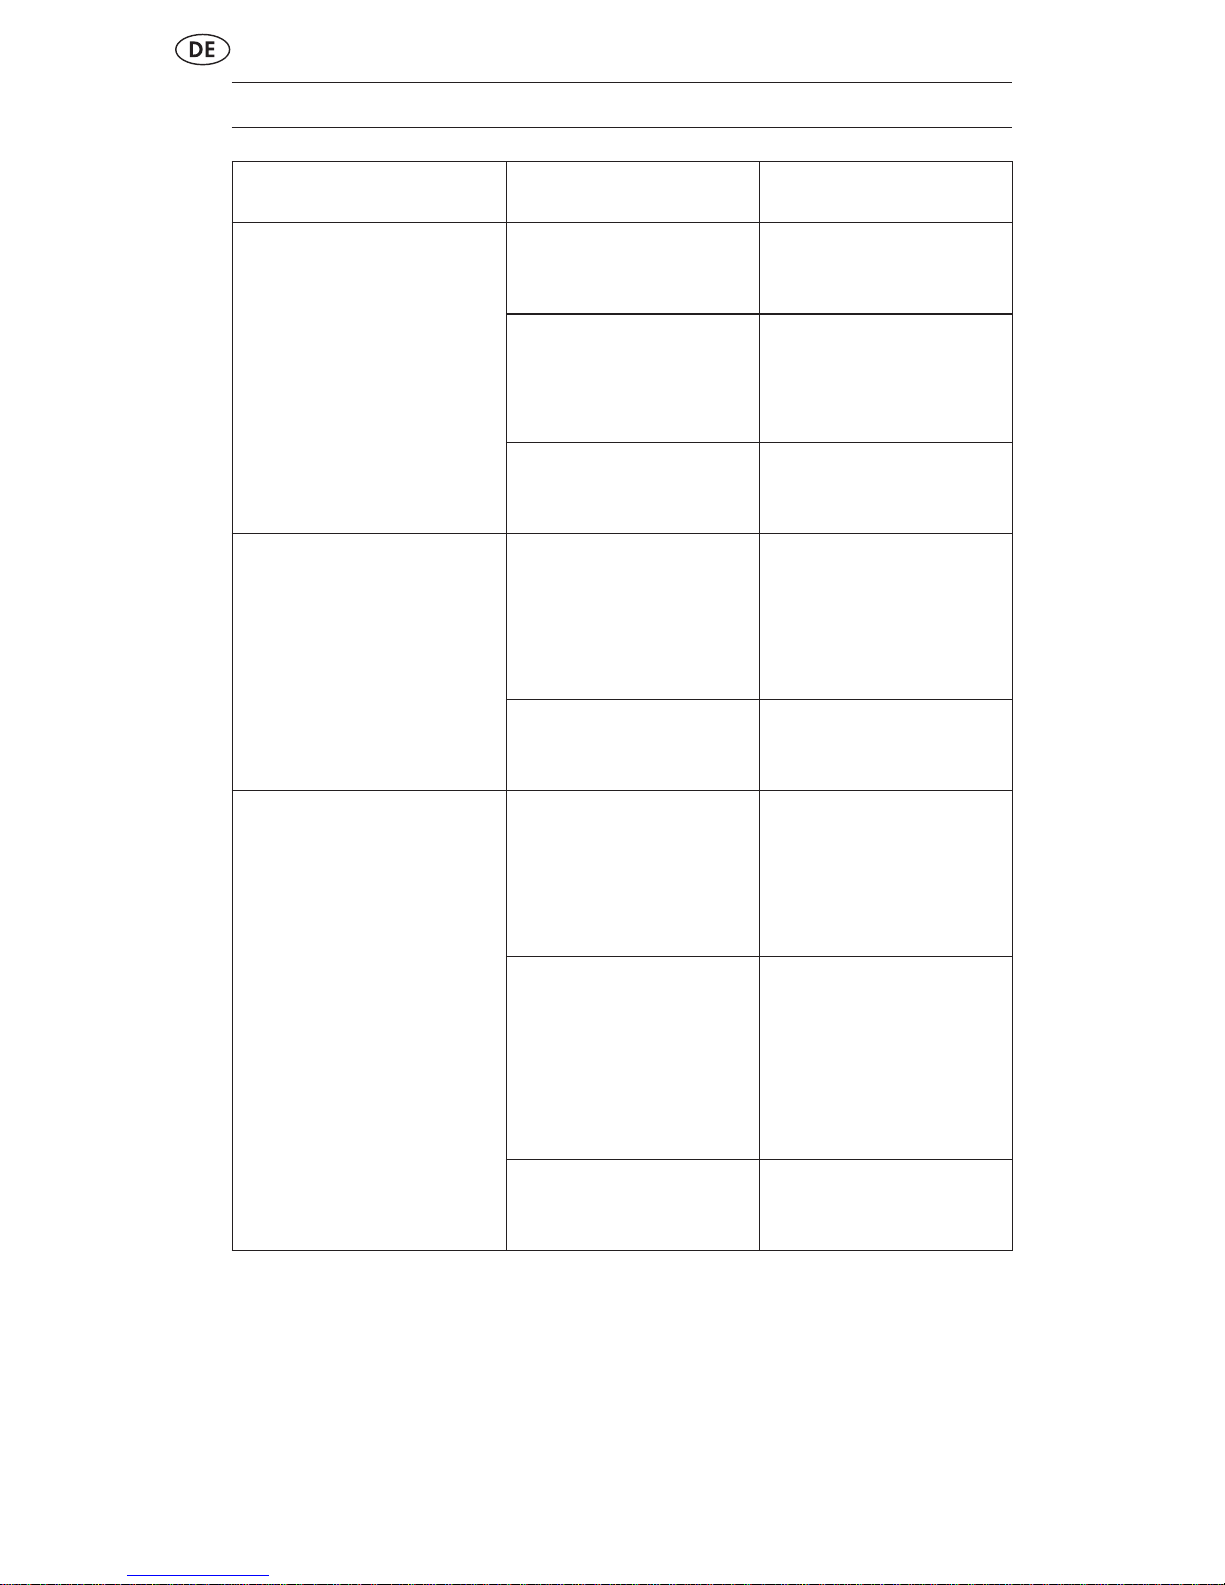
STÖRUNGEN BEHEBEN
Störung Ursache Behebung
Funktionsleuchte (5) leuchtet nicht
beim Drücken einer
Taste.
Batterie falsch
eingelegt.
Batterie richtig
eingelegt ist.
Batterie hat keinen Kontakt.
Batterie an Kontaktklemmen andrücken.
Batterie leer. Neue Batterie
einlegen
Verbraucher funktioniert nicht.
Schaltersteckdose nicht richtig
angeschlossen.
Schaltersteckdose fest in die
Steckdose stecken.
Verbraucher nicht
eingeschaltet.
Verbraucher einschalten.
Schaltersteckdose
schaltet nicht ein.
Systemcode der
Schaltersteckdose nicht richtig
eingestellt.
Systemcode der
Fernbedienung in
der Schaltersteckdose einstellen.
Reichweite zwischen Fernbedienung und Schaltersteckdose nicht
ausreichend
Den Abstand zwischen Fernbedienung und Schaltersteckdose
verringern.
Elektrische Geräte stören.
Mögliche Störquellen entfernen.
Page 13
13
GARANTIE
2 Jahre Garantie ab Kaufdatum auf dieses Gerät. Bitte Kassenbon als Nachweis aufbewahren. Die Garantieleistung gilt nur für
Material- oder Fabrikationsfehler, nicht aber für Verschleißteile
oder für Beschädigungen durch unsachgemäßen Gebrauch. Die
Garantie erlischt bei Fremdeingriff. Ihre gesetzlichen Rechte
werden durch diese Garantie nicht eingeschränkt. Im Garantiefall mit der Servicestelle telefonisch in Verbindung setzen. Nur
so kann eine kostenlose Einsendung Ihres Geräts gewährleistet
werden. Durch Reparatur oder ersetzte Teile verlängert sich die
ursprüngliche Garantiezeit nicht.
Hersteller
H. Brennenstuhl GmbH u. Co. KG
Seestraße 1 - 3
72074 Tübingen
Deutschland
E-Mail: info@brennenstuhl.com
Page 14

14
Page 15

15
SAFETY
Intended use
The devices which constitute this RF remote control switch set
are intended for personal use only. It is not suitable for commercial use.
The RF remote control switch set is used for switching lamps
and electrical appliances on and off. The receivers are suitable
for outdoor use.
The devices may only be operated individually. Do not stack
several socket switches together.
Any other use is considered non-intended use. The manufacturer assumes no liability for damage caused by non-intended
use.
Operating manual
Read this operating manual through carefully before
using the device. Keep the operating manual in a safe
place. Should you pass on this device to another party be
sure to include the operating manual.
Basic safety instructions
Children are not aware of the dangers that may arise from im-•
proper handling of electrical devices. Never allow children to
use electrical devices without supervision.
Risk of suffocation! Do not leave the packaging material lying •
around. Children could swallow the small parts and choke on
them.
Plug the socket switches into conventional 220-240VAC/50Hz •
two-pin earthed sockets only.
Do not connect the socket switches to extension cables. •
Only connect appliances that are within the performance•
limits of the socket switches.
Do not connect consumers (for example irons) which could •
cause re or other damage if they are accidentally switched
on.
Do not connect consumers (for example refrigerators) which •
require condenser motors.
Page 16
16
Do not cover the socket switches. Heat builds up under the •
cover. and can pose a re hazard.
Regularly check the devices for damage. Do not replace dam-•
aged parts. Contact the manufacturer or dispose of the devices in an environmentally friendly manner.
Do not touch the devices with wet hands.•
To de-energise the socket switches disconnect them from the•
mains supply.
Batteries must be handled with particular care.
Risk of explosion! Do not try to recharge non-rechargeable •
batteries.
When the battery is empty remove it from the battery com-•
partment and dispose of it in an environmentally friendly manner.
Do not throw batteries into res and never subject them to •
high temperatures.
Do not open or short-circuit batteries.•
Battery acid which leaks from a battery can cause skin irrita-•
tions. In case of contact with skin rinse with plenty of water.
Do not rub your eyes if any liquid gets in them; rinse them
thoroughly with water and contact a doctor immediately.
If you are not using the battery remove it to avoid•
discharging.
WASTE DISPOSAL
Dispose of electrical devices in an environmentally
friendly manner!
Electrical devices do not belong in the household rubbish.
In accordance with European Directive 2002/96/EC on
waste electrical and electronic equipment old power tools must
be collected separately and sent to a proper recycling facility.
You can nd out more about the options for disposing of used
devices from your local government or municipal authorities.
Page 17
17
Risk of environmental damage from improper
disposal of batteries!
Batteries do not belong in the household rubbish. They
may contain poisonous heavy metals and must be treated as
hazardous waste. For this reason, take used batteries to a local
collection point.
DEVICE
Scope of delivery:
The following items are included in the scope of delivery:
remote control with battery –
two IP44 socket switches. –
Device overview
3
45
6
8
1
7
2
Page 18

18
1 Socket switch 5 Function indicator light
2 Childproof IP44 two-pin
earthed socket with cover
6
7
OFF keys (A, B, C, D)
Battery compartment
3 Protective contact
connector 8
cover
ON keys (A, B, C, D)
4 Remote control
Preparations
Before you can use the devices you must:
insert the battery, –
synchronise the system code between the remote control and –
the socket switches and
assign an ON/OFF key pair on the remote control to a socket –
switch.
Inserting the battery
A Caution!
Observe the correct polarity of the battery. An incorrectly
inserted battery can cause material damage.
7
9
10
Open the cover (7) of the battery compartment (9).1.
Insert the battery as shown in the gure.2.
Close the battery compartment (9).3.
Page 19
19
Press any key on the remote control (4). The function indica-4.
tor light (5) illuminates when the key is pressed.
3 If the function indicator light (5) does not light up when a
key is pressed the device is not receiving any power from
the battery. Check whether you have inserted the battery
correctly.
Synchronising the system code
Before the devices can be used for the rst time the system
code must be synchronised to enable all socket switches to
react to the radio signal of the remote control.
Moreover, each socket switch must be assigned a key pair on
the remote control to enable it to be operated
individually.
3 Adjust the DIP switches using a suitable object, for
instance a small screwdriver, by pushing them down or
up.
Setting a system code on the remote control
Open the cover (7) of the battery compartment (9).1.
Set any system code using DIP switches 1 to 5 (10).2.
Close the battery compartment (9).3.
Page 20
20
Setting a system code on the socket switch
3
1413
15
11 12
Undo the screw (15) of the cover (12) using a PH0 Phillips 1.
screwdriver.
Slightly raise the cover (12) above the screw hole (11) and 2.
push out.
Set the same system code as for the remote control using 3.
DIP switches 1 to 5 (13).
Page 21
21
Assigning a socket switch to a control key
Set a control key on the remote control using DIP switches A 1.
to E (13):
3 DIP switch E is not occupied.
Control key DIP switch
ABCDE
A
ON
OFF OFF OFF OFF
B OFF
ON
OFF OFF OFF
C OFF OFF
ON
OFF OFF
D OFF OFF OFF
ON
OFF
Push the cover in (12) and close.2.
Insert the screw (15) through the screw hole (11) into the 3.
thread (14) and tighten.
Example
Set the system code '123' on the remote control.
Set the system code '123' on all socket switches. Set a control
key as well. In the gure the key pair 'A' is set with DIP switch .
Page 22

22
Connecting the devices
The remote control radio signal has a range of up to 25 m
(dependent on structural conditions).
3 The range can be affected by structural conditions (for
example reinforced concrete), electrical conditions (for
example electrical lines) or electromagnetic conditions
(for example telephones). If necessary remove the source
of interference or maintain a suf cient distance to the
source of interference.
To connect the socket switches:
plug the socket switches into sockets.•
To connect the remote control:
insert the battery into the battery compartment (9).•
OPERATION
Switching on a socket switch
Plug the socket switch (1) into a socket.1.
Plug the consumer into the two-pin earthed socket (2).2.
Press the preset ON key (8), for example 'A', to switch on the 3.
socket switch (1).
The function indicator light (5) illuminates whenever a key is
pressed.
Switching off a socket switch
Press the preset OFF key (6), for example 'A', to switch off 1.
the socket switch (1).
The function indicator light (5) illuminates whenever a key is
pressed.
CLEANING
B Caution! Risk of electric shock.
Before cleaning the device disconnect it from the mains supply.
Page 23
23
B Caution! Risk of electric shock.
Ensure that no liquid penetrates into the device. Liquid which
enters the device can cause short-circuiting.
A Caution! Risk of damage from aggressive cleaning
agents.
Never use aggressive or abrasive cleaning agents for cleaning.
Clean the device with a soft damp cloth and a mild cleaning
agent.
Ensure that the device is completely dry before using it again.
MAINTENANCE
Check the battery regularly for damage.
TECHNICAL DATA
Operating voltage 230 VAC 50 Hz
Switching voltage 230 VAC 4,35 A
Socket switch switching power max. 1000 W
Type of protection IP44
Radio signal range max. 25 m
Operating frequency 433.92 MHz
Ambient temperature 0°C to 35°C
Storage temperature -40°C to 70°C
Battery 12 V, type A 23
CE-compliant
Page 24

24
TROUBLESHOOTING
Fault Possible cause Remedy
Function indicator
light (5) does not
light up when a key
is pressed.
Battery has been
inserted incorrectly.
Insert battery
correctly.
There is no battery contact.
Press down on
the battery terminals.
Battery is empty. Insert a new bat-
tery.
Consumer does not
work.
Socket switch has
not been connected correctly.
Push the socket
switch rmly into
the socket.
Consumer has
not been switched
on.
Switch on the
consumer.
Socket switch does
not switch on.
System code of
the socket switch
has not been set
correctly.
Set the system
code of the remote control on
the socket switch.
Range between
remote control
and socket switch
is insuf cient.
Reduce the distance between
the remote control
and the socket
switch.
Electrical devices
are causing interference.
Remove possible
sources of interference.
Page 25

25
WARRANTY
Warranty valid for 2 years from date of purchase. Please retain
your sales receipt as proof of purchase. The warranty covers
material and manufacturing defects only, not wear parts or
damage resulting from improper use. Any intervention by a third
party will void the warranty. Your legal rights are not restricted
by this warranty. Should you wish to make a claim under the
warranty please contact our Service Hotline. Only then can your
device be returned free of charge. The original warranty period
shall not be extended by repair or replacement of parts.
Manufacturer
H. Brennenstuhl GmbH u. Co. KG
Seestraße 1 - 3
72074 Tübingen
Germany
Email: info@brennenstuhl.com
Page 26

26
Page 27

27
SÉCURITÉ
Utilisation conforme aux dispositions
Ces kits de commutateur radio sont conçus pour un usage
uniquement personnel. Il ne convient pas à une utilisation
commerciale.
Le kit de commutateur radio sert à allumer et à éteindre des
lampes et des appareils électriques. Les récepteurs conviennent à l'utilisation à l'extérieur.
Ces appareils ne doivent être utilisés qu'individuellement. Ne
pas brancher plusieurs prises commutables les unes derrière
les autres.
Toute autre utilisation est considérée comme contraire aux
dispositions. Le fabricant n'assume aucune responsabilité pour
tout dommage résultant d'une utilisation contraire aux dispositions.
Manuel d'utilisation
Veuillez lire l’intégralité du présent mode d’emploi avant
d’utiliser l’appareil. Veuillez conserver le présent mode
d’emploi. En cas de revente de l'appareil, le manuel
d'utilisation doit également être fourni.
Consignes de sécurité de base
Les enfants ne connaissent pas les dangers pouvant résulter •
de l’utilisation inappropriée des appareils électriques. Ne laissez jamais des enfants utiliser des appareils électriques sans
surveillance.
Risque d'étouffement ! Ne laissez pas « traîner » l'emballage. •
Les enfants peuvent avaler des petites pièces et s'étouffer.
Ne cher les prises commutables que dans des prises de •
courant de sécurité usuelles d'une tension alternative de
220 à 240 V et de 50 Hz.
Ne pas cher les prises commutables dans une rallonge. •
Ne brancher que des consommateurs compris dans les limi-•
tes de puissance des prises commutables.
Ne pas brancher de consommateurs dont la mise sous ten-•
sion sans surveillance (telle que celle d'un fer à repasser)
peut déclencher un incendie ou tout autre dommage.
Page 28
28
Ne pas brancher de consommateurs qui nécessitent un •
condensateur pour le moteur (par exemple un réfrigérateur).
Ne pas recouvrir les prises commutables. La chaleur s'accu-•
mule sous le recouvrement. Risque d’incendie.
Contrôler régulièrement le parfait état des appareils. Ne pas •
remplacer les pièces endommagées. Adressez-vous au fabri-
cant ou éliminez les appareils en respectant l'environnement.
Ne pas toucher les appareils avec des mains mouillées.•
Débrancher les prises commutables pour les mettre hors ten-•
sion.
Les piles doivent être traitées avec des précautions particuliè-
res.
Risque d'explosion ! Ne pas tenter de recharger une pile non •
rechargeable.
Dès que la pile est usée, la retirer de son compartiment et •
l'éliminer en respectant l'environnement.
Ne pas jeter les piles dans le feu ou les exposer à de hautes •
températures.
Ne pas ouvrir les piles ni les court-circuiter.•
De l'électrolyte qui s'échappe d'une pile peut provoquer des •
irritations de la peau. En cas de contact, passer l’endroit à
grande eau. Quand de l'électrolyte pénètre dans les yeux, ne
pas les frotter, mais les rincer à grande eau et consulter im-
médiatement un médecin.
Si vous n’utilisez pas la pile, la retirer a n d’éviter qu’elle se •
déchargent inutilement.
ÉLIMINATION
Éliminer les appareils ménagers en respectant
l’environnement !
Ne pas jeter les appareils ménagers dans la poubelle
ménagère. Conformément à la directive européenne
2002/96/CE relative aux appareils électriques et électroniques,
les outils électriques usagés doivent être collectés séparément
et conduits à un centre de recyclage respectant l’environnement. Vous pouvez vous informer des possibilités d’élimination
Page 29

29
des appareils usagés auprès des autorités communales ou
municipales compétentes.
Dommages écologiques dus à une élimination
incorrecte des piles !
Les piles ne doivent pas être jetées à la poubelle. Elles
peuvent contenir des métaux lourds toxiques et doivent être
traitées comme des déchets dangereux. Veuillez pour cela
remettre les piles usées dans une déchetterie communale.
APPAREIL
Étendue de la fourniture
Sont compris dans l'étendue de la fourniture :
une télécommande avec pile et –
deux prises commutables IP 44. –
Page 30

30
Aperçu de l’appareil
3
45
6
8
1
7
2
1
2
Prise commutable
Prises de courant de sécu-
5 Voyant de
fonctionnement
rité IP44 avec couvercle
rabattable et sécurité
enfants
6
7
Touches OFF
(A, B, C, D)
Couvercle du comparti-
3 Fiche de prise de courant
de sécurité
8
ment de pile
Touches ON
4 Télécommande (A, B, C, D)
Page 31

31
Préparation de l'appareil
Avant de pouvoir utiliser les appareils, il vous faut
mettre la pile en place, –
synchroniser le code système entre la télécommande et les –
prises commutables et
affecter une paire de touches ON/OFF de la télécommande à –
une prise commutable.
Mise en place de la pile
A Attention !
Veillez à la bonne polarisation de la pile. Une pile mise à
l'envers peut provoquer des dommages matériels.
7
9
10
Ouvrir le couvercle (7) du compartiment à piles (9).1.
Mettre la pile en place comme indiqué sur l'illustration.2.
Fermer le compartiment à piles (9).3.
Appuyer sur une touche quelconque de la télécommande (4). 4.
Le voyant de fonctionnement (5) s'allume lorsque l'on appuie
sur la touche.
3 Le voyant de fonctionnement (5) ne s'allume pas lorsque
l'on appuie sur la touche quand l'appareil n'est pas
alimenté par la pile. Contrôlez que la pile soit bien mise
en place.
Page 32

32
Synchronisation du code système
Le code système doit être synchronisé avant la première
utilisation des appareils a n que toutes les prises commutables
réagissent au signal radio de la télécommande.
Une paire de touches doit en outre être affectée à chaque prise
commutable de la télécommande a n que ces prises puissent
être commandées individuellement.
3 Réglez les commutateurs DIP avec un objet adéquat, par
exemple avec un petit tournevis en les poussant vers le
haut ou le bas.
Réglage du code système sur la télécommande
Ouvrir le couvercle (7) du compartiment à piles (9).1.
Régler un code système quelconque avec les commutateurs 2.
DIP (10) 1 à 5.
Fermer le compartiment à piles (9).3.
Page 33

33
Réglage du code système sur la prise commutable
3
1413
15
11 12
Dévisser la vis (15) du recouvrement (12) avec un tournevis à 1.
fentes en croix de taille PH0.
Soulever légèrement le recouvrement (12) au-dessus de 2.
l'ouverture de la vis (11) et faire pivoter vers l'extérieur.
Régler le même code système que sur la télécommande avec 3.
les commutateurs DIP (13) 1 à 5.
Page 34

34
Affectation d'une prise commutable à une touche de commande
Régler une touche de commande de la télécommande avec 1.
les commutateurs DIP (13) A à E :
3 Le commutateur DIP E n'est pas affecté.
Touche de commande Commutateur DIP
ABCDE
A
ON
OFF OFF OFF OFF
B OFF
ON
OFF OFF OFF
C OFF OFF
ON
OFF OFF
D OFF OFF OFF
ON
OFF
Faire pivoter le recouvrement (12) vers l'intérieur et fermer.2.
Mettre la vis (15) en place dans le let (14) à travers l'ouvertu-3.
re (11) qui lui est réservée et bien la visser.
Exemple
Régler le code système 123 sur la télécommande.
Régler le code système 123 sur toutes les prises commutables.
Régler en outre une touche de commande. Sur l'illustration, la
paire de touches A est réglée avec le commutateur DIP A.
Page 35

35
Branchement des appareils
La portée du signal radio de la télécommande est de 25 m maxi
et dépend des éléments de construction.
3 La portée peut être réduite par des éléments de construc-
tion (tels que le béton armé), électriques (tel qu'une ligne
électrique) ou électromagnétiques (tel que le téléphone).
Éloignez la source parasite si c'est nécessaire ou
respectez une distance adéquate par rapport à cette
source.
Pour brancher les prises commutables
Ficher les prises commutables dans une prises de courant.•
Pour brancher la télécommande
Mettre la pile en place dans son compartiment (9).•
COMMANDE
Mise sous tension de la prise commutable
Ficher la prise commutable (1) in dans une prise de courant.1.
Ficher le consommateur dans la prise de courant de sécuri-2.
té (2).
Appuyer sur la touche préréglée (8) ON (par exemple A) pour 3.
mettre la prise commutable (1) sous tension.
Le voyant de fonctionnement (5) s'allume à chaque pression de
touche.
Mise hors tension de la prise commutable
Appuyer sur la touche préréglée (6) OFF (par exemple A) 1.
pour mettre la prise commutable (1) hors tension.
Le voyant de fonctionnement (5) s'allume à chaque pression de
touche.
NETTOYAGE
B Attention ! Risques d’électrocution.
Débrancher l’appareil avant de le nettoyer.
Page 36

36
B Attention ! Risques d’électrocution.
Veillez à ce qu’aucun liquide ne pénètre dans l’appareil. Du
liquide s’in ltrant à l’intérieur peut provoquer un court-circuit.
A Attention !
Risques causés par des détergents agressifs.
N’utilisez jamais de détergents agressifs ou abrasifs pour le
nettoyage.
Nettoyez l’appareil avec un chiffon doux légèrement humide et
un détergent doux.
Assurez-vous avant d’utiliser l’appareil de nouveau qu’il est
entièrement sec.
MAINTENANCE
Véri ez à intervalles réguliers que la pile n'est pas endommagée.
CARACTÉRISTIQUES TECHNIQUES
Tension de service 230 V ~ 50 Hz
Tension de commutation 230 V ~ 4,35 A
Puissance de coupure prise
commutable
maxi 1000 W
Type de protection IP44
Portée du signal radio maxi 25 m
Fréquence de service 433,92 MHz
Température ambiante 0 ° à 35 °C
Température de stockage - 40 ° à 70 °C
Batterie 12 Volt, type A 23
Conformité CE
Page 37

37
ÉLIMINATION DES DÉRANGEMENTS
Dérangement Cause Remède
Le voyant de fonctionnement (5) ne
s'allume pas quand
on appuie sur une
touche.
Pile mal mise en
place.
Mettre la pile correctement en
place.
La pile n'a pas de
contact.
Appuyer la pile
sur les bornes de
contact.
Pile vide. Mettre une nou-
velle pile en place
Le consommateur
ne fonctionne pas.
La prise commutable n'est pas
correctement
branchée.
Ficher correctement la prise
commutable dans
la prise de courant.
Consommateur
non allumé.
Allumer le
consommateur.
La prise commutable ne s'allume pas.
Le code système
de la prise commutable n'est pas
réglé correctement.
Régler le code
système de la
télécommande
dans la prise
commutable.
Portée insuf sante entre la télécommande et la
prise commutable
Réduire la distance entre la télécommande et la
prise commutable.
Des appareils
électriques perturbent
Éloigner les éventuelles sources
parasite
Page 38

38
GARANTIE
2 ans de garantie sur cet appareil à partir de la date d'achat.
Veuillez conserver le bon d'achat comme preuve. La prestation
de garantie ne concerne que les défauts de matériau ou de
fabrication, mais pas les pièces d'usure ou les dommages dus à
une utilisation non conforme. La garantie devient caduque en
cas d'intervention étrangère. Cette garantie ne restreint pas vos
droits légaux. Veuillez prendre contact par téléphone avec le
service après-vente pour tout cas de garantie. C'est seulement
ainsi que peut être garanti un envoi gratuit de l'appareil. La
durée de garantie originale n'est pas prolongée par une réparation ou des pièces échangées.
Fabricant
H. Brennenstuhl GmbH u. Co. KG
Seestraße 1 - 3
72074 Tübingen
Allemagne
E-Mail : info@brennenstuhl.com
Page 39

39
VEILIGHEID
Doelmatig gebruik
De apparaten zijn schakelaarset met afstandsbediening
uitgevoerd voor privégebruik. Ze is niet geschikt voor professioneel gebruik.
De schakelaarset dient voor het in- en uitschakelen van lampen
en elektrische apparatuur. De ontvangers zijn geschikt voor
gebruik in de openlucht.
De apparaten mogen alleen afzonderlijk worden gebruikt. Nooit
meerdere schakelbare stopcontacten in elkaar steken.
Elk ander gebruik geldt als niet-doelmatig. Voor schade als
gevolg van niet-doelmatig gebruik aanvaardt de fabrikant geen
aansprakelijkheid.
Gebruiksaanwijzing
Lees deze gebruiksaanwijzing volledig door voordat u het
apparaat gebruikt. Bewaar de gebruiksaanwijzing. Indien
u het apparaat doorgeeft aan derden, voeg er dan de
handleiding bij.
Fundamentele veiligheidsinstructies
Kinderen herkennen de gevaren niet die bij ondeskundige •
omgang met elektronische apparatuur kunnen ontstaan. Laat
kinderen nooit zonder toezicht elektronische apparatuur ge-
bruiken.
Verstikkingsgevaar! Laat het verpakkingsmateriaal niet achte-•
loos liggen. Kinderen kunnen kleine onderdelen inslikken en
stikken.
Steek de schakelbare stopcontacten alleen in gebruikelijke •
stopcontacten met een wisselspanning van 220 - 240 V en
50 Hz.
Steek de schakelbare stopcontacten niet in een verlengsnoer. •
Sluit alleen verbruikers aan die binnen de aangegeven ver-•
mogensgrenzen van het schakelbare stopcontact liggen.
Sluit geen verbruikers aan waarvan het onbewaakte inscha-•
kelen brand (bijvoorbeeld een strijkijzer) of andere beschadi-
gingen kan veroorzaken.
Page 40

40
Sluit geen verbruikers aan die een motorcondensator verei-•
sen (bijvoorbeeld een koelkast).
Dek de schakelbare stopcontacten niet af. Onder de afdek-•
king ontstaat hitte. Er bestaat brandgevaar.
Controleer de apparaten regelmatig op beschadigingen. Be-•
schadigde delen niet vervangen. Wendt u zich tot de fabrikant
of verwijder de apparaten op een milieuvriendelijke manier.
Raak de apparaten niet met natte handen aan.•
Om de schakelbare stopcontacten spanningvrij te schakelen, •
scheidt u deze van het stroomnet.
Batterijen moeten bijzonder voorzichtig worden behandeld.
Explosiegevaar! Probeer in geen geval een niet herlaadbare •
batterij op te laden.
Zodra batterij verbruikt is, moeten deze uit het batterijvak ge-•
nomen en op een milieuvriendelijke manier verwijderd worden.
Werp batterijen niet in het vuur en stel ze niet bloot aan hoge •
temperaturen.
Batterijen mogen niet geopend of kortgesloten worden.•
Batterijzuur dat ontsnapt uit een batterij kan huidirritatie ver-•
oorzaken. Bij contact moet de vloeistof met veel water worden
afgespoeld. Als de vloeistof in contact komt met de ogen, de
ogen niet uitwrijven. Onmiddellijk spoelen met water en een
arts opzoeken.
Als u de batterij niet gebruikt, verwijdert u deze uit het appa-•
raat om onnodige ontlading te vermijden.
VERWIJDERING
Elektrische apparaten milieuvriendelijk verwijderen!
Elektrische apparaten horen niet bij het huisvuil. Conform
Europese richtlijn 2002/96/EG over oude elektrische en
elektronische apparatuur moeten verbruikte elektronische
apparaten gescheiden ingezameld en naar een milieuvriendelijk
recyclagepunt gebracht worden. Informatie over mogelijkheden
voor de verwijdering van het uitgediende apparaat krijgt u bij uw
gemeente- of stadsbestuur.
Page 41

41
Milieuschade door foute verwijdering van de bat-
terijen!
Batterijen horen niet bij het huisvuil. Ze kunnen giftige
zware metalen bevatten en moeten als speciaal afval worden
behandeld. Lever verbruikte batterijen daarom in bij een
gemeentelijk inzamelpunt.
APPARAAT
Leveringsomvang
Meegeleverd worden:
een afstandsbediening met batterij en –
twee schakelbare stopcontacten IP 44. –
Overzicht van de apparatuur
3
45
6
8
1
7
2
Page 42

42
1 Schakelbaar stopcontact 5 Functielamp
2 Geaard stopcontact IP44
met klapdeksel en kinderveiligheid
6
7
Toetsen OFF
(A, B, C, D)
Deksel van het batterijvak
3 Geaarde stekker
8 Toetsen ON (A, B, C, D)
4 Afstandsbediening
Apparaten voorbereiden
Voor u de apparaten kunt gebruiken, moet u
de batterij aanbrengen, –
de systeemcode tussen de afstandsbediening en de schakel- –
bare stopcontacten synchroniseren en
een toetsenpaar ON/OFF van de afstandsbediening toewijzen –
aan een schakelbaar stopcontact.
Batterij aanbrengen
A Opgelet!
Let op de correcte plaatsing van de batterijpolen. Een fout
geplaatste batterij kan materiële schade veroorzaken.
7
9
10
Open het deksel (7) van het batterijvak (9).1.
Breng de batterij aan zoals aangegeven op de afbeelding.2.
Sluit het batterijvak (9).3.
Page 43

43
Druk op een willekeurige toets van de afstandsbediening (4). 4.
De functielamp (5) brandt als de toets ingedrukt wordt.
3 Als de functielamp (5) niet brandt bij het indrukken van de
toets, krijgt het apparaat geen energie van de batterij.
Controleer of u de batterij correct hebt aangebracht.
Systeemcode synchroniseren
Voor u de apparaten voor het eerst gebruikt, moet de systeemcode gesynchroniseerd worden, zodat alle schakelbare stopcontacten reageren op het radiosignaal van de afstandsbediening.
Bovendien moet aan elk schakelbaar stopcontact een toetsenpaar van de afstandsbediening worden toegewezen, zodat elk
schakelbaar stopcontact afzonderlijk bedienbaar is.
3 Schuif de DIP-schakelaars met behulp van een geschikt
voorwerp, bijvoorbeeld een kleine schroevendraaier,
omhoog of omlaag.
Systeemcode instellen op de afstandsbediening
Open het deksel (7) van het batterijvak (9).1.
Stel met de DIP-schakelaars (10) 1 tot 5 een willekeurige sys-2.
teemcode in.
Sluit het batterijvak (9).3.
Page 44

44
Systeemcode instellen op het schakelbare stopcontact
3
1413
15
11 12
Draai de schroef (15) van de afdekking (12) los met een kruis-1.
kopschroevendraaier maat PH0.
Til de afdekking (12) boven de schroefopening (11) lichtjes op 2.
en zwenk ze opzij.
Stel met de DIP-schakelaars (13) 1 tot 5 dezelfde systeemco-3.
de in als op de afstandsbediening.
Page 45

45
Schakelbaar stopcontact toewijzen aan een bedieningstoets
Stel met de DIP-schakelaars (13) A tot E een bedieningstoets 1.
van de afstandsbediening in:
3 De DIP-schakelaar E is niet bezet.
Bedieningstoets DIP-schakelaar
ABCDE
A
ON
OFF OFF OFF OFF
B OFF
ON
OFF OFF OFF
C OFF OFF
ON
OFF OFF
D OFF OFF OFF
ON
OFF
Zwenk de afdekking (12) terug en sluit ze.2.
Steek de schroef (15) door de schroefopening (11) in de bo-3.
ring (14) en draai de schroef vast.
Voorbeeld
Stel de systeemcode 123 in op de afstandsbediening.
Stel op alle schakelbare stopcontacten de systeemcode 123 in.
Stel bovendien een bedieningstoets in. Op de afbeelding is het
toetsenpaar A ingesteld met de DIP-schakelaar A.
Page 46

46
Apparaten aansluiten
De reikwijdte van het radiosignaal van de afstandsbediening
bedraagt max. 25 m en is afhankelijk van de bouwkundige
omstandigheden.
3 De reikwijdte kan door bouwkundige (bijvoorbeeld
staalbeton), elektrische (bijvoorbeeld elektrische leiding)
of elektromagnetische (bijvoorbeeld telefoon) omstandigheden gestoord worden. Indien nodig verwijdert u de
storingsbron of zorgt u voor voldoende afstand van de
storingsbron.
Om de schakelbare stopcontacten aan te sluiten,
steekt u het schakelbare stopcontact in een stopcontact.•
Om de afstandsbediening aan te sluiten,
plaatst u de batterij in het batterijvak (9).•
BEDIENING
Schakelbaar stopcontact inschakelen
Steek het schakelbare stopcontact (1) in een stopcontact.1.
Verbind de verbruiker met het geaarde stopcontact (2).2.
Druk op de vooringestelde toets (8) ON (bijvoorbeeld A) om 3.
het schakelbare stopcontact (1) in te schakelen.
De functielamp (5) brandt bij elke druk op de toets.
Schakelbaar stopcontact uitschakelen
Druk op de vooringestelde toets (6) OFF (bijvoorbeeld A) om 1.
het schakelbare stopcontact (1) uit te schakelen.
De functielamp (5) brandt bij elke druk op de toets.
REINIGING
B Opgelet! Gevaar door elektrische schok.
Scheid het apparaat van het stroomnet voor u het reinigt.
Page 47

47
B Opgelet! Gevaar door elektrische schok.
Zorg ervoor dat er geen vloeistof in het apparaat dringt. Binnendringende vloeistof kan kortsluiting veroorzaken.
A Opgelet! Gevaar door agressieve reinigingsproduc-
ten.
Gebruik voor de reiniging nooit agressieve of schurende
reinigingsproducten.
Reinig het apparaat met een zachte, licht bevochtigde doek en
een mild reinigingsproduct.
Controleer voor het volgende gebruik of het apparaat volledig
gedroogd is.
ONDERHOUD
Controleer de batterij geregeld op beschadiging.
TECHNISCHE GEGEVENS
Bedrijfsspanning 230 V ~ 50 Hz
Schakelspanning 230 V ~ 4,35 A
Schakelvermogen
schakelbaar stopcontact
max. 1000 W
Isolatieklasse IP44
Reikwijdte radiosignaal max. 25 m
Bedrijfsfrequentie 433,92 MHz
Omgevingstemperatuur 0 ° tot 35 °C
Bewaartemperatuur - 40 ° tot 70 °C
Batterij 12 volt, type A 23
EG-conform
Page 48

48
STORINGEN OPLOSSEN
Storing Oorzaak Oplossing
Functielamp (5)
brandt niet bij het
indrukken van een
toets.
Batterij niet correct geplaatst.
Batterij correct
aanbrengen.
Batterij heeft geen
contact.
Batterij tegen de
contactklemmen
drukken.
Batterij leeg. Nieuwe batterij
aanbrengen.
Verbruiker werkt
niet.
Schakelbaar stopcontact niet correct aangesloten.
Schakelbaar stopcontact vast in het
stopcontact steken.
Verbruiker niet
ingeschakeld.
Verbruiker inschakelen.
Schakelbaar stopcontact wordt niet
ingeschakeld.
Systeemcode van
het schakelbare
stopcontact niet
correct ingesteld.
Systeemcode van
de afstandsbediening in het schakelbare stopcontact instellen.
Reikwijdte tussen
afstandsbediening
en schakelbaar
stopcontact niet
voldoende.
Afstand tussen
afstandsbediening
en schakelbaar
stopcontact reduceren.
Elektrische apparaten veroorzaken
storingen.
Mogelijke storingsbronnen
verwijderen.
Page 49

49
GARANTIE
2 jaar garantie vanaf de aankoopdatum op dit apparaat.
Kassabon bewaren als bewijs a.u.b. De garantie geldt alleen
voor materiaal- of productiefouten, niet voor slijtagedelen of
beschadigingen door foutief gebruik. De garantie vervalt bij
ingrepen door derden. Uw wettelijke rechten worden niet
beperkt door deze garantie. Om een garantiegeval te melden,
neemt u telefonisch contact op met de servicedienst. Alleen zo
is een kostenloze inzending van uw apparaat verzekerd.
Reparatie of vervanging van onderdelen heeft geen verlenging
van de oorspronkelijke garantieperiode tot gevolg.
Fabrikant
H. Brennenstuhl GmbH u. Co. KG
Seestraße 1 - 3
72074 Tübingen
Duitsland
E-mail: info@brennenstuhl.com
Page 50

50
Page 51
51
SEGURIDAD
Uso previsto
Los aparatos están diseñados como un juego de interruptores
de control remoto para el uso privado. No es apto para el uso
industrial.
El juego de interruptores de control remoto sirve para la
conexión y desconexión de lámparas y aparatos eléctricos. Los
receptores son apropiados para el uso en el exterior.
Los aparatos sólo pueden utilizarse individualmente. No
conectar en serie varias tomas de corriente con interruptor.
Cualquier otro uso será considerado como no conforme al
previsto. El fabricante no asumirá responsabilidad alguna por
los daños ocasionados debido al uso no prescrito.
Instrucciones de uso
Lea estas instrucciones íntegramente antes de utilizar el
aparato y consérvelas bien. En caso de transmisión del
aparato, entréguelo junto con las instrucciones de uso.
Indicaciones básicas de seguridad
Los niños no reconocen los peligros que pueden derivarse •
del manejo indebido de los aparatos eléctricos. No deje que
los niños utilicen aparatos eléctricos sin vigilancia.
¡Peligro de as xia! No deje esparcido el material de embalaje. •
Los niños podrían ingerir las piezas pequeñas y as xiarse.
Enchufe las tomas de corriente con interruptor sólo en tomas •
de corriente con puesta a tierra con una corriente alterna de
220 - 240 V y 50 Hz.
No enchufe las tomas de corriente con interruptor en un cable •
alargador.
Conecte sólo aparatos que no consuman más de los límites •
de potencia indicados para las tomas de corriente con interruptor.
No conecte consumidores cuya conexión sin vigilancia pueda •
provocar incendios u otros daños (por ejemplo, una plancha).
No conecte consumidores que necesiten un condensador de •
motor (por ejemplo, una nevera).
Page 52

52
No cubra las tomas de corriente con interruptor. Bajo la cu-•
bierta se acumula el calor. Existe peligro de incendio.
Compruebe los aparatos periódicamente por si presentan al-•
gún tipo de daño. No sustituya las piezas dañadas. Póngase
en contacto con el fabricante o elimine el aparato conforme a
las normas medioambientales.
No toque los aparatos con las manos mojadas.•
Para dejar sin tensión las tomas de corriente con interruptor, •
sepárelas de la red eléctrica.
Las pilas deben manipularse con especial cautela.
¡Peligro de explosión! No intente recargar pilas no recarga-•
bles.
En cuanto se haya acabado la pila, sáquela del compartimen-•
to y elimínela respetando el medio ambiente.
No tire las pilas al fuego ni las someta a temperaturas eleva-•
das.
No abra ni ponga en cortocircuito las pilas.•
El ácido que se desprende de una pila puede provocar irrita-•
ciones en la piel. En caso de contacto, limpie el líquido con
abundante agua. En caso de que el líquido entre en contacto
con los ojos, no se los frote, límpielos con abundante agua y
acuda inmediatamente al médico.
Si no usa la pila, sáquela para evitar que se descargue sin •
necesidad.
ELIMINACIÓN
¡Elimine los aparatos eléctricos conforme a las
normas medioambientales!
No tire aparatos eléctricos a la basura doméstica. Según
la directiva europea 2002/96/CE sobre residuos de
aparatos eléctricos y electrónicos, las herramientas eléctricas
usadas deben recogerse por separado y reciclarse respetando
el medio ambiente. En su ayuntamiento o administración
municipal le informarán sobre las posibilidades de eliminar el
aparato viejo.
Page 53

53
¡Daños medioambientales debidos a la eliminación
errónea de las pilas!
No tire pilas a la basura doméstica. Pueden contener
metales pesados tóxicos y están sometidas al tratamiento de
residuos especiales. Por ello, entregue las pilas usadas en el
punto verde municipal.
APARATO
Material incluido en el suministro
El volumen de suministro incluye:
Un mando a distancia con pilas y –
dos tomas de corriente con interruptor IP 44. –
Vista general del aparato
3
45
6
8
1
7
2
Page 54

54
1 Toma de corriente con
interruptor
4
5
Mando a distancia
Diodo de funcionamiento
2 Toma de corriente con
puesta a tierra IP44, con
tapa y protección para
niños
6
7
8
Teclas OFF (A, B, C, D)
Tapa del departamento
para pilas
Teclas ON (A, B, C, D)
3 Conector con puesta a
tierra
Preparación de los aparatos
Antes de utilizar los aparatos,
coloque las pilas, –
sincronice el código de sistema entre el mando a distancia y –
las tomas de corriente con interruptor, y
asigne el par de teclas ON/OFF del mando a distancia a una –
toma de corriente con interruptor.
Colocación de la pila
A ¡Atención!
Tenga en cuenta la correcta polarización de la pila. Las pilas
mal colocadas pueden provocar daños materiales.
7
9
10
Page 55

55
Abra la tapa (7) del departamento para pilas (9).1.
Inserte la pila como se muestra en la gura.2.
Cierre el departamento para pilas (9).3.
Pulse cualquier tecla del mando a distancia (4). Al pulsar la 4.
tecla se iluminará el diodo de funcionamiento (5).
3 En caso de que el diodo de funcionamiento (5) no se
ilumine, signi ca que no recibe energía de la pila.
Compruebe que haya insertado la pila correctamente.
Sincronización del código de sistema
Antes de usar por primera vez, se tiene que sincronizar el
código de sistema para que todas las tomas de corriente con
interruptor respondan a la señal de radiofrecuencia del mando a
distancia.
Además, a cada toma de corriente con interruptor se le tiene
que asignar un par de teclas del mando a distancia para poder
controlar cada toma por separado.
3 Regule los interruptores DIP mediante un objeto adecua-
do, por ejemplo un destornillador pequeño, desplazando
los interruptores DIP hacia arriba y abajo.
Confi guración del código de sistema en el mando a distancia
Abra la tapa (7) del departamento para pilas (9).1.
Con los interruptores DIP (10) 1 a 5, con gure un código de 2.
sistema cualquiera.
Cierre el departamento para pilas (9).3.
Page 56

56
Confi guración del código de sistema en la toma de corriente
con interruptor
3
1413
15
11 12
Desatornille el tornillo (15) de la tapa (12) mediante un des-1.
tornillador para cabezas de ranura en cruz tamaño PH0.
Levante ligeramente la tapa (12) sobre el ori cio para el torni-2.
llo (11) y gírela hacia el exterior.
Con los interruptores DIP (13) 1 a 5, con gure el mismo códi-3.
go de sistema que para el mando a distancia.
Page 57
57
Asignación de una tecla de mando a la toma de corriente con
interruptor
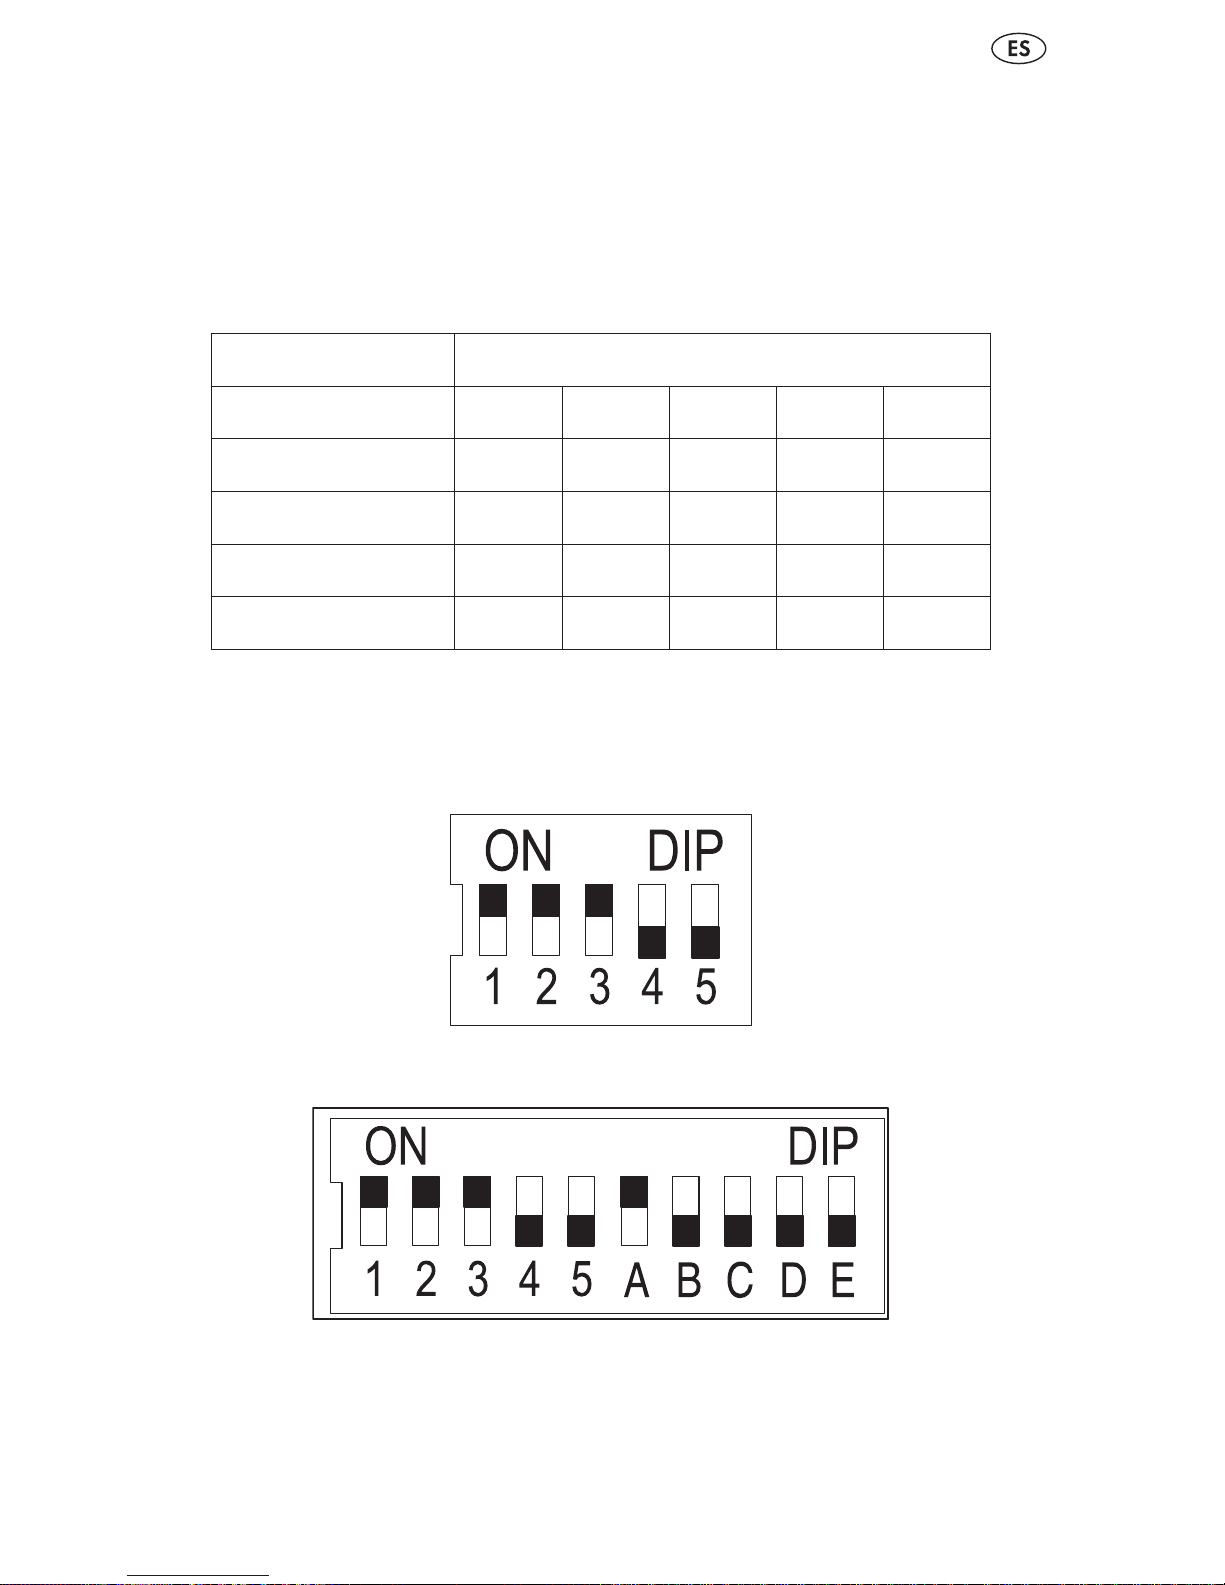
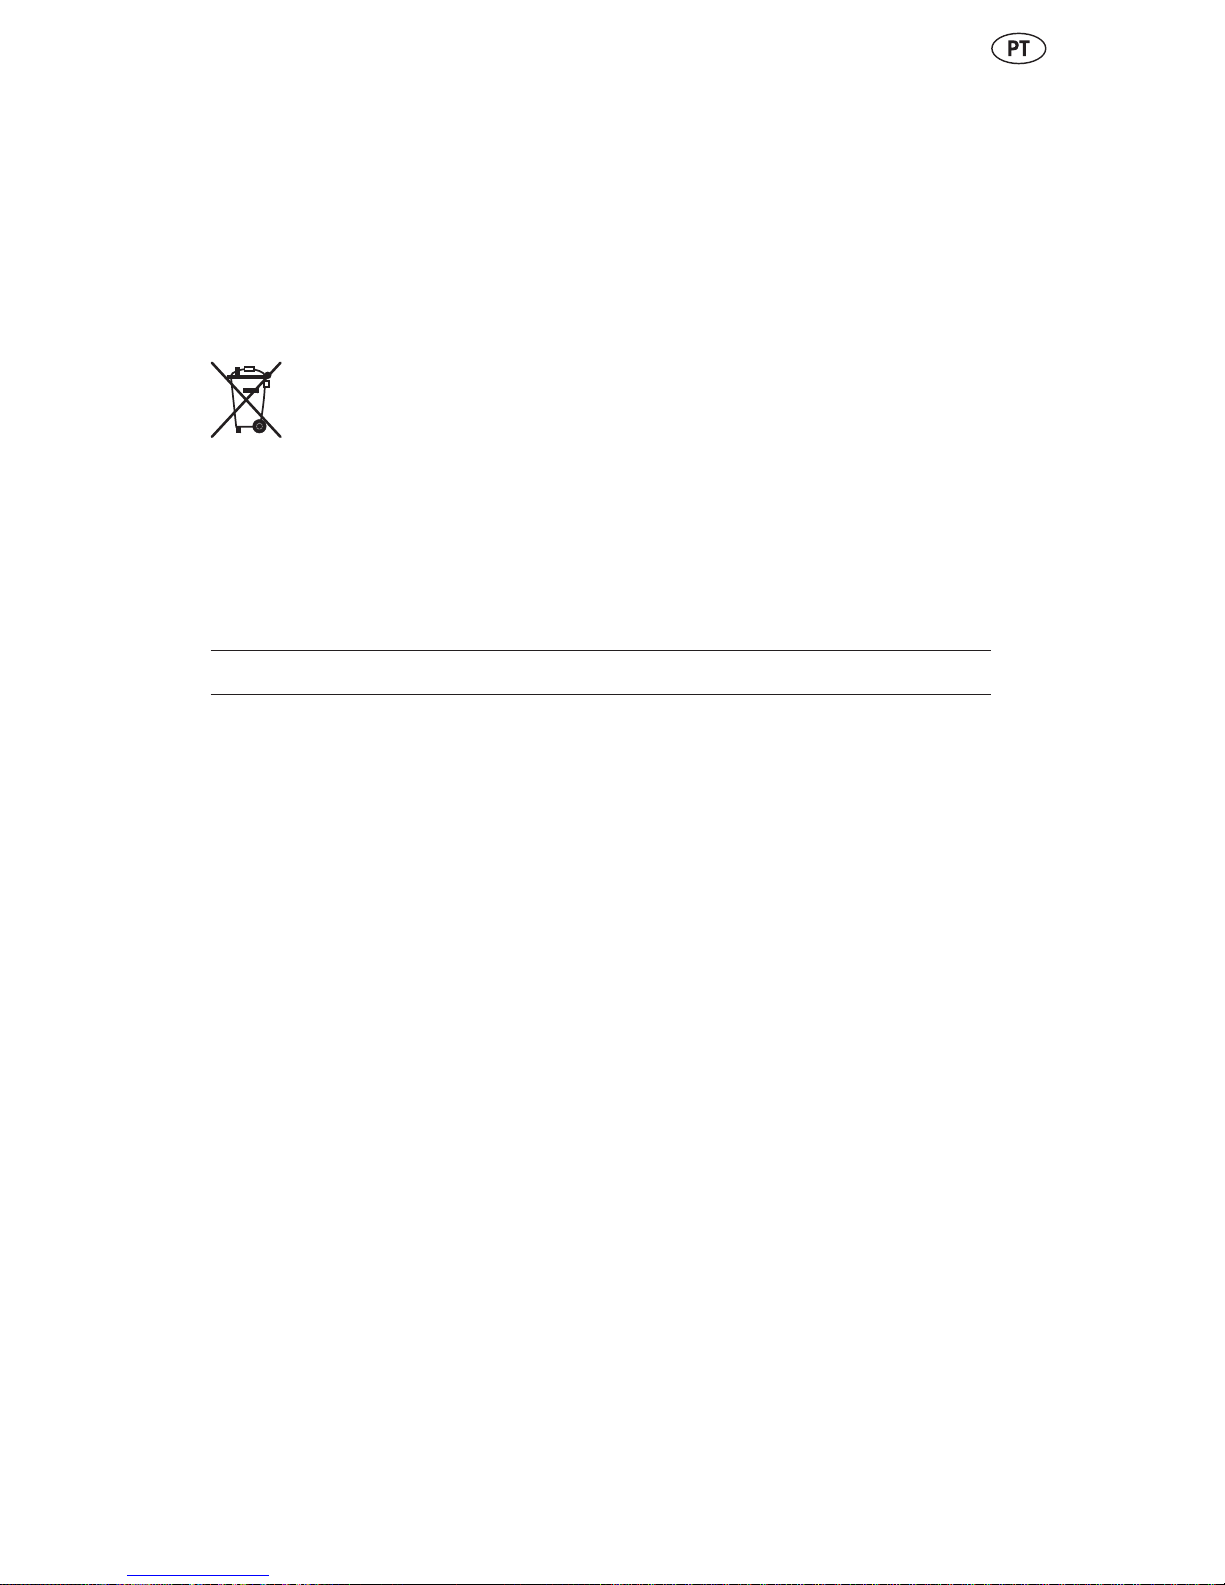
Con los interruptores DIP (13) A a E, con gure una tecla del 1.
mando a distancia:
3 El interruptor DIP E no está asignado.
Tecla de servicio Interruptor DIP
ABCDE
A
ON
OFF OFF OFF OFF
B OFF
ON
OFF OFF OFF
C OFF OFF
ON
OFF OFF
D OFF OFF OFF
ON
OFF
Gire la tapa (12) hacia el interior y ciérrela.2.
Introduzca el tornillo (15) a través del ori cio (11) en la ros-3.
ca (14) y atorníllelo.
Ejemplo
Con gure en el mando a distancia el código de sistema 123.
Con gure en todas las tomas de corriente con interruptor el
código de sistema 123. Con gure también una tecla de mando.
En la gura está con gurado el par de teclas A con el interrutpor
DIP A.
Page 58

58
Conexión de los aparatos
El alcance de la señal radioeléctrica del mando a distancia es
de 25 m como máximo y depende de las circunstancias
constructivas.
3 Las circunstancias constructivas (por ejemplo hormigón
armado), eléctricas (por ejemplo cables eléctricos) o
electromagnéticas (por ejemplo el teléfono) pueden
interferir en el alcance. En caso necesario, elimine la
fuente de interferencia o mantenga la distancia correspondiente a la fuente de interferencia.
Para conectar los enchufes de conexión
conecte los enchufes de conexión en un enchufe.•
Para conectar el mando a distancia
inserte la pila en el departamento para pilas (9).•
MANEJO
Conexión del enchufe de conexión
Conecte el enchufe de conexión (1) en un enchufe.1.
Enchufe el consumidor en la toma de corriente con puesta a 2.
tierra (2).
Pulse la tecla preajustada (8) ON (por ejemplo A) para conec-3.
tar el enchufe de conexión (1).
El diodo de funcionamiento (5) se ilumina con cada accionamiento de la tecla.
Desconexión del enchufe de conexión
Pulse la tecla con gurada (6) OFF (por ejemplo A) para des-1.
activar la toma de corriente con interruptor (1).
El diodo de funcionamiento (5) se ilumina con cada accionamiento de la tecla.
LIMPIEZA
B ¡Atención! Peligro de descarga eléctrica.
Antes de limpiarlo, desconecte el aparato de la red.
Page 59

59
B ¡Atención! Peligro de descarga eléctrica.
Asegúrese de que no entren líquidos en el aparato. La penetración de líquido puede provocar un cortocircuito.
A ¡Atención! Peligro debido a productos de limpieza
agresivos.
Nunca utilice productos de limpieza agresivos o abrasivos.
Limpie el aparato con un paño suave ligeramente mojado y un
producto de limpieza suave.
Antes del siguiente uso, asegúrese de que el aparato esté
completamente seco.
MANTENIMIENTO
Compruebe periódicamente la pila por si presenta algún tipo de
daño.
CARACTERÍSTICAS TÉCNICAS
Tensión de servicio 230 V ~ 50 Hz
Tensión de maniobra 230 V ~ 4,35 A
Potencia de conmutación
de la toma de corriente
con interruptor
máx. 1000 W
Tipo de protección IP44
Alcance
de la señal radioeléctrica
máx. 25 m
Frecuencia de servicio 433,92 MHz
Temperatura ambiente 0 ° hasta 35 °C
Temperatura de almacenaje - 40 ° hasta 70 °C
Pila 12 voltios, tipo A 23
Conforme a CE
Page 60

60
SOLUCIÓN DE ANOMALÍAS
Anomalía Causa Solución
El diodo de funcionamiento (5) no se
ilumina al pulsar
una tecla.
Pila insertada
incorrectamente.
Insertar la pila
correctamente.
La pila no tiene
contacto.
Apretar la pila
contra los bornes
de contacto.
Pila agotada. Insertar una pila
nueva.
El consumidor no
funciona.
El enchufe de
conexión no está
conectado correctamente.
Conectar los enchufes de conexión de forma
ja en el enchufe.
Consumidor no
conectado.
Conectar el consumidor.
El enchufe de conexión no se conecta.
El código de sistema de la toma
de corriente con
interruptor no está
bien con gurado.
Con gurar el código de sistema
del mando a distancia en la toma
de corriente con
interruptor.
El alcance entre
el mando a distancia y el enchufe de conexión es
insu ciente.
Reducir la distancia entre el mando a distancia y el
enchufe de conexión.
Interferencias de
aparatos eléctricos.
Eliminar las posibles fuentes de
interferencia.
Page 61

61
GARANTÍA
2 años de garantía a partir de la fecha de compra de este
aparato. Guarde el ticket de compra como justi cante. La
prestación de garantía sólo es válida para fallos de material o
producción, pero no para piezas de desgaste o daños debidos
al uso incorrecto. La garantía se extingue en caso de manipulación por parte de terceros. Esta garantía no limita sus derechos
legales. En caso de garantía llame al servicio postventa. Sólo
así se garantiza el envío gratuito de su aparato. El período de
garantía inicial no se prolonga debido a reparaciones o piezas
reemplazadas.
Fabricante
H. Brennenstuhl GmbH u. Co. KG
Seestraße 1 - 3
72074 Tubinga
Alemania
E-mail: info@brennenstuhl.com
Page 62

62
Page 63

63
SEGURANÇA
Uso de acordo com o estipulado
Os aparelhos foram construidos como um interruptor com
controlo remoto para o uso particular. Ele não é indicado para o
uso comercial.
O set de interruptor com controlo remoto serve para o accionamento e o desligamento de lâmpadas e aparelhos eléctricos.
Os receptores não são indicados para o uso ao ar livre.
Os aparelhos só devem ser colocados em funcionamento e
usados individualmente. Não ligar diversas tomadas com
interruptor uma depois da outra.
Qualquer outro uso será considerado indevido. O fabricante
não assume nenhuma responsabilidade por canos causados
por uso indevido.
Manual de serviço
Antes de usar o aparelho, leia este manual de serviço
completamente. Guarde este manual de serviço. Caso
dê este aparelho à outra pessoa qualquer, entregue-lhe
também o manual de serviço.
Instruções básicas de segurança
Crianças não podem avaliar ou reconhecer os perigos que •
podem surgir devido ao uso indevido de aparelhos eléctricos.
Jamais permita que crianças utilizem aparelhos eléctricos
sem os cuidados de adultos.
Perigo de sufocamento! O material de embalagem não deve •
ser deixado de lado e car acessível à crianças. As crianças
podem engolir peças ou partes pequenas e sufocarem.
Só encaixe as tomadas com interruptor em tomadas de cor-•
rente de contacto de segurança tradicionais com uma tensão
alternada de 220 - 240 V e 50 Hz.
Não use extensões para as tomadas com interruptor. •
Só conecte consumidores no âmbito dos limites de potência •
prescritos das tomadas com interruptor.
Page 64

64
Não ligue nenhum consumidor, cujo accionamento imprevisto •
possa causar incêndio (p.ex. ferro de passar roupa) ou outros
danos.
Não ligue nenhum consumidor que necessite de um conden-•
sador de motor (p.ex. frigorí co).
Não tampe as tomadas com interruptor. Sob a cobertura acu-•
mula-se calor existindo, portanto, o perigo de incêndio.
Controle os aparelhos regularmente e veri que se os mes-•
mos apresentam danos. Não substitua peças dani cadas. Di-
rija-se ao fabricante ou jogue o aparelho fora conforme as
normas de protecção ao meio-ambiente.
Não toque os aparelhos com as mãos molhadas.•
A m de levar as tomadas com interruptor para um estado •
isento de tensão, desconecte-as da rede de energia.
As pilhas precisam ser tratadas com um cuidado especial.
Perigo de explosão! Não tente recarregar pilhas não recarre-•
gáveis.
Assim que a pilha estiver vazia, retire-a do habitáculo de pilha •
e descarte-a de forma a não poluir o meio-ambiente.
Não jogue pilhas no fogo ou as exponha à altas temperatu-•
ras.
Não abra ou curto-circuite pilhas.•
O ácido das pilhas que pode sair das mesmas, pode causar •
irritações cutâneas. Caso a sua pele entre em contacto com o
líquido, lave-a com água em abundância. Se o líquido da pi-
lha atingir os seus olhos, não os esfregue, mas lave-os logo e
abundantemente com água e procure a ajuda de um médico
imediatamente.
Caso não esteja a usar a pilha, retire-a a m de evitar um •
descarregamento desnecessário.
DESCARTE
Jogue aparelhos electrónicos fora apenas conforme
as normas de protecção ao meio-ambiente!
Aparelhos eléctricos não devem ser jogados fora junto
com o lixo doméstico. De acordo com a directiva euro-
Page 65
65
peia 2002/96/CE de aparelhos electro-electrónicos, as ferramentas usadas precisam ser jogadas fora separadamente e
levadas para pontos de colecta que respeitem as normas de
protecção ao meio-ambiente de forma que possam ser reciclados. Junto aos departamentos públicos competentes pode-se
obter informações a respeito das possibilidades de descarte de
aparelhos usados.
Danos ao meio-ambiente devido ao descarte errado
de pilhas!
Pilhas não devem ser jogadas fora junto com o lixo
doméstico. Elas podem conter metais pesados nocivos à saúde
e precisam ser tratadas como lixo especial. Portanto, leve as
pilhas usadas a um contentor disponibilizado pelo departamento público competente.
APARELHO
Faz parte do fornecimento
O fornecimento compreende:
Um controlo à distância com pilha e –
duas tomadas com interruptor IP 44. –
Page 66

66
Quadro sinóptico do aparelho
3
45
6
8
1
7
2
1 Tomada com interruptor 5 Luz de função
2 Tomada com interruptor de
protecção IP44 com tampa
e protecção para criança
6
7
Teclas OFF (A, B, C, D)
Tampa do habitáculo
de pilha
3
4
Ficha de contacto terra
Controlo à distância
8 Teclas ON (A, B, C, D)
Page 67

67
Preparar os aparelhos
Antes de utilizar os aparelhos, é necessário
colocar a pilha, –
sincronizar o código do sistema entre o controlo à distância e –
as tomadas com interruptor e
atribuir um par de teclas ON/OFF do controlo à distância à –
uma tomada com interruptor.
Colocação de pilhas
A Cuidado!
Atente para que a polarização das pilhas esteja correcta. Uma
pilha colocada incorrectamente pode causar danos materiais.
7
9
10
Abrir a tampa (7) do habitáculo da pilha (9).1.
Colocar a pilha como indicado na gura.2.
Fechar o habitáculo de pilha (9).3.
Premir uma tecla qualquer do controlo à distância (4). A luz 4.
de função (5) acende quando a tecla é premida.
3 Se ao premir, a luz de função (5) não brilhar, isso
signi ca que o aparelho não está a receber abastecimento de energia da pilha. Veri que se pilha foi colocada
correctamente.
Page 68

68
Sincronizar o código do sistema
Antes de usar o aparelho pela primeira vez é necessário
sincronizar o código do sistema, a m de que todas as tomadas
com interruptor possam reagir ao sinal de rádio do controlo à
distância.
Além disso, à cada tomada com interruptor deve ser atribuido
um par de teclas do controlo à distância, para que com isso
cada tomada com interruptor possa ser operadada individualmente.
3 Ajuste o interruptor DIP com um objecto adequado, p.ex.
com uma chave de fenda pequena levando o interruptor
DIP para cima ou para baixo.
Ajustar o código do sistema para o controlo à distância
Abrir a tampa (7) do habitáculo da pilha (9).1.
Ajustar com os interruptores DIP (10) 1 a 5 um sistema de có-2.
digo.
Fechar o habitáculo de pilha (9).3.
Page 69

69
Ajustar o código do sistema para a tomada com interruptor
3
1413
15
11 12
Desaparafusar o parafuso (15) da cobertura (12) com uma 1.
chave de fenda em cruz do tamanho PH0.
Levantar levemente e bascular para fora a cobertura (12) so-2.
bre o orifício do parafuso (11).
Com os interruptores DIP (13) 1 a 5 ajustar o código do siste-3.
ma igual como no controlo à distância.
Page 70

70
Atribuir tomada com interruptor à uma tecla de operação
Ajustar com os interruptores DIP (13) a uma tecla de opera-1.
ção do controlo à distância:
3 Não foi atribuído nada ao interruptor DIP E.
Tecla de operação Interruptor DIP
ABCDE
A
ON
OFF OFF OFF OFF
B OFF
ON
OFF OFF OFF
C OFF OFF
ON
OFF OFF
D OFF OFF OFF
ON
OFF
Bascular a cobertura (12) para dentro e fechar.2.
Colocar os parafusos (15) através do orifício de parafuso (11) 3.
na rosca (14) e apertar.
Exemplo
Ajustar no controlo à distância o sistema de código 123.
Ajustar em todas as tomadas com interruptor o código do
sistema 123. Além disso, ajustar a tecla de operação. Na gura
é mostrado o par de teclas A com o interruptor DIP A.
Page 71

71
Conectar aparelhos
O alcance do sinal de rádio do controlo à distância é de no
máx. 25 m e depende das condições da construção.
3 O alcance pode sofrer interferência do tipo de construção
(p.ex. construção de betão), das condições eléctricas
(p.ex. condutos eléctricos) ou electromagnéticas (como
telefone por exemplo). Caso necessário, afaste fontes de
interferência ou mantenha uma respectiva distância da
fonte de interferência.
Para conectar a tomada de corrente com interruptor
encaixar as tomadas de corrente de ligação em uma tomada •
de corrente.
Para conectar o controlo à distância
colocar a pilha no habitáculo de pilha (9).•
MANUSEIO
Ligar a tomada de corrente de ligação
Encaixar a tomada com interruptor (1) na tomada de corrente.1.
Encaixar o consumidor na tomada de corrente de protec-2.
ção (2).
Premir a tecla pré-ajustada (8) ON (como p.ex. A) a m de li-3.
gar a tomada com interruptor (1).
A luz da função (5) brilha cada vez que a tecla for premida.
Desligar a tomada com interruptor
Premir a tecla pré-ajustada (6) OFF (como p.ex. A) a m de 1.
desligar a tomada com interruptor (1).
A luz da função (5) brilha cada vez que a tecla for premida.
LIMPEZA
B Atenção! Perigo causado por choque eléctrico.
Antes de limpar, o aparelho desligue-o da rede de energia
eléctrica.
Page 72

72
B Atenção! Perigo causado por choque eléctrico.
Esteja atento para que nenhum líquido penetre no aparelho.
Caso entre líquido no aparelho, pode ocorrer um curto-circuito.
A Atenção! Perigo causado por produtos de limpeza
agressivos.
Jamais utilize produtos de limpeza agressivos ou abrasivos ao
limpar o aparelho.
Limpe o aparelho com um pano macio e levemente humedecido e um produto de limpeza suave.
Na próxima vez que utilizar o aparelho, veri que antes se o
mesmo está completamento seco.
MANUTENÇÃO
Em intervalos regulares, controle se a pilha sofreu danos.
CARACTERÍSTICAS TÉCNICAS
Tensão de serviço 230 V ~ 50 Hz
Tensão de comutação 230 V ~ 4,35 A
Potência de ligação tomada
com interruptor
máx. 1000 W
Classe de protecção IP44
Alcance do sinal de rádio máx. 25 m
Frequência operacional 433,92 MHz
Temperatura ambiente 0 ° até 35 °C
Temperatura de armazenagem - 40 ° até 70 °C
Pilha 12 Volt, tipo A 23
Conforme a CE
Page 73
73
REPARAR FALHAS
Falha Causa Reparo
A luz de função (5)
não brilha quando
se aperta uma tecla.
A pilha foi colocada errado.
Pilha colocada
correctamente.
A pilha não tem
contacto.
Premir a pilha nos
terminais de contacto.
A pilha está vazia. Colocar pilha
nova.
Consumidor não
funciona.
A tomada de corrente de ligação
não foi conectada
correctamente.
Encaixar a tomada com interruptor
na tomada de
corrente de forma
que que rmemente encaixada.
Consumidor não
foi ligado.
Ligar o consumidor.
A tomada com interruptor não liga.
O código do sistema da tomada de
corrente com
interruptor não foi
ajustado correctamente.
Ajustar o sistema
de código do controlo à distância
na tomada com
interruptor.
O alcance entre o
controlo à distância e a tomada
com corrente não
é su ciente.
Diminuir a distância entre o controlo à distância e a
tomada com interruptor.
Interferência causada por aparelhos eléctricos.
Afastar possíveis
fontes de interferência.
Page 74

74
GARANTIA
2 anos de garantia a partir da data da compra do aparelho.
Guarde o comprovante de compra. A prestação de garantia só
é válida para falhas de material ou de fabrico. Ela não é válida
para peças que sofrem desgaste ou se o aparelho for usado
indevidamente. A garantia irá caducar se for o aparelho sofrer
alguma intervenção por estranhos. Os Vossos direitos legais
não são limitados por esta garantia. Em caso de garantia, entre
em contacto por telefone com o nosso departamento de
serviços. Apenas desta forma é possível garantir a remessa
gratuita do Vosso aparelho. O prazo de garantia original não é
prolongado devido a reparos ou substituição de peças.
Fabricante
H. Brennenstuhl GmbH u. Co. KG
Seestraße 1 - 3
72074 Tübingen
Alemanha
E-Mail: info@brennenstuhl.com
Page 75

Page 76

 Loading...