

Page 1
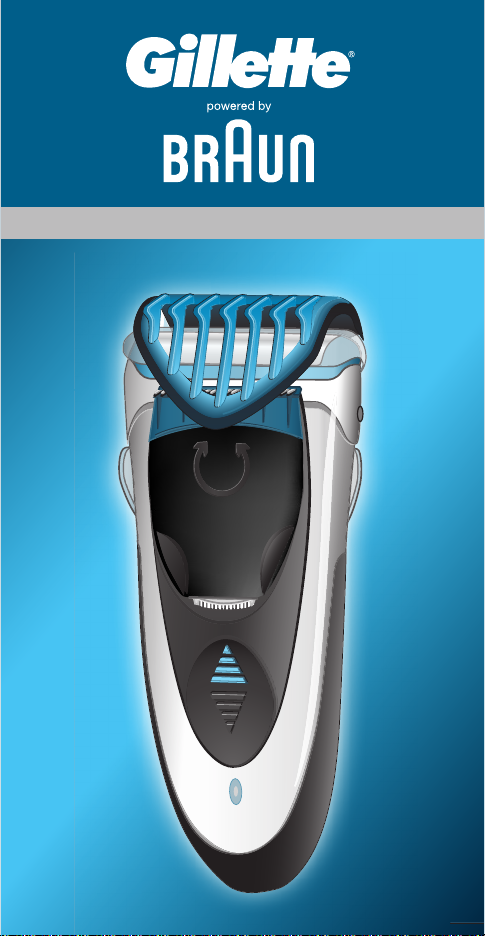
cruZer
3
Z50
Type 5734
Page 2
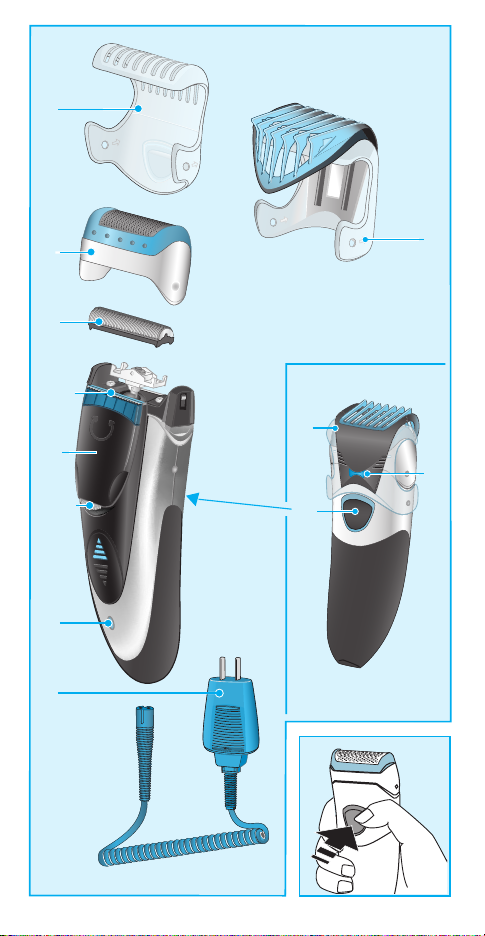
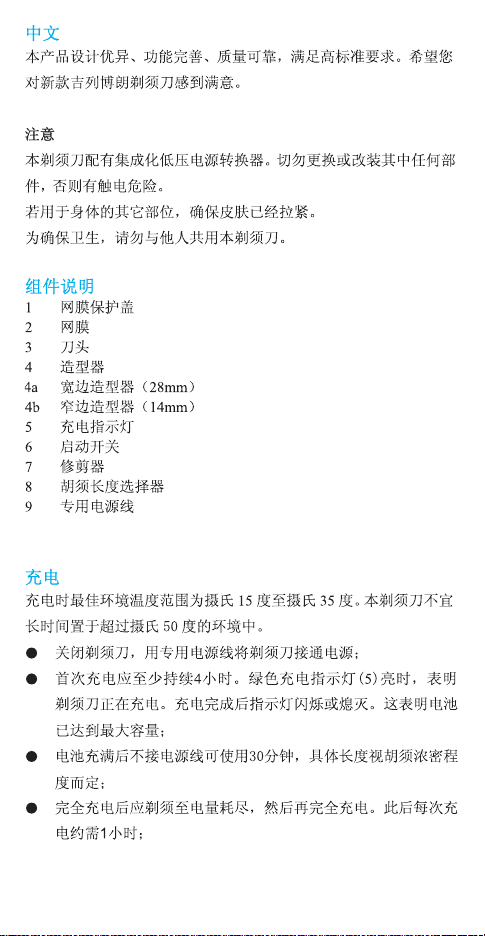
1
2
3
4
5
9
4a
4b
7
7
8
6
2
Page 3
a
1
1
2
2
1
b
90°
90°
c
d
3
2
1
180°
Page 4
l
e
2
1
f
g
3
r
e
h
Z
u
r
c
oi
4
Page 5
567891011
Page 6

Page 7

Page 8

Page 9

Page 10

Page 11

English
Our products are designed to meet the highest standards of
quality, functionality and design. We hope you entirely enjoy
your new Gillette shaver.
Warning
Your shaver is provided with a special cord set with an
integrated Safety Extra Low Voltage power supply. Do not
exchange or manipulate any part of it. Otherwise there is risk
of electric shock.
For usage in other body areas, please make sure that the
skin is stretched.
For hygienic reasons, do not share this appliance with other
persons.
Description
1 Foil protection cap
2 Shaver foil
3 Cutter block
4 Rotating styler
4a Wide shaper (28 mm)
4b Narrow shaper (14 mm)
5 Charging light
6 On/off switch
7 Trimming attachment
8 Beard length selector
9 Special cord set
Charging
The best environmental temperature for charging is between
15 °C and 35 °C. Do not expose the shaver to temperatures
higher than 50 °C for extended periods of time.
Using the special cord set, connect the shaver to an
•
electrical outlet with the motor switched off.
When charging for the first time, leave the shaver to
•
charge continuously for 4 hours. The green charging light
(5) shows that the shaver is being charged. When the
battery is fully charged, the charging light intermittently
blinks on and off. This indicates that the battery maintains
its full capacity.
A full charge provides 30 minutes of cordless shaving time
•
depending on your beard growth.
Once the shaver is completely charged, discharge the
•
shaver through normal use. Then recharge to full capacity.
Subsequent charges will take about 1 hour.
Page 12

Maximum battery capacity will only be reached after
•
several charging/discharging cycles.
If the rechargeable batteries are discharged, you may also
•
shave by connecting the shaver to an electrical outlet via
the special cord set.
Shaving
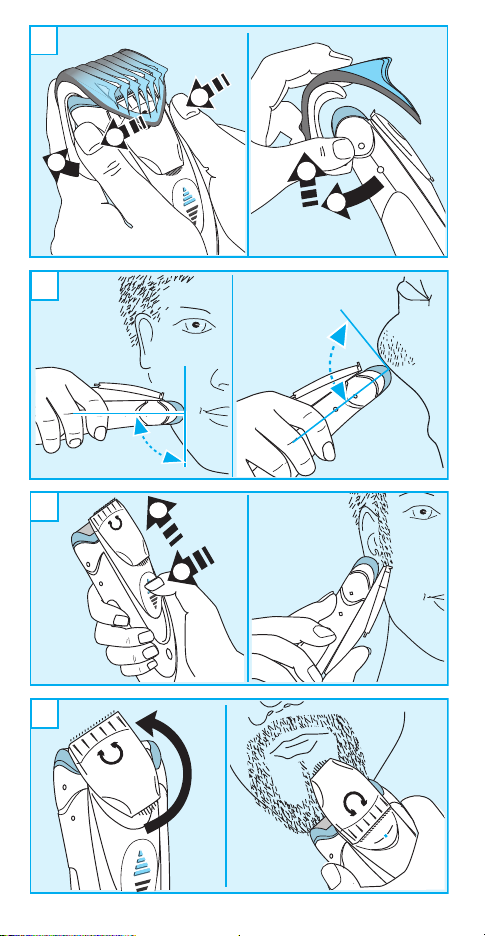
First, remove the trimming attachment (7): Using your
thumbs, press against the side clips of the trimming
attachment so that they swing off in the direction of the
arrows (a). Activate the on/off switch (6). The floating foil
frame automatically adapts to your skin surface for a close,
smooth shave.
For best results:
Always shave before washing your face.
•
At all times, hold the shaver at right angles (90°) to the
•
skin (b).
Stretch the skin and shave against the direction of hair
•
growth.
For pre-shaving after a few days of not having shaved, use
•
the wide shaper (4a) to pre-cut long hairs. For a close,
smooth shave, finish with the foil.
To maintain 100% shaving performance, replace your foil
•
and cutter block at least every 18 months or when worn.
Using the rotating styler (4)
The wide shaper (4a) evenly cuts and trims large areas (c).
It is ideal for shaping sideburns, moustaches and partial
short beards. The wide shaper is provided with safety rips
and a gliding strip for less irritation and easy gliding. Press
the blue stripes to push up the rotating styler (4).
While stretching the skin, guide the wide shaper against the
direction of hair growth.
The narrow shaper (4b) precisely defines lines and edges (d),
being ideal for precise contouring.
To use the narrow shaper, push up the styler and turn it 180°.
Frequent use of the styler (4) will reduce the battery capacity.
Using the trimming attachment
The trimming attachment (7) is ideal for beard trimming
•
and keeping it at a constant length.
Place the trimming attachment onto the shaver foil (2) and
•
press it against the shaver housing until it snaps into place
with a click.
12
Page 13

Press the beard length selector (8) (e) and slide it up in
•
order to set the desired beard length (length settings from
top to bottom 1.2 mm, 2.8 mm, 4.4 mm, 6 mm). Push up
the styler (4).
Activate the on/off switch and trim against hair growth by
•
guiding the transparent comb part over the skin.
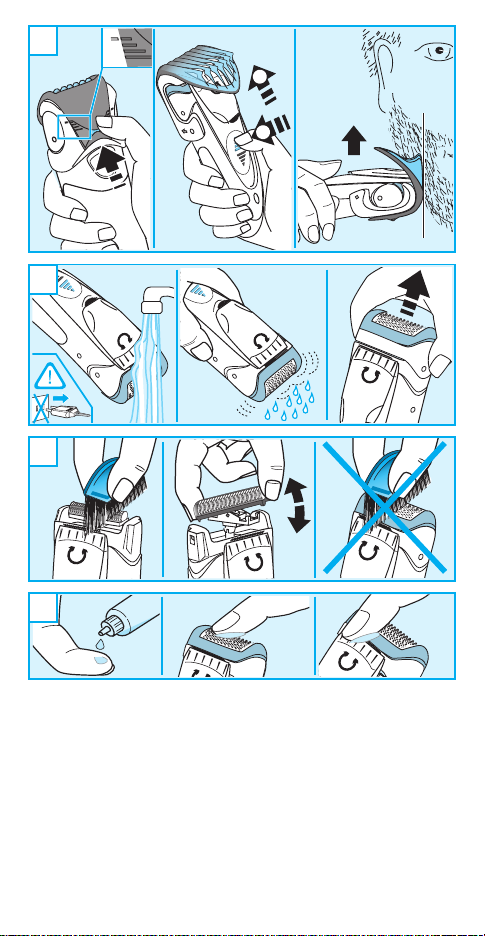
Cleaning
This appliance is suitable for cleaning under an open
water tap. Warning: Detach the hand-held part from
the power supply before cleaning it in water.
Regular cleaning ensures better shaving performance.
Rinsing the shaving head after each shave under running
water is an easy and fast way to keep it clean:
Switch the shaver on (cordless) and rinse the shaving head
•
under hot running water (f). A natural based soap may also
be used provided it contains no particles or abrasive
substances. Rinse off all foam and let the shaver run for a
few more seconds.
Next, switch off the shaver, remove the shaver foil and the
•
cutter block. Then leave the disassembled shaving parts
to dry.
If you regularly clean the shaver under water, then once a
•
week apply a drop of light machine oil onto the long hair
trimmer and shaver foil (h).
Alternatively, you may clean the shaver using the brush
provided (g):
Switch off the shaver. Remove the shaver foil.
•
Using the brush, clean the cutter block and the inner area
•
of the shaver head. However, do not clean the shaver foil
with the brush as this may damage the foil.
Keeping your shaver in top shape
Replacing the shaving parts
To maintain 100% shaving performance, replace your foil
and cutter block at least every 18 months or when worn.
Change both parts at the same time for a closer shave with
less skin irritation.
(Shaver foil and cutter block: 20S)
Preserving the batteries
In order to maintain the optimum capacity of the
rechargeable batteries, the shaver has to be fully discharged
(by shaving) every 6 months approximately. Then recharge
the shaver to full capacity.
13
Page 14

Environmental notice
This product contains rechargeable batteries. In the
interest of protecting the environment, please do not
dispose of the product in the household waste at the
end of its useful life. Disposal can take place at a
Braun Service Centre or at appropriate collection
points provided in your country.
Subject to change without notice.
This product conforms to the European Directives
EMC 89/336/EEC and Low Voltage 2006/95/EC.
For electric specifications, see printing on the
special cord set.
Internet:
www.braun.com
Braun GmbH
Frankfurter Straße 145
61476 Kronberg/Germany
5-734-356/00/IV-07
China/GB
14
 Loading...