

BRAUN Triumph Professional Care User Manual [fr]
Oral-B
™
WIRELESS
WIRELESS
WITH
powered
by
®

English 4
Français 10
Nederlands 17
Deutsch 24
Español 31
Português 38
GB
0 800 73 11 792
IRL
1 800 509 448
F
0 810 365 855
B
0 800 14 592
LU
4 00 50 51
NL
0800-4 45 53 88
Internet:
www.oralb.com
www.braun.com
Braun GmbH
Frankfurter Straße 145
61476 Kronberg/Germany
D A
CH
E
P
HK
00 800 27 28 64 63
08 44 - 88 40 10
901 11 61 84
808 20 00 33
852-25249377
(Audio Supplies Company Ltd.)
Type 3731
3-738-160/00/IV-07/G2/M
GB/F/NL/D/E/P
Printed in Germany
1
m
a
l
Oral-B
k
Oral-B
2
j
3
i
b
c
4
d
h
e
g
B
f
Oral-
English
h/min
set
h/min
set
Description
You have chosen the most technologically
advanced Oral-B toothbrush. Oral-B
®
Triumph™ with SmartGuide™ is the first
toothbrush with a wireless display, designed
to provide an outstanding clean and to help
improve your oral hygiene. With its many
state-of-the-art features powered by Braun
technology and inspired by the dental experts
at Oral-B, you can feel confident that you are
brushing brilliantly well.
New Oral-B Triumph now with SmartGuide
uses an interactive wireless display to help you
optimize your brushing experience. Its state-ofthe-art brushing technology delivers outstanding
plaque removal and its advanced Oral-B
®
FlossAction™ brush head features MicroPulse™
bristles to gently penetrate deep between teeth.
Oral-B Triumph with SmartGuide is brought to
you by Oral-B, the leader in toothbrushes and
the brand more dentists use themselves
worldwide.
When using electrical products, basic safety
precautions should always be followed. Please
read carefully before use.
Important
• To avoid electromagnetic interference and/or
compatibility conflicts, deactivate the radio
transmission of your toothbrush before
carrying or using it in restricted surroundings
such as aircrafts or specially marked areas
in hospitals (see «Deactivating the radio
transmission»).
• Persons with pacemakers should always
keep the toothbrush more than six inches (15
centimeters) from the pacemaker when turned
on. If at any time you suspect interference is
taking place, deactivate the radio transmission
of your toothbrush before using it (see
«Deactivating the radio transmission»).
•
Your toothbrush is provided with a SmartPlug™
with integrated Safety Extra Low Voltage
power supply. Do not exchange or manipulate
any part of it. Otherwise there is the risk
of electric shock. Periodically check the
SmartPlug for damage. A damaged or nonfunctioning appliance shall no longer be used.
Take it to an Oral-B Braun Service Centre.
• This product is not intended for use by
children under age three.
• If the product is dropped, the brush head
should be replaced before the next use even
if no damage is visible.
4
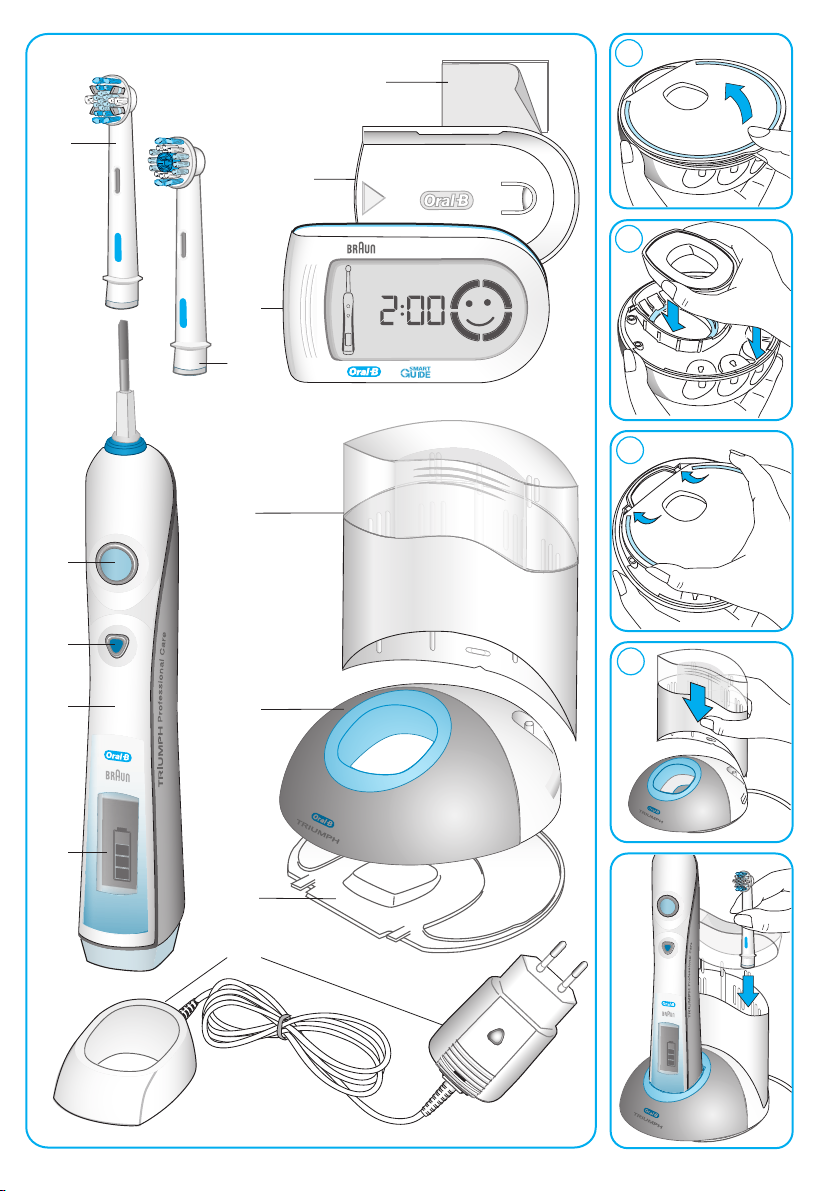
a Oral-B FlossAction brush head
b On/off button
c Mode button
d Handle
e Handle display
f SmartPlug charger (includes charging ring
and SmartPlug)
g Base plate
h Base station
i Protective cover
j Oral-B
®
ProBright™ brush head (not with all
models)
k SmartGuide™ display unit
l Wall mount
m Adhesive tape
First use
Before brushing for the first time, charge your
toothbrush. Plug the SmartPlug into an electrical
outlet and place the handle on the charging ring
(see «Connecting and charging»).
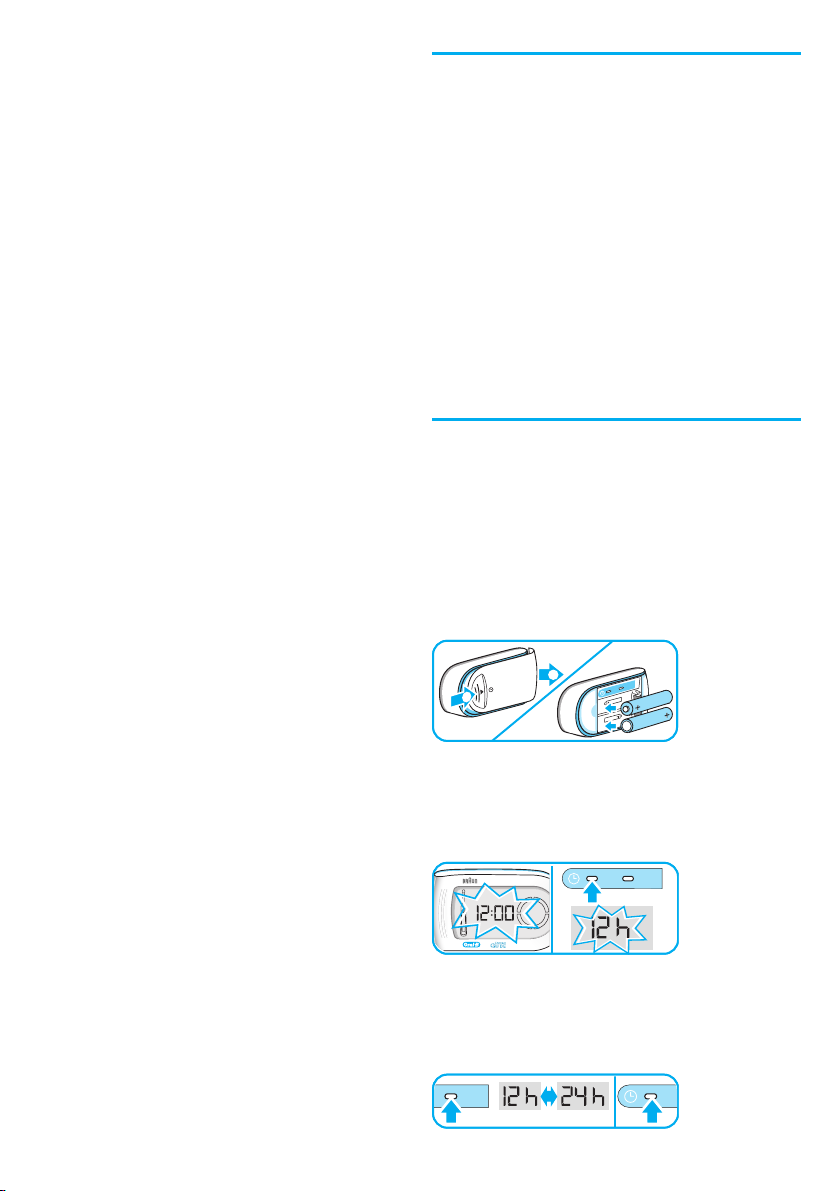
• To activate the SmartGuide display unit (k),
remove the battery compartment cover on the
back and insert the two batteries (type AA)
with correct polarity (see symbol in the battery
compartment).
h/min
h/min
set
set
2
2
1
1
• A flashing «12:00» on the SmartGuide display
unit indicates that time can be adjusted.
Press the «set» button, located in the battery
compartment, until «12h» is displayed.
• By briefly pressing the «h/min» button, you
can toggle between a «12h» or «24h» daytime
format. Push the «set» button to confirm your
choice.
h/min
h/min
set
set
set
set
h/min
h/min
• Then the hour digit starts flashing. Press the
t
h/min
set
t
h/min
set
«h/min» button until the right hour appears
and confirm with the «set« button. Proceed
the same way to set both minute digits. If you
prefer not using this clock feature, the flashing
«12:00» will disappear automatically after 24h.
You can start your toothbrush by pressing the
on/off button (b). To avoid splashing, guide the
brush head to your teeth before switching the
appliance on.
ral-B
ral-B
O
Oral-B
Oral-B
O
Connecting and charging
Your toothbrush has a waterproof handle, is
electrically safe and is designed for use in the
bathroom.
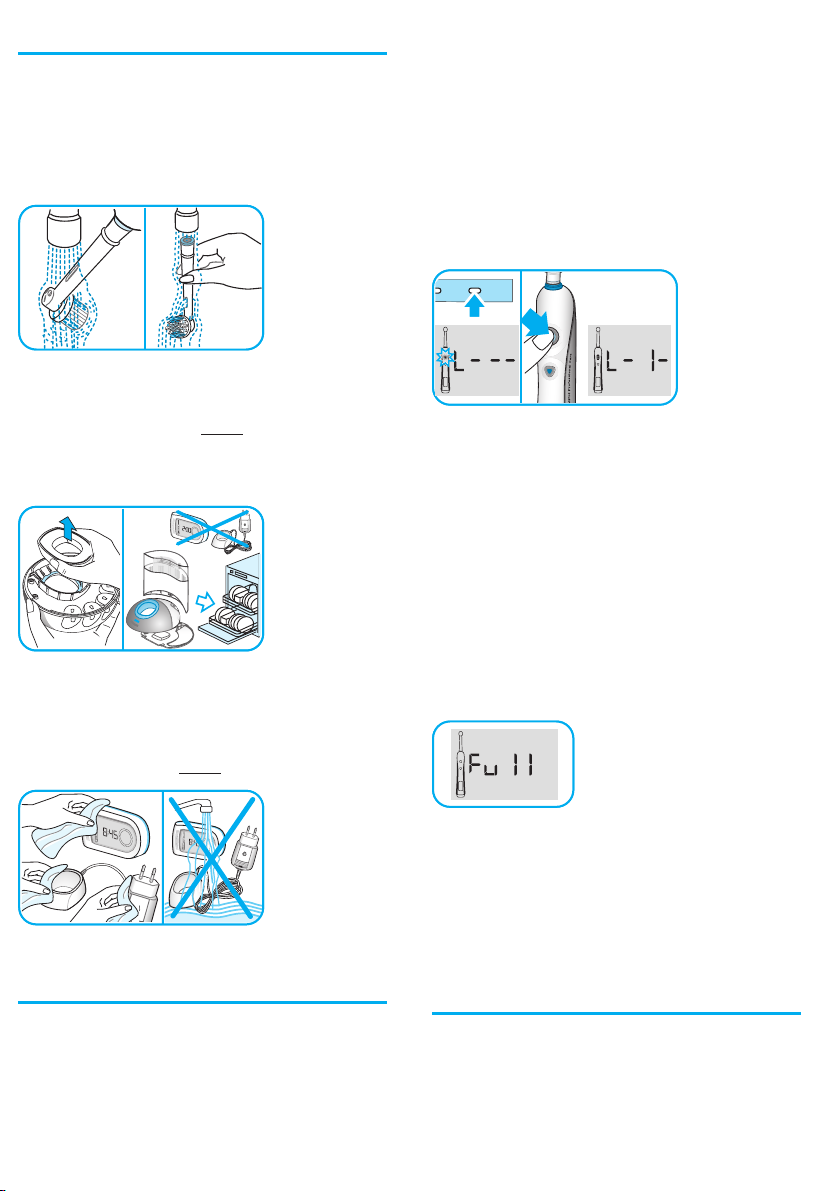
To assemble the base station (h) as a charging
unit, detach the base plate (g) first (
Place the charging ring into the base station and
attach the base plate as shown (
3). Then insert the protective cover (i) on the
back of your base station (see diagram
page 3).
• Plug the SmartPlug into an electrical outlet
and place the toothbrush handle (d) on the
charging unit. A battery symbol should appear
in the handle display (e). The battery symbol
will fill up while the handle is being charged.
Once the handle is fully charged, the battery
symbol is completely filled with four bars.
A full charge takes at least 12 hours to
complete and allows for approximately two
weeks of regular brushing (twice a day,
2 minutes).
1, page 3).
2 and 3, page
4,
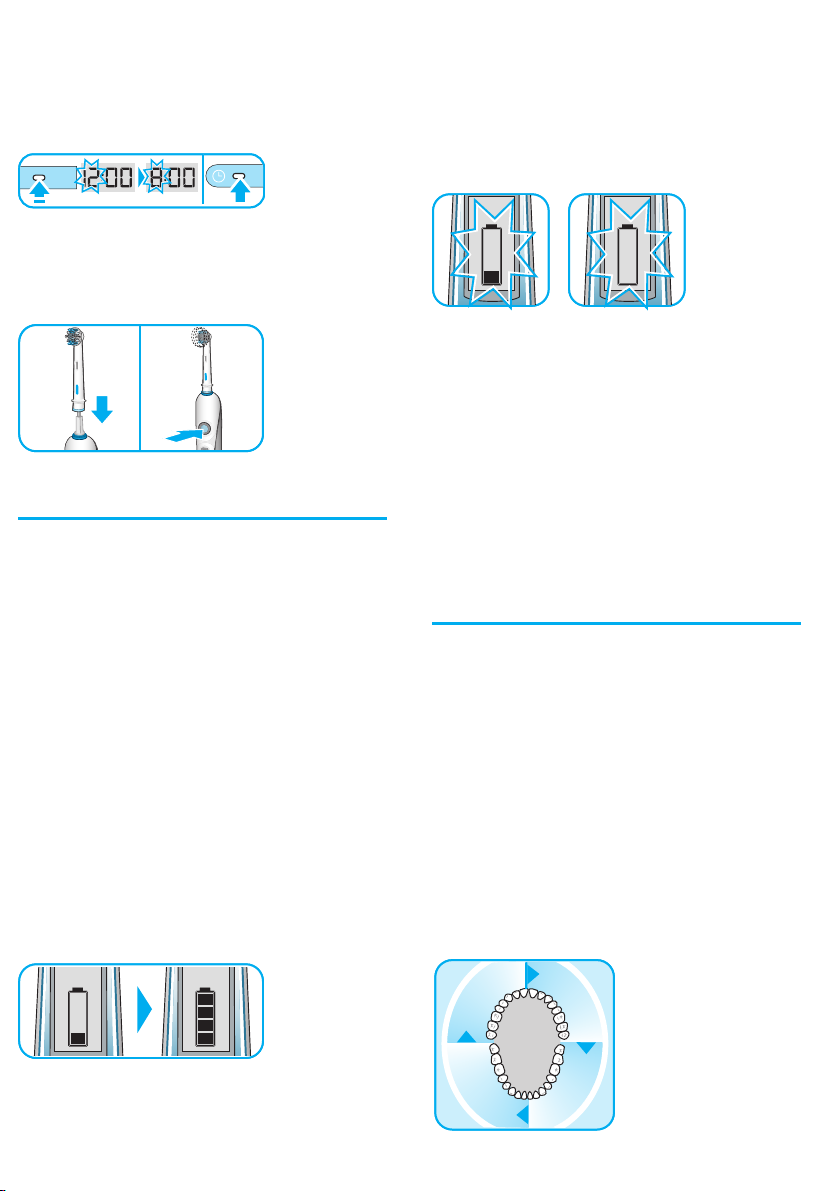
• When the rechargeable battery is low, the
battery symbol with one remaining bar starts
flashing. Your toothbrush will slow down and
then stop. It is time to recharge your toothbrush. When the battery is fully discharged,
the empty frame of the battery symbol flashes.
It will then need a 15-minute charge before
you can use it for a 2-minute brushing.
• For everyday use, the toothbrush handle can
be stored on the charging unit to maintain it at
full power. There is no risk of overcharging the
battery.
• To maintain the maximum capacity of the
rechargeable battery, unplug the charging unit
and fully discharge the handle by regular use
at least every 6 months.
For electric specifications, see printing on the
SmartPlug.
Personalizing the timer
You can choose between the «Professional
Timer» or «2-Minute Timer» and a «Count Up
Timer» or «Count Down Timer» to meet your
specific needs.
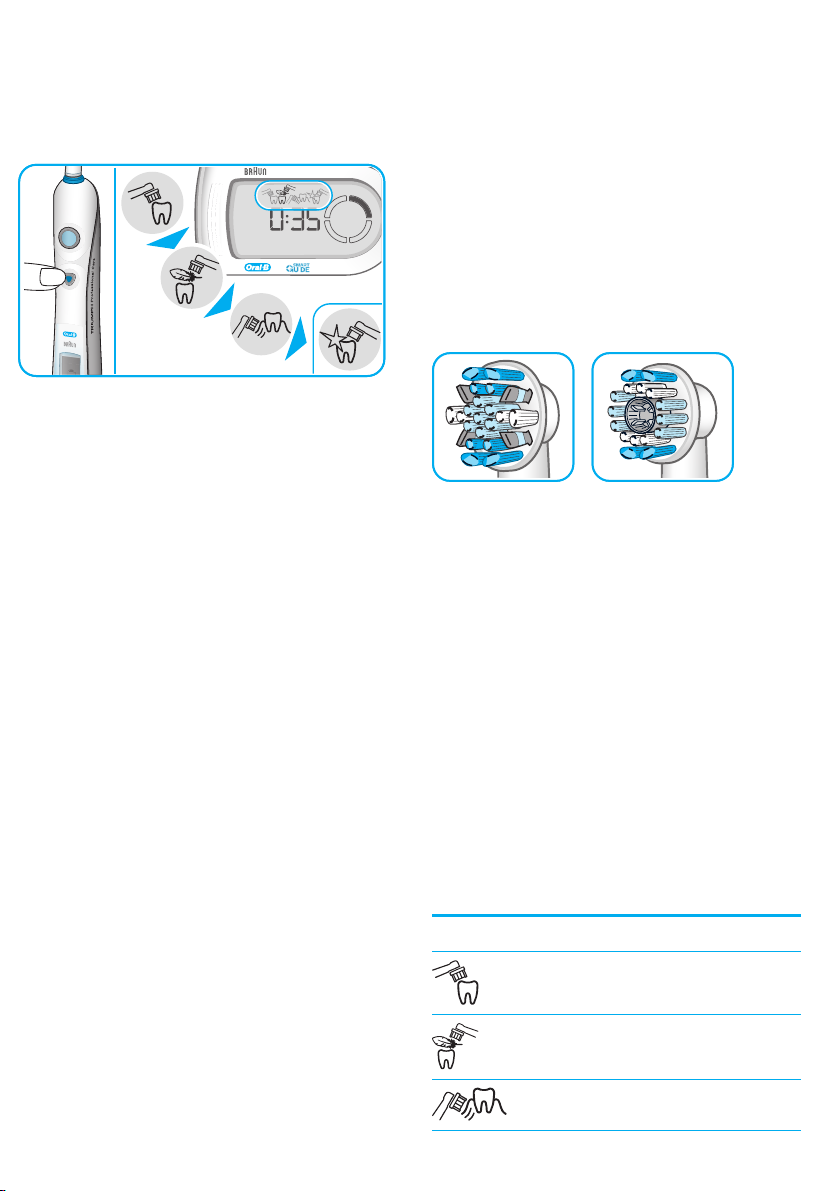
The «2-Minute Timer» indicates by a long
stuttering sound and a «smiley» on the
SmartGuide display unit that the dentist
recommended 2-minute brushing time has been
reached. In addition, the «Professional Timer»
helps you brush all four quadrants of your
mouth equally. It signals with a short stuttering
sound at 30-second intervals and the «quadrant
circle» on the SmartGuide display unit that it is
time to move to the next quadrant of your
mouth.
Please note: If the battery symbol is not
displayed immediately, continue charging. It will
appear in 10 – 15 minutes.
3
3
c
c
e
e
s
s
0
0
3
3
c
c
e
e
s
s
0
0
0
0
s
s
e
e
c
c
3
3
0
0
s
s
e
e
c
c
3
3
5
Both timers memorize the elapsed brushing
time, even when the handle is briefly switched
off during brushing. Only when pausing longer
than 30 sec. the timer resets to the initial
starting point.
The «Count Up Timer» displays your actual
brushing time. The «Count Down Timer»
indicates the remaining brushing time. Starting
with «2:00» minutes, it goes down to «0:00».
When brushing longer than two minutes, it
automatically changes to the «Count Up Timer».
Your toothbrush comes with the «Professional
Timer» and the «Count Up Timer» activated. If
you wish to change these settings, proceed as
follows:
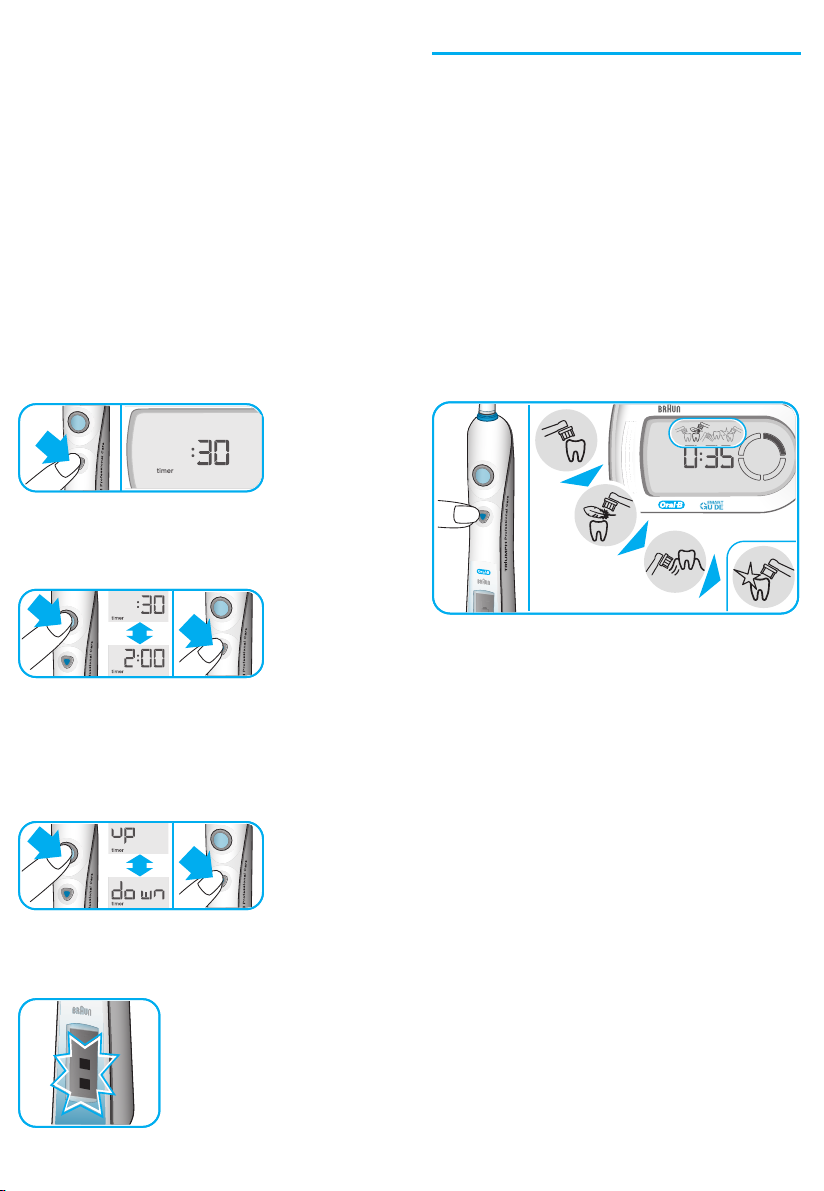
• Press and hold the mode button (c) until the
SmartGuide display unit (k) shows «:30» and
«timer».
3 sec.3 sec.
• By briefly pressing the on/off button (b), switch
to the «2-Minute Timer». Confirm your choice
by pushing the mode button.
Brushing
Brushing modes
Your toothbrush offers different brushing modes
for varying oral care needs:
«Clean» – Exceptional cleaning of teeth and
gums.
«Sensitive» – Gentle, yet thorough cleaning for
sensitive areas.
«Massage» – Gentle stimulation of gums.
«Polish» – Exceptional polishing for naturally
(deluxe white teeth for occasional or
model only) everyday use.
• When pressing the on/off button your
toothbrush automatically starts in the «clean»
mode.
• To switch to the other modes, successively
press the mode button.
• This will lead you directly to the «Count Up
Timer» display («up» and «timer» will be
shown). Switch to the «Count Down Timer» by
pressing the on/off button and confirm it with
the mode button.
Please note: it is normal that the handle display
shows two flashing bars when operating in the
timer setting mode.
6
• To return from any mode to the «clean» mode,
press and hold the mode button.
• To turn your brush off, press the on/off button.
Please note: the «polish» mode (deluxe model
only) is best used with an Oral-B ProBright
brush head. Once the Oral-B ProBright is
attached, press the on/off button and your
toothbrush automatically starts in the «polish»
mode (please see «Brush heads»).
Brushing technique
• Guide the brush head slowly from tooth to
tooth.
• Hold the brush head in place for a few
seconds before moving on to the next tooth.
• Brush the gums as well as the teeth, first the
outsides, then the insides, finally the chewing
surfaces.
• Do not press too hard or scrub, simply let the
brush do all the work.
When you finish brushing, the total brushing
time will be displayed for 30 seconds before the
display switches back to the time mode. To
directly get to the time mode, clear the brushing
time display by pushing the mode button.
In the first days of using the toothbrush, your
gums may bleed slightly. In general, bleeding
should stop after a few days. Should it persist
after two weeks, please consult your dentist or
hygienist. If you have sensitive teeth and gums,
Oral-B recommends using the «sensitive» mode.
Brush heads
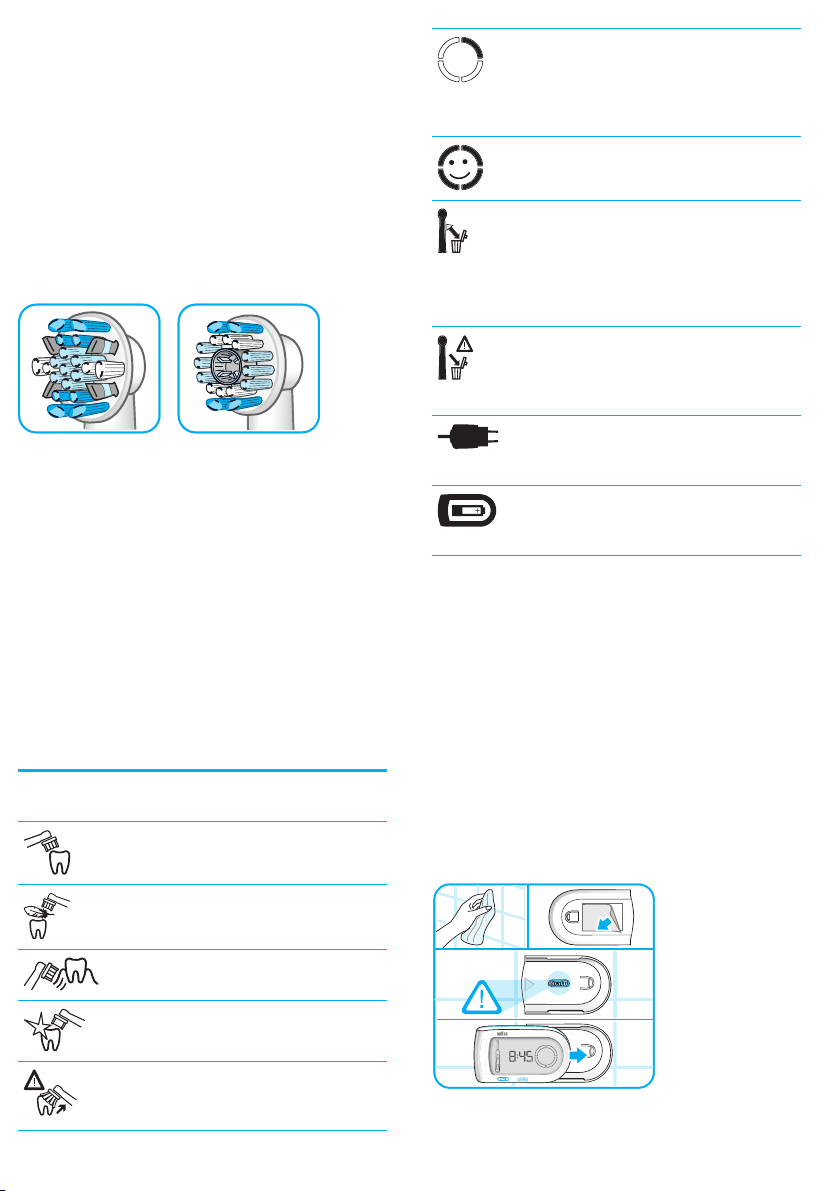
The Oral-B FlossAction (a) brush head is
recommended for everyday deep cleaning. For
occasional or everyday polishing, use the Oral-B
ProBright (j) brush head (not with all models).
Please note: children under 12 should not use
the Oral-B ProBright brush head.
aa
Both brush heads contain a «smart chip» to
communicate with the electronics inside the
toothbrush handle. Therefore, your toothbrush
automatically switches to the appropriate
brushing mode for the attached brush head.
Nevertheless, you can select other brushing
modes to customize your routine.
Do not use these brush heads with braces. We
recommend using the Oral-B Ortho brush head,
which is specifically designed to clean around
braces and wires.
jj
SmartGuide display unit
Icons
«Clean» mode
«Quadrant circle» – currently you
are brushing in the first 30-second
interval. Move to the next quadrant
of your mouth, when the second
segment starts flashing.
Dentist recommended 2-minute
brushing time has been reached.
«Pre-notice» that your brush head
*
needs to be replaced soon. You can
use it for another 10 days (twice a
day, 2 minutes) before the recommended replacement time has been
reached.
Your brush head has surpassed the
*
dentist recommended usage time of
3 months (twice a day, 2 minutes).
Replace it with a new one.
The rechargeable battery of the
handle is low. Charge the
toothbrush handle.
Batteries of the SmartGuide display
unit are low. Change batteries of the
SmartGuide display unit.
* the «brush head replacement» and «pre-notice
brush head replacement» features only work
when using brush heads enabled with Smart
Technology (Oral-B FlossAction and Oral-B
ProBright)
Wall mount
If you prefer to mount the SmartGuide display
unit on a wall, mirror or other surface, use the
adhesive tape (m) to fix the wall mount. Before
doing so, make sure the chosen surface is clean
and dry (remove grease and dust first).
Position the wall mount so that the Oral-B logo
is readable. Then press the wall mount evenly
and firmly to the wall. Wait 24h before sliding
the SmartGuide display unit into the fixed wall
mount.
«Sensitive» mode
«Massage» mode
«Polish» mode (not with all models)
Too much pressure is applied.
Reduce the brushing force.
Please note: the adhesive tape will not work on
dirt-repellent surfaces.
7
Cleaning recommendations
set
h/min
3 sec.
set
h/min
3 sec.
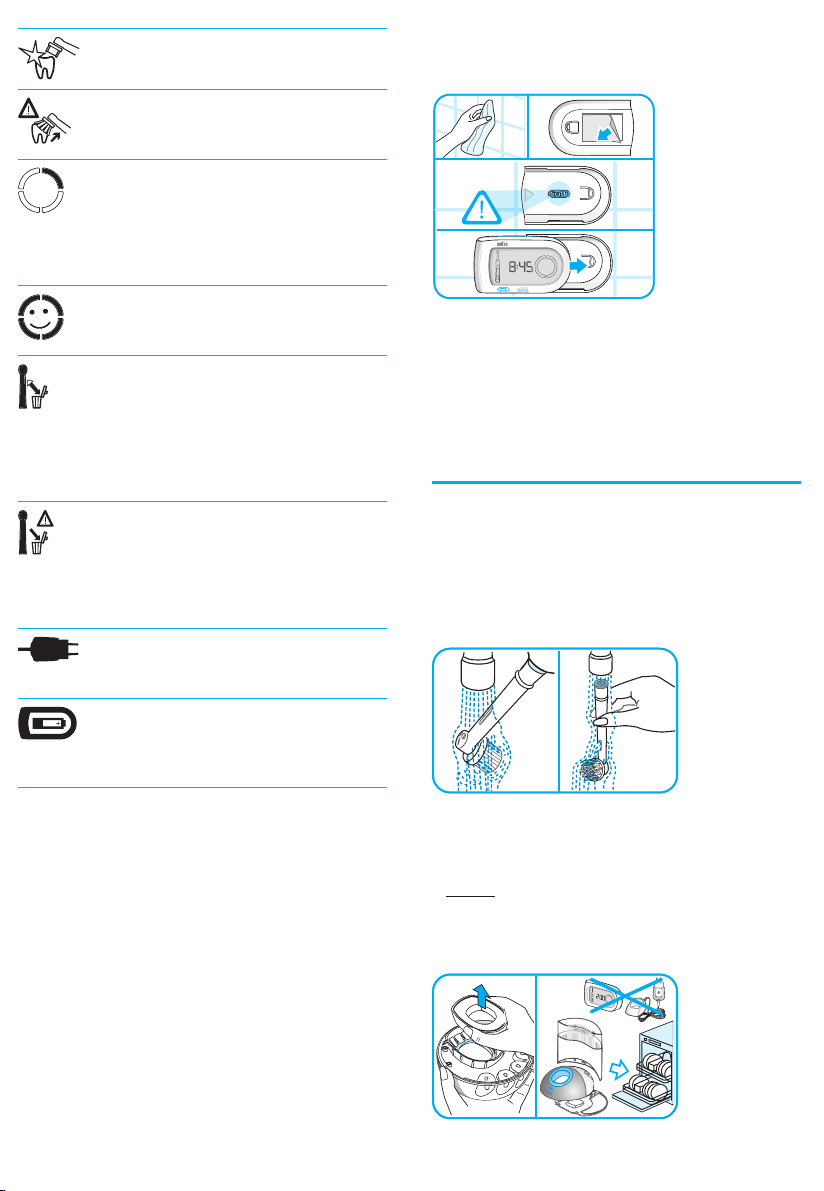
• After brushing, rinse your brush head
thoroughly under running water.
• Remove the brush head from the handle and
clean both parts separately under running
water. Then wipe them dry before you put the
handle on the charging unit.
• Before cleaning your charging unit, make sure
you disassemble it first. The charging ring and
the SmartPlug should never be placed in the
dishwasher. However, all other parts (base
station, base plate and protective cover) are
dishwasher-safe.
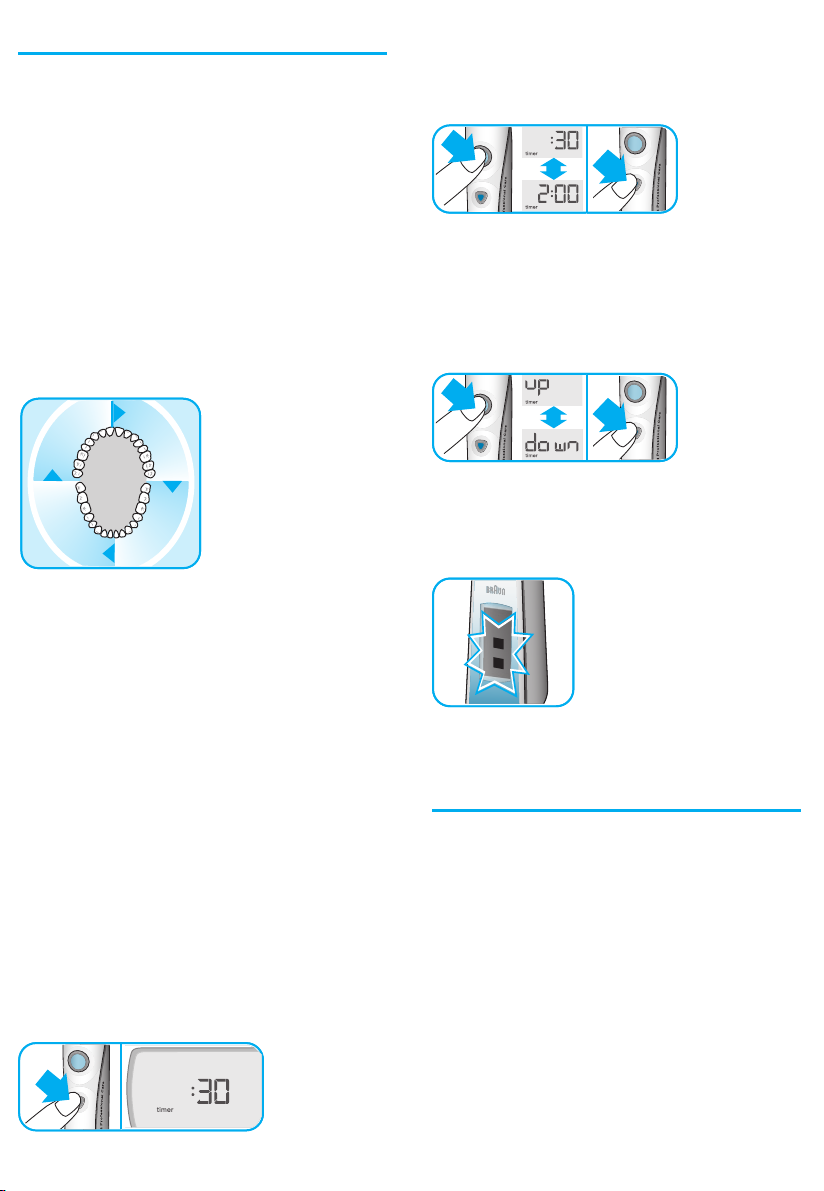
• Push the «h/min» button in the battery
compartment for at least 3 seconds.
The SmartGuide display unit shows «L---»,
indicating the «Learn» mode for synchronization is activated.
• Now you are requested by a flashing
on/off button in the toothbrush icon on the
SmartGuide display unit to turn the handle on.
When doing so, the automatic synchronization
process starts. It is finished when «L-1-» is
displayed.
• Then turn off the handle.
If you would like to assign a second handle to
the same SmartGuide display unit, repeat the
last two steps described above with the other
handle. You can exit the «Learn» mode by
pressing the «h/min» or «set» button. Otherwise
the «Learn» mode will automatically end after
30 seconds.
• From time to time, you can also clean
the charging ring, the SmartPlug and the
SmartGuide display unit with a damp cloth.
The SmartPlug charger and the SmartGuide
display unit should never be placed in water.
Synchronizing
In order to avoid interference of display
messages when using more than one Oral-B
Triumph toothbrush with separate SmartGuide
display units in the same household, you need
to assign the handles to their respective display
units. Please follow the steps below:
8
Please note:
– A maximum of 2 handles can be synchro-
nized with one SmartGuide display unit.
After you synchronized the second handle,
«Full» will be displayed.
– When changing batteries of the SmartGuide
display unit, stored data will be erased.
Therefore, please repeat the synchronization
process every time you change the batteries.
Deactivating the radio
transmission
If you want to use or carry your toothbrush in
surroundings where radio controlled appliances
are not allowed (e.g. hospitals or aircraft),
deactivate the radio transmission first. To do so,
simultaneously press the on/off and mode

button for 3 seconds. The handle display shows
the radio deactivation icon. If you want to
reactivate the radio transmission, press both
buttons again for 3 seconds and the display
icon disappears.
3 sec.3 sec.
Removing batteries
Remove fully discharged batteries of the
SmartGuide display unit immediately and
dispose of them according to local
environmental regulations. Replace all batteries
at the same time. Do not mix alkaline batteries
with zinc carbon or rechargeable batteries.
This guarantee does not cover: damage due to
improper use, normal wear or use, especially
regarding the brush heads, as well as defects
that have a negligible effect on the value or
operation of the appliance. The guarantee
becomes void if repairs are undertaken by
unauthorised persons and if original Braun parts
are not used.
To obtain service within the guarantee period,
hand in or send the complete appliance with
your sales receipt to an authorised Oral-B Braun
Service Centre.
This guarantee in no way affects your rights
under statutory law.
The 30-Day Challenge
Subject to change without notice.
This product conforms to the European
Directives EMC 89/336/EEC and Low
Voltage 2006/95/EC.
This appliance complies with the requirements
covered by the European Directive 1999/5/EC.
Receiver Class 3, Duty Cycle Class 3
This product contains rechargeable
batteries. In the interest of protecting
the environment, please do not dispose
of the product in the household waste at
the end of its useful life. Disposal can take
place at an Oral-B Braun Service Centre or at
appropriate collection points provided in your
country.
Guarantee
We grant 2 years guarantee on the product
commencing on the date of purchase. Within
the guarantee period we will eliminate, free of
charge, any defects in the appliance resulting
from faults in materials or workmanship, either
by repairing or replacing the complete appliance
as we may choose. This guarantee extends to
every country where this appliance is supplied
by Braun or its appointed distributor.
Take the challenge! Experience the Oral-B
Triumph difference!
Oral-B Triumph with SmartGuide is Oral-B’s
most technologically advanced rechargeable
toothbrush for outstanding cleaning, natural
whitening, gentle gum care and freshening of
your mouth.
No wonder that Oral-B is the brand more
dentists use themselves worldwide. In fact, we
are so convinced you’ll fall in love with your new
toothbrush that we give you this risk-free offer.
Try Oral-B Triumph with SmartGuide for
30 days, starting from the day of purchase.
If you are not 100% satisfied, receive a full
refund. No questions asked. Guaranteed.
For a full refund, please return your handle,
refills, and charging unit with your original cash
register receipt to the address below.
Great Britain / Ireland:
«Oral-B 30-Day Challenge»
Braun Cashback (BC 024)
PO Box 504
Leicester
LE94 0AE
For further details, please contact our customer
service 0800 7311 792 to be referred to the
authorized Oral-B Braun Service Centre closest
to you.
9

Français
Vous avez choisi une brosse à dents Oral-B à la
hauteur du progrès. Conçue pour vous offrir un
résultat exceptionnel en matière d’hygiène
bucco-dentaire, Oral-B
SmartGuide™ est une brosse à dents avec
un écran sans fil. On trouve derrière ses
nombreuses caractéristiques avant-gardistes la
technologie Braun et le savoir-faire des experts
dentaires d’Oral-B. Avec cette brosse à dents,
vous avez la certitude d’un nettoyage
extraordinaire.
La nouvelle brosse à dents Oral-B Triumph,
maintenant avec SmartGuide, est dotée d’un
écran sans fil interactif qui vous aide à optimiser
le brossage de vos dents. Sa technologie
de brossage unique permet une élimination en
profondeur de la plaque dentaire. Sa brossette
avancée Oral-B
soies MicroPulse™ qui pénètrent en profondeur
les espaces interdentaires.
Oral-B Triumph avec SmartGuide vous est
proposée par Oral-B, leader des brosses à
dents électriques. Cette marque est utilisée par
de nombreux dentistes dans le monde.
Lors de l’utilisation de tout appareil électrique,
il convient de respecter certaines règles
élémentaires de sécurité. Avant toute utilisation,
veuillez lire attentivement les précautions et
recommandations ci-dessous.
Important
• Pour éviter toute interférence électromagnétique et/ou tout conflit de compatibilité,
veuillez désactiver la transmission radio de
votre brosse à dents avant de l’emporter ou
de l’utiliser dans des lieux réglementés
comme les avions ou les zones restreintes
des hôpitaux (voir « Désactivation de la transmission radio »).
• Les personnes porteuses d’un stimulateur
cardiaque sont priées de toujours laisser un
écart d’au moins 15 centimètres entre la
brosse à dents en marche et leur stimulateur.
Si, à un moment ou à un autre, il vous
semble qu’il y a interférence, désactivez la
transmission radio de votre brosse à dents
avant de l’utiliser (voir « Désactivation de la
transmission radio »).
• Votre brosse à dents est fournie avec une
prise secteur (SmartPlug™), intégrant, pour
plus de sécurité, une alimentation à tension
extra basse. Ne remplacez ni manipulez
10
®
Triumph™ avec
®
FlossAction™ est pourvue des
aucune des pièces qui la compose, car risque
d’électrocution. Assurez-vous régulièrement
que la fiche SmartPlug n’est pas endommagée. Tout appareil électrique endommagé
ou qui ne fonctionne plus ne doit plus être
utilisé. Il convient de l’apporter dans un centre
de Service après-vente Oral-B Braun.
• Ce produit ne convient pas aux enfants de
moins de trois ans.
• En cas de chute de votre brosse à dents,
remplacez la brossette avant de vous en
resservir, même si aucun dommage n’est
visible.
Description
a Brossette Oral-B FlossAction
b Bouton marche/arrêt
c Bouton mode de brossage
d Manche
e Cadran d’affichage du manche
f Chargeur SmartPlug (comprend la bague de
recharge et la fiche SmartPlug)
g Plaque support
h Socle
i Couvercle protecteur
j Brossette Oral-B
®
ProBright™ (non fournie
avec tous les modèles)
k Unité d’affichage SmartGuide
l Support mural
m Ruban adhésif
Première utilisation
Avant d’utiliser votre brosse à dents pour la
première fois, veuillez la charger. Insérez la fiche
SmartPlug dans une prise électrique et mettez
le manche de la brosse à dents sur la bague de
recharge (voir « Branchement et chargement »).
• Pour activer l’unité d’affichage SmartGuide (k),
enlevez le couvercle du logement à piles situé
au dos de l’appareil et insérez deux piles (type
AA) en respectant la polarité indiquée (selon
les symboles du logement à piles).
h/min
h/min
set
set
2
2
1
1
• « 12:00 » clignote sur l’unité d’affichage
SmartGuide pour indiquer que l’heure peut
être programmée. Appuyez sur le bouton
h/min
h/min
set
set

« set » (réglages) situé dans le logement à
h/min
set
h/min
set
t
h/min
set
t
h/min
set
piles jusqu’à ce que le cadran affiche « 12h ».
Ensuite, emboîtez le couvercle protecteur (i) sur
l’arrière du socle (voir schéma
4, page 3).
set
set
h/min
h/min
• En appuyant brièvement sur le bouton
« h/min », vous pouvez commuter entre le
mode « 12h » et le mode « 24h ». Appuyez sur
le bouton « set » (réglages) pour confirmer
votre choix.
• Les heures commencent à clignoter. Appuyez
sur le bouton « h/min » jusqu’à ce que la
bonne heure apparaisse et confirmez en
appuyant sur le bouton « set » (réglages).
Procédez de la même manière pour régler les
minutes. Si vous ne voulez pas utiliser la
montre, les chiffres clignotants « 12:00 »
disparaîtront automatiquement au bout de
24h.
Vous pouvez faire démarrer votre brosse à dents
en appuyant sur le bouton marche/arrêt (b).
Pour éviter les éclaboussures, approchez la
brossette de vos dents avant de mettre
l’appareil en marche.
• Insérez la fiche SmartPlug dans une prise
secteur et placez le manche de la brosse à
dents (d) sur l’unité de recharge. Un symbole
de batterie doit apparaître sur le cadran
d’affichage du manche (e). La batterie affichée
se remplit au fur et à mesure que le manche
se recharge. Lorsque le manche est complètement chargé, le symbole de batterie est plein
et contient quatre barres. Un chargement
complet prend au moins 12 heures et permet
environ deux semaines de brossage normal
(deux fois par jour, 2 minutes).
Remarque: si le symbole de la batterie ne s’affiche pas immédiatement, continuez à charger.
Il apparaîtra au bout de 10 à 15 minutes.
• Lorsque la charge de l’accumulateur est faible,
le symbole de la batterie n’affiche plus qu’une
seule barre et commence à clignoter. Votre
brosse à dents ralentit, puis s’arrête. Il est
temps de la recharger. Lorsque l’accumulateur
est complètement déchargé, le symbole de la
batterie est vide et clignote. Dans ce cas, l’appareil nécessita une recharge de 15 minutes
avant de pouvoir être utilisé pour un brossage
de 2 minutes.
ral-B
ral-B
O
Oral-B
Oral-B
O
Branchement et chargement
Votre brosse à dents est dotée d’un manche
étanche, elle est d’une sécurité électrique
absolue et est conçue pour être utilisée dans
une salle de bain.
Pour assembler le socle (h) et en faire une unité
de recharge, commencez par détacher (schéma
1, page 3) la plaque support (g). Posez la bague
de recharge sur le socle et fixez la plaque support comme indiqué (schémas
2 et 3, page 3).
• En utilisation quotidienne, le manche de la
brosse à dents peut être posé sur l’unité de
recharge de manière à le maintenir à pleine
charge. Il n’y a aucun risque de surcharge de
l’accumulateur.
• Pour conserver la capacité de l’accumulateur
à son niveau maximum, débranchez l’unité de
recharge au moins une fois tous les six mois
et déchargez complètement le manche en
l’utilisant normalement.
Pour ce qui est des spécifications électriques,
référez-vous à l’imprimé du SmartPlug.
11
Personnalisation du minuteur
En fonction de vos besoins, vous pouvez
choisir entre le « Minuteur professionnel » et le
« Minuteur 2 minutes » et entre le « Chronométrage progressif » et le « Compte à rebours ».
Le « Minuteur 2 minutes » indique, par une
longue suite de bips sonores et un « icone
souriante » sur l’unité d’affichage SmartGuide
que la durée de brossage de 2 minutes,
recommandée par les dentistes, est atteinte.
Le « Minuteur professionnel », quant à lui, vous
permet de brosser les quatre quadrants de votre
bouche de manière uniforme. Une brève suite
de bips sonores, répétée à 30 secondes
d’intervalle, ainsi que le «Cercle des quadrants»
sur l’unité d’affichage SmartGuide, vous
signalent qu’il est temps de passer à un autre
quadrant de votre bouche.
3
3
c
c
e
e
s
s
0
0
3
3
0
0
s
s
e
e
c
c
• En appuyant brièvement sur le bouton
marche/arrêt (b), passez au « Minuteur 2
minutes ». Confirmez votre choix en appuyant
sur le bouton mode de brossage.
• Ceci vous conduit directement à l’affichage
« Chronométrage progressif » (vous verrez
« up » et « timer »). Passez au « Compte à
rebours » en appuyant sur le bouton marche/
arrêt et confirmez votre choix à l’aide du
bouton mode de brossage.
3
c
c
e
e
s
s
0
0
3
3
Les deux minuteurs mémorisent le temps de
brossage écoulé, même en cas de bref arrêt de
la brosse à dents pendant le brossage. Ils ne se
remettent à zéro qu’après une pause de plus de
30 secondes.
Le minuteur « Chronométrage progressif » vous
informe de votre temps de brossage réel. Le
minuteur « Compte à rebours » indique le temps
de brossage restant. Il commence à « 2:00 »
minutes pour finir à « 0:00 ». Si la durée de
brossage dépasse les deux minutes, la brosse
à dents passe automatiquement en mode
« Chronométrage progressif ».
A l’origine, votre brosse à dents est activée par
défaut en mode « Minuteur professionnel » et
« Chronométrage progressif ». Si vous souhaitez
modifier ces réglages, veuillez procéder comme
suit :
• Appuyez sur le bouton mode de brossage (c)
et maintenez-le enfoncé jusqu’à ce que l’unité
d’affichage SmartGuide (k) indique « :30 » et
« timer » (minuteur).
3 sec.3 sec.
12
3
0
0
s
s
e
e
c
c
Remarque : il est normal que deux barres
clignotantes apparaissent sur le cadran
d’affichage du manche de la brosse à dents
lorsque vous êtes en mode réglage du minuteur.
Brossage
Modes de brossage
Votre brosse à dents propose différents modes
de brossage en fonction des divers besoins de
soins bucco-dentaires :
« Nettoyer » – Hygiène exceptionnelle des
dents et des gencives.
« Douceur » – Nettoyage des zones
sensibles en douceur mais en
profondeur.
« Massage » – Stimulation des gencives en
douceur.
« Polir » – Polissage exceptionnel et
(uniquement blanchiment naturel des dents,
avec le modèle pour un usage occasionnel ou
de luxe) quotidien.
• Lorsque vous appuyez sur le bouton marche/
arrêt, votre brosse à dents se met automatiquement en mode « Nettoyer ».
• Pour passer aux autres modes, appuyez sur
le bouton mode de brossage jusqu’à ce que
vous ayez atteint le mode souhaité.
devraient cesser au bout de quelques jours.
S’ils persistent plus de deux semaines,
consultez votre dentiste ou votre spécialiste en
hygiène bucco-dentaire. Si vous avez des dents
ou des gencives sensibles, Oral-B vous
conseille de vous brosser les dents en mode
« Douceur ».
Brossettes
La brossette Oral-B FlossAction (a) est recommandée pour une hygiène quotidienne en profondeur. La brossette Oral-B ProBright (j) (non
fournie avec tous les modèles) sert à faire briller
les dents, en usage occasionnel ou quotidien.
Remarque : la brossette Oral-B ProBright ne
convient pas aux enfants de moins de 12 ans.
• Pour revenir d’un mode quelconque au mode
« Nettoyer », appuyez sur le bouton mode de
brossage et maintenez-le enfoncé.
• Pour éteindre votre brosse, appuyez sur le
bouton marche/arrêt.
Remarque : le mode « Polir » (uniquement avec
le modèle de luxe) est optimal avec la brossette
Oral-B ProBright. Après avoir monté la brossette Oral-B ProBright, appuyez sur le bouton
marche/arrêt pour que votre brosse à dents
démarre automatiquement en mode « Polir »
(voir « Brossettes »).
Technique de brossage
• Déplacez lentement la brossette d’une dent à
l’autre.
• Maintenez la brossette en place quelques
secondes avant de passer à la dent suivante.
• Brossez les gencives aussi bien que les dents,
d’abord les faces avant, puis les faces arrières
pour terminer par les faces occlusales.
• N’appuyez pas trop fort et ne frottez pas,
laissez simplement la brosse faire tout le
travail.
A la fin du brossage, le temps global de brossage sera indiqué pendant 30 secondes, puis
l’affichage se remettra en mode Heure. Pour
accéder directement au mode Heure, vous
pouvez faire disparaître l’affichage du temps de
brossage en appuyant sur le bouton mode de
brossage.
aa
Les brossettes Oral-B FlossAction et Oral-B
ProBright contiennent une « puce intelligente »
qui communique avec l’électronique de l’intérieur du manche de votre brosse à dents. Ainsi,
votre brosse à dents sélectionne automatiquement le mode de brossage correspondant à la
brossette montée. Toutefois, pour personnaliser
votre brossage habituel, vous pouvez choisir
d’autres modes de brossage.
Il est déconseillé d’utiliser ces brossettes avec
des appareils dentaires. Dans ce cas, nous
recommandons plutôt la brossette Oral-B Ortho,
qui est spécifiquement conçue pour l’hygiène
des dents appareillées.
jj
Pictogrammes d’affichage
SmartGuide
Icônes
Mode « Nettoyer »
Mode « Douceur »
Pendant les premiers jours d’utilisation de votre
brosse à dents, vos gencives peuvent saigner
légèrement. En règle générale, les saignements
Mode « Massage »
13
Mode « Polir » (non fourni avec
tous les modèles)
La brossette exerce trop de
pression sur les dents. Réduire la
force de brossage.
« Cercle des quadrants » – selon
le schéma, vous êtes au premier
intervalle de 30 secondes. Lorsque
le second quadrant se met à
clignoter, passez au quadrant
suivant de votre bouche.
La durée de brossage de
2 minutes, recommandée par les
dentistes, est atteinte.
*
*
« Premier avertissement » : il va
bientôt falloir remplacer votre
brossette. Vous pouvez encore
l’utiliser pendant 10 jours (deux fois
par jour, 2 minutes), puis il sera
temps de la remplacer, comme
recommandé.
Votre brossette a dépassé la
durée d’utilisation de 3 mois
recommandée par les dentistes
(deux fois par jour, 2 minutes).
Remplacez-la par une brossette
neuve.
La charge de la batterie rechargeable du manche est faible. Chargez
le manche de la brosse à dents.
La charge des piles de l’unité
d’affichage SmartGuide est faible.
Changez les piles de l’unité
d’affichage SmartGuide.
uniformément et fermement contre le mur.
Attendez 24h avant de glisser l’unité d’affichage
SmartGuide dans le support mural fixé au mur.
Remarque : le ruban adhésif ne tiendra pas sur
des surfaces anti-tâches.
Recommandations
d’entretien
• Après le brossage, rincez la brossette avec
soin à l’eau courante.
• Retirez la brossette du manche et nettoyez les
deux éléments séparément à l’eau courante.
Puis essuyez-les avant de reposer le manche
sur l’unité de recharge.
* les fonctions d’avertissement de
« remplacement de la brossette » et de
« premier avertissement remplacement de la
brossette » ne marchent que si vous utilisez
des brossettes dotées de la technologie Smart
(Oral-B FlossAction et Oral-B ProBright)
Montage mural
Si vous préférez monter l’unité d’affichage
SmartGuide contre un mur, sur un miroir ou
sur toute autre surface, servez-vous du ruban
adhésif (m) pour fixer le support mural. Assurezvous tout d’abord que la surface choisie est
propre et sèche (enlevez au préalable toute
trace de gras ou de poussière). Placez le
support mural de telle sorte que le logo Oral-B
soit lisible. Appuyez ensuite le support mural
14
• Avant de nettoyer l’unité de recharge,
commencez par la démonter. La bague de
recharge et la fiche SmartPlug ne doivent
jamais être mises au lave-vaisselle. En
revanche, tous les autres éléments (socle,
plaque support et couvercle de protection)
supportent un lavage au lave-vaisselle.
 Loading...