

Page 1
TRIUMPH
O
ral-B
TRIUMPH
®
powered
powered
powered
powered
ral-B
O
by
by
by
by
5000
5000
WIRELESS
SMARTGUIDE
TM
VISIBLE PRESSURE
INDICATOR
Page 2
4
English 11
Internet:
www.oralb.com
www.braun.com
www.service.braun.com
Braun GmbH
Frankfurter Straße 145
61476 Kronberg/Germany
KR
If you should require further
assistance, please call our
Consumer Service line.
Helpline
GB
0 800 731 1792
Helpline
IE
1 800 509 448
Type 3731
99345065/IX-09
Korea/GB
Page 3
D32
Explo
MN
KURTZ
DESIGN
130209
l
k
a
Oral-B
j
Oral-B
i
b
c
d
h
e
g
f
Page 4
h/min
set
2
1
h/min
set
4
Page 5
set
h/min
set
t
h/min
set
h/min
ral-B
Oral-B
O
5
Page 6
3
c
e
s
0
3
0
s
e
c
5
4
4
c
e
s
5
s
e
c
c
e
s
0
3
3
0
s
e
c
c
e
s
5
4
4
5
s
e
c
3 sec.
6
Page 7

a
i
7
Page 8

8
Page 9

set
h/min
3 sec.
3 sec.
9
Page 10

10
Page 11

English
Oral-B® Triumph® with SmartGuide™ has
been carefully designed to offer you and your
family a unique brushing experience that is both
safe and effective. When using electrical products, however, some basic safety precautions
should always be followed.
IMPORTANT
• The Oral-B Triumph is provided with a
SmartPlug (integrated Safety Extra Low
Voltage) power supply. Do not exchange or
manipulate any part of it, as there is a risk
of electric shock. Periodically check the
SmartPlug for damage and if the appliance is
damaged or non-functional, stop use of the
product. Take damaged units to an Oral-B
®
Braun
• This product is not intended for use by
• This appliance is not intended for use by
• If the product is dropped, the brush head
• Keep the SmartPlug away from water or other
• Do not modify or repair the product. This may
• When taking out the battery for disposal, use
• Do not touch the SmartPlug with wet hands.
• Use this product only for its intended use as
• If you are undergoing treatment for any oral
Your Oral-B Triumph with SmartGuide uses an
interactive wireless display to help you optimize
your brushing experience.
Important
• To avoid electromagnetic interference and/or
Service Centre.
children under age three.
children or persons with reduced physical or
mental capabilities, unless they are supervised
by a person responsible for their safety.
should be replaced before the next use, even
if no damage is visible.
liquid.
cause fire, electric shock or injury. Consult
your dealer for repairs or contact an Oral-B
Braun Service Centre. Do not disassemble the
product, except when disposing of the battery.
caution not to short the positive (+) and
negative (–) terminals.
This can cause an electric shock.
described in this manual. Do not use attachments or chargers not recommended by the
manufacturer.
care condition, consult your dental professional prior to use.
compatibility conflicts, deactivate the radio
transmission of your toothbrush before
carrying or using it in restricted surroundings,
such as aircrafts or specially marked areas in
hospitals (see «Deactivating the radio
transmission»).
• Persons with pacemakers should always
keep the toothbrush more than six inches
(15 centimeters) from the pacemaker when
turned on. If at any time you suspect interference is taking place, deactivate the radio
transmission of your toothbrush before using
it (see «Deactivating the radio transmission»).
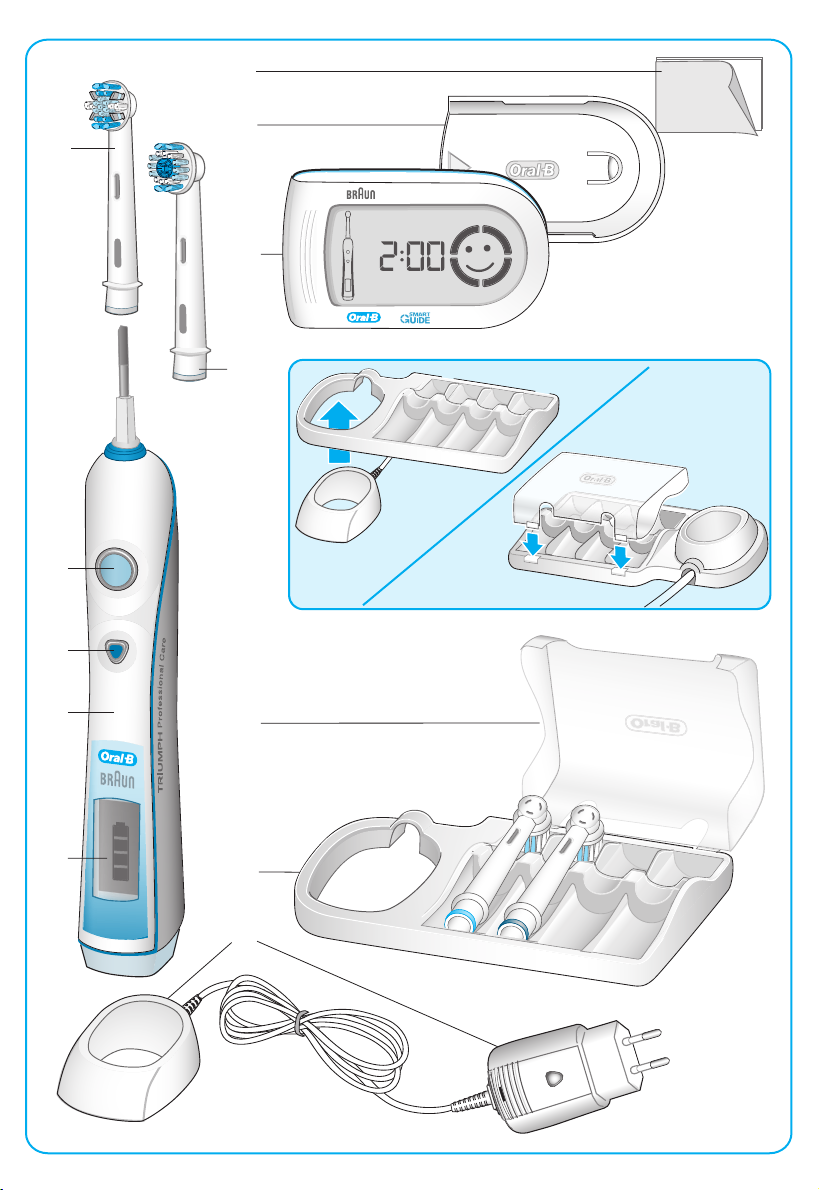
Description
a Oral-B FlossAction® brush head
b On/off button
c Brushing mode button
d Handle
e Handle display
f SmartPlug charger (includes charging ring
and SmartPlug)
g Base plate
h Protective cover
i Oral-B ProWhite brush head (not with all
models)
j SmartGuide display unit
k Wall mount
l Adhesive tape
First use
Before brushing for the first time, charge your
toothbrush. Plug the SmartPlug into an electrical
outlet and place the handle (d) on the charging
ring (f), (see «Connecting and charging»).
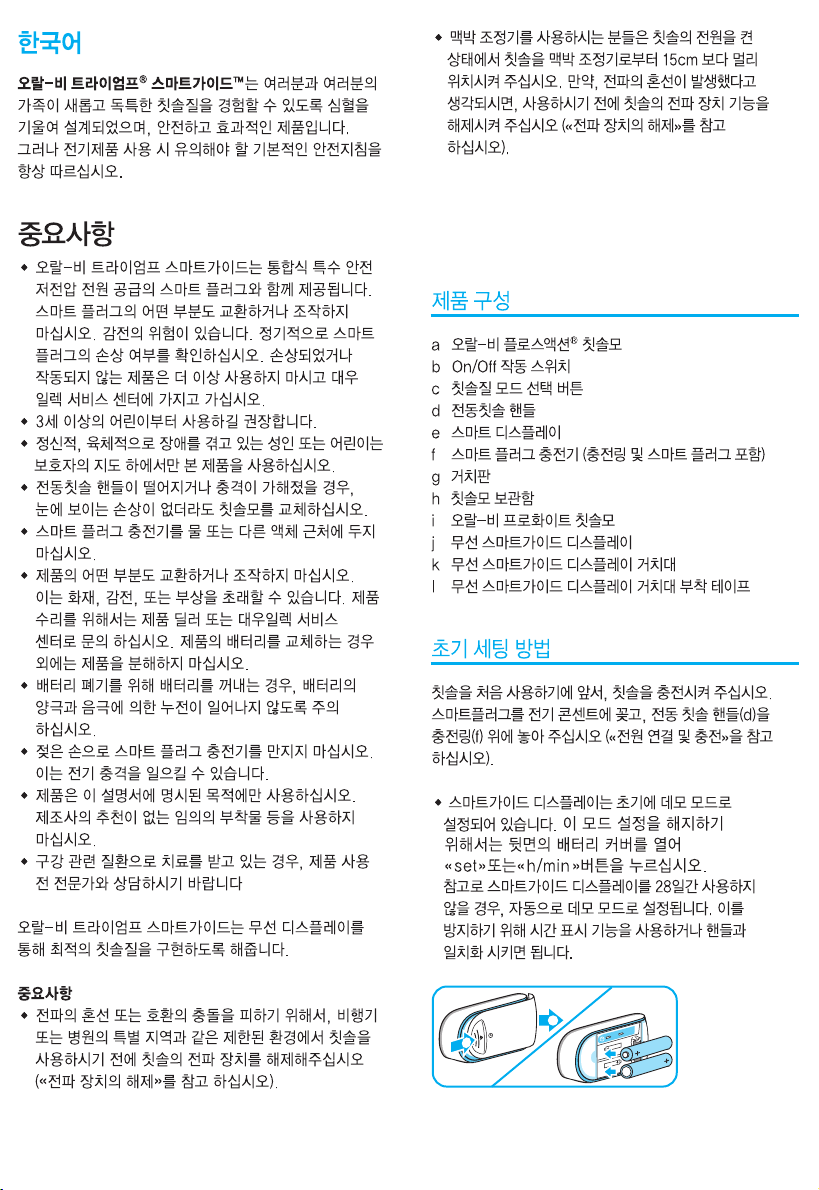
• Your SmartGuide display comes with a
demonstration mode activated. To leave this
mode please remove the compartment cover
on the back and push the «set» or the «h/min»
button, located in the battery compartment.
Please note that your SmartGuide display will
self-activate this demonstration mode when
you do not use your toothbrush for 28 days.
You can avoid this self-activation by setting
the clock or synchronizing your handle.
h/min
h/min
set
set
2
2
1
1
h/min
h/min
set
set
11
Page 12

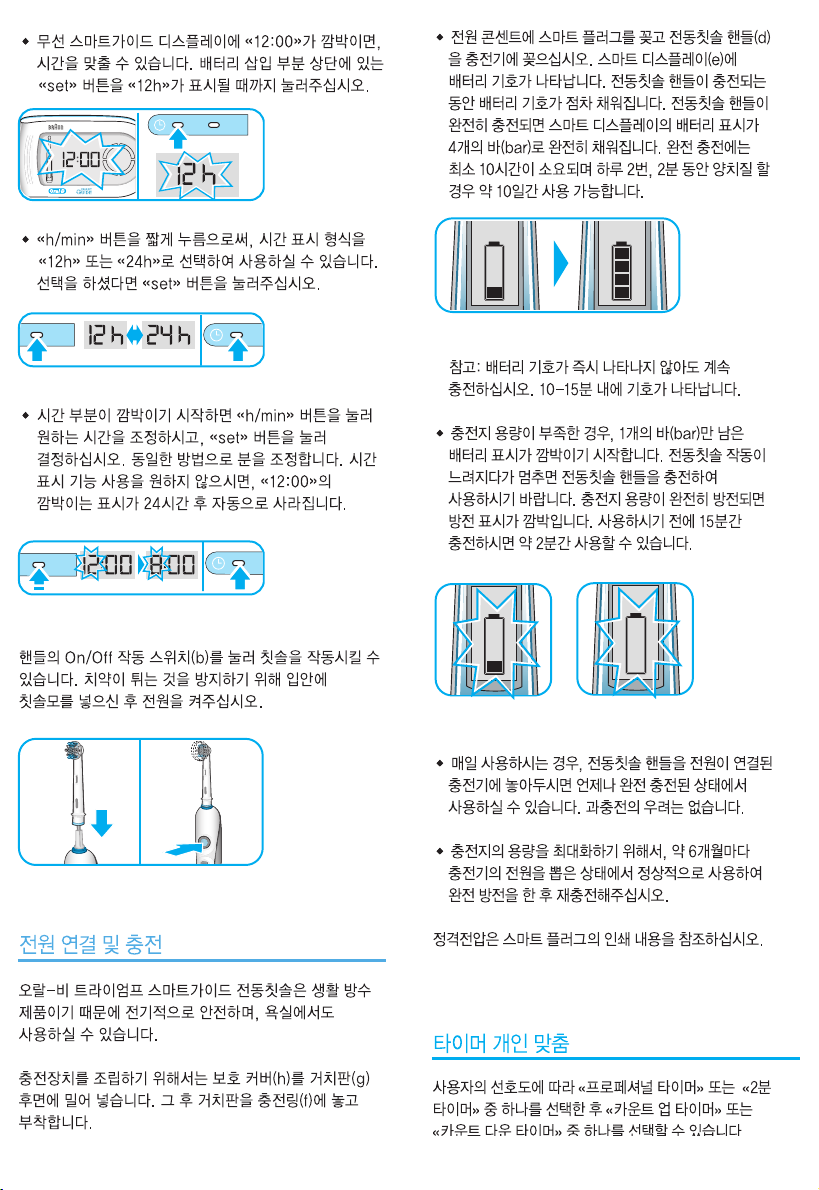
• A flashing «12:00» on the SmartGuide display
h/min
set
h/min
set
t
h/min
set
t
h/min
set
indicates that time can be adjusted. Press the
«set» button until «12h» is displayed.
set
set
h/min
h/min
• By briefly pressing the «h/min» button, you
can toggle between a «12h» or «24h» daytime
format. Push the «set» button to confirm your
choice.
• Then the hour digit starts flashing. Press the
«h/min» button until the right hour appears
and confirm with the «set» button. Proceed
the same way to set both minute digits. If you
prefer not using this clock feature, the flashing
«12:00» will disappear automatically after
24 hours.
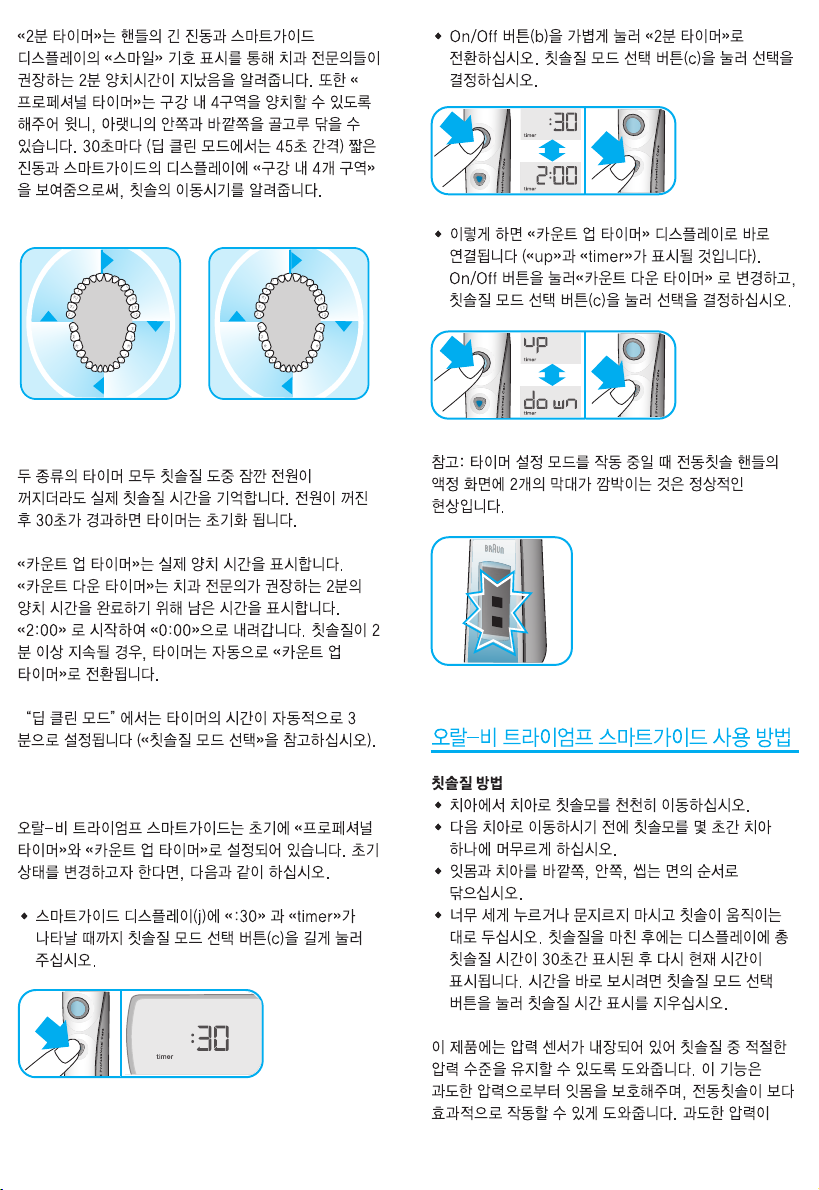
• Plug the SmartPlug into an electrical outlet
and place the toothbrush handle (d) on the
charging unit. A battery symbol should appear
in the handle display (e). The battery symbol
will fill up while the handle is being charged.
Once the handle is fully charged, the battery
symbol will be filled with four bars. A full
charge takes at least 10 hours to complete
and allows for approximately 10 days of
regular brushing (twice a day, 2 minutes).
Please note: If the battery symbol is not
displayed immediately, continue charging.
It will appear in 10–15 minutes.
• When the rechargeable battery is low, the
battery symbol with one remaining bar starts
flashing. Your toothbrush will slow down
and then stop. When the battery is fully
discharged, the empty frame of the battery
symbol flashes. It will then need a 15-minute
charge before you can use it for a 2-minute
brushing.
You can start your toothbrush by pressing the
on/off button (b). To avoid splashing, guide the
brush head to your teeth before switching on
the appliance.
B
B
l-
lra
ra
O
Oral-B
Oral-B
O
Connecting and charging
Your toothbrush has a waterproof handle, is
electrically safe and designed for use in the
bathroom.
To assemble the charging unit, insert the
protective cover (h) on the back of the base
plate (g). Then, place the base plate on the
charging ring (f) until it clicks into place.
12
• For everyday use, the toothbrush handle can
be stored on the charging unit to maintain it at
full power. There is no risk of overcharging the
battery.
• To maintain the maximum capacity of the
rechargeable battery, unplug the charging unit
and fully discharge the handle with regular use
at least every 6 months.
For electric specifications, please see printing
on the SmartPlug.
Personalizing the timer
You can choose between the «Professional» or
«2-Minute» timer and the «Count Up» or «Count
Down» timer to meet your specific needs.
Page 13

The «2-Minute Timer» indicates by a long
stuttering sound and a «smiley» on the
SmartGuide display unit that the dentist
recommended 2-minute brushing time has been
reached. In addition the «Professional Timer»
helps you brushing all four quadrants of your
mouth equally. It signals with a short stuttering
sound at 30-second intervals (45-second
intervals within «Deep Clean» mode) and the
«quadrant circle» on the SmartGuide display unit
that it is time to move to the next quadrant of
your mouth.
4
4
c
3
3
c
c
0
e
e
s
s
0
0
3
3
c
c
e
e
s
s
0
s
s
e
e
c
c
3
3
0
0
s
s
e
0
0
e
c
c
3
3
c
5
e
e
s
s
5
5
4
4
c
c
e
e
s
s
5
s
s
e
e
c
c
4
4
5
5
s
s
e
5
5
e
c
c
4
4
• By briefly pressing the on/off button (b), switch
to the «2-Minute Timer». Confirm your choice
by pushing the brushing mode button (c).
• This will lead you directly to the «Count Up
Timer» display («up» and «timer» will be
shown). Switch to the «Count Down Timer»
by pressing the on/off button and confirm it
with the mode button (c).
Both timers memorize the elapsed brushing
time, even when the handle is briefly switched
off during brushing. When pausing longer than
30 seconds, the timer resets to the initial
starting point.
The «Count Up Timer» displays your actual
brushing time. The «Count Down Timer»
indicates the remaining brushing time. Starting
with «2:00» minutes, it goes down to «0:00».
When brushing longer than two minutes, it
automatically changes to the «Count Up Timer».
The total brushing time can be extended to
3 minutes by using the «Deep Clean» mode
(see «Brushing modes»).
Your toothbrush comes with the «Professional
Timer» and the «Count Up Timer» activated. If
you wish to change these settings, proceed as
follows:
• Press and hold the mode button (c) until the
SmartGuide display unit (j) shows «:30» and
«timer».
3 sec.3 sec.
Please note: It is normal that the handle display
shows two flashing bars when operating in the
timer setting mode.
Brushing
Brushing technique
• Guide the brush head slowly from tooth to
tooth.
• Hold the brush head in place for a few
seconds before moving on to the next tooth.
• Brush the gums as well as the teeth, first the
outsides, then the insides, finally the chewing
surfaces.
• Do not press too hard or scrub, simply let
the brush do all the work. When you finish
brushing, the total brushing time will be
displayed for 30 seconds before the display
switches back to the time mode. To directly
get to the time mode, clear the brushing time
display by pushing the mode button.
Your toothbrush has a pressure control feature
to help ensure that the right degree of pressure
is applied. This helps protect your gums from
13
Page 14

excessive brushing and makes your toothbrush
easy to operate. If too much pressure is applied,
the oscillating movement of the brush head will
continue but the pulsation will stop. In addition
to feeling the change, you can also hear a
different sound.
Brush heads
The Oral-B FlossAction brush head (a) is
recommended for everyday deep cleaning. It
features micropulse bristles that get deep in
hard-to-reach areas between your teeth, gently
removing hidden plaque.
In the first few days of using your electric toothbrush, your gums may bleed slightly. In general,
bleeding should stop after a few days. Should
it persist after 2 weeks, please consult your
dentist or dental hygienist. If you have sensitive
teeth and gums, Oral-B recommends using the
«Sensitive» mode.
Brushing modes
Your toothbrush offers different brushing modes
for varying oral care needs:
«Daily Clean» – Exceptional mouth cleaning.
«Sensitive» – Gentle, yet thorough cleaning
for sensitive areas.
«Massage» – Gentle massage of gums.
«Whitening» – Polishing and whitening for
occasional or everyday use.
«Deep Clean» – Exceptional mouth cleaning
with extended brushing time.
Within this mode the brushing
time has been extended to
45 seconds per quadrant for
a total brushing time of
3 minutes.
• When pressing the on/off button, your toothbrush automatically starts in the «Daily Clean»
mode.
• To switch to the other modes, successively
press the mode button (c).
For occasional or everyday whitening, please
use the Oral-B ProWhite (i) brush head (not
with all models). It features a dentist-inspired
polishing cup to remove surface stains from
coffee, tea and tobacco for effective brightening.
Please note that children under 12 years old
should not use the Oral-B ProWhite brush head.
aa
ii
Do not use the Oral-B FlossAction or Oral-B
ProWhite brush head with braces. We recommend using the Oral-B Ortho brush head, which
is specifically designed to clean around braces
and wires.
All brush heads feature blue Indicator
®
bristles
helping you to monitor brush head replacement
need. With proper brushing, twice a day for
two minutes, the blue color will fade halfway
approximately within 3 months, signalling that it
is time to change the brush head.
• To return from any mode to the «Daily Clean»
mode, press and hold the mode button.
• To turn your brush off, press the on/off button.
Please note: The «Whitening» mode is best used
with an Oral-B ProWhite (i) brush head.
14
Page 15

SmartGuide display unit
Displayed
Icon
Meaning
«Daily Clean» mode
«Sensitive» mode
«Massage» mode
«Whitening» mode
«Deep Clean» mode
and firmly to the wall. Wait 24 hours before
sliding the SmartGuide display unit into the fixed
wall mount.
Please note: The adhesive tape will not work on
dirt-repellent surfaces.
Too much pressure is applied.
Reduce the brushing force.
«Quadrant circle» – currently you
are brushing in the first 30-second
interval (45-second interval within
Deep Clean mode). Move to the
next quadrant of your mouth,
when the second segment starts
flashing.
Dentist recommended 2-minute
brushing time (3-minute brushing
time within the Deep Clean mode)
has been reached.
The rechargeable battery of the
handle is low. Charge the toothbrush handle.
Batteries of the SmartGuide
display unit are low. Change
batteries of the SmartGuide
display unit.
Wall mount
If you prefer to mount the SmartGuide display
unit on a wall, mirror or other surface, use
the adhesive tape (l) to fix the wall mount.
Before doing so, make sure the chosen surface
is clean and dry (remove grease and dust first).
Position the wall mount that the Oral-B logo
is readable. Then, press the wall mount evenly
Cleaning recommendations
• After brushing, rinse your brush head
thoroughly under running water.
• Remove the brush head from the handle and
clean both parts separately under running
water. Then, wipe them dry before returning
the handle to the charging unit.
• Before cleaning your charging unit, make sure
you disassemble it first. The charging ring
and SmartPlug should never be placed in the
dishwasher. All other parts (base plate and
protective cover) are dishwasher-safe.
• From time to time, you can also clean the
charging ring, SmartPlug and SmartGuide
display unit with a damp cloth. Both the
SmartPlug charger and SmartGuide display
unit should never be placed in water.
15
Page 16

Synchronizing
set
h/min
3 sec.
set
h/min
3 sec.
In order to avoid interference of display
messages when using more than one Oral-B
Triumph toothbrush with separate SmartGuide
display units in the same household, you need
to assign the handles to their respective display
units. Please follow the steps below:
• Push the «h/min» button in the battery
compartment for at least 3 seconds. The
SmartGuide display unit shows «L---», indicating the «Learn» mode for synchronization
is activated.
• Now you are requested by a flashing
on/off button in the toothbrush icon on the
SmartGuide display unit to turn the handle on.
When doing so, the automatic synchronization
process starts. It is finished when «L-1-» is
displayed.
• Then turn off the handle.
If you would like to assign a second handle to
the same SmartGuide display unit, repeat the
last two steps described above with the other
handle. You can exit the «Learn» mode by
pressing the «h/min» or «set» button. Otherwise
the «Learn» mode will automatically end after
30 seconds.
Deactivating the radio
transmission
If you want to use or carry your toothbrush in
surroundings where radio controlled appliances
are not allowed (e.g. hospitals or aircraft),
deactivate the radio transmission first by
pressing the on/off and mode button
simultaneously for 3 seconds. The handle
display shows the radio deactivation icon. If you
want to reactivate the radio transmission, press
both buttons again for 3 seconds and the
display icon disappears.
3 sec.3 sec.
Removing batteries
SmartGuide display unit
Remove fully discharged batteries immediately.
Replace all batteries at the same time. Do not
mix alkaline batteries with zinc carbon or
rechargeable batteries.
Subject to change without notice.
This product conforms to the European
Directives EMC 2004/108/EC and Low
Voltage 2006/95/EC.
Please note:
• A maximum of 2 handles can be synchronized
with one SmartGuide display unit. After you
synchronized the second handle, «Full» will be
displayed.
• When changing batteries of the SmartGuide
display unit, stored data will be erased.
Therefore, please repeat the synchronization
process every time you change the batteries.
16
This appliance complies with the require-
ments covered by the European Directive
1999/5/EC. Receiver Class 3, Duty Cycle
Class 3.
Class Notice
Class B This appliance complies EMC
requirements as household use
and can be used in any areas.
Page 17

Environmental notice
This product contains rechargeable
batteries. In the interest of protecting the
environment, please do not dispose of
the product in the household waste at the
end of its useful life. Disposal can take place at
an Oral-B Braun Service Center or at approved
recycling or disposing locations in accordance
with local regulations.
Guarantee
We grant 1 year limited guarantee on the
product commencing on the date of purchase.
Within the guarantee period we will eliminate,
free of charge, any defects in the appliance
resulting from faults in materials or workmanship, either by repairing or replacing the
complete appliance as we may choose. This
guarantee extends to every country where this
appliance is supplied by Braun or its appointed
distributor.
This guarantee does not cover: damage due to
improper use, normal wear or use, especially
regarding the brush heads, as well as defects
that have a negligible effect on the value or
operation of the appliance. The guarantee
becomes void if repairs are undertaken by
unauthorised persons and if original Braun parts
are not used.
To obtain service within the guarantee period,
hand in or send the complete appliance with
your sales receipt to an authorised Oral-B Braun
Service Centre.
1. Model Name: 3738
2. Certifi cation No: BAG-BRAUN-3738-B
3. Company Name who get the certifi cation:
Braun GmbH
4. Production Date (YYMM): Indicated on product itself
5. Manufacturer’s Name: Braun GmbH
6. Country of Origin: Germany
Electric Toothbrush Manual according to Electronic Wave
Law and Electronic Wave Communication Law
• Product: Electronic Toothbrush, Rechargeable Battery
• Type:
a) 3738 Toothbrush handle having Transmitter & Reader
b) 3741 Wireless SmartGuide Display product having a
c) 3731 Smart Plug Charger
• Specifi cation Type 3738 (Toothbrush handle)
reception function
Operational
Temperature
Frequency
Scope
Electronic Type F1D A1D
Variation 2FSK AM
No. of Channel
Output < 10 mW < 93.5 dBuV/m @10m
Operational
Voltage
2.401 – 2.452 GHz 13.56 MHz
–10°C ~ +55°C
2.4 GHz 13.56 MHz
41
3.0 VDC
• Specifi cation Type 3741
(Wireless SmartGuide Display)
Operational Temperature –10°C ~ +55°C
• Specifi cation Type 3731
(Smart Plug Charger)
Operational Temperature 0°C to +40°C
It is possible to happen to electric wave trouble in using
radio product
This appliance cannot provide the service which is related
to human safety as it has the possibility of electronic wave
cross.
17
 Loading...