

Page 1
TRIUMPH
Oral-B
TRIUMPH
powered
powered
powered
powered
Oral-B
by
by
by
by
5000
5000
WIRELESS
SMARTGUIDE
VISIBLE PRESSURE
INDICATOR
Page 2
English 4
Français 11
Polski 18
âesk˘ 26
Slovensk˘ 33
Magyar 40
Hrvatski 47
Slovenski 54
Türkçe 61
Românå (RO/MD) 67
Lietuvi˜ 74
Latviski 81
Eesti 88
кЫТТНЛИ 95
ì͇ªÌҸ͇ 103
ä‡Á‡Í¯‡ 111
126
GB
0 800 731 1792
IE
1 800 509 448
FR
0 800 944 803
(appel gratuit depuis
un poste fixe)
BE
0 800 14 592
LU
4 00 50 51
PL
0 801 127 286
0 801 1 BRAUN
CZ
221 804 335
SK
02/5710 1135
HU
06-1-451-1256
HR
01/66 90 330
SI
080 2822
0 800 261 63 65
TR
RU
8-800-200-20-20
UA
+ 38 044 428 65 05
Internet:
www.oralb.com
www.braun.com
www.service.braun.com
www.instytut.pl
Braun GmbH
Frankfurter Straße 145
61476 Kronberg/Germany
Type 3731
99278770/III-10
GB/F/PL/CZ/SK/H/HR/SLO/TR/RO/MD/LT/LV/EST/
RUS/UA/KZ/Arab
HK
852-25249377
(Audio Supplies
Company Ltd.)
Page 3
D32
Explo
MN
KURTZ
DESIGN
130209
l
k
a
Oral-B
j
Oral-B
i
b
c
d
h
e
g
f
Page 4

English
Oral-B® Triumph with SmartGuide has been
carefully designed to offer you and your family
a unique brushing experience that is both safe
and effective. When using electrical products,
however, some basic safety precautions should
always be followed.
IMPORTANT
• The Oral-B Triumph is provided with a
SmartPlug (integrated Safety Extra Low
Voltage) power supply. Do not exchange or
manipulate any part of it, as there is a risk
of electric shock. Periodically check the
SmartPlug for damage and if the appliance is
damaged or non-functional, stop use of the
product. Take damaged units to an Oral-B
®
Service Centre.
Braun
• This product is not intended for use by
children under age three.
• This appliance is not intended for use by
children or persons with reduced physical,
sensory or mental capabilities, unless they are
supervised by a person responsible for their
safety. In general, we recommend that you
keep out of reach of children.
• Children should be supervised that they do
not play with the appliance.
• If the product is dropped, the brush head
should be replaced before the next use, even
if no damage is visible.
• Keep the SmartPlug away from water or other
liquid.
• Do not modify or repair the product. This may
cause fire, electric shock or injury. Consult
your dealer for repairs or contact an Oral-B
Braun Service Centre. Do not disassemble the
product, except when disposing of the battery.
• When taking out the battery for disposal, use
caution not to short the positive (+) and
negative (–) terminals.
• Do not touch the SmartPlug with wet hands.
This can cause an electric shock.
• Use this product only for its intended use as
described in this manual. Do not use attachments or chargers not recommended by the
manufacturer.
• If you are undergoing treatment for any oral
care condition, consult your dental professional prior to use.
Your Oral-B Triumph with SmartGuide uses an
interactive wireless display to help you optimize
your brushing experience.
4
Important
•
To avoid electromagnetic interference and/or
compatibility conflicts, deactivate the radio
transmission of your toothbrush before
carrying or using it in restricted surroundings,
such as aircrafts or specially marked areas
in hospitals (see «Deactivating the radio
transmission»).
• Persons with pacemakers should always
keep the toothbrush more than six inches
(15 centimeters) from the pacemaker when
turned on. If at any time you suspect
interference is taking place, deactivate the
radio transmission of your toothbrush before
using it (see «Deactivating the radio
transmission»).
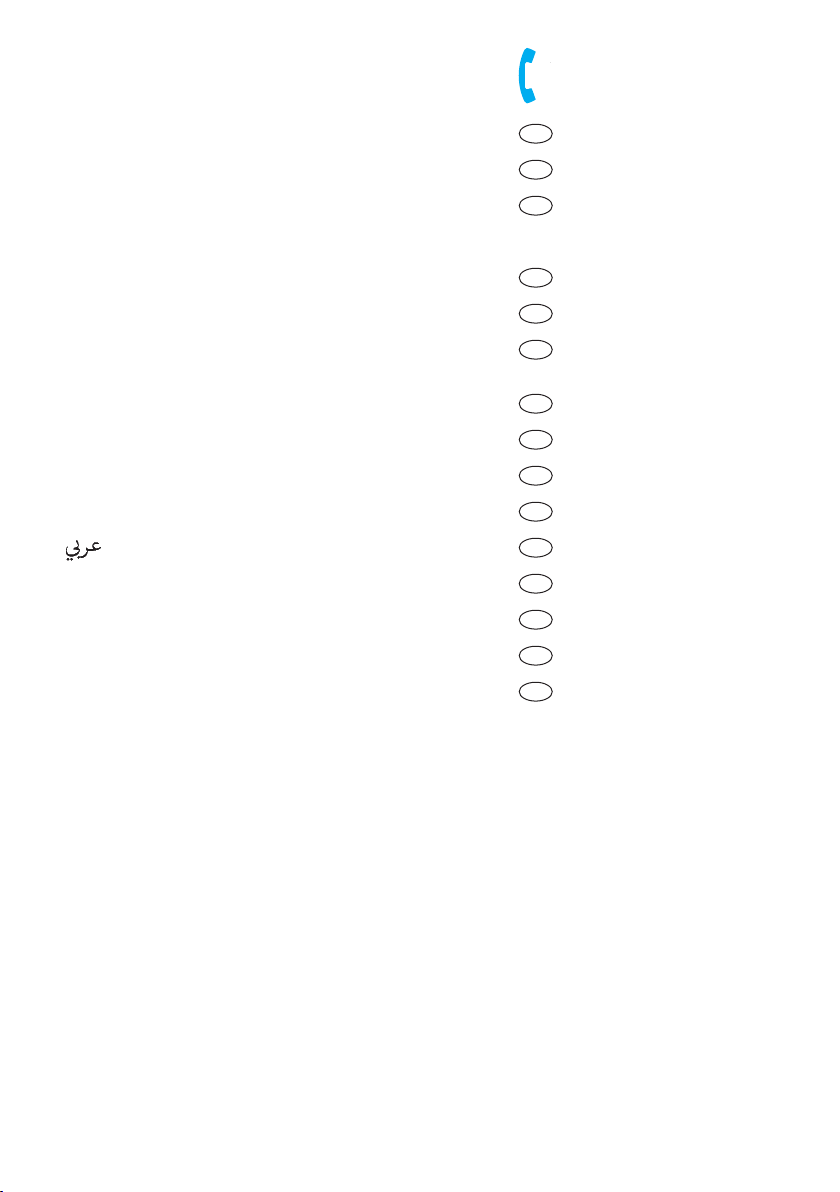
Description
a Oral-B FlossAction brush head
b On/off button
c Brushing mode button
d Handle
e Handle display
f SmartPlug charger (includes charging ring
and SmartPlug)
g Base plate
h Protective cover
i Oral-B 3D WHITE brush head (not with all
models)
j SmartGuide display unit
k Wall mount
l Adhesive tape
Specifications:
Type: 3731
Voltage: 100–240 V
Frequency: 50–60 Hz
Power: 3 W
Noise level: 63 db (A)
IP: 67
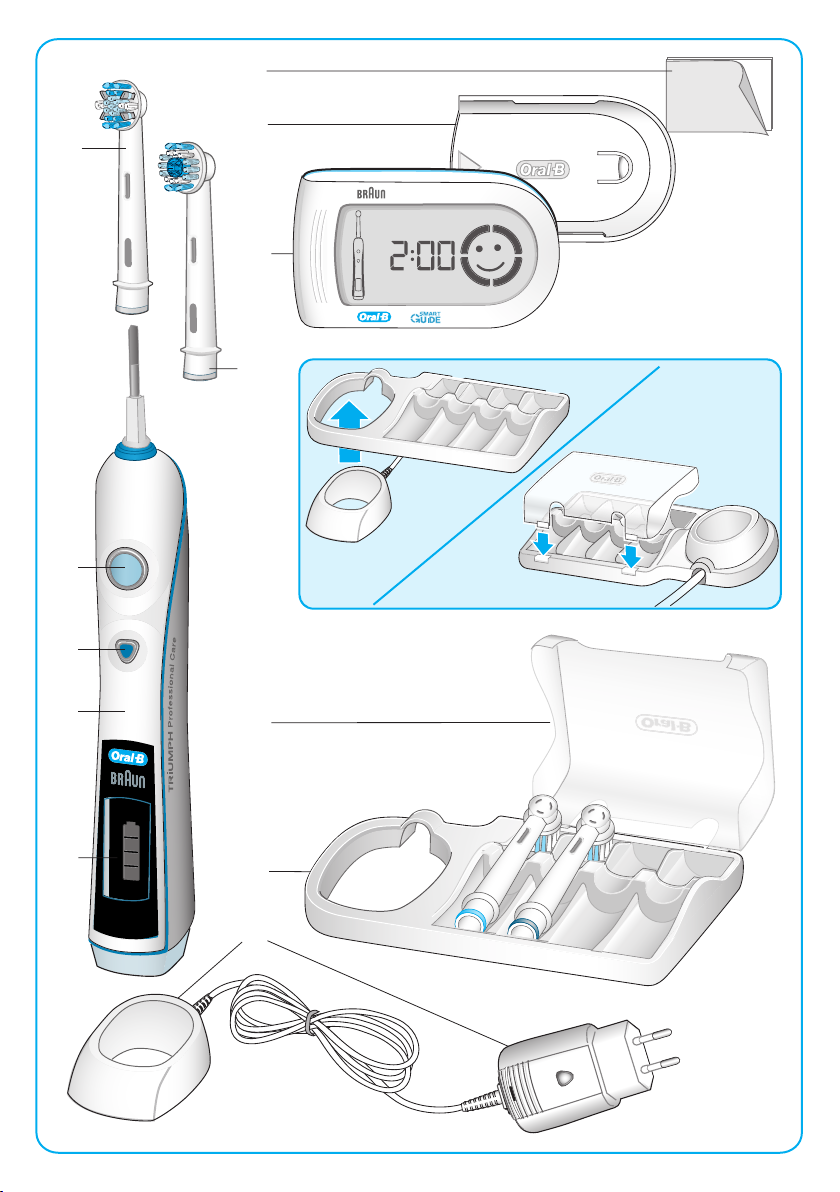
First use
Before brushing for the first time, charge your
toothbrush. Plug the SmartPlug into an electrical
outlet and place the handle (d) on the charging
ring (f), (see «Connecting and charging»).
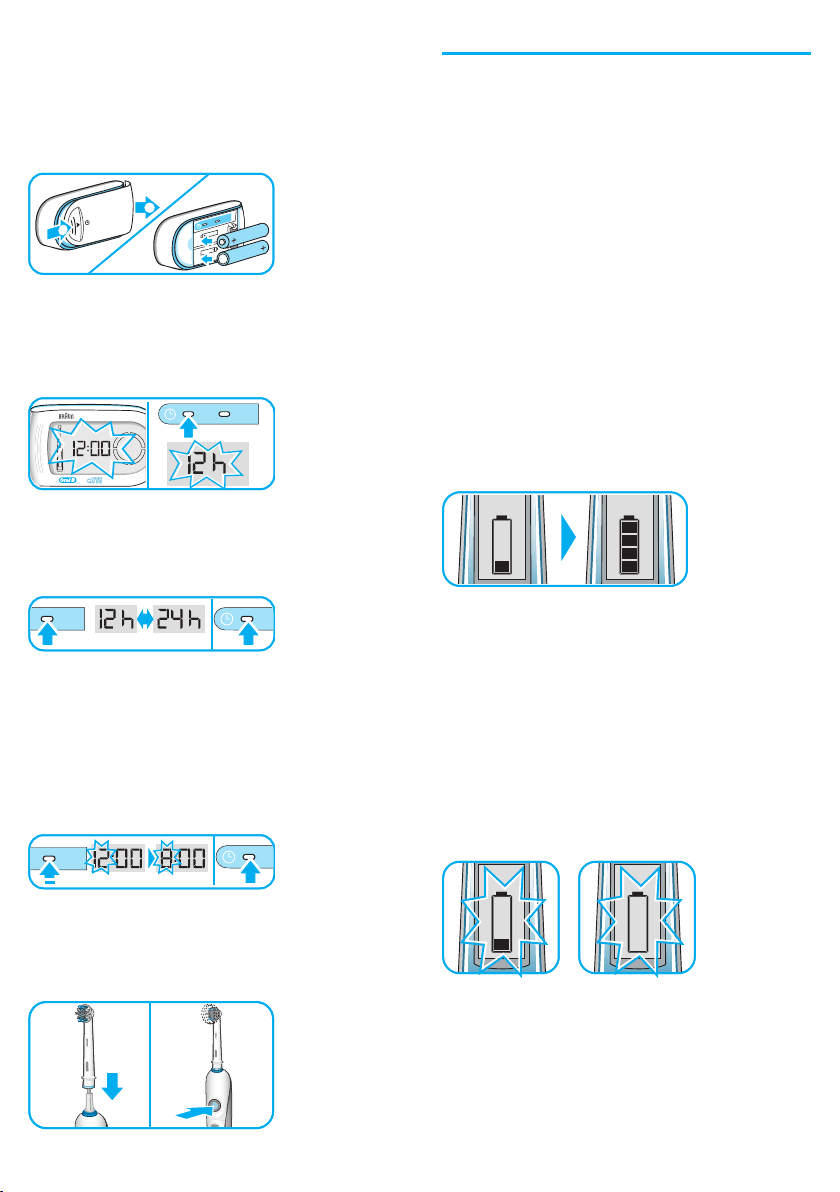
• Your SmartGuide display comes with a
demonstration mode activated. To leave this
mode, please remove the compartment cover
on the back and push the «set» or the «h/min»
button, located in the battery compartment.
Page 5
Please note that your SmartGuide display will
h/min
set
h/min
set
t
h/min
set
t
h/min
set
self-activate this demonstration mode when
you do not use your toothbrush for 28 days.
You can avoid this self-activation by setting
the clock or synchronizing your handle.
h/min
h/min
set
set
2
2
1
1
h/min
h/min
set
set
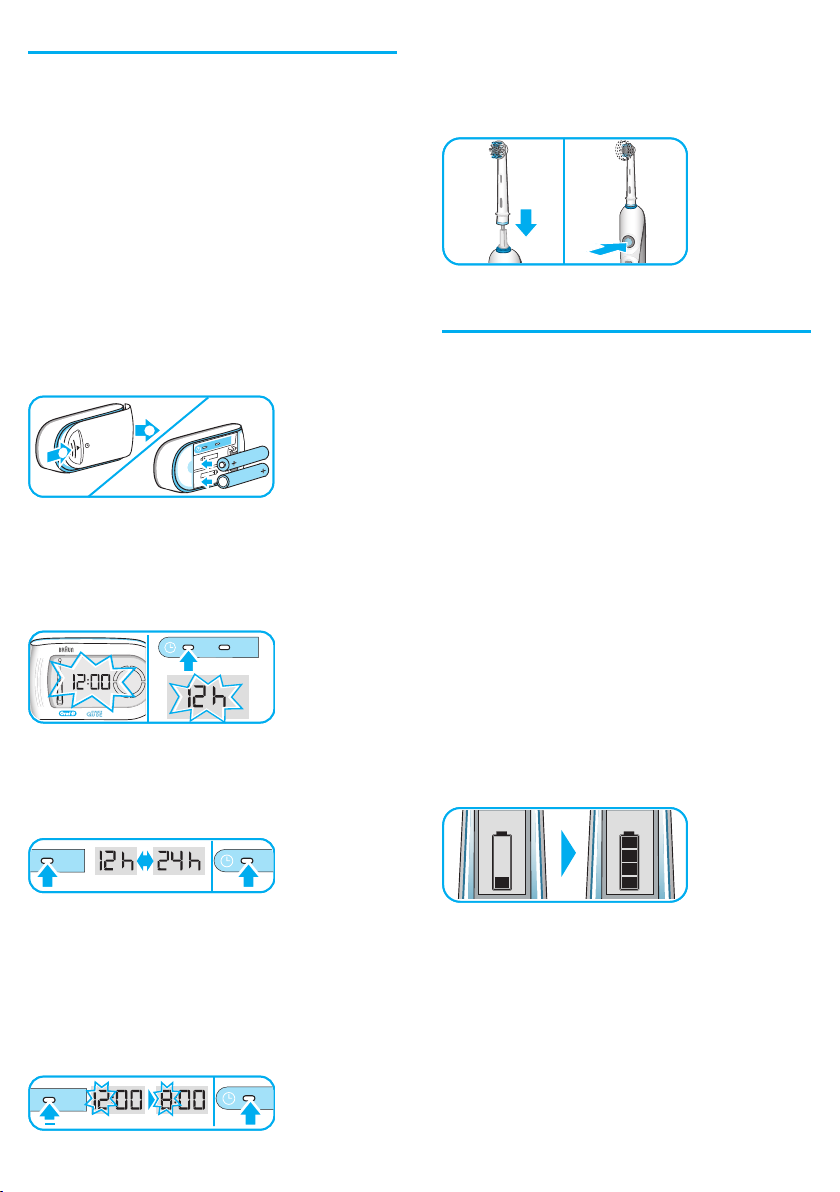
• A flashing «12:00» on the SmartGuide display
indicates that time can be adjusted. Press the
«set» button, located in the battery compartment, until «12 h» is displayed.
set
set
h/min
h/min
• By briefly pressing the «h/min» button, you
can toggle between a «12 h» or «24 h»
daytime format. Push the «set» button to
confirm your choice.
Connecting and charging
Your toothbrush has a waterproof handle, is
electrically safe and designed for use in the
bathroom.
To assemble the charging unit, insert the
protective cover (h) on the back of the base
plate (g). Then, place the base plate on the
charging ring (f) until it clicks into place.
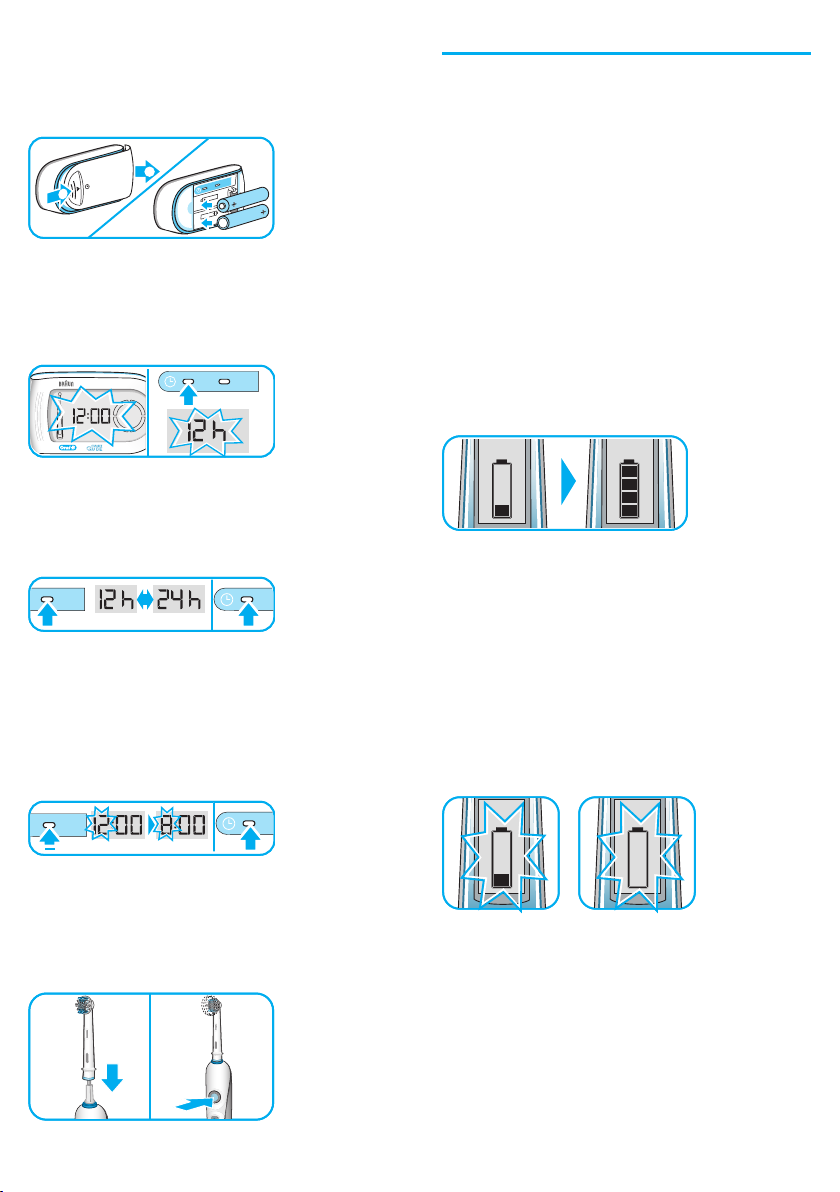
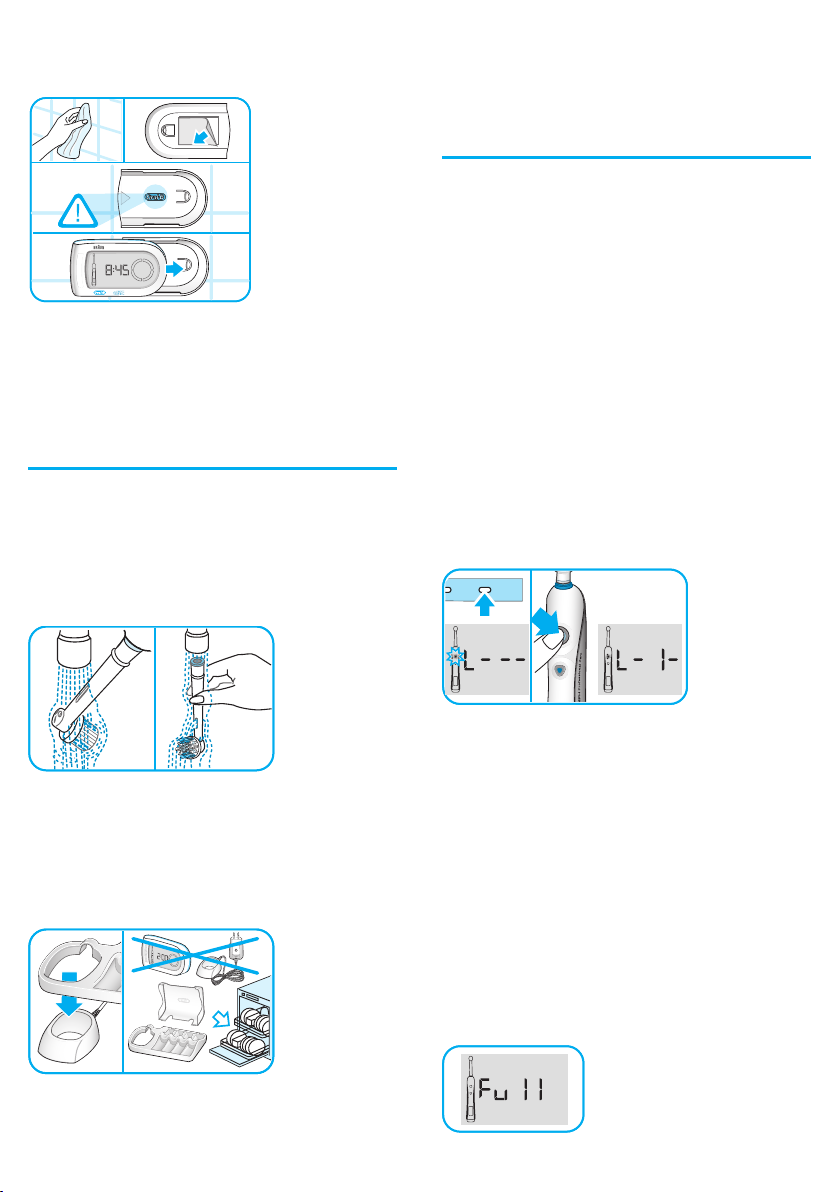
• Plug the SmartPlug into an electrical outlet
and place the toothbrush handle (d) on the
charging unit. A battery symbol should appear
in the handle display (e). The battery symbol
will fill up while the handle is being charged.
Once the handle is fully charged, the battery
symbol will be filled with four bars. A full
charge takes at least 10 hours to complete
and allows for approximately 10 days of
regular brushing (twice a day, 2 minutes).
Please note: If the battery symbol is not
displayed immediately, continue charging.
It will appear in 10–15 minutes.
• Then the hour digit starts flashing. Press the
«h/min» button until the right hour appears
and confirm with the «set» button. Proceed
the same way to set both minute digits. If you
prefer not using this clock feature, the flashing
«12:00» will disappear automatically after 24h.
You can start your toothbrush by pressing the
on/off button (b). To avoid splashing, guide the
brush head to your teeth before switching on
the appliance.
Oral-B
Oral-B
Oral-B
Oral-B
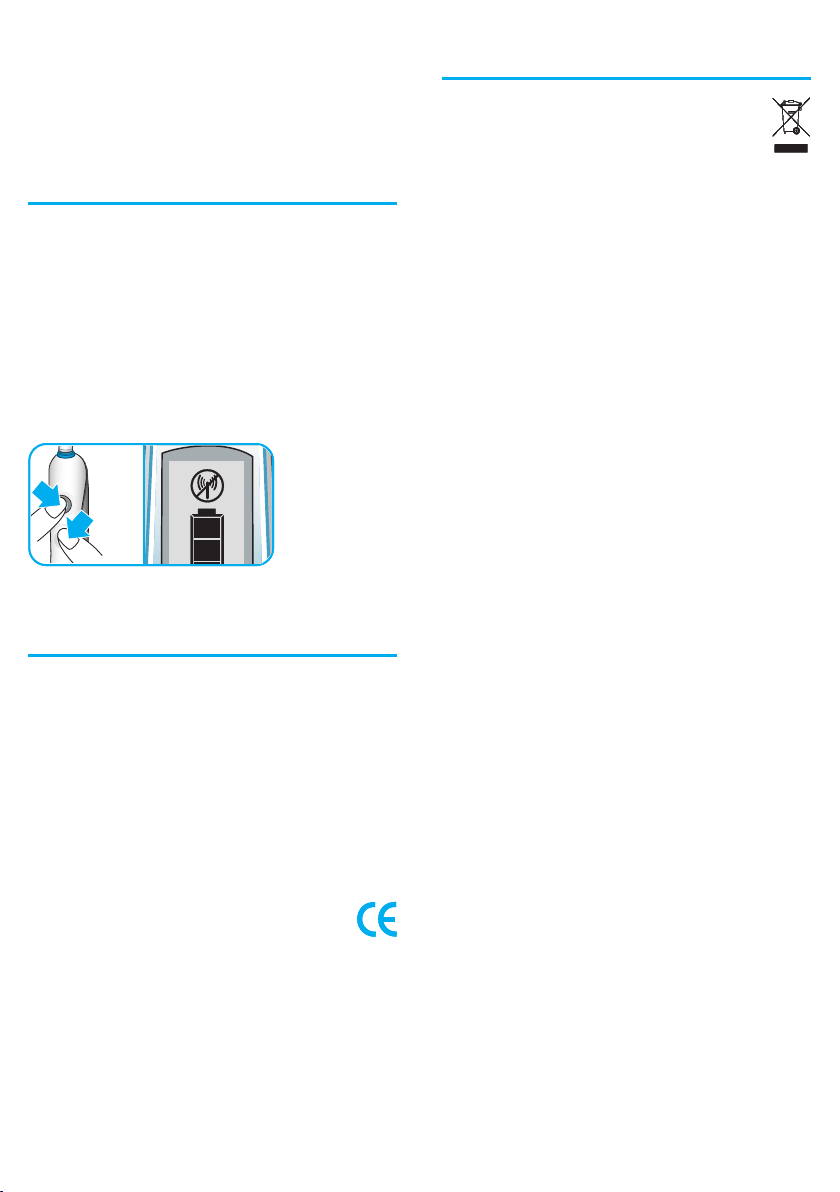
• When the rechargeable battery is low, the
battery symbol with one remaining bar starts
flashing. Your toothbrush will slow down
and then stop. When the battery is fully
discharged, the empty frame of the battery
symbol flashes. It will then need a 15-minute
charge before you can use it for a 2-minute
brushing.
• For everyday use, the toothbrush handle can
be stored on the charging unit to maintain it at
full power. There is no risk of overcharging the
battery. However for environmental reasons,
Oral-B recommends to unplug the charging
unit until the next recharge is required.
• To maintain the maximum capacity of the
rechargeable battery, unplug the charging unit
and fully discharge the handle with regular use
at least every 6 months.
5
Page 6
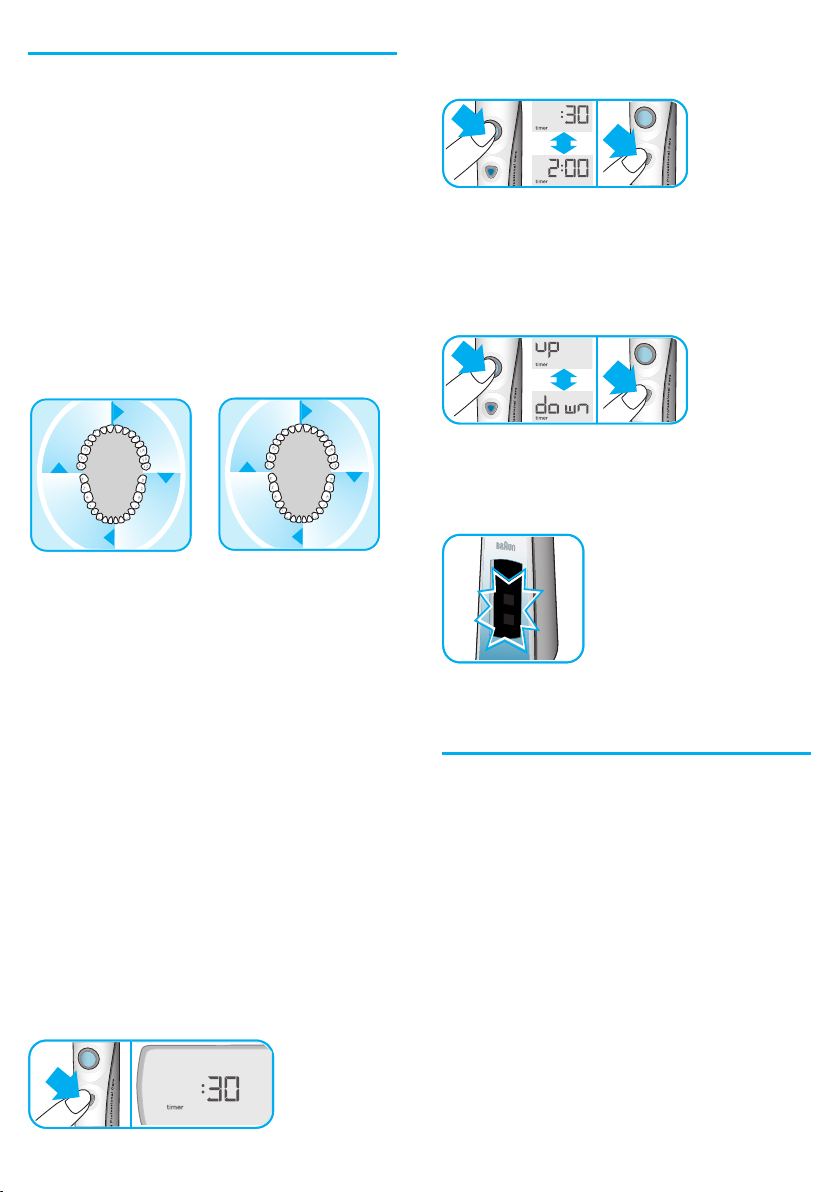
Personalizing the timer
You can choose between the «Professional» or
«2-Minute» timer and the «Count Up» or «Count
Down» timer to meet your specific needs.
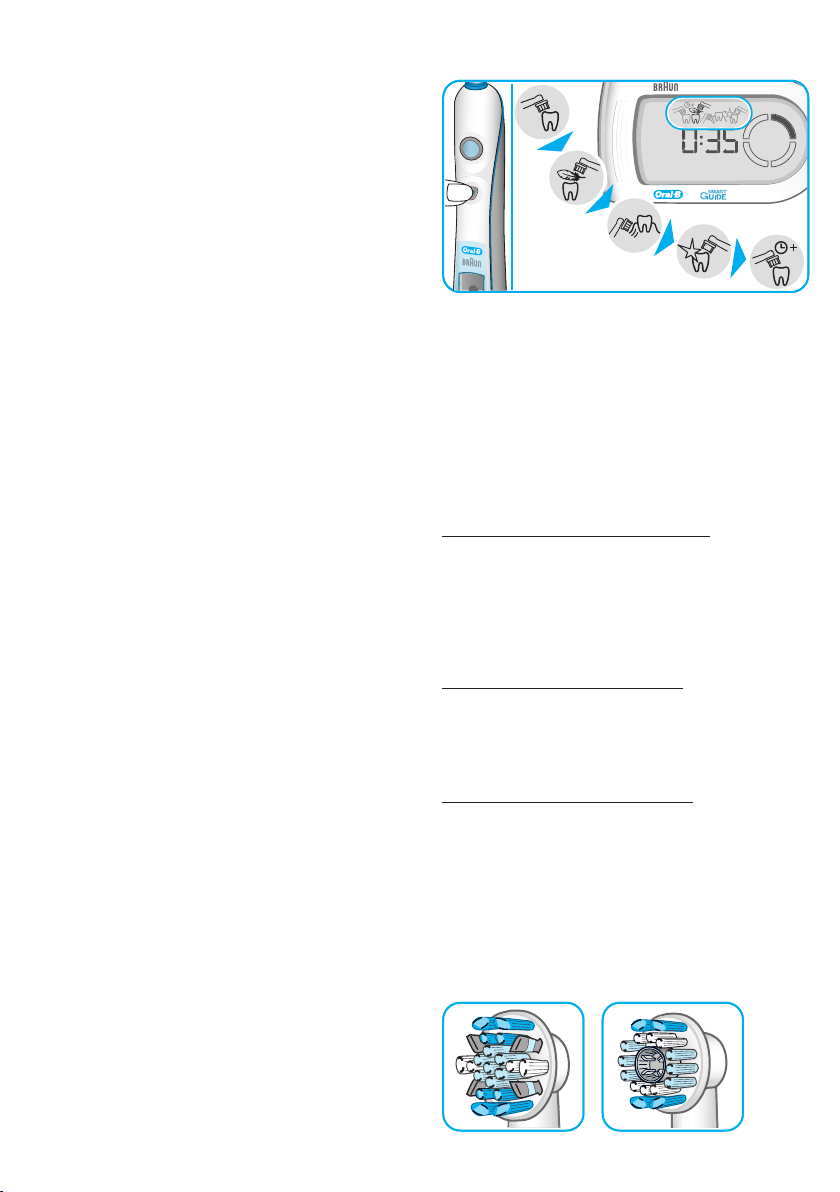
The «2-Minute Timer» indicates by a long
stuttering sound and a «smiley» on the
SmartGuide display unit that the dentist
recommended 2-minute brushing time has been
reached. In addition the «Professional Timer»
helps you brush all four quadrants of your
mouth equally. It signals with a short stuttering
sound at 30-second intervals (45-second
intervals within «Deep Clean» mode) and the
«quadrant circle» on the SmartGuide display unit
that it is time to move to the next quadrant of
your mouth.
4
4
c
3
3
c
c
0
e
e
s
s
0
0
3
3
c
c
e
e
s
s
0
s
s
e
e
c
c
3
3
0
0
s
s
e
0
0
e
c
c
3
3
Both timers memorize the elapsed brushing
time, even when the handle is briefly switched
off during brushing. When pausing longer than
30 seconds, the timer resets to the initial
starting point.
c
5
e
e
s
s
5
5
4
4
c
c
e
e
s
s
5
s
s
e
e
c
c
4
4
5
5
s
s
e
5
5
e
c
c
4
4
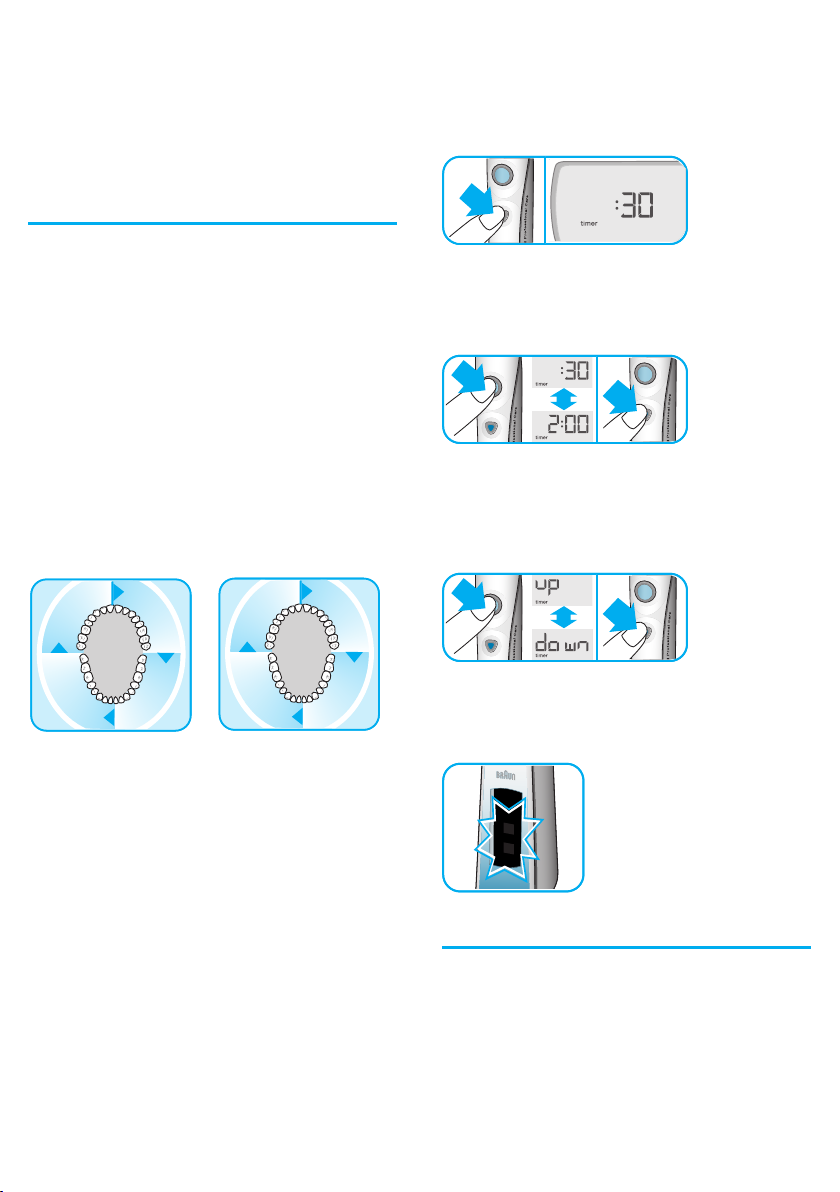
• By briefly pressing the on/off button (b), switch
to the «2-Minute Timer». Confirm your choice
by pushing the mode button (c).
• This will lead you directly to the «Count Up
Timer» display («up» and «timer» will be
shown). Switch to the «Count Down Timer»
by pressing the on/off button and confirm it
with the mode button.
Please note: It is normal that the handle display
shows two flashing bars when operating in the
timer setting mode.
The «Count Up Timer» displays your actual
brushing time. The «Count Down Timer»
indicates the remaining brushing time. Starting
with «2:00» minutes, it goes down to «0:00».
When brushing longer than two minutes, it
automatically changes to the «Count Up Timer».
The total brushing time can be extended to
3 minutes by using the «Deep Clean» mode
(see «Brushing modes»).
Your toothbrush comes with the «Professional
Timer» and the «Count Up Timer» activated. If
you wish to change these settings, proceed as
follows:
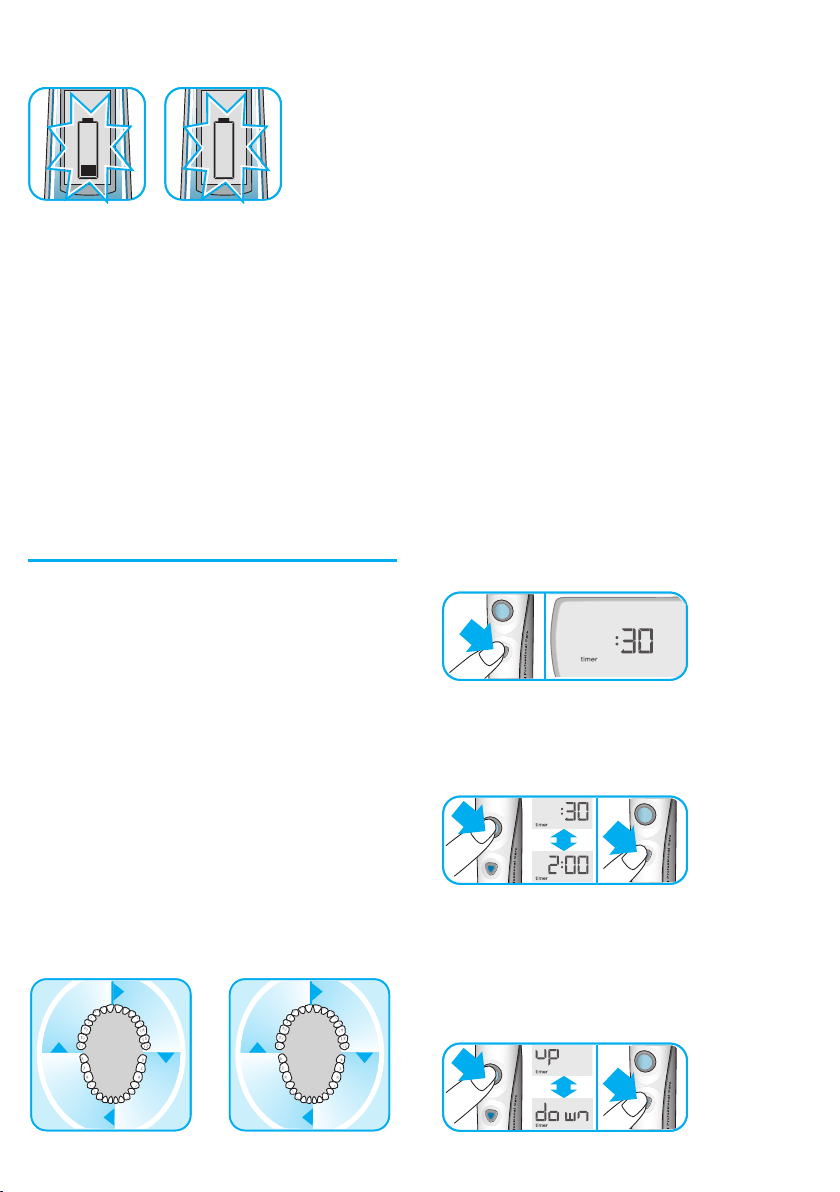
• Press and hold the mode button (c) until the
SmartGuide display unit (j) shows «:30» and
«timer».
3 sec.3 sec.
6
Brushing
Brushing technique
• Guide the brush head slowly from tooth to
tooth.
• Hold the brush head in place for a few
seconds before moving on to the next tooth.
• Brush the gums as well as the teeth, first the
outsides, then the insides, finally the chewing
surfaces.
• Do not press too hard or scrub, simply let
the brush do all the work. When you finish
brushing, the total brushing time will be
displayed for 30 seconds before the display
switches back to the time mode. To directly
get to the time mode, clear the brushing time
display by pushing the mode button.
Your toothbrush has a pressure control feature
to help ensure that the right degree of pressure
is applied. This helps protect your gums from
Page 7
excessive brushing and makes your toothbrush
easy to operate. If too much pressure is applied,
the oscillating movement of the brush head will
continue but the pulsation will stop. In addition
to feeling the change, you can also hear a
different sound.
In the first few days of using any electric toothbrush, your gums may bleed slightly. In general,
bleeding should stop after a few days. Should
it persist after 2 weeks, please consult your
dentist or dental hygienist. If you have sensitive
teeth and gums, Oral-B recommends using the
«Sensitive» mode.
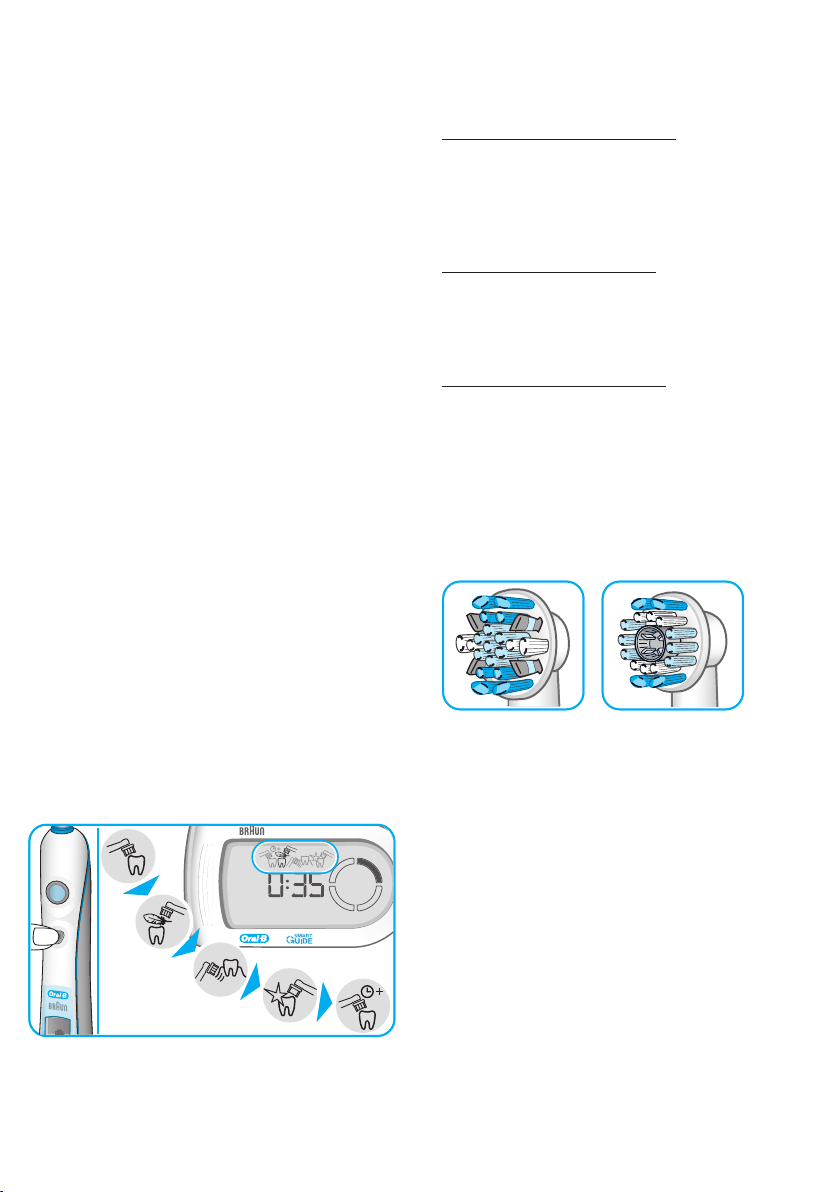
Brushing modes
Your toothbrush offers different brushing modes
for varying oral care needs:
«Daily Clean» – Exceptional mouth cleaning.
«Sensitive» – Gentle, yet thorough cleaning
for sensitive areas.
«Massage» – Gentle massage of gums.
«Whitening» – Polishing and whitening for
occasional or everyday use.
«Deep Clean» – Exceptional mouth cleaning
with extended brushing time.
Within this mode the brushing
time has been extended to
45 seconds per quadrant for
a total brushing time of
3 minutes.
Please note: The «Whitening» mode is best used
with an Oral-B 3D WHITE (i) brush head.
Brush heads (depending on model)
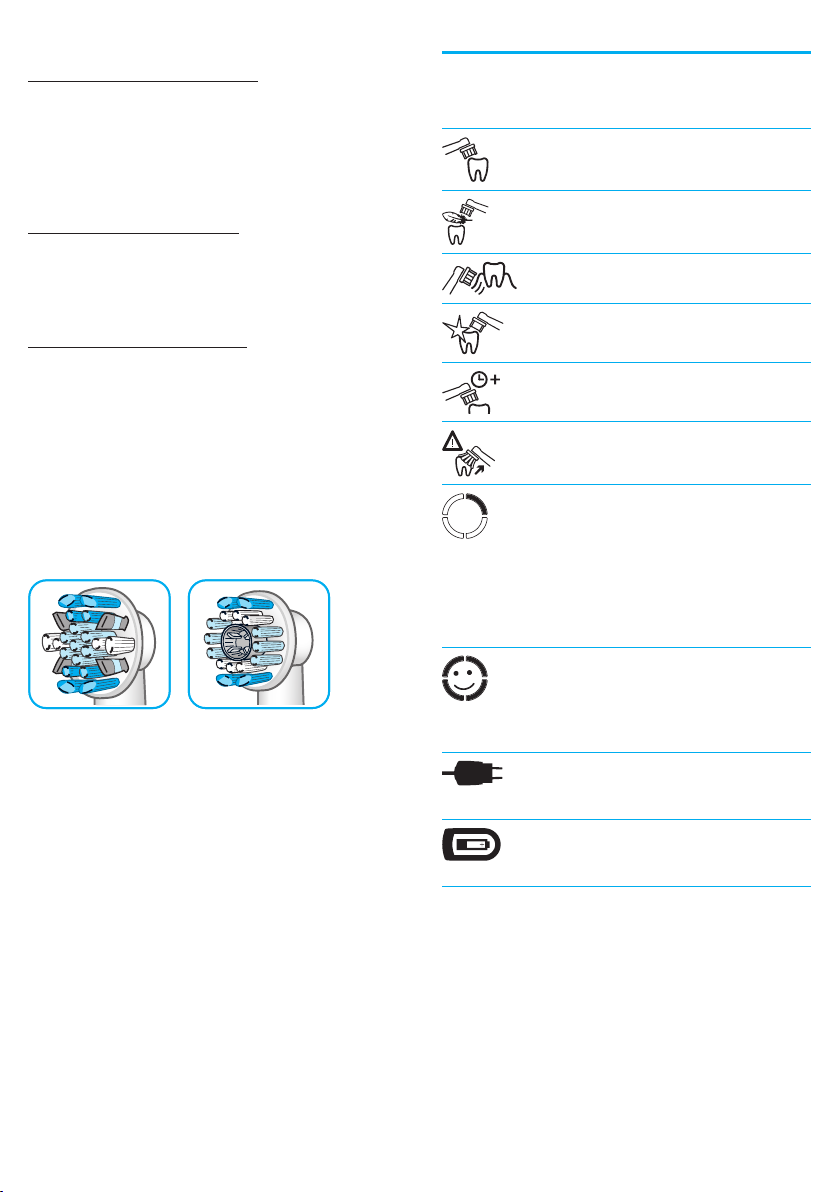
Oral-B FlossAction brush head
The Oral-B FlossAction brush head (a) is
recommended for everyday deep cleaning. It
features micropulse bristles that get deep in
hard-to-reach areas between your teeth, gently
removing hidden plaque.
Oral-B Sensitive brush head
The Oral-B Sensitive brush head provides
thorough cleaning for sensitive teeth and gums.
It has an extra soft bristle texture that is gentle
on teeth and gums.
Oral-B 3D WHITE brush head
For occasional or everyday polishing, please
use the Oral-B 3D WHITE brush head (i) (not
with all models). It features a dentist-inspired
polishing cup to remove surface stains from
coffee, tea and tobacco for effective brightening.
Please note that children under 12 years old
should not use the Oral-B 3D WHITE brush
head.
aa
ii
• When pressing the on/off button, your
toothbrush automatically starts in the «Daily
Clean» mode.
• To switch to another mode, successively press
the mode button.
• To return from any mode to the «Daily Clean»
mode, press and hold the mode button.
• To turn your brush off, press the on/off button.
Do not use the Oral-B FlossAction or Oral-B
3D WHITE brush head with braces. We recommend using the Oral-B Ortho brush head, which
is specifically designed to clean around braces
and wires.
All brush heads feature blue INDICATOR bristles
helping you to monitor brush head replacement
need. With proper brushing, twice a day for two
minutes, the light blue color will fade halfway
approximately within 3 months, signalling it is
time to change the brush head.
7
Page 8
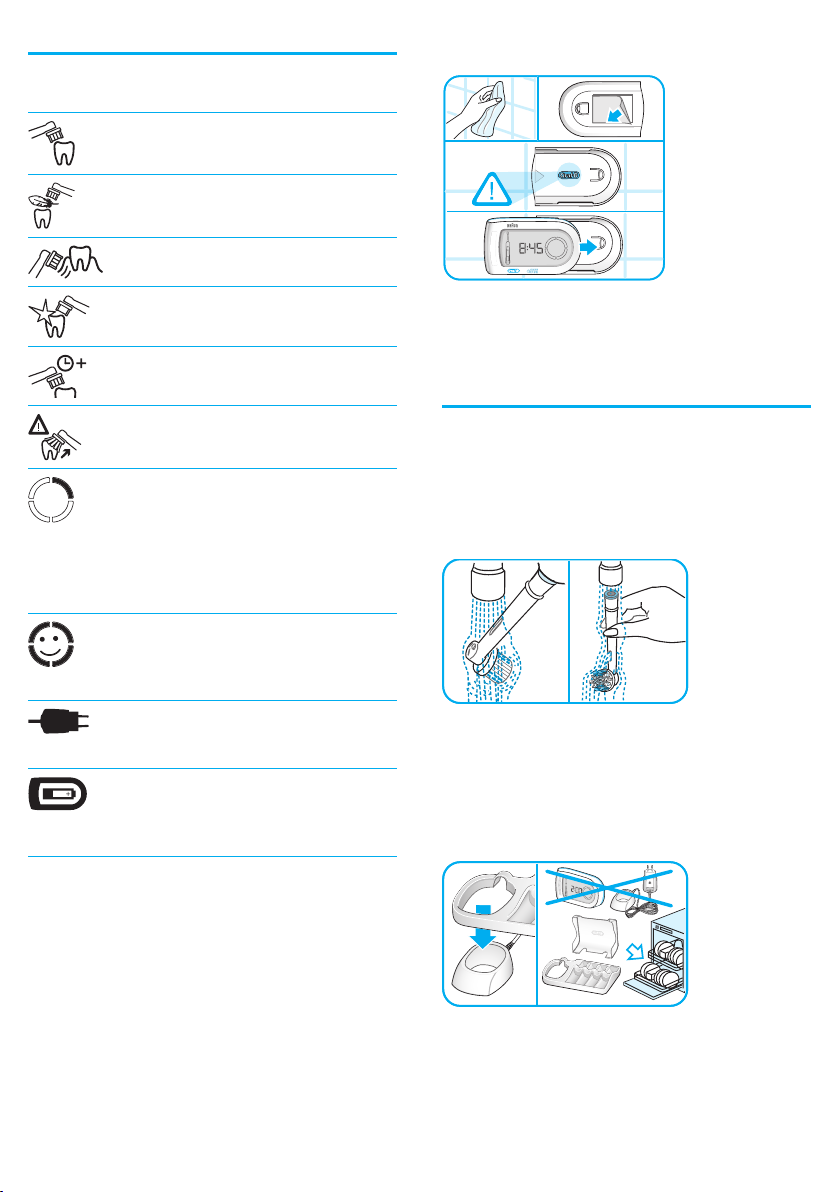
SmartGuide display unit
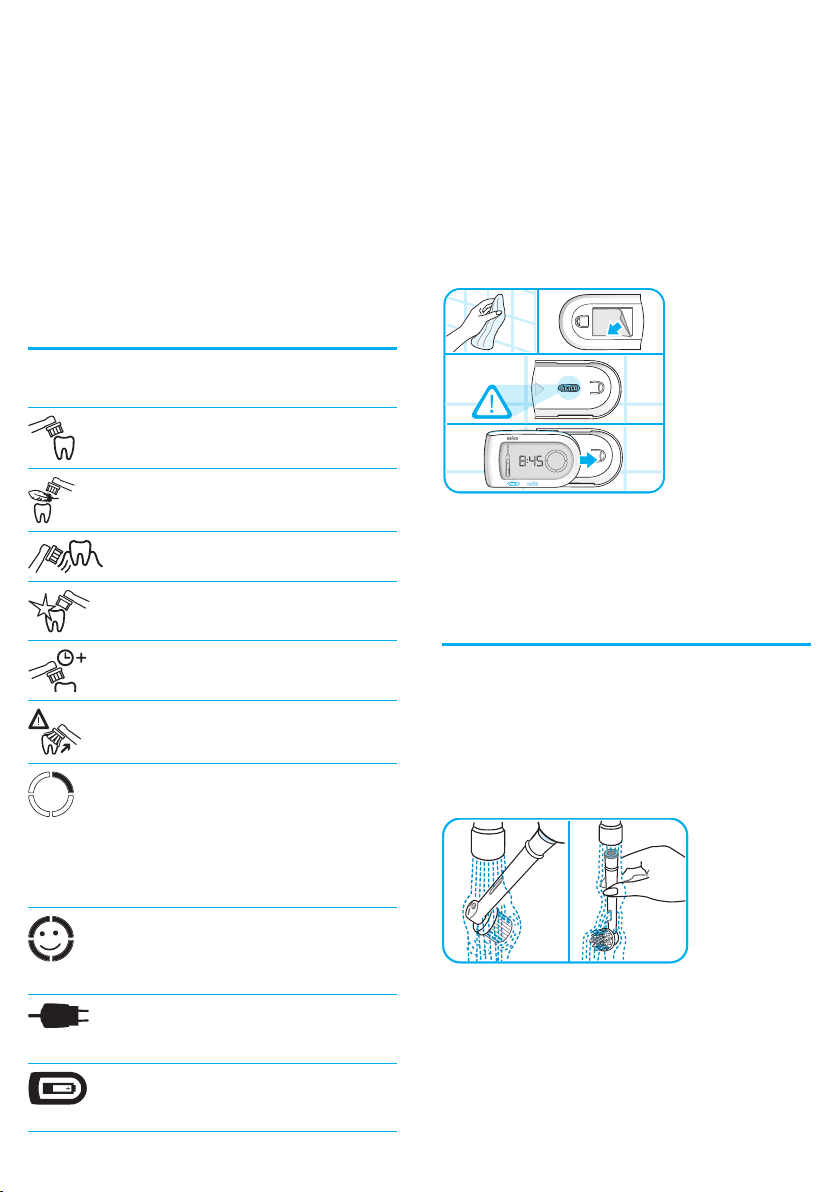
Displayed
Icon
Meaning
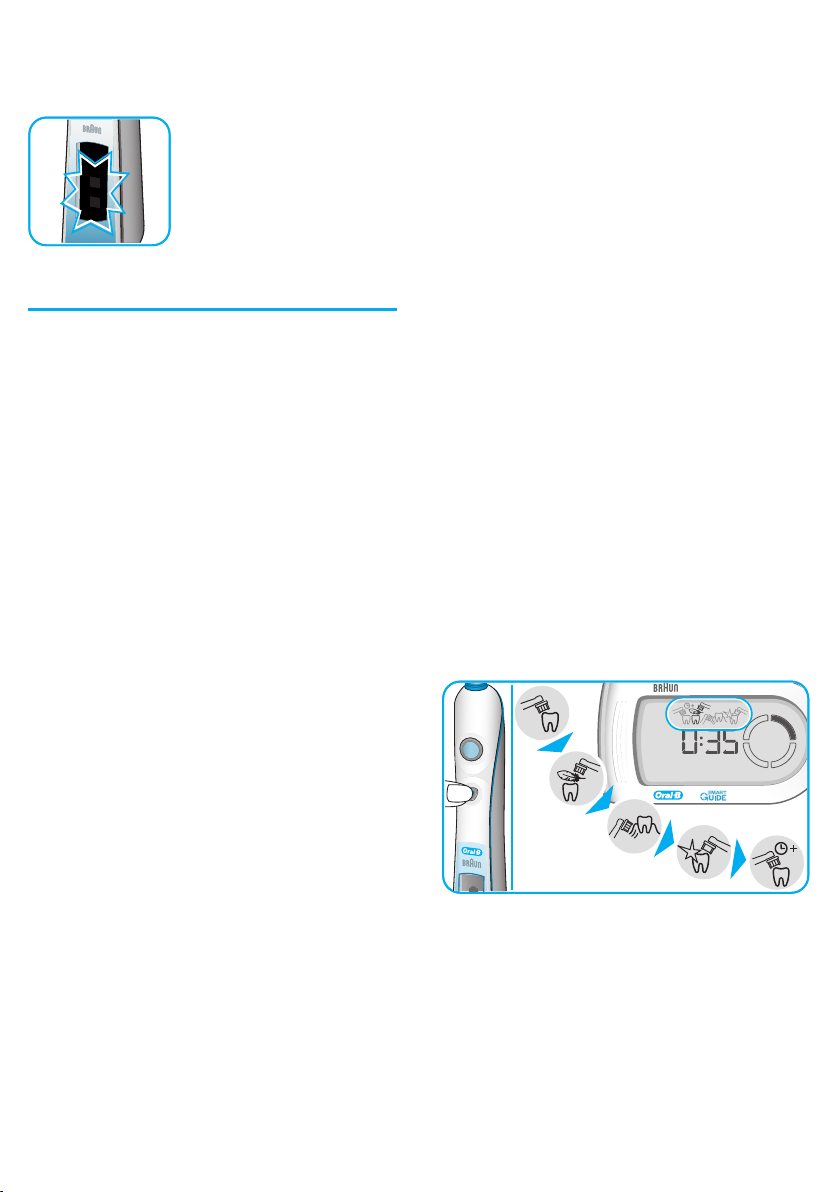
«Daily Clean» mode
«Sensitive» mode
«Massage» mode
the wall. Wait 24h before sliding the SmartGuide
display unit into the fixed wall mount.
«Whitening» mode
«Deep Clean» mode
Too much pressure is applied.
Reduce the brushing force.
«Quadrant circle» – currently you
are brushing in the first 30-second
interval (45-second interval within
«Deep Clean» mode). Move to the
next quadrant of your mouth,
when the second segment starts
flashing.
Dentist recommended 2-minute
brushing time (3-minute brushing
time within the «Deep Clean»
mode) has been reached.
The rechargeable battery of the
handle is low. Charge the
toothbrush handle.
Batteries of the SmartGuide
display unit are low. Change
batteries of the SmartGuide
display unit.
Please note: The adhesive tape will not work on
dirt-repellent surfaces.
Cleaning recommendations
• After brushing, rinse your brush head
thoroughly under running water.
• Remove the brush head from the handle and
clean both parts separately under running
water. Then, wipe them dry before you put the
handle on the charging unit.
• Before cleaning your charging unit, make sure
you disassemble it first. The charging ring
and SmartPlug should never be placed in the
dishwasher. However, all other parts (base
plate and protective cover) are dishwashersafe.
Wall mount
If you prefer to mount the SmartGuide display
unit on a wall, mirror or other surface, use the
adhesive tape (l) to fix the wall mount. Before
doing so, make sure the chosen surface is clean
and dry (remove grease and dust first). Position
the wall mount that the Oral-B logo is readable.
Then, press the wall mount evenly and firmly to
8
• From time to time, you can also clean the
charging ring, SmartPlug and SmartGuide
display unit with a damp cloth.
Both SmartPlug charger and the SmartGuide
display unit should never be placed in water.
Page 9
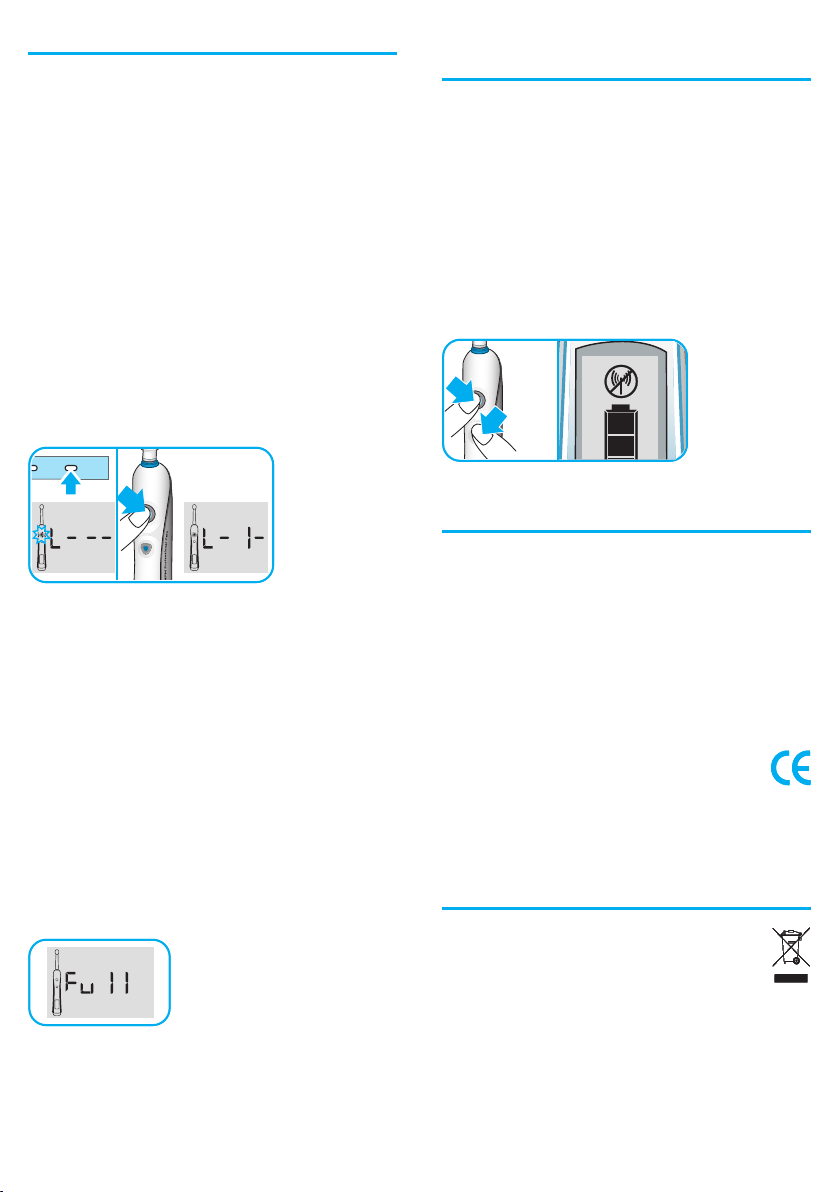
Synchronizing
set
h/min
3 sec.
set
h/min
3 sec.
In order to avoid interference of display
messages when using more than one Oral-B
Triumph toothbrush with separate SmartGuide
display units in the same household, you need
to assign the handles to their respective display
units. Please follow the steps below:
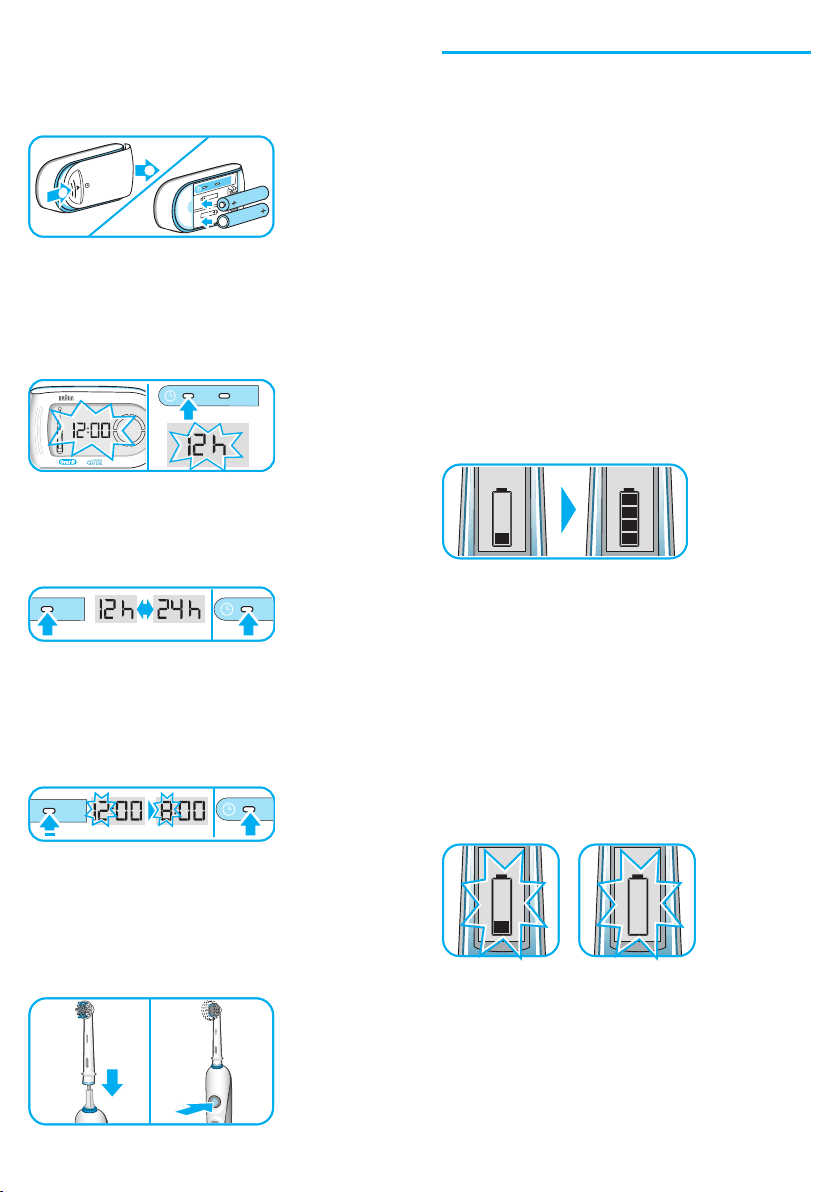
• Push the «h/min» button in the battery
compartment for at least 3 seconds. The
SmartGuide display unit shows «L---», indicating the «Learn» mode for synchronization
is activated.
• Now you are requested by a flashing
on/off button in the toothbrush icon on the
SmartGuide display unit to turn the handle on.
When doing so, the automatic synchronization
process starts. It is finished when «L-1-» is
displayed.
• Then turn off the handle.
Deactivating the radio
transmission
If you want to use or carry your toothbrush in
surroundings where radio controlled appliances
are not allowed (e.g. hospitals or aircraft), deactivate the radio transmission first.
To do so, simultaneously press the on/off and
mode button for 3 seconds. The handle display
shows the radio deactivation icon. If you want
to reactivate the radio transmission, press both
buttons again for 3 seconds and the display
icon disappears.
3 sec.3 sec.
Removing batteries
SmartGuide display unit
Remove fully discharged batteries immediately.
Replace all batteries at the same time. Do not
mix alkaline batteries with zinc carbon or
rechargeable batteries.
If you would like to assign a second handle to
the same SmartGuide display unit, repeat the
last two steps described above with the other
handle. You can exit the «Learn» mode by
pressing the «h/min» or «set» button. Otherwise
the «Learn» mode will automatically end after
30 seconds.
Please note:
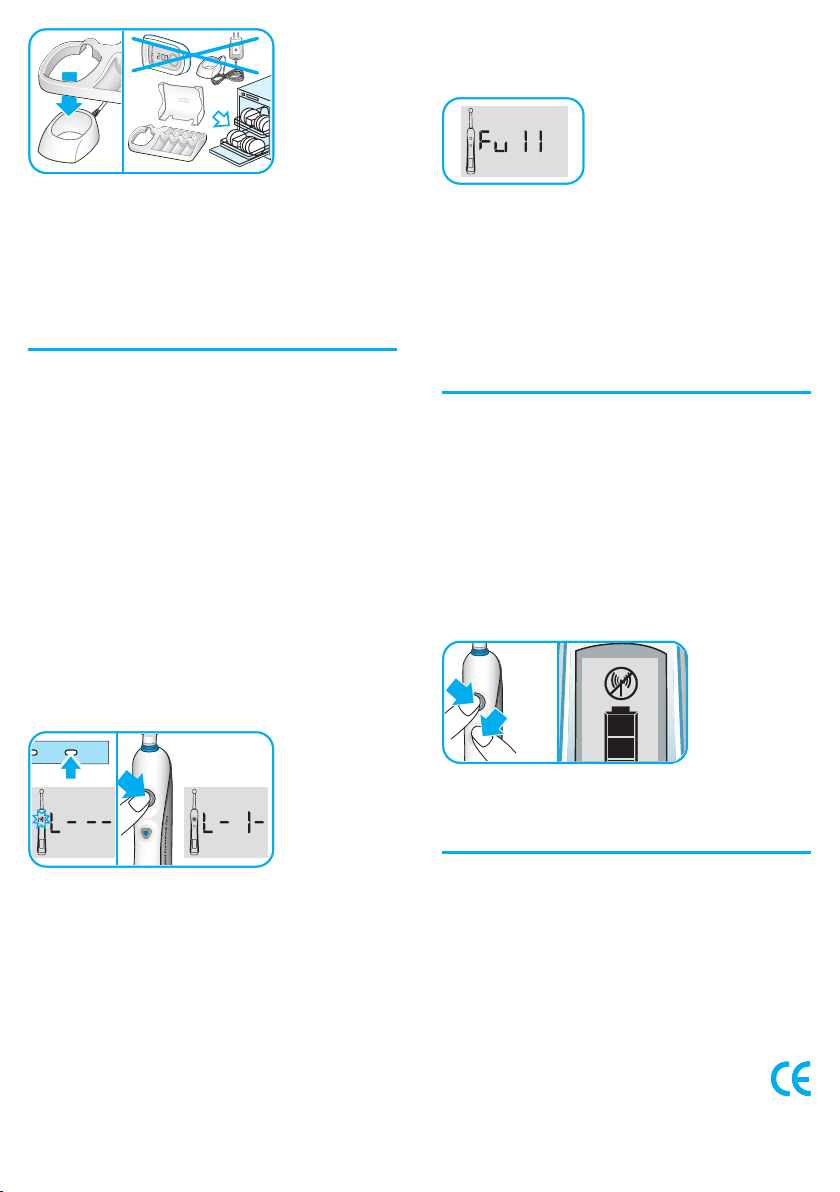
• A maximum of 2 handles can be synchronized
with one SmartGuide display unit. After you
synchronized the second handle, «Full» will be
displayed.
• When changing batteries of the SmartGuide
display unit, stored data will be erased.
Therefore, please repeat the synchronization
process every time you change the batteries.
Subject to change without notice.
This appliance complies with the require-
ments covered by the European Directive
1999/5/EC. Receiver Class 3, Duty Cycle
Class 3.
Environmental notice
This product contains rechargeable
batteries. In the interest of protecting the
environment, please do not dispose of
the product in the household waste at the
end of its useful life. Disposal can take place at
an Oral-B Braun Service Center or at approved
recycling or disposing locations in accordance
with local regulations.
9
Page 10

Guarantee
We grant 2 years limited guarantee on the
product commencing on the date of purchase.
Within the guarantee period we will eliminate,
free of charge, any defects in the appliance
resulting from faults in materials or workmanship, either by repairing or replacing the
complete appliance as we may choose. This
guarantee extends to every country where this
appliance is supplied by Braun or its appointed
distributor.
This guarantee does not cover: damage due to
improper use, normal wear or use, especially
regarding the brush heads, as well as defects
that have a negligible effect on the value or
operation of the appliance. The guarantee
becomes void if repairs are undertaken by
unauthorised persons and if original Braun parts
are not used.
To obtain service within the guarantee period,
hand in or send the complete appliance with
your sales receipt to an authorised Oral-B Braun
Service Centre.
This guarantee in no way affects your rights
under statutory law.
10
Page 11

Français
Oral-B® Triumph avec SmartGuide a été
conçue avec soin pour vous offrir, ainsi qu’à
votre famille, une solution de brossage unique, à
la fois sûre et efficace. Toutefois, lorsque vous
utilisez des produits électriques, vous devez
toujours respecter certaines précautions.
IMPORTANT
• La brosse à dents Oral-B Triumph est fournie
avec une alimentation SmartPlug (Safety Extra
Low Voltage intégré). Ne changez pas ou ne
manipulez pas l’un de ses éléments : vous
risquez un choc électrique. Vérifiez régulièrement que l’alimentation SmartPlug n’est pas
endommagée et si l’appareil est endommagé
ou dysfonctionne, cessez d’utiliser le produit.
Portez les unités endommagées dans un
Centre de service Oral B Braun
• Ce produit n’est pas conçu pour les enfants
de moins de trois ans.
• L’appareil n’est pas conçu pour les enfants ou
les personnes dont les capacités physiques,
sensorielles ou mentales sont réduites, sauf
sous le contrôle d’une personne responsable,
pour leur propre sécurité. En général, nous
vous recommandons de garder le produit hors
de portée des enfants.
• Si le produit chute, il y a lieu de remplacer
la tête de brosse avant l’utilisation suivante,
même si aucun dommage n’est visible.
• Tenez la SmartPlug éloignée de l’eau ou d’un
autre liquide.
• Ne modifiez pas et ne réparez pas le produit.
Vous pourriez provoquer un incendie, un choc
électrique ou une blessure. Consultez votre
distributeur pour toute réparation ou contactez
un Centre de service Oral-B. Ne démontez
pas le produit, sauf pour remplacer la pile.
• Lorsque vous retirez la pile pour la jeter, veillez
à ne pas court-circuiter les pôles positif (+) et
négatif (–).
• Ne touchez pas la SmartPlug avec les mains
mouillées. Cela pourrait entraîner un choc
électrique.
• Utilisez ce produit seulement pour l’usage
envisagé et décrit dans ce manuel. N’utilisez
pas d’accessoires ou de chargeurs qui ne sont
pas recommandés par le fabricant.
Si vous subissez un traitement pour un
•
problème buccal quelconque, consultez d’abord
votre dentiste ou médecin avant toute utilisation.
Votre Oral-B Triumph avec SmartGuide possède
un écran sans fil interactif pour vous aider à
optimiser le brossage de vos dents.
®
.
Important
• Pour éviter toute interférence électromagnétique et/ou problème de compatibilité,
désactivez la transmission radio de votre
brosse à dents avant de l’emporter ou de
l’utiliser dans des endroits où s’appliquent
des restrictions, comme les avions ou
certaines zones délimitées dans les hôpitaux
(voir « Désactivation de la transmission
radio »).
• Les personnes ayant des pacemakers
doivent toujours tenir leur brosse à dents à
plus de 15 centimètres de leur pacemaker
lorsqu’elle est allumée. Si vous pensez
que des interférences peuvent se produire,
désactivez la transmission radio de votre
brosse à dents avant de l’utiliser (voir
« Désactivation de la transmission radio »).
Description
a Tête de brosse Oral-B Floss-Action
b Bouton marche/arrêt
c Bouton mode de brossage
d Manche
e Ecran manche
f Chargeur SmartPlug (avec anneau de
chargement et SmartPlug)
g Plaque de base
h Couvercle de protection
i Tête de brosse Oral-B 3D WHITE (pas avec
tous les modèles)
j Unité d’affichage SmartGuide
k Support mural
l Ruban adhésif
Spécifications :
Type : 3731
Voltage : 100–240 V
Fréquence : 50–60 Hz
Puissance : 3 W
Niveau sonore : 63 dB (A)
IP: 67
Première utilisation
Chargez votre brosse à dents avant le premier
brossage. Branchez la SmartPlug dans une
prise électrique et mettez le manche (d) sur
l’anneau de chargement (f), (voir «Branchement
et chargement»).
• L’écran SmartGuide s’active en mode
démonstration. Pour quitter ce mode, poussez
soit sur le bouton « set » soit le bouton « h/min »
11
Page 12
situé dans le compartiment de la pile. Notez que
h/min
set
h/min
set
t
h/min
set
t
h/min
set
l’écran SmartGuide active automatiquement le
mode démonstration lorsque la brosse à dents
n’a pas été utilisée pendant 28 jours. Vous
pouvez empêcher cette activation automatique
en réglant l’horloge ou en synchronisant le
manche.
h/min
h/min
set
set
2
2
1
1
h/min
h/min
set
set
• Le chiffre «12:00» clignote à l’écran SmartGuide
pour indiquer que l’heure peut être réglée.
Appuyez sur le bouton « set » situé dans le
compartiment de la pile jusqu’à ce que la
mention « 12 h » s’affiche.
set
set
h/min
h/min
•
En appuyant brièvement sur le bouton
« h/min », vous pouvez alterner entre le format
horaire « 12 h » ou « 24 h ». Appuyez sur le
bouton « set » pour confirmer votre choix.
Branchement et chargement
Votre brosse à dents est équipée d’un manche
étanche, garantit la sécurité électrique et est
conçue pour être utilisée dans la salle de bains.
Pour assembler l’unité de chargement, insérez
le couvercle de protection (h) dans l’arrière de la
plaque de base (g). Ensuite, placez la plaque de
base sur l’anneau de chargement (f) jusqu’à ce
qu’il s’enclique
Branchez la SmartPlug dans une prise
•
électrique et mettez le manche (d) sur l’anneau
de chargement. Le symbole de la pile doit
apparaître à l’écran du manche (e). Le symbole
de la pile se remplit lorsque le manche est en
charge. Une fois que le manche est totalement chargé, le symbole de la pile comporte
4 barres. Un chargement complet prend au
moins 10 heures et permet un utilisation de
10 jours environ, en conditions normales (deux
fois par jour, 2 minutes).
• Le chiffre de l’heure commence alors à
clignoter. Appuyez sur le bouton « h/min »
jusqu’à ce que la bonne heure apparaisse et
confirmez avec le bouton « set ». Faites-en
de même pour régler les deux chiffres des
minutes. Si vous préférez ne pas utiliser
cette fonction horaire, le « 12:00 » clignotant
disparaîtra automatiquement après 24 heures.
Pour démarrer votre brosse à dents, appuyez
sur le bouton marche/arrêt (b). Pour éviter les
éclaboussures, placez la tête de la brosse sur
vos dents avant d’allumer l’appareil.
Oral-B
Oral-B
Oral-B
12
Oral-B
Remarque : Si le symbole de la pile n’apparaît
pas immédiatement, poursuivez le chargement.
Le témoin s’illuminera en 10 à 15 minutes.
• Lorsque la pile rechargeable est presque vide,
le symbole de la pile ne comporte plus qu’une
barre et se met à clignoter. Votre brosse à
dents ralentit et puis s’arrête. Lorsque la pile
est totalement déchargée, le symbole vide
de la pile clignote. Il faut charger la brosse à
dents 15 minutes avant de pouvoir l’utiliser
pendant 2 minutes.
• En usage quotidien, le manche de la brosse à
dents peut être replacé sur l’unité de chargement pour rester totalement chargé. Il n’y a
aucun risque de surcharger la pile. Toutefois,
pour des raisons environnementales, Oral-B
recommande de débrancher le chargeur
jusqu’au prochain chargement.
Page 13
• Pour maintenir une capacité maximale de la
pile rechargeable, débranchez l’unité de
chargement et laissez décharger totalement
le manche en utilisant la brosse à dents
normalement, et ce au moins tous les 6 mois.
activés. Si vous désirez changer ces paramètres,
procédez comme suit :
• Appuyez sur le bouton mode (c) jusqu’à ce
que l’écran SmartGuide (j) affiche « :30 » et
« timer ».
Personnalisation de la
minuterie
Vous pouvez choisir entre la minuterie « Professional » ou « 2-Minute » et la minuterie « Count
Up » ou « Count Down » pour répondre à vos
besoins spécifiques.
Le « 2-Minute Timer » indique par un cliquetis
long et un « smiley » à l’écran du SmartGuide
que le temps de brossage de 2 minutes recommandé par les dentistes a été respecté.
En outre, le « Professional Timer » vous aide à
brosser de la même façon les quatre quadrants
de votre bouche. Il signale par un bref cliquetis
à 30 secondes d’intervalle (45 secondes d’intervalle en mode « Deep Clean ») et le « cercle de
quadrant » à l’écran du SmartGuide qu’il est
temps de passer au quadrant suivant de votre
bouche.
4
4
c
3
3
c
c
0
e
e
s
s
0
0
3
3
c
c
e
e
s
s
0
s
s
e
e
c
c
3
3
0
0
s
s
e
0
0
e
c
c
3
3
Les deux minuteries mémorisent le temps de
brossage écoulé, même lorsque la brosse à
dents est éteinte brièvement pendant le brossage. Lorsque vous l’arrêtez pendant plus de
30 secondes, la minuterie se remet à son point
de départ.
c
5
e
e
s
s
5
5
4
4
c
c
e
e
s
s
5
s
s
e
e
c
c
4
4
5
5
s
s
e
5
5
e
c
c
4
4
3 sec.3 sec.
En appuyant brièvement sur le bouton marche/
•
arrêt (b), passez au « 2-Minute Timer ».
Appuyez sur le bouton « mode » (c) pour
confirmer votre choix.
• Vous passez ainsi immédiatement à l’écran
« Count Up Timer » (« up » et « timer »
s’affichent). Passez au « Count Down Timer »
en appuyant sur le bouton marche/arrêt et
confirmez avec le bouton mode.
Remarque : Il est normal que l’écran du manche
affiche deux barres clignotantes en mode de
configuration de la minuterie.
Le « Count Up Timer » affiche le temps de
brossage réel. Le « Count Down Timer » indique
le temps de brossage restant. Débutant à
« 2:00 » minutes, il descend à « 0:00 ». Lorsque
le brossage dure plus de deux minutes, il passe
automatiquement au « Count Up Timer ».
Le temps de brossage total peut être étendu à
3 minutes en utilisant le mode « Deep Clean »
(voir « Modes de brossage »).
Votre brosse à dents est fournie avec le
«Professional Timer» et le «Count Up Timer»
Brossage
Technique de brossage
• Guidez la tête de la brosse lentement d’une
dent vers l’autre.
• Maintenez la tête de la brosse en place
pendant quelques secondes avant de passer
à la dent suivante.
• Brossez les gencives et les dents, d’abord du
côté extérieur, puis du côté intérieur et en
finissant par les surfaces de mastication.
13
Page 14
• N’appuyez pas trop fort, ne récurez pas,
laissez simplement la brosse faire son travail.
Lorsque vous avez terminé, le temps de
brossage total s’affiche pendant 30 secondes
avant que l’écran ne revienne au mode temps.
Pour passer directement au mode temps,
videz l’écran du temps d’affichage en appuyant sur le mode bouton.
Votre brosse à dents est équipée d’un dispositif
de contrôle de la pression pour vous aider à
appliquer une pression adéquate. Ce dispositif
aide à protéger vos gencives d’un brossage
excessif et facilite l’utilisation de votre brosse
à dents. Lorsque vous appuyez trop fort, le
mouvement oscillant de la brosse se poursuit,
mais les pulsations s’arrêtent. Outre ce changement, la brosse à dents émet également un son
différent.
Les quelques premiers jours d’utilisation de
n’importe quelle brosse à dents électrique, vos
gencives peuvent saigner légèrement.
En général, les saignements s’arrêtent après
quelques jours. Si les saignements persistent
après 2 semaines, consultez votre dentiste. Si
vous avez les dents et les gencives sensibles,
Oral-B recommande l’utilisation du mode
« Sensitive ».
Modes de brossage
Votre brosse à dents propose différents modes
de brossage pour répondre à vos différents
besoins :
« Daily Clean » – Nettoyage exceptionnel de
la bouche.
« Sensitive » – Nettoyage doux, mais
efficace pour les zones
sensibles.
« Massage » – Massage en douceur des
gencives.
« Whitening » –
« Deep Clean »
la bouche avec temps de
Polissage et blanchiment
pour usage occasionnel ou
quotidien.
– Nettoyage exceptionnel de
brossage prolongé. Dans ce
mode, le temps de brossage
est étendu à 45 minutes par
quadrant, pour un temps de
brossage de 3 minutes.
• Pour passer à un autre mode, appuyez
plusieurs fois sur le bouton mode.
• Pour passer d’un mode au mode « Daily
Clean », appuyez sur le bouton mode et
maintenez-le enfoncé.
• Pour éteindre votre brosse à dents, appuyez
sur le bouton marche/arrêt.
Remarque : Le mode « Whitening » doit être
utilisé de préférence avec la tête de brosse
Oral-B 3D WHITE (i).
Têtes de brosse (selon le modèle)
Tête de brosse Oral-B Floss-Action
La tête de brosse Oral-B FlossAction (a) est
recommandée pour un nettoyage quotidien en
profondeur. Elle comporte des poils à micropulsations qui pénètrent loin dans les zones
difficiles d’accès de vos dents, pour éliminer la
plaque cachée.
Tête de brosse Oral-B Sensitive
La brosse Braun Oral-B Sensitive permet de
nettoyer parfaitement les dents et les gencives
sensibles. Ses poils extra-souples sont doux
pour les dents et les gencives.
Tête de brosse Oral-B 3D WHITE
Pour un polissage occasionnel ou quotidien,
utilisez la tête de brosse Oral-B 3D WHITE (i)
(pas avec tous les modèles). Elle est équipée
d’une forme polissante inspirée des instruments
du dentiste pour éliminer les taches laissées par
le café, le thé et le tabac, pour un polissage
efficace.
Notez que les enfants de moins de 12 ans ne
doivent pas utiliser la tête de brosse Oral-B
3D WHITE.
aa
ii
• Lorsque vous appuyez sur le bouton marche/
arrêt, votre brosse à dents démarre automatiquement en mode « Daily Clean ».
14
Page 15
N’utilisez pas les têtes de brosse Oral-B
FlossAction ou Oral-B ProBrigh si vous portez
des appareils. Nous vous recommandons
d’utiliser la tête de brosse Oral-B Ortho, conçue
pour nettoyer parfaitement la bouche autour des
appareils et des fils.
Toutes les têtes de brosse possèdent des poils
bleus INDICATOR pour vous informer lorsque la
tête de brosse doit être remplacée. Si vous vous
brossez les dents activement deux fois par jour
pendant deux minutes, la couleur bleue va
s’affadir progressivement pendant trois mois,
vous indiquant que c’est le moment de remplacer la tête de brosse.
Ecran SmartGuide
Support mural
Si vous préférez monter l’écran SmartGuide sur
le mur, un miroir ou une autre surface, utilisez
le ruban adhésif (l) pour fixer le support mural.
Avant cela, assurez-vous que la surface
concernée est propre et sèche (éliminez toute
trace de graisse et de poussière au préalable).
Placez le support mural de façon à ce que le
logo Oral-B soit lisible. Ensuite, appuyez
fermement sur le support mural pour le fixer
solidement. Attendez 24 heures avant de glisser
l’écran SmartGuide dans le support mural.
Icône
affichée
Signification
Mode « Daily Clean »
Mode « Sensitive »
Mode « Massage »
Mode « Whitening »
Mode « Deep Clean »
Vous appuyez trop fort. Brossez
moins fort.
« Cercle de quadrant » – vous en
êtes au premier intervalle de brossage de 30 secondes (intervalle
de 45 secondes en mode « Deep
Clean »). Passez au quadrant suivant
de votre bouche lorsque le second
segment commence à clignoter.
Le temps de brossage de 2 minutes recommandé par les dentistes
(3 minutes en mode « Deep
Clean ») est écoulé.
La pile rechargeable du manche
est presque vide. Chargez le
manche de la brosse à dents.
Les piles de l’écran SmartGuide
sont presque vides. Changez les
piles de l’écran SmartGuide.
Remarque : Le ruban adhésif n’adhère pas sur
les surfaces anti-salissures.
Recommandations
d’entretien
• Après le brossage, rincez la tête de brosse
soigneusement sous le robinet.
• Retirez la tête de brosse du manche et
nettoyez les deux parties séparément sous le
robinet. Ensuite, séchez-les avant de remettre
le manche sur l’unité de chargement.
• Avant de nettoyer votre unité de chargement,
démontez-la. L’anneau de chargement
SmartPlug ne peut jamais être lavé au lavevaisselle. Toutes les autres parties (plaque de
base et couvercle de protection) peuvent aller
au lave-vaisselle.
15
Page 16
le second manche synchronisé, la mention
set
h/min
3 sec.
set
h/min
3 sec.
« Full » s’affiche.
• De temps en temps, vous pouvez aussi
nettoyer l’anneau de chargement, le SmartPlug
et le SmartGuide avec un tissu humide. Le
chargeur SmartPlug et l’écran SmartGuide ne
peuvent jamais être plongés dans l’eau.
Synchronisation
Pour éviter toute interférence des messages
affichés lorsque vous utilisez plus d’une brosse
à dents Oral-B Triumph avec d’autres écrans
dans le même ménage, vous devez attribuer les
manches à leurs écrans respectifs. Procédez
comme suit :
• Appuyez sur le bouton « h/min » dans le
compartiment à piles pendant au moins
3 secondes. L’écran SmartGuide affiche
« L--- », indiquant que le mode « Learn » pour
la synchronisation est activé.
• Le bouton on/off clignotant dans l’icône de la
brosse à dents sur l’écran SmartGuide vous
indique à présent d’allumer le manche.
Ce faisant, vous lancez le processus de
synchronisation automatique. Il est achevé
lorsque « L-1- » s’affiche.
• Lorsque vous changez les piles de l’écran
SmartGuide, les données stockées sont
effacées. Vous devez donc répéter le processus de synchronisation à chaque fois que
vous changez les piles.
Désactivation de la
transmission radio
Si vous désirez utiliser ou emporter votre
brosse à dents dans des environnements où
les appareils contrôlés par radio sont interdits
(ex. hôpitaux ou avions), désactivez d’abord
la transmission radio. A cet effet, appuyez
simultanément sur le bouton
bouton mode pendant 3 secondes. L’écran du
manche affiche l’icône de la désactivation radio.
Si vous désirez réactiver la transmission radio,
appuyez à nouveau sur les boutons pendant
3 secondes : l’icône disparaît.
3 sec.3 sec.
marche/arrêt
et le
• Eteignez alors le manche.
Si vous désirez attribuer un second manche
au même écran SmartGuide, répétez les deux
dernières étapes décrites ci-dessus avec l’autre
manche. Vous pouvez quitter le mode « Learn »
en appuyant sur le bouton « h/min » ou « set ».
Sinon, le mode « Learn » se désactive automatiquement après 30 secondes.
Remarque :
• Maximum 2 manches peuvent être synchronisés avec un écran SmartGuide. Une fois
16
Remplacement des piles
Unité d’affichage SmartGuide
Retirez immédiatement les piles plates.
Remplacez toutes les piles en même temps. Ne
mélangez pas des piles alcalines avec des piles
au zinc-carbone ou des piles rechargeables.
Sujet à modification sans préavis.
Cet appareil respecte les exigences requises
par la Directive Européenne 1999/5/EC.
Récepteur Classe 3, Cycle de travail
Classe 3.
Page 17

Notice environnementale
Ce produit comporte des piles rechargeables.
Pour protéger l’environnement, ne jetez
pas le produit avec les déchets ménagers
lorsqu’il aura fi ni de vous rendre service.
Vous pouvez le déposer dans un Centre de service
Oral-B Braun ou un site de recyclage ou une
déchetterie agréés, conformément aux législations
locales.
Garantie
Nous offrons 2 ans de garantie sur le produit,
à partir de la date d’achat. Pendant la période
de garantie, nous éliminons gratuitement tout
défaut de l’appareil résultats de vices matériels
ou de fabrication, soit en réparant l’appareil, soit
en remplaçant tout l’appareil, à notre discrétion.
Cette garantie s’applique dans tous les pays où
cet appareil est distribué par Braun ou ses
distributeurs agréés.
Cette garantie ne couvre pas : les dommages
consécutifs à un usage inadéquat, à l’usure et
l’utilisation normales, particulièrement en ce qui
concerne les têtes de brosse, ainsi que les
défauts ayant un effet négligeable sur la valeur
ou le fonctionnement de l’appareil. La garantie
devient caduque si des réparations sont
effectuées par des personnes non autorisées ou
à défaut d’utiliser des pièces d’origine Braun.
Pour faire valoir votre droit à la garantie pendant
la période concernée, remettez ou envoyez
l’appareil complet, avec votre preuve d’achat,
à un Centre de Service Oral-B Braun agréé.
Cette garantie n’affecte en aucune façon vos
droits dans le cadre de la loi.
17
Page 18

Polski
Szczoteczka Oral-B® Triumph z systemem
SmartGuide została dokładnie zaprojekto-
wana, aby zapewnić Tobie i Twojej rodzinie
wyjątkowe szczotkowanie zębów, które jest
jednocześnie bezpieczne i skuteczne. Prosimy
pamiętać, że podczas używania urządzeń
elektrycznych należy zachować podstawowe
środki ostrożności. Prosimy o dokładne
zapoznanie się z instrukcją obsługi przed
pierwszym użyciem.
WAŻNE
Szczoteczka Oral-B Triumph wyposażona jest
•
w zasilacz SmartPlug (zintegrowany zasilacz
bardzo niskiego bezpiecznego napięcia –
SELV). Nie wolno wymieniać lub modyfikować
jakiejkolwiek części zasilacza, gdyż wiąże się
to z ryzykiem porażenia prądem. Okresowo
należy kontrolować zasilacz SmartPlug pod
kątem uszkodzeń, jeżeli urządzenie jest
uszkodzone lub niesprawne, należy natychmiast zaprzestać jego użytkowania.
Uszkodzone urządzenie należy oddać do
Centrum Serwisowego Oral-B Braun.
Niniejszy wyrób nie jest przeznaczony do
•
użytkowania przez dzieci poniżej trzeciego
roku życia.
Niniejsze urządzenie nie jest przeznaczone
•
do używania przez dzieci lub osoby dorosłe
niepełnosprawne fizycznie lub umysłowo, jeżeli
nie są nadzorowane przez osobę odpowiedzialną za ich bezpieczeństwo. Zaleca się
przechowywać produkt z dala od dzieci.
Jeżeli produkt zostanie upuszczony, przed
•
ponownym użyciem należy wymienić
końcówkę szczoteczki, nawet, jeżeli nie są
widoczne jakiekolwiek uszkodzenia.
Zasilacz SmartPlug należy trzymać z dala od
•
wody i innych cieczy.
Nie wolno modyfikować lub naprawiać
•
produktu. Może to doprowadzić do powstania
pożaru, porażenia prądem lub poniesienia
obrażeń. W przypadku konieczności przeprowadzenia napraw należy skontaktować
się z lokalnym przedstawicielem lub centrum
serwisowym Oral-B Braun. Nie wolno
rozmontowywać produktu, za wyjątkiem
sytuacji, kiedy usuwana jest bateria.
Kiedy bateria jest wyjmowana w celu jej
•
usunięcia (utylizacji), należy uważać, aby nie
zewrzeć ze sobą końcówki dodatniej (+) i
ujemnej (–).
18
Nie dotykać zasilacza SmartPlug mokrymi
•
rękami. Może to doprowadzić do porażenia
prądem elektrycznym.
Produktu należy używać wyłącznie zgodnie
•
z przeznaczeniem opisanym w niniejszej
instrukcji obsługi. Nie wolno używać końcówek
lub zasilaczy niezalecanych przez producenta.
Jeżeli użytkownik jest w trakcie leczenia
•
stomatologicznego, przed użyciem szczoteczki
należy skonsultować się ze swoim lekarzem
stomatologiem.
Szczoteczka Oral-B Triumph z ekranem
SmartGuide wykorzystuje interaktywny
bezprzewodowy wyświetlacz, który pozwala
zoptymalizować pracę urządzenia.
Ważne
W celu uniknięcia zakłóceń elektro-
•
magnetycznych oraz/lub konfliktów
kompatybilności, należy dezaktywować
nadajnik radiowy urządzenia przed
wniesieniem jej lub używaniem w obszarach
z ograniczeniami w zakresie używania
urządzeń elektronicznych, jak na przykład
statki powietrzne lub specjalnie oznaczone
strefy w szpitalach (patrz «Wyłączanie
nadajnika radiowego»).
Osoby z rozrusznikami serca (kardio-
•
werterami) powinny trzymać szczoteczkę
przynajmniej 6 cali (15 centymetrów) od
rozrusznika serca (kardiowertera), kiedy jest
ona włączona. Jeżeli wystąpi jakiekolwiek
podejrzenie występowania zakłóceń,
należy przed przystąpieniem do używania
szczoteczki dezaktywować jej nadajnik
radiowy (patrz «Wyłączanie nadajnika
radiowego»).
Opis
a Końcówka Oral-B FlossAction
b Włącznik/Wyłącznik
c Przycisk trybu szczotkowania
d Rączka
e Ekran na rączce
f Zasilacz SmartPlug (wraz z pierścieniem
ładującym oraz zasilaczem SmartPlug)
g Podstawka
h Pokrywa ochronna
i Końcówka Oral-B 3D WHITE (nie do
wszystkich modeli)
j Ekran SmartGuide
k Wspornik mocowania na ścianie
l Taśma klejąca
Page 19
Pierwsze użycie
h/min
set
h/min
set
t
h/min
set
t
h/min
set
Przed pierwszym szczotkowaniem, należy
najpierw naładować szczoteczkę. Podłączyć
zasilacz SmartPlug do gniazdka zasilania
elektrycznego i umieścić rączkę (d) na pierścieniu
ładującym (f), (patrz «Podłączanie i ładowanie »).
Ekran SmartGuide dostarczany jest z akty-
•
wowanym trybem demonstracyjnym. Aby
wyłączyć ten tryb, należy nacisnąć przycisk
«set» lub przycisk «h/min» znajdujące się we
wnęce baterii. Prosimy pamiętać, że ekran
SmartGuide aktywuje automatycznie tryb
demonstracyjny, jeżeli szczoteczka nie będzie
używana przez 28 dni. Automatycznej aktywacji można uniknąć przez ustawienie zegara
lub synchronizację rączki
h/min
h/min
set
set
2
2
1
1
Miganie godziny «12:00» na ekranie
•
SmartGuide oznacza, że można teraz ustawić
godzinę. W tym celu należy nacisnąć przycisk
«set», znajdujący się we wnęce baterii, aż
pojawi się symbol «12 h».
Aby przełączać urządzenie pomiędzy
•
formatami «12 h» lub «24 h» należy nacisnąć
krótko przycisk «h/min». Należy nacisnąć
przycisk «set» w celu zatwierdzenia wyboru.
.
h/min
h/min
set
set
set
set
h/min
h/min
Szczoteczkę można uruchomić naciskając
przycisk Włącz./Wyłącz. (b). Aby uniknąć
rozpryskiwania wody i pasty, należy przed
włączeniem urządzenia najpierw umieścić
szczoteczkę w ustach.
Oral-B
Oral-B
Oral-B
Oral-B
Podłączanie i ładowanie
Szczoteczka wyposażona została w
wodoszczelną rączkę, jest elektrycznie
bezpieczna i przeznaczona do użytkowania w
łazience.
Aby zmontować moduł ładujący, należy
zainstalować pokrywę ochronną (h) z tyłu
podstawki (g). Następnie umieścić podstawkę
na pierścieniu ładującym (f) aż zatrzaśnie się
na miejscu.
Podłączyć zasilacz SmartPlug do gniazdka
•
zasilania elektrycznego i umieścić rączkę
szczoteczki (d) na ładowarce. Na ekranie
rączki (e) pojawi się symbol baterii. Podczas
ładowania akumulatora rączki, bateria
wyświetlana na ekranie będzie się napełniać.
Kiedy akumulator będzie w pełni naładowany,
symbol baterii będzie zapełniony czterema
kreskami. Naładowanie szczoteczki do pełna
zajmuje około 10 godzin i wystarcza na około
10 dni regularnego szczotkowania (dwa razy
dziennie po 2 minuty).
Następnie zaczyna migać cyfra godziny.
•
Nacisnąć przycisk «h/min» aż na ekranie
wyświetlona zostanie prawidłowa godzina,
zatwierdzić przyciskiem «set». W ten sam
sposób ustawić obie cyfry minut. Jeżeli nie
chcemy korzystać z zegara, migająca godzina
«12:00» zniknie automatycznie po upływie
24 godzin.
Uwaga: Jeżeli ikona ładowania baterii nie
pojawi się natychmiast należy kontynuować
ładowanie, ikona pojawi się po 10–15 minu-
tach.
Kiedy akumulator jest już rozładowany, symbol
•
baterii z pozostałą na nim jedną kreską
zaczyna migać. Szczoteczka zacznie pracować wolniej, a następnie się zatrzyma. Jeśli
bateria jest całkowicie wyładowana pusty
symbol baterii miga. Do 2 minutowego
19
Page 20
szczotkowania należy ładować szczoteczkę
przez 15 minut.
Do codziennego użytku, rączkę szczoteczki
•
można trzymać na ładowarce, tak aby zawsze
była w pełni naładowana. Nie istnieje ryzyko
przeładowania baterii. Jednakże, z powodów
związanych z ochroną środowiska, Oral-B
zaleca odłączyć ładowarkę, aż do czasu, kiedy
wymagane będzie następne ładowanie.
•
Aby zachować maksymalną pojemność
akumulatora, należy co 6 miesięcy odłączyć
ładowarkę i całkowicie rozładować urządzenie
podczas normalnego użytkowania.
Personalizacja
mechanizmu sterowania
zegarowego
Zgodnie z własnymi preferencjami można
ustawić mechanizm sterowania zegarowego
na tryb «Professional» (profesjonalny) lub
«2-Minute» (dwie minuty) oraz «Count Up»
(podliczania) lub «Count Down» (odliczania).
W obu przypadkach mechanizm sterowania
zegarowego zapamiętuje czas szczotkowania,
nawet jeżeli szczoteczka została na krótko
wyłączona. W przypadku przerwy dłuższej niż
30 sekund, mechanizm sterowania zegarowego
resetuje się do stanu początkowego.
Zegar podliczania «Count Up Timer» ukazuje
aktualny czas szczotkowania. Zegar odliczania
«Count Down Timer» ukazuje pozostały czas
szczotkowania. Zegar zaczyna od «2:00» i
odlicza do «0:00». Jeżeli szczotkowanie trwa
ponad 2 minuty, zegar automatycznie przełącza
się na tryb podliczania «Count Up Timer».
Całkowity czas szczotkowania można wydłużyć
do 3 minut włączając tryb głębokiego czyszczenia «Deep Clean» (patrz «Tryby szczotkowania»).
Szczoteczka dostarczana jest z aktywowanym
trybem zegara «Professional Timer»
(profesjonalny) oraz «Count Up Timer»
(podliczanie). Jeżeli chcemy zmienić te
ustawienia należy:
•
Nacisnąć i przytrzymać przycisk trybu pracy (c)
aż na ekranie SmartGuide (j) pojawi się «:30»
oraz «timer».
3 sec.3 sec.
W przypadku wybrania trybu «2-Minute Timer»
(dwie minuty) po upływie zalecanego przez
dentystów czasu czyszczenia zębów, wynoszącego dwie minuty zostanie to zasygnalizowanie przerywaną pracą szczoteczki oraz
wyświetleniem «uśmiechniętej buźki» na ekranie
SmartGuide. Ponadto, tryb «Professional Timer»
pomaga równomiernie wyczyścić każdy kwadrant
linii zębów. Kiedy czas przejść do następnego
kwadrantu linii zębów, szczoteczka sygnalizuje to
przerywaną pracą, w trzydziestosekundowych
interwałach (45-sekundowych w trybie głębokiego
czyszczenia «Deep Clean») oraz wyświetlanym
na ekranie SmartGuide «kółkiem kwadrantów».
3
20
3
c
c
0
e
e
s
s
0
0
3
3
c
c
e
e
s
s
0
s
s
e
e
c
c
3
3
0
0
s
s
e
0
0
e
c
c
3
3
s
s
5
5
4
4
c
c
e
e
s
s
4
4
c
c
5
e
e
5
s
s
e
e
c
c
4
4
5
5
s
s
e
5
5
e
c
c
4
4
•
Szybko nacisnąć Włącznik/Wyłącznik (b), by
przełączyć na tryb zegara 2-minutowego
«2-Minute Timer». Zatwierdzić wybór ponownie naciskając przycisk trybu (c).
•
Następnie na ekranie pojawia się zegar
podliczający «Count Up Timer» (na ekranie
wyświetlane jest «up» oraz «timer»). Aby
przełączyć na zegar odliczający «Count Down
Timer» należy nacisnąć Włącznik/Wyłącznik i
zatwierdzić wybór naciskając przycisk trybu (c).
Page 21
Uwaga: Podczas pracy w trybie ustawiania
mechanizmu sterowania zegarowego na ekranie
wyświetlane są dwie błyskające kreski, jest to
zjawisko normalne.
Szczotkowanie
Technika szczotkowania
Prowadzić końcówkę szczoteczki powoli od
•
jednego zęba do drugiego.
Przed przesunięciem szczoteczki do następ-
•
nego zęba należy przytrzymać szczoteczkę na
miejscu przez kilka sekund.
Szczotkować dokładnie zarówno zęby jak i
•
dziąsła, zaczynając od zewnętrznej, następnie
po wewnętrznej stronie zębów i na koniec po
powierzchni żującej każdego zęba.
Szczotkuj bez silnego nacisku lub tarcia,
•
pozwól szczoteczce wykonywać automatycznie ruchy myjące. Po zakończeniu szczotkowania na ekranie wyświetlany będzie przez
30 sekund całkowity czas szczotkowania,
następnie ekran przełączy się ponownie
w tryb wyświetlania godziny. Aby przejść
bezpośrednio do trybu wyświetlania godziny,
należy skasować czas szczotkowania naciskając przycisk trybu.
Tryby szczotkowania
Szczoteczka oferuje różne tryby szczotkowania
w zależności od osobistych preferencji w zakresie higieny jamy ustnej:
«Daily Clean» – Wyjątkowe czyszczenie jamy
(czyszczenie ustnej.
codzienne)
«Sensitive» – Delikatne, lecz dokładne
(czyszczenie czyszczenie wrażliwych
wrażliwych obszarów.
zębów i dziąseł)
«Massage» – Delikatny masaż dziąseł.
(masaż)
«Whitening» – Polerowanie oraz wybielanie
(wybielanie) codziennie lub sporadycznie.
«Deep Clean»
(głębokie ustnej z wydłużonym czasem
czyszczenie) szczotkowania. W tym trybie
Po naciśnięciu przycisku Włącz/Wyłącz
•
szczoteczka automatycznie uruchamia się w
trybie codziennego czyszczenia «Daily Clean».
Aby przełączyć na inny tryb, należy ponownie
•
nacisnąć przycisk trybu.
– Dokładne czyszczenie jamy
czas szczotkowania został
wydłużony do 45 sekund na
każdy kwadrant linii zębów,
co w sumie daje 3 minuty
całkowitego czasu czyszczenia.
Szczoteczka posiada funkcję kontroli nacisku,
która pomaga upewnić się, że stosowany
jest odpowiedni nacisk. Pomaga to ochronić
zęby przed zbyt silnym szczotkowaniem oraz
zapewnia sprawne działanie szczoteczki. Jeżeli
przyłożony zostanie zbyt silny nacisk, ruch
oscylacyjny szczoteczki będzie kontynuowany,
lecz pulsowanie zostanie przerwane. Użytkownik
nie tylko odczuje zmianę w pracy szczoteczki,
ale także ją usłyszy.
Przez pierwsze kilka dni używania szczoteczki
elektrycznej dziąsła mogą lekko krwawić. Zwykle
krwawienie ustępuje po kilku dniach. Jeżeli po
upływie 2 tygodni krwawienie wciąż występuje,
należy skonsultować się ze swoim dentystą.
Jeżeli masz wrażliwe żeby i dziąsła, Oral-B
zaleca stosowanie trybu «Sensitive» do wrażliwych zębów i dziąseł.
Aby powrócić z dowolnego trybu do trybu
•
codziennego czyszczenia «Daily Clean»,
należy nacisnąć i przytrzymać przycisk trybu.
Aby wyłączyć szczoteczkę należy nacisnąć
•
przycisk Włącz./Wyłącz.
Uwaga: Tryb wybielania «Whitening» najlepiej
stosować z końcówką Oral-B 3D WHITE (i).
21
Page 22
Końcówki szczoteczki (w zależności od
modelu)
Końcówka Oral-B FlossAction
Końcówka Oral-B FlossAction (a) zalecana
jest do codziennego dokładnego czyszczenia.
Wyposażona jest we włókna MircoPulse, które
docierają głęboko w trudnodostępne miejsca
pomiędzy zębami, delikatnie usuwając ukryty
kamień nazębny.
Końcówka Oral-B Sensitive
Końcówka Oral-B Sensitive zapewnia dokładne
czyszczenie wrażliwych zębów i dziąseł.
Wyposażona jest w wyjątkowo miękkie włókna,
które są delikatne dla dziąseł i zębów.
Końcówka Oral-B 3D WHITE
Do codziennego i sporadycznego czyszczenia
zalecamy stosowanie końcówki Oral-B
3D WHITE (i) (nie do wszystkich modeli).
Szczoteczka ta posiada specjalną wypustkę
usuwającą przebarwienia powstałe na skutek
picia kawy, herbaty lub palenia tytoniu, zapewniając skuteczne wybielanie.
Prosimy pamiętać, że dzieci poniżej 12 roku
życia nie powinny korzystać z końcówki Oral-B
3D WHITE.
aa
Nie wolno używać końcówki Oral-B FlossAction
lub Oral-B 3D WHITE w przypadku noszenia
aparatu korekcyjnego. Zalecamy stosowanie
końcówki Oral-B Ortho, która została specjalnie
zaprojektowana by czyścić przestrzenie wokół
elementów aparatów korekcyjnych.
Końcówki zawierają niebieskie włókna
INDICATOR, które pomagają kontrolować
stopień zużycia końcówki. Przy prawidłowym
szczotkowaniu, dwa razy dziennie po dwie
minuty, jasnoniebieski kolor wyblaknie do połowy
po około 3 miesiącach, co oznacza, że czas
wymienić końcówkę.
ii
Ekran SmartGuide
Wyświetlana
ikona
Mocowanie na ścianie
Jeżeli chcesz zamontować ekran SmartGuide na
ścianie, lustrze lub innej tego typu powierzchni,
należy najpierw zamocować do niej wspornik
mocowania na ścianie, używając w tym celu
taśmy klejącej (l). Przed przyklejeniem wspornika, należy upewnić się, że wybrana powierzchnia jest czysta i sucha (najpierw usunąć
ewentualne zatłuszczenia oraz pył/kurz).
Ustawić wspornik tak, aby widoczne było logo
Oral-B. Następnie docisnąć wspornik mocno i
Znaczenie
Tryb «Daily Clean»
Tryb «Sensitive»
Tryb «Massage»
Tryb «Whitening»
Tryb «Deep Clean»
Wywierany jest zbyt silny nacisk.
Szczotkować z mniejszą siłą.
«Kółeczko kwadrantów» –
aktualnie szczotkowany jest
pierwszy z 30-sekundowych
interwałów (45-sekundowych
w trybie głębokiego czyszczenia
«Deep Clean»). Przejść do następnego kwadrantu linii zębów, kiedy
zacznie migać drugi segment.
Upłynął zalecany przed dentystów
czas czyszczenia wynoszący
2 minuty (3 minuty w trybie
głębokiego czyszczenia «Deep
Clean»).
Akumulator w rączce jest rozładowany. Podłączyć szczoteczkę do
ładowarki.
Baterie ekranu SmartGuide są
rozładowane. Wymienić baterię
w module SmartGuide.
22
Page 23
równomiernie do ściany. Przed zainstalowaniem
set
h/min
3 sec.
set
h/min
3 sec.
ekranu SmartGuide na wsporniku odczekać
24 godziny.
Uwaga: Taśma klejąca nie nadaje się do
stosowania na powierzchniach zabezpieczonych
środkami czystości.
Zalecenia w zakresie
czyszczenia
Po szczotkowaniu wypłukać dokładnie
•
końcówkę szczoteczki pod bieżącą wodą.
Zdjąć końcówkę z rączki i wyczyścić obie
•
części osobno pod bieżącą wodą. Następnie
wytrzeć do sucha przed umieszczeniem rączki
na ładowarce.
ekran SmartGuide używając do tego wilgotnej
szmatki. Zasilacza SmartPlug oraz ekranu
SmartGuide nie wolno nigdy umieszczać
w wodzie.
Synchronizacja
Jeżeli w domu używana jest więcej niż jedna
szczoteczka Oral-B Triumph z indywidualnymi
ekranami SmartGuide, w celu uniknięcia interferencji wyświetlanych na ekranie komunikatów,
należy przypisać poszczególne rączki do
właściwych ekranów. Prosimy postępować
zgodnie z poniższymi instrukcjami:
Nacisnąć znajdujący się we wnęce baterii
•
przycisk «h/min» przez przynajmniej 3 sekundy.
Na ekranie SmartGuide pojawi się «L---», co
oznacza, że tryb uczenia się (Learn) do
synchronizacji został uruchomiony.
Następnie ikona szczoteczki na ekranie
•
SmartGuide zaczyna migać, co oznacza, że
należy uruchomić rączkę. Po włączeniu rączki
następuje proces automatycznej synchronizacji. Synchronizacja jest zakończona, kiedy
na ekranie wyświetlone zostanie «L-1-».
Przed czyszczeniem ładowarki należy ją
•
najpierw zdemontować. Nie wolno umieszczać
pierścienia ładującego lub zasilacza SmartPlug
w zmywarce. Natomiast, wszystkie inne
elementy (podstawka i pokrywa ochronna)
nadają się do mycia w zmywarce.
Od czasu do czasu można także wyczyścić
•
pierścień ładujący, zasilacz SmartPlug oraz
Wyłączyć rączkę.
•
Jeżeli do tego samego ekranu SmartGuide
ma zostać przypisana druga rączka, należy
powtórzyć dwie ostatnie czynności opisane dla
pierwszej rączki. Z trybu uczenia się (Learn)
można wyjść naciskając przycisk «h/min» lub
«set». W przeciwnym wypadku tryb uczenia się
(Learn) zostanie automatycznie zakończony po
upływie 30 sekund.
Uwaga:
Z jednym ekranem SmartGuide można
•
zsynchronizować maksymalnie 2 rączki
szczoteczek. Po zsynchronizowaniu drugiej
rączki na ekranie pojawi się komunikat «Full»
(pełny).
23
Page 24
W przypadku wymiany baterii ekranu
•
SmartGuide, wszystkie zapisane dane zostają
usunięte. Dlatego też proces synchronizacji
należy powtarzać ilekroć baterie są wymieniane.
Dezaktywacja nadajnika
radiowego
Jeżeli chcesz wnieść szczoteczkę w miejsce,
gdzie urządzenia sterowane radiowo nie są
dozwolone (np. szpitale, statki powietrzne),
należy najpierw wyłączyć nadajnik radiowy.
W tym celu naciśnij jednocześnie przycisk
Włącznika/Wyłącznika oraz przycisk trybu
przez 3 sekundy. Na ekranie pojawi się ikona
dezaktywacji nadajnika radiowego. Jeżeli chcesz
z powrotem włączyć nadajnik, ponownie naciśnij
jednocześnie oba przyciski przez 3 sekundy, aż
ikona na ekranie zniknie.
3 sec.3 sec.
Usuwanie baterii
Ekran SmartGuide
Całkowicie rozładowane baterie należy
natychmiast usunąć. Należy wymieniać
wszystkie baterie jednocześnie. Nie wolno
mieszać baterii alkalicznych z bateriami
cynkowo-węglowymi lub akumulatorowymi.
Zastrzega si´ mo˝liwoÊç zmian poni˝szych
informacji.
Produkt spełnia wymogi dyrektywy
europejskiej 1999/5/WE w sprawie
urządzeń radiowych i końcowych
urządzeń telekomunikacyjnych oraz wzajemnego
uznawania ich zgodności (klasa odbiornika 3,
klasa cyklu pracy 3).
24
Uwagi dotyczące ochrony
środowiska
Niniejszy produkt zawiera baterie i akumulator. Ten symbol oznacza, że
zużytego sprzętu nie można wyrzucać
łącznie z odpadami socjalnymi. Wyjąć
baterie przed wyrzuceniem. Zużyty produkt i
baterie należy zostawić w jednym z lokalnych
punktów zbiórki zużytego sprzętu elektrycznego
i elektronicznego oraz zużytych baterii lub
w autoryzowanym serwisie Oral-B Braun.
Odpowiednie przetworzenie zużytego sprzętu
zapobiega potencjalnym negatywnym wpływom
na środowisko lub zdrowie ludzi, wynikającym
z obecności składników niebezpiecznych
w sprzęcie.
Warunki gwarancji
1. Procter and Gamble DS Polska Sp. z o.o. z
siedzibą w Warszawie przy ul. Zabranieckiej
20, gwarantuje sprawne działanie sprzętu w
okresie 24 miesięcy od daty jego wydania
Kupującemu. Ujawnione w tym okresie
wady będą usuwane bezpłatnie, przez
wymieniony przez firmę Procter and
Gamble DS Polska Sp. z o.o. autoryzowany
punkt serwisowy, w terminie 14 dni od daty
dostarczenia sprzętu do autoryzowanego
punktu serwisowego.
2. Kupujący może wysłać sprzęt do naprawy
do najbliżej znajdującego się autoryzowanego punktu serwisowego wymienionego
przez firmę Procter and Gamble DS Polska
Sp. z o.o. lub skorzystać z pośrednictwa
sklepu, w którym dokonał zakupu sprzętu.
W takim wypadku termin naprawy ulegnie
wydłużeniu o czas niezbędny do
dostarczenia i odbioru sprzętu.
3. Kupujący powinien dostarczyć sprzęt w
opakowaniu należycie zabezpieczonym
przed uszkodzeniem. Uszkodzenia
spowodowane niedostatecznym
zabezpieczeniem sprzętu nie podlegają
naprawom gwarancyjnym. Naprawom
gwarancyjnym nie podlegają także inne
uszkodzenia powstałe w następstwie
okoliczności, za które Procter and Gamble
DS Polska Sp. z o.o. nie ponosi
odpowiedzialności, w szczególności
zawinione przez Pocztę Polską lub firmy
kurierskie.
4. Niniejsza gwarancja jest ważna jedynie z
dokumentem zakupu i obowiązuje
Page 25

wyłącznie na terytorium Rzeczypospolitej
Polskiej.
5. Okres gwarancji przedłuża się o czas od
zgłoszenia wady lub uszkodzenia do
naprawy sprzętu i zwrotnego postawienia
go do dyspozycji Kupującego.
6. Naprawa gwarancyjna nie obejmuje
czynności przewidzianych w instrukcji, do
wykonania, których Kupujący zobowiązany
jest we własnym zakresie i na własny koszt.
7. Ewentualne oczyszczenie sprzętu
dokonywane jest na koszt Kupującego
według cennika danego autoryzowanego
punktu serwisowego i nie będzie traktowane
jako naprawa gwarancyjna, chyba, że
oczyszczenie jest niezbędne do usunięcia
wady w ramach świadczeń objętych
niniejszą gwarancją i nie stanowi czynności,
o których mowa w p. 6.
8. Gwarancją nie są objęte:
a) mechaniczne uszkodzenia sprzętu
spowodowane w czasie jego
użytkowania lub w czasie dostarczania
sprzętu do naprawy;
b) uszkodzenia i wady wynikłe na skutek:
– używania sprzętu do celów innych
niż osobisty użytek;
– niewłaściwego lub niezgodnego
z instrukcją użytkowania,
konserwacji, przechowywania lub
instalacji;
– używania niewłaściwych
materiałów eksploatacyjnych;
– napraw dokonywanych przez
nieuprawnione osoby;
stwierdzenie faktu takiej naprawy
lub samowolnego otwarcia plomb
lub innych zabezpieczeń sprzętu
powoduje utratę gwarancji;
– przeróbek, zmian konstrukcyjnych
lub używania do napraw
nieoryginalnych części
zamiennych;
c) części szklane, żarówki oświetlenia.
9. Bez nazwy i modelu sprzętu, daty jego
zakupu potwierdzonej pieczątką i podpisem
sprzedawcy karta gwarancyjna jest
nieważna.
10. Niniejsza gwarancja na sprzedany towar
konsumpcyjny nie wyłącza, nie ogranicza
ani nie zawiesza uprawnień Kupującego
wynikających z niezgodności towaru
z umową.
25
Page 26

Český
Zubní kartáček Oral-B® Triumph s displejem
SmartGuide byl pečlivě navržen tak, aby
vám i vaší rodině poskytoval jedinečný zážitek
z čištění zubů, které je bezpečné a zároveň
účinné. Při používání jakýchkoliv elektrických
přístrojů je však nezbytné dodržovat základní
bezpečnostní opatření. Před prvním použitím si
pečlivě přečtěte návod k použití.
DŮLEŽITÁ UPOZORNĚNÍ
Zubní kartáček Oral-B Triumph je vybaven
•
nabíječkou SmartPlug (integrovaný zdroj
nízkého napětí). Žádnou z jeho částí nevyměňujte ani nerozebírejte, jinak by mohlo dojít
k úrazu elektrickým proudem. Pravidelně
kontrolujte, zda není nabíječka SmartPlug
poškozená. Poškozené nebo nefunkční
zařízení dále nepoužívejte a předejte ho do
autorizovaného servisního střediska Braun
Oral-B.
Tento výrobek není určen pro děti do 3 let.
•
Tento přístroj není určen k používání dětmi
•
nebo osobami se sníženými fyzickými či
duševními schopnostmi, pokud nejsou pod
dohledem osoby, zodpovědné za jejich
bezpečnost. Doporučujeme výrobek uchovávat
mimo dosah dětí.
Pokud výrobek spadne, kartáčkovou hlavu
•
před dalším použitím vyměňte, i když není
viditelné žádné poškození.
•
Nabíječku SmartPlug udržujte v dostatečné
vzdálenosti od vody a jiných kapalin.
•
Výrobek neupravujte ani neopravujte. Mohlo
by dojít k požáru, úrazu elektrickým proudem
nebo zranění. S opravami se obracejte na
prodejce nebo kontaktujte autorizované
servisní středisko Braun Oral-B. Výrobek
nerozebírejte s výjimkou případu, kdy chcete
odstranit baterii.
Při odstraňování baterie postupujte opatrně,
•
abyste nezkratovali kladný (+) a záporný (–) pól.
Nedotýkejte se nabíječky SmartPlug mokrýma
•
rukama. Můžete to způsobit úraz elektrickým
proudem.
Tento výrobek používejte pouze v souladu s
•
jeho určením tak, jak popisuje tento návod k
použití. Nepoužívejte příslušenství, které není
doporučeno výrobcem.
Pokud podstupujete léčbu jakéhokoliv
•
onemocnění ústní dutiny, poraďte se před
použitím tohoto výrobku se zubním lékařem.
Zubní kartáček Oral-B Triumph s displejem
SmartGuide používá interaktivní bezdrátový
26
®
displej, který pomáhá optimalizovat váš zážitek
z čištění zubů.
UPOZORNĚNÍ
S cílem zabránit elektromagnetické
•
interferenci a/anebo narušení kompatibility
vypněte rádiové vysílání zubního kartáčku
dříve, než jej přinesete nebo použijete ve
vyhrazeném prostoru, jako například
v letadle nebo speciálně označených
prostorech v nemocnici (viz «Vypnutí
rádiového vysílání»).
•
Osoby s kardiostimulátorem by měly držet
zapnutý zubní kartáček stále více než
15 centimetrů od kardiostimulátoru. Pokud
se obáváte interference, měli byste před
použitím zubního kartáčku vypnout rádiové
vysílání (viz «Vypnutí rádiového vysílání»).
Popis
a Kartáčková hlava Oral-B FlossAction
b Tlačítko zapnutí/vypnutí
c Tlačítko pro nastavení režimu čištění
d Rukojeť
e Displej na rukojeti
f Nabíječka SmartPlug (obsahuje nabíjecí
kroužek a zástrčku SmartPlug)
g Základní deska
h Ochranný kryt
i Kartáčková hlava Oral-B 3D WHITE
(není součástí všech modelů)
j Inteligentní displej SmartGuide
k Držák na zeď
l Lepicí páska
Technické údaje:
Typ: 3731
Napětí: 100 – 240 V
Frekvence: 50 – 60 Hz
Výkon: 3 W
Hladina hluku: 63 db (A)
IP: 67
První použití
Zubní kartáček před prvním čištěním nabijte.
Nabíječku SmartPlug zapojte do elektrické
zásuvky a rukojeť zubního kartáčku (d) postavte
na nabíjecí kroužek (f) (viz «Zapojení do sítě a
nabíjení»).
Displej SmartGuide se aktivuje v klidovém
•
režimu. K vypnutí tohoto režimu stiskněte
tlačítko «set» nebo tlačítko «h/min», které se
nachází v bateriovém prostoru. Displej
Page 27
SmartGuide se automaticky aktivuje opět
h/min
set
h/min
set
t
h/min
set
t
h/min
set
v klidovém režimu, pokud zubní kartáček
28 dní nepoužíváte. Této automatické aktivaci
můžete zabránit buď nastavením času nebo
synchronizací rukojeti.
h/min
h/min
set
set
2
2
1
1
Pokud se na displeji SmartGuide objeví
•
h/min
h/min
set
set
«12:00», znamená to, že je možné nastavit
čas. Stiskněte tlačítko «set», umístěné
v bateriovém prostoru, dokud se nezobrazí
«12h».
set
set
h/min
h/min
Krátkým stisknutím tlačítka «h/min» si můžete
•
vybrat mezi 12hodinovým «12h» nebo
24hodinovým «24h» formátem. Svůj výběr
potvrďte tisknutím tlačítka «set».
Zapojení do sítě a nabíjení
Váš zubní kartáček má vodotěsnou rukojeť, je
elektricky bezpečný a můžete jej používat v
koupelně.
Nabíjecí jednotku složíte tak, že ochranný kryt
(h) připojíte k zadní straně základny (g).
Základnu potom umístěte na nabíjecí kroužek (f)
tak, aby zapadla na místo.
Nabíječku SmartPlug zapojte do elektrické
•
zásuvky a rukojeť zubního kartáčku (d)
postavte na nabíjecí jednotku. Na displeji
rukojeti (e) se objeví symbol baterie. Tento
symbol se bude během nabíjení postupně
vyplňovat. Jakmile bude rukojeť plně nabitá,
symbol baterie se zaplní čtyřmi plnými políčky.
Plné nabití rukojeti trvá nejméně 10 hodin a
tehdy umožňuje přibližně 10 dní pravidelného
čištění zubů (dvakrát denně po dobu dvou
minut).
Poznámka: Pokud se symbol baterie neobjeví
ihned, pokračujte v nabíjení rukojeti. Symbol
se objeví za 10 – 15 minut.
Poté se rozbliká číslice hodin. Tiskněte tlačítko
•
«h/min», dokud se neobjeví správná hodina a
výběr potvrďte stisknutím tlačítka «set».
Stejným způsobem nastavte i minuty. Pokud
funkci hodin nechcete používat, blikající údaj
«12:00» po 24 hodinách automaticky zmizí.
Zubní kartáček zapnete stisknutím tlačítka
zapnutí/vypnutí (b). Před zapnutím zubního
kartáčku si kartáčkovou hlavu se zubní pastou
nejdříve přiložte k zubům, abyste zabránili
vystřikování zubní pasty.
Oral-B
Oral-B
Oral-B
Oral-B
Když je akumulátorová baterie téměř vybitá,
•
symbol baterie s posledním plným políčkem
začne svítit. Zubní kartáček se zpomalí a
nakonec se zastaví. Když se baterie úplně
vybije, na displeji začne blikat prázdný
rámeček symbolu baterie. Rukojeť musíte
nejdříve nechat 15 minut nabíjet, až potom
můžete zubní kartáček použít na
dvouminutové čištění zubů.
Při každodenním používání může být rukojeť
•
zubního kartáčku umístěna na nabíjecí
jednotce, aby byla neustále plně nabitá. Přebití
baterie není možné. Za účelem ochrany
životního prostředí však Oral-B doporučuje
nechat nabíjecí jednotku odpojenou od
elektrické sítě až do doby, kdy je potřebné
baterii znovu nabít.
27
Page 28
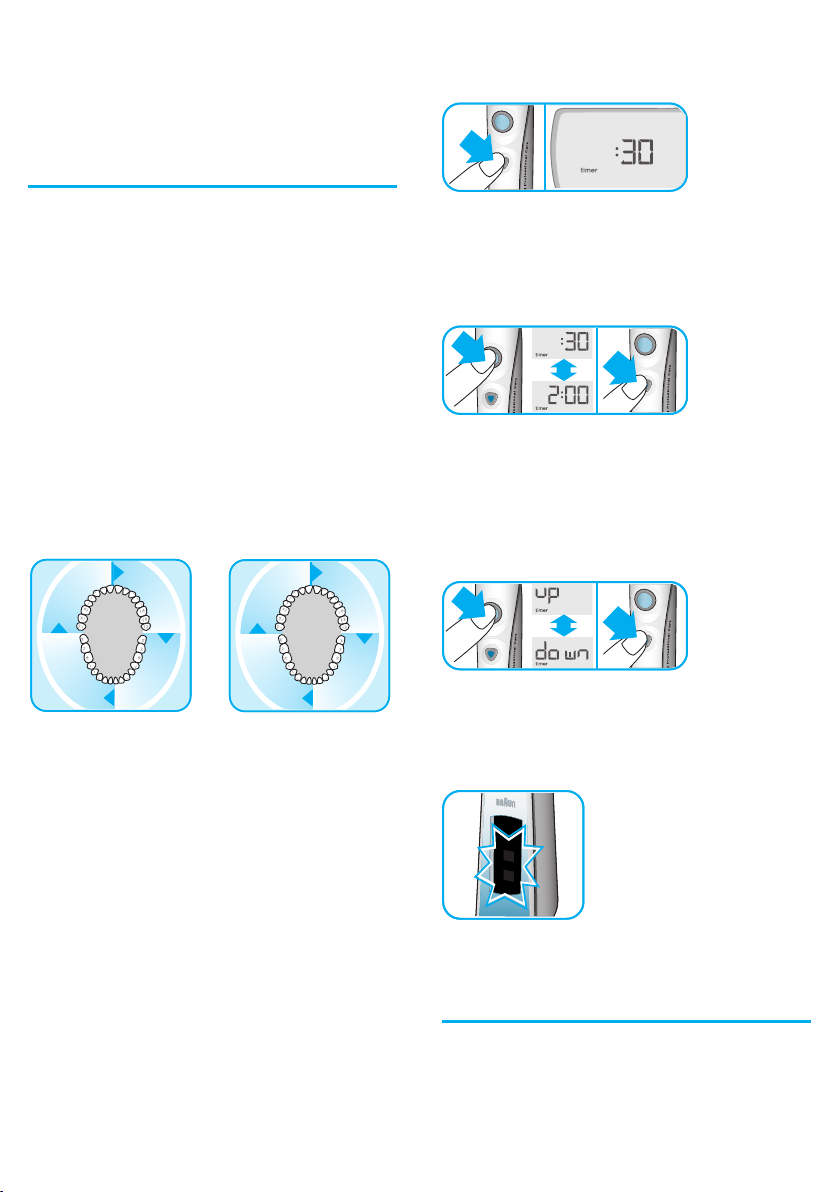
Pro zachování maximální kapacity akumu-
•
látorové baterie odpojte nejméně jednou za
6 měsíců nabíjecí jednotku od elektrické sítě a
běžným používáním nechte rukojeť zcela
vybít.
Osobní nastavení časovače
Držte stisknuté tlačítko nastavení režimu
•
čištění (c), dokud se na displeji SmartGuide (j)
neobjeví «:30» a «timer» (časovač).
3 sec.3 sec.
Můžete si vybrat mezi profesionálním («Professional») nebo dvouminutovým («2-Minute»)
časovačem a mezi načítajícím («Count Up»)
nebo odpočítávajícím («Count Down») časovačem podle svých potřeb.
Dvouminutový («2-Minute») časovač dlouhým
přerušovaným signálem a symbolem «smajlíku»
na displeji SmartGuide oznamuje, že uplynuly
zubními lékaři doporučené dvě minuty čištění.
Profesionální («Professional») časovač vám
navíc pomáhá rovnoměrně vyčistit každý
kvadrant vašich úst. Krátký přerušovaný signál
v 30-ti sekundových intervalech (45-ti sekundové
intervaly u režimu «Deep Clean») a symbol
kvadrantu na displeji SmartGuide vám připomenou, že nastal čas vyčistit si další kvadrant
úst.
3
3
c
c
0
e
e
s
s
0
0
3
3
c
c
e
e
s
s
0
s
s
e
e
c
c
3
3
0
0
s
s
e
0
0
e
c
c
3
3
s
s
5
5
4
4
c
c
e
e
s
s
4
4
c
c
5
e
e
5
s
s
e
e
c
c
4
4
5
5
s
s
e
5
5
e
c
c
4
4
Pokud rukojeť při čištění zubů na krátkou dobu
vypnete, oba časovače si zapamatují uplynulou
dobu čištění. Pokud čištění přerušíte na víc než
30 sekund, časovač se nastaví opět na začátek.
Krátkým stisknutím tlačítka zapnutí/vypnutí (b)
•
přepněte na dvouminutový («2-Minute») časovač. Svůj výběr potvrďte stisknutím tlačítka
nastavení režimu čištění (c).
Tak se dostanete přímo k zobrazení načíta-
•
jícího («Count Up») časovače a na displeji
(objeví se «up» a «timer»). Stisknutím tlačítka
zapnutí/vypnutí přepněte na odpočítávající
(«Count Down») časovač a svoji volbu
potvrďte tlačítkem nastavení režimu čištění.
Poznámka: Je normální, že displej rukojeti
zobrazuje dva blikající dílky baterie, když
pracujete v režimu nastavení časovačů.
Načítající («Count Up») časovač zobrazuje
aktuální délku čištění zubů. Odpočítávající
(«Count Down») časovač zobrazuje zbývající
čas čištění zubů. Začne počítat na «2:00»
minutách a odpočítává až «0:00» minut. Pokud
si zuby čistíte déle než dvě minuty, automaticky
se změní na načítající časovač.
Celkový čas čištění lze prodloužit až na 3 minuty
použitím režimu «Deep Clean» (viz «Režimy
čištění»).
Zubní kartáček se prodává s aktivovaným
profesionálním («Professional») a načítajícím
(«Count Up») časovačem. Pokud chcete toto
nastavení změnit, postupujte následovně:
28
Čištění
Technika čištění zubů
Veďte kartáčkovou hlavu pomalu od jednoho
•
zubu k druhému.
Kartáčkovou hlavu podržte několik sekund na
•
místě až potom ji posuňte na další zub.
Page 29
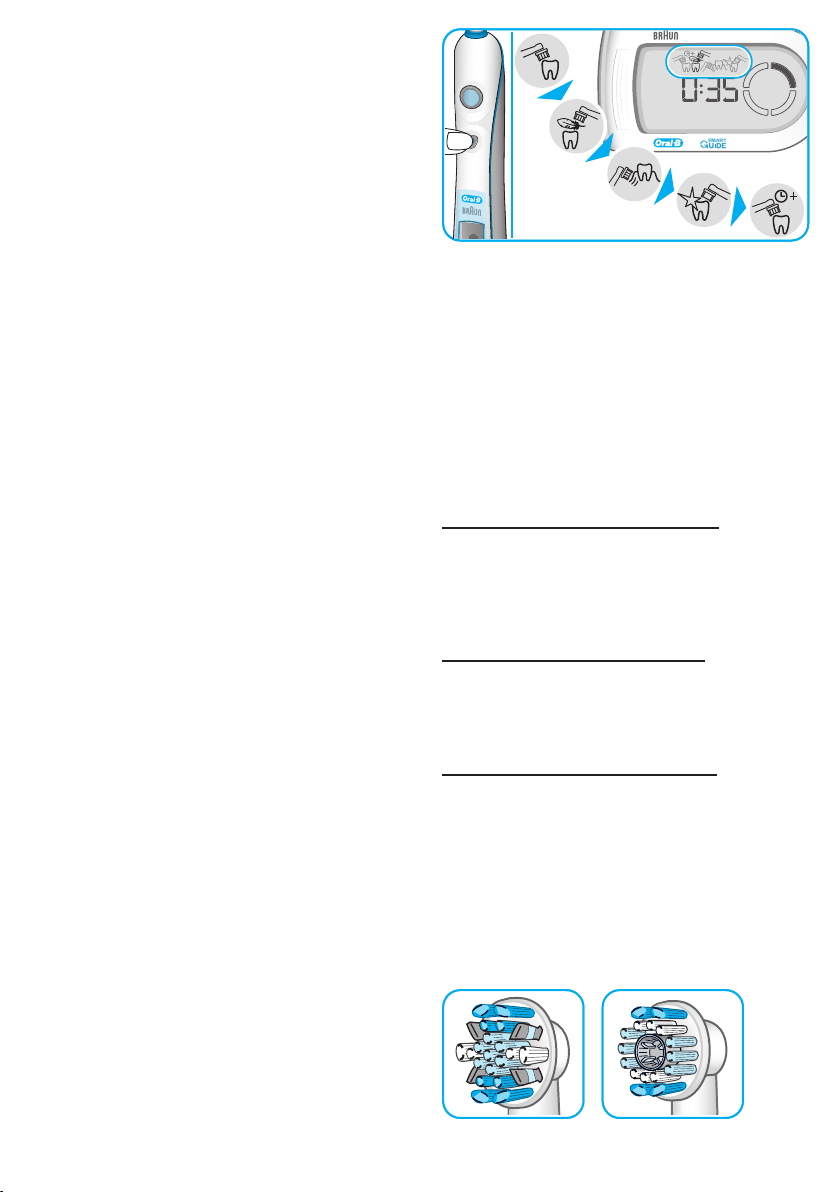
Vyčistěte si dásně i zuby, nejdříve vnější
•
plochy, potom vnitřní a nakonec žvýkací
plochy.
Na zuby netlačte ani je nedrhněte. Nechte
•
zubní kartáček, aby vykonal veškerou práci za
vás. Jakmile si zuby vyčistíte, celková délka
čištění se bude na displeji zobrazovat ještě
30 sekund, než se displej znovu přepne do
časového režimu. Vymažte zobrazování délky
čištění zubů stisknutím tlačítka nastavení
režimu čištění.
Váš zubní kartáček má funkci kontroly tlaku,
která pomáhá zajistit, že při čištění vyvíjíte
správnou úroveň tlaku. To pomáhá chránit zuby
i dásně před nadměrným drhnutím a usnadňuje
používání zubního kartáčku. Pokud na kartáček
příliš zatlačíte, oscilační pohyb kartáčkové hlavy
bude pokračovat, ale pulzní pohyb se zastaví.
Nejenže to ucítíte, ale navíc uslyšíte jiný zvuk.
V prvních několika dnech používání jakéhokoliv
elektrického zubního kartáčku mohou vaše
dásně mírně krvácet. Tento příznak by měl po
několika dnech ustoupit. Pokud však krvácení
přetrvává i po 2 týdnech, kontaktujte svého
zubního lékaře. Pokud máte citlivé zuby a
dásně, Oral-B vám doporučuje používat jemný
režim čištění «Sensitive».
Režimy čištění
Zubní kartáček vám nabízí různé režimy čištění
pro měnící se potřeby péče o ústní dutinu:
«Daily Clean» – Výjimečné čištění ústní
dutiny.
«Sensitive» – Šetrné, a přesto důkladné
čištění citlivých oblastí.
«Massage» – Jemné masírování dásní.
«Whitening» – Leštění a bělení zubů pro
«Deep Clean»
Po stisknutí tlačítka zapnutí/vypnutí se zubní
•
kartáček automaticky zapne v čisticím režimu
«Daily Clean».
příležitostné nebo každodenní použití.
– Výjimečné čištění ústní
dutiny s prodlouženou dobou
čištění. U tohoto režimu se
doba čištění prodlužuje až
na 45 sekund u každého
kvadrantu úst, což znamená,
že celkový čas čištění
představuje 3 minuty.
Pokud se chcete z jakéhokoliv režimu vrátit do
•
režimu «Daily Clean», držte stisknuté tlačítko
nastavení režimu čištění.
Zubní kartáček vypnete stisknutím tlačítka
•
zapnutí/vypnutí.
Poznámka: Bělící režim «Whitening» funguje
nejlépe s kartáčkovou hlavou Oral-B 3D WHITE
(i).
Kartáčkové hlavy (v závislosti na modelu
zubního kartáčku)
Kartáčková hlava Oral-B FlossAction
Kartáčková hlava Oral-B FlossAction (a) se
doporučuje pro každodenní důkladné čištění
zubů. Obsahuje vlákna MicroPulse, která
pronikají do těžko dostupných míst mezi zuby,
kde šetrně odstraňují zubní plak.
Kartáčková hlava Oral-B Sensitive
Kartáčková hlava Oral-B Sensitive poskytuje
důkladné čištění citlivých zubů a dásní. Má
mimořádně jemná vlákna, která jsou šetrná
k zubům i dásním.
Kartáčková hlava Oral-B 3D WHITE
Pro příležitostné nebo každodenní leštění zubů
používejte kartáčkovou hlavu Oral-B 3D WHITE
(i) (není součástí všech modelů). Obsahuje
lešticí vložku, inspirovanou zubními lékaři, která
odstraňuje z povrchu zubů barevné skvrny od
kávy, čaje a tabáku pro dosažení efektivního
bělení.
Děti do 12 let by neměly kartáčkovou hlavu
Oral-B 3D WHITE používat.
aa
ii
•
Pro přechod do jiného režimu postupně
stlačujte tlačítko nastavení režimu čištění.
29
Page 30
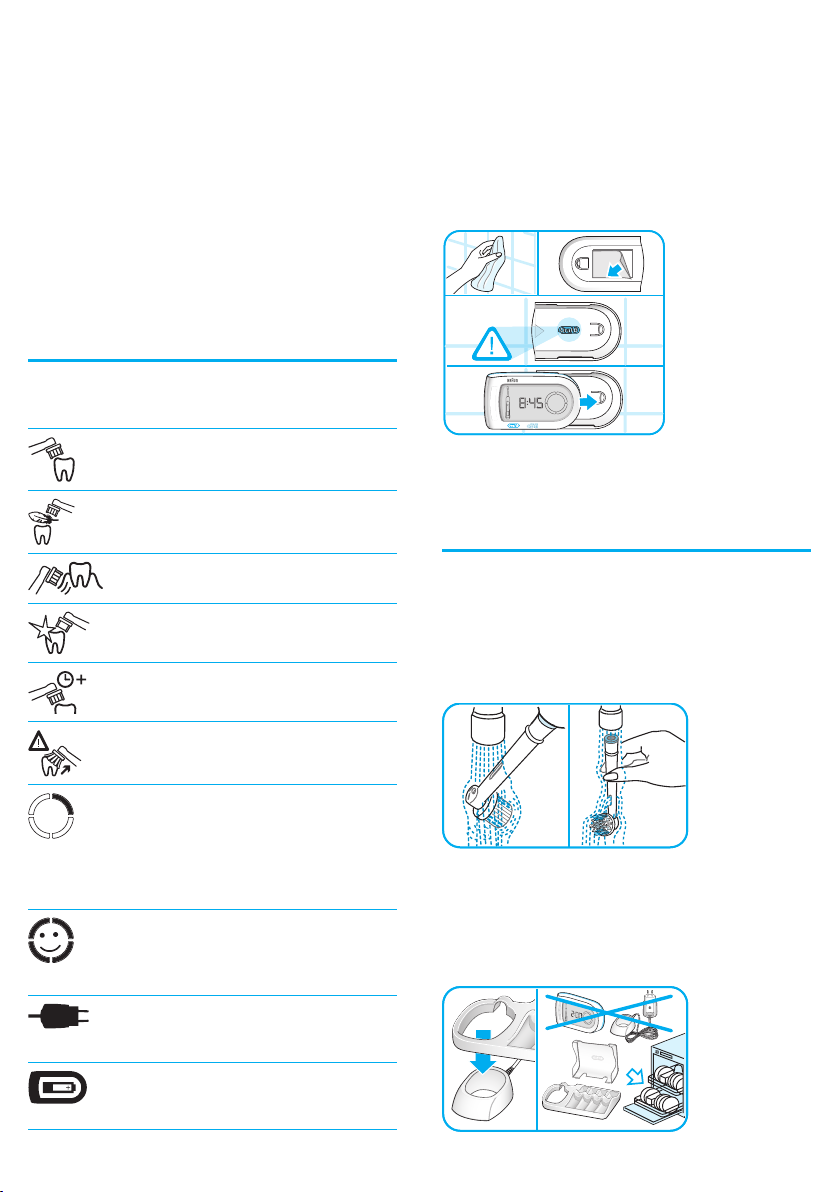
Kartáčkové hlavy Oral-B FlossAction a Oral-B
3D WHITE nedoporučujeme používat, pokud
nosíte rovnátka. K tomuto účelu doporučujeme
používat kartáčkovou hlavu Oral-B Ortho, která
je navržená speciálně k čištění prostorů okolo
rovnátek.
Všechny kartáčkové hlavy mají modrá vlákna
INDICATOR, která pomáhají kontrolovat potřebu
výměny kartáčkové hlavy. Při důkladném čištění
zubů dvakrát denně po dobu dvou minut modrá
barva vláken vybledne do poloviny přibližně po
3 měsících. Tím signalizuje, že je potřeba
vyměnit kartáčkovou hlavu za novou.
Displej SmartGuide
Zobrazená
ikonka
Význam
Režim «Daily Clean»
Režim «Sensitive»
Režim «Massage»
Režim «Whitening»
Režim «Deep Clean»
Připevnění na zeď
Pokud chcete displej SmartGuide připevnit na
zeď, zrcadlo nebo jiný povrch, použijte lepicí
pásku (l), kterou držák na zeď (k) připevníte.
Nejdřív se však přesvědčte, že vybraný povrch
je čistý a suchý (odstraňte z něho mastnotu a
prach). Držák na zeď umístěte tak, aby bylo
vidět logo Oral-B. Potom držák rovnoměrně a
pevně přitlačte na zeď. Počkejte 24 hodin než do
připevněného držáku vložíte displej SmartGuide.
Poznámka: Lepicí páska se nepřichytí
k povrchu, který je odolný vůči nečistotám.
Čistění
Kartáčkovou hlavu po použití důkladně
•
opláchněte pod tekoucí vodou.
Kartáčkovou hlavu sejměte z rukojeti a obě
•
části jednotlivě opláchněte pod tekoucí vodou.
Dříve, než rukojeť znovu položíte na nabíjecí
jednotku, obě části otřete do sucha.
30
Příliš tlačíte. Nepoužívejte takovou
sílu.
«Kvadrantový kruh» – nyní si čistíte
zuby v prvním 30ti vteřinovém
intervalu (45ti vteřinovém intervalu
při režimu «Deep Clean»).
Přesuňte se na další kvadrant,
jakmile začne blikat druhý segment.
Zubními lékaři doporučovaná
dvouminutová doba čištění
(tříminutová doba čištění u režimu
«Deep Clean») už byla splněna.
Akumulátorová baterie v rukojeti
je málo nabitá. Nabijte rukojeť
zubního kartáčku.
Baterie v displeji SmartGuide jsou
málo nabité. Vyměňte baterie
displeje SmartGuide.
Nabíjecí jednotku před čištěním nejdřív
•
rozeberte. Nabíjecí kroužek a nabíječku
SmartPlug nikdy nemyjte v myčce nádobí.
Všechny ostatní části (základní deska a
ochranný kryt) se však mohou mýt v myčce
nádobí.
Page 31

Občas můžete vyčistit i nabíjecí kroužek,
set
h/min
3 sec.
set
h/min
3 sec.
•
nabíječku SmartPlug a displej SmartGuide
vhlkým hadříkem. Nabíječku SmartPlug a
displej SmartGuide nikdy neponořujte do vody.
Synchronizace
Vypnutí rádiového vysílání
Pokud chcete používat nebo přenášet svůj zubní
kartáček v místech, kde je zakázána přítomností
přístrojů s rádiovým vysíláním (např. nemocnice
nebo letadla), můžete jednoduše jeho rádiové
vysílání vypnout.
S cílem zabránit interferenci zpráv na displeji při
používání více než jednoho zubního kartáčku
Oral-B Triumph v jedné domácnosti, přičemž
každý má svůj displej SmartGuide, musíte rukojeti nejdříve přiřadit k odpovídajícím displejům.
Postupujte podle následujících kroků:
Alespoň na 3 sekundy stiskněte tlačítko
•
«h/min» v bateriovém prostoru. Na displeji
SmartGuide se ukáže «L---», což znamená, že
je aktivovaný režim «Learn» pro synchronizaci.
Potom vás blikající symbol tlačítko zapnutí/
•
vypnutí na displeji SmartGuide vyzve, abyste
rukojeť zapnuli. Když to uděláte, spustí se
proces automatické synchronizace, který
skončí ve chvíli, kdy se na displeji objeví
«L-1-».
Potom rukojeť vypněte.
•
Pokud chcete k displeji SmartGuide přiřadit
druhou rukojeť, zopakujte s druhou rukojetí
poslední dva kroky, popsané výše. Režim
«Learn» můžete opustit stisknutím tlačítka
«h/min» nebo tlačítka «set». Jinak se režim
«Learn» po 30 sekundách automaticky vypne.
Poznámka:
S jedním displejem SmartGuide můžete
•
sesynchronizovat maximálně 2 rukojeti. Po
synchronizaci druhé rukojeti se na displeji
zobrazí nápis «Full».
Při výměně baterií v displeji SmartGuide se
•
uložená data vymažou. Proto synchronizaci
zopakujte při každé výměně baterií.
Provedete to tak, že na 3 sekundy simultánně
stisknete tlačítko vypnutí/zapnutí a tlačítko
nastavení režimu čištění. Na displeji rukojeti se
zobrazí symbol vypnutí rádiového vysílání.
Pokud chcete rádiové vysílání opět aktivovat,
stiskněte znovu na 3 sekundy obě tlačítka
najednou a symbol na displeji zmizí.
3 sec.3 sec.
Výměna baterií
Displej SmartGuide
Zcela vybité baterie okamžitě vyměňte.
Vyměňujte všechny baterie najednou.
Nepoužívejte alkalické baterie spolu se zinkouhlíkovými nebo akumulátorovými bateriemi.
Změny vyhrazeny.
Tento přístroj odpovídá požadavkům
směrnice Rady 1999/5/ES. Přijímač třída 3,
pracovní cyklus třída 3.
Poznámka k životnímu
prostředí
Tento výrobek obsahuje akumulátorové
baterie. V zájmu ochrany životního
prostředí nevyhazujte výrobek po
skončení jeho životnosti do běžného
domovního odpadu. Můžete ho odevzdat v
servisních střediscích Braun Oral-B nebo na
příslušných sběrných místech ve vaší zemi,
zřízených podle místních předpisů a norem.
31
Page 32

Záruka
Na tento výrobek poskytujeme záruku 2 roky
ode dne prodeje spotřebiteli. V záruční době
bezplatně odstraníme závady na přístroji,
způsobené vadami materiálu nebo chybou
výroby. Tato záruka platí pro všechny země,
kam je tento přístroj dodáván firmou Braun nebo
jejím autorizovaným distributorem.
Tato záruka se nevztahuje na poškození, vzniklá
nesprávným používáním a údržbou, na běžné
opotřebení, vzniklé při používání, zejména v
případě kartáčkových hlav, jakož i na závady,
které mají zanedbatelný vliv na hodnotu a
použitelnost přístroje. Záruka pozbývá platnosti,
pokud byly opravy provedeny neautorizovanými
osobami nebo pokud nejsou použity originální
díly Braun.
Chcete-li využít servisních služeb v záruční
době, předejte nebo zašlete kompletní přístroj
spolu s doklady o koupi do autorizovaného
servisního střediska Braun Oral-B.
Tato záruka nemá žádný vliv na vaše práva,
vyplývajících z platných zákonů.
32
Page 33

Slovenský
Zubná kefka Oral-B® Triumph s displejom
SmartGuide bola dôkladne navrhnutá tak, aby
vám i vašej rodine poskytovala jedinečný zážitok
z čistenia zubov, ktoré je bezpečné a zároveň
efektívne. Pri používaní elektrických zariadení
by ste však vždy mali dodržiavať základné
bezpečnostné opatrenia. Pred prvým použitím si
dôkladne prečítajte tento návod na použitie.
DÔLEŽITÉ UPOZORNENIA
Zubná kefka Oral-B Triumph je vybavená
•
nabíjačkou SmartPlug so špeciálnym
prevodníkom na nízke napätie (špeciálnym
sieťovým káblom so sieťovým adaptérom).
Žiadnu jeho časť nesmiete meniť ani ho
rozoberať, inak by mohlo dôjsť k úrazu
elektrickým prúdom. Nabíjačku SmartPlug
pravidelne kontrolujte, či nie je poškodená.
Poškodené alebo nefunkčné zariadenie ďalej
nepoužívajte. Poškodené zariadenia vezmite
do servisného strediska Braun Oral-B Braun
Tento výrobok nie je určený deťom do 3 rokov.
•
Tento prístroj nie je určený deťom ani osobám
•
so zníženými fyzickými, zmyslovými alebo
mentálnymi schopnosťami, ak na ne nedohliada osoba zodpovedná za ich bezpečnosť.
Prístroj odporúčame uchovávať mimo dosahu
detí.
Ak vám výrobok spadne, čistiacu hlavicu pred
•
ďalším použitím vymeňte, aj keď nie je
viditeľne poškodená.
Nabíjačku SmartPlug udržujte v dostatočnej
•
vzdialenosti od vody a od iných tekutín.
Výrobok neupravujte ani neopravujte. Mohlo
•
by to spôsobiť požiar, úraz elektrickým prúdom
alebo zranenie. S opravami sa obráťte na
predajcu alebo kontaktujte servisné stredisko
Braun Oral-B. Výrobok rozoberajte iba vtedy,
keď chcete odstrániť batériu.
Pri odstraňovaní batérie dávajte pozor, aby ste
•
neskratovali kladný (+) a záporný (–) pól.
Nedotýkajte sa nabíjačky SmartPlug mokrými
•
rukami. Môže to spôsobiť úraz elektrickým
prúdom.
Používajte tento výrobok iba na určené
•
použitie, ako sa popisuje v tomto návode na
použitie. Nepoužívajte nadstavce, ktoré neodporúča výrobca.
Ak podstupujete akúkoľvek liečbu ústnej
•
dutiny, pred použitím tohto výrobku sa poraďte
so zubným lekárom.
Zubná kefka Oral-B Triumph s displejom
SmartGuide používa interaktívny bezdrôtový
®
.
displej, ktorý pomáha optimalizovať váš zážitok
z čistenia zubov.
UPOZORNENIE
S cieľom zabrániť elektromagnetickej
•
interferencii a/alebo narušeniu kompatibility zrušte rádiové vysielanie zubnej
kefky, skôr ako ju prinesiete alebo
použijete vo vyhradenom priestore, ako
napríklad v lietadle alebo v osobitne
vyznačených priestoroch nemocnice
(pozri «Zrušenie rádiového vysielania»).
•
Osoby s kardiostimulátorom by mali vždy
držať zubnú kefku viac ako 15 cm od
kardiostimulátora, keď je zapnutá. Keď si
budete myslieť, že dochádza k interferencii,
pred použitím zubnej kefky zrušte jej
rádiové vysielanie («Zrušenie rádiového
vysielania»).
Popis
a Čistiaca hlavica Oral-B FlossAction
b Spínač zapnutia/vypnutia
c Tlačidlo na nastavenie režimu čistenia
d Rukoväť
e Displej na rukoväti
f Nabíjačka SmartPlug (obsahuje nabíjací
krúžok a zástrčku SmartPlug)
g Základná doska
h Ochranný kryt
i Čistiaca hlavica Oral-B 3D WHITE
(nie je súčasťou všetkých modelov)
j Inteligentný displej SmartGuide
k Držiak na stenu
l Lepiaca páska
Technické údaje
Typ: 3731
Napätie: 100 – 240 V
Frekvencia: 50 – 60 Hz
Výkon: 3 W
Hladina hluku: 63 dB (A)
IP: 67
Prvé použitie
Zubnú kefku pred prvým použitím nabite.
Nabíjačku SmartPlug zapojte do elektrickej
zásuvky a rukoväť zubnej kefky (d) postavte na
nabíjací krúžok (f) (pozri «Zapojenie do siete
a nabíjanie»).
Displej SmartGuide sa aktivuje v pokojovom
•
režime. Na vypnutie tohto režimu stlačte
tlačidlo «set» alebo tlačidlo «h/min», ktoré sa
33
Page 34

nachádza v batériovom priestore. Displej
h/min
set
h/min
set
t
h/min
set
t
h/min
set
SmartGuide sa automaticky opäť aktivuje
v pokojovom režime, ak zubnú kefku 28 dní
nepoužívate. Tejto automatickej aktivácii
môžete zabrániť buď nastavením času, alebo
synchronizáciou rukoväti.
h/min
h/min
set
set
2
2
1
1
Keď sa na displeji SmartGuide objaví «12:00»,
•
h/min
h/min
set
set
znamená to, že je možné nastaviť čas. Stlačte
tlačidlo «set» umiestnené v batériovom priestore, kým sa nezobrazí «12 h».
set
set
h/min
h/min
Krátkym stlačením tlačidla «h/min» si môžete
•
vybrať medzi 12-hodinovým «12 h» alebo
24-hodinovým «24 h» formátom. Svoj výber
potvrďte stlačením tlačidla «set».
Zapojenie do siete a
nabíjanie
Vaša zubná kefka má vodotesnú rukoväť, je
elektricky bezpečná a môžete ju používať
v kúpeľni.
Nabíjaciu jednotku zložíte tak, že ochranný kryt
(h) pripojíte k zadnej strane základne (g). Potom
základňu umiestnite na nabíjací krúžok (f), tak
aby zapadla na miesto.
Nabíjačku SmartPlug zapojte do elektrickej
•
zásuvky a rukoväť zubnej kefky (d) postavte
na nabíjaciu jednotku. Na displeji na rukoväti
(e) sa objaví symbol batérie. Tento symbol
sa bude počas nabíjania rukoväti postupne
vypĺňať. Keď je rukoväť plne nabitá, symbol
batérie sa zaplní štyrmi plnými políčkami.
Rukoväť sa plne nabije za najmenej 10 hodín
a vtedy umožňuje približne 10 dní pravidelného
čistenia (dvakrát denne po dve minúty).
Poznámka: Ak sa symbol batérie neobjaví
hneď, pokračujte v nabíjaní. Symbol sa objaví
o 10–15 minút.
Potom sa rozbliká číslica hodín. Stláčajte
•
tlačidlo «h/min», kým sa neobjaví správna
hodina a výber potvrďte stlačením tlačidla
«set». Rovnako nastavte aj minúty. Ak
nechcete funkciu hodín používať, blikajúci
nápis «12:00» sa po 24 hodinách automaticky
stratí.
Zubnú kefku zapnete stlačením tlačidla zapnutia/
vypnutia (b). Pred zapnutím zubnej kefky si
čistiacu hlavicu najskôr priložte k zubom, aby
ste zabránili vystrekovaniu.
Oral-B
Oral-B
Oral-B
34
Oral-B
Keď je akumulátorová batéria takmer vybitá,
•
symbol batérie s posledným plným políčkom
začne svietiť. Zubná kefka sa spomalí a
nakoniec sa úplne zastaví. Keď sa batéria
úplne vybije, na displeji začne blikať prázdny
rám symbolu batérie. Rukovať musíte najskôr
nechať 15 minút nabíjať, až potom môžete
zubnú kefku použiť na 2-minútové čistenie.
Pri každodennom používaní môže byť rukoväť
•
zubnej kefky umiestnená na nabíjacej
jednotke, aby bola neustále plne nabitá.
Prebitie batérie nie je možné. Na účely
ochrany životného prostredia však Oral-B
odporúča odpojiť nabíjaciu jednotku z elektrickej siete až dovtedy, kým nie je potrebné
batériu znova nabiť.
Page 35

Na zachovanie maximálnej kapacity akumulá-
•
torovej batérie najmenej raz za 6 mesiacov
odpojte nabíjaciu jednotku z elektrickej zásuvky a bežným používaním nechajte rukoväť
úplne vybiť.
Osobné nastavenie
časovača
Stlačte a podržte tlačidlo na nastavenie režimu
•
čistenia (c), až kým sa na displeji SmartGuide
(j) neobjaví «:30» a «timer» (časovač).
3 sec.3 sec.
Môžete si vybrať medzi profesionálnym («Professional») alebo dvojminútovým («2-Minute»)
časovačom a medzi pripočítavajúcim («Count
Up») alebo odpočítavajúcim («Count Down»)
časovačom podľa svojich potrieb.
Dvojminútový («2-Minute») časovač dlhým
zaseknutím zvuku a symbolom tváričky na displeji
SmartGuide oznamuje, že uplynuli zubnými
lekármi odporúčané dve minúty čistenia.
Profesionálny («Professional») časovač vám
navyše pomáha rovnomerne vyčistiť každý
kvadrant vašich úst. Krátke zaseknutie zvuku
v 30-sekundových intervaloch (45-sekundové
intervaly pri režime «Deep Clean») a symbol
kvadrantu na displeji SmartGuide vám pripomenú,
že nastal čas vyčistiť ďalší kvadrant úst.
3
3
c
c
0
e
e
s
s
0
0
3
3
c
c
e
e
s
s
0
s
s
e
e
c
c
3
3
0
0
s
s
e
0
0
e
c
c
3
3
s
s
5
5
4
4
c
c
e
e
s
s
4
4
c
c
5
e
e
5
s
s
e
e
c
c
4
4
5
5
s
s
e
5
5
e
c
c
4
4
Keď rukoväť pri čistení na chvíľu vypnete, oba
časovače si zapamätajú uplynutú dobu čistenia.
Ak čistenie prerušíte na viac ako 30 sekúnd,
časovač sa nastaví opäť na začiatok.
Krátkym stlačením tlačidla zapnutia/vypnutia
•
(b) prepnite na dvojminútový («2-Minute»)
časovač. Svoj výber potvrďte stlačením tlačidla
na nastavenie režimu čistenia (c).
•
Tak sa dostanete priamo k zobrazeniu
pripočítavajúceho («Count Up») časovača na
displeji (ukáže sa «up» a «timer»). Stlačením
tlačidla zapnutia/vypnutia prepnite na odpočítavajúci («Count Down») časovač a svoju
voľbu potvrďte stlačením tlačidla na nastavenie
režimu čistenia.
Poznámka: Je normálne, ak displej na rukoväti
zobrazuje dva blikajúce dieliky batérie, keď
pracujete v režime nastavenia časovačov.
Pripočítavajúci («Count Up») časovač zobrazuje
aktuálnu dĺžku čistenia. Odpočítavajúci («Count
Down») časovač zobrazuje zostávajúci čas
čistenia. Začne počítať na «2:00» minútach
a odpočítava až do «0:00» minút. Ak si zuby
čistíte dlhšie ako dve minúty, automaticky sa
zmení na pripočítavajúci časovač.
Celkový čas čistenia je možné predĺžiť až na
3 minúty použitím dôkladného režimu «Deep
Clean» (pozri «Režimy čistenia»).
Zubná kefka sa predáva s aktivovaným
profesionálnym a pripočítavajúcim časovačom.
Ak si želáte zmeniť tieto nastavenia, postupujte
nasledovne:
Čistenie
Technika čistenia zubov
Čistiacu hlavicu pomaly veďte z jedného zuba
•
na druhý.
Čistiacu hlavicu podržte niekoľko sekúnd na
•
mieste a až potom ju posuňte na ďalší zub.
35
Page 36

Vyčistite si ďasná aj zuby, najskôr vonkajšie
•
plochy, potom vnútorné a napokon žuvacie
plochy.
Na zuby netlačte ani ich nedrhnite. Nechajte
•
zubnú kefku urobiť všetku prácu za vás. Keď si
zuby dočistíte, celková dĺžka čistenia sa bude
na displeji zobrazovať ešte 30 sekúnd, než sa
displej znova prepne do časového režimu.
Vymažte zobrazovanie dĺžky čistenia zubov
stlačením tlačidla na nastavenie režimu čistenia, aby ste sa dostali priamo do časového
režimu.
Vaša zubná kefka má funkciu kontroly tlaku,
ktorá pomáha zaručiť, že pri čistení vyvíjate
správnu úroveň tlaku. To pomáha chrániť zuby
a ďasná pred nadmerným drhnutím a uľahčuje
používanie zubnej kefky. Ak kefkou príliš
zatlačíte, oscilačný pohyb čistiacej hlavice bude
pokračovať, ale pulzový pohyb sa zastaví.
Nielenže to pocítite, ale navyše budete počuť iný
zvuk.
V prvých dňoch používania akejkoľvek
elektrickej zubnej kefky môžu vaše ďasná
mierne krvácať. Tento príznak by mal po
niekoľkých dňoch ustúpiť. Ak však ďasná
neprestanú do dvoch týždňov krvácať, kontaktujte svojho zubného lekára. Ak máte citlivé zuby
a ďasná, Oral-B vám odporúča používať jemný
režim čistenia «Sensitive».
Režimy čistenia
Zubná kefka vám ponúka rôzne režimy čistenia
pre meniace sa potreby starostlivosti o ústnu
dutinu:
«Daily Clean» – Výnimočné čistenie ústnej
dutiny.
«Sensitive» – Šetrné, ale dôkladné čistenie
citlivých oblastí.
«Massage» – Jemné masírovanie ďasien.
«Whitening» – Leštenie a bielenie zubov
«Deep Clean»
na príležitostné alebo každodenné použitie.
– Výnimočné čistenie ústnej
dutiny s predĺženou dobou
čistenia. Pri tomto režime sa
doba čistenia predlžuje až
na 45 sekúnd pri každom
kvadrante úst, čo znamená,
že celkový čas čistenia
predstavuje 3 minúty.
Na prechod do iného režimu postupne
•
stláčajte tlačidlo na nastavenie režimu čistenia.
Ak sa chcete z ktoréhokoľvek režimu vrátiť
•
do režimu «Daily Clean», stlačte a podržte
tlačidlo na nastavenie režimu čistenia.
Zubnú kefku vypnete stlačením tlačidla
•
zapnutia/vypnutia.
Poznámka: Bieliaci režim «Whitening» funguje
najlepšie, ak použijete čistiacu hlavicu Oral-B
3D WHITE (i).
Čistiace hlavice (v závislosti od modelu
zubnej kefky)
Čistiaca hlavica Oral-B FlossAction
Čistiaca hlavica Oral-B FlossAction (a) sa
odporúča na každodenné dôkladné čistenie.
Obsahuje lamely MicroPulse, ktoré sa dostanú
hlboko do ťažko dostupných miest medzi
zubami, kde šetrne odstránia zubný povlak.
Čistiaca hlavica Oral-B Sensitive
Čistiaca hlavica Oral-B Sensitive poskytuje
dôkladné čistenie citlivých zubov a ďasien. Má
mimoriadne mäkké štetinky, ktoré sú jemné
k zubom i ďasnám.
Čistiaca hlavica Oral-B 3D WHITE
Na príležitostné alebo každodenné leštenie
používajte čistiacu hlavicu Oral-B 3D WHITE (i)
(nie je súčasťou všetkých modelov). Obsahuje
leštiaci kalištek inšpirovaný zubnými lekármi,
ktorý odstraňuje z povrchu zubov farebné škvrny
od kávy, čaju a tabaku na dosiahnutie efektívneho bielenia.
Deti do 12 rokov by nemali používať čistiacu
hlavicu Oral-B 3D WHITE.
aa
ii
•
Po stlačení tlačidla zapnutia/vypnutia sa zubná
kefka automaticky zapne v čistiacom režime
«Daily Clean».
36
Page 37

Čistiace hlavice Oral-B FlossAction a Oral-B
3D WHITE neodporúčame používať, ak
nosíte zubný aparát (strojček). Na tento účel
odporúčame používať čistiacu hlavicu Oral-B
Ortho, ktorá je navrhnutá špeciálne na čistenie
priestorov okolo zubných aparátov.
Všetky čistiace hlavice majú modré štetinky
INDICATOR, ktoré vám pomáhajú kontrolovať
potrebu výmeny čistiacej hlavice. Pri dôkladnom
čistení zubov dvakrát za deň po dve minúty
modrá farba štetiniek do polovice vybledne
približne po troch mesiacoch používania. Tým
signalizuje, že je potrebné vymeniť čistiacu
hlavicu za novú.
Displej SmartGuide
Zobrazená
ikonka
Význam
Režim «Daily Clean»
Režim «Sensitive»
Pripevnenie na stenu
Ak chcete displej SmartGuide prichytiť na stenu,
zrkadlo alebo na iný povrch, použite lepiacu pásku
(l), ktorou držiak na stenu (k) pripevníte. Ešte
predtým sa však uistite, že vybraný povrch je čistý
a suchý (odstráňte z neho mastnotu a prach).
Držiak na stenu umiestnite tak, aby bolo vidieť
logo Oral-B. Potom držiak rovnomerne a pevne
pritlačte k stene. 24 hodín počkajte, kým do
pripevneného držiaka vložíte displej SmartGuide.
Poznámka: Lepiaca páska sa neprichytí
k povrchu, ktorý je odolný voči nečistotám.
Čistenie
Režim «Massage»
Režim «Whitening»
Režim «Deep Clean»
Vyvíjate príliš veľký tlak. Zmenšite
silu vynaloženú pri čistení zubov.
«Symbol kvadrantu» – práve si
čistíte zuby v prvom 30-sekundovom
intervale (45-sekundovom intervale
v prípade režimu «Deep Clean»).
Keď sa rozsvieti druhý kvadrant,
začnite čistiť ďalší kvadrant úst.
Uplynuli zubnými lekármi
odporúčané 2 minúty čistenia
(3 minúty čistenia v prípade režimu
«Deep Clean»).
Akumulátorová batéria v rukoväti
je takmer vybitá. Nabite rukoväť
zubnej kefky.
Batérie displeja SmartGuide sú
takmer vybité. Vymeňte batérie
v displeji SmartGuide.
Čistiacu hlavicu po použití dôkladne opláchnite
•
pod tečúcou vodou.
Čistiacu hlavicu odmontujte z rukoväti a obe
•
časti poumývajte zvlášť pod tečúcou vodou.
Skôr, ako rukoväť znova položíte na nabíjaciu
jednotku, obe časti vyutierajte dosucha.
Nabíjaciu jednotku pred čistením najskôr
•
rozmontujte. Nabíjací krúžok a nabíjačku
SmartPlug nikdy neumývajte v umývačke
riadu. Všetky ostatné časti (základná doska
a ochranný kryt) sa však môžu umývať
v umývačke riadu.
37
Page 38

Z času na čas môžete vyčistiť aj nabíjací
set
h/min
3 sec.
set
h/min
3 sec.
•
krúžok, nabíjačku SmartPlug a displej
SmartGuide vlhkou handričkou. Nabíjačku
SmartPlug a displej SmartGuide nikdy
neponárajte do vody.
Synchronizácia
S cieľom zabrániť interferencii správ na displeji
pri používaní viac ako jednej zubnej kefky Oral-B
Triumph v jednej domácnosti, pričom každá má
svoj vlastný displej SmartGuide, musíte rukoväti
najskôr priradiť k príslušným displejom.
Postupujte takto:
Aspoň na 3 sekundy stlačte tlačidlo «h/min»
•
v batériovom priestore. Na displeji SmartGuide
sa ukáže «L---», čo znamená, že je aktivovaný
režim «Learn» na synchronizáciu.
Potom vás blikajúci symbol tlačidla zapnutia/
•
vypnutia na displeji SmartGuide vyzve, aby ste
rukoväť zapli. Keď to urobíte, spustí sa proces
automatickej synchronizácie, ktorý sa skončí
vo chvíli, keď sa na displeji objaví «L-1-».
Zrušenie rádiového
vysielania
Ak chcete používať alebo prenášať svoju zubnú
kefku v miestach, kde je zakázaná prítomnosť
prístrojov s rádiovým vysielaním (napr. nemocnice alebo lietadlá), najskôr zrušte jej rádiové
vysielanie.
Urobíte to tak, že na 3 sekundy simultánne
stlačíte tlačidlo zapnutia/vypnutia a tlačidlo
na nastavenie režimu čistenia. Na displeji na
rukoväti sa zobrazí symbol zrušenia rádiového
vysielania. Ak chcete rádiové vysielanie opäť
aktivovať, obe tlačidlá znova na 3 sekundy
naraz potlačte a symbol na displeji sa stratí.
3 sec.3 sec.
Výmena batérií
Displej SmartGuide
Úplne vybité batérie okamžite vyberte. Všetky
batérie vymeňte naraz. Nemiešajte alkalické
batérie so zinkovo-uhlíkovými alebo akumulátorovými batériami.
Potom rukoväť vypnite.
•
Ak chcete k displeju SmartGuide prideliť druhú
rukoväť, zopakujte s druhou rukoväťou posledné
dva kroky opísané vyššie. Z režimu «Learn»
môžete vystúpiť stlačením tlačidla «h/min»
alebo tlačidla set. Inak sa režim «Learn» po
30 sekundách automaticky vypne.
Poznámka:
S jedným displejom SmartGuide môžete
•
zosynchronizovať maximálne dve rukoväti. Po
synchronizácii druhej rukoväti sa na displeji
zobrazí nápis «Full».
Po výmene batérií v displeji SmartGuide sa
•
uložené údaje vymažú. Synchronizáciu preto,
prosím, zopakujte vždy, keď vymeníte batérie.
38
Právo na zmeny vyhradené.
Tento výrobok je v súlade s požiadavkami
smernice Rady 1999/5/ES. Prijímač
trieda 3, pracovný cyklus trieda 3.
Poznámka k životnému
prostrediu
Toto zariadenie obsahuje akumulátorové
batérie. V záujme ochrany životného
prostredia nevyhadzujte zariadenie po
skončení jeho životnosti ako súčasť
bežného odpadu domácnosti. Odovzdať ho
môžete v servisných strediskách Braun Oral-B
alebo na príslušných zberných miestach vo
vašej krajine zriadených podľa miestnych
predpisov a noriem.
Page 39

Záruka
Na tento výrobok poskytujeme záruku 2 roky odo
dňa jeho predaja spotrebiteľovi. Počas záručnej
lehoty bezplatne odstránime akékoľvek poruchy
na výrobku spôsobené chybou materiálu alebo
výroby, a to na základe nášho rozhodnutia buď
opravou, alebo výmenou celého výrobku.
Záruka sa vzťahuje na všetky krajiny, do ktorých
tento výrobok dodáva firma Braun alebo jej
autorizovaný distribútor.
Táto záruka sa nevzťahuje na poškodenia
vzniknuté nesprávnym používaním a na bežné
opotrebovanie vzniknuté pri používaní, najmä
pokiaľ ide o čistiace hlavice, ani na poruchy,
ktoré majú zanedbateľný vplyv na hodnotu
a použiteľnosť prístroja. Záruka stráca platnosť,
ak opravy vykonajú neautorizované osoby, alebo
ak sa na opravu nepoužijú originálne náhradné
diely Braun.
Táto záruka nemá žiadny vplyv na vaše práva
vyplývajúce so zákona.
39
Page 40

Magyar
A SmartGuide rendszerrel ellátott Oral-B®
Triumph elektromos fogkefét azért fejlesztettük
ki, hogy Önnek és családjának olyan új
szájápolásban legyen része, amely biztonságos
és hatékony. Kérjük, hogy az első használat
megkezdése előtt figyelmesen olvassa el a
használati útmutatót!
FONTOS!
Ne cserélje, illetve ne alakítsa át a termék
•
egyik alkatrészét sem, mivel ezzel áramütést
okozhat Időközönként ellenőrizze a SmartPlug
sértetlenségét, és amennyiben a készüléken
rendellenességet tapasztal, függessze fel a
termék használatát! A meghibásodott
alkatrészt juttassa el az Oral-B Braun
szervízbe.
A terméket nem tervezték 3 év alatti gyerme-
•
kek használatára.
A készüléket gyermekek, mozgássérültek,
•
szellemi vagy értelmi fogyatékosszemélyek
kizárólag a biztonságukért felelős felügyelet
mellett használják!
Amennyiben a készüléket leejtette, a kefefejet
•
célszerű kicserélni a következő használat előtt
még akkor is, ha sérülésnek látható jelei
nincsenek a fogkefén.
A SmartPlug csatlakozót tartsa víztől vagy
•
egyéb folyadéktól távol!
A készüléken ne hajtson végre átalakítást,
•
és ne javítsa azt, mivel ezzel tüzet illetve
áramütést, valamint sérülést okozhat.
A javítással kapcsolatban érdeklődjön a
kereskedőnél, vagy vegye fel a kapcsolatot az
Oral-B szervizközponttal. A készüléket csakis
akkor szedje szét, ha ezt az akkumulátor
eltávolításának céljából teszi!
Az akkumulátor eltávolításakor ügyeljen arra,
•
hogy a pozitív (+) és negatív (–) cellákban ne
okozzon zárlatot!
Ne érjen a SmartPlug csatlakozóhoz nedves
•
kézzel, mert ez áramütést okozhat!
A terméket kizárólag rendeltetésszerűen, a
•
használati utasításban leírtaknak megfelelően
használja! A készülékhez ne alkalmazzon
kiegészítőket a gyártó ajánlása nélkül!
Amennyiben bármilyen fogorvosi kezelés alatt
•
áll, a készülék használatának megkezdése
előtt konzultáljon fogorvosával!
®
FONTOS!
Az elektromágneses interferenciák,
•
és/vagy kompatibilitás-zavarok elkerülése
érdekében kérjük, iktassa ki fogkeféje
rádió átviteli funkcióját, vagy függessze fel
használatát az olyan tiltott zónákban, mint
pl. repülőgépeken, vagy a különleges
jelzésekkel ellátott kórházi területeken
(lásd: «A rádió átvitel kiiktatása»).
•
A szívritmus-szabályozóval rendelkező
személyek mindig tartsák bekapcsolt
fogkeféjüket legalább 15 cm-es távolságban
beültetett készüléküktől. Amennyiben
bármilyen interferenciát észlel, a használat
megkezdése előtt iktassa ki készüléke
rádió-átviteli funkcióját! (lásd: «a rádió
átvitel kiiktatása»).
Leírás
a Oral-B FlossAction fogkefe fej
b Be/kikapcsoló gomb
c Fogmosási mód kapcsoló
d Markolat
e Markolat kijelző
f SmartPlug töltőrendszer (töltőgyűrűvel és
SmartPlug dugaszolóval)
g Talpazat
h Védőborítás
i Oral-B 3D WHITE fogkefe fej (nem minden
modellhez)
j SmartGuide kijelzőegység
k Fali tartó
l Ragasztószalag
Műszaki adatok:
Típus: 3731
Feszültség: 100–240V
Rezgésszám: 50–60 Hz
Teljesítmény: 3 W
Zajszint: 63 db (A)
IP: 67
Első használat
Az első használat megkezdése előtt töltse
fel elektromos fogkeféjét! Csatalkoztassa a
SmartPlug csatlakozót az elektromos hálózatba,
és helyezze a markolatot (d) a töltőgyűrűre (f)
(lásd: «Csatlakozás és töltés» c. fejezet).
Az Ön SmartGuide rendszerrel ellátott Oral-B
Triumph készüléke interaktív, vezeték nélküli
kijelzővel segít biztosítani az optimális fogmosási
élményt.
40
A SmartGuide kijelző alapállapotában a demo
•
mód aktivált. Ebből az elemtartó rekeszen
feltüntetett «set» vagy a «h/min» gomb
megnyomásával tud kilépni. Felhívjuk
Page 41

figyelmét arra, hogy amennyiben fogkeféjét
h/min
set
h/min
set
t
h/min
set
t
h/min
set
28 napon át nem használja, a SmartGuide
kijelző automatikusan visszaáll «demo»
üzemmódba. Az óra beállításával vagy a
fogkefe markolat beállításával ez a funkció
kiküszöbölhető.
h/min
h/min
set
set
2
2
1
1
•
A SmartGuide kijelzőn megjelenő, villogó
h/min
h/min
set
set
«12:00» felirat az idő beállíthatóságát jelzi.
Tartsa benyomva az elemtartó rekeszen
található «set» gombot mindaddig, amíg a
«12h» felirat meg nem jelenik.
set
set
h/min
h/min
•
A «h/min» gomb rövid megnyomásával
kiválaszthatja az idő formátumát («12 h» vagy
«24 h»). Választását a «set» gombbal
rögzítheti.
Csatlakozás és töltés
A fogkefe markolata vízálló, érintésvédelmi
szempontból biztonságos, fürdőszobai
használatra tervezett.
A töltőegység összeállításához helyezze a
védőborítást (h) a talpazatra (g), majd ezt
követően a talpazatot a töltőgyűrűre (f) mindaddig amíg az helyére nem pattan.
Csatlakoztassa a SmartPlug csatlakozót az
•
elektromos hálózathoz, majd helyezze a
fogkefe markolatot (d) a töltőegységre. A
markolat kijelzőjén (e) megjelenik az elem
szimbólum. A feltöltés során a töltöttségi
szintnek megfelelően telik meg az elem ábra.
A teljes feltöltöttséget az elem ábrát kitöltő
4 hasáb jelzi. A teljes feltöltöttség legalább
10 órát vesz igénybe, és rendszeres fogmosás
mellett (napi kétszer 2 perces) körülbelül
10 nap használatot tesz lehetővé.
Figyelem: Amennyiben a töltés megkezdése-
kor az elem ábrája nem jelenik meg azonnal,
folytassa a töltést. Kb. 10–15 perc elteltével
előtűnik majd.
•
Ezt követően az órát jelző számok kezdenek
villogni. Tartsa az «h/min» gombot benyomva
mindaddig, amíg a megfelelő óra meg nem
jelenik a kijelzőn, majd nyomja meg a «set»
gombot! Járjon el ugyanígy a percek beállításához. Amennyiben az óra funkciót nem
kívánja használni, a villogó «12:00» kijelzés
24 óra elteltével automatikusan eltűnik.
A fogmosást a be/kikapcsoló gomb (b)
megnyomásával tudja elkezdeni. A szétfröccsenés
elkerülése érdekében még a bekapcsolás előtt
helyezze a fogkefét a fogfelületre.
Oral-B
Oral-B
Oral-B
Oral-B
Amikor az újratölthető akkumulátor
•
lemerülőben van, az elem ábrája a benne
lévő egy hasábbal villogni kezd. A fogkefe
működése ekkor lelassul, majd megáll. Amikor
az akkumulátor teljesen lemerül, az elem ábra
üres kerete villogni kezd. Ebben az esetben
15 perces töltésre lesz szüksége egy 2 perces
fogmosás elvégzéséhez.
Mindennapi használat mellett a markolatot
•
célszerű a töltőegységen tárolni, mert így a
készülék megőrzi teljes feltöltöttségi állapotát.
Noha túltöltés nem lehetséges, környezetvédelmi okokból az Oral-B javasolja a készülék
kihúzását a hálózatból mindaddig, amíg a
következő töltés aktuálissá nem válik.
•
Ahhoz, hogy a tölthető akkumulátor megőrizze
maximális kapacitását, legalább félévente
41
Page 42

egyszer a töltőegységet áramtalanítani kell,
a markolatot pedig rendszeres használattal
teljesen le kell meríteni.
Az időzítő személyre
szabott beállítása
Szükségletinek megfelelően Ön választhat a
«Professional» (professzionális) vagy a «2Minute» (2 perces) időzítők, illetve a «Count Up»
(a fogmosásra addig eltöltött időt) vagy a
«Count Down» (a fogmosásból még hátralévő
időt) mutató kijelzések közül. Mindezek mellett a
«Professional Timer» (vagyis a professzionális
időmérő) segít Önnek mind a négy szájkvadráns
egyenletes megtisztításában. Rövid csipogó
hanggal jelzi a 30 másodperces időintervallumok
elteltét (45 másodpercét a «Deep Clean» –
mélytisztító üzemmódban), valamint a
SmartGuide kijelzőn megjelenő a «quadrant
circle» (körnegyed) felirat azt, hogy áttérhet a
következő szájkvadráns tisztítására.
3
3
c
c
0
e
e
s
s
0
0
3
3
c
c
e
e
s
s
0
s
s
e
e
c
c
3
3
0
0
s
s
e
0
0
e
c
c
3
3
s
s
5
5
4
4
c
c
e
e
s
s
4
4
c
c
5
e
e
5
s
s
e
e
c
c
4
4
5
5
s
s
e
5
5
e
c
c
4
4
Nyomja meg, és tartsa benyomva a «mode»
•
gombot (c) mindaddig, amíg a SmartGuide
kijelző (j) az alábbi jelzést mutatja: «:30» és
«timer».
3 sec.3 sec.
A Be/kikapcsoló gomb rövid megnyomásával
•
kapcsoljon a «2-Minute Timer» (2-perces
időmérő jelzésre). Nyomja meg a «mode»
gombot (c).
A «mode» gomb megnyomásával közvetlenül
•
a «Count Up Timer» jelenik meg a kijelzőn
(az «up» és «timer»). A Be/kikapcsoló gomb
megnyomásával lépjen át a «Count Down
Timer» visszaszámlálóra, majd rögzítse
választását a «mode» gomb megnyomásával.
Mindkét időmérő memorizálja az eltelt fogmosási
időt még akkor is, ha a markolatot rövid időre
kikapcsolja fogmosás közben. Amennyiben
30 másodpercnél hosszabb a szünet, a
számlálás újraindul.
A «Count Up Timer» kijelző a fogmosásra
aktuálisan eltöltött időt, míg a «Count Down
Timer» a fogmosásból még hátralévő időt jelzi.
A visszaszámlálás «2:00» percről indul egészen
a «0:00»-ig. Amennyiben a fogmosás több
mint 2 percig tart, a számláló automatikusan a
«Count Up Timer» kijelzőre vált, és a fogmosásra aktuálisan eltöltött időt mutatja.
A «Deep Clean» üzemmód használatával a
teljes fogmosási idő 3 percesre hosszabbítható
(lásd: «Fogmosási módok»).
Fogkeféje alapbeállításán a «Professional
Timer» (professzionális időmérő) valamint
«Count Up Timer» (vagyis a fogmosási idő)
számlálók aktívak. Amennyiben az alapbeállítást
szeretné megváltoztatni, ezt az alábbi módon
teheti:
42
Figyelem: Az időzítő beállításakor normális
jelenség, ha a markolat kijelzője két villogó
hasábot mutat.
Fogmosás
Fogmosási technikák
Vezesse végig a kefefejet lassú mozdulattal
•
fogról-fogra.
Tartsa a kefefejet minden egyes fogán pár
•
másodpercig, mielőtt áttérne a következő
fogra!
Page 43

A fogínyt ugyanúgy tisztítsa meg, mint a
•
fogakat: először a külső-, aztán a belső-, végül
pedig a rágófelületeken.
A fogkefét ne nyomja túl erősen, és ne
•
végezzen sikáló mozdulatokat: hagyja hogy az
magától dolgozzon! A fogmosás befejeztével
30 másodpercig a fogmosásra fordított idő
jelenik meg a kijelzőn, ezt követően visszakapcsol az időzítő módra. A fogmosási idő
megjelenítése helyett az időzítő módra történő
manuális visszaállítást a «mode» gomb
megnyomásával tudja elvégezni.
A megfelelő erősségű fogkefevezetés érdekében
az Ön elektromos fogkeféjét nyomásérzékelővel
láttuk el. Ez segít megóvni a fogínyt a túl erősen
végzett fogmosástól, és egyszerűvé teszi a
fogkefe használatát. Ha túl erős a nyomás,
akkor a fogkefe oszcilláló mozgása tovább
folytatódik, azonban a pulzulás megáll. Ezt,
fogmosás közben Ön érezni fogja, de egy hang
is jelzi.
A fogkefe használatának első napjaiban enyhe
fogínyvérzés jelentkezhet. Ez azonban általában
néhány nap elteltével megszűnik. Amennyiben
a probléma 2 hét elteltével még mindig fennáll,
forduljon fogorvosához, vagy dentálhigiéniás
szakemberhez! Ha fogai és fogínye érzékenyek,
az Oral-B javasolja hogy a fogkefét «Sensitive»
(érzékeny) üzemmódban használja!
Fogmosási módok
A különböző szájápolási igényeknek megfelelően, fogkeféje is különféle fogmosási módokat
kínál Önnek:
«Daily Clean» – Alapos tisztítás.
«Sensitive» – Gyengéd, de alapos tisztítás
az érzékeny területekhez.
«Massage» – A fogíny gyengéd
masszírozásához.
«Whitening» – Fogpolírozás és fogfehérítés
«Deep Clean»
alkalmi vagy mindennapos
használathoz.
– Mélytisztítás meghosszab-
bított fogmosási idővel.
Ebben a fogmosási módban
az egyes szájkvadránsokra
beállított idő 45 másodperc,
ez adja ki a 3 perces teljes
fogmosási időt.
Egy másik üzemmód aktiválásához, nyomja be
•
hosszan a «mode» gombot.
Ha bármely kiválasztott fogmosási módból
•
vissza kíván térni a «Daily Clean» üzemmódba,
nyomja be, és tartsa lenyomva a «mode»
gombot.
A fogkefe kikapcsolásához nyomja meg a be/
•
kikapcsoló gombot.
Figyelem: A «Whitening» módban végzett
fogmosáshoz a legalkalmasabb az Oral-B
3D WHITE fogkefe fej.
Fogkefe fejek (modelltől függően)
Oral-B FlossAction fogkefefej
Az Oral-B FlossAction fogkefefej (a) a mindennapos alapos tisztításhoz ajánlott. Mikropulzáló
sörtéi mélyen, a nehezen elérhető fogközökbe
is behatolnak, és kíméletesen eltávolítják a
lepedéket.
Oral-B Sensitive fogkefe fej
Az Oral-B Sensitive fogkefefej alapos tisztítást
nyújt az érzékeny fogak és fogíny számára.
Extra puha sörtéi kíméletesek a fogakhoz és a
fogínyhez.
Oral-B 3D WHITE fogkefefej
Az időközönkénti vagy mindennapos polírozáshoz
alkalmazza az Oral-B 3D WHITE fogkefefejet (i)
(nem mindegyik modell tartozéka). Olyan
fogorvosok ihlette polírozókehellyel rendelkezik,
amely eltávolítja a kávé, tea és dohányzás okozta
felületi elszíneződéseket a ragyogó fogakért.
Figyelem: az Oral-B 3D WHITE fogkefefej
alkalmazása 12 éven aluli gyermekek számára
nem ajánlott!
aa
ii
•
A be/kikapcsoló gomb megnyomásával a
fogkefe automatikusan a «Daily Clean»
üzemmódban indul.
43
Page 44

Amennyiben Önnek fogszabályozója van, ne
használja az Oral-B Floss Action és az Oral-B
3D WHITE fogkefefejeket! Ez esetben az Oral-B
Ortho fogkefefej használatát ajánljuk, amelyet
kifejezetten a fogszabályozó körüli területek
tisztítására terveztek.
Mindegyik fogkefefej jellemzője közé tartoznak
a kék színű Indicator sörték, amelyek segítenek
nyomon követni a fogkefefejek cseréjének
szükségességét. A napi két alkalommal történő
két perces fogmosás mellett, a kék sörték
körülbelül 3 hónap múlva kezdenek elhalványulni,
jelezve ezzel a kefefej cseréjének aktualitását.
SmartGuide kijelző egység
Kijelzőn
megjelenő
ábra
Jelentése
«Daily Clean» üzemmód
«Sensitive» üzemmód
Fali tartó
Amennyiben Ön jobb szeretné a SmartGuide
kijelzőegységet a falon, tükrön vagy bármely
más felületen elhelyezni, a falitartó rögzítéséhez
használja a ragasztószalagot (l). Mielőtt
nekilátna, győződjön meg arról, hogy a kijelölt
felület tiszta és száraz (első lépésben távolítsa
el a zsíros és poros szennyeződéseket). Állítsa
be a falitartót oly módon, hogy az Oral-B logo
olvasható legyen. Ezt követően egyenletes
és határozott mozdulattal nyomja a falitartót
a kívánt felülethez. Csak 24 óra elteltével
csúsztassa a SmartGuide kijelzőegységet a
rögzített falitartóhoz!
44
«Massage» üzemmód
«Whitening» üzemmód
«Deep Clean» üzemmód
Túl erős nyomás. Csökkentse a
fogmosás erősségét.
«Szájkvadráns» – jelenleg Ön az
első 30 másodperces fogmosási
időintervallumban van (45 másodperc
«Deep Clean» üzemmódban). Amikor
a második szegmens villogni kezd,
térjen át a következő szájkvadránsra!
Elérte a fogorvosok által ajánlott
2-perces fogmosási időt! (3-perces
fogmosási idő «Deep Clean»
üzemmódban).
A fogkefe markolat akkumulátora
lemerülőfélben van. Töltse fel a
markolatot!
A SmartGuide kijelző elemei
lemerülőfélben vannak. Cserélje
ki az elemeket a SmartGuide
kijelzőegységben!
Figyelem: A ragasztószalag nem tapad meg
porvisszataszító felületeken!
Tisztítási Javaslatok
A fogmosást követően pár másodpercen
•
keresztül alaposan öblítse le a fogkefefejet.
Távolítsa el a kefefejet, és mindkét részt külön
•
tisztítsa át vízsugár alatt, majd a töltőegységre
való visszahelyezés előtt törölje azokat
szárazra.
A töltőegység tisztítását megelőzően
•
mindenekelőtt szerelje szét az egységet. A
töltőgyűrűt és a SmartPlug csatlakozót soha
ne helyezze mosogatógépbe! A többi alkatrész
Page 45

azonban (talpazat és védőborítás)
set
h/min
3 sec.
set
h/min
3 sec.
biztonsággal tisztíthatók mosogatógében.
•
Időközönként a töltőgyűrűt, a SmartPlug
csatlakozót valamint a SmartGuide kijelzőegységet is megtisztíthatja egy nedves
segítségével. A SmartPlug töltőt és a
SmartGuide kijelzőt soha ne helyezze vízbe!
Szinkronba hozás
A különböző SmartGuide kijelzőkben keletkezett
zavarok elkerülése érdekében – amely adott
háztartáson belül egyszerre több Oral-B Triumph
fogkefe használatából adódhat – az adott
fogkefe kijelzőjén Önnek az alábbi beállításokat
kell elvégeznie:
•
Tartsa benyomva az elemtartó rekeszen
található «h/min» gombot legalább 3 másodpercen keresztül. A SmartGuide kijelzőn
megjelenik az «L---» jelzés, amely azt mutatja,
hogy a szinkronba hozás aktivált állapotba
került.
•
A SmartGuide kijelzőn ekkor megjelenő
be/kikapcsolást jelző ikon villogása arra
figyelmezteti Önt, hogy kapcsolja be a
készüléket. A bekapcsolással egyidejűleg az
automatikus szinkronba hozás megkezdődik.
Amikor az «L-1-» jelzés jelenik meg a kijelzőn
az arra utal, hogy a műveletvégzés befejeződött.
megnyomásával tud kilépni. Ellenkező esetben
a «Learn» vagyis a beállító mód automatikusan,
30 másodperc elteltével véget ér.
Kérjük ügyeljen a következőkre:
Maximum két fogkefe markolatot lehet a
•
SmartGuide kijelzőegységgel szinkronba
hozni. A második fogkefenyél szinkronba
hozását követően a kijelzőn a «Full» (megtelt)
felirat jelenik meg.
•
A SmartGuide kijelzőben az elemcsere
alkalmával az elmentett adatok kitörlődnek.
A szinkronba hozás műveletét épp ezért
ismételje meg minden elemcsere alkalmával.
A rádió átvitel kiiktatása
Amennyiben olyan helyre szeretné vinni vagy
olyan helyen szeretné használni a fogkeféjét
ahol a rádióvezérlésű eszközök használata nem
megengedett (pl. kórházakban vagy repülőgépek
fedélzetén), először ki kell iktatnia a rádió
átvitelt.
Ehhez 3 másodpercen keresztül egyidejűleg
tartsa lenyomva az «on/off» (be/kikapcsoló)
valamint a «mode» gombokat. Ekkor a markolat
kijelzője a rádió átvitel kiiktatásának ikonját
jelenít meg. Amennyiben a rádió átvitelt újra
szeretné aktiválni, nyomja be újból 3 másodpercen keresztül mindkét gombot, ekkor eltűnik
a kijelző ikon.
•
Ezt követően kapcsolja ki a fogkefét.
Amennyiben egy második fogkefe markolatot
is szeretne szinkronba hozni ugyanazzal a
SmartGuide kijelzőegységgel, hajtsa újból végre
a fent leírt utolsó két műveletet. A beállító módból
(«Learn») a «h/min» vagy a «set» gombok
3 sec.3 sec.
Az elemek cseréje
A SmartGuide kijelzőegységben
A lemerült elemeket azonnal távolítsa el a
készülékből, majd ezzel egyidejűleg helyezze
bele az új elemeket. Ne használjon együtt
alkáli- és a cink-karbon vagy újratölthető
elemeket!
45
Page 46

A változtatás jogát fenntartjuk.
A készülék megfelel a 1999/5/EC
direktívának.
Környezetvédelmi felhívás
A termék újratölthető akkumulátort
tartalmaz. A környezet megóvása
érdekében azonban kérjük, ne dobja
az elhasznált készüléket háztartási
hulladékok közé! Leadhatja azt bármely Oral-B
Braun Márkaszervizben, vagy hulladékudvarban.
Garancia
A Braun a vásárlás dátumától számítva 2 év
garanciát vállal termékeire. A garanciális
időszakban, a gyártásból vagy anyaghibából
eredő mindennemű meghibásodást
térítésmentesen kiküszöbölünk, javítással vagy
a teljes készülék cseréjével - indokoltságnak
megfelelően. A garancia hatálya minden olyan
országra kiterjed ahol a készülék forgalomban
van.
A garancia hatálya alól kivételt képeznek
azok a meghibásodások, amelyek a készülék
szakszerűtlen vagy nem rendeltetésszerű
használatára vezethetők vissza, valamint azok
az apróbb hibák, amelyek a készülék értékét
vagy használhatóságát nem befolyásolják.
Amennyiben a készüléket arra nem jogosult
személyek szakszerűtlenül javítják, illetve ha a
javítás során a készülékbe nem eredeti Braun
alkatrészeket helyeznek, a garancia érvényét
veszíti.
A jótállási igény érvényesítéséhez vigye be
vagy küldje el a teljes készüléket a vásárlást
igazoló bizonylattal az illetékes Oral-B Braun
szervizközpontba..
Ez a garancia az Ön törvényes jogait semmilyen
módon nem befolyásolja!
46
Page 47

Hrvatski
Oral-B® Triumph s interaktivnim bežičnim
zaslonom SmartGuide je pažljivo dizajniran
kako bi vama i vašoj obitelji pružio jedinstveno
iskustvo pranja zubi koje je podjednako sigurno i
učinkovito. Ipak, pri uporabi električnih proizvoda
moraju se uvijek provoditi osnovne mjere predostrožnosti. Molimo vas da prije prve uporabe
pažljivo pročitajte ove upute.
VAŽNO
Oral-B Triumph ima SmartPlug s ugrađenim
•
sigurnosnim niskonaponskim kabelom.
Nemojte zamjenjivati ili podešavati ni jedan
njegov dio zbog opasnosti od strujnog udara.
Povremeno provjerite je li SmartPlug oštećen.
Oštećeni ili pokvareni uređaji ne bi se trebali
koristiti. Odnesite ih u servisni centar Oral-B
Braun.
Ovaj proizvod nije namijenjen za uporabu djeci
•
mlađoj od tri godine.
Nije predviđeno da ovaj uređaj koriste djeca
•
ili osobe smanjenih fizičkih ili mentalnih
sposobnosti, osim ako ih ne nadgleda osoba
odgovorna za njihovu sigurnost. Općenito
preporučujemo da ovaj proizvod držite dalje od
dohvata djece.
Ako proizvod padne na pod, glava zubne
•
četkice trebala bi se zamijeniti prije sljedeće
uporabe, čak i ako nema vidljivih oštećenja.
Držite SmartPlug dalje od vode ili bilo koje
•
druge tekućine.
Nemojte sami modificirati ili popravljati proiz-
•
vod. Tako možete uzrokovati požar, strujni
udar ili neku drugu ozljedu. Za sve popravke
konzultirajte se s ovlaštenim zastupnikom ili
servisnim centrom Oral-B Braun. Nemojte
rastavljati proizvod osim kada trebate izvući
bateriju
Kada izvlačite bateriju pripazite da ne izazo-
•
vete kratki spoj.
Ne dodirujte SmartPlug mokrim rukama jer to
•
može izazvati strujni udar.
Proizvod koristite samo za ono čemu je
•
namijenjen i kako je opisano u ovim uputama.
Nemojte koristiti dodatke koje ne preporučuje
proizvođač.
Ako provodite neki stomatološki tretman,
•
molimo da se prije uporabe konzultirate sa
svojim stomatologom.
Vaša četkica Oral-B Triumph ima interaktivni bežični zaslon SmartGuide uz čiju pomoć
možete optimizirati svoje iskustvo četkanja.
Važno
Kako biste izbjegli elektromagnetske
•
smetnje i / ili probleme s kompatibilnošću,
deaktivirajte radijsku frekvenciju svoje
četkice prije nego je unesete ili koristite u
prostor koji ima takva ograničenja, npr. u
avionu ili u posebno označenim dijelovima
bolnica (pogledati poglavlje «Deaktiviranje
radijske frekvencije»)
•
Ako imate pejsmejker, obratite pažnju na to
da zubnu četkicu, kada je uključena, držite
barem 15 centimetara dalje od njega. Ako
u bilo kojem trenutku pomislite da je došlo
do elektromagnetskih smetnji, deaktivirajte
radijsku frekvenciju zubne četkice prije
korištenja (pogledati poglavlje «Deaktivacija radijske frekvencije»).
Opis
a Glava četkice Oral-B FlossAction
b Prekidač za uključivanje/isključivanje
c Prekidač za odabir načina rada
d Ručka
e Zaslon na ručki
f Punjač SmartPlug (uključuje kolut za punjenje
i SmartPlug)
g Ploča baze
h Zaštitni poklopac
i Glava četkice Oral-B 3D WHITE
(samo s pojedinim modelima)
j Jedinica zaslona SmartGuide
k Zidni držač
l Ljepljiva traka
Specifikacije:
Tip: 3731
Napon: 100–240 V
Frekvencija: 50–60 Hz
Snaga: 3 W
Razina buke: 63 db (A)
IP: 67
Prva uporaba
Prije prve uporabe napunite zubnu četkicu.
Uključite SmartPlug u utičnicu i postavite ručku
(d) na kolut za punjenje (f), (pogledajte poglavlje
«Spajanje i punjenje»).
Čim uključite svoj zaslon SmartGuide on će
•
vam odmah prikazati demonstraciju rada. Kako
biste napustili takav vid prikaza, u odjeljku za
baterije pritisnite ili «set» ili «h/min». Molimo
47
Page 48

upamtite da se će se zaslon SmartGuide sam
h/min
set
h/min
set
t
h/min
set
t
h/min
set
vratiti na prikaz demonstracije rada ako ne
koristite svoju zubnu četkicu 28 dana. To
možete deaktivirati podešavanjem sata ili
sinkronizacijom ručke.
h/min
h/min
set
set
2
2
1
1
Kada na zaslonu SmartGuide bljeska «12:00»
•
h/min
h/min
set
set
to znači da možete podesiti sat. Pritisnite «set»
u odjeljku za baterije, sve dok se ne prikaže
«12 h».
set
set
h/min
h/min
Kratkim pritiskom na «h/min» možete izabrati
•
format prikaza sati: «12 h» ili «24 h». Pritisnite
«set» kako biste potvrdili svoj odabir.
Spajanje i punjenje
Vaša zubna četkica ima vodootpornu dršku,
sigurna je i namijenjena za uporabu u kupaonici.
Kako biste sastavili jedinicu za punjenje umetnite
zaštitni poklopac (h) sa stražnje strane ploče
baze (g). Potom postavite ploču baze na kolut
za punjenje (f) tako da sjedne na svoje mjesto.
Uključite SmartPlug u električnu utičnicu i
•
postavite ručku zubne četkice (d) na jedinicu
za punjenje. Na zaslonu ručke (d) trebao bi se
pojaviti simbol baterije. Simbol baterije će se
puniti dok se puni ručka. Kada je baterija puna,
simbol baterije je pun i ima četiri crtice. Baterija
je puna nakon 10 sati i omogućuje otprilike dva
tjedna redovne uporabe (dvaput dnevno po
2 minute).
Molimo upamtite: Ako lampica indikatora
punjenja odmah ne počne svijetliti, nastavite
s punjenjem. Bljeskanje će se pojaviti za
10–15 minuta.
Tada počinje bljeskati brojka sata. Držite
•
pritisnutim «h/min» sve dok se ne pojavi točno
vrijeme, pa to potvrdite priskom na «set». Isti
postupak primijenite i za podešavanje minuta.
Ako ne želite koristiti opciju sata, bljeskanje
broja «12:00» će automatski nestati nakon
24 sata.
Četkicu ćete uključiti pritiskom na prekidač za
uključivanje/isključivanje (b). Kako biste izbjegli
prskanje, postavite glavu četkice na zube prije
nego uključite uređaj.
Oral-B
Oral-B
Oral-B
48
Oral-B
Kad je punjiva baterija prazna simbol baterije
•
s jednom preostalom crticom počinje bljeskati.
Vaša zubna četkica će se usporiti i stati. Kad
je baterija potpuno ispražnjena bljeska prazni
simbol baterije. U tom slučaju treba se puniti
15 minuta kako biste je mogli koristiti za
dvominutno četkanje.
Za svakodnevnu upotrebu ručka može stajati
•
na jedinici za punjenje kako bi zubna četkica
uvijek bila puna. Nije moguće prepuniti
bateriju. No, u cilju zaštite okoliša, Oral-B
preporučuje da isključite jedinicu za punjenje
dok ne budete trebali ponovno napuniti
četkicu.
Kako biste održali maksimalni kapacitet
•
punjive baterije, najmanje jednom svakih 6
mjeseci, isključite jedinicu za punjenje i neka
se baterija isprazni normalnom upotrebom.
Page 49

Personalizacija mjerača
vremena
Možete birati između «Professional»
(profesionalnog) ili «2-Minute» (2-minutnog)
mjerača vremena te mjerača «Count Up»
(koji broji koliko dugo četkate) ili «Count Down»
(koji broji koliko još trebate četkati), ovisno o
svojim potrebama.
2-minutni mjerač vremena dugim isprekidanim
zvukom označava da su prošle dvije minute,
koliko stomatolozi preporučuju da traje četkanje,
a na jedinici zaslona SmartGuide se pojavljuje
«smješko». Profesionalni mjerač vremena
pomaže vam da jednako dugo četkate sva
četiri kvadranta vaših usta. Kratki isprekidani
zvuk označava kraj intervala od 30 sekundi
(45 sekundi pri načinu rada «Deep Clean» /
Dubinski čisto). Tada se na jedinici zaslona
SmartGuide pojavljuje «kružić kvadranta». Sve
to zajedno ukazuje da je vrijeme da se započne
četkati sljedeći kvadrant usta.
3
3
c
c
0
e
e
s
s
0
0
3
3
c
c
e
e
s
s
0
s
s
e
e
c
c
3
3
0
0
s
s
e
0
0
e
c
c
3
3
s
s
5
5
4
4
c
c
e
e
s
s
4
4
c
c
5
e
e
5
s
s
e
e
c
c
4
4
5
5
s
s
e
5
5
e
c
c
4
4
Pritisnite i držite prekidač za odabir načina
•
rada (c) dok zaslon SmartGuide (j) ne pokaže
«:30» i «timer».
3 sec.3 sec.
Kratkim pritiskom na prekidač za uključivanje/
•
isključivanje (b), prebacite postavku na
2-minutni mjerač vremena. Potvrdite svoj
odabir pritiskom na prekidač za odabir načina
rada (c).
•
To vas direktno vodi do zaslona mjerača
vremena «Count Up» (pritisnete «up» i
prikazat će se «timer»). Prebacite postavke na
mjerač vremena «Count Down» pritiskom na
prekidač za uključivanje/isključivanje i potvrdite
svoj odabir pritiskom na prekidač za odabir
načina rada.
Oba mjerača vremena pamte koliko je vremena
prošlo kad se četkica nakratko isključi tijekom
pranja zubi. Kad je stanka duža od 30 sekundi
profesionalni mjerač vremena resetira se na
nulu.
Mjerač vremena «Count Up» prikazuje stvarno
vrijeme četkanja, dok mjerač «Count Down»
prikazuje preostalo vrijeme četkanja. On
započinje s «2:00» minute i ide do «0:00». Kada
četkanje traje duže od 2 minute, automatski se
prebacuje na mjerač «Count Up».
Ukupno vrijeme četkanja se može produžiti na
3 minute pri načinu rada «Dubinski čisto»
(pogledati poglavlje «Deep Clean»).
Vaša četkica na početku ima aktiviran
Profesionalni mjerač vremena i mjerač vremena
«Count Up». Želite li promijeniti te postavke,
postupite na sljedeći način:
Molimo upamtite: Dok podešavate mjerač
vremena, sasvim je normalno da zaslon na ručki
pokazuje dvije crtice koje bljeskaju.
Četkanje
Tehnika četkanja
Polako pomičite glavu četkice od zuba do
•
zuba.
49
Page 50

Zadržite se na pojedinoj zubnoj povrršini
•
nekoliko sekundi, prije nego prijeđete na
sljedeći zub.
Četkajte i desni kao i zube, prvo izvana, onda
•
iznutra i na kraju zagrizne plohe.
Nemojte previše pritiskati ni trljati, jednostavno
•
pustite četkicu da sama obavi posao.
Kada završite sa četkanjem, ukupno vrijeme
četkanja će se prikazati na zaslonu na
30 sekundi, a nakon toga zaslon će pokazivati
točno vrijeme (sat). Kako biste direktno došli
do prikaza sati, obrišite vrijeme četkanja tako
da pritisnete prekidač za odabir načina
četkanja.
Kako biste se prebacili na drugačiji način rada
•
samo pritišćite prekidač za odabir načina rada
dok ne dođete do željenog.
Kako biste bili sigurni da koristite pravilan
pritisak, vaša četkica ima ugrađeni senzor
pritiska. Na ovaj se način vaše desni štite od
pretjeranog četkanja i upotreba vaše četkice je
jednostavnija. Ako je pritisak prejak, oscilirajući
pokreti četkice će se nastaviti, ali će pulsiranje
stati. To se osjeti, a čuje se i drukčiji zvuk.
Tijekom prvih dana uporabe električne zubne
četkice desni vam mogu malo krvariti. U načelu,
krvarenje bi trebalo prestati nakon nekoliko
dana. Ako potraje duže od 2 tjedna, molimo
posavjetujte se sa svojim stomatologom.
Ako imate osjetljive zubi i desni, Oral-B preporučuje korištenje načina «Nježno» (ovisno o
modelu).
Načini četkanja
Vaša zubna četkica omogućuje različite načina
četkanja za različite potrebe njege usne
šupljine:
«Daily Clean» – Vrhunsko čišćenje usta.
«Sensitive» – Nježno, ali temeljito čišćenje
osjetljivih područja.
«Massage» – Nježna masaža desni.
«Whitening» – Poliranje i izbjeljivanje za
«Deep Clean»
povremenu ili svakodnevnu
uporabu.
– Iznimno čišćenje usta uz
produženo vrijeme četkanja.
Tijekom ovog načina
čišćenja svaki se kvadrant
čisti 45 sekudni duže, pa
ukupno vrijeme četkanja
iznosi 3 minute.
Da biste se iz bilo kojeg načina rada vratili na
•
«Daily Clean» samo pritisnite i držite prekidač
za odabir načina rada.
Kako biste isključili četkicu, pritisnite prekidač
•
za uključivanje/isključivanje.
Molimo upamtite: Način četkanja «Whitening»
ima najbolji učinak kada koristite glavu četkice
Oral-B 3D WHITE (i).
Glave četkica (ovisno o modelu)
Glava četkice Oral-B FlossAction
Glava četkice Oral-B FlossAction (a) preporučuje se za svakodnevno dubinsko čišćenje.
Njena mikropulsirajuća vlakna prodiru duboko
u teško dostupna područja između zubi, nježno
uklanjajući skrivene zubne naslage.
Glava zubne četkice Oral-B Sensitive
Glava zubne četkice Oral-B Sensitive pruža
temeljito čišćenje osjetljivih zuba i desni. Njezina
su vlakna izuzetno mekane teksture koja je
nježna za zube i desni.
Glava četkice Oral-B 3D WHITE
Glava četkice Oral-B 3D WHITE (i) (samo s pojedinim modelima) namijenjena je povremenom
ili svakodnevnom poliranju zubi. Inspirirana je
profesionalnom stomatološkom opremom pa ima
kapicu za poliranje koja uklanja površinske mrlje
od kave, čaja i duhana za učinkovito posvjetljivanje.
Molimo upamtite da djeca mlađa od 12 godina
ne bi smjela koristiti glavu četkice Oral-B
3D WHITE.
aa
ii
•
Kada uključite četkicu, automatski se aktivira
način rada «Daily Clean».
50
Page 51

Ako nosite zubni aparatić, nemojte koristiti glavu
zubne četice Oral-B FlossAction ili Oral-B
3D WHITE. Preporučujemo da u tom slučaju
koristite glavu zubne četkice Oral-B Ortho, koja
je posebno oblikovana za čišćenje oko aparatića
i žica.
Sve glave zubnih četkica imaju plava vlakna
INDICATOR koja vam pomažu pratiti kad
trebate zamijeniti glavu zubne četkice.
Temeljitim četkanjem, dvaput dnevno po dvije
minute, plava boja će izblijediti na pola nakon
otprilike 3 mjeseca i tako označiti da je vrijeme
za zamjenu glave zubne četkice.
Zaslon SmartGuide
Ikona na
zaslonu
Značenje
Način «Daily Clean»
Zidni držač
Ako biste radije svoju jedinicu zaslona
SmartGuide postavili na zid, ogledalo ili neku
drugu površinu, zalijepite zidni držač na
odabranu površinu uz pomoć ljepljive trake (l).
Prije toga se pobrinite da je površina na koju
ga postavljate čista (prvo očistite masnoću i
prašinu). Postavite zidni držač tako da se vidi
logo Oral-B. Potom jednoliko i čvrsto pritisnite
držač uz zid. Pričekajte 24 sata i onda u njega
postavite jedinicu zaslona SmartGuide.
Način «Sensitive»
Način «Massage»
Način «Whitening»
Način «Deep Clean»
Pritisak je prejak. Smanjite snagu
četkanja.
«Kružić kvadranta» – trenutno
četkate prvi kvadrant i to treba
trajati 30 sekundi (45 ako ste
odabrali način četkanja «Deep
Clean»). Počnite čistiti sljedeći
kvadrant kada drugi segment
počne bljeskati.
Zube ste četkali 2 minute
(3 minute ako ste odabrali način
čišćenja «Deep Clean») što je
optimalno vrijeme koje preporučuju
i stomatolozi.
Punjiva baterija ručke će se uskoro
isprazniti. Napunite ručku zubne
četkice.
Baterije jedinice zaslona
SmartGuide će se uskoro
isprazniti. Zamijenite ih novima.
Molimo upamtite: Ljepljiva traka neće prianjati uz
površine koje imaju zaštitu od prljavštine.
Preporuke za čišćenje
Nakon četkanja, temeljito isperite glavu zubne
•
četkice pod tekućom vodom.
Skinite glavu zubne četkice s ručke pa ih
•
očistite odvojeno pod tekućom vodom. Potom
ih dobro obrišite prije nego stavite ručku na
jedinicu za punjenje.
Jedinicu za punjenje obavezno rastavite prije
•
čišćenja. Kolut za punjenje i SmartPlug nikada
nemojte stavljati u perilicu suđa. No, svi se
ostali dijelovi (ploču baze i zaštitni poklopac)
mogu se prati u perilici suđa.
51
Page 52

S vremena na vrijeme očistite kolut za
set
h/min
3 sec.
set
h/min
3 sec.
•
punjenje, SmartPlug i zaslon SmartGuide s
vlažnom krpom. Punjač SmartPlug i zaslon
SmartGuide se nikada ne bi smjeli uranjati u
vodu.
Sinkronizacija
Deaktivacija radijske
frekvencije
Ako četkicu želite koristiti lili ponijeti sa sobom u
okruženje gdje nisu dozvoljeni uređaji koji koriste
radijsku frekvenciju (npr. bolnice ili avioni),
deaktivirajte radijsku frekvenciju.
Kako biste izbjegli miješanje poruka na zaslonu
kada koristite više od jedne zubne četkice Oral-B
Triumph s odvojenim zaslonima SmartGuide u
istom kućanstvu, svaku ručku trebate povezati
s njezinim zaslonom. Kako biste to napravili,
molimo slijedite ove korake:
Pritisnite «h/min» u odjeljku za baterije i držite
•
ga tako barem 3 sekunde. Zaslon SmartGuide
prikazuje «L---», koji signalizira način rada
«Learn», tj. aktivaciju sinkronizacije.
Nakon toga vas bljeskanje prekidača za
•
uključivanje/isključivanje u ikoni zubne četkice
na zaslonu SmartGuide podsjeća da uključite
ručku. Kada to napravite, započinje postupak
automatske sinkronizacije, koji završava kada
se prikaže «L-1-».
Potom isključite ručku.
•
Želite li s istim zaslonom SmartGuide povezati
drugu ručku, ponovite zadnja dva gore navedena
koraka s drugom ručkom. Iz načina rada
«Learn» izlazite pritiskom na «h/min» ili «set».
U suprotnom će način rada «Learn» automatski
završiti nakon 30 sekundi.
Kako biste to napravili istodobno pritisnite
prekidač za uključivanje/isključivanje i prekidač
za odabir načina rada i držite ih tako 3 sekunde.
Zaslon na ručki će pokazati ikonu deaktivacije.
Ako želite ponovno aktivirati radijsku frekvenciju,
samo pritisnite oba prekidača na 3 sekunde i
ikona na zaslonu će nestati.
3 sec.3 sec.
Mijenjanje baterija
Jedininca zaslona SmartGuide
Odmah izvucite prazne baterije. Zamijenite sve
baterije istodobno. Nemojte miješati alkalne
s cink-ugljik ili punjivim baterijama.
Podložno promjenama bez prethodne najave.
Napomena o brizi za okoli‰
Molimo upamtite:
S jednim SmartGuide zaslonom mogu se
•
sinkronizirati najviše 2 ručke. Nakon što
sinkronizirate drugu ručku na zaslonu će se
ispisati «Full» (pun).
Pri promjeni baterija jedinice zaslona
•
SmartGuide izbrisat će se svi pohranjeni
podaci. Zato molimo ponovite proces sinkronizacije svaki put kada mijenjate baterije.
52
Ovaj proizvod sadrži punjive baterije.
U interesu zaštite okoliša, molimo da ga
na kraju njegovog radnog vijeka ne
odlažete zajedno s kućnim otpadom.
Možete ga odložiti u servisnim centrima
Oral-B Braun ili na mjestima predviđenima za
prikupljanje takvog otpada u vašoj zemlji.
Page 53

,Jamstvo
Dajemo dvogodišnje ograničeno jamstvo
na uređaj počevši s danom kupnje. Unutar
jamstvenog roka besplatno ćemo ukloniti sve
kvarove koji su nastali zbog greške na materijalu
ili u proizvodnji, bilo popravkom ili zamjenom za
novi uređaj, a tu odluku donosimo mi.
Ovo se jamstvo primjenjuje u svakoj zemlji u
kojoj ovaj uređaj distribuira Braun ili njegov
ovlašteni distributer. Ovo jamstvo ne pokriva:
oštećenja nastala nepravilnom upotrebom,
normalnom istrošenošću ili upotrebom, posebno
što se tiče glava četkice, kao ni nedostatke koji
samo neznatno utječu na vrijednost ili valjanost
uporabe aparata. Jamstvo je nevažeće ako
popravke izvrši neovlaštena osoba i ako se ne
koriste originalni dijelovi Braun.
Kako biste ostvarili svoja prava u okviru
razdoblja koje pokriva jamstvo, donesite ili
pošaljite cijeli aparat zajedno s računom na
adresu ovlaštenog servisnog centra Oral-B
Braun.
Ovo jamstvo ni na koji način ne utječe na vaša
ustavna prava.
53
Page 54

Slovenski
Zobna ščetka Oral-B® Triumph s funkcijo
SmartGuide je bila skrbno zasnovana, da vam
in vaši družini ponudi edinstven način ščetkanja
zob, ki je hkrati varen in učinkovit. Kot pri vseh
električnih aparatih je tudi pri uporabi ščetke
Oral-B Triumph potrebno upoštevati nekaj
osnovnih varnostnih opozoril. Prosimo, da pred
prvo uporabo izdelka pozorno preberete
navodila za uporabo.
POMEMBNO
Ščetki Oral-B Triumph je priložen polnilnik
•
SmartPlug, ki ima vgrajeno varnostno
nizkonapetostno napajanje. Njegovih delov ne
smete zamenjati ali spreminjati, sicer obstaja
tveganje električnega udara. SmartPlug
občasno preverite glede morebitnih poškodb.
Če na njem opazite poškodbe ali če ne deluje,
prenehajte uporabljati izdelek. Poškodovane
enote odnesite na servisni center Oral-B Braun
Izdelek ni primeren za otroke, mlajše od treh
•
let.
Otroci in ljudje z zmanjšanimi fizičnimi ali
•
duševnimi sposobnostmi lahko uporabljajo
aparat le pod nadzorstvom osebe, ki je
odgovorna za njihovo varnost. Načeloma
priporočamo, da aparat hranite izven dosega
otrok.
Če je ščetka padla na tla, morate njen nasta-
•
vek pred naslednjo uporabo zamenjati, tudi če
na njem ni vidnih poškodb.
Pazite, da polnilnik SmartPlug ne pride v stik
•
z vodo ali drugimi tekočinami.
Izdelka ne smete spreminjati ali popravljati.
•
To lahko povzroči požar, električni udar ali
poškodbo. V primeru, da je potrebno popravilo,
se posvetujte s svojim zastopnikom ali pokličite
servisni center Oral-B Braun. Izdelka ne smete
razstaviti, razen če želite odstraniti baterijo.
Ko odstranite baterijo, z namenom, da jo boste
•
odvrgli, pazite, da ne povežete pozitivne (+) in
negativne (–) sponke.
Ne dotikajte se vtiča SmartPlug z mokrimi
•
rokami. Nevarnost električnega udara!
Izdelek uporabljajte samo v predvidene
•
namene in v skladu s temi navodili.
Ne uporabljajte nastavkov ali polnilnikov, ki jih
ne priporoča proizvajalec.
Če ste v postopku zdravljenja katerega koli
•
stanja v ustni votlini, se pred uporabo izdelka
posvetujte s svojim zobozdravnikom.
Vaša zobna ščetka Oral-B Triumph s funkcijo
SmartGuide uporablja interaktivni brezžični
54
prikazovalnik, ki vam pomaga optimirati vaše
ščetkanje.
POMEMBNO
Preden ščetko prenašate ali uporabite
•
v omejenih območjih, kot so letala ali
posebej označeni deli bolnišnic, morate
deaktivirati radijski prenos zobne ščetke
(glejte poglavje «Deaktivacija radijskega
prenosa»), da preprečite elektromagnetne
motnje in/ali težave z združljivostjo.
•
Osebe s srčnim spodbujevalnikom morajo
paziti, da je zobna ščetka med delovanjem
vsaj 15 centimetrov stran od spodbujevalnika. Če kadar koli sumite, da prihaja do
motenj, deaktivirajte radijski prenos zobne
ščetke, preden jo uporabite (glejte poglavje
«Deaktivacija radijskega prenosa»).
Opis
®
.
a Nastavek ščetke Oral-B FlossAction
b Tipka za vklop/izklop
c Tipka za nastavitev načina delovanja
d Ročaj
e Prikazovalnik na ročaju
f Polnilnik SmartPlug (vključuje obroč za
polnjenje in vtič SmartPlug)
g Podstavek
h Zaščitni pokrov
i Nastavek ščetke Oral-B 3D WHITE
(odvisno od modela)
j Prikazovalnik SmartGuide
k Stensko držalo
l Samolepilni trak
Tehnični podatki:
Model: 3731
Napetost: 100–240 V
Frekvenca: 50–60 Hz
Moč: 3 W
Nivo hrupa: 63 db (A)
IP: 67
Prva uporaba
Preden zobno ščetko prvič uporabite, jo morate
napolniti. Vtič SmartPlug vstavite v omrežno
vtičnico in položite ročaj (d) na obroč za
polnjenje (f) (glejte «Priklop in polnjenje»).
Prikazovalnik SmartGuide ima aktiviran
•
demonstracijski način. Ta način delovanja
zapustite tako, da pritisnete tipko «set» ali
«h/min», ki sta v prostoru za baterijo. Prosimo,
Page 55

upoštevajte, da se v primeru, da ščetke
h/min
set
h/min
set
t
h/min
set
t
h/min
set
ne uporabljate 28 dni, prikazovalnik
SmartGuide ponovno samodejno aktivira
v demonstracijskem načinu. Tej samodejni
aktivaciji se lahko izognete, tako da nastavite
uro ali sinhronizirate ročaj ščetke.
h/min
h/min
set
set
2
2
1
1
Ko na prikazovalniku SmartGuide utripa
•
h/min
h/min
set
set
«12:00», lahko nastavite uro. Pritisnite tipko
«set», ki se nahaja v prostoru za baterijo,
dokler se ne pojavi prikaz «12 h».
set
set
h/min
h/min
S kratkimi pritiski tipke «h/min» lahko izberete
•
med območjem prikaza ure «12 h» ali «24 h».
Nato pritisnite tipko «set», da potrdite svojo
izbiro.
Priklop na električno
omrežje in polnjenje
Vaša zobna ščetka ima vodoodporen ročaj, je
električno varna in zasnovana za uporabo
v kopalnici.
Polnilno enoto sestavite tako, da vstavite zaščitni
pokrov (h) na zadnjo stran podstavka (g), nato
pa le-tega namestite na obroč za polnjenje (f),
tako da se zaskoči na svoje mesto.
Polnilnik SmartPlug vstavite v omrežno
•
vtičnico, nato pa ročaj ščetke (d) postavite na
enoto za polnjenje. Na prikazovalniku ročaja
(e) se bo prikazal simbol baterije. Medtem ko
se baterija polni, se obris baterije zapolnjuje.
Ko je baterija v ročaju povsem napolnjena, je
simbol baterije zapolnjen s štirimi segmenti.
Baterijo morate polniti vsaj 10 ur, da doseže
polno kapaciteto, ta pa zadošča za približno
10 dni rednega ščetkanja (dvakrat dnevno po
2 minuti).
Utripati začneta številki za uro. S tipko «h/min»
•
nastavite ustrezno uro in jo potrdite s tipko
«set». Na enak način nastavite še minute. Če
funkcije ure ne želite uporabljati, utripajoči
prikaz «12:00» po 24 urah avtomatsko ugasne.
Zobno ščetko vključite s pritiskom na tipko
za vklop/izklop (b). Nastavek ščetke najprej
približajte zobem in šele nato vključite ščetko,
da se ne boste poškropili.
Oral-B
Oral-B
Oral-B
Oral-B
Opomba: Če se simbol baterije ne pojavi
takoj, nadaljujte s polnjenjem. Simbol se bo
prikazal v 10–15 minutah.
Ko je baterija skoraj prazna, simbol baterije
•
z enim polnim segmentom začne utripati.
Delovanje ščetke se upočasni in čez nekaj
časa povsem ustavi. Če je baterija povsem
izpraznjena, utripa prazen okvir simbola
baterije. V tem primeru baterijo polnite
15 minut, kar bo zadoščalo za dve minuti
ščetkanja.
Če ščetko uporabljate vsak dan, lahko ročaj
•
hranite na enoti za polnjenje, da bo vzdrževal
polno kapaciteto. Baterija se ne more
prekomerno napolniti. Iz okoljevarstvenih
razlogov pa Oral-B priporoča, da polnilnik
55
Page 56

izklopite iz omrežja, dokler ni potrebno
naslednje polnjenje baterije.
Da bo baterija za ponovno polnjenje ohranila
•
svojo maksimalno kapaciteto, morate enoto za
polnjenje vsaj vsakih šest mesecev izključiti iz
električnega omrežja in ročaj z redno uporabo
popolnoma izprazniti.
Prilagoditev merilnika
časa
Ob dobavi je aktiven «profesionalni merilnik
časa», ki «meri» čas. Če želite te nastavitve
spremeniti, ravnajte po naslednjem postopku:
Pritisnite in zadržite tipko za način delovanja
•
(c), dokler na prikazovalniku SmartGuide (j)
ni izpisano «:30» in «timer».
3 sec.3 sec.
Izbirate lahko med «profesionalnim» ali
«2-minutnim» merilnikom časa ter «merjenjem»
ali «odštevanjem» časa ter tako merilnik
prilagodite svojim lastnim potrebam.
«2-minutni merilnik časa» vas z dolgim signalom
in «smeškom» na prikazovalniku SmartGuide
opozori, da je dvominutno ščetkanje, ki
ga priporočajo zobozdravniki, končano.
«Profesionalni merilnik časa» pa vam poleg
tega pomaga, da vse štiri dele ustne votline
čistite enako dolgo. S kratkim signalom vsakih
30 sekund (45 sekund v načinu delovanja
«globinsko čiščenje») in «krogom kvadrantov»
na prikazovalniku SmartGuide vas opozori, da
se lahko pomaknete v naslednji kvadrant ustne
votline.
3
3
c
c
0
e
e
s
s
0
0
3
3
c
c
e
e
s
s
0
s
s
e
e
c
c
3
3
0
0
s
s
e
0
0
e
c
c
3
3
s
s
5
5
4
4
c
c
e
e
s
s
4
4
c
c
5
e
e
5
s
s
e
e
c
c
4
4
5
5
s
s
e
5
5
e
c
c
4
4
Oba merilnika časa shranita čas ščetkanja v
pomnilnik, tudi če ročaj ščetke med uporabo za
kratek čas izklopite. Če umivanje zob prekinete
za več kot 30 sekund, pa se merilnik časa
ponastavi na prvotno začetno vrednost.
•
S kratkim pritiskom na tipko za vklop/izklop (b)
preklopite na «2-minutni merilnik časa».
Potrdite svojo izbiro, tako da pritisnete tipko
za način delovanja (c).
•
Tako pridete neposredno do prikaza «merjenje
časa» (izpisana sta «up» in «timer»). Če želite
preklopiti na «odštevanje časa», pritisnite tipko
za vklop/izklop in potrdite izbiro s tipko za
način delovanja.
Opomba: Normalno je, da sta takrat, ko ste
v načinu delovanja za nastavitev merilnika
časa, na prikazovalniku ročaja prikazana dva
utripajoča segmenta.
Če se odločite za merilnik časa z «merjenjem»,
je na prikazovalniku izpisan dejanski čas
ščetkanja. Če pa se odločite za «odštevanje
časa», je prikazan preostali čas ščetkanja. Čas
se začne odštevati pri «2:00» in se odšteva do
«0:00». Če zobe ščetkate več kot dve minuti,
se prikaz avtomatsko spremeni na «merjenje
časa».
Skupni čas ščetkanja lahko podaljšate na
3 minute, če uporabljate način «globinsko
čiščenje» (glejte poglavje «Deep Clean»).
56
Ščetkanje
Tehnika ščetkanja
Nastavek ščetke počasi pomikajte od zoba do
•
zoba.
Page 57

•
Nastavek ščetke nekaj sekund zadržite na
mestu, preden ga pomaknete do naslednjega
zoba.
•
Ščetkajte dlesni in zobe; najprej zunanje, nato
notranje površine, na koncu pa še grizne
ploskve.
•
S ščetko ne pritiskajte premočno in ne drgnite,
temveč pustite, da sama opravi svoje delo. Po
končanem ščetkanju se na prikazovalniku za
30 sekund prikaže skupni čas ščetkanja, nato
pa se spet pojavi prikaz ure. Če želite takoj
preklopiti na prikaz ure, izbrišite čas ščetkanja,
tako da pritisnete tipko za način delovanja.
Vaša ščetka ima vgrajeno funkcijo za nadzor
pritiska, ki pomaga zagotoviti, da pritiskanje na
zobe in dlesni ni premočno. Sistem pomaga
zaščititi vaše dlesni pred premočnim ščetkanjem
in omogoča enostavno uporabo ščetke. Če
s ščetko preveč pritiskate, se oscilacijski gibi
nadaljujejo, pulzacije pa prenehajo. Razlike ne
boste samo občutili, ampak boste zaslišali tudi
drugačen zvok.
Za preklop na drug način delovanja zapore-
•
doma pritiskajte tipko za način delovanja.
Če se želite vrniti iz katerega koli načina
•
v način delovanja
zadržite tipko za načina delovanja.
Ščetko izključite s pritiskom na tipko za vklop/
•
izklop.
Opomba: Priporočamo vam, da način delovanja
«Whitening» uporabite z nastavkom ščetke
Oral-B 3D WHITE (i).
«Deep Clean»
, pritisnite in
V prvih nekaj dneh uporabe katere koli električne
zobne ščetke se lahko pojavijo blage krvavitve
iz dlesni, ki običajno prenehajo po nekaj dneh.
Če po dveh tednih ne prenehajo, se posvetujte
s svojim zobozdravnikom. Če imate občutljive
zobe in dlesni, vam Oral-B priporoča uporabo
načina delovanja «Sensitive».
Načini delovanja
Vaša zobna ščetka omogoča različne načine
ščetkanja za različne potrebe ustne nege:
«Daily Clean» – Izjemno temeljito čiščenje
ustne votline.
«Sensitive» – Nežno, vendar temeljito
čiščenje občutljivih območij.
«Massage» – Nežna masaža dlesni.
«Whitening» – Poliranje in beljenje za
«Deep Clean»
•
Ko pritisnete tipko za vklop/izklop, se ščetka
avtomatsko vklopi v načinu
vsakodnevno ali občasno
uporabo.
– Izjemno temeljito čiščenje
ustne votline s podaljšanim
časom ščetkanja. V tem
načinu delovanja je čas
ščetkanja podaljšan na
45 sekund za vsak kvadrant
ustne votline, kar je skupaj
3 minute ščetkanja.
«Deep Clean»
.
Nastavki ščetke (odvisno od modela)
Nastavek ščetke Oral-B FlossAction
Nastavek ščetke Oral-B FlossAction (a) je
namenjen vsakodnevnemu temeljitemu čiščenju
zob. Opremljen je z vlakni MicroPulse, ki
prodrejo globoko v težko dostopne medzobne
prostore in nežno odstranijo skrite zobne obloge.
Nastavek ščetke Oral-B Sensitive
Nastavek ščetke Oral-B Sensitive omogoča
temeljito čiščenje občutljivih zob in dlesni. Ima
izjemno mehko teksturo vlaken, ki je nežna do
zob in dlesni.
Nastavek ščetke Oral-B 3D WHITE
Za občasno ali vsakdanje poliranje zob uporabite
nastavek ščetke Oral-B 3D WHITE (i) (ni pri
vseh modelih). Opremljen je s posebno polirno
čašo, ki odstrani površinske madeže od kave,
čaja in tobaka ter tako učinkovito pobeli zobe.
Prosimo, upoštevajte, da otroci, mlajši od 12 let,
nastavka Oral-B 3D WHITE ne smejo
uporabljati.
aa
ii
57
Page 58

Če nosite fiksni ortodontski aparat, ne
uporabljajte nastavkov Oral-B FlossAction
in Oral-B 3D WHITE. V tem primeru vam
svetujemo uporabo nastavka ščetke Oral-B
Ortho, ki je posebej zasnovan za čiščenje
območja okrog fiksnega ortodontskega aparata.
Vsi nastavki ščetke so opremljeni z modrimi
vlakni INDICATOR, ki vam pomagajo ugotoviti,
kdaj je potrebna zamenjava nastavka. Če zobe
pravilno ščetkate dvakrat dnevno po dve minuti,
bodo svetlomodra vlakna obledela do polovice v
približno treh mesecih in vas tako opozorila, da
je potrebna zamenjava nastavka ščetke.
Prikazovalnik SmartGuide
Prikazan
simbol
Pomen
Način «Daily Clean»
Stensko držalo
Če želite, lahko prikazovalnik SmartGuide
namestite na steno, ogledalo ali drugo površino,
tako da s samolepilnim trakom (l) pritrdite stensko
držalo. Pred tem se prepričajte, da je izbrana
površina čista in suha (najprej odstranite maščobo
in prah). Stensko držalo namestite tako, da je
logotip Oral-B normalno čitljiv. Nato enakomerno
in trdno pritisnite stensko držalo na steno.
Počakajte 24 ur in šele nato potisnite prikazovalnik
SmartGuide v pritrjeno stensko držalo.
Način «Sensitive»
Način «Massage»
Način «Whitening»
Način «Deep Clean»
Prevelik pritisk na zobe ali dlesni.
Zmanjšajte moč ščetkanja.
«Krog kvadrantov» – trenutno
ščetkate v prvem 30-sekundnem
intervalu (45-sekundnem v načinu
delovanja «Deep Clean») Ko
začne utripati naslednji segment
kroga, se pomaknite v naslednji
kvadrant ustne votline.
Doseženo je 2-minutno ščetkanje
(3-minutno ščetkanje v načinu
«Deep Clean»), ki ga priporočajo
zobozdravniki.
Baterija za ponovno polnjenje v
ročaju je skoraj prazna. Napolnite
ročaj ščetke.
Baterije prikazovalnika
SmartGuide so skoraj prazne.
Zamenjajte baterije prikazovalnika
SmartGuide.
Opomba: Samolepilni trak ne deluje na
površinah, ki odbijajo umazanijo.
Nasveti za čiščenje
Nastavek ščetke po uporabi temeljito sperite
•
pod tekočo vodo.
Z ročaja odstranite nastavek ščetke in oba
•
dela ločeno sperite pod tekočo vodo. Nato ju
obrišite s suho krpo in ročaj namestite nazaj na
enoto za polnjenje.
Preden enoto za polnjenje očistite, jo morate
•
razstaviti. Obroča za polnjenje in polnilnika
SmartPlug ne smete pomivati v pomivalnem
stroju. Ostali deli (podstavek in zaščitni pokrov)
so primerni za pomivanje v pomivalnem stroju.
58
Page 59

Občasno lahko obroč za polnjenje, polnilnik
set
h/min
3 sec.
set
h/min
3 sec.
•
SmartPlug in prikazovalnik SmartGuide očistite
z vlažno krpo. Polnilnika SmartPlug in prikazovalnika SmartGuide ne smete namočiti v vodo.
Sinhronizacija
Da se izognete motnjam pri prikazovanju
sporočil, če v istem gospodinjstvu uporabljate
več kot eno zobno ščetko Oral-B Triumph z
ločenimi prikazovalniki SmartGuide, morate
vsakemu ročaju določiti ustrezno prikazovalno
enoto. Ravnajte po naslednjem postopku:
Pritisnite tipko «h/min» v prostoru za baterije in
•
jo zadržite vsaj 3 sekunde. Na prikazovalniku
SmartGuide se izpiše «L---», ki označuje,
da je aktiviran način «učenje (Learn)» za
sinhronizacijo.
Zdaj vas utripajoča tipka za vklop/izklop
•
v simbolu zobne ščetke na prikazovalniku
SmartGuide opozori, da morate vklopiti ročaj.
Ko to storite, se začne avtomatski proces
sinhronizacije. Postopek je končan, ko se na
prikazovalniku pojavi «L-1-».
Zato vas prosimo, da po vsaki zamenjavi
baterij ponovite postopek sinhronizacije.
Deaktivacija radijskega
prenosa
Če želite ščetko uporabljati ali prenašati v
okoljih, kjer niso dovoljene naprave z radijskim
nadzorom (npr. bolnišnice ali letala), najprej
deaktivirajte radijski prenos.
V ta namen hkrati pritisnite tipki za vklop/izklop
in za način delovanja in ju zadržite 3 sekunde.
Na prikazovalniku ročaja se pojavi simbol
deaktivacije radijskih signalov. Če želite ponovno
aktivirati radijski prenos, še enkrat hkrati
pritisnite obe tipki in ju zadržite 3 sekunde.
Simbol na prikazovalniku ugasne.
3 sec.3 sec.
Ugasnite ročaj ščetke.
•
Če želite določiti še en ročaj ščetke istemu
prikazovalniku SmartGuide, ponovite zadnja dva
koraka zgoraj opisanega postopka še z drugim
ročajem. Način «učenje (Learn)» zapustite tako,
da pritisnete tipko «h/min» ali «set». Če tega
ne storite, se način «učenje» čez 30 sekund
samodejno izklopi.
Opomba:
Z enim prikazovalnikom SmartGuide lahko
•
sinhronizirate največ 2 ročaja ščetk. Ko
sinhronizirate drugi ročaj, se na prikazovalniku
pojavi «polno (Full)».
Ko zamenjate baterije prikazovalnika
•
SmartGuide, se shranjeni podatki izbrišejo.
Odstranjevanje baterij
Prikazovalnik SmartGuide
Povsem izpraznjene baterije takoj odstranite.
Zamenjajte vse baterije hkrati. Ne mešajte
alkalnih baterij s cink-karbonskimi ali baterijami
za ponovno polnjenje.
Pridržujemo si pravico do sprememb brez
predhodnega opozorila.
Ta naprava izpolnjuje zahteve evropske
direktive 1999/5/ES. Razred sprejemnika 3,
razred obratovalnega cikla 3.
Varovanje okolja
Izdelek vsebuje baterije za ponovno
polnjenje. Iz okoljevarstvenih razlogov
vas prosimo, da izdelka ob koncu njegove
življenjske dobe ne odvržete med
gospodinjske odpadke. Odnesete ga lahko na
ustrezno zbirno mesto, določeno v skladu z
veljavnimi predpisi v Republiki Sloveniji.
59
Page 60

Garancija
Za izdelek velja dveletna omejena garancija, ki
začne veljati z datumom nakupa. V garancijski
dobi bomo brezplačno odpravili vse okvare
izdelka, ki so posledica napak v materialu ali
izdelavi, tako da vam bomo izdelek po naši
presoji popravili ali v celoti zamenjali. Garancija
velja v vseh državah, kjer izdelek dobavlja
podjetje Braun ali njegov pooblaščeni distributer.
Garancija ne velja v primeru: okvar, ki so
posledica nepravilne uporabe, normalne obrabe
ali rabe, kar se še posebej nanaša na nastavke
ščetke, oziroma napak, ki imajo zanemarljiv
učinek na vrednost in delovanje izdelka. Če
popravilo opravi nepooblaščena oseba ali če pri
popravilu niso uporabljeni originalni Braunovi
rezervni deli, garancija ni veljavna.
Za popravilo v garancijski dobi celotno napravo
skupaj z računom odnesite ali pošljite na
pooblaščen Braun Oral-B servisni center.
Ta garancija ne vpliva na pravice, ki vam po
zakonu pripadajo.
60
Page 61

Türkçe
Oral-B® Triumph SmartGuide size ve ailenize
güvenli ve etkili bir diş fırçalama deneyimi
yaşatmak üzere özenle tasarlandı. Ancak
elektrikli ürünler kullanılırken bazı temel güvenlik
önlemlerine mutlaka uyulması gerekmektedir.
Ürünü ilk kullanımınızdan önce aşağıdakileri
lütfen dikkatle okuyun.
ÖNEML
Oral-B Triumph’ın üzerinde güvenli ve düşük
•
voltajlı özel SmartPlug priz sistemi bulunur.
Priz sisteminin hiçbir parçasını değiştirmeyin
veya kurcalamayın; aksi halde elektrik
çarpmasına neden olabilir. SmartPlug’ı düzenli
olarak kontrol edin ve cihazın hasarlı olması ya
da çalışmaması durumunda ürünü kullanmaya
devam etmeyin. Hasarlı ürünleri Oral-B Braun
Servis Merkezine götürün.
Bu ürün, üç yaşın altındaki çocuklarca kul-
•
lanılmak üzere tasarlanmamıştır.
Bu cihaz, güvenliğinden sorumlu bir kimsenin
•
gözetimi altında olmadıkça, çocuklar, zihinsel
ve fiziksel engelliler tarafından kullanılmak
için tasarlanmamıştır. Cihazın genel olarak
çocukların ulaşamayacağı bir yerde bulundurulması tavsiye edilir.
Cihazın yere düşmesi durumunda fırça başı,
•
gözle görülür bir hasar olmasa bile değiştirilmelidir.
SmartPlug adaptörü sudan ve diğer sıvılardan
•
uzak tutun.
Ürünü onarmaya çalışmayın. Yangına,
•
elektrik çarpmasına veya yaralanmaya neden
olabilirsiniz. Onarım için ürünü aldığınız yere
danışın veya Oral-B Braun Yetkili Servisine
başvurun. Pilleri çıkarmak dışında ürünü
sökmeyin.
Pili atmak için çıkarırken artı (+) ve eksi (–)
•
kutupların kısa devre yapmamasına dikkat
edin.
SmartPlug’a ıslak elle dokunmayın. Elektrik
•
çarpmasına neden olabilir.
Ürünü sadece bu kılavuzda belirtilen kullanım
•
amacı doğrultusunda kullanın. Üreticinin
tavsiye etmediği eklentiler veya adaptörler
kullanmayın.
Herhangi bir diş veya ağız tedavisi görüyorsa-
•
nız, ürünü kullanmadan önce diş hekiminize
danışın.
Oral-B Triumph SmartGuide, fırçalama
deneyiminizi iyileştirmek için bir etkileşimli
kablosuz ekrana sahiptir.
Önemli
Elektromanyetik girişimi ve/veya uyumluluk
•
sorunlarını engellemek için, diş fırçanızı
uçakta ya da hastanelerin belirli bölümleri
gibi elektromanyetik iletişimin kısıtlanmış
olduğu yerlerde bulundurur veya taşırken,
fırçanın kablosuz iletim özelliğini kapatın
(Bkz. «Kablosuz bağlantının kesilmesi»).
Kalp pili kullanan kişiler, fırçayı çalışır
•
durumdayken kalp pilinin en az 15 cm
uzağında tutmalıdır. Elektromanyetik
girişim olduğundan şüphelendiğiniz anda,
fırçanızı kullanmadan önce kablosuz
bağlantıyı kesin (bkz. «Kablosuz
bağlantının kesilmesi»).
Parçalar
®
a Oral-B FlossAction fırça başı
b Açma/kapama düğmesi
c Fırçalama modu düğmesi
d Diş fırçası gövdesi
e Diş fırçası gövdesi göstergesi
f SmartPlug şarj prizi (şarj yuvası ve SmartPlug
adaptör)
g Taban
h Koruyucu kapak
i Oral-B 3D WHITE fırça başı (bazı modellerde)
j SmartGuide gösterge
k Duvar askısı
l Yapışkan bant
Teknik Özellikler:
Tip: 3731
Voltaj: 100–240 V
Frekans: 50–60 Hz
Güç: 3 W
Ses Düzeyi: 63 dB (A)
IP: 67
İlk kullanım
Fırçanızı ilk kullanımdan önce şarj edin.
SmartPlug’ı bir prize takın ve fırça gövdesini (d)
şarj yuvasına (f) yerleştirin (bkz. «Bağlama ve
şarj»).
SmartGuide ekranın tanıtım modu çalışmaya
•
başlayacaktır. Bu moddan çıkmak için,
pil yuvası üzerindeki «set» veya «h/min»
düğmelerinden birine basın. Fırçanızı
28 günden fazla kullanmazsanız SmartGuide
otomatik olarak tanıtım modunu çalıştıracaktır.
61
Page 62

Saati ayarlayarak veya fırça sapının
h/min
set
h/min
set
t
h/min
set
t
h/min
set
bağlantısını yaparak bunu engelleyebilirsiniz.
h/min
h/min
set
set
2
2
1
1
SmartGuide üzerinde 12:00 rakamının yanıp
•
h/min
h/min
set
set
sönmesi, saatin ayarlanması gerektiğini
gösterir. Pil yuvası üzerindeki «set» düğmesine basarak «12 h» ibaresinin görünmesini
sağlayın.
set
set
h/min
h/min
«h/min» düğmesine basıp bırakarak «12 h»
•
(12 saat) veya «24 h» (24 saat) saat formatları
arasında geçiş yapabilirsiniz. Tercihinizi
onaylamak için «set» düğmesine basın.
Şarja takma ve şarj etme
Fırçanızın gövdesi su geçirmediği için, elektrik
açısından güvenlidir ve banyoda kullanılmak
üzere tasarlanmıştır.
Şarj ünitesini kurmak için, koruyucu kapağı (h)
tabanın (g) arka bölümüne yerleştirin. Ardından
tabanı şarj yuvasının (f) üzerine koyup bir tık
sesi gelene kadar bastırın.
SmartPlug adaptörü bir prize takın ve fırça
•
sapını (d) şarj ünitesine yerleştirin. Fırça
gövdesindeki göstergede (e) bir pil simgesi
belirecektir. Fırça şarj olurken bu pil simgesinin
içi dolar. Fırça tam şarj olduğunda pil simgesinin
içinde dört yatay çubuk görünecektir. Tam şarj
için en az 10 saat gerekir ve tam şarjlı bir fırça
yaklaşık 10 gün düzenli fırçalama sağlar (günde
iki kez, iki dakika).
Not: Pil simgesi hemen belirmese de şarja
devam edin. 10–15 dakika içinde belirecektir.
Saat basamakları yanıp sönmeye başlar. Saati
•
ayarlayana kadar «h/min» düğmesine basın,
saati kabul etmek için «set» düğmesine basın.
Aynı işlemi, dakika basamaklarının her biri
için tekrarlayın. Saat özelliğini kullanmak
istemezseniz, yanıp sönen «12:00» rakamı
24 saat sonra kapanacaktır.
Diş fırçanızı açma kapama düğmesine (b)
basarak çalıştırın. Diş macununun çevreye
sıçramaması için fırçayı çalıştırmadan önce fırça
başını dişlerinize götürün.
Oral-B
Oral-B
Oral-B
62
Oral-B
Pil zayıfladığında, içinde bir çubuk kalan pil
•
simgesi yanıp sönmeye başlayacaktır. Fırçanız
yavaşlayarak durur. Pil boşaldığında ise içi
boş pil simgesi yanıp söner. Bu durumda
2 dakikalık fırçalamadan önce 15 dakika şarja
ihtiyaç duyulacaktır.
Günlük kullanımda diş fırçası, pilinin her
•
zaman dolu olması için şarj cihazının üzerinde
tutulabilir. Aşırı şarj mümkün değildir. Ancak
Oral-B, çevreyi korumak için adaptörün pil
tekrar şarj gerektirene kadar prizden çekilmesini tavsiye eder.
Şarj edilebilir pilin kapasitesini korumak için
•
en az altı ayda bir kere şarj cihazını prizden
çekerek fırçayı düzenli kullanıp pilin boşalmasını sağlayın.
Page 63

Zaman sayacının
ayarlanması
htiyaçlarınıza göre «Profesyonel» ve «2 Dakika»
zaman ayarları ve «Geri Sayım» ve «leri Sayım»
özelliklerinden birini seçebilirsiniz.
ki dakikalık sayaç, diş hekimlerinin tavsiye ettiği
iki dakikalık fırçalama süresinin sonuna
geldiğinizi bildirmek için uzun bir tıklama sesi
çıkarır ve SmartGuide’da bir «gülen yüz» belirir.
Ayrıca, profesyonel sayaç, ağzınızın dört
bölümünü eşit fırçalamanıza yardımcı olur.
30 saniyelik («Yoğun» Temizleme modu açıkken 45 saniye) aralarla kısa tıklama sesleri
çıkarırken, SmartGuide üzerindeki kadranda bir
sonraki bölüm yanarak ağzınızın diğer bölümüne
geçmeniz gerektiğini işaret eder.
3
3
c
c
0
e
e
s
s
0
0
3
3
0
s
s
e
e
c
c
s
s
5
5
4
4
4
4
c
c
5
e
e
5
s
s
e
e
c
c
Açma/kapama düğmesini (b) basıp bırakarak
•
«2:00» ile gösterilen iki dakikalık sayaca geçin.
Tercihinizi onaylamak için mod düğmesine (c)
basın.
Bunun ardından «leri Sayım» özelliği
•
görülecektir (ekranda «up» ve «timer» yazıları
belirir). Açma kapama düğmesine basıp «Geri
Sayım» seçeneğine geçin («down» yazar) ve
mod düğmesiyle tercihinizi onaylayın.
3
c
c
e
e
s
s
0
0
3
3
3
0
0
s
s
e
e
c
c
c
c
e
e
s
s
5
5
4
4
4
4
5
5
s
s
e
e
c
c
ki sayaç da fırçalama süresini, fırça kısa süreyle
kapatıldığında bile hafızada tutar. Fırçayı 30
saniyeden uzun süre kapatırsanız sayaç başa
dönecektir.
«leri Sayım», fırçalarken geçen süreyi gösterir.
«Geri Sayım» ise kalan fırçalama süresini
gösterir. «2:00» dakika ile başlar ve «0:00»
kalana kadar geri sayar. ki dakikadan fazla
fırçalarsanız kendiliğinden ileri saymaya
başlayacaktır.
Toplam fırçalama süresi, «Yoğun» Temizlik
seçeneğiyle 3 dakikaya uzatılabilir (bkz.
«Fırçalama seçenekleri»).
Fırçanızda standart olarak «Profesyonel Sayaç»
ve «leri Sayım» açık durumdadır. Bu ayarları
değiştirmek için:
Mod düğmesini (c) basılı tutarak SmartGuide
•
ekranda (j) «:30» ve «timer» yazıları görünene
kadar bekleyin.
3 sec.3 sec.
Not: Fırça sayaç özelliği açık halde çalışırken
fırça gövdesi göstergesinde iki çubuğun yanıp
sönmesi normaldir.
Fırçalama
Fırçalama yöntemi
Fırça başını yavaşça dişten dişe geçirin.
•
Bir dişten diğerine geçmeden önce fırça başını
•
diş üzerinde birkaç saniye sabit tutun.
Dişlerin önce dış yüzeyini, sonra iç yüzeyini,
•
ardından çiğneme yüzeyini fırçalayın.
Fırçayı sert bastırmayın veya sürtmeyiniz;
•
sadece fırça başını dişlerinizin üzerinde
gezdirmeniz yeterli olacaktır. Fırçalamayı
bitirdiğinizde toplam fırçalama süreniz 30
saniye boyunca gösterilecek, ardından ekran
saat moduna dönecektir. Saat moduna hemen
geçmek için mod düğmesine basarak fırçalama süresini silin.
Fırçanızda, doğru fırçalama kuvvetinin uygulanmasını güvenceye alan bir basınç algılama
özelliği vardır. Böylece dişetleriniz fazla bastır-
63
Page 64

manın zararından korunur ve diş fırçanız kolay
kullanılır. Fazla bastırırsanız fırçanın salınım
hareketi devam eder ama titremesi durur. Bunu
hissetmenin yanında, farklı bir ses de duyarsınız.
Herhangi bir pilli diş fırçasını kullanmaya
başladığınız ilk günlerde diş etlerinizde hafif
kanama olabilir. Bu durum genellikle birkaç
gün sonra geçer. Eğer iki 2 hafta süresince
geçmezse lütfen diş hekiminize danışın.
Dişleriniz ve diş etleriniz hassassa, «Hassas»
seçeneğini kullanmanız tavsiye edilir.
Fırçalama seçenekleri
Fırçanız, farklı ağız bakımı ihtiyaçlarını
karşılayacak çeşitli fırçalama seçeneklerine
sahiptir:
«Günlük» – Olağanüstü ağız temizliği
sağlar.
«Hassas» – Hassas bölgeleri
yıpratmadan derinlemesine
temizler.
«Masaj» – Dişetlerine hafifçe masaj
yapar.
«Beyazlatma» – Her gün veya zaman zaman
«
Yoğun» – Daha uzun fırçalama
kullanılabilir ve beyazlatma
etkisi gösterir
süresiyle olağanüstü ağız
temizliği sağlar.
Bu seçenekte fırçalama
süresi her bir bölüm için
45 saniyeye, toplam
3 dakikaya uzar.
Not: «Beyazlatma» seçeneğinde en iyi sonucu,
Oral-B 3D WHITE (i) fırça başıyla alırsınız.
Fırça başları (modellere göre)
Oral-B FlossAction fırça başı
Oral-B FlossAction fırça başı, günlük
derinlemesine temizlik için tavsiye edilir. Mikro
titreşim kılları, dişlerinizin arasındaki ulaşılması
zor bölgelere girerek gizli plağı dişe zarar
vermeden uzaklaştırır.
Oral-B Sensitive fırça başı
Oral-B Sensitive fırça başı, hassas dişleri ve
dişetlerini derinlemesine temizler. Dişlere ve
dişetlerine zarar vermeyen yumuşak kıl
dokusuna sahiptir.
Oral-B 3D WHITE fırça başı
Belirli zamanlarda veya günlük beyazlatma
işlemi için Oral-B 3D WHITE fırça başını (i)
kullanın (bazı modellerde mevcuttur). Diş
hekimlerinden esinlenen parlatıcı haznesi,
kahve, çay ve tütün lekelerini etkili şekilde
çıkararak beyazlatma sağlar.
12 yaşın altındaki çocuklar Oral-B 3D WHITE
fırça başını kullanmamalıdır.
aa
ii
Açma kapama düğmesine bastığınızda
•
otomatik olarak «Günlük» seçenek çalışır.
Başka bir seçeneğe geçmek için, o seçeneğe
•
gelene kadar mod düğmesine basın.
Başka bir seçenekten «Günlük» seçeneğine
•
dönmek için mod düğmesini basılı tutun.
•
Fırçayı kapatmak için tekrar açma/kapama
düğmesine basın.
64
Dişinizde tel varsa Oral-B FlossAction veya
Oral-B 3D WHITE fırça başlarını kullanmayın.
Teller ve aparatların çevresini temizlemek
üzere tasarlanmış Oral-B Ortho fırça başını
kullanmanız önerilir.
Tüm fırça başlarında, fırçanın ne zaman
değiştirilmesi gerektiğini gösteren mavi
INDICATOR kıllar vardır. Dişler günde iki kez iki
dakika süreyle fırçalandığında, bu kılların mavi
rengi yaklaşık 3 ayda yarıya kadar solar, bu da
fırçanın değiştirilmesi gerektiğini gösterir.
Page 65

SmartGuide gösterge
Ekrandaki
Simge
Anlam
«Günlük Temizlik» seçeneği
«Hassas» seçeneği
«Masaj» seçeneği
tutturun. SmartGuide ekranı duvar askısına
takmadan önce 24 saat bekleyin.
«Beyazlatma» seçeneği
«Yoğun Temizlik» seçeneği
Fazla basınç uyguluyorsunuz.
Fırçalama basıncını azaltın.
«Zaman Sayacı»: Bu işaret
yanarken ilk 30 saniyelik («Yoğun»
Temizleme modunda 45 saniye)
fırçalama aşamasındasınız
demektir. kinci çeyrek yanıp
sönmeye başladığında ağzınızın
diğer bölümüne geçin.
Diş hekimlerinin tavsiye ettiği iki
dakikalık («Yoğun» Temizleme ile
3 dakika) süreye ulaştınız.
Diş fırçası gövdesinin pili zayıfladı.
Fırça gövdesini şarj edin.
SmartGuide göstergenin pili
zayıfladı. SmartGuide göstergenin
pilini değiştirin.
Not: Yapışkan bant, kir tutmama özellikli
yüzeylere yapışmaz.
Temizleme önerileri
Dişinizi fırçaladıktan sonra fırça başını akan su
•
altında iyice durulayın.
Fırça başını fırça gövdesinden çıkarıp iki
•
parçayı da akan suyun altında iyice temizleyin.
Şarj ünitesine yerleştirmeden önce silerek
kurulayın.
Şarj ünitesini temizlemeden önce tüm
•
parçalarını sökün. Şarj yuvası ve SmartPlug,
bulaşık makinesine kesinlikle konmamalıdır.
Ancak diğer parçalar (taban ve koruyucu
kapak) makinede yıkanabilir.
Duvar askısı
SmartGuide göstergeyi duvara, aynaya veya
başka bir yüzeye asmak isterseniz, duvar
askısını sabitlemek için yapışkan bandı (l)
kullanın. Asmadan önce, asacağınız yüzeyin
temiz ve kuru olmasına dikkat edin (önce yağı ve
tozu temizleyin). Duvar askısını, Oral-B logosunu
okuyabileceğiniz bir konumda yerleştirin.
Ardından askıyı yüzeye kuvvetle bastırarak
Şarj yuvası, SmartPlug ve SmartGuide
•
göstergeyi zaman zaman nemli bir bezle
silebilirsiniz. SmartPlug şarj cihazı ve
SmartGuide ekran hiçbir zaman suyla temas
etmemelidir.
65
Page 66

Senkronizasyon
set
h/min
3 sec.
set
h/min
3 sec.
Aynı mekanda ayrı SmartGuide ekranları olan
birden fazla Oral-B Triumph diş fırçasını kullanırken ekran mesajlarının birbirine karışmaması için, fırça gövdelerinin kendi ekranlarıyla
senkronize edilmesi gerekir. Aşağıdaki adımları
uygulayın:
Pil yuvası üzerindeki «h/min» düğmesini en
•
az 3 saniye basılı tutun. SmartGuide ekranda
«L---» ibaresi görülecek ve ekran senkronizasyona hazır hale gelecektir.
SmartGuide ekrandaki diş fırçası simgesinin
•
üzerinde açma kapama düğmesi yanıp
sönmeye başlayacaktır. Bunu görünce fırçayı
açın. Fırça açılınca otomatik senkronizasyon
işlemi başlar. Ekranda «L-1-» görüldüğünde
işlem bitmiştir.
Fırça gövdesini kapatın.
•
Aynı SmartGuide ekrana ikinci bir fırça gövdesi
bağlamak isterseniz, yukarıdaki son iki adımı
diğer sapla tekrarlayın. Senkronizasyon
modundan çıkmak için «h/min» veya «set»
düğmelerine basabilirsiniz. Aksi halde bu mod
30 saniye sonra kendiliğinden kapanacaktır.
Not:
Bir SmartGuide ekrana en fazla 2 fırça
•
gövdesi bağlanabilir. kinci fırça gövdesini de
senkronize etmenizin ardından ekranda «Full»
yazısı görünür.
Kablosuz bağlantının
kesilmesi
Diş fırçanızı kablosuz cihazların kullanımının
yasak olduğu yerlerde (hastane, uçak vb.)
bulundurmak veya kullanmak istiyorsanız önce
kablosuz bağlantıyı kesin.
Bunun için, açma kapama ve mod düğmelerini
aynı anda 3 saniye basılı tutun. Fırça gövdesinde, bağlantının kesildiği simgesi görülecektir.
Bağlantıyı tekrar kurmak için aynı düğmeleri
3 saniye basılı tutun. Fırça gövdesindeki simge
kaybolacaktır.
3 sec.3 sec.
Pillerin çıkarılması
SmartGuide gösterge
Biten pilleri hemen çıkarın. Tüm pilleri aynı anda
değiştirin. Alkalin pilleri, çinko karbon veya şarj
edilebilir pillerle karıştırmayın.
Bildirim yapılmadan değişiklik yapılabilir.
EEE STANDARTLARINA UYGUNDUR
Bakanlıkça tespit ve ilan edilen kullanım
ömrü 7 yıldır.
Üretici firma ve CE işareti uygunluk
değerlendirme kuruluşu:
Braun GmbH
Frankfurter Straße 145
61476 Kronberg / Germany
“ (49) 6173 30 0
Fax (49) 6173 30 28 75
SmartGuide göstergenin pilini değiştirirken,
•
hafızasındaki bilgiler silinecektir. Bu nedenle
pili her değiştirdiğinizde senkronizasyon
işlemini tekrarlamanız gerekmektedir.
66
P & G Sat. ve Dağ. Ltd. Şti.
Serin Sok. No: 9 34752 çerenköy/stanbul
tarafından ithal edilmiştir.
P & G Tüketici Hizmetleri
0 800 261 63 65,
trconsumers@custhelp.com
Page 67

Românå (RO/MD)
Periuţa de dinţi Oral-B® Triumph cu
SmartGuide a fost special creată pentru a
transforma periajul dinţilor într-o experienţă
unică, care este atât sigură, cât şi eficientă
pentru dumneavoastră şi familia dumneavoastră.
Cu toate acestea, atunci când folosiţi produse
electrice, trebuie să luaţi întotdeauna anumite
măsuri de precauţie de bază. Vă rugăm să citiţi
cu atenţie instrucţiunile de utilizare înainte de a
folosi produsul pentru prima oară.
IMPORTANT
Oral-B Triumph este prevăzută cu un ştecăr
•
SmartPlug (de tensiune joasă de siguranţă).
Nu schimbaţi şi nu modificaţi nici o parte a
acestuia, deoarece există riscul de şoc
electric. Verificaţi periodic că ştecărul
SmartPlug nu prezintă defecţiuni, iar dacă
aparatul este defect sau nu funcţionează
corect, nu îl mai folosiţi. Mergeţi cu aparatele
defecte la un centru service Oral-B Braun
Acest produs nu este destinat pentru a fi
•
utilizat de către copiii sub trei ani.
Acest aparat nu este destinat utilizării de către
•
copii sau persoane cu capacităţi fizice sau
mentale reduse, cu excepţia cazului în care
sunt supravegheate de către o persoană
responsabilă pentru siguranţa lor. În general,
vă recomandăm să nu ţineţi produsul la îndemâna copiilor.
În cazul în care produsul este scapat, capătul
•
de periaj trebuie înlocuit înainte de următoarea
folosire, chiar dacă nu sunt urme vizibile de
avariere.
Nu permiteţi contactul ştecărului SmartPlug cu
•
apa sau alte lichide.
Nu modificaţi sau reparaţi produsul. Aceasta
•
poate cauza incendiu, şoc electric sau rănire.
Consultaţi dealerul pentru reparaţii sau
contactaţi un service Oral-B Braun. Nu
dezasamblaţi produsul, cu excepţia cazului în
care schimbaţi bateria.
Atunci când scoateţi bateria pentru a fi arun-
•
cată, aveţi grijă să nu scurtcircuitaţi bornele
pozitive (+) şi negative (–).
Nu atingeţi ştecărul SmartPlug cu mâinile ude.
•
Acest lucru poate provoca un şoc electric.
Folosiţi acest produs numai pentru scopul
•
descris în acest manual. Nu folosiţi ataşamente sau încărcătoare care nu sunt recomandate de producător.
Dacă urmaţi un tratament pentru orice
•
problemă de îngrijire orală, consultaţi medicul
dentist înainte de utilizarea produsului.
®
.
Periuţa dumneavoastră Oral-B Triumph cu
SmartGuide prezintă un ecran interactiv fără fir
pentru a vă ajuta să vă îmbunătăţiţi experienţa
periajului.
Important
Pentru a evita perturbaţia electromagnetică
•
şi/sau conflictele de compatibilitate,
dezactivaţi transmisia radio a periuţei
dumneavoastră înainte de a o transporta
sau de folosirea în zone restricţionate, cum
ar fi avioane sau zone special desemnate în
spitale (consultaţi «Dezactivarea transmisiei radio»).
•
Persoanele care utilizează stimulatoare
cardiace trebuie să ţină periuţa la o distanţă
de peste 15 centimetri de stimulatorul
cardiac, atunci când aceasta este pornită.
Dacă bănuiţi în orice moment că au loc
perturbaţii, dezactivaţi transmisia radio a
periuţei dumneavoastră înainte de utilizare
(consultaţi «Dezactivarea transmisiei
radio»).
Descriere
a Capăt de periaj Oral-B FlossAction
b Buton pornit/oprit
c Buton de selectare a modului de periaj
d Mâner
e Displayul de pe mâner
f Încărcător SmartPlug (include inelul de
încărcare şi ştecărul SmartPlug)
g Bază
h Capac de protecţie
i Capăt de periaj Oral-B 3D WHITE
(nu este disponibil la toate modelele)
j Display SmartGuide
k Suport de perete
l Bandă adezivă
Caracteristici tehnice:
Tip: 3731
Tensiune: 100–240 V
Frecvenţă: 50–60 Hz
Putere: 3 W
Nivel de zgomot: 65 dB (A)
IP: 67
Prima utilizare
Înainte de prima utilizare, încărcaţi periuţa.
Conectaţi ştecărul SmartPlug la o priză electrică
şi fixaţi mânerul (d) pe inelul de încărcare (f),
(consultaţi «Conectare şi încărcare»).
67
Page 68

Displayul SmartGuide are activat modul de
h/min
set
h/min
set
t
h/min
set
t
h/min
set
•
demonstraţie. Pentru a schimba modul, apăsaţi
butonul «set» sau butonul «h/min» situat în
compartimentul pentru baterie. Observaţie:
displayul SmartGuide va autoactiva acest mod
de demonstraţie în cazul în care nu veţi utiliza
periuţa timp de mai mult de 28 de zile. Puteţi
evita această autoactivare prin setarea ceasului
sau sincronizarea mânerului.
h/min
h/min
set
set
2
2
1
1
Atunci când pe displayul SmartGuide este
•
h/min
h/min
set
set
afişată intermitent ora «12:00», înseamnă că
puteţi seta ora. Apăsaţi butonul «set», situat în
compartimentul bateriei, până când apare
afişajul «12 h».
set
set
h/min
h/min
Prin apăsarea scurtă a butonului «h/min», puteţi
•
alege între formatul «12 h» sau formatul «24 h».
Apăsaţi butonul «set» pentru a confirma alegerea.
Conectare şi încărcare
Periuţa are un mâner rezistent la apă, este
prevăzută cu protecţie electrică şi este destinată
utilizării în camera de baie.
Pentru a asambla unitatea de încărcare, introduceţi capacul de protecţie (h) în spatele bazei (g).
Apoi, plasaţi baza pe inelul de încărcare (f) până
se aude un clic.
Conectaţi ştecărul SmartPlug la o priză
•
electrică şi plasaţi mânerul periuţei (d) în
unitatea de încărcare. Un simbol de baterie ar
trebui să apară pe displayul de pe mâner (e).
Simbolul de baterie se va umple în timp ce se
încarcă mânerul. Odată ce mânerul este
încărcat complet, simbolul de baterie va
prezenta patru bare. O încărcare completă
durează cel puţin 10 ore şi permite utilizarea
timp de 10 zile pentru un periaj regulat (de
două ori pe zi, câte 2 minute).
Observaţie: chiar dacă simbolul bateriei nu
este afişat imediat, continuaţi încărcarea.
Acesta va apărea în 10–15 minute.
Apoi cifrele pentru oră vor începe să clipească.
•
Apăsaţi butonul «h/min» până când apare ora
corectă şi confirmaţi cu butonul «set».
Procedaţi la fel pentru a seta şi minutele. Dacă
preferaţi să nu folosiţi funcţia de ceas, afişajul
intermitent «12:00» va dispărea automat după
24 de ore.
Puteţi porni periuţa prin apăsarea butonului de
pornire/oprire (b). Pentru a evita stropirea,
îndreptaţi capătul de periaj spre dinţi înainte de a
porni dispozitivul.
Oral-B
Oral-B
Oral-B
68
Oral-B
Atunci când acumulatorul este descărcat,
•
simbolul de baterie cu o singură bară rămasă
va începe să clipească. Periuţa va merge mai
încet şi apoi se va opri. Atunci când bateria
este complet descărcată, conturul simbolului
de baterie clipeşte. Va avea nevoie de o
încărcare de 15 minute înainte de a putea fi
utilizată pentru un periaj de 2 minute.
Pentru utilizare zilnică, mânerul periuţei poate
•
fi aşezat pe unitatea de încărcare, pentru
a-l menţine încărcat complet. Nu există riscul
de a supraîncărca bateria. Cu toate acestea,
din motive ecologice, Oral-B recomandă să
deconectaţi încărcătorul până la următoarea
reîncărcare necesară.
Page 69

Pentru a conserva capacitatea maximă a
•
acumulatorului, deconectaţi unitatea de
încărcare şi descărcaţi integral mânerul prin
folosire normală, cel puţin o dată la 6 luni.
Personalizarea
cronometrului
Puteţi alege între cronometrul «Professional»
sau «2-Minute» şi între cronometrul «Count Up»
(crescător) sau «Count Down» (descrescător),
după cum doriţi.
Cronometrul «2-Minute» indică printr-un sunet
lung şi un zâmbet («smiley») pe displayul
SmartGuide că cele 2 minute de periaj
recomandate de medicul dentist s-au scurs. În
plus, cronometrul «Professional» vă ajută să
periaţi cele patru sectoare ale gurii în mod egal.
Vă anunţă printr-un sunet scurt la intervale de
30 de secunde (intervale de 45 de secunde
pentru modul «Deep Clean» – Curăţare
profundă) şi prin «cercul cu sectoare» pe
displayul SmartGuide că este timpul să treceţi la
următorul sector al gurii.
3
3
c
c
0
e
e
s
s
0
0
3
3
0
s
s
e
e
c
c
s
s
5
5
4
4
4
4
c
c
5
e
e
5
s
s
e
e
c
c
Apăsaţi lung butonul de selectare a modului de
•
periaj (c) până când pe displayul SmartGuide
(j) se afişează «:30» şi «timer».
3 sec.3 sec.
Prin apăsarea scurtă a butonului pornit-oprit
•
(b), schimbaţi pe cronometrul «2-Minute».
Confirmaţi alegerea prin apăsarea butonului
de selectare a modului (c).
Apoi se va afişa cronometrul «Count Up» (vor
•
apărea «up» şi «timer»). Pentru a schimba pe
cronometrul «Count Down» apăsaţi butonul
pornit/oprit şi confirmaţi cu butonul de selectare a modului.
3
c
c
e
e
s
s
0
0
3
3
3
0
0
s
s
e
e
c
c
c
c
e
e
s
s
5
5
4
4
4
4
5
5
s
s
e
e
c
c
Ambele cronometre memorează timpul de periaj
care s-a scurs, chiar dacă mânerul este oprit
pentru o scurtă perioadă în timpul periajului.
Cronometrul se resetează numai dacă se face
o pauză mai lungă de 30 de secunde.
Cronometrul «Count Up» afişează timpul real
de periaj. Cronometrul «Count Down» afişează
timpul rămas de periaj. Începând cu «2:00»
minute, numără descrescător până la «0:00».
Dacă periaţi mai mult de două minute, se trece
automat pe cronometrul «Count Up».
Timpul total de periaj poate fi prelungit la
3 minute prin utilizarea modului «Deep Clean»
(consultaţi «Moduri de periaj»).
Periuţa dumneavoastră are iniţial activate
cronometrele «Professional» şi «Count Up».
Dacă doriţi să schimbaţi aceste setări, procedaţi
în felul următor:
Observaţie: Este normal ca displayul de pe
mâner să afişeze două bare care clipesc atunci
când este selectat modul de setare a cronometrului.
Periaj
Tehnica de periaj
Ghidaţi încet capătul de periaj de la un dinte la
•
altul.
Menţineţi capătul de periaj timp de câteva
•
secunde în aceeaşi poziţie, înainte de a trece
la dintele următor.
69
Page 70

Periaţi atât gingiile cât şi dinţii, întâi suprafeţele
•
exterioare, apoi cele interioare, iar la final
suprafaţa orizontală cu care se mestecă.
Nu apăsaţi prea tare şi nu frecaţi; lăsaţi periuţa
•
să facă toată treaba. Când terminaţi periajul,
timpul total de periaj va fi afişat timp de 30 de
secunde înainte ca ecranul să afişeze din nou
ora. Pentru a trece direct la modul de afişare
a orei, ştergeţi afişajul timpului de periaj prin
apăsarea butonului de selectare a modului (c).
Periuţa este prevăzută cu funcţia de control al
presiunii, pentru a vă ajuta să aplicaţi nivelul de
presiune corect. Astfel, gingiile dumneavoastră
sunt protejate împotriva unui periaj excesiv, iar
periuţa este uşor de folosit. Dacă presiunea
exercitată este prea mare, capătul pentru periaj
va continua să oscileze, dar pulsaţiile se vor
opri. Schimbarea va fi simţită, şi de asemenea
veţi auzi un sunet diferit.
În primele zile de utilizare a periuţei, gingiile
dumneavoastră ar putea sângera uşor. În mod
normal, sângerarea ar trebui să se oprească
după câteva zile. Dacă aceasta persistă mai
mult de 2 săptămâni, vă rugăm să consultaţi un
medic dentist. Dacă aveţi dinţi şi gingii sensibile,
Oral-B vă recomandă utilizarea modului
«Sensitive» (Sensibil).
Moduri de periaj
Periuţa vă oferă diferite moduri de periaj pentru
diverse nevoi de îngrijire orală:
«Daily Clean» – Curăţare excepţională a
cavităţii bucale.
«Sensitive» – Curăţare delicată, dar
completă, pentru zone
sensibile.
«Massage» – Masare delicată a gingiilor.
«Whitening» – Lustruire şi albire pentru
«Deep Clean»
utilizare ocazionala sau
zilnică.
– Curăţare excepţională a
gurii, cu timp prelungit de
periaj. Cu acest mod, timpul
de periaj a fost prelungit la
45 secunde pe sector, pentru
un timp total de periaj de
3 minute.
Pentru a schimba pe alt mod, apăsaţi succesiv
•
butonul de selectare a modului.
Oricând doriţi să vă întoarceţi la modul «Daily
•
Clean» (Curăţare zilnică), apăsaţi lung butonul
de selectare a modului.
Pentru a opri periuţa, apăsaţi butonul pornit/
•
oprit.
Observaţie: Modul «Whitening» se foloseşte cel
mai bine cu un capăt de periaj Oral-B 3D WHITE
(i).
Capete de periaj (disponibile în funcţie de
model)
Capătul de periaj Oral-B FlossAction
Capătul de periaj Oral-B FlossAction (a) este
recomandat pentru o curăţare profundă zilnică.
Acesta conţine peri MicroPulse care pătrund
adânc în locurile greu accesibile dintre dinţi şi
înlătură delicat placa dentară.
Capătul de periaj Oral-B Sensitive
Capătul de periaj Oral-B Sensitive asigură o
curăţare atentă pentru dinţi şi gingii sensibile.
Are peri cu textură foarte moale care curăţă
delicat dinţii şi gingiile.
Capătul de periaj Oral-B 3D WHITE
Pentru o lustruire ocazională sau zilnică, utilizaţi
capătul de periaj Oral-B 3D WHITE (i) (nu este
disponibil pentru toate modelele). Acesta conţine
o cupă inspirată de instrumentele stomatologice,
care înlătură petele ce pot proveni de la cafea,
ceai şi tutun, conferind strălucire.
Observaţie: copiii sub 12 ani nu trebuie să
folosească capul de periaj Oral-B 3D WHITE.
aa
ii
•
Atunci când apăsaţi butonul pornit / oprit,
periuţa porneşte automat cu modul «Daily
Clean» (Curăţare zilnică).
70
Page 71

Nu utilizaţi capetele de periaj Oral-B FlossAction
sau Oral-B 3D WHITE dacă purtaţi aparate
dentare. Recomandăm capul de periaj Oral-B
Ortho, care este special creat pentru a curăţa în
jurul aparatelor dentare.
Toate capetele de periaj au peri albaştri
INDICATOR care vă ajută să urmăriţi când
trebuie să schimbaţi capul periuţei. Cu un periaj
corect, de două ori pe zi, câte două minute,
culoarea albastră se va decolora până la jumătatea perilor în aproximativ 3 luni, semnalând ca
este timpul să schimbaţi capătul de periaj.
Display SmartGuide
Suport de perete
Dacă preferaţi să montaţi displayul SmartGuide
pe perete, oglindă sau altă suprafaţă, folosiţi
banda adezivă (l) pentru a fixa suportul de
perete. Înainte de aceasta, asiguraţi-vă că
suprafaţa pe care doriţi să montaţi suportul este
curată şi uscată (îndepărtaţi mai întâi grăsimea
şi praful). Poziţionaţi suportul de perete astfel
încât să puteţi citi sigla Oral-B. Apoi, apăsaţi
suportul de perete în mod uniform şi ferm.
Aşteptaţi 24 de ore înainte de a glisa displayul
SmartGuide pe suportul de perete fixat.
Imaginea
afişată
Semnificaţie
Modul «Daily Clean»
Modul «Sensitive»
Modul «Massage»
Modul «Whitening»
Modul «Deep Clean»
Se aplică prea multă presiune.
Reduceţi forţa cu care periaţi.
«Cercul cu sectoare» – în acest
moment periaţi în primul interval
de 30 de secunde (interval de
45 de secunde în modul «Deep
Clean»). Treceţi la următorul
sector al gurii atunci când al doilea
segment începe să clipească.
Cele 2 minute de periaj
recomandate de medicul dentist
(3 minute de periaj în modul
«Deep Clean») s-au scurs.
Acumulatorul din mâner este
descărcat. Puneţi la încărcat
mânerul periuţei.
Bateriile displayului SmartGuide
sunt descărcate. Schimbaţi
bateriile displayului SmartGuide.
Observaţie: Banda adezivă nu va funcţiona pe
suprafeţe cu tratament anti-murdărie.
Recomandări pentru
curăţare
După periaj, clătiţi bine capul periuţei sub jetul
•
de apă.
Detaşaţi capătul periuţei de mâner şi clătiţi
•
ambele dispozitive sub jetul de apă. Apoi,
ştergeţi-le înainte de a pune mânerul pe
unitatea de încărcare.
Înainte de a curăţa unitatea de încărcare,
•
dezasamblaţi-o. Inelul de încărcare şi ştecărul
SmartPlug nu trebuie puse niciodată în maşina
de spălat vase. Cu toate acestea, toate
celelalte componente (baza şi capacul de
71
Page 72

protecţie) pot fi curăţate în siguranţă în maşina
set
h/min
3 sec.
set
h/min
3 sec.
de spălat vase.
Din când în când, puteţi şterge inelul de
•
încărcare, ştecărul SmartPlug şi ecranul
SmartGuide cu o cârpă umedă. Atât
încărcătorul SmartPlug cât şi ecranul
SmartGuide nu trebuie să intre niciodată în
contact cu apa.
Sincronizare
Pentru a evita interferenţa mesajelor afişate
atunci când se utilizează mai multe periuţe de
dinţi Oral-B Triumph cu displayuri SmartGuide
diferite în aceeaşi casă, trebuie să asociaţi
mânerele cu ecranele corespunzătoare. Urmăriţi
paşii de mai jos:
Apăsaţi butonul «h/min» din compartimentul
•
pentru baterie timp de cel puţin 3 secunde.
Ecranul SmartGuide afişează «L---», care
indică modul «Learn» (Învăţare) pentru
activarea sincronizării.
Apoi vi se indică, printr-un buton pornit/oprit pe
•
imaginea periuţei de pe displayul SmartGuide,
să porniţi mânerul. Când veţi face acest lucru
începe procesul automat de sincronizare. Se
va termina atunci când pe ecran apare afişajul
«L-1-».
Observaţie:
Maxim 2 mânere pot fi sincronizate cu acelaşi
•
display SmartGuide. După ce veţi sincroniza al
doilea mâner, mesajul «Full» va fi afişat.
Atunci când schimbaţi bateriile displayului
•
SmartGuide, informaţiile stocate vor fi şterse.
De aceea, trebuie să repetaţi procesul de
sincronizare de fiecare dată când schimbaţi
bateriile.
Dezactivarea transmisiei
radio
Dacă doriţi să transportaţi periuţa de dinţi în
spaţii în care dispozitivele radio nu sunt permise
(de exemplu spitale sau avioane), dezactivaţi
mai întâi transmisia radio.
Pentru aceasta, apăsaţi simultan butonul pornit/
oprit şi butonul de selectare a modului de periaj,
timp de cel puţin 3 secunde. Displayul de pe
mâner afişează imaginea corespunzătoare
dezactivării radio. Dacă doriţi să reactivaţi
transmisia radio, apăsaţi ambele butoane din
nou, timp de 3 secunde, şi imaginea afişată va
dispărea.
3 sec.3 sec.
Apoi puteţi opri mânerul.
•
Dacă doriţi să asociaţi un al doilea mâner cu
acelaşi ecran SmartGuide, repetaţi ultimii doi
paşi descrişi mai sus folosind al doilea mâner.
Puteţi ieşi din modul «Learn» (Învăţare) prin
apăsarea butonului «h/min» sau «set». Altfel,
modul «Learn» (Învăţare) se va termina după
30 de secunde.
72
Scoaterea bateriilor
Displayul SmartGuide
Scoateţi imediat bateriile complet descărcate.
Înlocuiţi toate bateriile în acelaşi timp. Nu
amestecaţi baterii alcaline cu baterii zinc carbon
sau reîncărcabile.
Informaţii supuse schimbărilor neanunţate.
Page 73

Acest aparat respectă cerinţele impuse
de Directiva Europeană 1999/5/CE.
Colector Clasa 3, Ciclu de serviciu Clasa 3.
Aviz ecologic
Acest produs conţine acumulatori. Pentru
a proteja mediul înconjurător, vă rugăm să
nu aruncaţi produsul în gunoiul menajer
la sfârşitul duratei de viaţă utilă. Îl puteţi
aduce la un Centru Service Braun Oral-B sau la
centre de reciclare sau colectare aprobate, în
conformitate cu reglementările locale.
Garanţie
Oferim o garanţie de 2 ani, începând cu data
achiziţionării produsului. În perioada de garanţie,
vom remedia gratuit orice defecţiuni ale
aparatului, cauzate de defecte ale materialelor
utilizate sau de greşeli de manoperă, fie prin
repararea, fie prin înlocuirea întregului aparat,
după cum vom considera de cuviinţă. Această
garanţie este valabilă în orice ţară în care
produsul este comercializat de Braun sau de
alt distribuitor autorizat.
Această garanţie nu acoperă: daunele cauzate
de utilizarea incorectă, uzajul obişnuit, cu referire
specială la capetele de periaj şi nici defectele
care au un efect neglijabil asupra valorii sau
funcţionării aparatului. Garanţia expiră dacă
aparatul suferă reparaţii efectuate de persoane
neautorizate şi dacă nu sunt folosite piese
originale Braun.
Pentru a beneficia de service în timpul
perioadei de garanţie, aduceţi sau trimiteţi întreg
dispozitivul, însoţit de chitanţă, la un Centru
Service Braun Oral-B autorizat.
Această garanţie nu vă afectează în niciun fel
drepturile legale.
73
Page 74

Lietuvi˜
Dantų šepetėlis „Oral-B® Triumph“ su
„SmartGuide“ įrenginiu sukurtas siekiant
pasiūlyti Jums ir Jūsų šeimai saugų ir
veiksmingą dantų valymo būdą. Tačiau
naudojant elektros prietaisus būtina laikytis
saugumo instrukcijų. Prieš naudodami prietaisą
pirmą kartą, atidžiai perskaitykite jo naudojimo
instrukciją.
DĖMESIO!
Dantų šepetėlis „Oral-B Triumph“ turi saugios
•
labai žemos įtampos (SELV) kištuką
„SmartPlug“. Nekeiskite ir netaisykite jokių jo
dalių, nes rizikuojate patirti elektros šoką.
Reguliariai tikrinkite, ar nepažeistas kištukas.
Jei prietaisas pažeistas ar nefunkcionuojantis,
liaukitės jį naudoję. Nuneškite pažeistas dalis
®“
į „Braun
Šiuo prietaisu negali naudotis vaikai iki trijų
•
metų amžiaus.
Šiuo prietaisu negali naudotis vaikai ir fiziškai
•
ar protiškai neįgalūs asmenys, jei jie nėra
prižiūrimi už jų saugumą atsakingo asmens.
Rekomenduojame laikyti prietaisą vaikams
nepasiekiamoje vietoje.
Jei prietaisas nukrito, dantų šepetėlio galvutę
•
pakeiskite prieš sekantį naudojimą, net jei
nesimato jokių pažeidimų.
Laikykite „SmartPlug“ kištuką atokiau nuo
•
vandens ar kitokio skysčio.
Nekeiskite ir netaisykite jokių produkto dalių.
•
Tai gali sukelti ugnies, elektros šoko ar
susižeidimo pavojų. Susisiekite su „Braun“
klientų aptarnavimo centru dėl produkto
taisymo. Kitais nei akumuliatoriaus šalinimo
tikslais, neardykite prietaiso.
Išimdami akumuliatorių šalinimui, būkite
•
atsargūs, kad nesukeltumėte trumpo
susjungimo teigiamame (+) ir neigiamame (–)
poliuose.
Nelieskite „SmartPlug“ kištuko šlapiomis
•
rankomis. Elektros šoko pavojus.
Naudokite šį produktą tik šioje instrukcijoje
•
nurodytais tikslais. Nenaudokite antgalių ar
įkroviklių, kurių nerekomenduoja gamintojas.
Jei Jums paskirtas bet koks burnos ertmės
•
gydymas, prieš naudodami prietaisą pasitarkite
su odontologu.
Dantų šepetėlis „Oral-B Triumph“ turi sąveikinį
„SmartGuide“ belaidį įrenginį, sukurtą padėti
Jums veiksmingai išsivalyti dantis.
74
klientų aptarnavimo centrą.
Svarbu:
Tam, kad išvengtumėte elektromagnetinių
•
trikdžių ir/arba suderinamumo problemų,
išjunkite šepetėlį, skleidžiantį radijo
signalus, prieš gabendami ar naudodami jį
uždraustoje aplinkoje, tokioje kaip lėktuvas
ar specialiai pažymėtos vietos ligoninėse
(žr. „Radijo signalus skleidžiančių prietaisų
išjungimas“).
Žmonės su širdies stimuliatoriais turėtų
•
visuomet laikyti dantų šepetėlį daugiau
nei 15 centimetrų atstumu nuo širdies
stimuliatoriaus, kai šepetėlis įjungtas. Jei
bet kuriuo metu įtariate trikdžius, išjunkite
šepetėlį, skleidžiantį radijo signalus, prieš
jį naudodami (žr. „Radijo signalus
skleidžiančių prietaisų išjungimas“).
Aprašymas
a Antų šepetėlio galvutė „Oral-B FlossAction“
b Įjungimo/išjungimo mygtukas
c Burnos valymo režimo mygtukas
d Kotelis
e Kotelio ekranas
f Įkroviklis „SmartPlug“ (su įkrovimo žiedu ir
„SmartPlug“ kištuku)
g Pagrindo plokštelė
h Apsauginis dangtelis
i Dantų šepetėlio galvutė „Oral-B 3D WHITE“
(ne visuose modeliuose)
j „SmartGuide“ įrenginys
k Sieninis laikiklis
l Lipnioji juostelė
Specifikacijos:
Tipas: 3731
Įtampa: 100–240 V
Dažnis: 50–60 Hz
Galia: 3 W
Triukšmo lygis: 63 db (A)
IP: 67
Pirmas naudojimas
Prieš pirmą naudojimą įkraukite šepetėlį. Įkiškite
„SmartPlug“ kištuką į elektros lizdą ir uždėkite
kotelį (d) ant įkrovimo žiedo (f) (žr. „Prijungimas
ir krovimas“).
Jūsų „SmartGuide“ įrenginyje aktyvuotas
•
demonstracijos režimas. Norėdami palikti šį
režimą, paspauskite „set“ arba „h/min“
mygtuką, esantį akumuliatoriaus skyriuje.
Įsidėmėkite, kad „SmartGuide“ įrenginys
Page 75

suaktyvins demonstracijos režimą jei šepetėlio
h/min
set
h/min
set
t
h/min
set
t
h/min
set
nenaudosite 28 dienas. Galite išvengti šio
suaktyvinimo nustatydami laikrodį ar sinchronizuodami kotelį.
h/min
h/min
set
set
2
2
1
1
Mirksintis „12:00“ skaitmuo „SmartGuide“
•
h/min
h/min
set
set
įrenginyje parodo, kad galima nustatyti laiką.
Paspauskite „set“ mygtuką, esantį akumuliatoriaus skyriuje, kol įrenginyje matysis
„12 h“.
set
set
h/min
h/min
Trumpai paspausdami „h/min“ mygtuką, galite
•
rinktis iš „12 h“ ar „24 h“ dienos formatų.
Paspauskite „set“ mygtuką, kad patvirtintumėte savo pasirinkimą.
Prijungimas ir krovimas
Jūsų dantų šepetėlis turi vandeniui atsparų
kotelį, yra elektriškai saugus ir yra skirtas
naudoti vonios kambaryje.
Norėdami surinkti įkroviklį, įstatykite apsauginį
dangtelį (h) pagrindo plokštelės (g) kitoje pusėje.
Tuomet uždėkite pagrindo plokštelę ant įkrovimo
žiedo (f) taip, kad įsitvirtintų savo vietoje.
Įkiškite „SmartPlug“ kištuką į elektros lizdą ir
•
uždėkite šepetėlio kotelį (d) ant įkroviklio.
Kotelio ekrane (e) turi atsirasti baterijos
simbolis. Baterijos simbolis užsipildys kotelio
krovimo metu. Kai kotelis pilnai įsikraus,
baterijos simbolis bus užpildytas keturiomis
juostelėmis. Pilnas įkrovimas trunka mažiausiai
10 valandų. Pilnai įkrautą šepetėlį galėsite
naudoti apytikriai 10 dienų reguliariai valydami
dantis (dukart per dieną po 2 minutes).
Svarbu: Jei baterijos simbolis iš karto
neatsiranda, kraukite toliau. Jis atsiras po
10–15 minučių.
Tuomet valandos skaitmuo ima mirksėti.
•
Spauskite „h/min“ mygtuką, kol atsiras
reikiama valanda ir patvirtinkite pasirinkimą
„set“ mygtuku. Tuo pačiu būdu nustatykite abu
minučių skaitmenis. Jei nenorite naudoti
laikrodžio, mirksintis „12:00“ skaitmuo
automatiškai išnyks po 24 valandų.
Dantų šepetėlį įjungsite paspaudę įjungimo/
išjungimo mygtuką (b). Kad neapsitaškytumėte,
pridėkite šepetėlio galvutę prie dantų prieš
įjungdami šepetėlį.
Oral-B
Oral-B
Oral-B
Oral-B
Kai įkraunamas akumuliatorius senka,
•
baterijos simbolis su viena likusia juostele ima
mirksėti. Dantų šepetėlis sulėtės ir sustos.
Akumuliatoriui visiškai išsikrovus, mirksi
baterijos simbolio rėmelis. Tuomet turėsite
krauti šepetėlį 15 minučių, kad galėtumėte jį
naudoti 2 minutes.
Kasdien naudodami šepetėlį, galite laikyti jo
•
kotelį ant įkroviklio, kad palaikytumėte jį pilno
galingumo. Nėra jokio pavojaus perkrauti
akumuliatoriaus. Tačiau dėl aplinkosaugos
priežasčių „Oral-B“ rekomenduoja ištraukti
įkroviklį iš elektros lizdo iki to laiko, kai bus
reikalingas kitas šepetėlio įkrovimas.
Norėdami palaikyti pilną įkraunamo
•
akumuliatoriaus galingumą, ištraukite įkroviklį
75
Page 76

iš elektros lizdo ir leiskite koteliui visiškai
išsikrauti bent kartą per 6 mėnesius, naudojant
reguliariai.
Laikmačio pritaikymas
asmeniniams poreikiams
Galite rinktis iš „Professional“ ar „2-Minute“
laikmačių ir „Count Up“ ar „Count Down“
laikmačių, savo asmeniniams poreikiams
patenkinti.
„2-Minute“ laikmatis ilgu trūkčiojančiu garsu ir
„šypsenėle“ įrenginyje „SmartGuide“ praneša,
kad pasiektas odontologų rekomenduojamas
2 minučių dantų valymo laikas. Be to,
„Professional“ laikmatis padeda vienodai
išsivalyti visus burnos ketvirčius. Trumpu
trūkčiojančiu garsu kas 30 sekundžių (kas
45 sekundes valant „Deep Clean“ režimu) ir
„burnos ketvirčių rato“ simboliu įrenginyje
„SmartGuide“, jis praneša, kad laikas pereiti
prie kito burnos ketvirčio.
3
3
c
c
0
e
e
s
s
0
0
3
3
c
c
e
e
s
s
0
s
s
e
e
c
c
3
3
0
0
s
s
e
0
0
e
c
c
3
3
s
s
5
5
4
4
c
c
e
e
s
s
4
4
c
c
5
e
e
5
s
s
e
e
c
c
4
4
5
5
s
s
e
5
5
e
c
c
4
4
3 sec.3 sec.
Trumpai paspaudę įjungimo/išjungimo
•
mygtuką (b), perjunkite į „2-Minute“ laikmatį.
Patvirtinkite savo pasirinkimą paspausdami
režimo mygtuką (c).
Ekrane iškart matysis „Count Up Timer“ (bus
•
rodomi „up“ ir „timer“). Perjunkite į „Count
Down Timer“ laikmatį paspausdami įjungimo/
išjungimo mygtuką ir patvirtindami savo
pasirinkimą režimo mygtuku.
Dėmesio: Kai nustatytas laikmatis šepetėlio
naudojimo metu, normalu, kad kotelio ekrane
rodomos dvi mirksinčios juostelės.
Abu laikmačiai įsimena praėjusio dantų valymo
laiką, net ir tuo atveju, jei kotelis buvo trumpai
išjungtas dantų valymo metu. Sustabdžius
šepetėlį ilgiau nei 30 sekundžių, laikmatis
nusistato į pradinę padėtį.
„Count Up“ laikmatis rodo esamą dantų valymo
laiką. „Count Down“ laikmatis rodo likusį dantų
valymo laiką. Pradedant nuo „2:00“ minučių, jis
mažėja iki „0:00“. Valant dantis ilgiau nei dvi
minutes, jis automatiškai pasikeičia į „Count Up“
laikmatį.
Visas valymo laikas gali būti pratęstas iki
3 minučių dantis valant „Deep Clean“ režimu
(žr. „Dantų valymo režimai“).
Jūsų dantų šepetėlyje suaktyvinti „Professional“
ir „Count Up“ laikmačiai. Jei norite pakeisti
nustatymus, tęskite kaip nurodyta:
Paspauskite ir palaikykite režimo mygtuką (c),
•
kol „SmartGuide“ įrenginyje (j) atsiras „:30“ ir
„timer».
76
Dantų valymas
Valymo technika
Lėtai veskite šepetėlio galvutę nuo danties prie
•
danties.
Šepetėlio galvutę palaikykite kelias sekundes
•
toje pačioje vietoje, prieš pereidami prie kito
danties.
Valykite dantis ir dantenas, pirmiausia
•
išorinius, tuomet – vidinius, galiausiai –
kramtomuosius paviršius.
Per daug nespauskite dantų šepetėlio ir
•
nešveiskite, tiesiog leiskite šepetėliui atlikti
savo darbą. Kai baigsite valyti dantis,
visas dantų valymo laikas bus rodomas
30 sekundžių prieš ekranui persijungiant atgal
Page 77

į laiko režimą. Norėdami tiesiogiai pereitį
į laiko režimą, panaikinkite dantų valymo laiką
paspausdami režimo mygtuką.
Jūsų šepetėlyje yra spaudimo jutiklis, padedantis
užtikrinti, kad dantys nėra valomi per stipriai.
Tai padeda apsaugoti dantenas nuo per stipraus
valymo ir palengvina šepetėlio valdymą. Per
daug spaudžiant dantų šepetėlį, vibruojamieji
galvutės judesiai tęsis, bet pulsavimas liausis.
Jūs ne tik pajusite pasikeitimą, bet ir išgirsite
kitokį garsą.
Pirmomis dienomis naudojant elektrinį dantų
šepetėlį, dantenos gali šiek tiek kraujuoti.
Paprastai kraujavimas liaujasi po kelių dienų.
Jei po 2 savaičių dantenos vis dar kraujuoja,
prašome kreiptis į odontologą ar dantų higienistą. Jei turite jautrius dantis ar dantenas,
„Oral-B“ rekomenduoja dantis valytis „Sensitive“
režimu.
Dantų valymo režimai
Jūsų šepetėlis siūlo skirtingus valymo režimus,
atitinkančius burnos priežiūros poreikius:
„Daily Clean“ – Išskirtinis burnos valymas.
„Sensitive“ – Švelnus, tačiau kruopštus
jautrių burnos vietų valymas.
„Massage“ – Švelnus dantenų masaža vimas.
„Whitening“ – Dantų poliravimas ir
„Deep Clean“
balinimas retam ar
kasdieniam naudojimui.
– Išskirtinis burnos valymas
ilgesnį laiką. Valant dantis
šiuo režimu skiriamos
45 sekundės kiekvienam
burnos ketvirčiui, t.y. iš viso
3 minutės.
Norėdami grįžti iš bet kurio režimo į „Daily
•
Clean“ režimą, paspauskite ir palaikykite
režimo mygtuką.
Norėdami išjungti šepetėlį, paspauskite
•
įjungimo/išjungimo mygtuką.
Dėmesio: „Whitening“ režimą geriausia naudoti
su dantų šepetėlio galvute „Oral-B 3D WHITE“ (i).
Dantų šepetėlio galvutės (priklausomai nuo
modelio)
Dantų šepetėlio galvutė „Oral-B FlossAction“
Dantų šepetėlio galvutė „Oral-B FlossAction“ (a)
rekomenduojama kasdieniam giluminiam
valymui. Galvutės „Micropulse“ šereliai
prasiskverbia giliai į sunkiai pasiekiamas vietas
ir švelniai pašalina apnašas.
Dantų šepetėlio galvutė „Oral-B Sensitive“
Dantų šepetėlio galvutė „Oral-B Sensitive“
kruopščiai valo jautrius dantis ir dantenas. Šios
galvutės ypač minkšta šerelių struktūra yra
švelni dantims ir dantenoms.
Dantų šepetėlio galvutė „Oral-B 3D WHITE“
Retam ar kasdieniam dantų poliravimui,
naudokite dantų šepetėlio galvutę „Oral-B
3D WHITE“ (i) (ne visuose modeliuose). Šios
galvutės poliruojamasis kaušelis padeda
pašalinti dantų paviršiaus dėmes atsiradusias
dėl kavos, arbatos ar tabako vartojimo ir
veiksmingai balinti dantis.
Vaikai iki 12 metų amžiaus neturėtų naudoti
„Oral-B 3D WHITE“ dantų šepetėlio galvutės.
aa
ii
Paspaudus įjungimo/išjungimo mygtuką, dantų
•
šepetėlis automatiškai pradeda valyti „Daily
Clean“ režimu.
•
Norėdami perjungti į kitą režimą, iš eilės
paspauskite režimo mygtuką.
Nenaudokite „Oral-B FlossAction“ ar „Oral-B
3D WHITE“ galvučių, jei nešiojate dantų
plokšteles. Rekomenduojame naudoti „Oral-B
Ortho“ galvutę, specialiai skirtą valyti aplink
dantų plokšteles ir vieleles.
Visos dantų šepetėlio galvutės turi mėlynus
„INDICATOR“ šerelius, padedančius prisiminti
apie galvutės pakeitimą. Reguliariai naudojant,
dukart per dieną po dvi minutes, mėlyna
šerelių spalva pusiau išblunka maždaug per
3 mėnesius, primindama pakeisti galvutę.
77
Page 78

„SmartGuide“ įrenginys
Rodomas
paveikslėlis
Reikšmė
„Daily Clean“ režimas
„Sensitive“ režimas
„Massage“ režimas
„Whitening“ režimas
„Deep Clean“ režimas
Šepetėlis per daug spaudžiamas
prie dantų. Sumažinkite
spaudimą.
„Ketvirčių ratas“ – šiuo metu Jūs
valote pirmame 30 sekundžių
intervale (45 sekundžių intervale
valant „Deep Clean“ režimu).
Pereikite prie kito burnos
ketvirčio, kai ims mirksėti
sekantis segmentas.
Pasiektas odontologų
rekomenduojamas 2 minučių
valymo laikas (3 minučių valymo
laikas dantis valant „Deep Clean“
režimu).
Įkraunamas akumuliatorius
senka. Įkraukite dantų šepetėlio
kotelį.
„SmartGuide“ įrenginio baterijos
senka. Pakeiskite „SmartGuide“
įrenginio baterijas.
sienos lygiai ir tvirtai. Palaukite 24 valandas
prieš įstatydami „SmartGuide“ įrenginį į
pritvirtintą sieninį laikiklį.
Dėmesio: Lipnioji juostelė nesilaikys ant purvinų
paviršių.
Šepetėlio valymas
Išsivalę dantis, nuplaukite dantų šepetėlio
•
galvutę po tekančiu vandeniu.
Nuimkite galvutę nuo kotelio ir abi dalis
•
nuplaukite tekančiu vandeniu. Nusausinkite
abi dalis prieš dėdami kotelį ant įkroviklio.
Prieš valydami įkroviklį, pirmiausia jį
•
išmontuokite. Niekuomet neplaukite įkrovimo
žiedo ir „SmartPlug“ kištuko indaplovėje.
Kitos dalys (pagrindo plokštelė ir apsauginis
dangtelis) gali būti plaunamos indaplovėje.
Sieninis laikiklis
Norėdami pritvirtinti „SmartGuide“ įrenginį
prie sienos, veidrodžio ar kitokio paviršiaus,
naudokite lipniąją juostelę (l). Prieš tai darydami
įsitikinkite, kad pasirinktas paviršius švarus
ir sausas (pirmiausia nuvalykite riebalus ir
nešvarumus). Pakabinkite sieninį laikiklį taip,
kad įskaitytumėte „Oral-B“ logotipą. Tuomet
paspausdami pritvirtinkite sieninį laikiklį prie
78
Kartais įkrovimo žiedą, „SmartPlug“ kištuką ir
•
„SmartGuide“ įrenginį galite nuvalyti drėgna
šluoste. Niekuomet nepamerkite „SmartPlug“
įkroviklio ir „SmartGuide“ įrenginio į vandenį.
Page 79

Sinchronizavimas
set
h/min
3 sec.
set
h/min
3 sec.
Tam, kad išvengtumėte įrenginio pranešimų
trikdžių naudojant daugiau negu vieną „Oral-B“
Triumph dantų šepetėlį su atskirais „SmartGuide“
įrenginiais tuose pačiuose namuose, turite
priskirti šepetėlių kotelius atitinkamiems įrenginiams. Tęskite kaip nurodyta:
Paspauskite „h/min“ mygtuką akumuliatoriaus
•
skyriuje ir palaikykite nuspaudę mažiausiai
3 sekundes. „SmartGuide“ įrenginyje matysite
„L---“, tai reiškia, kad yra aktyvuotas „Learn“
režimas sinchronizavimui.
„SmartGuide“ įrenginyje šepetėlio simbolyje
•
mirksės įjungimo/išjungimo mygtukas,
reiškiantis kad reikia įjungti kotelį. Įjungus
kotelį, prasidės automatinis sinchronizavimo
procesas. Jis baigsis tuomet, kai įrenginyje
matysite „L-1-“.
Tuomet išjunkite kotelį
•
Norėdami priskirti kitą kotelį tam pačiam
„SmartGuide“ įrenginiui, pakartokite du
paskutinius aukščiau nurodytus žingsnius su
kitu koteliu. Galite išeiti iš „Learn“ režimo
paspausdami „h/min“ arba „set“ mygtuką. Kitokiu
atveju „Learn“ režimas automatiškai išsijungs
po 30 sekundžių.
Dėmesio:
Daugiausia 2 koteliai gali būti sinchronizuoti
•
su tuo pačiu „SmartGuide“ įrenginiu. Kai
sinchronizuosite antrą kotelį, įrenginyje
matysite „Full“.
Pakeitus „SmartGuide“ įrenginio baterijas,
•
jame buvę duomenys bus panaikinti. Todėl
kaskart pakeitę baterijas pakartokite
sinchronizavimo procesą.
Radijo signalus skleidžiančių
prietaisų išjungimas
Jei gabenate šepetėlį vietose, kuriose negalima
turėti radijo signalus skleidžiančių prietaisų
(pvz., ligoninėse ar lėktuvuose), pirmiausia
išjunkite savo šepetėlį, skleidžiantį radijo
signalus.
Tai padarysite paspausdami įjungimo/išjungimo
mygtuką ir režimo mygtuką tuo pat metu ir
palaikydami nuspaudę 3 sekundes. Kotelio
ekrane matysite radijo siganlų išjungimo simbolį.
Norėdami vėl įjungti radijo signalus, paspauskite
abu mygtukus dar kartą ir palaikykite nuspaustus
3 sekundes, kol ekrano simbolis išnyks.
3 sec.3 sec.
Baterijų šalinimas
„SmartGuide“ įrenginys:
Išeikvotas baterijas nedelsdami išimkite iš
įrenginio. Visas baterijas pakeiskite tuo pat metu.
Nemaišykite šarminių baterijų su cinko-anglies ar
įkraunamomis baterijomis.
Turinys gali būti keičiamas atskirai neįspėjus.
Šis gaminys atitinka Europos Parlamento ir
Tarybos direkyvos 1999/5/EB reikalavimus.
Įrenginio klasė 3, darbo ciklo klasė 3.
Šiame produkte yra įkraunamas
akumuliatorius. Elektros ir elektroninės
įrangos atliekas reikia rinkti atskirai ir
nešalinti su kitomis komunalinėmis
atliekomis. Jas galite priduoti į „Braun“
aptarnavimo centrą arba specialų surinkimo
punktą.
79
Page 80

Garantija
Šiam prietaisui suteikiama 2 metų garantija,
skaičiuojant nuo jo įsigijimo datos. Garantiniu
laikotarpiu mes nemokamai pašalinsime bet
kokius prietaiso defektus, atsiradusius dėl
gamybos ir medžiagų broko. Priklausomai nuo
gedimo mes nusprendžiame, ar prietaisas turi
būti taisomas arba keičiamos jo dalys, ar visas
prietaisas turi būti pakeistas nauju. Garantija
galioja kiekvienoje šalyje, kur šis prietaisas
tiekiamas „Braun“ ar jo paskirto platintojo.
Garantija negalioja šiais atvejais: gedimai,
atsiradę dėl netinkamo prietaiso naudojimo,
įprastinis nusidėvėjimas, ypač kalbant apie
šepetėlio galvutes, taip pat defektai, neturintys
įtakos prietaiso funkcionalumui. Garantija
nustoja galioti, jei prietaiso remontas vykdytas
tai daryti neįgaliotų asmenų ir jei naudotos
neoriginalios „Braun“ dalys.
Norėdami gauti garantinį aptarnavimą, atveškite
visą prietaisą arba atsiųskite jį su pirkimo kvitu į
„Braun“ įgaliotąjį klientų aptarnavimo centrą.
Garantija galioja tik tuo atveju, jei pirkimo data
patvirtinta pardavėjo spaudu ir parašu
garantinėje ir registracijos kortelėse.
Ši garantija niekaip nepaveikia Jūsų įstatymų
nustatytų teisių.
Importuotojas:
Procter & Gamble International Operations SA
LT100001716312
Garantinis aptarnavimas:
UAB „Baltic Continent“
P. Lukšio g. 23,
LT-09132 Vilnius
Tel. (8 5) 274 1788
www.service.braun.com
Pagaminta Vokietijoje.
80
Page 81

Latviski
Oral-B® Triumph zobu birste ar SmartGuide
displeju ir rūpīgi veidota, lai piedāvātu Jums un
Jūsu ģimenei unikālu zobu tīrīšanas veidu,
kas ir gan drošs, gan efektīvs. Tomēr, lietojot
elektriskās ierīces, vienmēr jāievēro daži pamata
drošības noteikumi. Pirms pirmās lietošanas
reizes, lūdzu uzmanīgi izlasiet lietošanas
instrukciju.
SVARĪGI
Oral-B Triumph zobu birste ir aprīkota ar
•
SmartPlug elektroapgādes iekārtu (drošībai
tiek izmantots īpaši zems spriegums).
Nenomainiet un nepārveidojiet nevienu no tās
daļām, jo pastāv elektrošoka risks. Regulāri
pārbaudiet vai SmartPlug iekārta nav bojāta,
ja tā ir bojāta vai nedarbojas, pārtrauciet
produkta lietošanu. Bojāto iekārtu nogādājiet
Braun servisa centrā.
Šis produkts nav paredzēts lietošanai bērniem,
•
kuri ir jaunāki par trim gadiem.
Šī ierīce nav paredzēta lietošanai bērniem
•
vai personām ar garīga vai fiziska rakstura
traucējumiem, izņemot gadījumus, kad tos
uzrauga personas, kas atbild par viņu drošību.
Mēs iesakām glabāt ierīci bērniem nepieejamā
vietā.
Nodrošiniet, lai bērni nespēlējas ar ierīci.
•
Ja produkts ir nokritis zemē, pirms nākamās
•
lietošanas ir jānomaina uzgalis, pat ja nav
redzamu bojājumu.
Turiet SmartPlug iekārtu drošā attālumā no
•
ūdens vai citiem šķidrumiem.
Nepārveidojiet vai nelabojiet produktu. Tas var
•
izraisīt ugunsgrēku, elektrošoku vai traumu.
Par remontu jautājiet veikalā, kurā Jūs nopirkāt
produktu vai sazinieties ar Braun servisa
centru. Neizjauciet produktu, izņemot gadījumu, kad izņemat akumulatoru.
Izņemot akumulatoru, lai to izmestu,
•
uzmanieties, lai nenotiktu īssavienojums starp
(+) un (–) spailēm.
Nepieskarieties SmartPlug iekārtai ar slapjām
•
rokām. Tas var izraisīt elektrošoku.
Lietojiet šo produktu tikai tam paredzētajam
•
nolūkam kā aprakstīts šajā lietošanas
instrukcijā. Nelietojiet papildpiederumus vai
lādētājus, kurus neiesaka ražotājs.
Ja Jums ir veikta jebkāda veida mutes dobuma
•
ārstēšana, pirms lietošanas konsultējieties ar
savu zobārstu.
Oral-B Triumph zobu birstei ir interaktīvs
SmartGuide bezvadu displejs, lai palīdzētu Jums
uzlabot zobu tīrīšanas procesu.
Svarīgi
Lai izvairītos no elektromagnētiskiem
•
traucējumiem un/vai savietojamības
problēmām, deaktivizējiet zobu birstes datu
raidītāju pirms zobu birstes pārnēsāšanas
vai lietošanas aizliegtās vietās, piemēram,
lidmašīnās vai īpaši atzīmētās vietās
slimnīcās (skat. «Datu raidītāja deaktivizēšana»).
Personām, kuras lieto elektroniskos sirds
•
stimulatorus, zobu birste ieslēgtā režīmā
vienmēr jātur vairāk nekā 15 centimetru
attālumā no stimulatora. Ja Jums rodas
aizdomas par traucējumiem, deaktivizējiet
datu raidītāju pirms zobu birstes lietošanas
(skat. «Datu raidītāja deaktivizēšana»).
Apraksts
a Oral-B FlossAction uzgalis
b Ieslēgšanas/izslēgšanas poga
c Tīrīšanas režīmu poga
d Korpuss
e Korpusa displejs
f SmartPlug lādētājs (t.sk. lādēšanas gredzens
un SmartPlug iekārta)
g Pamatne
h Aizsargvāciņš
i Oral-B 3 D WHITE uzgalis (ne visiem
modeļiem)
j SmartGuide displejs
k Iekārta piestiprināšanai pie sienas
l Līmlente
Specifikācijas:
Tips: 3731
Spriegums: 100–240 V
Frekvence: 50–60 Hz
Jauda: 3 W
Trokšņu līmenis: 63 db (A)
IP: 67
Pirmā lietošanas reize
Pirms pirmās lietošanas reizes, uzlādējiet
zobu birsti. Pieslēdziet SmartPlug iekārtu pie
elektrotīkla un ievietojiet korpusu (d) lādēšanas
gredzenā (f), (skat. «Pieslēgšana un lādēšana»).
SmartGuide displejā ir aktivizēts
•
demonstrēšanas režīms. Lai saglabātu šo
režīmu, nospiediet «set» vai «h/min» pogu,
kas atrodas bateriju nodalījumā. Lūdzu
ievērojiet, ka SmartGuide displejs pats
81
Page 82

aktivizēs šo demonstrēšanas režīmu, ja zobu
h/min
set
h/min
set
t
h/min
set
t
h/min
set
birste netiks lietota 28 dienas. Jūs varat to
novērst, iestatot pulksteni vai sinhronizējot
korpusu.
h/min
h/min
set
set
2
2
1
1
Mirgojošs «12:00» SmartGuide displejā
•
h/min
h/min
set
set
norāda, ka var iestatīt laiku. Nospiediet «set»
pogu, kas atrodas bateriju nodalījumā, līdz
displejā parādās «12 h».
set
set
h/min
h/min
Īsi nospiežot «h/min» pogu, Jūs varat
•
izvēlēties «12 h» vai «24 h» formātu.
Nospiediet «set» pogu, lai apstiprinātu izvēli.
Pieslēgšana un lādēšana
Zobu birstei ir ūdensdrošs korpuss, tā ir elektrodroša un veidota lietošanai vannas istabā.
Lai saliktu lādēšanas ierīci, ielieciet aizsargvāciņu
(h) pamatnes (g) aizmugurē. Pēc tam novietojiet
pamatni uz lādēšanas gredzena (f) līdz tas
iestiprinās vietā.
Pieslēdziet SmartPlug iekārtu pie elektrotīkla un
•
ievietojiet zobu birstes korpusu (d) lādēšanas
ierīcē. Korpusa displejā (e) jāparādās baterijas
simbolam. Kamēr korpuss lādējas, baterijas
simbols aizpildīsies. Kad korpuss būs pilnībā
uzlādēts, baterijas simbols būs aizpildījies un
tajā būs redzamas četras iedaļas. Pilna uzlāde
aizņem vismaz 10 stundas un nodrošina
aptuveni 10 dienas ilgu darbību, regulāri tīrot
zobus (2 reizes dienā, 2 minūtes).
Lūdzu, ievērojiet: ja baterijas simbols
neparādās uzreiz, turpiniet lādēšanu. Tas
parādīsies pēc 10–15 minūtēm.
Pēc tam sāks mirgot stundas cipars. Spiediet
•
«h/min» pogu līdz parādās pareizais stundas
cipars un apstipriniet ar «set» pogu. Turpiniet,
tādā pašā veidā iestatot abus minūšu ciparus.
Ja Jūs nevēlaties lietot šo pulksteņa funkciju,
mirgojošais «12:00» nodzisīs automātiski pēc
24 stundām.
Jūs varat iedarbināt zobu birsti, nospiežot pogu
(b). Lai izvairītos no izšļakstīšanās, pirms ierīces
ieslēgšanas pielieciet zobu birstes uzgali pie
zobiem.
Oral-B
Oral-B
Oral-B
82
Oral-B
Ja akumulatora jauda ir zema, baterijas
•
simbols ar vienu palikušo iedaļu sāk mirgot.
Zobu birstes darbība palēnināsies un tad
apstāsies. Ja akumulators ir pilnībā izlādējies,
mirgo tukšs baterijas simbola ietvars. Lai
varētu lietot zobu birsti 2 minūšu ilgai tīrīšanai,
tai ir jāuzlādējas 15 minūtes.
Ikdienas lietošanai zobu birstes korpusu var
•
turēt lādētājā, lai tas vienmēr būtu pilnībā
uzlādēts. Pārmērīgas akumulatora uzlādēšanas risks nepastāv. Tomēr, apkārtējās vides
aizsardzības nolūkā, Oral-B iesaka atvienot
lādētāju no elektrotīkla līdz nākamai uzlādēšanas reizei.
Lai uzturētu maksimālu akumulatora jaudu,
•
atvienojiet lādētāju no elektrotīkla un pilnībā
izlādējiet korpusu regulāras lietošanas laikā
vismaz reizi 6 mēnešos.
Page 83

Taimera iestatīšana
individuālajām vajadzībām
Jūs varat izvēlēties Profesionālo taimeri
(«Professional») vai 2-minūšu taimeri
(«2-Minute») un taimeri aktuālajam tīrīšanas
laikam («Count Up») vai taimeri atlikušajam
tīrīšanas laikam («Count Down») Jūsu individuālajām vajadzībām.
2-minūšu taimeris ar garu signālu un «smaidiņu»
SmartGuide displejā norāda, ka ir pagājis
zobārstu ieteiktais 2 minūšu tīrīšanas laiks.
Turklāt, Profesionālais taimeris palīdz visus
četrus mutes dobuma kvadrantus tīrīt vienmērīgi.
Tas īsi signalizē ik pēc 30 sekundēm (ik pēc
45 sekundēm, izmantojot Dziļās tīrīšanas
(«Deep clean)» režīmu) un SmartGuide displejā
parādās «Kvadrantu aplis», kas nozīmē, ka ir
laiks pāriet uz nākamo mutes dobuma
kvadrantu.
3
3
c
c
0
e
e
s
s
0
0
3
3
c
c
e
e
s
s
0
s
s
e
e
c
c
3
3
0
0
s
s
e
0
0
e
c
c
3
3
s
s
5
5
4
4
c
c
e
e
s
s
4
4
c
c
5
e
e
5
s
s
e
e
c
c
4
4
5
5
s
s
e
5
5
e
c
c
4
4
Īsi nospiežot on/off pogu (b), pārslēdzieties uz
•
2-minūšu taimeri. Apstipriniet savu izvēli,
nospiežot tīrīšanas režīmu pogu (c).
Displejā parādīsies «up» un «timer».
•
Pārslēdzieties uz «Count Down» taimeri,
nospiežot pogu (b) un apstipriniet, nospiežot
tīrīšanas režīmu pogu.
Lūdzu, ievērojiet: tas ir normāli, ja korpusa
displejā ir redzamas divas mirgojošas iedaļas,
darbojoties taimeru iestatīšanas režīmā.
Abi taimeri saglabā atmiņā pagājušo tīrīšanas
laiku, pat ja korpuss tīrīšanas laikā uz īsu brīdi ir
izslēgts. Ja pārtraukums ir ilgāks nekā 30 sekundes, taimeris tiek iestatīts no jauna.
«Count Up» taimeris uzrāda aktuālo tīrīšanas
laiku. «Count Down» taimeris uzrāda atlikušo
tīrīšanas laiku. Sākot ar «2:00» minūtēm, tas
skaita līdz «0:00». Tīrot zobus ilgāk nekā divas
minūtes, tas automātiski pārslēdzas uz «Count
Up» taimeri.
Kopējo zobu tīrīšanas laiku var pagarināt līdz
3 minūtēm, izmantojot «Deep Clean» režīmu
(skat. «Tīrīšanas režīmi»).
Zobu birstē jau ir aktivizēts Profesionālais
taimeris un «Count Up» taimeris. Ja Jūs vēlaties
šos iestatījumus mainīt, rīkojieties sekojoši:
Nospiediet un turiet tīrīšanas režīmu pogu (c)
•
līdz SmartGuide displejā (j) parādās «:30» un
«timer».
3 sec.3 sec.
Zobu tīrīšana
Tīrīšanas tehnika
Virziet uzgali lēnām no zoba uz zobu.
•
Dažas sekundes paturiet uzgali vienā vietā
•
pirms pārejat pie nākamā zoba.
Notīriet smaganas un zobus, vispirms notīriet
•
ārējās virsmas, tad iekšējās un visbeidzot
notīriet kožamvirsmas.
Nespiediet vai neberziet pārāk stipri, vienkārši
•
ļaujiet zobu birstei darīt savu darbu. Kad
zobu tīrīšana būs pabeigta, 30 sekundes tiks
uzrādīts kopējais tīrīšanas laiks, pirms displejs
pārslēgsies atpakaļ uz laika režīmu. Lai
pārslēgtos uzreiz uz laika režīmu, nodzēsiet
tīrīšanas laika norādi displejā, nospiežot
režīmu pogu.
Zobu birstei ir spiediena kontroles funkcija, lai
palīdzētu nodrošināt pareizu spiediena pakāpi.
Tas palīdz pasargāt smaganas no pārāk stipras
tīrīšanas un atvieglo zobu birstes lietošanu.
83
Page 84

Ja tiek pielietots pārāk liels spiediens, zobu
birstes uzgaļa atgriezeniskās rotācijas kustības
turpināsies, bet pulsācija tiks pārtraukta. Jūs ne
tikai sajutīsiet izmaiņas zobu birstes darbībā, bet
arī izdzirdēsiet atšķirīgu skaņu.
Pirmajās dažās dienās, lietojot jebkuru elektrisko
zobu birsti, smaganas var nedaudz asiņot.
Asiņošanai vajadzētu pāriet pēc dažām dienām.
Ja asiņošana nepāriet pēc divām nedēļām,
sazinieties ar savu zobārstu vai higiēnistu. Ja
Jums ir jutīgi zobi un smaganas, Oral-B iesaka
lietot «Sensitive» režīmu.
Tīrīšanas režīmi
Zobu birste piedāvā dažādus tīrīšanas režīmus
dažādām mutes dobuma kopšanas vajadzībām:
«Daily Clean» – Lieliska mutes dobuma
tīrīšana.
«Sensitive» – Maiga, bet rūpīga tīrīšana
jutīgās vietās.
«Massage» – Maiga masāža smaganām.
«Whitening» – Pulēšana un baltināšana
«Deep Clean»
neregulārai vai ikdienas
lietošanai.
–
Lieliska mutes dobuma
tīrīšana ar pagarinātu
tīrīšanas laiku. Šajā režīmā
tīrīšanas laiks ir pagarināts
līdz 45 sekundēm katram
kvadrantam, kas veido kopējo
tīrīšanas laiku – 3 minūtes.
Lūdzu, ievērojiet: «Whitening» režīmu ir vislabāk
lietot ar Oral-B 3 D WHITE uzgali (i).
Zobu birstes uzgaļi (atkarībā no modeļa)
Oral-B FlossAction uzgalis
Oral-B FlossAction uzgalis (a) ir ieteicams
ikdienas dziļai tīrīšanai. Tam ir micropulse sariņi,
kas iekļūst dziļi grūti aizsniedzamās vietās starp
zobiem, maigi notīrot paslēpto aplikumu.
Oral-B Sensitive uzgalis
Oral-B Sensitive uzgalis nodrošina rūpīgu
tīrīšanu jutīgiem zobiem un smaganām. Tam ir
īpaši mīksti sariņi, kas ir maigi saskaroties ar
zobiem un smaganām.
Oral-B 3 D WHITE uzgalis
Neregulārai vai ikdienas zobu pulēšanai,
lūdzu, izmantojiet Oral-B 3 D WHITE uzgali (i)
(ne visiem modeļiem). Tam ir pēc zobārstu
ieteikuma veidots pulējošais kausiņš, lai notīrītu
virsmas pigmentētās apgulsnes, kas rodas no
kafijas, tējas un tabakas, efektīvai spodrināšanai.
Lūdzu, ievērojiet, ka bērniem jaunākiem par
12 gadiem nevajadzētu lietot Oral-B 3 D WHITE
uzgali.
aa
ii
Nospiežot pogu (b), zobu birste automātiski
•
ieslēgsies «Daily Clean» režīmā.
Lai veiksmīgi pārslēgtos uz citu režīmu,
•
nospiediet tīrīšanas režīmu pogu.
Lai atgrieztos «Daily Clean» režīmā no jebkura
•
cita režīma, nospiediet un turiet tīrīšanas
režīmu pogu.
•
Lai izslēgtu zobu birsti, nospiediet pogu (b).
84
Nelietojiet Oral-B FlossAction uzgali vai Oral-B
3D WHITE uzgali, ja lietojat ortodontiskās
skavas. Mēs iesakām lietot Oral-B ortodontisko
birstīti, kas ir īpaši veidota tīrīšanai ap skavām
un stieplēm.
Visiem uzgaļiem ir zili INDICATOR sariņi, lai
palīdzētu Jums noteikt, kad ir jāmaina zobu
birstes uzgalis. Rūpīgi tīrot zobus divas reizes
dienā, divas minūtes, zilā sariņu krāsa daļēji
izbalēs aptuveni 3 mēnešu laikā, tādējādi
norādot, ka ir laiks nomainīt uzgali.
Page 85

SmartGuide displejs
Attēlotā
ikona
Nozīme
«Daily Clean» režīms
«Sensitive» režīms
«Massage» režīms
sienas. Nogaidiet 24 stundas un tad ievietojiet
SmartGuide displeju piestiprinātajā iekārtā.
«Whitening» režīms
«Deep Clean» režīms
Pielietots pārāk liels spiediens.
Samaziniet tīrīšanas spiedienu.
«Kvadrantu aplis» – pašlaik Jūs
tīrāt pirmajā 30 sekunžu intervālā
(45 sekunžu intervāls «Deep
Clean» režīmā). Pārejiet uz
nākamo mutes dobuma kvadrantu
tiklīdz sāks mirgot otrs segments.
Zobārstu ieteiktais 2 minūšu
tīrīšanas laiks (3 minūtes «Deep
Clean» režīmā) ir pagājis.
Korpusa akumulatora jauda ir
zema. Uzlādējiet zobu birstes
korpusu.
SmartGuide displeja bateriju jauda
ir zema. Nomainiet SmartGuide
displeja baterijas.
Lūdzu, ievērojiet: līmlente nepiestiprināsies pie
virsmām, kas ir apstrādātas pret netīrumiem.
Ieteikumi tīrīšanai
Pēc zobu tīrīšanas rūpīgi noskalojiet uzgali
•
zem tekoša ūdens.
Noņemiet uzgali no korpusa un notīriet abas
•
daļas atsevišķi zem tekoša ūdens, Pēc tam
noslaukiet pirms ieliekat korpusu lādēšanas
ierīcē.
Pirms lādēšanas ierīces tīrīšanas vispirms
•
pārliecinieties, ka tā ir izjaukta. Lādēšanas
gredzenu un SmartPlug iekārtu nekad nedrīkst
likt trauku mazgājamā mašīnā. Visas pārējās
detaļas (pamatni un aizsargvāciņu) var mazgāt
trauku mazgājamā mašīnā.
Iekārta piestiprināšana pie sienas
Ja vēlaties piestiprināt SmartGuide displeju pie
sienas, spoguļa vai citas virsmas, izmantojiet
līmlenti (l), lai piestiprinātu iekārtu. Pirms tam
pārliecinieties, ka izvēlētā virsma ir tīra un sausa
(vispirms notīriet taukus un putekļus). Novietojiet
iekārtu tā, lai Oral-B logo zīme būtu redzama.
Tad piespiediet iekārtu vienmērīgi un stingri pie
Laiku pa laikam Jūs varat arī tīrīt lādēšanas
•
gredzenu, SmartPlug iekārtu un SmartGuide
displeju ar mitru drānu. Gan SmartPlug
lādētāju, gan SmartGuide displeju nekad
nedrīkst ievietot ūdenī.
85
Page 86

Sinhronizēšana
set
h/min
3 sec.
set
h/min
3 sec.
Lai izvairītos no traucējumiem displeja
paziņojumos, lietojot vairāk nekā vienu Oral-B
Triumph zobu birsti ar atsevišķiem SmartGuide
displejiem vienā saimniecībā, Jums ir jāpiesaista
korpusi to attiecīgajiem displejiem. Lūdzu,
rīkojieties sekojoši:
•
Nospiediet uz vismaz 3 sekundēm «h/min»
pogu bateriju nodalījumā. SmartGuide
displejā ir redzams «L---», kas nozīmē, ka
sinhronizēšanai ir aktivizēts «Learn» režīms.
•
Mirgojoša on/off poga zobu birstes ikonā, kas
redzama SmartGuide displejā, nozīmē, ka
jāieslēdz korpuss. Pēc tam, kad tas ir izdarīts,
tiks uzsākts automātisks sinhronizācijas
process. Tas būs pabeigts, kad displejā
parādīsies «L-1-».
•
Pēc tam izslēdziet korpusu.
Ja vēlaties piesaistīt otru korpusu vienam un
tam pašam SmartGuide displejam, atkārtojiet
pēdējos divus augstāk minētos soļus. Jūs varat
iziet no «Learn» režīma, nospiežot «h/min» vai
«set» pogu. Citādi «Learn» režīms automātiski
pārtrauks darboties pēc 30 sekundēm.
slimnīcās vai lidmašīnās), vispirms deaktivizējiet
datu raidītāju.
Lai to izdarītu, vienlaicīgi spiediet pogu un
tīrīšanas režīmu pogu 3 sekundes. Korpusa
displejā būs redzama deaktivizēšanas ikona. Ja
vēlaties aktivizēt datu raidītāju, nospiediet vēlreiz
abas pogas 3 sekundes un ikona pazudīs.
3 sec.3 sec.
Bateriju izņemšana
SmartGuide displejs
Pilnībā izlādējušās baterijas izņemiet nekavējoties. Nomainiet visas baterijas vienlaicīgi.
Nelietojiet vienlaicīgi sārma baterijas un cinka
oglekļa baterijas vai akumulatorus.
Šeit minētā informācija var tikt mainīta, iepriekš
nebrīdinot.
Šī ierīce atbilst Eiropas direktīvas
1999/5/EC noteikumiem. 3. uztvērēja
kategorija, 3. darba cikla kategorija.
Lūdzu, ievērojiet:
•
Vienam SmartGuide displejam var būt
piesaistīti maksimāli 2 korpusi. Pēc tam,
kad būs sinhronizēts otrs korpuss, displejā
būs redzams «Full».
•
Nomainot SmartGuide displeja baterijas,
saglabātie dati tiks izdzēsti. Tāpēc atkārtojiet
sinhronizācijas procesu katru reizi, kad maināt
baterijas.
Datu raidītāja deaktivizēšana
Ja vēlaties nēsāt vai lietot zobu birsti vietās,
kurās nav atļautas radio vadāmas ierīces (piem.
86
Apkārtējās vides
aizsardzība
Produktā ir akumulators. Lai aizsargātu
apkārtējo vidi - ja ierīce ir nolietojusies
un Jūs to vairs nelietosiet, neizmetiet to
sadzīves atkritumu konteinerā.
Par iespējām bez maksas nodot lietotās
elektropreces, lūdzu, interesējieties veikalā, kurā
Jūs nopirkāt produktu.
Page 87

Servisa nodrošināšana
Šim produktam mēs nodrošinam 2 gadu
bezmaksas servisu no produkta iegādes dienas.
Servisa nodrošināšanas laikā, veicot remontu vai
nomainot bojātās produkta detaļas, mēs bez
maksas novērsīsim visus defektus, kas radušies
ražošanas procesā. Ja produktu nav iespējams
salabot, to var apmainīt pret jaunu vai
analoģisku produktu. Šī servisa nodrošināšana
ir spēkā jebkurā valstī, kurā šo produktu piedāvā
Braun vai tā pilnvaroti izplatītāji.
Servisa nodrošināšana neattiecas uz
1) bojājumiem, kas radušies nepareizas
lietošanas rezultātā;
2) normālu ierīces nolietojumu, īpaši attiecībā
uz zobu birstes uzgaļiem;
3) defektiem, kuri būtiski neietekmē ierīces
darbību vai tās vērtību.
Servisa nodrošināšana nav spēkā, ja
remontu ir veikusi persona, kura nav
pilnvarota to darīt, kā arī ja remonta laikā nav
izmantotas oriģinālās Braun detaļas.
Lai veiktu bezmaksas ierīces remontu servisa
nodrošināšanas laikā, griezieties Braun
pilnvarotā servisa centrā, līdzi ņemot ierīci un
pirkuma čeku.
Patērētājam ir noteiktas tiesības saskaņā ar
normatīvajiem aktiem un šie noteikumi
neietekmē patērētāja ar likumu noteiktās
tiesības.
Braun servisa centrus skatieties
www.service.braun.com
vai zvaniet pa tālruni 67425232 vai 26304860.
Ražotājs:
Braun GmbH, Frankfurter Str.145,
61476 Kronberg/Ts., Vācija.
Izplatītājs:
Procter & Gamble, Kr. Valdemāra 21,
Rīga, LV-1010.
Ražots Vācijā.
87
Page 88

Eesti
Oral-B® Triumph elektriline hambahari
SmartGuide näidikuga on hoolikalt välja
töötatud selleks, et pakkuda Teile ja Teie perele
uut ja ainulaadset hambapuhastuskogemust,
mis on turvaline ja tõhus. Elektriseadmete
kasutamisel tuleb aga alati järgida elementaarseid ohutusnõudeid.
Enne hambaharja kasutuselevõttu lugege
kasutusjuhend hoolikalt läbi.
NB!
Oral-B Triumph´il on SmartPlugi pistikuga
•
võrgutoiteadapter. Ärge muutke ise selle
ehitust ega vahetage osi. See võib põhjustada
elektrilöögi. Kontrollige regulaarselt, et juhe
ei oleks kahjustatud. Kahjustatud ja katkist
seadet ei tohi enam kasutada. Viige selline
toode Oral-B Brauni teeninduskeskusesse.
•
Käesolevat toodet ei tohiks kasutada alla
kolmeaastased lapsed.
•
Käesolevat toodet ei tohiks kasutada lapsed
või isikud, kes on füüsiliselt või vaimselt
vähemvõimekad, välja arvatud juhul kui neid
juhendab isik, kes vastutab nende ohutuse
eest. Üldiselt soovitame, et hoiaksite seadet
lastele kättesaamatus kohas.
•
Jälgida, et lapsed seadmega ei mängiks.
•
Kui seade kukub maha, siis tuleks hari enne
järgmist kasutamist välja vahetada, isegi kui
kahjustus ei ole nähtav.
•
Ärge asetage SmartPlugi vette või muusse
vedelikku.
•
Ärge muutke ega parandage seadet. See
võib põhjustada tulekahju, elektrišoki või
kehavigastusi. Konsulteerige jaemüüjaga
parandustööde osas või võtke ühendust Oral-B
Brauni teeninduskeskusega. Ärge võtke toodet
osadeks lahti, v.a kui soovite kõrvaldada
patareisid jäätmekäitluse eesmärgil.
•
Kui eemaldate patareisid jäätmekäitluse
eesmärgil, olge ettevaatlikud (+) ja (–)
klemmidega.
•
Ärge puudutage SmartPlugi märgade kätega.
See võib esile kutsuda elektrišoki.
•
Kasutage seadet ainult sihtotstarbeliselt
vastavalt käesolevale juhendile. Ärge kasutage
lisaosi ega laadijaid, mida tootja ei ole soovitanud.
•
Kui Teil on parajasti pooleli mõni hambaravikuur,
konsulteerige eelnevalt oma hambaarstiga.
SmartGuide Oral-B Triumph kasutab interaktiivset juhtmevaba näidikut, et optimeerida
Teie harjamiskogemust.
88
NB!
Elektromagnetiliste häirete ja/või ühildumis-
•
konflikide ärahoidmiseks deaktiveerige
hambaharja raadioedastus enne, kui
kannate või kasutate seda kohtades, kus
selliste seadmete kasutamine on keelatud,
nt lennukites või haiglates (vt «Raadioedastuse deaktiveerimine»).
Südamestimulaatoriga isikud peaksid alati
•
hoidma hambaharja 15 cm kaugusel
südamestimulaatorist, kui hambahari on
sisse lülitatud. Kahtluse korral lülitage
hambaharja raadioedastus enne hambaharja
kasutamist välja (vt «Raadioedastuse
deaktiveerimine»).
Seadme osad
a Oral-B vahetushari FlossAction
b Toitenupp
c Harjamisrežiimi nupp
d Käepide
e Käepideme näidik
f SmartPlugi laadimisadapter (koosneb
laadimisrõngast ja SmartPlugi pistikust)
g Alusplaat
h Kaitsekate
i Oral-B vahetushari 3D WHITE
(mitte kõikidel mudelitel)
j SmartGuide näidik
k Seinahoidik
l Kinnitusteip
Spetsifikatsioon:
Tüüp: 3731
Pinge: 100–240 V
Sagedus: 50–60 Hz
Võimsus: 3 W
Müratase: 63 dB (A)
IP: 67
Esmakordne kasutamine
Enne esmakordset kasutamist laadige hambaharja. Ühendage SmartPlug pistik vooluvõrku ja
asetage käepide (d) laadimisrõngasse (f) (vt
«Ühendamine ja laadimine»).
SmartGuide näidikul on kõigepealt aktiveeritud
•
demo-režiim. Kui Te ei soovi režiimi muuta,
siis vajutage kas seadistusnuppu või «h/min»
nuppu patareilahtris. Pidage meeles, et
SmartGuide näidik aktiveerib demorežiimi ise,
kui Te ei kasuta hambaharja 28 päeva jooksul.
Page 89

Saate selle ära hoida, kui seadistate kella või
h/min
set
h/min
set
t
h/min
set
t
h/min
set
sünkroniseerite käepideme.
h/min
h/min
set
set
2
2
1
1
•
Vilkuv «12:00» SmartGuide näidikul viitab
h/min
h/min
set
set
sellele, et aega saab muuta. Vajutage
seadistusnuppu «set», mis asub patareilahtris,
kuni näidikule ilmub «12 h».
set
set
h/min
h/min
•
Lühiajaliselt «h/min» nupule vajutades saate
valida ajaformaadi «12 h» või «24 h». Vajutage
«set» nupule valiku kinnitamiseks.
•
Seejärel hakkab vilkuma tunde märkiv number.
Vajutage «h/min» nuppu kuni ilmub õige tund
ja vajutage kinnitamiseks «set» nuppu. Tehke
samamoodi minutitega. Kui Te ei soovi kella
kasutada, kaob vilkuv «12:00» automaatselt
24h möödudes.
Laadimisseadme kokkupanemiseks sisestage
kaitsekate (h) alusplaadi tagaossa (g). Seejärel
asetage alusplaat laadimisrõngale (f), kuni see
klõpsatusega paigale kinnitub.
Ühendage SmartPlugi pistik pistikupessa ja
•
pange hambaharja käepide (d) laadimisseadmele. Käepideme näidikule (e) näidikule peaks
ilmuma akusümbol. Akusümbol täitub aku
laadimise ajal. Kui hambaharja aku on täis
laetud, siis on akusümbolil näha nelja täiesti
laetud segmenti. Aku täislaadimine võtab aega
10 tundi ning täislaetud seade võimaldab
umbes 10 päeva regulaarselt hambaid
puhastada (kaks korda päevas ja iga kord
2 minutit).
Pange tähele: kui akusümbolit otsekohe
ei kuvata, jätkake laadimist. See ilmub
10–15 minuti jooksul.
Kui aku on peaaegu tühi, siis on vilkuma
•
hakkaval akusümbolil näha ühe segmenti.
Hambaharja töö aeglustub ja lõpuks seade
seiskub. Kui aku on täiesti tühi, siis näete
vilkumas akusümboli tühja kujutist. Nüüd on
vaja seda 15 minutit laadida, et saaksite
2 minutit hambaid harjata.
Hambaharja käivitamiseks vajutage toitenuppu
(b). Pritsimise vältimiseks asetage harjapea
enne seadme sisselülitamist hammastele.
Oral-B
Oral-B
Oral-B
Oral-B
Ühendamine ja laadimine
Hambahari on elektriliselt ohutu, seda võib
kasutada vannitoas ning sellel on veekindel
käepide.
Igapäevasel kasutamisel hoidke hambaharja
•
käepidet alati laadimisseadmes, et tagada aku
pidev laetus. Aku ülelaadimise ohtu ei ole.
Kuid keskkonnasäästlikkust silmas pidades
soovitab Oral-B laadija välja lülitada kuni
järgmise laadimise vajaduseni.
Aku maksimaalse mahutavuse tagamiseks
•
eemaldage laadimisaluse toitejuhtme pistik
pistikupesast ning tühjendage seadme aku
tavakasutuse käigus täielikult vähemalt iga
6 kuu tagant.
89
Page 90

Taimeri valik
Te võite valida profitaimeri, 2-minuti taimeri,
«Count-up» ja «Count-down» taimeri vahel.
2-minuti taimer annab pika pulseeriva heli ja
naerunäoga SmartGuide näidikul märku
sellest, et hambaarstide soovitatud 2 minutit
harjamisaega on lõpule jõudnud. Profitaimer
aitab Teil harjata kõiki nelja suu-sektorit
võrdselt. Profitaimer annab iga 30-sekundilise
(45 sekundit «Deep Clean» režiimi korral)
intervalli järel lühikese pulseeriva heliga ja sektori
sümboliga SmartGuide näidikul märku, et on aeg
asuda puhastama järgmist suu-sektorit.
3
c
e
s
0
3
c
e
s
0
s
e
c
3
0
s
0
e
c
3
s
5
4
c
e
s
4
c
e
5
s
e
c
4
5
s
5
e
c
4
Mõlema taimeri mällu salvestub harjamisele
kulunud aeg isegi siis, kui hari lülitatakse
harjamise käigus lühiajaliselt välja. Ainult siis, kui
paus kestab kauem kui 30 sekundit, lähtestab
taimer ennast uuesti.
«Count-up» taimer kuvab tegelikku harjamisaega.
«Count-down» taimer kuvab aega, mis on jäänud
harjamise lõpuni. Algusajaks on «2:00» minutit ja
see väheneb «0:00» minutini. Kui harjate kauem
kui kaks minutit, siis muutub see automaatselt
«Count-up» taimeriks.
Harjamise aega saab pikendada kuni 3 minutini,
kui kasutada «Deep Clean» režiimi (vt «Harjamisrežiimid»).
Kui Teie harjal on aktiveeritud profitaimer ja
«Count-up» taimer ning Te soovite seadistust
muuta, siis toimige järgmiselt:
Vajutage ja hoidke all režiiminuppu (c), kuni
•
SmartGuide näidik (j) näitab «:30» ja «timer».
See viib Teid otse «Count Up Timer» näidikule
•
(näete «up» ja «timer»). Lülitage sisse «Count
Down Timer» vajutades toitenuppu (b) ja
kinnitage seda valikut režiiminupuga.
Märkus: taimeri seadistusrežiimis liikudes on
käepideme näidikul näha kahte vikuvat
segmenti.
Harjamine
Harjamistehnika
Harjake hambaid, liigutades harja aeglaselt
•
ühelt hambalt teisele.
Puhastage iga hammast vähemalt mõni
•
sekund.
Harjake nii hambaid kui ka igemepiiri, esmalt
•
väljastpoolt, siis seestpoolt, seejärel mälumispinnad.
Ärge suruge hambaharjale liiga tugevalt,
•
hambahari teeb ise harjamisliigutusi. Kui olete
harjamise lõpetanud, näete harjamise aega
näidikul 30 sekundi jooksul. Seejärel lülitub
näidik tagasi ajarežiimile. Kui soovite kohe
ajarežiimile üle minna, siis vajutage korraks
režiiminupule.
3 sec.
Vajutades korraks on/off toitenuppu (b) lülitage
•
sisse «2-Minute Timer». Kinnitage valik
režiiminupule vajutades (c).
90
Hammaste ohutuks ning tõhusaks harjamiseks on hambaharjal surumistugevuse
kontrollsüsteem. See aitab kaitsta igemeid
liiga tugeva harjamise eest ning lihtsustab
hambaharja kasutamist. Kui vajutate harja liiga
tugevasti vastu hambaid, pöörleb hari edasitagasi, kuid pulseerivad liigutused katkevad.
Peale muutuse tunnetamise kuulete ka
teistsugust helisignaali.
Page 91

Esimestel päevadel võivad igemed pärast
elektrilise hambaharja kasutamist veidi
veritseda. Üldiselt peaks veritsemine lõppema
mõne päeva pärast. Kui veritsemine kestab üle
kahe nädala, peate konsulteerima hambaarsti
või hügieenispetsialistiga. Kui teil on tundlikud
hambad ja igemed, soovitab Oral-B kasutada
režiimi «Sensitive».
Vahetusharjad (sõltuvad mudelist)
Oral-B vahetushari FlossAction
Hammaste igapäevaseks põhjalikuks puhastamiseks on soovitatav kasutada vahetusharja
Oral-B FlossAction (a). Sellel on MicroPulse’i
harjased, mis pääsevad raskesti ligipääsetavatesse kohtadesse hammaste vahel ning eemaldavad õrnalt seal peituva hambakatu.
Harjamisrežiimid
Hambahari pakub erinevaid harjamisrežiime
erinevate suuhooldusvajaduste jaoks:
«Daily Clean» – Suurepärane suupuhastus.
«Sensitive» – Õrn, kuid põhjalik
puhastamisrežiim tundlikele
piirkondadele.
«Massage» – Õrn massaaž igemetele.
«Whitening» – Suurepärane läige ja
«Deep Clean»
Vajutage nuppu (b) ühe korra ja hambahari
•
hakkab automaatselt «Daily Clean» režiimil
tööle.
Teisele režiimile ümberlülitamiseks vajutage
•
järjest režiiminuppu.
valgendus; vahetevahel või
igapäevaseks kasutamiseks.
– Suurepärane suupuhastus
pikema harjamisajaga. Selles
režiimis on harjamisaega
pikendatud 45 sekundile
iga suu-sektori kohta ja
harjamisaeg kokku on
3 minutit.
Oral-B vahetushari Sensitive
Oral-B Sensitive harja abil saab tundlikke
hambaid ja igemeid põhjalikult puhastada. Harja
tekstuur on eriti pehme, see on õrn hammaste ja
igemete vastu.
Oral-B vahetushari 3D WHITE
Hammaste aeg-ajalt või igapäevaseks
poleerimiseks on vahetushari 3D WHITE (i)
(mitte igal mudelil). Sellel on poleerimisosa
kohvi-, tee- ja tubakaplekkide eemaldamiseks
ning hammaste efektiivseks valgendamiseks.
NB! Alla 12-aastased lapsed ei tohiks Oral-B
3D WHITE vahetusharja kasutada.
a
Me ei soovita kasutada vahetusharju Oral-B
3D WHITE ega Oral-B FlossAction sel juhul, kui
kannate hambaklambreid. Soovitame kasutada
vahetusharja Oral-B Ortho, mis on spetsiaalselt
mõeldud klambrite ja traatide ümbruse
puhastamiseks.
i
Mis tahes režiimist tagasi «Daily Clean»
•
režiimile lülitumiseks vajutage ja hoidke all
režiiminuppu.
•
Hambaharja väljalülitamiseks vajutage
toitenuppu (b).
Märkus: «Whitening» režiimil saate parimad
tulemused Oral-B 3D WHITE harjapead
kasutades.
Kõikidel harjapeadel on sinised INDICATOR
harjased, mis aitavad kindlaks määrata harja
vahetamise vajadust. Kaks korda päevas
ning kahe minuti jooksul asetleidva põhjaliku
puhastuse tulemusena kulub sinine värv poole
peale maha umbes 3 kuu jooksul ning see
annab märku harja vahetamise vajadusest.
91
Page 92

SmartGuide näidik
Ikoon
näidikul
Tähendus
«Daily Clean» režiim
«Sensitive» režiim
«Massage» režiim
«Whitening» režiim
nii, et Oral-B logo oleks loetavalt näha. Seejärel
vajutage seinahoidik ühtlaselt ja tugevalt vastu
seina. Oodake 24 tundi enne SmartGuide
näidiku paigaldamist fikseeritud seinahoidikusse.
«Deep Clean» režiim
Surute harja liiga tugevasti
hammaste vastu. Vähendage
harjamise ajal survet hammastele.
«Suusektori ring» – praegu on
esimesed 30 sekundit (45sek
intervall Deep Clean režiimis).
Asuge puhastama järgmist
sektorit, kui hakkab vilkuma
järgmine segment.
Hambaarstide soovitatud
2-minutiline harjamisaeg (3 minutit
Deep Clean režiimis) on täis.
Käepideme taaslaetav aku on
tühjaks saamas. Laadiga
hambaharja käepide.
SmartGuide näidiku patareid on
tühjaks saamas. Vahetage
SmartGuide näidiku patareid.
Märkus: kinnitusteip ei sobi mustust hülgavatele
pindadele.
Soovitusi puhastamiseks
Pärast kasutamist loputage harja hoolikalt
•
jooksva vee all.
Eemaldage vahetushari käepideme küljest ja
•
puhastage mõlemad osad eraldi jooksva vee
all. Seejärel pühkige need enne käepideme
laadimisalusesse panemist kuivaks.
Enne laadimisaluse puhastamist võtke see
•
kindlasti lahti. Laadimisrõngast ja SmartPlugi
pistikut ei tohi kunagi nõudepesumasinas
pesta. Teised osad (alusplaat ja kaitsekate) on
masinpesukindlad.
Seinahoidik
Kui soovite SmartGuide näidiku asetada seinale
või muule pinnale, kasutage kinnitusteipi (l)
seinahoidiku fikseerimiseks. Eelnevalt
veenduge, et pind on puhas ja kuiv (eemaldage
kõigepealt rasv ja mustus). Asetage seinahoidik
92
Aeg-ajalt puhastage ka laadimisrõngast ja
•
SmartPlugi pistikut niiske lapiga. Ärge kunagi
pange SmartPlugiga laadijat ja SmartGuide
näidikut vette.
Page 93

Sünkroniseerimine
set
h/min
3 sec.
Selleks et vältida häireid näidikusõnumite töös,
kui kasutate kodus rohkem kui ühte Oral-B
Triumph hambaharja, millel on eraldi SmartGuide
näidikud, peate käepidemed oma vastavate
näidikutega sünkroniseerima. Toimige järgmiselt:
Vajutage «h/min» nuppu patarei lahtris
•
vähemalt 3 sekundit. SmartGuide näidik kuvab
«L---», st aktiveerunud on sünkroniseerimise
«Learn» režiim.
Nüüd hakkab vilkuma on/off nupp hambaharja
•
ikoonil, mis asub SmartGuide näidikul. See
tähendab, et peate hambaharja käepideme
sisse lülitama. Nii tehes algab automaatne
sünkroniseerimise protsess. See lõppeb, kui
näidikule ilmub «L-1-».
Raadioedastuse
deaktiveerimine
Kui soovita kasutada või kannate endaga kaasas
hambaharja kohtades, kus on keelatud raadiojuhitavad seadmed (nt haiglas või lennukis),
deaktiveerige kõigepealt raadioedastus.
Selleks vajutage üheaegselt toitenuppu ja
režiiminupule 3 sekundit. Käepideme näidikule
ilmub raadioedastuse deaktiveerumise ikoon.
Kui soovite raadioedastust reaktiveerida,
vajutage uuesti mõlemale nupule 3 sekundit ja
ikoon näidikul kaob.
3 sec.
Patareide eemaldamine
•
Seejärel lülitage käepide välja.
Kui soovite veel teist käepidet sama SmartGuide
näidikuga vastavusse viia, siis korrake kahte
viimast ülal kirjeldatud sammu teise käepidemega. Väljute «Learn» režiimist, kui vajutate
«h/min» või «set» nuppu. «Learn» režiim lõpeb
automaatselt pärast 30 sekundi möödumist.
Märkused:
SmartGuide näidikuga saab maksimaalselt
•
sünkroniseerida 2 käepidet. Pärast teise
käepideme sünkroniseerimist kuvatakse
näidikule «Full» (täis).
Kui vahetate SmartGuide näidiku patareisid,
•
kustuvad salvestunud andmed. Seepärast
peate sünkroniseerima iga kord, kui vahetate
patareisid.
SmartGuide näidikust
Eemaldage täiesti tühjad patareid kohe. Patareid
vahetage välja kõik korraga. Ärge kasutage koos
leelis- ja tsinksüsinikpatareisid või taaslaetavaid
akusid.
Toodud andmed võivad muutuda ilma
etteteatamiseta.
Valmistaja:
Braun GmbH. Valmistatud Saksamaal.
Esindaja:
Procter & Gamble Services Eesti OÜ,
Paldiski mnt 27/29, 10612 Tallinn.
Seade vastab Euroopa Liidu direktiivi
1999/5/EC nõuetele. Ressiiverklass 3,
koormustsükliklass 3.
Sisaldab akut
Antud toodet ei tohi visata segaolmejäätmete hulka. Kõik kasutuselt
kõrvaldatud elektri- ja elektroonikaseadmed ning patareid ja akud tuleb
koguda lahus ja viia selleks ettenähtud
93
Page 94

lähimasse tasuta vastuvõtu punkti. Kasutuselt
kõrvaldatud elektri- ja elektroonikaseadmete
ning patareide ja akude lahuskogumine ning
materjalide ringlussevõtt aitavad vähendada
keskkonnale ja tervisele kohalduvaid riske.
Lisainformatsiooni kasutuselt kõrvaldatud
seadmete lahuskogumise kohta saad kohalikust
omavalitsusest, jäätmekäitlusettevõtetelt või
seadmeid müüvatelt kauplustelt.
Garantii
Seadmel on kaheaastane garantii, mis hakkab
kehtima seadme müügipäevast (müügitempel
talongil). Garantiiaja jooksul kõrvaldatakse
tasuta kõik seadmel ilmnenud vead, mis on
tingitud ebakvaliteetsest materjalist või
valmistamisest ja koostamisest, vahetatakse
välja vigased detailid või kogu seade, kui praak
on tekkinud tootja süü tõttu.
Garantiiparandust ei tehta juhul, kui rikke on
põhjustanud seadme vale kasutamine (juhendi
järgimata jätmine), ebaõige voolupinge või kui
seade on purunenud. Samuti ei kehti garantii
seadme normaalse kulumise ning vigade korral,
mis ei halvenda seadme väärtust ega kasutust.
Garantii ei kehti, kui seadet ei ole parandatud
Brauni ametlikus hooldus- ja parandustöökojas
ega Brauni varuosadega.
Garantiiparanduse alla ei käi seadme
puhastamine.
Garantii ei kehti pardlite ja kosmeetiliste pardlite
võrgukasseti ja lõiketera kohta ning elektriliste
hambaharjade harjapeade kohta.
Garantii jõustub ainult siis, kui ostukuupäev
garantii- ja registreerimistalongil on kinnitatud
kaupluse templi ja müüja allkirjaga.
Garantii ei anna seadme kasutajale ja teistele
isikutele õigust nõuda väärast kasutamisest
johtuvate materiaalsete ja isiklike kahjude
korvamist.
Garantii kehtib riikides, kus käesolevat seadet
müüakse kas Brauni tütarfirma või selle ametliku
esindaja kaudu ja kus ei ole kehtestatud
impordipiiranguid ega muid seadusi, mis
takistavad seadmele lubatud garantiiteenindust.
Garantiiparandusse viidav seade peab
olema komplektne. Klient toimetab seadme
parandustöökotta omal kulul.
Seadme garantiiaeg pikeneb garantiiparanduses oldud aja võrra. Seadme üksikute
ümbervahetatud osade või kogu ümbervahetatud
seadme garantii lõpeb kogu seadme garantiiaja
lõppemisega (2 aastat).
Simson OÜ, Raua 55, 10152 Tallinn.
Tel: 627 8730. Faks: 627 8739.
Simson OÜ, Aleksandri 6, 51004 Tartu.
Tel: 7 343 494.
Simson OÜ, Laine 4, 80016 Pärnu.
Tel: 4 427 231.
www.service.braun.com
94
Page 95

кЫТТНЛИ
Зубная щетка Oral-B® Triumph со
SmartGuide была специально разработана,
чтобы предложить Вам и Вашей семье
уникальный метод чистки зубов, который
одновременно является безопасным и
эффективным для Ваших зубов. Тем не
менее, при использовании электрических
приборов следует соблюдать основные
меры предосторожности. Пожалуйста,
внимательно прочитайте инструкцию перед
тем, как начать пользоваться этой щеткой.
ВАЖНО
Oral-B Triumph оснащена зарядным
•
устройством SmartPlug (малое по условиям
безопасности напряжение). Не заменяйте и
не регулируйте запасные части зарядного
устройства самостоятельно, чтобы избежать
поражения электрическим током.
Периодически проверяйте зарядное устройство SmartPlug на наличие повреждений.
Не используйте поврежденное или неработающее зарядное устройство. Отнесите
поврежденное зарядное устройство в
сервисный центр Oral-B Braun
•
Данный продукт не предназначен для
использования детьми до 3-х лет.
•
Это зарядное устройство не предназначено
для использования детьми или лицами
с ограниченными физическими или умственными возможностями за исключением
случаев, когда они находятся под наблюдением лиц, отвечающих за их общую безопасность. Рекомендуется хранить зарядное
устройство в недоступных для детей местах.
•
Если зубную щетку уронили, насадку
необходимо заменить перед следующим
использованием, даже если нет видимых
повреждений.
•
Храните зарядное устройство SmartPlug
вдали от воды или других жидкостей.
•
Не модифицируйте или ремонтируйте
данный продукт самостоятельно. Это может
привести к возгоранию, поражению электрическим током или иным повреждениям.
В случае необходимости ремонта данного
продукта следует обратиться к продавцу
данного товара или в сервисный центр
Oral-B Braun. Не разбирайте данное
устройство самостоятельно за исключением
случаев замены батареек.
•
При замене батареек действуйте осторожно,
стараясь не замкнуть положительный (+) и
отрицательный (–) контакты.
®
.
Не дотрагивайтесь до зарядного устройства
•
SmartPlug влажными руками. Это может
привести к поражению электрическим
током.
Используйте данное зарядное устройство
•
только по назначению, как описано в данном
руководстве. Не используйте запасные или
дополнительные детали, не рекомендованные фирмой-изготовителем.
В случае если Вы проходите стоматологи-
•
ческое лечение, проконсультируйтесь
с Вашим лечащим врачом-стоматологом
перед началом пользования данной зубной
щеткой.
Ваша зубная щетка Oral-B Triumph со
SmartGuide оснащена интерактивным
беспроводным дисплеем, чтобы помочь Вам
достичь оптимального результата чистки
зубов.
ВАЖНО
Рекомендуется деактивировать
•
радиопередачу Вашей щетки во
избежание электромагнитных помех и/
или конфликтов совместимости перед
перевозкой или использованием щетки
в местах, где запрещено использование
приборов, создающих радиопомехи,
например, в самолетах или специально
отмеченных территориях в больницах
(см. «Деактивация радиопередачи»).
Людям с электрокардиостимуляторами
•
следует всегда держать включенную
щетку на расстоянии более 6 дюймов
(15 см) от электрокардиостимулятора.
В случае наличия радиопомех, отключите радиопередачу вашей щетки перед
использованием (см. «Деактивация
радиопередачи»).
Описание
a Насадка Oral-B FlossAction
b Кнопка включения/выключения
c Кнопка выбора режима
d Рукоятка
e Дисплей на рукоятке щетки
f Зарядное устройство SmartPlug (включает
зарядное кольцо и SmartPlug штекер)
g База-подставка
h Защитная крышка
i Сменная насадка Oral-B 3D WHITE
(не со всеми моделями)
j дисплей SmartGuide
k Крепитель на стену
l Липкая лента
95
Page 96

Спецификация:
h/min
set
t
h/min
set
Тип: 3731
Напряжение: 100–240 В
Частота: 50–60 Гц
Сила тока: 3 Вт
Уровень шума: ≤65 дБ(A)
IP: 67
Первое использование
Перед первым использованием зарядите
Вашу зубную щетку. Включите зарядное
устройство SmartPlug в электрическую
розетку и поставьте ручку (d) на зарядное
кольцо (f) (см. «Подсоединение и зарядка»).
Ваш дисплей SmartGuide включит режим
•
показа-демонстрации. Чтобы выйти из
этого режима, нажмите либо кнопку
настройки «set», либо кнопку час/мин
«h/min», находящиеся в контейнере для
батареек. Обратите внимание, что дисплей
SmartGuide автоматически включит
режим показа-демонстрации, если Вы не
используете вашу зубную щетку в течение
28 дней. Вы можете избежать этой самоактивации, установив часы или произведя
синхронизацию рукоятки щетки.
«h/min» до тех пор, пока не появится
нужный вам час. Подтвердите
с помощью кнопки настройки «set».
Продолжайте действовать таким же
образом, чтобы установить обе цифры,
обозначающие минуты. Если Вы
предпочитаете не использовать часы,
мигающие цифры«12:00» исчезнут
автоматически по истечении суток.
Вы можете включить Вашу щетку, нажав
кнопку включения/выключения. Чтобы
избежать разбрызгивания, коснитесь
насадкой зубов до включения щетки.
Oral-B
Oral-B
Подсоединение и зарядка
h/min
set
2
1
Светящиеся цифры «12:00» на дисплее
•
h/min
set
SmartGuide означают, что можно установить
время. Нажимайте кнопу «set», находящуюся в контейнере для батареек, до тех
пор, пока не появится надпись «12 h».
set
h/min
Кратковременным нажатием кнопки
•
(час/мин) «h/min», Вы можете выбрать
12-ти или 24-х часовой формат времени.
Нажмите кнопу настройки «set» для
подтверждения вашего выбора.
•
После этого цифра, обозначающая часы
начинает мигать. Нажимайте кнопку
96
Рукоятка Вашей зубной щетки водонепроницаема, электрически безопасна и Вы можете
без сомнений использовать ее в ванной
комнате.
Чтобы собрать зарядное устройство,
разместите защитную крышку (h) на задней
стенке базы-подставки (g). Затем поставьте
базу-подставку на зарядное кольцо (f) до
щелчка
Включите зарядное устройство SmartPlug
•
в электрическую розетку и поставьте
рукоятку щетки (d) на зарядное устройство.
Изображение батарейки должно появиться
на дисплее на рукоятке щетки (e).
Изображение батарейки будет заполняться,
пока рукоятка заряжается. Когда рукоятка
будет полностью заряжена, изображение
батарейки будет заполнено четырьмя полосками. Для полной зарядки щетки требуется
не менее 10 часов. После полной зарядки Вы
можете 10 дней (2 раза в день по 2 минуты)
чистить зубы щеткой до полной ее разрядки.
Page 97

Внимание: Если изображение батарейки не
появляется на дисплее сразу, продолжайте
заряжать. Он появится через 10–15 минут.
При низком уровне заряда аккумулятора
•
загорится изображение батарейки с одной
полоской. Ваша щетка замедлит работу,
а потом остановится. Когда аккумулятор
полностью разряжен, загорается изображение пустого корпуса батарейки.
Необходимо будет заряжать рукоятку в
течение 15 минут, чтобы Вы могли чистить
зубы 2 минуты.
на дисплее SmartGuide появляется
изображение квадранта, сигнализирующего,
что необходимо перейти к следующему
участку рта.
3
c
e
s
0
3
c
e
s
0
s
e
c
3
0
s
0
e
c
3
s
5
4
c
e
s
4
c
e
5
s
e
c
4
5
s
5
e
c
4
При ежедневном использовании щетки
•
Вы можете хранить рукоятку на зарядном
устройстве, чтобы поддерживать полный
уровень заряда щетки. Перезарядка
аккумулятора невозможна. Однако в целях
защиты окружающей среды, Oral-B
рекомендует Вам отключать зарядное
устройство от электропитания до того
момента, когда понадобиться следующая
подзарядка аккумулятора.
•
Для того чтобы поддерживать максимальную емкость аккумуляторной батареи, не
реже 1 раза в 6 месяцев отключайте
зарядное устройство от сети и используйте
щетку регулярно до ее полной разрядки.
Персонализация
таймера
Вы можете выбрать для себя «профессиональный» или «2-минутный» таймер, а также
таймер с «прямым» и «обратным» отсчетом
времени.
«2-минутный» таймер обозначается длинным
прерывистым звуком и изображением
«смайлика» на дисплее SmartGuide, давая
Вам понять, что рекомендуемые стоматологами 2 минуты чистки подошли к концу.
«Профессиональный» таймер помогает Вам
чистить все квадранты Вашего рта равное
количество времени. Короткий прерывистый
звук раздается каждые 30 секунд (45 секунд
в режиме «Глубокая чистка») одновременно
Оба таймера снабжены функцией запоминания истекшего времени чистки, даже если
щетки выключалась во время чистки. При
паузе больше 30 секунд, таймер обнуляется.
Таймер «прямого» отсчета времени
отражает время, которое прошло
непосредственно с начала чистки. Таймер
«обратного» отсчета времени отражает
время, которое остается до окончания
чистки. Таймер отсчитывает время начиная
с «2 минут» и до времени «0:00». При чистке
дольше 2 минут, таймер автоматически
переключатся в режим «прямого» отсчета
времени.
Общее время чистки может быть увеличено
до 3 минут при использовании режима
«Глубокая чистка» (см. «Pежимы чистки).
На Вашей зубной щетке уже активированы
два таймера: «профессиональный» и таймер
«прямого» отсчета времени. Если Вы хотите
изменить настройки, выполните следующее:
Нажмите и удерживайте кнопку (с) до
•
появления на дисплее SmartGuide (j)
изображения символов «:30» и «timer».
3 sec.
Кратковременное нажатие на кнопку
•
включения/выключения (b) включает
режим «2-минутный таймер». Подтвердите
выбор режима нажатием кнопки выбора
режима (с).
97
Page 98

На дисплее появятся символы «up» и
•
«timer» и включится функция «прямого»
отсчета времени. Переключение в режим
«обратного» отсчета времени осуществляется посредством нажатия кнопки
включения/выключения и подтверждения
выбора режима нажатием кнопки выбора
режима.
Важно: во время установки режима таймера
на дисплее рукоятки щетки появляются две
мигающие полоски, это является нормой.
Чистка
Техника чистки
Медленно перемещайте щетку, переходя
•
от одного зуба к другому.
Задерживайтесь на несколько секунд
•
на поверхности каждого зуба перед
переходом к следующему зубу.
Чистите десны таким же образом, как и
•
зубы, сначала снаружи, а затем изнутри.
На заключительном этапе почистите
жевательные поверхности зубов.
Не нажимайте на щетку слишком сильно
•
и не пытайтесь тереть. Просто позвольте
щетке сделать всю работу за Вас. После
окончания чистки, экран дисплея в течение
30 сек. будет показывать полное время
чистки. Затем дисплей переключится в
режим показа времени. Для перехода в
режим показа времени сразу после чистки
нажмите кнопку выбора режима.
пульсации прекратятся. Вы почувствуете и
услышите это.
В течение первых дней использования
щетки десны могут кровоточить. Если
кровоточивость сохраняется более двух
недель, обратитесь к стоматологу.
Если у Вас чувствительные зубы и десны,
Oral-B рекомендует использовать режим
«Чувствительная» чистка.
Режимы чистки
Ваша щетка имеет разные режимы чистки,
из которых Вы можете выбрать наиболее
подходящий для Вас:
«Ежедневная – Tщательная чистка.
чистка»
«Чувствитель- – Мягкая, но тщательная
ный» чистка чувствительных
областей полости рта.
«Массаж» – Мягкий массаж десен.
«Полировка» – Исключительная
«Глубокая – Исключительное
чистка» качество чистки за счет
Нажмите кнопку включения/выключения,
•
и Ваша щетка автоматически включит
режим «Ежедневная чистка».
Для переключения в другой режим,
•
последовательно нажмите кнопку выбора
режима.
полировка и отбеливание
зубов в особых случаях
или ежедневно.
продленного времени
чистки: 45 секунд для
каждого квадранта
полости рта и в целом
составляет 3 минуты.
Ваша щетка оснащена датчиком давления
для лучшего контроля за степенью давления
щетки на зубы во время чистки. Данная
функция помогает избежать чрезмерного
давления и делает использование щетки
более простым. Если Вы слишком сильно
нажимаете на щетку, возвратно-вращательные движения щетки продолжатся, а
98
Чтобы вернуться из любого режима в
•
режим «Ежедневная чистка», нажмите и
удерживайте кнопку выбора режима.
Page 99

Чтобы выключить щетку, нажмите кнопку
•
включения/выключения.
Внимание: при выборе режима «Полировка»
рекомендуется использовать насадку Oral-B
3D WHITE.
Сменные насадки (в зависимости от
модели)
Насадка Oral-B FlossAction
Насадка Oral-B FlossAction (a) рекомендована для ежедневной глубокой чистки.
Щетинки Micropulse глубоко проникают
в труднодоступные пространства между
зубами, мягко удаляя налет из межзубных
промежутков.
Насадка Oral-B Sensitive –
Чувствительная чистка
Насадка Oral-B Sensitive дает превосходные
результаты чистки для чувствительных зубов
и десен. Для изготовления этой насадки
используются сверхмягкие щетинки, которые
бережно чистят Ваши зубы и десны.
обесцвечиваются в течение 3 месяцев,
таким образом информируя Вас, о необходимости замены насадки.
SmartGuide дисплее
Дисплее Объяснение
Режим «Ежедневная чистка»
Режим «Чувствительный»
Режим «Массаж»
Режим «Полировка»
Режим «Глубокая чистка»
Слишком сильно нажимаете на
щетку. Уменьшите давление.
Насадка Oral-B 3D WHITE – отбеливающая
Для ежедневной и приуроченной к особым
случаям полировки зубов используйте
насадку Oral-B 3D WHITE (i) (не со всеми
моделями). Наличие специально
разработанной вместе со стоматологами
полирующей чашечки способствует
возвращению естественной белизны зубам
посредством удаления потемнений (от кофе,
чая и табака) с поверхности эмали.
Насадка Oral-B 3D WHITE не должна
использоваться детьми до 12 лет.
a
Не используйте насадку Oral-B 3D WHITE,
если есть брекеты
У всех насадок есть голубые щетинки
INDICATOR для того, чтобы помочь Вам
узнать о времени, когда Вам необходимо
заменить насадку. При ежедневной
тщательной чистке зубов дважды в день
по 2 минуты, голубые щетинки постепенно
i
«Квандранты полости рта» – в
настоящий момент Вы чистите
первые 30 секунд (45 секунд
в режиме «Глубокой чистки»).
Переходите к чистке следующего квадранта полости рта,
когда загорится второй сектор.
2 минуты (рекомендованное
стоматологами время чистки)
(3 минуты в режиме «Глубокой
чистки») истекли.
Низкий заряд аккумулятора.
Зарядите ручку зубной щетки.
Батарейки дисплея SmartGuide
разряжены. Замените
батарейки дисплея SmartGuide.
Настенный крепеж
Если Вы хотите разместить дисплей
SmartGuide на стене, зеркале или другой
поверхности, закрепите настенный крепеж
с помощью липкой ленты (l). Перед тем, как
делать это, убедитесь, что выбранная Вами
поверхность чистая и сухая (сначала вытрите
жир и пыль). Расположите настенный крепеж
99
Page 100

так, чтобы был виден логотип Oral-B. Затем
set
h/min
3 sec.
прижмите настенный крепеж крепко и ровно
к стене. Поместите дисплей SmartGuide
в настенный крепеж через 24 часа.
Внимание: липкая лента не крепится
к грязеотталкивающим поверхностям.
Рекомендации по чистке
После использования промойте насадку
•
под струей воды в течение нескольких
секунд.
Снимите насадку и промойте все части
•
отдельно под струей воды, затем вытрите
их насухо перед тем, как вы поставить
рукоятку на зарядное устройство.
Периодически, Вы также можете вытирать
•
зарядное устройство SmartPlug и дисплей
SmartGuide влажной тряпкой. Ни в коем
случае не помещайте зарядное устройство
SmartPlug и дисплей SmartGuide в воду.
Синхронизация
При использовании нескольких зубных щеток
Oral-B Triumph с отдельными дисплеями
SmartGuide в одной семье, Вам необходимо
синхронизировать рукоятки щеток с соответствующим устройством во избежание
помех при передаче информации от насадки
на дисплей SmartGuide.
Выполните следующие действия:
Нажмите на кнопку«час/мин» в контейнере
•
для батареек в течение не менее 3 секунд.
Дисплей SmartGuide покажет «L---»,
обозначающее режим «Распознавание»
для активизации процесса синхронизации.
Светящаяся кнопка включения/выключения
•
на изображении зубной щетки на дисплее
SmartGuide означает, что Вам необходимо
включить рукоятку щетки. После этого
начинается автоматический процесс
синхронизации. Когда он закончится,
появится надпись «L-1-».
Разберите зарядное устройство перед
•
чисткой. Ни в коем случае не помещайте
зарядное кольцо и зарядное устройство
SmartPlug в посудомоечную машину.
Все остальные части (база-подставка и
защитная крышка) можно мыть в посудомоечной машине.
100
Выключите рукоятку щетки.
•
Чтобы прикрепить вторую щетку к тому же
дисплею SmartGuide, повторите последние
два действия, описанные выше, с этой
щеткой. Вы можете выйти из режима
«Распознавание», нажав кнопку «h/min»
or «set». Иначе режим «Распознавание»
отключится автоматически через 30 секунд.
Внимание:
Максимум 2 щетки могут быть
•
синхронизированы с одним дисплеем
SmartGuide. После синхронизации второй
щетки на дисплее высветится надпись
«Full» (Нет свободного места).
 Loading...