

Braun IRT 3520, IRT 3020, ThermoScan Plus IRT 3520, ThermoScan Plus IRT 3020 User Manual
IRT 3520
IRT 3020
/ mem
ThermoScan
Plus
Plus
Plus
Type 6012
Type 6013
ThermoScan
ThermoScan

English 4
Français 17
Español 30
Internet:
www.braun.com
6-013-341/00/III-02/G3
USA/CDN/MEX
Printed in Germany
Imprimé en Allemagne
Impreso en Alemania

IRT 3520
12
1
2
3
4
5
6
7
8
9
10
/ mem
ThermoScan
Plus
11
13
13
12
configuration A
b
a
ThermoScan
configuration B
IRT 3020
8
/ mem
ThermoScan
Plus
11
13
12
b
a
ThermoScan

English
The Braun ThermoScan thermometer has been carefully developed for
accurate, safe and fast human body temperature measurements in the
ear. The shape of the thermometer prevents it from being inserted too
far into the ear canal to damage the eardrum.
However, as with any thermometer, proper technique is critical
to obtaining accurate temperatures. Therefore, please read all
instructions carefully and thoroughly before using this product.
Important
• The operating ambient temperature range for this thermometer is
50 °F to 104 °F (10 °C to 40 °C).
• Do not expose the thermometer to temperature extremes below
– 4 °F or over 122 °F (– 20 / 50 °C) or excessive humidity
(> 95 % RH non-condensing).
• This thermometer must only be used with genuine Braun
ThermoScan Lens Filters (LF 40). Never use this thermometer
without a new, clean lens filter attached.
• If the thermometer is ever accidentally used without a lens filter
attached, clean the lens (see «Care and cleaning»).
• Always store thermometer in travel case or protective cover.
• Basic safety precautions should always be observed, especially
when using the thermometer on or near children and disabled
persons.
• Keep lens filters out of reach of children.
• This thermometer is intended for home use only.
• Use of this thermometer is not intended as a substitute for
consultation with your physician.
How does Braun ThermoScan work?
The Braun ThermoScan thermometer measures the infrared heat
generated by the eardrum and surrounding tissue. To help ensure
accuracy, the thermometer «scans» by taking 8 measurements in just
one second and displaying the highest temperature.
The displayed ThermoScan temperature is the actual measured ear
canal temperature plus a mathematical adjustment to approximate the
familiar oral range. However, this is not necessarily the same as an oral
temperature measured at the same time.
Why measure in the ear?
The goal of thermometry is to measure core body temperature, which
is the temperature of the vital organs. Clinical studies have shown that
the ear is an excellent site to measure body temperature, since ear
temperatures reflect core body temperature. The eardrum shares
blood supply with the temperature control center in the brain, the
hypothalamus, allowing changes in body temperature to be reflected
sooner in the ear than at other sites.
4

• Axillary temperatures reflect skin temperature which may not
indicate core body temperature.
• Oral temperatures are influenced by drinking, eating and breathing
through the mouth.
• Rectal temperatures often lag behind changes in core body
temperature and there is a risk of cross-contamination.
Body temperature
Normal body temperature is a range. The following table1 shows
that ranges of normal also vary by site. Therefore, readings from
different sites, even if taken at the same time, should not be directly
compared.
Axillary: 94.5 °F – 99.1 °F 34.7 °C – 37.3 °C
Oral: 95.9 °F – 99.5 °F 35.5 °C – 37.5 °C
Rectal: 97.9 °F – 100.4 °F 36.6 °C – 38.0 °C
ThermoScan2: 96.4 °F – 100.4 °F 35.8 °C – 38.0 °C
• Also, a person’s normal temperature range tends to decrease with
age. The following table shows normal ThermoScan ranges by age.
Normal ThermoScan temperature ranges2
0 – 2 years 97.5 °F – 100.4 °F 36.4 °C – 38.0 °C
3 – 10 years 97.0 °F – 100.0 °F 36.1 °C – 37.8 °C
11 – 65 years 96.6 °F – 99.7 °F 35.9 °C – 37.6 °C
> 65 years 96.4 °F – 99.5 °F 35.8 °C – 37.5 °C
• However, the range of normal also varies from person to person and
fluctuates throughout the day. It is therefore important to determine
your and your family members’ normal temperature ranges. This is
easily done using Braun ThermoScan. Practice taking temperatures
on yourself and healthy family members to determine their normal
temperature ranges.
Note: When consulting your physician, communicate that the
ThermoScan temperature is a temperature measured in the ear and
if possible, note the individual’s normal ThermoScan temperature
range as additional reference.
1. Chamberlain, J.M., Terndrup, T.E., New Light on Ear Thermometer Readings,
Contemporary Pediatrics, March 1994.
2. Chamberlain, J.M., et al., Determination of Normal Ear Temperature with an Infrared
Emission Detection Thermometer, Annals of Emergency Medicine, January 1995.
5

Product description
1. Lens filter
2. Probe tip
3. Probe
4. Lens filter detector
5. Lens filter ejector
6. Display (LCD)
7. LCD light button (IRT 3520 only)
8. /mem button (On / memory function)
9. Battery door lock
10. Battery door
11. Activation button
12. Label
13. Travel case or protective cover
(depending on configuration)
Package components
• Braun ThermoScan thermometer
• Use and Care manual
• Quick Reference Guide
• Lens filters (20, plus one on the thermometer)
• Owner registration / warranty card
• Additional items may be included as noted on
outer packaging
• Label
The first time you use the thermometer, please
make sure to apply the special label included
in the package, in the language of your choice
(Item 12 on page 3).
How to use Braun ThermoScan
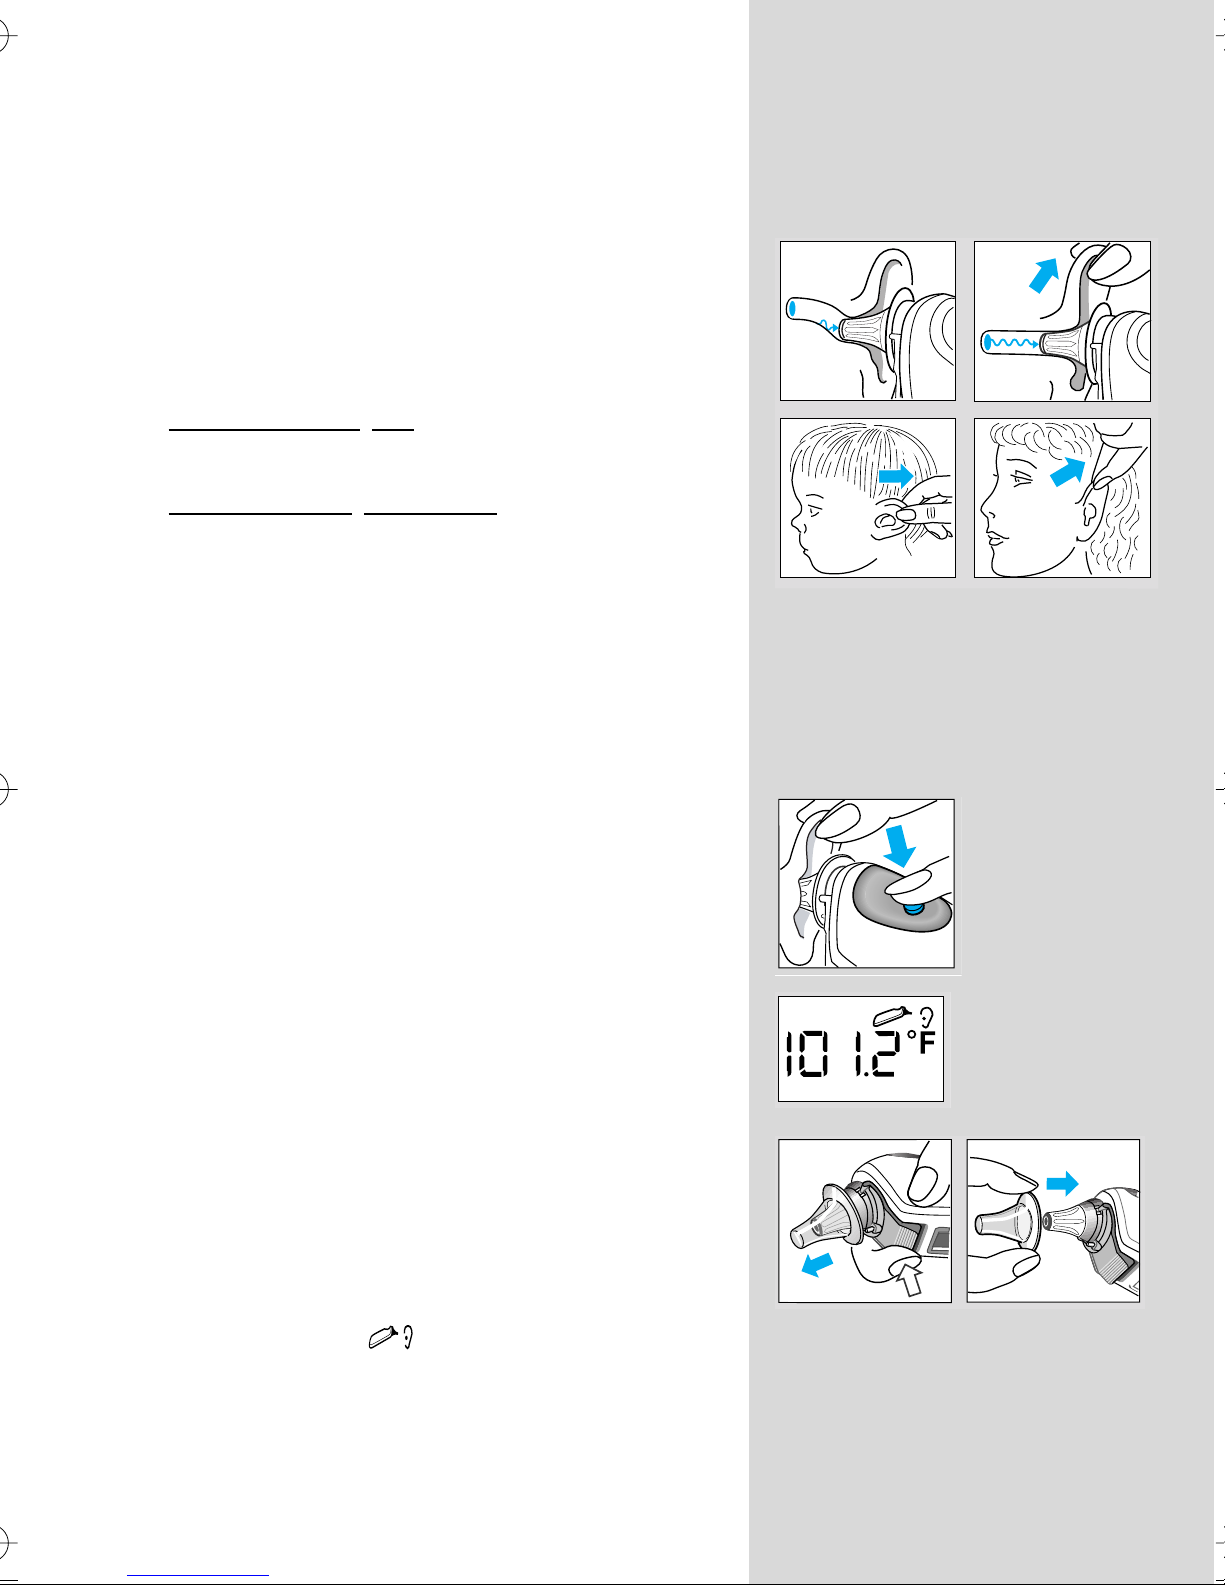
1. Always make sure a new, clean lens filter
is in place to help ensure an accurate
reading.
The thermometer will not function without a
lens filter attached (see Changing the lens
filter).
2. Press the /mem button.
The LCD (liquid crystal display) is activated,
showing all segments.
When the ready symbol is displayed the
thermometer is ready for use.
6
To help ensure an accurate temperature reading,
use the following technique: If you are right
handed, hold the thermometer in the right hand
and take the temperature in the right ear. If you
are left handed, hold it in the left hand and use
the left ear.
3. Perform an ear tug to straighten the ear canal.
This gives the thermometer a clear view of the
eardrum.
Children under 1 year:
Pull the ear straight back.
Children aged 1 year to adult:
Pull the ear up and back.
An ear tug is best performed by using your free
hand to grasp the outer edge of the top half of the
ear. To take your own temperature, wrap your
free hand around the back of your head and grab
your ear from behind.
4. While tugging the ear, fit the probe snugly into
the ear canal as far as possible and press the
activation button. Release it when you hear a
beep. This is the Temp Beep that confirms the
end of measurement.
94.3°F
98.2°F
5. Remove the thermometer from the ear canal.
The LCD displays the temperature measured.
6. Replace the lens filter after each measure-
ment: press the ejector button and put on a
new, clean lens filter.
7. A new measurement can be taken as long as
the ready symbol is shown. If no button is
pressed within 2 minutes, the thermometer will
turn off automatically.
7

Note: In the following situations, it is recommended that you
take three temperatures in the same ear. If they differ, use the
highest reading.
• Infants in the first 90 days of life.
• Children under three years of age who have a condition such
as a compromised immune system and for whom the presence or absence of fever is critical.
• When you are first learning to use the ear thermometer until
you are comfortable with the technique and are obtaining
consistent readings.
Important: As with any type of thermometer, slight temperature
variations ( ± 0.3 – 0.5 °F / ± 0.2 – 0.3 °C) can occur, if consecutive measurements are taken.
Temperature taking hints
• The right ear reading may differ from the reading taken at the left
ear. Therefore, always take the temperature in the same ear.
• The ear must be free from obstructions or excess earwax buildup to take an accurate reading.
• External factors may influence ear temperatures, including when
an individual has:
– been lying on one ear or the other
– had their ears covered
– been exposed to very hot or very cold temperatures, or
– been recently swimming or bathing.
In these cases, remove the individual from the situation and wait
20 minutes prior to taking a temperature.
8
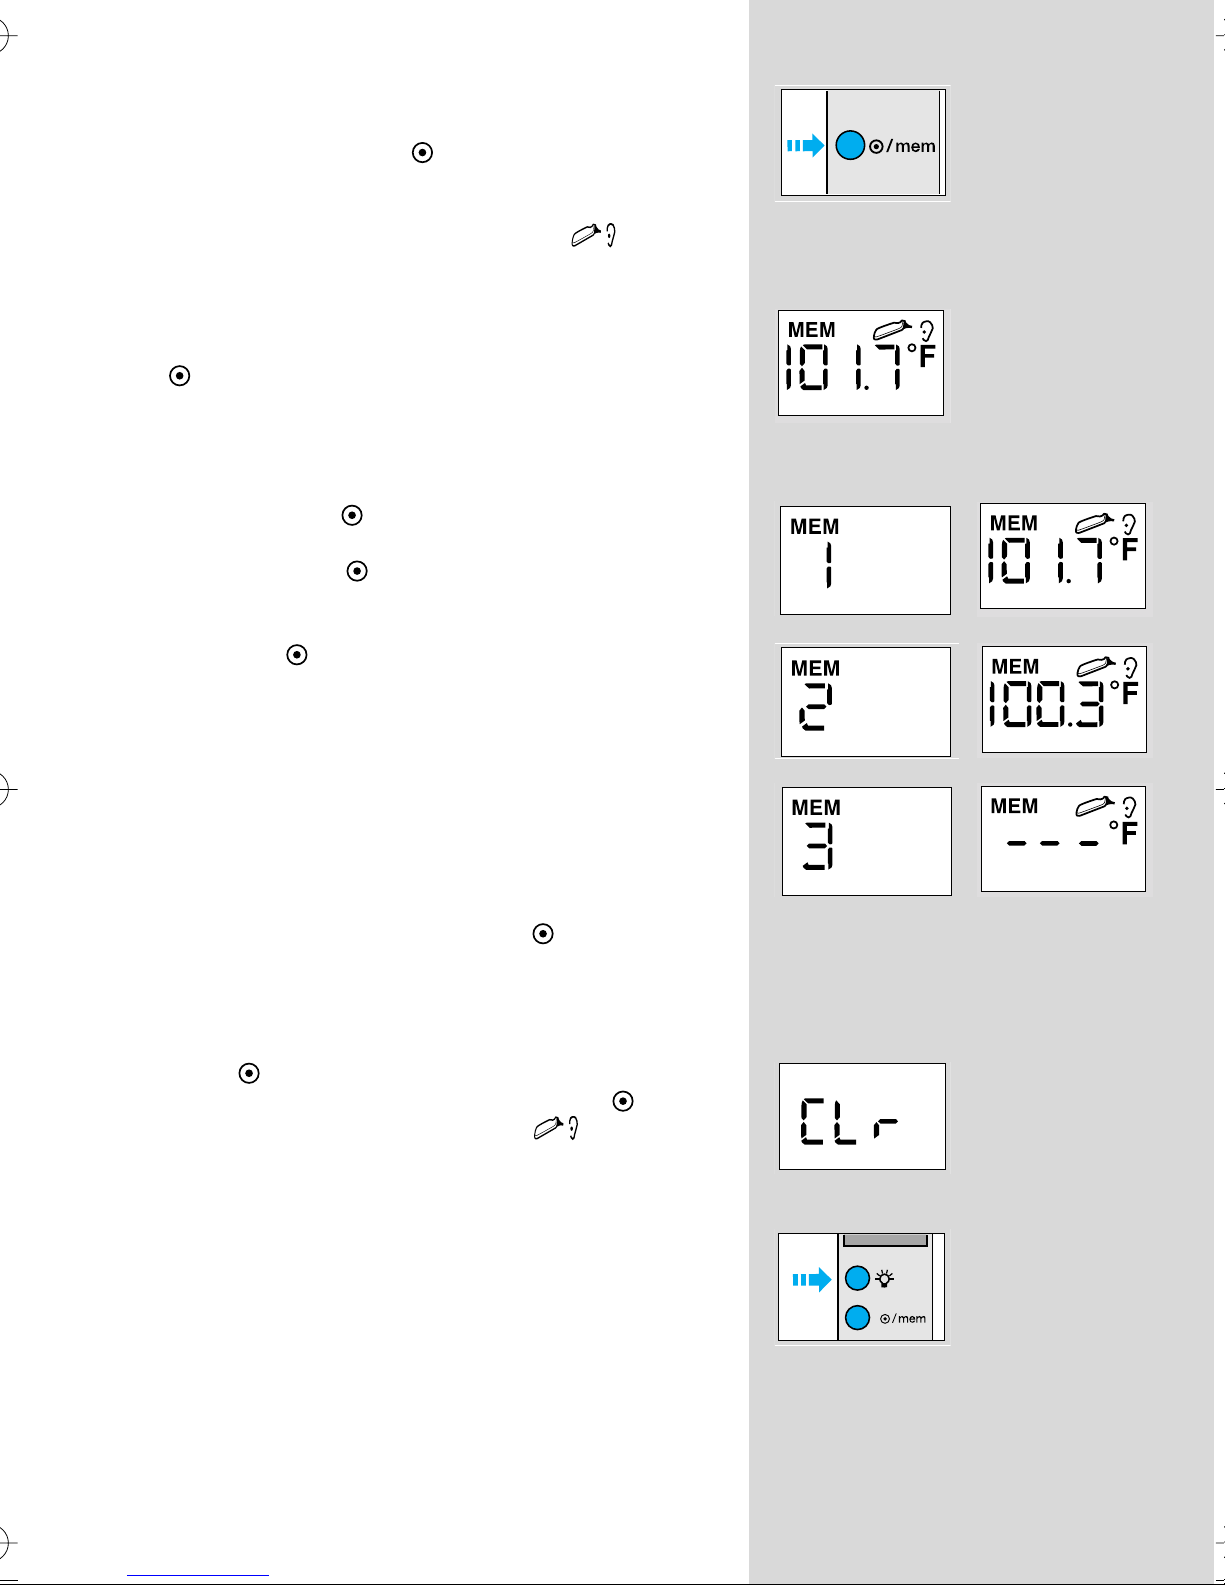
Memory mode
The last temperature taken before the thermometer
powers down is stored in memory. To enter the
memory mode, press the /mem button.
Even in memory mode, a new temperature can be
taken provided that the ready symbol is shown.
IRT 3020
The last stored temperature is displayed along with
the MEM symbol. To quit the memory mode, press
the /mem button again.
IRT 3520
This model allows you to store up to 8 temperatures.
When pressing the /mem button, the display
shows the memory cell number (e.g. MEM 1).
When releasing the /mem button, the stored
temperature is displayed.
Each time the /mem button is pressed,
a new memory cell is displayed (up to MEM 8).
An empty memory cell shows « - - - °F ».
Only the first empty memory cell will be displayed.
To quit the memory mode, press the /mem button
again after reaching MEM 8 or « - - - °F ».
Memory clear
Press the /mem button for 5 seconds to clear the
temperatures stored in memory. Release the /mem
button to return to the ready symbol .
LCD light
(model IRT 3520 only)
for easy nighttime reading.
9
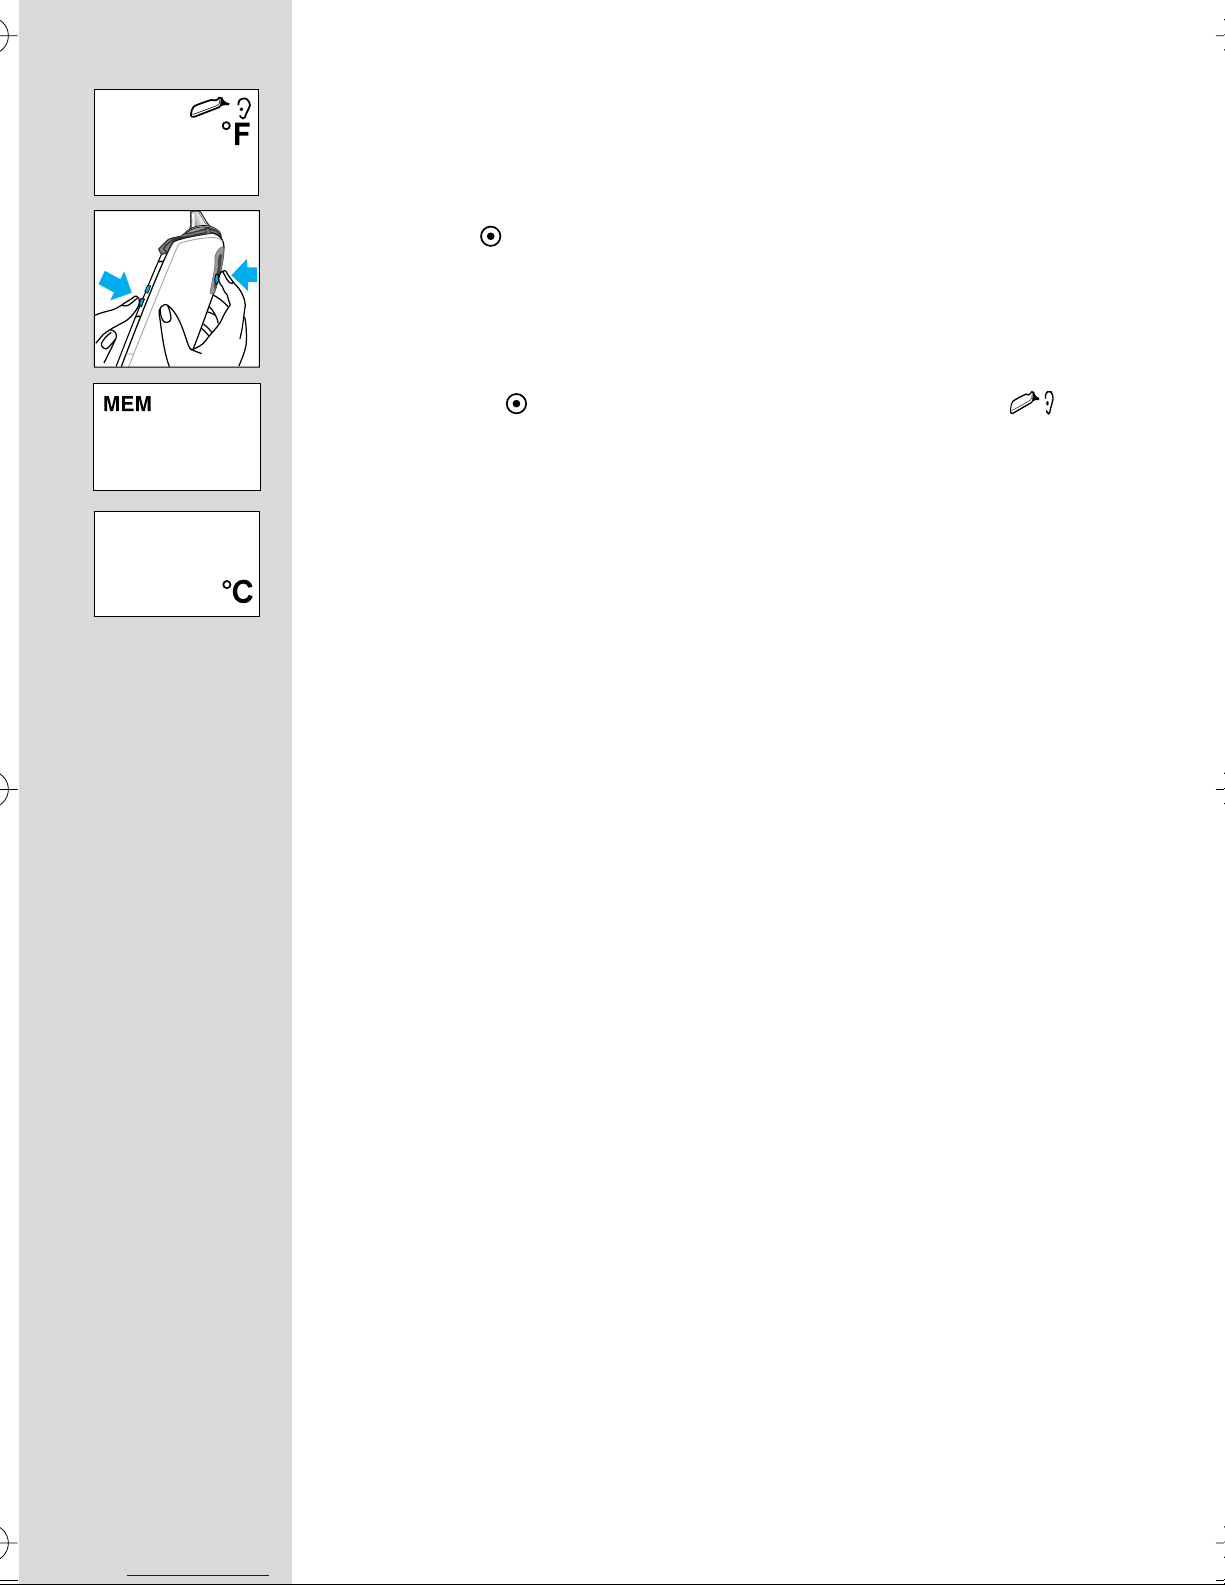
Changing the temperature scale
This thermometer is shipped with the Fahrenheit temperature scale
activated. If you wish to switch to Celsius (°C), proceed as follows:
• Turn on the thermometer.
(If it is already turned on, make sure it is not in memory mode.)
• Press the /mem button and keep it pressed. Then press and
release the activation button to switch over to the «change
temperature scale» mode.
• By pressing the activation button again, the Celsius scale is
activated, «°C» is displayed on the LCD. Each further pressing of
the activation button toggles the scale between °C and °F.
• Release the /mem button to return to the ready symbol .
All temperatures stored in memory will automatically be converted
to the selected scale when displayed on the LCD.
Changing the lens filter
The thermometer is supplied with a lens filter in place. To assure
accuracy and sanitary practice, Braun recommends replacing the lens
filter after each use. To install a new lens filter, first remove the one in
place by pressing the lens filter ejector. Check the lens for any damage.
Then take a new lens filter from the box, and holding it by its edges,
slide it onto the probe until it snaps in place.
Caution: Do not touch the tip of the probe or lens filters
when installing. Fingerprints, ear wax, dust and other soiling
compounds reduce the transparency, resulting in lower
temperature readings (see also «Care and cleaning»).
Should you run out of lens filters and need to take a temperature, you
may use the following lens filter cleaning procedure:
• Clean the lens filter without removing it from the thermometer with
a soft cloth or cotton swab moistened with alcohol.
• Do not use hot or boiling water.
• Dry completely with a soft cloth before reusing.
• Replace lens filter as soon as possible with a new one (LF 40).
• Additional lens filters (LF 40) are available at most stores carrying
Braun ThermoScan thermometers or at Braun Service Centers.
• If you have accidentally placed the thermometer in your ear without
a lens filter in place, be sure and clean the probe (see «Care and
cleaning») and then apply a clean lens filter.
10
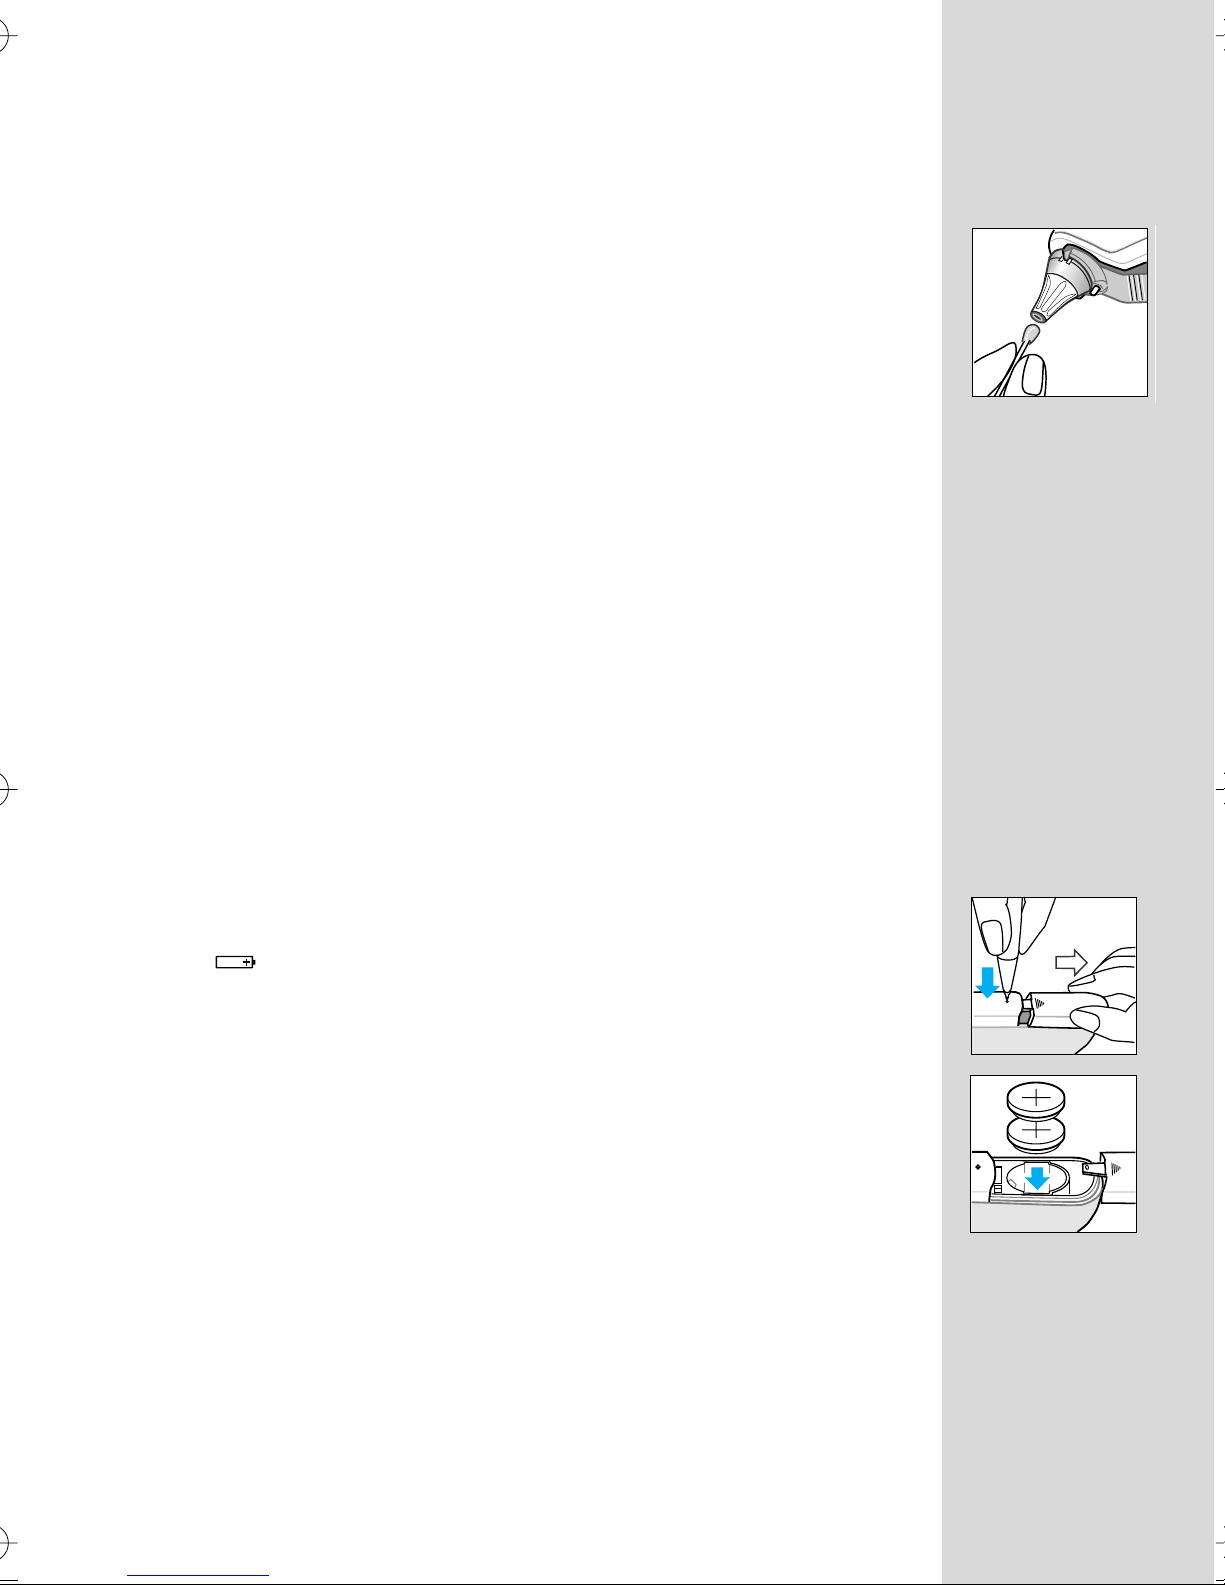
Care and cleaning
The probe tip is the most delicate part of the thermometer.
It has to be clean and intact to ensure accurate readings.
If the thermometer is ever accidentally used without a lens filter, clean
the lens as follows:
• Hold the appliance with the probe tip facing down to prevent liquid
from entering the probe tip area. Very gently wipe the surface with
a cotton swab or soft cloth moistened with alcohol.
• After cleaning, allow at least 45 minutes drying time before reattaching a new, clean lens filter and taking a temperature.
If the probe tip is damaged, contact Braun.
Use a soft, dry cloth to clean the thermometer display and exterior. Do
not use abrasive cleaners. Never submerge the thermometer in water
or any other liquid.
Store thermometer and lens filters in a dry location free from dust and
contamination and away from direct sunlight. The ambient temperature
at the storage location should remain fairly constant and within the
range of 50 °F to 104 °F (10 °C – 40 °C).
Always keep cleaning solutions and rubbing alcohol away from
children.
Replacing the batteries
The thermometer is supplied with two 3 V lithium batteries
(CR 2032/DL 2032). Insert new batteries when the battery
symbol appears on the display.
Using the tip of a ball-point pen, press the battery door lock to open
the battery compartment. Remove the batteries and replace with new
batteries, making sure the poles are in the right direction.
Slide battery door back in until it snaps in place.
11
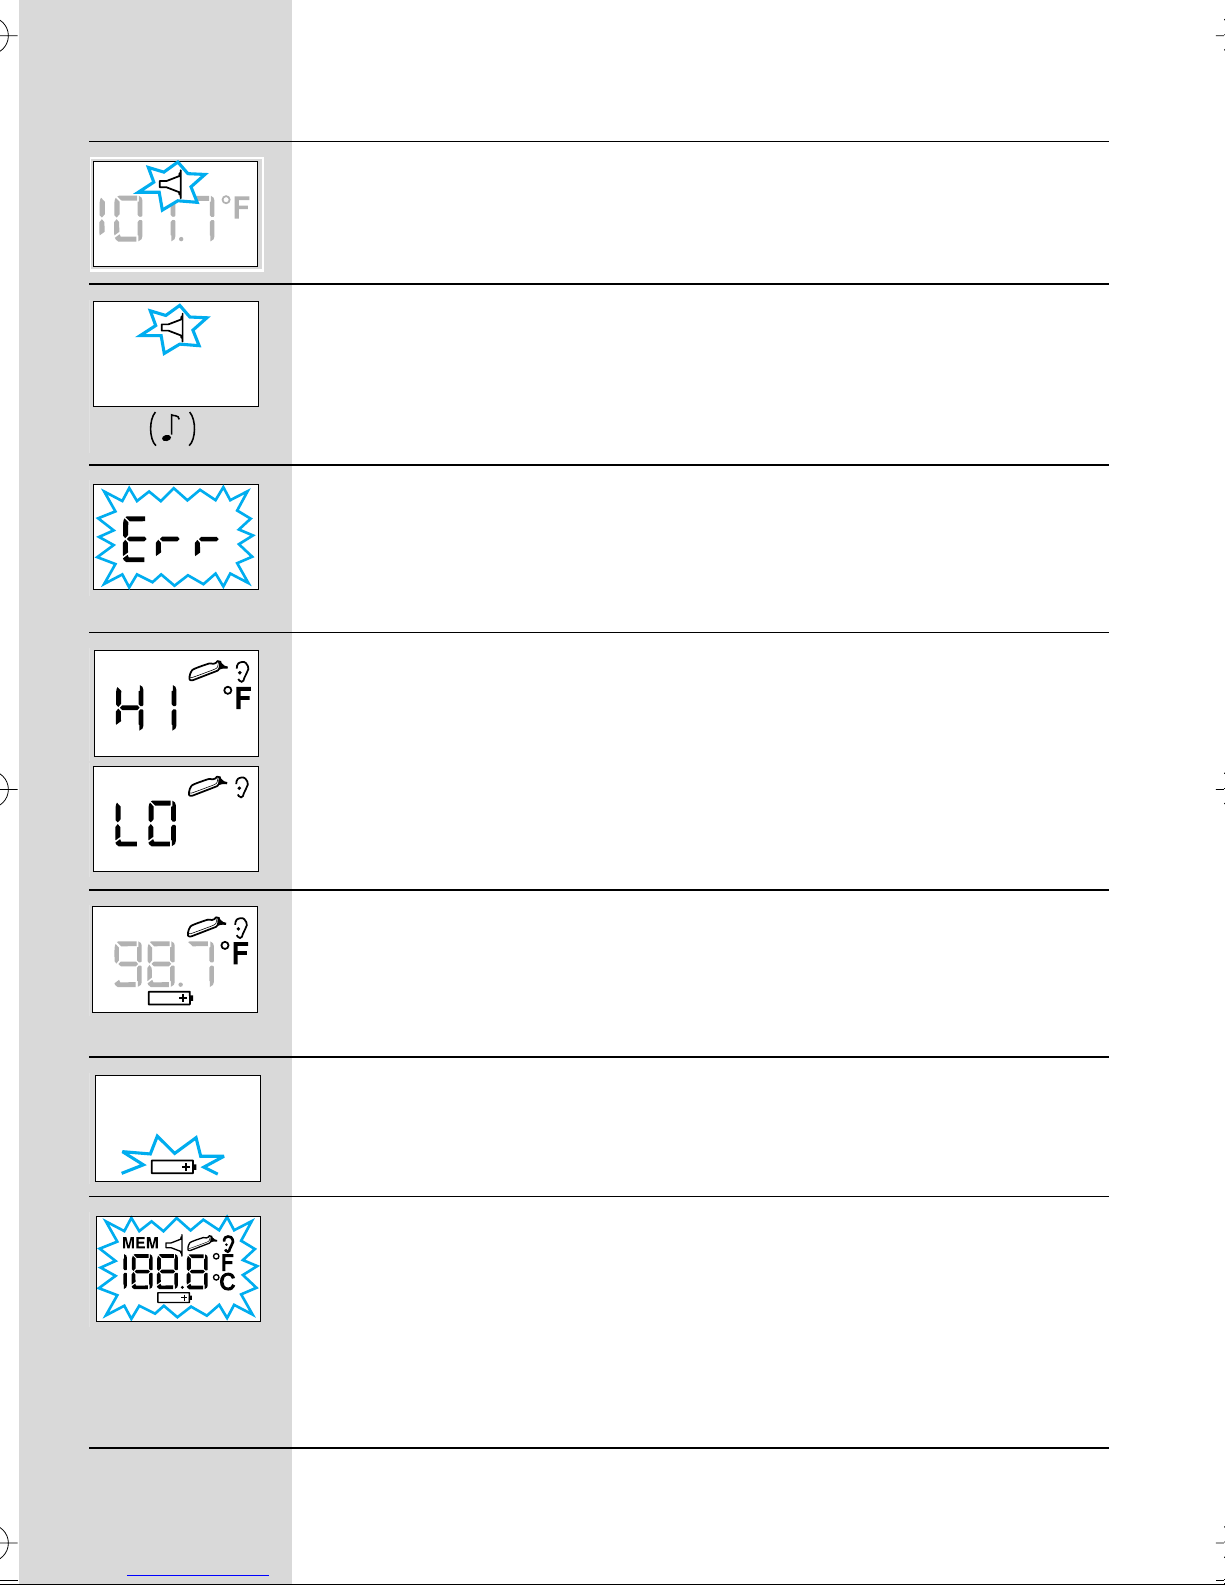
Troubleshooting
Error message Situation Solution
No lens filter is attached. Attach new, clean lens filter.
No lens filter is attached and
activation button was pressed
while probe was in the ear.
Ambient temperature is not
within the allowed operating
range of 50°F to 104°F
(10°C–40°C) or changing
too rapidly.
Temperature taken is not
within typical human
temperature range
(93.2°F–108°F / 34°C–42.2°C).
HI = too high
LO = too low
Make sure probe tip is clean; refer
to section «Care and cleaning» if
necessary.
Attach new, clean lens filter to
stop error beeps.
Allow the thermometer to remain
in a room for 30 minutes where
the temperature is between
50°F to 104°F (10°C–40°C).
Make sure new, clean lens filter is
attached and thermometer is
properly inserted.
Then, take a new temperature.
Battery is low, but
thermometer will still operate
correctly.
(No light function on
RT 3520 model.)
Battery is too low to take
correct temperature readings.
System error
• If error persists
• If error still persists
Insert new batteries
Insert new batteries
Wait 2 minutes until thermometer
powers down, then turn on again.
… reset the thermometer by
removing the batteries and putting
them back in.
… call Braun ThermoScan
Customer Service at
1-800-327-7226.
12

Special situations
The Braun ThermoScan thermometer has been shown in clinical
studies to obtain accurate temperatures on persons of all ages.
However, there are certain situations when the ear thermometer should
not be used. These include but may not be limited to the following
situations.
• If there is blood or drainage in the external ear canal.
• For persons who have deformities of the face and ear canal where
the probe of the thermometer cannot be inserted fully into the ear
canal.
• For persons wearing hearing aids or ear plugs, remove the device
and wait 20 minutes prior to taking a temperature.
• Use the untreated ear if prescription ear drops or other ear
medications have been placed in the ear canal.
Never attempt to clean inside ears. You could damage the ear drum or
surrounding tissues. You should remove excess ear wax only when
you can reach it with a wash cloth. If you suspect that you or your child
has excess ear wax, consult your physician.
Fever facts
Many persons may not have an elevated temperature even when
they are ill. These include, but are not limited to infants under
90 days of age, persons taking steroids, antibiotics or antipyretics
(acetaminophen, ibuprofen, aspirin), persons with compromised
immune systems, including the elderly or persons with some chronic
illnesses. Consult your physician if you feel an illness is present even
if there may not be an elevated temperature.
Fever is described as an elevation of body temperature over an
individual’s «normal» temperature.
An elevated temperature or fever is often viewed as a danger sign.
In fact, a fever can be very beneficial, and helps our immune system
work more effectively. A fever should be evaluated in the light of other
physical symptoms. With the exception of newborn infants, the
presence of fever, without any other symptoms of illness, or in a
child who is behaving normally may not be cause for concern. On
the other hand, a physician should be consulted in the following
situations:
– vomiting
– diarrhea
– changes in appetite, activity or breathing, or
– with children who are irritable, lethargic or unusually sleepy.
13

Some people, like the elderly, infants under 90 days of age, those
with compromised immune systems, or persons who take steroids,
for example are often unable to build a response to illness or environmental conditions. These individuals may not have a fever when they
are ill, or their elevated temperature may be lower than expected for the
severity of their illness. Other medications such as anti-inflammatories
and some analgesics may also mask fever.
The presence or absence of fever should rarely be used as the only
measurement of the significance of illness. Your physician should be
contacted whenever there is a question about your family’s health.
Antipyretics, like acetaminophen or ibuprofen, are usually recommended to relieve the aches and associated symptoms of fever, not
the fever itself. Febrile seizures, or convulsions, which usually occur
in children six months to six years of age, are thought to occur not
because a fever is present, but because of the rate of rise of the child’s
temperature. Call your physician if your child has a febrile seizure or
you desire further information.
Use of the Braun ThermoScan thermometer is not intended as a
substitute for consultation with your physician.
14
 Loading...