

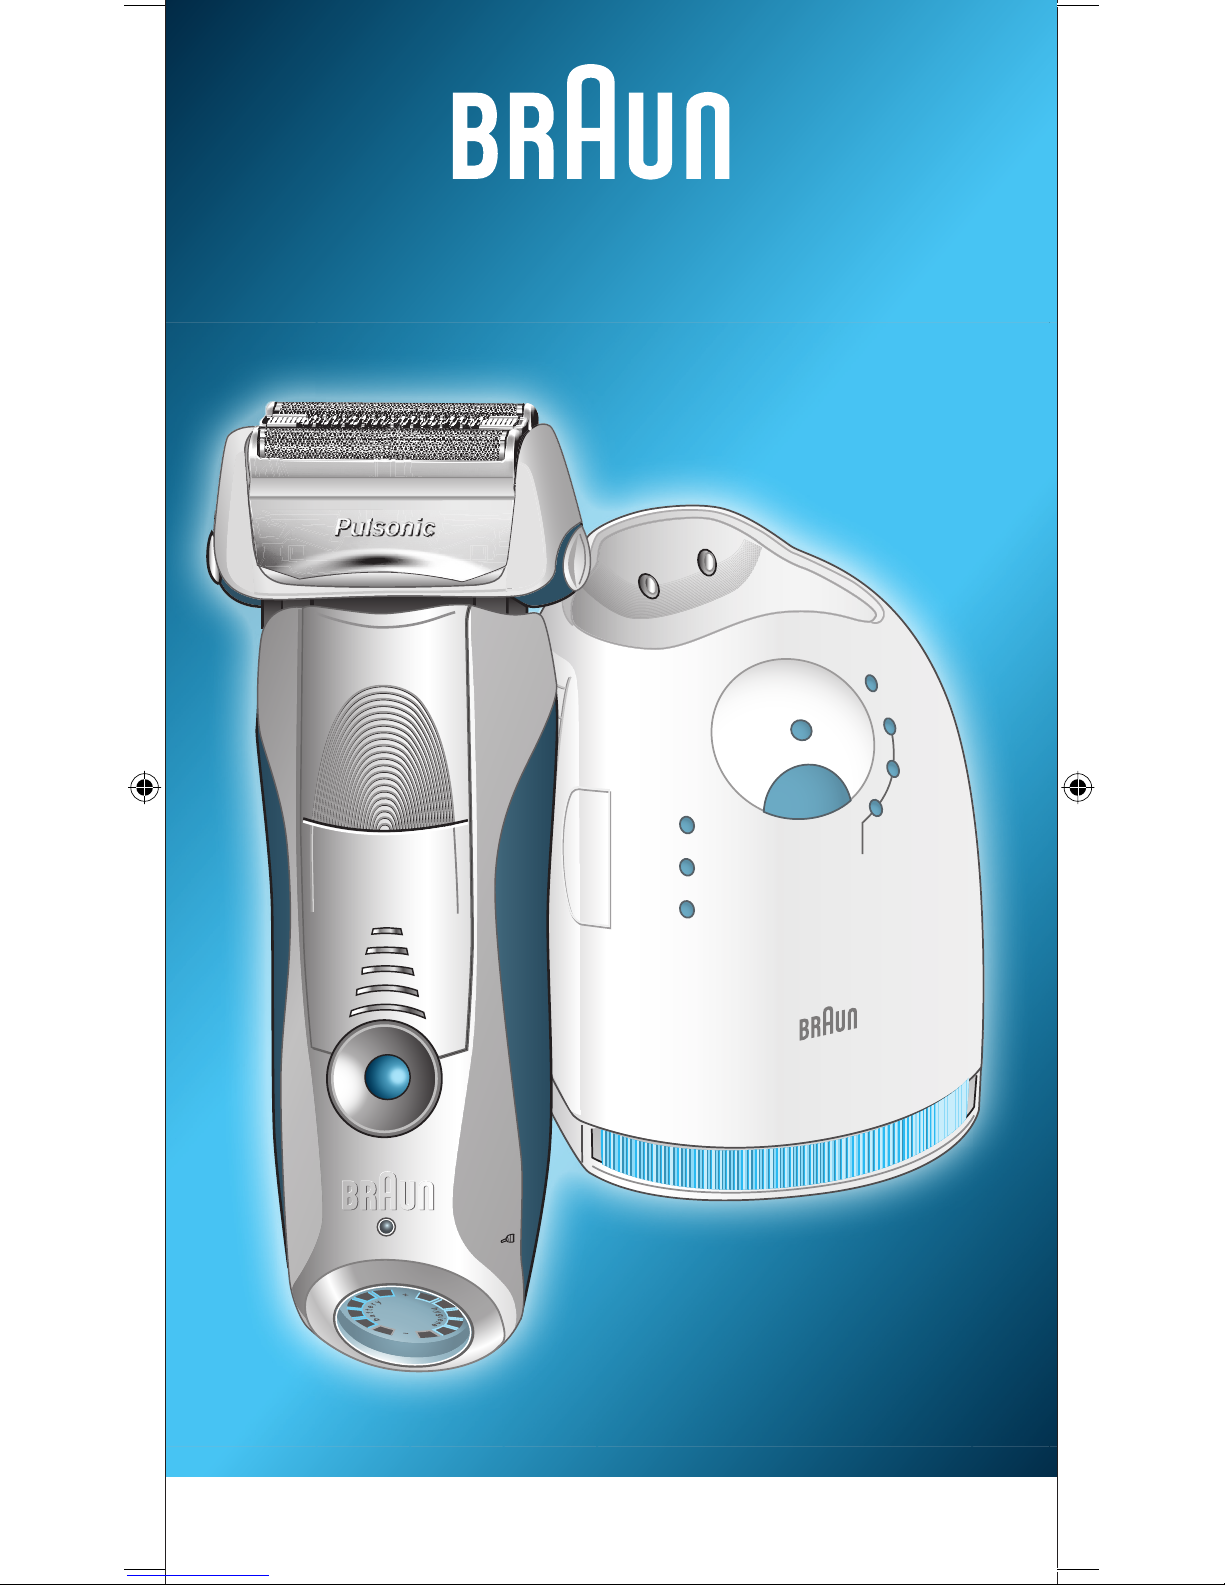
Braun pulsonic 9595, PULSONIC 9585 User Manual
www.braun.com/register
Type 5671
9595
high
clean
eco
normal
intensive
auto select
low
empty
s
t
a
r
t
c
l
e
a
n
i
n
g
f
a
s
t
c
l
e
a
n
washable
washable
reset
9595
trimmer
trimmer
trimmer
on
offonoff
Pulsonic
®
Braun Infolines
GB
0800 783 70 10
IRL
1 800 509 448
F
0 810 309 780
B
0 800 14 592
PL
0 801 127 286
0 801 1 BRAUN
TR
0212 - 473 75 85
RUS
+ 7 495 258 62 70
UA
+ 38 044 417 24 15
HK
852-25249377
(Audio Supplies Company Ltd.)
English 4
Français 11
Polski 19
âesk˘ 28
Slovensk˘ 36
Magyar 44
Hrvatski 52
Slovenski 60
Türkçe 67
кЫТТНЛИ 74
ì͇ªÌҸ͇ 84
104
Braun GmbH
Frankfurter Straße 145
61476 Kronberg/Germany
5-671-451/00/X-06/M
GB/F/PL/CZ/SK/H/HR/SLO/TR/
RUS/UA/Arab
Printed in Germany
4
Our products are designed to meet the highest
standards of quality, functionality and design.
We hope you enjoy your new Braun Shaver.
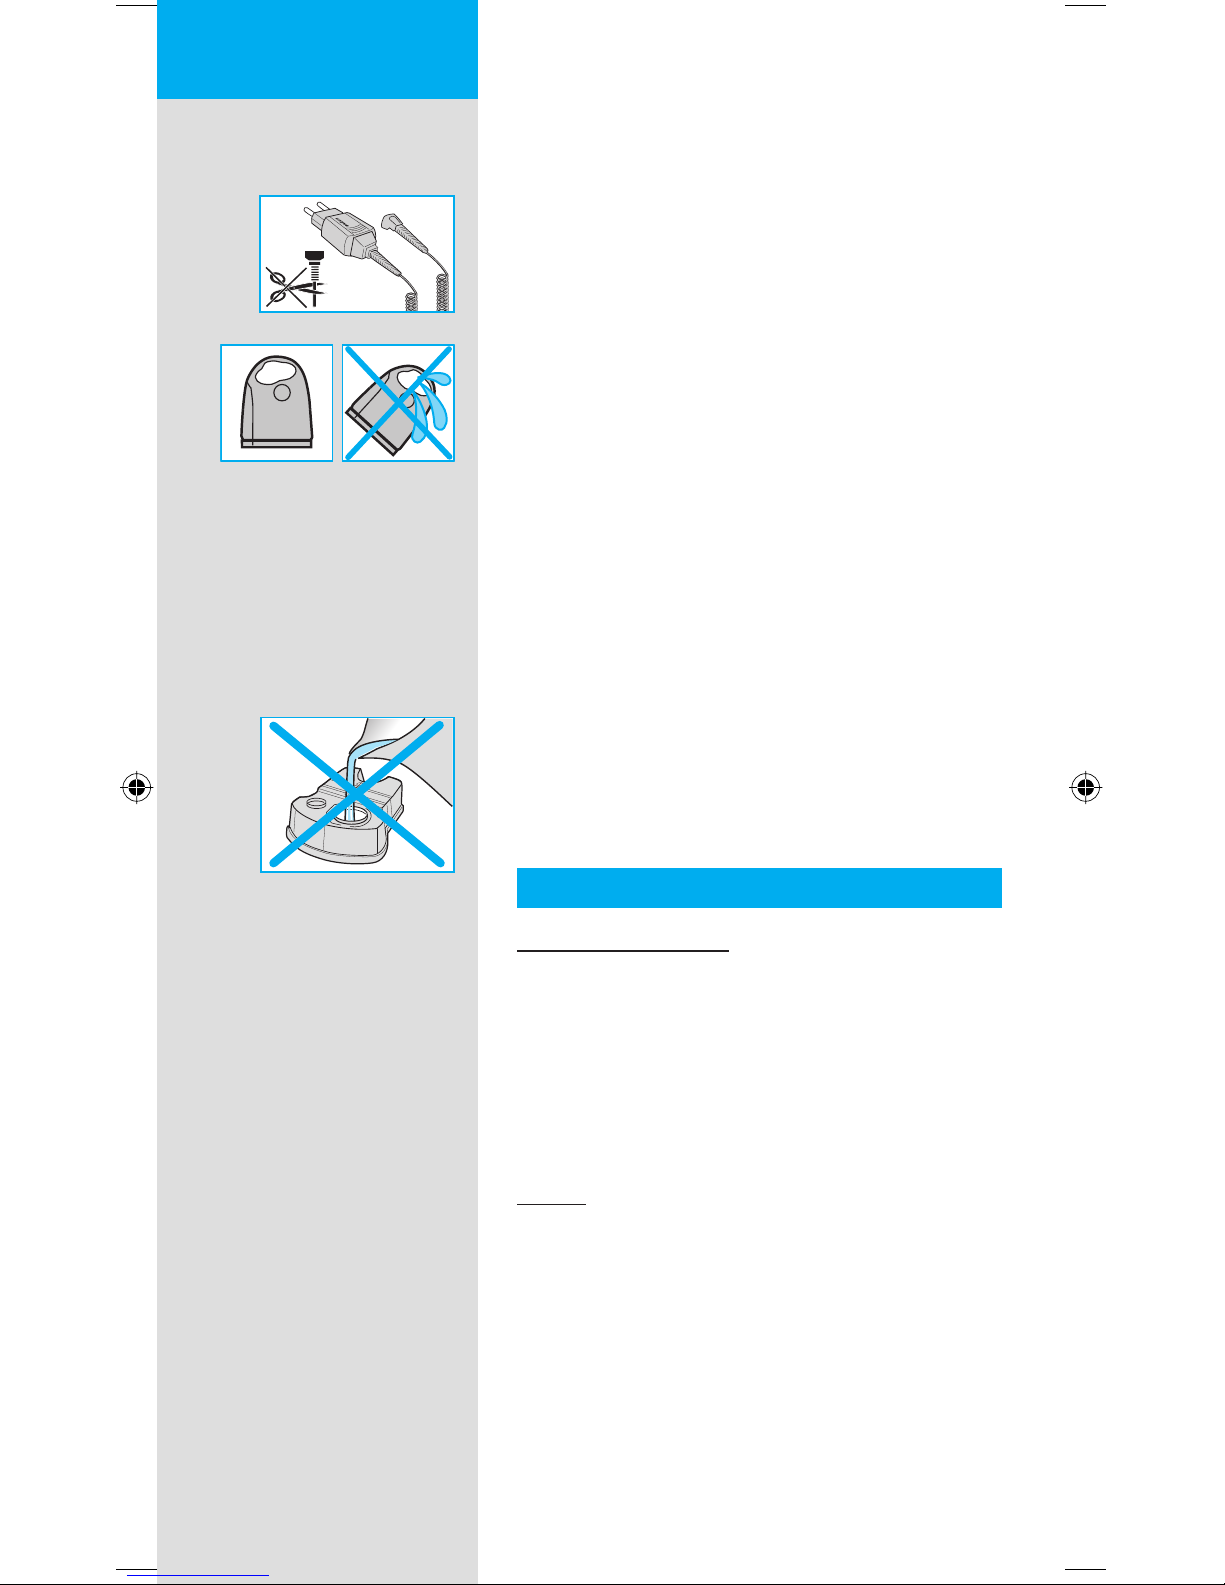
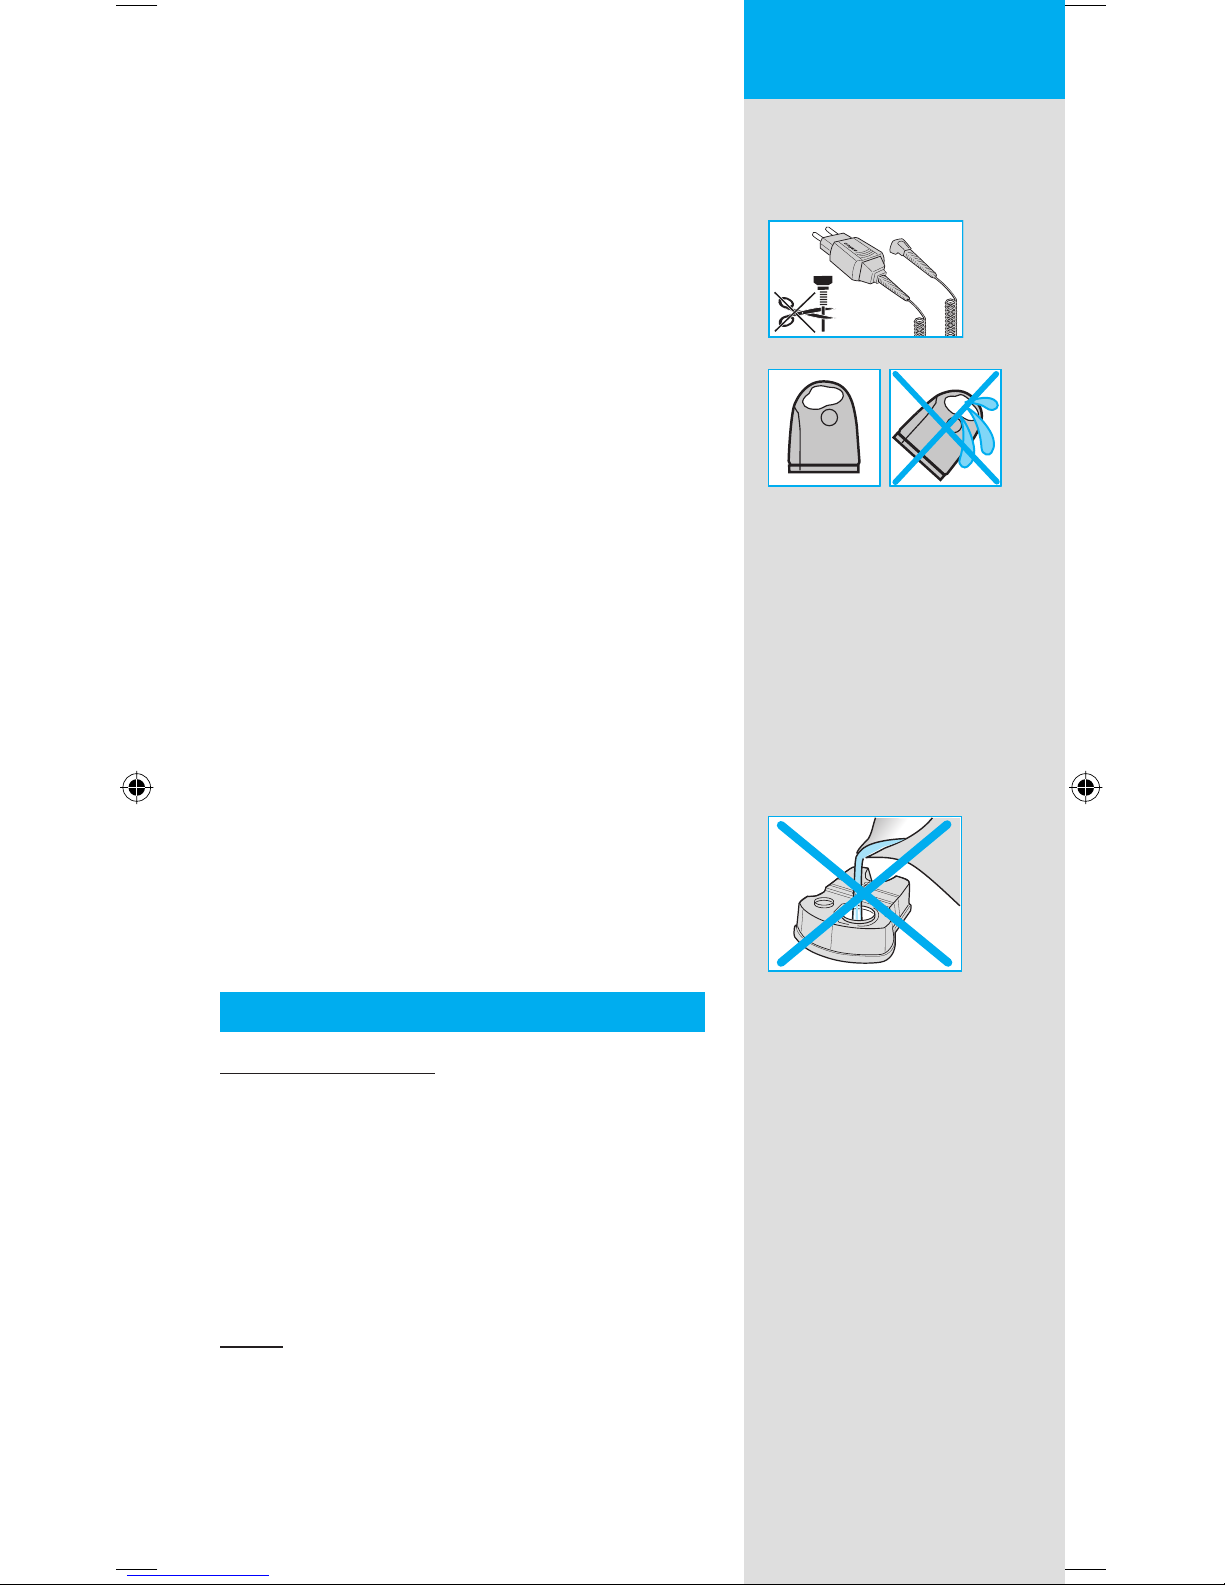
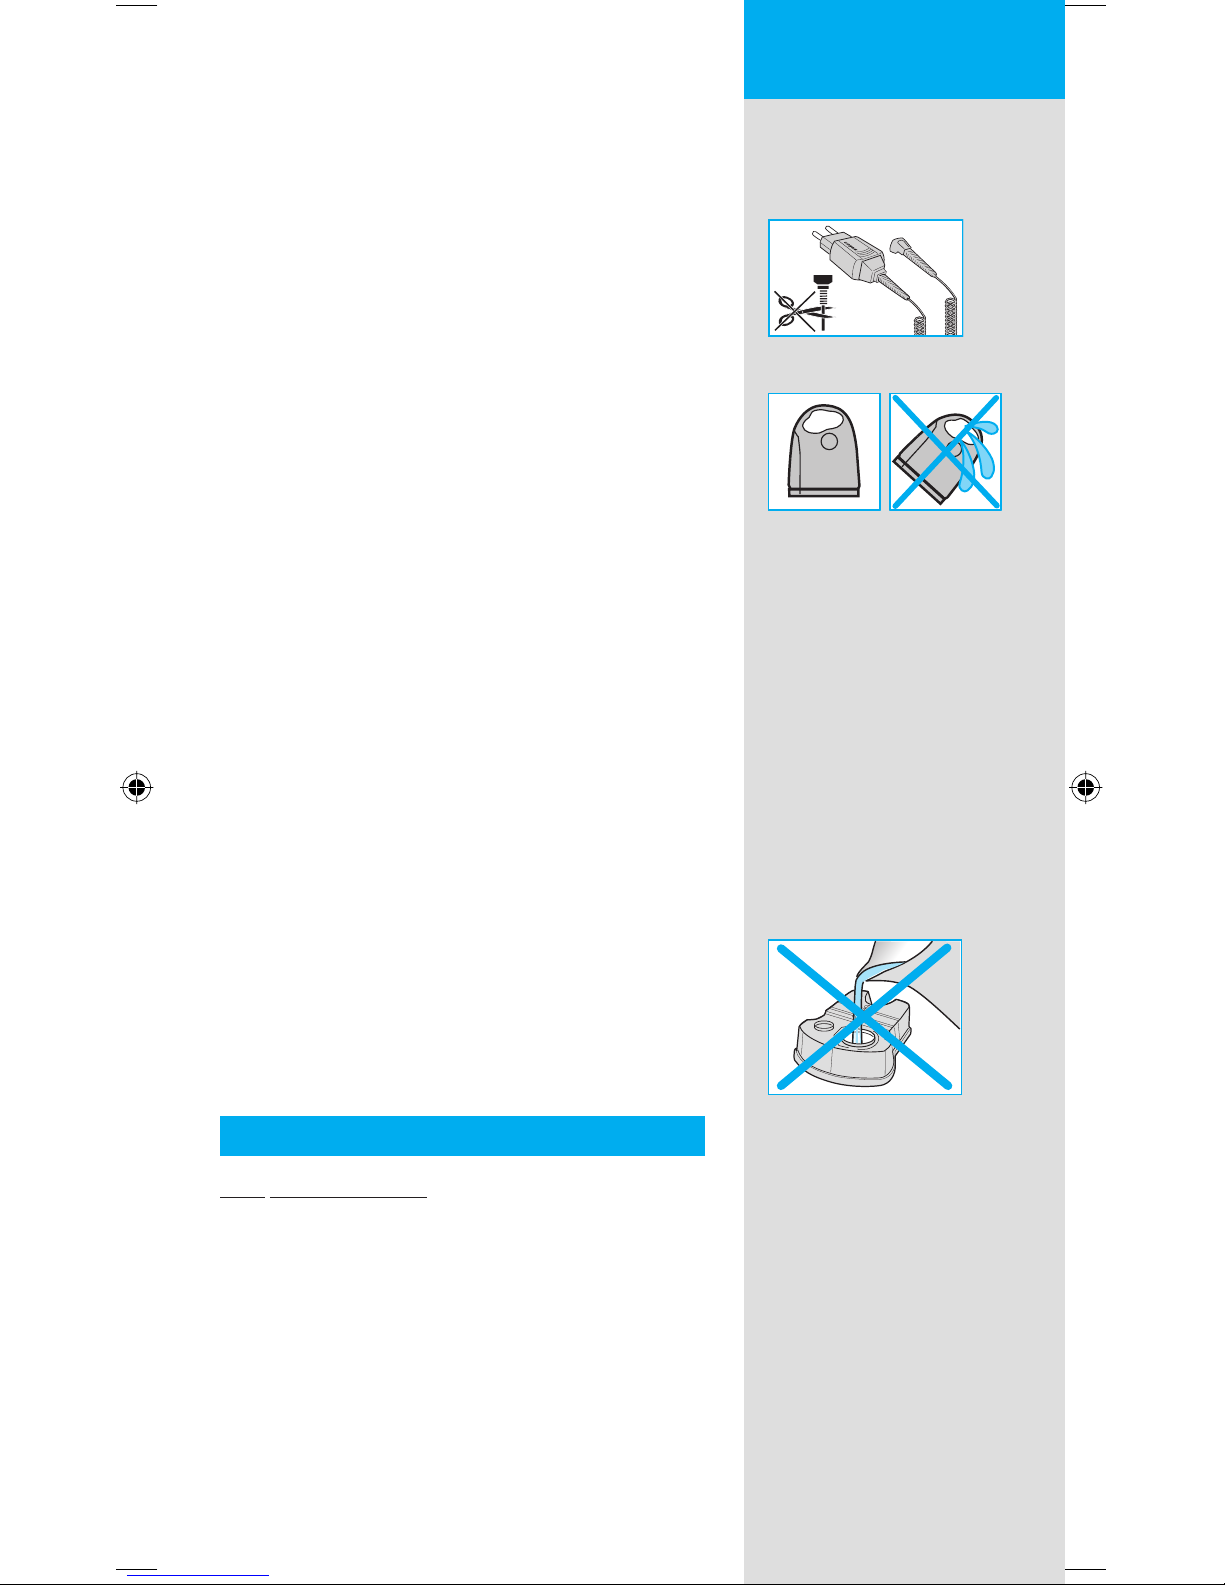
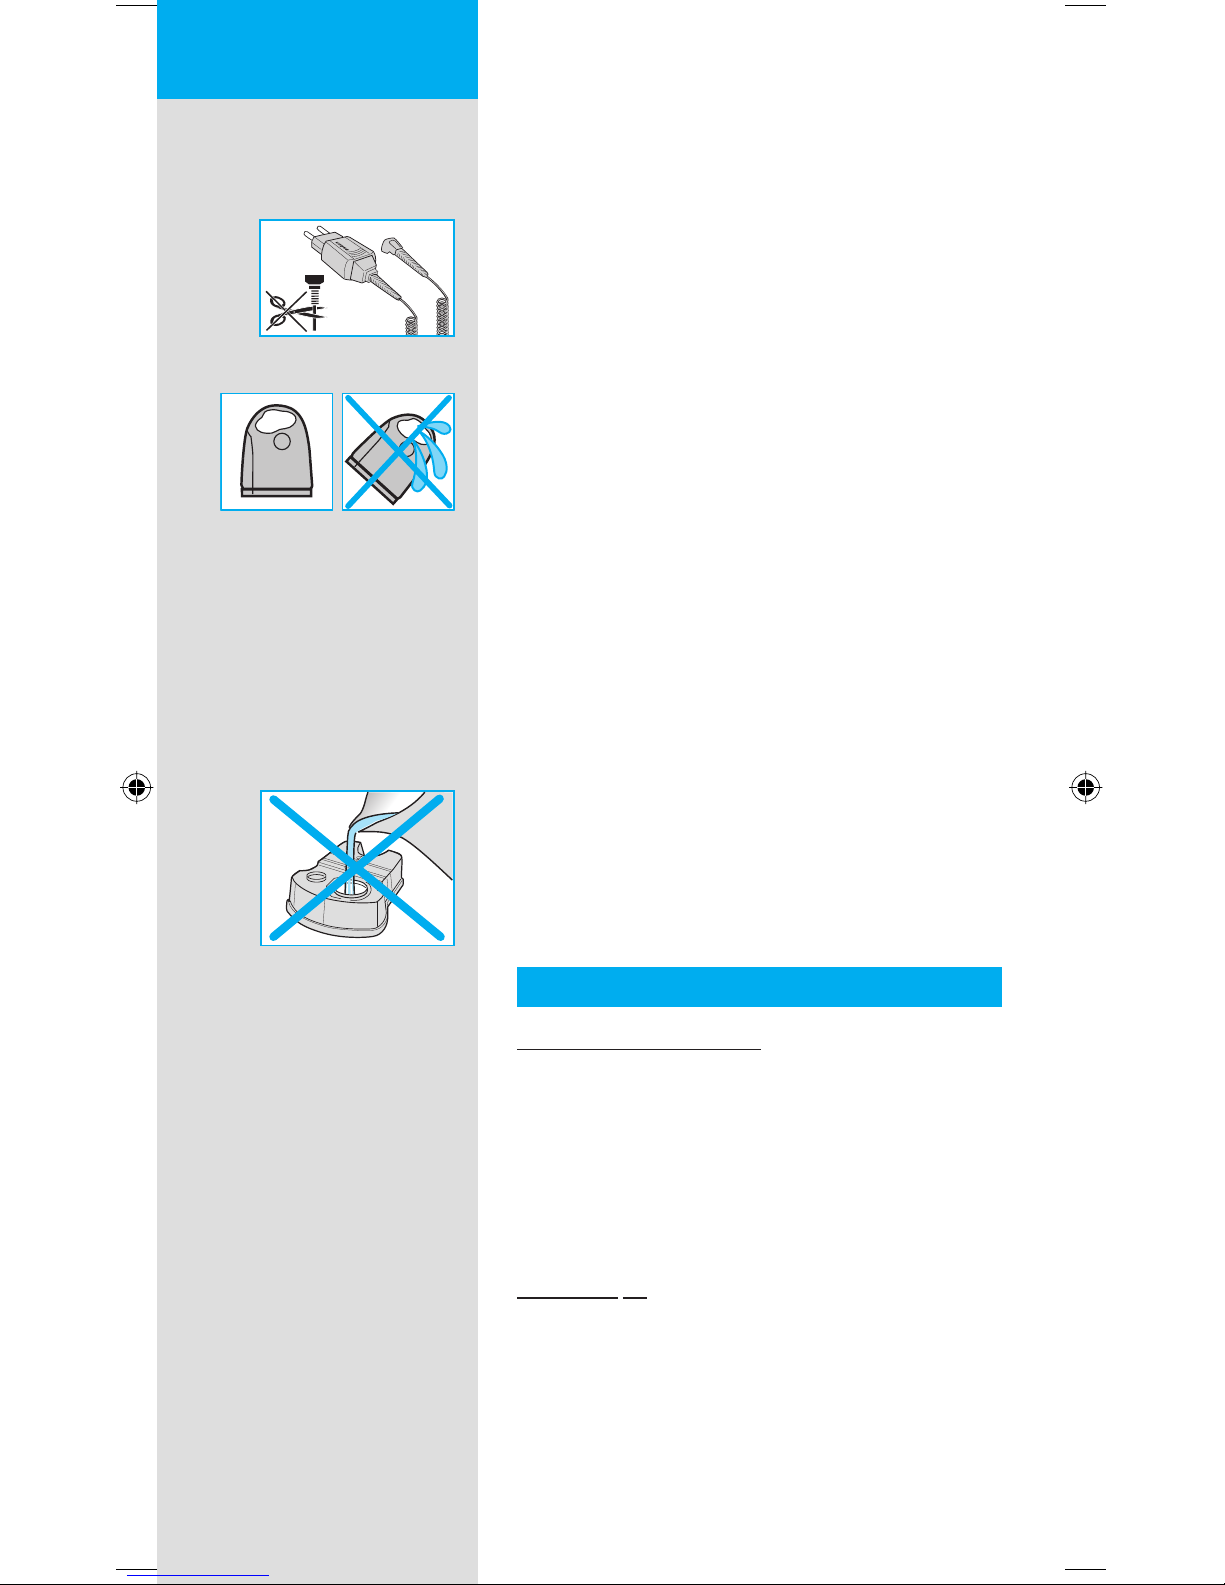
Warning
Your Pulsonic shaving system is provided with
a special cord set, which has an integrated
Safety Extra Low Voltage power supply. Do not
exchange or tamper with any part of it, otherwise
there is risk of an electric shock.
To prevent the cleaning fl uid from leaking, ensure
that the Clean&Renew station is placed on a fl at
surface. When a cleaning cartridge is installed,
do not tip, move suddenly or transport the
station in any way as cleaning fl uid might spill
out of the cartridge. Do not place the station
inside a mirror cabinet, nor place it on a polished
or lacquered surface.
The cleaning cartridge contains a highly
fl ammable liquid so keep it away from sources
of ignition. Do not expose to direct sunlight and
cigarette smoking nor store it over a radiator.
Keep it out of reach of children.
Do not refi ll the cartridge and use only original
Braun refi ll cartridges.
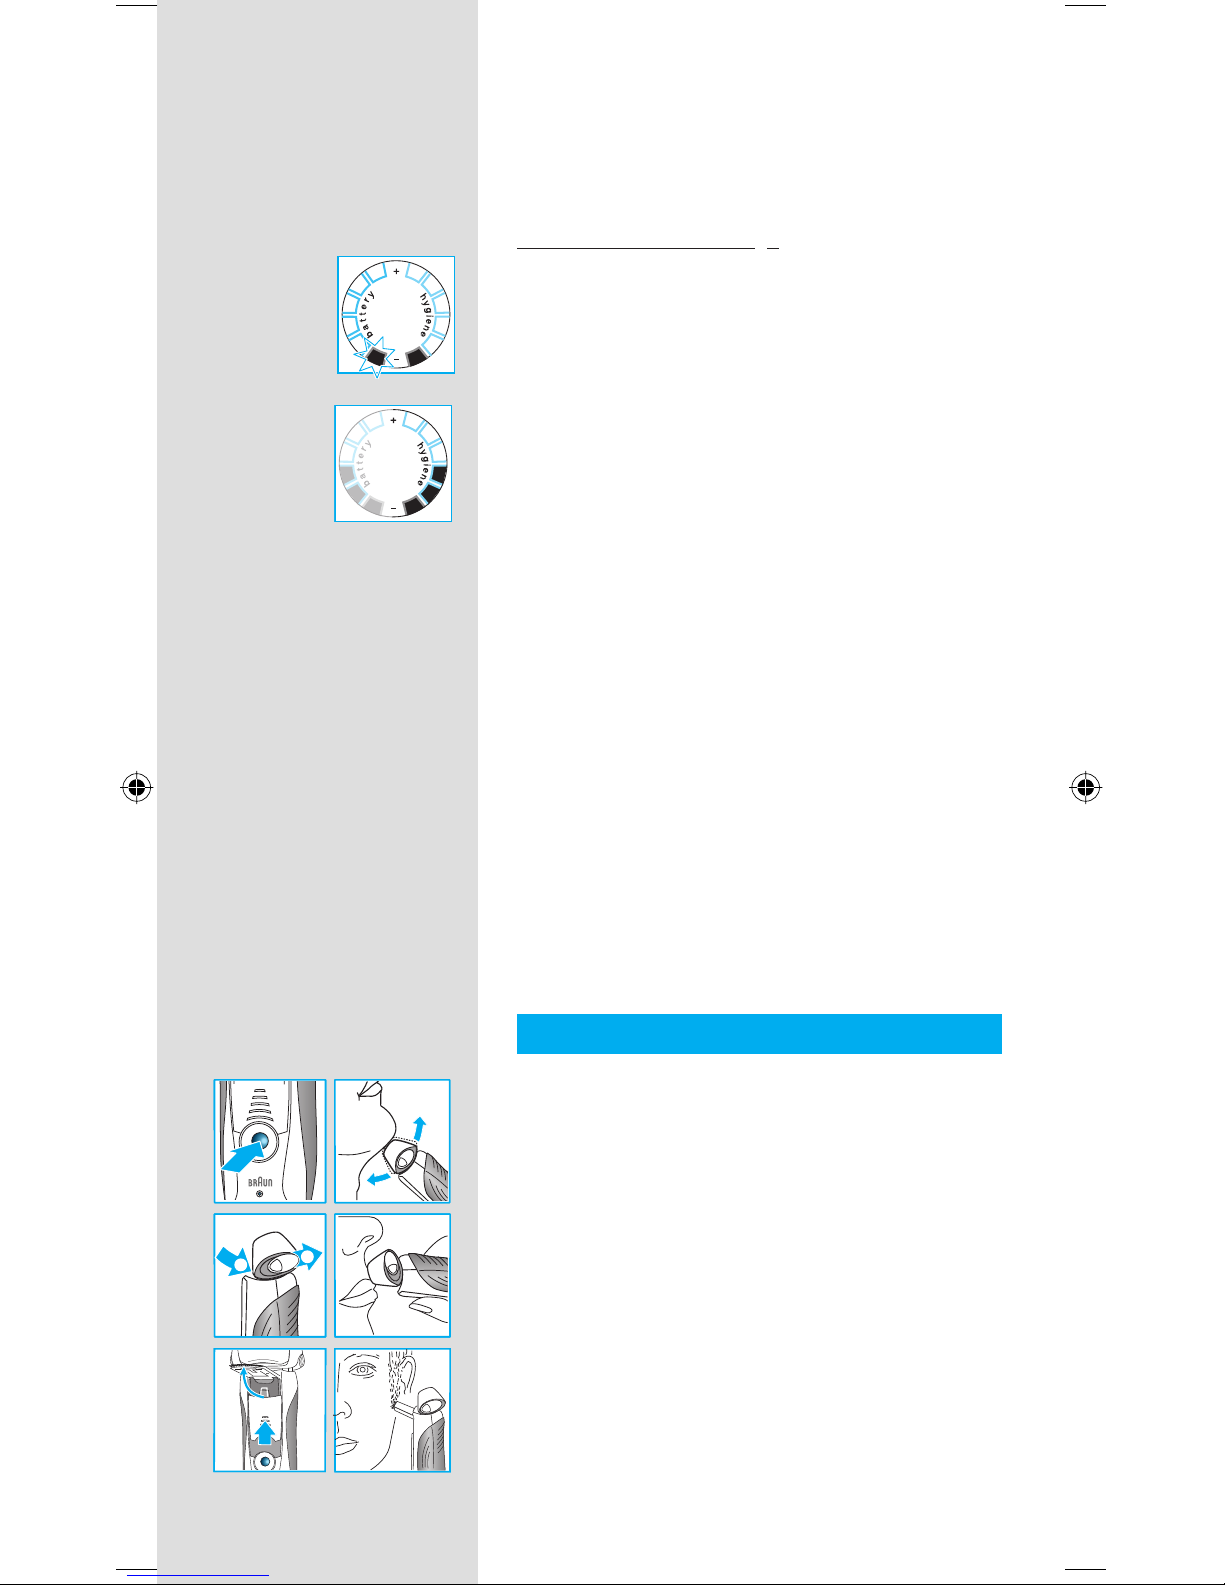
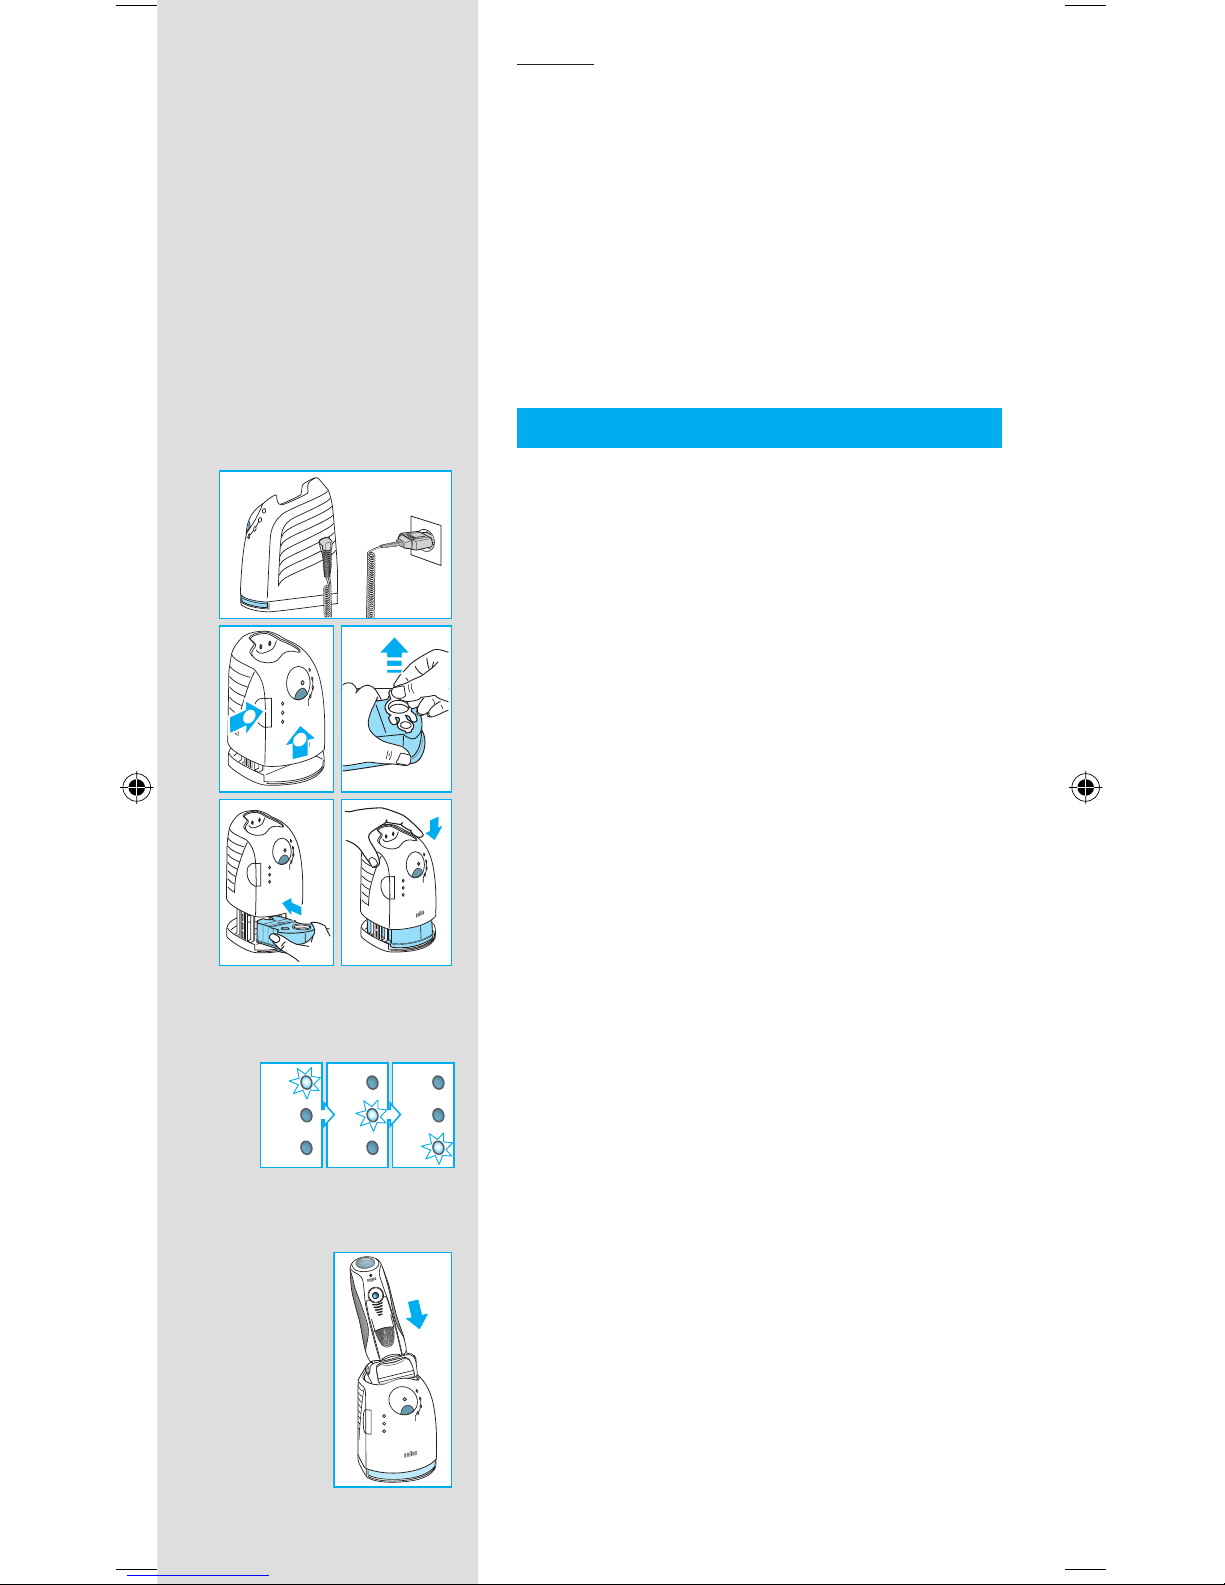
Description
Clean&Renew station
1 Cleaning fl uid display
2 Lift button for cartridge exchange
3 Station-to-shaver contacts
4 «start cleaning» button
D «fast clean» button
5 Cleaning program diodes
6 Station power socket
7 Cleaning cartridge
Shaver
8 Foil & cutter cassette
9 Cassette release button
0 Shaver head «lock» switch
q Pop-out long hair trimmer
w On/off switch
e «reset» button
r Shaver display
t Shaver-to-station contacts
z Shaver power socket
u Travel case
i Special cord set
STOPSTOP
English
5
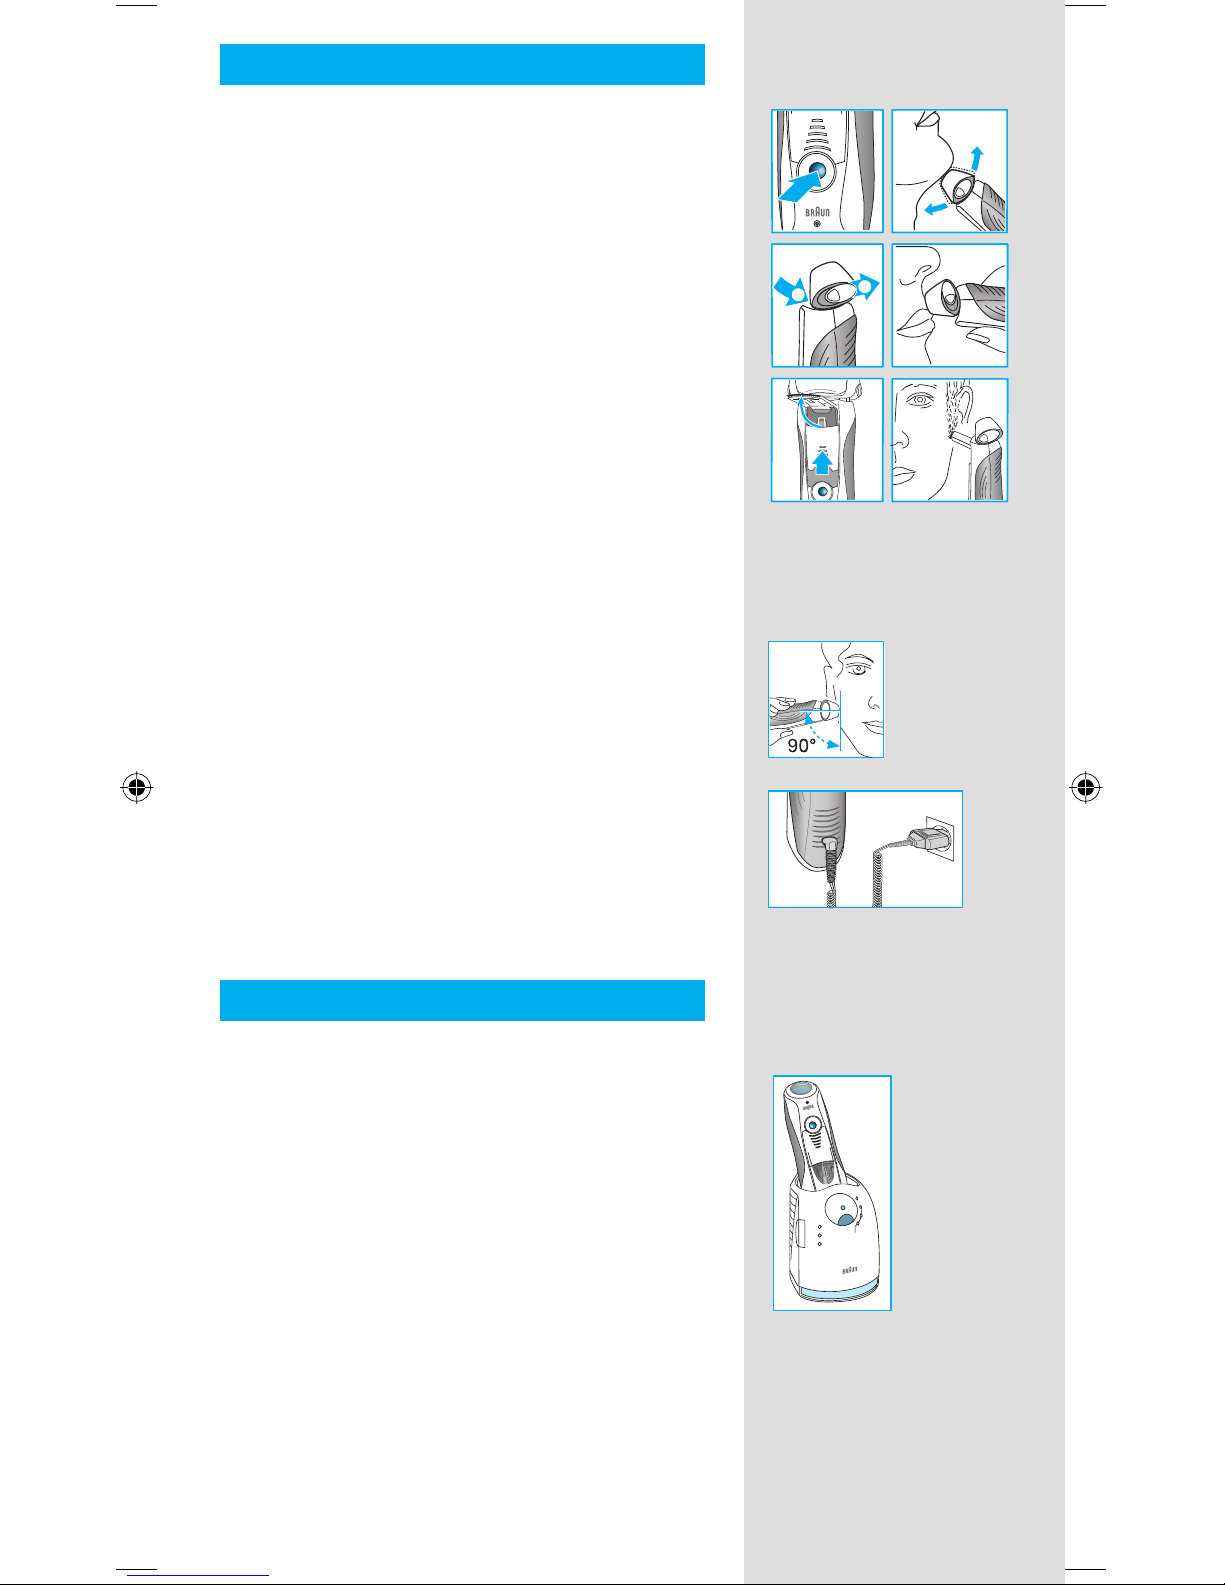
Before shaving
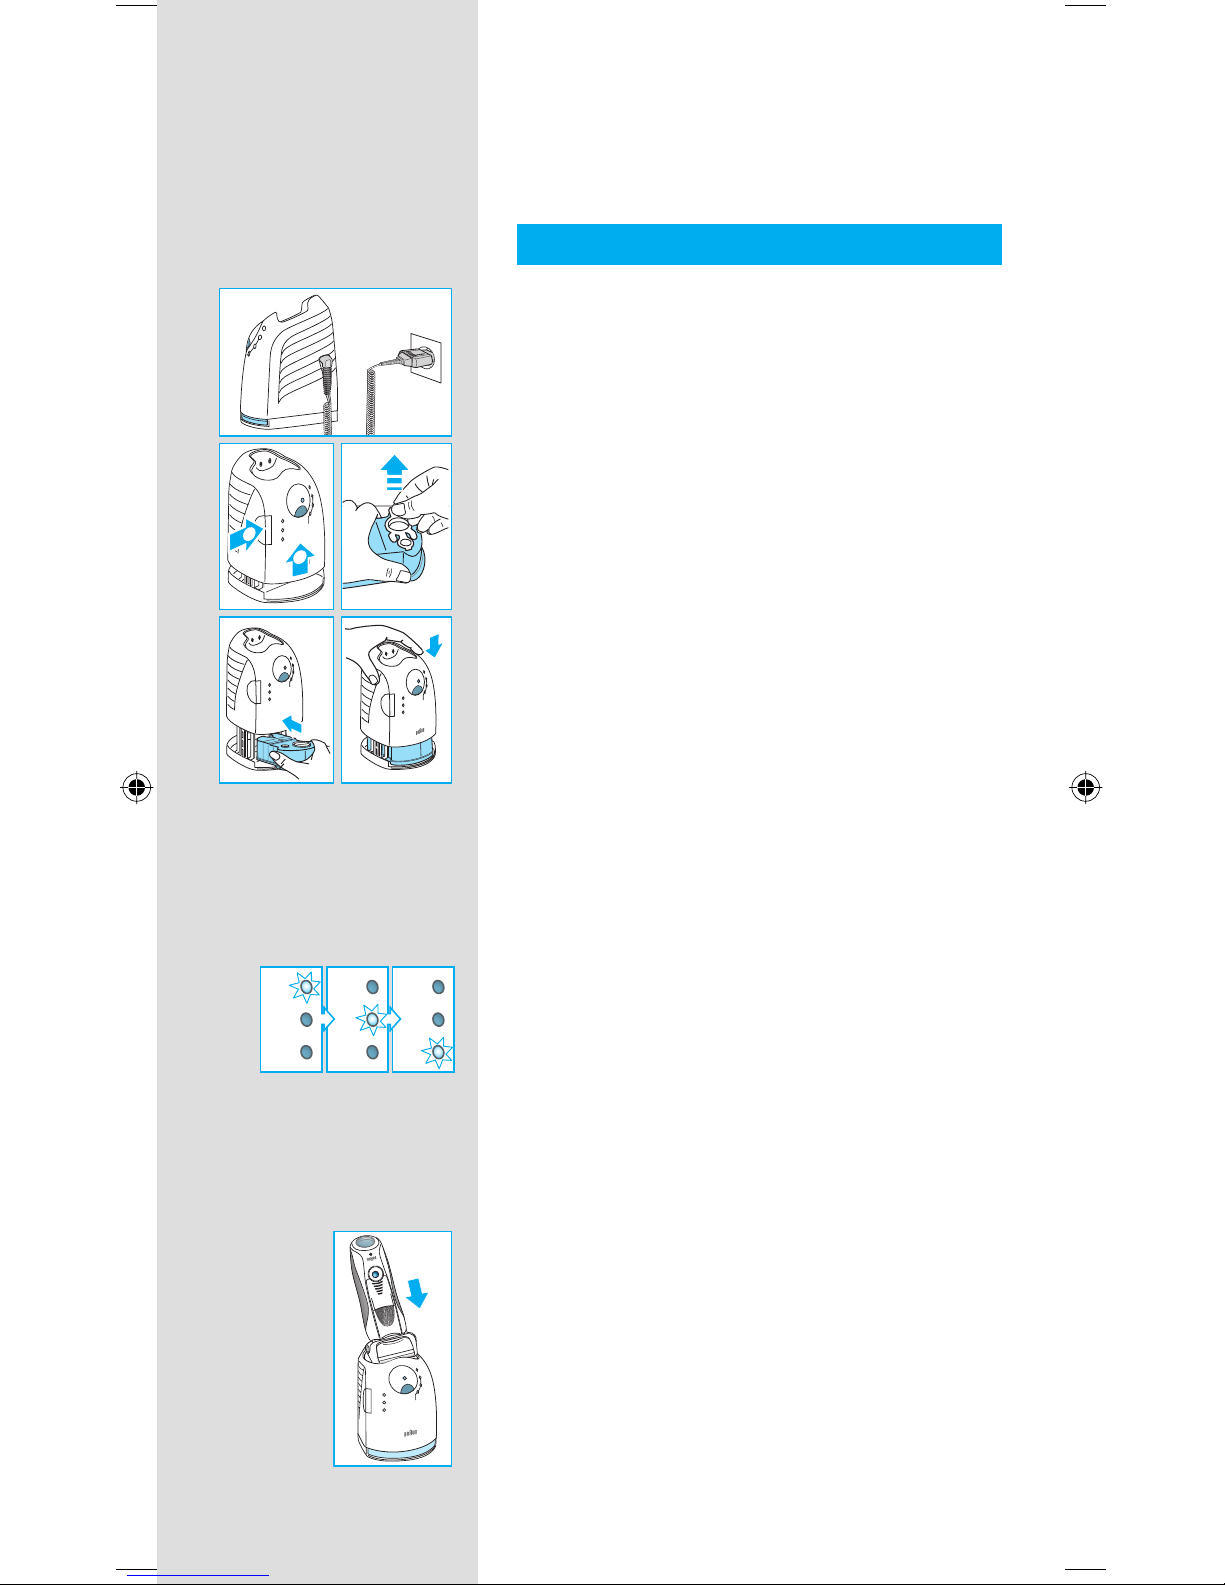
Prior to fi rst use you must connect the shaver to
an electrical outlet using the special cord set i
or alternatively proceed as below.
Installing the Clean&Renew station
• Using the special cord set i, connect the
station power socket 6 to an electrical outlet.
• Press the lift button
2 to open the housing.
• Hold the cleaning cartridge 7 down on a fl at,
stable surface (e.g. table).
• Carefully remove the lid from the cartridge.
• Slide the cartridge into the base of the station
as far as it will go.
• Slowly close the housing by pushing it down
until it locks.
The cleaning fl uid display 1 will show how much
fl uid is in the cartridge:
«high» up to 30 cleaning cycles available
«low» up to 7 cleaning cycles remaining
«empty» new cartridge required
Charging and cleaning the shaver
Insert the shaver head down into the cleaning
station. (The contacts t on the back of the
shaver will align with the contacts 3 in the
cleaning station).
If required, the Clean&Renew station will now
charge the shaver. The hygiene status of the
shaver will also be analyzed and one of the
following cleaning program diodes 5 will light
up:
«clean» shaver is clean
«eco» short economical cleaning required
«normal» normal level of cleaning required
«intensive» high intensive cleaning required
If the station selects one of the required cleaning
programs, it will not start unless you press the
«start cleaning» button 4. For best shaving
results, we recommend cleaning after each
shave.
new
f
a
s
t
c
l
e
a
n
high
cle
an
e
co
n
orm
a
l
intensive
a
u
to
s
e
le
c
t
low
empty
s
t
a
r
t
c
l
e
a
n
i
n
g
cle
an
eco
nor
mal
in
te
n
s
ive
a
u
to
sel
e
c
t
f
a
s
t
c
l
e
a
n
high
clean
eco
normal
intensive
au
to select
low
empty
s
t
a
r
t
c
l
e
a
n
i
n
g
f
a
s
t
c
l
e
a
n
high
clean
eco
normal
intensive
auto select
low
empty
s
t
a
r
t
c
l
e
a
n
i
n
g
2
1
f
a
s
t
c
l
e
a
n
f
a
s
t
c
l
e
a
n
f
a
s
t
c
l
e
a
n
high
low
empty
high
low
empty
high
low
empty
high
low
empty
high
low
empty
high
low
empty
high
clean
eco
normal
intensive
auto select
low
empty
s
t
a
r
t
c
l
e
a
n
i
n
g
w
ashable
trim
mer
reset
f
a
s
t
c
l
e
a
n
high
clean
eco
normal
intensive
auto select
low
empty
s
t
a
r
t
c
l
e
a
n
i
n
g
w
ashable
trim
mer
reset
f
a
s
t
c
l
e
a
n
auto select
intensive
normal
eco
clean
s
t
a
r
t
c
l
e
a
n
i
n
g
f
a
s
t
c
l
e
a
n
auto select
intensive
normal
eco
clean
s
t
a
r
t
c
l
e
a
n
i
n
g
f
a
s
t
c
l
e
a
n
high
clean
eco
normal
intensive
auto select
low
washable
s
t
a
r
t
c
l
e
a
n
i
n
g
f
a
s
t
c
l
e
a
n
high
clean
eco
normal
intensive
auto select
low
washable
s
t
a
r
t
c
l
e
a
n
i
n
g
f
a
s
t
c
l
e
a
n
6
Whilst cleaning is in progress, the respective
cleaning program diode will blink. Each cleaning
program consists of several cycles, where
cleaning fl uid is fl ushed through the shaver head
and a heat drying process dries the shaver.
Depending on the program selected the total
cleaning time will range from 32 to 43 minutes.
The cleaning programs should not be
interrupted. Please note that whilst the shaver is
drying, the shaving head may be hot and wet.
When the program is fi nished, the blue «clean»
diode will light up. Your shaver is now clean and
ready for use.
Fast cleaning
Push the «fast clean» button
D to activate
the fast clean program without drying. This
program takes about 25 seconds only and is
recommended when you do not have time to
wait for one of the automatic cleaning programs.
If you remove the shaver just after the program
has fi nished, wipe off the shaver head with a
tissue to avoid dripping.
Stand-by mode
10 minutes after completing the charging or
cleaning session, the Clean&Renew station
switches to the stand-by mode: The diodes of
the Clean&Renew station turns off.
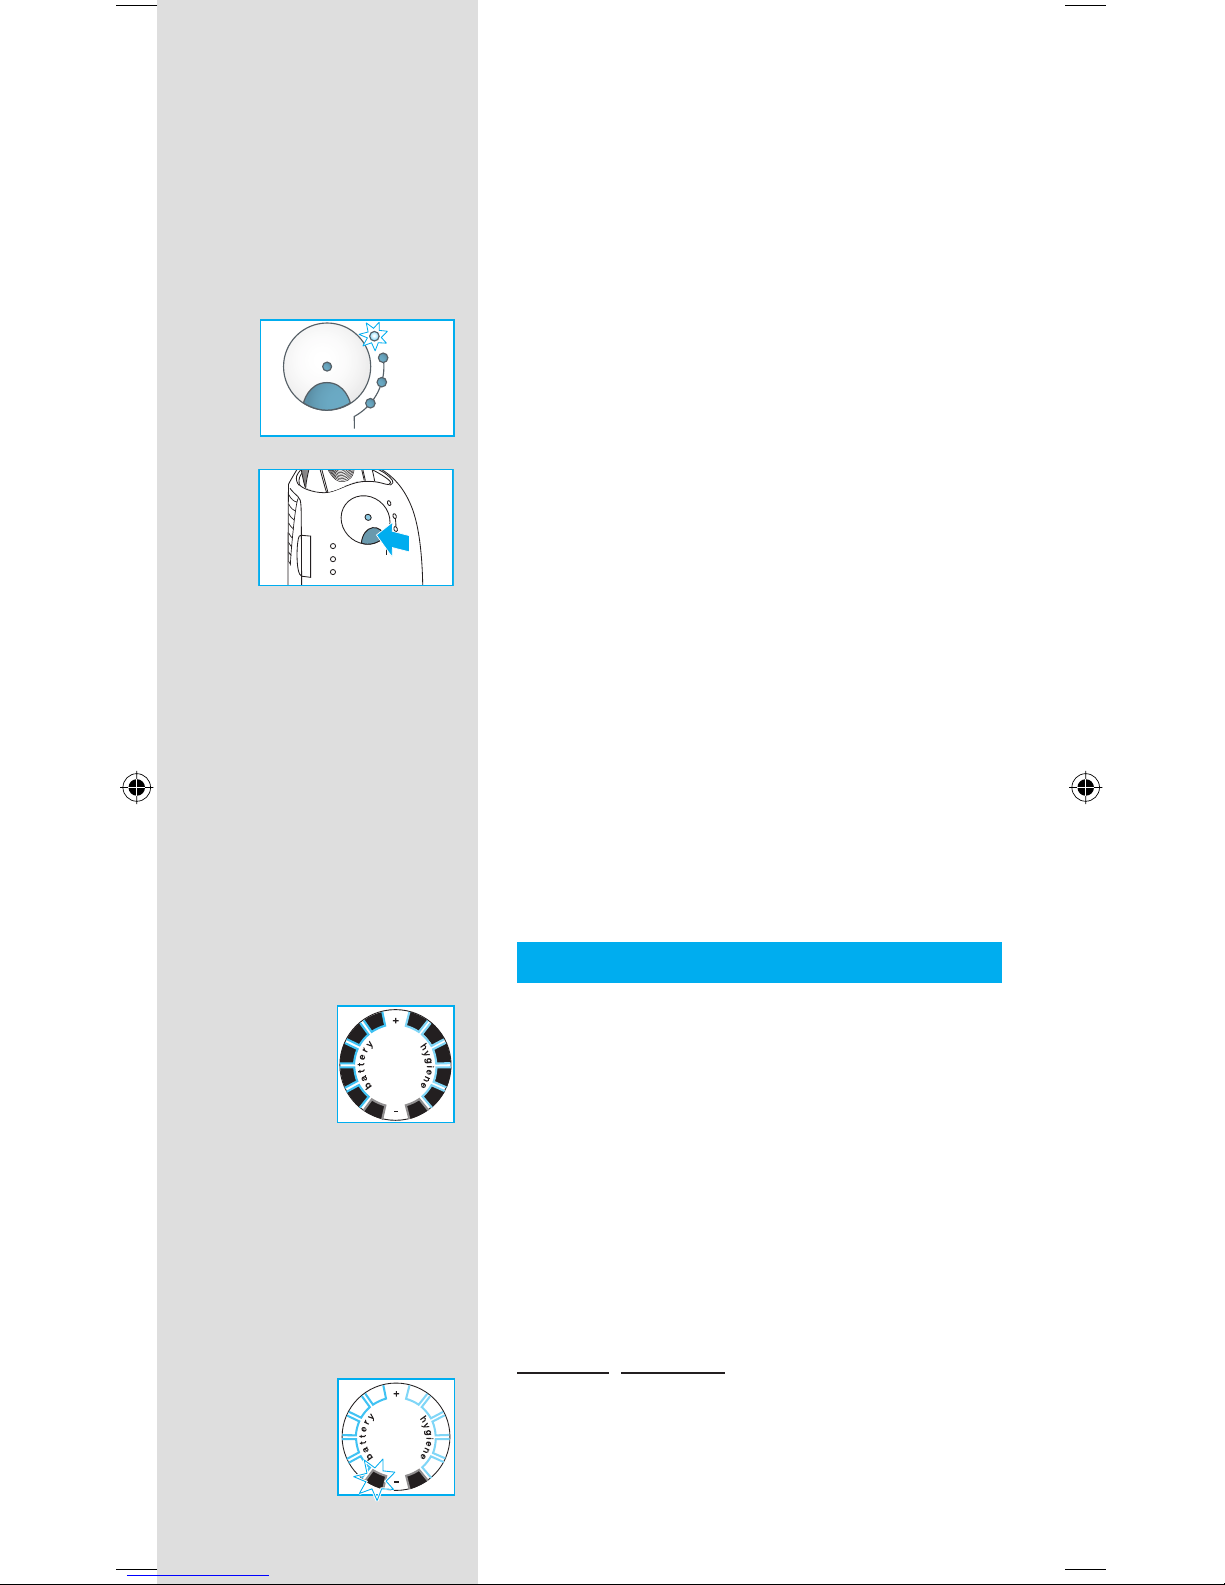
Shaver display
The shaver display r shows the charge status of
the battery on the left, and the hygiene status on
the right. (6 dark segments are shown on each
side when the battery is fully charged and the
shaver is hygienically clean.)
Battery segments:
During charging or when using the shaver, the
respective battery segments will blink. When
fully charged all 6 segments are shown. With
decreasing charge the segments gradually
disappear.
Low charge indicator
The low charge segment provided with a red
frame blinks to indicate that the charge has
dropped below 20%. The remaining capacity is
suffi cient for 2 to 3 shaves.
auto select
intensive
normal
eco
clean
s
t
a
r
t
c
l
e
a
n
i
n
g
f
a
s
t
c
l
e
a
n
auto select
intensive
normal
eco
clean
s
t
a
r
t
c
l
e
a
n
i
n
g
f
a
s
t
c
l
e
a
n
high
clean
eco
normal
intensive
auto select
low
empty
washable
s
t
a
r
t
c
l
e
a
n
i
n
g
f
a
s
t
c
l
e
a
n
high
clean
eco
normal
intensive
auto select
low
empty
washable
s
t
a
r
t
c
l
e
a
n
i
n
g
f
a
s
t
c
l
e
a
n
7
Hygiene segments:
All 6 hygiene segments will appear after the
shaver has been cleaned in the Clean&Renew
station. When the shaver is being used, the
hygiene segments will gradually disappear.
Once the shaver is returned to the station, the
system will automatically select the appropriate
cleaning program and restore the segments
to maximum hygiene. Given that rinsing the
shaver under tap water is not as hygienic as the
cleaning station, the hygiene segments will only
restore themselves when the shaver has been
cleaned in the Clean&Renew station.
Charging information
• A full charge provides up to 50 minutes
of cordless shaving time. This may vary
according to your beard growth.
• The best environmental temperature for
charging is between 5 °C to 35 °C. Do not
expose the shaver to temperatures higher than
50 °C for extended periods of time.
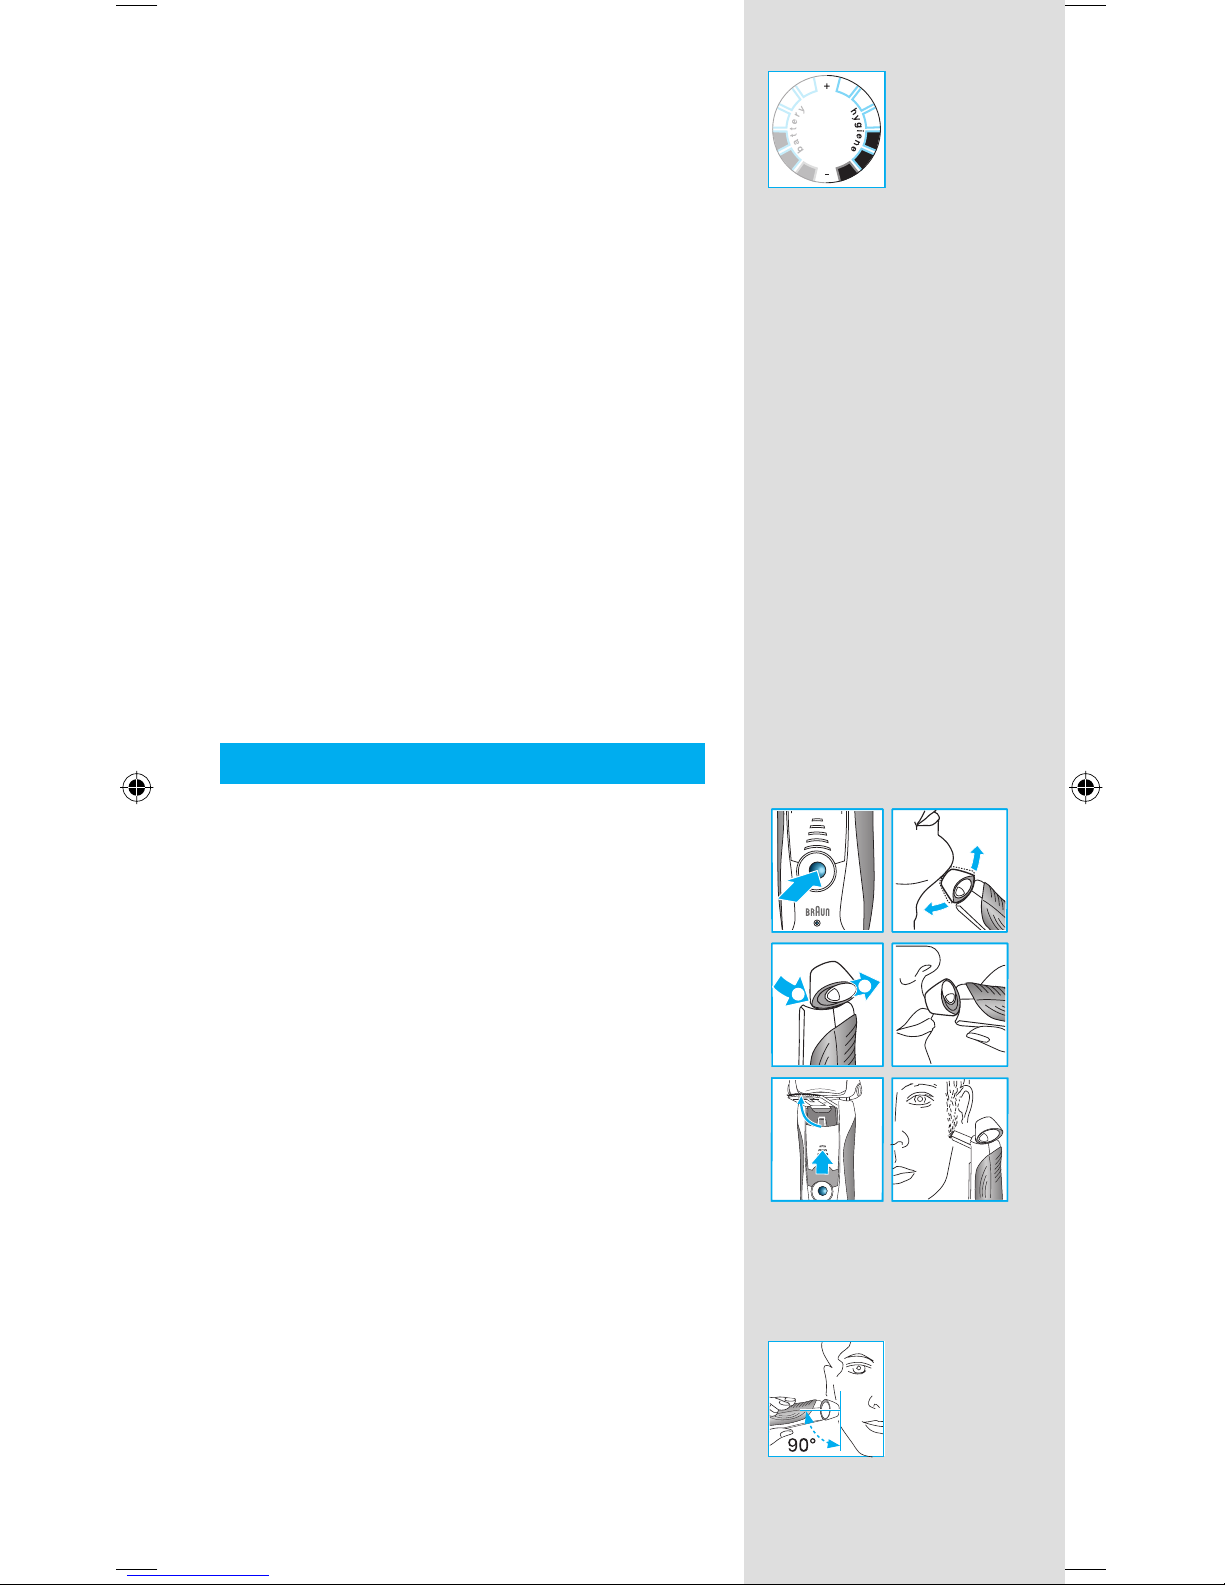
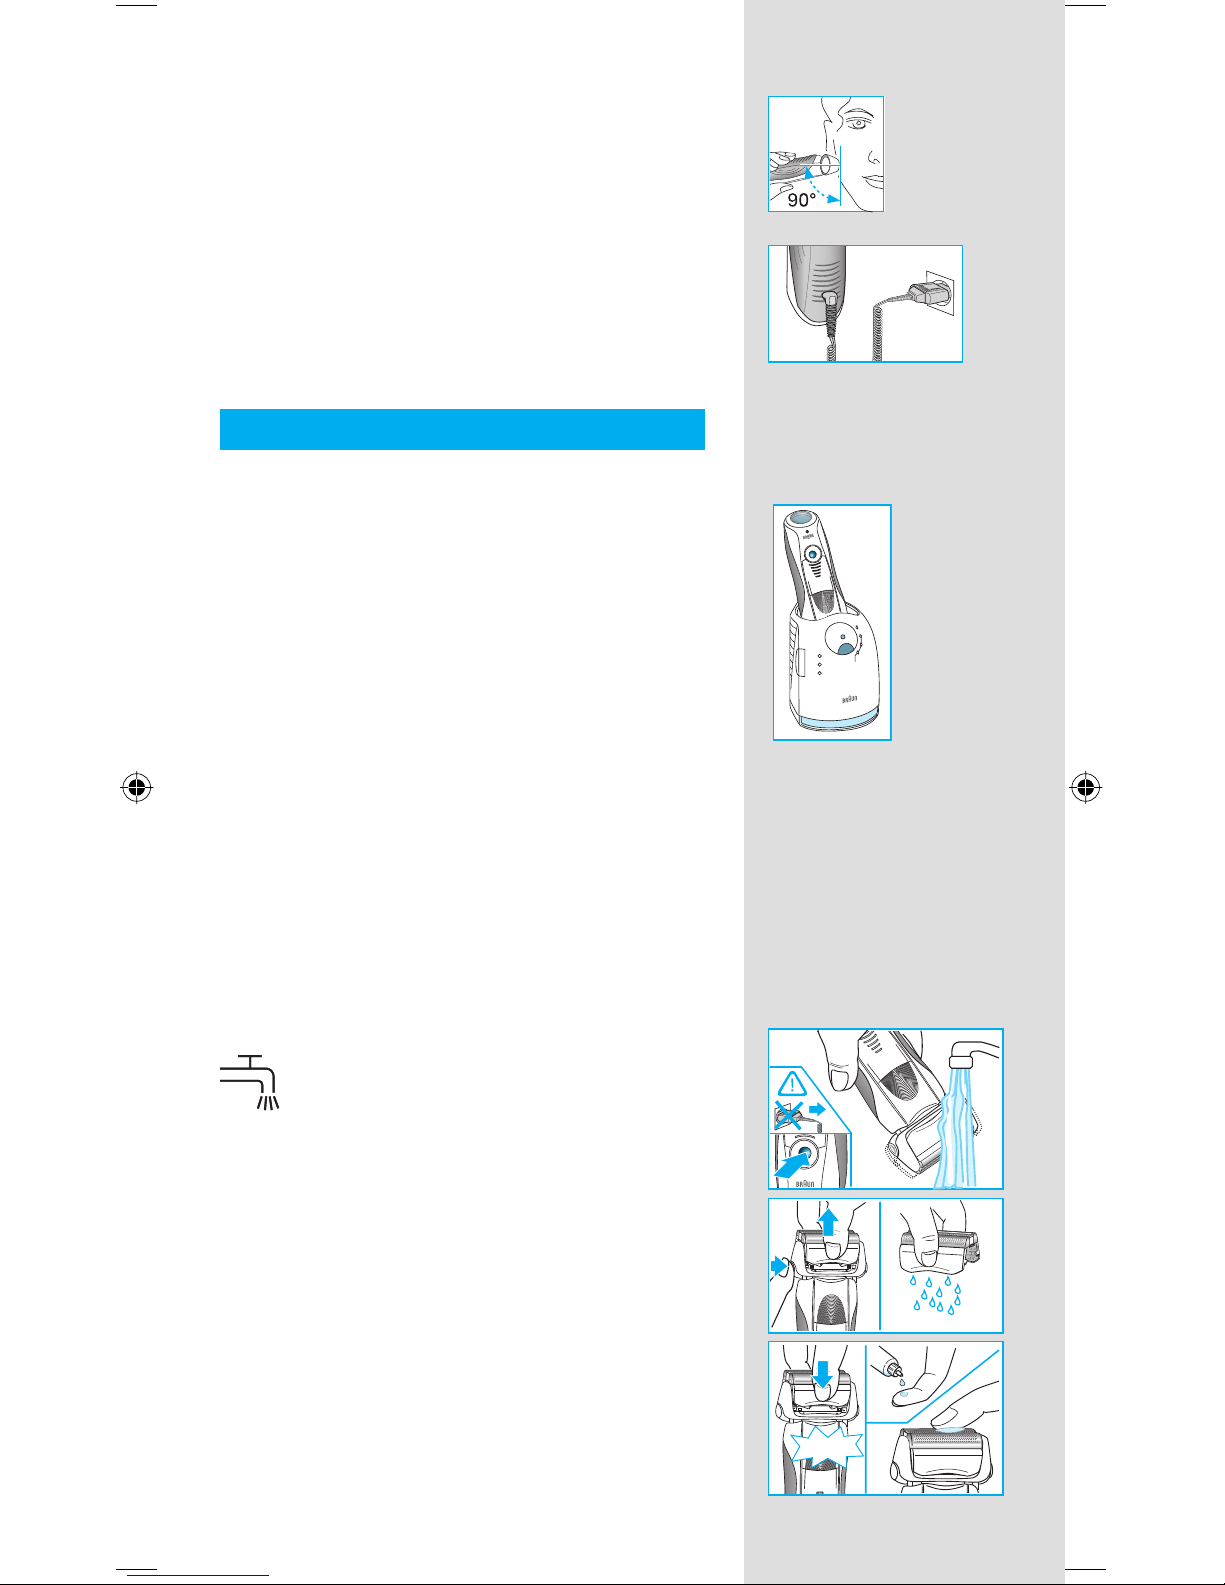
Shaving
Press the on/off switch w to operate the shaver:
• The pivoting shaver head and fl oating foils
automatically adjust to every contour of your
face.
• To shave hard to reach areas (e.g. under the
nose) slide the shaver head «lock» switch 0 to
the back position to lock the pivoting head at
an angle.
• To trim sideburns, moustache or beard, slide
the pop-out long hair trimmer q upwards.
Tips for the perfect shave
For best shaving results, Braun recommends you
follow 3 simple steps:
1. Always shave before washing your face.
2. At all times, hold the shaver at right angles
(90°) to your skin.
3. Stretch your skin and shave against the
direction of your beard growth.
tr
lock
1
2
trimmer
lock
lock
lock
on
on
off
off
tr
lock
1
2
trimmer
lock
lock
lock
on
on
off
off
releaserelea
se
8
Shaving with the cord
If the shaver has run out of power (discharged),
and you do not have the time to recharge it in the
Clean&Renew station, you may also shave with
the shaver connected to an electrical outlet via
the special cord set.
Cleaning
Automatic cleaning
After each shave, return the shaver to the
Clean&Renew station and proceed as described
above in the section «Before shaving».
All charging and cleaning needs are then
automatically taken care of. With daily use, a
cleaning cartridge should be suffi cient for about
30 cleaning cycles.
The hygienic cleaning cartridge contains alcohol,
which once opened will naturally evaporate
slowly into the surrounding air. Each cartridge,
if not used daily, should be replaced after
approximately 8 weeks.
The cleaning cartridge also contains lubricates,
which may leave residual marks on the outer foil
frame after cleaning. However, these marks can
be removed easily by wiping gently with a cloth
or soft tissue paper.
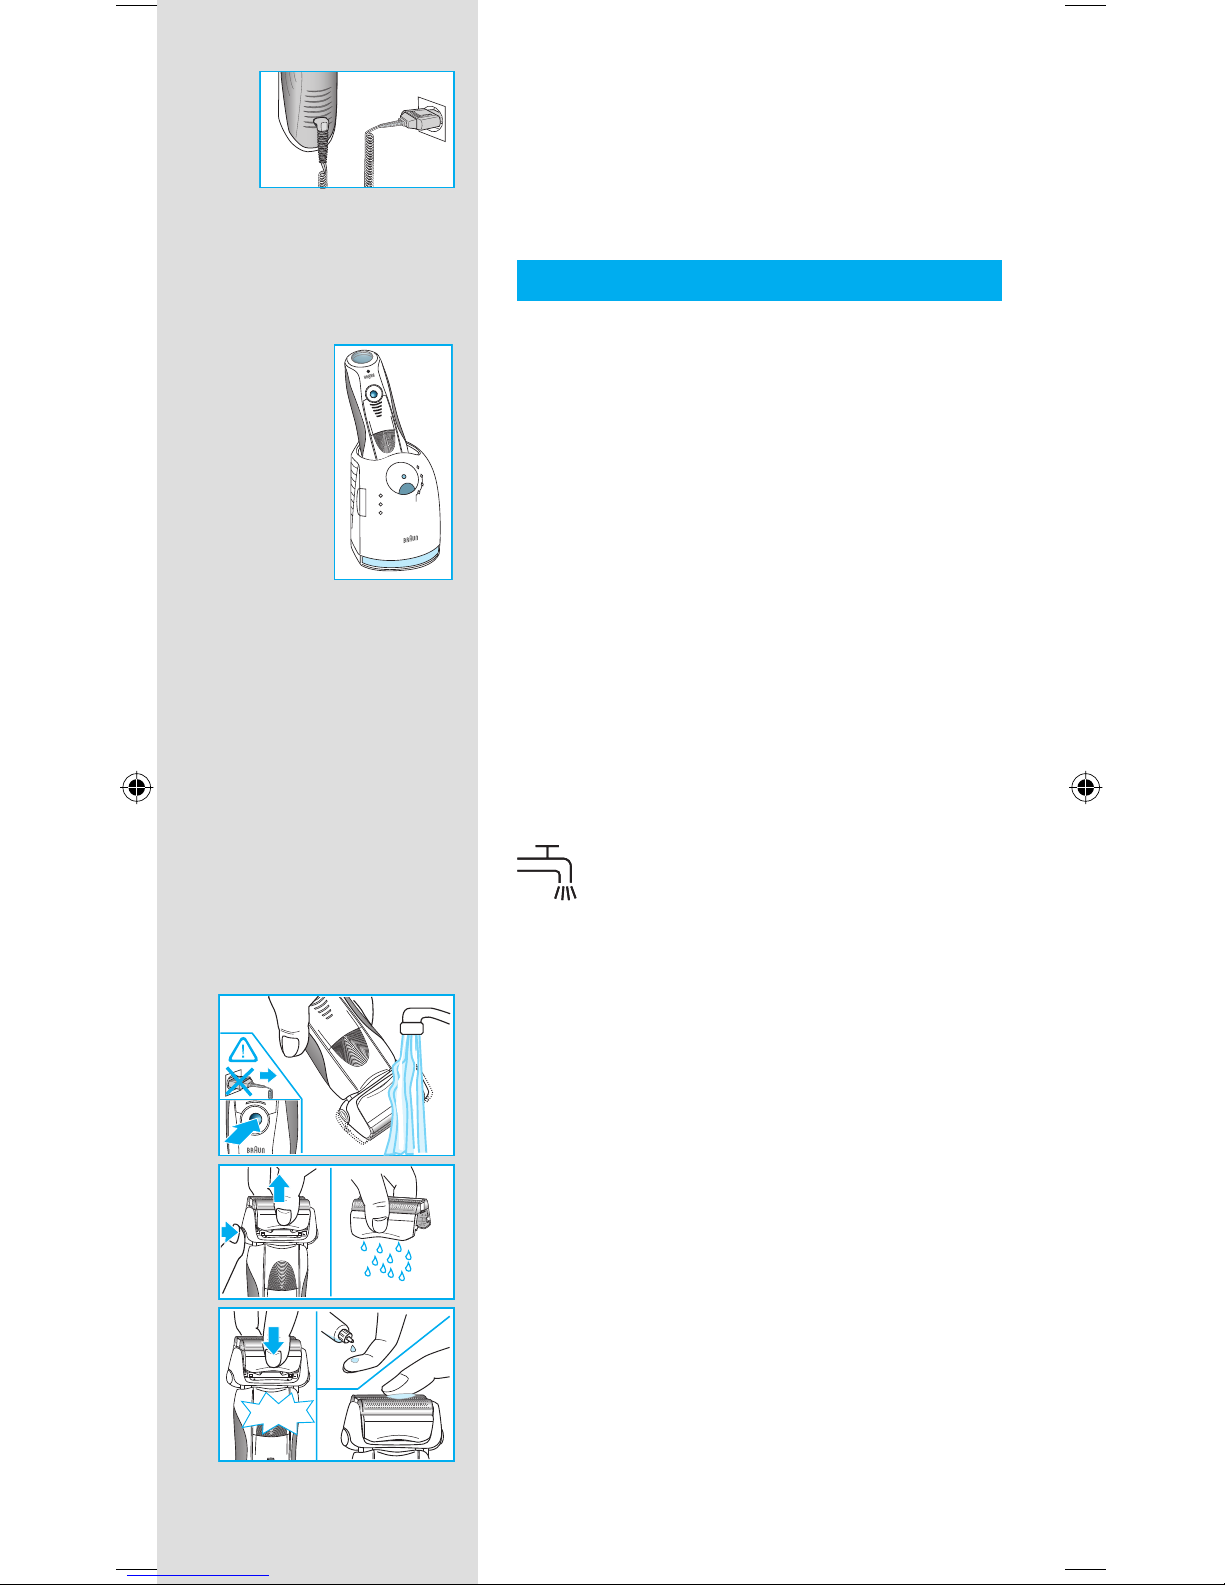
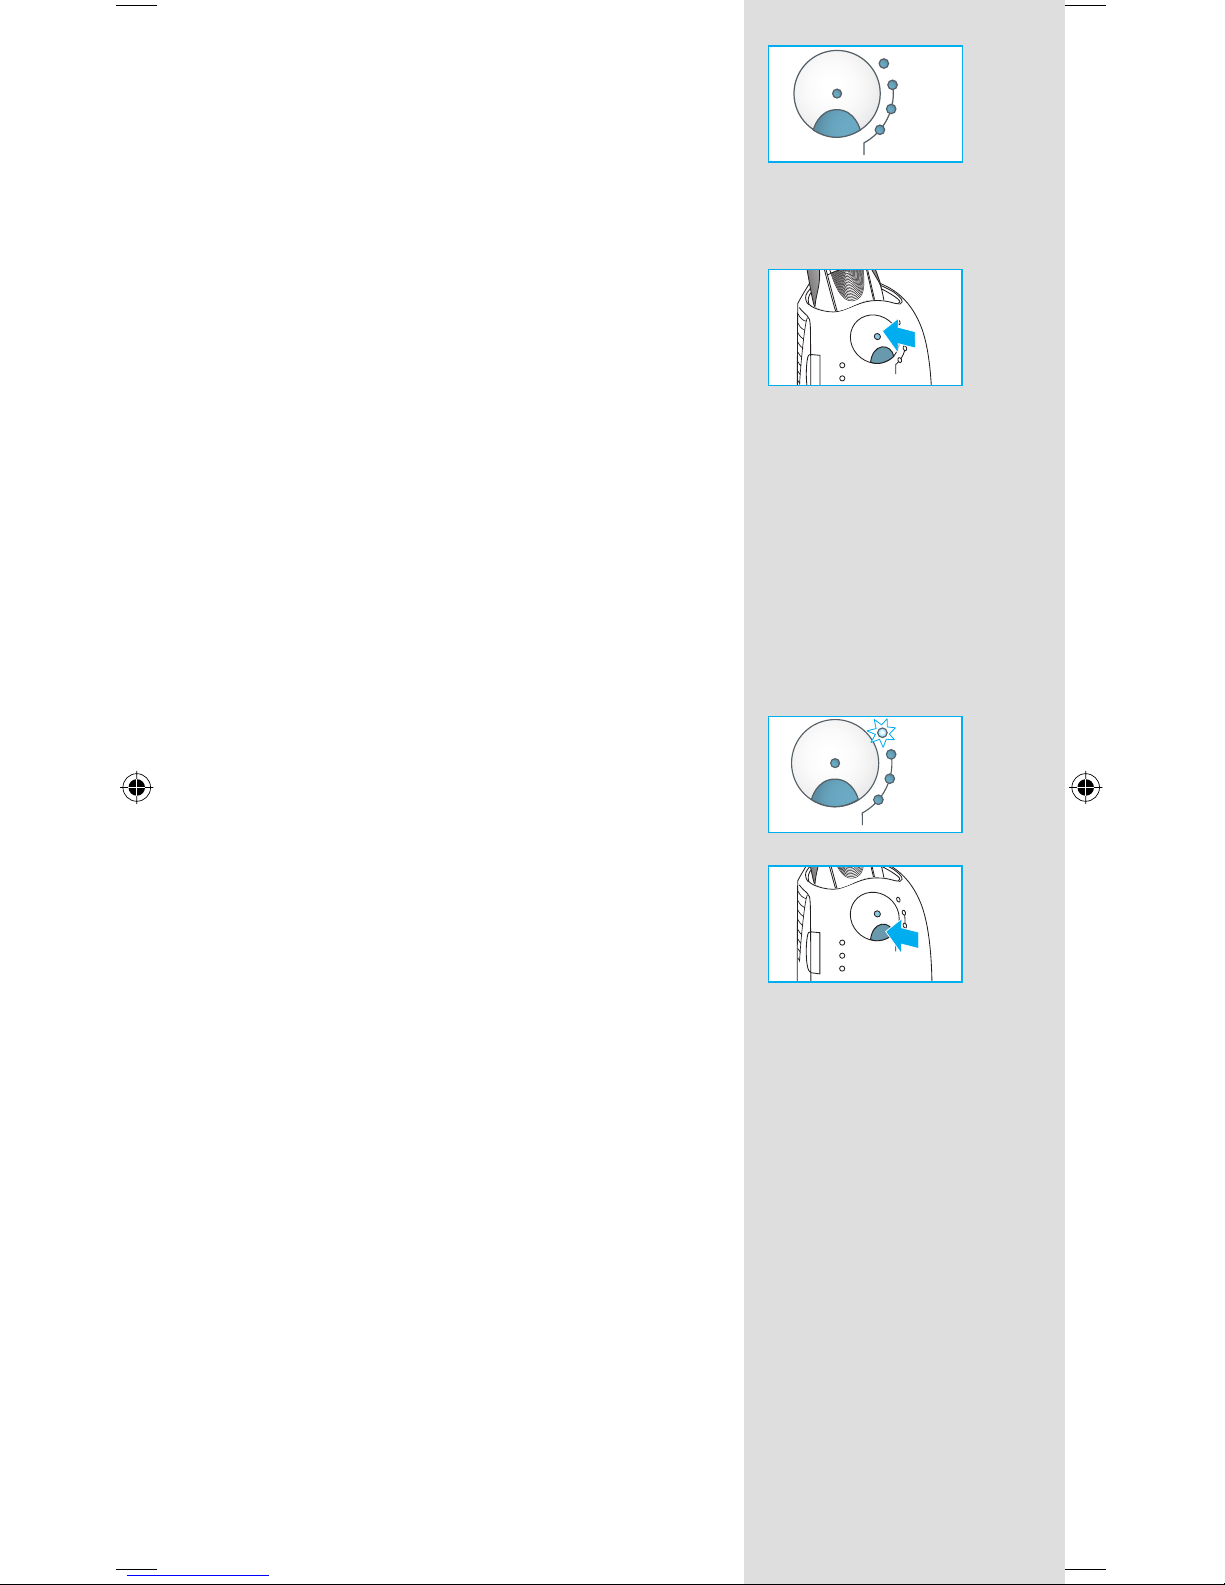
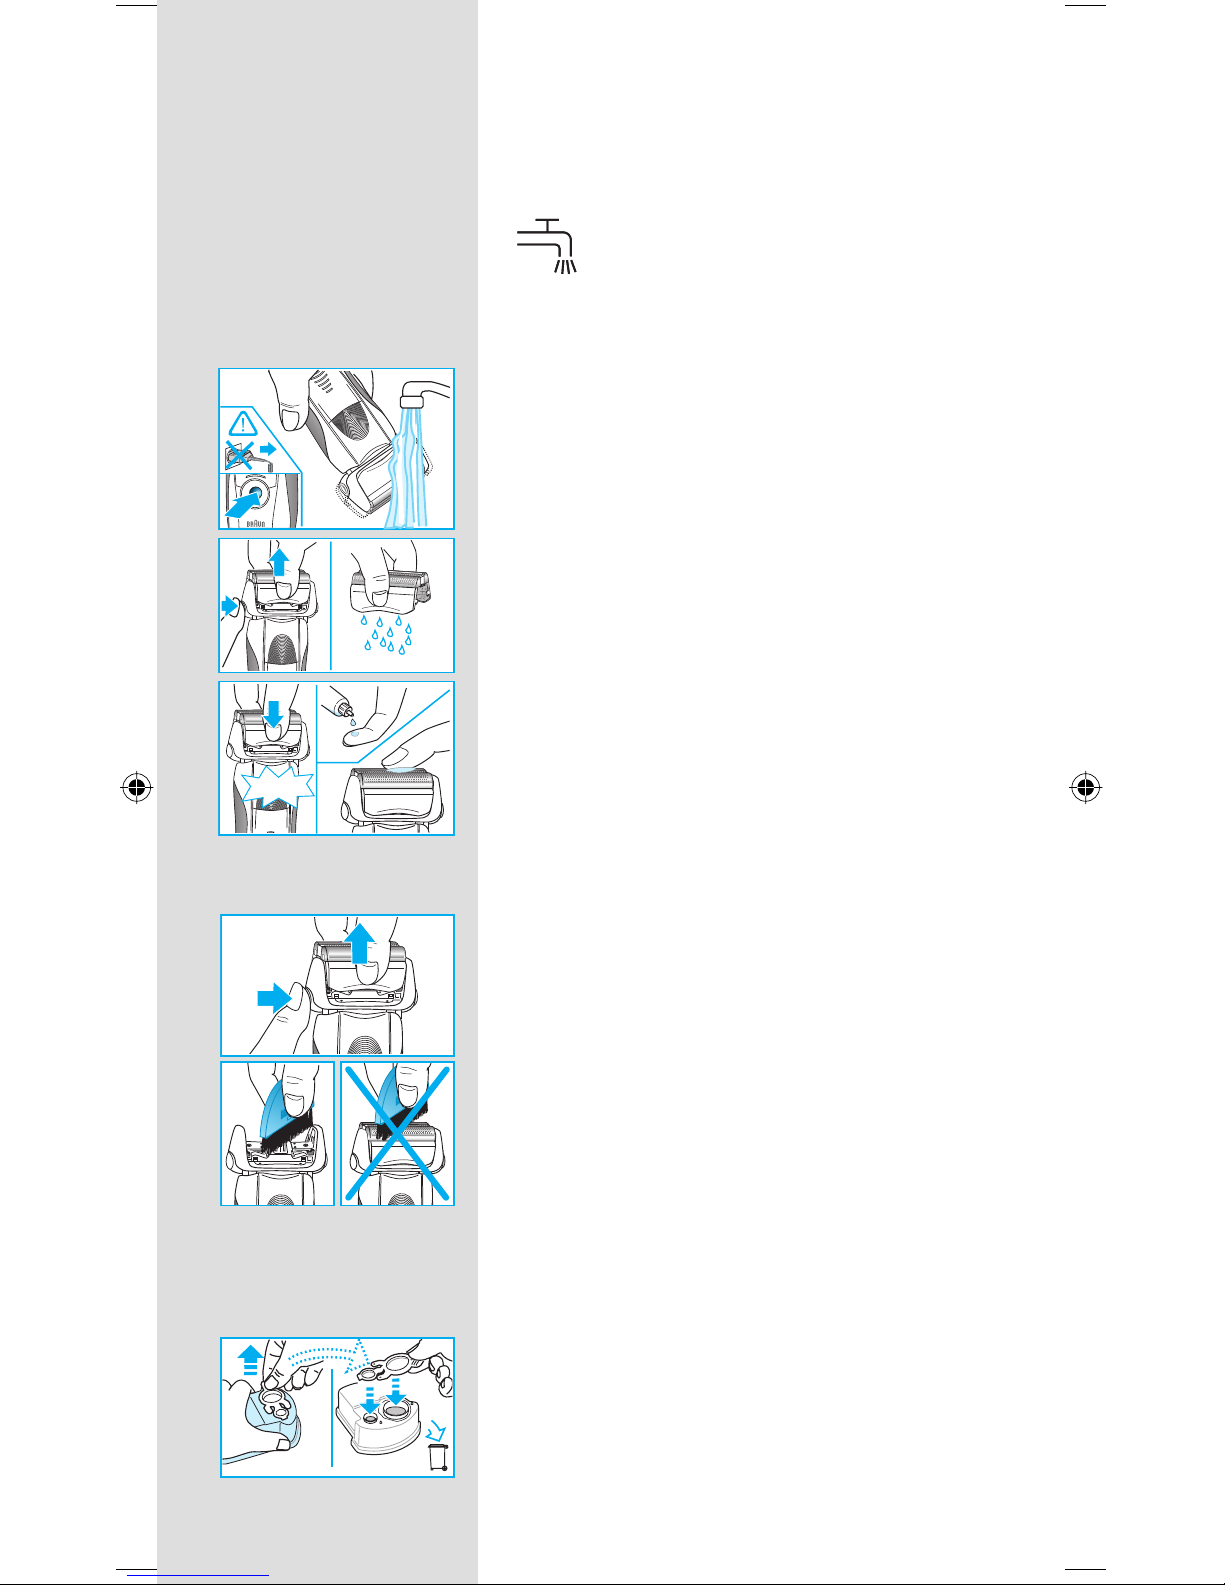
Manual cleaning
The shaver head is suitable for cleaning
under running tap water.
Warning: Detach the shaver from the
power supply before cleaning the shaver
head in water.
Rinsing the shaving head under running water
is an alternative way to keep the shaver clean,
especially when travelling:
• Switch the shaver on (cordless) w and rinse
the shaving head under hot running water.
You may use liquid soap without abrasive
substances. Rinse off all foam and let the
shaver run for a few more seconds.
• Next, switch off the shaver, press the release
button 9 to remove the foil and cutter cassette
8 and let it dry.
• If you regularly clean the shaver under
water, then once a week apply a drop of
light machine oil on top of the foil and cutter
cassette.
high
clean
eco
normal
inten
sive
auto select
low
empty
s
t
a
r
t
c
l
e
a
n
i
n
g
washable
trimmer
re
s
e
t
f
a
s
t
c
l
e
a
n
high
clean
eco
normal
inten
sive
auto select
low
empty
s
t
a
r
t
c
l
e
a
n
i
n
g
washable
trimmer
re
s
e
t
f
a
s
t
c
l
e
a
n
oil
washable
trim
mer
on
washable
er
re
le
a
s
e
washable
trimmer
re
le
a
s
e
re
le
a
s
e
click!
oil
washable
trim
mer
on
washable
er
re
le
a
s
e
washable
trimmer
re
le
a
s
e
re
le
a
s
e
click!
9
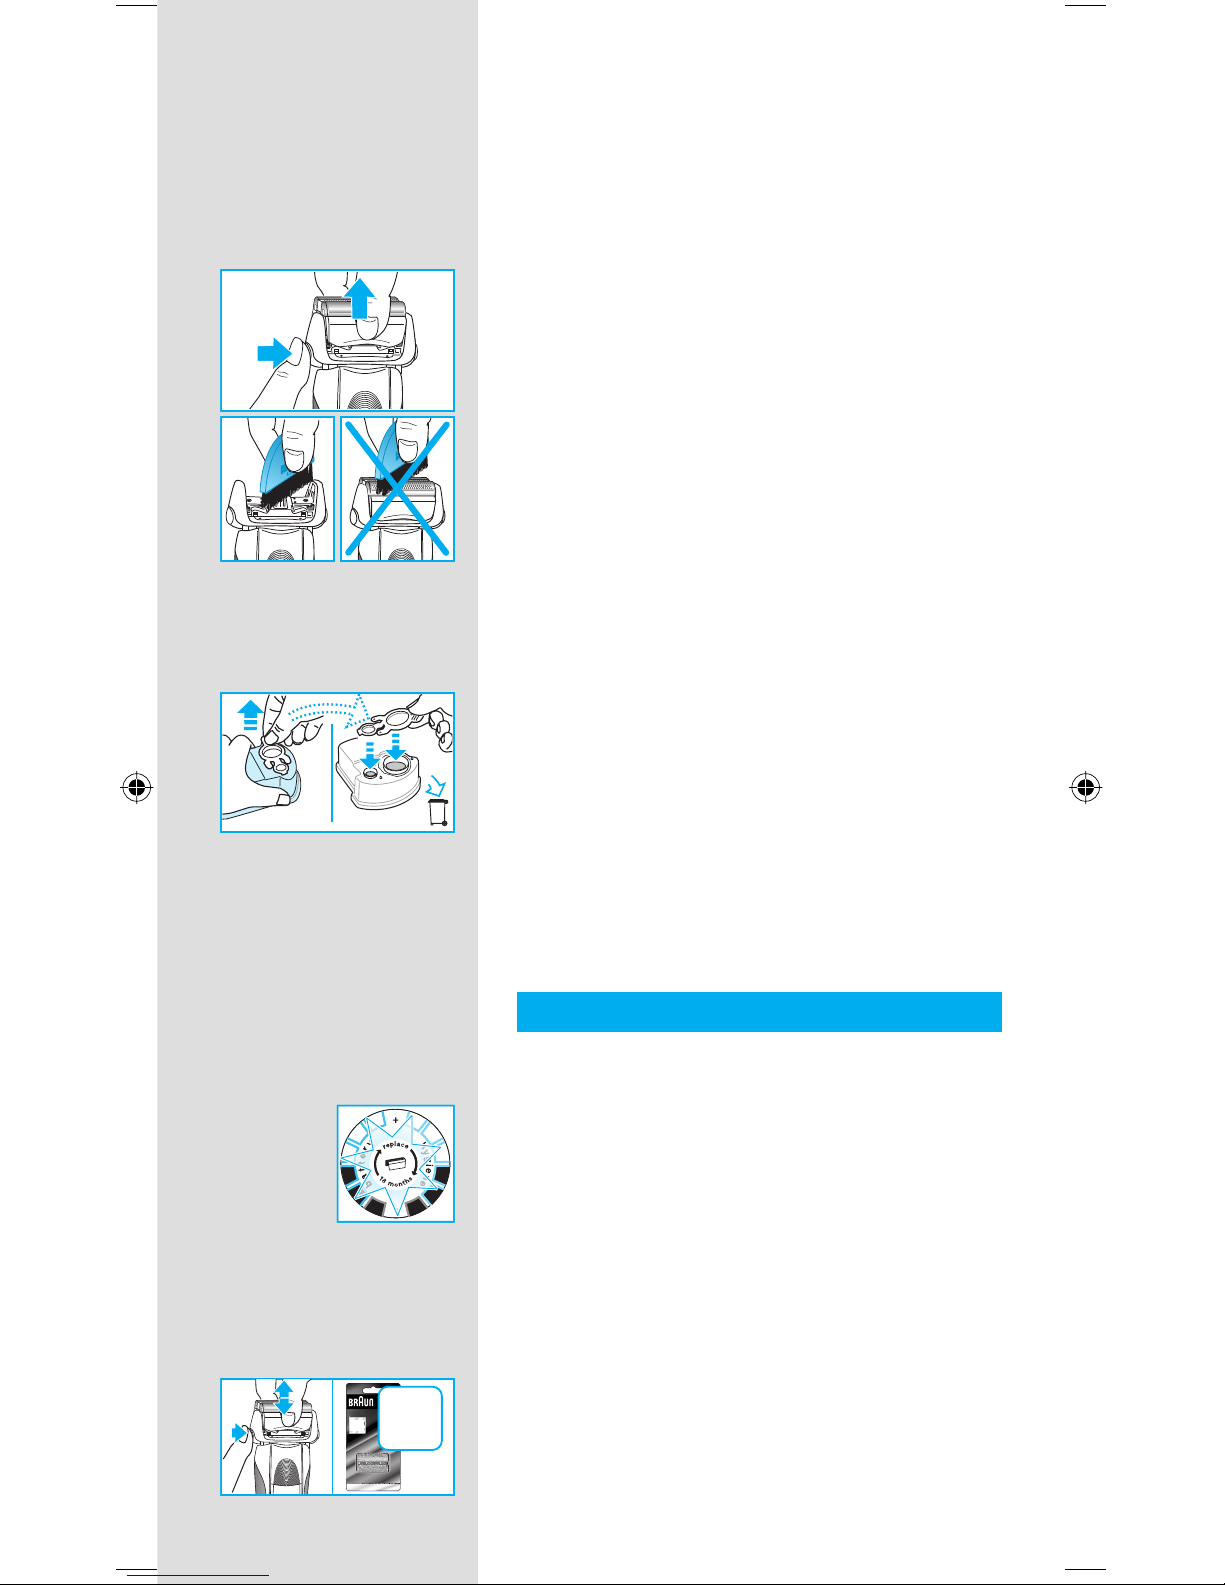
Alternatively, you may clean the shaver using the
brush provided:
• Switch off the shaver. Remove the foil and
cutter cassette
8 and tap it out on a fl at
surface. Using the brush, clean the inner area
of the pivoting head. However, do not clean the
cassette with the brush as this may damage it.
Cleaning the housing
From time to time clean the housing of the
shaver and the Clean&Renew station with a
damp cloth, especially inside the cleaning
chamber where the shaver rests.
Replacing the cleaning cartridge
After having pressed the lift button
2 to open the
housing, wait for a few seconds before removing
the used cartridge to avoid any dripping.
Before discarding the used cartridge, make sure
to close the openings using the lid of the new
cartridge, since the used cartridge will contain
contaminated cleaning solution.
Keeping your shaver in top shape
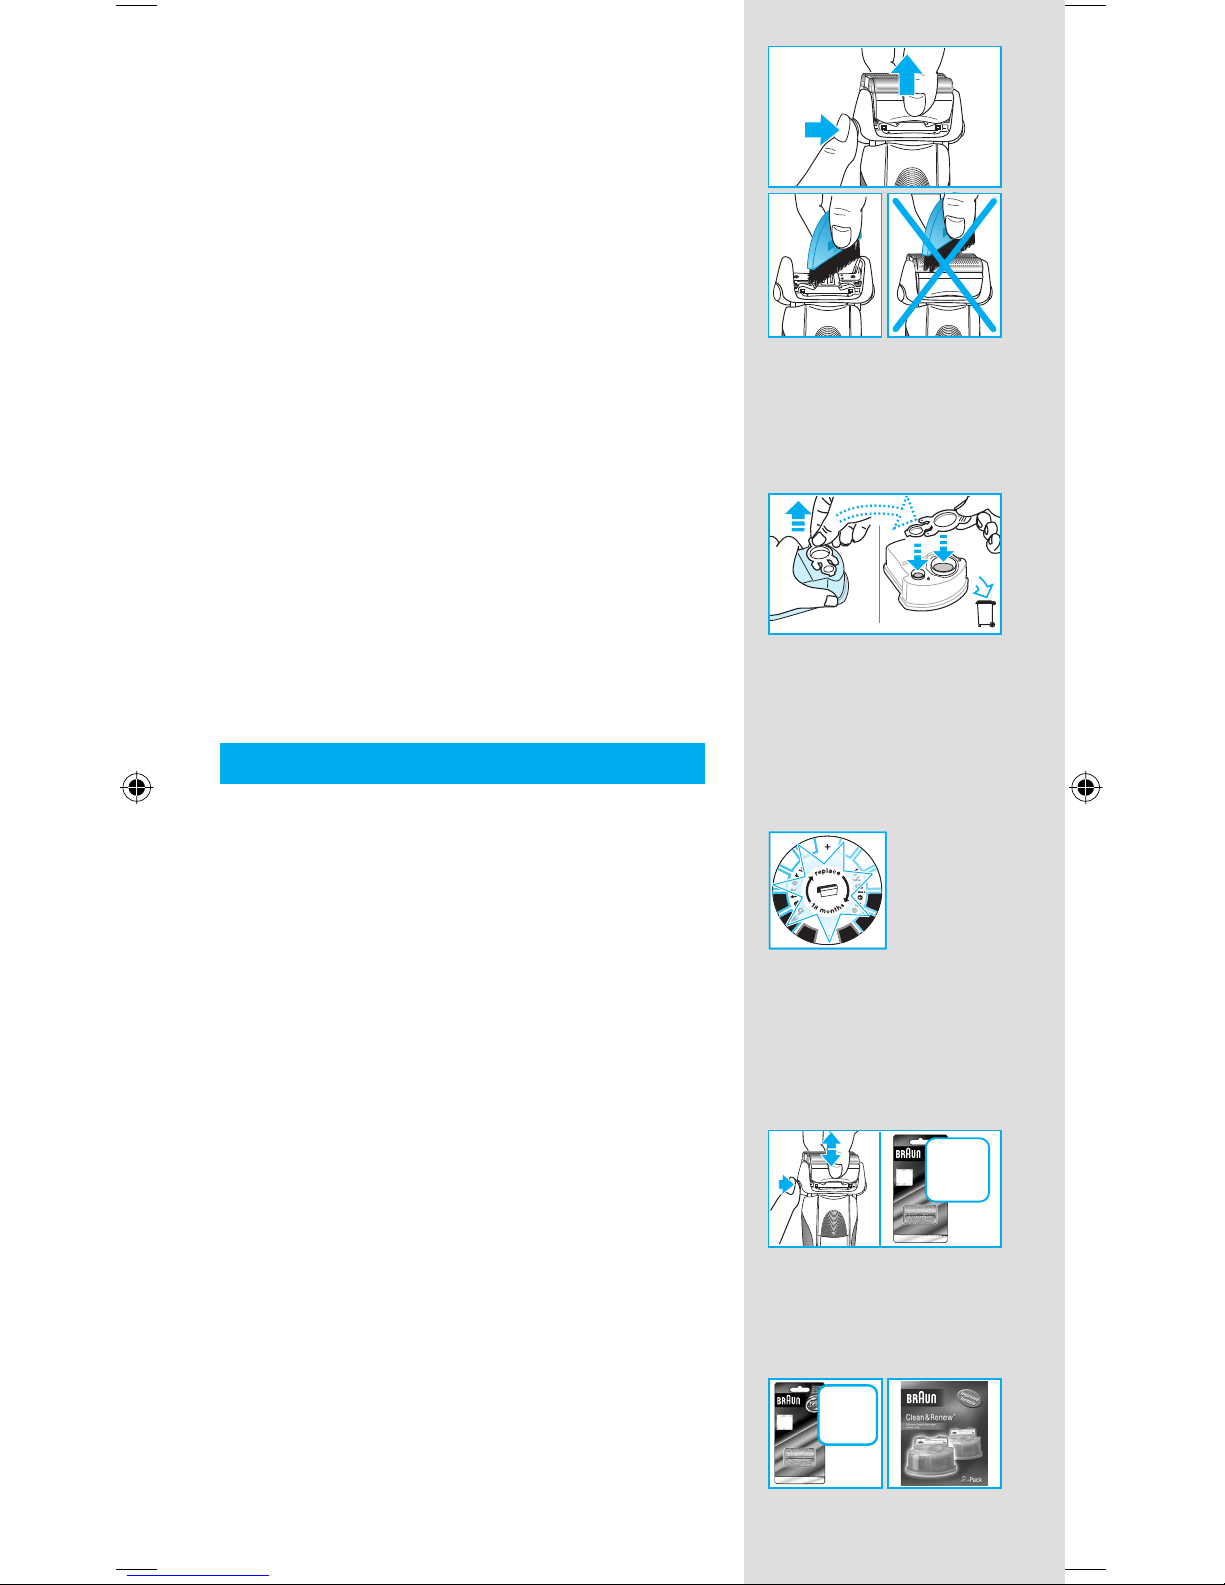
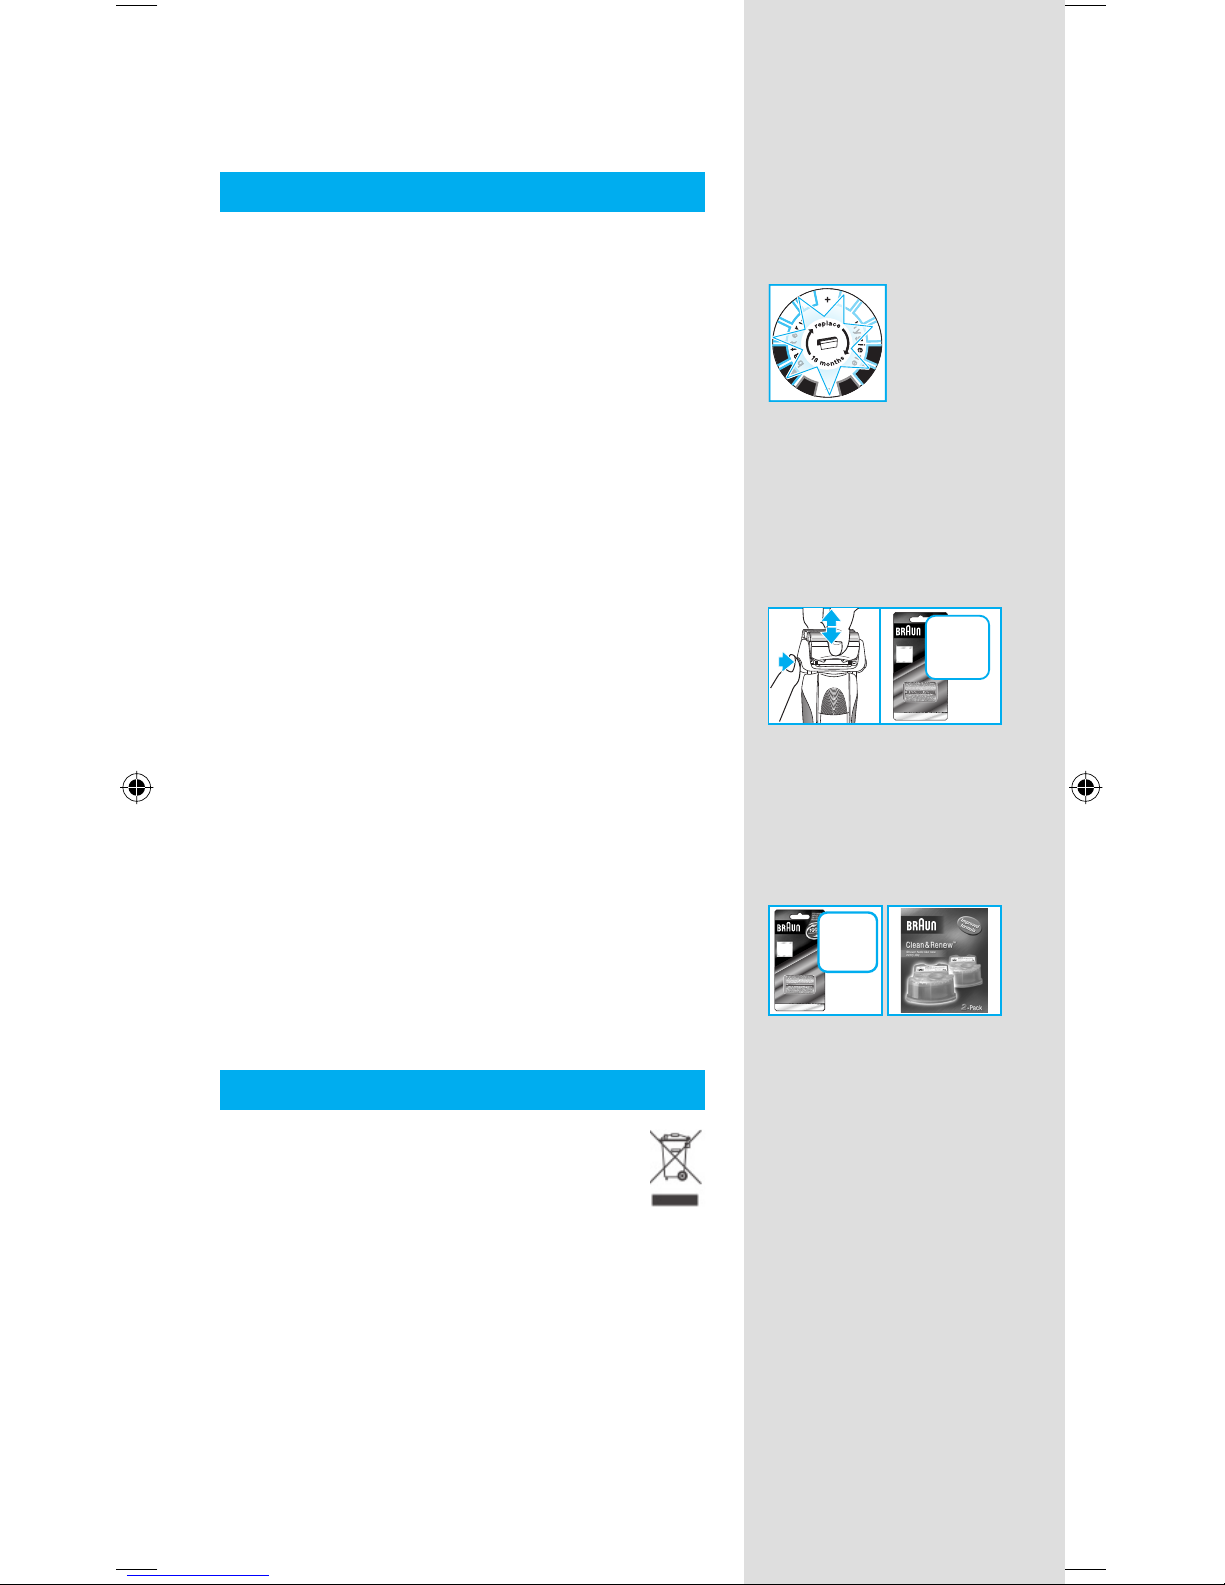
Replacing the foil and cutter cassette / reset
To maintain 100% shaving performance, replace the foil and cutter cassette 8, when the
replacement symbol lights up on the shaver
display r (after about 18 months) or when
cassette is worn.
The replacement symbol will remind you during
the next 7 shaves to replace the foil and cutter
cassette. Then the shaver will automatically reset
the display.
After you have replaced the foil and cutter
cassette, use a ball-pen to push the «reset»
button e for at least 3 seconds to reset the
counter.
While doing so, the replacement light blinks and
goes off when the reset is complete. The manual
reset can be done at any time.
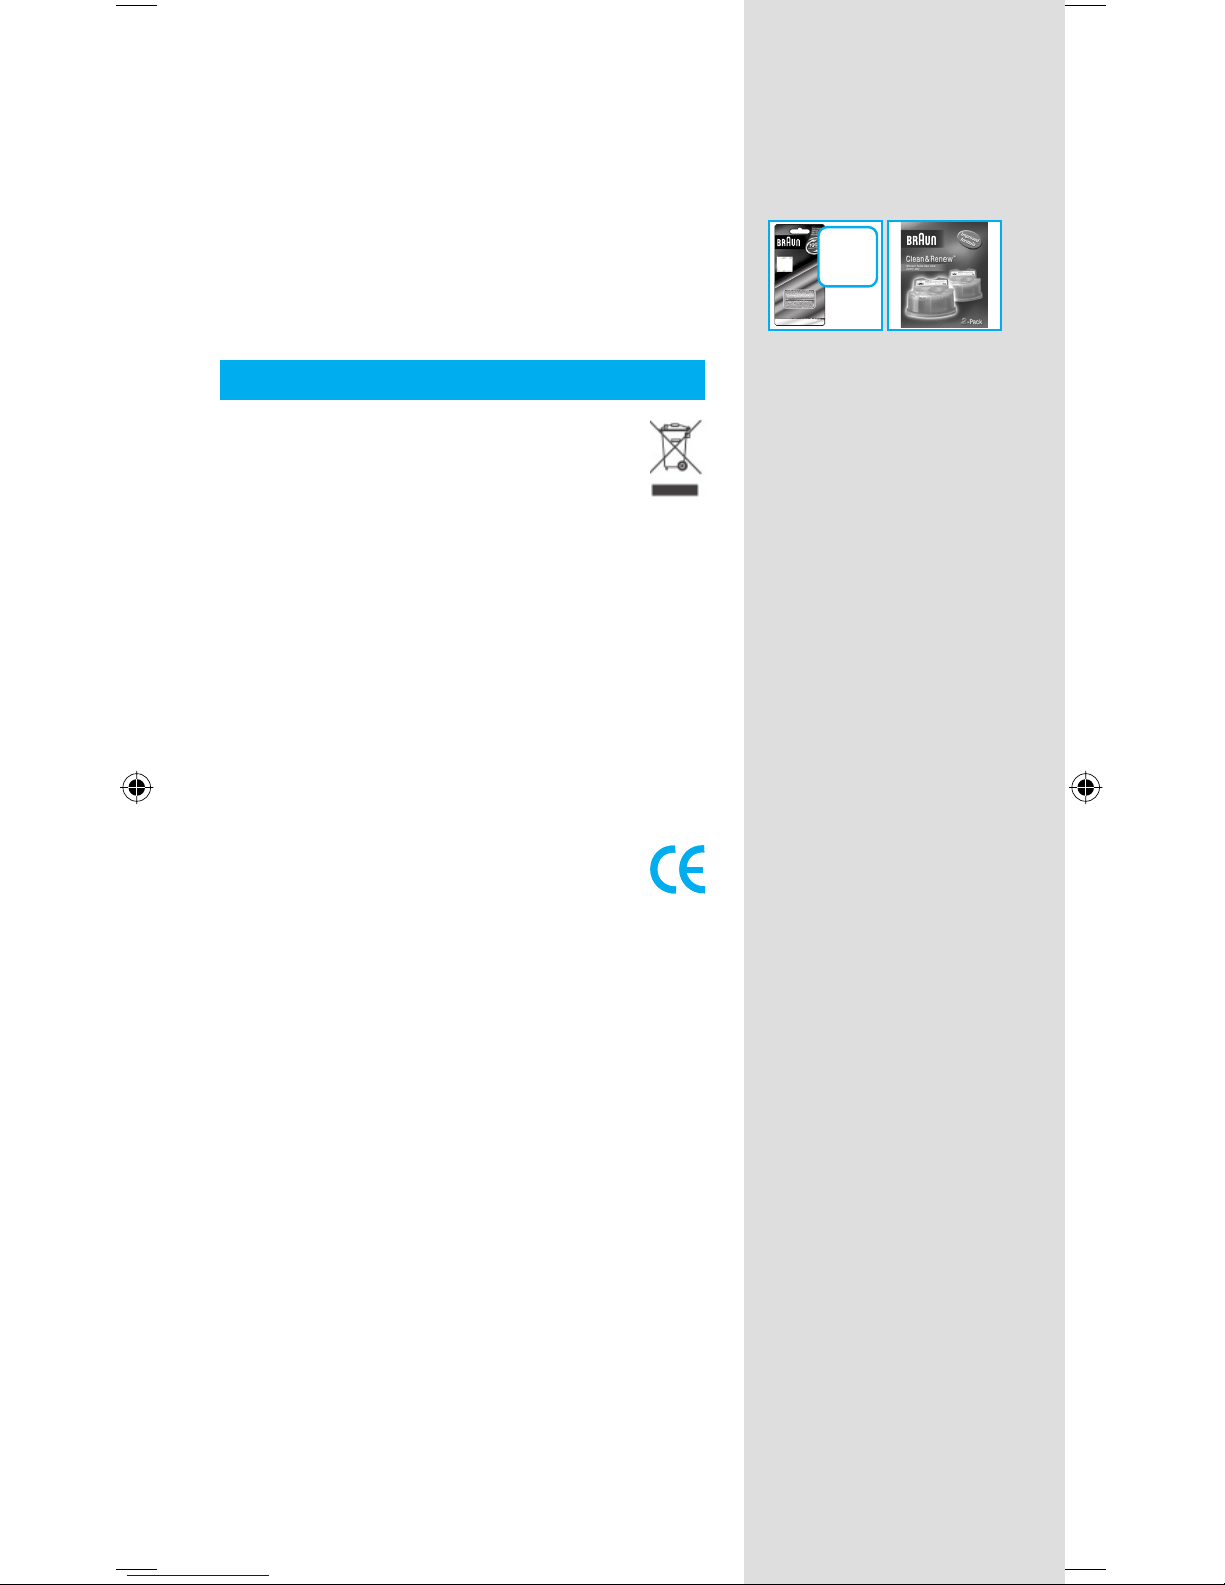
Accessories
Available at your dealer or Braun Service
Centres:
• Foil & cutter cassette No. 9000
• Cleaning cartridge Clean&Renew CCR
washable
re
le
a
s
e
washable
re
le
a
s
e
washable
re
le
a
s
e
washable
re
le
a
s
e
washable
re
le
a
s
e
washable
re
le
a
s
e
new
old
new
old
360°Complete
9000
Series
9000
Series
washable
er
re
le
a
s
e
360°Complete
9000
Series
9000
Series
washable
er
re
le
a
s
e
360°Complete
9000
Series
9000
Series
360°Complete
9000
Series
9000
Series
10
Environmental notice
This product contains rechargeable
batteries. In the interest of protecting the
environment, please do not dispose of the
product in household waste at the end of
its useful life. Disposal can take place at a
Braun Service Centre or at appropriate
collection points provided in your country.
The cleaning cartridge can be disposed with
regular household waste.
Subject to change without notice.
This product conforms to the European
Directives EMC 89/336/EEC and Low
Voltage 73/23/EEC.
For electric specifi cations, see printing on the
special cord set.
Guarantee
We grant 2 years guarantee on the product
commencing on the date of purchase. Within
the guarantee period we will eliminate, free of
charge, any defects in the appliance resulting
from faults in materials or workmanship, either
by repairing or replacing the complete appliance
as we may choose.
This guarantee extends to every country where
this appliance is supplied by Braun or its
appointed distributor.
This guarantee does not cover: damage due
to improper use, normal wear and tear (e.g. foil
& cutter cassette) as well as defects that have
a negligible effect on the value or operation of
the appliance. The guarantee becomes void if
repairs are undertaken by unauthorised persons
and if original Braun parts are not used.
To obtain service within the guarantee period,
hand in or send the complete appliance with
your sales receipt to an authorised Braun
Customer Service Centre.
For UK only:
This guarantee in no way affects your rights
under statutory law.
11
Français
Nos produits sont conçus pour répondre
aux normes les plus élevées de qualité, de
fonctionnalité et de design. Nous espérons que
vous apprécierez votre nouveau rasoir Braun.
Attention
Votre système de rasage Pulsonic est fournit
avec un cordon spécial présentant une
alimentation électrique sécurisée à très faible
voltage intégrée. Tout échange ou modifi cation
vous expose à un risque d’électrocution.
Pour éviter toute fuite du liquide de nettoyage,
veillez à ce que la station Clean&Renew soit
posée sur une surface plane. Lorsqu’une
cartouche de nettoyage est installée, ne pas
basculer, bouger brusquement ou transporter
la station d’une quelconque manière, car le
liquide de nettoyage pourrait se répandre hors
de la cartouche. Ne pas mettre la station dans
une armoire à glace, ni sur une surface cirée ou
laquée.
La cartouche de nettoyage contient des liquides
hautement infl ammables, gardez-la à l’écart des
sources d’ignition. Ne pas l’exposer directement
à la lumière du soleil et à la fumée de cigarette,
et ne pas la poser sur un radiateur.
Garder hors de portée des enfants.
Ne pas re-remplir la cartouche et utiliser uniquement les cartouches de recharge originales
Braun.
Description
Station Clean&Renew
1 Indicateur du liquide de nettoyage
2 Bouton curseur pour l’échange de la
cartouche
3 Contacts station-rasoir
4 Bouton de démarrage du nettoyage
D Bouton de nettoyage rapide
5 Diodes du programme de nettoyage
6 Fiche d’alimentation de la station
7 Cartouche de nettoyage
Rasoir
8 Cassette Foil & Cutter
9 Bouton d’éjection de la cassette
0 Bouton de verrouillage de la tête du rasoir
q Tondeuse rétractable pour poils longs
w Interrupteur marche/arrêt
STOPSTOP
12
e Bouton de réinitialisation
r Affi cheur du rasoir
t Contacts rasoir-station
z Fiche d’alimentation du rasoir
u Trousse de voyage
i Cordon spécial
Avant le rasage
Avant la première utilisation, vous devez connecter le rasoir à une prise électrique en utilisant
le cordon spécial i ou, en variante, procéder
comme suit.
Installation de la station Clean&Renew
• En utilisant le cordon spécial i, connectez la
fi che d’alimentation de la station 6 à une prise
électrique.
• Appuyez sur le bouton curseur 2 pour ouvrir le
boîtier.
• Tenez la cartouche de nettoyage 7 vers le bas
sur une surface stable et plane (par exemple
une table).
• Retirez délicatement le couvercle de la
cartouche.
• Faites glisser la cartouche dans la base de la
station aussi loin que possible.
• Fermez doucement le boîtier en le poussant
vers le bas jusqu'à ce qu’il se verrouille.
L’indicateur du liquide de nettoyage 1 indiquera
la quantité de fl uide se trouvant dans la
cartouche :
« high » Jusqu’à 30 cycles de nettoyage
disponibles
« low » Jusqu’à 7 cycles de nettoyage
restants
« empty » Une nouvelle cartouche de nettoyage
est nécessaire
Chargement et nettoyage du rasoir
Insérez la tête du rasoir dans la station de
nettoyage. (Les contacts t au dos du rasoir
s’aligneront avec les contacts 3 de la station de
nettoyage).
Si nécessaire, la station Clean&Renew
rechargera le rasoir. Le niveau de propreté
du rasoir sera également analysé et une des
diodes de programme 5 de nettoyage suivantes
s’allumera :
new
f
a
s
t
c
l
e
a
n
high
clean
e
c
o
n
orm
a
l
intensive
a
u
to
s
e
le
c
t
low
empty
s
t
a
r
t
c
l
e
a
n
i
n
g
cle
an
eco
nor
mal
in
te
n
s
ive
a
u
to
sel
e
c
t
f
a
s
t
c
l
e
a
n
high
clean
eco
normal
intensive
au
to select
low
empty
s
t
a
r
t
c
l
e
a
n
i
n
g
f
a
s
t
c
l
e
a
n
high
clean
eco
normal
intensive
auto select
low
empty
s
t
a
r
t
c
l
e
a
n
i
n
g
2
1
f
a
s
t
c
l
e
a
n
f
a
s
t
c
l
e
a
n
f
a
s
t
c
l
e
a
n
high
low
empty
high
low
empty
high
low
empty
high
low
empty
high
low
empty
high
low
empty
high
clean
eco
normal
intensive
auto select
low
empty
s
t
a
r
t
c
l
e
a
n
i
n
g
w
ashable
trim
m
er
reset
f
a
s
t
c
l
e
a
n
high
clean
eco
normal
intensive
auto select
low
empty
s
t
a
r
t
c
l
e
a
n
i
n
g
w
ashable
trim
m
er
reset
f
a
s
t
c
l
e
a
n
13
« clean » Le rasoir est propre
« eco » Un rapide nettoyage économique
est nécessaire
« normal » Un nettoyage de niveau normal est
nécessaire
« intensive » Un nettoyage intensif est nécessaire
Si la station sélectionne l’un des programmes
de nettoyage requis, elle ne démarrera pas tant
que vous n’aurez pas appuyé sur le bouton de
démarrage du nettoyage 4. Pour de meilleurs
résultats de rasage, nous recommandons un
nettoyage après chaque rasage.
Pendant la phase de nettoyage, la diode du
programme de nettoyage correspondant
clignotera. Tous les programmes de nettoyage
consistent en plusieurs cycles, lors desquels le
liquide de nettoyage rince la tête du rasoir et un
processus de chauffage sèche le rasoir. Suivant
le programme sélectionné, le temps total de
nettoyage varie entre 32 et 43 minutes.
Le programme de nettoyage ne doit pas être
interrompu. Veuillez noter que lorsque le rasoir
est en train de sécher, la tête du rasoir peut être
chaude et humide.
Lorsque le programme est terminé, la diode
bleue « clean » s’allume. Votre rasoir est
maintenant propre et prêt à être utilisé.
Nettoyage rapide
Appuyez sur le bouton de nettoyage rapide D
pour activer le programme de nettoyage rapide
sans séchage. Ce programme prend environ 25
secondes seulement et est recommandé si vous
n’avez pas le temps d’attendre pour l’un des
programmes automatiques de nettoyage. Si vous
retirez le rasoir juste après la fi n du programme,
essuyez la tête du rasoir avec un mouchoir en
papier afi n d’éviter qu’elle ne goutte.
Mode stand-by
10 minutes après le chargement complet ou
la fi n de la session de nettoyage, la station
Clean&Renew se met en mode stand-by : les
diodes de la station Clean&Renew s’éteignent.
Affi cheur du rasoir
L’affi cheur du rasoir r indique le niveau de
charge de la batterie sur la gauche, et le niveau
de propreté (hygiene) sur la droite. (6 segments
noirs sont affi chés de chaque côté lorsque la
batterie est complètement chargée et le rasoir
propre).
auto select
intensive
normal
eco
clean
s
t
a
r
t
c
l
e
a
n
i
n
g
f
a
s
t
c
l
e
a
n
auto select
intensive
normal
eco
clean
s
t
a
r
t
c
l
e
a
n
i
n
g
f
a
s
t
c
l
e
a
n
high
clean
eco
normal
intensive
auto select
low
washable
s
t
a
r
t
c
l
e
a
n
i
n
g
f
a
s
t
c
l
e
a
n
high
clean
eco
normal
intensive
auto select
low
washable
s
t
a
r
t
c
l
e
a
n
i
n
g
f
a
s
t
c
l
e
a
n
auto select
intensive
normal
eco
clean
s
t
a
r
t
c
l
e
a
n
i
n
g
f
a
s
t
c
l
e
a
n
auto select
intensive
normal
eco
clean
s
t
a
r
t
c
l
e
a
n
i
n
g
f
a
s
t
c
l
e
a
n
high
clean
eco
normal
intensive
auto select
low
empty
washable
s
t
a
r
t
c
l
e
a
n
i
n
g
f
a
s
t
c
l
e
a
n
high
clean
eco
normal
intensive
auto select
low
empty
washable
s
t
a
r
t
c
l
e
a
n
i
n
g
f
a
s
t
c
l
e
a
n
14
Segments de la batterie :
Pendant le chargement ou lors de l’utilisation
du rasoir, les segments de la batterie correspondants clignoteront. En charge complète,
les 6 segments sont affi chés. Les segments
disparaissent graduellement au fur et à mesure
du déchargement.
Indicateur de faible charge
Le segment de faible charge encadré en rouge
clignote pour indiquer que la charge est tombée
en dessous de 20 %. La capacité restante est
suffi sante pour 2 à 3 rasages.
Segments de propreté :
Les 6 segments de propreté apparaissent
une fois que le rasoir a été nettoyé dans la
station Clean&Renew. Lorsque le rasoir est en
cours d’utilisation, les segments disparaissent
graduellement. Une fois le rasoir remis dans la
station, le système sélectionne automatiquement
le programme de nettoyage approprié et rétablit
le nombre maximal de segments de propreté.
Étant donné que rincer le rasoir sous l’eau du
robinet n’est pas aussi hygiénique que dans la
station de nettoyage, les segments de propreté
se rétablissent uniquement lorsque le rasoir a été
nettoyé dans la station Clean&Renew.
Information sur la charge
• Une charge complète permet jusqu’à 50
minutes de temps de rasage sans le cordon.
Cela peut varier suivant l’épaisseur de votre
barbe.
• La meilleure température de chargement se
situe entre 5 °C et 35 °C. Ne pas exposer le
rasoir à des températures supérieures à 50 °C
pendant une période prolongée.
Rasage
Appuyez sur l’interrupteur marche/arrêt w pour
actionner le rasoir :
• La tête pivotante du rasoir et les lames
fl ottantes s’ajustent automatiquement à tous
les contours de votre visage.
• Pour raser les zones diffi ciles d’accès (par
exemple sous le nez), faites basculer le bouton
de verrouillage 0 de la tête du rasoir afi n de
verrouiller la tête pivotante à un angle donné.
• Pour tondre les pattes, la moustache ou la
barbe, faire sortir la tondeuse rétractable pour
poils longs q.
Conseils pour un rasage parfait
Pour un résultat de rasage optimal, Braun vous
recommande de suivre ces 3 conseils simples :
tr
lock
1
2
trimmer
lock
lock
lock
on
on
off
off
tr
lock
1
2
trimmer
lock
lock
lock
on
on
off
off
15
1. Rasez-vous toujours avant de vous laver le
visage.
2. Tenez toujours le rasoir à angle droit (90°)
avec la peau.
3. Tendez votre peau et rasez-vous dans le sens
opposé à la pousse du poil.
Raccordement du rasoir au secteur
Si le rasoir est à court de batterie (déchargé), et
que vous n’avez pas le temps de le recharger
dans la station Clean&Renew, vous pouvez aussi
utiliser le rasoir branché à une prise de courant
via le cordon spécial.
Nettoyage
Nettoyage automatique
Après chaque rasage, replacez le rasoir dans
la station Clean&Renew et procédez comme
décrit précédemment dans la rubrique « Avant
le rasage ». Toutes les étapes de chargement et
de nettoyage nécessaires sont automatiquement
prises en charge. Pour un usage quotidien, une
cartouche de nettoyage doit suffi re pour environ
30 cycles de nettoyage.
La cartouche de nettoyage hygiénique contient
de l’alcool, qui, une fois la cartouche ouverte,
s’évaporera automatiquement et lentement dans
l’air. Toute cartouche, si elle n’est pas utilisée
quotidiennement, doit être remplacée après
environ 8 semaines.
La cartouche nettoyante contient un lubrifi ant
qui peut éventuellement laisser quelques traces
résiduelles sur la grille même après le nettoyage.
Ces quelques traces résiduelles peuvent
cependant être enlevées facilement, en essuyant
à l’aide d’une lingette de tissu ou de papier.
Nettoyage manuel
La tête du rasoir permet un nettoyage
sous l’eau courante.
Attention : débranchez le rasoir de
l’alimentation électrique avant de
nettoyer la tête du rasoir dans l’eau.
Le nettoyage de la tête du rasoir sous l’eau
courante est une autre manière de garder le
rasoir propre, en particulier en voyage :
• Mettez le rasoir sous tension (sans cordon) w
et rincez la tête de rasage sous l’eau courante
chaude. Vous pouvez utiliser du savon liquide
ne contenant pas de substances abrasives.
Rincez toute la mousse et laissez fonctionner
le rasoir pendant quelques secondes
supplémentaires.
releaserelea
se
high
clean
eco
normal
intensive
auto select
low
empty
s
t
a
r
t
c
l
e
a
n
i
n
g
washable
trimmer
re
s
e
t
f
a
s
t
c
l
e
a
n
high
clean
eco
normal
intensive
auto select
low
empty
s
t
a
r
t
c
l
e
a
n
i
n
g
washable
trimmer
re
s
e
t
f
a
s
t
c
l
e
a
n
oil
washable
trim
m
er
on
washable
er
re
le
a
s
e
washable
trimmer
re
le
a
s
e
re
le
a
s
e
click!
oil
washable
trim
m
er
on
washable
er
re
le
a
s
e
washable
trimmer
re
le
a
s
e
re
le
a
s
e
click!
16
• Ensuite, mettez le rasoir hors tension, pressez
sur le bouton de déblocage 9 afi n de retirer la
cassette Foil & Cutter 8 et laissez sécher.
• Si vous nettoyez régulièrement le rasoir sous
l’eau, appliquez une fois par semaine une
goutte d’huile à machine fi ne à l’extrémité de
la cassette.
En variante, vous pouvez nettoyer le rasoir en
utilisant la petite brosse fournie :
• Mettez le rasoir hors tension. Retirez la
cassette Foil & Cutter 8 et tapotez-la sur une
surface plane pour la vider. En utilisant la petite
brosse, nettoyez l’intérieur de la tête pivotante.
Cependant, ne nettoyez pas la cassette avec la
petite brosse, car cela pourrait l'endommager.
Nettoyage du boîtier
De temps en temps, nettoyez le boîtier du rasoir
et de la station Clean&Renew avec un chiffon
humide, en particulier l’intérieur de la chambre
de nettoyage où repose le rasoir.
Remplacement de la cartouche de nettoyage
Après avoir appuyé sur le bouton curseur 2 afi n
d’ouvrir le boîtier, attendez pendant quelques
secondes avant de retirer la cartouche usagée
pour éviter qu’elle ne goutte.
Avant de jeter la cartouche usagée, assurez-vous
de fermer les ouvertures en utilisant le couvercle
de la nouvelle cartouche, puisque la cartouche
usagée contient de la solution de nettoyage
contaminée.
Entretien de votre rasoir
Remplacement de la cassette Foil & Cutter /
réinitialisation
Pour conserver des performances de rasage
parfaites, remplacez la cassette Foil & Cutter 8
lorsque le symbole de remplacement apparaît
sur l’écran du rasoir r (après environ 18 mois)
ou lorsque la cassette sera usée.
Le symbole de remplacement vous rappellera
au cours des 7 rasages suivants de remplacer
la cassette. Au delà, le rasoir réinitialisera
automatiquement son affi chage.
Une fois que vous avez remplacé la cassette
Foil & Cutter, utilisez un stylo bille pour pousser
le bouton « reset » e pendant au moins 3
secondes afi n de réinitialiser le compteur.
washable
re
le
a
s
e
washable
re
le
a
s
e
washable
re
le
a
s
e
washable
re
le
a
s
e
washable
re
le
a
s
e
washable
re
le
a
s
e
new
old
new
old
360°Complete
9000
Series
9000
Series
washable
er
re
le
a
s
e
360°Complete
9000
Series
9000
Series
washable
er
re
le
a
s
e
17
À ce moment là, le voyant de remplacement
clignote puis s’éteint lorsque la réinitialisation est
terminée. La réinitialisation manuelle peut être
effectuée à tout moment.
Accessoires
Disponible auprès de votre revendeur ou des
centres de services Braun :
• Cassette Foil & Cutter N° 9000
• Cartouche de nettoyage Clean&Renew CCR
Informations relatives à l’environnement
Ce produit contient des batteries rechargeables. Dans un souci de protection de
l’environnement, veuillez ne pas jeter le
produit dans la poubelle ménagère au
terme de son cycle de vie. Vous pouvez
remettre ce produit au centre de service
Braun ou aux points de collecte dans votre
pays.
La cartouche de nettoyage peut être jetée dans
la poubelle ménagère.
Susceptible d’être modifi é sans préavis.
Ce produit est conforme aux directives
européennes CEM 89/336/CEE et Faible
voltage 73/23/CEE.
Pour les spécifi cations électriques, se référer aux
inscriptions sur le bloc d’alimentation.
Garantie
Nous accordons une garantie de 2 ans sur ce
produit, à partir de la date d‘achat.
Pendant la durée de la garantie, Braun prendra
gratuitement à sa charge la réparation des vices
de fabrication ou de matière en se réservant
le droit de décider si certaines pièces doivent
être réparées ou si l‘appareil lui-même doit être
échangé.
Cette garantie s‘étend à tous les pays où cet
appareil est commercialisé par Braun ou son
distributeur exclusif.
360°Complete
9000
Series
9000
Series
360°Complete
9000
Series
9000
Series

18
Cette garantie ne couvre pas : les dommages
occasionnés par une utilisation inadéquate,
l’usure normale (par exemple, grille et bloccouteaux) ainsi que les défauts d’usures qui ont
un effet négligeable sur la valeur ou l’utilisation
de l’appareil. Cette garantie devient caduque
si des réparations ont été effectuées par des
personnes non agréées par Braun et si des pièces
de rechange ne provenant pas de Braun ont été
utilisées.
Pour toute réclamation intervenant pendant la
période de garantie, retournez ou rapportez
l‘appareil ainsi que l‘attestation de garantie à
votre revendeur ou à un Centre Service Agréé
Braun.
Appelez au 08.10.30.97.80 (ou se référez
à http://
www.braun.com/global/contact/servicepartners/
europe.country.html) pour connaitre le Centre
Service Agrée Braun le plus proche de chez
vous.
Clause spéciale pour la France
Outre la garantie contractuelle exposée cidessus, nos clients bénéfi cient de la garantie
légale des vices cachés prévue aux articles 1641
et suivants du Code civil.
19
Polski
Nasze wyroby spe∏niajà najwy˝sze wymagania
dotyczàce jakoÊci, funkcjonalnoÊci i wzornictwa.
˚yczymy zadowolenia z u˝ytkowania nowej
golarki marki Braun.
Ostrze˝enie
Golarka Pulsonic jest dostarczana wraz ze
specjalnym kablem wyposa˝onym w wbudowany zasilacz dostarczajàcy bezpieczne,
niskie napi´cie. Elementów kabla nie wolno
wymieniaç ani modyfi kowaç, poniewa˝ grozi to
pora˝eniem pràdem elektrycznym.
Aby uniknàç wycieku p∏ynu czyszczàcego,
stacj´ Clean&Renew nale˝y stawiaç na
p∏askiej i stabilnej powierzchni. JeÊli
w urzàdzeniu znajduje si´ wk∏ad z p∏ynem
czyszczàcym, nie nale˝y go odwracaç do góry
dnem, gwa∏townie przesuwaç ani
w jakikolwiek sposób przewoziç, poniewa˝
mo˝e to doprowadziç do wylania si´ p∏ynu
czyszczàcego. Urzàdzenia nie nale˝y
wstawiaç do szafki ∏azienkowej ani stawiaç
na wypolerowanych lub lakierowanych
powierzchniach.
Wk∏ad zawiera ∏atwopalny p∏yn i nale˝y
przechowywaç go z dala od êróde∏ zap∏onu.
Wk∏adu nie nale˝y wystawiaç na bezpoÊrednie
dzia∏anie promieni s∏onecznych ani przechowywaç w pomieszczeniu dla palàcych lub nad
kaloryferem.
Urzàdzenie nale˝y przechowywaç w miejscu
niedost´pnym dla dzieci.
Wk∏adu nie wolno ponownie nape∏niaç i nale˝y
u˝ywaç wy∏àcznie oryginalnych wk∏adów
wymiennych marki Braun.
Opis
Stacja Clean&Renew
1 Wskaênik iloÊci p∏ynu czyszczàcego
2 Przycisk umo˝liwiajàcy uniesienie
obudowy w celu wymiany wk∏adu z p∏ynem
czyszczàcym
3 Styki stacji
4 Przycisk «start cleaning» (rozpocznij
czyszczenie)
D Przycisk «fast clean» (szybkie czyszczenie)
5 Kontrolki wskaênika programu czyszczenia
6 Gniazdo zasilania stacji
7 Wk∏ad w p∏ynem czyszczàcym
STOPSTOP
20
Golarka
8 Kaseta z folià golàcà i ostrzami
9 Przyciski zwalniajàce kaset´
0 Prze∏àcznik blokady g∏owicy golarki «lock»
q Wysuwany trymer do d∏u˝szego zarostu
w Wy∏àcznik
e Przycisk do resetowania «reset»
r WyÊwietlacz golarki
t Styki golarki
z Gniazdo zasilania golarki
u Futera∏ podró˝ny
i Specjalny kabel sieciowy
Przed goleniem
Przed pierwszym goleniem golark´ nale˝y
pod∏àczyç specjalnym kablem sieciowym i do
gniazdka elektrycznego lub w opisany poni˝ej
sposób.
Uruchamianie stacji Clean&Renew
• Przy pomocy specjalnego kabla sieciowego
i pod∏àcz gniazdo zasilania stacji 6 do
gniazdka elektrycznego.
• NaciÊnij przycisk 2, aby otworzyç obudow´.
• Przytrzymaj wk∏ad w p∏ynem czyszczàcym
7 na p∏askiej, stabilnej powierzchni (np. na
stole).
• Ostro˝nie zdejmij z wk∏adu pokrywk´.
• Wsuƒ wk∏ad w podstawk´, a˝ wejdzie do
koƒca.
• Powoli zamknij obudow´ i dociÊnij jà, a˝ do
zatrzaÊni´cia.
Wskaênik 1 poka˝e, ile p∏ynu czyszczàcego
znajduje si´ wewnàtrz wk∏adu:
«high» maksymalnie 30 cykli czyszczenia
«low» pozosta∏o maksymalnie 7 cykli
czyszczenia
«empty» nale˝y u˝yç nowego wk∏adu
¸adowanie i czyszczenie golarki
UmieÊç golark´ g∏owicà w dó∏ w stacji
czyszczàcej. (Styki t z ty∏u golarki zetknà si´
ze stykami stacji 3).
JeÊli b´dzie taka potrzeba, golarka zostanie
na∏adowana w stacji Clean&Renew.
JednoczeÊnie, sprawdzony zostanie poziom
czystoÊci golarki i zaÊwieci si´ jedna z kontrolek
wskaênika programów czyszczenia 5:
new
f
a
s
t
c
l
e
a
n
high
clean
e
c
o
n
orm
al
intensive
a
u
to
s
e
le
c
t
low
empty
s
t
a
r
t
c
l
e
a
n
i
n
g
cle
an
eco
nor
mal
in
te
n
s
ive
a
u
to
sel
e
c
t
f
a
s
t
c
l
e
a
n
high
clean
eco
normal
intensive
a
uto select
low
empty
s
t
a
r
t
c
l
e
a
n
i
n
g
f
a
s
t
c
l
e
a
n
high
clean
eco
normal
intensive
auto select
low
empty
s
t
a
r
t
c
l
e
a
n
i
n
g
2
1
f
a
s
t
c
l
e
a
n
f
a
s
t
c
l
e
a
n
f
a
s
t
c
l
e
a
n
high
low
empty
high
low
empty
high
low
empty
high
low
empty
high
low
empty
high
low
empty
high
clean
eco
normal
intensive
auto select
low
empty
s
t
a
r
t
c
l
e
a
n
i
n
g
w
ashable
trim
m
er
reset
f
a
s
t
c
l
e
a
n
high
clean
eco
normal
intensive
auto select
low
empty
s
t
a
r
t
c
l
e
a
n
i
n
g
w
ashable
trim
m
er
reset
f
a
s
t
c
l
e
a
n
21
«clean» golarka jest czysta
«eco» golarka wymaga krótkiego czysz czenia (program ekonomiczny)
«normal» golarka wymaga normalnego
czyszczenia
«intensive» golarka wymaga bardzo
intensywnego czyszczenia
Gdy wybrany zostanie jeden z wymaganych
programów czyszczenia, rozpocznie si´ on
dopiero gdy naciÊniesz przycisk «start cleaning»
(rozpocznij czyszczenie) 4. Zalecamy czyÊciç
golark´ po ka˝dym goleniu, co zagwarantuje
najlepsze efekty golenia.
W trakcie czyszczenia miga kontrolka w∏aÊciwego programu czyszczenia. Ka˝dy program
czyszczenia obejmuje kilkanaÊcie cykli, podczas
których g∏owica jest przep∏ukiwana p∏ynem
czyszczàcym a nast´pnie suszona. W zale˝noÊci od wybranego programu, ca∏kowity czas
czyszczenia wynosi od 32 do 43 minut.
Procesu czyszczenia nie nale˝y przerywaç.
Nale˝y pami´taç, ˝e podczas suszenia golarki
jej g∏owica mo˝e byç goràca i mokra.
Po zakoƒczeniu programu czyszczenia zaÊwieci
si´ niebieska kontrolka «clean», co oznacza, ˝e
Twoja golarka jest ju˝ czysta i gotowa do u˝ycia.
Szybkie czyszczenie
NaciÊnij przycisk «fast clean» D, aby uruchomiç
program szybkiego czyszczenia bez suszenia.
Program trwa jedynie ok. 25 sekund i zalecamy
korzystanie z niego, gdy nie masz czasu,
aby czekaç na zakoƒczenie jednego z
automatycznych programów czyszczenia. Po
wyj´ciu golarki ze stacji tu˝ po zakoƒczeniu
czyszczenia, nale˝y wytrzeç g∏owic´ golarki
chusteczkà higienicznà.
Tryb oczekiwania
Po up∏ywie 10 minut od zakoƒczenia cyklu
∏adowania lub czyszczenia stacja Clean&Renew
prze∏àcza si´ w tryb oczekiwania: kontrolki stacji
Clean&Renew zostajà wy∏àczone.
auto select
intensive
normal
eco
clean
s
t
a
r
t
c
l
e
a
n
i
n
g
f
a
s
t
c
l
e
a
n
auto select
intensive
normal
eco
clean
s
t
a
r
t
c
l
e
a
n
i
n
g
f
a
s
t
c
l
e
a
n
high
clean
eco
normal
intensive
auto select
low
washable
s
t
a
r
t
c
l
e
a
n
i
n
g
f
a
s
t
c
l
e
a
n
high
clean
eco
normal
intensive
auto select
low
washable
s
t
a
r
t
c
l
e
a
n
i
n
g
f
a
s
t
c
l
e
a
n
auto select
intensive
normal
eco
clean
s
t
a
r
t
c
l
e
a
n
i
n
g
f
a
s
t
c
l
e
a
n
auto select
intensive
normal
eco
clean
s
t
a
r
t
c
l
e
a
n
i
n
g
f
a
s
t
c
l
e
a
n
high
clean
eco
normal
intensive
auto select
low
empty
washable
s
t
a
r
t
c
l
e
a
n
i
n
g
f
a
s
t
c
l
e
a
n
high
clean
eco
normal
intensive
auto select
low
empty
washable
s
t
a
r
t
c
l
e
a
n
i
n
g
f
a
s
t
c
l
e
a
n
22
WyÊwietlacz golarki
W lewej cz´Êci wyÊwietlacza golarki r
wyÊwietlany jest poziom na∏adowania
akumulatora a w prawej poziom czystoÊci
golarki. (Gdy akumulator jest ca∏kowicie
na∏adowany a golarka jest czysta na
wskaênikach po obu stronach wyÊwietlacza
widocznych jest 6 ciemnych segmentów).
Segmenty poziomu na∏adowania akumulatora:
Podczas ∏adowania lub golenia odpowiednie
segmenty poziomu na∏adowania akumulatora
migajà. Gdy akumulator jest ca∏kowicie na∏adowany, widocznych jest wszystkich 6 segmentów.
Segmenty b´dà stopniowo znikaç w miar´
roz∏adowywania si´ baterii.
Wskaênik niskiego poziomu na∏adowania
akumulatora
Gdy poziom na∏adowania akumulatora spadnie
poni˝ej 20 proc., wyÊwietlony zostaje migajàcy
segment w czerwonej ramce. Pozosta∏a energia
wystarczy jeszcze na 2–3 golenia.
Segmenty poziomu czystoÊci golarki:
Gdy golarka zostanie oczyszczona w stacji
Clean&Renew, na wyÊwietlaczu widocznych
jest wszystkich 6 segmentów. Segmenty b´dà
stopniowo znikaç w miar´ jak golarka b´dzie
u˝ywana. Gdy golarka zostanie umieszczona
w stacji, wybrany zostanie odpowiedni program
czyszczenia, a po jego zakoƒczeniu wszystkie
segmenty zostanà wyÊwietlone ponownie.
Poniewa˝ czyszczenie golarki pod bie˝àcà
wodà nie jest tak higieniczne, jak czyszczenie
w stacji, wszystkie segmenty poziomu czystoÊci
zostanà ponownie wyÊwietlone tylko wtedy,
gdy golarka zostanie oczyszczona w stacji
Clean&Renew.
Informacje dotyczàce ∏adowania
• Pe∏ne ∏adowanie zapewnia do 50 minut
golenia bez zasilania w zale˝noÊci od
cz´stotliwoÊci golenia.
• Golark´ najlepiej jest ∏adowaç przy tempera-
turze otoczenia mi´dzy 15 °C a 35 °C. Golarki
nie wolno wystawiaç na d∏ugotrwa∏e dzia∏anie
temperatur powy˝ej 50 °C.
23
Golenie
NaciÊnij w∏àcznik w, aby w∏àczyç golark´:
• Ruchoma g∏owica golarki i spr´˝ysta folia
automatycznie dopasowuje si´ do kszta∏tów
twarzy.
• Aby zgoliç zarost w trudno dost´pnych
miejscach (np. pod nosem), przesuƒ
prze∏àcznik blokady g∏owicy golarki
0, aby
zablokowaç ruchomà g∏owic´ pod w∏aÊciwym
kàtem.
• Aby przystrzyc baki, wàsy lub brod´, wysuƒ
trymer do d∏u˝szego zarostu q.
Wskazówki, jak goliç si´ dok∏adnie
JeÊli chcesz osiàgnàç najlepsze efekty golenia,
radzimy:
1. Zawsze goliç si´ przed umyciem twarzy.
2. Trzymaç golark´ przez ca∏y czas przy skórze
pod odpowiednim kàtem (90°).
3. Naciàgnàç skór´ i goliç pod w∏os.
Golenie przy zasilaniu z sieci
JeÊli golarka ca∏kowicie si´ roz∏aduje lub
nie masz czasu, aby jà na∏adowaç w stacji
Clean&Renew, mo˝esz si´ tak˝e goliç po
pod∏àczeniu golarki do gniazdka przy pomocy
specjalnego kabla.
Czyszczenie
Czyszczenie automatyczne
Po ka˝dym goleniu umieÊç golark´ z powrotem
w stacji Clean&Renew i powtórz czynnoÊci
opisane powy˝ej w sekcji «Przed goleniem».
Zale˝nie od potrzeb, golarka zostanie automatycznie na∏adowana i oczyszczona. JeÊli
u˝ywasz golarki codziennie, wk∏ad z p∏ynem
czyszczàcym wystarczy na oko∏o 30 cykli
czyszczenia.
Piel´gnacyjny p∏yn czyszczàcy zawiera alkohol,
który po otwarciu wk∏adu zacznie si´ powoli
ulatniaç w naturalny sposób w otaczajàcym
powietrzu. Ka˝dy wk∏ad, jeÊli golarka nie b´dzie
u˝ywana codziennie, nale˝y wymieniç po oko∏o
8 tygodniach.
P∏yn czyszczàcy zawiera równie˝ substancje
smarujàce, które po czyszczeniu mogà
tr
lock
1
2
trimmer
lock
lock
lock
on
on
off
off
tr
lock
1
2
trimmer
lock
lock
lock
on
on
off
off
releaserelease
high
clean
eco
normal
intensive
auto select
low
empty
s
t
a
r
t
c
l
e
a
n
i
n
g
washable
trimmer
rese
t
f
a
s
t
c
l
e
a
n
high
clean
eco
normal
intensive
auto select
low
empty
s
t
a
r
t
c
l
e
a
n
i
n
g
washable
trimmer
rese
t
f
a
s
t
c
l
e
a
n
24
pozostawiç Êlady na ramce zewn´trznej folii.
Âlady te mo˝na jednak ∏atwo usunàç, delikatnie
Êcierajàc je kawa∏kiem materia∏u lub chusteczkà
higienicznà.
Czyszczenie r´czne
G∏owica golarki jest przystosowana do
czyszczenia pod bie˝àcà wodà.
Uwaga: Przed umyciem g∏owicy golarki
w wodzie nale˝y wyciàgnàç wtyczk´
z gniazdka sieciowego.
Op∏ukanie g∏owicy golarki pod bie˝àcà wodà
to inny mo˝liwy sposób na utrzymanie golarki
w czystoÊci, zw∏aszcza podczas podró˝y:
• W∏àcz golark´ (przy wy∏àczonym zasilaniu
z sieci) w i op∏ucz g∏owic´ golàcà pod
strumieniem goràcej wody. Mo˝esz tak˝e u˝yç
myd∏a w p∏ynie bez Êrodków Êcierajàcych.
Sp∏ucz resztki piany i odczekaj kilka sekund,
zanim wy∏àczysz golark´.
• Nast´pnie wy∏àcz golark´, naciÊnij przycisk
zwalniajàcy blokad´ 9, aby wyjàç kaset´
z folià golàcà i ostrzami 8 i poczekaj a˝
cz´Êci wyschnà.
• JeÊli regularnie czyÊcisz golark´ pod bie˝àcà
wodà, raz na tydzieƒ nasmaruj kaset´ z folià
i ostrzami niewielkà iloÊcià lekkiego oleju do
maszyn do szycia.
Ewentualnie mo˝esz tak˝e oczyÊciç golark´
do∏àczonà do zestawu szczoteczkà:
• Wy∏àcz golark´. Wyjmij kaset´ z folià
i ostrzami 8 i postukaj nià o p∏askà
powierzchni´. Przy pomocy szczoteczki
wyczyÊç wewn´trznà stron´ ruchomej g∏owicy.
Nie czyÊç jednak szczoteczkà kasety, gdy˝
mo˝e je to uszkodziç.
Czyszczenie obudowy
Obudow´ i stacj´ Clean&Renew, a zw∏aszcza
otwór, w którym umieszcza si´ golark´, nale˝y
co jakiÊ czas oczyÊciç wilgotnà szmatkà.
Wymiana wk∏adu
Po naciÊni´ciu przycisku 2 i otwarciu obudowy,
odczekaj kilka sekund zanim wyjmiesz zu˝yty
wk∏ad.
Przed wyrzuceniem zu˝ytego wk∏adu, pami´taj,
aby go szczelnie zamknàç, u˝ywajàc pokrywki
oil
washable
trimm
er
on
washable
er
re
le
a
s
e
washable
trimmer
re
le
a
s
e
re
le
a
s
e
click!
oil
washable
trimm
er
on
washable
er
re
le
a
s
e
washable
trimmer
re
le
a
s
e
re
le
a
s
e
click!
washable
re
le
a
s
e
washable
re
le
a
s
e
washable
re
le
a
s
e
washable
re
le
a
s
e
washable
re
le
a
s
e
washable
re
le
a
s
e
new
old
new
old
25
zdj´tej z nowego wk∏adu, poniewa˝ zu˝yty
wk∏ad zawiera zanieczyszczony roztwór p∏ynu
czyszczàcego.
Konserwacja
Wymiana kasety z folià I ostrzami /
resetowanie
Aby zapewniç 100 proc. skutecznoÊç golenia,
kaset´ z folia i ostrzami
8 nale˝y wymieniç,
gdy na wyÊwietlaczu golarki r pojawi si´
symbol informujàcy o potrzebie wymiany cz´Êci
golàcych (po oko∏o 18 miesiàcach) lub gdy
kaseta si´ zu˝yje.
Symbol ten b´dzie wyÊwietlany podczas
kolejnych 7 cykli golenia w celu przypomnienia
o potrzebie wymiany kasety z folià i ostrzami.
Nast´pnie wyÊwietlacz golarki zostanie
automatycznie zresetowany.
Po wymianie kasety z folià i ostrzami, naciÊnij
d∏ugopisem przycisk do resetowania i
przytrzymaj go przez co najmniej 3 sekundy,
aby zresetowaç licznik.
W tym samym czasie kontrolka informujàca
o wymianie cz´Êci b´dzie migaç i zgaÊnie
dopiero, gdy resetowanie zostanie zakoƒczone.
WyÊwietlacz mo˝na zresetowaç r´cznie
w dowolnym momencie.
Akcesoria
Dost´pne w lokalnym sklepie lub punktach
serwisowych marki Braun:
• Kaseta z folià i ostrzami Nr 9000
• Wk∏ad w p∏ynem czyszczàcym
Clean&Renew CCR
Uwagi dotyczàce ochrony Êrodowiska
Urzàdzenie to wyposa˝one jest w baterie
przystosowane do wielokrotnego
∏adowania. Aby zapobiec zanieczyszczaniu Êrodowiska, pod koniec okresu
eksploatacji produktu nie wyrzucaj go do
kosza na Êmieci. Mo˝esz pozostawiç go
w punkcie serwisowym marki Braun lub
jednym ze specjalnych punktów zajmujàcych
si´ zbiórkà zu˝ytych produktów w wybranych
miejscach na terenie kraju.
Wk∏ad po p∏ynie czyszczàcym mo˝na wyrzuciç
do zwyk∏ego kosza na Êmieci.
360°Complete
9000
Series
9000
Series
washable
er
re
le
a
s
e
360°Complete
9000
Series
9000
Series
washable
er
re
le
a
s
e
360°Complete
9000
Series
9000
Series
360°Complete
9000
Series
9000
Series
26
Powy˝sze informacje mogà ulec zmianie bez
uprzedniego powiadomienia.
Produkt ten spe∏nia wymogi dyrektywy
EMC 89/336/EEC oraz dyrektywy
73/23 EEC dotyczàcej elektrycznych
urzàdzeƒ niskonapi´ciowych.
Specyfi kacje elektryczne zosta∏y wydrukowane
na specjalnym kablu sieciowym.
Warunki gwarancji
1. Procter and Gamble DS Polska sp. z.o.o.
gwarantuje sprawne działanie sprzętu w
okresie 24 miesięcy od daty jego wydania
Kupującemu. Ujawnione w tym okresie wady
będą usuwane bezpłatnie, przez wymieniony
przez fi rmę Procter and Gamble DS Polska
sp. z.o.o. autoryzowany punkt serwisowy, w
terminie 14 dni od daty dostarczenia sprzętu
do autoryzowanego punktu serwisowego.
2. Kupujący może wysłać sprzęt do naprawy do
najbliżej znajdującego się autoryzowanego
punktu serwisowego wymienionego przez
fi rmę Procter and Gamble DS Polska sp.
z.o.o. lub skorzystać z pośrednictwa sklepu,
w którym dokonał zakupu sprzętu. W takim
wypadku termin naprawy ulegnie wydłużeniu
o czas niezbędny do dostarczenia i odbioru
sprzętu.
3. Kupujący powinien dostarczyć sprzęt
w oryginalnym opakowaniu fabrycznym
dodatkowo zabezpieczonym przed
uszkodzeniem. Uszkodzenia spowodowane
niedostatecznym zabezpieczeniem sprzętu
nie podlegają naprawom gwarancyjnym.
4. Niniejsza gwarancja jest ważna z
dokumentem zakupu i obowiązuje na
terytorium Rzeczypospolitej Polskiej.
5. Okres gwarancji przedłuża się o czas od
zgłoszenia wady lub uszkodzenia do naprawy
sprzętu.
6. Naprawa gwarancyjna nie obejmuje czynności
przewidzianych w instrukcji, do wykonania
których Kupujący zobowiązany jest we
własnym zakresie i na własny koszt.
7. Ewentualne oczyszczenie sprzętu
dokonywane jest na koszt Kupującego według
cennika danego autoryzowanego punktu
serwisowego i nie będzie traktowane jako
naprawa gwarancyjna.

27
8. Gwarancją nie są objęte:
a) mechaniczne uszkodzenia sprzętu
spowodowane w czasie jego użytkowania
lub w czasie dostarczania sprzętu do
naprawy;
b) uszkodzenia i wady wynikłe na skutek:
– używania sprzętu do celów innych niż
osobisty użytek;
– niewłaściwego lub niezgodnego z
instrukcją użytkowania, konserwacji,
przechowywania lub instalacji;
– używania niewłaściwych materiałów
eksploatacyjnych;
– napraw dokonywanych przez
nieuprawnione osoby; stwierdzenie
faktu takiej naprawy lub samowolnego
otwarcia sprzętu powoduje utratę
gwarancji;
– przeróbek, zmian konstrukcyjnych lub
używania do napraw nieoryginalnych
części zamiennych fi rmy Braun;
c) części szklane, żarówki oświetlenia;
d) ostrza i folie do golarek oraz materiały
eksploatacyjne.
9. Bez nazwy i modelu sprzętu, daty jego
zakupu potwierdzonej pieczątką i podpisem
sprzedawcy karta gwarancyjna jest nieważna.
10. Niniejsza gwarancja na sprzedany towar
konsumpcyjny nie wyłącza, nie ogranicza
ani nie zawiesza uprawnień Kupującego
wynikających z niezgodności towaru z
umową.
28
âesk˘
Na‰e v˘robky jsou navrÏeny tak, aby splÀovaly
nejvy‰‰í standard kvality, funkãnosti a designu.
Doufáme, Ïe s nov˘m holicím strojkem Braun
budete spokojeni.
Varování
Holicí systém Pulsonic, kter˘ jste si zakoupili,
je vybaven speciální sadou ‰ÀÛr, které mají
zabudovan˘ zdroj bezpeãného extra nízkého
napûtí. NevymûÀujte ani neprohazujte Ïádnou
z ãástí, vystavili byste se tím riziku úrazu
elektrick˘m proudem.
Ujistûte se, Ïe jste umístili základnu
Clean&Renew na rovn˘ povrch, zabráníte tím
úniku ãistící kapaliny. Po instalaci zásobníku
ãisticí kapaliny základnu nenah˘bejte, nijak s
ní nepohybujte ani ji nepfiemísÈujte, protoÏe by
z ní mohla pfii manipulaci vytéct ãisticí kapalina.
NeumísÈujte stanici do koupelnové skfiíÀky, ani
ji nedávejte na le‰tûn˘ ãi lakovan˘ povrch.
Zásobník ãisticí kapaliny obsahuje vysoce
hofilavou tekutinu, proto jej skladujte mimo
zdroje záÏehu. Nevystavujte jej pfiímému slunci
ani cigaretovému d˘mu, neskladujte jej nad
radiátorem.
UdrÏujte mimo dosah dûtí.
Nedolévejte do zásobníku náhradní náplÀ a
pouÏívejte pouze originální zásobníky Braun.
Popis
Základna Clean&Renew
1 Displej ãisticí kapaliny
2 Tlaãítko pro v˘mûnu zásobníku
3 Kontakty mezi základnou a holicím strojkem
4 Tlaãítko «start cleaning» (zaãátek ãi‰tûní)
D Tlaãítko «fast clean» (rychlé ãi‰tûní)
5 Diody ãisticích programÛ
6 Elektrická zásuvka základny
7 Zásobník ãisticí kapaliny
Holicí strojek
8 Kazeta planÏety a zastfiihovaãe
9 Tlaãítko pro uvolnûní kazety
0 Spínaã «lock» (zámku) holicí hlavice
q Vystfielovací zastfiihovaã dlouh˘ch vlasÛ
w Pfiepínaã Zapnuto / Vypnuto
e Tlaãítko «reset»
r Displej holicího strojku
STOPSTOP
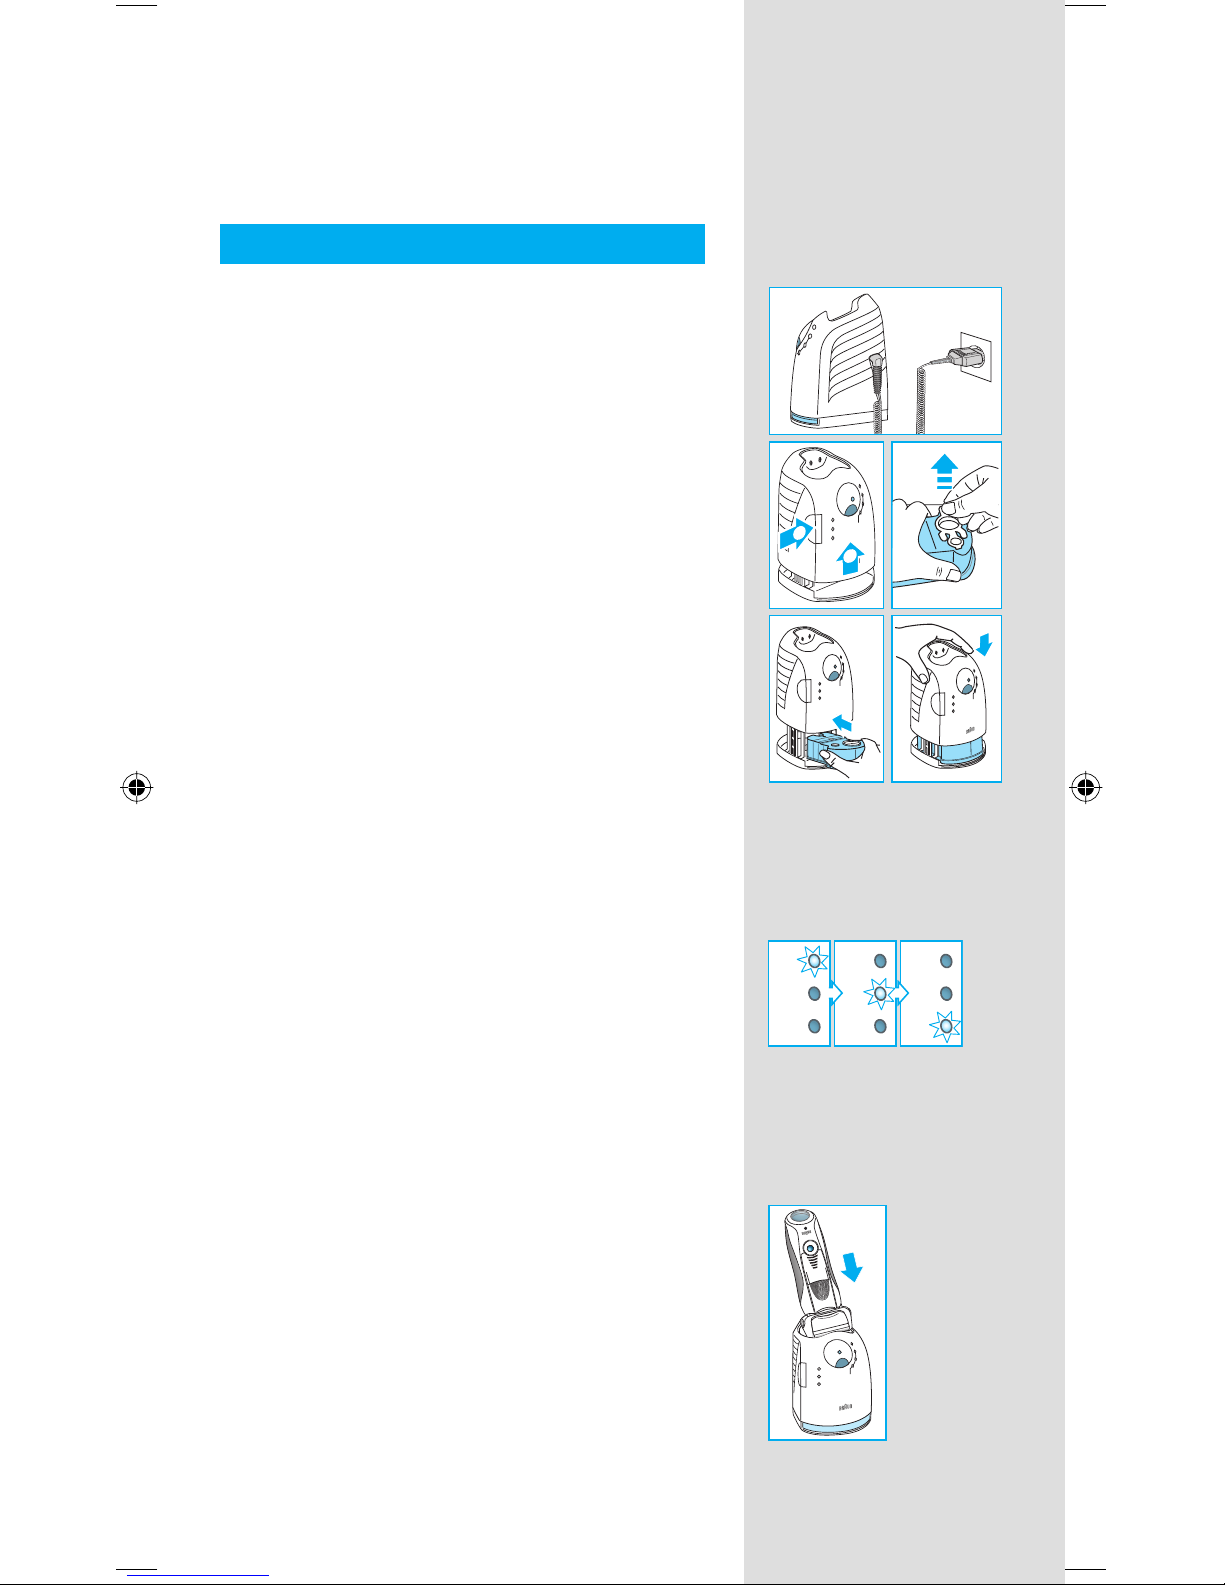
29
t Kontakt holicího strojku do základny
z Elektrická zásuvka holicího strojku
u Cestovní krabiãka
i Speciální sada ‰ÀÛr
Pfied holením
Pfied prvním pouÏitím musíte zapojit holicí
strojek do elektrické zásuvky pomocí speciální
sady ‰ÀÛr i nebo pfiípadnû postupovat dle níÏe
uvedeného.
Instalace základny Clean&Renew
• Pomocí speciální sady ‰ÀÛr i zapojte
elektrickou zásuvku základny 6 do elektrické
zásuvky.
• Stisknûte tlaãítko pro v˘mûnu zásobníku 2 a
otevfiete kryt.
• Zásobník ãisticí kapaliny 7 podrÏte na
rovném, stabilním povrchu (napfi. na stole).
• Opatrnû odstraÀte ze zásobníku krytku.
• Zásobník zasuÀte jak nejrychleji to pÛjde do
spodní ãásti základny.
• Pomalu zatlaãte na kryt smûrem dolÛ a tak jej
zavírejte do doby neÏ se zamkne.
Displej ãisticí kapaliny 1 ukáÏe kolik kapaliny je
v zásobníku:
«high» k dispozici je maximálnû 30 ãisticích
cyklÛ
«low» k dispozici zb˘vá maximálnû
7 ãisticích cyklÛ
«empty» nutno instalovat nov˘ zásobník
Nabíjení a ãi‰tûní holicího strojku
VloÏte hlavici holicího strojku do ãisticí základny.
(Kontakty t na zadní stranû holicího strojku se
spojí s kontakty 3 v ãisticí základnû.)
Pokud budete chtít, mÛÏe základna
Clean&Renew nabíjet holicí strojek. Probûhne
také anal˘za hygienického stavu holicího strojku
a na jejím základû se rozsvítí jedna
z následujících diod 5 ãisticích programÛ:
new
f
a
s
t
c
l
e
a
n
high
clean
e
co
norm
a
l
intensive
a
u
to
s
e
le
c
t
low
empty
s
t
a
r
t
c
l
e
a
n
i
n
g
cle
an
eco
nor
mal
in
te
n
s
ive
a
u
to
sel
e
c
t
f
a
s
t
c
l
e
a
n
high
clean
eco
normal
intensive
au
to select
low
empty
s
t
a
r
t
c
l
e
a
n
i
n
g
f
a
s
t
c
l
e
a
n
high
clean
eco
normal
intensive
auto select
low
empty
s
t
a
r
t
c
l
e
a
n
i
n
g
2
1
f
a
s
t
c
l
e
a
n
f
a
s
t
c
l
e
a
n
f
a
s
t
c
l
e
a
n
high
low
empty
high
low
empty
high
low
empty
high
low
empty
high
low
empty
high
low
empty
high
clean
eco
norm
al
intensive
auto select
low
empty
s
t
a
r
t
c
l
e
a
n
i
n
g
w
ashable
trim
mer
reset
f
a
s
t
c
l
e
a
n
high
clean
eco
norm
al
intensive
auto select
low
empty
s
t
a
r
t
c
l
e
a
n
i
n
g
w
ashable
trim
mer
reset
f
a
s
t
c
l
e
a
n
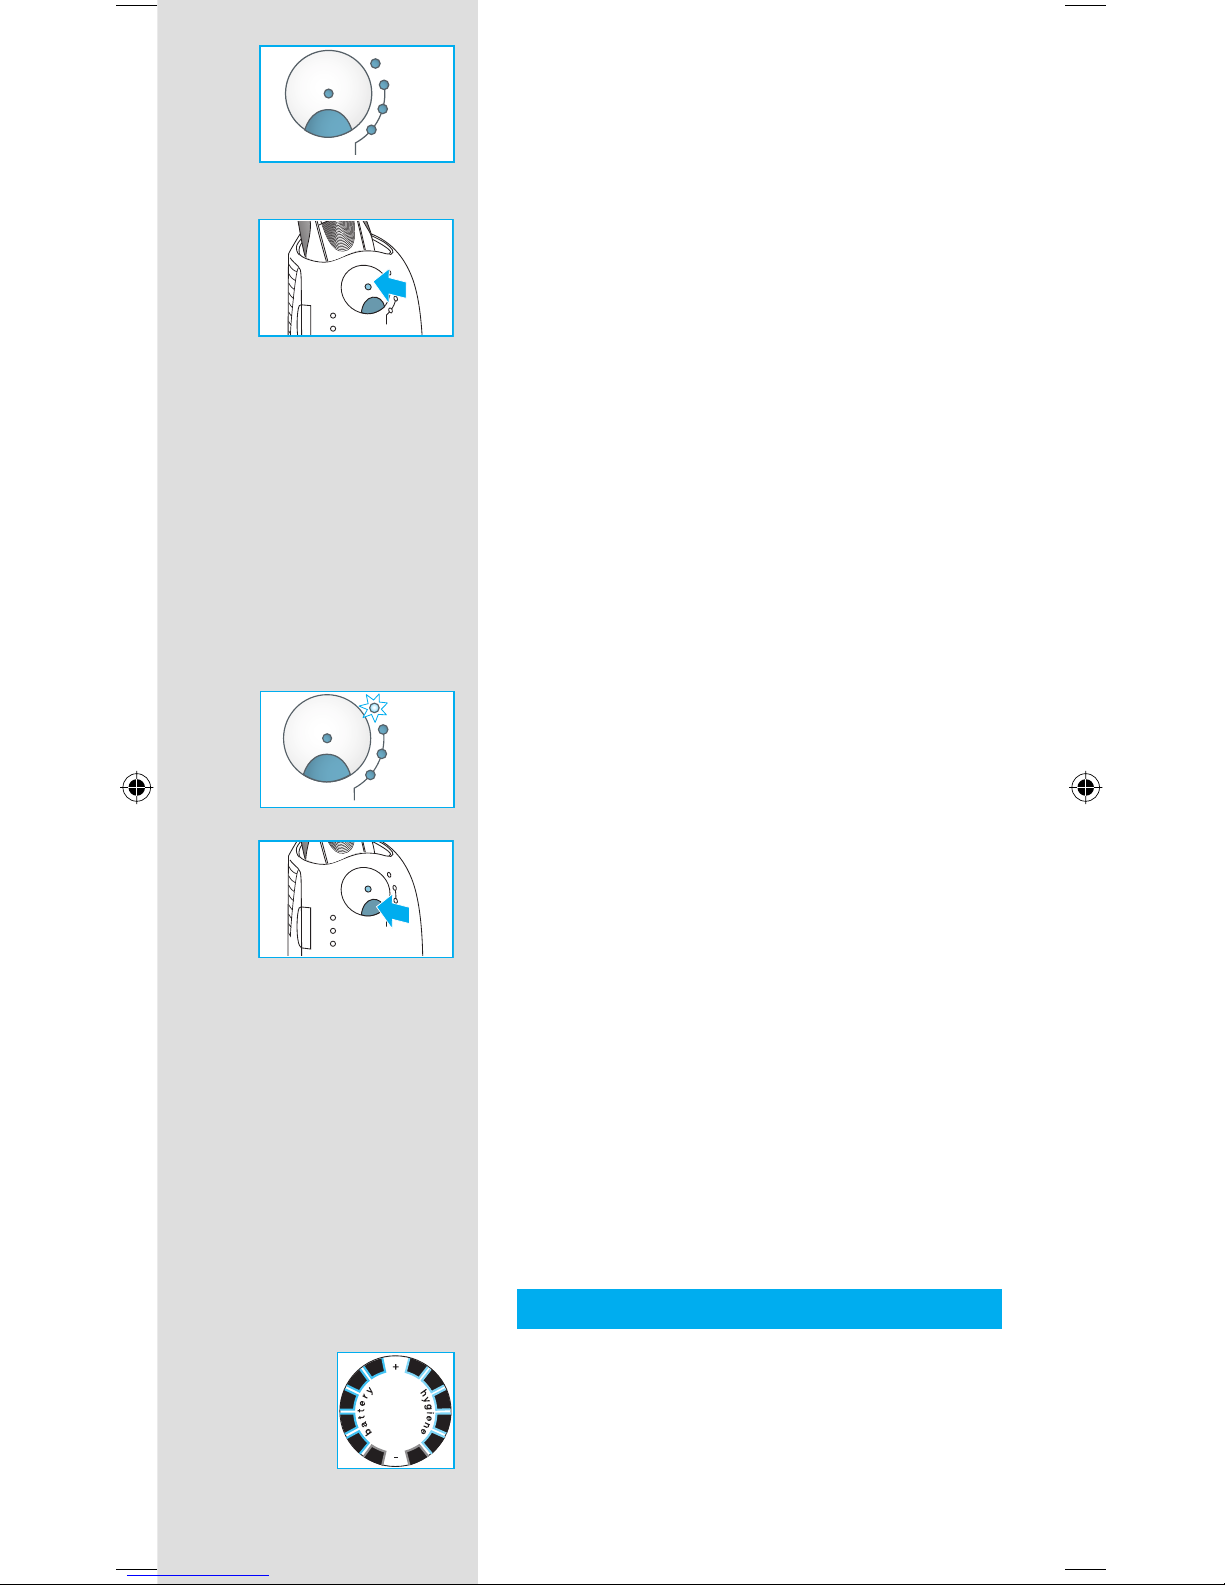
30
«clean» holicí strojek je ãist˘
«eco» je tfieba provést krátké úsporné
ãi‰tûní
«normal» je tfieba provést bûÏné ãi‰tûní
«intensive» je tfieba provést intenzivní ãi‰tûní
KdyÏ základna zvolí jedno z potfiebn˘ch
ãi‰tûní, nedojde k jeho spu‰tûní do doby, neÏ
zmáãknete tlaãítko «start cleaning» 4.
Pro dosaÏení nejlep‰ích v˘sledkÛ holení
doporuãujeme provádût ãi‰tûní po kaÏdém
holení.
V prÛbûhu ãi‰tûní bude blikat dioda pfiíslu‰ného
ãisticího programu. KaÏd˘ ãisticí program se
skládá z nûkolika cyklÛ, pfii kter˘ch protéká
ãisticí kapalina hlavicí holicího strojku. Pak
se holicí strojek vysu‰uje tepeln˘m su‰ením.
V závislosti na zvoleném programu se bude
celkov˘ ãas ãi‰tûní pohybovat mezi 32 a 43
minutami.
âisticí programy by se nemûly pfieru‰ovat.
NezapomeÀte, prosím, Ïe pfii su‰ení holicího
strojku mÛÏe b˘t holicí hlavice horká a mokrá.
Po ukonãení programu se rozsvítí modrá dioda
«clean». Vበholicí strojek je ãist˘ a pfiipraven˘
na dal‰í pouÏití.
Rychlé ãi‰tûní
Pro spu‰tûní programu rychlého ãi‰tûní bez
su‰ení zmáãknûte tlaãítko «fast clean» D.
Tento program trvá pouze asi 25 sekund a
doporuãuje se v pfiípadech, kdy nemáte ãas
ãekat na jeden z automatick˘ch ãisticích
programÛ. Pokud sejmete strojek hned po
skonãení programu, otfiete holicí hlavici
kapesníãkem, aby z ní nekapalo.
Pohotovostní reÏim
10 minut po dobití nebo ukonãení ãi‰tûní
se základna Clean&Renew pfiepne do
pohotovostního reÏimu: diody základny
Clean&Renew zhasnou.
Displej holicího strojku
Displej holicího strojku r ukazuje na levé stranû
stav nabití baterie a hygienick˘ stav na pravé
stranû. (Na kaÏdé stranû najdete 6 tmav˘ch
segmentÛ v pfiípadû, Ïe je baterie plnû nabitá a
holicí strojek je hygienicky ãist˘.)
auto select
intensive
normal
eco
clean
s
t
a
r
t
c
l
e
a
n
i
n
g
f
a
s
t
c
l
e
a
n
auto select
intensive
normal
eco
clean
s
t
a
r
t
c
l
e
a
n
i
n
g
f
a
s
t
c
l
e
a
n
high
clean
eco
normal
intensive
auto select
low
washable
s
t
a
r
t
c
l
e
a
n
i
n
g
f
a
s
t
c
l
e
a
n
high
clean
eco
normal
intensive
auto select
low
washable
s
t
a
r
t
c
l
e
a
n
i
n
g
f
a
s
t
c
l
e
a
n
auto select
intensive
normal
eco
clean
s
t
a
r
t
c
l
e
a
n
i
n
g
f
a
s
t
c
l
e
a
n
auto select
intensive
normal
eco
clean
s
t
a
r
t
c
l
e
a
n
i
n
g
f
a
s
t
c
l
e
a
n
high
clean
eco
normal
intensive
auto select
low
empty
washable
s
t
a
r
t
c
l
e
a
n
i
n
g
f
a
s
t
c
l
e
a
n
high
clean
eco
normal
intensive
auto select
low
empty
washable
s
t
a
r
t
c
l
e
a
n
i
n
g
f
a
s
t
c
l
e
a
n
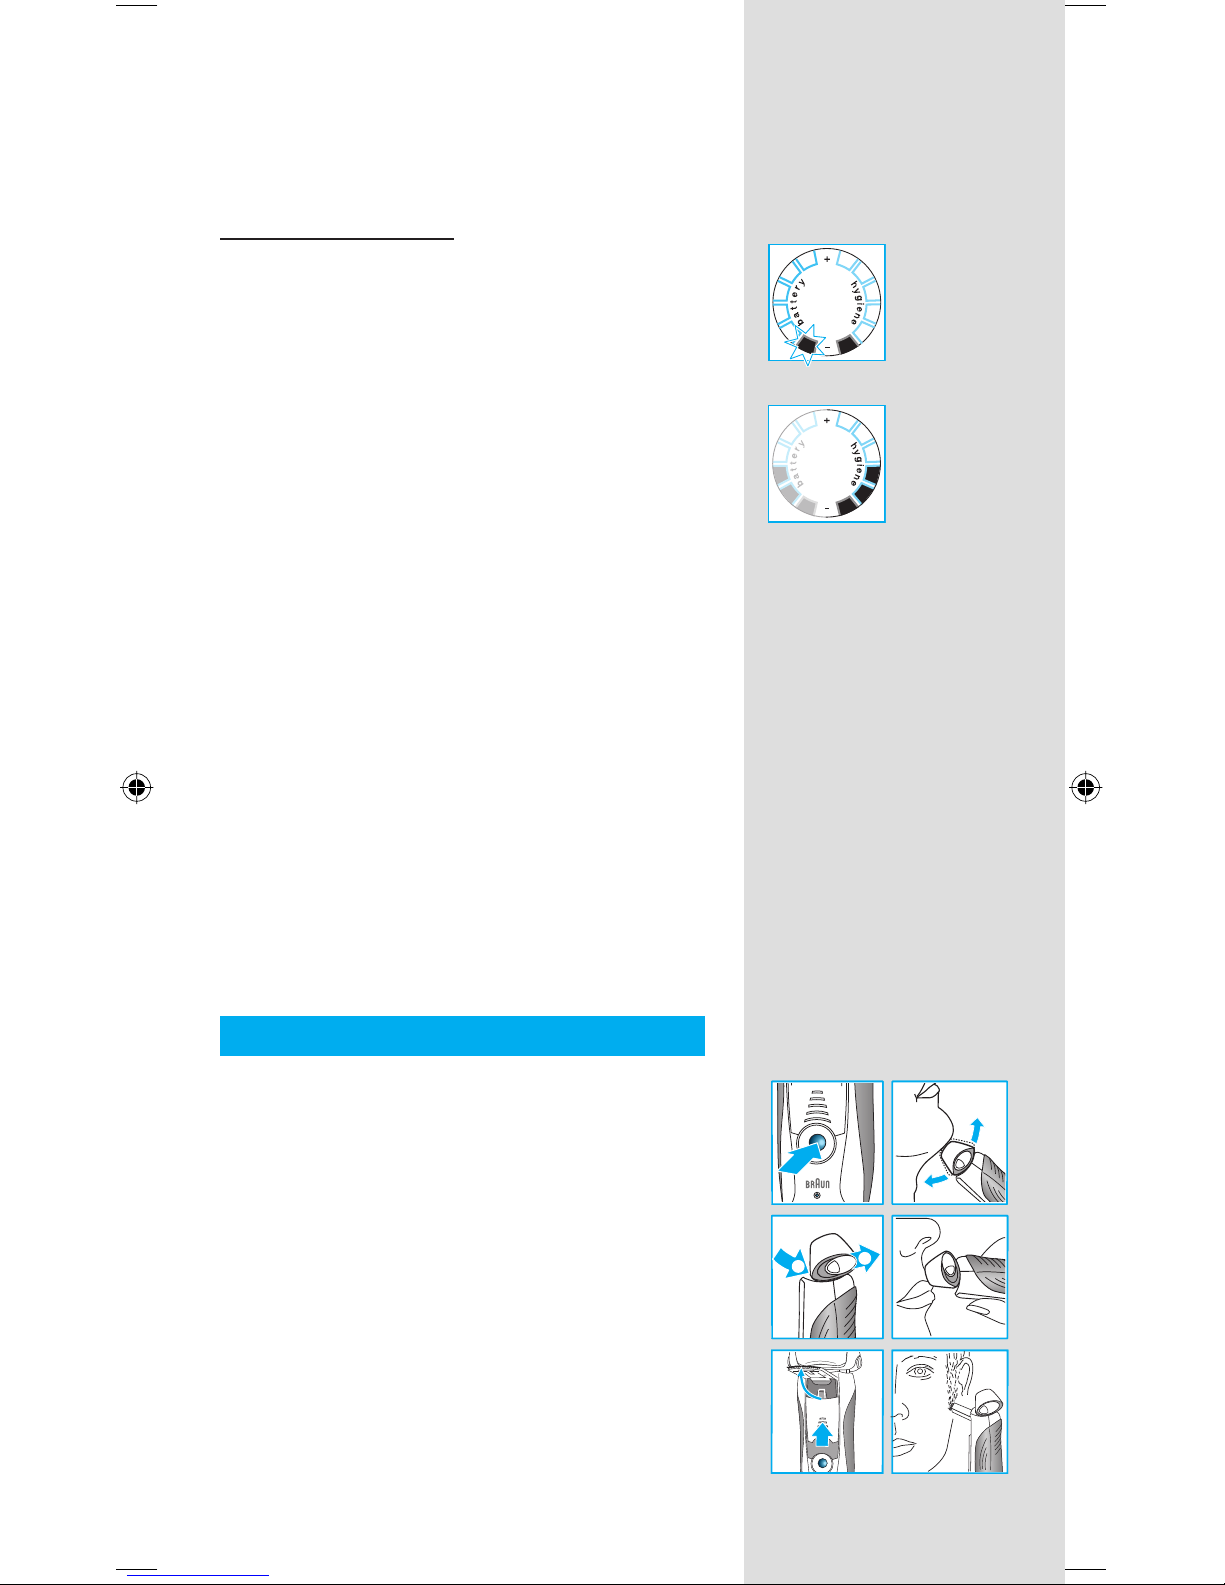
31
Segmenty baterie:
Bûhem nabíjení nebo pfii pouÏívání holicího
strojku bude pfiíslu‰n˘ bateriov˘ segment blikat.
Pfii plném nabití se ukáÏe v‰ech 6 segmentÛ.
Jak se bude nabití sniÏovat, budou segmenty
postupnû mizet.
Indikátor nízkého nabití
Segment nízkého nabití je vybaven ãervenû
ohraniãen˘mi svûtly, která indikují, Ïe nabití
kleslo pod 20%. Zb˘vající kapacita postaãí na
2–3 oholení.
Hygienické segmenty:
Po vyãi‰tûní holicího strojku v základnû
Clean&Renew se objeví v‰ech 6 hygienick˘ch
segmentÛ. Pfii pouÏívání holicího strojku budou
hygienické segmenty postupnû mizet. Jakmile
vrátíte holicí strojek do základny, systém
automaticky zvolí vhodn˘ ãisticí program a
uvede segmenty do maximálnû hygienického
stavu. ProtoÏe oplachování holicího strojku pod
tekoucí vodou není tak hygienické jako poÏití
ãisticí stanice, obnoví se hygienické segmenty
jen po vyãi‰tûní holicího strojku v základnû
Clean&Renew.
Informace o nabití:
• Plné nabití postaãí aÏ na 50 minut bezdráto-
vého holení. Tato doba se mÛÏe li‰it podle
délky Va‰ich vousÛ.
• Nejvhodnûj‰í okolní teplota pro dobíjení je
5 °C – 35 °C. Dlouhodobû holicí strojek
nevystavujte teplotám vy‰‰ím neÏ 50 °C.
Holení
Pro pouÏití holicího strojku zmaãknûte pfiepínaã
Zapnuto / Vypnuto w:
• Otoãná hlavice holicího strojku a plovoucí
planÏety se automaticky pfiizpÛsobí kaÏdé
kontufie Va‰í tváfie.
• Pfii holení tûÏko dostupn˘ch míst (napfiíklad
pod nosem) pfiepnûte spínaã «lock» holicí
hlavice 0 do zadní pozice a zamknûte
otoãnou hlavici do vhodného úhlu.
• Pro stfiíhání kotlet, kníru nebo bradky vysuÀte
zastfiihovaã dlouh˘ch vlasÛ q smûrem
nahoru.
tr
lock
1
2
trimmer
lock
lock
lock
on
on
off
off
tr
lock
1
2
trimmer
lock
lock
lock
on
on
off
off
 Loading...