

Page 1
Omnitest
®
3
B. Braun Melsungen AG, OPM
Carl-Braun-Straße 1
34212 Melsungen
Germany
Page 2

- 2 -
Important Information
!
WARNING
Before using Omnitest® 3 meter, read all instructions
in this manual and the additional information given in
instructions for use of the test strips. Practice for
accurate and safe test. You should have commentary
recommendation from your diabetes care professional
for the proper use of this meter and daily management
of your diabetes. Do not change your therapy due to
blood glucose results of the Omnitest® 3 system
without prior consulting your physician.
The Omnitest® 3 system provides a quick and easy way to
measure the blood glucose level. Omnitest® 3 can be used for
self-monitoring of blood glucose level by diabetes patients.
It should be used only for testing blood glucose (sugar) and only
with fresh capillary whole blood samples. It should not be used
for the diagnosis of diabetes or for the testing of newborns
(neonates). Do not use Omnitest® 3 system for any purpose
other than blood glucose test. The Omnitest® 3 system is
intended for use outside the body (in vitro diagnostic use only).
Page 3

- 3 -
Content
Omnitest® 3 Blood Glucose Monitoring System 4
The Meter, Display Segments 6
Quick Reference 8
Omnitest® 3 Blood Glucose Test Strip 12
Automatic Coding of the Meter 15
Battery 17
Checking the Meter Display 19
Check Strip 20
Using Control Solution 22
Set the Meter 29
Reviewing Your Results 40
Deleting Test Results 41
Collecting a Drop of Blood Sample 42
Testing Your Blood Glucose 46
Marking Function 54
Maintain Your Blood Glucose Monitor System 56
Troubleshooting 58
Specifications 62
Transfer Test Results to a Computer 65
Blood Glucose Conversion Table 66
Page 4
- 4 -
Omnitest® 3 Blood Glucose Monitoring System
Omnitest®3
Omnitest® 3 meter
Two 3V lithium-batteries (CR2032)
Check strip
Omnitest® 3 test strips (may be sold separately)
Omnitest® 3 Control solution (sold separately)
Page 5
- 5 -
trips
ps
Code
Control M
Mean
Control H
Mean
B. Braun Melsungen AG · O
34209 Melsungen · Germa
06/2019
C21
8
2
Omnitest
®
3
!
Check that your Omnitest® 3 system contains all parts
shown on the outer packaging. If anything is missing,
please return your system to the place of purchase or
contact your nearest B. Braun representative.
H
3,5mL
3
on de contrôle
plossing
one di controllo
®
3 Control H
1
M
3,5mL
lllösung
l solution
®
3 Control M
Lancets and lancing device are only parts of the Omnitest® 3
Set.
Page 6
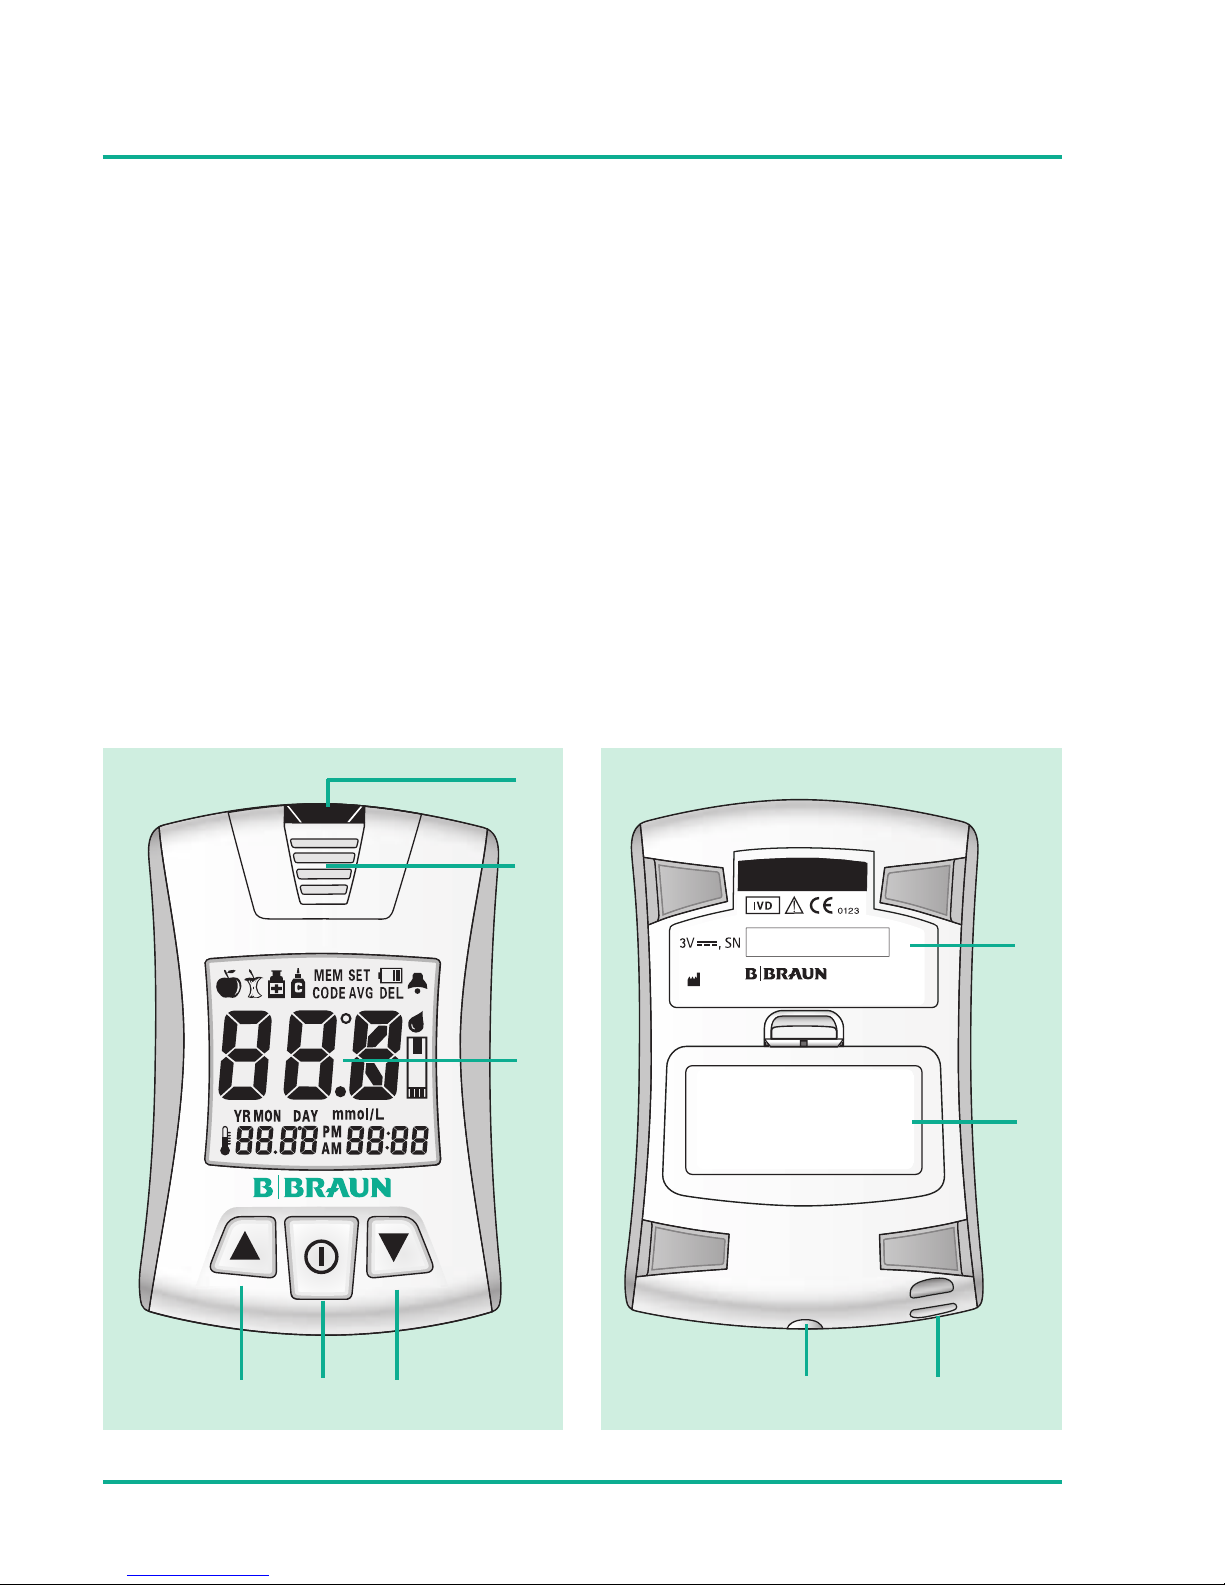
- 6 -
The Meter
Frontside
Test strip port
Test strip ejector
LCD display
Up button
Power + Select button
Down button
Backside
Product label
Battery cover
Strap holder
Data transfer port
Omnitest®3
www.omnitest.bbraun.com
Omnitest®3
B3MLG 2010/01
Omnitest®3 mmol/L
B. Braun Melsungen AG · OPM · Germany · www.bbraun.com
GKGBGBS00266
Page 7
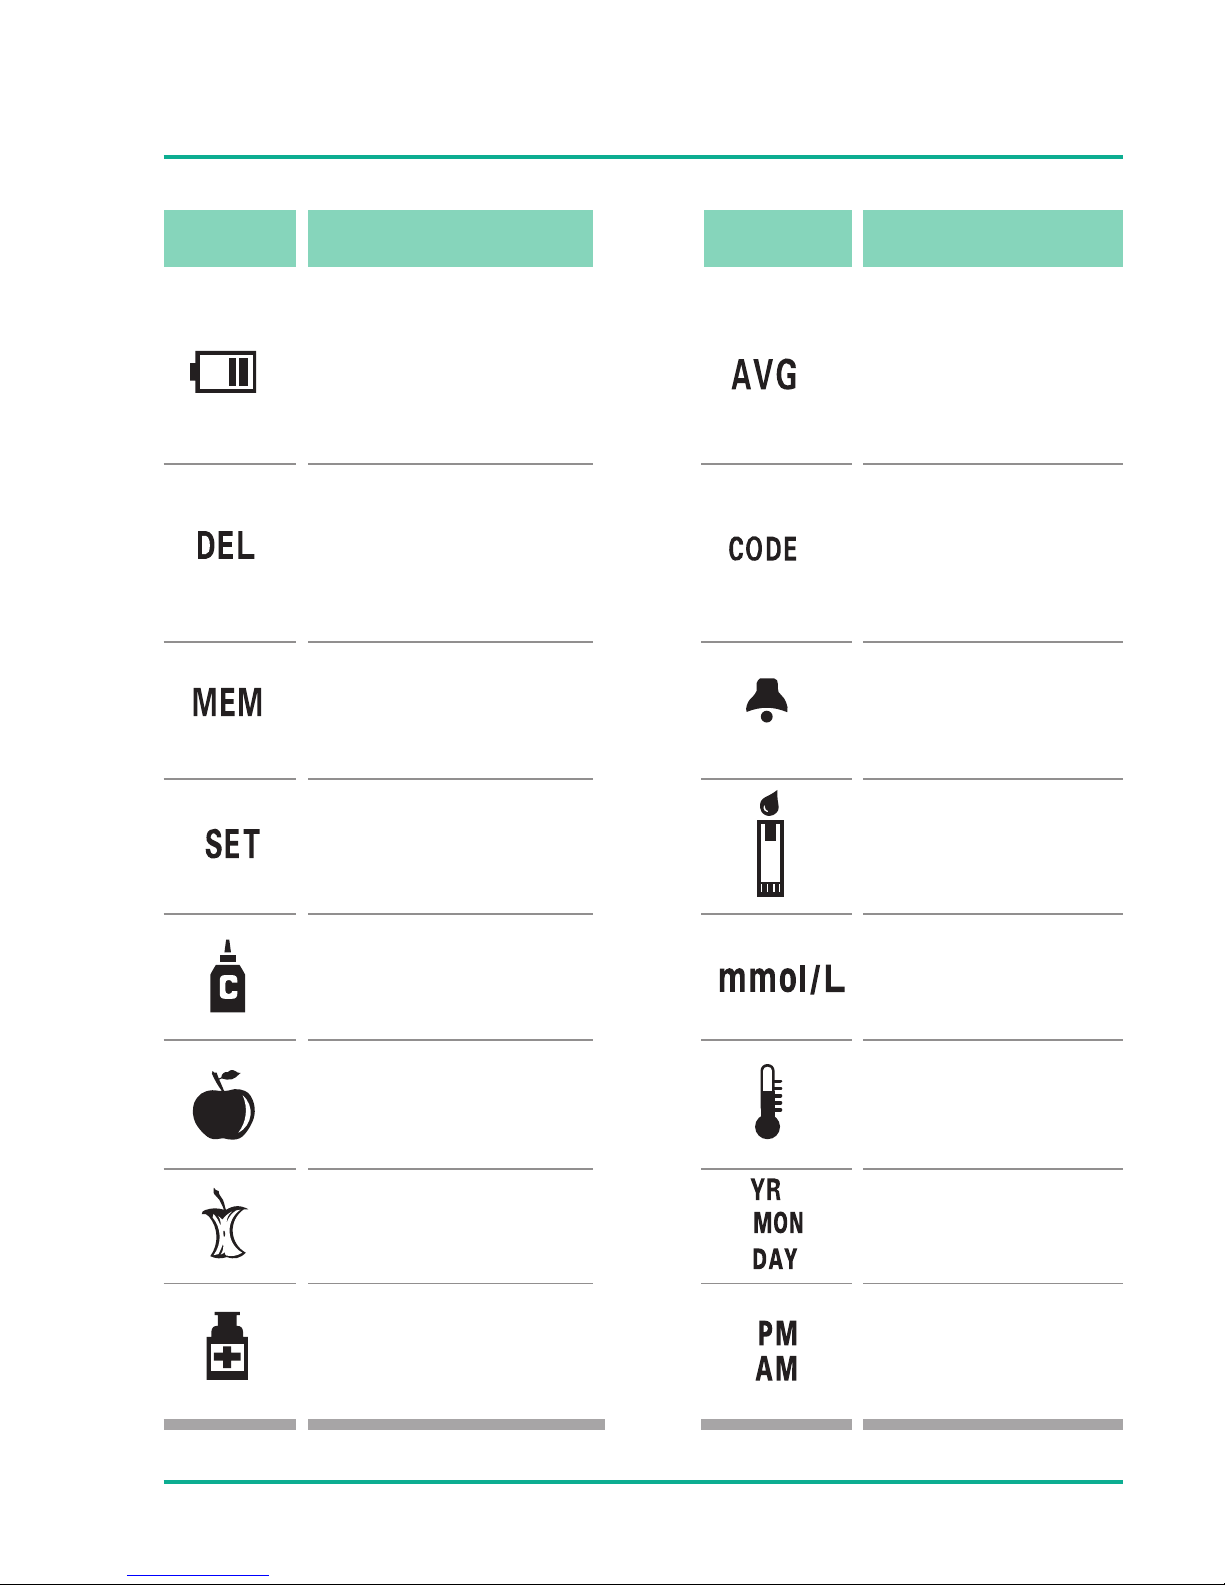
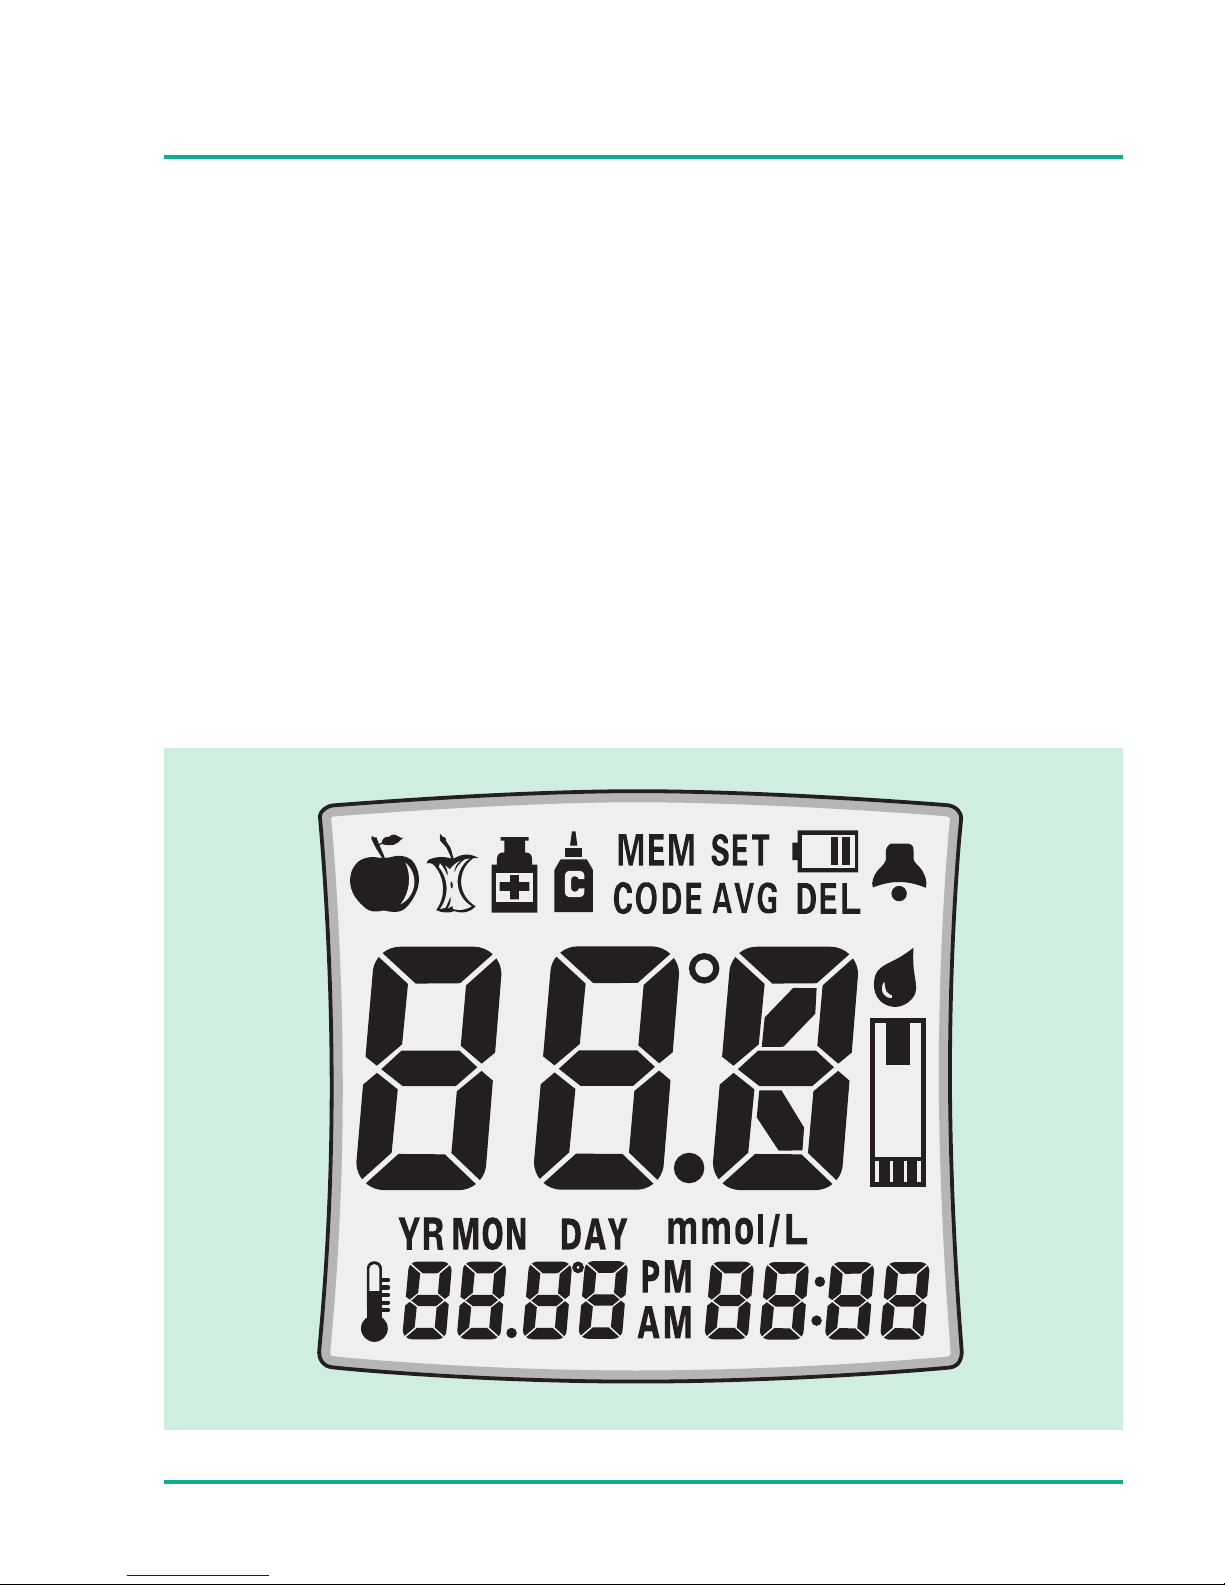
“AVG” is displayed
when average results
are shown.
The “CODE” mark is
displayed when the
recognized test strip
code is shown.
Alarm symbol
Sample applying
symbol
Test result unit
Temperature symbol
Year
Month
Day
12–24 o'clock
0–12 o'clock
- 7 -
Display Segments
The battery symbol
means the battery is
low and has to be
changed.
The “DEL” mark will
display when you can
delete results from the
meter memory.
The “MEM” mark will
display while reviewing
the results.
The “SET” mark will
display during ALL
meter setting.
Control solution
symbol
Before
Having a Meal
After
Having a Meal
After
Taking Medication
Segment Meaning
Segment Meaning
Page 8
www.omnitest.bbraun.com
Omnitest®3
B3MLG 2010/01
Omnitest®3 mmol/L
B. Braun Melsungen AG · OPM · Germany · www.bbraun.com
GKGBGBS00266
B3MLG 2010/01
Omnitest®3 mmol/L
B. Braun Melsungen AG · OPM · Germany · www.bbraun.com
GKGBGBS00266
trips
ps
Code
Control M
Mean
Control H
Mean
B. Braun Melsungen AG · O
34209 Melsungen · Germa
06/2019
C21
8
2
Omnitest®3
Omnitest®3
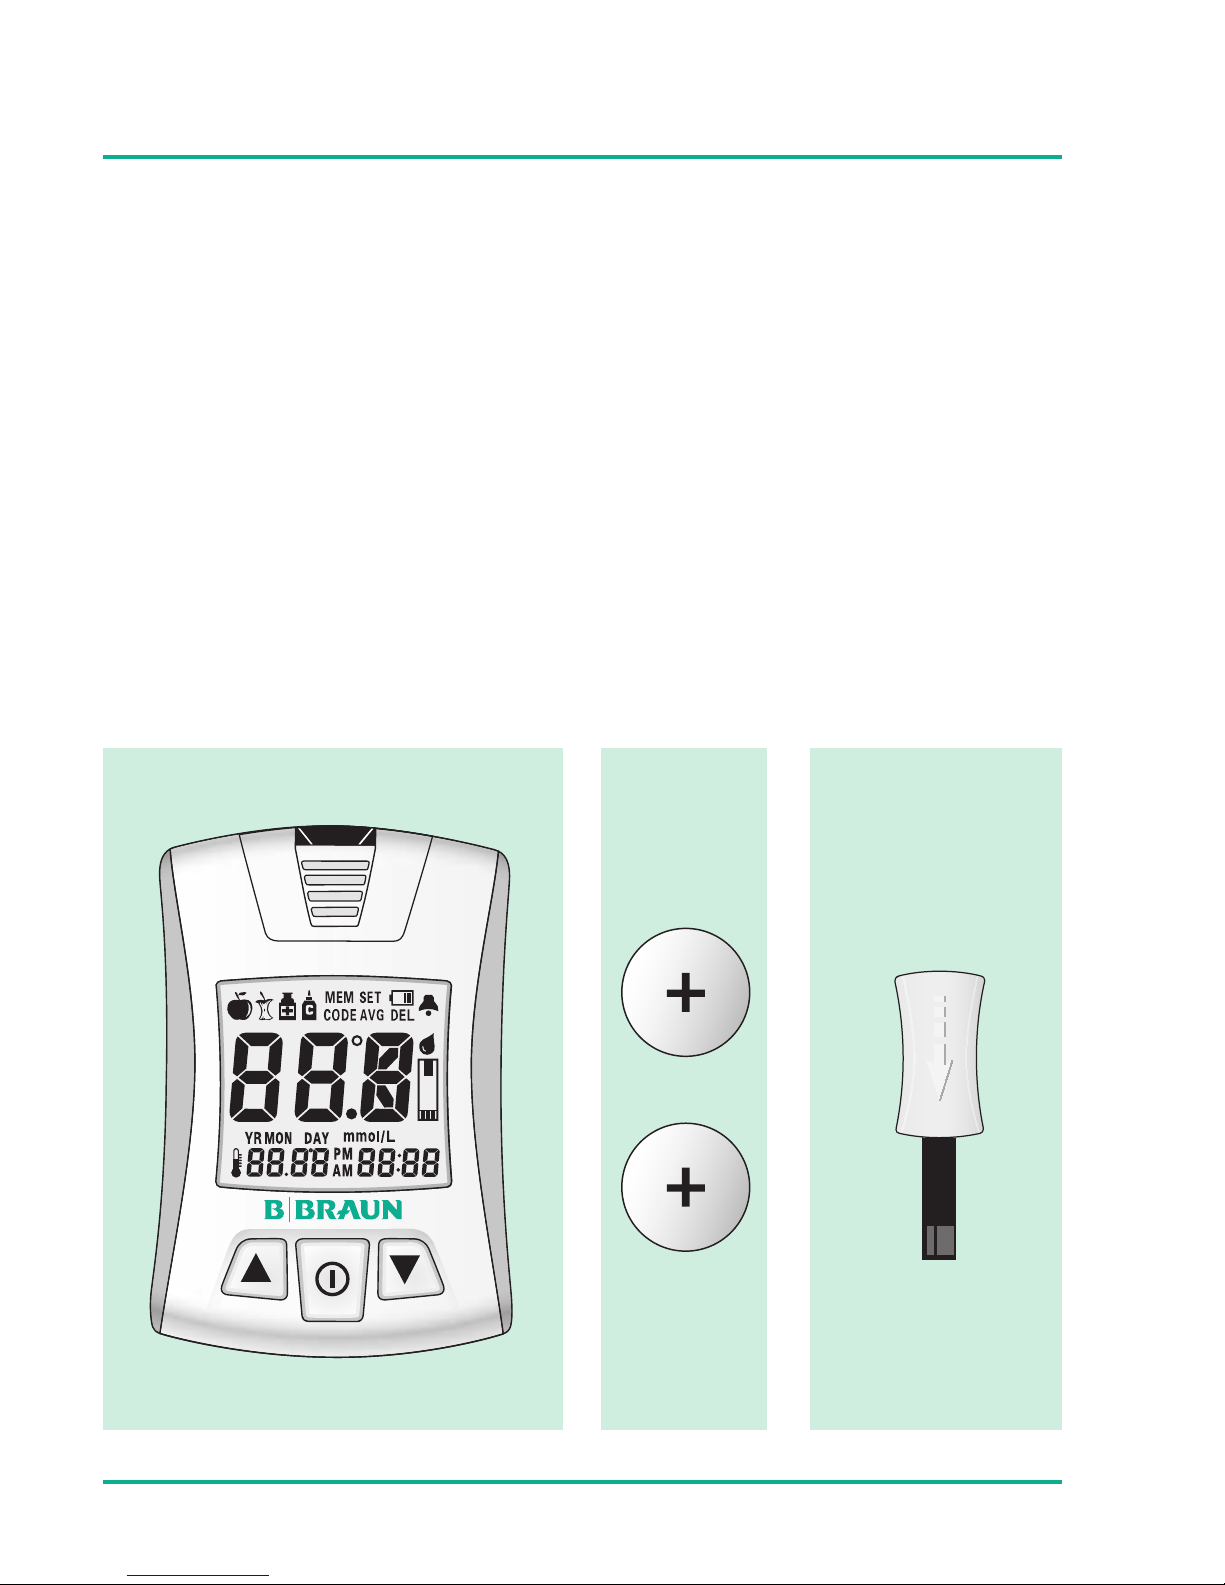
- 8 -
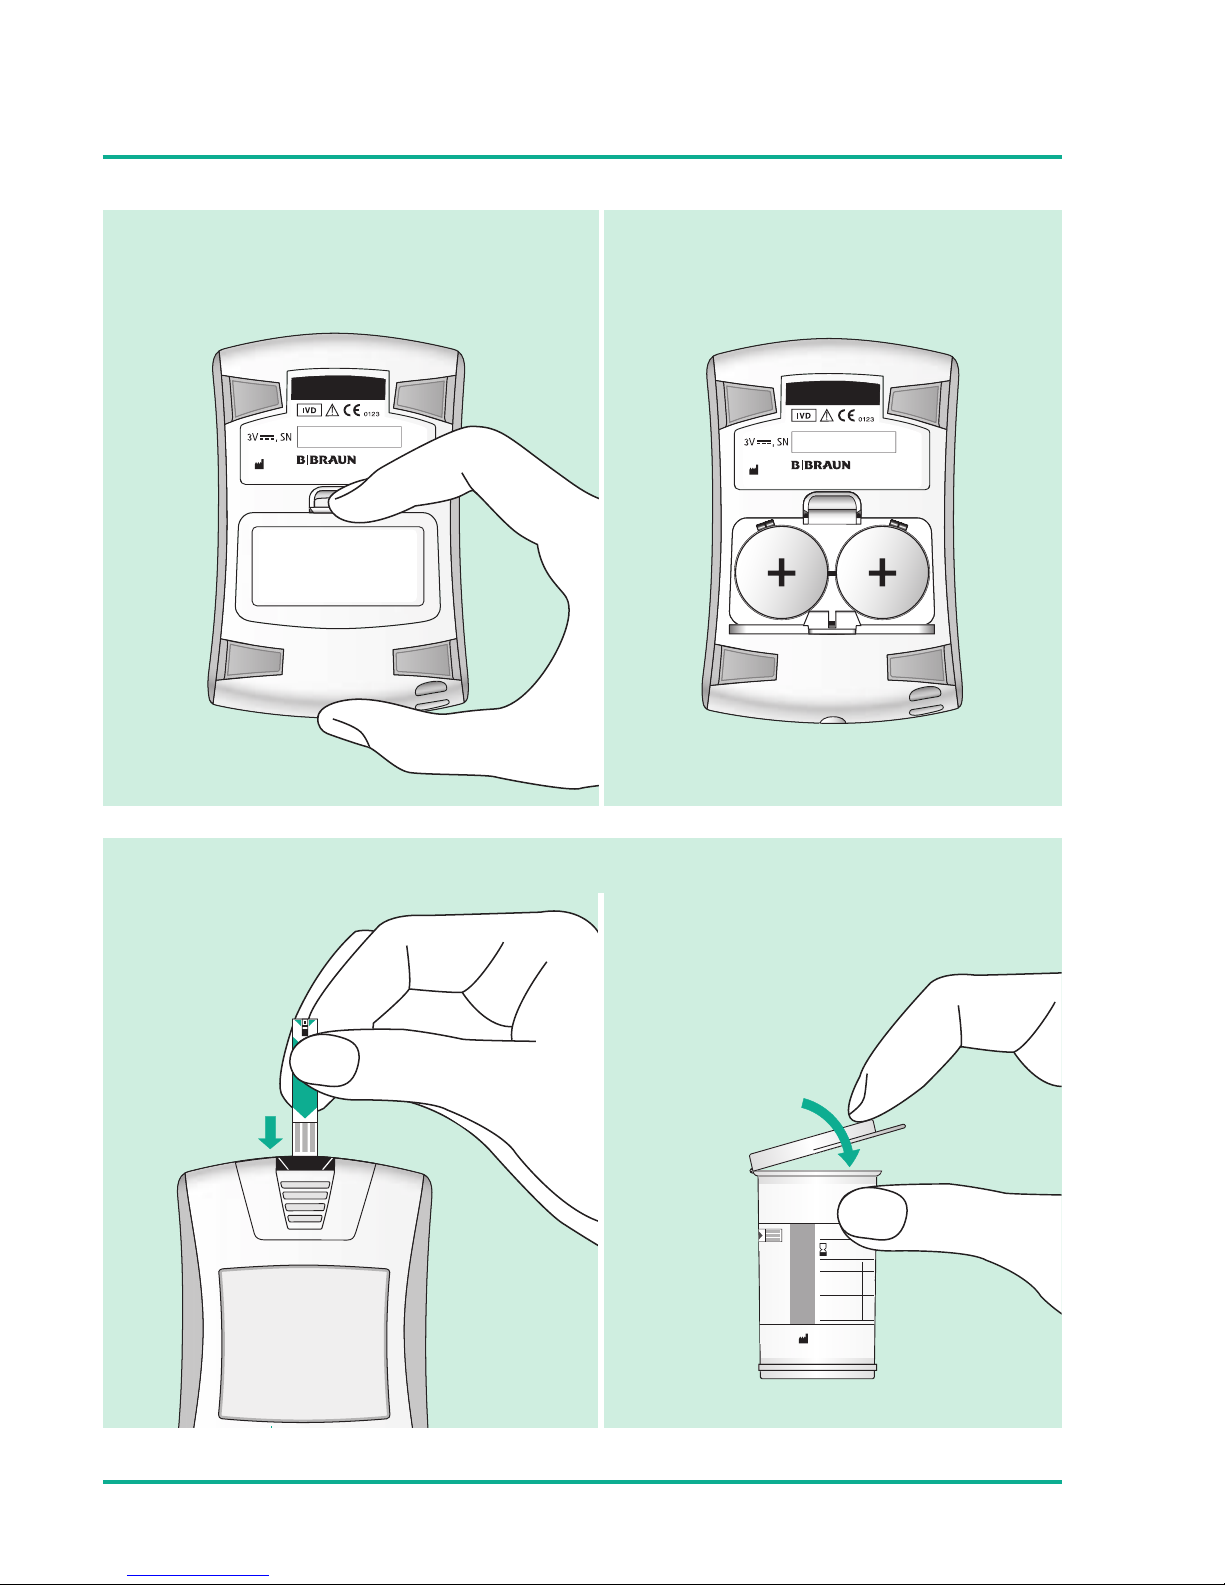
Quick Reference
Insert batteries
Insert test strip Close test strip vial
Page 9
Omnitest®3
Omni
t
Omnitest®3
Omni
t
CODE?
trips
ps
Code
Control M
Mean
Control H
Mean
B. Braun Melsungen AG · O
34209 Melsungen · Germa
06/2019
C21
8
2
C21
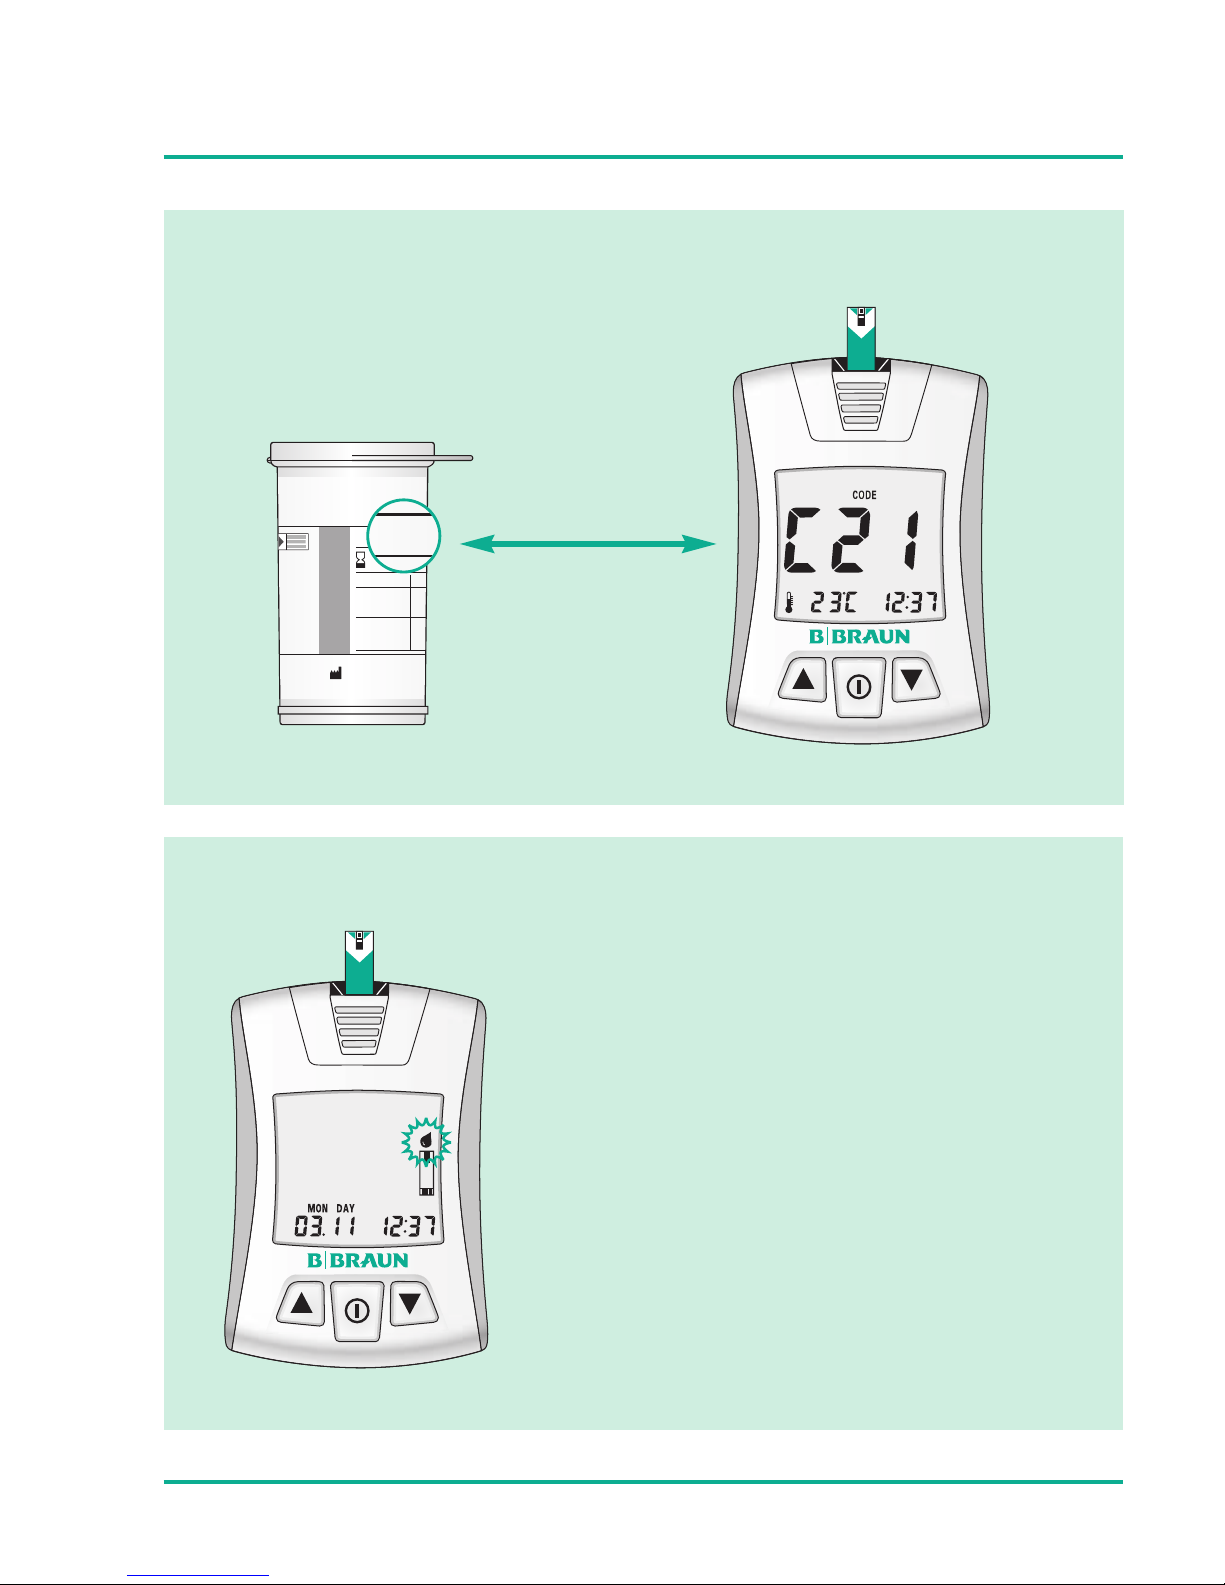
- 9 -
Code is automatically recognized and displayed
Ready for measurement
Page 10
- 10 -
Quick Reference
Get blood sample with lancing device
Page 11
Wait 3 sec for result
Eject test strip
Omnitest®3
Omni
t
Omnitest
®
3
Omni
t
Omnitest
®
3
Omni
t
Omnitest® 3
Omnitest
®
3
- 11 -
Apply blood
sample
Omnitest®3
Omni
t
✔
Page 12
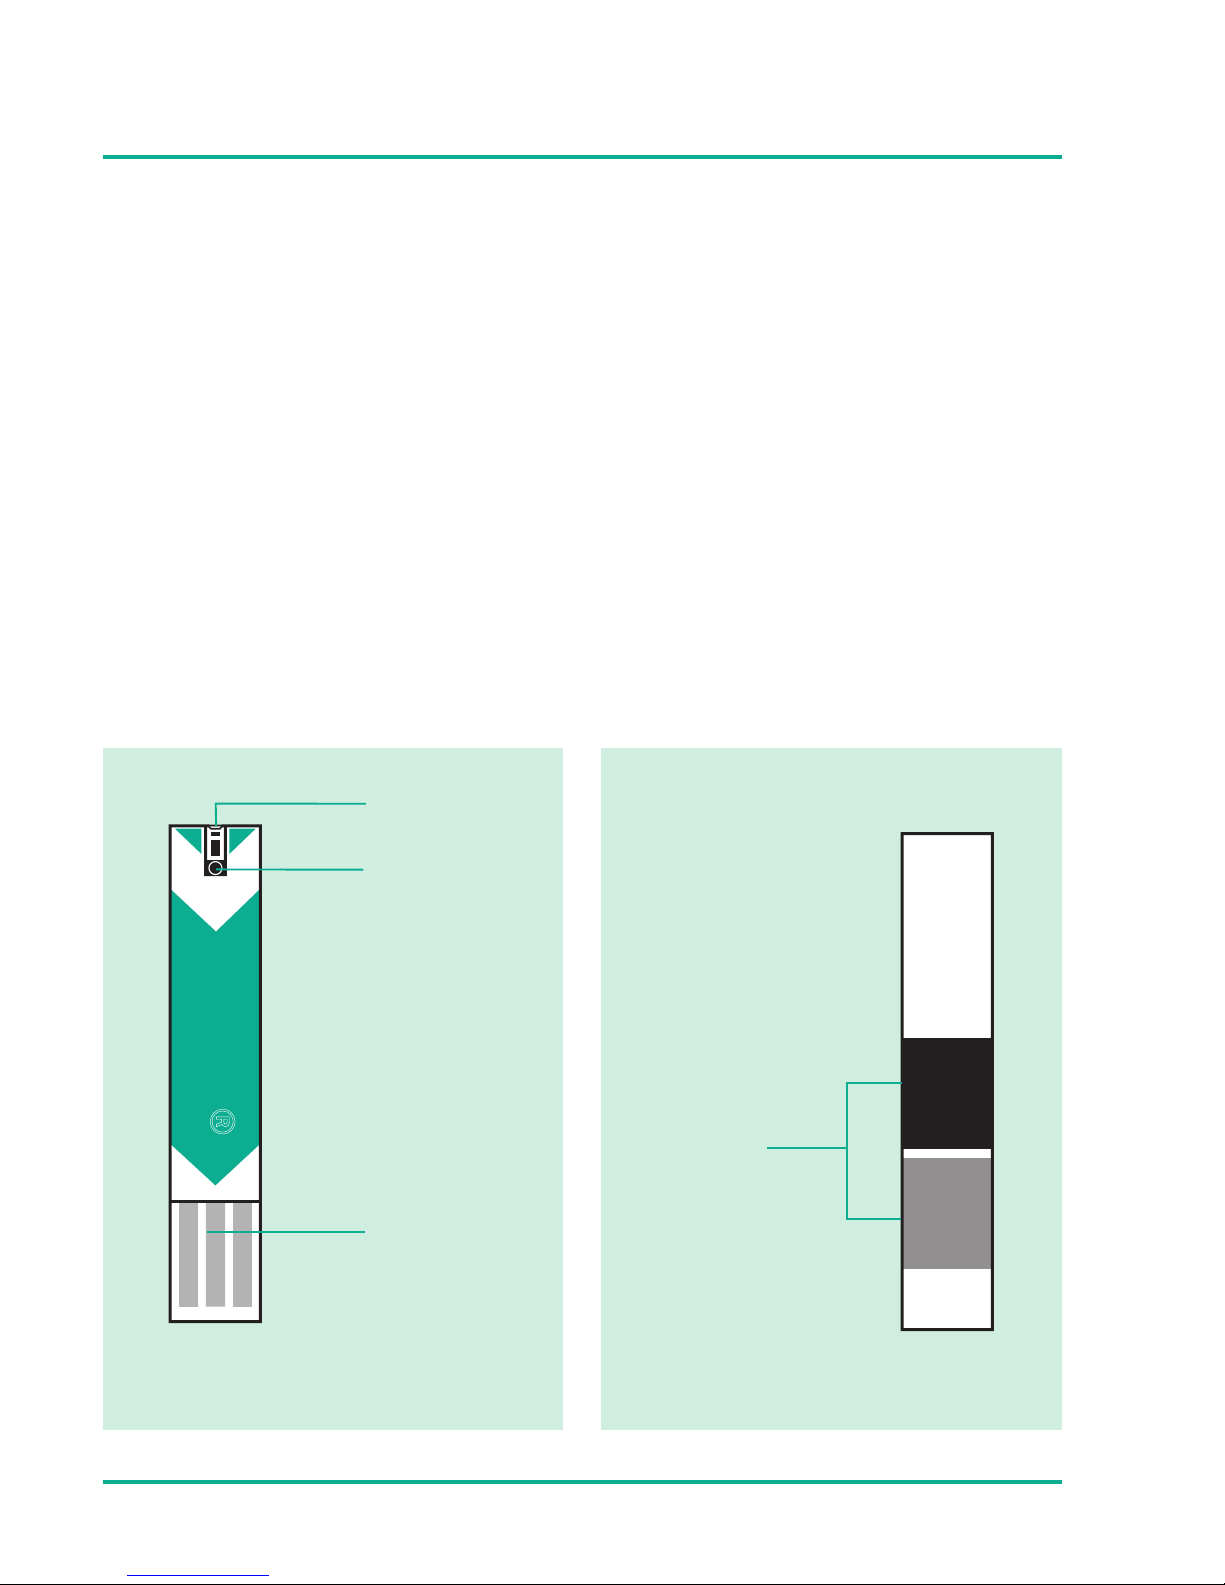
- 12 -
Omnitest® 3 Blood Glucose Test Strip
Omnitest® 3 meter is only to be used with Omnitest® 3
test strips for accurate analysis of your blood glucose level.
Use the test strip exactly as described in the user’s manual
for Omnitest® 3 test strips.
Opening of the measurement chamber
Confirmation window
Meter contacting leads
Auto-coding label
Omnitest®
3
Page 13

- 13 -
Storage and Handling:
Prior to first use, check that the vial is undamaged and
closed.
Store the Omnitest® 3 test strip vials in a cool, dry place
between 2 – 30 °C (36 – 86 °F). Do not refrigerate or freeze.
Keep out of direct sunlight. Do not use test strips which
had been stored under inappropriate conditions.
Store test strips in their original vials only. Do not put the
test strips in new vials or in any other container.
Close the vial cap tightly immediately after removing an
Omnitest® 3 test strip. This keeps the strips fully functional
right up to the expiry date.
Use test strip immediately after removing it from the vial.
Do not use test strips after the expiration date printed on
the package or vial since it may cause inaccurate results.
Make a notation on the vial label of the date when you first
open it. Discard remaining Omnitest® 3 test strips 6 months
after first opening the vial.
Avoid getting dirt, food or water on the test strip. Do not
handle test strips with wet hands. All parts of the test strip
should only be touched with dry and clean fingers.
Do not bend, cut, or alter an Omnitest® 3 test strip.
Omnitest® 3 test strips are for single use only.
Page 14

- 14 -
Be careful not to modify the auto-coding label on the back
side of the test strip.
Do not perform blood glucose tests at temperature below
+10 °C (50 °F) or above +40 °C (104 °F) and above 90 % relative humidity.
Warning! Keep the test strip bottle away from children.
A child could choke on the cap or the test strips. The test
strip and the vial wall contain agents that may be harmful
if swallowed.
!
NOTE
Please refer to the user’s manual for Omnitest® 3
blood glucose test strip for additional information.
Omnitest® 3 Blood Glucose Test Strip
Page 15

- 15 -
Automatic Coding of the Meter
Insert Omnitest® 3 test strip to turn on the meter. A special
auto-coding label on the back side of the test strip calibrates
the Omnitest® 3 meter automatically. Before testing, make sure
that the code number of the test strip vial matches the code
shown on the meter. If these two code numbers match,
you can start testing.
Omnitest®3
Omni
t
trips
ps
Code
Control M
Mean
Control H
Mean
B. Braun Melsungen AG · O
34209 Melsungen · Germa
06/2019
C21
8
2
CODE?
C21
Page 16

- 16 -
Automatic Coding of the Meter
If the code on the vial and the meter do not match, you will
not get accurate test results of your blood glucose level.
Make sure that you are checking the code against the right
vial.
Verify that the auto-code label on the back side of the test
strip is undamaged.
Insert the test strip again or try another test strip.
If problem still exists, please contact your local distributor
for warranty services.
!
CAUTION
Do not test, if the code numbers do not match.
Page 17
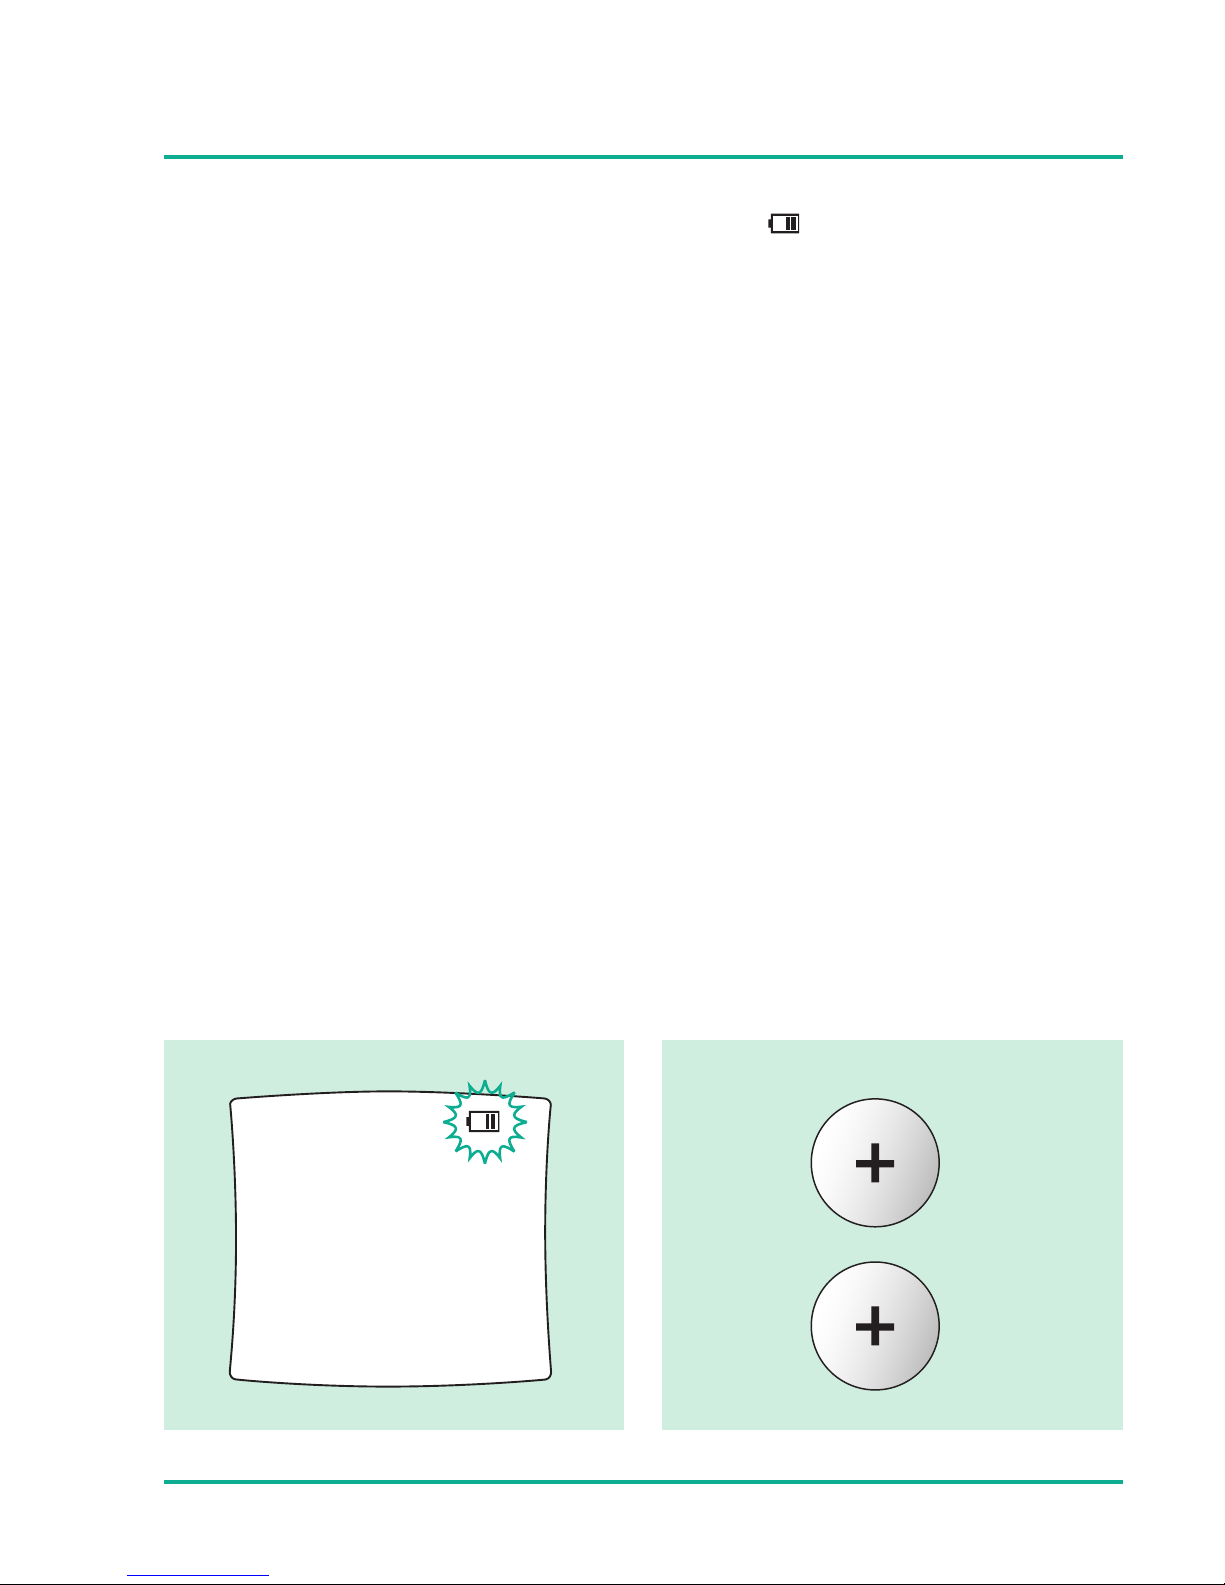
- 17 -
Battery
Change batteries when the battery icon appears on the
display or when the meter does not power on by any means.
The meter needs two 3V lithium-batteries (CR2032). Batteries
are provided with the Omnitest® 3 meter system.
The Omnitest® 3 system could also operate with a single
3V lithium-battery (CR2032) which will reduce the operating
time.
Page 18
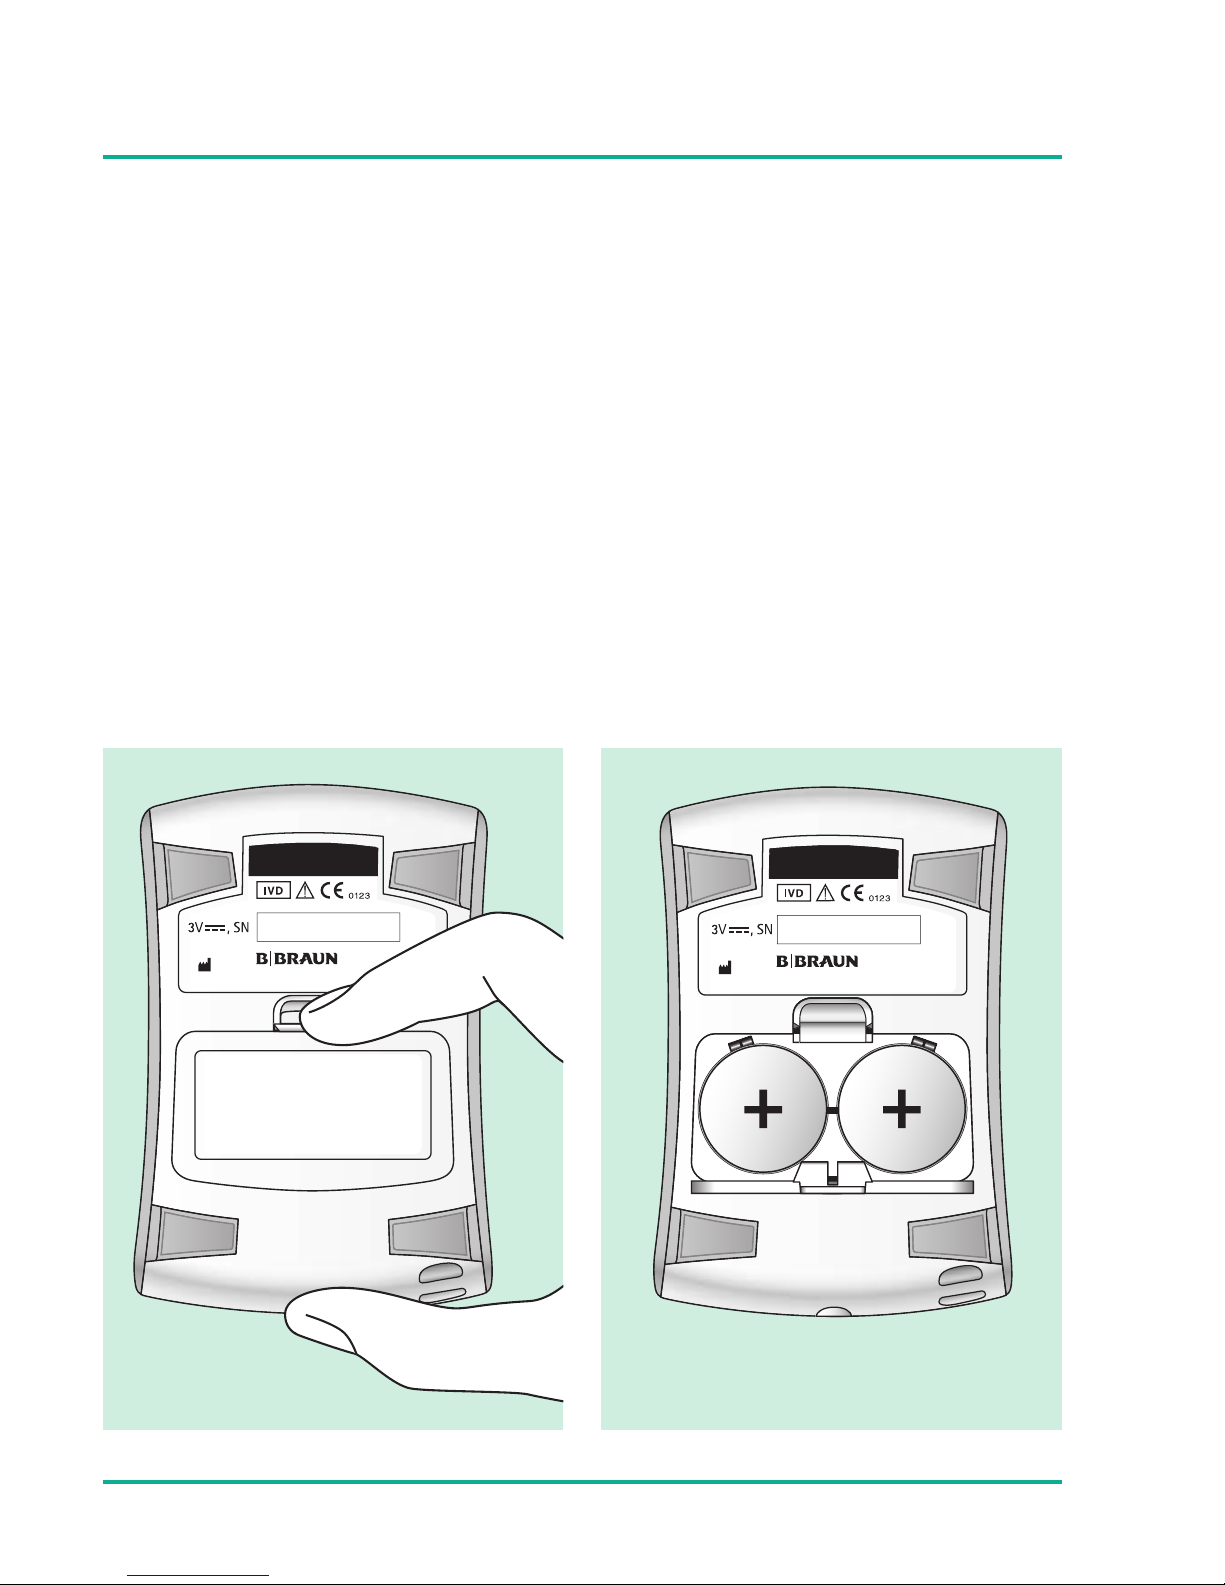
- 18 -
Battery
When changing batteries, pay attention to the polarity, which
is printed in the battery holder of the meter. The positive pole
of the batteries has to face up.
If the new batteries are inserted, at first all segments of the
display will be shown. Thereafter an internal check of the
electronic takes place in the following seconds.
Correct the date and time setting after the battery change.
B3MLG 2010/01
Omnitest®3 mmol/L
B. Braun Melsungen AG · OPM · Germany · www.bbraun.com
GKGBGBS00266
www.omnitest.bbraun.com
Omnitest®3
B3MLG 2010/01
Omnitest®3 mmol/L
B. Braun Melsungen AG · OPM · Germany · www.bbraun.com
GKGBGBS00266
Page 19
- 19 -
Checking the Meter Display
Each time you insert a new battery, all segments of the display
will appear for 3 seconds. The numbers displayed are only
meant for internal tests of the electronics. Also, after inserting
a test strip, all segments will be displayed.
The following picture shows all possible display segments, so
that you could check that the display is working properly.
Page 20
- 20 -
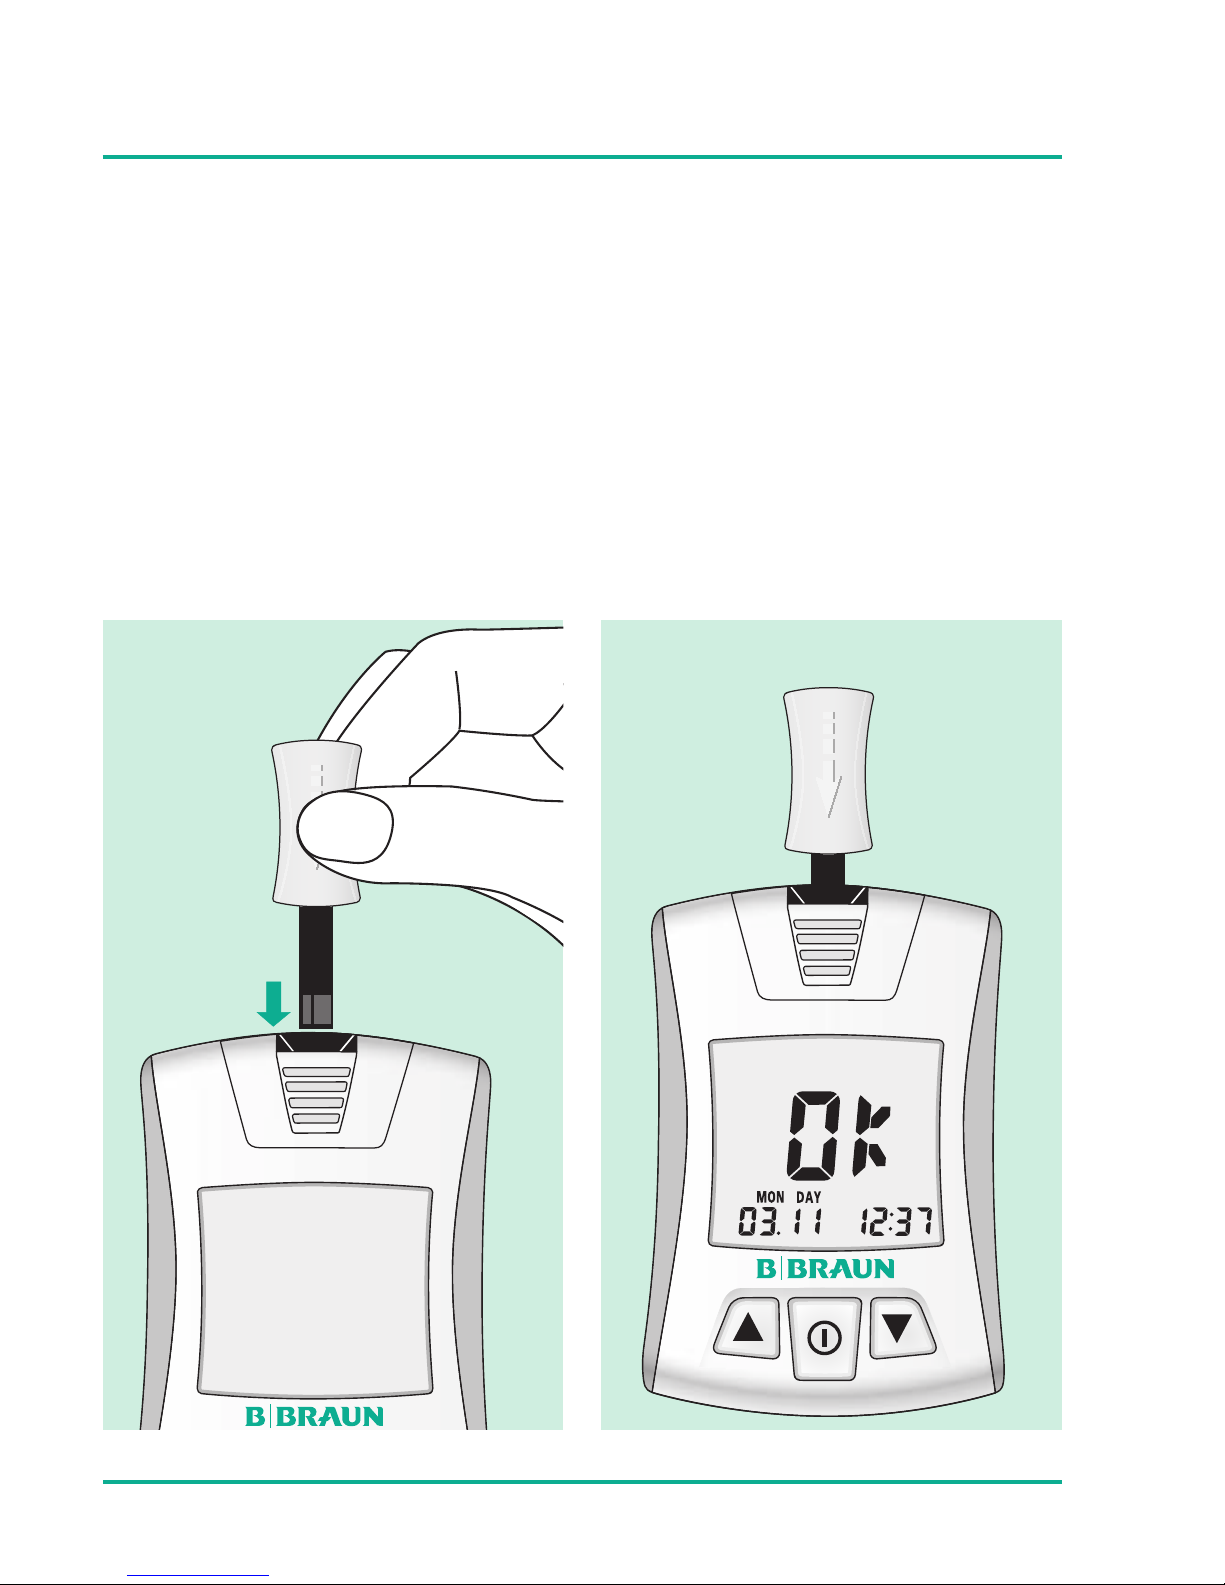
Check Strip
Meter is ok
Omnitest®3
Omnitest®3
The check strip is used to test that the Omnitest® 3 meter is
working properly. Insert check strip into meter. Meter will be
automatically turned on.
Page 21
- 21 -
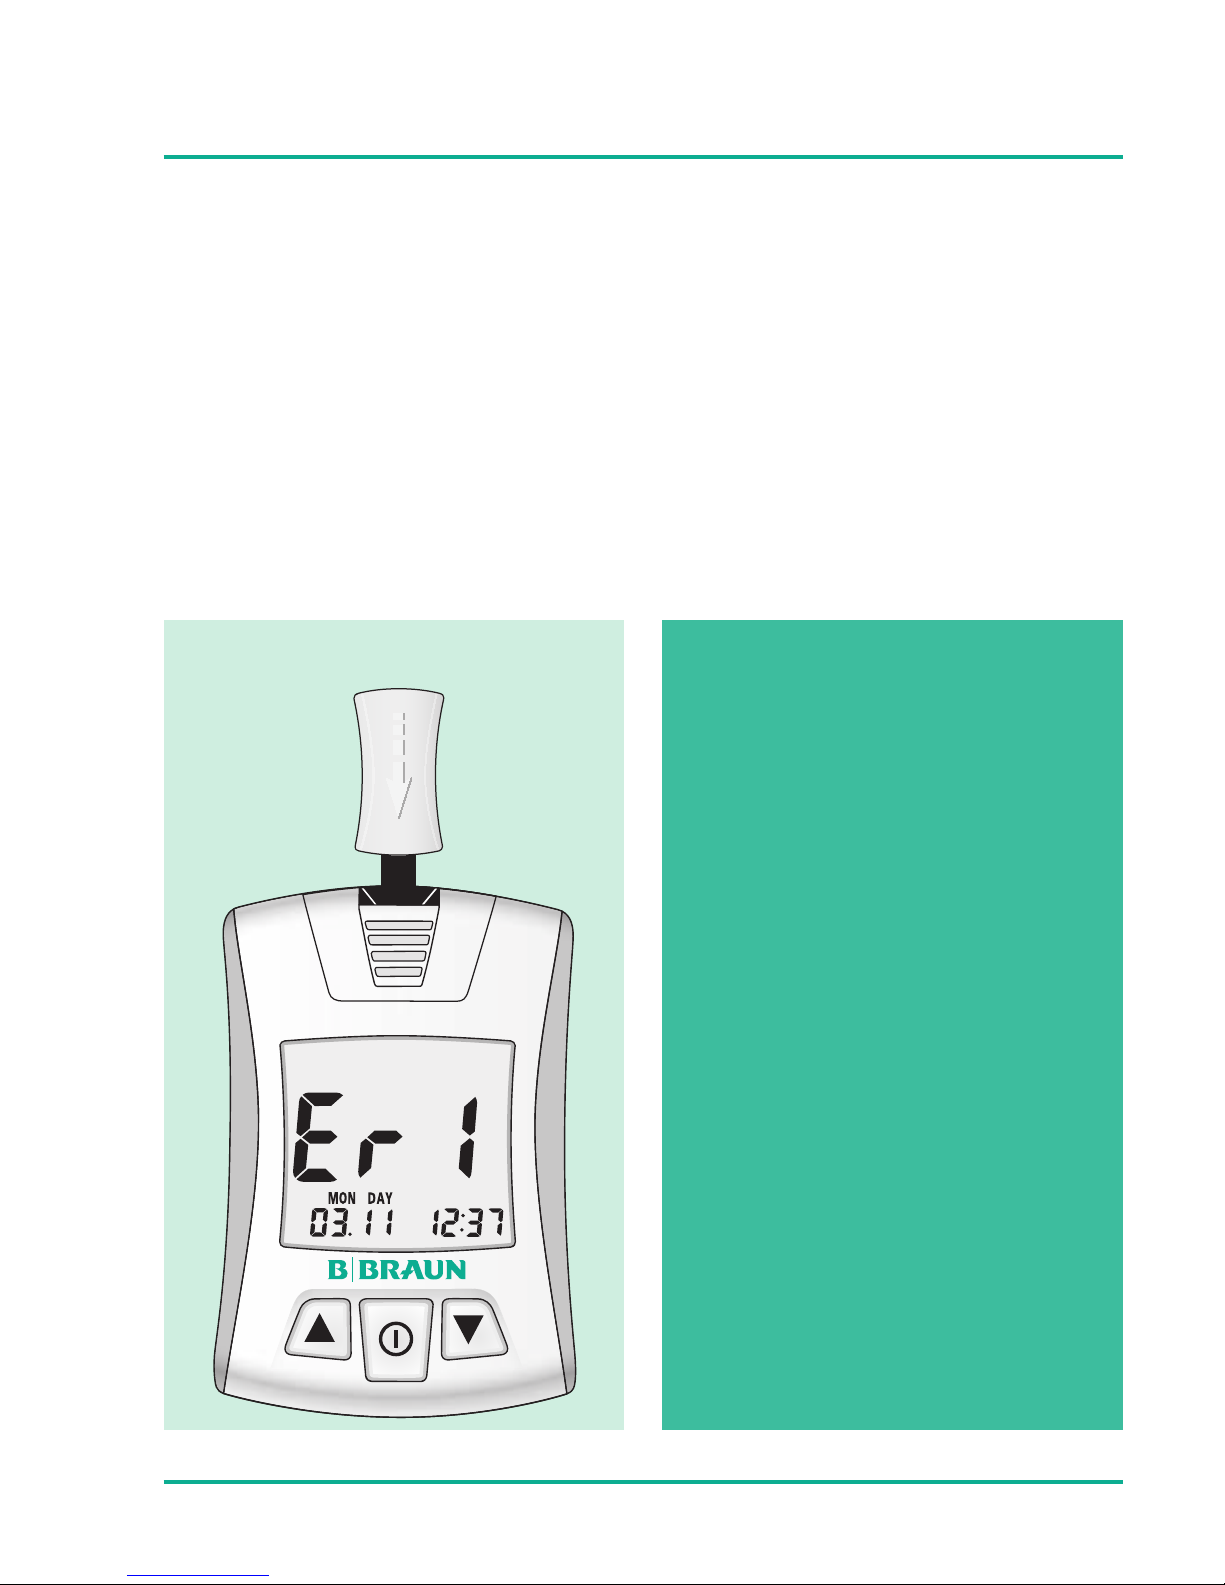
Meter is not ok
Omnitest®3
If an error message is displayed, repeat 2 or 3 times.
If it is still Er 1, do not use the meter for blood glucose monitoring. Please contact your local distributor for warranty services.
It is recommended to do this test before first use and always if
you suspect the meter is not properly working.
!
NOTE
Any time the meter
is powered on via
test strip insertion,
the electronic performs a self test.
In case of any problems, an error code
will be displayed.
Page 22

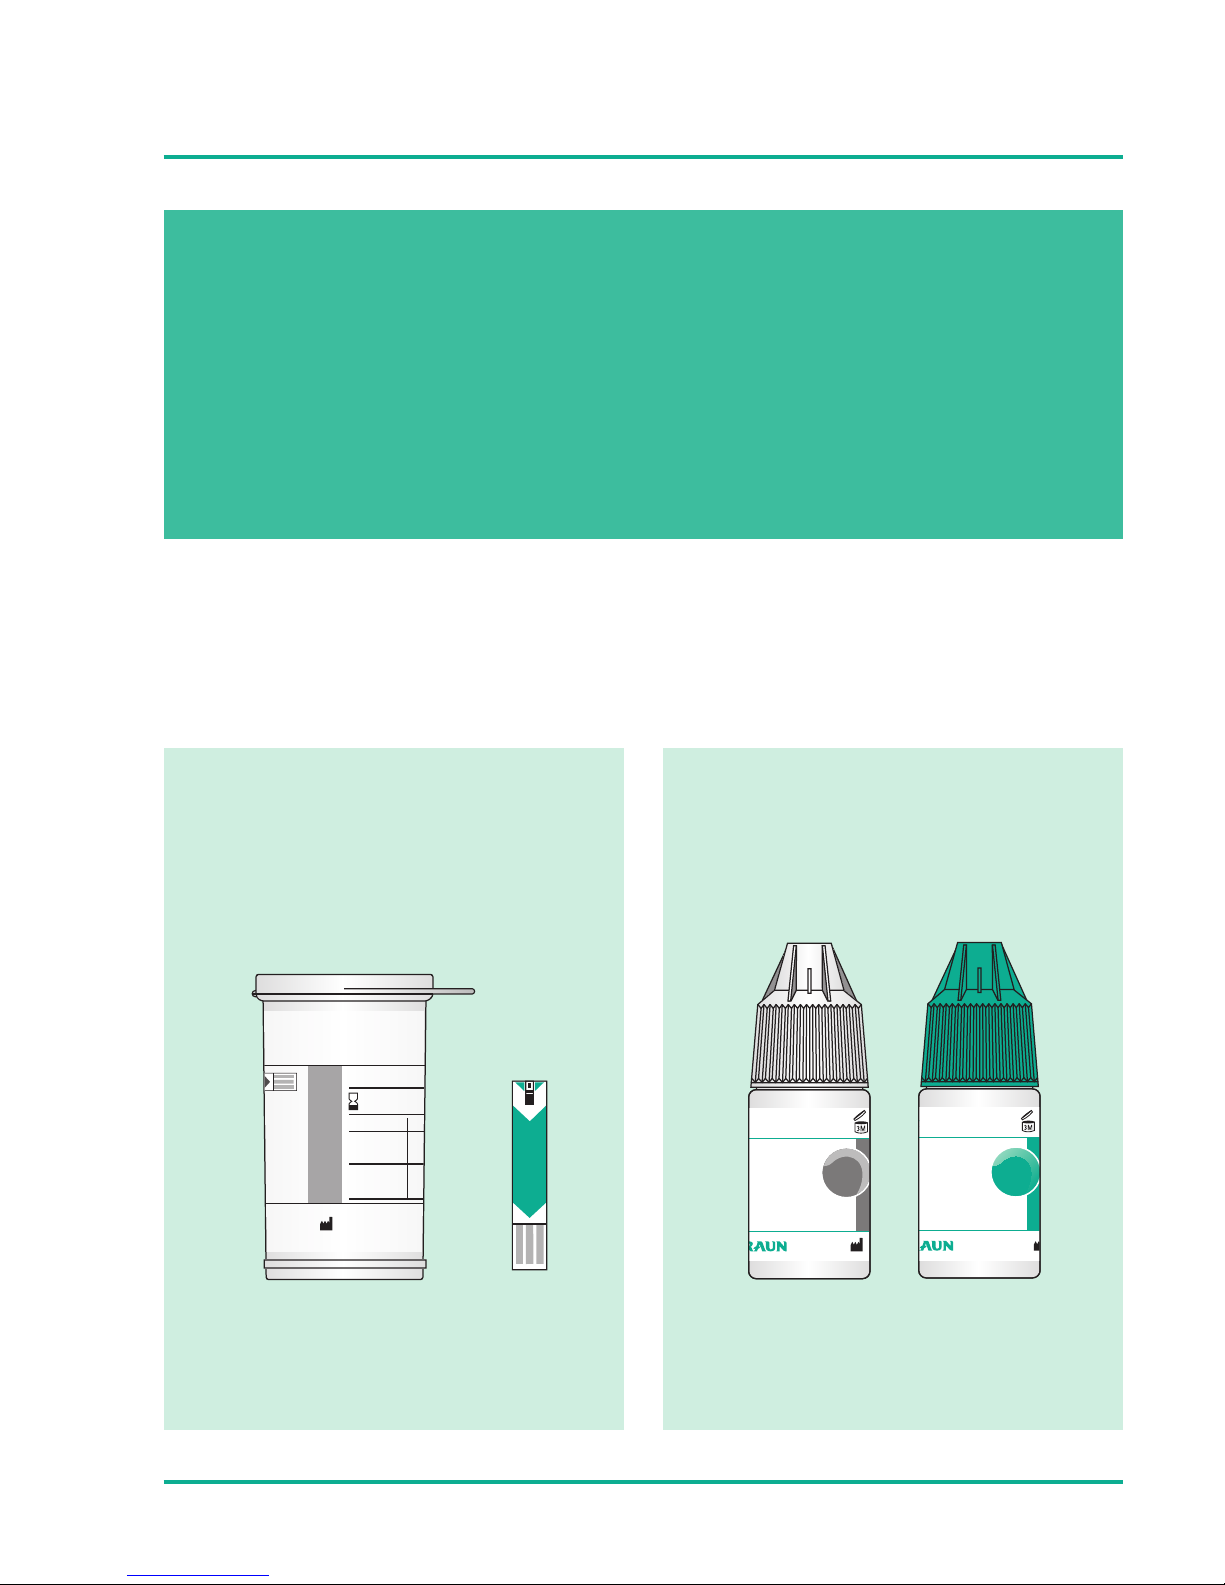
- 22 -
Using Control Solution
H
3,5mL
3
on de contrôle
plossing
one di controllo
®
3 Control H
The Omnitest® 3 Control solution is used to check that the
blood glucose monitoring system consisting of the meter and the
test strips is working correctly.
The control solution should be used:
Whenever you suspect the meter or test strip is not
functioning properly.
If your blood glucose test results are not consistent
with your symptoms or if you think they are not accurate.
If you have dropped the meter.
For quality control in the point of care usage.
For teaching or learning the system.
To perform a control solution test, follow the same test procedure as for a blood glucose test, substituting control solution
for the drop of blood. For detail instruction, see page 46
“Testing Your Blood Glucose”.
!
NOTE
Use only Omnitest® 3 Control
solution for the Omnitest® 3
monitoring system. The Omnitest® 3
Control solution is sold separately.
Page 23

- 23 -
Omnitest®3
Omnitest
®
3
Omnitest®3
Omni
t
Insert Test Strip
If the control solution is cold, do not use until the solution has
warmed up to room temperature. Control solution tests have to
be done in a temperature range 20 – 25 °C (68–77 °F). Insert a
test strip. Push the test strip until it will go no further without
bending the strip. The meter will automatically turn on.
Page 24

- 24 -
Using Control Solution
Kontrolllösung
Control solution
Solution de contrôl
Test oplossing
Soluzione di contro
Omnitest
®
3 Cont
Apply Control Solution
Shake the control solution vial gently. Remove the cap. Squeeze
the vial, discard the first drop, and wipe off the dispenser tip
with a clean tissue to ensure an accurate result.
Squeeze the vial again to get a drop. Apply a drop of control
solution on a clean and none absorbing base. Guide the tip of
the test strip toward the drop until it is drawn up by the test
strip.
Omnitest
®
3
Omni
te
s
t
Page 25

- 25 -
Once you hear the “beep”, it means the test strip is completely
filled.
The meter begins to count down 3 to 1 and then the result is
displayed.
✔
Page 26

- 26 -
Using Control Solution
!
Compare the result displayed with the
range printed on the test strip vial.
The result should fall within the range.
Omnitest®3
Omni
t
trips
ps
Code
Control M
Mean
Control H
Mean
B. Braun Melsungen AG · O
34209 Melsungen · Germa
06/2019
C21
8
2
mmol/L
4.5 - 6.3
5.4
Page 27

- 27 -
Comparing Control Solution Results
If test results fall outside the range, repeat the test. Out-ofrange results may be caused by one or more of the following
causes:
Error in performing the test.
Failure to shake the control solution vial gently.
Expired or contaminated control solution.
Control solution that is too warm or too cold.
Failure to discard the first drop of control solution and wipe
the dispenser tip clean.
Contamination of the control solution e.g. if the drop of the
control solution is taken back into the control vial.
Meter malfunction.
Test strip deterioration.
Do not use the Omnitest® 3 system to test your blood glucose
until you get a control solution test result that falls within the
range.
Page 28

- 28 -
Using Control Solution
Omnitest®3
Omni
t
!
NOTE
Mark all control solution tests with symbol to distinguish from
blood glucose tests
in the meter memory.
Marked control solution test results will
not be included in
your averages.
Marking Function
Press or button after the measurement to choose the
control solution symbol among the available symbols.
Page 29

- 29 -
Set the Meter
If you intend to change any of the settings, you need to enter
the setting mode. Turn on the meter by pressing button and
hold for 3 seconds. This will initiate the “Set the Meter” mode.
SET icon will appear on the display during the setting.
Page 30

- 30 -
Set the Meter
12 hour / 24 hour
date and time
alarm
buzzer
temperature unit (°C or °F)
average day
The Omnitest® 3 meter has 6 functional setting modes
To go to the next step of the setting mode, press the
button. To leave the “Set the Meter” mode at any time,
press the button for 3 seconds.
If you have missed out a setting, start the “Set the Meter”
procedure again.
Page 31

- 31 -
Set the 12 Hour or 24 Hour Mode
If you are in the "Set the Meter" mode, at first you can change
the hour mode. Press or button to select the proper time
system.
Page 32

- 32 -
Set the Meter
Set the Date and Time
After setting the hour mode press button to set the date and
time. Press or button to select the year.
The year can range from
2009 to 2099, which is not
displayed in normal operation.
!
NOTE
Without setting the date properly, the average glucose
level and the results in memory will not show proper
value. It is highly recommended to set the meter before
use and to check the time when a new battery is
installed. You can not test your blood glucose while in
the setting mode.
Page 33

- 33 -
With the correct year on display, press the button and the
month setting will start flashing. Press or button to select
the month and then press button to set the day. After that
press button to set time. Press or button to select the
appropriate hour, press button to set minutes.
YR - Year
MON - Month
DAY - Day
Page 34

- 34 -
Set the Meter
Set the Alarm
Omnitest® 3 has 5 different alarm settings. The bell icon will
be displayed during the alarm setting. Alarm setting order is
AL1 « AL2 « AL3 « AL4 « AL5. If the AL2 is OFF the rest of
AL3 - AL5 are all OFF.
Press or button to select the ON/OFF of alarm function.
If you choose ON, press button to set the time for alarm.
Press or button to set the proper alarm time (hour),
press button to set minutes.
Press button to set next alarm.
Page 35

- 35 -
!
NOTE
Press either , or button to stop the alarm.
The alarm will not work during the testing of blood
glucose. The loudness of the alarm is intended to
remind you of a glucose measurement but not to
wake you up from deep sleep.
The alarm buzzer is always turned on, even when the
buzzer is set to OFF.
Page 36

- 36 -
Set the Meter
Set the Buzzer
Press button to set the buzzer. Buzzer character “bEEP” will
appear on the display. Press or to select ON/OFF the buzzer
sound.
!
NOTE
There is no beep sound
during buzzer is OFF
when test strip inserted,
sufficient blood sample
applied and when test
result is displayed.
Page 37

- 37 -
Set the Temperature Unit
Press button to set the temperature unit.
Press or button to select the proper temperature unit.
Page 38

- 38 -
Set the Meter
Set the Average Day
Press button to proceed to set the average day.
Omnitest® 3 will show 3 different average results and the
number of days can range from 1 to 99 days. The setting mode
begins with setting the number of days of which you would like
to receive an average calculation of your glucose level.
E.g. 7d = 7 days average
First average setting Second average setting
Page 39

- 39 -
To increase or decrease the number of days, press the button
or button; holding the or button the value will be
increased or decreased at a quicker rate.
With the correct number of days displayed, press button to
set next average day. AVG character will display during the
average day setting.
Third average setting
Page 40

- 40 -
Reviewing Your Results
Omnitest® 3 saves up to 365 test results with date and time
in built-in memory and 3 different average glucose levels are
calculated and saved. These values will appear on the display
by recalling anytime you like to see them. The latest result
will replace the oldest beyond 365 data.
The meter enters “Memory” mode by pressing the button
shortly.
The first display shows the latest test result
Press button to see the individual test
results.
Press button to see the average results.
Small AVG icon will be shown on the display
(7d = 7 days average; 23n = 23 results taken
for average calculation).
Page 41

- 41 -
Deleting Test Results
To delete any individual test result in the
memory press or button for 3 seconds.
Small DEL icon will be shown on the upper
right of the display. Press or button until
3 beeping sounds will be heard and the test
result disappears from the display.
To delete all test results press buttons
at the same time for 3 seconds and then big
dEL character will be displayed. Keep on pressing buttons until 3 beeping sounds
will be heard and dEL disappears from the
display.
Average results (AVG) can not be deleted, because they are
calculated from the remaining test results in the memory.
Page 42

- 42 -
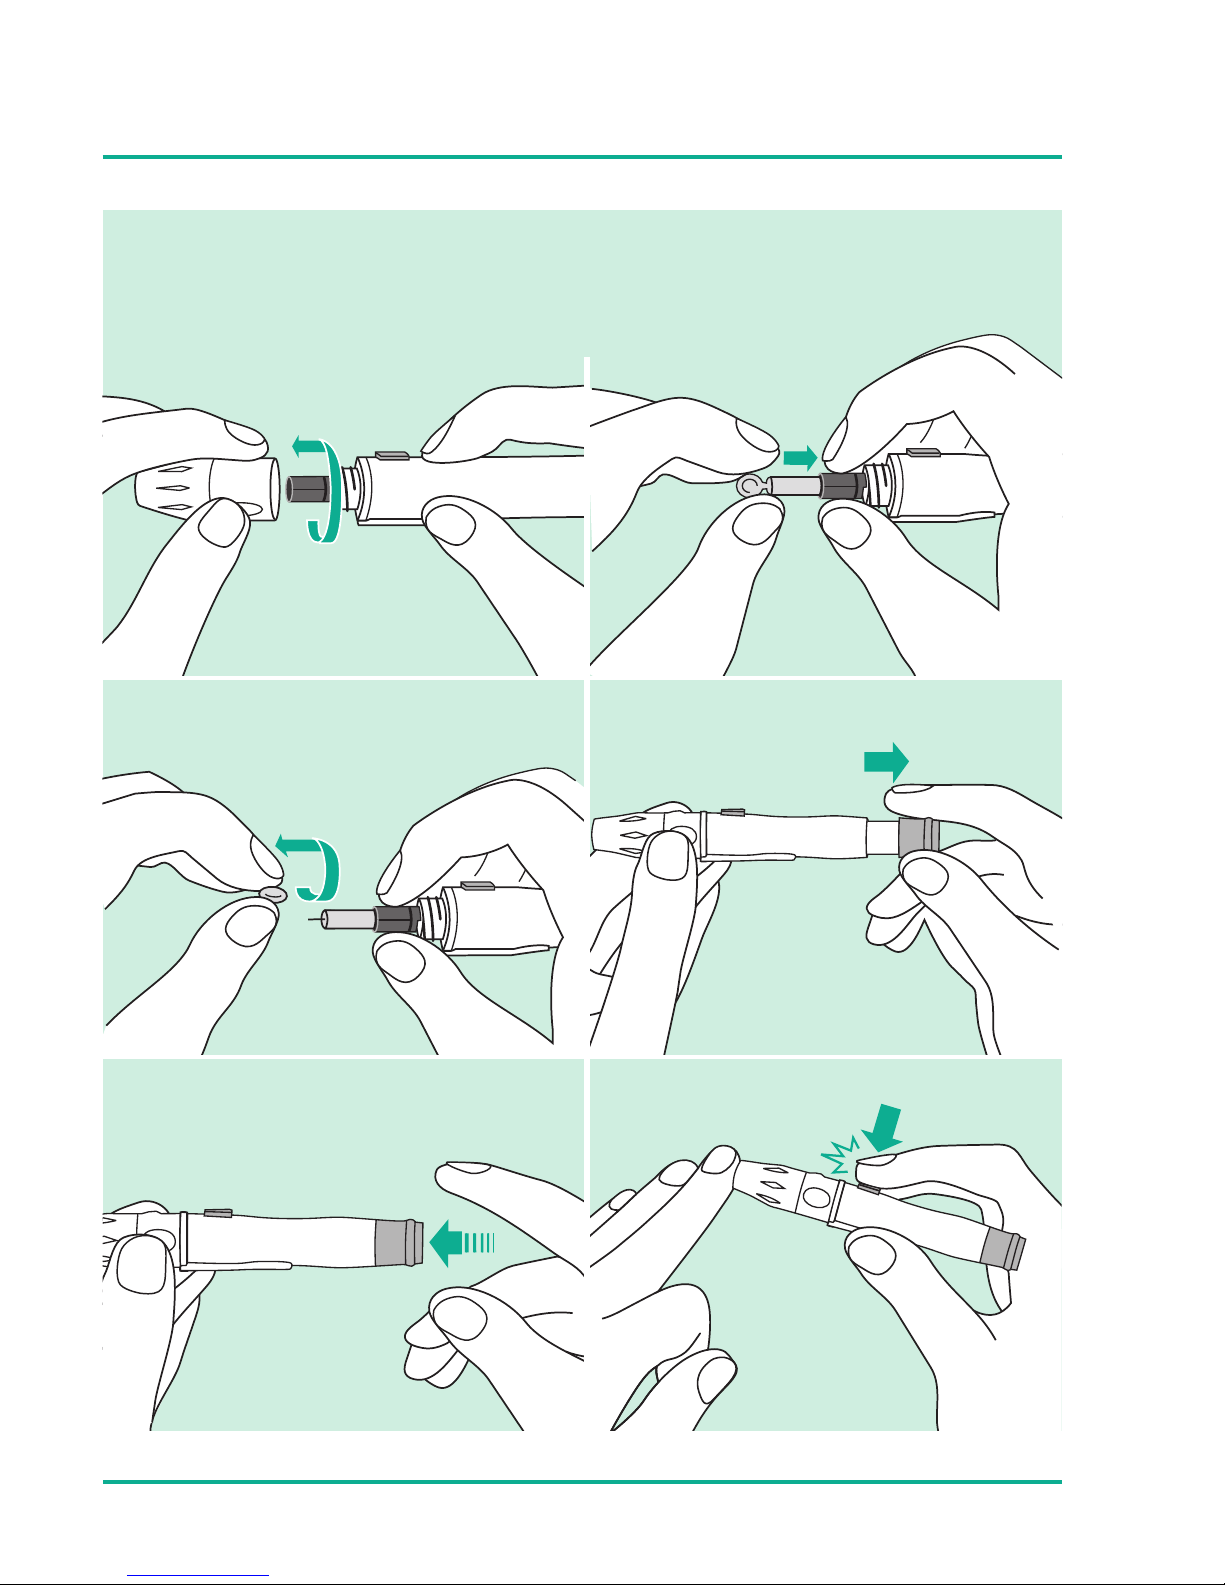
Collecting a Drop of Blood Sample
Unscrew the tip of the Omnilance lancing device.
Insert a new Omnican® lancet to the end of the carrier.
Twist off the protective cover of the lancet.
Replace the threaded tip of the Omnilance device.
The comfort tip offers 5 different levels of skin penetration.
To select best depth: 1-2 for soft or thin skin,
3 for average skin, 4-5 for thick or calloused skin.
To select a desired depth, move the number to match
the arrow.
Page 43

- 43 -
Next hold the tip in one hand and pull on the sliding barrel
with the other hand. As the ends are pulled apart, the spring
tension increases. When a click is felt, the spring tension is
locked and the device is ready for use.
Release the sliding barrel. It will automatically move back to
its original position.
Page 44

- 44 -
Collecting a Drop of Blood Sample
Place Omnilance against the tip of the finger. Next press
the trigger and lift up the device. It is less painful to prick
the side of the finger tip.
Set aside Omnilance and wait a few seconds for a blood drop
to form. The flow of blood will be helped by keeping the hand
warm, by lowering the hand to waist level, and by gentle massage of the finger.
Never allow another person to use a lancet that has already been
used. The lancing device has only to be used by one person and
has not to be lend since the tip could be contaminated.
Page 45

- 45 -
Omnican® Lancet Removal
Unscrew the Omnilance tip. Push ahead the lancet ejector
with thumb and simultaneously pull out the sliding barrel to
dispose the lancet.
For safety reasons, and to prevent cross-contamination, discard
the used lancet into an appropriate sharps or biohazard container.
Taking Care of Your Omnilance
Use mild soap and water to wipe the outside of the lancing
device. For more complete cleaning, remove the tip, wash the tip
in warm water and rinse well.
Page 46

- 46 -
Testing Your Blood Glucose
Cleanliness:
Wash your hands with warm soapy water. Rinse and dry hands
thoroughly. You may also use an alcohol wipe to clean the
puncture area. Make sure it is completely dry before you obtain
the blood sample. Alcohol, dirt or perspiration may affect the
test result.
Lancing:
Prepare the lancing device and lancet. Insert an unused
needle (lancet) in the lancing device. Refer to page 42 for
more information.
!
NOTE
Read the additional information given in the instructions for use of the test strips. Your healthcare professional will advice you on your ideal blood glucose range.
Consult your physician before making any changes
to your diabetes therapy.
Page 47

- 47 -
Insert the Test Strip
Remove test strip from the vial. Check the test strip for any
damage. Recap the vial immediately to prevent moisture from
affecting the other strips. Insert a test strip. Push the test
strip until it will go no further without bending the strip. The
meter will automatically turn on. First all display segments
and then the code number is shown.
Omnitest®3
Omnitest
®
3
trips
ps
Code
Control M
Mean
Control H
Mean
B. Braun Melsungen AG · O
34209 Melsungen · Germa
06/2019
C21
8
2
Page 48

- 48 -
Testing Your Blood Glucose
Compare the Code Number
The Omnitest® 3 automatically recognizes the test strip code
and adjusts the meter accordingly. Make sure the code number
on the display matches the code number on the test strip vial.
Omnitest®3
Omni
t
trips
ps
Code
Control M
Mean
Control H
Mean
B. Braun Melsungen AG · O
34209 Melsungen · Germa
06/2019
C21
8
2
CODE?
C21
Page 49

- 49 -
!
CAUTION
If the code number on the display and on the test
strip vial do not match, please try it again by using
a new test strip (see also page 15 “Automatic Coding
of the Meter”).
If any different message appears on the display due
to several causes and conditions please refer to
“Trouble shooting” page 58. Do not perform blood
glucose tests at a temperature below +10 °C (50 °F)
or above +40 °C (104 °F) and above 90 % relative
humidity.
Page 50

- 50 -
Testing Your Blood Glucose
Ready for the Measurement
2 seconds after code display, blood icon will be displayed on
the screen. Date and time information are shown at the bottom.
Omnitest® 3 is now ready for the measurement.
Omnitest®3
Omni
t
Page 51

- 51 -
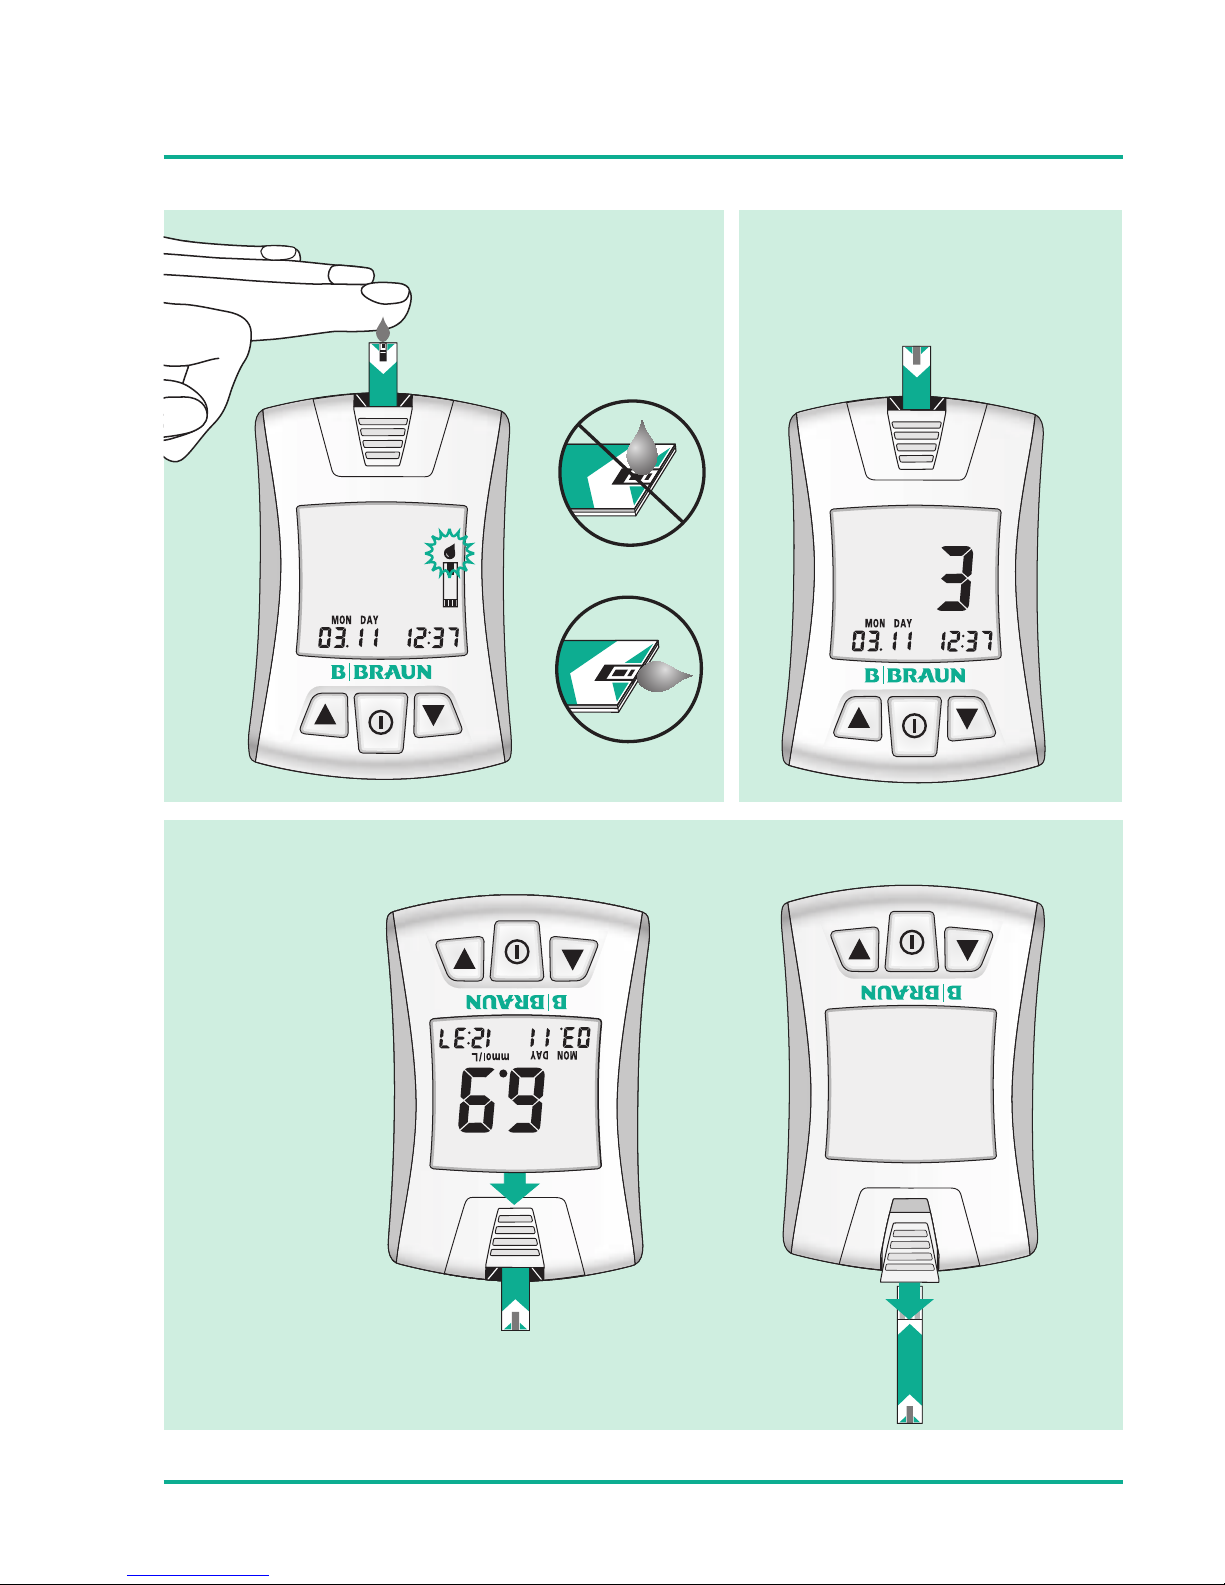
Applying Blood Sample
Prick the area where you have decided to obtain the blood.
Touch your finger to the tip of Omnitest® 3 test strip to
apply the blood sample.
Omnitest®3
Omni
t
✔
Page 52

- 52 -
Testing Your Blood Glucose
The measurement chamber of the test strip will draw automatically the blood of your finger. Your finger should remain still,
until the confirmation window is completely filled and you hear
the “beep” sound.
The minimal sample volume is 0.3 µL.
Do not allow blood to flow aside the test strip into the meter.
This could lead to malfunction.
!
NOTE: Do not force your finger against the test
strip. Do not try to apply a smeared sample. Do not add
blood to the test strip after the “beep” sound. Do not
squeeze the fingertip. The meter will power off automatically after 3 minutes, if no testing was done on the test
strip. In this case, you have to reinsert the test strip.
Page 53

- 53 -
Accurate Results in Seconds
The test will begin automatically, counting down the numbers
from 3 to 1 on the display. Then the test result will be shown
in mmol/L (millimoles of glucose per litre of blood).
Date and time information are displayed under the test
result. The Omnitest® 3 meter displays results between
0.6–33.3 mmol/L.
Omnitest®3
Omni
t
Omnitest®3
Omni
t
Page 54

- 54 -
Testing Your Blood Glucose
!
IMPORTANT NOTE
Your meter has been preset and locked to display
results in mmol/L. Results in mmol/L have a decimal
point (e.g. 6.9 mmol/L). If your display shows mg/dL
rather than mmol/L, contact our Customer Service.
You cannot change the unit of measure.
Using the wrong unit of measure may cause you to
misinterpret your blood glucose level and could lead
to incorrect treatment.
Marking Function
If required, you can press the or button to choose one of
the following marks:
Before having a meal
After having a meal
After taking medication
Control solution or
no marker
The result is stored automatically with the shown mark.
Page 55

- 55 -
Remove used Test Strip by Ejector
Slide the ejector button forward to remove the test strip from
the meter while it is directed downwards. The meter is turned
off with the removal of the test strip. Discard the used test strip
and the lancet according to the local regulations.
Omnitest
®
3
Omnitest
®
3 Omnitest
®
3
Omni
t
Omnitest
®
3
Omni
t
Page 56

- 56 -
Maintain Your Blood Glucose Monitor System
For safe, accurate, and long-term use of Omnitest® 3, be sure
that the meter is maintained with proper care. Clean and dry
your hands before use to prevent any damage of the meter and
the test strips.
The meter should be cared after test, and cleaned if necessary with soft cloth or paper tissues. Objects which had
been in contact with blood bear the potential risk for transmitting an infectious disease. If necessary, alcohol swabs
can be used to wipe out dirt on the outer surface of the
meter, but chemical solution such as benzene or acetone
MUST NOT be used since either of those can harm and
damage the meter surface.
When cleansing the meter with pure alcohol, DO NOT pour
directly onto the meter, but use the cloth soaked with a
small amount of alcohol. After cleansing the meter,
dry completely at a cool place avoiding direct sun light.
The meter or the test strips are not to be placed into
water or any other liquid.
Do not put the meter and strip near fire or microwave
ovens. Strong electromagnetic fields (e.g. mobile phones,
microwave ovens) could disturb the meter function.
Omnitest® 3 complies with the requirements concerning
electromagnetic compatibility and electromagnetic
emission (according to IEC 61326).
Page 57

- 57 -
Furthermore immunity of Omnitest® 3 against electrostatic
discharge (according to IEC 61000-4-2) and high frequent
electromagnetic fields (according to IEC 61000-4-3) was
tested. A disturbance of other electronic equipment is not
likely.
After test, put the parts of Omnitest® 3 in the pouch
together, and keep it at a cool and dry place out of the
reach of children. Do not refrigerate. Avoid exposure to the
sun.
For detailed storage instructions for Omnitest® 3 test strips,
refer to the user’s manual of Omnitest® 3 test strips.
The lancing device should be cleaned if blood or stain
remains after test for infectious disease prevention.
Discharge used materials according to the local regulations
for contaminated materials.
Page 58

- 58 -
Troubleshooting
message caused by what to do?
There is a problem with the
meter. There is an abnormal
Check Strip signal.
Repeat the Check Strip test
2 or 3 times.
Do not use the meter. Contact
B. Braun representative.
Error message could be
caused by a used or wet
test strip.
Repeat the test with a new
test strip. Apply a sufficient
amount of blood.
There is a problem with the
test strip.
Test strip is damaged. Repeat
the test with a new test strip.
Error message that indicates that the blood or
control solution sample
was applied before the
symbol appeared on the
display.
Repeat the test with new test
strip. Apply blood or control
solution only after the
symbol appears on the
display.
Page 59

- 59 -
message caused by what to do?
There is a problem with the
auto-code detection.
Please insert a new test strip
and perform your test again.
If the problem persists,
please contact B. Braun
representative.
There is a problem with the
auto-code detection.
If the LCD screen shows “Sun”
message alternately with Er 6,
avoid the direct sunlight and
insert test strip again.
No results obtained on
the meter.
The meter memory is empty
until you perform a first blood
glucose measurement.
The ambient temperature
is too low.
Place the meter at the operating temperature range
10-40°C (50 - 104 °F) for more
than 10 minutes and re-test.
Page 60

- 60 -
Troubleshooting
message caused by what to do?
The test result is higher
than 33.3 mmol/L.
The test result is lower
than 0.6 mmol/L.
In case of doubt of blood test
result, check the meter with
control solution. With normal
result, re-test with blood sample two or three times. When
“HI” message persists, please
consult a doctor for assistance.
In case of doubt of blood test
result, check the meter with
control solution. With normal
result, re-test with blood sample two or three times. When
“Lo” message persists, please
consult a doctor for assistance.
Place the meter at the operating temperature range 1040 °C (50 -104 °F) for more
than 10 minutes and re-test.
The ambient temperature
is too high.
Page 61

- 61 -
problem caused by what to do?
Meter is calibrated against
whole blood from the manufacturer.
To check the accuracy of your
system use Omnitest® 3
Control solution or measure
against a laboratory device
which uses plasma.
Blood samples are not taken
at the same time.
Battery is flat or there is a
problem with the meter.
Change batteries and if the
problem persists, contact your
distributor or nearest B. Braun
representative.
Insufficient sample or there
is a problem with test strip
or meter.
Apply sufficient amount of a
fresh sample to a new blood
glucose test strip and re-test.
Conduct a control solution
test or a check strip test.
The code numbers of the
meter and of the test strip
vial do not match.
Different
result in
comparison
with another
meter.
The meter
does not
power on.
Test does not
start after
applying
sample.
Re-test with a new test strip.
If the problem persists, please
contact your authorized representative or customer support.
There may be a problem
with the test strip.
The result
is doubtful.
Re-test with a new test strip.
Conduct a control solution
test.
Repeat the measurement and
take the samples at the same
time for comparison.
Page 62

- 62 -
Specifications
Test Range 0.6 – 33.3 mmol/L
Reading Time 3 seconds
Memory Capacity 365 test results with date and
time
Operating Temperature 10 °C – 40 °C (50 °F – 104 °F )
Operating Humidity 10 – 90 %
Sample Type Fresh capillary whole blood
Sample Volume 0.3 µL
Display Type LCD
Size (L x W x H) 83 x 56 x 18 mm
Weight including battery 54 g
Power Supply 2 x 3V lithium batteries
(CR2032)
Battery Life 3000 tests
Page 63

Consult operating instructions
Use by
This product fulfills the requirements of
Directive 98/79/EC on in vitro diagnostic
medical devices
In vitro diagnostic medical device
Batch code
Catalogue number
Temperature limitation
Do not re-use
Use within 3 or 6 months
after first opening
Caution, consult accompanying documents
Direct current
Omnican
®
Lance soft: Do not use if the
protective cap is missing or damaged.
Symbol Description
- 63 -
63
Page 64

- 64 -
Specifications
Limitations of the System:
For any additional information concerning limitations of the
system or interferences that may affect test results, please
refer to the user’s manual for Omnitest® 3 blood glucose test
strip. Omnitest® 3 complies with the requirements of
EN ISO 15197. Exchange your blood glucose meter after maximum 5000 measurements or at the latest 5 years after first use
of the device.
Test Principle:
The enzyme glucose oxidase on the test strip reacts specifically
with the blood glucose. The current generated is converted and
displayed as blood glucose value.
The Omnitest® 3 system is plasma-calibrated to allow easy
comparison of results with laboratory methods.
Blood glucose meters which are calibrated against a whole
blood method may have different results in comparison to
Omnitest® 3. The laboratory system used for calibration of the
Omnitest® 3 system is YSI 2300 STAT plus which is equipped
with a glucose oxidase system.
Page 65

- 65 -
Transfer Test Results to a Computer
You can transfer test results from the Omnitest® 3 meter to
a computer, where the data can be further analyzed. To make
use of this feature, you need the Omnitest® 3 PC interface
cable REF 9152856G, as well as a link to the Online Diary
Omnitest® Center. The monitor will display ”PC“ as soon as
the cable is connected to the PC and the software is activated.
For further information see
www.omnitestcenter.com
Omnitest®3
Page 66

- 66 -
Blood Glucose Conversion Table
Blood Glucose Conversion Table (mmol/L to mg/dL)
mmol/L
mg/dL
2.8
50
1.0
18
1.5
27
2.0
36
2.2
40
2.5
45
3.0
54
0.55
10
8.3
150
mmol/L
mg/dL
7.0
126
7.2
130
7.5
135
7.8
140
8.0
145
8.9
160
6.7
120
mmol/L
mg/dL
14.4
260
15.0
270
16.0
288
16.6
300
17.0
306
18.0
325
19.0
342
20.0
360
Page 67

- 67 -
3.3
60
3.9
70
4.0
72
4.4
80
4.7
85
5.0
90
5.5
100
6.0
108
6.1
110
9.0
162
9.4
170
10.0
180
10.5
190
11.0
196
11.1
200
12.0
216
12.5
225
13.9
250
20.8
375
22.2
400
23.0
414
24.0
432
25.0
450
26.4
475
27.7
500
30.0
540
33.3
600
Page 68

If you have any questions about the use of the Omnitest® 3
system, please contact your nearest B. Braun representative
or go to www.omnitest.bbraun.com
2013/05
B3MMMGB 9334990MMGB
B. Braun Melsungen AG
OPM
Carl-Braun-Straße 1
34212 Melsungen
Germany
Tel +49 (0) 56 61 71-33 99
Fax +49 (0) 56 61 71-35 50
www.bbraun.com
www.diabetes.bbraun.com
Distributed by:
B. Braun Australia Pty Ltd
17 Lexington Drive
Bella Vista NSW 2153
AU
 Loading...