

Page 1
Professional Professional
CareCare
OxyOxyJetJet®CenCentererOxyJet®Center
OC 17 565 X
Oral-B
OxyJet
20
20
16
16
1
12
12
powered
by
Professional Care
8
8
4
4
2
2
1
1
fl.oz
fl.oz
Professional Care
Type 3719
Page 2

Thank you for purchasing an Oral-B Professional Care OxyJet
®
Center.
If you have any questions, please call:
US residents: 1-800-984-9668
Canadian residents: 1 800 387-6657
Merci d’avoir fait l’achat d’un combiné buccodentaire Oral-B Professional Care OxyJet
®
Center.
Si vous avez des questions, veuillez appeler :
Braun Canada: 1 800 387-6657
Gracias por haber comprado un centro dental
Oral-B Professional Care OxyJet
®
Center.
Si Ud. tiene alguna duda, por favor, en México,
llame al: 01 (800) 508-5800
3-719-124/02/XI-03/G2
Printed in Germany
Imprimé en Allemagne
Impreso en Alemania
U.S. Pats.
6,363,565; 6,497,458; 6,367,108; 6,327,736; 6,308,359; 6,259,021;
6,195,828; 6,021,538; 5,974,615; 5,930,858; 5,604,329; 5,577,285;
5,545,968; 5,289,604; 5,033,617; 4,802,255; Des. 388,958
Page 3
5a
6
7
9
8
click!
5
Oral-B
Oral-B
timer
4
2 speeds
10
3
2
Professional Care
11
12
13
1
Professional Care
14
15
a
click!
b
Page 4

English
IMPORTANT SAFEGUARDS
When using electrical products, especially when
children are present, basic safety precautions should
always be followed, including the following:
Read all instructions before using.
DANGER
To reduce the risk of electrocution:
1. Do not place or store charger where it can fall or be
pulled into a tub or sink.
2. Do not place charger in or drop into water or other
liquid.
3. Do not reach for a charger that has fallen into water.
Unplug immediately.
4. Do not use while bathing.
WARNING
To reduce the risk of burns, electrocution, fire,
or injury to persons:
1. Close supervision is necessary when this product is
used by, on, or near children.
2. Use this product only for its intended use as
described in this manual. Do not use attachments
not recommended by the manufacturer.
3. Never operate this product if it has a damaged cord
or plug, if it is not working properly, if it has been
dropped or damaged, or if the charger has been
dropped into water. Return the product to a service
center for examination and repair.
4. Keep the cord away from heated surfaces.
5. Never drop or insert any object into any opening.
SAVE THESE INSTRUCTIONS
4
Page 5

The Oral-B Professional Care OxyJet
developed with leading dental professionals to effectively
remove plaque from all areas of your teeth and to attack
plaque bacteria.
The Oral-B Professional Care toothbrush adds a gentle
pulsating movement to its oscillation to create a deepcleaning 3D brushing action. The toothbrush should be used
twice a day for at least two minutes, the minimum brushing
time recommended by dental professionals.
The Oral-B OxyJet
micro-bubbles. These micro-bubbles in the water stream
attack plaque bacteria. At the same time, the irrigator removes
remaining food particles from between your teeth and
massages your gums. Always use the irrigator after brushing
your teeth.
Please read the use instructions carefully before first use.
Important
The plug should always be accessible. Periodically check the
cord for damage. A damaged or non-functioning appliance
should no longer be used. Take it to a Braun Service Center.
®
irrigator mixes air into water in the form of
®
Center has been
Description
Toothbrush
1
Charging base
2
Charge indicator
3
Toothbrush handle (rechargeable)
4
On/off switch
5
Brushhead
E
Power Tip® brushhead
6
Brushhead compartment
®
OxyJet
7
8
9
j
k
l
m
n
o
irrigator
Jet compartment
Irrigator jet
Jet switch
Jet release button
On/off switch
Water pressure control dial
Handle switch (water stop and go)
Irrigator handle
Water container (20 fl.oz / 600 ml)
Specifications
Power supply: see bottom of housing
Power intake: 24 W
5
Page 6
on
Using the toothbrush
Connecting and charging
ral-B
O
ral-B
O
ral-B
O
+1x1x
+1x
off
ral-B
O
The toothbrush is electrically safe and can be used in the
bathroom without hesitation.
• Plug the appliance into an electrical outlet. Place the
toothbrush handle
• The charge indicator
3
on the charging base 1.
2
flashes while the handle is being
charged.
• When the handle is fully charged, the charge indicator lights
permanently. A full charge takes at least 16 hours and
provides an operation time of approximately 45 minutes.
• For everyday use, the toothbrush handle can be stored on
the charging base to maintain it at full power. Overcharging
is impossible.
Battery maintenance
To maintain the maximum capacity of the rechargeable battery, the following procedure should be done every 6 months:
Do not place the toothbrush handle back onto the charging
base in order to discharge it by regular use. Once discharged,
recharge the handle on the charging base.
Operating the on/off switch 4
The toothbrush features two speed options, the lower speed
being ideal for sensitive areas in the mouth.
• Press the switch
4
to operate with normal speed.
• Press a second time to operate with reduced speed.
• Press a third time to switch the toothbrush off.
Removing plaque
• The toothbrush can be used with any leading brand of
toothpaste.
• To avoid splashing, guide the brushhead to your teeth
before switching on.
• Guide the brushhead slowly from tooth to tooth. Hold the
brushhead in place for a few seconds before moving on the
next tooth.
• Brush the gums as well as the teeth, first the outsides, then
the insides and finally the chewing surfaces. Do not press
too hard nor scrub, simply let the brush do all the work.
During the first days of using the toothbrush, your gums may
bleed slightly. In general, bleeding should stop after a few
days. Should it persist after two weeks, please consult your
dentist or hygienist.
6
Page 7
Professional timer
With a signal you can hear and feel, the timer invites you to
brush quadrant by quadrant. After every 30 seconds, it signals
by a very short stutter that it is time to move to the next
quadrant. After two minutes - which is the recommended
brushing time - the timer signals by a longer stutter.
Pressure sensor
For safety and optimum brushing results, the toothbrush has
a pressure control system: If too much pressure is applied, the
oscillating movement of the brushhead will continue, but the
pulsation will stop. There is a noticeable change in feeling and
sound when the pressure sensor is activated.
INDICATOR® bristles
The INDICATOR® bristles help you monitor and improve the
brushing performance.
With proper brushing, twice a day for two minutes, the blue
color on the INDICATOR
®
bristles will disappear halfway down
within 3 months, signalling it is time to replace the brushhead.
Power Tip® brushhead
The Power Tip® brushhead is designed for cleaning between
teeth as well as around bridges, crowns and implants. To use,
position brushhead at 45° angle to gumline. Slowly guide the
brushhead along the gumline, pausing between teeth for
optimum results.
Replacement brushheads
Available at retail stores or Braun Service Centers.
3
c
0
e
s
s
0
3
c
e
c
3
0
e
s
s
e
0
c
3
After use
Rinse the brushhead thoroughly under running water for
several seconds with the handle switched on.
Switch off the handle and remove the brushhead. Clean both
parts separately under running water, then wipe them dry.
The environment
For environmental reasons, the toothbrush handle is provided
with an «environmentally sound» nickel-hydride rechargeable
battery. The battery does not contain any harmful heavy
metals. Nevertheless, in the interest of recycling, please do
not dispose of the product in the household waste at the end
of its useful life. Instead dispose of it at an authorized Braun
Service Center or at an appropriate collection site.
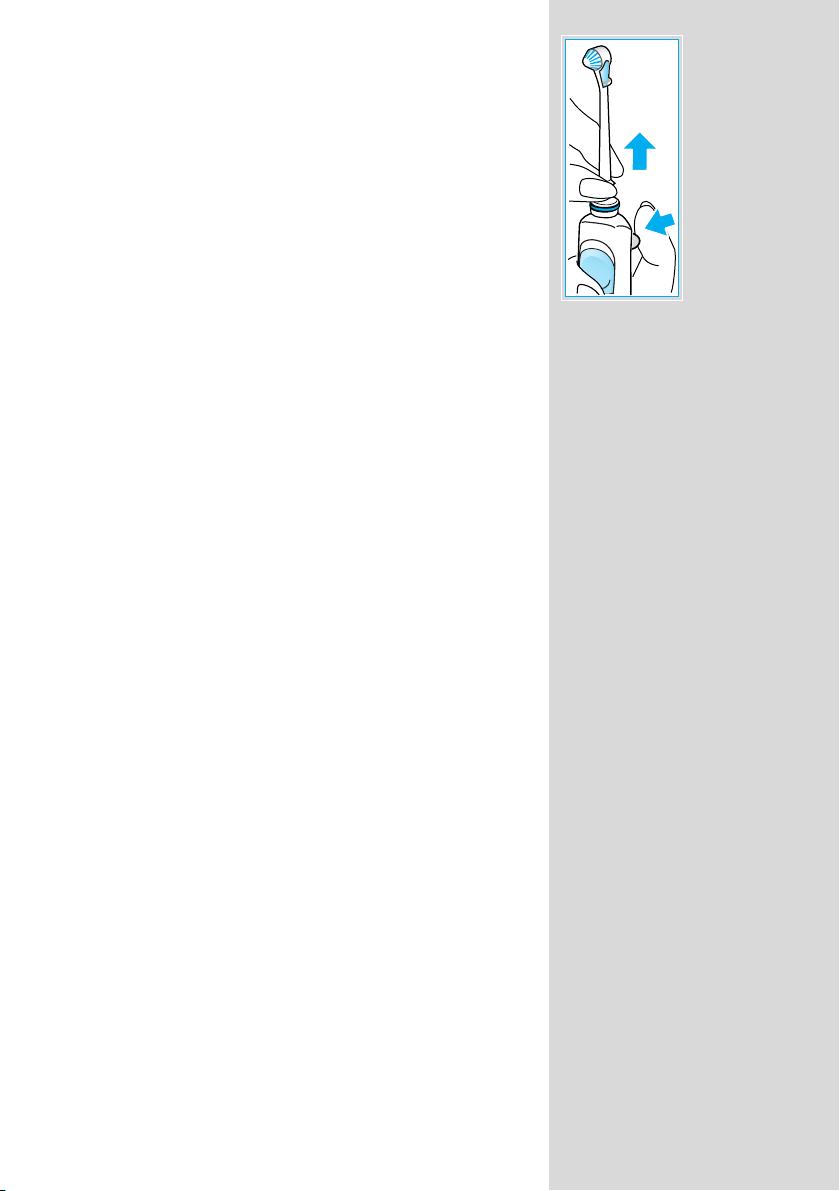
However, if you prefer to dispose of the battery yourself, open
the handle as shown, remove the battery and dispose of it
according to local environmental regulations. Caution:
Opening the handle will definitely destroy it.
Note: You will not be able to place new batteries in the handle.
1 2 3
2
sp
e
ed
s
t
im
e
r
4
6
5
7
7
Page 8
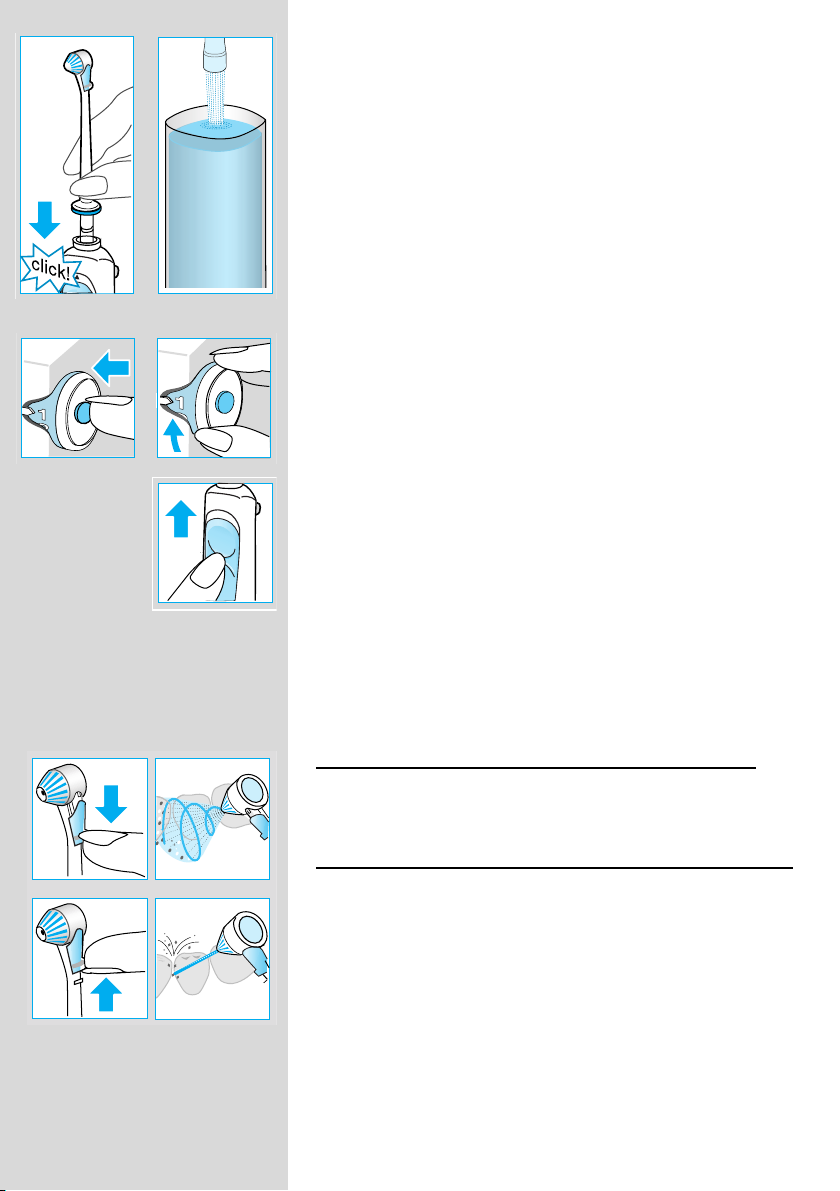
Using the OxyJet® irrigator
Before using for the first time, fill the water container and allow
the water to run through completely by holding the irrigator
handle over a washbasin.
1.
Attach one of the irrigator jets to the handle until it locks into
place. Fill the water container with water and add mouthwash,
if desired.
2.
Turn on the irrigator by pressing the on/off switch. (When
doing so, the handle switch should be in the lower position =
water stop).
3.
Select the water pressure with the pressure control dial
(1 = gentle, 5 = strong). We recommend that you start with
setting 1, especially if your gums tend to bleed or if children
are using the irrigator.
4.
Bend over a washbasin and guide the jet to your teeth and
gums. Slide the handle switch up to start the water stream.
Keep your mouth slightly open to allow the water to run into
the washbasin.
You can choose between two different jet functions by sliding
the jet switch
stream by sliding the handle switch
Rotating stream
(jet switch in lower position): The rotation of the water stream
and its micro-bubbles is designed for easy penetration below
the gumline.
Mono stream:
(jet switch in upper position)
Max. operating time: 15 minutes
Cooling off time: 2 hours
To ensure the jet functions, a small sieve is incorporated in the
lower end of the shaft. Should you notice a reduced water
pressure, check the sieve for any deposits and remove them,
e.g. by carefully tapping the shaft on a flat surface.
8
9
down or up (before doing so, turn off the water
m
down):
for general cleaning and gum massage
straight water stream for site-specific cleaning
Page 9
After use
Always empty the water container entirely to prevent bacteria
from collecting in the standing water. If your dentist has recommended the use of a chlorhexidine solution with your
irrigator, allow some water to run through the irrigator after use
to prevent any deposit build-up.
Press the on/off switch to turn off the irrigator. It will automatically turn off after 10 minutes if you forget to turn it off
manually. In this case, to turn it on again, you have to press the
on/off switch twice.
To take off the irrigator jet, press the jet release button. The
jets can be stored in the jet compartment. Wipe the handle dry
and place it back onto its base.
Cleaning
Regularly clean the housing with a damp cloth. The water
container and the jet compartment are removable and
dishwasher-safe.
Subject to change without notice
9
Page 10

FOR USA ONLY
Limited 2-Year Warranty
Braun warrants this appliance to be free of
defects in material and workmanship for a
period of two years from the date of original
purchase at retail.
If the appliance exhibits such a defect, Braun
will, at its option, repair or replace it without cost
for parts and labor. The product must be carried
in or shipped, prepaid and insured (recommended), to an authorized Braun Service
Center. Proof of date of original purchase is
required.
The cost to ship the product to an authorized
Service Center is the responsibility of the
consumer, the cost to return the product to the
consumer is the responsibility of Braun.
This warranty does not cover finishes or normal
wear, nor does it cover damage resulting from
accident, misuse, dirt, water, tampering,
unreasonable use, service performed or
attempted by unauthorized service agencies,
failure to provide reasonable and necessary
maintenance, including recharging, or units that
have been modified or used for commercial
purposes.
How to obtain service in the USA
Should this product require service, please call
1-800-BRAUN 11 (272-8611) to be referred to
the Authorized Braun Service Center closest to
you.
To obtain service:
A. Carry the product in to the authorized Braun
Service Center of your choice or,
B. Ship the product to the authorized Braun
Service Center of your choice.
Pack the product well.
Ship the product prepaid and insured
(recommended). Include a copy of your proof
of purchase to verify warranty coverage, if
applicable.
To obtain original Braun replacement parts and
accessories:
Contact an authorized Braun Service Center.
Please call 1-800-BRAUN 11 (272-8611) to be
referred to the authorized Braun Service Center
closest to you.
ALL IMPLIED WARRANTIES, INCLUDING ANY
IMPLIED WARRANTY OF MERCHANTABILITY OR
FITNESS FOR ANY PARTICULAR PURPOSE, ARE
LIMITED IN DURATION TO TWO YEARS FROM DATE
OF ORIGINAL PURCHASE. IN NO EVENT WILL
BRAUN BE RESPONSIBLE FOR CONSEQUENTIAL
DAMAGES RESULTING FROM THE USE OF THIS
PRODUCT.
Some states do not allow the exclusion or
limitation of incidental or consequential
damages, so the above limitation may not apply
to you.
This warranty gives you specific legal rights, and
you may have other legal rights which vary from
state to state.
10
To order original Braun replacement parts and
accessories (including replacement brushheads)
by phone:
Please call 1-800-892-8534.
To speak to a Braun Consumer Ser vice
Representative:
Please call 1-800-984-9668.
Page 11

For Canada only
Limited 2-Year Warranty
In the event this appliance fails to function within the specified warranty period because of
defects in material or workmanship, and the
consumer returns the unit to an authorized
service centre, Braun Canada will, at its option
either repair or replace the unit without additional charge to the consumer. This warranty
does not cover any product which has been
damaged by dropping, tampering, servicing
performed or attempted by unauthorized service agencies, misuse or abuse. This warranty
excludes units which have been modified or
used for commercial purposes.
To the extent allowed by law, Braun Canada
shall not be responsible for loss of the product,
loss of time, inconvenience, commercial loss,
special or consequential damages.
The provisions of this warranty are in addition to
and not a modification of or subtraction from the
statutory warranties and other rights and
remedies contained in applicable provincial
legislation.
How to obtain service in Canada
Should this product require service, please call
1-800-387-6657 to be referred to the authorized
Braun Service Center closest to you.
To obtain service:
A. Carry the product in to the authorized Braun
Service Center of your choice or,
B. Ship the product to the authorized Braun
Service Center of your choice.
Pack the product well.
Ship the product prepaid and insured
(recommended). Include a copy of your proof
of purchase to verify warranty coverage, if
applicable.
To obtain original Braun replacement parts &
accessories:
Contact an authorized Braun Service Center.
Please call 1-800-387-6657 to be referred to the
Authorized Braun Service Center closest to you.
To speak to a Braun Service Representative:
Please call 1-800-387-6657.
11
Page 12

24 Month Performance Guarantee
24 Month Performance Guarantee
For USA only
Use the Oral-B Professional Care Center daily
until you are fully familiar with this mechanical
plaque removal instrument. If you are not convinced that the Oral-B Professional Care Center
significantly reduces plaque, send it back for a
full refund.
If not satisfied please send the Oral-B Professional Care Center within 24 months, post-paid
and insured along with your name and address
filled in below and the original sales slip
indicating the purchase price and the date of
purchase to:
24 Month Performance Guarantee
Braun Division,
The Gillette Company,
Sobin Park and A Street, MS 1F
South Boston, MA 02127
Sorry:
No refunds will be made for any
appliance damaged by accident, neglect or
unreasonable use.
The Oral-B Professional Care Center must be
shipped in its original packaging and be
postmarked no later than 24 months after the
date of purchase.
For Canada only
Use the Oral-B Professional Care Center daily
until you are fully familiar with this mechanical
plaque removal instrument. If you are not convinced that the Oral-B Professional Care Center
significantly reduces plaque, send it back for a
full refund.
If not satisfied please send the Oral-B Professional Care Center within 24 months, post-paid
and insured along with your name and address
filled in below and the original sales slip indicating the purchase price and the date of purchase to:
24 Month Performance Guarantee
Braun Products
Gillette Canada Company
4 Robert Speck Parkway
Mississauga ON L4Z 4C5
Sorry: No refunds will be made for any
appliance damaged by accident, neglect or
unreasonable use.
The Oral-B Professional Care Center must
be shipped in its original packaging and be
postmarked no later than 24 months after the
date of purchase.
Please allow 6–8 weeks for handling.
Name of Regular Toothbrush
Your Name
Street
City
State Zip Code
12
Please allow 6–8 weeks for handling.
Name of Regular Toothbrush
Your Name
Street
City
State Zip Code
Page 13

INSTRUCTIONS DE SÉCURITÉ
IMPORTANTES
Lors de l’utilisation d’appareils électriques, surtout en
présence d’enfants, certaines précautions élémentaires
doivent être observées, dont les suivantes :
Lire toutes les directives avant d’utiliser
l’appareil.
DANGER
Pour réduire les risques d’électrocution, suivre les
directives suivantes :
1. Ne pas placer ni ranger le chargeur à un endroit où
il peut tomber ou glisser dans une baignoire ou
un lavabo.
2. Ne pas immerger dans l’eau ni aucun autre liquide.
3. Éviter de toucher le chargeur s’il est entré en contact avec de l’eau. Le débrancher immédiatement.
4. Ne pas utiliser pendant le bain.
AVERTISSEMENT
Pour réduire les risques de brûlure, d’électrocution,
d’incendie ou de blessure, suivre les directives
suivantes :
1. Exercer une surveillance attentive lorsque l’appareil est utilisé par ou pour des enfants ou près
de ceux-ci.
2. Ne pas utiliser cet appareil à des fins autres que
celles indiquées dans ce manuel. Ne pas employer
d’accessoires non recommandés par le fabricant.
3. Ne jamais faire fonctionner un appareil dont la fiche
ou le cordon est abîmé, qui n’est pas en bon état de
fonctionnement, est tombé, a été endommagé ou si
le chargeur a été mis en contact avec de l’eau.
Retourner l’appareil à un centre de service aprèsvente pour inspection et réparation.
4. Ne pas laisser le cordon entrer en contact avec des
surfaces chaudes.
5. Ne jamais laisser tomber ni insérer d’objets dans les
orifices de l’appareil.
Français
CONSERVER CES DIRECTIVES
13
Page 14

Oral-B Professional Care OxyJet
collaboration avec d’éminents professionnels des soins
dentaires pour enlever efficacement la plaque sur toutes les
surfaces des dents et pour attaquer les bactéries de la plaque.
La brosse à dents Oral-B Professional Care allie de légères
pulsations et un mouvement d’oscillation pour assurer une
action de brossage 3D qui nettoie en profondeur. La brosse à
dents devrait être utilisée deux fois par jour pendant au moins
deux minutes, la durée de brossage minimale recommandée
par les professionnels des soins dentaires.
®
Center a été mis au point en
L’irrigateur Oral-B OxyJet
des microbulles. Ces microbulles présentes dans le jet d’eau
attaquent les bactéries de la plaque. Simultanément, l’irrigateur élimine les particules d’aliments entre les dents et
masse les gencives. Toujours utiliser l’irrigateur après le
brossage des dents.
Lire attentivement les directives avant d’utiliser l’appareil pour
la première fois.
®
mélange l’air et l’eau pour former
Important
La fiche doit toujours être accessible. Vérifier régulièrement
le cordon pour s’assurer qu’il n’y a aucun dommage. Éviter
d’utiliser un appareil endommagé ou défectueux. Le retourner
à un centre de service après-vente Braun.
Description
Brosse à dents
1 Base de charge
2 Indicateur de charge
3 Poignée de la brosse à dents (rechargeable)
4 Interrupteur marche-arrêt
5 Tête de brosse
E Tête de brosse Power Tip
6 Compartiment pour têtes de brosse
Irrigateur OxyJet
®
7 Compartiment de rangement des buses
8 Buse d’irrigation
9 Bouton de sélection de jet
j Bouton de déclenchement de la buse
k Interrupteur marche-arrêt
l Cadran de réglage de la pression d’eau
m Interrupteur de la poignée (interrupteur d’eau par à-coups)
n Poignée de l’irrigateur
o Réservoir d’eau (600 mL / 20 oz liq.)
®
14
Caractéristiques techniques
Bloc d’alimentation : voir sous le bloc-moteur
Puissance utilisée : 24 W
Page 15

Utilisation de la brosse à dents
Branchement et charge
La brosse à dents électrique peut être utilisée en toute
sécurité dans la salle de bain.
• Brancher l’appareil sur une prise de courant. Placer la
poignée de la brosse à dents
• L’indicateur de charge
cours de charge.
• Lorsque la poignée est chargée à pleine capacité,
l’indicateur s’allume de façon permanente. Il faut prévoir un
délai au moins de 16 heures pour une charge complète qui
assure une durée d’utilisation d’environ 45 minutes.
• Pour une utilisation quotidienne, la poignée peut être
rangée sur la base de charge afin que la brosse à dents
conserve sa pleine capacité. Il n’y a aucun risque de
surcharge.
Entretien de la pile
Pour conserver la capacité maximale de la pile rechargeable,
suivre les directives suivantes tous les six mois : Éviter de
remettre la poignée de la brosse à dents sur la base de charge
afin de permettre de la décharger complètement au cours
d’une utilisation régulière. Une fois que la poignée est
déchargée, la recharger sur la base de charge.
Fonctionnement de l’interrupteur marche-arrêt 4
La brosse à dents présente un choix de deux vitesses, la
vitesse moins élevée étant idéale pour les régions sensibles
de la bouche.
• Appuyer sur l’interrupteur
normale,
• appuyer une seconde fois pour sélectionner la vitesse
réduite
• et appuyer une troisième fois pour mettre la brosse à dents
hors tension.
3 sur la base de charge 1.
2 clignote lorsque la poignée est en
4 pour sélectionner la vitesse
on
ral-B
O
ral-B
O
ral-B
O
+1x1x
+1x
off
ral-B
O
Enlèvement de la plaque
• La brosse à dents peut être utilisée avec toute marque de
dentifrice reconnue.
• Pour éviter les éclaboussures, diriger la tête de brosse vers
les dents avant de mettre l’appareil en marche.
• Faire passer lentement la tête de brosse sur chaque dent.
Garder la tête de brosse en place pendant quelques
secondes avant de passer à la dent suivante.
• Brosser les gencives et les dents, d’abord les surfaces
extérieures, puis intérieures, et enfin les surfaces de
mastication. Ne pas exercer une pression excessive ni
frotter. Laisser simplement la brosse faire tout le travail.
Durant les premiers jours d’utilisation de la brosse à dents, les
gencives peuvent saigner légèrement. Généralement, le
saignement cesse après quelques jours. Si le saignement
persiste après deux semaines, consulter un dentiste ou un
hygiéniste.
15
Page 16

3
c
0
e
s
s
0
3
c
e
c
3
e
0
s
s
e
0
c
3
Minuterie professionnelle
La minuterie émet un signal que l’on peut entendre et sentir
pour favoriser un brossage allant d’un quadrant à l’autre.
Toutes les 30 secondes, elle émet un signal à brèves
répétitions pour indiquer qu’il est temps de passer au
quadrant suivant. Après deux minutes _ la durée de brossage
recommandée _ la minuterie émet un signal à répétitions plus
longues.
Capteur de pression
Pour un brossage optimal en toute sécurité, la brosse à dents
est dotée d’un système de réglage de pression : En cas
d’excès de pression, les pulsations de la tête de brosse
cessent même si le mouvement d’oscillation continue.
Lorsque le capteur de pression est en marche, la différence
peut nettement se sentir et s’entendre.
Soies INDICATOR®
Les soies INDICATOR® aident à évaluer et à améliorer
l’efficacité du brossage.
Suivant un brossage adéquat de deux minutes deux fois par
jour, la couleur bleue des soies INDICATOR® s’estompe à mihauteur au cours d’une période de trois mois, indiquant qu’il
est temps de remplacer la tête de brosse.
Tête de brosse Power Tip
La tête de brosse Power Tip® est conçue pour nettoyer
entre les dents et autour des ponts, couronnes et implants
dentaires. Mode d'emploi: Positionner la tête de brosse
Interspace à un angle de 45 degrés par rapport à la ligne des
gencives. Assurer le passage en douceur de la tête de brosse
le long de la ligne des gencives, en insistant sur la région entre
des dents pour obtenir des résultats optimaux.
®
Têtes de brosse de rechange
Chez les détaillants ou dans les centres de service aprèsvente Braun.
Après l’utilisation
Rincer à fond la tête de brosse à l’eau du robinet pendant
plusieurs secondes en maintenant la poignée en marche.
Mettre ensuite la poignée hors tension et retirer la tête de
brosse. Nettoyer ces deux pièces séparément à l’eau du
robinet et les essuyer.
16
Page 17

L’environnement
Pour protéger l’environnement, la poignée de la brosse à
dents est munie d’une pile rechargeable à l’hydrure de nickel
écologique. Cette pile ne contient aucun métal lourd nuisible.
Cependant, pour les besoins du recyclage, ne pas jeter le
produit dans les ordures ménagères lorsqu’il n’est plus
utilisable, mais le retourner à un centre de service après-vente
agréé Braun ou à un centre de collecte approprié.
Toutefois, l’utilisateur qui préfère jeter lui-même la pile doit
ouvrir la poignée en suivant les indications, retirer la pile et la
jeter conformément aux règlements environnementaux
locaux.
Mise en garde : L’ouverture de la poignée détruit
automatiquement l’appareil.
Remarque: Il est impossible de mettre de nouvelles piles dans
la poignée.
Utilisation de l’irrigateur OxyJet®
Avant la première utilisation, remplir le réservoir d’eau et faire
circuler l’eau dans tout l’appareil en tenant la poignée de
l’irrigateur au-dessus du lavabo.
1.
Fixer l’une des buses d’irrigation à la poignée jusqu’à ce
qu’elle s’enclenche. Remplir le réservoir d’eau et ajouter du
rince-bouche si désiré.
1 2 3
2
s
p
e
e
d
s
tim
e
r
4
6
5
7
2.
Mettre l’irrigateur en marche en appuyant sur l’interrupteur
marche-arrêt. (Pousser l’interrupteur de la poignée vers le bas
= arrêt d’eau).
3.
Sélectionner la pression d’eau à l’aide du cadran de réglage
(1 = doux, 5 = fort). Il est recommandé de commencer par la
position 1, surtout si les gencives ont tendance à saigner ou si
des enfants utilisent l’irrigateur.
4.
Se pencher au-dessus du lavabo et diriger la buse vers les
dents et les gencives. Pousser l’interrupteur de la poignée
vers le haut pour faire jaillir l’eau. Garder la bouche légèrement
ouverte pour permettre l’écoulement de l’eau dans le lavabo.
Pour choisir l’une ou l’autre des deux positions de jet, pousser
le bouton de sélection de jet
9 vers le bas ou vers le haut (au
préalable, arrêter le jet d’eau en poussant l’interrupteur de la
poignée
m vers le bas) :
17
Page 18

Jet r
otatif pour un nettoyage général et le massage des
gencives
(bouton de sélection de jet vers le bas) : Le jet rotatif et les
microbulles sont conçus pour faciliter la pénétration de l’eau
sous la ligne des gencives.
Jet simple
précises
(bouton de sélection de jet vers le haut)
Temps de fonctionnement maximal : 15 minutes
Temps de refroidissement : 2 heures
Pour assurer le fonctionnement du jet, un petit tamis est
intégré à l’extrémité inférieure de l’arbre moteur. En cas de
réduction de la pression de l’eau, vérifier le tamis. Enlever tout
dépôt, par exemple en tapotant l’arbre moteur sur une surface
plane.
: jet d’eau droit pour le nettoyage de régions
Après l’utilisation
Toujours vider complètement le réservoir d’eau pour éviter
que des bactéries ne se développent dans l’eau stagnante. Si
le dentiste a recommandé d’utiliser une solution à la
chlorhexidine dans l’irrigateur, laisser circuler un peu d’eau
dans l’appareil après l’utilisation pour éviter l’accumulation de
dépôts.
Appuyer sur l’interrupteur marche-arrêt pour mettre l’irrigateur
hors tension. Il s’arrête automatiquement après dix minutes si
l’utilisateur oublie de le mettre manuellement hors tension.
Dans ce cas, pour le remettre en marche, il faut appuyer deux
fois sur l’interrupteur marche-arrêt.
Pour retirer la buse d’irrigation, appuyer sur le bouton de
déclenchement. Les buses peuvent être rangées dans le
compartiment réservé à cet effet. Essuyer la poignée et la
replacer sur la base.
18
Nettoyage
Nettoyer régulièrement le bloc-moteur à l’aide d’un chiffon
humide. Le réservoir d’eau et le compartiment de rangement
des buses sont amovibles et lavables au lave-vaisselle.
Sous réserve de modifications sans préavis
Page 19

Pour le Canada seulement
Pour le Canada seulement
Garantie restreinte de deux ans
En l'occurrence d'un défaut à cet appareil au cours
de la période de garantie mentionnée, soit par suite
d'un vice de matière ou de fabrication, et du renvoi de
l'appareil par le consommateur à un centre de service
après-vente agrée, Braun Canada se réserve le choix
de réparer ou remplacer l'appareil sans aucuns frais
supplémentaires pour le consommateur. Cette garantie
devient invalide si le produit est endommagé par une
chute, une modification, un abus, une utilisation
incorrecte ou s'il a été soumis à un entretien ou à
des tentatives d'entretien par des centres de service
après-vente non agréés. Cette garantie exclut les
appareils modifiés ou utilisés à des fins commerciales.
Dans la mesure permise par la loi, Braun Canada n'est
pas responsable pour une perte d'utilisation, une perte
de temps, un inconvénient, une perte commerciale, un
dommage spécial ou indirect, causés par l'appareil.
Les clauses de cette garantie constituent une addition
et non une modification ou soustraction aux garanties
statutaires et autres droits et recours contenus dans la
législation provinciale applicable.
Service après-vente au Canada
Pour obtenir des services après-vente pour ce produit,
veuillez composer le 1 800 387-6657 afin d’être dirigé
vers le centre de service après-vente agréé Braun le
plus proche.
Pour obtenir des services après-vente :
A. Veuillez remettre le produit au centre de service
après-vente agréé Braun de votre choix; ou
Garantie de rendement de 24 mois
Utilisez le combiné bucco-dentaire Oral-B Professional
Care Center quotidiennement jusqu’à ce que vous
vous soyez familiarisé(e) avec cet instrument. Si vous
n’êtes pas d’avis que la brosse à dents réduit la plaque
de façon significative, veuillez nous la retourner et nous
vous ferons parvenir un remboursement intégral.
Si vous n’êtes pas satisfait(e), veuillez nous retourner
votre appareil d’ici 24 mois, dans un colis affranchi et
assuré, accompagné du formulaire ci-dessous où vous
aurez inscrit votre nom et votre adresse, ainsi que du
reçu de caisse d’origine indiquant le prix et la date de
l’achat, à l’adresse suivante :
Garantie de rendement de 24 mois
Braun Products
Gillette Canada Company
4 Robert Speck Parkway
Mississauga, ON
L4Z 4C5
Désolés : Nous n’autoriserons aucun remboursement
si votre appareil a été endommagé par accident,
négligence ou usage abusif.
L’appareil doit être expédié dans son emballage
d’origine et doit nous parvenir au plus tard 24 mois
après la date de l’achat, le cachet de la poste faisant
foi.
Veuillez prévoir un délai de six à huit semaines pour le
traitement de votre demande.
B. Veuillez expédier le produit au centre de service
après-vente agréé Braun de votre choix.
Assurez-vous de bien emballer le produit. Expédiez
le produit, port payé et assuré (recommandé).
N’oubliez pas d’inclure une copie de votre preuve
d’achat afin de confirmer la couverture de la
garantie, le cas échéant.
Pour obtenir des pièces et accessoires de rechange
Braun d’origine :
Communiquez avec un centre de service après-vente
agréé Braun.
Veuillez composer le 1 800 387-6657
afin d’être dirigé vers le centre de service après-vente
agréé Braun le plus proche.
Pour communiquer avec un représentant
du Service à la clientèle Braun :
Veuillez composer le 1 800 387-6657.
Marque de la brosse à dents employée le plus souvent
Nom
Adresse
Ville
Province Code postal
19
Page 20

Español
PRECAUCIONES
IMPORTANTES DE SEGURIDAD
Cuando utilice productos eléctricos, especialmente
si hay niños presentes, existen ciertas precauciones de seguridad que siempre hay que observar,
incluyendo las siguientes:
Lea todas las instrucciones antes
de usar el aparato.
PELIGRO
Para reducir el riesgo de electrocutación:
1. No coloque o guarde el cargador en algún lugar
de donde pueda caerse al lavabo o a la tina.
2. No introduzca el aparato al agua ni a ningún otro
tipo de líquido.
3. No tome el cargador si éste se a caído al agua.
Desconéctelo inmediatamente.
4. No lo utilice mientras se esta bañando.
ADVERTENCIA
20
Para reducir el riesgo de quemaduras, electrocutación,
fuego o algún daño:
1. Se debe supervisar detenidamente el uso de este
aparato cuando sea empleado por o cerca de niños
pequeños o inválidos.
2. Este aparato debe ser utilizado solo y únicamente
para los fines descritos en este manual. No utilice
accesorios que no hayan sido recomendados por
el fabricante.
3. Nunca use este aparato si el cable ha sufrido algún daño,
si no está funcionando adecuadamente, si el aparato
esta dañado o lo ha dejado caer, o si lo ha sumergido en
agua. Lleve su aparato a cualquier Centro de Servicio
Braun para su revisión y reparación.
4. Mantenga el cable lejos de superficies calientes.
5. Nunca inserte ningún tipo de objetos en las ranuras
del aparato.
GUARDE ESTAS
INSTRUCCIONES
Page 21

El centro dental Oral-B Professional Care
sido desarrollado conjuntamente con dentistas de primera
línea para reducir la placa dental eficazmente en todas las
áreas de los dientes y combatir las bacterias existentes.
El cepillo eléctrico Professional Care añade a su movimiento
oscilante unas suaves pulsaciones dentro y fuera,
consiguiendo una acción de cepillado en tres dimensiones
para una limpieza en profundidad. El cepillo debería utlizarse
dos veces al día al menos durante dos minutos, tiempo
mínimo de cepillado recomendado por los dentistas.
®
El impulsor de agua Oral-B OxyJet
agua en forma de micro-burbujas. Estas micro-burbujas en el
chorro de agua atacan las bacterias existentes. Al mismo
tiempo, desprenden las partículas de alimentos que hayan
podido quedar en los espacios interdentales, a la vez que
masajean las encías. Por este motivo el impulsor de agua
siempre deberá utilizarse después de cepillarse los dientes.
Antes de utilizar este aparato, recomendamos que lea
atentamente las siguientes instrucciones.
Importante
El enchufe debe estar siempre en un lugar accesible. Verifique
periódicamente que el cable se encuentre en buenas condiciones. Si el aparato está dañado o no funciona, no lo use.
Lleve el aparato a un Centro de Servicio Autorizado Braun.
mezcla el aire dentro del
OxyJet
®
Center ha
Descripción
Cepillo eléctrico
1 Base cargadora
2 Indicador de carga
3 Unidad de carga (recargable)
4 Interruptor
5 Cabezal de cepillo
E Cabezal de cepillo Power Tip
6 Compartimento portacepillos
®
Im
pulsor de agua
7 Compartimento para guardar las boquillas
8 Boquilla del impulsor de agua
9 Interruptor de la boquilla
j Botón de expulsión de la boquilla
k Interruptor de conexión/desconexión
l Regulador de presión del agua
m Interruptor deslizable (activa la impulsión de agua)
n Mango del impulsor
o Depósito de agua (600 ml)
Especificaciones
Tensión de alimentación: 120 V
Frecuencia de operación: 60 Hz
Potencia: 24 W
21
Page 22

on
Uso del cepillo eléctrico
Conexión y carga
ral-B
O
ral-B
O
ral-B
O
+1x1x
+1x
off
ral-B
O
El cepillo de dientes es eléctricamente seguro y se puede
mantener o usar en el baño sin problemas.
• Conecte el aparato a cualquier salida de corriente. Coloque
la unidad de carga
• El indicador de carga
3 en el la base cargadora 1.
2 parpadea mientras la unidad de
carga se está cargando.
• Cuando la unidad de carga esté totalmente cargada, la luz
del indicador de carga permanecerá encendida. Se tarda al
menos 16 horas en alcanzar una carga completa, que proporciona un tiempo de funcionamiento de unos 45 minutos.
• La unidad de carga podrá seguir conectada
permanentemente de forma que se mantenga con la carga
completa para su uso diaria. Es imposible que se
sobrecargue.
Mantenimiento de la bateria
Para maximizar la capacidad y vida de la batería recargable,
realice el siguiente procedimiento cada 6 meses: no coloque
el cepillo en la base cargadora hasta que la carga se agote
completamente por el uso.
Una vez descargado, vuelva a cargarlo en la base cargadora.
Funcionamiento del interruptor
El cepillo de dientes presenta dos opciones de velocidad,
siendo la velocidad baja idónea para las zonas más sensibles
de la boca.
• Presione el interruptor
4 para el funcionamiento a velo-
cidad normal,
• presione una segunda vez para el funcionamiento a velo-
cidad reducida,
• presione una tercera vez para apagar el cepillo.
22
Remoción de la placa dental
El cepillo eléctrico puede ser utilizado con cualquier
tipo de
pasta dentífrica convencional.
Con el fin de evitar salpicaduras, conecte la unidad de carga
una vez introducido el cepillo en la boca.
Guíe el cabezal de diente a diente, siguiendo la línea de la
encía y la forma de cada diente. Mantenga el cabezal en la
superficie de cada diente durante unos segundos antes de
desplazarlo al siguiente diente. Igualmente, cepille también
las encías. No presione ni frote excesivamente, deje que el
cepillo haga todo el trabajo.
Puede que sus encías sangren ligeramente las primeras veces
que utilice el cepillo. No obstante, en general esta reacción
debería desaparecer al cabo de pocas días. Si persistiera
después de 2 semanas, consulte con su dentista o higienista.
Page 23

Sensor de presión
Con el fin de optimizar los resultados y seguridad del
cepillado, el cepillo incorpora un sistema de control de
presión, de forma que si se aplica demasiada presión, el
movimiento oscilante del cabezal continúa mientras que
las pulsaciones dentro y fuera s detienen automáticamente.
Vd. mismo podrá oír y sentir que el sensor de presión se
ha activado.
Temporizador profesional
Con una señal que puede oír y sentir, el temporizador le invita
a cepillarse cuadrante por cuadrante. Cada 30 segundos
suena un sonido corto, indicándole que pase al siguiente
cuadrante. Después de dos minutos – tiempo recomendado
de cepillado - el temporizador le avisará con un sonido más
largo.
FILAMENTOS INDICATOR ®
Los filamentos INDICATOR ® le ayudarán a controlar y
mejorar la efectividad de su cepillado.
Con un cepillado adecuado , dos veces al día durante dos
minutos, el color de los filamentos INDICATOR ® irá
desapareciendo hasta la mitad en unos 3 ó 4 meses,
indicándole que debe cambiar el cabezal de su cepillo.
Cabezal de cepillo Power Tip
El cabezal de cepillo Power Tip® está diseñado para limpiar
entre los dientes y alrededor de puentes, coronas e implantes.
Para usarlo, posicione el repuesto a un ángulo de 45 grados
con la línea de las encías. Suavemente guíe el cabezal de
cepillo Interspace alrededor de la encía, parando entre los
dientes para un óptimo resultado.
Cabezales de repuesto
Disponibles en tiendas departamentales, autoservicios,
farmacias y en cualquier Centro de Servicio Braun .
Después de su utilización
Aclare el cabezal bajo agua corriente durante varios
segundos con la unidad de carga conectada. Desconecte
el aparato y retire el cabezal de la unidad de carga. Limpie
ambas partes de forma separada bajo agua corriente y
después séquelas.
®
3
c
0
e
s
s
0
3
c
e
c
3
0
e
s
s
e
0
c
3
23
Page 24

1 2 3
2
s
p
e
e
d
s
tim
er
4
5
Aviso ecológico
La unidad de carga contiene una bateria de níquel-hidruro.
No contiene metales pesados dañinos. Sin embargo, para
reciclar las materias primas, no arroje este producto a la
basura al final de su vida útil. Puede entregarlo en un
Centro de Servicio Braun o en lugares de recogida
apropiados. No obstante, si Ud. prefiere retirar la bateria, abra
el aparato como se muestra, extraiga la bateria y llévelo a un
Servicio de Asistencia Técnica de Braun o deshágase de ella
de acuerdo con las regulaciones nacionales o locales de
protección medioambiental y reciclaje de materias primas.
6
7
Nota: Usted no podra reemplazar baterias nuevas en la unidad
de carga.
Uso del impulsor de agua OxyJet
®
Antes de utilizarlo por primera vez, llene el depósito de
agua y haga circular el agua completamente por el aparato
colocando en mango dentro del lavabo.
1.
Coloque una de las boquillas en el mango hasta que encaje en
su sitio. Llene de nuevo el depósito de agua y añada una
solución de higiene bucal si lo desea.
2.
Para conectar el impulsor, presione el botón de conexión/
desconexión.
(Cuando realice esta operación, el interruptor deslizable
del mango no debe ser presionado.)
24
3.
Seleccione la presión de agua que Ud. desee con el regulador
de presión (1 = suave, 5 = fuerte). Es aconsejable comenzar
con la posición 1, especialmente si sus encías tienen
tendencia a sangrar o si es utilizado por un niño.
4.
Inclínese sobre el lavabo y dirija la boquilla del impulsor hacia
sus dientes y encías. Deslice el interruptor hacia arriba para
activar la impulsión de agua. Mantenga la boca ligeramente
abierta para permitir que el agua caiga dentro del lavabo.
Page 25

Puede seleccionar entre dos funciones diferentes del impulsor deslizando el interruptor de la boquilla hacia abajo o
hacia arriba (antes de hacer esto, deberá desconectar la
impulsión de agua deslizando el interruptor del mango
hacia abajo):
Impulsión r
y un masaje de las encías (colocar el interruptor de la
boquilla en la posición hacia abajo)
La rotación del chorro de agua y las micro-burbujas ha
sido diseñada para una fácil penetración bajo la línea de las
encías.
Posición monochorr
la limpieza de zonas específicas (colocar el interruptor
de la boquilla en la posición hacia arriba)
Tiempo máximo de funcionamiento: 15 minutos
Tiempo de enfriamiento: 2 horas
Para asegurar las funciones del impulsor, se ha incorporado al
final del mango un pequeño colador. Si nota una disminución
de la presión del agua, compruebe si hay algún deposito en el
colador eliminándolo, golpeando suavemente el mango en
una superficie plana.
Después del uso
Siempre ha de vaciar el depósito de agua completamente.
De este modo, en el caso de la no utilización del aparato
por un período de tiempo, se previene la proliferación
de bacterias. Si su dentista le recomienda que utilice una
solución chlorhexidina con el impulsor, haga circular el agua
completamente por el aparato después de su utilización
para prevenir que se forme algún depósito. Presione el
interruptor de conexión/desconexión para desconectar el
impulsor de agua.
El aparato se apagará automáticamente al cabo de 10
minutos si se ha olvidado apagarlo manualmente. En este
caso, para volver a ponerlo en marcha de nuevo, presione el
botón de conexión/desconexión dos veces.
otatoria de agua para una limpieza general
o: chorro de agua directo para
Para extraer la boquilla del impulsor de agua, presione el
botón de expulsión de la boquilla.
Las boquillas pueden ser guardadas en el compartimento
especialmente diseñado para ello.
Asegúrese que el mango esté seco y colóquelo de nuevo
sobre su base.
Limpieza
Limpie regularmente la cubierta con un paño húmedo. El
depósito de agua, el compartimento portacepillos y el
compartimento para las boquillas son extraíbles y se pueden
limpiar en el lavavajillas.
Sujeto a cambio sin previo aviso.
25
Page 26

Garantía
Braun concede a este producto dos años de garantía desde la
fecha de compra. Dentro del período de garantía,
subsanaremos, sin cargo alguno, cualquier defecto del
aparato imputable tanto a los materiales como a la
fabricación, ya sea reparando, sustituyendo piezas o
facilitando un aparato nuevo según nuestro criterio. Cualquier
otra reclamación por daños queda excluida. Esta garantía sólo
será válida dentro del período amparado por la misma. Las
reclamaciones sólo serán validas en los países donde se
venden oficialmente y siempre y cuando la garantía este
sellada y fechada. Cualesquiera otras reclamaciones no
especificadas están excluídas a menos que la ley prevea otra
cosa con caracter obligatorio.
Importado y/o distribuído por:
Gillette Manufactura, S.A. de C.V. /
Gillette Distribuidora, S.A. de C.V.
Atomo No. 03
Parque Industrial Naucalpan
Naucalpan de Juarez
Estado de México
C.P. 53370
R.F.C. GMA 940301 MV7 /
R.F.C. GDI 930 706 NZ1
26
Page 27

GARANTÍA
DE REEMBOLSO
Sólo para México
Use el Oral-B Professional Care diariamente
hasta que esté familiarizado con este instrumento. Si no está convencido que el Oral-B
Professional Care reduce el sarro y mejora su
salud bucal en forma significativa, basta devolverlo para obtener la devolución total de su
dinereo.
Motivo de la devolución
Nombre del cliente
Calle Número Interior
Colonia Municipio/Delegación
Si no está satisfecho, sirvanse enviar el Oral-B
Professional Care dentro de los 24 meses de su
compra, con el flete prepagado y asegurado,
junto con su nombre y dirección debidamente
llenado en el talón de abajo y la factura o nota
de compra en la que se indique el precio y fecha
de compra, a la siguiente dirección:
Importado y/o distribuído por:
Gillette Manufactura, S.A. de C.V. /
Gillette Distribuidora, S.A. de C.V.
Atomo No. 03
Parque Industrial Naucalpan
Naucalpan de Juarez
Estado de México
C.P. 53370
R.F.C. GMA 940301 MV7 /
R.F.C. GDI 930 706 NZ1
Lo sentimos pero no se hará ningún reembolso
de Oral-B Professional Care dañado por acci-
dente, negligencia o uso inadecuado. Oral-B
Professional Care deberá ser enviado en su
empaque original y con sus accesorios
completos. La fecha de envío sellada no debe
exceder 24 meses a la fecha de compra. Por
favor considere de 6 a 8 semanas de envíos.
PoblaciónCódigo postal Estado
Tel éfono (con clave Lada)
27
 Loading...