

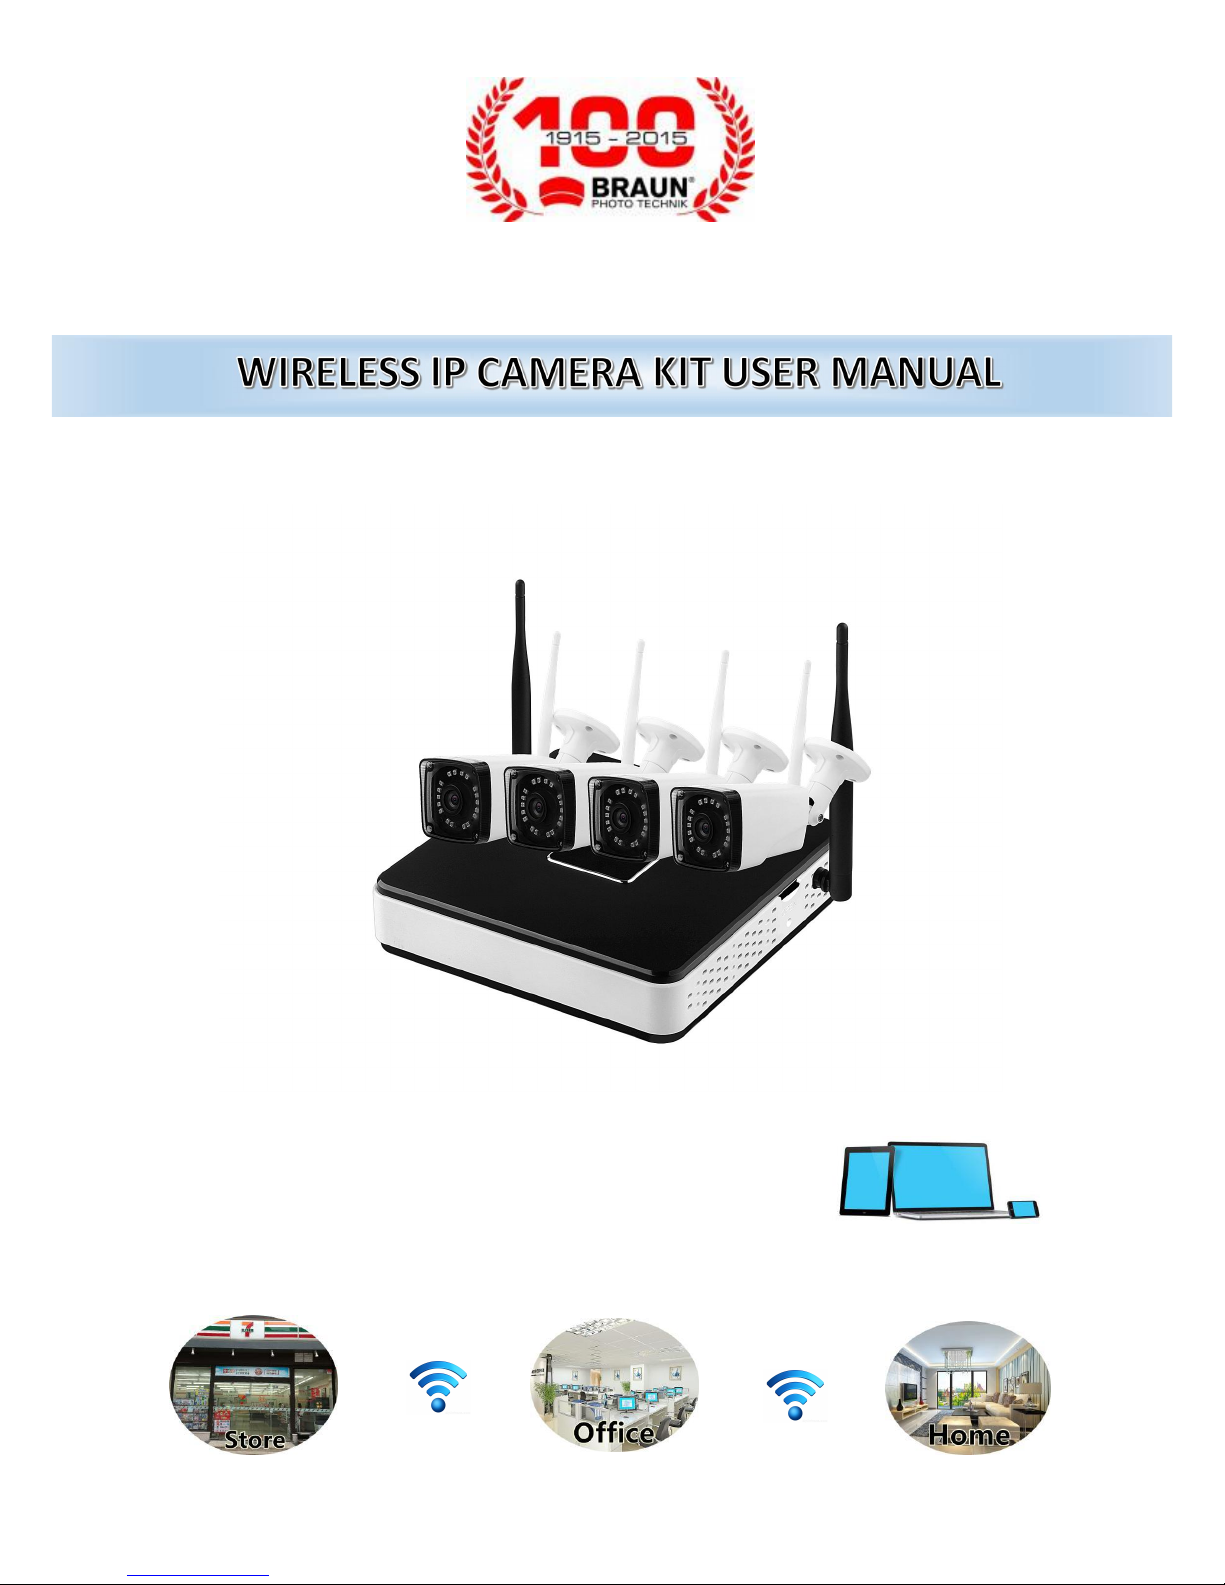
Braun NVR 400 User Manual
COPY RIGHT@PS.V1705

CONTENTS
PART A - PRODUCT INSTALLATION AND INSTRUCTION
CHAPTER ONE : DESCRIPTION
1-1 STATEMENT .............................................................................................................................................. Page 01
1-2 ATTENTIONS ............................................................................................................................................. Page 01
1-3 PACKAGE INSPECTION .............................................................................................................................. Page 01 - 02
1-4 PRODUCT DESCRIPTIONS ......................................................................................................................... Page 02 - 03
CHAPTER TWO : QUICK INSTALLATION
2-1 INSTALL WIRELESS CAMERAS ................................................................................................................... Page 03 - 04
2-2 INSTALL WIRELESS NVR ............................................................................................................................ Page 04 - 05
2-3 CONNECTION OF DEVICE ......................................................................................................................... Page 05 - 06
CHAPTER THREE : INSTALL SOFTWARE OF APP
3 - 1 APP FOR MOBILEPHONE .......................................................................................................................... Page 07 -11
3 - 2 APP FOR COMPUTER AND LAPTOP .......................................................................................................... Page 11 - 14
PART B - MANUAL OF WIRELESS NVR
CHAPTER FOUR : MAIN MENU
4 - 1 PLAYBACK ................................................................................................................................................ Page 15 - 17
4 - 2 BACKUP ................................................................................................................................................... Page 18
4 - 3 HD MANAGE ........................................................................................................................................... Page 19
4 - 4 RECORD .................................................................................................................................................. Page 20 - 21
4 - 5 CHANNEL ................................................................................................................................................ Page 21 - 25
4 - 6 SYSTEM ................................................................................................................................................... Page 25 - 32
4 - 7 MAINTENANCE ....................................................................................................................................... Page 33 - 35
4 - 8 SHUT DOWN ........................................................................................................................................... Page 36
CHAPTER FIVE : AUTO CONFIGURE ................................................................................................................. Page 37 - 38
CHAPTER SIX : UOTPUT ADJUST ..................................................................................................................... Page 39
CHAPTER SEVEN : LOCK SCREEN .................................................................................................................... Page 39
CHAPTER EIGHT : RESTART DEVICE ............................................................................................................... Page 40
CHAPTER NINE : FAQ AND TROUBLE SHOT ..................................................................................................... Page 40 - 41
CONTENTS
- 1 -
CHAPTER ONE : DESCRIPTION
1 - 1 STATEMENT
Thanks greatly for your purchasing our products, if you have any questions or needs, please contact us freely. This
manual applies to wireless network video recorder.Based on the enhancements of products features, the company will
update the content of this manual, renew the products and process described in this manual.In case of the description
inconsistent with materials object, prevail in hand.
1 - 2 ATTENTIONS
Please double check when unpacking boxes, confirm the items and lists.
Please don’t make the kit fall to ground or be hit by strong forces.
Please keep good ventilated environment around this product.
Avoid installation in severe vibration environments.
Please avoid environment with much humidity,dust,extreme heat or extreme cold (operating temperature:-10 ℃
~50℃),strong electromagnetic radiation field and magnetic sources.
Please remove the obstacle between cameras and NVR,to avoid the impact caused on signal transmission and image
quality.
In case of long distance, please connect cameras with NVR with cable.
Please keep the product box carefully, to facilitate transfer or removal of the equipment.
Please make sure to turn off power of all items during installation. Check the voltage properly.
Please contact the distributor or service center if the kit is damaged or does not work.
1 - 3 PACKAGE INSPECTION
After receiving product, please open gift box then check accessories. If any damage or lack,kindly please contact to the
distributor.
PCKING LIST :
S/N
Item
Quantity
1
NVR Host
1
2
NVR accessories bag(4 screws
1 date line, 1 power line for
HDD)
1
3
USB Mouse
1
4
1 meter network cable(for IPC
code match)
1
CHAPTER ONE : DESCRIPTION
- 2 -
5
DC 12V@2A Power supply
(NVR)
1
6
Product user manuals
1
7
Wireless IP Camera
4
8
DC 12V@0.5A Power supply
(for IPC)
4
9
Screw bag(4 screws 1 Date line
and 1power line for IPC)
1
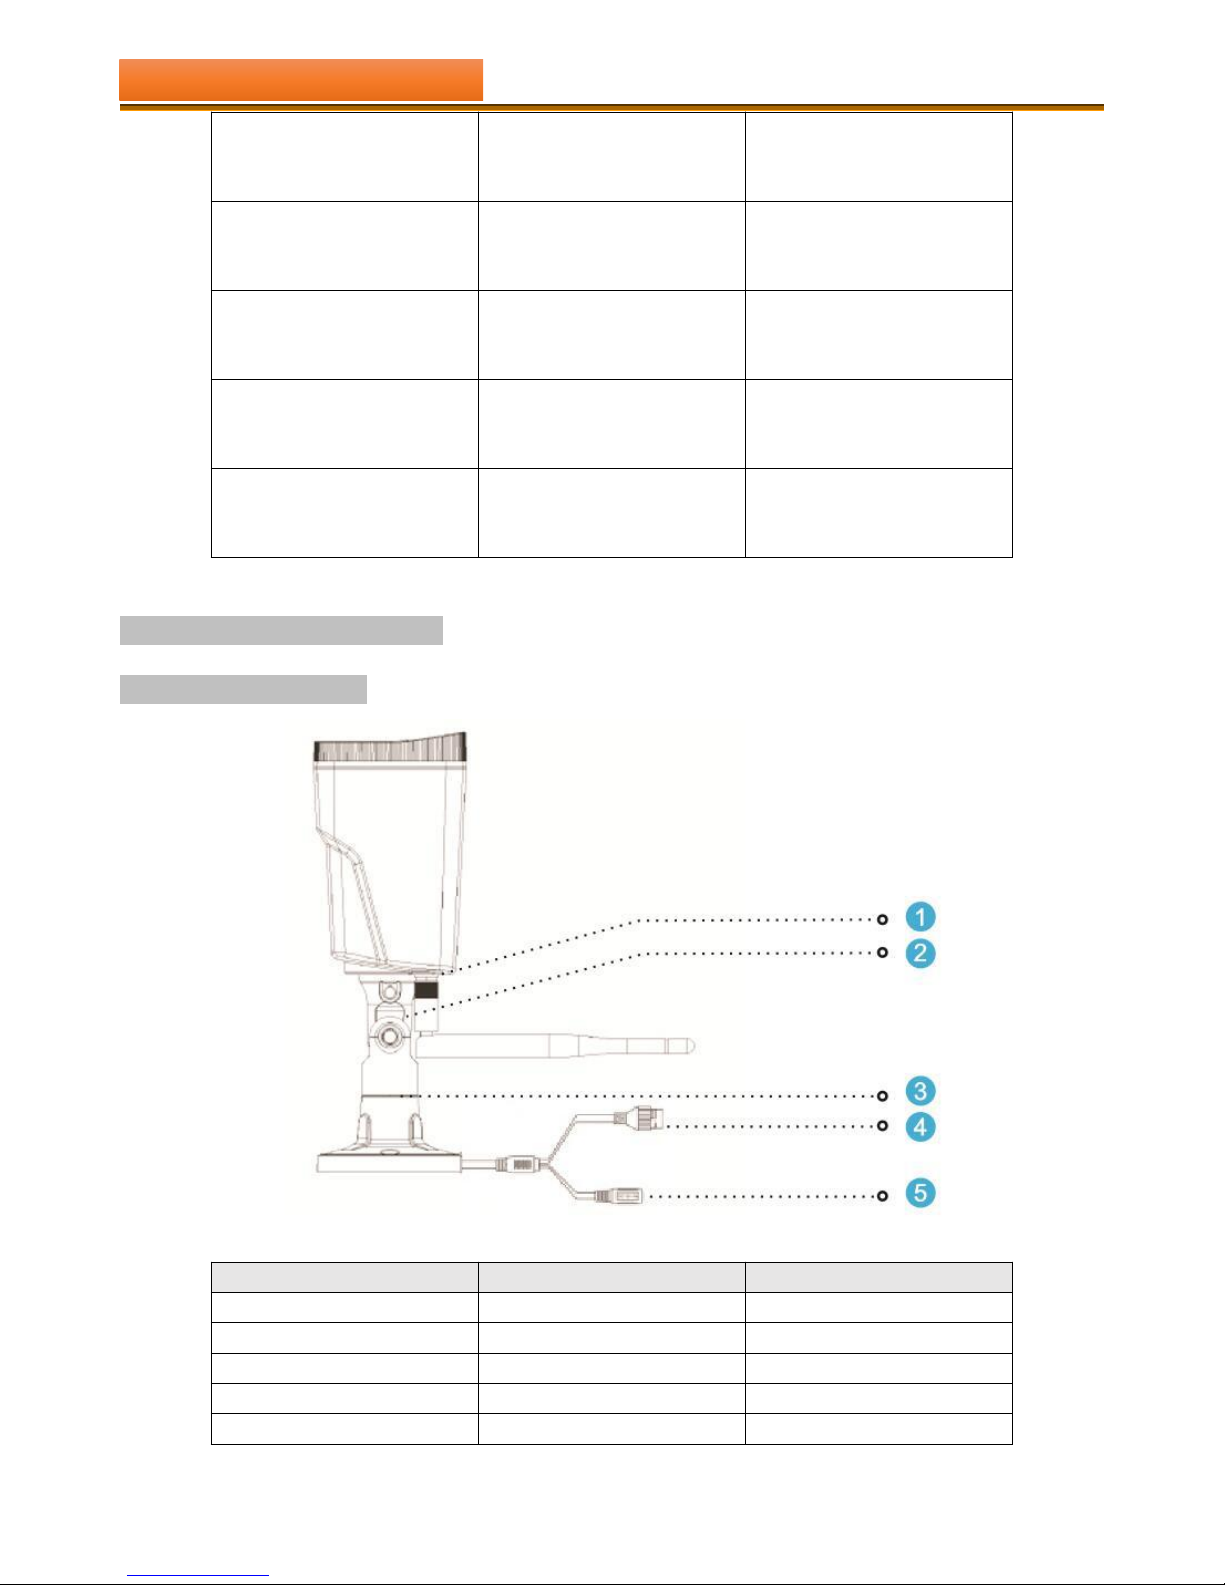
1 - 4 PRODUCT DESCRIPTIONS
【Wireless Camera】
S/N
Item
Description
1
Antenna interface
Install Antenna
2
Set screw
Fixed bracket
3
Knob
Adjust the camera angle
4
Network interface
Connector for LAN
5
Power Supply
12VDC power supply
CHAPTER ONE : DESCRIPTION

- 3 -
【WIRELESS NVR】
S/N
Item
Description
1
Antenna interface
Install Antenna
2
Network interface
Connector for LAN
3
VGA interface
DB9 connector for VGA output
4
HDMI interface
HDMI video output connector
5
USB interface
for USB mouse, U disk
6
Power Supply
12VDC power supply
CHAPTER TWO : QUICK INSTALLATION
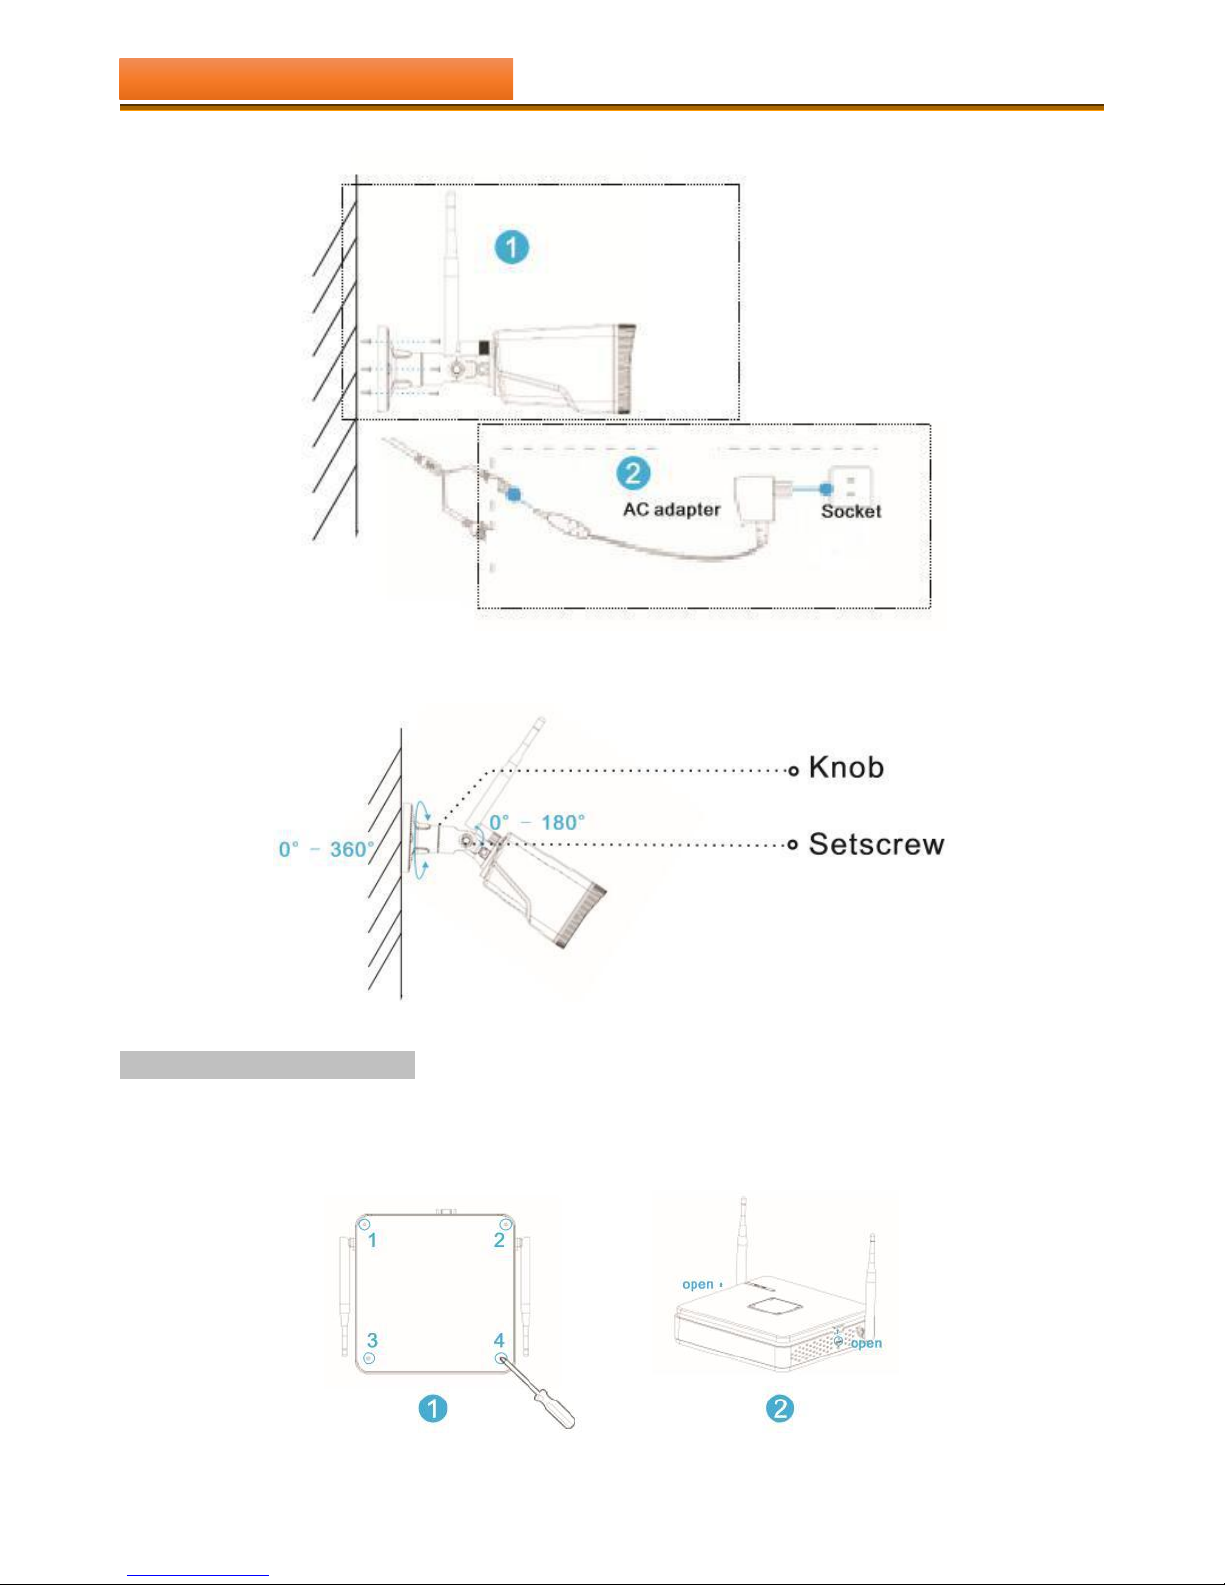
2 - 1 INSTALL WIRELESS CAMERAS
1. Disconnect the power from the NVR before installing a hard disk drive (HDD) inside. A factory recommended HDD
should be used for this installation.
2. The maximum of hard disk capacity supported is 4TB.
Steps:
1. Drill mounting holes, push in screws and fasten the screws.
2. Connect power adapter to socket.
CHAPTER ONE : DESCRIPTION
- 4 -
3. Loosen the setscrew and knob, adjust the camera angle according to your surveillance need, then fasten the screws.
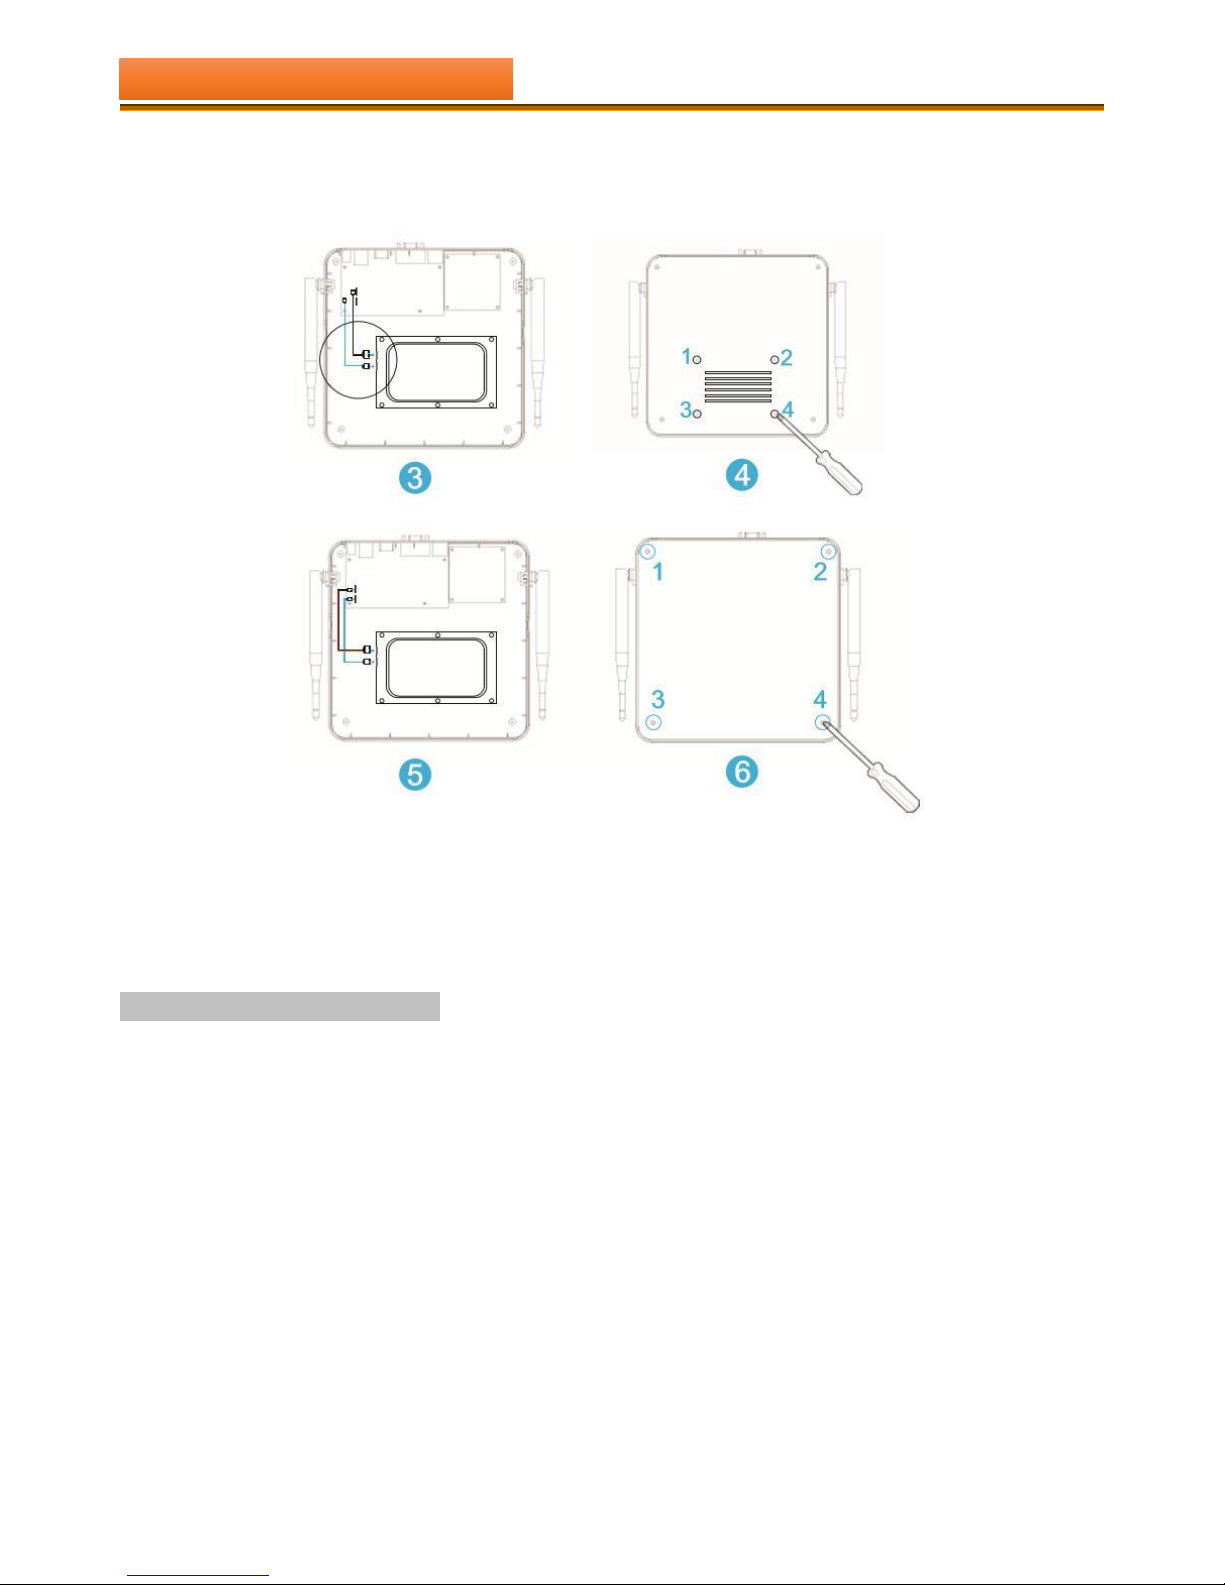
2 - 2 INSTALL WIRELESS NVR
Steps:
1. Install the hard disk with a cross screwdriver.
CHAPTER TWO : QUICK INSTALLATION
- 5 -
(1) Unfasten the screws on the rear panel, and side panel.
(2) Remove the up cover from the NVR.
(3) Connect the data cable and power cable to HDD.
(4) Fasten the screws on the bottom to fix the HDD.
(5) Connect the data cable and power cable from HDD to NVR.
(6) Re-install the cover of the NVR and fasten screws.
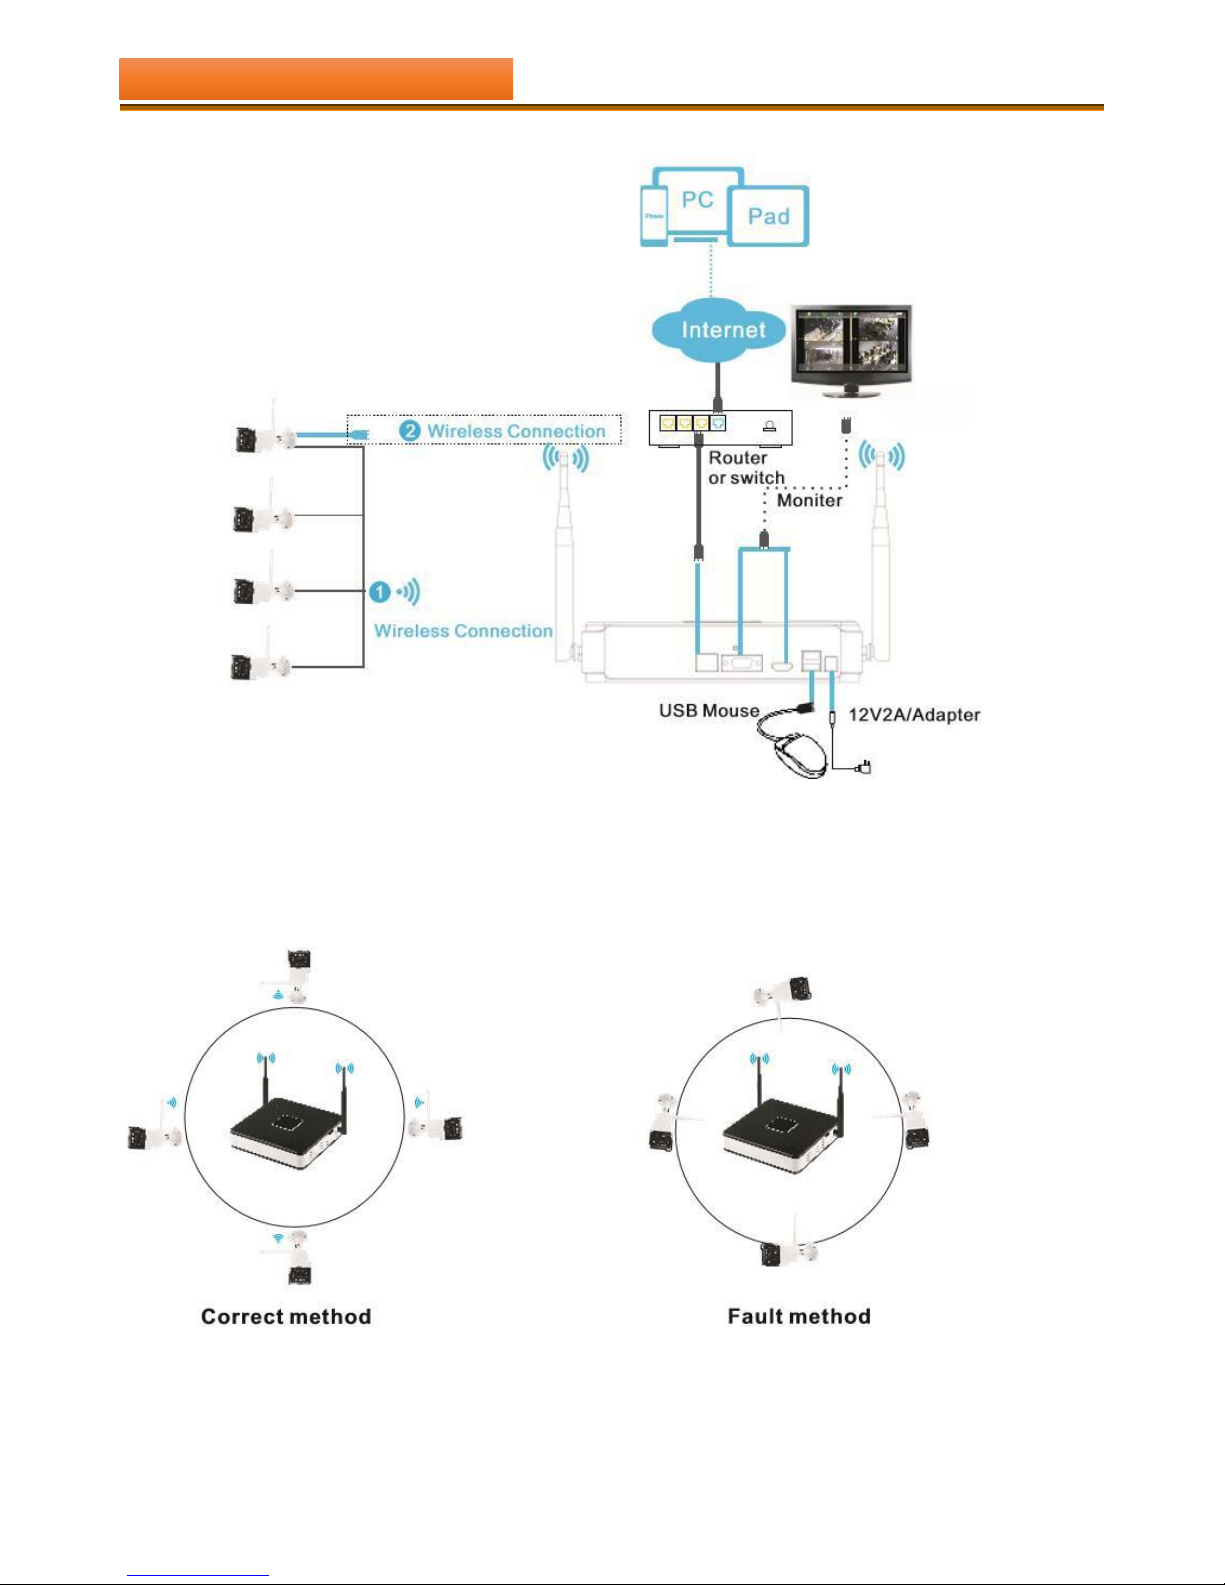
2 - 3 CONNECTION OF DEVICE
(1) Connect mouse to USB interface.
(2) Connect NVR to monitor by HDMI cable or VGA cable.
(3) Connect NVR to internet by network cable via router(or switch).
(4) Connect NVR to 12VDC adapter and turn on power, the power indicator would turn red.
CHAPTER TWO : QUICK INSTALLATION
- 6 -
Note:
1. If obstructions or long distance between NVR with wireless IP cameras or other weakening factors, please connect the
wireless cameras to NVR with network cable. If not, the signal is weak, the image abnormal.
2. In order to guarantee the video quality, IPC antenna should try to keep in parallel or tangent with NVR antenna.
Because the signal of surrounding antenna is much stronger , but much weaker if antenna endpoints back off direction.
CHAPTER TWO : QUICK INSTALLATION
- 7 -
CHAPTER THREE : INSTALL SOFTWARE OF APP
3 - 1 APP FOR MOBILEPHONE OR TABLET PC
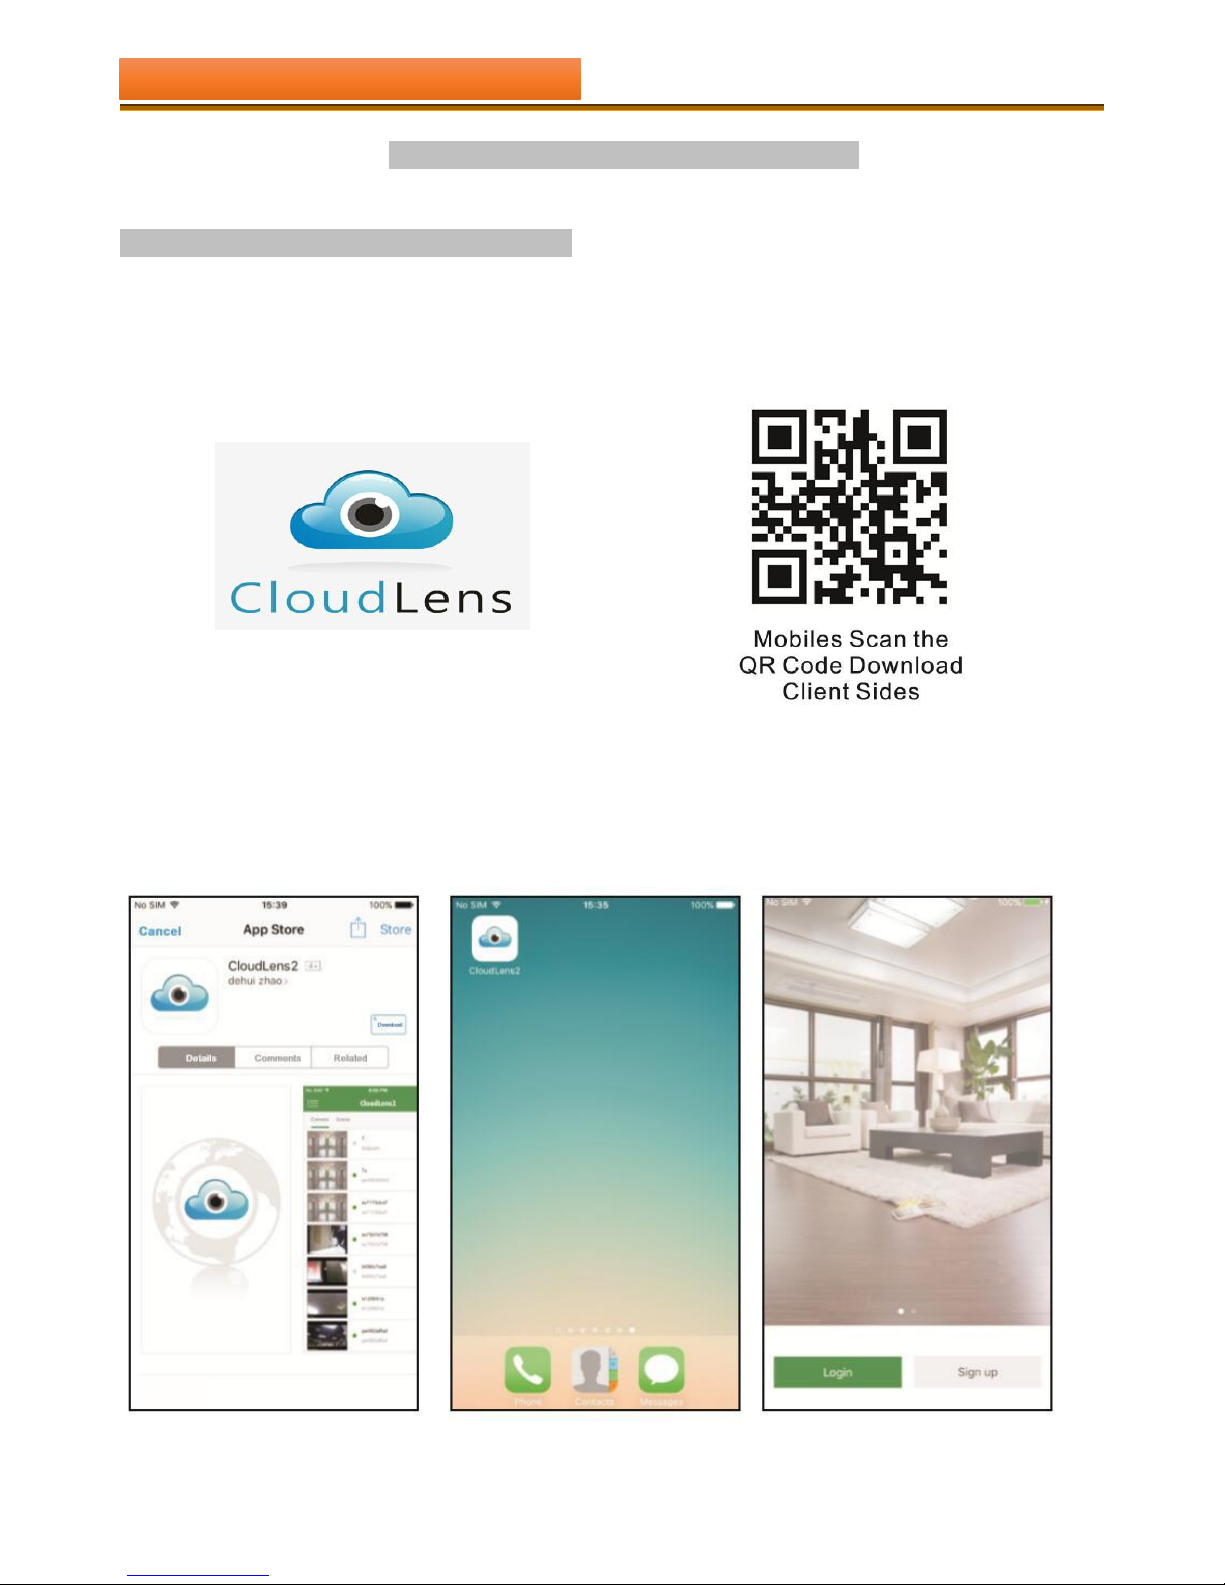
SECTION A : Download and install 【CloudLens2】 on Google Play or APP store
Method 1: Scanning the 【CloudLens2 】QR code in the user manual or the system maintenance windows of NVR to
download, and install the APP platform.
Method 2: Search keyword “CloudLens2” in your “Google Play Store” or APP Store.
SECTION B : Access the application
When the installation is completed,click the app icon to access.
CHAPTER THREE : INSTALL SOFTWARE OF APP
- 8 -
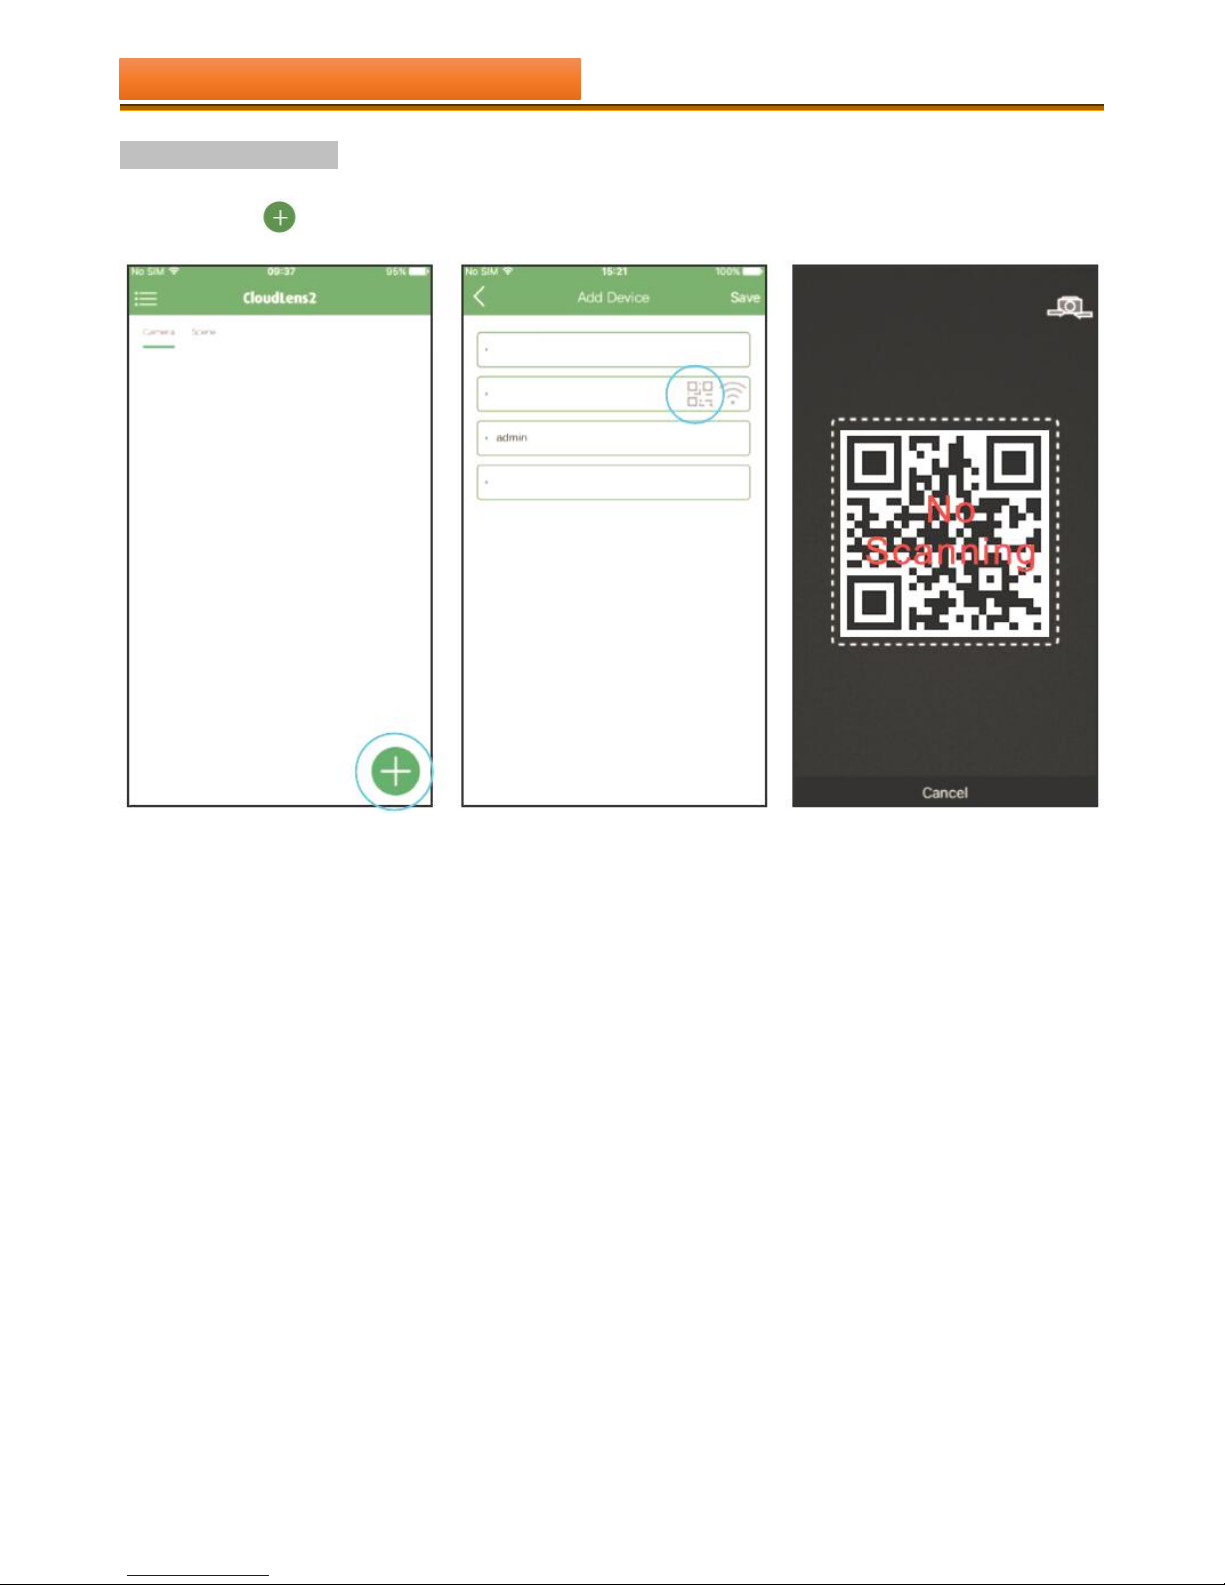
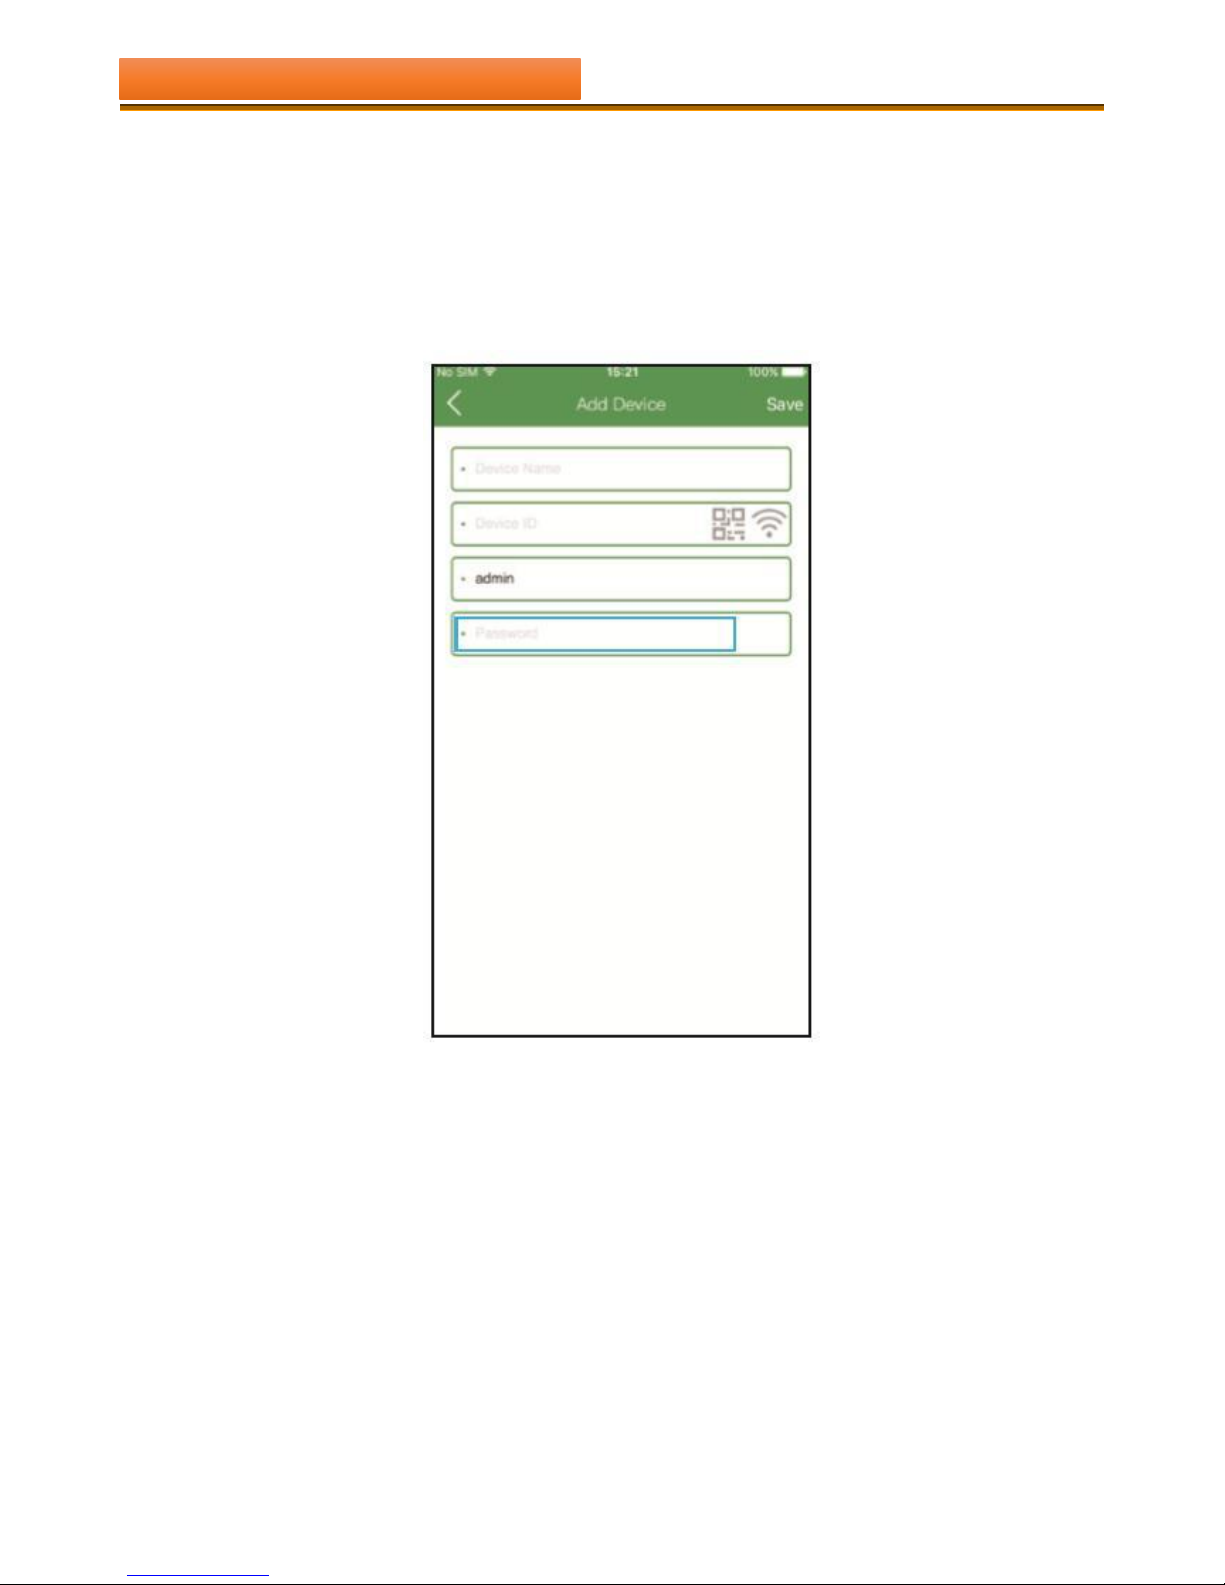
Step 2: Add device
(1) Tap button
in the main interface view to open the device .
CHAPTER THREE : INSTALL SOFTWARE OF APP
- 9 -
(2)Here are three methods to add devices:
Two-dimensional code scanning: Scan the QR code on your NVR(in “system maintenance”menu) to fill in the GID blank
column.
Manual enter: Fill in the info manually. The GID displays in system maintenance menu of NVR.
LAN Search: If the device is connected into the same local network with your phone, CloudLens2 would find them
automatically.
(3) Input the name(device name), User(device’s log in name), and password.
Notes: the user, password is same as NVR’s login user and password. The default user is admin, password is blank. When
you finish adding devices, these devices will display in the main interface view under the playing windows area. If the
device icon’s color is bright-Blue, it means that the device is online.
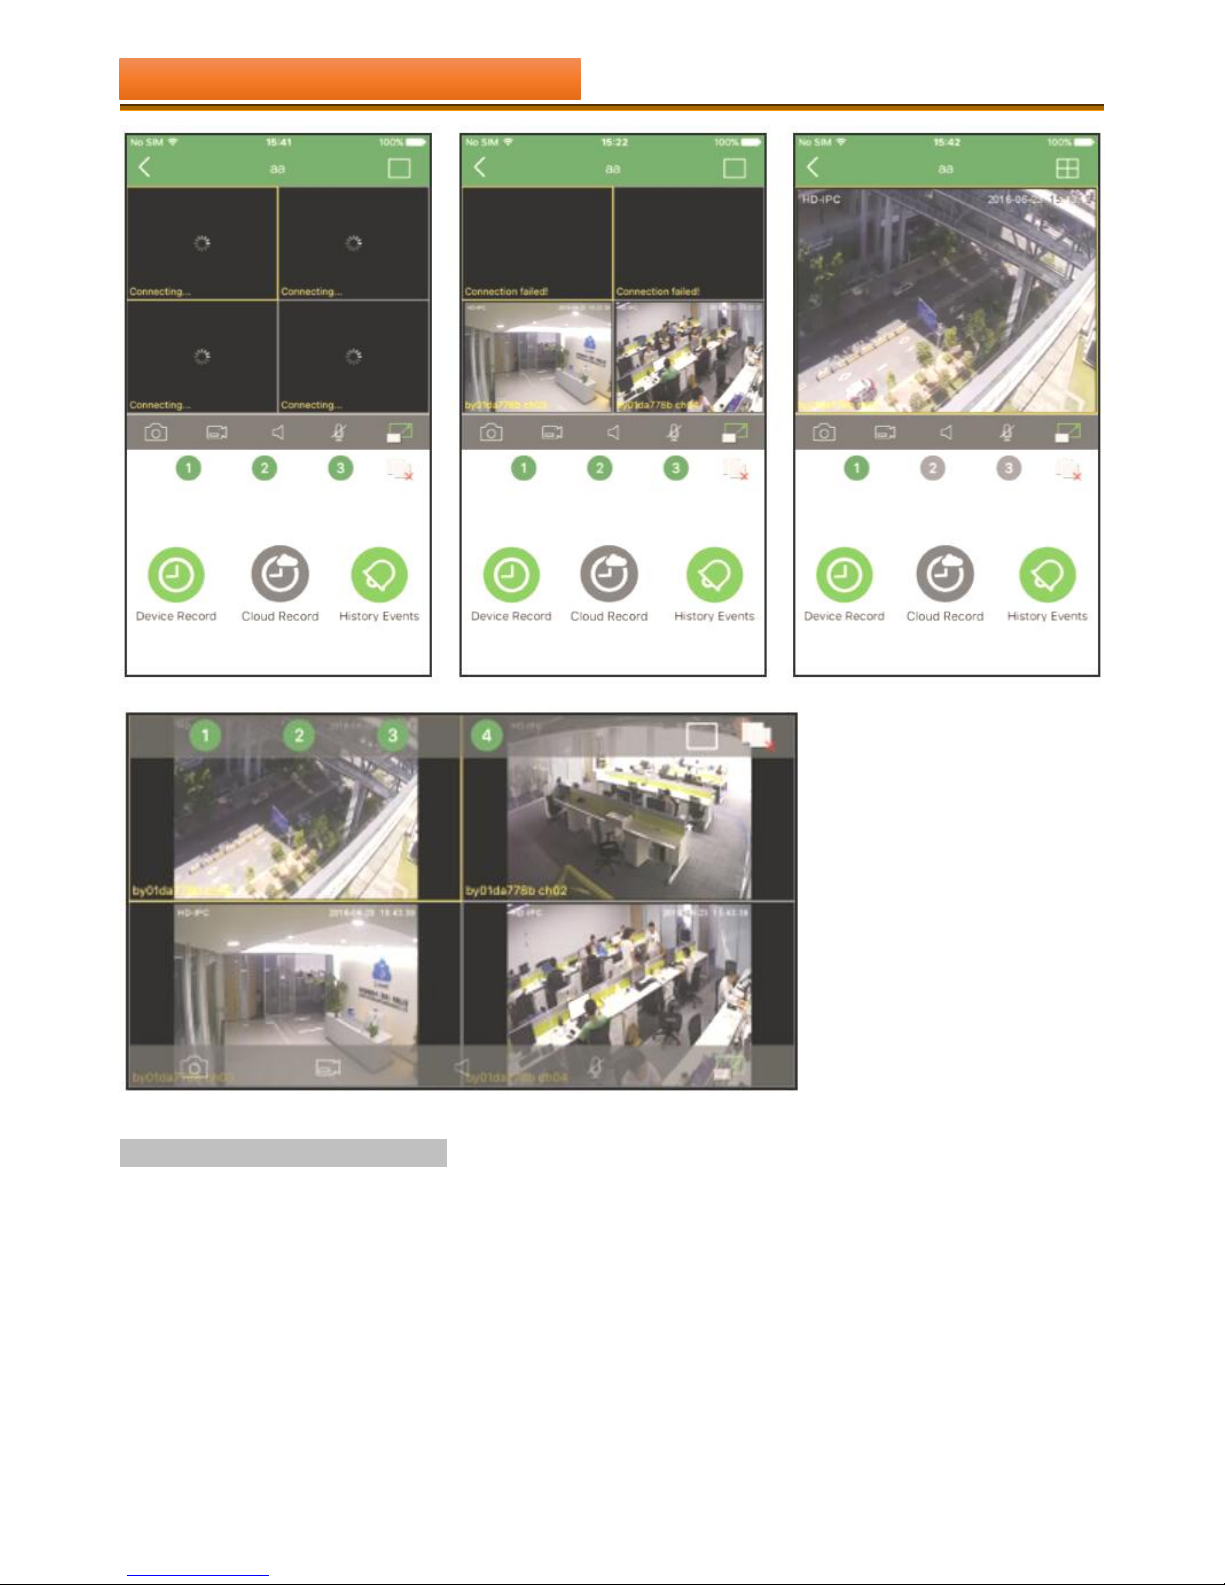
Step 3: live view
Notes: The circle icon’s color will turn into bright-Blue the function is on; when it turns gray, the function is off. Please
tap the icon to turn it on or off.
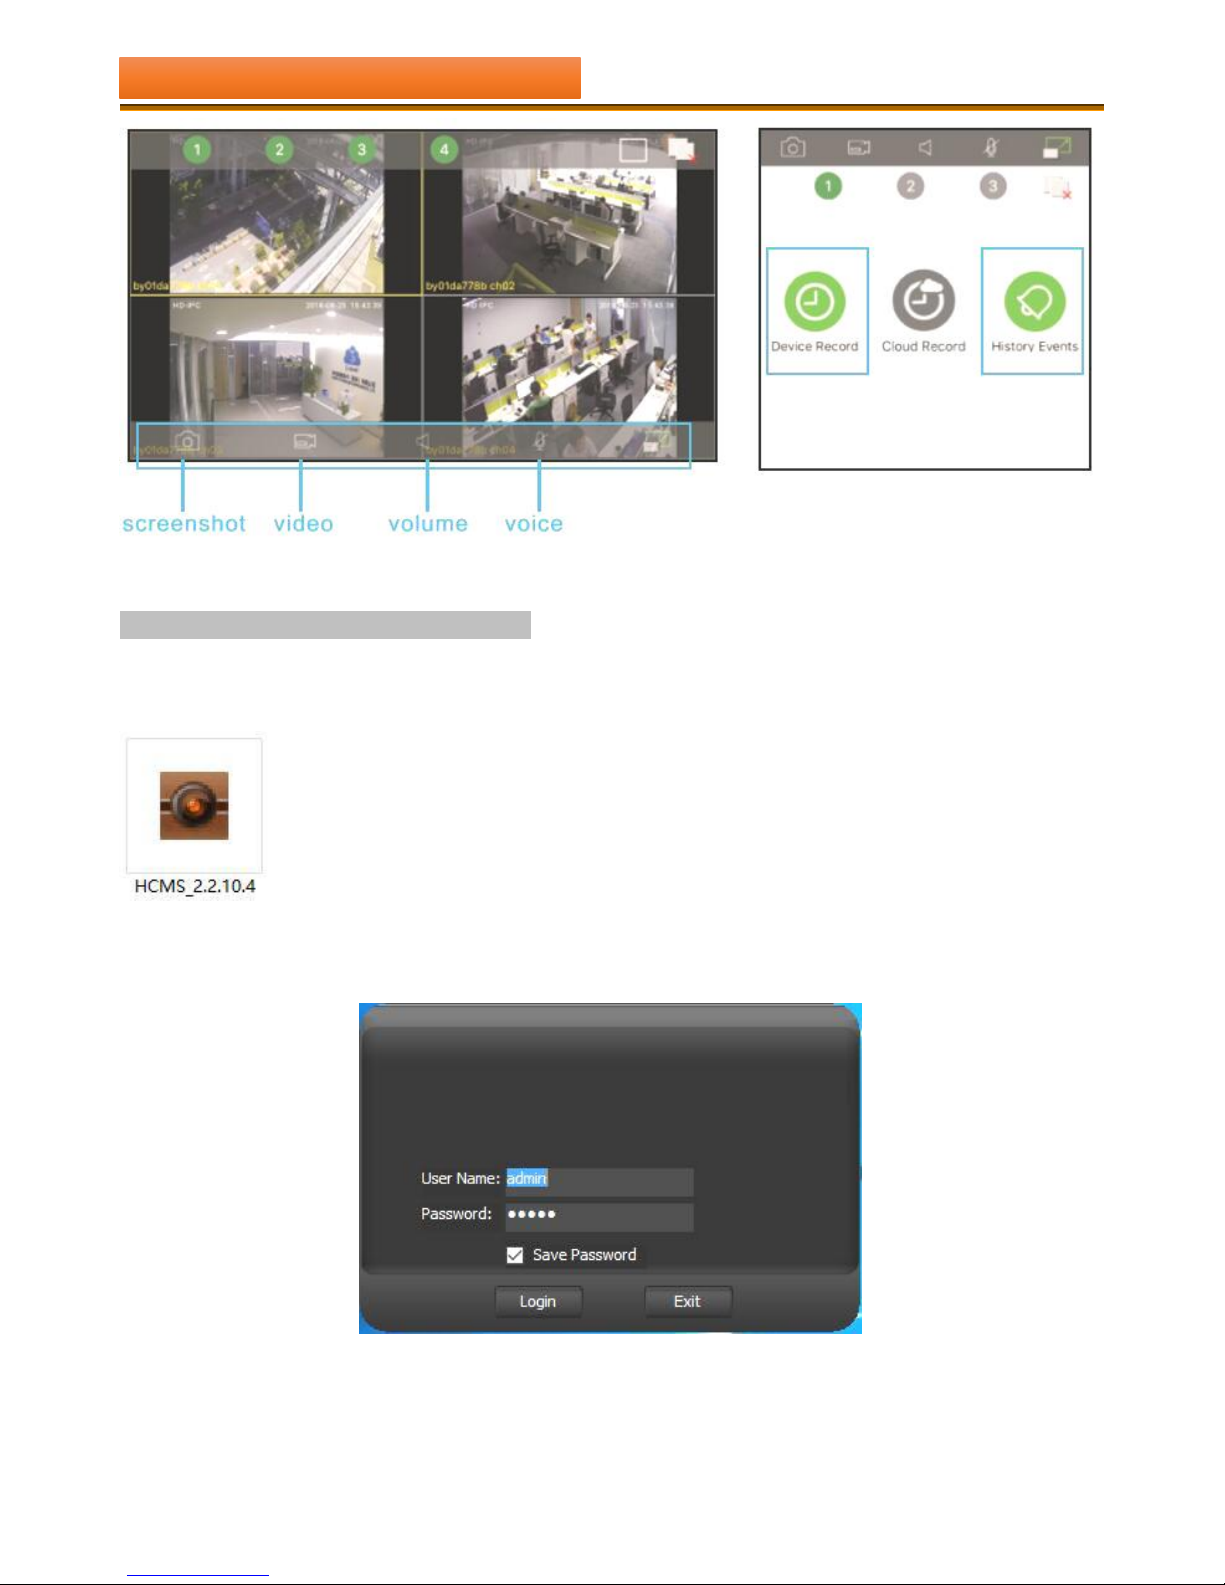
(1) Tap the device icon which you want, will show the channel icons under the device.
(2) Tap the channel icon which you want, then the channel’s video will be connected.
(3) Repeat above steps to connect to other channels of the device or another device.
CHAPTER THREE : INSTALL SOFTWARE OF APP
- 10 -
CloudLens2 Function Introduction
In addition, CloudLens2 also supports mobile PTZ , screen shots, video, editing, local and remote video playback,
equipment, and other functions. When customers click on tools column, slide and flip over to find the other related
functions.
CHAPTER THREE : INSTALL SOFTWARE OF APP
- 11 -
3 - 2 APP FOR COMPUTER AND LAPTOP
STEP 1 : Please install the 【HCMS_2.2.10.4】on PC.
STEP 2 : Run the HCMS after install completed,entry 【User Name/Password:admin】 to Login.
CHAPTER THREE : INSTALL SOFTWARE OF APP
- 12 -
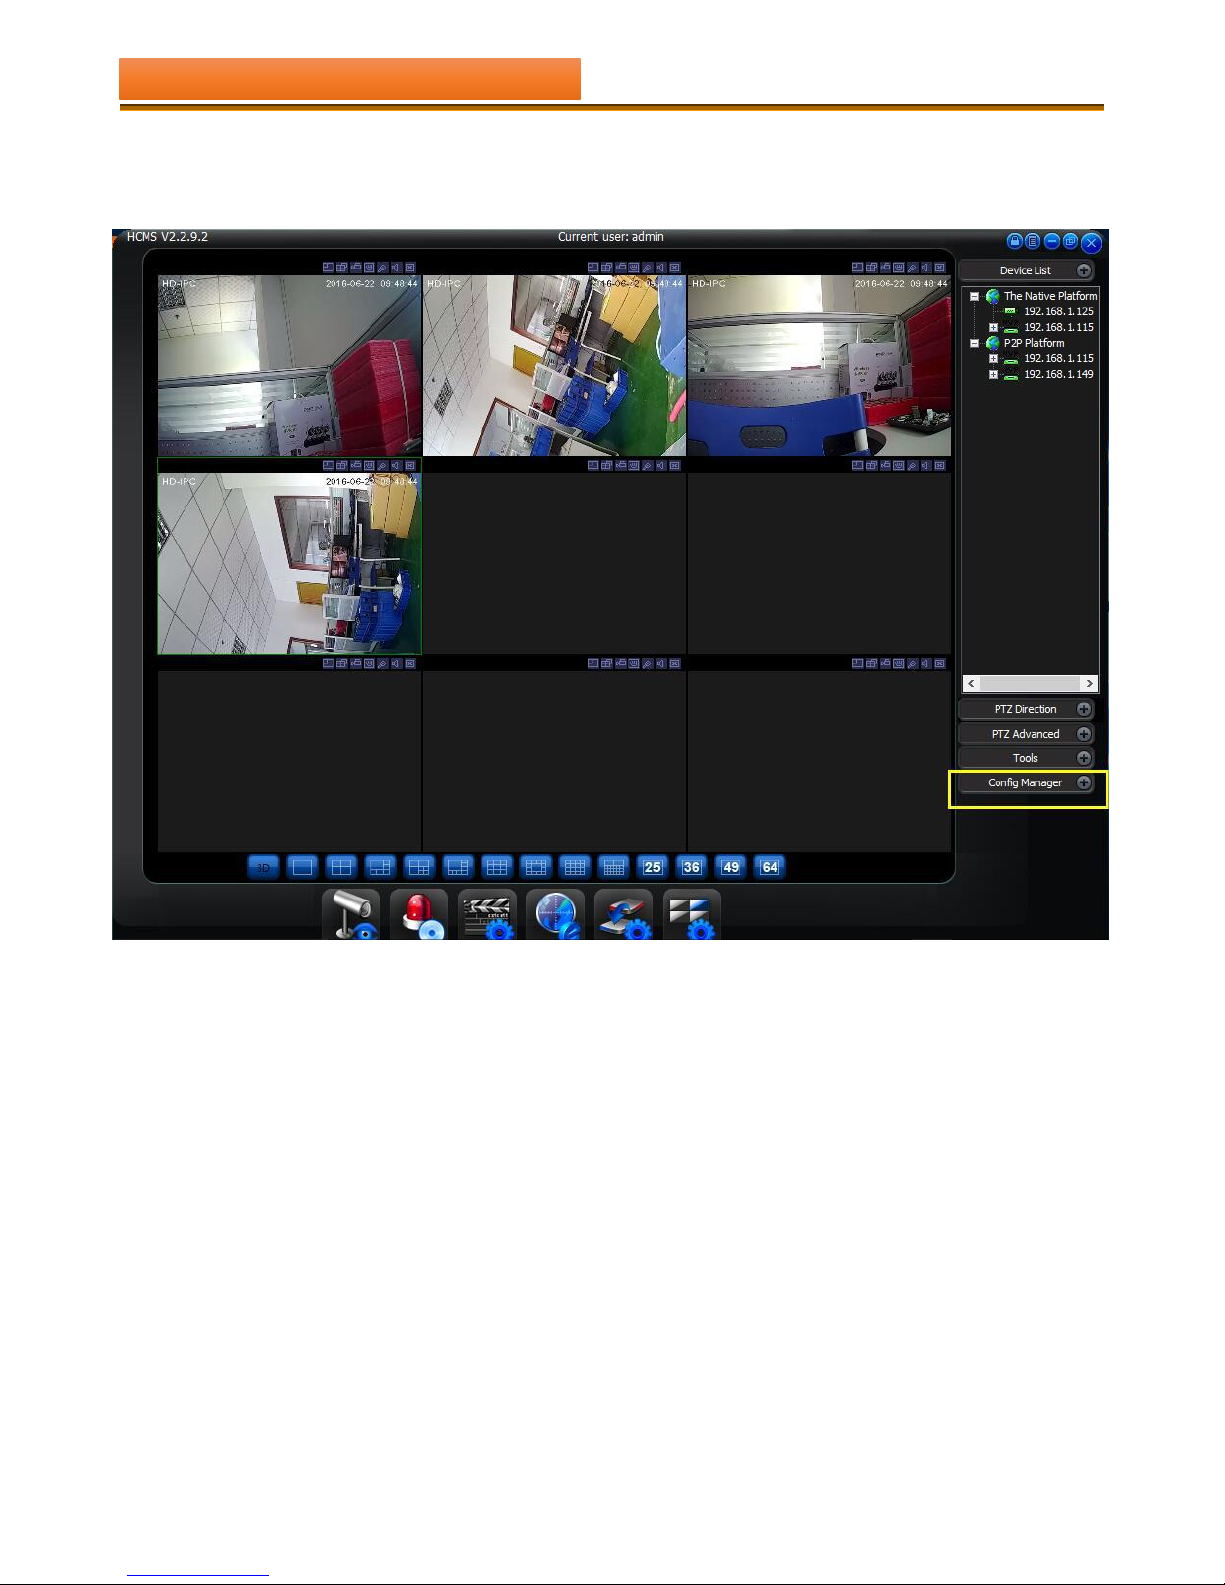
STEP 3 : ADD DEVICE INTO【HCMS_2.2.10.4】
1) Click Button”Configure Manager”
CHAPTER THREE : INSTALL SOFTWARE OF APP
 Loading...