

Page 1

MultiMix M 810 Duo
MultiMix M 820 Trio
MultiMix M 830 Trio
MultiMix M 870 Quattro
MultiMix M 880 Quattro
MultiMix M 880 M Quattro pro
Type 4642
English
Use Instructions
Guarantee
Service Centers
Page 2
2 3
Page 3

English
Our products are engineered to meet the
highest standards of quality, functionality
and design. We hope you thoroughly enjoy
your new Braun appliance.
Caution
Read all instructions carefully before
using this product.
• This appliance was constructed to
process normal household quantities.
• Please remember to keep your Braun
handmixer out of the reach of children.
• Before operating, check whether your
voltage corresponds to the voltage
printed on the top of the unit.
• Only with the models M 870, 880 and
M 880 M:
The blade inserts are very sharp!
Do not reach into or underneath the
blades.
• Braun electric appliances meet
applicable safety standards.
• This appliance can only be opened by
an authorised Braun Service Centre for
repairs.
• The cord of this appliance may only be
replaced by an authorised Braun
Service Centre since special tools are
required.
• Faulty, unqualified repair work may
cause accidents or injury to the user.
For UK only:
IMPORTANT
Your appliance is already fitted with a plug
incorporating a 3 A fuse. If it does not fit
your socket the plug should be cut off from
the mains lead and an appropriate plug
fitted. Throw away the cut off plug; do not
insert it in a 13 A socket elsewhere in the
house as this could cause a shock hazard.
IMPORTANT – Fitting a Different Plug:
The wires in the mains lead are coloured in
accordance with the following code:
Blue – Neutral Brown – Live
If the colours of the wires in the mains lead
do not correspond with the coloured
markings identifying the terminals in your
plug, proceed as follows:
The blue wire must be connected to the
terminal marked with the letter N or
coloured black. The brown wire must be
connected to the terminal marked with the
letter L or coloured red.
Never connect the blue or brown wire to
the earth pin (E), when using a three pin
plug. The appliance must be protected by
a 3 amp fuse if a 13A (BS 1363) plug is
used.
The fuse cover must be refitted when
changing the fuse. If the fuse cover is lost
do not use the plug until a replacement
cover has been fitted. These parts are
available from authorised Braun Service
Dealers. Never use the plug without the
fuse cover fitted.
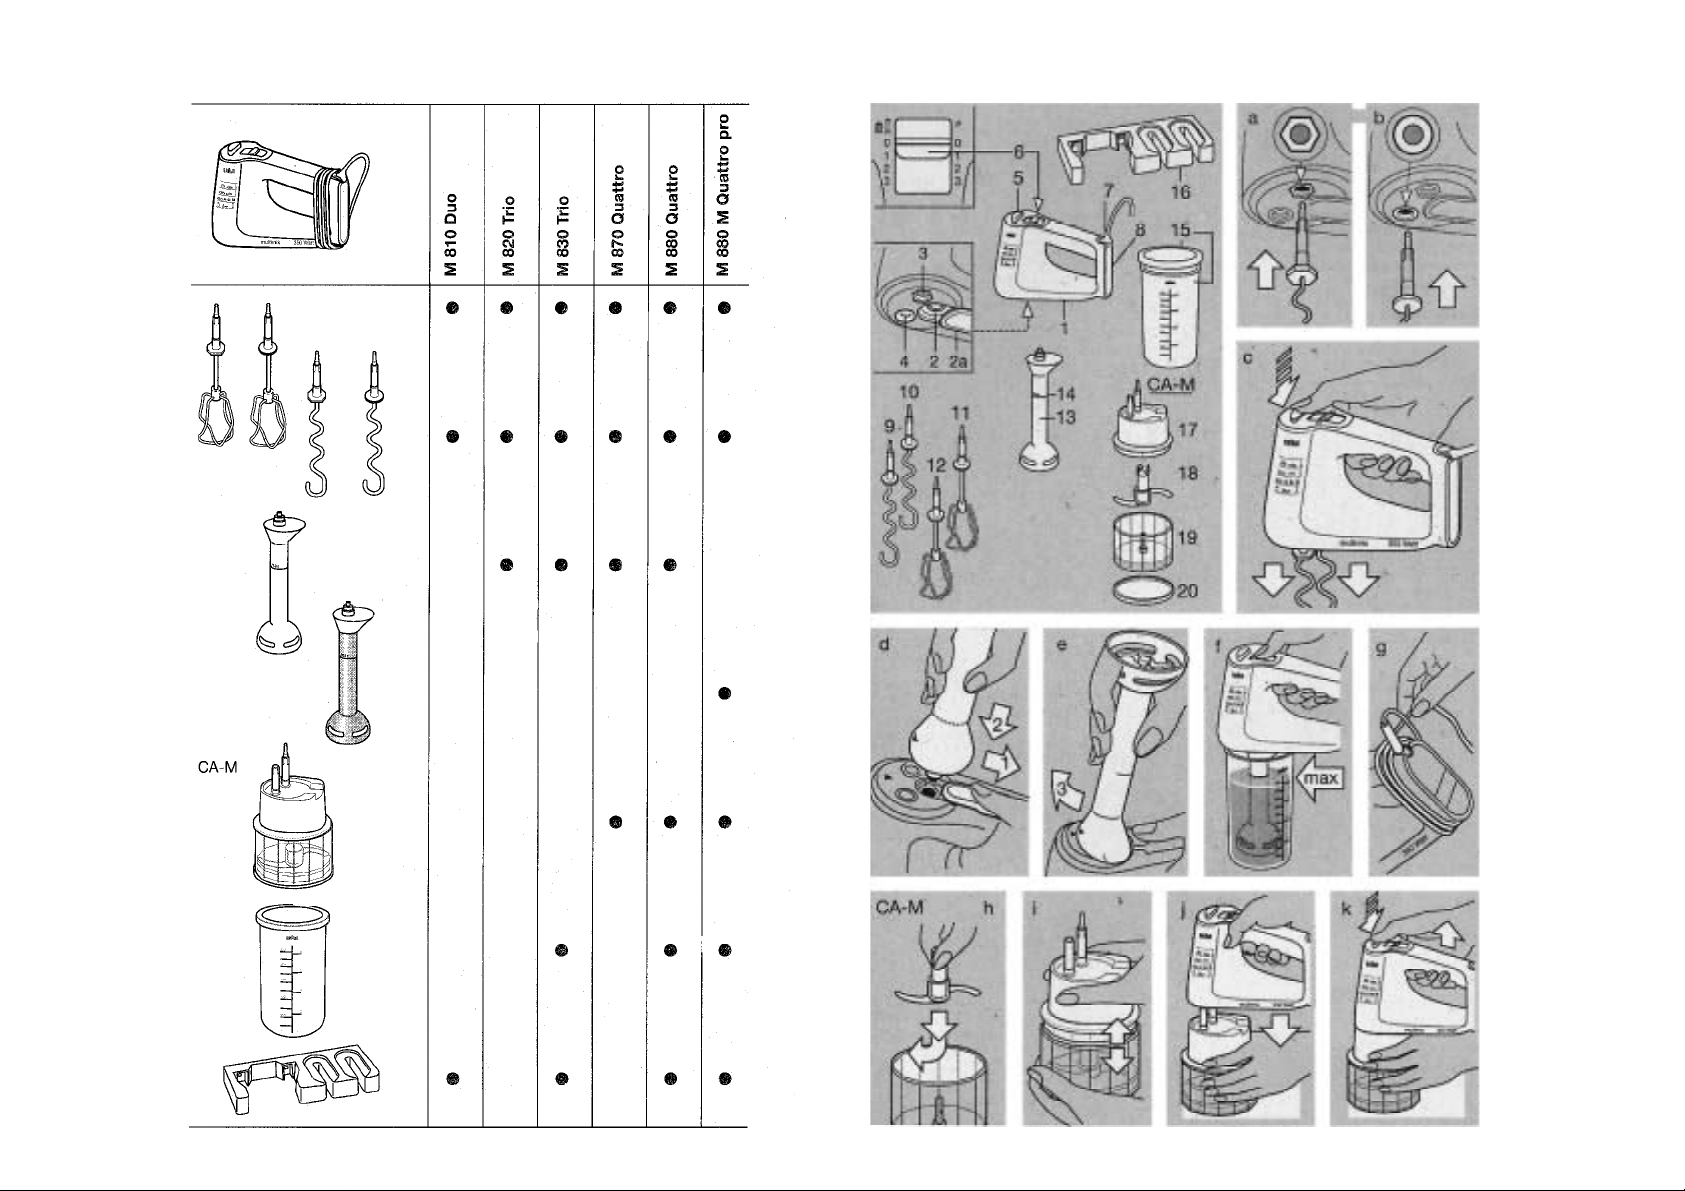
Description
All models:
Motor part
Opening for the handblender
attachment
Cover for the opening
%
Opening marked with a hexagon
Opening marked with a circle
Ejection key for the dough hooks
the whisks
attachment CA-M
Switch
Locking flap-up spout for winding up the
cord around the motor part (g)
Anti-skid base ring
Dough hook with hexagonal plate
Dough hook with round plate
M
Whisk with round plate
N
Whisk with hexagonal plate
O
With the models M 820, M 830, M 870,
M 880 and M 880 M only:
Handblender attachment
P
Q
Mark for maximum immersion of the
handblender attachment
With the models M 830, M 880
and M 880 M only:
Mixing/measuring beaker with air-tight
R
lid (to be used only with the handblender attachment
With the models M 810, M 830, M 880
and M 880 M only:
Wall holder
S
With the models M 870, M 880
and M 880 M only:
Chopper attachment CA-M
T
Upper part
Blade insert
U
Chopper bowl with modell indenti-
V
fication on the bowl (CA)
W
Anti-skid double function base/lid
Notice: All models can be extended b
handblender attachment
chopper attachment CA-M
HC-M (without illustration), if these
attachments are not standard with your
model.
Specifications
Voltage/wattage: see type plate on the
motor part
P
/
N
O
.
and the chopper
P
)
P
-
T
W
P
and the
-
and
T
W
y the
Automatic shut-off
If the appliance is overloaded, e. g. if the
motor is blocked, the motor part may be
automatically switched off.
If this is the case, light vibrations may be
observed. The inserts stop rotating or
rotate only very slowly. Turn the switch off,
so that the motor can cool off. After a
/
,
M
cooling off period of at least 10 minutes it
can be switched on again.
Switch
Switch
position:
P = «pulse» (speed corresponds
to setting «3»
0 = Off
1 = Low speed
2 = Medium speed
3 = High speed
Assembling/disassembling
Important
position «0» and plug the appliance before
assembling or disassembling the
appliance, in order to avoid accientally
switching on the appliance when inserting
the two dough hooks or two whisks.
For inserting the dough hooks and whisks
correctly, see illustrations (a) and (b).
Once inserted, the dough hooks or whisks
can only be ejected by pressing the
ejection key (c). However, for safety
reasons this is only possible when the
handmixer is switched off.
: Always set the switch to
How to use the handmixer
Dough hooks
For kneading yeast dough, pasta dough,
pastries, as well as for mixing heavy
minced meat doughs.
Generally all speed settings may be used.
The speed settings are recommended as
follows:
position 1:
Switch
• Mixing of e. g. nuts and fruits into
heavy doughs.
position 2:
Switch
• Kneading of the dough ball and working
in of ingredients.
position 3:
Switch
• Fast mixing of all ingredients.
/
M
4
5
Page 4

Whisks
For mixing cake mixtures, sponges and
mashed potatoes.
For whipping cream (minimum 100 ml
cream), eggwhites (minimum 1 eggwhite),
and creamy ingredients.
Generally all speed settings may be used.
The speed settings are recommended as
follows:
Switch
• For carefully adding whipped eggwhites
• Adding flour to foamy substances,
• Smoothly adding flour, cacao etc.
• Mashing of boiled potatoes for mashed
Switch
• Initial and final speed when whipping
• Whipping of smaller quantities of cream.
• Adding of liquids to processed goods
Switch
• Whipping of cream, eggwhites, sponges
• Mixing of creamy goods and mixtures.
Tips:
– To obtain optimum results when making
– Whipped cream has more volume, if the
– Mashed potatoes will become more
/
N
O
position 1:
or other foamy ingredients.
without flattening them (e. g. sponges).
without blowing them around.
potatoes.
position 2:
larger quantities of cream.
(little splashing of the liquids, e. g.
mashed potatoes).
position 3:
and other foamy goods, e. g. desserts.
cake mixtures, etc. all ingredients
should have the same temperature.
Butter, eggs, etc. should be removed
from the refrigerator some time before
they are being used.
cream is well chilled before being
whipped.
creamy, if all ingredients are being used
as hot as possible (e. g. potatoes
immediately after boiling).
Handblender attachment
(With the models M 820, M 830,
M 870, M 880 and M 880 M)
To insert the handblender attachment
into the motor part, slide back the cover
of the opening for the handblender
attachment
blender attachment into the opening
that the marking on the handblender
attachment aligns with the marking on the
motor part (e). Then turn the handblender
90° clockwise (e), until it locks. To remove
the handblender attachment, turn it 90°
anti-clockwise and pull it off.
portant: The handblender attachment
Im
may only be immersed to the mark (f).
The handblender attachment blends and
mixes fast and easily. Use it to make
sauces, soups, mayonnaise, dietary and
baby food.
portant: The handblender attachment
Im
can be operated only in the «pulse» mode
(switch position «P» – see section «Switch
»). When the handblender attachment is
inserted into the motor part, the switch
positions 1, 2 and 3 do not function for
safety reasons.
The handblender attachment can be used
in the practical mixing/measuring beaker,
but you can operate the Braun handblender attachment just as well in any
bowl, pan or other container too.
Should you want to blend directly in the
saucepan while cooking, take the pan from
the stove first and allow to cool to protect
your handblender attachment from
overheating. Never use your handblender
attachment in very hot or boiling ingredients. To avoid splashing, insert the
handblender attachment into the vessel
first, and then switch the appliance on.
(d) and insert the hand-
%
P
so
Keep the switch pressed down as long as
you operate your handblender attachment.
Turn appliance off first by releasing the
switch when you are finished.
portant: The mixing/measuring beaker
Im
may be used onl
attachment for processing smaller
quantities. It should not
whisk. Do not place the mixing/measuring
beaker into a microwave oven.
y with the handblender
be used with a
Chopper attachment
(With the models M 870, M 880 and
M 880 M only)
Maximum capacity: 250 g of meat
Assembling and operating
• Pull off the plastic blade cover from the
blade insert.
Caution: Blades are shar
Always hold by the upper plastic part.
• Place the double function base/lid on
the bottom of the chopper bowl.
• Place the blade insert on the centre pin
of the chopper bowl (h).
• Place the food into the chopper bowl.
• Set the upper part on the chopper
bowl (i).
• Safety look: The chopper will not work
if the upper part is not fitted properly.
• Connect the chopper attachment with
the motor part by inserting the two pins
on the upper part into the two corresponding openings on the bottom of the
motor part, until the upper part locks into
place (j).
• Use the «pulse» mode (switch position
«P») for brief and fast processing
whereas the switch position «3» should
be used for fine grating.
Always hold the motor part with your
hand and do not allow the appliance to
operate unsupervised.
p!
Food preparation and chopping
•Donot
• When chopping meat, ensure that all
• Besides meat, the chopper attachment
• When chopping cooked food, allow it to
• The double function base/lid also serves
chop ice cubes or extremely hard
food, such as nutmeg, chocolate and
coffee beans.
bones, tendons and gristles are
removed.
can also be used, e. g. for cheese,
onions, parsley, dried fruits, tomatoes,
carrots, apples etc.
cool off for a few minutes before putting
it into the chopper bowl.
as air-tight cover for the chopper bowl.
6
7
Page 5

Processing guide for the chopper attachment CA-M
Food Quantity Preparation Approx. time
Beef (lean)
Pork (lean)
Cheese
Almonds
Hard boiled eggs
Onions
Parsley
Carrots
Hard rolls
(for breadcrumbs)
The processing times indicated are approximate; they also depend on the quality
of the food to be processed and the degree of fineness you want.
Disassembling
• Switch the motor part off (switch position
«0») before you start disassembling.
To remove the motor part from the
upper part, keep the ejection key
pressed, hold the upper part of the
chopper attachment with one hand and
lift the motor part off (k).
• Before you remove the processed food
from the chopper bowl, first remove the
blade insert. Caution! The blade
very sharp. Hold by the upper plastic
part only. For safety reasons, the blade
insert cannot be removed in every
position. If necessary, turn the upper
plastic part slightly to and fro until the
blade insert can be removed.
Cleaning
When processing foods with colour
Notice:
(e. g. carrots), the plastic parts of the
appliance can become discoloured.
Wipe these parts with cooking oil, before
cleaning them with detergents.
Handmixer:
Always unplug the appliance before
cleaning.
The dough hooks and the whisks can be
cleaned in the dishwasher. The motor part
should be cleaned with a damp cloth only.
Do not immerse the motor part in water or
hold it under running water.
250 g
250 g
100 g
200 g
2 eggs
100 g
handful
200 g
1 roll
approx. 2 cm cubes
approx. 2 cm cubes
approx. 2 cm cubes
whole
halved
quartered
stalks removed
cut in pieces
cut in pieces
Handblender attachment
Caution! The blade is very sharp.
The handblender attachment can be
cleaned by holding it under running water.
It may be necessary to clean it with soap/
mild detergents and water to remove
residues from oily foods.
Do not use any sharp or pointed objects to
remove residues under the blade.
The mixing/measuring beaker can be
U
cleaned in the dishwasher.
is
Cho
Caution when handling the blade insert.
Always hold it by the upper plastic part.
The blade insert, the chopper bowl and the
anti-skid double function base/lid may be
cleaned in the dishwasher.
Do not immerse the upper part in water!
Rinse only the inside of the upper part
under running water, but keep water from
entering the outside of the upper part
where the motor part is to be attached.
Subject to change without notice.
15 sec.
15-20 sec.
40- 50 sec.
30- 40 sec.
3- 5 pulses
5- 10 sec.
15- 20 sec.
15 sec.
20- 30 sec.
P
pper attachment
This product conforms to
the EMC-Requirements as laid
down by the Council Directive
89/336/EEC.
Guarantee
We grant a 1 year guarantee on the
product commencing on the date of
purchase.
Within the guarantee period we will
eliminate, free of charge, any defects in
the appliance resulting from faults in
material or workmanship either by
repairing, or exchanging parts or
exchanging the whole appliance as we
may choose.
Not covered by this guarantee: damage
arising from improper use (operation
with incorrect current/voltage, plugging
it into an unsuitable power point,
breakage), normal wear and defects
which have a negligible effect on the
value or operation of the appliance.
The guarantee becomes void if repairs
are undertaken by unauthorized
persons and if original Braun parts are
not used.
The guarantee only comes into force if
the date of purchase is confirmed by the
dealer's stamp and signature on the
guarantee card and registration card.
This guarantee extends to every country
where this appliance is supplied by
Braun or its appointed distributor and
where no import restrictions or other
legal regulations hinder or prevent
service being given under guarantee.
Service under the guarantee does not
affect the expiry date of the guarantee.
The guarantee on parts or entire appliances which are exchanged ends when
the guarantee on this appliance expires.
In the event of a claim under this
guarantee, hand in the complete appliance with the valid guarantee card to
your dealer, or send both to the nearest
Braun Customer Service Centre.
All other claims including for damages
resulting from this guarantee are
excluded unless our liability is legally
mandatory.
Those claims arising out of the sales
contract with the vendor are not affected
by this guarantee.
For UK only:
This guarantee in no way affects your
rights under statutory law.
8
9
 Loading...