

Page 1
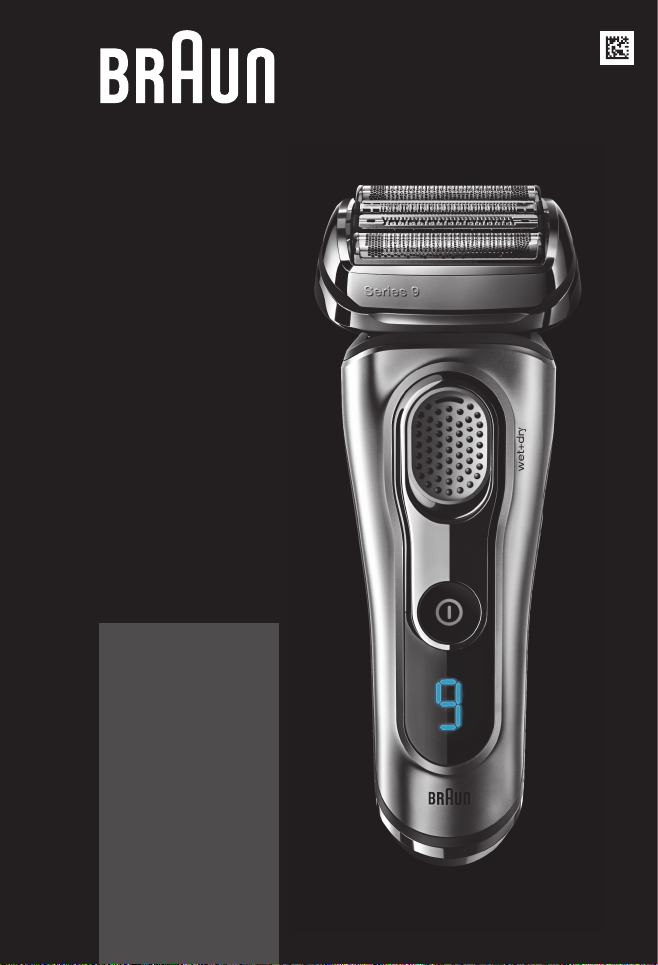
Series 9
Stapled booklet, 120 x 170 mm, 48 pages (incl. 8 pages cover), 2/2c = cyan + black
90892135/V-16
9297cc
9296cc
9295cc
9292cc
9291cc
9290cc
9280cc
Wet&dry
Peau sèche et mouillée
Type 5791
Modèle 5791
Modelo 5791
9299s
9293s
9260s
9242s
9240s
www.braun.com
Page 2
Braun Infolines
Lignes d’assistance Braun
Líneas de información de Braun
English 6
Français 20
Español 33
Thank you for purchasing a Braun product.
We hope you are completely satisfied with your
new Braun shaver.
If you have any questions, please call:
US residents 1-800-BRAUN-11
1-800-272-8611
Canadian residents 1-800-387-6657
Merci d’avoir fait l’achat d’un produit Braun.
Nous espérons que vous serez entièrement
satisfait de votre nouveau rasoir Braun.
Si vous avez des questions, veuillez appeler
Braun Canada : 1-800-387-6657
Gracias por haber comprado un producto
Braun.
EN/FR/ES
Page 3
Ser
ies 9
Ser
1
Series 9
Series 9
2
9
Series 9
ies
r
e
S
10
6
ies 9
10a
3
7
8
11
4
5
9
9299s
9297cc
9296cc
9295cc
9293s
9292cc
9291cc
9290cc
9260s
9280cc
9242s
9240s
9299s
9293s
9260s
9242s
9240s
14
12
15 a
15
15 c
15 b
13
16
17
9297cc, 9296cc, 9295cc, 9292cc, 9291cc, 9290cc, 9280cc
3
Page 4
Series
7
Series 7
20°
10°
0°
10°
A
90°
2
1
20°
10°
20°
0°
10°
B
C
4
Series 9
Series 9
Page 5
S
er
ies 7
S
er
i
es 7
Se
r
i
e
s
7
S
e
ries
7
D
2
1
2
1
E
F
5
Page 6

English
IMPORTANT SAFETY
INSTRUCTIONS
When using an electrical appliance, basic precautions should always be
followed, including the following:
Read all instructions before using this appliance.
When disconnected, the hand-held part of this shaving appliance
may be used in a bath or shower. For safety reasons, the appliance
can only be operated cordless.
DANGER
To reduce the risk of electric shock:
1. The charger unit is not for immersion in water or for use in shower.
2. Do not reach for a charger that has fallen into water.
Unplug immediately.
3. Do not place, store or charge the appliance where it can fall or be
pulled into a tub or sink. Do not place in or drop into water or other
liquid.
4. Except when charging, always unplug this appliance from the
electrical outlet immediately after using.
5. This appliance is provided with a special cord set with integrated
Safety Extra Low Voltage power supply. Do not exchange or
manipulate any part of it.
6. Do not use an extension cord with this appliance.
7. Unplug this appliance before cleaning.
6
Page 7

WARNING
To reduce the risk of burns, fire, electric shock, or injury to persons:
1. Close supervision is necessary when this appliance is used by, on,
or near children or persons with disabilities.
2. Use this appliance only for its intended use as described in this
manual. Do not use attachments not recommended by the
manufacturer.
3. Never operate this appliance if it has a damaged cord or plug, if it is
not working properly, if it has been dropped or damaged, or if the
power supply has been dropped into water. Return the appliance to a
service center for examination and repair.
4. Keep the cord away from heated surfaces.
5. Never drop or insert any object into any opening of the appliance.
6. Do not use outdoors or operate where aerosol (spray) products are
being used or where oxygen is being administered.
7. Do not use this appliance with a damaged or broken foil, as serious
skin injuries may occur.
8. Always attach plug to appliance first, then to outlet. To disconnect,
turn all controls off, then remove plug from outlet.
9. When plugging to an electrical outlet outside North America, use a
plug adapter to match the outlet’s pin configuration.
10. Caution: The battery used in this device may present a fire or
chemical burn hazard if mistreated. Do not disassemble, heat above
100 °C (212 °F), or incinerate.
11. Only use the special electric cord set provided with the appliance.
SAVE THESE INSTRUCTIONS
7
Page 8

Our products are designed to meet the highest standards of quality, functionality and
design. Thank you for your trust in Braun’s quality, and we hope you enjoy your new
Braun shaver.
This product is for household use only.
Warning
Clean&Charge Station (not with all models)
To prevent the cleaning fluid from leaking, ensure that the Clean&Charge Station is
placed on a flat surface. When a cleaning cartridge is installed, do not tip, move
suddenly or transport the station in any way as cleaning fluid might spill out of the
cartridge.
Do not place the station inside a mirror cabinet, nor place it on a polished or
lacquered surface.
The cleaning cartridge contains a highly flammable liquid so keep it away from
sources of ignition. Do not expose to direct sunlight and cigarette smoking nor store
it over a radiator.
Do not refill the cartridge and use only original Braun refill cartridges.
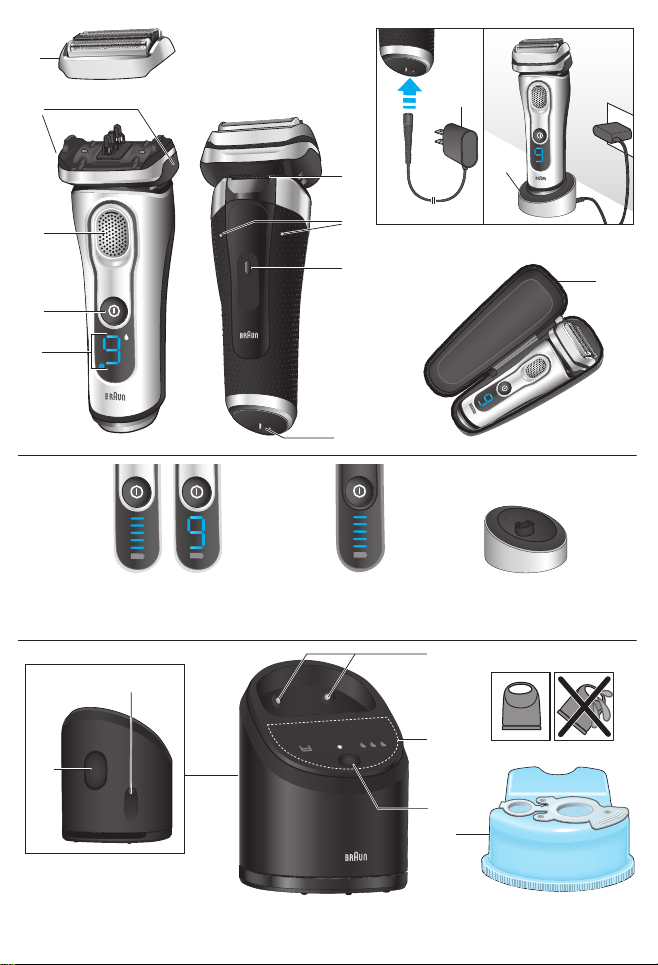
Shaver
1 Foil & Cutter cassette
2 Cassette release buttons
3 MultiHeadLock switch
4 On/off switch
5 Shaver display*
6 Long hair trimmer
7 Shaver-to-station contacts
8 Release button for long hair trimmer
9 Shaver power socket
10 Special cord set*
10a Charging stand* (not with all models)
11 Travel case
* design can differ
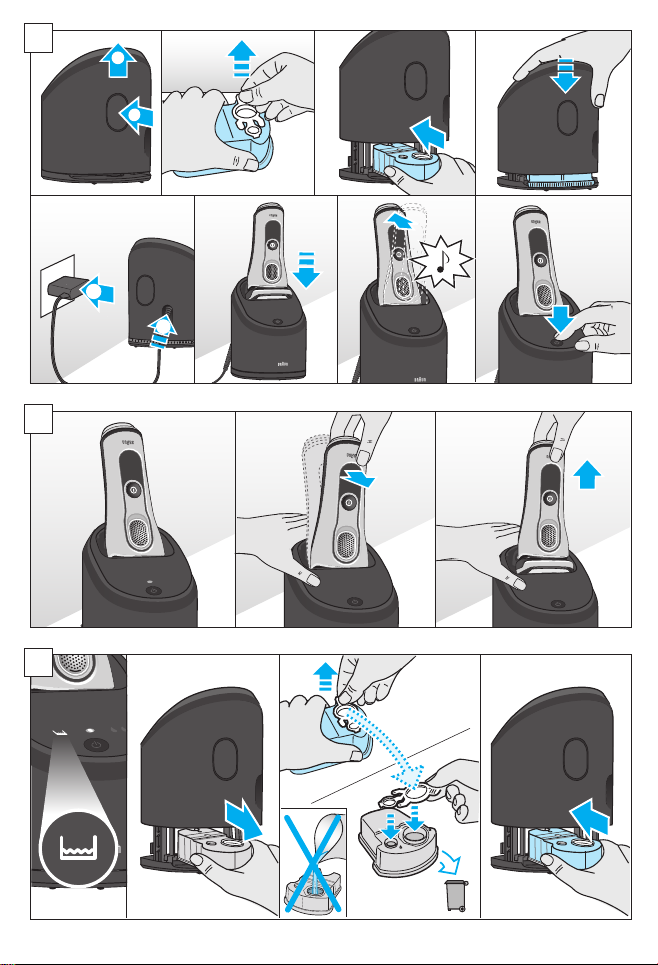
First use and Charging
Connect the shaver to an electrical outlet by snapping the special cord set (10) into the
power socket (9) / the charging stand (10a) or for cc models via the Clean&Charge
Station (see Chapter «Clean&Charge Station»).
Charging and basic operating information
• When charging for the first time, charge continuously for 1 hour.
• A full charge provides up to 50 minutes of cordless shaving time. This may vary
according to your beard growth and environmental temperature.
8
Page 9

• Recommended ambient temperature for charging is 41 °F to 95 °F / 5 °C to 35 °C.
The battery may not charge properly or at all under extreme low or high temperatures.
• Recommended ambient temperature for shaving is 60 °F to 95 °F / 15 °C to 35 °C.
• Do not expose the shaver to temperatures higher than 122 °F / 50 °C for extended
periods of time.
• When the shaver is connected to an electrical outlet, it may take some minutes until
the display illuminates.
Shaver display
Charge status
The shaver display (5) shows the charge status of the battery when connected to an
electrical outlet:
• During charging the respective battery segment will blink.
• When fully charged all battery segments will light up for a few seconds then the
display turns off.
Low charge
The low-charge light flashes red when the battery is running low. You should be able
to finish your shave. With switching off the shaver a beep sound reminds of the low
charge status. The last 9 minutes of remaining shaving time are displayed in digits
(depending on your model / display).
Cleaning status (only models with Clean & Charge Station)
The cleaning indicator lights up when the shaver needs to be cleaned in the
Clean&Charge Station.
Travel lock
The lock symbol lights up when the shaver has been locked to avoid unintended
starting of the motor (e.g. for storing in a suitcase).
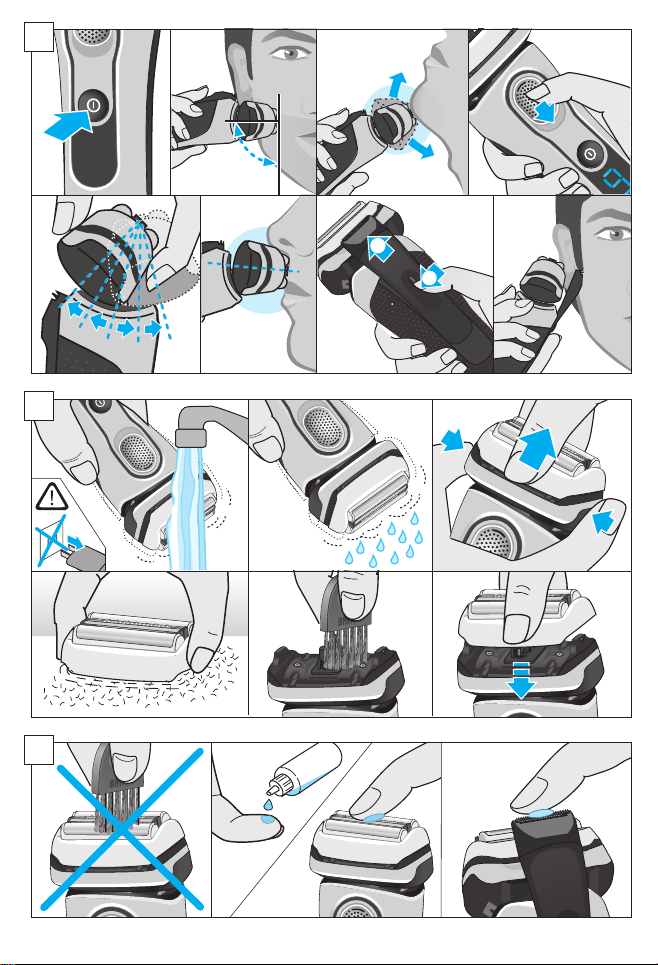
Using the shaver (see fig. A)
Press the on/off switch (4) to operate the shaver.
Tips for a perfect dry shave
1. Always shave before washing your face.
2. At all times, hold the shaver at the right angle (90°) to your skin.
3. Stretch your skin and shave against the direction of your beard growth.
MultiHeadLock switch (head lock)
To shave hard-to-reach areas (e.g. under the nose) slide the MultiHeadLock switch (3)
down to lock the shaver head. The shaver head can be locked in five positions.
To change position, move the shaver head with your thumb and forefinger back or forth.
It will automatically click into the next position.
9
Page 10
Only models with Clean & Charge Station: For automatic cleaning in the Clean&Charge
Station the head lock should be released.
Long hair trimmer
To trim sideburns, moustache or beard press the release button (8) and slide the long
hair trimmer (6) upwards.
Travel lock
• Activation: By pressing the on/off switch (4) for 3 seconds the shaver is locked. This is
confirmed by a beep sound and the lock symbol in the display. Afterwards the display
turns off.
• Deactivation: By pressing the on/off switch for 3 seconds the shaver is unlocked again.
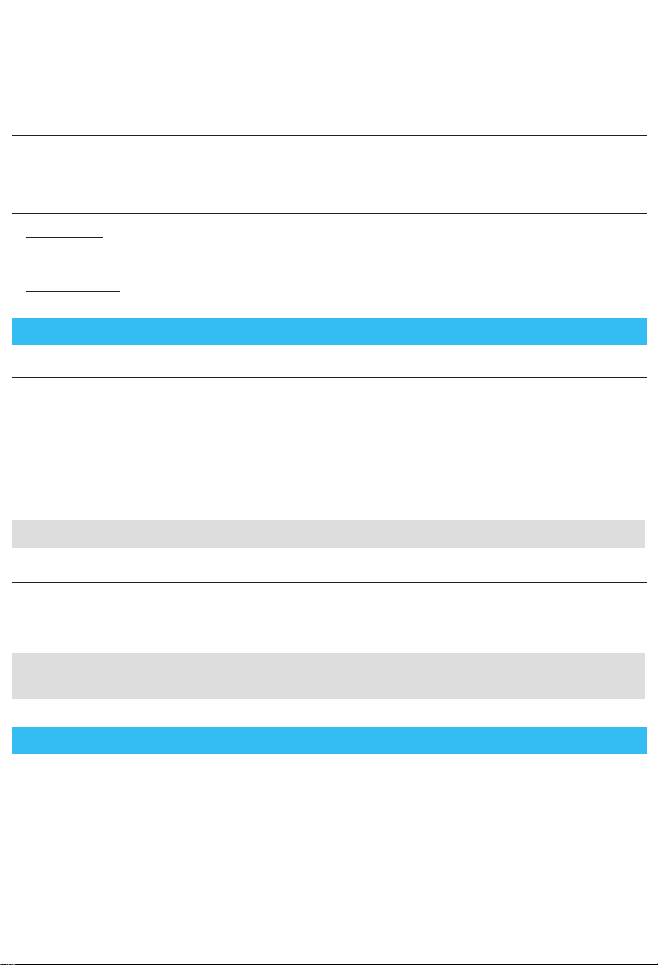
Manual cleaning of the shaver (see fig. B/C)
Cleaning under running water
• Switch on the shaver (cordless) and rinse the shaver head under hot running
water until all residues have been removed. You may use liquid soap without
abrasive substances. Rinse off all foam and let the shaver run for a few more seconds.
• Next, switch off the shaver, press the release buttons (2) to remove the Foil & Cutter
cassette (1) and let it dry completely.
• If you regularly clean the shaver under water, then once a week apply a drop of light
machine oil (not included) on top of the Foil & Cutter cassette and the long hair trimmer.
The shaver should be cleaned after each foam usage.
Cleaning with a brush
• Switch off the shaver. Remove the Foil & Cutter cassette (1) and tap it out on a flat
surface. Using the brush, clean the inner area of the pivoting head. Do not clean the
cassette with the brush as this may damage it!
The Foil & Cutter cassette can be attached either way. There is no impact on the
shaving performance.
Clean&Charge Station (not with all models)
The Clean&Charge Station has been developed for cleaning, charging, lubricating,
disinfecting, drying and storing your Braun shaver.
12 Station power socket
13 Lift button for cartridge exchange
14 Station-to-shaver contacts
15 Clean&Charge Station display
15a Level indicator
15b Status light
15c Cleaning program indicators
10
Page 11
16 Start button
17 Cleaning cartridge (not with all models)
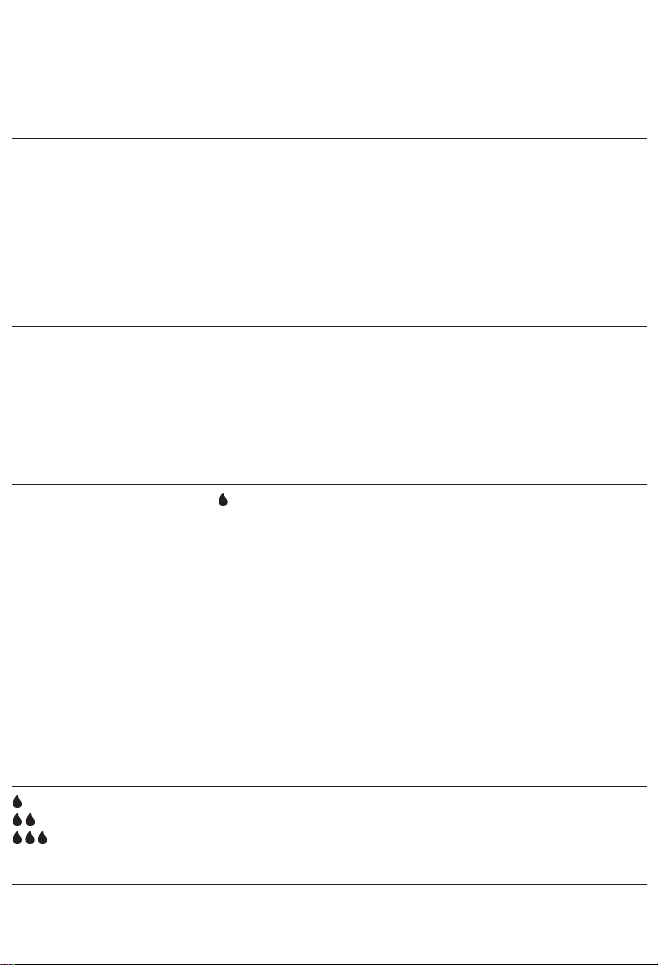
Installing the Clean&Charge Station (see fig. D)
• Press the lift button (13) at the rear side of the Clean&Charge Station to lift up the
housing.
• Hold the cleaning cartridge (17) down on a flat, stable surface (e.g. table).
• Carefully remove the lid from the cartridge.
• Slide the cartridge from the rear side into the base of the station until it snaps into place.
• Slowly close the housing by pushing it down until it locks.
• Connect the station to an electrical outlet by snapping the special cord set (10) into
the power socket (12).
Charging the shaver in the Clean&Charge Station (see fig. D)
Insert the shaver head with the front showing and released head lock into the cleaning
station. Important: The shaver needs to be dry and free from any foam or soap
residue!
The contacts (7) on the back of the shaver need to align with the contacts (14) in the
station. Push the shaver in the correct position. A beep sound confirms that the shaver
sits properly in the station. Charging will start automatically.
Cleaning the shaver (see fig. D)
When the cleaning indicator
Clean&Charge Station, as described above and press the start button (16).
The hygiene status will be analyzed and is shown by the cleaning program indicators
(15c) in the Clean&Charge Station display.
If status light (15b) does not shine (Clean&Charge Station switches to stand-by after
ca. 10 minutes), press start button twice. Otherwise cleaning will not start. For best
shaving results, we recommend cleaning after each shave.
The cleaning process consists of several cycles, in which cleaning fluid is flushed
through the shaver head. Depending on the program selected, the cleaning time takes
up to 3 minutes, followed by an active drying phase of about 40 minutes, during which a
fan is running.
Afterwards charging will resume, which is indicated in the shaver display. When the
shaver is fully charged the display turns off.
lights up in the shaver display, insert the shaver into the
Cleaning programs
short economical cleaning
normal level of cleaning
high intensive cleaning
Removing the shaver from the Clean&Charge Station (see fig. E)
Hold the Clean&Charge Station with one hand and tilt the shaver slightly to the front to
release it.
11
Page 12
Cleaning Cartridge / Replacement (see fig. F)
S
er
ie
s
5
S
e
rie
s 5
When the level indicator (15a) lights up permanently red, the remaining fluid in the
cartridge is sufficient for about 3 more cycles. When the level indicator blinks red, the
cartridge needs to be replaced (about every 3 weeks when used daily).
After having pressed the lift button (13) to open the housing, wait for a few seconds
before removing the used cartridge to avoid any dripping. Before discarding the used
cartridge, make sure to close the openings using the lid of the new cartridge, since the
used cartridge will contain contaminated cleaning solution.
The hygienic cleaning cartridge contains alcohol or isopropanol (specification see
cartridge), which once opened will naturally evaporate slowly. Each cartridge, if not used
daily, should be replaced after approximately 8 weeks to ensure optimal disinfection.
The cleaning cartridge also contains lubricants for the shaving system, which may leave
residual marks on the outer foil frame and the cleaning chamber of the Clean&Charge
Station. These marks can be removed easily by wiping gently with a damp cloth.
Accessories
Braun recommends changing your shaver’s Foil & Cutter cassette every 18 months to
maintain your shaver’s maximum performance.
Available at your dealer or Braun Service Centres:
• Foil & Cutter cassette: 92S/92B
• Cleaning cartridge Clean&Charge Station: CCR
• Braun Shaver cleaner spray
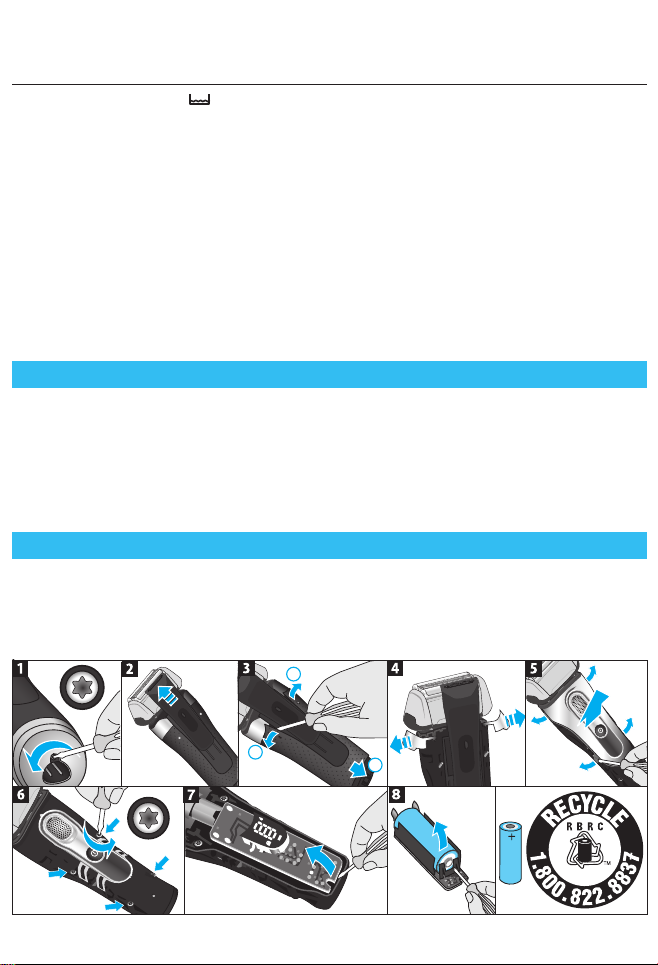
Battery removal
This appliance contains a rechargeable battery. Before disposing of the appliance,
disassemble the housing as shown, remove the rechargeable battery and recycle or
dispose of properly, according to local guidelines.
Caution: Disassembling the appliance will destroy it and invalidate the warranty.
Ser
ies 5
1
12
1
2
Li-ion
Page 13
The cleaning cartridge can be disposed of with regular household waste.
Subject to change without notice.
For electric specifications, see printing on the special cord set.
Trouble-Shooting
Problem Possible reason Remedy
SHAVER
Shaver does
not start when
pressing the
start button.
Shaver does
not charge
completely and
keeps blinking.
Charging does
not start when
connected to
power socket or
put in charging
stand /
Clean&Charge
Station.
Unpleasant
smell from the
shaver head.
Battery
performance
dropped
significantly.
1. Travel lock is activated.
2. This appliance can only be
operated cordless.
Ambient temperature is out of
valid range.
1. Shaver is not placed
properly in the charging
stand / Clean&Charge
Station.
2. Sometimes charging could
start delayed (e.g. after
long storage).
3. Ambient temperature is out
of valid range.
4. Special cord set is not
plugged in properly.
1. Shaver head is cleaned
with water.
2. Cleaning cartridge is in use
for more than 8 weeks.
1. Shaver head is regularly
cleaned with water but not
lubricated.
2. Foil and cutter are worn
which requires more power
for each shave.
1. Press the on/off switch for 3
seconds to unlock the shaver.
2. Unplug the shaver.
Recommended ambient temperature
for charging is 41 °F to 95 °F / 5 °C to
35 °C.
1. Contacts of shaver need to align
with contacts in the Clean&Charge
Station.
2. Wait a few minutes, if charging will
start automatically.
3. Recommended ambient
temperature for charging is 41 °F to
95 °F / 5 °C to 35 °C.
4. Special cord set needs to snap into
place.
1. When cleaning the shaver head with
water only use hot water and from
time to time some liquid soap
(without abrasive substances).
Remove Foil & Cutter cassette to let
it dry.
2. Change cleaning cartridge at least
every 8 weeks.
1. If the shaver is regularly cleaned
with water, apply a drop of light
machine oil on top of the foil once a
week for lubrication.
2. Replace Foil & Cutter cassette.
13
Page 14
Shaving
performance
dropped
significantly.
Shaver turns
off with fully
charged
battery.
1. Shaving system is
clogged.
2. Foil and cutter are worn.
Foil and cutter are worn
which requires more power
than the motor can deliver.
The appliance turns off.
1. Soak the Foil & Cutter cassette in
hot water with a drop of dish liquid.
Afterwards rinse it properly and tap
it out. Once dry apply a drop of light
machine oil on the foil.
2. Replace Foil & Cutter cassette.
– Replace Foil & Cutter cassette.
– Regularly oil the shaving system,
especially when cleaning with water
only.
Shaver head is
damp.
CLEAN&CHARGE STATION
Cleaning does
not start when
pressing the
start button.
Increased
consumption of
cleaning fluid.
1. Drain of the Clean&Charge
Station is clogged.
2. Cleaning cartridge has
been used for quite a
while.
1. Shaver is not placed
properly in the
Clean&Charge Station.
2. Cleaning cartridge does
not contain enough
cleaning fluid (level
indicator blinks red).
3. Appliance is in stand-by
mode.
Drain of the Clean&Charge
Station is clogged.
1. Clean the drain with a wooden
toothpick.
2. The alcohol proportion has
decreased while the oil proportion
has increased. Remove residue
with a cloth.
1. Insert shaver into the Clean&Charge
Station (contacts of the shaver
need to align with contacts in the
station).
2. Insert new cleaning cartridge.
3. Press start button again.
– Clean the drain with a wooden
toothpick.
– Regularly wipe the tub clean.
14
Page 15

How to obtain service in the USA
60 day money back satisfaction guarantee
Should your Braun product require service, please call 1-800-BRAUN 11
(272-8611) to be referred to the Authorized Braun Service Center closest
to you.
To obtain service:
A. Carry the product in to the Authorized Braun Service Center of your
choice or,
B. Ship the product to the Authorized Braun Service Center of your choice.
Pack the product well.
Ship the product prepaid and insured (recommended).
Include a copy of your proof of purchase to verify warranty
coverage, if applicable.
To obtain original Braun replacement parts and accessories:
Contact a Braun Authorized Service Center.
Please call 1-800-BRAUN 11 (272-8611) to be referred to the Authorized
Braun Service Center closest to you.
To speak to a Braun Consumer Service Representative:
Please call 1-800-BRAUN 11 (272-8611).
15
Page 16

How to obtain service in Canada
60 day money back satisfaction guarantee
Should your Braun product require service, please call 1-800-387-6657
to be referred to the Authorized Braun Service Center closest to you.
To obtain service:
A. Carry the product in to the Authorized Braun Service Center of your
choice or,
B. Ship the product to the Authorized Braun Service Center of your choice.
Pack the product well.
Ship the product prepaid and insured (recommended).
Include a copy of your proof of purchase to verify warranty
coverage, if applicable.
To obtain original Braun replacement parts & accessories:
Contact a Braun Authorized Service Center.
Please call 1-800-387-6657 to be referred to the Authorized Braun
Service Center closest to you.
To speak to a Braun Service Representative:
Please call 1-800-387-6657.
16
Page 17

60 day money back satisfaction guarantee for
men’s grooming products
Braun Shavers
Braun Beard Trimmers
Once you have tried your new Braun shaver or beard trimmer, we are
confident you will appreciate its performance. We suggest using the
product regularly for 2 to 3 weeks. If you are not satisfied with the
product, please call 1-800-211-6661 for instructions on how to return the
product. Return the unit and all parts within 60 days of purchase. Retain
original cash receipt, product and all product parts, including the box.
Do not return to the retailer for guarantee fulfillment.
Please note: No refunds will be made for any product damaged by
accident, neglect or unreasonable use.
Your product must be shipped in its original packaging, with your original
sales slip indicating the date of purchase.
Please include the following information when you return your product:
Name
Street
City
State
Zip code
Telephone number
Please allow 6-8 weeks for handling.
17
Page 18

FOR USA ONLY
2 year limited warranty
(foil and cutter block excluded)
Braun warrants this Braun shaver (except foil and cutter block) to be free
of defects in material and workmanship for a period of two years from the
date of original purchase.
If the shaver exhibits such a defect, Braun will, at its option, either repair
or replace it for the consumer without charge.
Please call 1-800-Braun 11 (800-272-8611) to be referred to the
authorized Braun Service Center closest to you.
This warranty does not cover foil and cutter cassette or damage resulting
from accident, misuse, abuse, dirt, water, tampering, unreasonable use,
normal wear, servicing performed or attempted by unauthorized service
agencies or failure to provide reasonable and necessary maintenance,
including recharging.
ALL IMPLIED WARRANTIES, INCLUDING ANY IMPLIED WARRANTY OF
MERCHANTABILITY OR FITNESS FOR ANY PARTICULAR PURPOSE,
ARE LIMITED IN DURATION TO 2 YEARS FROM DATE OF ORIGINAL
PURCHASE. IN NO EVENT WILL BRAUN BE RESPONSIBLE FOR
CONSEQUENTIAL DAMAGES RESULTING FROM THE USE OF THIS
PRODUCT. Some states do not allow the exclusion or limitation of
incidental or consequential damages, so the above limitation or exclusion
may not apply to you.
This warranty gives you specific legal rights, and you may also have other
legal rights which vary from state to state.
18
Page 19

FOR CANADA ONLY
2 year limited warranty
(foil and cutter block excluded)
In the event a Braun Shaver fails to function within 2 years from date of
purchase, because of defects in material or workmanship, and the
consumer returns the unit to an authorized service center, Braun Canada,
will, at its option, either repair or replace the unit without additional charge
to the consumer.
This guarantee does not cover any product, which has been damaged by
dropping, tampering, wrong current, servicing performed or attempted
by unauthorized service agencies, misuse or abuse, kinks in the shaver
foil as well as the normal wear of the shearing parts.
Exclusion of Warranties: The foregoing warranty is the sole warranty
offered by Braun Canada. Braun Canada hereby disclaims any implied
warranty or merchantability or fitness for any particular purpose. In no
event will Braun Canada be responsible for consequential damages
resulting from the use of this product.
19
Page 20

Français
CONSIGNES DE SÉCURITÉ
IMPORTANTES
Lors de l’utilisation d’appareils électriques, toujours prendre les mesures
de sécurité de base suivantes :
Lire toutes les directives avant d’utiliser cet appareil.
Lorsqu’elle est débranchée, la partie de cet appareil que l’on tient
dans la main peut être utilisée dans le bain ou sous la douche.
Pour des raisons de sécurité, cet appareil ne peut être utilisé avec
un cordon d’alimentation.
DANGER
Pour réduire les risques de choc électrique :
1. Ne pas utiliser le bloc chargeur en prenant son bain ou sa douche.
2. Ne pas toucher l’appareil s’il est tombé dans l’eau. Le débrancher
immédiatement.
3. Ne pas placer, ranger ou recharger l’appareil à un endroit d’où il
pourrait tomber ou glisser dans une baignoire ou un lavabo. Ne pas
immerger dans l’eau ni dans aucun autre liquide.
4. Sauf dans le cas d’une recharge, toujours débrancher l’appareil de la
prise électrique immédiatement après l’utilisation.
5. Cet appareil comprend un cordon spécial muni d’un dispositif de
sécurité intégré assurant une alimentation à très basse tension.
Aucune pièce de ce dispositif ne doit être remplacée ou manipulée.
6. Ne pas utiliser de rallonge pour faire fonctionner cet appareil.
7. Débrancher cet appareil avant de le nettoyer.
20
Page 21

MISE EN GARDE
Pour réduire les risques de brûlure, d’incendie, de choc électrique ou de
blessure, suivre les directives suivantes :
1. L’utilisation de cet appareil par un jeune enfant ou une personne
handicapée, ou en présence de ces derniers, doit être faite sous
étroite supervision.
2. Ne pas utiliser cet appareil à des fins autres que celles indiquées dans
ce manuel. Ne pas utiliser d’accessoires non recommandés par le
fabricant.
3. Ne jamais utiliser cet appareil si la prise ou le cordon sont endommagés,
s’il ne fonctionne pas correctement, s’il est tombé, s’il a été endommagé
ou si le bloc d’alimentation a été échappé dans l’eau. Retourner l’appareil
à un centre de services autorisé pour qu’il soit examiné et réparé.
4. Tenir le cordon loin des surfaces chauffantes.
5. Ne jamais laisser tomber l’appareil ni insérer d’objet dans les orifices.
6. Ne pas utiliser à l’extérieur, dans un endroit où des produits en aérosol
(vaporisateurs) sont utilisés ni là où l’on administre de l’oxygène.
7. Ne pas utiliser cet appareil si sa grille est endommagée ou brisée; cela
pourrait entraîner des blessures graves à la peau.
8. Toujours relier la fiche à l’appareil avant de brancher à la prise électrique.
Pour débrancher, placer tous les interrupteurs à la position d’arrêt,
puis retirer la fiche de la prise.
9. Pour brancher à une prise électrique à l’extérieur de l’Amérique du
Nord, utiliser une fiche d’adaptation conforme à la configuration des
broches de la prise.
10. Mise en garde : La pile qui se trouve dans cet appareil peut causer
un incendie ou une brûlure chimique si elle n’est pas utilisée
adéquatement. Ne pas la désassembler, l’exposer à des températures
supérieures à 100 °C (212 °F) ni la jeter au feu.
11. Utiliser seulement le cordon d’alimentation spécial fourni avec l’appareil.
CONSERVER CES CONSIGNES
21
Page 22

Nos produits sont conçus pour répondre aux normes les plus strictes en matière de
qualité, de fonctionnalité et de conception. Merci d’avoir confiance en la qualité de
Braun. Nous espérons que vous aimerez votre nouveau rasoir Braun.
Ce produit est conçu pour un usage domestique seulement.
Avertissement
Système Clean&Charge (n’est pas offert avec tous les modèles)
Afin d’éviter tout débordement du liquide nettoyant, placer le système Clean&Charge
sur une surface unie et stable. Ne pas l’incliner, le bouger brusquement ou le
transporter de quelque façon que ce soit quand une cartouche de liquide nettoyant
est en place; le liquide nettoyant pourrait se déverser hors de la cartouche.
Ne pas mettre le système dans une armoire de toilette, ni le placer sur une surface
polie ou vernie.
La cartouche de liquide nettoyant contient du liquide hautement inflammable.
La tenir à l’écart des sources inflammables. Ne pas l’exposer directement à la
lumière du soleil, ne pas fumer à proximité, ni la ranger au-dessus d’un radiateur.
Ne pas remplir la cartouche à nouveau. N’utiliser que des cartouches de
recharge Braun originales.
Rasoir
1 Grille de rasage et bloc-couteaux
2 Boutons d’ouverture du boîtier
3 Interrupteur MultiHeadLock
4 Interrupteur marche/arrêt
5 Écran d’affichage du rasoir*
6 Tondeuse pour poils longs
7 Points contact du rasoir au système autonettoyant
8 Bouton d’ouverture du boîtier pour tondeuse pour poils longs
9 Socle de branchement du rasoir
10 Cordon d’alimentation spécial*
10a Appui de recharge* (n’est pas offert avec tous les modèles)
11 Étui de voyage
* le modèle peut différer
Première utilisation et recharge
Brancher le rasoir à une prise électrique en insérant le cordon d’alimentation spécial (10)
dans le socle de branchement (9) / appui de recharge (10a) ou, dans le cas des modèles
cc, dans le système Clean&Charge (voir le chapitre « Système Clean&Charge »).
Mise en charge et renseignements de base sur le fonctionnement
• Lors de la première charge, laisser le rasoir charger en continu pendant 1 heure.
22
Page 23

• Une pleine charge procure environ 50 minutes de rasage sans cordon. Cette durée
peut varier selon votre type de barbe et la température ambiante.
• La température ambiante recommandée pour la mise en charge est de 5 °C à 35 °C
(41 °F à 95 °F). Il se peut que la pile ne se recharge pas correctement ou qu’elle ne se
recharge pas du tout à des températures extrêmement hautes ou basses.
• La température ambiante recommandée pour le rasage est de 15 °C à 35 °C (60 °F à
95 °F).
• Ne pas exposer le rasoir à une température supérieure à 50 °C (122 °F) pendant trop
longtemps.
• Lorsque le rasoir est branché à une prise murale, quelques minutes peuvent s’écouler
avant que l’écran d’affichage s’allume.
Écran d’affichage du rasoir
Niveau de charge
L’écran d’affichage (5) indique le niveau de charge de la pile lorsque le rasoir est
branché dans une prise murale :
• Pendant la recharge du rasoir, le segment correspondant de la pile clignotera.
• Lorsque le rasoir est complètement chargé, tous les segments s’allumeront pendant
quelques secondes, puis l’écran s’éteindra.
Charge faible
Le témoin lumineux de décharge rouge se met à clignoter lorsque la pile est faible.
Vous devriez être en mesure de terminer votre rasage. Lorsque vous éteignez le rasoir,
un signal sonore vous rappelle que la pile est faible. Les 9 dernières minutes de temps
de rasage sont affichées en chiffres (selon le modèle / écran d’affichage).
État de nettoyage (modèles avec système Clean & Charge seulement)
L’indicateur de nettoyage s’allume lorsque le rasoir doit être nettoyé dans le système
Clean&Charge.
Verrouillage pour les déplacements
Le symbole de verrouillage s’allume lorsque le rasoir a été verrouillé afin d’éviter un
démarrage involontaire du moteur (p. ex. lorsque le rasoir est rangé dans une valise).
Utilisation du rasoir (voir la figure A)
Appuyer sur l’interrupteur marche/arrêt (4) pour mettre le rasoir en marche.
Conseils pour un rasage à sec parfait
1. Toujours se raser avant de se laver le visage.
2. Toujours tenir le rasoir à angle droit (90º) par rapport à la peau.
3. Tendre la peau et se raser dans le sens opposé à la repousse.
23
Page 24

Interrupteur MultiHeadLock (tête à verrouillage multiple)
Pour raser les endroits difficiles à atteindre (par exemple sous le nez), pousser
l’interrupteur MultiHeadLock (3) vers le bas afin de verrouiller la tête de rasage.
La tête de rasage peut être verrouillée dans cinq positions. Pour changer la position,
bouger la tête de rasage à l’aide du pouce et de l’index vers l’avant ou l’arrière.
Elle s’enclenchera automatiquement à la position suivante.
Modèles avec système Clean & Charge seulement : Pour effectuer un nettoyage
automatique à l’aide du système Clean&Charge, la tête à verrouillage doit être
déverrouillée.
Tondeuse pour poils longs
Pour tailler les favoris, la moustache ou la barbe, appuyer sur le bouton d’éjection (8) et
faire glisser la tondeuse pour poils longs (6) vers le haut.
Verrouillage pour les déplacements
• Activation : Le rasoir se verrouille en appuyant sur l’interrupteur marche/arrêt (4)
pendant 3 secondes. Un signal sonore est émis et le symbole de verrouillage s’allume
à l’écran pour confirmer que le rasoir est bien verrouillé. Ensuite, l’écran s’éteint.
• Désactivation : Le rasoir se déverrouille en appuyant sur l’interrupteur marche/arrêt
pendant 3 secondes.
Nettoyage manuel du rasoir (voir les figures B et C)
Nettoyage sous l’eau courante
• Mettre en marche le rasoir (sans le cordon) et rincer la tête du rasoir sous
l’eau chaude jusqu’à ce que tous les résidus soient éliminés. Il est possible
d’utiliser un peu de savon doux naturel qui ne contient aucune particule abrasive.
Rincer la mousse et laisser le rasoir en marche pendant quelques secondes.
• Ensuite, éteindre le rasoir puis appuyer sur les boutons d’éjection (2) pour enlever la
grille de rasage et le bloc-couteaux (1) et laisser sécher complètement.
• Si le rasoir est régulièrement nettoyé sous l’eau courante, appliquer une fois par
semaine une goutte d’huile mouvement (non comprise) sur la partie supérieure de la
grille de rasage et bloc-couteaux et la tondeuse pour poils longs.
Le rasoir devrait être nettoyé après chaque utilisation avec de la mousse.
Nettoyage à l’aide d’une brosse
• Éteindre le rasoir. Enlever la grille de rasage et le bloc-couteaux (1) et les secouer
délicatement sur une surface unie. À l’aide de la brosse, nettoyer l’intérieur de la tête
pivotante. Ne pas nettoyer la grille de rasage avec la brosse, car cela risquerait de
l’abîmer!
La grille de rasage et le bloc-couteaux peuvent être fixés dans un sens comme dans
l’autre. La performance de rasage ne sera pas affectée.
24
Page 25

Système Clean&Charge (n’est pas offert avec tous les modèles)
Le système Clean&Charge a été conçu pour nettoyer, charger, lubrifier, désinfecter,
sécher et ranger votre rasoir Braun.
12 Prise d’alimentation du système autonettoyant
13 Bouton-poussoir d’ouverture du boîtier pour remplacer la cartouche
14 Points contact du système autonettoyant au rasoir
15 Écran d’affichage du système Clean&Charge
15a Indicateur de niveau
15b Témoin lumineux d’état
15c Indicateurs des programmes de nettoyage
16 Bouton de démarrage du nettoyage
17 Cartouche de liquide nettoyant (n’est pas offerte avec tous les modèles)
Installation du système Clean&Charge (voir la figure D)
• Appuyer sur le bouton-poussoir (13) à l’arrière du système Clean&Charge pour
soulever le boîtier.
• Poser la cartouche (17) sur une surface unie et stable (par exemple, une table).
• Retirer délicatement l’opercule de la cartouche.
• Installer la cartouche à partir de l’arrière en la poussant dans la base du système
autonettoyant jusqu’à ce qu’il soit fixé correctement en place.
• Abaisser délicatement le boîtier supérieur du système jusqu’à ce qu’il se verrouille
pour le fermer.
• Brancher le système autonettoyant à une prise électrique en fixant le cordon
d’alimentation spécial (10) à la prise d’alimentation (12).
Chargement du rasoir dans le système autonettoyant Clean&Charge (voir la figure D)
Insérer la tête de rasage face avant vers l’avant et la tête à verrouillage déverrouillée
dans le système autonettoyant. Important : Le rasoir doit être sec et exempt de
tout résidu de mousse ou de savon!
Les points de contact (7) au dos du rasoir doivent être alignés avec les points de
contact (14) du système. Pousser le rasoir pour bien le positionner. Un signal sonore
confirme que le rasoir est correctement placé dans le système. La recharge démarrera
automatiquement.
Nettoyage du rasoir (voir la figure D)
Lorsque l’indicateur de nettoyage
rasoir dans le système Clean&Charge tel que décrit plus haut et appuyer sur le bouton
de démarrage (16).
L’état de propreté du rasoir sera analysé et affiché par les indicateurs des programmes
de nettoyage (15c) sur l’écran du système Clean&Charge.
Si le voyant indicateur d’état (15b) ne s’allume pas (le système Clean&Charge passe en
mode d’attente après environ 10 minutes), appuyer deux fois sur le bouton de mise en
marche. Sinon, le nettoyage ne démarrera pas. Pour un rasage optimal, nous vous
recommandons de nettoyer le rasoir après chaque rasage.
s’allume sur l’écran d’affichage du rasoir, insérer le
25
Page 26

Le processus de nettoyage consiste en plusieurs cycles au cours desquels du liquide
nettoyant s’écoule dans la tête de rasage. Selon le programme sélectionné, le
nettoyage prend jusqu’à 3 minutes et est suivi d’une phase de séchage actif d’une
durée d’environ 40 minutes, pendant laquelle un ventilateur est mis en marche.
Par la suite, la recharge se terminera, ce qui sera indiqué à l’écran d’affichage du rasoir.
Lorsque le rasoir est complètement rechargé, l’écran d’affichage s’éteint.
Programmes de nettoyage
nettoyage bref et économique
nettoyage normal
nettoyage intensif
Retirer le rasoir du système Clean&Charge (voir la figure E)
Tenir le système Clean&Charge d’une main et incliner légèrement le rasoir vers l’avant
pour le dégager.
Remplacement de la cartouche de liquide nettoyant (voir la figure F)
Quand l’indicateur rouge du niveau de liquide (15a) reste allumé, le liquide restant
est suffisant pour environ 3 cycles de nettoyage supplémentaires. Lorsque l’indicateur
rouge du niveau de liquide clignote, la cartouche doit être remplacée (environ toutes
les 3 semaines lorsqu’elle est utilisée quotidiennement).
Après avoir appuyé sur le bouton-poussoir (13) pour ouvrir le boîtier, attendre quelques
secondes avant de retirer la cartouche usagée pour éviter de dégoutter. Avant de jeter
la vieille cartouche contenant du liquide nettoyant usagé, la refermer en utilisant
l’opercule de la nouvelle cartouche. La cartouche usagée contiendra de la solution
nettoyante contaminée.
La cartouche de solution hygiénique nettoyante contient de l’éthanol ou de l’isopropanol
(voir cartouche pour spécifications). Une fois ouverte, une partie de la solution s’évaporera
naturellement et lentement. Toute cartouche, si elle n’est pas utilisée quotidiennement,
devra être remplacée après environ 8 semaines pour assurer une désinfection optimale.
La cartouche de liquide nettoyant contient aussi un lubrifiant qui peut laisser quelques
traces résiduelles sur le cadre de la grille de rasage et à l’intérieur du réceptacle du
système Clean&Charge. Ces traces peuvent être enlevées facilement en les essuyant
doucement à l’aide d’un linge humide.
Accessoires
Braun recommande de changer la grille de rasage de votre rasoir tous les 18 mois afin
de conserver la performance maximale de votre rasoir.
Disponible auprès de votre détaillant ou d’un centre de services Braun :
• Grille de rasage et bloc-couteaux : 92S/92B
• Cartouche de liquide nettoyant du système Clean&Charge : CCR
• Nettoyant en vaporisateur pour rasoir Braun
26
Page 27

Retrait de la pile
S
er
ie
s
5
S
e
rie
s 5
Cet appareil contient une pile rechargeable. Avant de se débarrasser de l’appareil, le
démonter comme illustré, retirer la pile rechargeable et la recycler ou la jeter
conformément aux règlements locaux.
Mise en garde : Le démontage rend l’appareil inutilisable et invalide la garantie.
Ser
ies 5
1
1
2
Li-ion
La cartouche de liquide nettoyant usagée peut être jetée avec les ordures ménagères.
Sous réserve de modifications sans préavis.
Pour les spécifications électriques, voir l’imprimé sur le cordon d’alimentation spécial.
Dépannage
Problème Cause possible Solution
RASOIR
Le rasoir ne
démarre pas
en appuyant
sur le bouton
de démarrage.
Le rasoir ne se
charge pas
complètement
et clignote
constamment.
1. Le verrouillage pour les
déplacements est activé.
2. Cet appareil ne peut être
utilisé avec un cordon
d’alimentation.
La température ambiante se
situe hors de la plage
recommandée.
1. Appuyer sur l’interrupteur marche/
arrêt pendant 3 secondes pour
déverrouiller le rasoir.
2. Débrancher le rasoir.
La température ambiante
recommandée pour la mise en charge
est de 5 °C à 35 °C (41 °F à 95 °F).
27
Page 28

La recharge ne
démarre pas
lorsque le rasoir
est branché
au socle de
branchement
ou inséré dans
l’appui de
recharge/
système
Clean&Charge.
La tête de
rasage dégage
une mauvaise
odeur.
La performance
de la pile a
diminué considérablement.
La performance
de rasage a
diminué considérablement.
1. Le rasoir n’est pas placé
correctement dans l’appui
de recharge/système
Clean&Charge.
2. La recharge peut parfois
commencer plus tard (par
exemple après une longue
période d’entreposage).
3. La température ambiante
se situe hors de la plage
recommandée.
4. Le cordon spécial n’est
pas branché correctement.
1. La tête de rasage est
nettoyée avec de l’eau.
2. La cartouche de liquide
nettoyant a été utilisée
pendant plus de
8 semaines.
1. La tête de rasage est
nettoyée régulièrement
avec de l’eau, mais elle
n’est pas lubrifiée.
2. La grille de rasage et le
bloc-couteaux sont usés,
donc chaque rasage
nécessite plus de
puissance.
1. Le système de rasage est
obstrué.
2. La grille de rasage et le
bloc-couteaux sont usés.
1. Les points de contact du rasoir
doivent être alignés avec les points
de contact du système
Clean&Charge.
2. Attendre quelques minutes afin de
vérifier si la recharge démarrera
automatiquement.
3. La température ambiante
recommandée pour la mise en
charge est de 5 °C à 35 °C (41 °F à
95 °F).
4. Le cordon spécial doit être fixé
correctement en place.
1. Lors du nettoyage de la tête de
rasage avec de l’eau seulement,
utiliser de l’eau chaude et de temps
en temps, un peu de savon liquide
(sans particules abrasives).
Enlever la grille de rasage et le
bloc-couteaux pour les laisser
sécher.
2. Changer la cartouche de liquide
nettoyant au moins toutes les
8 semaines.
1. Si le rasoir est nettoyé
régulièrement avec de l’eau,
appliquer une goutte d’huile
mouvement sur la grille de rasage
une fois par semaine pour la
lubrifier.
2. Changer la grille de rasage et le
bloc-couteaux.
1. Laisser tremper la grille de rasage
et le bloc-couteaux dans l’eau
chaude, en y ajoutant une goutte
de détergent à vaisselle liquide.
Ensuite, les rincer correctement et
les secouer. Une fois séchée,
appliquer une goutte d’huile
mouvement sur la grille.
2. Remplacer le boîtier grille de
rasage et bloc-couteaux.
28
Page 29

Le rasoir
s’éteint même
si la pile est
complètement
chargée.
La tête de
rasage est
humide.
STATION CLEAN&CHARGE
Le nettoyage ne
démarre pas en
appuyant sur le
bouton de
démarrage.
La consommation du
liquide
nettoyant
augmente.
La grille de rasage et le
bloc-couteaux sont usés, ce
qui nécessite plus de
puissance que ce que le
moteur peut fournir.
L’appareil s’éteint.
1. Le drain du système
Clean&Charge est bloqué.
2. La cartouche de liquide
nettoyant a été utilisée
depuis un certain temps.
1. Le rasoir n’est pas placé
correctement dans le
système Clean&Charge.
2. La cartouche ne contient
pas assez de liquide
nettoyant (l’indicateur
rouge du niveau de liquide
clignote).
3. L’appareil est en mode
d’attente.
Le drain du système
Clean&Charge est bloqué.
– Changer la grille de rasage et le
bloc-couteaux.
– Lubrifier le système de rasage de
façon régulière, surtout s’il est
nettoyé à l’eau seulement.
1. Nettoyer le drain à l’aide d’un
cure-dent en bois.
2. La proportion d’alcool a diminué,
tandis que la proportion d’huile a
augmenté. Enlever les résidus à
l’aide d’un linge.
1. Insérer le rasoir dans le système
Clean&Charge (les points de
contact du rasoir doivent être
alignés avec les points de contact
du système).
2. Insérer la nouvelle cartouche de
liquide nettoyant.
3. Appuyer de nouveau sur le bouton
de démarrage.
– Nettoyer le drain à l’aide d’un
cure-dent en bois.
– Essuyer régulièrement la base.
29
Page 30

Service après-vente au Canada
Garantie de satisfaction ou remboursement (60 jours)
Pour obtenir des services après-vente pour un produit Braun, veuillez
composer le 1-800-387-6657 afin d’être dirigé vers le centre de service
après-vente agréé Braun le plus proche.
Pour obtenir des services après-vente :
A. Veuillez remettre le produit au centre de service après-vente agréé
Braun de votre choix. Ou :
B. Veuillez expédier le produit au centre de service après-vente agréé
Braun de votre choix.
Assurez-vous de bien emballer le produit.
Expédiez le produit, port payé et assuré (recommandé).
N’oubliez pas d’inclure une copie de votre preuve d’achat afin de
confirmer la couverture de la garantie, le cas échéant.
Pour obtenir des pièces et accessoires de rechange Braun d’origine :
Communiquez avec un centre de service après-vente agréé Braun.
Veuillez composer le 1-800-387-6657 afin d’être dirigé vers le centre de
service après-vente agréé Braun le plus proche.
Pour communiquer avec un représentant du Service après-vente Braun :
Veuillez composer le 1-800-387-6657.
30
Page 31

Garantie de remboursement de 60 jours sur les
produits de soins personnels pour hommes
Rasoirs Braun
Tondeuses à barbe Braun
À notre avis, vous serez satisfait de la performance de votre nouveau
rasoir ou nouvelle tondeuse à barbe de Braun. Nous suggérons
l’utilisation régulière du produit pendant 2 à 3 semaines. Si vous n’êtes
pas satisfait de ce produit, veuillez composer le 1-800-211-6661 pour
obtenir des renseignements sur la façon de le retourner. Retournez
l’appareil et toutes ses pièces dans les 60 jours suivant l’achat.
Conservez le reçu de caisse original, le produit, toutes les pièces ainsi
que la boîte. Ne vous présentez pas chez le détaillant pour que la garantie
soit honorée.
Veuillez noter qu’aucun remboursement ne sera autorisé pour tout
appareil endommagé à la suite d’un accident, de négligence ou d’un
usage impropre.
Votre produit doit être expédié dans son emballage original, avec votre
reçu de caisse indiquant la date d’achat.
Lors du retour du produit, veuillez inclure l’information suivante :
Nom
Rue
Ville
Province
Code postal
Numéro de téléphone
Prévoir un délai de 6 à 8 semaines pour le traitement.
31
Page 32

POUR LE CANADA SEULEMENT
Garantie limitée de 2 ans
(à l’exclusion de la grille et du bloc-couteaux)
Advenant un défaut de fonctionnement d’un rasoir Braun survenant au
cours de la période de deux ans suivant la date d’achat, en raison d’un
vice de matériau ou de fabrication, et pourvu que le consommateur
retourne l’appareil à un centre de services autorisé, Braun Canada se
réserve le choix de le réparer ou de le remplacer, sans aucuns frais
supplémentaires pour le consommateur.
La présente garantie ne couvre pas tout produit endommagé par une
chute, une modification, l’utilisation d’un courant inapproprié, un
entretien ou des tentatives d’entretien par des centres de services non
agréés, un usage impropre ou abusif, des anomalies dans la grille de
rasage ou par l’usure normale des pièces de la tondeuse.
Exclusion des garanties : La présente garantie est la seule garantie offerte
par Braun Canada. Par la présente, Braun Canada rejette toute garantie
implicite à l’égard de la qualité marchande ou de l’aptitude à des fins
particulières. En aucun cas Braun Canada ne sera tenue responsable des
dommages indirects résultant de l’utilisation de ce produit.
32
Page 33

Español
MEDIDAS DE SEGURIDAD
IMPORTANTES
Cuando use un aparato eléctrico, tome las medidas de seguridad
básicas, entre las que se incluyen las siguientes:
Lea todas las instrucciones antes de usar este aparato.
Si está desconectada, la rasuradora se puede usar en la bañera o
en la ducha. Por razones de seguridad, solo se puede operar sin el
cable.
PELIGRO
Para disminuir el riesgo de una descarga eléctrica:
1. El cargador no debe sumergirse bajo el agua ni usarse en la ducha.
2. Si el cargador se cae al agua, no trate de sacarlo. Desenchúfelo de
inmediato.
3. No coloque, almacene ni ponga a recargar el aparato en lugares
donde pudiera caerse a la bañera o al lavamanos. No coloque o deje
caer en el agua ni en otros líquidos.
4. Desenchufe siempre el aparato después de usarlo, excepto cuando
se está cargando.
5. Este aparato está equipado con un cable eléctrico especial que tiene
integrado un transformador de seguridad de voltaje extra bajo. No
cambie ni manipule ninguna de sus piezas.
6. No use extensiones eléctricas con este aparato.
7. Desenchufe el aparato antes de limpiarlo.
33
Page 34

ADVERTENCIA
Para disminuir el riesgo de quemaduras, incendio, descarga eléctrica
o lesiones:
1. Supervise detenidamente el uso de este aparato cuando sea
empleado por, en o cerca de niños o personas discapacitadas.
2. Use este aparato solamente para los propósitos que se describen en
este manual. No utilice accesorios que no estén recomendados por
el fabricante.
3. No use este aparato si el cable o el enchufe están dañados, si no
funciona debidamente, si se ha caído o dañado o si el cargador se
ha caído al agua. Envíe el aparato a un centro de servicio técnico para
su revisión y reparación.
4. Mantenga el cable alejado de las superficies calientes.
5. No deje caer el aparato ni le introduzca ningún objeto.
6. No lo use al aire libre ni en lugares donde se estén usando productos
en aerosol (spray) o donde se esté administrando oxígeno.
7. No use este aparato si la lámina rasuradora está dañada o rota, pues
podría causar lesiones graves en la piel.
8. Siempre conecte primero el enchufe al aparato y luego al
tomacorriente. Para desconectar, apague todos los controles y luego
desenchufe del tomacorriente.
9. Si enchufa el aparato a un tomacorriente fuera de Norteamérica,
use un adaptador que se acople a la configuración para clavijas del
tomacorriente.
10. Precaución: Este aparato usa una batería que puede ocasionar
incendios o quemaduras químicas si se somete a maltratos.
No desarme, incinere ni caliente a temperaturas superiores a 100 °C
(212 °F).
11. Use solamente el cable eléctrico especial provisto con el aparato.
GUARDE ESTAS INSTRUCCIONES
34
Page 35

Nuestros productos están diseñados para cumplir con los más altos estándares de
calidad, funcionamiento y diseño. Esperamos que disfrute su nueva rasuradora Braun.
Este aparato está diseñado exclusivamente para uso doméstico.
Advertencia
Soporte Clean&Charge (no incluido con todos los modelos)
Para evitar fugas de la solución limpiadora, asegúrese de colocar el soporte
Clean&Charge sobre una superficie plana. Si hay un cartucho limpiador instalado,
no vuelque el soporte ni lo mueva bruscamente ni lo transporte de manera que la
solución limpiadora se pueda salir del cartucho. No coloque el soporte dentro del
botiquín de pared ni sobre superficies pulidas o laqueadas.
El cartucho limpiador contiene un líquido altamente inflamable, por lo que debe
mantenerse alejado de fuentes de ignición. No lo exponga a la luz solar directa ni
a personas que estén fumando ni lo almacene encima de un radiador.
No rellene el cartucho. Use solamente cartuchos de repuesto Braun
originales.
Rasuradora
1 Cartucho de láminas y cuchillas
2 Botones para liberar el cartucho
3 Interruptor MultiHeadLock
4 Interruptor de encendido y apagado
5 Indicador de carga de la rasuradora*
6 Recortador de vellos largos
7 Contactos de la rasuradora al soporte
8 Botón de liberación de la recortadora de vello largo
9 Entrada del enchufe de la rasuradora
10 Cable eléctrico especial*
10a Soporte cargador* (no incluido con todos los modelos)
11 Estuche de viaje
* el diseño puede variar
Primer uso y carga
Conecte la rasuradora a un tomacorriente colocando el cable eléctrico especial (10) en
la entrada del enchufe (9) / soporte cargador (10a) o para los modelos cc a través del
soporte Clean&Charge (consulte el capítulo «soporte Clean&Charge»).
Información de carga y operación básica
• Al cargar por primera vez, cargue durante una hora seguida.
• La batería cargada completamente proporciona hasta 50 minutos de rasurada sin
cable. El tiempo puede variar según el tamaño de la barba y la temperatura ambiente.
35
Page 36

• La temperatura ambiental que se recomienda para la recarga es de 41 °F a 95 °F/
5 °C a 35 °C. Es posible que la batería no se cargue o no se cargue debidamente en
temperaturas sumamente bajas o altas.
• La temperatura ambiental que se recomienda para rasurar es de 60 °F a 95 °F/
15 °C a 35 °C.
• No exponga la rasuradora a temperaturas superiores a los 122 °F (50 °C) durante
períodos prolongados.
• Cuando se conecta la rasuradora a un tomacorriente, el indicador de carga se ilumina
luego de algunos minutos.
Indicador de carga de la rasuradora
Estado de la carga
El Indicador de carga de la rasuradora (5) muestra el nivel de carga de la batería
cuando está conectada al tomacorriente:
• Durante la carga, el segmento correspondiente de la batería parpadeará.
• Cuando la carga se completa, todos los segmentos de la batería se iluminarán
durante algunos segundos y, luego, el indicador de carga se apaga.
Carga baja
La luz de carga baja se ilumina de color rojo cuando se está agotando la batería.
No debería tener problemas para terminar su rasurada. Cuando apaga la rasuradora,
un sonido le recuerda el nivel de batería bajo. Los últimos 9 minutos de tiempo restante
para rasurar se muestran en dígitos (según el modelo / indicador)
Estado de la limpieza (solo los modelos con soporte Clean & Charge)
El indicador de limpieza se ilumina cuando es necesario limpiar la rasuradora en el
soporte Clean&Charge.
Seguro de viaje
El símbolo de seguro se ilumina cuando la rasuradora se bloquea para evitar que se
encienda accidentalmente (por ejemplo, mientras se guarda en una maleta).
Uso de la rasuradora (vea la fig. A)
Oprima el interruptor de encendido y apagado (4) para operar la rasuradora.
Consejos para la rasurada en seco perfecta
1. Siempre rasúrese antes de lavarse la cara.
2. Siempre sostenga la rasuradora perpendicular a su rostro; es decir, en un ángulo
de 90°.
3. Estire la piel y rasure en dirección contraria al crecimiento de la barba.
36
Page 37

Interruptor MultiHeadLock (bloqueo del cabezal)
Para rasurar las áreas difíciles de alcanzar (por ej. debajo de la nariz) deslice el
interruptor MultiHeadLock (3) hacia abajo para bloquear el cabezal de la rasuradora.
El cabezal de la rasuradora puede bloquearse en cinco posiciones. Para cambiar la
posición, mueva el cabezal de la rasuradora hacia atrás o hacia adelante con sus dedos
pulgar e índice. Se encajará automáticamente en la próxima posición con un clic.
Solamente los modelos con el soporte Clean & Charge: Para limpieza automática en el
soporte Clean&Charge se debe liberar el interruptor de bloqueo del cabezal.
Recortadora de vello largo
Para cortar las patillas, el bigote o la barba, oprima el botón de liberación (8) y deslice
hacia arriba la recortadora de vello largo (6).
Seguro de viaje
• Activación: La rasuradora se bloquea oprimiendo el interruptor de encendido y
apagado (4) durante 3 segundos. El bloqueo se confirma con un sonido y se muestra
el símbolo de bloqueo en el indicador de carga. Después, el indicador de carga se
apaga.
• Desactivación: Oprima el interruptor de encendido y apagado durante 3 segundos
para desbloquear la rasuradora.
Limpieza manual de la rasuradora (vea las figuras B y C)
Limpieza bajo agua corriente
• Encienda la rasuradora (sin conectar el cable) y enjuague el cabezal con agua
caliente hasta eliminar todos los residuos. Puede usar jabón líquido que no
contenga abrasivos. Enjuague toda la espuma y deje la rasuradora encendida unos
cuantos segundos más.
• Luego, apague la rasuradora, oprima los botones de liberación (2) para quitar el
cartucho de láminas y cuchillas (1), y déjelo secar completamente.
• Si limpia regularmente la rasuradora con agua, una vez por semana aplique una gota
de aceite ligero para máquinas (no incluido) en la parte superior del cartucho de
láminas y cuchillas y la recortadora de vello largo.
La rasuradora se debe limpiar después de cada uso con espuma.
Limpieza con el cepillo
• Apague la rasuradora. Retire el cartucho de láminas y cuchillas (1) y dele unos
golpecitos suaves sobre una superficie plana. Limpie la parte interna del cabezal
móvil con el cepillo. ¡No limpie el cartucho con el cepillo porque se podría dañar!
El cartucho de láminas y cuchillas se puede colocar de cualquier manera. Esto no
afecta el rendimiento de la rasuradora.
37
Page 38

Soporte Clean&Charge (no incluido con todos los modelos)
El soporte Clean&Charge ha sido creado para limpiar, cargar, lubricar, desinfectar,
secar y guardar la rasuradora Braun.
12 Entrada del enchufe al soporte
13 Botón de apertura para reemplazo de cartuchos
14 Contactos del soporte a la rasuradora
15 Indicador de carga del soporte Clean&Charge
15a Indicador de nivel de líquido limpiador
15b Luz de estado
15c Indicadores del programa de limpieza
16 Botón de inicio
17 Cartucho de limpieza (no incluido con todos los modelos)
Instalación del soporte Clean&Charge (vea la fig. D)
• Oprima el botón de apertura (13) ubicado en la parte posterior del soporte
Clean&Charge para levantar la cubierta.
• Sujete el cartucho limpiador (17) sobre una superficie plana y estable (por ej., una
mesa).
• Quite cuidadosamente la tapa del cartucho.
• Deslice el cartucho desde la parte posterior hacia la base del soporte hasta que se
coloque en su lugar.
• Cierre la cubierta lentamente presionando hacia abajo hasta que esté asegurado.
• Conecte el soporte al tomacorriente usando el cable eléctrico especial (10) en la
entrada del enchufe al soporte (12).
Recarga de la rasuradora en el soporte Clean&Charge (vea la fig. D)
Introduzca el cabezal de la rasuradora con el frente hacia adelante y con el cabezal
desbloqueado en el soporte de limpieza. Importante: ¡La rasuradora tiene que
estar seca y libre de residuos de espuma y jabón!
Los contactos (7) de la parte posterior de la rasuradora deben estar alineados con los
contactos (14) del soporte. Empuje la rasuradora para que quede en la posición correcta.
Un sonido confirmará que la rasuradora está posicionada correctamente en el soporte.
La recarga comenzará automáticamente.
Limpieza de la rasuradora (vea la fig. D)
Cuando la luz indicadora de limpieza
rasuradora, coloque la rasuradora en el soporte Clean&Charge, tal como se describe
arriba y presione el botón de inicio (16).
Se analizará el estado de higiene y los indicadores del programa de limpieza (15c)
muestran el estado en el indicador de carga del soporte Clean&Charge.
Si la luz de estado (15b) no brilla (el soporte Clean&Charge cambia a modo de espera
después de aprox.10 minutos), oprima el botón de inicio dos veces. De lo contrario,
la limpieza no comenzará. Para obtener resultados óptimos durante la rasurada,
recomendamos que limpie la rasuradora después de cada uso.
38
se ilumina en el indicador de carga de la
Page 39

El proceso de limpieza consiste en varios ciclos en los que la solución limpiadora pasa
por el cabezal de la rasuradora. Según el programa seleccionado, la limpieza puede
tardar hasta 3 minutos, seguida de una fase de secado activa de aproximadamente
40 minutos, durante la cual un ventilador está encendido.
Luego se reanudará la carga, lo cual se muestra en el indicador de carga de la rasuradora.
Una vez que la rasuradora está cargada por completo, el indicador de carga se apaga.
Programas de limpieza
limpieza económica corta
nivel de limpieza normal
limpieza intensiva
Extracción de la rasuradora del soporte Clean&Charge (vea fig. E)
Sostenga el soporte Clean&Charge con una mano e incline la rasuradora levemente
hacia adelante para liberarla.
Reemplazo del cartucho de limpieza (vea la fig. F)
Cuando el indicador de nivel (15a) se enciende en rojo de forma permanente,
el líquido que queda en el cartucho es suficiente para unos 3 ciclos más. Cuando el
indicador
de nivel parpadea en rojo, se debe reemplazar el cartucho (aproximadamente cada
3 semanas si se usa a diario).
Después de oprimir el botón de apertura (13) para abrir la cubierta, espere unos
segundos antes de quitar el cartucho usado a fin de evitar que gotee. Antes de
desechar el cartucho usado, asegúrese de tapar las aberturas con la tapa del cartucho
nuevo, ya que el cartucho usado contiene solución limpiadora contaminada.
El cartucho limpiador higiénico contiene etanol o isopropanol (lea las especificaciones
en el cartucho), los cuales, al abrir el cartucho, se evaporan lentamente de forma
natural. Si no se usa a diario, el cartucho debe reemplazarse aproximadamente al cabo
de 8 semanas a fin de garantizar una óptima desinfección. El cartucho limpiador
también contiene lubricantes para el sistema de rasurada que pueden dejar marcas
residuales en el armazón de la lámina exterior y en la cámara de limpieza del soporte
Clean&Charge. Estas marcas se quitan con facilidad pasando suavemente un paño
húmedo.
Accesorios
Braun recomienda cambiar el cartucho láminas y cuchillas cada 18 meses para
mantener el rendimiento máximo de su rasuradora.
A la venta en su tienda detallista o en los Centros de Servicio Braun:
• Cartucho de láminas y cuchillas: 92S/92B
• Cartucho limpiador del soporte Clean&Charge: CCR
• Atomizador limpiador para la rasuradora Braun
39
Page 40

Desmontaje de la batería
S
eries
5
S
e
ries 5
Este aparato contiene una batería recargable. Antes de desechar el aparato, desarme
el armazón como se muestra, retire la batería y recíclela o deséchela según las normas
ambientales locales.
¡Precaución! Desarmar el aparato lo destruirá y anulará la garantía.
Ser
ies 5
1
1
2
Li-ion
El cartucho de limpieza puede tirarse junto con la basura común del hogar.
Sujeto a cambios sin previo aviso.
Para ver las especificaciones eléctricas, consulte el texto que aparece en el cable
eléctrico especial.
Solución de problemas
Problema Causa posible Solución
RASURADORA
La rasuradora
no se enciende
luego de oprimir
el botón de
encendido.
La rasuradora
no se carga
por completo
y sigue
parpadeando.
40
1. El bloqueo de viaje está
activado.
2. Este aparato solo puede
operarse sin cable.
La temperatura ambiental se
ubica fuera del rango válido.
1. Oprima el interruptor de encendido/
apagado durante 3 segundos para
desbloquear la rasuradora.
2. Desenchufe la rasuradora.
La temperatura ambiental que se
recomienda para la recarga es de
41 °F a 95 °F/5 °C a 35 °C.
Page 41

La recarga no
se inicia cuando
se enchufa
o se coloca
en el soporte
Clean&Charge.
Olor
desagradable
proveniente del
cabezal de la
rasuradora.
El rendimiento
de la batería se
ha reducido
considerablemente.
El rendimiento
de rasurada
disminuyó considerablemente.
La rasuradora
se apaga aun
cuando la
batería está
cargada completamente.
1. La rasuradora no está bien
ubicada en el soporte
Clean&Charge.
2. Algunas veces la recarga
podría demorarse (por ej.,
después del almacenamiento prolongado).
3. La temperatura ambiental
se ubica fuera del rango
válido.
4. El cable eléctrico especial
no está enchufado correctamente.
1. El cabezal de la rasuradora
se ha limpiado con agua.
2. El cartucho limpiador se
ha usado por más de 8
semanas.
1. El cabezal de la rasuradora
regularmente se limpia con
agua pero no se lubrica.
2. La lámina y las cuchillas
están desgastadas, lo que
requiere más energía para
cada rasurada.
1. El sistema de rasurada se
encuentra obstruido.
2. La lámina y las cuchillas
están desgastadas.
La lámina y las cuchillas
están desgastadas, lo que
requiere más energía de la
que el motor puede ofrecer.
El aparato se apaga.
1. Los contactos de la rasuradora
deben estar alineados con los
contactos del soporte
Clean&Charge.
2. Espere unos minutos y la recarga
se iniciará automáticamente.
3. La temperatura ambiental que se
recomienda para la recarga es de
41 °F a 95 °F/5 °C a 35 °C.
4. El cable eléctrico especial tiene
que estar en su lugar.
1. Al limpiar el cabezal de la
rasuradora con agua, use solo
agua caliente y de vez en cuando
use un jabón líquido (sin sustancias
abrasivas). Retire el cartucho de
láminas y cuchillas y déjelo secar.
2. Cambie el cartucho limpiador por
lo menos cada 8 semanas.
1. Si la rasuradora regularmente se
limpia con agua, aplique una gota
de aceite para máquinas sobre la
lámina una vez por semana para
lubricarla.
2. Reemplace el cartucho de láminas
y cuchillas.
1. Sumerja el cartucho de láminas y
cuchillas en agua caliente con una
gota de jabón líquido. Después
enjuáguelo adecuadamente y
sacúdalo. Una vez que se seque,
coloque una gota de aceite para
máquinas en la lámina.
2. Reemplace el cartucho de láminas
y cuchillas.
– Reemplace el cartucho de láminas
y cuchillas.
– Aceite periódicamente el sistema
de rasurada, especialmente cuando
lo limpie con agua solamente.
41
Page 42

El cabezal de la
rasuradora está
húmedo.
SOPORTE CLEAN&CHARGE
La limpieza no
comienza al
oprimir el botón
de encendido.
Aumentó el
consumo de
solución
limpiadora.
1. El drenaje del soporte
Clean&Charge está
obstruido.
2. Se ha usado el cartucho
limpiador durante
demasiado tiempo.
1. La rasuradora no está bien
ubicada en el soporte
Clean&Charge.
2. El cartucho limpiador no
contiene suficiente
solución limpiadora (el
indicador de nivel
parpadea en rojo).
3. El aparato está en modo
de espera.
El drenaje del soporte
Clean&Charge está
obstruido.
1. Limpie el drenaje con un palillo de
madera.
2. La proporción de alcohol ha
disminuido y la de aceite ha
aumentado. Quite los residuos
con un paño.
1. Coloque la rasuradora en el soporte
Clean&Charge (los contactos de la
rasuradora deben estar alineados
con los contactos del soporte).
2. Inserte el nuevo cartucho limpiador.
3. Oprima el botón de encendido
nuevamente.
– Limpie el drenaje con un palillo de
madera.
– Limpie la base con regularidad.
42
Page 43

Cómo obtener servicio técnico en EE. UU.
Garantía de satisfacción con reembolso de 60 días
Si su producto Braun requiere servicio técnico, sírvase llamar al
1-800-BRAUN 11 (272-8611) para que lo remitan al Centro de Servicio
Braun autorizado de su localidad.
Para obtener servicio de reparación:
A. Lleve el producto al Centro de Servicio Braun autorizado de su
elección, o
B. Envíe el producto al Centro de Servicio Braun autorizado de su
elección.
Empaque bien el producto.
Envíelo por correo prepagado y asegurado (opción recomendada).
Incluya una copia del comprobante de compra para corroborar la
cobertura de la garantía, si corresponde.
Para obtener accesorios y repuestos originales Braun:
Comuníquese con un Centro de Servicio Braun autorizado.
Sírvase llamar al 1-800-BRAUN 11 (272-8611) para que lo remitan al
Centro de Servicio Braun autorizado de su localidad.
Si desea hablar con un representante de atención al consumidor
de Braun:
Sírvase llamar al 1-800-BRAUN 11 (272-8611).
43
Page 44

Garantía de satisfacción con reembolso de 60 días
para los productos de cuidado personal para hombres
Rasuradoras Braun
Recortadoras de barba Braun
Cuando haya probado la nueva rasuradora o recortadora de barba Braun,
estamos seguros de que estará satisfecho con su desempeño.
Le sugerimos usar el producto regularmente durante 2 o 3 semanas.
Si no está satisfecho con el producto, sírvase llamar al 1-800-211-6661
para recibir instrucciones de cómo devolver el producto. Devuelva la
unidad y todas las partes dentro de los 60 días a partir de la fecha de
compra. Conserve el recibo de compra original, el producto y todas sus
piezas, incluida la caja. No devuelva el producto a la tienda detallista para
el cumplimiento de la garantía.
Nota: No se realizarán reembolsos para los productos dañados por
accidentes, uso negligente o irracional.
El producto deberá enviarse en su empaque original, con el recibo de
venta original que indique la fecha de compra.
Le rogamos incluya la siguiente información al momento de devolver el
producto:
Nombre
Calle
Ciudad
Estado
Código postal
Número de teléfono
Espere de 6 a 8 semanas para procesar.
44
 Loading...