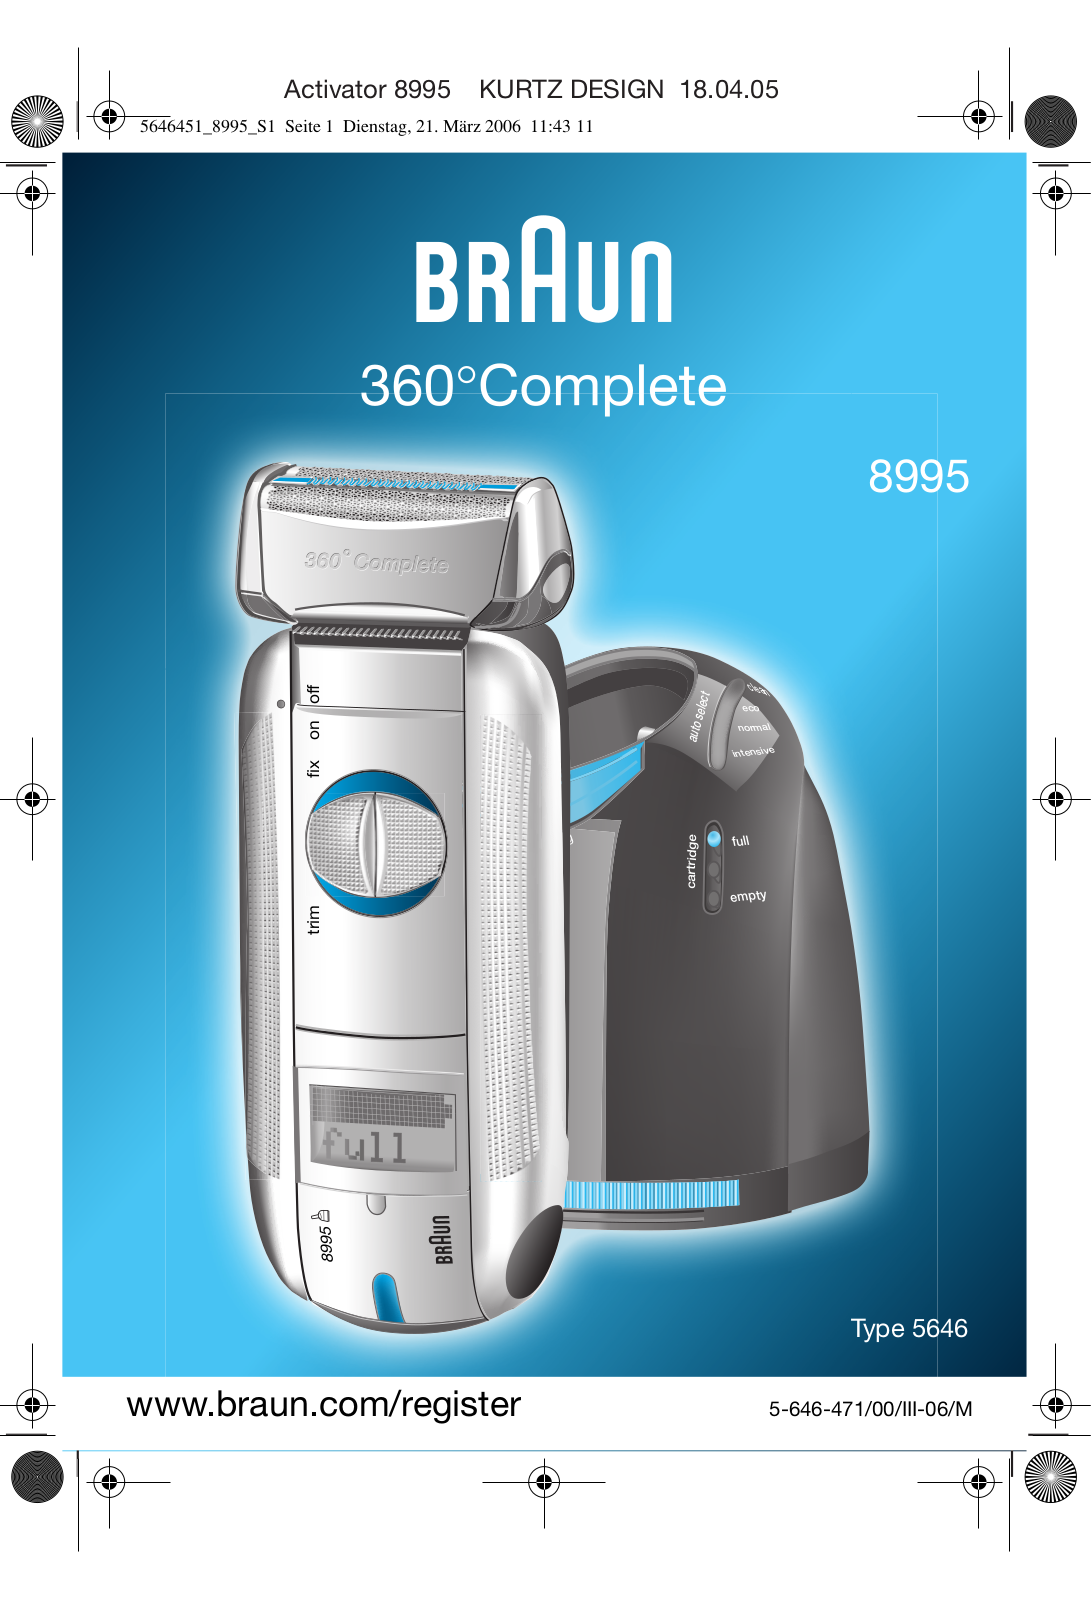
Braun 8995 360°Complete User Manual

Braun 8995 360°Complete User Manual

fix on off


g

in

an


trim

8995

8995


select

clean

auto

eco


normal


intensive

cartridge


full


empty

Type 5646

www.braun.com/register

5-646-471/00/III-06/M


English

4, 94

Français

11, 94

Polski

18, 94

âesk˘

25, 95

Slovensk˘

32, 96

Magyar

39, 96

Hrvatski

46, 96

Slovenski

53, 97

Türkçe

60

кЫТТНЛИ

67, 97

ìÍ ‡ªÌҸ͇

75, 98


93, 83

Braun GmbH

Frankfurter Straße 145

61476 Kronberg/Germany


Braun Infoline

D

A 00 800 27 28 64 63


00 800 BRAUNINFOLINE

CH

08 44 - 88 40 10

GB

0800 783 70 10

IRL

1 800 509 448

F

0 810 309 780

TR

0212 - 473 75 85

RUS

8 800 200 11 11

GB/F/PL/CZ/SK/H/HR/SLO/TR/

RUS/UA/Arab

Printed in Germany

8000

S e r i e s

1

2

3

4

clean

start

cleaning

cartridge

full


empty

5

6

7

12

8

8000

S e r i e s

11

10

9

10

11

12


13

off

14

on

fix


15

trim


16

8995

17

18


19

English

STOP

Your 360° Complete (shaver with Clean&Renew™ station) is a system equipped with highly advanced electronic processors. It ensures unsurpassed closeness and comfort for you and optimum care for your shaver:

The system automatically adapts to any voltage worldwide.

The system recognizes when cleaning of your shaver is required, and automatically recognizes which of the three cleaning programs is appropriate.

While the shaver is connected to the mains, the system automatically takes care of charging and discharging in a way that is optimized for the shaver’s battery capacity and life span.

The system takes care of lubrication of the shaver’s cutting parts.

The system tells you when to replace the shaving foil and cutter block.

Warning

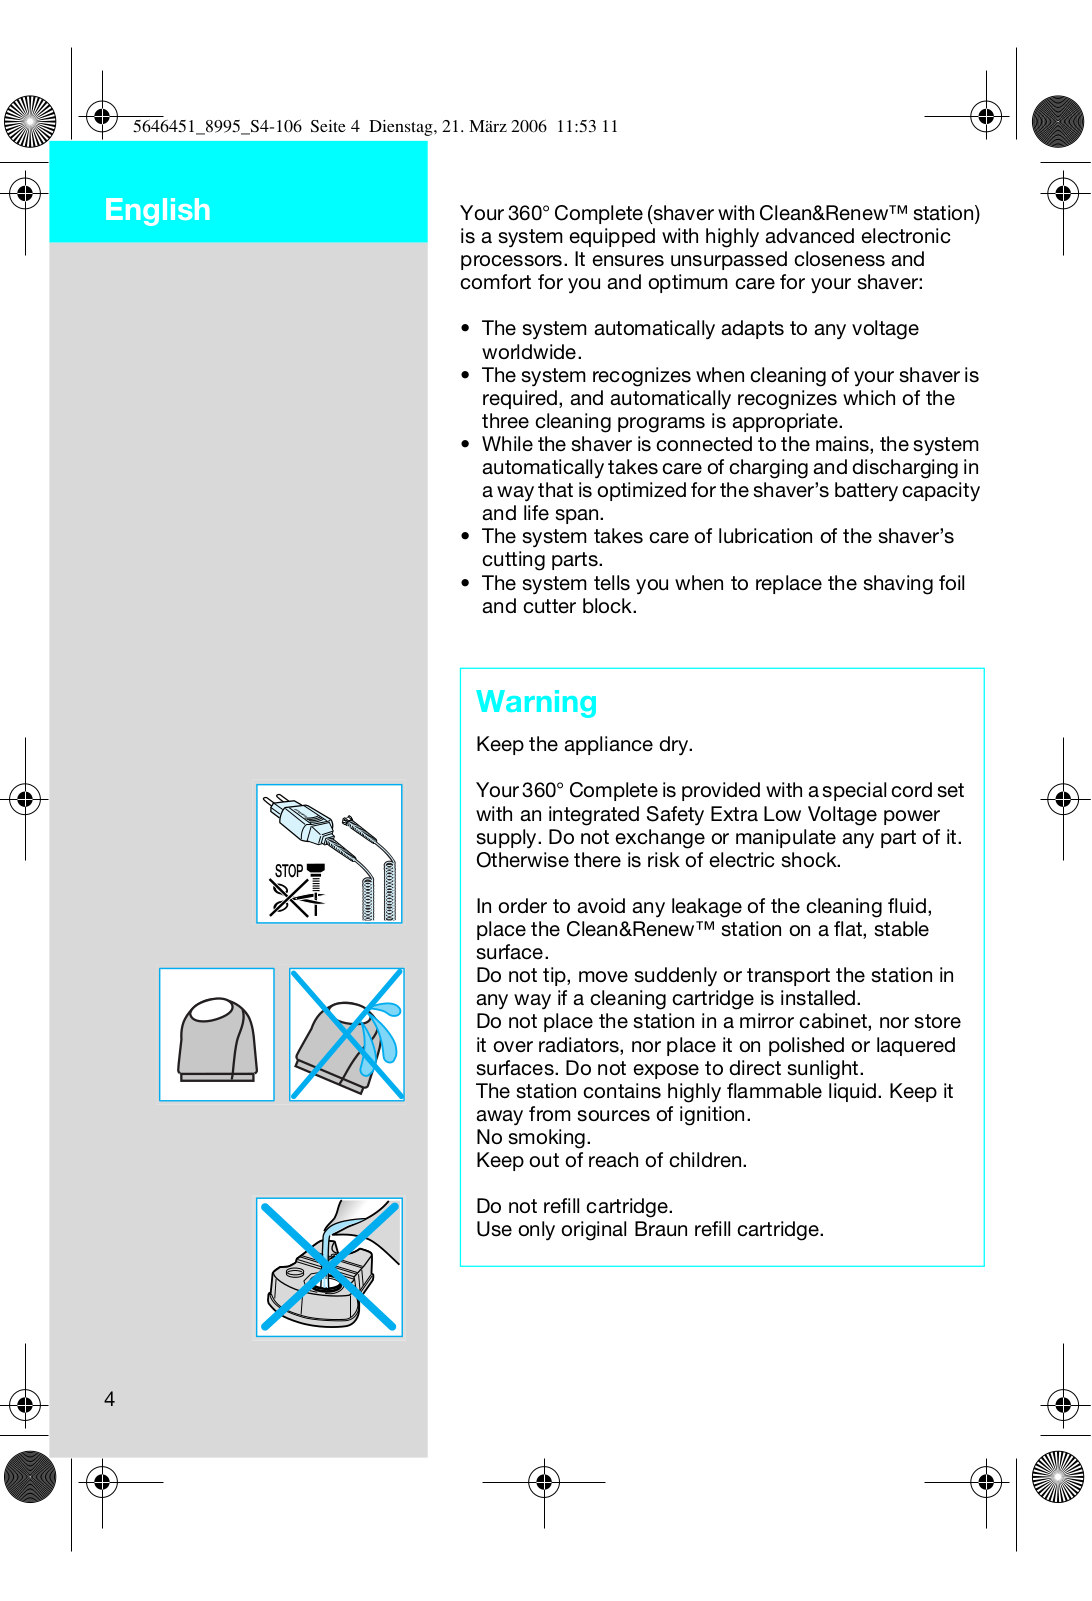
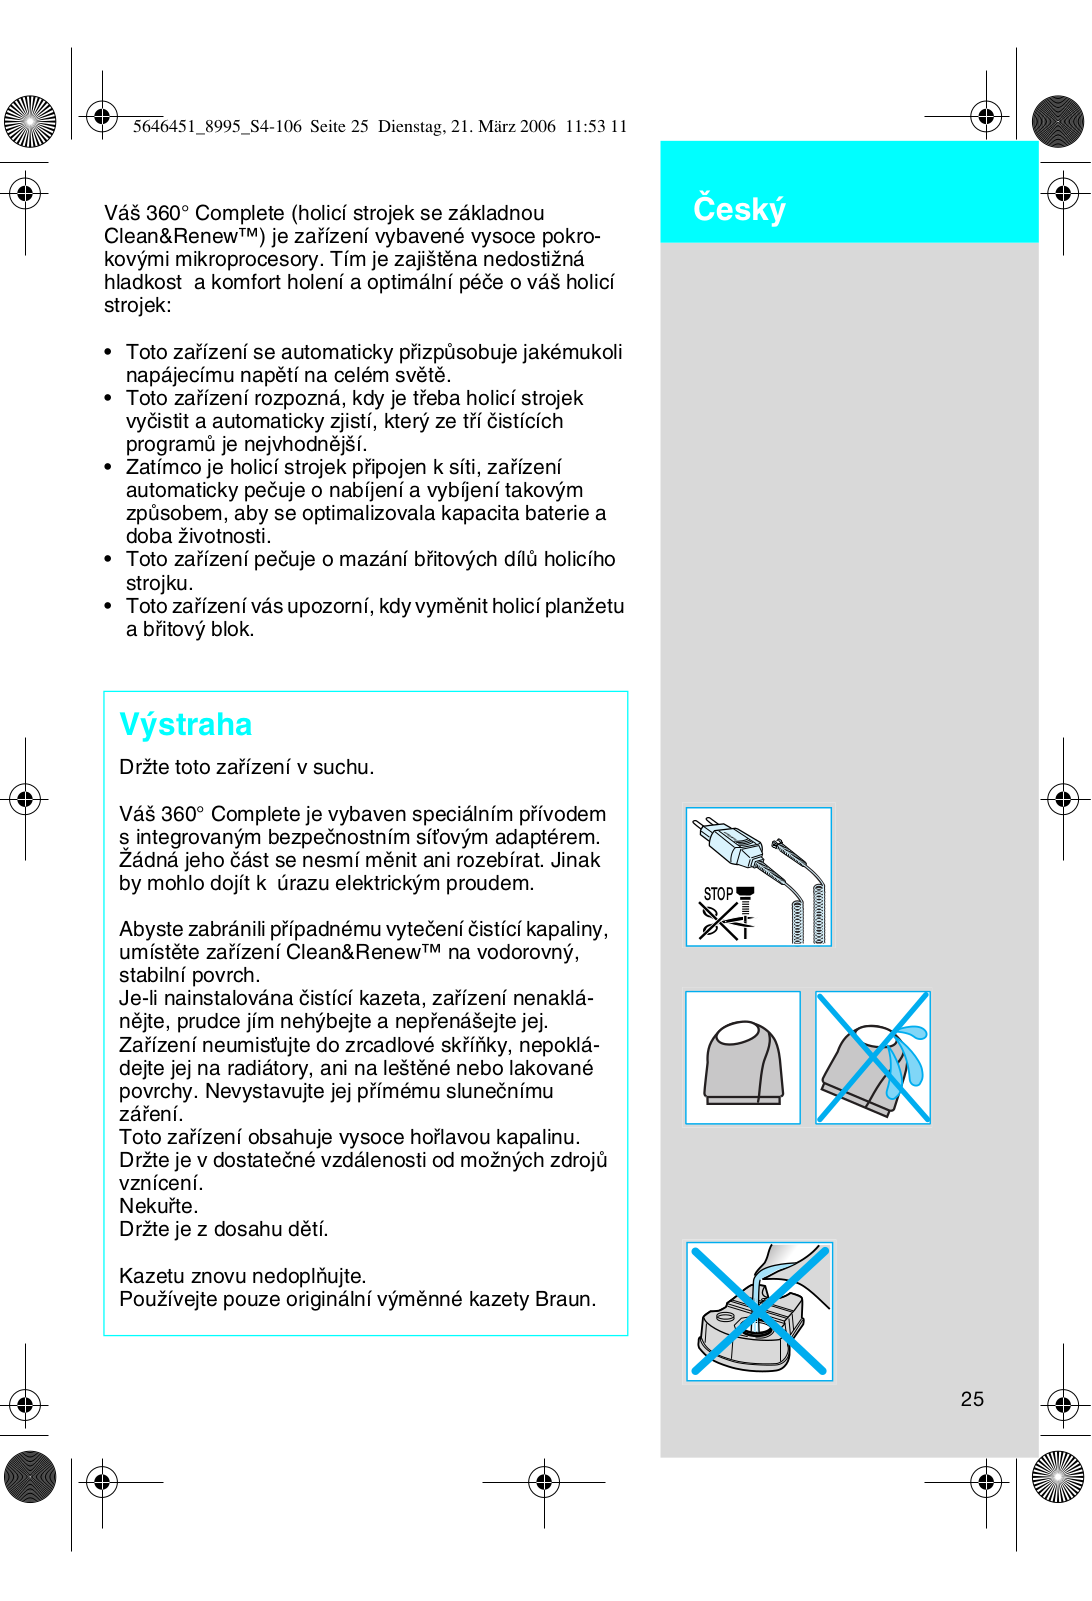
Keep the appliance dry.

Your 360° Complete is provided with a special cord set with an integrated Safety Extra Low Voltage power supply. Do not exchange or manipulate any part of it. Otherwise there is risk of electric shock.

In order to avoid any leakage of the cleaning fluid, place the Clean&Renew™ station on a flat, stable surface.

Do not tip, move suddenly or transport the station in any way if a cleaning cartridge is installed.

Do not place the station in a mirror cabinet, nor store it over radiators, nor place it on polished or laquered surfaces. Do not expose to direct sunlight.

The station contains highly flammable liquid. Keep it away from sources of ignition.

No smoking.

Keep out of reach of children.

Do not refill cartridge.

Use only original Braun refill cartridge.

4

Description

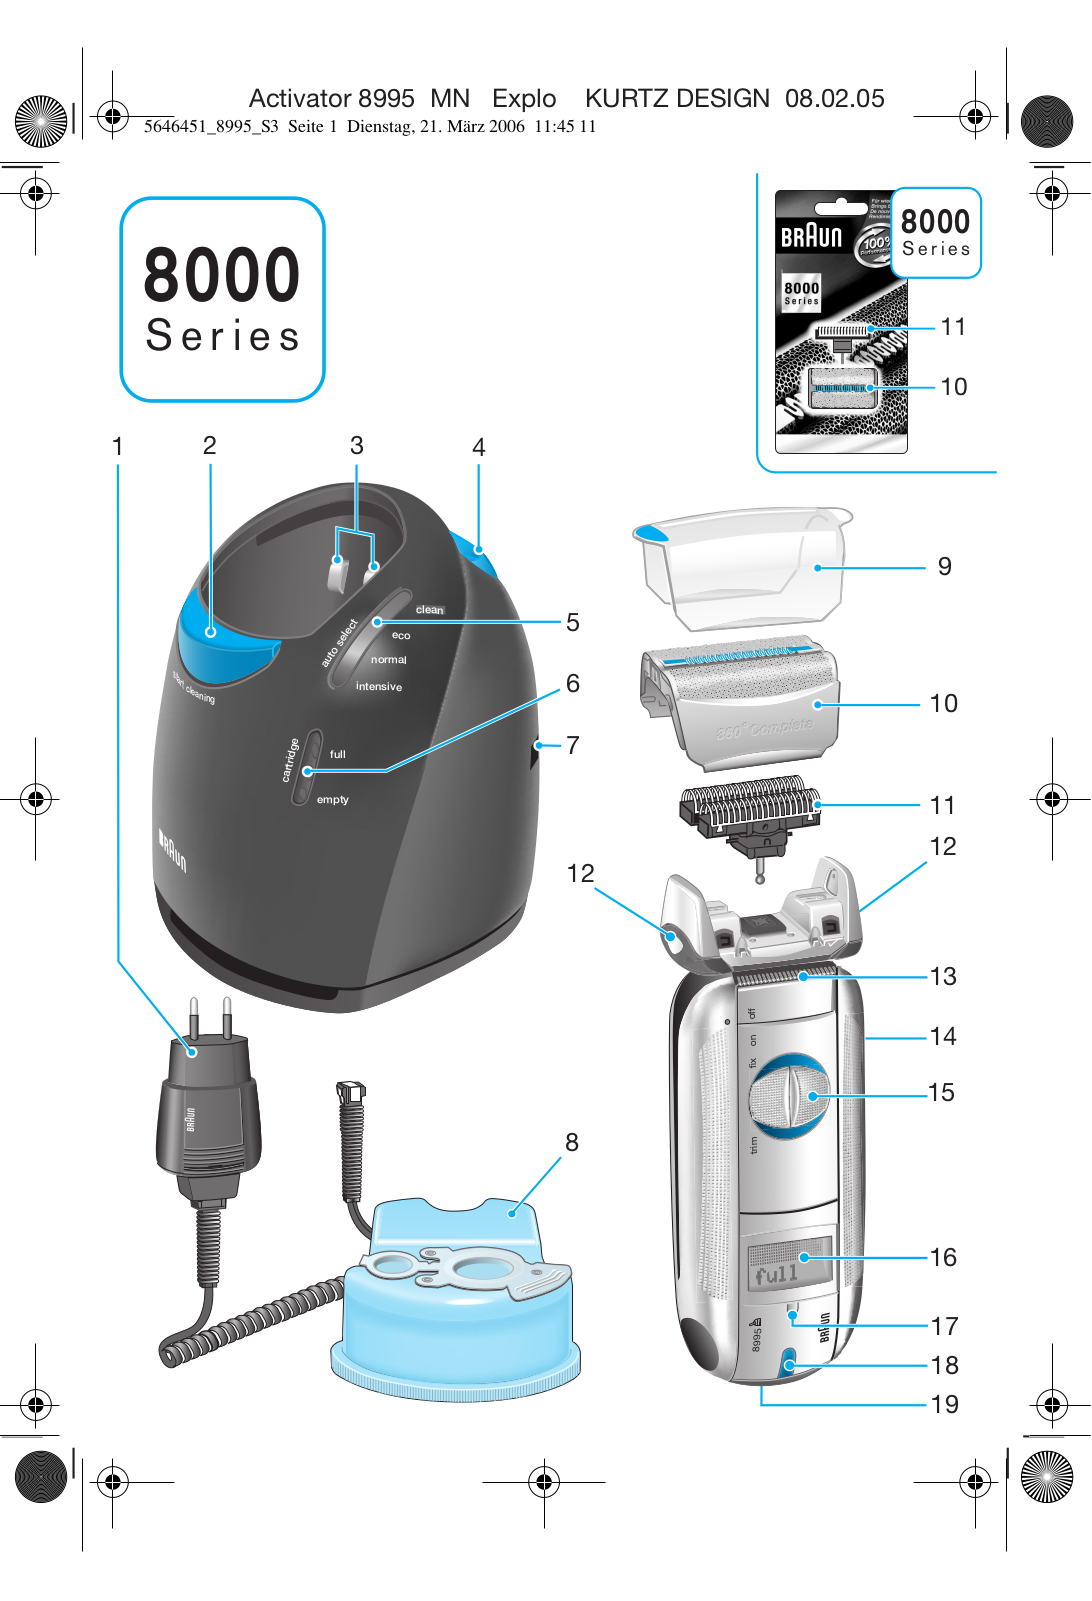
1Special cord set

2«start cleaning» button

3Station-to-shaver connecting contacts

4Station lift button for cartridge exchange

5Display for cleaning programs

6Display for cleaning fluid status

7Station mains socket

8Cleaning cartridge

9Shaver foil protection cap

10Shaver foil

11Cutter block

12Foil release buttons

13Long hair trimmer

14Shaver-to-station connecting contacts (shaver backside)

15Switch

16Shaver display

17Info key

18Pilot light

19Shaver mains socket

Before shaving

If you wish, you may start shaving right away (if the shaver is charged, see section «Shaver display»). However, we recommend to follow the procedure described here:

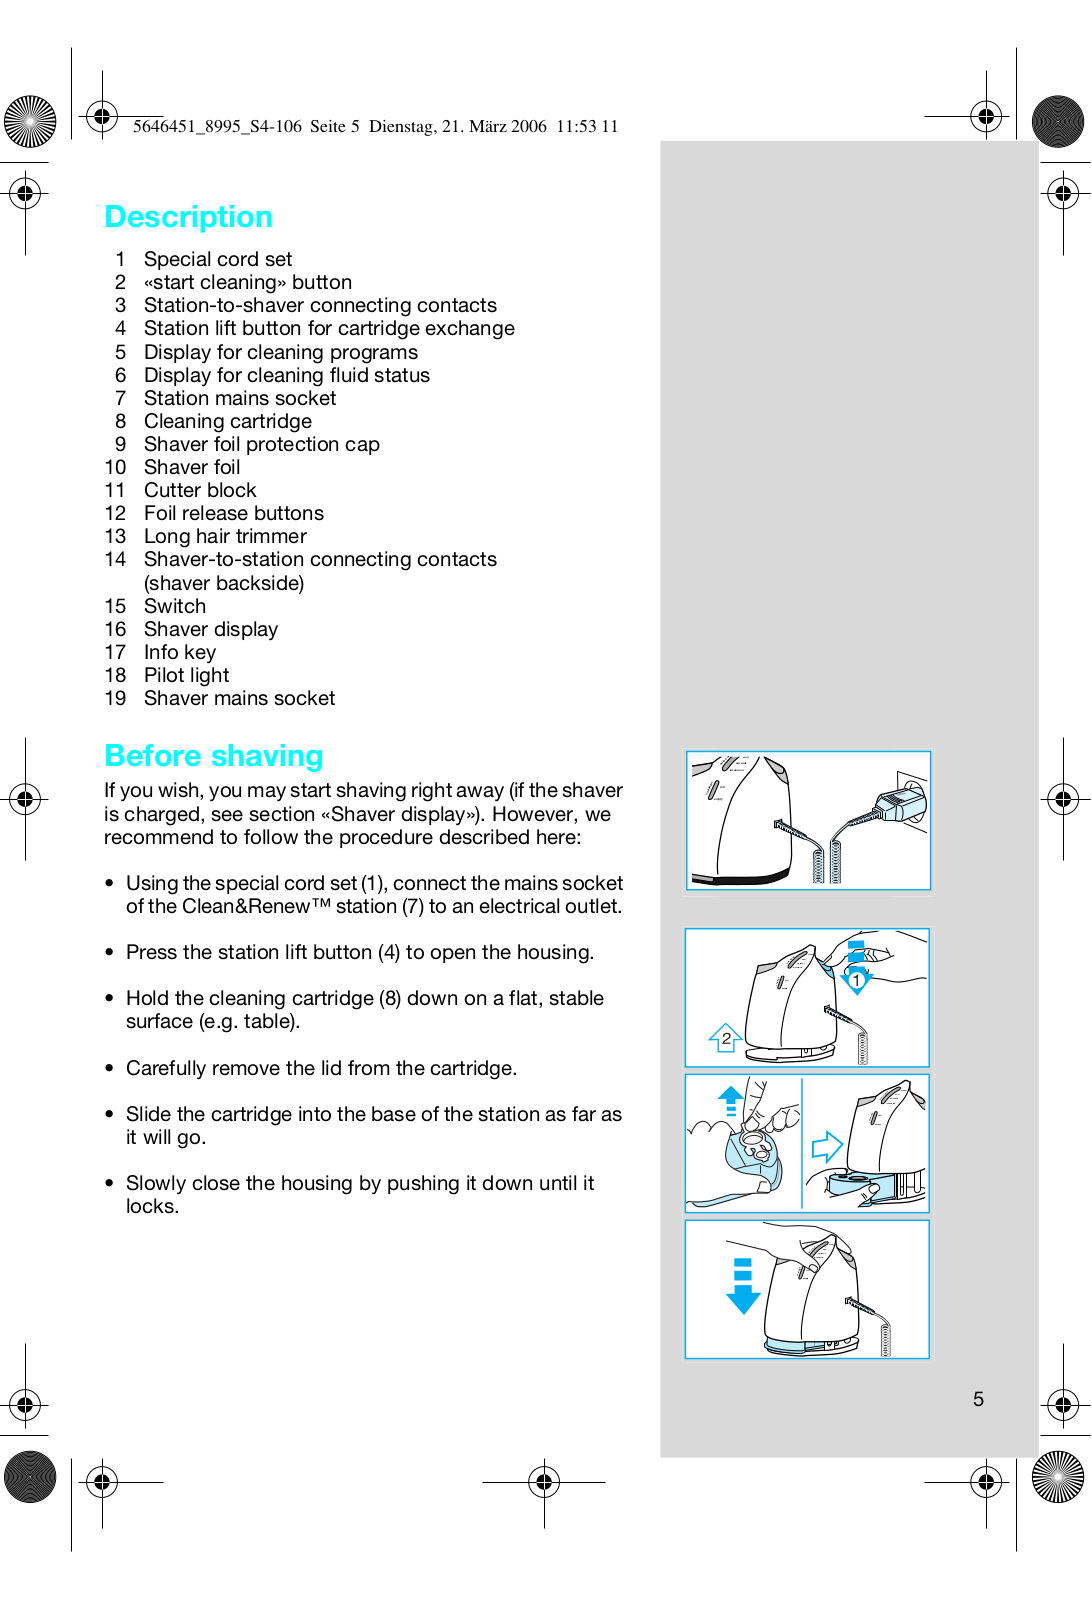
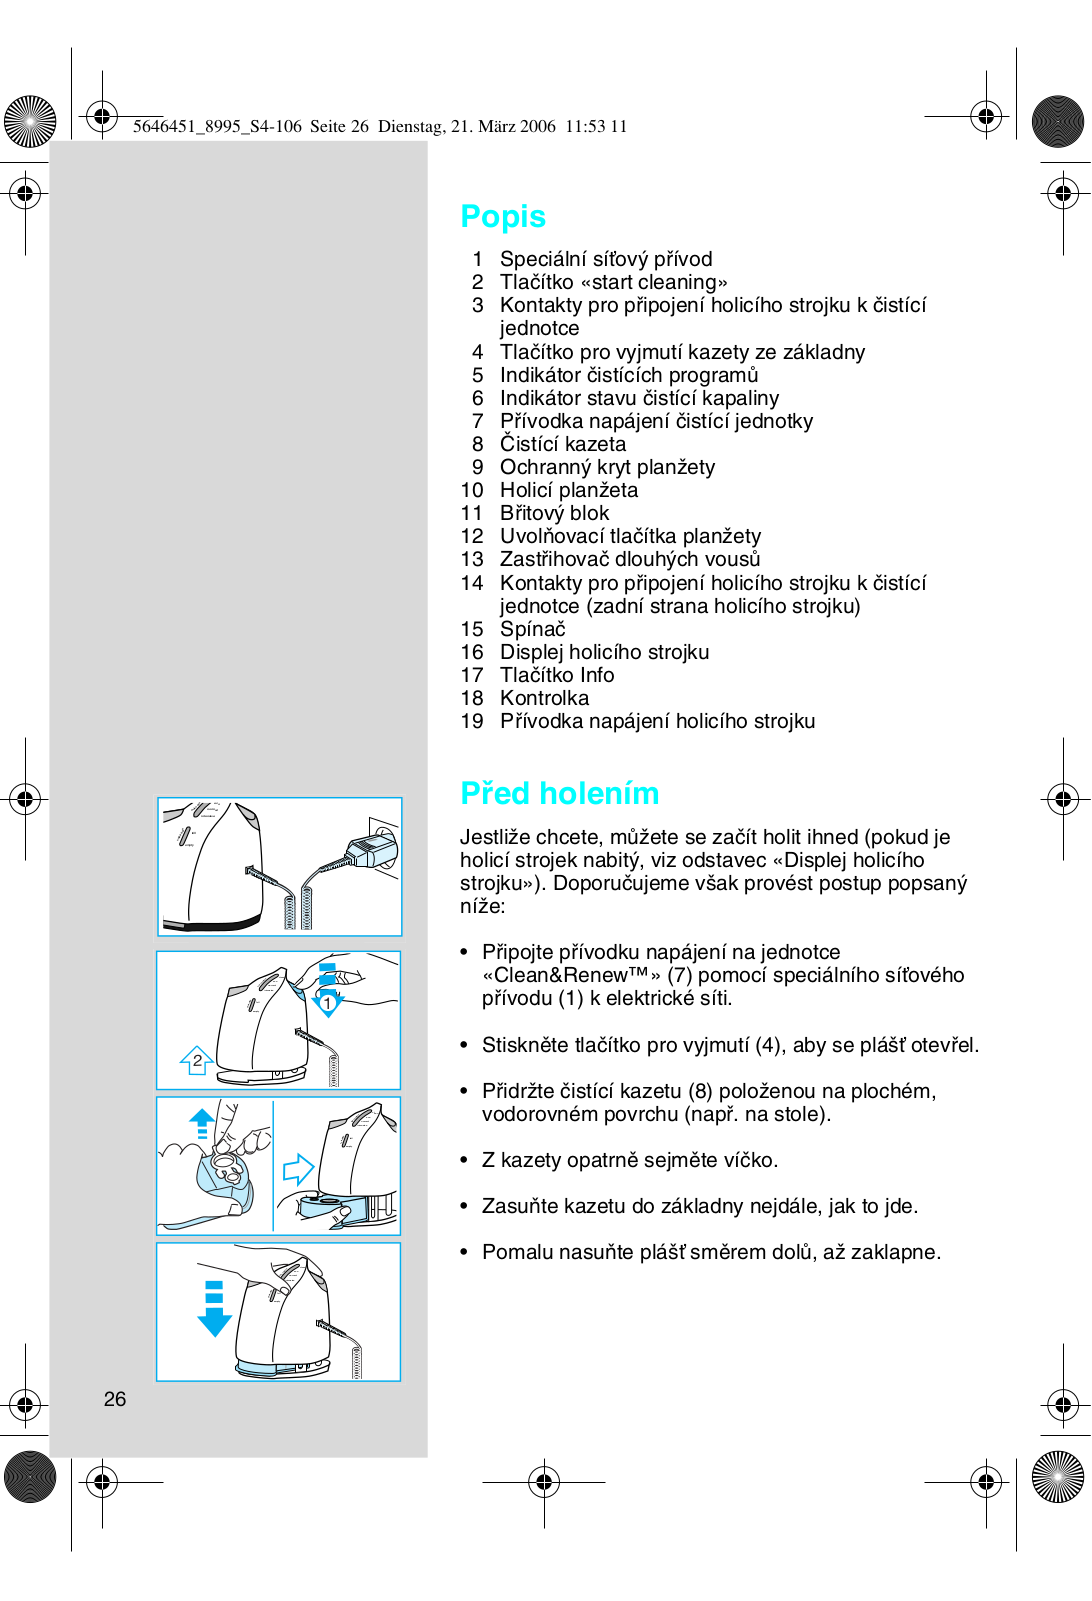
Using the special cord set (1), connect the mains socket of the Clean&Renew™ station (7) to an electrical outlet.

Press the station lift button (4) to open the housing.

Hold the cleaning cartridge (8) down on a flat, stable surface (e.g. table).

Carefully remove the lid from the cartridge.

Slide the cartridge into the base of the station as far as it will go.

Slowly close the housing by pushing it down until it locks.

eco

normal intensive

cartridge

full


empty

1

2

5


a


b


c


cartridge

full

cartridge


full

cartridge

full


empty


empty


empty

trim


a


select


clean


eco

b


auto


normal

c


clean


intensive

d


select

eco


auto

normal


intensive


st


art cleaning

cartridge


full


empty


8995


clean


select


auto

eco


trim


normal


fix


intensive


on


clean


off


eco


normal


intensive


start

g


cleanin

cartridge

full


empty


select

clean

auto

eco


normal


intensive

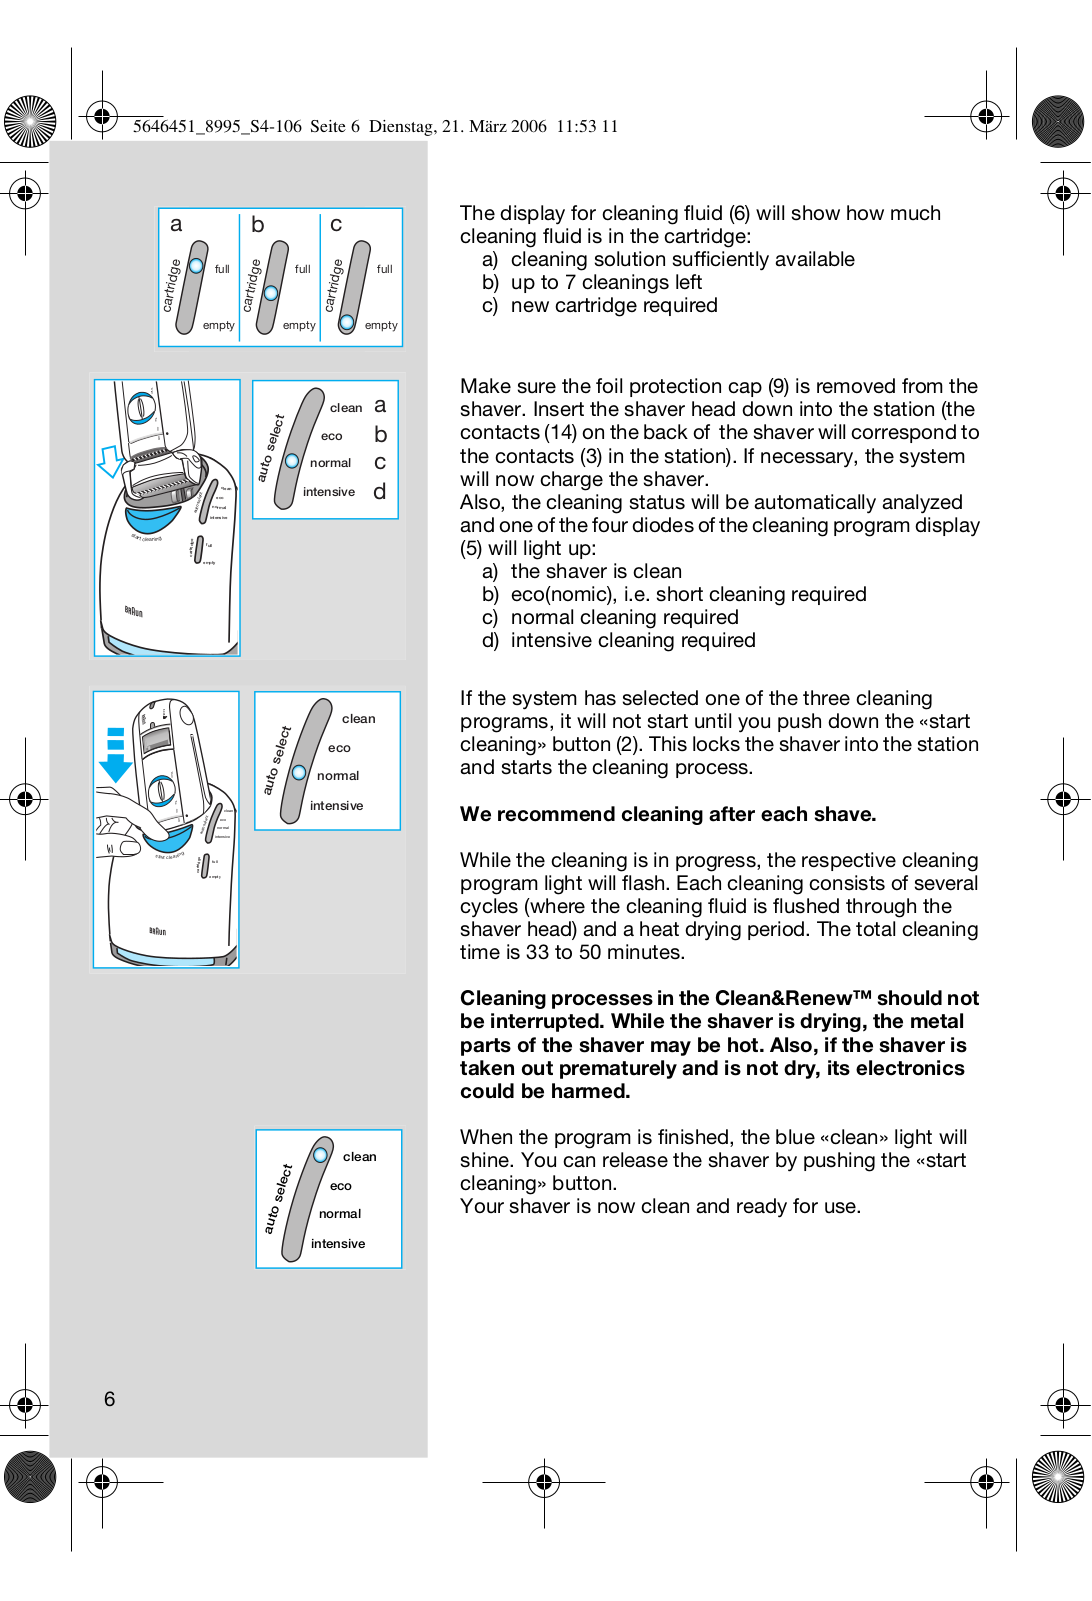
The display for cleaning fluid (6) will show how much cleaning fluid is in the cartridge:

a)cleaning solution sufficiently available

b)up to 7 cleanings left

c)new cartridge required

Make sure the foil protection cap (9) is removed from the shaver. Insert the shaver head down into the station (the contacts (14) on the back of the shaver will correspond to the contacts (3) in the station). If necessary, the system will now charge the shaver.

Also, the cleaning status will be automatically analyzed and one of the four diodes of the cleaning program display

(5)will light up:

a)the shaver is clean

b)eco(nomic), i.e. short cleaning required

c)normal cleaning required

d)intensive cleaning required

If the system has selected one of the three cleaning programs, it will not start until you push down the «start cleaning» button (2). This locks the shaver into the station and starts the cleaning process.

We recommend cleaning after each shave.

While the cleaning is in progress, the respective cleaning program light will flash. Each cleaning consists of several cycles (where the cleaning fluid is flushed through the shaver head) and a heat drying period. The total cleaning time is 33 to 50 minutes.

Cleaning processes in the Clean&Renew™ should not be interrupted. While the shaver is drying, the metal parts of the shaver may be hot. Also, if the shaver is taken out prematurely and is not dry, its electronics could be harmed.

When the program is finished, the blue «clean» light will shine. You can release the shaver by pushing the «start cleaning» button.

Your shaver is now clean and ready for use.

6

Shaving

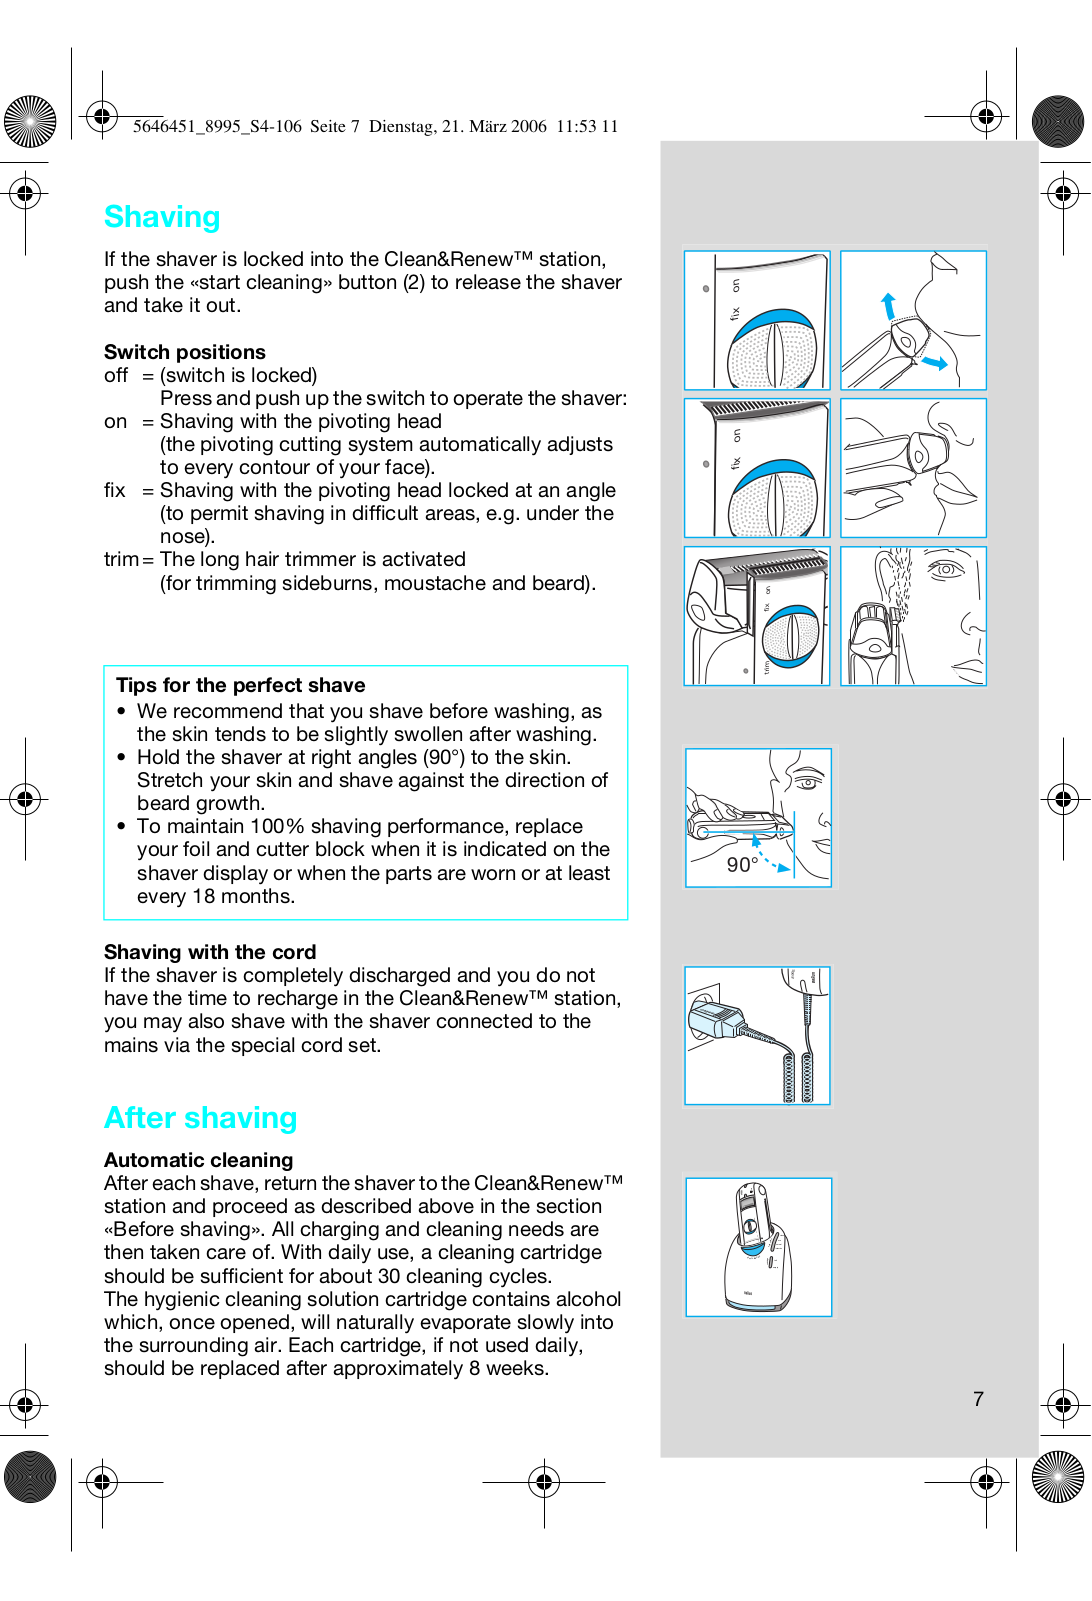
If the shaver is locked into the Clean&Renew™ station, push the «start cleaning» button (2) to release the shaver and take it out.

Switch positions

off

= (switch is locked)


Press and push up the switch to operate the shaver:

on

= Shaving with the pivoting head


(the pivoting cutting system automatically adjusts


to every contour of your face).

fix

= Shaving with the pivoting head locked at an angle

(to permit shaving in difficult areas, e.g. under the nose).

trim = The long hair trimmer is activated

(for trimming sideburns, moustache and beard).

Tips for the perfect shave

We recommend that you shave before washing, as the skin tends to be slightly swollen after washing.

Hold the shaver at right angles (90°) to the skin. Stretch your skin and shave against the direction of beard growth.

To maintain 100% shaving performance, replace your foil and cutter block when it is indicated on the shaver display or when the parts are worn or at least every 18 months.

Shaving with the cord

If the shaver is completely discharged and you do not have the time to recharge in the Clean&Renew™ station, you may also shave with the shaver connected to the mains via the special cord set.

After shaving

Automatic cleaning

After each shave, return the shaver to the Clean&Renew™ station and proceed as described above in the section «Before shaving». All charging and cleaning needs are then taken care of. With daily use, a cleaning cartridge should be sufficient for about 30 cleaning cycles.

The hygienic cleaning solution cartridge contains alcohol which, once opened, will naturally evaporate slowly into the surrounding air. Each cartridge, if not used daily, should be replaced after approximately 8 weeks.

on fix

on fix

on fix

trim

8995

st

7

off on fix

off on

old

new

8995

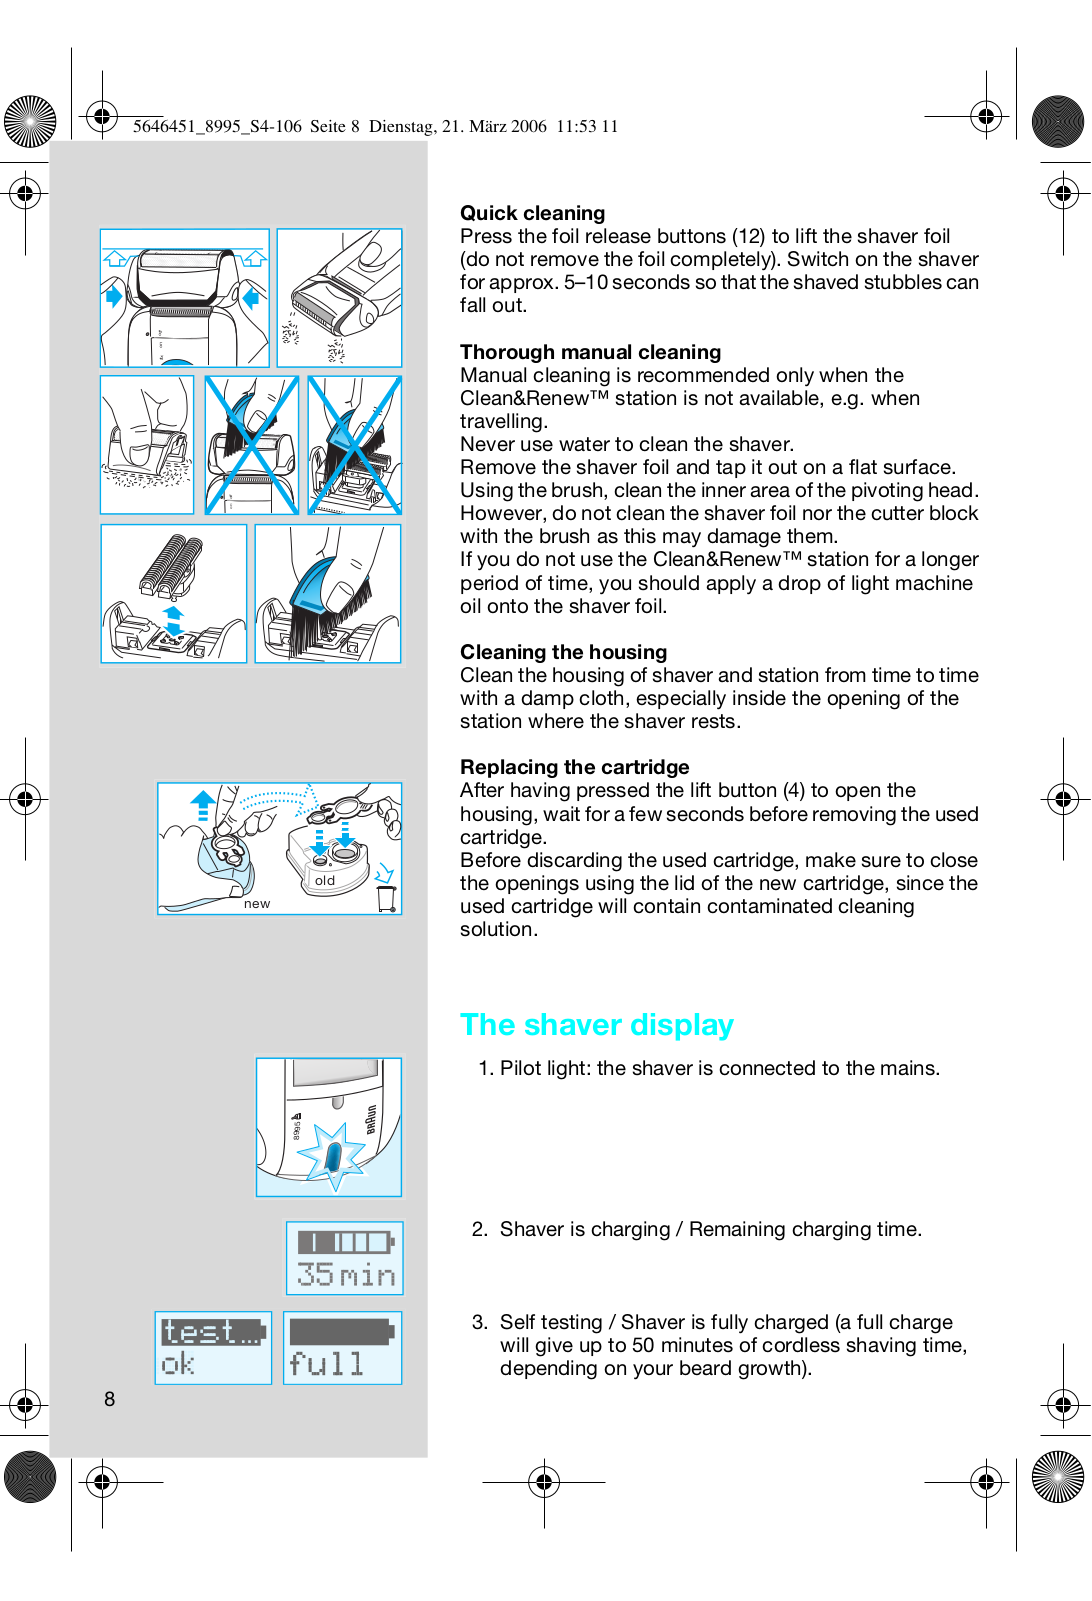
Quick cleaning

Press the foil release buttons (12) to lift the shaver foil (do not remove the foil completely). Switch on the shaver for approx. 5–10 seconds so that the shaved stubbles can fall out.

Thorough manual cleaning

Manual cleaning is recommended only when the Clean&Renew™ station is not available, e.g. when travelling.

Never use water to clean the shaver.

Remove the shaver foil and tap it out on a flat surface. Using the brush, clean the inner area of the pivoting head. However, do not clean the shaver foil nor the cutter block with the brush as this may damage them.

If you do not use the Clean&Renew™ station for a longer period of time, you should apply a drop of light machine oil onto the shaver foil.

Cleaning the housing

Clean the housing of shaver and station from time to time with a damp cloth, especially inside the opening of the station where the shaver rests.

Replacing the cartridge

After having pressed the lift button (4) to open the housing, wait for a few seconds before removing the used cartridge.

Before discarding the used cartridge, make sure to close the openings using the lid of the new cartridge, since the used cartridge will contain contaminated cleaning solution.

The shaver display

1. Pilot light: the shaver is connected to the mains.

2.Shaver is charging / Remaining charging time.

3.Self testing / Shaver is fully charged (a full charge will give up to 50 minutes of cordless shaving time, depending on your beard growth).

8

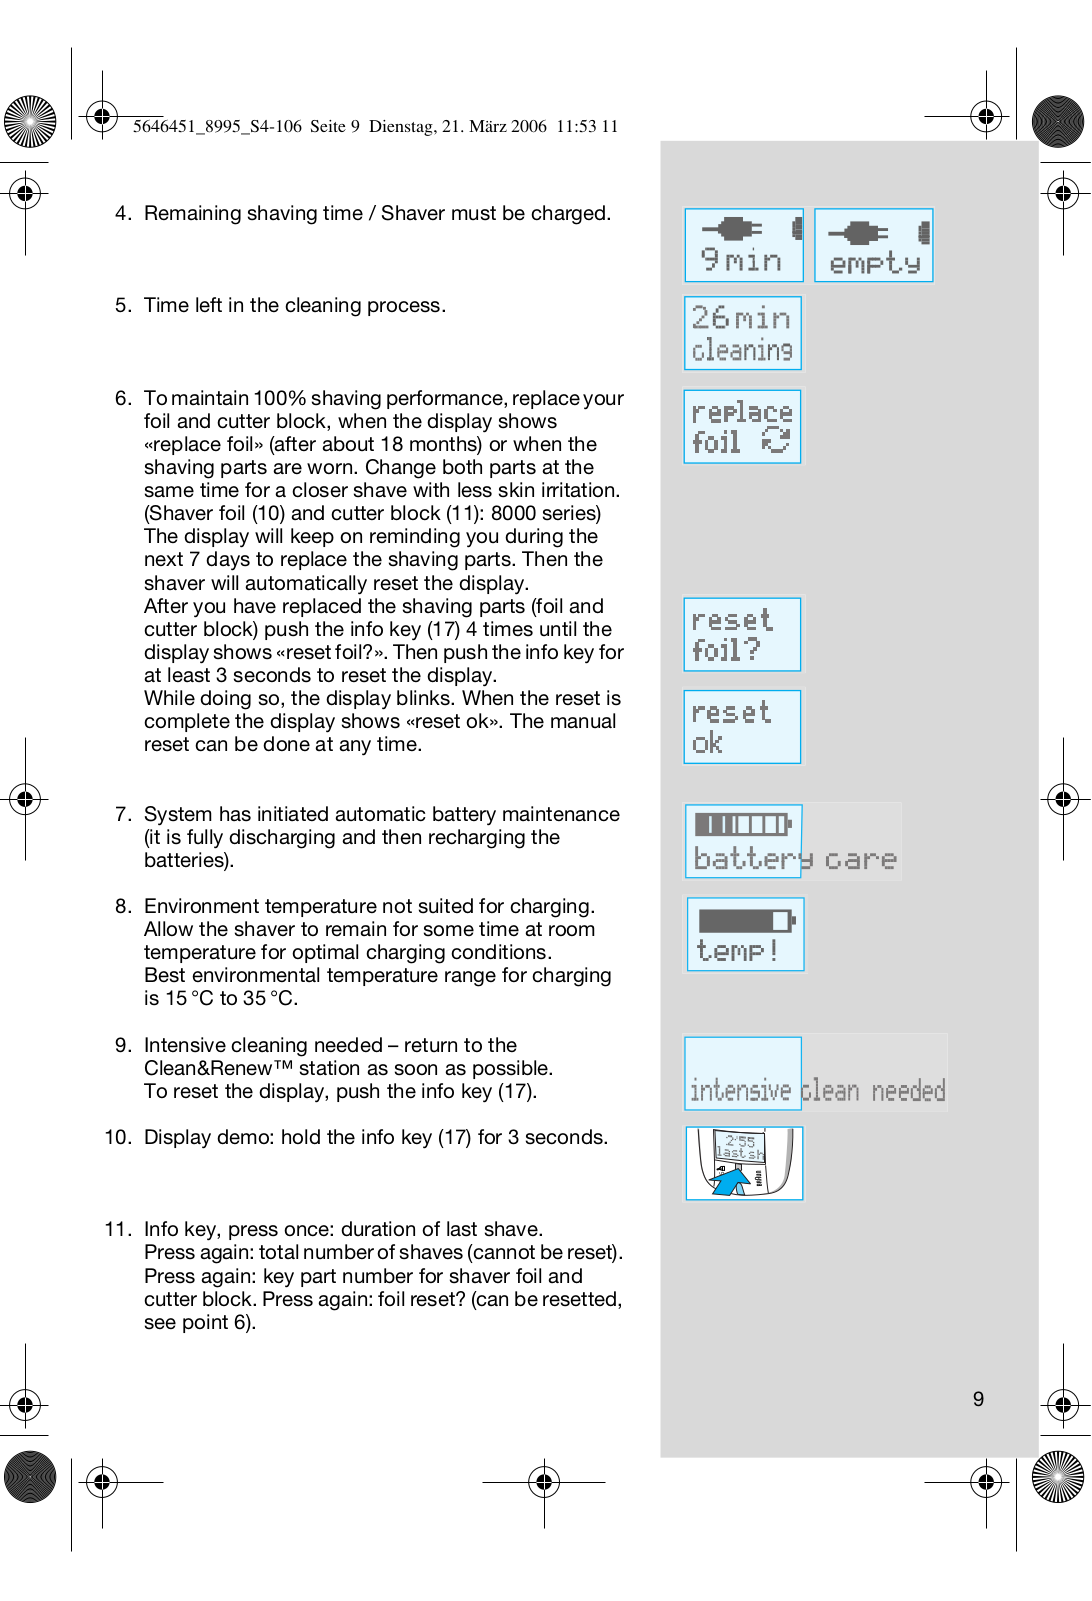
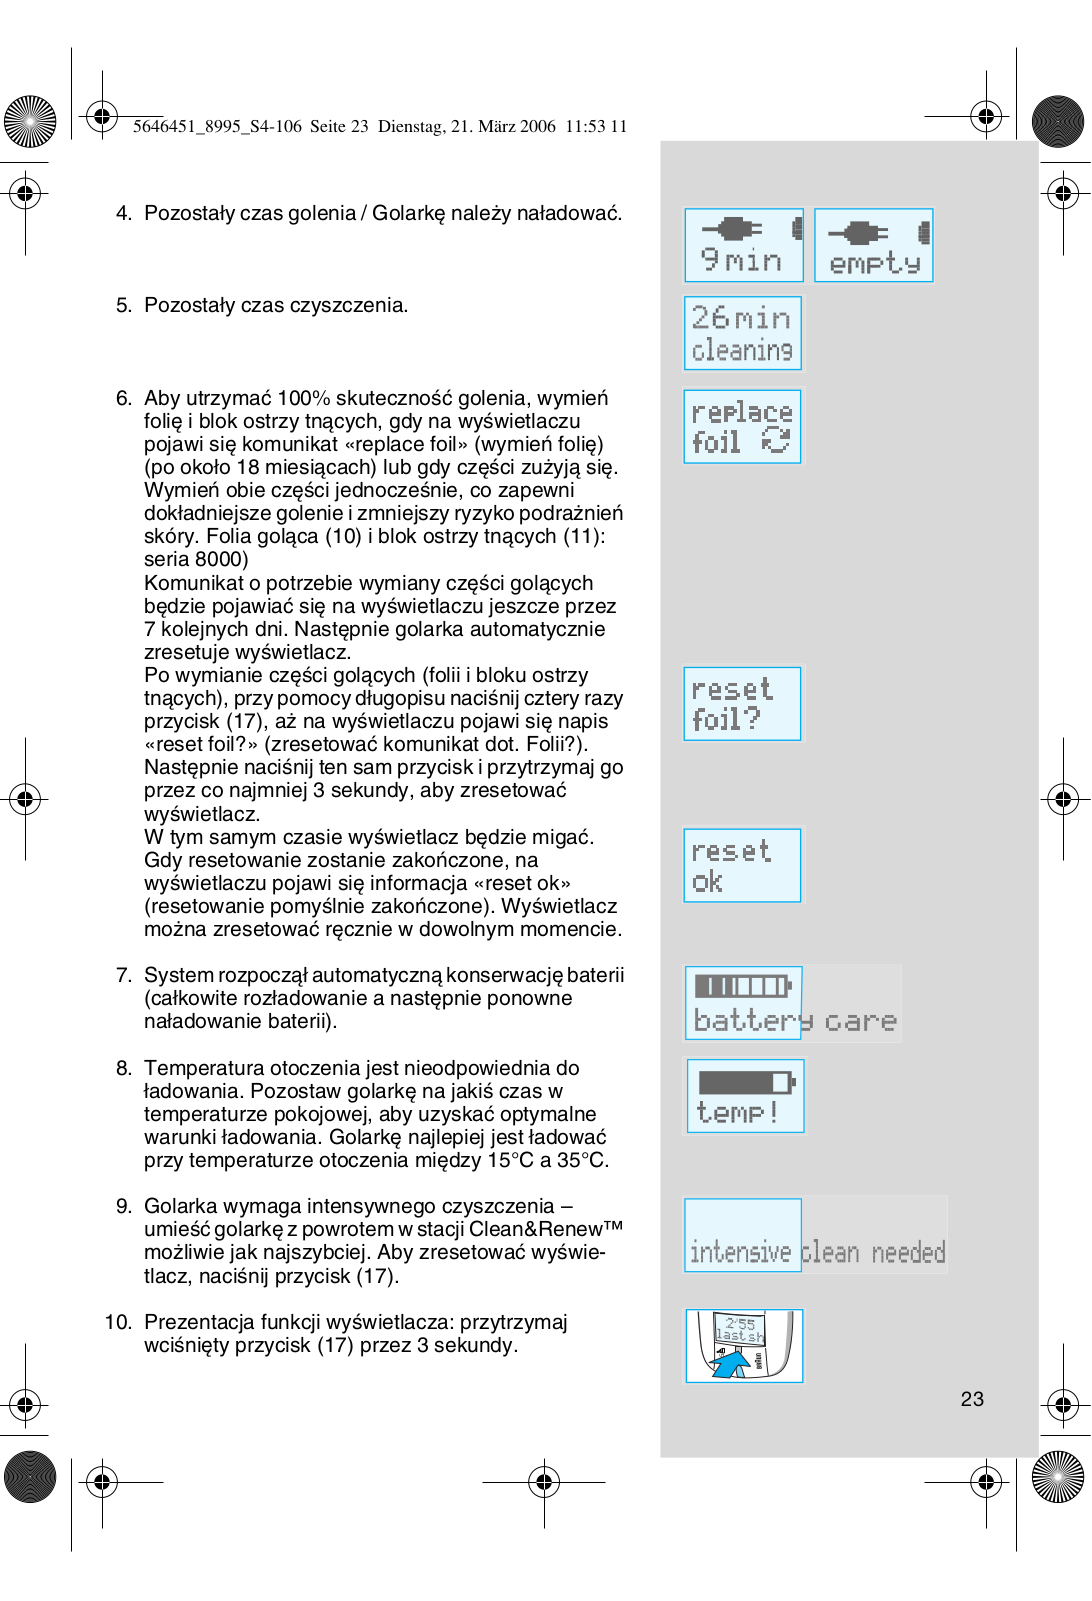
4.Remaining shaving time / Shaver must be charged.

5.Time left in the cleaning process.

6.To maintain 100% shaving performance, replace your foil and cutter block, when the display shows «replace foil» (after about 18 months) or when the shaving parts are worn. Change both parts at the same time for a closer shave with less skin irritation. (Shaver foil (10) and cutter block (11): 8000 series) The display will keep on reminding you during the next 7 days to replace the shaving parts. Then the shaver will automatically reset the display.

After you have replaced the shaving parts (foil and cutter block) push the info key (17) 4 times until the display shows «reset foil?». Then push the info key for at least 3 seconds to reset the display.

While doing so, the display blinks. When the reset is complete the display shows «reset ok». The manual reset can be done at any time.

7.System has initiated automatic battery maintenance (it is fully discharging and then recharging the batteries).

8.Environment temperature not suited for charging. Allow the shaver to remain for some time at room temperature for optimal charging conditions.

Best environmental temperature range for charging is 15 °C to 35 °C.

9.Intensive cleaning needed – return to the Clean&Renew™ station as soon as possible. To reset the display, push the info key (17).

10.Display demo: hold the info key (17) for 3 seconds.

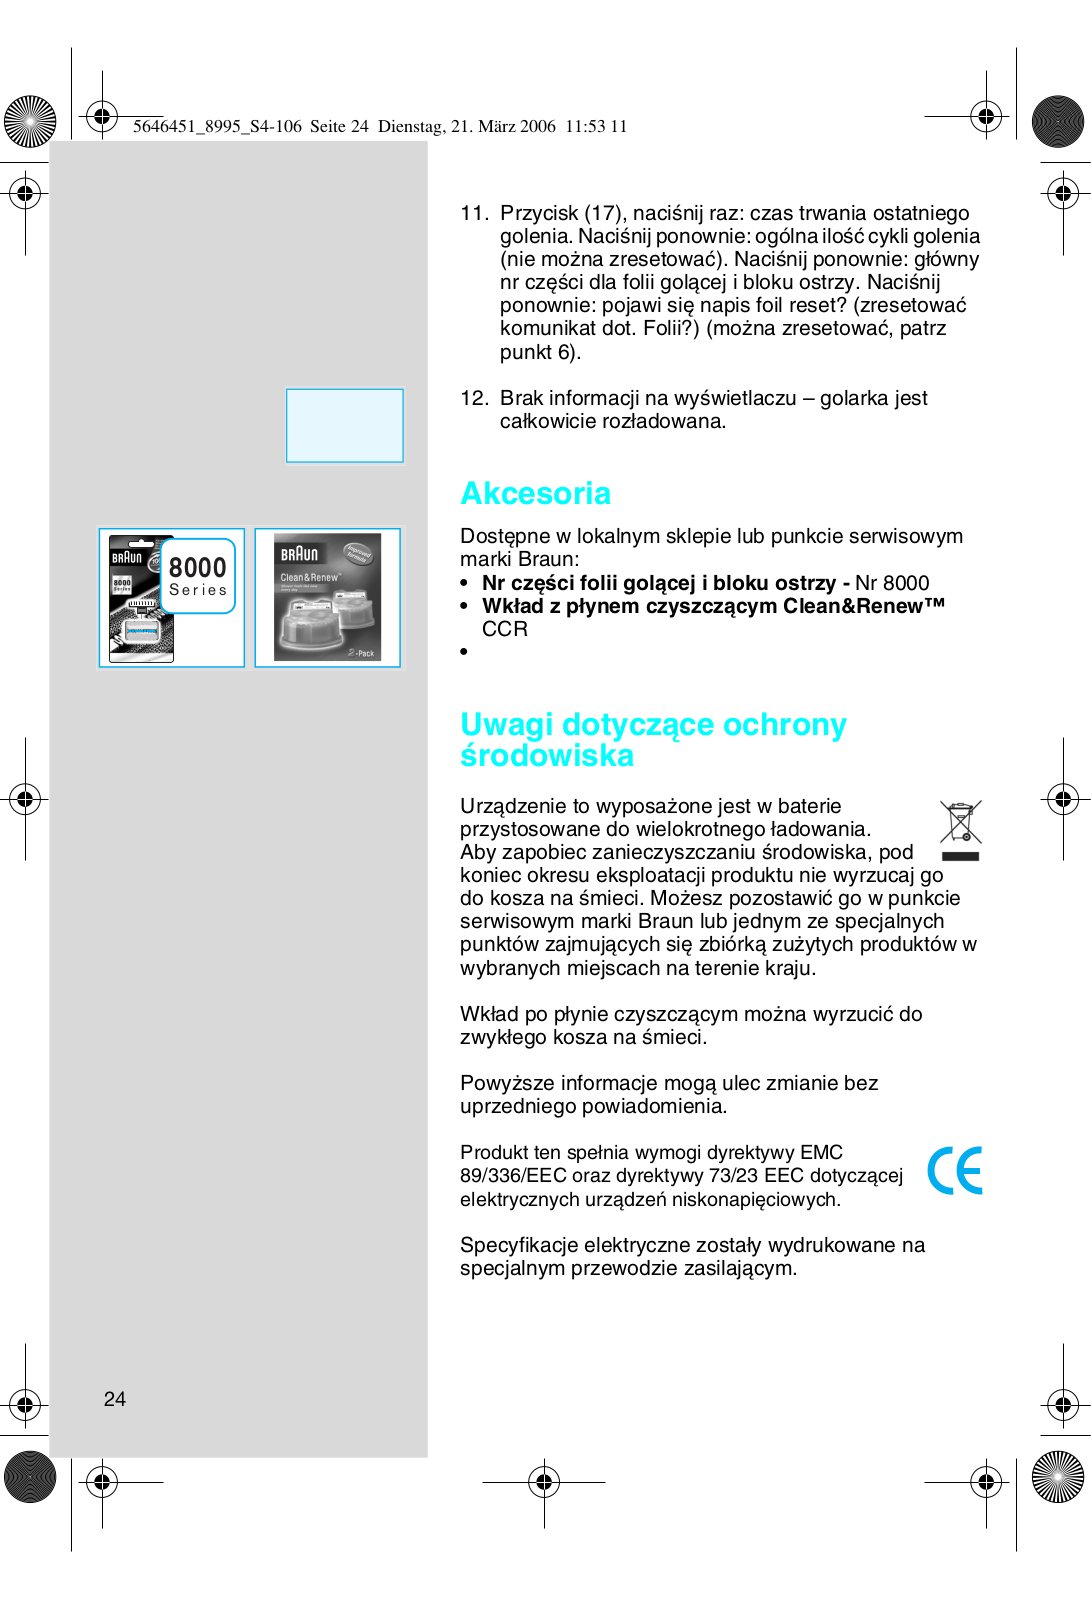
11.Info key, press once: duration of last shave.

Press again: total number of shaves (cannot be reset). Press again: key part number for shaver foil and cutter block. Press again: foil reset? (can be resetted, see point 6).

9

8000

S e r i e s

360°Complete

12. No display – shaver is completely discharged.

Accessories

Available at your dealer or Braun Service Centres:

Shaver foil and cutter block No. 8000

Cleaning cartridge Clean&Renew™ CCR

Environmental notice

This product contains rechargeable batteries. In the interest of protecting the environment, please do not dispose of the product in the household waste

at the end of its useful life. Disposal can take place at a Braun Service Centre or at appropriate collection points provided in your country.

The cartridge can be disposed with regular garbage.

Subject to change without notice.

This product conforms to the European Directives EMC 89/336/EEC and Low Voltage 73/23/EEC.

For electric specifications, see printing on the special cord set.

10

Votre 360° Complete (rasoir avec un chargeur nettoyant « Clean& Renew™ ») est un système équipé de microprocesseurs de haute technologie. Il vous assure une précision et un confort inégalés ainsi qu’un entretien optimum de votre rasoir.

Le système s’adapte automatiquement à n’importe quelle tension dans le monde.

Le système détecte quand votre rasoir a besoin d’être nettoyé, et sélectionne automatiquement le programme de nettoyage le plus adapté parmi les trois existants.

Lorsque le rasoir est sous tension, le système gère automatiquement la charge et la décharge de la batterie de façon à optimiser sa capacité et sa durée de vie.

Le système prend en charge la lubrification des éléments de coupe du rasoir.

Le système vous indique quand changer la grille et le bloc-couteaux.

Attention:

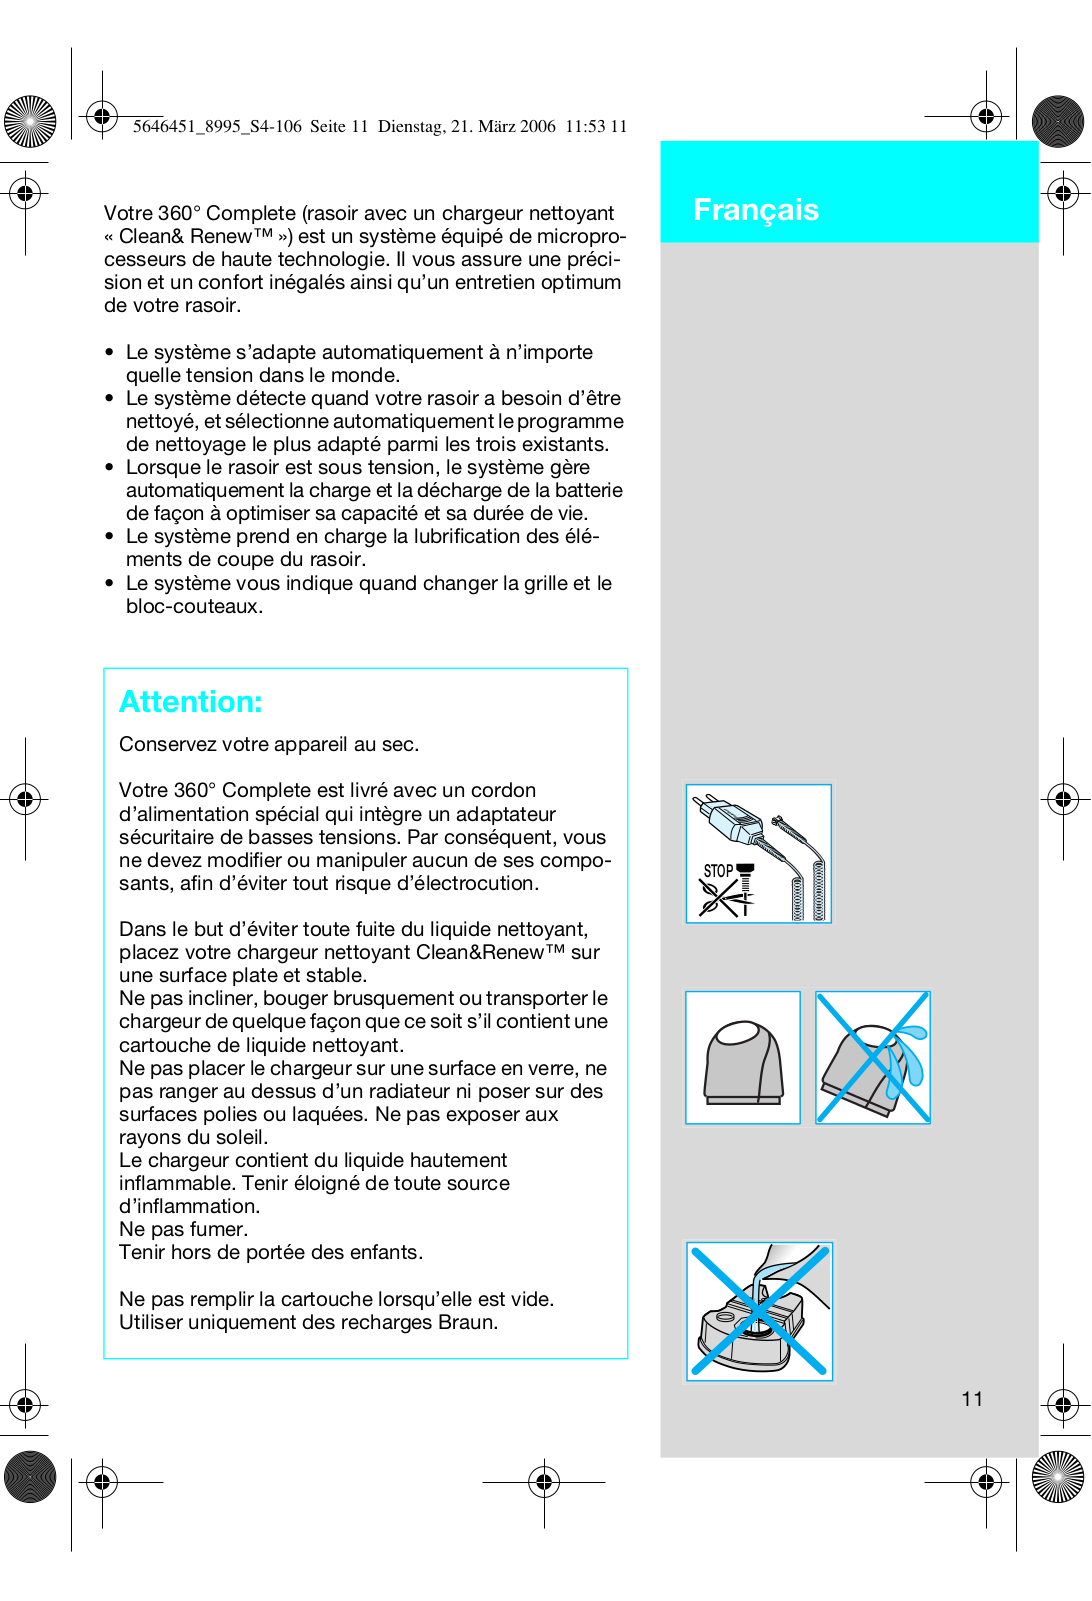
Conservez votre appareil au sec.

Votre 360° Complete est livré avec un cordon d’alimentation spécial qui intègre un adaptateur sécuritaire de basses tensions. Par conséquent, vous ne devez modifier ou manipuler aucun de ses composants, afin d’éviter tout risque d’électrocution.

Dans le but d’éviter toute fuite du liquide nettoyant, placez votre chargeur nettoyant Clean&Renew™ sur une surface plate et stable.

Ne pas incliner, bouger brusquement ou transporter le chargeur de quelque façon que ce soit s’il contient une cartouche de liquide nettoyant.

Ne pas placer le chargeur sur une surface en verre, ne pas ranger au dessus d’un radiateur ni poser sur des surfaces polies ou laquées. Ne pas exposer aux rayons du soleil.

Le chargeur contient du liquide hautement inflammable. Tenir éloigné de toute source d’inflammation.

Ne pas fumer.

Tenir hors de portée des enfants.

Ne pas remplir la cartouche lorsqu’elle est vide. Utiliser uniquement des recharges Braun.

Français

STOP

11

cartridge

Description

1Cordon d’alimentation

2Bouton de démarrage du nettoyage « Start cleaning »

3Points de contact chargeur-rasoir

4Bouton d’ouverture du chargeur pour le remplacement de la cartouche

5Indicateur de programme de nettoyage

6Indicateur du niveau de liquide nettoyant

7Prise d’alimentation secteur du chargeur

8Cartouche de liquide nettoyant

9Capot de protection de la grille

10Grille de rasage

11Bloc-couteaux

12Bouton d’éjection de la grille de rasage

13Tondeuse rétractable

14Points de contact rasoir-chargeur (au dos du rasoir)

15Interrupteur

16Ecran d’affichage du rasoir

17Touche informations

18Témoins lumineux

19Prise d’alimentation secteur du rasoir

eco normal intensive

full

empty

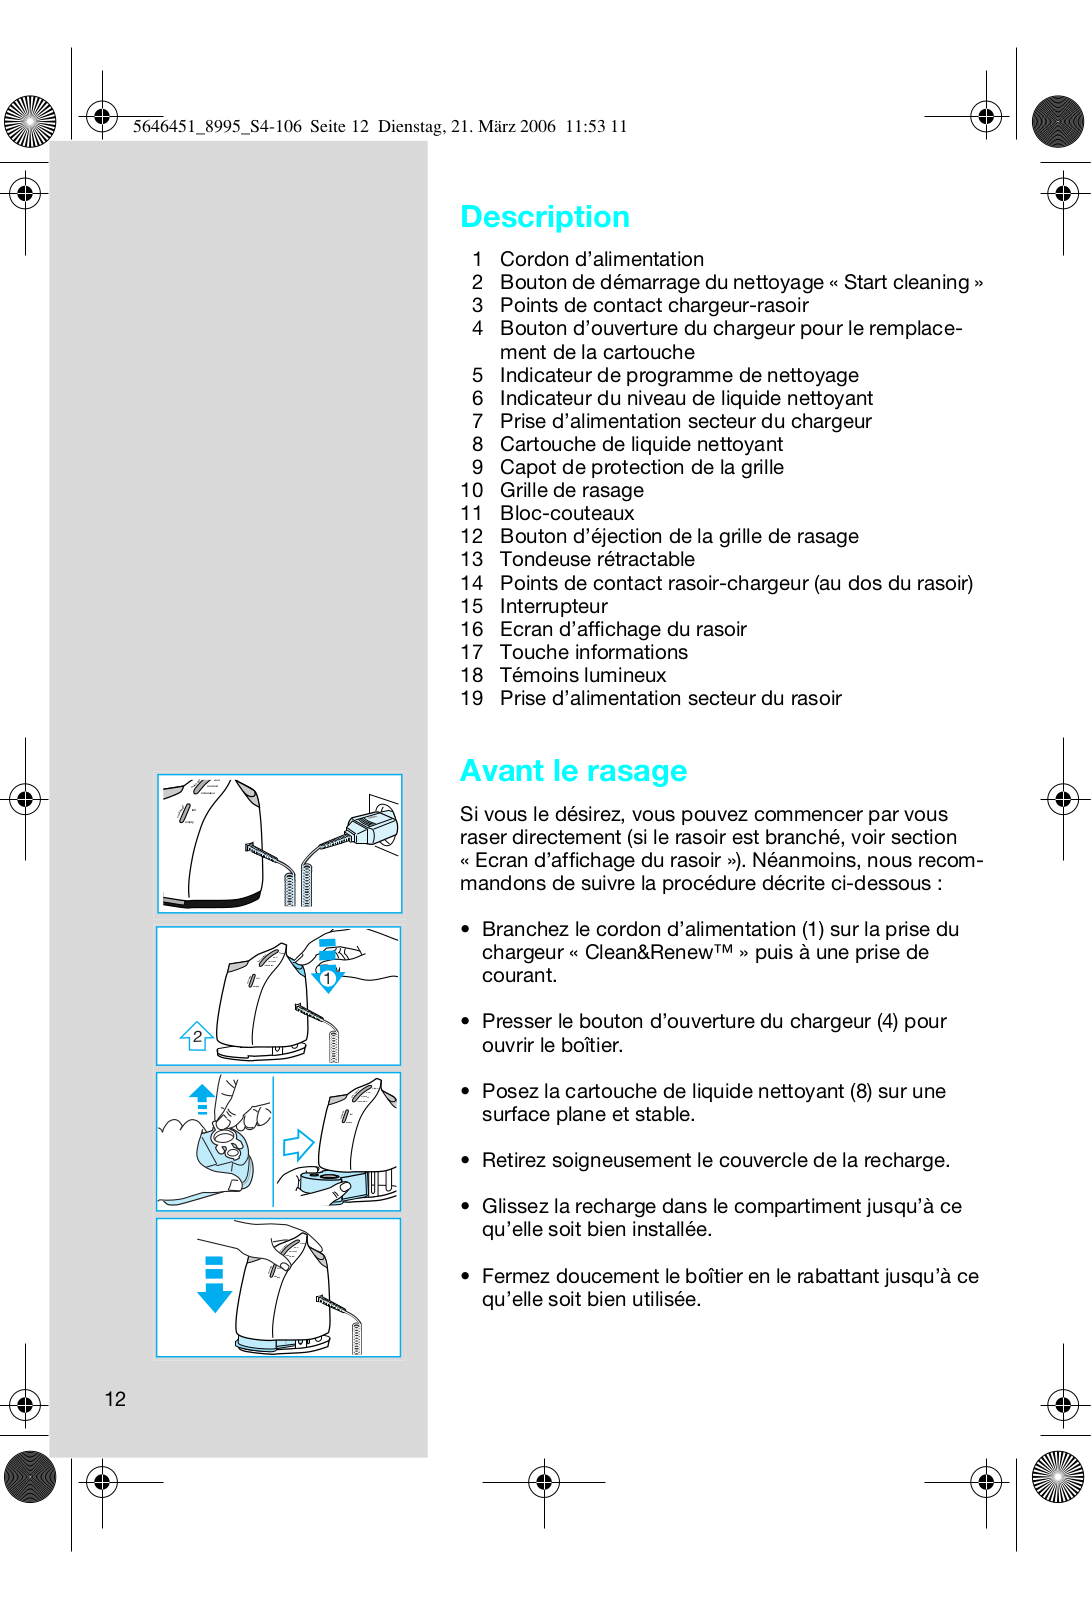
Avant le rasage

Si vous le désirez, vous pouvez commencer par vous raser directement (si le rasoir est branché, voir section

« Ecran d’affichage du rasoir »). Néanmoins, nous recommandons de suivre la procédure décrite ci-dessous :

Branchez le cordon d’alimentation (1) sur la prise du


chargeur « Clean&Renew™ » puis à une prise de

1

courant.

Presser le bouton d’ouverture du chargeur (4) pour

2

ouvrir le boîtier.


Posez la cartouche de liquide nettoyant (8) sur une


surface plane et stable.

Retirez soigneusement le couvercle de la recharge.

Glissez la recharge dans le compartiment jusqu’à ce


qu’elle soit bien installée.

Fermez doucement le boîtier en le rabattant jusqu’à ce


qu’elle soit bien utilisée.

12

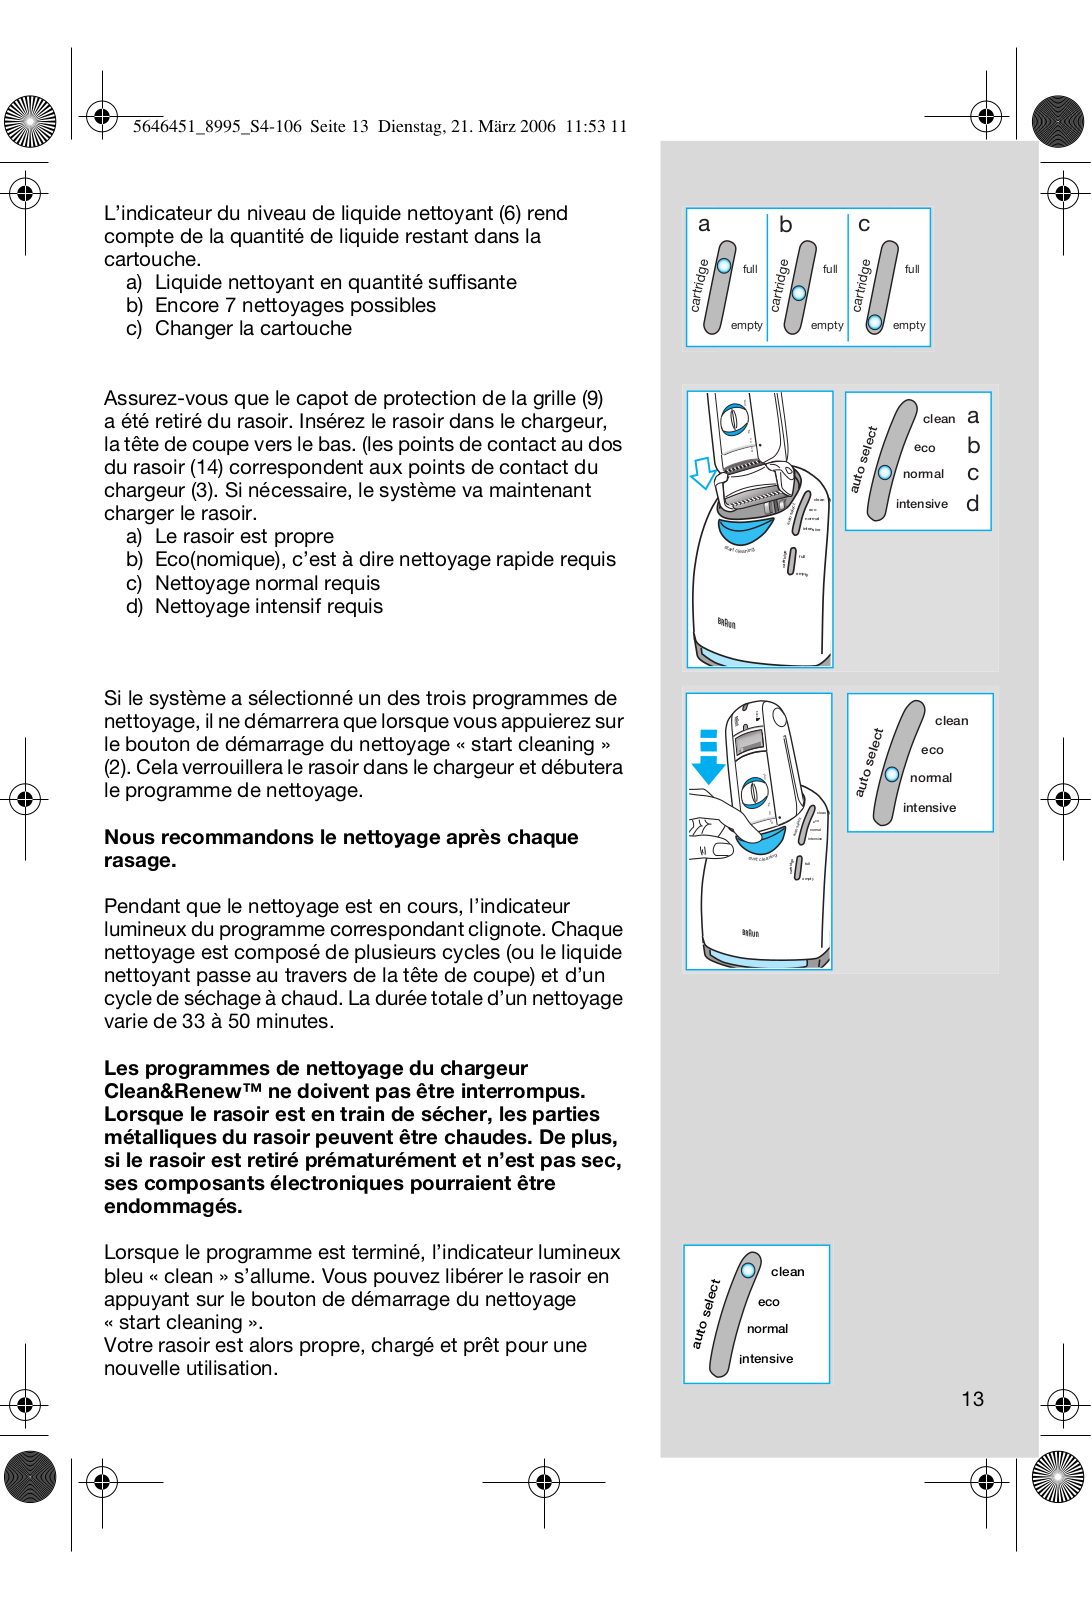
L’indicateur du niveau de liquide nettoyant (6) rend compte de la quantité de liquide restant dans la cartouche.

a)Liquide nettoyant en quantité suffisante

b)Encore 7 nettoyages possibles

c)Changer la cartouche

Assurez-vous que le capot de protection de la grille (9) a été retiré du rasoir. Insérez le rasoir dans le chargeur, la tête de coupe vers le bas. (les points de contact au dos du rasoir (14) correspondent aux points de contact du chargeur (3). Si nécessaire, le système va maintenant charger le rasoir.

a)Le rasoir est propre

b)Eco(nomique), c’est à dire nettoyage rapide requis

c)Nettoyage normal requis

d)Nettoyage intensif requis

Si le système a sélectionné un des trois programmes de nettoyage, il ne démarrera que lorsque vous appuierez sur le bouton de démarrage du nettoyage « start cleaning »

(2). Cela verrouillera le rasoir dans le chargeur et débutera le programme de nettoyage.

Nous recommandons le nettoyage après chaque rasage.

Pendant que le nettoyage est en cours, l’indicateur lumineux du programme correspondant clignote. Chaque nettoyage est composé de plusieurs cycles (ou le liquide nettoyant passe au travers de la tête de coupe) et d’un cycle de séchage à chaud. La durée totale d’un nettoyage varie de 33 à 50 minutes.

Les programmes de nettoyage du chargeur Clean&Renew™ ne doivent pas être interrompus. Lorsque le rasoir est en train de sécher, les parties métalliques du rasoir peuvent être chaudes. De plus, si le rasoir est retiré prématurément et n’est pas sec, ses composants électroniques pourraient être endommagés.

Lorsque le programme est terminé, l’indicateur lumineux bleu « clean » s’allume. Vous pouvez libérer le rasoir en appuyant sur le bouton de démarrage du nettoyage

« start cleaning ».

Votre rasoir est alors propre, chargé et prêt pour une nouvelle utilisation.

a


b


c


cartridge

full

cartridge

full


cartridge

full


empty


empty


empty


trim


a


select

clean


eco

b


auto


normal

c


clean


intensive

d


select

eco


auto

normal


intensive


st


art cl eaning

cartridge


full


empty


8


995


clean


select


auto

eco


trim


normal


fix


intensive


on

clean


off

eco


normal


a

intensive


start

g


cleanin


cartridge

full


empty


clean

auto

eco

normal


intensive

13

on fix

on fix

on fix

trim

8995

st

Rasage

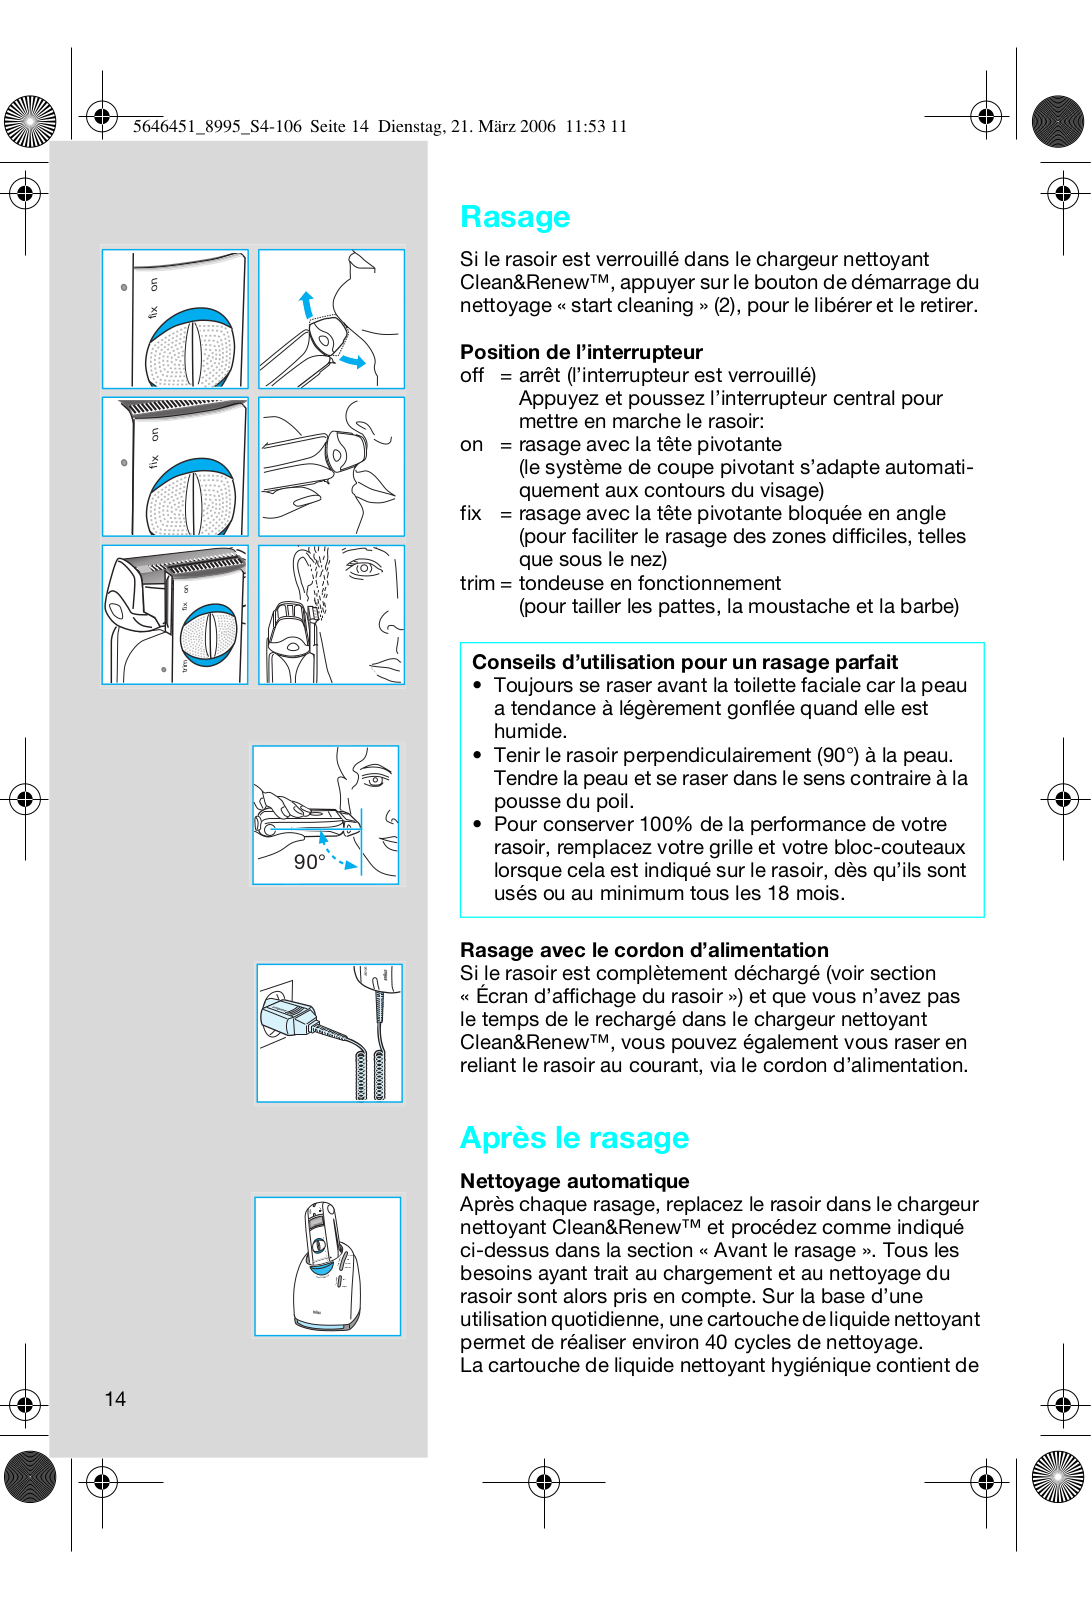
Si le rasoir est verrouillé dans le chargeur nettoyant Clean&Renew™, appuyer sur le bouton de démarrage du nettoyage « start cleaning » (2), pour le libérer et le retirer.

Position de l’interrupteur

off

= arrêt (l’interrupteur est verrouillé)


Appuyez et poussez l’interrupteur central pour


mettre en marche le rasoir:

on

= rasage avec la tête pivotante


(le système de coupe pivotant s’adapte automati-


quement aux contours du visage)

fix

= rasage avec la tête pivotante bloquée en angle

(pour faciliter le rasage des zones difficiles, telles que sous le nez)

trim = tondeuse en fonctionnement

(pour tailler les pattes, la moustache et la barbe)

Conseils d’utilisation pour un rasage parfait

Toujours se raser avant la toilette faciale car la peau a tendance à légèrement gonflée quand elle est humide.

Tenir le rasoir perpendiculairement (90°) à la peau. Tendre la peau et se raser dans le sens contraire à la pousse du poil.

Pour conserver 100% de la performance de votre rasoir, remplacez votre grille et votre bloc-couteaux lorsque cela est indiqué sur le rasoir, dès qu’ils sont usés ou au minimum tous les 18 mois.

Rasage avec le cordon d’alimentation

Si le rasoir est complètement déchargé (voir section

« Écran d’affichage du rasoir ») et que vous n’avez pas le temps de le rechargé dans le chargeur nettoyant Clean&Renew™, vous pouvez également vous raser en reliant le rasoir au courant, via le cordon d’alimentation.

Après le rasage

Nettoyage automatique

Après chaque rasage, replacez le rasoir dans le chargeur nettoyant Clean&Renew™ et procédez comme indiqué ci-dessus dans la section « Avant le rasage ». Tous les besoins ayant trait au chargement et au nettoyage du rasoir sont alors pris en compte. Sur la base d’une utilisation quotidienne, une cartouche de liquide nettoyant permet de réaliser environ 40 cycles de nettoyage.

La cartouche de liquide nettoyant hygiénique contient de

14

l’alcool qui, une fois la cartouche ouverte, va naturellement et lentement s’évaporer dans l’air environnant. Chaque cartouche, si elle n’est pas utilisée quotidiennement devra être remplacé environ toutes les 8 semaines.

Nettoyage rapide

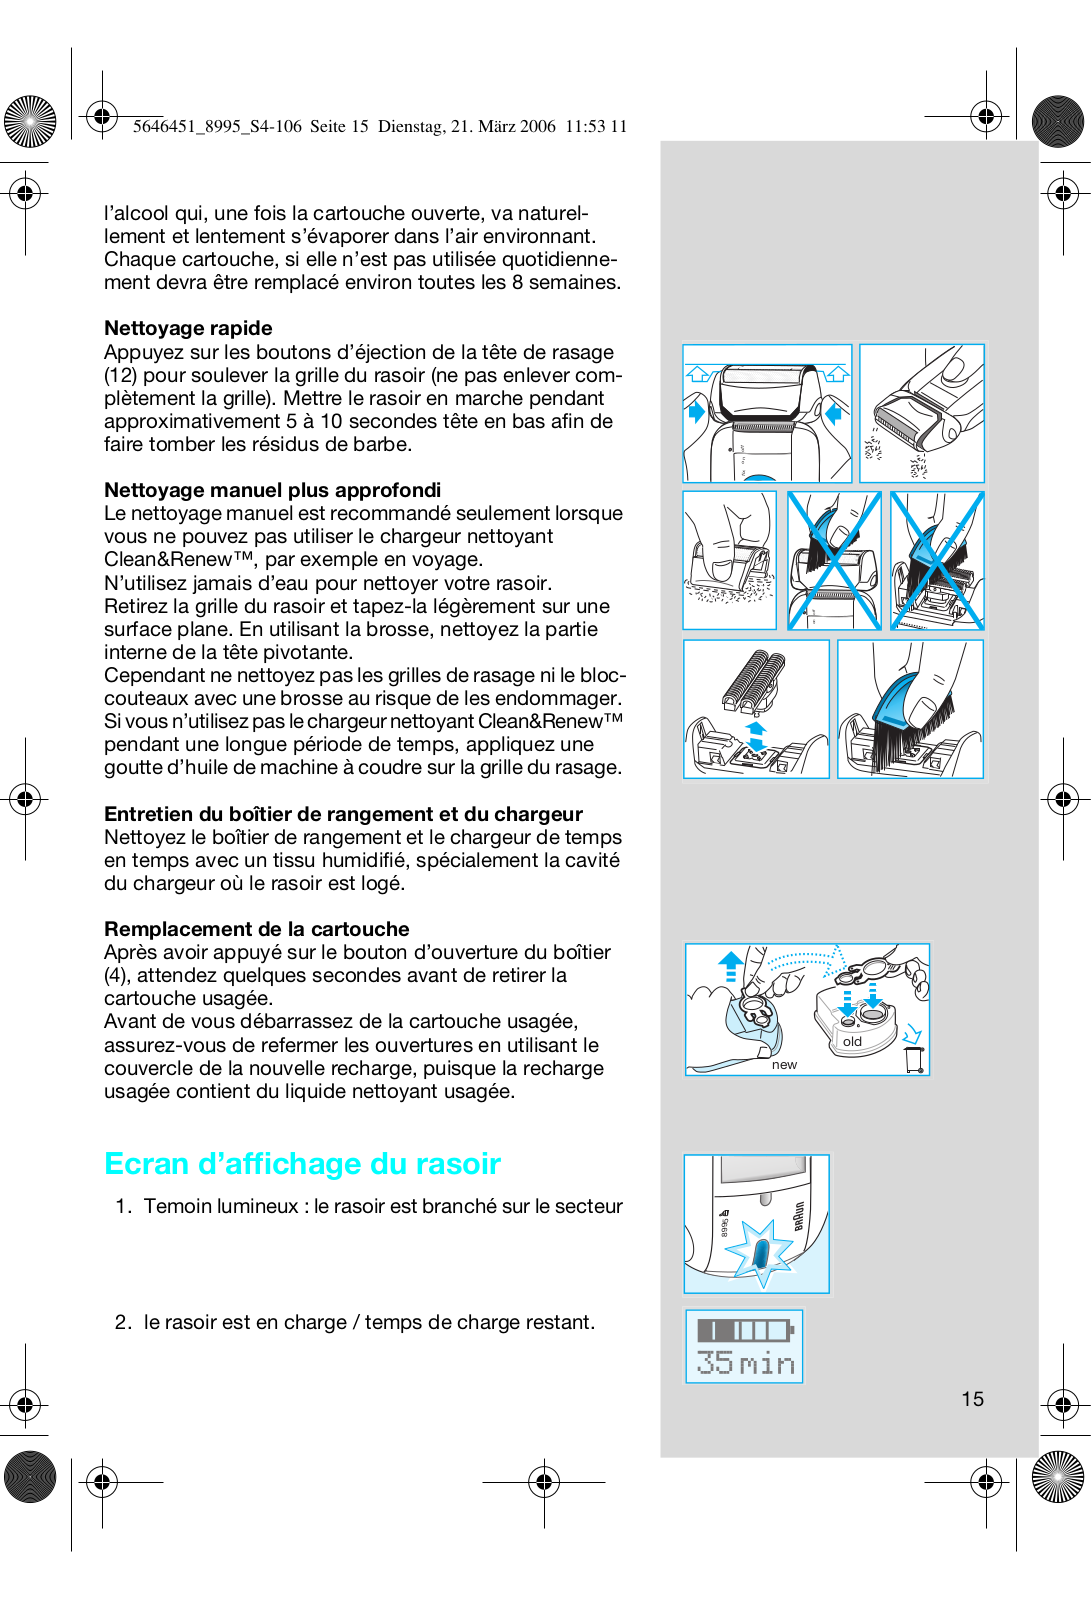
Appuyez sur les boutons d’éjection de la tête de rasage (12) pour soulever la grille du rasoir (ne pas enlever complètement la grille). Mettre le rasoir en marche pendant approximativement 5 à 10 secondes tête en bas afin de faire tomber les résidus de barbe.

Nettoyage manuel plus approfondi

Le nettoyage manuel est recommandé seulement lorsque vous ne pouvez pas utiliser le chargeur nettoyant Clean&Renew™, par exemple en voyage.

N’utilisez jamais d’eau pour nettoyer votre rasoir. Retirez la grille du rasoir et tapez-la légèrement sur une surface plane. En utilisant la brosse, nettoyez la partie interne de la tête pivotante.

Cependant ne nettoyez pas les grilles de rasage ni le bloccouteaux avec une brosse au risque de les endommager. Si vous n’utilisez pas le chargeur nettoyant Clean&Renew™ pendant une longue période de temps, appliquez une goutte d’huile de machine à coudre sur la grille du rasage.

Entretien du boîtier de rangement et du chargeur

Nettoyez le boîtier de rangement et le chargeur de temps en temps avec un tissu humidifié, spécialement la cavité du chargeur où le rasoir est logé.

Remplacement de la cartouche

Après avoir appuyé sur le bouton d’ouverture du boîtier (4), attendez quelques secondes avant de retirer la cartouche usagée.

Avant de vous débarrassez de la cartouche usagée, assurez-vous de refermer les ouvertures en utilisant le couvercle de la nouvelle recharge, puisque la recharge usagée contient du liquide nettoyant usagée.

Ecran d’affichage du rasoir

1.Temoin lumineux : le rasoir est branché sur le secteur

2.le rasoir est en charge / temps de charge restant.

off on fix

off on

8995

15

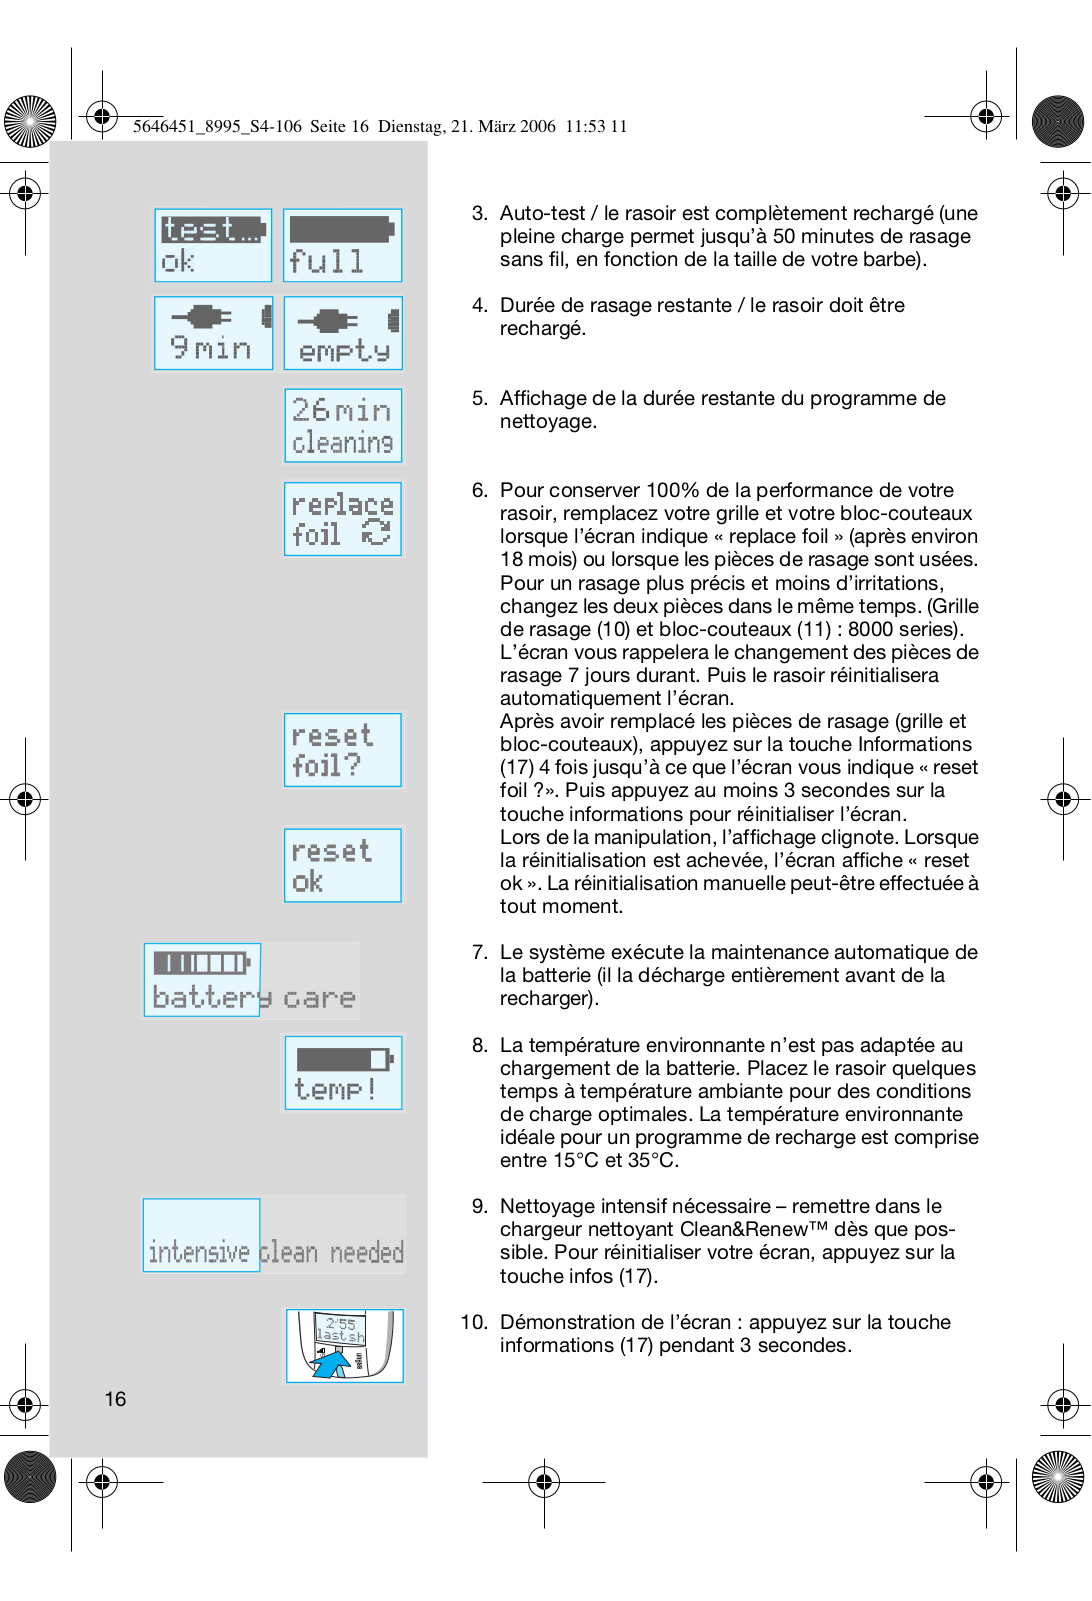
3. Auto-test / le rasoir est complètement rechargé (une pleine charge permet jusqu’à 50 minutes de rasage sans fil, en fonction de la taille de votre barbe).

4. Durée de rasage restante / le rasoir doit être rechargé.

5. Affichage de la durée restante du programme de nettoyage.

6. Pour conserver 100% de la performance de votre rasoir, remplacez votre grille et votre bloc-couteaux lorsque l’écran indique « replace foil » (après environ 18 mois) ou lorsque les pièces de rasage sont usées. Pour un rasage plus précis et moins d’irritations, changez les deux pièces dans le même temps. (Grille de rasage (10) et bloc-couteaux (11) : 8000 series). L’écran vous rappelera le changement des pièces de rasage 7 jours durant. Puis le rasoir réinitialisera automatiquement l’écran.

Après avoir remplacé les pièces de rasage (grille et bloc-couteaux), appuyez sur la touche Informations (17) 4 fois jusqu’à ce que l’écran vous indique « reset foil ?». Puis appuyez au moins 3 secondes sur la touche informations pour réinitialiser l’écran.

Lors de la manipulation, l’affichage clignote. Lorsque la réinitialisation est achevée, l’écran affiche « reset ok ». La réinitialisation manuelle peut-être effectuée à tout moment.

7.Le système exécute la maintenance automatique de la batterie (il la décharge entièrement avant de la

recharger).

8. La température environnante n’est pas adaptée au chargement de la batterie. Placez le rasoir quelques temps à température ambiante pour des conditions de charge optimales. La température environnante idéale pour un programme de recharge est comprise entre 15°C et 35°C.

9.Nettoyage intensif nécessaire – remettre dans le chargeur nettoyant Clean&Renew™ dès que pos-

sible. Pour réinitialiser votre écran, appuyez sur la touche infos (17).

10. Démonstration de l’écran : appuyez sur la touche informations (17) pendant 3 secondes.

8595

16

11.Touche informations, appuyez une fois : durée du dernier rasage. Appuyez une seconde fois : nombre total de rasage (ne peut être réinitialisé). Rappuyez : référence de la grille et du bloc-couteaux. Rappuyez : foil reset ? (peut-être réinitialisé, voir point 6).

12.Pas d’affichage – le rasoir est complètement déchargé.

Accessoires

Accessoire disponible chez votre revendeur ou auprès de votre centre service agréé Braun :

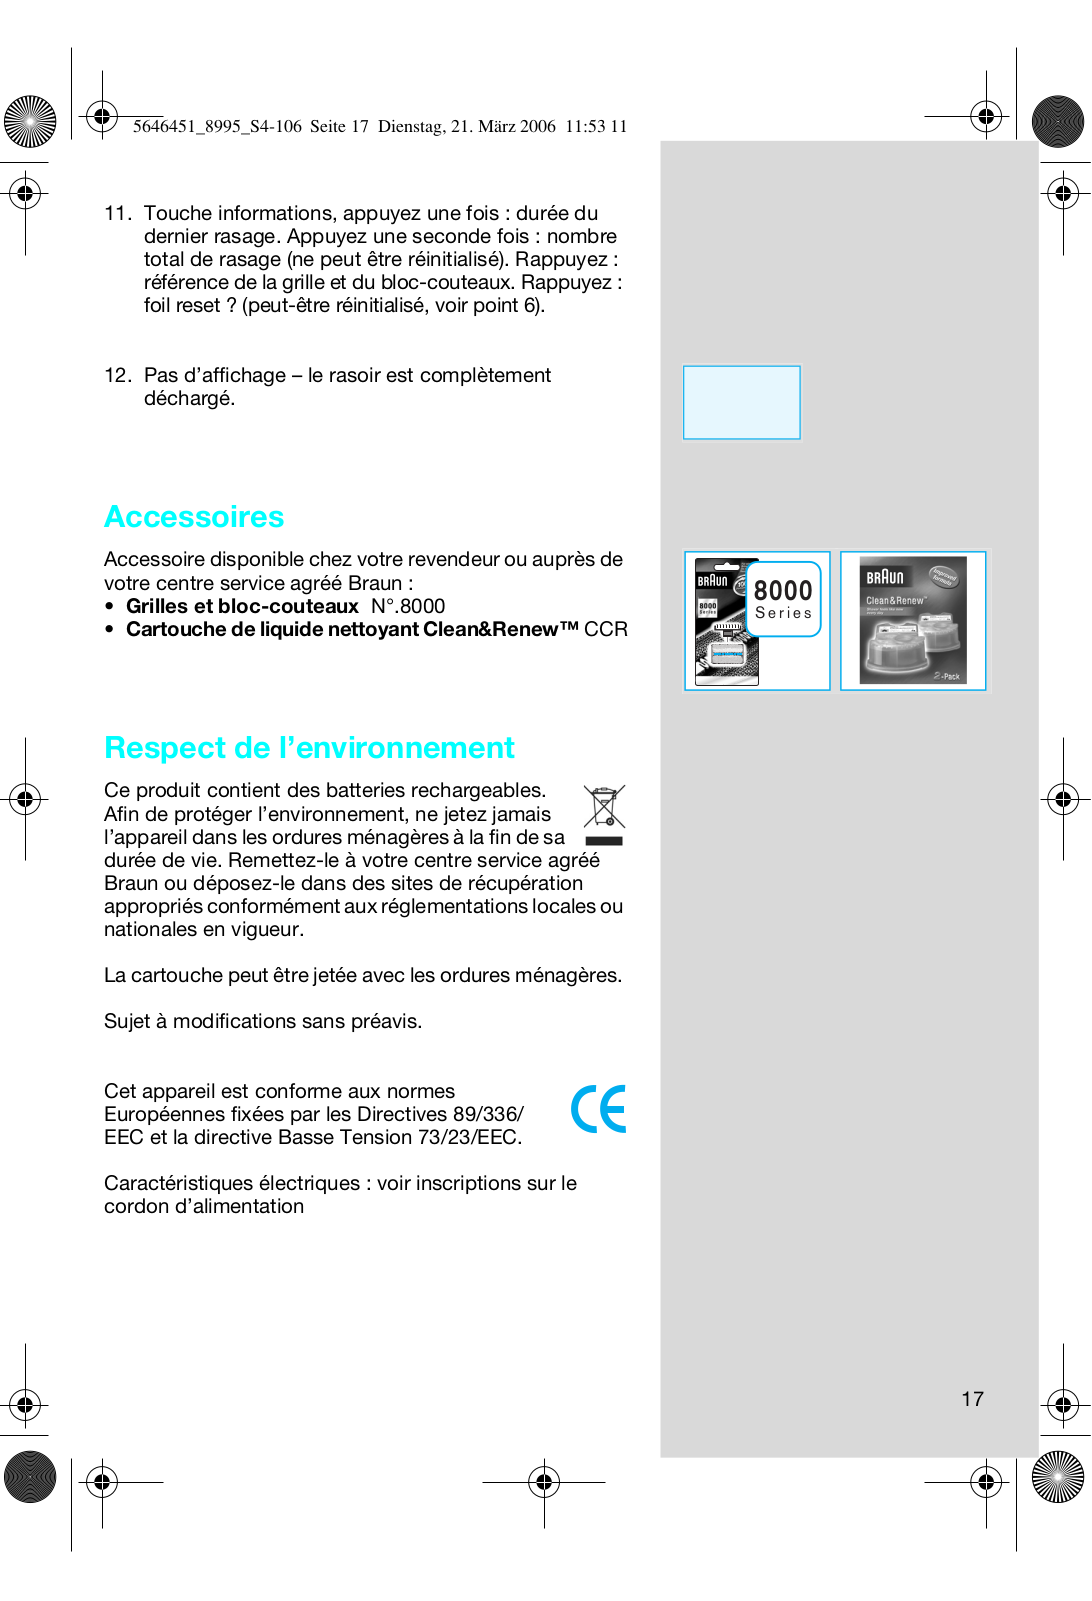
Grilles et bloc-couteaux N°.8000

Cartouche de liquide nettoyant Clean&Renew™ CCR

Respect de l’environnement

Ce produit contient des batteries rechargeables. Afin de protéger l’environnement, ne jetez jamais l’appareil dans les ordures ménagères à la fin de sa

durée de vie. Remettez-le à votre centre service agréé Braun ou déposez-le dans des sites de récupération appropriés conformément aux réglementations locales ou nationales en vigueur.

La cartouche peut être jetée avec les ordures ménagères.

Sujet à modifications sans préavis.

Cet appareil est conforme aux normes Européennes fixées par les Directives 89/336/ EEC et la directive Basse Tension 73/23/EEC.

Caractéristiques électriques : voir inscriptions sur le cordon d’alimentation

8000

S e r i e s

360°Complete

17

Polski

STOP

Twój zestaw 360° Complete (golarka ze stacjà «Clean&Renew™») wyposa˝ony jest w wysoce zaawansowane elektroniczne mikroprocesory. Gwarantuje Ci to niezrównanà dok∏adnoÊç i wygod´ oraz optymalne utrzymanie golarki.

Zestaw automatycznie dostosowuje si´ do napi´cia zasilania na ca∏ym Êwiecie.

Zestaw rozpoznaje, kiedy golarka wymaga czyszczenia i automatycznie decyduje, który z trzech programów czyszczenia jest odpowiedni.

Gdy golarka jest pod∏àczona do zasilania z sieci, zestaw automatycznie zajmuje si´ ∏adowaniem i roz∏adowywaniem w sposób zapewniajàcy optymalnà pojemnoÊç i ˝ywotnoÊç baterii golarki.

Zestaw dba o oliwienie cz´Êci tnàcych golarki.

Zestaw powiadamia Ci´ o potrzebie wymiany folii golàcej i bloku ostrzy tnàcych.

Ostrze˝enie

Urzàdzenie nale˝y przechowywaç w stanie suchym.

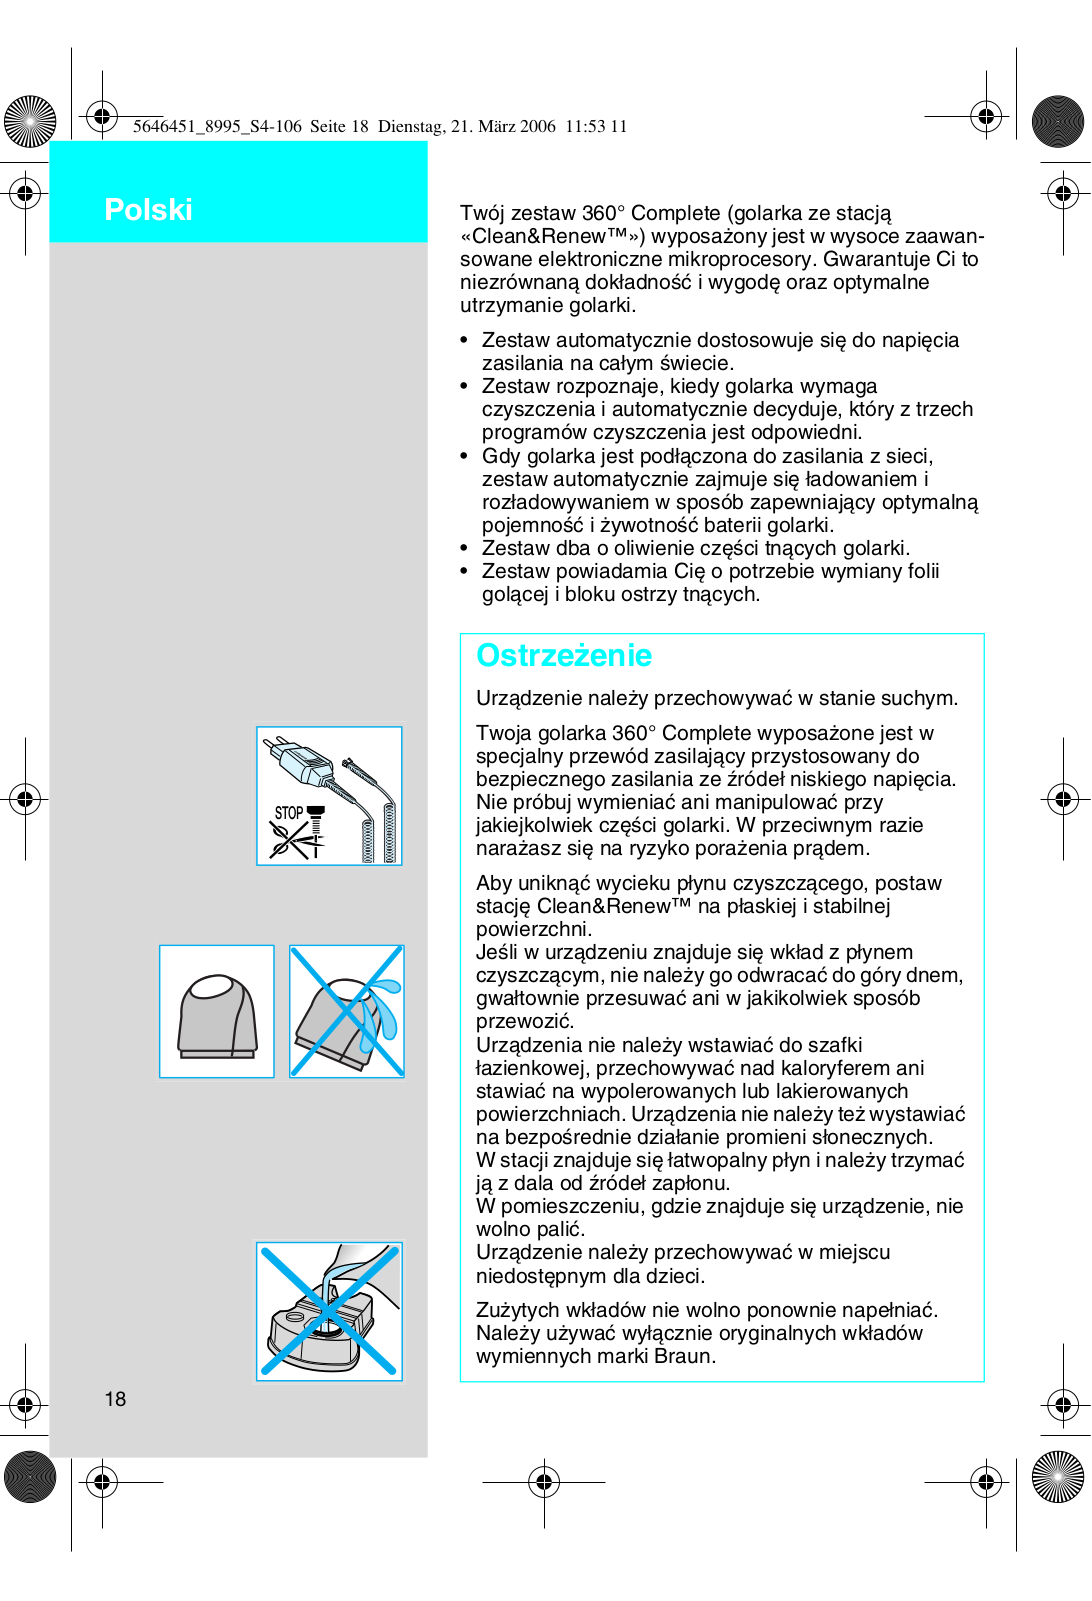
Twoja golarka 360° Complete wyposa˝one jest w specjalny przewód zasilajàcy przystosowany do bezpiecznego zasilania ze êróde∏ niskiego napi´cia. Nie próbuj wymieniaç ani manipulowaç przy jakiejkolwiek cz´Êci golarki. W przeciwnym razie nara˝asz si´ na ryzyko pora˝enia pràdem.

Aby uniknàç wycieku p∏ynu czyszczàcego, postaw stacj´ Clean&Renew™ na p∏askiej i stabilnej powierzchni.

JeÊli w urzàdzeniu znajduje si´ wk∏ad z p∏ynem czyszczàcym, nie nale˝y go odwracaç do góry dnem, gwa∏townie przesuwaç ani w jakikolwiek sposób przewoziç.

Urzàdzenia nie nale˝y wstawiaç do szafki ∏azienkowej, przechowywaç nad kaloryferem ani stawiaç na wypolerowanych lub lakierowanych powierzchniach. Urzàdzenia nie nale˝y te˝ wystawiaç na bezpoÊrednie dzia∏anie promieni s∏onecznych.

W stacji znajduje si´ ∏atwopalny p∏yn i nale˝y trzymaç jà z dala od êróde∏ zap∏onu.

W pomieszczeniu, gdzie znajduje si´ urzàdzenie, nie wolno paliç.

Urzàdzenie nale˝y przechowywaç w miejscu niedost´pnym dla dzieci.

Zu˝ytych wk∏adów nie wolno ponownie nape∏niaç. Nale˝y u˝ywaç wy∏àcznie oryginalnych wk∏adów wymiennych marki Braun.

18

Opis

1 Specjalny przewód zasilajàcy

2 przycisk «start cleaning» – rozpocz´cie czyszczenia

3 Styki stacji

4Przycisk umo˝liwiajàcy uniesienie obudowy w celu wymiany wk∏adu z p∏ynem czyszczàcym

5 Wskaênik programów czyszczenia

6 Wskaênik iloÊci p∏ynu czyszczàcego

7 Gniazdo zasilania stacji

8 Wk∏ad z p∏ynem czyszczàcym

9 Ochronna os∏ona na foli´ golàcà

10Folia golàca

11Blok ostrzy tnàcych

12Przyciski zwalniajàce foli´ golàcà

13Trymer do d∏u˝szego zarostu

14Styki golarki (z ty∏u golarki)

15Prze∏àcznik

16WyÊwietlacz golarki

17Przycisk do wyÊwietlania informacji

18Kontrolka zasilania

19Gniazdo zasilania golarki

Przed goleniem

JeÊli chcesz, mo˝esz od razu zaczàç si´ goliç, (jeÊli golarka jest na∏adowana, patrz sekcja «WyÊwietlacz golarki»). Zalecamy jednak zastosowaç si´ do opisanej poni˝ej procedury:

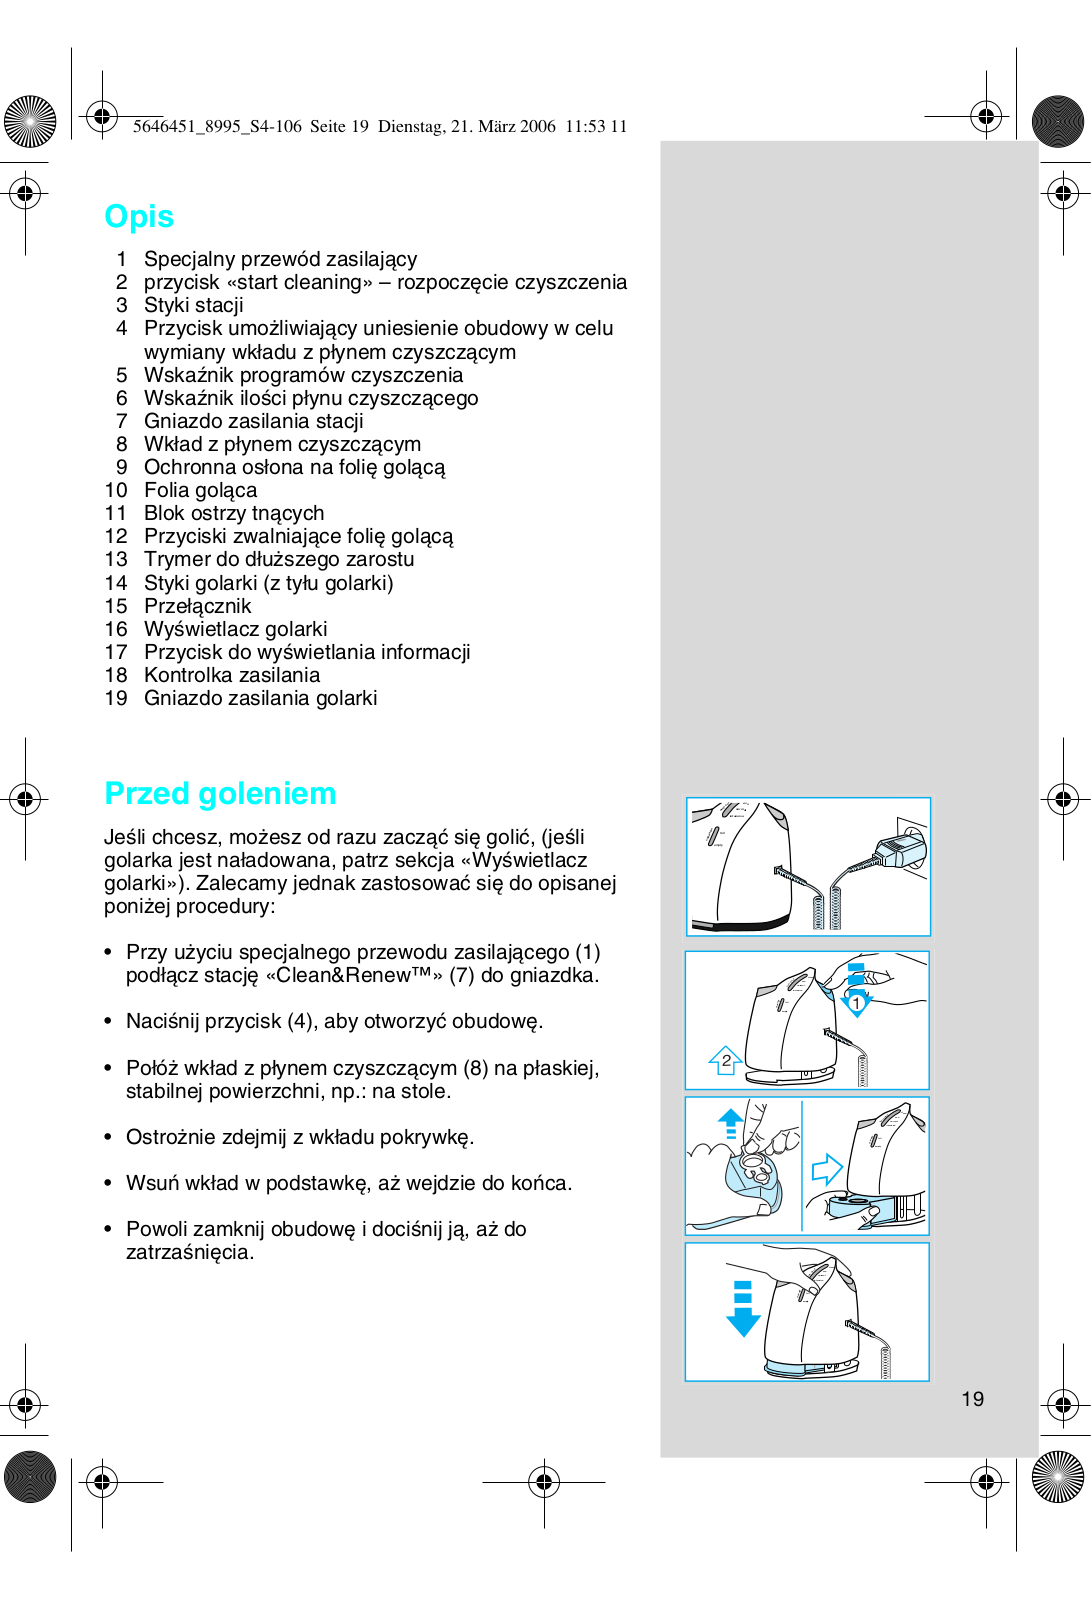
Przy u˝yciu specjalnego przewodu zasilajàcego (1) pod∏àcz stacj´ «Clean&Renew™» (7) do gniazdka.

NaciÊnij przycisk (4), aby otworzyç obudow´.

Po∏ó˝ wk∏ad z p∏ynem czyszczàcym (8) na p∏askiej, stabilnej powierzchni, np.: na stole.

Ostro˝nie zdejmij z wk∏adu pokrywk´.

Wsuƒ wk∏ad w podstawk´, a˝ wejdzie do koƒca.

Powoli zamknij obudow´ i dociÊnij jà, a˝ do zatrzaÊni´cia.

eco

normal intensive

cartridge

full


empty

1

2

19


a


b


c


cartridge

full

cartridge


full

cartridge

full


empty


empty


empty

trim


a


select


clean


eco

b


auto


normal

c


clean


intensive

d


select

eco


auto

normal


intensive


st


art cleaning

cartridge


full


empty


8995


clean


select


auto

eco


trim


normal


fix


intensive


on


clean


off


eco


normal


intensive


start

g


cleanin

cartridge

full


empty


select

clean

auto

eco


normal


intensive

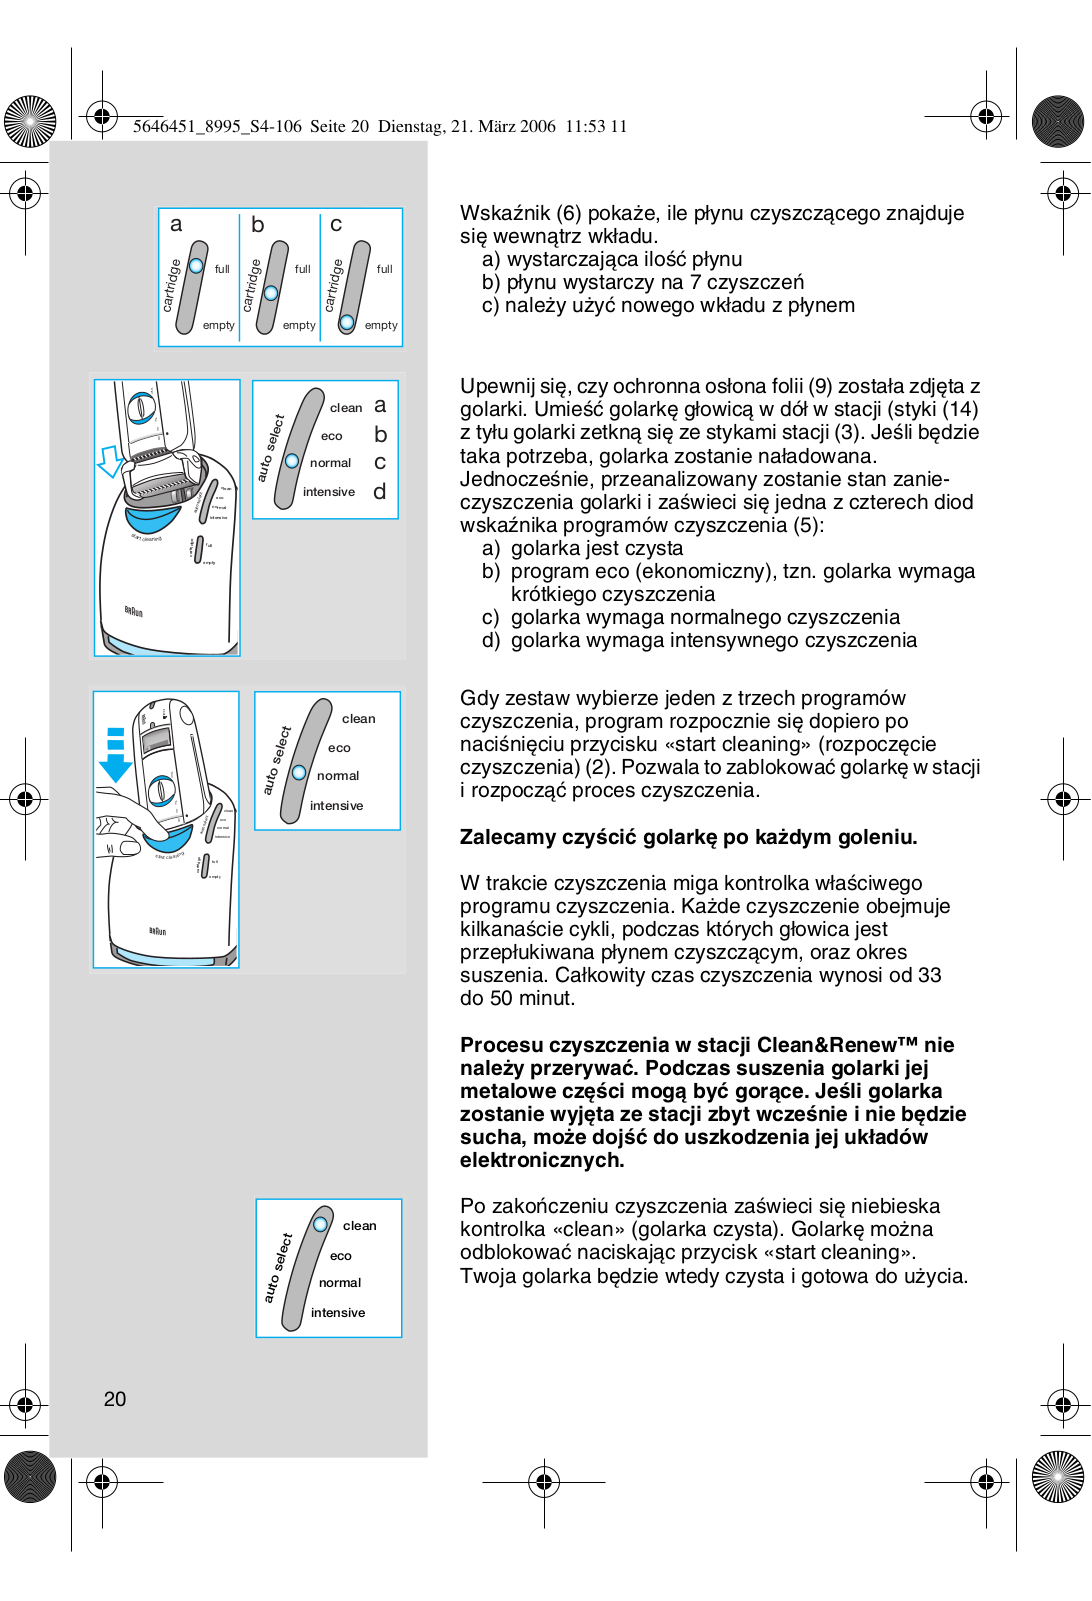
Wskaênik (6) poka˝e, ile p∏ynu czyszczàcego znajduje si´ wewnàtrz wk∏adu.

a)wystarczajàca iloÊç p∏ynu

b)p∏ynu wystarczy na 7 czyszczeƒ

c)nale˝y u˝yç nowego wk∏adu z p∏ynem

Upewnij si´, czy ochronna os∏ona folii (9) zosta∏a zdj´ta z golarki. UmieÊç golark´ g∏owicà w dó∏ w stacji (styki (14) z ty∏u golarki zetknà si´ ze stykami stacji (3). JeÊli b´dzie taka potrzeba, golarka zostanie na∏adowana.

JednoczeÊnie, przeanalizowany zostanie stan zanieczyszczenia golarki i zaÊwieci si´ jedna z czterech diod wskaênika programów czyszczenia (5):

a)golarka jest czysta

b)program eco (ekonomiczny), tzn. golarka wymaga krótkiego czyszczenia

c)golarka wymaga normalnego czyszczenia

d)golarka wymaga intensywnego czyszczenia

Gdy zestaw wybierze jeden z trzech programów czyszczenia, program rozpocznie si´ dopiero po naciÊni´ciu przycisku «start cleaning» (rozpocz´cie czyszczenia) (2). Pozwala to zablokowaç golark´ w stacji i rozpoczàç proces czyszczenia.

Zalecamy czyÊciç golark´ po ka˝dym goleniu.

W trakcie czyszczenia miga kontrolka w∏aÊciwego programu czyszczenia. Ka˝de czyszczenie obejmuje kilkanaÊcie cykli, podczas których g∏owica jest przep∏ukiwana p∏ynem czyszczàcym, oraz okres suszenia. Ca∏kowity czas czyszczenia wynosi od 33 do 50 minut.

Procesu czyszczenia w stacji Clean&Renew™ nie nale˝y przerywaç. Podczas suszenia golarki jej metalowe cz´Êci mogà byç goràce. JeÊli golarka zostanie wyj´ta ze stacji zbyt wczeÊnie i nie b´dzie sucha, mo˝e dojÊç do uszkodzenia jej uk∏adów elektronicznych.

Po zakoƒczeniu czyszczenia zaÊwieci si´ niebieska kontrolka «clean» (golarka czysta). Golark´ mo˝na odblokowaç naciskajàc przycisk «start cleaning».

Twoja golarka b´dzie wtedy czysta i gotowa do u˝ycia.

20

Golenie

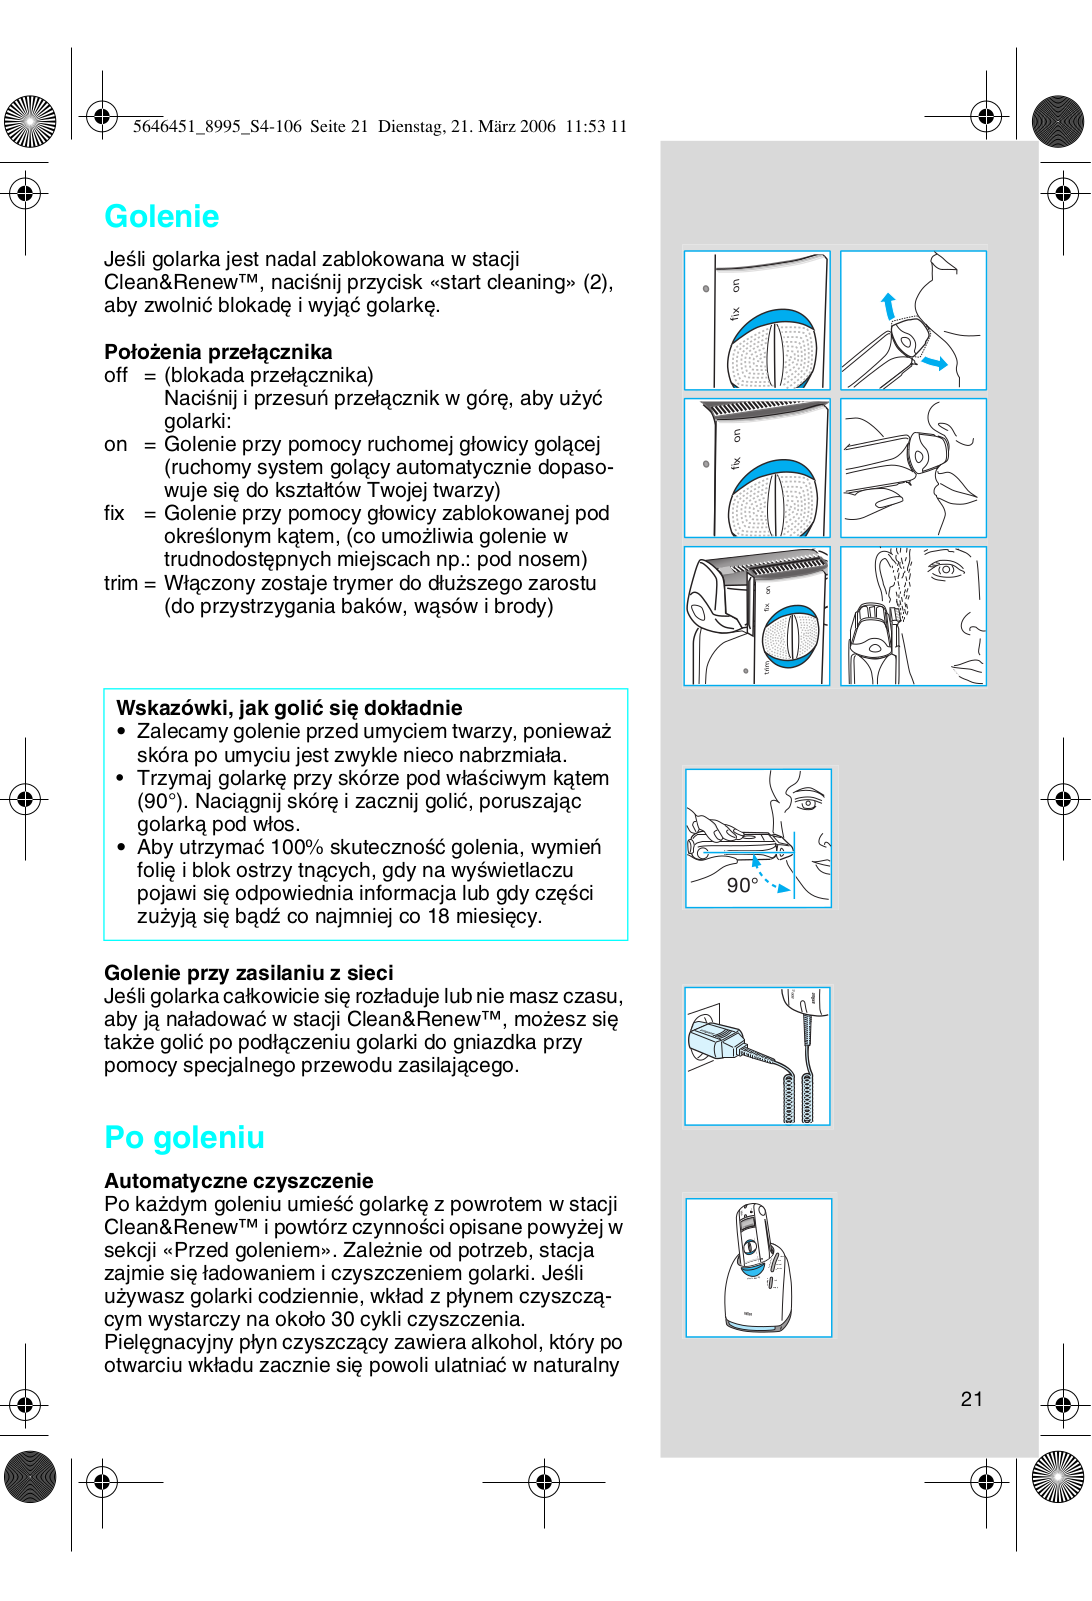
JeÊli golarka jest nadal zablokowana w stacji Clean&Renew™, naciÊnij przycisk «start cleaning» (2), aby zwolniç blokad´ i wyjàç golark´.

Po∏o˝enia prze∏àcznika

off

= (blokada prze∏àcznika)


NaciÊnij i przesuƒ prze∏àcznik w gór´, aby u˝yç


golarki:

on

= Golenie przy pomocy ruchomej g∏owicy golàcej


(ruchomy system golàcy automatycznie dopaso-


wuje si´ do kszta∏tów Twojej twarzy)

fix

= Golenie przy pomocy g∏owicy zablokowanej pod


okreÊlonym kàtem, (co umo˝liwia golenie w


trudnodost´pnych miejscach np.: pod nosem)

trim = W∏àczony zostaje trymer do d∏u˝szego zarostu (do przystrzygania baków, wàsów i brody)

Wskazówki, jak goliç si´ dok∏adnie

Zalecamy golenie przed umyciem twarzy, poniewa˝ skóra po umyciu jest zwykle nieco nabrzmia∏a.

Trzymaj golark´ przy skórze pod w∏aÊciwym kàtem (90°). Naciàgnij skór´ i zacznij goliç, poruszajàc golarkà pod w∏os.

Aby utrzymaç 100% skutecznoÊç golenia, wymieƒ foli´ i blok ostrzy tnàcych, gdy na wyÊwietlaczu pojawi si´ odpowiednia informacja lub gdy cz´Êci zu˝yjà si´ bàdê co najmniej co 18 miesi´cy.

Golenie przy zasilaniu z sieci

JeÊli golarka ca∏kowicie si´ roz∏aduje lub nie masz czasu, aby jà na∏adowaç w stacji Clean&Renew™, mo˝esz si´ tak˝e goliç po pod∏àczeniu golarki do gniazdka przy pomocy specjalnego przewodu zasilajàcego.

Po goleniu

Automatyczne czyszczenie

Po ka˝dym goleniu umieÊç golark´ z powrotem w stacji Clean&Renew™ i powtórz czynnoÊci opisane powy˝ej w sekcji «Przed goleniem». Zale˝nie od potrzeb, stacja zajmie si´ ∏adowaniem i czyszczeniem golarki. JeÊli u˝ywasz golarki codziennie, wk∏ad z p∏ynem czyszczàcym wystarczy na oko∏o 30 cykli czyszczenia. Piel´gnacyjny p∏yn czyszczàcy zawiera alkohol, który po otwarciu wk∏adu zacznie si´ powoli ulatniaç w naturalny

on fix

on fix

on fix

trim

8995

st

21

off on fix

off on

old

new

8995

sposób w otaczajàcym powietrzu. Ka˝dy wk∏ad, jeÊli golarka nie b´dzie u˝ywana codziennie, nale˝y wymieniç po oko∏o 8 tygodniach.

Szybkie czyszczenie

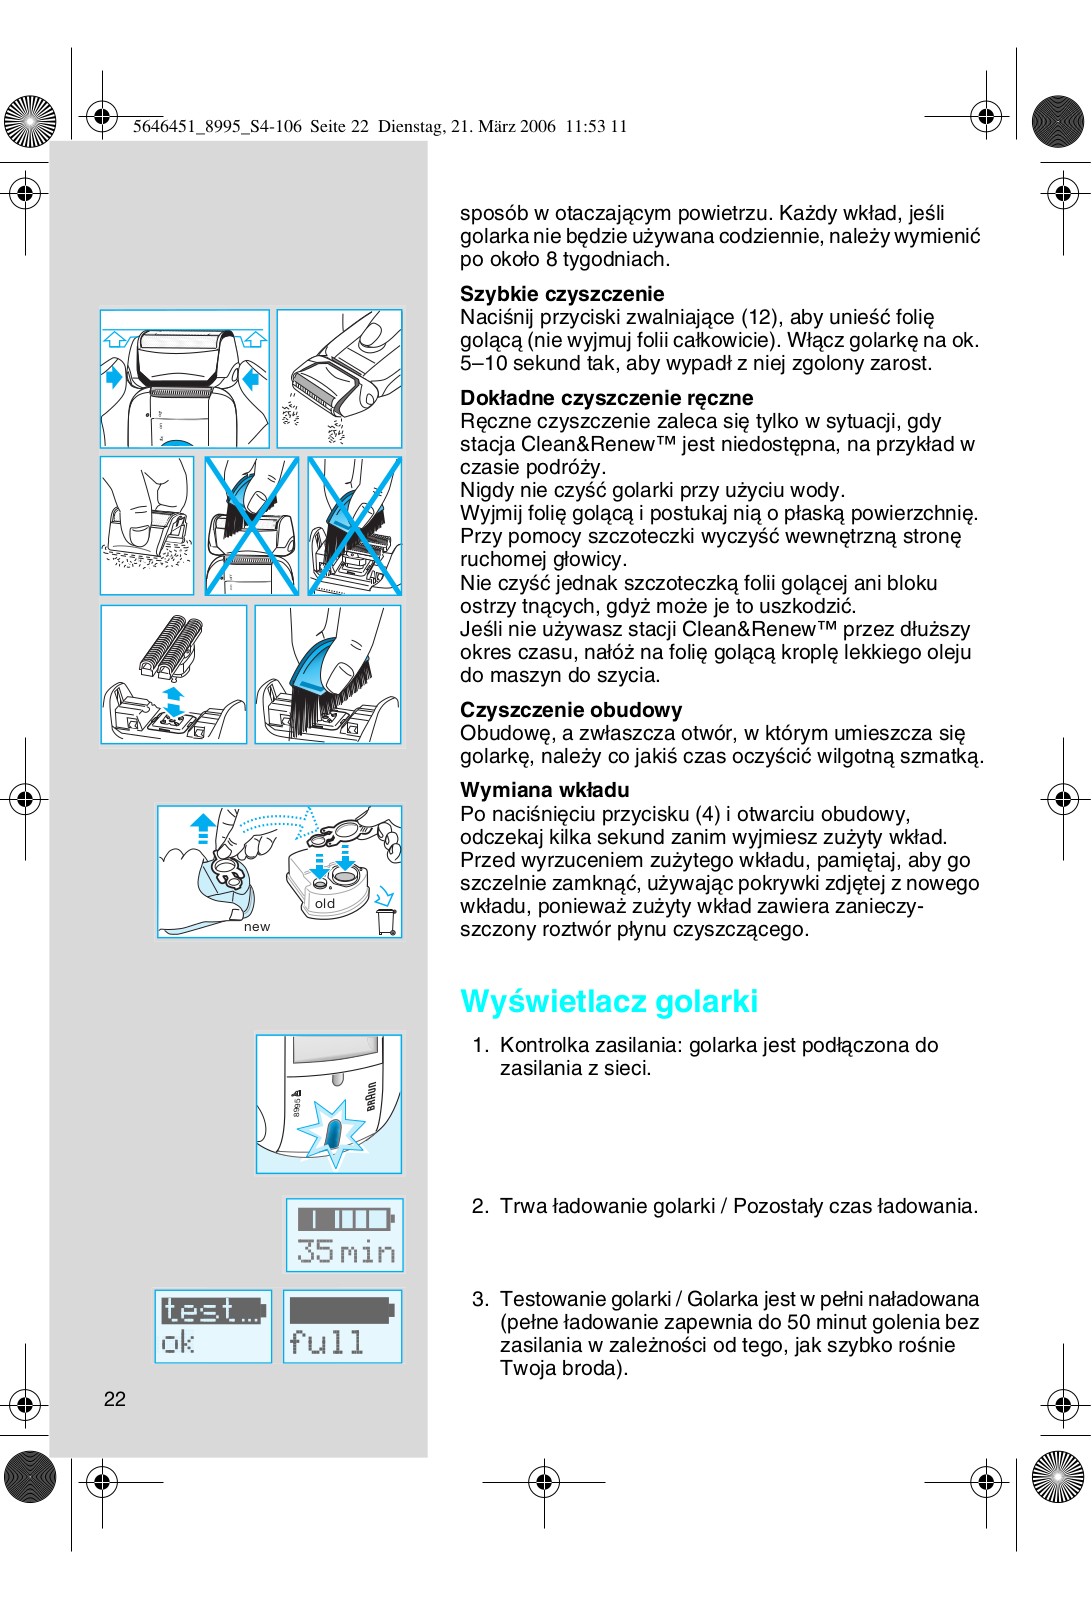
NaciÊnij przyciski zwalniajàce (12), aby unieÊç foli´ golàcà (nie wyjmuj folii ca∏kowicie). W∏àcz golark´ na ok. 5–10 sekund tak, aby wypad∏ z niej zgolony zarost.

Dok∏adne czyszczenie r´czne

R´czne czyszczenie zaleca si´ tylko w sytuacji, gdy stacja Clean&Renew™ jest niedost´pna, na przyk∏ad w czasie podró˝y.

Nigdy nie czyÊç golarki przy u˝yciu wody.

Wyjmij foli´ golàcà i postukaj nià o p∏askà powierzchni´. Przy pomocy szczoteczki wyczyÊç wewn´trznà stron´ ruchomej g∏owicy.

Nie czyÊç jednak szczoteczkà folii golàcej ani bloku ostrzy tnàcych, gdy˝ mo˝e je to uszkodziç.

JeÊli nie u˝ywasz stacji Clean&Renew™ przez d∏u˝szy okres czasu, na∏ó˝ na foli´ golàcà kropl´ lekkiego oleju do maszyn do szycia.

Czyszczenie obudowy

Obudow´, a zw∏aszcza otwór, w którym umieszcza si´ golark´, nale˝y co jakiÊ czas oczyÊciç wilgotnà szmatkà.

Wymiana wk∏adu

Po naciÊni´ciu przycisku (4) i otwarciu obudowy, odczekaj kilka sekund zanim wyjmiesz zu˝yty wk∏ad. Przed wyrzuceniem zu˝ytego wk∏adu, pami´taj, aby go szczelnie zamknàç, u˝ywajàc pokrywki zdj´tej z nowego wk∏adu, poniewa˝ zu˝yty wk∏ad zawiera zanieczyszczony roztwór p∏ynu czyszczàcego.

WyÊwietlacz golarki

1.Kontrolka zasilania: golarka jest pod∏àczona do zasilania z sieci.

2.Trwa ∏adowanie golarki / Pozosta∏y czas ∏adowania.

3.Testowanie golarki / Golarka jest w pe∏ni na∏adowana (pe∏ne ∏adowanie zapewnia do 50 minut golenia bez zasilania w zale˝noÊci od tego, jak szybko roÊnie Twoja broda).

22

4.Pozosta∏y czas golenia / Golark´ nale˝y na∏adowaç.

5.Pozosta∏y czas czyszczenia.

6.Aby utrzymaç 100% skutecznoÊç golenia, wymieƒ foli´ i blok ostrzy tnàcych, gdy na wyÊwietlaczu pojawi si´ komunikat «replace foil» (wymieƒ foli´) (po oko∏o 18 miesiàcach) lub gdy cz´Êci zu˝yjà si´. Wymieƒ obie cz´Êci jednoczeÊnie, co zapewni dok∏adniejsze golenie i zmniejszy ryzyko podra˝nieƒ skóry. Folia golàca (10) i blok ostrzy tnàcych (11): seria 8000)

Komunikat o potrzebie wymiany cz´Êci golàcych b´dzie pojawiaç si´ na wyÊwietlaczu jeszcze przez 7 kolejnych dni. Nast´pnie golarka automatycznie zresetuje wyÊwietlacz.

Po wymianie cz´Êci golàcych (folii i bloku ostrzy tnàcych), przy pomocy d∏ugopisu naciÊnij cztery razy przycisk (17), a˝ na wyÊwietlaczu pojawi si´ napis «reset foil?» (zresetowaç komunikat dot. Folii?). Nast´pnie naciÊnij ten sam przycisk i przytrzymaj go przez co najmniej 3 sekundy, aby zresetowaç wyÊwietlacz.

W tym samym czasie wyÊwietlacz b´dzie migaç. Gdy resetowanie zostanie zakoƒczone, na wyÊwietlaczu pojawi si´ informacja «reset ok» (resetowanie pomyÊlnie zakoƒczone). WyÊwietlacz mo˝na zresetowaç r´cznie w dowolnym momencie.

7.System rozpoczà∏ automatycznà konserwacj´ baterii (ca∏kowite roz∏adowanie a nast´pnie ponowne na∏adowanie baterii).

8.Temperatura otoczenia jest nieodpowiednia do ∏adowania. Pozostaw golark´ na jakiÊ czas w temperaturze pokojowej, aby uzyskaç optymalne warunki ∏adowania. Golark´ najlepiej jest ∏adowaç przy temperaturze otoczenia mi´dzy 15°C a 35°C.

9.Golarka wymaga intensywnego czyszczenia – umieÊç golark´ z powrotem w stacji Clean&Renew™ mo˝liwie jak najszybciej. Aby zresetowaç wyÊwietlacz, naciÊnij przycisk (17).

10.Prezentacja funkcji wyÊwietlacza: przytrzymaj wciÊni´ty przycisk (17) przez 3 sekundy.

23

8000

S e r i e s

360°Complete

11.Przycisk (17), naciÊnij raz: czas trwania ostatniego golenia. NaciÊnij ponownie: ogólna iloÊç cykli golenia (nie mo˝na zresetowaç). NaciÊnij ponownie: g∏ówny nr cz´Êci dla folii golàcej i bloku ostrzy. NaciÊnij ponownie: pojawi si´ napis foil reset? (zresetowaç komunikat dot. Folii?) (mo˝na zresetowaç, patrz punkt 6).

12.Brak informacji na wyÊwietlaczu – golarka jest ca∏kowicie roz∏adowana.

Akcesoria

Dost´pne w lokalnym sklepie lub punkcie serwisowym marki Braun:

Nr cz´Êci folii golàcej i bloku ostrzy - Nr 8000

Wk∏ad z p∏ynem czyszczàcym Clean&Renew™

CCR

Uwagi dotyczàce ochrony Êrodowiska

Urzàdzenie to wyposa˝one jest w baterie przystosowane do wielokrotnego ∏adowania. Aby zapobiec zanieczyszczaniu Êrodowiska, pod

koniec okresu eksploatacji produktu nie wyrzucaj go do kosza na Êmieci. Mo˝esz pozostawiç go w punkcie serwisowym marki Braun lub jednym ze specjalnych punktów zajmujàcych si´ zbiórkà zu˝ytych produktów w wybranych miejscach na terenie kraju.

Wk∏ad po p∏ynie czyszczàcym mo˝na wyrzuciç do zwyk∏ego kosza na Êmieci.

Powy˝sze informacje mogà ulec zmianie bez uprzedniego powiadomienia.

Produkt ten spe∏nia wymogi dyrektywy EMC 89/336/EEC oraz dyrektywy 73/23 EEC dotyczàcej elektrycznych urzàdzeƒ niskonapi´ciowych.

Specyfikacje elektryczne zosta∏y wydrukowane na specjalnym przewodzie zasilajàcym.

24

Vበ360° Complete (holicí strojek se základnou Clean&Renew™) je zafiízení vybavené vysoce pokrokov˘mi mikroprocesory. Tím je zaji‰tûna nedostiÏná hladkost a komfort holení a optimální péãe o vበholicí strojek:

Toto zafiízení se automaticky pfiizpÛsobuje jakémukoli napájecímu napûtí na celém svûtû.

Toto zafiízení rozpozná, kdy je tfieba holicí strojek vyãistit a automaticky zjistí, kter˘ ze tfií ãistících programÛ je nejvhodnûj‰í.

Zatímco je holicí strojek pfiipojen k síti, zafiízení automaticky peãuje o nabíjení a vybíjení takov˘m zpÛsobem, aby se optimalizovala kapacita baterie a doba Ïivotnosti.

Toto zafiízení peãuje o mazání bfiitov˘ch dílÛ holicího strojku.

Toto zafiízení vás upozorní, kdy vymûnit holicí planÏetu a bfiitov˘ blok.

V˘straha

DrÏte toto zafiízení v suchu.

Vበ360° Complete je vybaven speciálním pfiívodem s integrovan˘m bezpeãnostním síÈov˘m adaptérem. Îádná jeho ãást se nesmí mûnit ani rozebírat. Jinak by mohlo dojít k úrazu elektrick˘m proudem.

Abyste zabránili pfiípadnému vyteãení ãistící kapaliny, umístûte zafiízení Clean&Renew™ na vodorovn˘, stabilní povrch.

Je-li nainstalována ãistící kazeta, zafiízení nenaklánûjte, prudce jím neh˘bejte a nepfiená‰ejte jej. Zafiízení neumisÈujte do zrcadlové skfiíÀky, nepokládejte jej na radiátory, ani na le‰tûné nebo lakované povrchy. Nevystavujte jej pfiímému sluneãnímu záfiení.

Toto zafiízení obsahuje vysoce hofilavou kapalinu. DrÏte je v dostateãné vzdálenosti od moÏn˘ch zdrojÛ vznícení.

Nekufite.

DrÏte je z dosahu dûtí.

Kazetu znovu nedoplÀujte.

PouÏívejte pouze originální v˘mûnné kazety Braun.

âesk˘

STOP

25

cartridge

Popis

1 Speciální síÈov˘ pfiívod

2 Tlaãítko «start cleaning»

3Kontakty pro pfiipojení holicího strojku k ãistící jednotce

4 Tlaãítko pro vyjmutí kazety ze základny

5 Indikátor ãistících programÛ

6 Indikátor stavu ãistící kapaliny

7 Pfiívodka napájení ãistící jednotky

8 âistící kazeta

9 Ochrann˘ kryt planÏety

10Holicí planÏeta

11Bfiitov˘ blok

12UvolÀovací tlaãítka planÏety

13Zastfiihovaã dlouh˘ch vousÛ

14Kontakty pro pfiipojení holicího strojku k ãistící jednotce (zadní strana holicího strojku)

15Spínaã

16Displej holicího strojku

17Tlaãítko Info

18Kontrolka

19Pfiívodka napájení holicího strojku

eco normal intensive

full

empty

Pfied holením

JestliÏe chcete, mÛÏete se zaãít holit ihned (pokud je holicí strojek nabit˘, viz odstavec «Displej holicího strojku»). Doporuãujeme v‰ak provést postup popsan˘ níÏe:


• Pfiipojte pfiívodku napájení na jednotce


«Clean&Renew™» (7) pomocí speciálního síÈového

1

pfiívodu (1) k elektrické síti.

• Stisknûte tlaãítko pro vyjmutí (4), aby se plá‰È otevfiel.

2

PfiidrÏte ãistící kazetu (8) poloÏenou na plochém, vodorovném povrchu (napfi. na stole).

Z kazety opatrnû sejmûte víãko.

ZasuÀte kazetu do základny nejdále, jak to jde.

Pomalu nasuÀte plá‰È smûrem dolÛ, aÏ zaklapne.

26

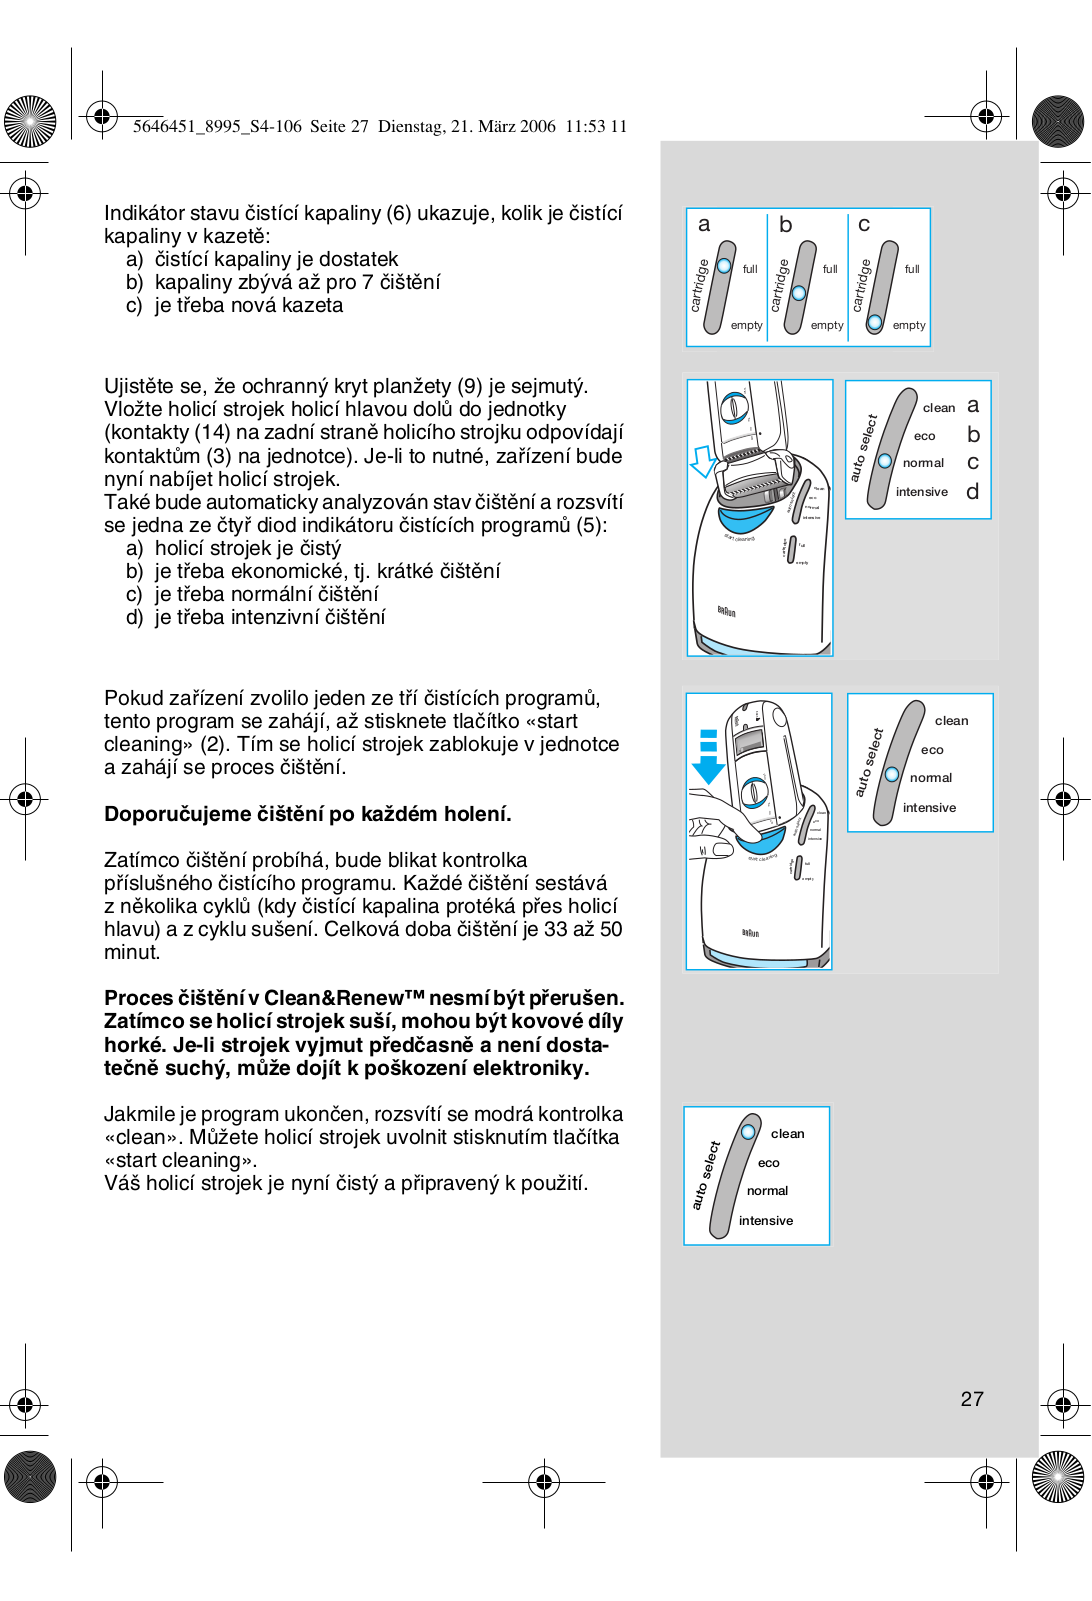
Indikátor stavu ãistící kapaliny (6) ukazuje, kolik je ãistící kapaliny v kazetû:

a)ãistící kapaliny je dostatek

b)kapaliny zb˘vá aÏ pro 7 ãi‰tûní

c)je tfieba nová kazeta

Ujistûte se, Ïe ochrann˘ kryt planÏety (9) je sejmut˘. VloÏte holicí strojek holicí hlavou dolÛ do jednotky (kontakty (14) na zadní stranû holicího strojku odpovídají kontaktÛm (3) na jednotce). Je-li to nutné, zafiízení bude nyní nabíjet holicí strojek.

Také bude automaticky analyzován stav ãi‰tûní a rozsvítí se jedna ze ãtyfi diod indikátoru ãistících programÛ (5):

a)holicí strojek je ãist˘

b)je tfieba ekonomické, tj. krátké ãi‰tûní

c)je tfieba normální ãi‰tûní

d)je tfieba intenzivní ãi‰tûní

Pokud zafiízení zvolilo jeden ze tfií ãistících programÛ, tento program se zahájí, aÏ stisknete tlaãítko «start cleaning» (2). Tím se holicí strojek zablokuje v jednotce a zahájí se proces ãi‰tûní.

Doporuãujeme ãi‰tûní po kaÏdém holení.

Zatímco ãi‰tûní probíhá, bude blikat kontrolka pfiíslu‰ného ãistícího programu. KaÏdé ãi‰tûní sestává z nûkolika cyklÛ (kdy ãistící kapalina protéká pfies holicí hlavu) a z cyklu su‰ení. Celková doba ãi‰tûní je 33 aÏ 50 minut.

Proces ãi‰tûní v Clean&Renew™ nesmí b˘t pfieru‰en. Zatímco se holicí strojek su‰í, mohou b˘t kovové díly horké. Je-li strojek vyjmut pfiedãasnû a není dostateãnû such˘, mÛÏe dojít k po‰kození elektroniky.

Jakmile je program ukonãen, rozsvítí se modrá kontrolka «clean». MÛÏete holicí strojek uvolnit stisknutím tlaãítka «start cleaning».

Vበholicí strojek je nyní ãist˘ a pfiipraven˘ k pouÏití.

a


b


c


cartridge

full

cartridge

full


cartridge

full


empty


empty


empty


trim


a


select

clean


eco

b


auto


normal

c


clean


intensive

d


select

eco


auto

normal


intensive


st


art cl eaning

cartridge


full


empty


8


995


clean


select


auto

eco


trim


normal


fix


intensive


on

clean


off

eco


normal


a

intensive


start

g


cleanin


cartridge

full


empty


clean

auto

eco

normal


intensive

27

on fix

on fix

on fix

trim

8995

st

Holení

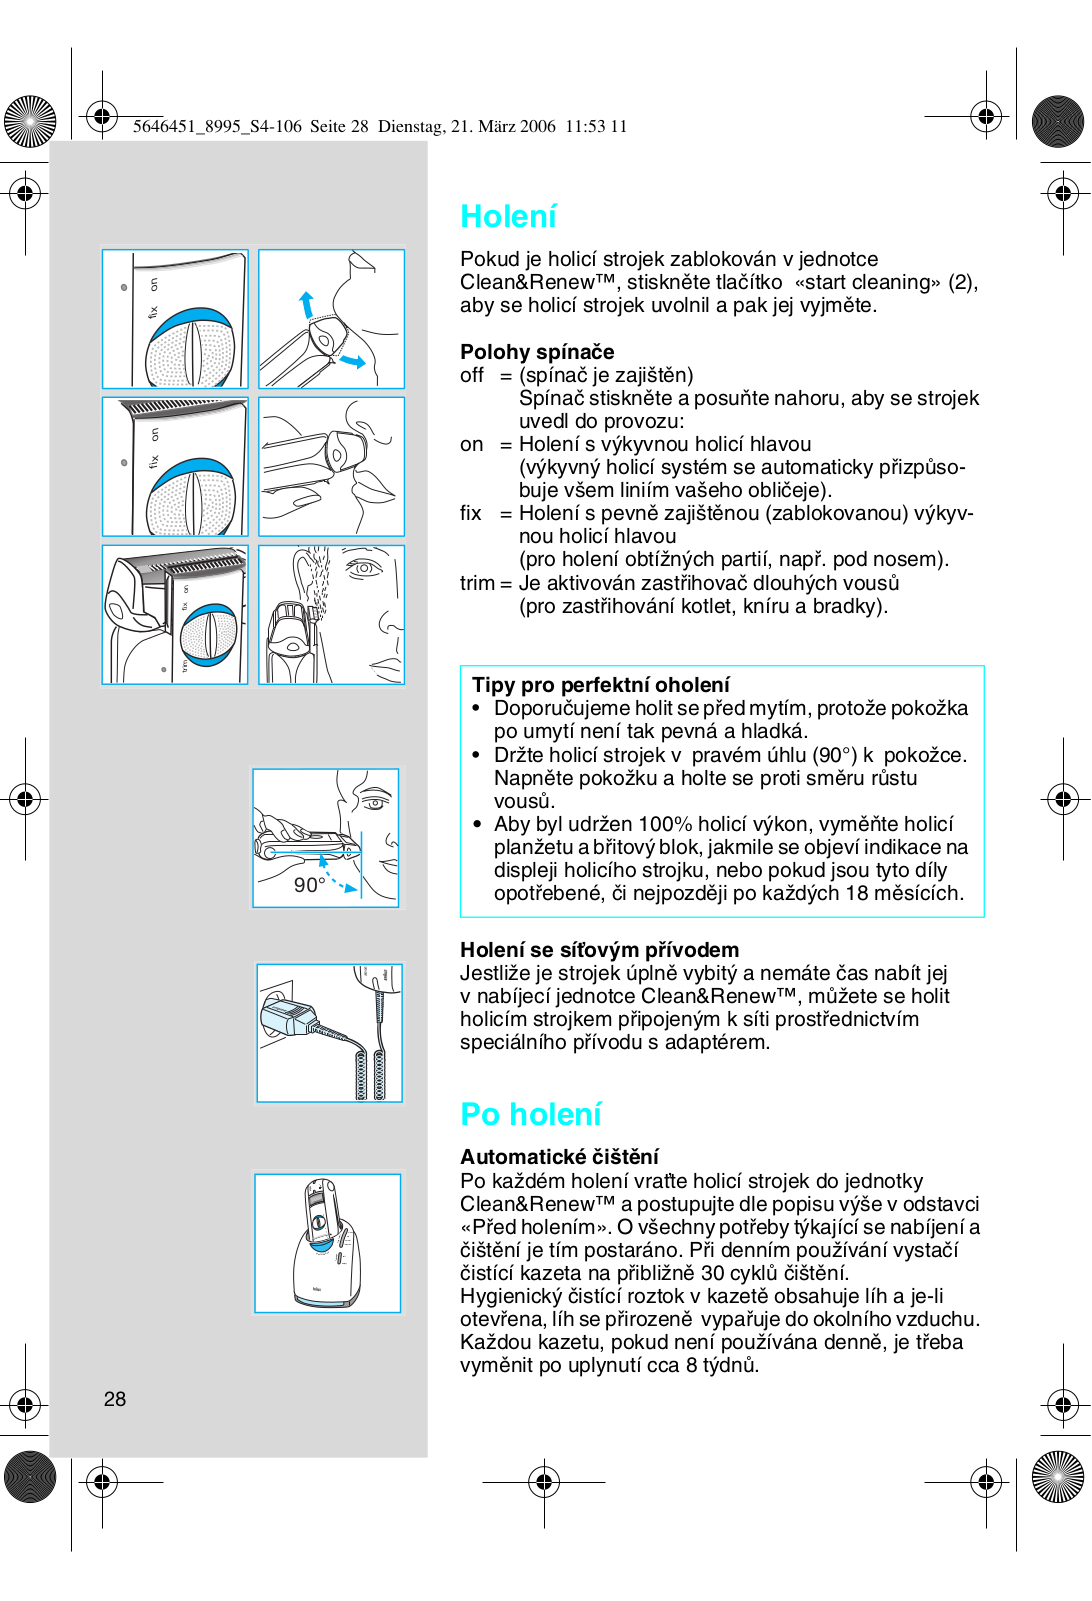
Pokud je holicí strojek zablokován v jednotce Clean&Renew™, stisknûte tlaãítko «start cleaning» (2), aby se holicí strojek uvolnil a pak jej vyjmûte.

Polohy spínaãe

off

= (spínaã je zaji‰tûn)


Spínaã stisknûte a posuÀte nahoru, aby se strojek


uvedl do provozu:

on

= Holení s v˘kyvnou holicí hlavou


(v˘kyvn˘ holicí systém se automaticky pfiizpÛso-


buje v‰em liniím va‰eho obliãeje).

fix

= Holení s pevnû zaji‰tûnou (zablokovanou) v˘kyv-


nou holicí hlavou


(pro holení obtíÏn˘ch partií, napfi. pod nosem).

trim = Je aktivován zastfiihovaã dlouh˘ch vousÛ (pro zastfiihování kotlet, kníru a bradky).

Tipy pro perfektní oholení

Doporuãujeme holit se pfied mytím, protoÏe pokoÏka po umytí není tak pevná a hladká.

DrÏte holicí strojek v pravém úhlu (90°) k pokoÏce. Napnûte pokoÏku a holte se proti smûru rÛstu vousÛ.

Aby byl udrÏen 100% holicí v˘kon, vymûÀte holicí planÏetu a bfiitov˘ blok, jakmile se objeví indikace na displeji holicího strojku, nebo pokud jsou tyto díly opotfiebené, ãi nejpozdûji po kaÏd˘ch 18 mûsících.

Holení se síÈov˘m pfiívodem

JestliÏe je strojek úplnû vybit˘ a nemáte ãas nabít jej v nabíjecí jednotce Clean&Renew™, mÛÏete se holit holicím strojkem pfiipojen˘m k síti prostfiednictvím speciálního pfiívodu s adaptérem.

Po holení

Automatické ãi‰tûní

Po kaÏdém holení vraÈte holicí strojek do jednotky Clean&Renew™ a postupujte dle popisu v˘‰e v odstavci «Pfied holením». O v‰echny potfieby t˘kající se nabíjení a ãi‰tûní je tím postaráno. Pfii denním pouÏívání vystaãí ãistící kazeta na pfiibliÏnû 30 cyklÛ ãi‰tûní.

Hygienick˘ ãistící roztok v kazetû obsahuje líh a je-li otevfiena, líh se pfiirozenû vypafiuje do okolního vzduchu. KaÏdou kazetu, pokud není pouÏívána dennû, je tfieba vymûnit po uplynutí cca 8 t˘dnÛ.

28

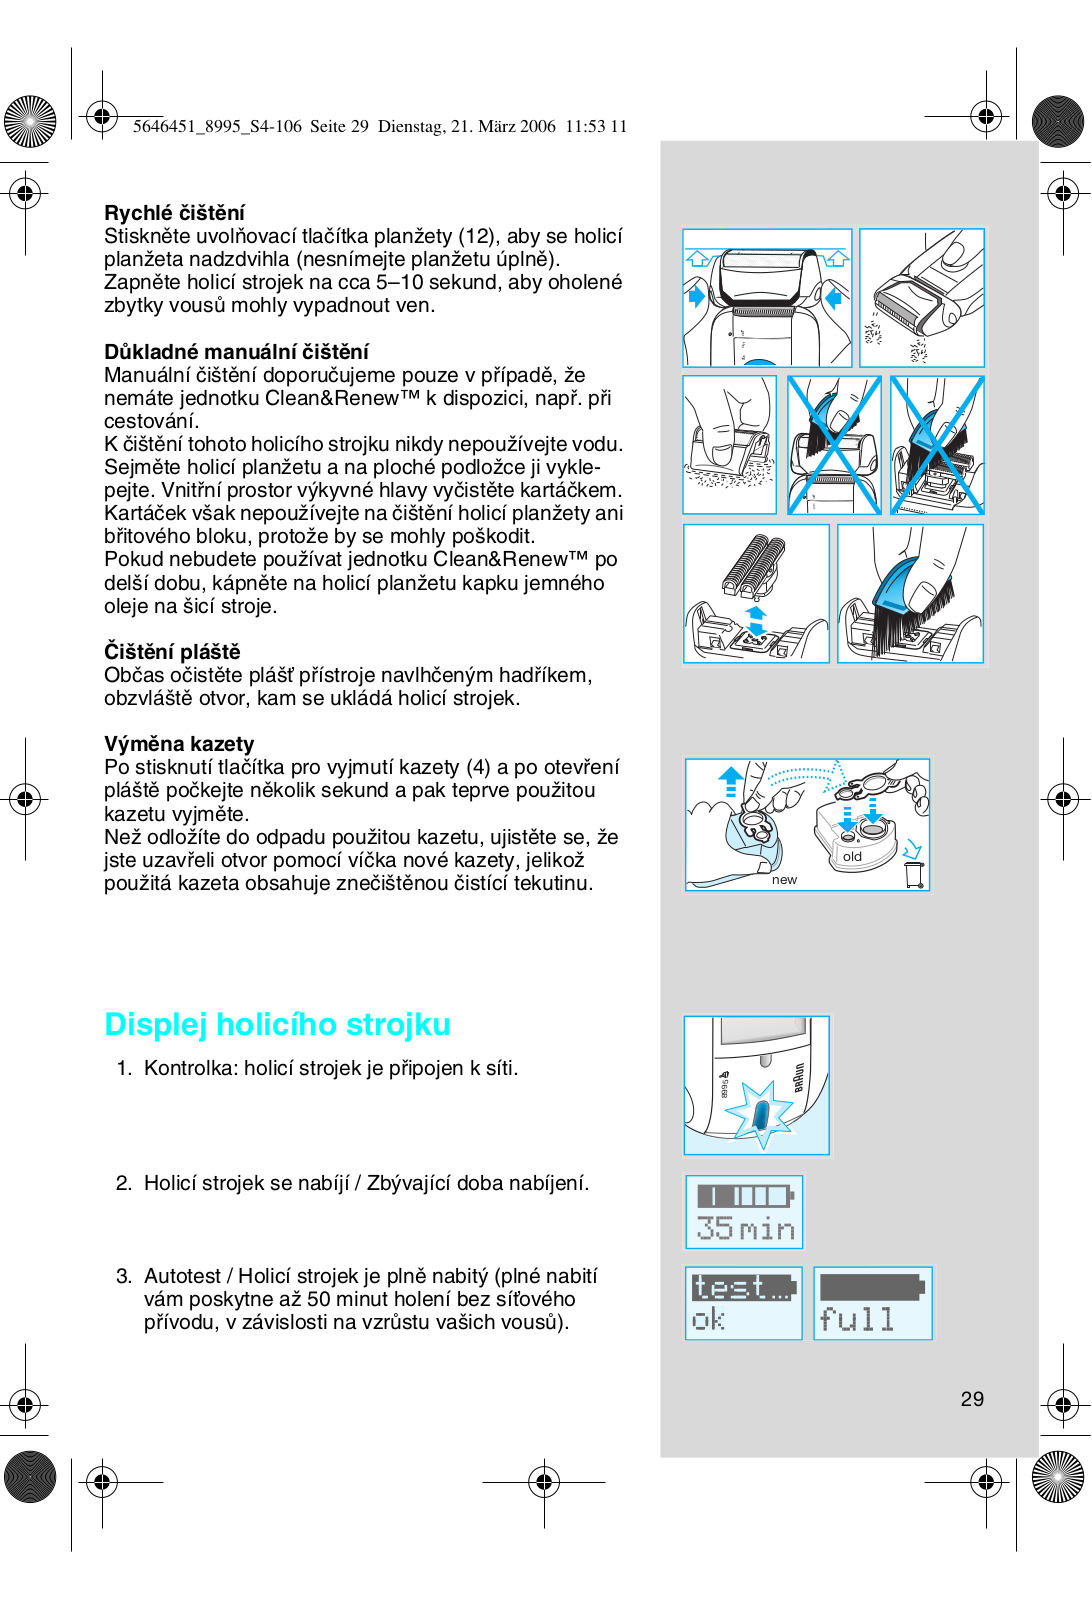
Rychlé ãi‰tûní

Stisknûte uvolÀovací tlaãítka planÏety (12), aby se holicí planÏeta nadzdvihla (nesnímejte planÏetu úplnû). Zapnûte holicí strojek na cca 5–10 sekund, aby oholené zbytky vousÛ mohly vypadnout ven.

DÛkladné manuální ãi‰tûní

Manuální ãi‰tûní doporuãujeme pouze v pfiípadû, Ïe nemáte jednotku Clean&Renew™ k dispozici, napfi. pfii cestování.

K ãi‰tûní tohoto holicího strojku nikdy nepouÏívejte vodu. Sejmûte holicí planÏetu a na ploché podloÏce ji vyklepejte. Vnitfiní prostor v˘kyvné hlavy vyãistûte kartáãkem. Kartáãek v‰ak nepouÏívejte na ãi‰tûní holicí planÏety ani bfiitového bloku, protoÏe by se mohly po‰kodit.

Pokud nebudete pouÏívat jednotku Clean&Renew™ po del‰í dobu, kápnûte na holicí planÏetu kapku jemného oleje na ‰icí stroje.

âi‰tûní plá‰tû

Obãas oãistûte plá‰È pfiístroje navlhãen˘m hadfiíkem, obzvlá‰tû otvor, kam se ukládá holicí strojek.

V˘mûna kazety

Po stisknutí tlaãítka pro vyjmutí kazety (4) a po otevfiení plá‰tû poãkejte nûkolik sekund a pak teprve pouÏitou kazetu vyjmûte.

NeÏ odloÏíte do odpadu pouÏitou kazetu, ujistûte se, Ïe jste uzavfieli otvor pomocí víãka nové kazety, jelikoÏ pouÏitá kazeta obsahuje zneãi‰tûnou ãistící tekutinu.

off on fix

off on

Displej holicího strojku

1. Kontrolka: holicí strojek je pfiipojen k síti.

8995

2.Holicí strojek se nabíjí / Zb˘vající doba nabíjení.

3.Autotest / Holicí strojek je plnû nabit˘ (plné nabití vám poskytne aÏ 50 minut holení bez síÈového pfiívodu, v závislosti na vzrÛstu va‰ich vousÛ).

29

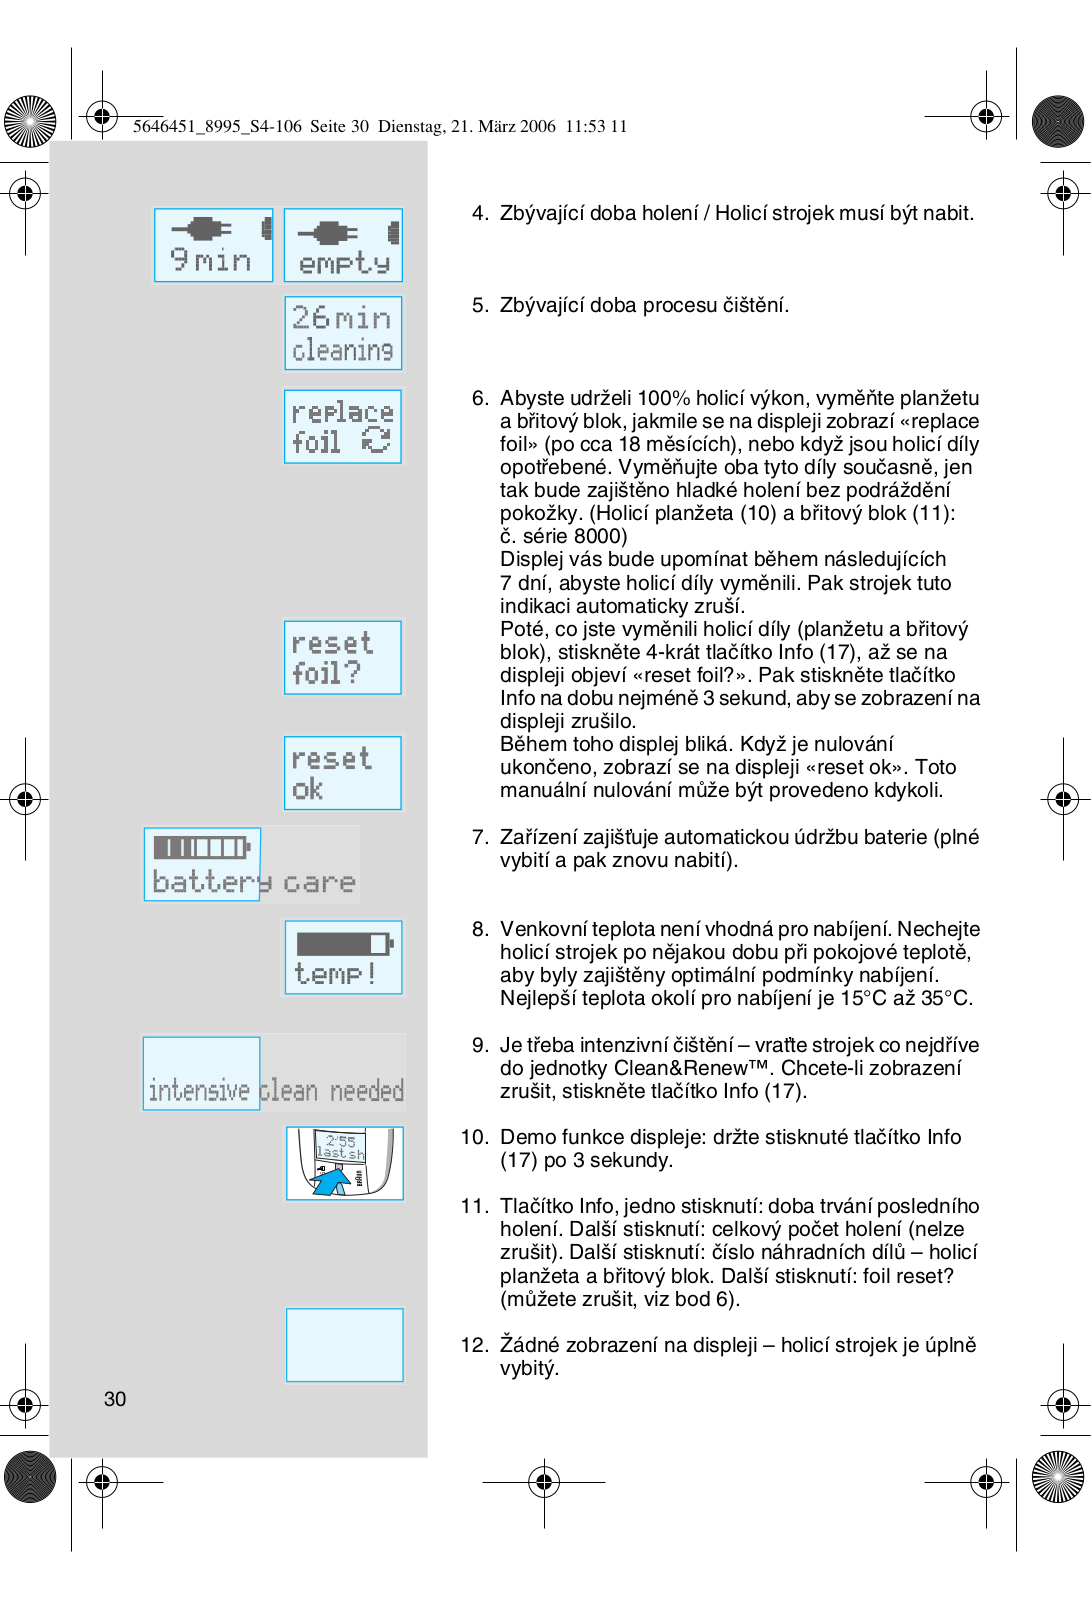
4. Zb˘vající doba holení / Holicí strojek musí b˘t nabit.

5. Zb˘vající doba procesu ãi‰tûní.

6. Abyste udrÏeli 100% holicí v˘kon, vymûÀte planÏetu a bfiitov˘ blok, jakmile se na displeji zobrazí «replace foil» (po cca 18 mûsících), nebo kdyÏ jsou holicí díly opotfiebené. VymûÀujte oba tyto díly souãasnû, jen tak bude zaji‰tûno hladké holení bez podráÏdûní pokoÏky. (Holicí planÏeta (10) a bfiitov˘ blok (11): ã. série 8000)

Displej vás bude upomínat bûhem následujících 7 dní, abyste holicí díly vymûnili. Pak strojek tuto indikaci automaticky zru‰í.

Poté, co jste vymûnili holicí díly (planÏetu a bfiitov˘ blok), stisknûte 4-krát tlaãítko Info (17), aÏ se na displeji objeví «reset foil?». Pak stisknûte tlaãítko Info na dobu nejménû 3 sekund, aby se zobrazení na displeji zru‰ilo.

Bûhem toho displej bliká. KdyÏ je nulování ukonãeno, zobrazí se na displeji «reset ok». Toto manuální nulování mÛÏe b˘t provedeno kdykoli.

7.Zafiízení zaji‰Èuje automatickou údrÏbu baterie (plné vybití a pak znovu nabití).

8.Venkovní teplota není vhodná pro nabíjení. Nechejte

holicí strojek po nûjakou dobu pfii pokojové teplotû, aby byly zaji‰tûny optimální podmínky nabíjení. Nejlep‰í teplota okolí pro nabíjení je 15°C aÏ 35°C.

9.Je tfieba intenzivní ãi‰tûní – vraÈte strojek co nejdfiíve do jednotky Clean&Renew™. Chcete-li zobrazení

zru‰it, stisknûte tlaãítko Info (17).

10. Demo funkce displeje: drÏte stisknuté tlaãítko Info

(17) po 3 sekundy.

8595

11.Tlaãítko Info, jedno stisknutí: doba trvání posledního holení. Dal‰í stisknutí: celkov˘ poãet holení (nelze zru‰it). Dal‰í stisknutí: ãíslo náhradních dílÛ – holicí planÏeta a bfiitov˘ blok. Dal‰í stisknutí: foil reset? (mÛÏete zru‰it, viz bod 6).

12.Îádné zobrazení na displeji – holicí strojek je úplnû vybit˘.

30

Loading...
+ 69 hidden pages