

Braun 710 User Manual [pl]
Series7
Series 7Series 7
Series 7
trimmer
trimmer
trimmer
on
710
710
Series 7
reset
www.braun.com/register
offonoff
Type 5674
Braun Infolines
English 4
Français 8
Polski 13
âesk˘ 18
Slovensk˘ 23
Magyar 28
Hrvatski 32
Slovenski 36
Türkçe 40
кЫТТНЛИ 44
ì͇ªÌҸ͇ 50
61
GB
0800 783 70 10
IRL
1 800 509 448
F
0 810 309 780
B
0 800 14 592
PL
0 801 127 286
0 801 1 BRAUN
221 804 335
CZ
02/5710 1135
SK
(06-1) 451-1256
H
01/6690 330
HR
SLO
080 2822
0 212 473 75 85
TR
RUS
8 800 200 20 20
UA
+ 38 044 428 65 05
HK
852-25249377
(Audio Supplies Company Ltd.)
www.service.braun.com
Braun GmbH
Frankfurter Straße 145
61476 Kronberg/Germany
98790830/I-09
GB/F/PL/CZ/SK/H/HR/SLO/TR/
RUS/UA/Arab
1
Series 7
res
et
trimmer
trimmer
trimmer
on
off
on
off
Series 7Series 7
Series 7
Series 7
7
1
0
Series 7
Series 7
2
3
trimmer
trimmer
trimmer
trimmer
trimmer
trimmer
on
offonoff
reset
710
Series 7
10
4
8
5
6
7
9

English
STOPSTOP
Our products are designed to meet the highest
standards of quality, functionality and design.
We hope you enjoy your new Braun Shaver.
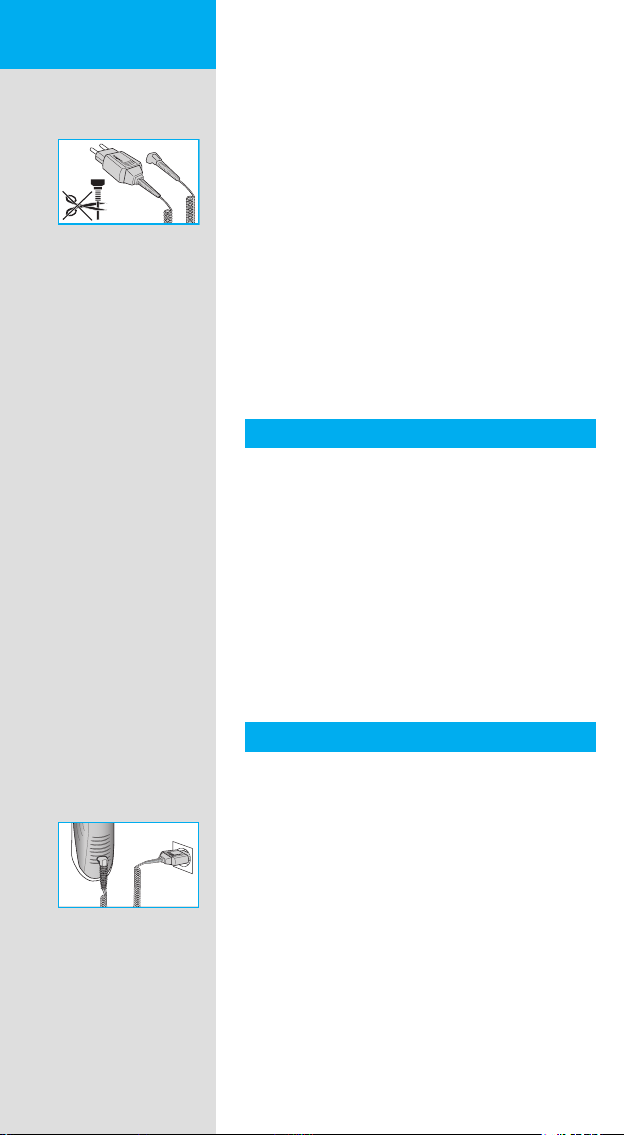
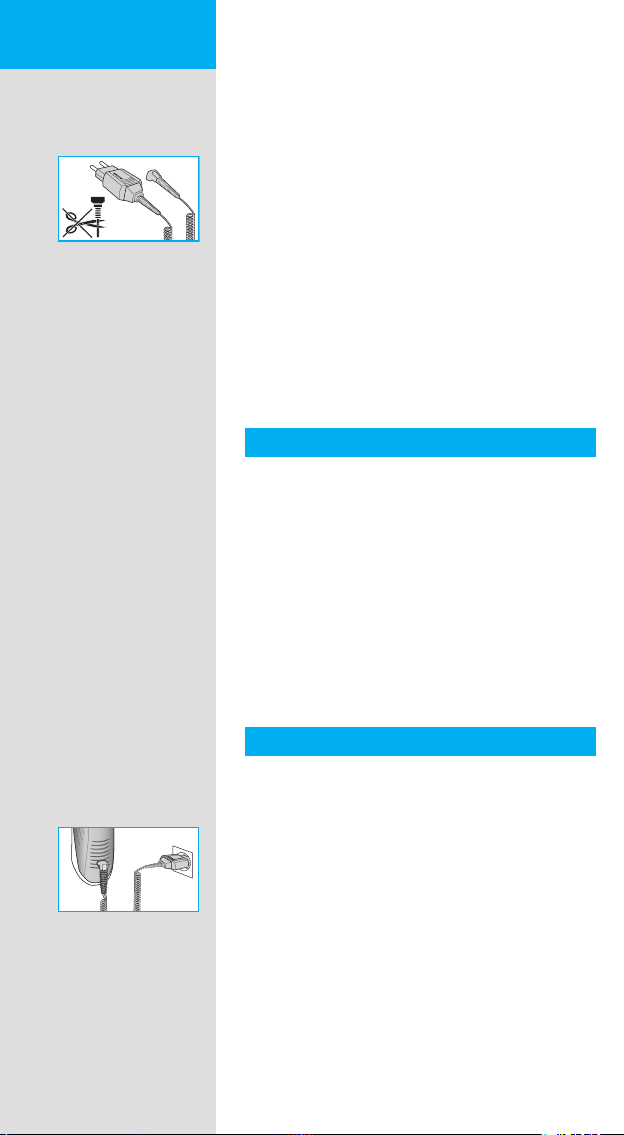
Warning
Your shaver is provided with a special cord
set, which has an integrated Safety Extra Low
Voltage power supply. Do not exchange or
tamper with any part of it, otherwise there is risk
of electric shock.
This appliance is not intended for use by children
or persons with reduced physical or mental
capabilities, unless they are supervised by a
person responsible for their safety. In general,
we recommend that you keep the appliance out
of reach of children.
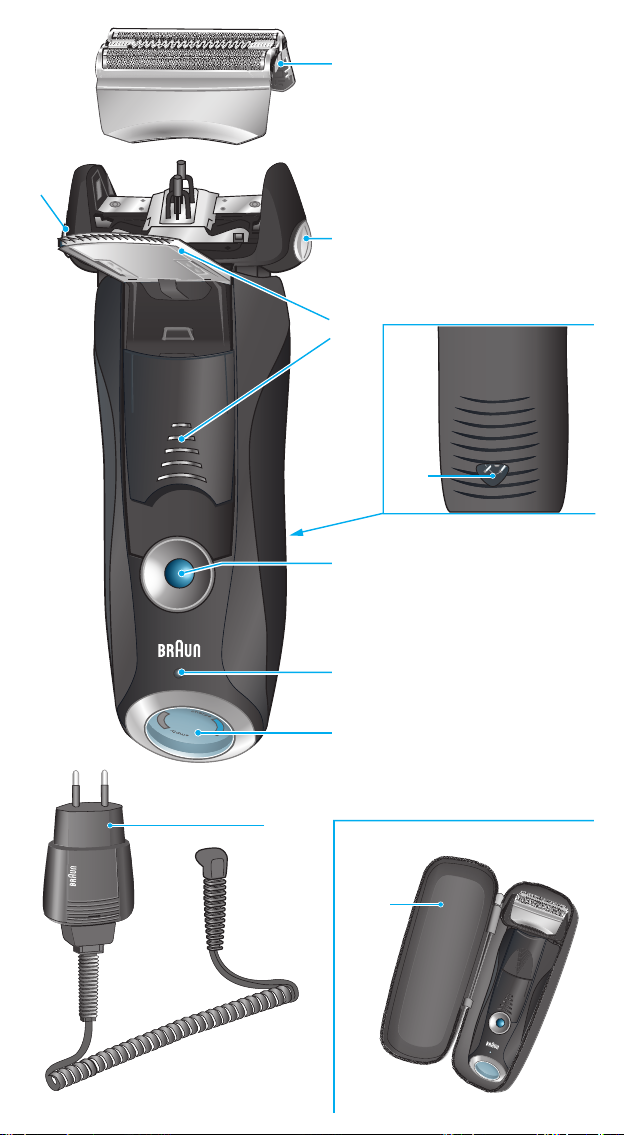
Description
1 Foil & Cutter cassette
2 Cassette release button
3 Shaver head «lock» switch
4 Pop-out long hair trimmer
5 On/off switch
6 Reset button
7 Shaver display
8 Shaver power socket
9 Travel case
0 Special cord set
Charging
The best environmental temperature for charging
is between 5 °C and 35 °C.
• Using the special cord set 0, connect the
shaver to an electrical outlet with the motor
switched off and charge it for at least one hour.
• A full charge provides up to 50 minutes
of cordless shaving time. This may vary
according to your beard growth.
• If the rechargeable battery has run out of
power (discharged), you may also shave by
connecting the shaver to an electrical outlet via
the special cord set.
4
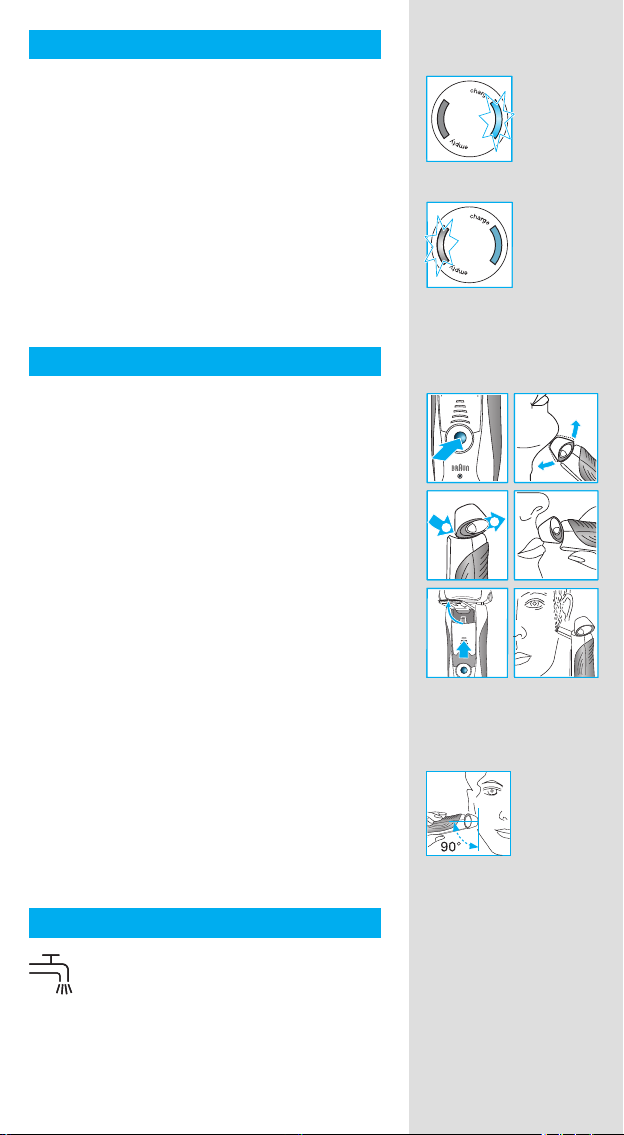
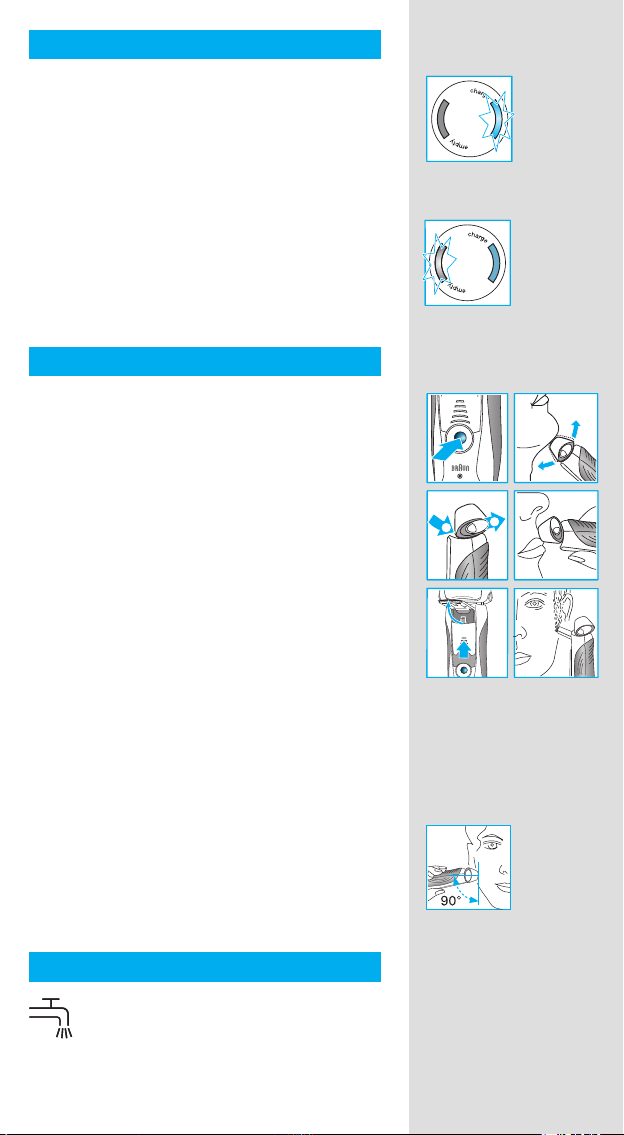
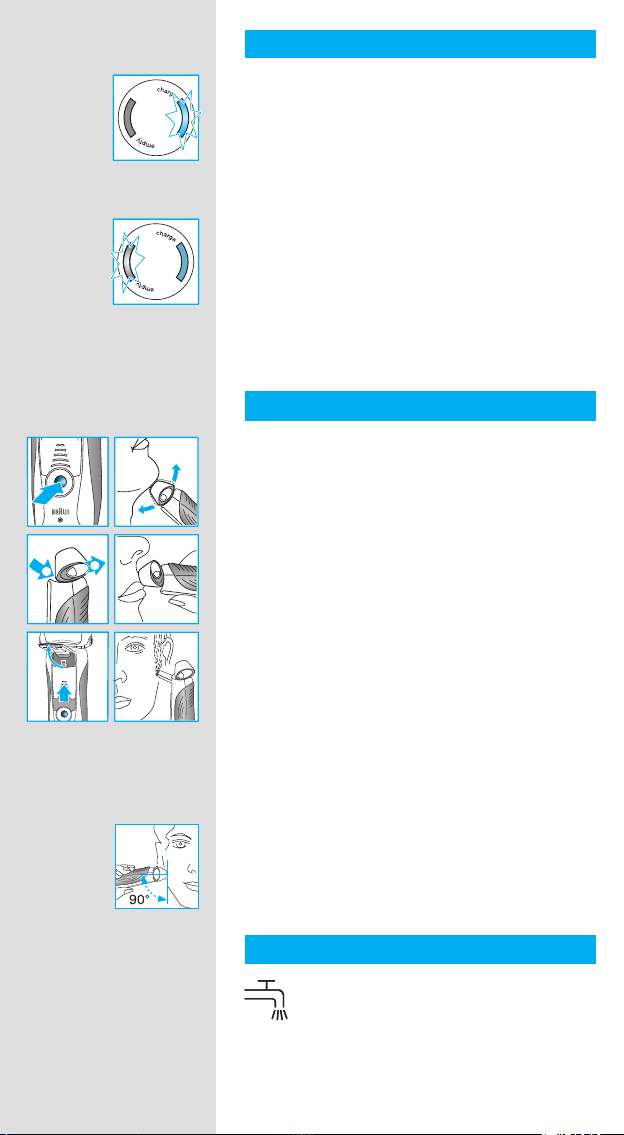
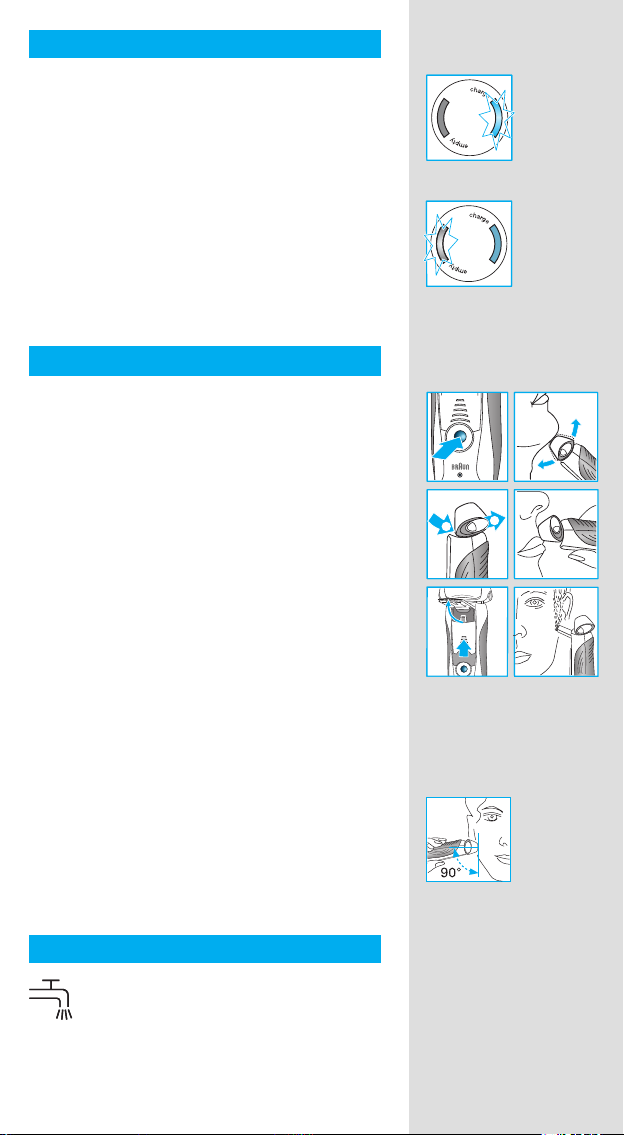
Shaver display 7
r
r
releaserelease
The green «charge» indicator fl ashes when
the shaver is being charged or when in use.
When the battery is fully charged, the charge
segment will light up continuously provided that
the shaver is switched on or connected to an
electrical outlet.
The red «empty» indicator fl ashes when the
battery capacity has dropped below 20%,
provided the shaver is switched on. The
remaining capacity will then be suffi cient for
2 to 3 shaves.
How to use
Press the on/off switch 5 to operate the shaver:
• The pivoting shaver head and fl oating foils
automatically adjust to every contour of your
face.
t
t
on
on
off
off
lock
lock
• To shave hard to reach areas (e.g. under the
nose) slide the shaver head «lock» switch 3 to
the back position to lock the pivoting head at
an angle.
• To trim sideburns, moustache or beard, slide
the pop-out long hair trimmer 4 upwards.
Tips for the perfect shave
For best shaving results, Braun recommends you
to follow 3 simple steps:
1. Always shave before washing your face.
2. At all times, hold the shaver at right angles
(90°) to your skin.
3. Stretch your skin and shave against the
direction of your beard growth.
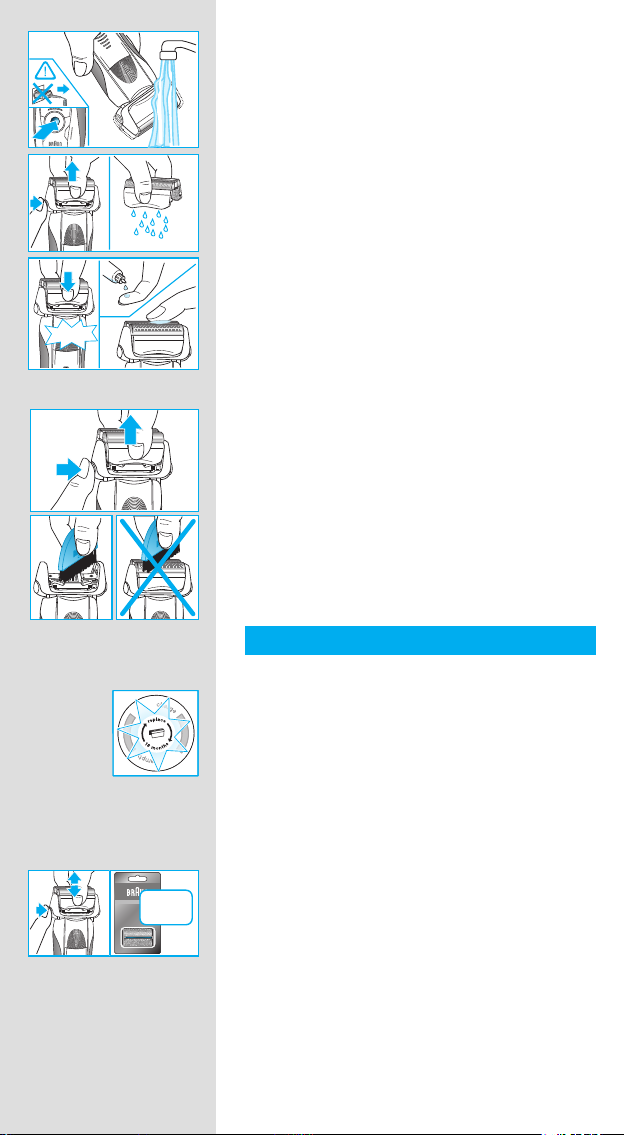
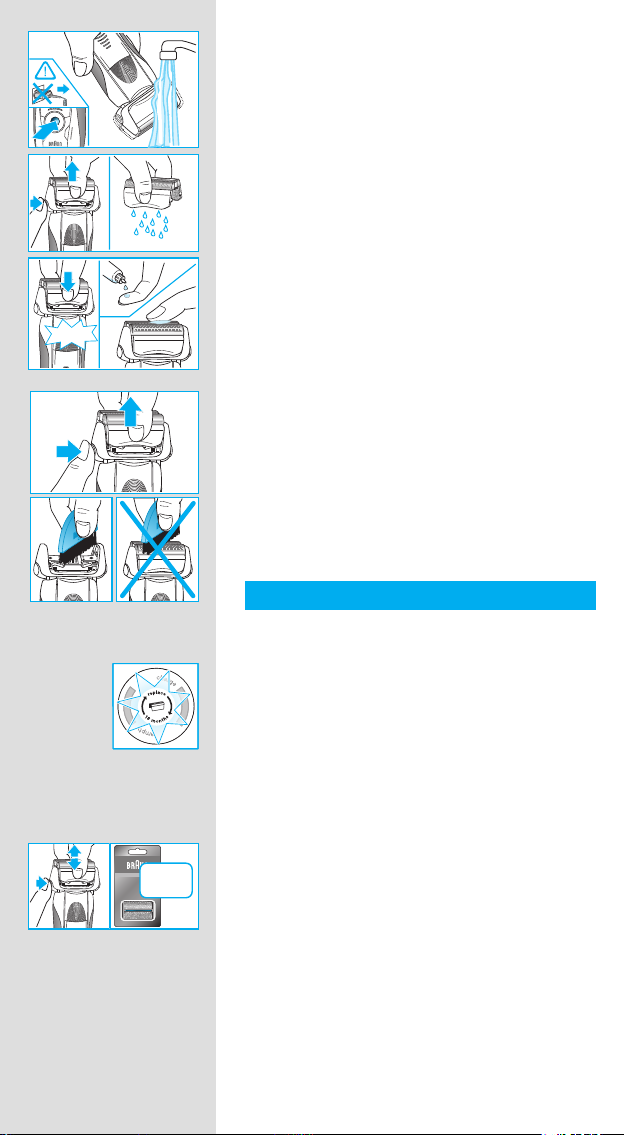
Cleaning
The shaver head is suitable for cleaning
under running tap water.
Warning: Detach the shaver from the
power supply before cleaning the shaver
head in water.
2
2
lock
lock
1
1
trimmer
trimmer
on
on
off
off
lock
lock
lock
lock
5
on
re
re
le
a
s
e
on
re
le
a
s
e
re
le
le
a
a
s
s
e
e
re
re
le
le
a
a
s
s
e
e
re
re
le
le
a
a
s
s
e
e
Series 7
Series 7
click!
click!
trim
trim
mer
mer
Regular cleaning ensures better shaving
performance. Rinsing the shaving head under
running water after each shave is an easy and
fast way to keep it clean:
• Switch the shaver on (cordless) and rinse
the shaving head under hot running water.
You may use liquid soap without abrasive
Series
Series
Series
Series
er
er
oil
oil
substances. Rinse off all foam and let the
shaver run for a few more seconds.
• Next, switch off the shaver, press the release
button 2 to remove the Foil & Cutter cassette
1 and let it dry.
• If you regularly clean the shaver under
Series 7
trimmer
trimmer
Series 7
water, then once a week apply a drop of
light machine oil on top of the Foil & Cutter
cassette.
Alternatively, you may clean the shaver using a
brush:
Series 7
Series 7
re
re
le
le
a
a
s
s
e
e
• Switch off the shaver. Remove the Foil & Cutter
cassette 1 and tap it out on a fl at surface.
Using a brush, clean the inner area of the
pivoting head. However, do not clean the foil
and cutter cassette with the brush as this may
damage it.
Series 7
Series 7
re
re
le
le
a
a
s
s
e
e
Keeping your shaver in top shape
Replacing the Foil & Cutter cassette / reset
To maintain 100% shaving performance,
replace the Foil & Cutter cassette 1, when the
replacement symbol lights up on the shaver
display 7 (after about 18 months) or when
cassette is worn.
The replacement symbol will remind you during
the next 7 shaves to replace the Foil & Cutter
cassette. Then the shaver will automatically reset
the display.
After you have replaced the Foil & Cutter
Series 7
Series 7
re
re
le
le
a
a
s
s
e
e
70S
70S
cassette, use a ball-pen to push the reset button
6 for at least 3 seconds to reset the counter.
While doing so, the replacement light blinks and
er
er
goes off when the reset is complete. The manual
reset can be done at any time.
Accessories
Available at your dealer or Braun Service
Centres:
• Foil & Cutter cassette 70S
6
Environmental notice
This appliance contains rechargeable
batteries. In the interest of protecting the
environment, please do not dispose of the
product in household waste at the end of
its useful life. Disposal can take place at a
Braun Service Centre or at appropriate
collection points provided in your country.
Subject to change without notice.
This product conforms to the European
Directives EMC 2004/108/EC and Low
Voltage 2006/95/EC.
For electric specifi cations, see printing on the
special cord set.
Guarantee
We grant a 2 year guarantee on the product
commencing on the date of purchase. Within the
guarantee period we will eliminate any defects in
the appliance resulting from faults in materials or
workmanship, free of charge either by repairing
or replacing the complete appliance at our
discretion.
This guarantee extends to every country where
this appliance is supplied by Braun or its
appointed distributor.
This guarantee does not cover: damage
due to improper use, normal wear and tear
(e.g. foil & cutter cassette) as well as defects that
have a negligible effect on the value or operation
of the appliance. The guarantee becomes void if
repairs are undertaken by unauthorised persons
and if original Braun parts are not used.
To obtain service within the guarantee period,
hand in or send the complete appliance with
your sales receipt to an authorised Braun
Customer Service Centre.
For UK only:
This guarantee in no way affects your rights
under statutory law.
7
Français
STOPSTOP
Nos produits sont conçus pour répondre aux
normes les plus élevées en matière de qualité,
fonctionnalité et design. Nous espérons que
vous apprécierez votre nouveau rasoir Braun.
Attention
Votre système de rasage est livré avec
un cordon d’alimentation qui intègre une
prise transformateur basse tension. Vous
ne devez remplacer ou modifi er aucun de
ses composants, afi n d’éviter tout risque
d’électrocution.
Cet appareil n’est pas destiné à des enfants
ou des personnes aux capacités physiques,
sensorielles ou mentales réduites à moins
qu’elles ne soient sous la surveillance d’un
adulte responsable de leur sécurité. Nous
recommandons de garder l’appareil hors de
portée des enfants.
Description
1 Cassette de rasage
2 Bouton d’éjection de la cassette
3 Bouton de verrouillage («lock») de la tête du
rasoir
4 Tondeuse rétractable pour poils longs
5 Interrupteur marche/arrêt
6 Bouton de réinitialisation
7 Ecran d’affi chage du rasoir
8 Prise d’alimentation du rasoir
9 Trousse de voyage
0 Cordon d’alimentation
Charge du rasoir
La température ambiante idéale pour la mise en
charge se situe entre 5 °C et 35 °C.
• A l‘aide du cordon d‘alimentation 0, branchez
le rasoir à une prise de courant avec le moteur
arrêté et chargez-le pendant au moins une
heure.
• Une charge complète procure jusqu’à 50
minutes de temps de rasage sans fi l. Cela peut
varier selon la densité, la dureté et la longueur
de votre barbe.
• Si la batterie est complètement déchargée,
vous pouvez également vous raser en
branchant le rasoir sur une prise de courant via
le cordon d‘alimentation.
8
Ecran d’affi chage du rasoir 7
r
r
releaserelease
Le voyant vert clignote lorsque le rasoir est en
charge ou en utilisation. Lorsque la batterie est
complètement chargée, le segment de charge
« charge » est allumé en continu, quand le rasoir
fonctionne ou quand il est branché sur une prise
de courant.
L’indicateur « empty » rouge clignote quand le
rasoir fonctionne pour indiquer que la capacité
de la batterie est inférieure à 20 %. La capacité
restante est suffi sante pour 2 à 3 rasages.
Utilisation
Appuyez sur l’interrupteur marche/arrêt 5 pour
mettre en marche le rasoir :
• La tête pivotante du rasoir et les grilles
fl exibles s'adaptent automatiquement aux
contours de votre visage.
• Pour raser les zones diffi ciles à atteindre
(ex. : sous le nez), faites glisser le « lock » de
verrouillage de la tête du rasoir 3 vers l’arrière
pour bloquer la tête pivotante en position
inclinée.
• Pour tailler les pattes, moustache et barbe,
faites coulisser la tondeuse rétractable pour
poils longs 4 vers le haut.
t
t
on
on
off
off
2
2
lock
lock
1
1
trimmer
trimmer
on
on
off
off
lock
lock
lock
lock
lock
lock
Conseils pour un rasage parfait
Pour des résultats de rasage optimaux, Braun
vous invite à suivre les 3 recommandations
suivantes :
1. Rasez-vous toujours avant de vous laver le
visage.
2. Tenez toujours le rasoir à angle droit (90°) par
rapport à votre peau.
3. Tendez la peau et rasez la barbe dans le sens
inverse de la pousse du poil.
Nettoyage
La tête du rasoir peut passer sous le
robinet d’eau courante.
Attention : Débranchez le rasoir avant de
le nettoyer à l’eau.
9
on
re
re
le
a
s
e
on
re
le
a
s
e
re
le
le
a
a
s
s
e
e
re
re
le
le
a
a
s
s
e
e
re
re
le
le
a
a
s
s
e
e
Series 7
Series 7
click!
click!
trim
trim
m
m
er
er
Un nettoyage régulier garantit une performance
de rasage optimale. Rincer la tête du rasoir sous
l‘eau courante après chaque utilisation est une
façon facile et rapide de la garder propre :
• Mettez le rasoir en marche (sans cordon
d'alimentation) et rincez la tête du rasoir
sous le robinet. Il est possible d'utiliser du
savon liquide ne contenant pas de substance
Series
Series
Series
Series
abrasive. Rincez toute la mousse et laissez le
rasoir en marche pendant quelques secondes.
er
er
oil
oil
• Ensuite, arrêtez le rasoir, appuyez sur le
bouton d'éjection de la cassette 2 pour retirer
la cassette de rasage 1 et laissez-la sécher.
• Si vous nettoyez régulièrement le rasoir sous
l'eau, appliquez ensuite une fois par semaine
Series 7
trimmer
trimmer
Series 7
une goutte d'huile fl uide de machine à coudre
sur le haut de la cassette de rasage.
Vous pouvez également nettoyer le rasoir en
utilisant une brossette :
Series 7
Series 7
re
re
le
le
a
a
s
s
e
e
• Arrêtez le rasoir. Retirez la cassette de
rasage 1 et tapotez-la sur une surface plane.
Nettoyez l'intérieur de la tête pivotante à l'aide
une brossette. Toutefois, ne nettoyez pas la
cassette avec la brosse car cela risque de
l'endommager.
Series 7
Series 7
re
re
le
le
a
a
s
s
e
e
Gardez votre rasoir en bon état
Remplacement de la cassette de rasage /
réinitialisation
Pour conserver une performance de rasage effi cace à 100 %, remplacez la cassette de rasage
1 lorsque le symbole s’allume sur l’écran du
rasoir 7 (au bout de 18 mois environ) ou lorsque
la cassette est usée.
Le symbole de remplacement vous rappellera
durant les 7 prochains rasages de remplacer la
cassette de rasage. Le rasoir réinitialisera ensuite
automatiquement l’écran.
Après le remplacement de la cassette de rasage,
Series 7
Series 7
re
re
le
le
a
a
s
s
e
e
70S
70S
utilisez un stylo pour presser le bouton de
réinitialisation 6 pendant au moins 3 secondes
afi n de réinitialiser le compteur.
er
er
Le témoin lumineux de remplacement clignote et
s’éteint lorsque la réinitialisation est terminée. Il
est possible de faire une réinitialisation manuelle
à tout moment.
Accessoires
Disponibles chez votre vendeur ou dans les
centres de service Braun :
• Cassette de rasage 70S
10
Informations relatives à l’environnement
Ce produit contient des batteries
rechargeables. Dans un souci de
protection de l’environnement, veuillez
ne pas jeter le produit avec les ordures
ménagères au terme de son cycle de vie.Vous
pouvez remettre ce produit au centre de service
Braun ou aux points de collecte dans votre pays.
Susceptible d’être modifi é sans préavis.
Cet appareil est conforme aux normes
Européennes fi xées par les Directives
2004/108/EC et la directive Basse Tension
2006/95/EC.
Pour les spécifi cations électriques, se référer aux
inscriptions sur l’adaptateur basse tension.
Garantie
Nous accordons une garantie de 2 ans sur ce
produit, à partir de la date d‘achat.
Pendant la durée de la garantie, Braun prendra
gratuitement à sa charge la réparation des vices
de fabrication ou de matière en se réservant
le droit de décider si certaines pièces doivent
être réparées ou si l‘appareil lui-même doit être
échangé.
Cette garantie s‘étend à tous les pays où cet
appareil est commercialisé par Braun ou son
distributeur exclusif.
Cette garantie ne couvre pas : les dommages
occasionnés par une utilisation inadéquate,
l’usure normale (par exemple, grille et bloccouteaux) ainsi que les défauts d’usures qui ont
un effet négligeable sur la valeur ou l’utilisation
de l’appareil. Cette garantie devient caduque
si des réparations ont été effectuées par des
personnes non agréées par Braun et si des pièces
de rechange ne provenant pas de Braun ont été
utilisées.
Pour toute réclamation intervenant pendant la
période de garantie, retournez ou rapportez
l‘appareil ainsi que l‘attestation de garantie à
votre revendeur ou à un Centre Service Agréé
Braun.
Appelez au 08.10.30.97.80 (ou se référez
http://www.braun.com/global/contact/
servicepartners/europe.country.html) pour
connaitre le Centre Service Agrée Braun le
plus proche de chez vous.
à
11

Clause spéciale pour la France
Outre la garantie contractuelle exposée cidessus, nos clients bénéfi cient de la garantie
légale des vices cachés prévue aux articles 1641
et suivants du Code civil.
12

Nasze wyroby spe∏niajà najwy˝sze wymagania
dotyczàce jakoÊci, funkcjonalnoÊci i wzornictwa.
˚yczymy zadowolenia z u˝ytkowania nowej
golarki marki Braun.
Ostrze˝enie
Golarka jest dostarczana wraz ze specjalnym
kablem wyposa˝onym w wbudowany zasilacz
dostarczajàcy bezpieczne, niskie napi´cie.
Elementów kabla nie wolno wymieniaç ani
modyfi kowaç, poniewa˝ grozi to pora˝eniem
pràdem elektrycznym.
Urządzenie nie jest przeznaczone dla dzieci
oraz dla osób z ograniczeniami fi zycznymi
lub psychicznymi, chyba że osoba będąca ich
opiekunem wyrazi na to pozwolenie. Generalnie
radzimy trzymać urządzenie z dala od dzieci.
Opis
1 Kaseta z folià golàcà i ostrzami
2 Przyciski zwalniajàce kaset´
3 Prze∏àcznik blokady g∏owicy golarki «lock»
4 Wysuwany trymer do d∏u˝szego zarostu
5 Wy∏àcznik
6 Przycisk do resetowania «reset»
7 WyÊwietlacz golarki
8 Gniazdo zasilania golarki
9 Futera∏ podró˝ny
0 Specjalny kabel sieciowy
Polski
STOPSTOP
Opis urzàdzenia
Golark´ najlepiej jest ∏adowaç przy temperaturze otoczenia mi´dzy 15 °C a 35 °C.
• Wy∏àczonà golark´ nale˝y pod∏àczyç do
gniazdka sieciowego przy u˝yciu specjalnego
kabla sieciowego 0 i ∏adowaç przez co
najmniej godzin´.
• W zale˝noÊci od cz´stotliwoÊci golenia,
golarka z ca∏kowicie na∏adowanymi akumulatorami mo˝e pracowaç bez zasilania
sieciowego do 50 minut.
• W przypadku roz∏adowania si´ akumulatorów
mo˝na goliç si´ po pod∏àczeniu golarki do
gniazdka sieciowego przy u˝yciu specjalnego
kabla.
13
WyÊwietlacz golarki
r
r
releaserelease
Podczas ∏adowania golarki lub golenia wyÊwietlany jest migajàcy zielony segment («charge»).
Gdy golarka jest ca∏kowicie na∏adowana,
segment poziomu na∏adowania akumulatora
b´dzie si´ Êwieciç przez ca∏y czas, pod
warunkiem, ˝e golarka b´dzie w∏àczona lub
pod∏àczona do gniazdka elektrycznego.
Gdy poziom na∏adowania akumulatora
spadnie poni˝ej 20 proc., wyÊwietlony zostanie
migajàcy czerwony pusty segment («empty»),
pod warunkiem, ˝e golarka b´dzie w∏àczona.
Pozosta∏a energia wystarczy jeszcze na 2–3
golenia.
Golenie
t
t
on
on
off
off
lock
lock
NaciÊnij w∏àcznik 5, aby w∏àczyç golark´:
• Ruchoma g∏owica golarki i spr´˝ysta folia
automatycznie dopasowuje si´ do kszta∏tów
twarzy.
14
2
2
lock
lock
1
1
lock
lock
• Aby zgoliç zarost w trudno dost´pnych
miejscach (np. pod nosem), przesuƒ
prze∏àcznik blokady g∏owicy golarki 3, aby
zablokowaç ruchomà g∏owic´ pod w∏aÊciwym
kàtem.
lock
trimmer
trimmer
on
on
off
off
lock
• Aby przystrzyc baki, wàsy lub brod´, wysuƒ
trymer do d∏u˝szego zarostu 4.
Wskazówki, jak goliç si´ dok∏adnie
JeÊli chcesz osiàgnàç najlepsze efekty golenia,
radzimy:
1. Zawsze goliç si´ przed umyciem twarzy.
2. Trzymaç golark´ przez ca∏y czas przy skórze
pod odpowiednim kàtem (90°).
3. Naciàgnàç skór´ i goliç pod w∏os.
Czyszczenie
G∏owica golarki jest przystosowana do
czyszczenia pod bie˝àcà wodà.
Uwaga: Przed umyciem g∏owicy golarki
w wodzie nale˝y wyciàgnàç wtyczk´
z gniazdka sieciowego.
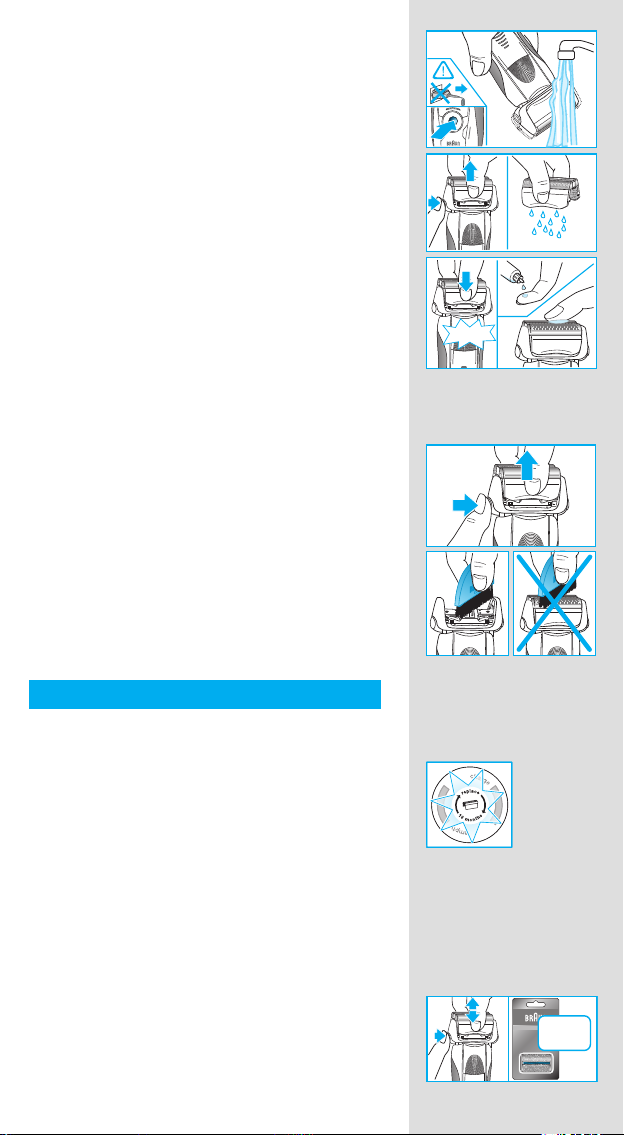
Regularne czyszczenie zapewnia lepsze efekty
on
re
le
a
s
e
on
re
le
a
s
e
golenia. Op∏ukanie g∏owicy golarki pod bie˝àcà
wodà po ka˝dym goleniu pozwala w ∏atwy i
szybki sposób utrzymaç jà w czystoÊci.
• W∏àcz golark´ (przy wy∏àczonym zasilaniu
z sieci) i op∏ucz g∏owic´ golàcà pod strumieniem goràcej wody. Mo˝esz tak˝e u˝yç myd∏a
w p∏ynie bez Êrodków Êcierajàcych. Sp∏ucz
resztki piany i odczekaj kilka sekund, zanim
wy∏àczysz golark´.
• Nast´pnie wy∏àcz golark´, naciÊnij przycisk
zwalniajàcy blokad´ 2, aby wyjàç kaset´
z folià golàcà i ostrzami 1 i poczekaj a˝
cz´Êci wyschnà.
• JeÊli regularnie czyÊcisz golark´ pod bie˝àcà
wodà, raz na tydzieƒ nasmaruj kaset´ z folià
i ostrzami niewielkà iloÊcià lekkiego oleju do
maszyn do szycia.
Golarka mo˝e byç tak˝e czyszczona przy
pomocy szczoteczki:
• Wy∏àcz golark´. Wyjmij kaset´ z folià
i ostrzami 1 i postukaj nià o p∏askà
powierzchni´. Przy pomocy szczoteczki
wyczyÊç wewn´trznà stron´ ruchomej g∏owicy.
Nie czyÊç jednak szczoteczkà kasety, gdy˝
mo˝e je to uszkodziç.
re
re
le
le
a
a
re
re
le
le
a
a
s
s
s
s
e
e
e
e
re
re
le
le
a
a
s
s
e
e
Series 7
Series 7
click!
click!
trimmer
trimmer
Series
Series
Series
Series
er
er
oil
oil
Series 7
trimmer
trimmer
Series 7
Series 7
Series 7
re
re
le
le
a
a
s
s
e
e
Series 7
Series 7
re
re
le
le
a
a
s
s
e
e
Konserwacja
Wymiana kasety z folià i ostrzami /
resetowanie
Aby zapewniç 100 proc. skutecznoÊç golenia,
kaset´ z folia i ostrzami 1 nale˝y wymieniç,
gdy na wyÊwietlaczu golarki 7 pojawi si´
symbol informujàcy o potrzebie wymiany cz´Êci
golàcych (po oko∏o 18 miesiàcach) lub gdy
kaseta si´ zu˝yje.
Symbol ten b´dzie wyÊwietlany podczas
kolejnych 7 cykli golenia w celu przypomnienia
o potrzebie wymiany kasety z folià i ostrzami.
Nast´pnie wyÊwietlacz golarki zostanie
automatycznie zresetowany.
Po wymianie kasety z folià i ostrzami, naciÊnij
d∏ugopisem przycisk do resetowania 6 i
przytrzymaj go przez co najmniej 3 sekundy,
aby zresetowaç licznik.
Series 7
Series 7
re
re
le
le
a
a
s
s
e
e
er
er
70S
70S
15
W tym samym czasie kontrolka informujàca
o wymianie cz´Êci b´dzie migaç i zgaÊnie
dopiero, gdy resetowanie zostanie zakoƒczone.
WyÊwietlacz mo˝na zresetowaç r´cznie
w dowolnym momencie.
Akcesoria
Dost´pne w lokalnym sklepie lub punktach
serwisowych marki Braun:
• Kaseta z folià i ostrzami 70S
Uwagi dotyczàce ochrony Êrodowiska
Urzàdzenie to wyposa˝one jest w baterie
przystosowane do wielokrotnego
∏adowania. Aby zapobiec zanieczyszczaniu Êrodowiska, pod koniec okresu
eksploatacji produktu nie wyrzucaj go do
kosza na Êmieci. Mo˝esz pozostawiç go
w punkcie serwisowym marki Braun lub
jednym ze specjalnych punktów zajmujàcych
si´ zbiórkà zu˝ytych produktów w wybranych
miejscach na terenie kraju.
Powy˝sze informacje mogà ulec zmianie bez
uprzedniego powiadomienia.
Produkt ten spe∏nia wymogi dyrektywy
EMC 2004/108/EC oraz dyrektywy
2006/95/EC dotyczàcej elektrycznych
urzàdzeƒ niskonapi´ciowych.
16
Specyfikacje elektryczne zosta∏y wydrukowane
na specjalnym kablu sieciowym.
Warunki gwarancji
1. Procter and Gamble DS Polska sp. z.o.o.
gwarantuje sprawne działanie sprzętu w
okresie 24 miesięcy od daty jego wydania
Kupującemu. Ujawnione w tym okresie wady
będą usuwane bezpłatnie, przez wymieniony
przez fi rmę Procter and Gamble DS Polska
sp. z.o.o. autoryzowany punkt serwisowy, w
terminie 14 dni od daty dostarczenia sprzętu
do autoryzowanego punktu serwisowego.
2. Kupujący może wysłać sprzęt do naprawy do
najbliżej znajdującego się autoryzowanego
punktu serwisowego wymienionego przez
fi rmę Procter and Gamble DS Polska sp.

z.o.o. lub skorzystać z pośrednictwa sklepu,
w którym dokonał zakupu sprzętu. W takim
wypadku termin naprawy ulegnie wydłużeniu
o czas niezbędny do dostarczenia i odbioru
sprzętu.
3. Kupujący powinien dostarczyć sprzęt
w oryginalnym opakowaniu fabrycznym
dodatkowo zabezpieczonym przed
uszkodzeniem. Uszkodzenia spowodowane
niedostatecznym zabezpieczeniem sprzętu
nie podlegają naprawom gwarancyjnym.
4. Niniejsza gwarancja jest ważna z
dokumentem zakupu i obowiązuje na
terytorium Rzeczypospolitej Polskiej.
5. Okres gwarancji przedłuża się o czas od
zgłoszenia wady lub uszkodzenia do naprawy
sprzętu.
6. Naprawa gwarancyjna nie obejmuje czynności
przewidzianych w instrukcji, do wykonania
których Kupujący zobowiązany jest we
własnym zakresie i na własny koszt.
7. Ewentualne oczyszczenie sprzętu
dokonywane jest na koszt Kupującego według
cennika danego autoryzowanego punktu
serwisowego i nie będzie traktowane jako
naprawa gwarancyjna.
8. Gwarancją nie są objęte:
a) mechaniczne uszkodzenia sprzętu
spowodowane w czasie jego użytkowania
lub w czasie dostarczania sprzętu do
naprawy;
b) uszkodzenia i wady wynikłe na skutek:
– używania sprzętu do celów innych niż
osobisty użytek;
– niewłaściwego lub niezgodnego z
instrukcją użytkowania, konserwacji,
przechowywania lub instalacji;
– używania niewłaściwych materiałów
eksploatacyjnych;
– napraw dokonywanych przez
nieuprawnione osoby; stwierdzenie
faktu takiej naprawy lub samowolnego
otwarcia sprzętu powoduje utratę
gwarancji;
– przeróbek, zmian konstrukcyjnych lub
używania do napraw nieoryginalnych
części zamiennych fi rmy Braun;
c) części szklane, żarówki oświetlenia;
d) ostrza i folie do golarek oraz materiały
eksploatacyjne.
9. Bez nazwy i modelu sprzętu, daty jego
zakupu potwierdzonej pieczątką i podpisem
sprzedawcy karta gwarancyjna jest nieważna.
10. Niniejsza gwarancja na sprzedany towar
konsumpcyjny nie wyłącza, nie ogranicza
ani nie zawiesza uprawnień Kupującego
wynikających z niezgodności towaru z
umową.
17
âesk˘
STOPSTOP
Na‰e v˘robky jsou navrÏeny tak, aby splÀovaly
nejvy‰‰í standard kvality, funkãnosti a designu.
Doufáme, Ïe s nov˘m holicím strojkem Braun
budete spokojeni.
Varování
Tento holicí strojek je vybaven speciální sadou
‰ÀÛr, které mají zabudovan˘ zdroj bezpeãného
extra nízkého napûtí. NevymûÀujte ani
neprohazujte Ïádnou z ãástí, vystavili byste se
tím riziku úrazu elektrick˘m proudem.
Tento přístroj nesmí používat děti ani osoby se
sníženými psychickými nebo mentálními schopnostmi bez dohledu osoby, která je zodpovědná
za jejich bezpečnost. Doporučujeme uchovávat
přístroj mimo dosah dětí.
Popis
1 Kazeta planÏety a zastfiihovaãe
2 Tlaãítko pro uvolnûní kazety
3 Spínaã «lock» (zámku) holicí hlavice
4 Vystfielovací zastfiihovaã dlouh˘ch vlasÛ
5 Pfiepínaã Zapnuto / Vypnuto
6 Tlaãítko «reset»
7 Displej holicího strojku
8 Elektrická zásuvka holicího strojku
9 Cestovní krabiãka
0 Speciální sada ‰ÀÛr
18
Nabíjení holicího strojku
Nejvhodnûj‰í teplota okolního prostfiedí pfii
dobíjení je mezi 5 °C a 35 °C.
• Zapojte holicí strojek do elektrické zásuvky.
PouÏívejte speciální sadu ‰ÀÛr 0. Motor
strojku musí pfii tom b˘t vypnut˘. Nabíjejte po
dobu alespoÀ 1 hodiny.
• Plné nabití postaãí na aÏ 50 minut bezdrátového holení. Tato doba se mÛÏe li‰it podle
délky Va‰ich vousÛ.
• Pokud se nabíjecí baterie vybily, mÛÏete se
holit holicím strojkem zapojen˘m pomocí
speciální sady ‰ÀÛr do elektrické zásuvky.
Displej holicího strojku
r
r
releaserelease
Zelen˘ segment («charge») nabíjení svítí kdyÏ
se holicí strojek dobíjí nebo kdyÏ se pouÏívá.
Pfii plném nabití baterie se segment nabíjení
nepfieru‰ovanû rozsvítí (pokud bude holicí
strojek zapnut˘ nebo zapojen˘ do elektrické
zásuvky).
Prázdn˘ ãerven˘ segment («empty») svítí pokud
klesne kapacita baterie pod 20% (je-li holicí
strojek zapnut˘). Zb˘vající kapacita pak postaãí
na 2 aÏ 3 oholení.
Holení
Pro pouÏití holicího strojku zmaãknûte pfiepínaã
Zapnuto / Vypnuto 5:
• Otoãná hlavice holicího strojku a plovoucí
planÏety se automaticky pfiizpÛsobí kaÏdé
kontufie Va‰í tváfie.
• Pfii holení tûÏko dostupn˘ch míst (napfiíklad
pod nosem) pfiepnûte spínaã «lock» holicí
hlavice 3 do zadní pozice a zamknûte
otoãnou hlavici do vhodného úhlu.
t
t
on
on
off
off
2
2
lock
lock
1
1
lock
lock
lock
lock
• Pro stfiíhání kotlet, kníru nebo bradky vysuÀte
zastfiihovaã dlouh˘ch vlasÛ 4 smûrem
nahoru.
Tipy pro perfektní oholení
K dosaÏení nejlep‰ího v˘sledku holení Vám
Braun doporuãuje následující 3 jednoduché
kroky:
1. VÏdy se holte dfiív neÏ si umyjete tváfi.
2. VÏdy drÏte holicí strojek v pravém úhlu (90°)
ke tváfii.
3. Vypnûte kÛÏi a holte se proti smûru rÛstu
vousÛ.
âi‰tûní
Holicí hlavici je moÏné um˘vat pod
tekoucí vodou.
Upozornûní: Odpojte holicí strojek od
zdroje elektfiiny pfied jeho ãi‰tûním ve
vodû.
lock
trimmer
trimmer
on
on
off
off
lock
19
 Loading...