

Page 1
En
glish
The Braun Oral-B Interclean
is an innovative interdental plaque
remover. Please read the use
instructions thoroughly before
first use.
Thorough, effective oral hygiene
means more than just brushing your
teeth. Plaque bacteria accumulate
particularly in spaces between the
teeth, where a toothbrush cannot
reach – and where gum disease
most frequently begins.
The Braun Oral-B Interclean interdental plaque remover has been
developed with leading dental professionals to disrupt and remove
plaque from between the teeth.
Clinical tests have proven that the
Braun Oral-B Interclean is effecive,
like dental floss, in reducing gingivitis. However, the Braun Oral-B
Interclean is much easier to use
than dental floss – which makes
it much easier to integrate into a
routine of daily interdental plaque
removal. Use the Braun Oral-B
Interclean once a day, every day
and before toothbrushing, so that
any loosened plaque can be swept
away by brushing.
The Braun Oral-B Interclean should
be able to clean most normal interdental spaces. Because every dentition is different, there may be some
interdental areas which neither dental floss nor the Braun Oral-B Interclean can clean properly, such as
under bridges or around implants.
For special interdental needs
please consult your dentist or
hygienist about products such as
Oral-B Super Floss™ or the Oral-B
Interdental Brush System.
Caution
Check the cord occasionally for any
damage. Should this be the case,
unplug the charging unit
1
immediately and take it to a Braun
Service Centre. Your Braun Service
Centre will replace the complete
charging unit (free of charge within
the guarantee period); the charging
unit cannot be repaired for safety
reasons. A damaged or nonfunctioning unit should no longer be
used.
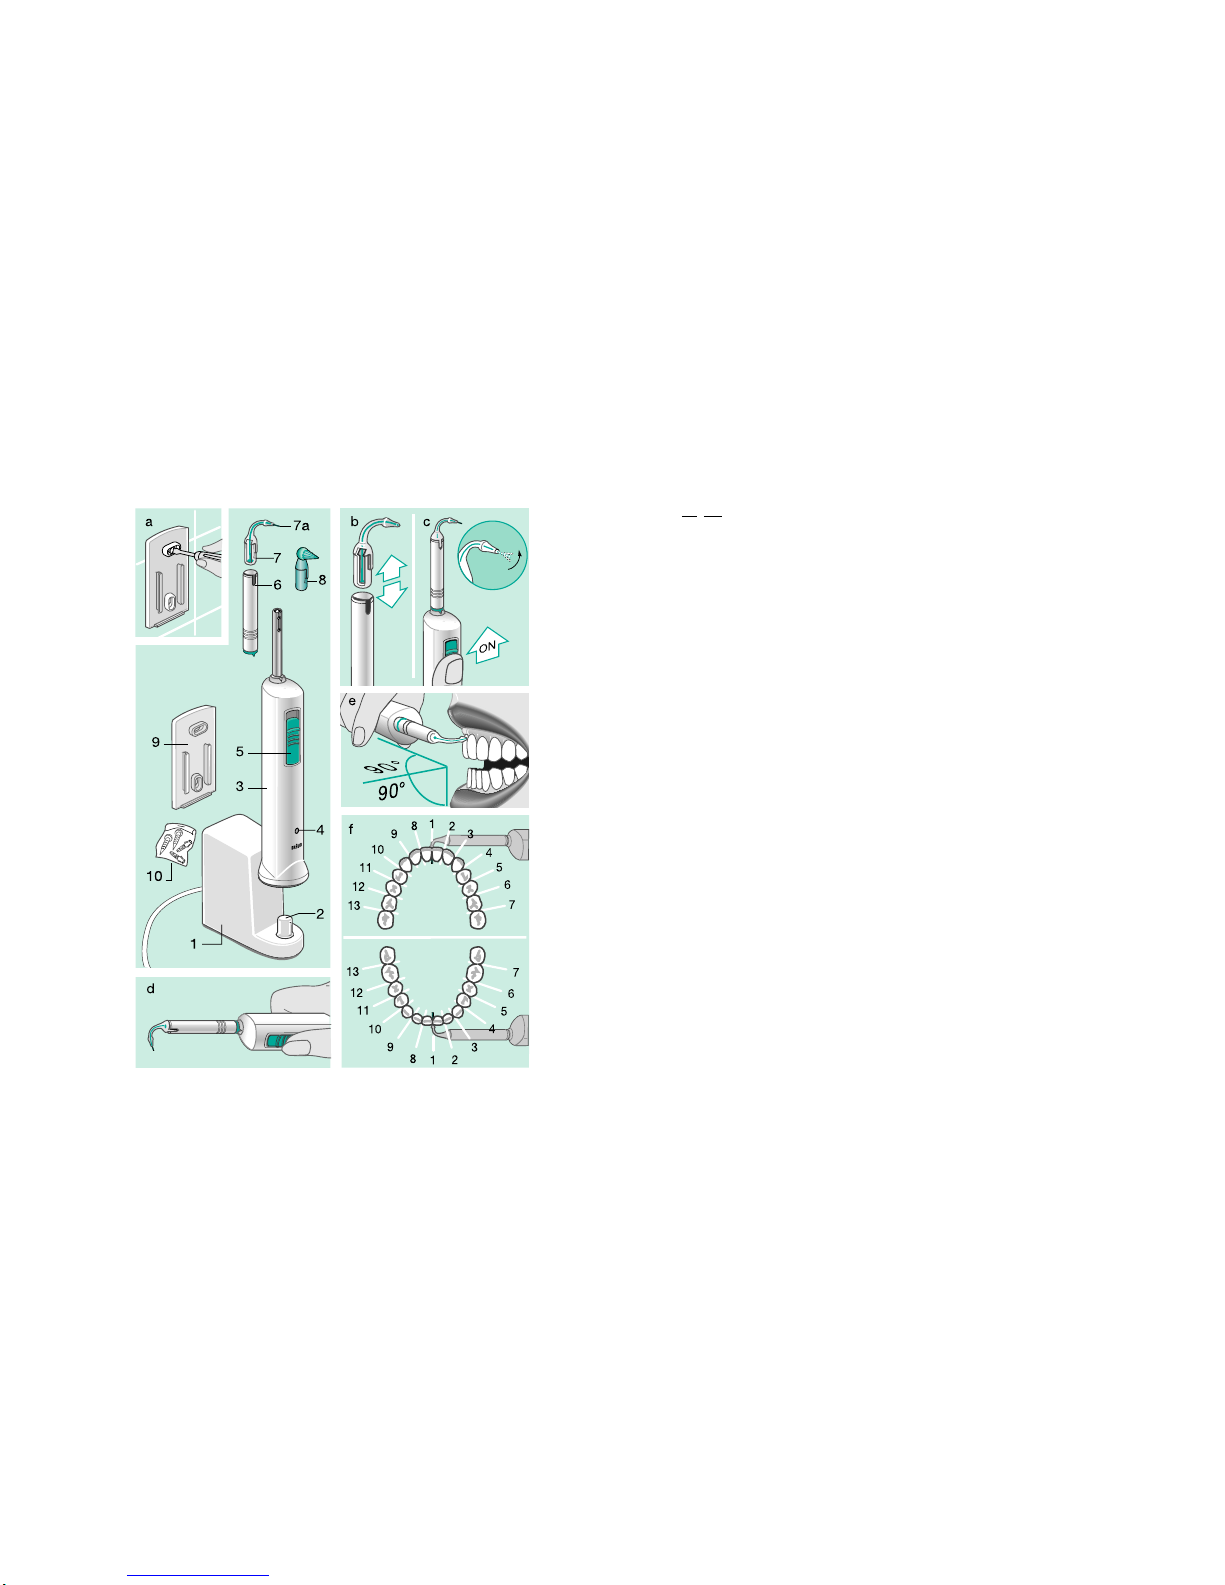
Description
1
Charging unit
2
Charging base
3
Rechargeable handle
4
Charge indicator
5
Sliding switch
6
Sleeve (2 x)
7
Cleaning tip with rotating filament
G
(plus pack of 50)
8
Flexi-Tip gum massager (2 x)
9
Wall holder
j
2 screws with wall plugs
Specifications
Charging unit: 220-240 volts ac (~),
50-60 Hz, 1 watt
Rechargeable handle: 1.2 volts
Min. operation time when fully
charged: 25 minutes
32
Page 2
4
Using the Braun Oral-B
Interclean
To ensure correct placement of the
tip at the gumline, always use in
front of a mirror. Interdental cleaning should always be done before
toothbrushing, so that any loosened
plaque can be swept away by
brushing.
●
For hygienic reasons alwa
ys
begin with a new tip, since the
Interclean filament removes
plaque bacteria.
●
To ensure correct placement,
press the new tip into the sleeve
firml
y until it snaps into place (b).
●
Before starting, check that the
filament comes out and rotates
when the switch is pressed (c).
You should also check this
periodically during the cleaning
session.
●
To ensure correct entry into the
interdental space, hold the appliance horizontally, just like a
toothbrush (d), and at a 90 °
angle to the teeth (e). Start with
the space between the two front
teeth.
●
The filament is extremely thin to
be able to pass into the interdental space. For this reason it is
fragile and must be handled with
care.
It is of key importance that the
tip first be positioned at the
interdental space, before the
appliance is turned on.
Slowly push the switch to its end
position and simply hold still two
to three seconds.
●
The cleaning action occurs at the
interdental space, directly at the
gumline. Let the filament do all
the work with its rapidly spinning
movement. Do not move the
appliance back and forth or up
and down between the teeth.
●
First release the switch to turn off
the appliance, then
move to the
next interdental space.
●
Clean the interdental spaces in a
systematic way: first between all
teeth of the upper jaw, then between all teeth of the lower jaw (f).
If you have not been used to regular
interdental cleaning, your gums
may bleed the first few times you
use the Braun Oral-B Interclean.
This may mean that you need to
clean between the teeth more
regularly. Bleeding should generally
stop after a few days; should it
persist after 2 weeks, please
consult your dentist or hygienist.
5
Because of the rechargeable cells
there is no need for a cord. This
makes handling simple. The Braun
Oral-B Interclean is inductively
charged and electrically safe. It can
be stored and used in the bathroom
without hesitation.
This product contains a
nickel-cadmium cell. In the
interest of protecting the
environment, please do not
dispose of the product in the
household waste at the end of its
useful life. Disposal can take place
at a Braun Service Centre or at
appropriate collection sites provided
in your country. Please also see the
insert «Rechargeable cell disposal
at the end of the product’s usefull
live».
Preserving the rechargeable cell
To maximize the capacity and life of
the rechargeable cell, it should be
fully charged for 16 hours before the
first use and then fully discharged
by using. Then recharge to full
capacity again. This discharging/
charging procedure should be done
every six months.
Wall holder
Slide the wall holder
9
downwards
out of the charging unit
1
and fix it
to the wall by using the screws and
wall plugs
j
provided (a). Then
slide the charging unit
1
downward
onto the wall holder
9
. Guide the
cord from the cord compartment
between the wall holder and the
charging unit. Only use as much
cord as you need to reach the
socket.
Connecting
The charging unit
1
can be connected to any outlet, even to
shaver sockets. Place the
rechargeable handle
3
, facing the
front, on the charging base
2
. The
green charge indicator
4
will light
up when the interdental plaque
remover is inserted on the pluggedin charging unit
1
. The recharge-
able handle
3
may warm up
somewhat. This has no effect on the
unit’s operation. Over-charging is
impossible.
Im
portant: Make sure that there is
electrical power in the socket when
you recharge the appliance.
Sockets in mirror cabinets over
wash basins of shaver sockets in
bathrooms may be without electrical
power when the light is turned off.
Switch
The power for rhe rechargeable
handle is switched on and off by
means of the sliding switch
5
.
On: Push the switch up and hold.
Off:
Release the switch.
Getting started
Before using the Braun Oral-B
Interclean for the first time, charge
the handle for at least 16 hours.
The appliance is delivered with a
cleaning tip
7
mounted. Make sure
that the rotating filament
G
comes
out by simply switching on (c).
Cd
Page 3

6
Getting used to interdental
cleaning
Cleaning between your teeth may
not be as easy as brushing your
teeth, since the size and shape of
interdental spaces can vary considerably.
Give yourself a week or two to
master the technique. Once you
have learned how to position the
product at the gum margin so that
the filament glides easily into the
interdental space, you should be
able to clean most of your interdental spaces with one to two ti
ps
per cleaning session.
However, depending on your
dentition, you may find that you
have one or more problem
interdental spaces where you
persistently encounter tip breakage
during the learning phase. Do not
persist in cleaning these problem
spaces with the filament until you
have mastered proper positioning of
the Braun Oral-B Interclean. During
the learning phase, you may also
want to use the Flexi-Tip gum
stimulator
8
to assist you with any
problem interdental spaces.
Trouble-Shooting Guide
Problem Advice
Finding the interdental space Use in front of a mirror.
Before switching the product on,
guide the tip along your teeth until
you feel the concave indentation of
the interdental space, directly at the
gumline.
Any difficulty in getting the filament
to glide easily into the interdental
space
Ensure the product is held at a 90°
angle to the teeth.
First position the tip, then activate
the filament with the slider switch.
Do not move up and down or back
and forth between the teeth – just
hold still 2 to 3 seconds.
Using at the back molars Gently pull back your cheek with one
finger. Maintain 90° angle.
Insert at the gumline, not at the
contact point of the teeth.
Problem Advice
Feeling the filament going through
the interdental space
The innovative cleaning action of the
filament is so quick, some may not
feel it – others may feel it with their
tongue when it cleans between front
teeth.
Overlapping teeth If the interdental space is «blocked»
by overlapping teeth, it may be
difficult to insert either dental floss or
the Interclean filament. You may
want to use the Flexi-Tip for these
interdental spaces.
Very tight interdental spaces In tight spaces where neither dental
floss nor the Interclean filament can
be inserted, you may want to use the
Flexi-Tip.
Number of tips per cleaning Depending on your dentition, it may
be necessary to use more than one
disposable tip per session.
For hygienic reasons always dispose
of the tip after each cleaning session.
Under bridges or around implants These interdental spaces are shaped
differently than those between
natural teeth. You may want to use
the Flexi-Tip or ask your dentist or
hygienist about special products
such as Oral-B Super Floss™.
Large amounts of calculus between
the teeth
Visit your dentist or hygienist
regularly and have the calculus
removed. Regular interdental
cleaning thereafter should reduce
calculus build-up.
7
Page 4

8 9
Flexi-Tip
the additional Flexi-Tip gum stimulator
8
is designed for gum mas-
sage and interdental stimulation.
The Flexi-Tip may also be used for
problem interdental spaces such as
very tight spaces, under bridges
and around implants and also for
any spaces which may not be
accessible with the rotating filament
and where brushing alone may not
clean.
Attach a Flexi-Tip
8
to the sleeve
6
. Position the Flexi-Tip directly
into the interdental space. In contrast to the rotating filament, you
make keep the appliance with the
Flexi-Tip switched on when moving
along the gum margin. The Flexi-Tip
can be used along the gumline both
on the inner and outer surfaces of
the teeth.
Tip replacement
The tip
7
is designed to be disposed of after use. Release the
switch
5
to turn off the appliance.
Take off the tip and throw it away. If
the cleaning session is not yet
finished, press a new tip into the
sleeve firmly until it snaps into place
(b).
Once the tip has been taken off, it
will no longer function properly.
Therefore always start the cleaning
session with a new tip.
Cleaning
For cleaning the product, remove
the tip used
7
or
8
from the
sleeve
6
.
The tip with the incorporated
filament
7
cannot be used for a
second session and has to be
discarded after use. The Flexi-Tip
8
can be cleaned under running
water.
Hold the sleeve under running water
for a few seconds and wipe it dry
before placing the rechargeable
handle back on the charging base
2
.
In order to thoroughly clean the
appliance after having used it for a
couple of days, you may also
remove the sleeve. Rinse the metal
shaft under running water and make
sure to wipe it dry before attaching
the sleeve again.
You may also remove the sliding
switch for cleaning: Slide a finger
underneath the switch to remove it
from the handle. The parts underneath the sliding switch are also
waterproof and may be cleaned
under running water. To attach the
sliding switch after cleaning, place it
back onto the handle and press
gently. An audible click is heard
when the switch engages correctly.
Replacement tips are available at
your dealer or Braun Service
Centres.
Subject to change without notice.
This product conforms to the
EMC-Requirements as laid
down by the Council
Directive 89/336/EEC.
Guarantee
We grant a 1 year guarantee on the
product commencing on the date of
purchase.
Within the guarantee period we will
eliminate, free of charge, any
defects in the appliance resulting
from faults in material or workmanship either by repairing, or exchanging parts or exchanging the
whole appliance as we may choose.
Not covered by this guarantee:
damage arising from improper
(operation with incorrect current/
voltage, plugging it into an unsuitable power point, breakage), normal
wear and defects which have a
negligible effect on the value or
operation of the appliance.
The guarantee becomes void if
repairs are undertaken by unauthorized persons and if original
Braun parts are not used. The
guarantee only comes into force if
the date of purchase is confirmed by
the dealer's stamp and signature on
the guarantee card and registration
card.
This guarantee extends to every
country where this appliance is
supplied by Braun or its appointed
distributor and where no import
restrictions or other legal regulations hinder or prevent service
being given under guarantee.
Service under the guarantee does
not affect the expiry date of the
guarantee. The guarantee on parts
or entire appliances which are
exchanged ends when the guarantee on this appliance expires.
In the event of a claim under this
guarantee, hand in the complete
appliance (rechar
ger and rechargeable power unit) with the
valid guarantee card to your dealer,
or send both to the nearest Braun
Customer Service Centre.
All other claims including for damages resulting from this guarantee
are excluded unless our liability is
legally mandatory.
Those claims arising out of the sales
contract with the vendor are not
affected by this guarantee.
For UK only:
This guarantee in no way affects
your rights under statutory law.
Page 5

8 9
Flexi-Tip
the additional Flexi-Tip gum stimulator
8
is designed for gum mas-
sage and interdental stimulation.
The Flexi-Tip may also be used for
problem interdental spaces such as
very tight spaces, under bridges
and around implants and also for
any spaces which may not be
accessible with the rotating filament
and where brushing alone may not
clean.
Attach a Flexi-Tip
8
to the sleeve
6
. Position the Flexi-Tip directly
into the interdental space. In contrast to the rotating filament, you
make keep the appliance with the
Flexi-Tip switched on when moving
along the gum margin. The Flexi-Tip
can be used along the gumline both
on the inner and outer surfaces of
the teeth.
Tip replacement
The tip
7
is designed to be disposed of after use. Release the
switch
5
to turn off the appliance.
Take off the tip and throw it away. If
the cleaning session is not yet
finished, press a new tip into the
sleeve firmly until it snaps into place
(b).
Once the tip has been taken off, it
will no longer function properly.
Therefore always start the cleaning
session with a new tip.
Cleaning
For cleaning the product, remove
the tip used
7
or
8
from the
sleeve
6
.
The tip with the incorporated
filament
7
cannot be used for a
second session and has to be
discarded after use. The Flexi-Tip
8
can be cleaned under running
water.
Hold the sleeve under running water
for a few seconds and wipe it dry
before placing the rechargeable
handle back on the charging base
2
.
In order to thoroughly clean the
appliance after having used it for a
couple of days, you may also
remove the sleeve. Rinse the metal
shaft under running water and make
sure to wipe it dry before attaching
the sleeve again.
You may also remove the sliding
switch for cleaning: Slide a finger
underneath the switch to remove it
from the handle. The parts underneath the sliding switch are also
waterproof and may be cleaned
under running water. To attach the
sliding switch after cleaning, place it
back onto the handle and press
gently. An audible click is heard
when the switch engages correctly.
Replacement tips are available at
your dealer or Braun Service
Centres.
Subject to change without notice.
This product conforms to the
EMC-Requirements as laid
down by the Council
Directive 89/336/EEC.
Guarantee
We grant a 1 year guarantee on the
product commencing on the date of
purchase.
Within the guarantee period we will
eliminate, free of charge, any
defects in the appliance resulting
from faults in material or workmanship either by repairing, or exchanging parts or exchanging the
whole appliance as we may choose.
Not covered by this guarantee:
damage arising from improper
(operation with incorrect current/
voltage, plugging it into an unsuitable power point, breakage), normal
wear and defects which have a
negligible effect on the value or
operation of the appliance.
The guarantee becomes void if
repairs are undertaken by unauthorized persons and if original
Braun parts are not used. The
guarantee only comes into force if
the date of purchase is confirmed by
the dealer's stamp and signature on
the guarantee card and registration
card.
This guarantee extends to every
country where this appliance is
supplied by Braun or its appointed
distributor and where no import
restrictions or other legal regulations hinder or prevent service
being given under guarantee.
Service under the guarantee does
not affect the expiry date of the
guarantee. The guarantee on parts
or entire appliances which are
exchanged ends when the guarantee on this appliance expires.
In the event of a claim under this
guarantee, hand in the complete
appliance (rechar
ger and rechargeable power unit) with the
valid guarantee card to your dealer,
or send both to the nearest Braun
Customer Service Centre.
All other claims including for damages resulting from this guarantee
are excluded unless our liability is
legally mandatory.
Those claims arising out of the sales
contract with the vendor are not
affected by this guarantee.
For UK only:
This guarantee in no way affects
your rights under statutory law.
 Loading...